Feature Guide-Invite Patients - RelayHealth Feature Guide provides overviews of two of the service...
32
RelayClinical Service Feature Guide Inviting Patients Release 15.8 August 2015 Health Connections Brought to Life ™
-
Upload
vuongnguyet -
Category
Documents
-
view
217 -
download
0
Transcript of Feature Guide-Invite Patients - RelayHealth Feature Guide provides overviews of two of the service...
RelayClinical Service Feature Guide
Inviting Patients
Release 15.8
August 2015
Health Connections Brought to Life™
2
Table of Contents
Overview ....................................................................................................................................................... 3
What’s Inside ............................................................................................................................................. 4
How Can We Help? ..................................................................................................................................... 4
Invite Patient Feature ..................................................................................................................................... 5
Build and Submit Invitee List ....................................................................................................................... 5
View Sent Invitations List ............................................................................................................................ 6
Invite Patient from RelayClinical Record ........................................................................................................... 7
View Enrollment Reports ................................................................................................................................. 9
Customize Patient Invitations ........................................................................................................................ 10
Customize Template Text .......................................................................................................................... 10
Customize Patient Heath Record Update Notifications ..................................................................................... 17
Customize Template Text .......................................................................................................................... 17
Appendix A: Patient Invitations – Frequently Asked Questions ....................................................................... 25
Appendix B: Auto-Invite – Frequently Asked Questions .................................................................................. 29
© 1999-2015 RelayHealth and/or its affiliates. All rights reserved.
3
Overview
One of the most important steps in the process of successfully implementing the RelayClinical service involves
inviting patients to register with RelayHealth and create their online accounts. Any patient with whom your
practice has an established relationship is eligible to use the service, and we believe you’ll find your patients eager to register once you explain the service and its benefits to them.
This Feature Guide provides overviews of two of the service’s common invitation workflows (Invite Patient feature and RelayClinical Record invitations). However, we recognize that inviting patients from within common
workflows creates efficiency, so we’ve also embedded patient invitation options into other areas of the RelayClinical service. For example, the service allows you to invite offline patients using simple checkbox and/or
email field options that appear in Bulk Patient Upload, electronic prescribing, referrals, Results Manager, etc.
This guide provides an overview of invitation workflows and it will familiarize you with access to Enrollment Reports and use of invitation templates. Your RelayHealth Practice Administrator has privileges to customize
invitation templates to the needs of your practice or health system. The RelayClinical service includes two types of invitations:
1. Patient Invitation Template – Personal Email
Manual patient invite using the Invite Patients workflow
Manual workflow accessed at the upper left of the provider's or staff member's Home page or in the left
navigation panel of the Patients tab
Considered a "blind" invitation as there is no existing offline record or practice/patient relationship
2. Patient Follow-up Invitation Template – Personal Invite
Automatic follow-up to manual invite (First Invitation Template above).
If no response from patient, subsequent invites sent based on configured Invitation Settings (e.g., send 2
follow-up invitations, 14 days apart)
Resend an invite from Sent Invitations list
Considered a "blind" invitation as there is no existing offline record or practice/patient relationship
ADT and Health Summary Invite Options
If your organization uses Health Summary documents (CCD, CDA, or C-CDA) or ADTs for patient upload,
RelayHealth offers an optional Auto Invite configuration for these transactions. If configured to do so, upon receipt of a Health Summary or ADT message, the service automatically sends out invitations to patients not
already associated with the practice, provided the Health Summary or ADT includes a valid email address for the
patient. An additional configuration option is available for Health Summary and ADT for sending multiple invitations. With this option enabled, the service will send an invitation for every Health Summary document or
ADT received with an email if the patient has an offline account and if the service has not sent an invitation within the last seven days.
The standard ADT Auto Invite option sends invitations to adults 18 and older, and if desired by your organization, ADT Auto Invite may be configured to invite minors aged 13 to 17 as well. Health Summary may be configured to
send invitations at any age desired by the customer; however, patients must be 13 years and above to register
for a RelayHealth account as required by federal law. A Health Summary invitation setting for minors under 13 years of age will allow a Patient Authorized Representative to register the minor as a dependent family member
and receive the Health Summary on the family member’s behalf. ED Notification ADTs send invitations only to adults 18 and older at this time.
Note that the ADT Auto Invite option does not allow for direct creation of a dependent account.

4
What’s Inside This Feature Guide describes how users in your organization can use the RelayClinical service features to invite
patients to communicate with your practice online. In this Guide you’ll find:
Instructions for all users that describe how to use the Invite Patient feature
Instructions for all users that describe how to invite a patient directly from his or her RelayClinical Record
Instructions for all users that describe how to access Enrollment Reports
Instructions for Practice Administrators that describe how to customize your practice’s invitation
templates and configure invitation follow-ups
Additionally, this document includes the following supplemental information:
Appendix A: Patient Invitations Frequently Asked Questions
Appendix B: Auto-Invite Frequently Asked Questions
How Can We Help? RelayHealth is ready to support you every step of the way as you use the service. You can request assistance,
propose suggestions, or submit comments by any of the following methods:
Use the ‘Contact Us’ link at the bottom of your Home page to send a secure message directly to our
RelayHealth Support organization. You can also call our toll-free number and speak to one of our Support
representatives from 4:30 am to 5:00 pm Pacific Standard Time. Call 1-866-RELAY-ME (1-866-735-2963)
and select option 1.
Speak with your RelayHealth Territory Director or Deployment Specialist. These RelayHealth professionals
welcome your suggestions and comments about the service, your experiences with system use, and any
concerns you may have.

5
Invite Patient Feature
One of the most important steps in implementing this service involves enrolling patients so they can
communicate with your office online. The more your practice and your patients communicate online, the greater
efficiencies you will enjoy – including reduced phone call levels. The most frequently used tool for this process is “Invite Patients” feature. This feature allows you to send invitations electronically through the service using
customized or standard messages from your practice. The workflow below uses the First Invitation template. If configured for your organization, within a specified number of days the service will send another invitation
(Follow-Up Invitation template) to patients who have not registered.
Why use an email invitation?
It’s effective: Our research shows that 41% of patients who are invited through the ‘Invite Patients’
feature decide to enroll.
It’s customizable: You can brand the patient invitation with header and footer logos, include your
practice Web site address and list the reasons your patients should use the RelayClinical service for secure communications with your practice and providers. In addition, you may personalize all elements of
the invite to the needs of your practice or health system.
It’s easy: The only required information is a patient’s email address. For more accurate records,
however, we also recommend collecting the patient’s first and last name and Patient ID. In just a few
seconds, you can invite a patient. Your Practice Administrator can also configure the service to re-send
invitations automatically to patients who have not responded.
Follow the instructions below to use the Invite Patients feature.
Build and Submit Invitee List
1. On your Home page, under Patient Enrollment at the upper left, click Invite Patients.
OR
On the Patients tab, in the vertical navigation panel,
click Invite Patients.
2. Enter the patient’s email
address (required), first
name, and last name.
3. Select the name of the
patient's provider from the drop down.
4. Click Add to List. Using the Invitee List, you can send up to 50 invitations at a time.
5. When you’ve finished adding one or more patients to the list, click Submit.
6. After clicking Submit, the confirmation screen allows you to:
Invite More Patients
Go to Home Page
View Sent Invitations List

6
View Sent Invitations List Do you want to quickly review a list of patients who have been sent an invitation but didn’t accept? Use the Sent
Invitations option to query the list and resend invitations manually to all or selected patients who meet your
criteria.
1. On the Patients tab, in the vertical navigation panel, click Sent Invitations.
2. At the upper right, next to Invitation Accepted, check No (and/or uncheck Yes). You can optionally select the provider, time period, or other search criteria.
3. Click Search.
4. Review the list of patients who have not accepted an invitation and select the patients you want to re-invite by checking the box to the left of the patient's name.
5. Click Re-send Invitation(s) to manually resend invitation(s) immediately. The invitation sent is the Follow-up invitation type.
You also have the option to remove individual patients from the resend list. Click the checkboxes to the
left of one or more patient names to remove the patient(s) from the list. Use the Check All or Clear All options at the lower left to select or deselect the entire list.

7
Invite Patient from RelayClinical Record
RelayClinical Records are the hub of activity for many workflows in the service, and we’ve included an Invite
Patient option in the Actions dropdown to provide convenient access to invitation options. As noted in the
introduction to this Guide, this invitation workflow uses the Offline Invitation template. Follow the instructions below to invite a patient directly from his or her RelayClinical Record.
1. You have two options to access the patient’s RelayClinical Record. Search for the patient using the Patient Search field in the global navigation bar. You can perform this search from any page in the
service. Type the first few letters of the patient name or patient identifier in the text field, and select the patient from the result list.
OR
Click the Patients tab on the global navigation bar. Begin typing the first few letters of the patient name or patient identifier in the Find a Patient text field. Select the patient from the drop-down list.
If the patient does not appear on the result list, click Add a New Patient to the right of the search field and complete all required fields to add this patient in an offline status. If your organization is part of a
configured affiliation, you can also click Search Your Entire Network to the right of the search field to
search for the patient’s record across affiliated entities. If your organization is not part of an affiliation, the Search Your Entire Network link does not display.
2. The patient’s RelayClinical Record displays and defaults to the Chart tab Summary view, which provides an at-a-glance view of the patient’s clinical data. Note that the patient’s ‘Offline’ status displays in the
Patient Banner above the Chart. Use the Actions dropdown to select Invite Patient. This action link appears only in charts for offline patients.

8
3. On the Invite this Patient screen, enter the Patient Email Address, if necessary. If the patient’s health record includes the patient’s email address, the service will populate this field automatically.
4. Under Invite on Behalf Of: select the appropriate Practice and Provider from the dropdowns.
5. Click Send Invitation.
6. The service displays a confirmation that the patient invitation has transmitted. From this screen, you may:
Review the Sent Invitations List
Go to the Patient tab or
Go to Patient’s Health Record
9
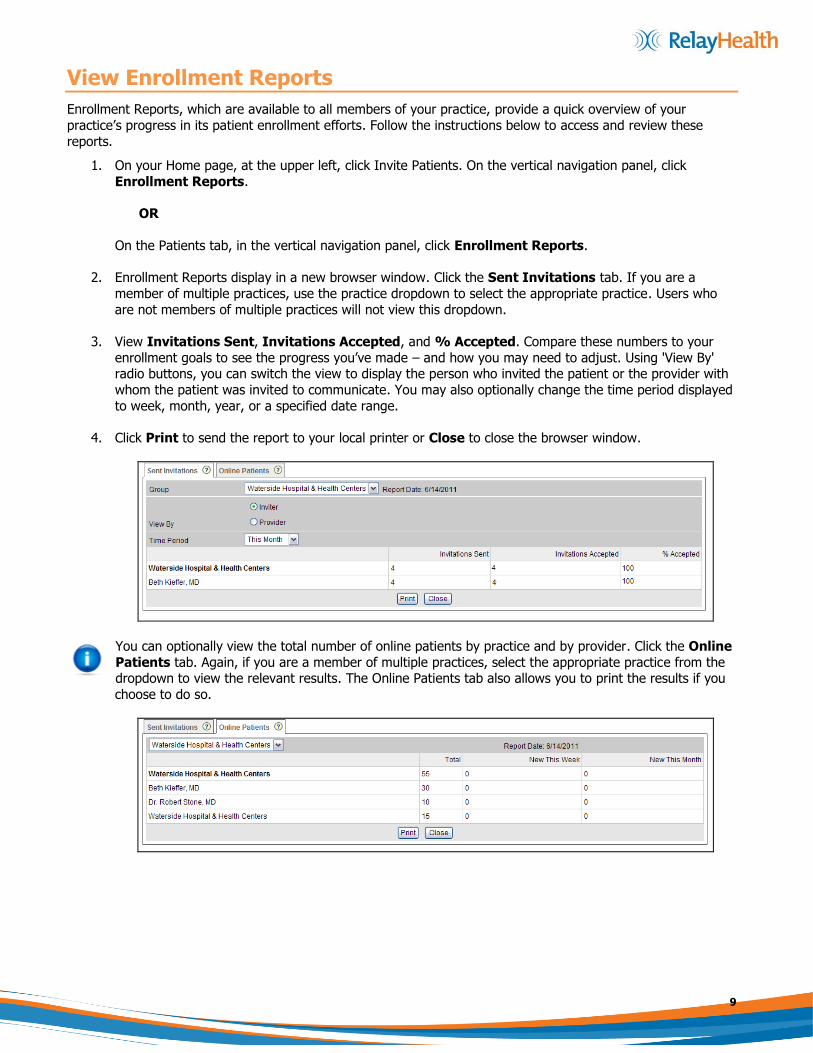
View Enrollment Reports
Enrollment Reports, which are available to all members of your practice, provide a quick overview of your
practice’s progress in its patient enrollment efforts. Follow the instructions below to access and review these
reports.
1. On your Home page, at the upper left, click Invite Patients. On the vertical navigation panel, click
Enrollment Reports.
OR
On the Patients tab, in the vertical navigation panel, click Enrollment Reports.
2. Enrollment Reports display in a new browser window. Click the Sent Invitations tab. If you are a
member of multiple practices, use the practice dropdown to select the appropriate practice. Users who
are not members of multiple practices will not view this dropdown.
3. View Invitations Sent, Invitations Accepted, and % Accepted. Compare these numbers to your
enrollment goals to see the progress you’ve made – and how you may need to adjust. Using 'View By' radio buttons, you can switch the view to display the person who invited the patient or the provider with
whom the patient was invited to communicate. You may also optionally change the time period displayed
to week, month, year, or a specified date range.
4. Click Print to send the report to your local printer or Close to close the browser window.
You can optionally view the total number of online patients by practice and by provider. Click the Online
Patients tab. Again, if you are a member of multiple practices, select the appropriate practice from the dropdown to view the relevant results. The Online Patients tab also allows you to print the results if you
choose to do so.
10
Customize Patient Invitations
Users in your practice who have Practice Administrator privileges in the RelayClinical service may optionally
customize invitation templates. For example, Practice Administrators can identify custom URLs for registration,
alter the text of the invitation messages, and configure the number of invitation attempts and number of days between invitation follow-ups. In addition, the Practice Administrator may optionally brand the patient invites by
uploading practice or health system logos in the Header, Footer, or both.
You can also include personalized information in all parts of the patient invitation, using a series of @ variables if
you choose. The variables are substituted with the applicable text when the invitation transmits to the patient. For example, using the @PracticeName variable will substitute the practice name (e.g., Waterside Family Care)
into the invitation automatically. Please refer to page 14 for a complete list of supported @ variables. Note that
all email customization and branding can be done through the front-end of the service by modifying the Patient Invitation and Follow-Up templates. No additional back-end configuration is needed.
The RelayClinical service provides suggested templates for the first invitation sent to the patient and the Follow Up Invitations that are sent automatically. The branding and customization are entirely under the Practice
Administrator’s control through the Provider/Staff Portal and are not related to any previous branding
configuration completed by a RelayHealth Deployment Specialist or other Implementation Consultant.
Patient Invitation Template – Personal Email along with the Patient Follow Up Invitation Template –
Personal Email are used for all patient invitation workflows. Follow the steps below to customize invitation templates and settings for your practice.
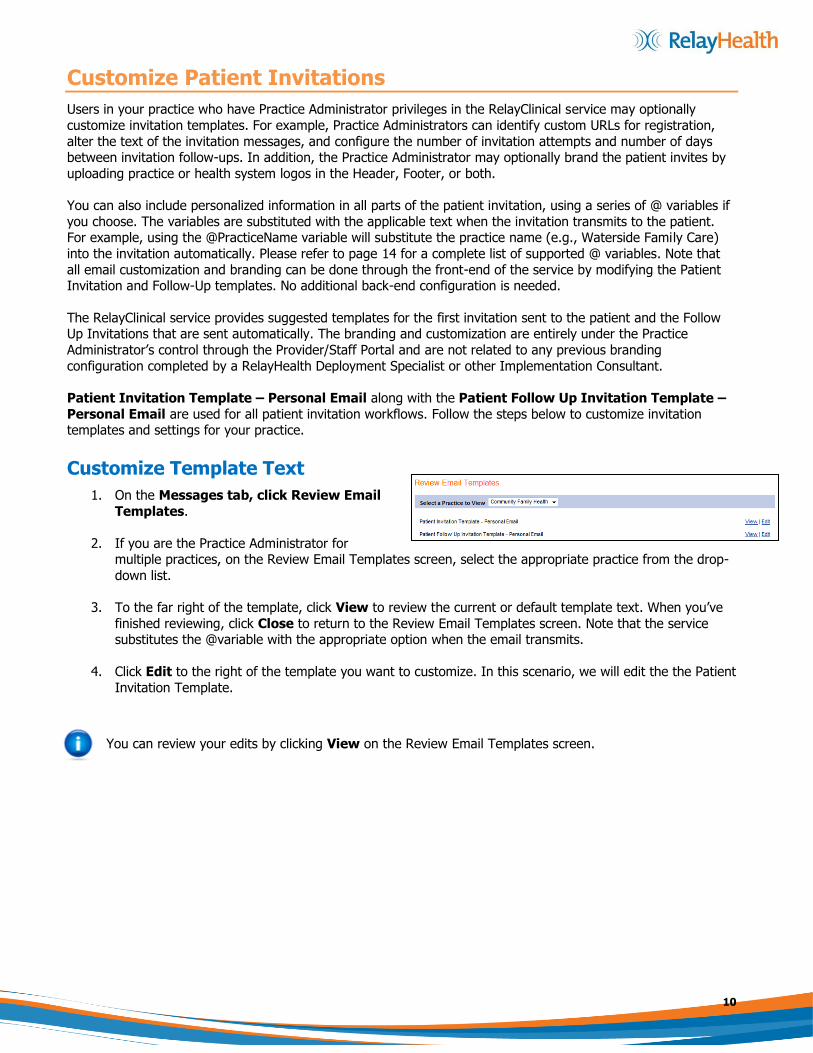
Customize Template Text
1. On the Messages tab, click Review Email
Templates.
2. If you are the Practice Administrator for multiple practices, on the Review Email Templates screen, select the appropriate practice from the drop-
down list.
3. To the far right of the template, click View to review the current or default template text. When you’ve
finished reviewing, click Close to return to the Review Email Templates screen. Note that the service substitutes the @variable with the appropriate option when the email transmits.
4. Click Edit to the right of the template you want to customize. In this scenario, we will edit the the Patient
Invitation Template.
You can review your edits by clicking View on the Review Email Templates screen.

11
Note: Clicking the How to Edit Email Templates link provides instructions for branding and customizing a patient invitation.
5. In the Add/Change Header Logo field, you may optionally include the practice or health plan logo on
the patient invitation. Click Browse to upload a logo. Alternately, you may change the logo if you
choose.
Note: The header logo displays centered at the top of invitation email. The maximum file size for the logo is 1MB. Logos may be in GIF, JPG, and/or PNG format. Other formats will be rejected.
6. In the Sender field, enter the practice name or use the corresponding @PracticeName. The service
automatically substitutes the @ variable with the practice name when the invitation transmits to the patient. Click the How to Edit Email Templates link for a list of all supported variables.
7. In the Sender field, enter the practice name or use the corresponding @PracticeName. The
@variable is substituted with the practice name when the invitation transmits to the patient. Click
the How to Edit Email Templates link for a list of all supported variables.
8. In the Reply to Email field, you may the change the default @RelayInvitationsEmail address to
the provider’s practice email by either entering the address or using the @PracticeEmail variable.
9. In the Subject field, you may edit the default text and @variable. For example, you might
replace the @PracticeName with the provider’s name, or use the @ProviderName variable instead.
10. For Banner Text, you may include a tag-line or catch phrase that identifies the practice or health
system. The banner text displays below the header logo.
11. In the Salutation field, you may use the default text and @variable to display the patient’s first
name in the email invitation
12. In the Body Text field, you may edit the standard text and use @variables if you choose. The ‘Click@RegisterLink’ directs patients to RelayHealth’s secure registration site. If your practice has a
custom registration link, enter the HTML anchor tag to the URL for your site. The text field also
supports the HTML bold tag.
13. In the Closing field, use one of the @variables (e.g.,@ProviderName or @PracticeName) or enter the applicable text.

12
14. You may optionally include a Footer Logo in the patient invitation. Click Browse to upload a logo. Alternately, you may a change the logo if you choose.
15. In the Footer Text field, you may optionally enter a footer, which will appear in small italics at
the bottom of the email. It is designed for legal text and a standard unsubscribe link, which is
@DeclineEmailLink.
16. Click Submit.
OR
17. Click the applicable button at the bottom of the screen to Restore Default Template, Delete Header Image, Delete Footer Image, or Cancel
your changes.
18. To review your changes, click View to the
right of the edited template. Repeat steps
2-18 to review or edit other invitation templates.
Note: Edits to the email templates are published as soon as you “submit" them, so Practice Administrators should plan their messages before editing. To view the email in full with all the @variables
substituted with the appropriate options, the easiest way is to create a test user with a valid external
email address. When the email is triggered, (e.g., the test patient is invited), you will see the full email format in the external email.
Viewing an Email Template (Example with header and footer customization)

13
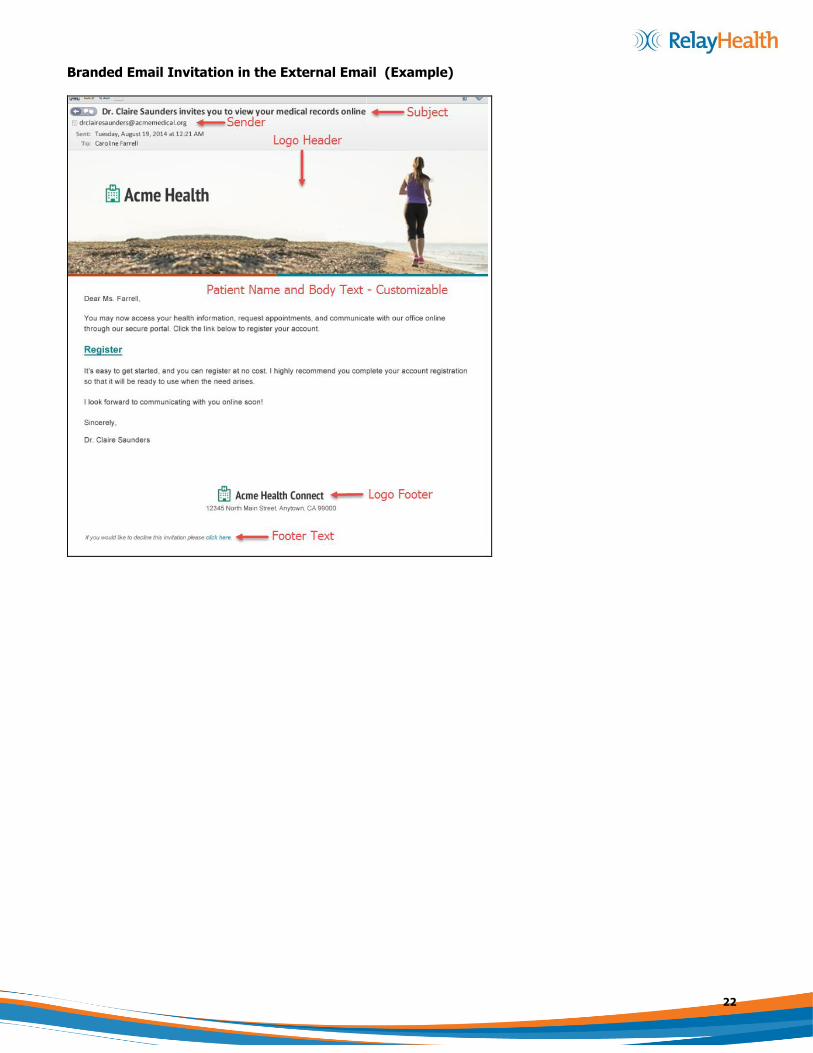
Branded Email Invitation in the External Email (Example)
14
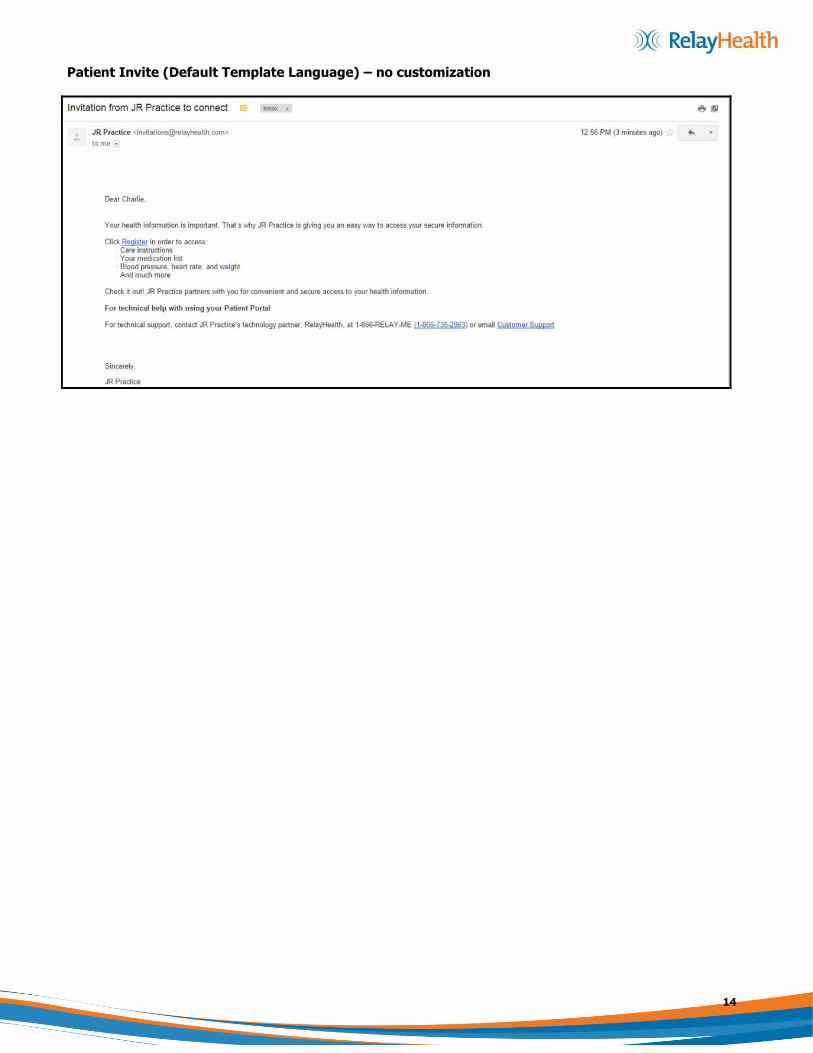
Patient Invite (Default Template Language) – no customization
15
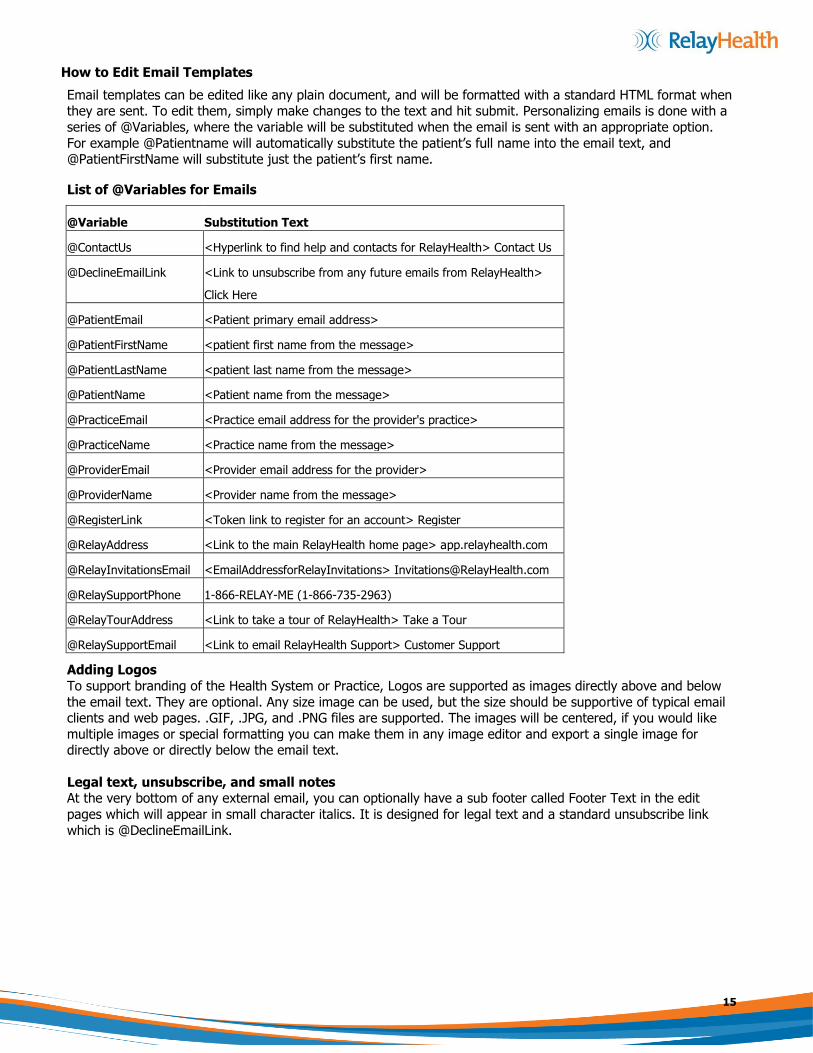
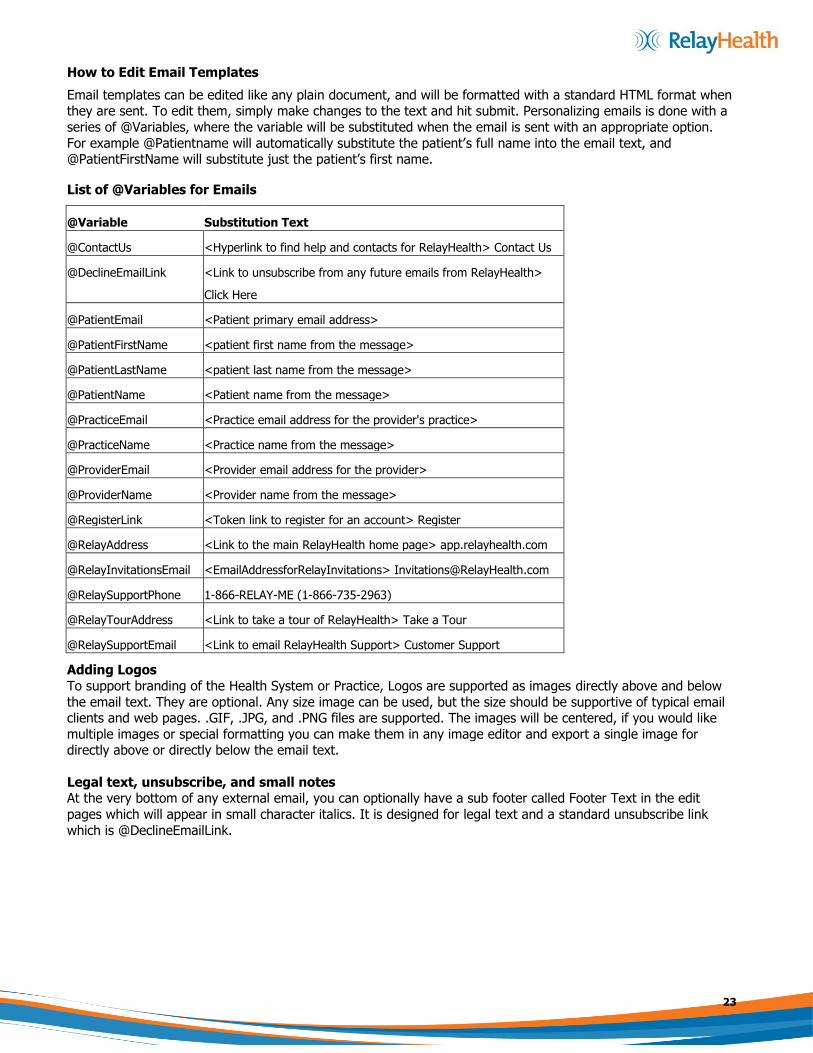
How to Edit Email Templates
Email templates can be edited like any plain document, and will be formatted with a standard HTML format when they are sent. To edit them, simply make changes to the text and hit submit. Personalizing emails is done with a
series of @Variables, where the variable will be substituted when the email is sent with an appropriate option.
For example @Patientname will automatically substitute the patient’s full name into the email text, and @PatientFirstName will substitute just the patient’s first name.
List of @Variables for Emails
@Variable Substitution Text
@ContactUs <Hyperlink to find help and contacts for RelayHealth> Contact Us
@DeclineEmailLink <Link to unsubscribe from any future emails from RelayHealth>
Click Here
@PatientEmail <Patient primary email address>
@PatientFirstName <patient first name from the message>
@PatientLastName <patient last name from the message>
@PatientName <Patient name from the message>
@PracticeEmail <Practice email address for the provider's practice>
@PracticeName <Practice name from the message>
@ProviderEmail <Provider email address for the provider>
@ProviderName <Provider name from the message>
@RegisterLink <Token link to register for an account> Register
@RelayAddress <Link to the main RelayHealth home page> app.relayhealth.com
@RelayInvitationsEmail <EmailAddressforRelayInvitations> [email protected]
@RelaySupportPhone 1-866-RELAY-ME (1-866-735-2963)
@RelayTourAddress <Link to take a tour of RelayHealth> Take a Tour
@RelaySupportEmail <Link to email RelayHealth Support> Customer Support
Adding Logos
To support branding of the Health System or Practice, Logos are supported as images directly above and below
the email text. They are optional. Any size image can be used, but the size should be supportive of typical email clients and web pages. .GIF, .JPG, and .PNG files are supported. The images will be centered, if you would like
multiple images or special formatting you can make them in any image editor and export a single image for directly above or directly below the email text.
Legal text, unsubscribe, and small notes
At the very bottom of any external email, you can optionally have a sub footer called Footer Text in the edit
pages which will appear in small character italics. It is designed for legal text and a standard unsubscribe link
which is @DeclineEmailLink.
16
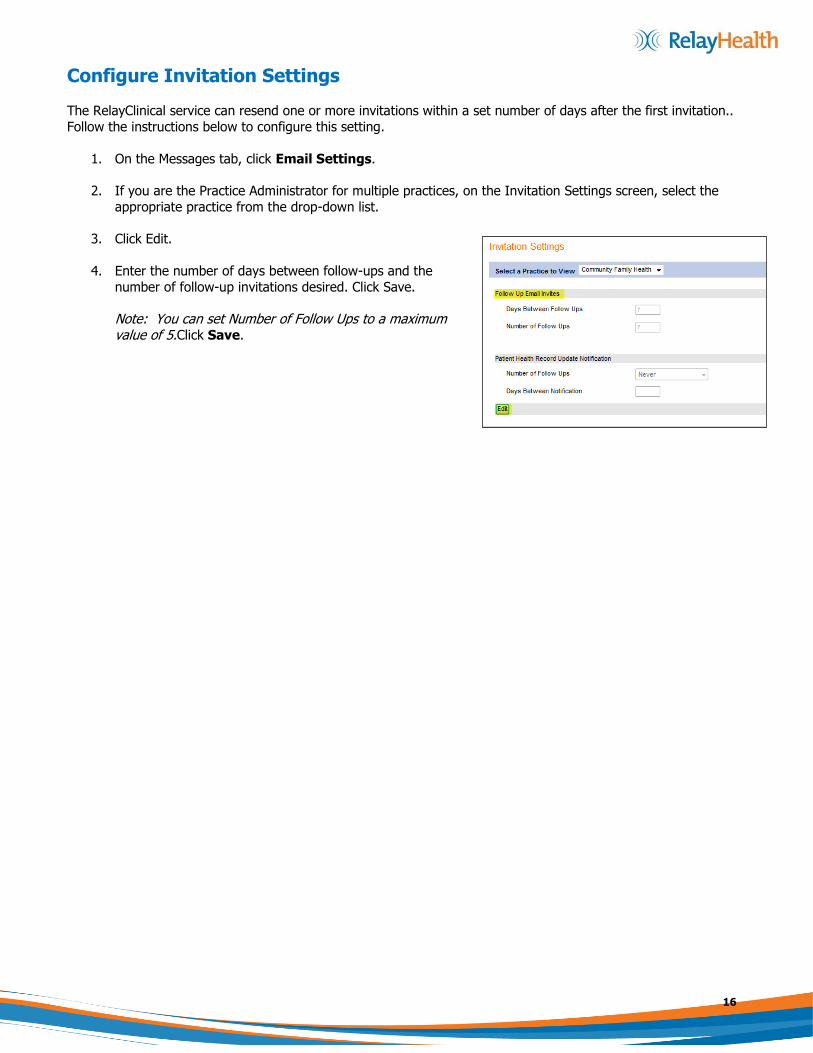
Configure Invitation Settings
The RelayClinical service can resend one or more invitations within a set number of days after the first invitation..
Follow the instructions below to configure this setting.
1. On the Messages tab, click Email Settings.
2. If you are the Practice Administrator for multiple practices, on the Invitation Settings screen, select the
appropriate practice from the drop-down list.
3. Click Edit.
4. Enter the number of days between follow-ups and the
number of follow-up invitations desired. Click Save.
Note: You can set Number of Follow Ups to a maximum value of 5.Click Save.

17
Customize Patient Heath Record Update Notifications
The RelayClinical service provides health record update notifications that inform a patient when a Health
Summary Document (CCD, CDA, C-CDA) is received into the patient’s health record. This functionality affects any
Health System that has enabled CCD/CDA/C-CDA patient updates.
As an administrator, you may optionally brand notification messaging to your patients. The notification templates
allow Practice Administrators to modify multiple elements of the notification messages. For example, these templates allow for upload of logos in the Header and Footer elements, the Subject line may be modified, and
Practice Administrators may use @variables in the email message. The variables are substituted with the applicable text when the notification transmits to the patient. For example, using the @PracticeName variable
will substitute the practice name (e.g., Waterside Family Care) into the notification automatically. Please refer to
page 48 for a complete list of supported @ variables. Note that all notification customization and branding can be done through the front-end of the service through Health Record Notification templates. No additional back-end
configuration is needed.
Customize Template Text
1. On the Messages tab, click Review Email Templates.
2. If you are the Practice Administrator for
multiple practices, on the Review Email
Templates screen, select the appropriate practice from the drop-down list.
3. To the far right of the template, click View to review the current or default template text.
When you’ve finished reviewing, click Close to return to the Review Email Templates screen.
4. Click Edit to the right of the template you want to customize. In this scenario, we will edit the the Health Record Update Template – Personal Email
You can review your edits by clicking View on the Review Email Templates screen.
18
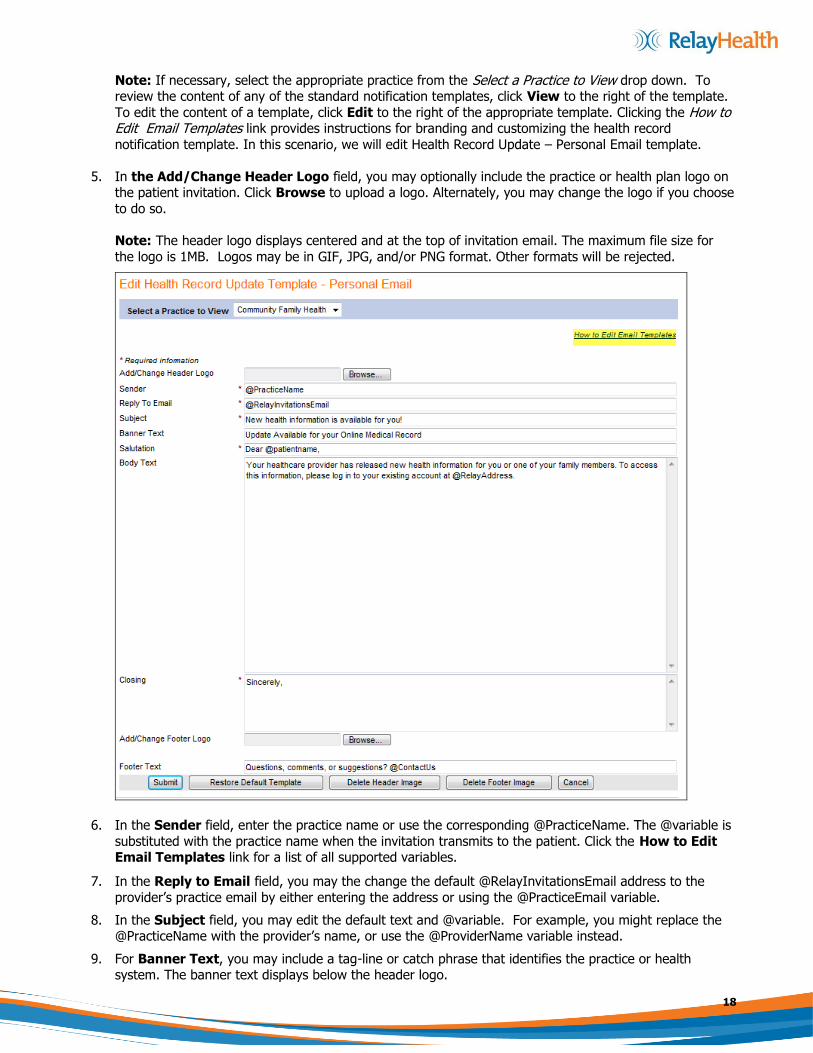
Note: If necessary, select the appropriate practice from the Select a Practice to View drop down. To review the content of any of the standard notification templates, click View to the right of the template.
To edit the content of a template, click Edit to the right of the appropriate template. Clicking the How to Edit Email Templates link provides instructions for branding and customizing the health record
notification template. In this scenario, we will edit Health Record Update – Personal Email template.
5. In the Add/Change Header Logo field, you may optionally include the practice or health plan logo on the patient invitation. Click Browse to upload a logo. Alternately, you may change the logo if you choose
to do so.
Note: The header logo displays centered and at the top of invitation email. The maximum file size for
the logo is 1MB. Logos may be in GIF, JPG, and/or PNG format. Other formats will be rejected.
6. In the Sender field, enter the practice name or use the corresponding @PracticeName. The @variable is
substituted with the practice name when the invitation transmits to the patient. Click the How to Edit Email Templates link for a list of all supported variables.
7. In the Reply to Email field, you may the change the default @RelayInvitationsEmail address to the
provider’s practice email by either entering the address or using the @PracticeEmail variable.
8. In the Subject field, you may edit the default text and @variable. For example, you might replace the @PracticeName with the provider’s name, or use the @ProviderName variable instead.
9. For Banner Text, you may include a tag-line or catch phrase that identifies the practice or health system. The banner text displays below the header logo.
19
10. In the Reply to Email field, you may the change the default @RelayInvitationsEmail address to
the provider’s practice email by either entering the address or using the @PracticeEmail variable.
11. In the Subject field, you may edit the default text and @variable. For example, you might
replace the @PracticeName with the provider’s name, or use the @ProviderName variable instead.
12. For Banner Text, you may include a tag-line or catch phrase that identifies the practice or health
system. The banner text displays below the header logo.
13. In the Salutation field, you may use the default text and @variable to display the patient’s first name in
the email invitation
14. In the Body Text field, you may edit the standard text and use @variables if you choose. The
‘Click@RegisterLink’ directs patients to RelayHealth’s secure registration site. If your practice has a custom registration link, enter the HTML anchor tag to the URL for your site. The text field also supports
the HTML bold tag.
15. In the Closing field, use one of the @variables (e.g.,@ProviderName or @PracticeName) or enter
the applicable text.
16. You may optionally include a Footer Logo in the patient invitation. Click Browse to upload a logo. Alternately, you may a change the logo if you choose to do so.
17. In the Footer Text field. You may optionally enter a footer which will appear in small italics at the bottom of the email. It is designed for legal text and a standard unsubscribe link, which is
@DeclineEmailLink.
18. Click Submit.
OR
19. Click the applicable button at the bottom of the screen to Restore Default Template, Delete Header Image, Delete Footer Image, or Cancel
your changes.
20. To review your changes, click View to the right of the edited template. Repeat steps
2-18 to review or edit other email templates.
21. Note: Edits to the email templates are published as soon as you “submit" them, so Practice
Administrators should plan their message before editing. To view the email in full with all the @variables substituted with the appropriate options, the easiest way is to create a test user with a valid external
email address, and when the email is triggered, (e.g., the test patient is invited), you will see the full email format in the external email.

20
Viewing an Email Template (Example)

21
How to Edit Email Templates
Email templates can be edited like any plain document, and will be formatted with a standard HTML format when they are sent. To edit them, simply make changes to the text and hit submit. Personalizing emails is done with a
series of @Variables, where the variable will be substituted when the email is sent with an appropriate option.
For example @Patientname will automatically substitute the patient’s full name into the email text, and @PatientFirstName will substitute just the patient’s first name.
List of @Variables for Emails
@Variable Substitution Text
@ContactUs <Hyperlink to find help and contacts for RelayHealth> Contact Us
@DeclineEmailLink <Link to unsubscribe from any future emails from RelayHealth>
Click Here
@PatientEmail <Patient primary email address>
@PatientFirstName <patient first name from the message>
@PatientLastName <patient last name from the message>
@PatientName <Patient name from the message>
@PracticeEmail <Practice email address for the provider's practice>
@PracticeName <Practice name from the message>
@ProviderEmail <Provider email address for the provider>
@ProviderName <Provider name from the message>
@RegisterLink <Token link to register for an account> Register
@RelayAddress <Link to the main RelayHealth home page> app.relayhealth.com
@RelayInvitationsEmail <EmailAddressforRelayInvitations> [email protected]
@RelaySupportPhone 1-866-RELAY-ME (1-866-735-2963)
@RelayTourAddress <Link to take a tour of RelayHealth> Take a Tour
@RelaySupportEmail <Link to email RelayHealth Support> Customer Support
Adding Logos
To support branding of the Health System or Practice, Logos are supported as images directly above and below
the email text. They are optional. Any size image can be used, but the size should be supportive of typical email clients and web pages. .GIF, .JPG, and .PNG files are supported. The images will be centered, if you would like
multiple images or special formatting you can make them in any image editor and export a single image for directly above or directly below the email text.
Legal text, unsubscribe, and small notes
At the very bottom of any external email, you can optionally have a sub footer called Footer Text in the edit
pages which will appear in small character italics. It is designed for legal text and a standard unsubscribe link
which is @DeclineEmailLink.
22
Branded Email Invitation in the External Email (Example)
23
How to Edit Email Templates
Email templates can be edited like any plain document, and will be formatted with a standard HTML format when they are sent. To edit them, simply make changes to the text and hit submit. Personalizing emails is done with a
series of @Variables, where the variable will be substituted when the email is sent with an appropriate option.
For example @Patientname will automatically substitute the patient’s full name into the email text, and @PatientFirstName will substitute just the patient’s first name.
List of @Variables for Emails
@Variable Substitution Text
@ContactUs <Hyperlink to find help and contacts for RelayHealth> Contact Us
@DeclineEmailLink <Link to unsubscribe from any future emails from RelayHealth>
Click Here
@PatientEmail <Patient primary email address>
@PatientFirstName <patient first name from the message>
@PatientLastName <patient last name from the message>
@PatientName <Patient name from the message>
@PracticeEmail <Practice email address for the provider's practice>
@PracticeName <Practice name from the message>
@ProviderEmail <Provider email address for the provider>
@ProviderName <Provider name from the message>
@RegisterLink <Token link to register for an account> Register
@RelayAddress <Link to the main RelayHealth home page> app.relayhealth.com
@RelayInvitationsEmail <EmailAddressforRelayInvitations> [email protected]
@RelaySupportPhone 1-866-RELAY-ME (1-866-735-2963)
@RelayTourAddress <Link to take a tour of RelayHealth> Take a Tour
@RelaySupportEmail <Link to email RelayHealth Support> Customer Support
Adding Logos
To support branding of the Health System or Practice, Logos are supported as images directly above and below
the email text. They are optional. Any size image can be used, but the size should be supportive of typical email clients and web pages. .GIF, .JPG, and .PNG files are supported. The images will be centered, if you would like
multiple images or special formatting you can make them in any image editor and export a single image for directly above or directly below the email text.
Legal text, unsubscribe, and small notes
At the very bottom of any external email, you can optionally have a sub footer called Footer Text in the edit
pages which will appear in small character italics. It is designed for legal text and a standard unsubscribe link
which is @DeclineEmailLink.

24
Configure Patient Health Record Notification Settings
The RelayClinical service can resend one or more notifications within a set number of days after the first
notification. Follow the instructions below to configure this setting.
5. On the Messages tab, click Email Settings.
6. If you are the Practice Administrator for multiple practices, on the Invitation Settings screen, select the
appropriate practice from the drop-down list.
7. Click Edit.
8. The patient health record update frequency options
include Never (the default), Always (send a notification for each a CCD/C-CCD/CDA that hits
the patient’s health record), and Set Number of Days (to place a time delay between notifications).
If applicable, enter the number of days between notifications. attempts.
9. Click Save.

25
Appendix A: Patient Invitations – Frequently Asked Questions
What invitation templates exist in the service and when are they triggered?
The RelayClinical service includes three invitation templates, which may be customized by a designated Practice
Administrator to meet the unique needs of the practice or health system.
1. Patient Invitation Template – Personal Email
Manual patient invite using the Invite Patients workflow
Manual workflow accessed at the upper left of the provider's or staff member's Home page or in the
left navigation panel of the Patients tab
Considered a "blind" invitation as there is no existing offline record or practice/patient relationship
Note: Changes to the Patient Invitation Template also apply to offline invitations.
2. Patient Follow Up Invitation Template – Personal Email
Automatic follow-up to manual invite (First Invitation Template above).
If no response from patient, subsequent invites sent based on configured Invitation Settings (e.g.,
send 2 follow-up invitations, 14 days apart)
Resend an invite from Sent Invitations list
Considered a "blind" invitation as there is no existing offline record or practice/patient relationship
Can the practice or health system add a brand/logo to the patient invitation?
Yes, Invitation Templates support graphics in the header and/or footer sections of the template. This branding is entirely in the control of the Practice Administrator through the Provider/Staff Portal and is not related to any
previous branding configuration completed by a RelayHealth Deployment Specialist or other Implementation Consultant. Logos do not have a size limit (e.g., 200 pixels X 50 pixels); however, the maximum file size is 1MB.
In addition, logos may be in GIF, JPG, and/or PNG format. Other formats will be rejected.
Who Can Update a Patient Invitation Template?
Only users with administrator privileges can update patient invites. All template configurations are done through
the front-end user interface (UI). No additional back-end configuration is required.
What elements of the patient invitation are customizable?
All parts of the patient invitation are customizable. Practice Administrators may optionally personalize invitation templates using a series of @ variables, in which these variables are substituted with the applicable text when
the invitation transmits to the patient. For example, using the @PracticeName variable will substitute the practice
name (e.g., Waterside Family Care) into the invitation automatically. Clicking the How to Edit Email Templates link on the Patient Invitation Template provides instructions for branding and customizing an invitation. Email
customization and branding can be done through the front-end of the service. No additional back-end configuration is needed.
Does the RelayClinical Service support notifications to patients when a Health Summary Document
(CCD, CDA, C-CDA) is added to their health record?
Yes, this functionality is available to any Health System that has enabled CCD/CDA/C-CDA patient updates.
Practice Administrators may optionally customize notification messaging to their patients, including healthcare organization branding for upload of logos in the Header and Footer elements. The Subject line may be modified,
and Practice Administrators may use @variables in the email message. In addition , the service offers the ability to control the frequency of health record update notifications. Notifications may be consolidated based on the
26
number of days between updates, regardless of how many CCDs are generated for a patient’s record. The patient may then access the portal to view all health record updates.
The invitation sent to the patient includes a URL with a token. How is the token used?
First, the token allows the service to make a connection with known information for the specific patient when the
patient clicks the link in the invitation email. The token also serves to automatically generate the
practice/provider relationship request for this patient when the patient completes registration successfully
How long is a registration link active after I send the invitation to a patient?
Patient invitation links do not expire. As long as the practice and provider accounts are active in the RelayClinical service, the link will remain valid.
What invitations will to allow the patient/practice relationship to be automatic when the patient creates an account using the invite?
Patient Invitation Template – Personal Email
Pre-populates registration form based on what was entered in the manual Invite Patients workflow
(e.g., patient name and email)
Automatically generates the request to join the practice that the invite when out on behalf of.
Practice user will need to accept the request.
Need to use the default "Default RelayHealth link for patient registration" option in the template
Patient must use the link in the email to create his/her account
Patient Follow Up Invitation Template – Personal Email
Pre-populates registration form based on what was entered in the manual Invite Patients workflow
(e.g., patient name and email)
Automatically generates the request to join the practice that the invite when out on behalf of.
Practice user will need to accept the request.
Need to use the default "Default RelayHealth link for patient registration" option in the template
Patient must use the link in the email to create his/her account
Under what scenarios must the practice accept the relationship request with the patient to
complete the patient invitation process?
Patient creates an online account and then requests a relationship with the practice.
Provider or staff member uses the Invite Patients button from the Home page, which generates a “blind"
invite. A blind invite does not create an offline record, so the patient creates an account, and then the request to link to the practice must be accepted by a practice user.

27
What's the fastest way to send patient e-mail invitations?
Hot Keys can save time when sending patient e-mail invitations.
Hot Key Action PC Hot Key Mac Hot Key
Home Page Invite Patients Alt + i Control + i
Invite Patients Page Add Invitee to List Alt + a Control + a
Invite Patients Page Submit Form Alt + s Control + s
Confirmation Page Invite Patients Alt + i Control + i
What are the benefits of inviting patients to use the RelayClinical service?
Researchers have found that practices with as few as 5-10% of their patients enrolled can reduce phone
volume by as much as 18%, giving both providers and practice staff greater control over their time. Patients
appreciate the convenience of reaching you securely online for non-urgent matters. Practices with at least 100 online patients per provider benefit most.
How do I know if my patient enrollment efforts are working?
Check your Enrollment Reports to see your progress on a daily, weekly, and monthly basis. Click on Patients
> Enrollment Reports.
How can I track the status of patient invitations that I've already sent?
The Sent Invitations view under your Patients tab lets you track the history and success of invitations sent by
your practice. If the patient has not accepted the invitation, you can re-schedule or schedule up to five automatic follow-up invitations.
In the Sent Invitations list, why are some patient names hyperlinked (underlined/blue text)?
If the patient has an existing RelayClinical Record created by a user in your organization, the patient’s name
is hyperlinked. You can optionally click the patient’s name to navigate directly to the patient’s health record in
the RelayClinical service.
Can I invite more than one patient at a time using the Patient Invitation feature?
Yes. Inviters from your practice can send as many as 50 invitations at a time. To avoid losing data, we recommend that you always submit and send your current list of e-mail invitations before starting another
task or leaving your computer. You can easily track the results of these invitations in the Sent Invitations page under your Patients tab.
What is an 'Online Patient' in Enrollment Reports?
An Online Patient is a registered patient who has a messaging relationship with a single provider. Because of this, a registered patient who has two messaging relationships with two different providers in the same
practice could be counted twice in the practice total number.
What is a 'Sent Invitation' in Enrollment Reports?

28
Any time an inviter starts a new invitation record in the Sent Invitations area of the site, that inviter is credited with one invitation. Follow up or re-sent invitations are not counted in Enrollment Reports.
What is the difference between the Sent Invitations list and the Enrollment Report?
The Sent Invitation list tracks patient invitations sent and accepted in the specified time period while the
Enrollment Report tracks all invitations accepted in the specified time period.
Are there other ways to invite patients to use this service?
Yes. This Feature Guide demonstrates two common patient invitation workflows. However, the RelayClinical
service also includes patient invitation options in basic messaging workflows, RelayClinical™ eScript, RelayClinical™ Referrals, and Results Manager. RelayHealth also supports optional Auto Invite configurations
in ADT and Health Summary Document transactions.
To invite patients in basic messaging workflows, eScript, and/or referrals, look in the ‘Options’ area at the
bottom of the form. If the selected patient is in an offline status, the form includes an option to invite the
patient. Just click the checkbox and enter the patient’s email address. If the patient’s health record includes the patient’s email address in the ‘Personal Information’ area, the service saves you time by pre-populating
the email field.
Results Manager also supports two types of invitation workflows. First, you have the option to send just an
invitation to the offline patient (with no results information) or create a pending patient message that
includes results information. If you choose to create a pending message for the patient, he or she will need to register with RelayHealth in order to access the message. The second supported invitation workflow is
specific to auto-release rule setup. You may optionally send an invitation when an auto-release rule triggers for a result. For detailed workflow information related to the Results Manager’s invitation options, see the
Results Manager Feature Guide.
29
Appendix B: Auto-Invite – Frequently Asked Questions
The RelayClinical service includes optional HL7 ADT or Health Summary Document (CCD, CDA, or CCDA)
configurations that allow healthcare organizations to invite patients automatically to register for this service. If
the healthcare organization includes the patient’s email address in the ADT or Health Summary Document, and if the organization’s interface is configured to enable automatic invitations, the service will transmit an invitation
message to the patient’s email address that includes a link where the patient can register for a RelayClinical service account and accept the Terms of Use. By default, the automatic invite interface configuration is disabled
unless specifically requested by the healthcare organization; therefore, the scenarios discussed below may not apply to your organization.
In a healthcare information exchange (HIE) environment, an auto-invite configuration poses multiple end-user
scenarios in regards to multiple sent invitations and other email address issues. The table below describes several scenarios and their outcomes.
Scenario Outcome
A patient has two offline records that reside in the repositories of two facilities (un-merged).
What is the patient experience if both facilities send auto-invites?
AND
A patient has a single offline record shared between multiple facilities (Longitudinal
Patient Record). What is the patient
experience if two facilities send auto-invites?
In both of these scenarios, the patient receives
invitations to register for a RelayClinical service account
from both facilities – meaning two separate invitations.
The patient may complete the registration process using
either the first or the second invitation.
Note that invitation text is configurable per practice or
health system, which allows for differentiation between
the invitations. For example, Memorial Health System
may send an invitation with text customized to the
services available at the facility, while Family Health
Practice sends a different invitation with text customized
to practitioners, hours, location, etc.
What if a patient accepts one invitation then
later attempts to accept the second invitation?
There are two possible outcomes for this scenario:
1) When the patient completes the registration
process using one invitation and attempts to
register again using the same demographic
information, he or she will receive an alert that
the email address is recognized. The patient is
advised to simply log in. If the patient doesn’t
remember the login, he or she can contact
RelayHealth Customer Support or use the reset
workflow launched from the “I forgot my User
ID or Password” link.
2) If the patient has registered using the email
30
address provided in the ADT or Health Summary
Document message, then he or she registers
using a different email address or alternate
login, the service creates a new, duplicate
account. A user at the practice or health system
can review and merge the duplicate accounts
using standard workflows currently available in
the service.
A patient has a single on-line record shared between multiple facilities (Longitudinal
Patient Record). What is the patient experience when manually invited by a user in
a physician practice who has not performed a
search using ‘Search Your Entire Network’ option and merged the records?
If potential duplicate exists, the service alerts the
practice or health system user and directs the user into
the patient record merge workflow. The service presents
the potential duplicate record for review and the option
to merge. The user cannot proceed with the manual
invitation workflow until the potential duplicate is
resolved.
How do the invitations work for minors aged 13 to 17?
The ADT interface can be configured to automatically
send invitations for minors 13 to 17. The Health
Summary Document interface can be configured to
automatically send invitations for minors at any age
desired by the customer. Patients must be 13 years and
above to create an online RelayHealth account by
federal law. However, a Health Summary invitation
setting for minors under 13 years of age will allow a
Patient Authorized Representative to register the minor
as a dependent family member and receive the Health
Summary on the family member’s behalf.
What is the patient experience for family members who are invited to register for the
RelayClinical service account(s) but share an email address
The email address provided receives all RelayClinical
service notifications, including invitations. The service
applies the following logic to the registration process:
First invitation User ID is the email address (for
example; RelayHealth does not auto-generate
31
the User ID)
o Wife/mother accepts invitation and registers
for RelayClinical service account using the
email address as her User ID plus her
specified password, which is not shared
among users.
Second invitation sent to the email address.
o Husband/father accepts invitation and
registers for a RelayClinical service account
using a different User ID. Husband/father
may specify a User ID of his choice, but he
may not use the family email address,
which is already in use by the wife/mother.
Husband/father must also specify a unique
password for his account. Passwords are
not shared among users.
Notification is viewable to anyone using the email
address, but RelayClinical service notifications do not
include protected health information, and each user
must sign in to his or her individual account to access
messages and/or health records.
What if the shared family email scenario above includes invitations from a second facility?
The email address provided receives all RelayClinical
service notifications, including invitations, regardless of
the number of sending facilities.
What is the patient experience for minors who
provided a parent’s email address at the time of registration?
The parent’s email address receives all RelayHealth
notifications, including invitations. The parent may allow
the minor access to the email and registration process.
The service will allow for primary account registration
for minors 13 years and older. If the minor is under 13,
the service will not allow for successful independent
registration.
The Patient Portal also includes a patient initiated merge

32
workflow, which is engaged only when the patient or
patient's authorized representative receives a patient
invite message. The patient invite will be received to the
email address contained in the system message
transaction (customers may implement patient invite
message types of ADT, Health Summary, Results, or
Orders). Upon receipt of the patient invite, the patient
or patient's authorized representative (user) will be
required to provide demographic information that must
match the information in the system transaction
generating the invite message. If the Patient First
Name, Last Name, Date of Birth, ZIP Code, or Gender
do not match the information in the system transaction,
the user will see the New Account Information screen
where they will need to indicate if the incoming
information is to be associated to their own health
record or the health record of a dependent family
member. The user will also have the option to add a
new family member for which they will need to enter
the patient demographic information. They can then
associate the newly received health information to the
new family member.
When is the invitation sent to the patient?
Admission, Discharge, both?
ADT and Health Summary Document processing does
not support invitation logic based on event type. If the
ADT or Health Summary Document includes a valid
email address, and the interface is configured to send
invitations automatically, the service will send the
patient invitation.