RelayClinical Service Feature Guide RelayClinical ... · RelayClinical Service Feature Guide ......
34
RelayClinical Service Feature Guide RelayClinical ™ Documentation Release 15.8 August 2015 Health Connections Brought to Life ™
Transcript of RelayClinical Service Feature Guide RelayClinical ... · RelayClinical Service Feature Guide ......

RelayClinical Service Feature Guide
RelayClinical™ Documentation
Release 15.8
August 2015
Health Connections Brought to Life™

2
Table of Contents
Overview .................................................................................................................................................................. 3
What’s Inside ........................................................................................................................................................ 3
How Can We Help? ................................................................................................................................................ 4
Navigate RelayClinical Documentation ........................................................................................................................ 5
Accessing Progress Notes ....................................................................................................................................... 5
Progress Note Form Navigation .............................................................................................................................. 6
Progress Note Status Area Navigation ..................................................................................................................... 8
Creating a Progress Note ......................................................................................................................................... 10
Creating a Progress Note Using a Template .............................................................................................................. 16
Importing a Previous Progress Note ......................................................................................................................... 18
Approving a Progress Note in Draft or Overdue Status ............................................................................................... 20
Printing Progress Notes ........................................................................................................................................... 23
Print from Notes Tab in the RelayClinical Record ................................................................................................... 23
Print from Progress Note Status Page ................................................................................................................... 24
Print from Displayed Note .................................................................................................................................... 25
Creating a Super Bill ................................................................................................................................................ 26
Configuring Progress Note Options ........................................................................................................................... 28
Appendix A: Sample Super Bill ................................................................................................................................ 29
Appendix B: Sample Clinical Summary ..................................................................................................................... 30
Appendix C: RelayClinical Documentation Templates ................................................................................................. 31
Appendix D: RelayClinical Documentation – FAQs ...................................................................................................... 32
© 1999-2015 RelayHealth and its affiliates. All rights reserved.
3
Overview
The RelayClinical™ Documentation application provides functionality to allow clinicians to record encounter-based clinical
data in a tabbed, SOAP-based (Subjective, Objective, Assessment, Plan) format. Our unique design embeds relevant
clinical data from the patient’s RelayClinical™ Record, which displays in context (i.e., medications, diagnosis, vitals, family history, etc.) where appropriate. The SOAP-based format also allows clinicians to use clinical templates to facilitate rapid
encounter documentation. Clinicians in your organization can choose from a range of templates that address the most common reasons for office visits to primary care physicians.
The Documentation application includes efficient workflows for recording patient vitals, placing orders (if licensed), ePrescribing (if licensed), and referral messaging workflows from links embedded in the Progress Note. These
applications launch with the selected patient’s data in context – saving time and reducing the possibility of errors. When
the clinician has completed other application workflows, he or she returns automatically to the Progress Note to complete the note or continue documenting the encounter.
Users in organizations that have licensed the RelayClinical™ Quality Reporting application can also use a Quality of Care Measures grid, which displays under a note’s ‘Plan’ tab, for clinical decision support. The service populates the
appropriate measures automatically based on the patient’s problem list, medication list, demographics, and laboratory
results. This tool assists providers in tracking and managing patient specific interventions for due and overdue services. Providers will be able to use the new component to improve the quality of care by addressing measures accompanied by
red and yellow icons or to confirm that a patient is on track to receive scheduled care services.
The Documentation application also supports optional outbound billing integration using a standard HL7 DFT transaction.
When billing is enabled, a provider or coder in your organization may generate a Super Bill for services performed during the visit, which will be transmitted electronically to the Practice Management system.
What’s Inside This Feature Guide provides an overview of the RelayClinical Documentation application. In this Guide, you’ll find:
A brief navigational overview
Instructions that identify the steps you’ll take to create a progress note
Instructions that describe how to create a progress note using standard template content
Instructions that identify how to import a previously created progress note into a new progress note
Instructions that describe how providers can approve a progress note
Instructions that identify three methods to print a progress note
Instructions that describe how to create a super bill
Instructions for Practice Administrators that describe how to configure progress note options
Additionally, this document includes the following supplemental information:
Appendix A: Sample Super Bill
Appendix B: Sample Clinical Summary
Appendix C: RelayClinical Documentation Templates
Appendix D: RelayClinical Documentation – Frequently Asked Questions
4
How Can We Help? RelayHealth is ready to support you every step of the way as you use the service. You can request assistance, propose
suggestions, or submit comments by any of the following methods:
Use the ‘Contact Us’ link at the bottom of your Home page to send a secure message directly to our RelayHealth
Support organization. You can also call our toll-free number and speak to one of our Support representatives from 4:30 am to 5:00 pm Pacific Standard Time. Call 1-866-RELAY-ME (1-866-735-2963) and select option 1.
Speak with your RelayHealth Territory Director or Deployment Specialist. These RelayHealth professionals
welcome your suggestions and comments about the service, your experiences with system use, and any concerns you may have.

5
Navigate RelayClinical Documentation
Accessing Progress Notes
The RelayClinical service provides multiple navigation paths to access the Documentation (Progress Notes) application.
Depending on your workflow, you can access this application from the global navigation bar or use one of three navigation options available in a patient’s RelayClinical Record.
Global Navigation Bar
Click Notes in the global navigation bar, and, click Create Progress Note at the far left of the secondary navigation bar. When you click Notes in the global navigation bar, the service displays the Progress Note Status area by default.
RelayClinical Record
From a patient’s RelayClinical Record, there are three areas where you can launch Progress Note workflows or review previously recorded notes:
1. On the Chart Summary page, in the Notes module, click the
Notes heading to review a full list of the selected patient’s progress notes. Click the New link at the upper right of the
module to create a Progress Note or click a previously recorded note’s Date to view that note. To review a full list
of the patient’s notes, click the View More link.
2. On the Chart tab, click the Notes link in the secondary navigation bar. Click the New link at the upper right of the list to create a Progress Note or click a previously recorded note’s Date to view that note.
6
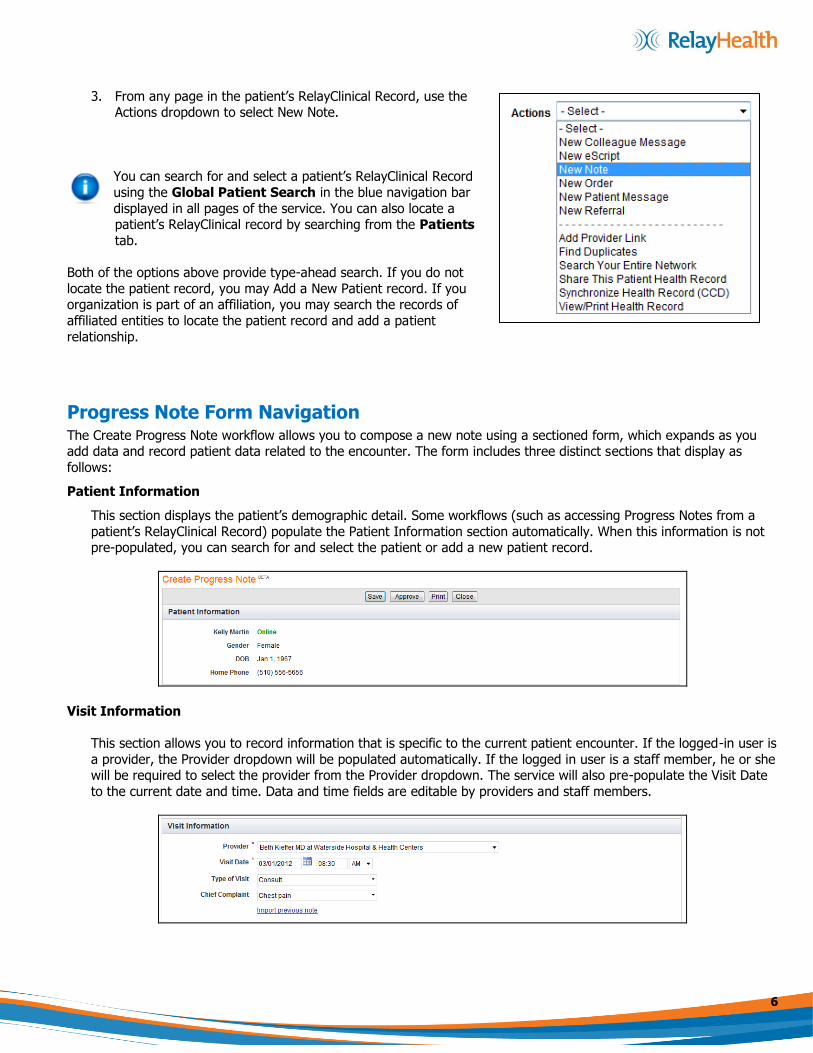
3. From any page in the patient’s RelayClinical Record, use the Actions dropdown to select New Note.
You can search for and select a patient’s RelayClinical Record
using the Global Patient Search in the blue navigation bar
displayed in all pages of the service. You can also locate a patient’s RelayClinical record by searching from the Patients
tab.
Both of the options above provide type-ahead search. If you do not
locate the patient record, you may Add a New Patient record. If you organization is part of an affiliation, you may search the records of
affiliated entities to locate the patient record and add a patient
relationship.
Progress Note Form Navigation The Create Progress Note workflow allows you to compose a new note using a sectioned form, which expands as you add data and record patient data related to the encounter. The form includes three distinct sections that display as
follows:
Patient Information
This section displays the patient’s demographic detail. Some workflows (such as accessing Progress Notes from a
patient’s RelayClinical Record) populate the Patient Information section automatically. When this information is not pre-populated, you can search for and select the patient or add a new patient record.
Visit Information
This section allows you to record information that is specific to the current patient encounter. If the logged-in user is
a provider, the Provider dropdown will be populated automatically. If the logged in user is a staff member, he or she will be required to select the provider from the Provider dropdown. The service will also pre-populate the Visit Date
to the current date and time. Data and time fields are editable by providers and staff members.

7
The Type of Visit and Chief Complaint dropdown lists include a
brief list of common encounter types/reasons; however, we’ve designed the dropdowns to accept and retain free-text entries
from end users. To add an entry, type it in the Type of Visit or
Chief Complaint field. To delete a free-text entry, hover your mouse over the X icon to the right of the entry – when it changes
to red, click to delete the entry.
Note
The Note section is segmented into Subjective, Objective, Assessment, and Plan tabs for standard SOAP-based
notes, as well as a Billing tab used to create a Super Bill for approved notes. Clinical information from the patient’s RelayClinical Record populates each tab as appropriate. You can record free-text notes in the text boxes just below
each of the tabs; the character limit is 5,000. Click hyperlinked entries under each tabbed section to view details of a
previously recorded problem, allergy, etc. You can also add a new entry or edit previous data using the links at the upper right of each section.
The Note section also allows you to select a standard template to use to record the note. At the upper right of the section header, click the Selected Template dropdown to select a standard template and populate the note with the
template’s contents. See Appendix C: RelayClinical Documentation Templates for a current list of templates.

8
Action Buttons
Action buttons displayed at the top and bottom of a new progress note
form allow you to Save the note, Print the note, or Close the Add Note
action. Providers view an additional Approve action button, which allows for immediate progress note approval. When notes are in an Approved
state, or if they have exceeded the edit timeframe configured for your practice, the only available actions are Print and Cancel.
Progress Note Status Area Navigation The Progress Note Status area allows providers and staff members to monitor a note’s status (e.g., New, Draft,
Approved, or Overdue) and provides options for managing orders awaiting approval. Notes displays in reverse
chronological order. To view older notes, click the page numbers at the lower right of the screen.
Simple Search
Progress Note Status allows users to perform simple searches to locate orders by provider, practice, order status, and patient name. To filter the displayed list of notes, select one or more of the search criteria (or enter the patient
name into the free-text field), and click View.
Access Note:
To view an individual note for review and/or approval, click the note’s date.
9
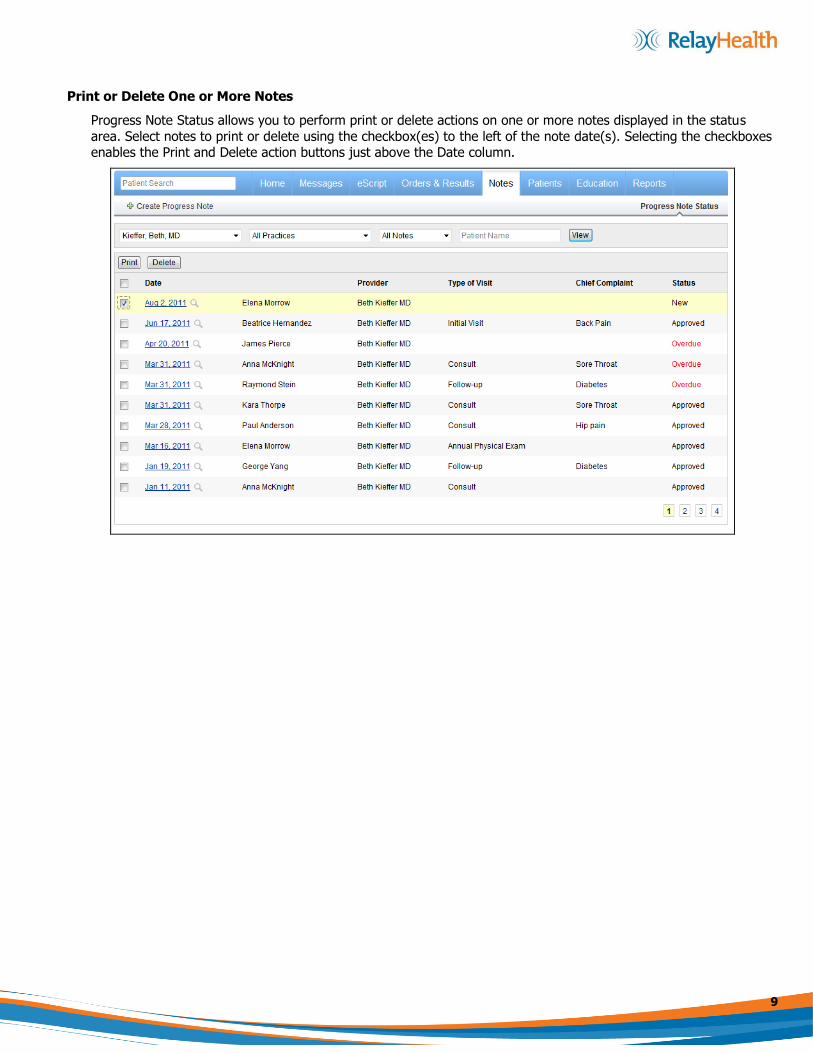
Print or Delete One or More Notes
Progress Note Status allows you to perform print or delete actions on one or more notes displayed in the status
area. Select notes to print or delete using the checkbox(es) to the left of the note date(s). Selecting the checkboxes enables the Print and Delete action buttons just above the Date column.
10
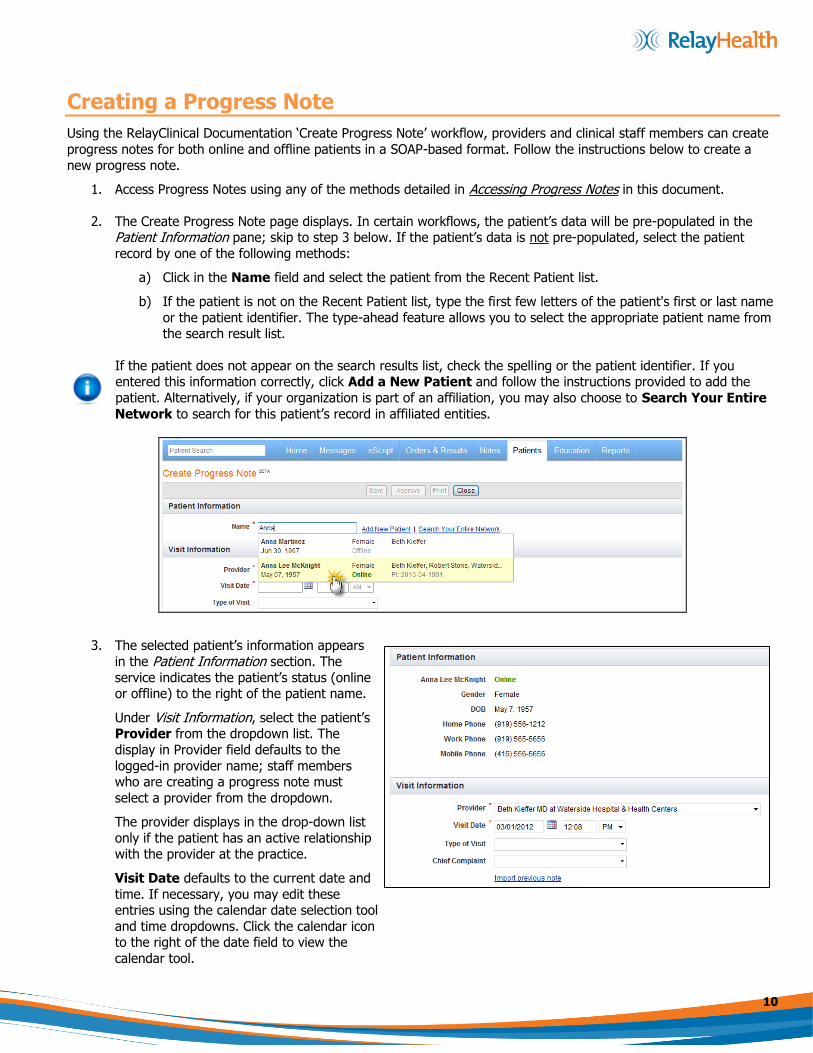
Creating a Progress Note
Using the RelayClinical Documentation ‘Create Progress Note’ workflow, providers and clinical staff members can create
progress notes for both online and offline patients in a SOAP-based format. Follow the instructions below to create a
new progress note.
1. Access Progress Notes using any of the methods detailed in Accessing Progress Notes in this document.
2. The Create Progress Note page displays. In certain workflows, the patient’s data will be pre-populated in the Patient Information pane; skip to step 3 below. If the patient’s data is not pre-populated, select the patient
record by one of the following methods:
a) Click in the Name field and select the patient from the Recent Patient list.
b) If the patient is not on the Recent Patient list, type the first few letters of the patient's first or last name
or the patient identifier. The type-ahead feature allows you to select the appropriate patient name from the search result list.
If the patient does not appear on the search results list, check the spelling or the patient identifier. If you entered this information correctly, click Add a New Patient and follow the instructions provided to add the
patient. Alternatively, if your organization is part of an affiliation, you may also choose to Search Your Entire
Network to search for this patient’s record in affiliated entities.
3. The selected patient’s information appears
in the Patient Information section. The
service indicates the patient’s status (online or offline) to the right of the patient name.
Under Visit Information, select the patient’s Provider from the dropdown list. The
display in Provider field defaults to the
logged-in provider name; staff members who are creating a progress note must
select a provider from the dropdown.
The provider displays in the drop-down list
only if the patient has an active relationship with the provider at the practice.
Visit Date defaults to the current date and
time. If necessary, you may edit these entries using the calendar date selection tool
and time dropdowns. Click the calendar icon to the right of the date field to view the
calendar tool.
11
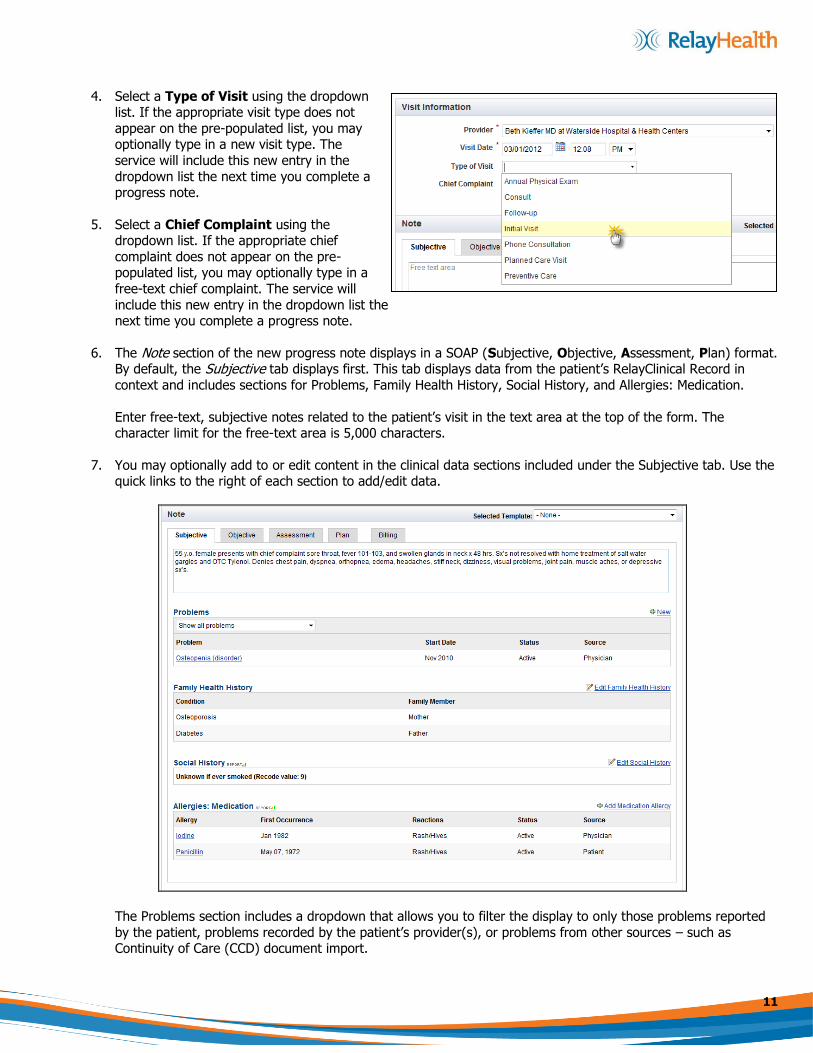
4. Select a Type of Visit using the dropdown list. If the appropriate visit type does not
appear on the pre-populated list, you may optionally type in a new visit type. The
service will include this new entry in the
dropdown list the next time you complete a progress note.
5. Select a Chief Complaint using the dropdown list. If the appropriate chief
complaint does not appear on the pre-populated list, you may optionally type in a
free-text chief complaint. The service will
include this new entry in the dropdown list the next time you complete a progress note.
6. The Note section of the new progress note displays in a SOAP (Subjective, Objective, Assessment, Plan) format. By default, the Subjective tab displays first. This tab displays data from the patient’s RelayClinical Record in
context and includes sections for Problems, Family Health History, Social History, and Allergies: Medication.
Enter free-text, subjective notes related to the patient’s visit in the text area at the top of the form. The character limit for the free-text area is 5,000 characters.
7. You may optionally add to or edit content in the clinical data sections included under the Subjective tab. Use the quick links to the right of each section to add/edit data.
The Problems section includes a dropdown that allows you to filter the display to only those problems reported
by the patient, problems recorded by the patient’s provider(s), or problems from other sources – such as Continuity of Care (CCD) document import.

12
For both the Problems and the Allergies: Medication sections, the service will include ‘No known…’ links if the patient has not specified any active problems or medication allergies. You can confirm that this information is
correct by clicking the ‘No known…’ links.
If your organization has enabled the Meaningful Use Guidance
Indicator feature, you will see Report icons where
appropriate in the progress note and in other area of the RelayClinical service. These icons highlight data entry
opportunities that will assist your organization with meeting Meaningful Use reporting requirements. Hover over the icons to
view details associated with the highlighted measure.
8. Click the Objective tab. This tab presents data from the Vitals, Recent Results, and Active Medications sections
of the patient’s RelayClinical Record. Enter free-text, objective notes related to the patient’s visit in the text area
at the top of the form.
On this tab, you may optionally:
View/Add Vitals –
Import Previous Vitals, View a Growth Chart, or
Add New Vitals: To
include one or more previously recorded
vitals in this progress note, click the Import
Patient Vitals link. Select the vitals you
would like to include in
the current progress note using the
checkboxes provided, and click Import. To
add vitals for this visit,
click the New link. Refer to the ‘Recording Patient
Vitals’ Feature Guide for detailed instructions
related to use of the
vitals feature.
View Recent Results on record for this patient -- If this patient has no results on record, you will not view
any action links in this section. If the patient does have recent results on record, you may optionally Edit
certain result data (i.e., city or state where test was performed) or View/Print Result using the link provided.
Add Medication(s) – add a medication for this patient or confirm that the patient has no active
medications.
Under the Active Medications section, the service presents two attestation checkboxes. You can attest that ‘This
visit was a result of a transition of care for the patient,’ if appropriate. You may also indicate that
‘Medication reconciliation has been completed’ using the checkbox provided. When the checkboxes are unchecked, this area of the Active Medication section is highlighted in red. When checked, the area is
highlighted in green.

13
9. Click the Assessment tab. This tab presents data from the Diagnoses section of the patient’s RelayClinical
Record. On this tab, enter a free-text assessment related to the patient’s visit.
You may optionally add a Diagnosis to the patient’s RelayClinical Record using the New link, if appropriate. If
the patient’s record does not currently include a Diagnoses entry, and this information is accurate, you may confirm this by clicking the ‘no known active diagnoses’ link.
10. Click the Plan tab. This tab includes a Quality of Care component, Smoking Cessation Counseling, Orders,
Prescriptions, Referrals, In-Office Procedures, Immunizations, and Surgeries data from the patient’s RelayClinical Record. This tab also includes a Clinical Summary attestation feature.
On the Plan tab, enter free-text notes in the text area at the top of the tab.
11. If your organization has licensed RelayClinical Quality Reporting, the Plan tab will include a Quality of Care
component (above). The component includes a grid of Quality of Care Measures that is specific to the patient’s
problem list, medication list, demographics, and laboratory results. Standard measure rules will be applied when
determining what measures appear for an individual patient.
You may Add Quality of Care Measure if you choose to do so or you may to exclude a patient from a measure, if appropriate. Click the Measure Title to access detail about an individual measure. For instance, you
may attest to completing care measure actions, edit measure criteria to reflect the patient’s progress, or record measure exclusions.
14
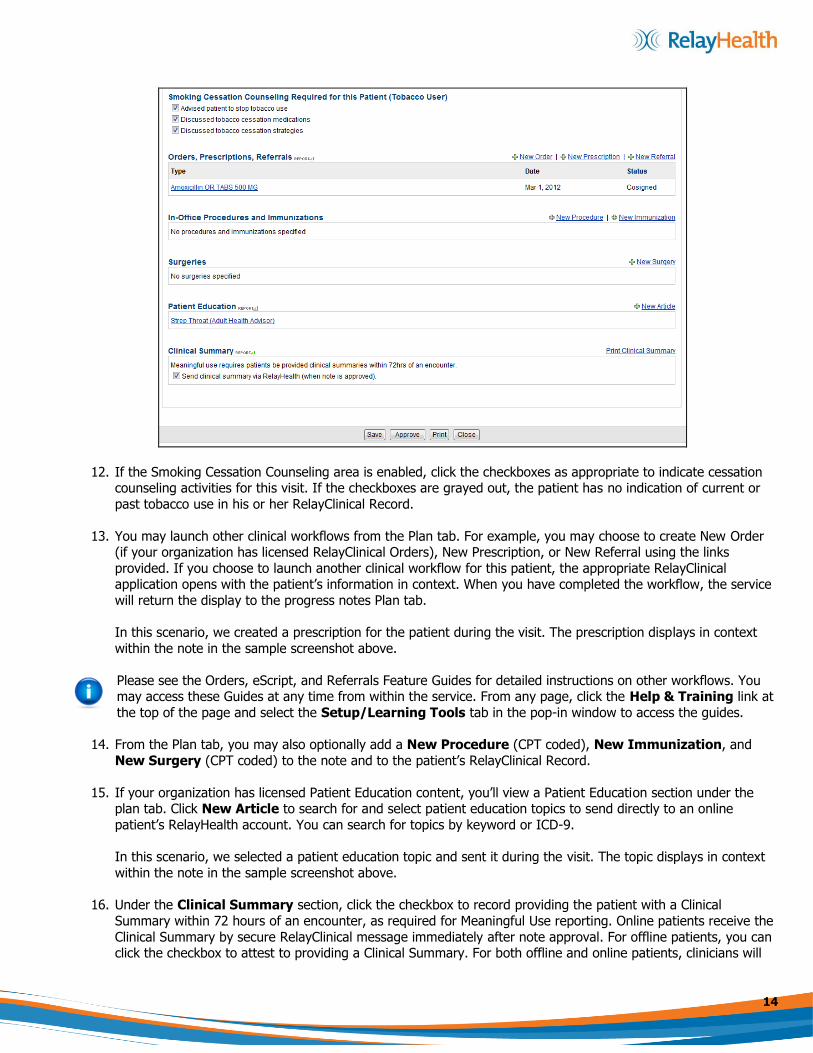
12. If the Smoking Cessation Counseling area is enabled, click the checkboxes as appropriate to indicate cessation counseling activities for this visit. If the checkboxes are grayed out, the patient has no indication of current or
past tobacco use in his or her RelayClinical Record.
13. You may launch other clinical workflows from the Plan tab. For example, you may choose to create New Order (if your organization has licensed RelayClinical Orders), New Prescription, or New Referral using the links
provided. If you choose to launch another clinical workflow for this patient, the appropriate RelayClinical application opens with the patient’s information in context. When you have completed the workflow, the service
will return the display to the progress notes Plan tab.
In this scenario, we created a prescription for the patient during the visit. The prescription displays in context
within the note in the sample screenshot above.
Please see the Orders, eScript, and Referrals Feature Guides for detailed instructions on other workflows. You may access these Guides at any time from within the service. From any page, click the Help & Training link at
the top of the page and select the Setup/Learning Tools tab in the pop-in window to access the guides.
14. From the Plan tab, you may also optionally add a New Procedure (CPT coded), New Immunization, and
New Surgery (CPT coded) to the note and to the patient’s RelayClinical Record.
15. If your organization has licensed Patient Education content, you’ll view a Patient Education section under the plan tab. Click New Article to search for and select patient education topics to send directly to an online
patient’s RelayHealth account. You can search for topics by keyword or ICD-9.
In this scenario, we selected a patient education topic and sent it during the visit. The topic displays in context
within the note in the sample screenshot above.
16. Under the Clinical Summary section, click the checkbox to record providing the patient with a Clinical
Summary within 72 hours of an encounter, as required for Meaningful Use reporting. Online patients receive the
Clinical Summary by secure RelayClinical message immediately after note approval. For offline patients, you can click the checkbox to attest to providing a Clinical Summary. For both offline and online patients, clinicians will

15
have the option to print a copy of the Clinical Summary to present to the patient during his or her visit or to send via postal mail.
17. Click Save or Approve at the top or bottom of the Progress Note form to complete the note. Only providers will view the ‘Approve’ button. Providers may Save, Approve the note immediately, Print the note, or Close the note.
Staff members will view only the ‘Save,’ ‘Print,’ and ‘Close’ buttons.

16
Creating a Progress Note Using a Template
RelayClinical Documentation includes a wide range of clinical templates to facilitate rapid encounter documentation.
These templates address the most common reasons for office visits to primary care physicians. See Appendix C: RelayClinical Documentation Templates for a full list of templates currently available in the service. To create a progress note using a template, follow the instructions below.
The process of creating a progress note using a template follows the same general procedure as Creating a Progress Note, with the following key differences:
1. After specifying the Patient Information and Visit Information for the encounter, select a template for the progress note using the Selected Template dropdown at the upper right of the Note section.
2. When you select the template you want to use, the service embeds the template’s content into the appropriate tabs (Subjective, Objective, Assessment, and Plan) automatically. For example, the service embeds History of
Present Illness, Review of Systems, etc. under the Subjective tab. The template content displays immediately
below the free-text area below each SOAP tab.
Free-text areas and all other sections displayed under each tab function exactly as they would if you had not
selected a template. See Creating a Progress Note for a detailed overview of standard SOAP tab content and functions.

17
3. To use the template’s contents, select a template sub-section link. The service expands the selected
template section. Use the dropdown list and checkbox options to complete this section of the
template. When you have completed your
selections, click OK.
Your template dropdown/checkbox selections display as a bulleted list under the section sub-heading. Edit
completed entries by clicking the underlined sub-heading to re-expand the template section. Click another sub-heading to continue adding detail to the progress note for this visit, or select another SOAP tab to complete
template entries, such as a Physical Exam section under the Objective tab.
Notes on Using Templates:
All template sections are optional. You may complete as many or as few as you wish, or as required by your
organization’s documentation policies.
To remove a template from a progress note, click on the Select Template dropdown and select ‘None.’
To change a template, click the dropdown and select a different template. The service currently supports
only one template per progress note. If you select a new template, the current template and all its content (i.e., any responses you have supplied for the template) will be deleted from the note permanently.

18
Importing a Previous Progress Note
RelayClinical Documentation provides a simple import option that providers and staff members can use to copy a
patient’s previous progress note into a new note. Using this option can save significant time when creating progress
notes for patients who have repeated visits related to the same issue. Follow the instructions below to use the import option.
The process of creating a progress note using an imported note follows the same general procedure as Creating a Progress Note, with the following key differences:
1. After specifying the Patient Information and Visit Information for the encounter, click the
Import previous note link at the bottom
of the Visit Information section.
2. The service presents a list of the patient’s previous progress notes. Hover your mouse over the magnifying glass
icon to the right of the date to view the note’s free-text SOAP content. The service displays this content to assist
you with selecting the appropriate progress note. To import a note, click the note’s Date.
3. The service presents an alert that all current progress note content will be replaced by the imported note’s
content. Click Import to continue, or click Cancel to exit the import workflow.
19
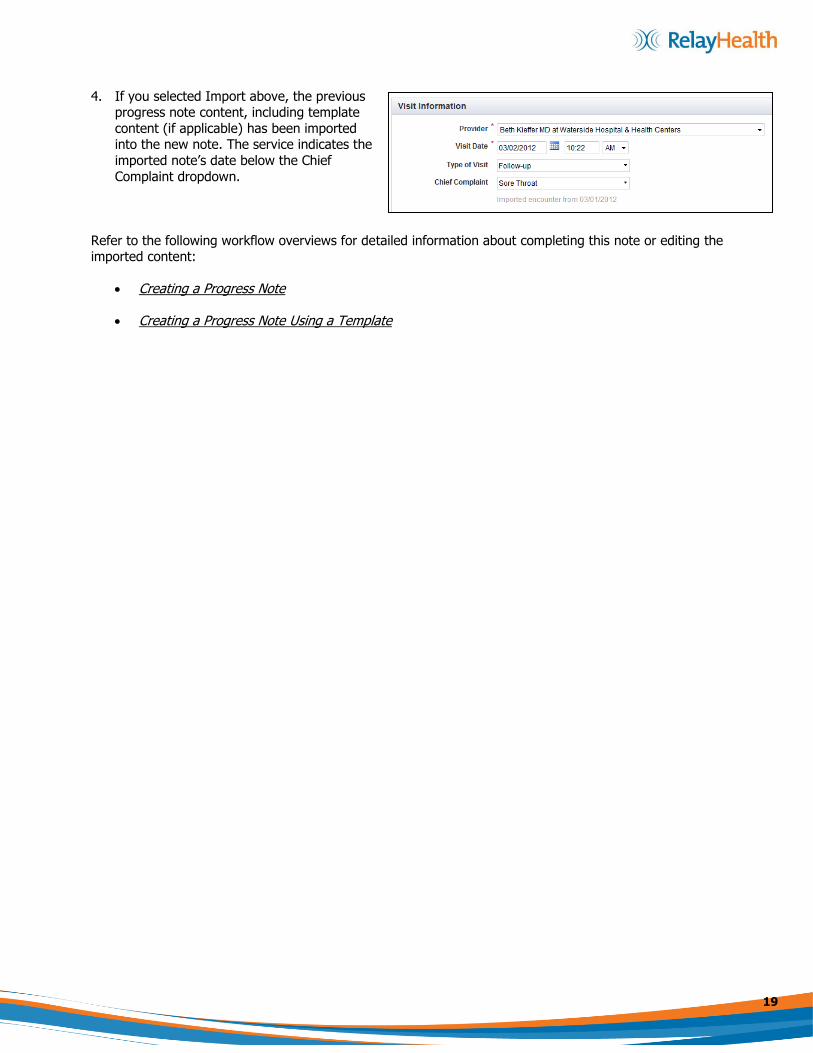
4. If you selected Import above, the previous progress note content, including template
content (if applicable) has been imported into the new note. The service indicates the
imported note’s date below the Chief
Complaint dropdown.
Refer to the following workflow overviews for detailed information about completing this note or editing the imported content:
Creating a Progress Note
Creating a Progress Note Using a Template

20
Approving a Progress Note in Draft or Overdue Status
Providers in your organization can easily filter the progress notes displayed in the Progress Note Status area to identify
notes that require their review and/or approval. Note that by default, progress notes in Draft state will change to
Overdue state after 10 calendar days. Your Practice Administrator may optionally change this default number of calendar days using the instructions specified in the Configuring Progress Note Options section of this guide.
Follow the instructions below to locate notes that require approval.
1. On the global navigation bar, click the Notes tab.
2. On the Progress Note Status page, the display defaults to the first page of the logged-in provider’s progress notes. Click the page numbers at the lower right corner of the page to view additional pages, if necessary.
3. Use the Provider, Practice, and Status dropdown options to filter the displayed list. You may also search for
progress notes by patient name. Specify your display preferences, then click View to refresh the displayed list.
4. Hover over the magnifying glass icons to review free-text note content.
5. To open a progress note in Draft or Overdue status, click the note’s date.
From the Progress Note Status page, you may also Print progress notes (in any status) or Delete progress notes in Draft or Overdue status. Place a checkmark to the left of one or more notes to enable the Print and Delete
action buttons.
6. Review all sections of the note including Patient Information and Visit Information as well as each of the Note’s
tabs (Subjective, Objective, Assessment, and Plan). You may edit or append the note according to your needs.
For instance, you may complete a prescription or referral for this patient under the Plan tab; enter additional narrative notes under the Subjective tab, or simply review the note with no edits.
21
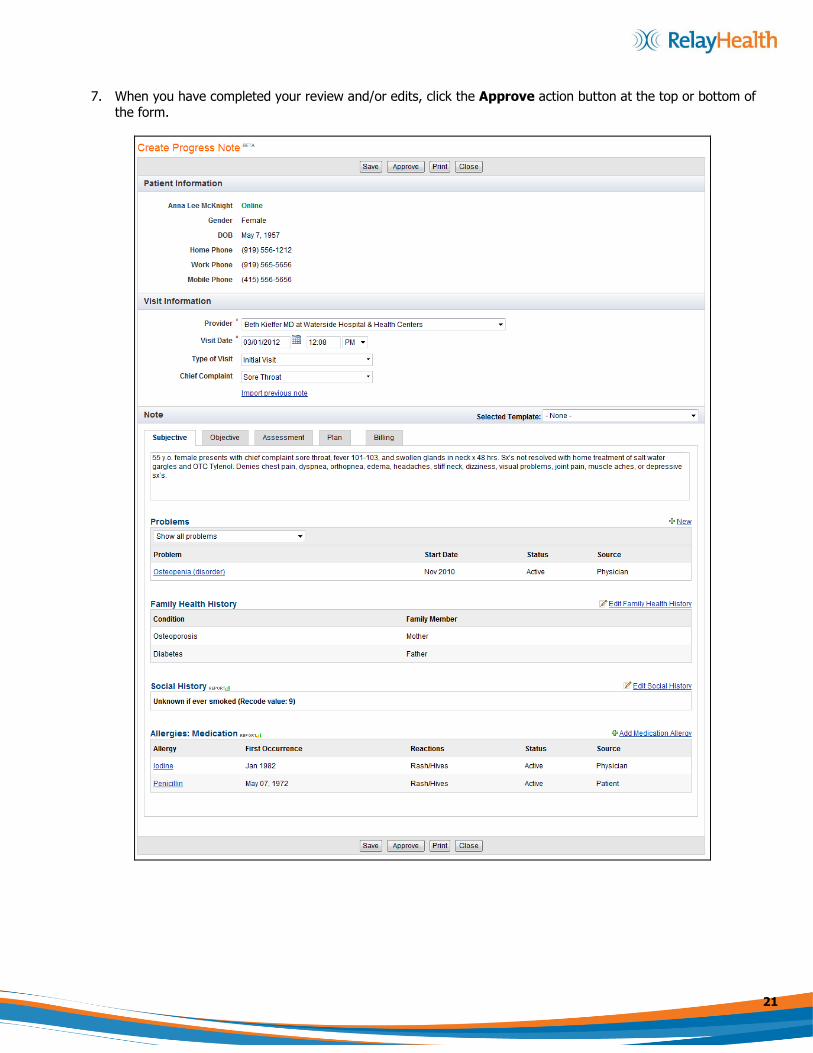
7. When you have completed your review and/or edits, click the Approve action button at the top or bottom of the form.

22
8. The Progress Note Status page displays. The note now indicates a status of ‘Approved’ and is locked to editing except for the Billing tab.
Within the note itself, the available action buttons are now Print and Close. The note identifies the approving provider as well as the date and time of electronic approval.
By default, progress notes in Approved state are locked to editing after 30 calendar days. Your Practice Administrator may optionally change this default number of calendar days using the instructions specified in the
Configuring Progress Note Options section of this guide.

23
Printing Progress Notes
The RelayClinical Documentation application provides three convenient options for printing a progress note:
1. Print from Notes Tab in the RelayClinical Record
2. Print from the Progress Note Status Page
3. Print from Displayed Note
Follow the instructions below to print progress notes for your records.
Print from Notes Tab in the RelayClinical Record
1. Search for the patient using the Global Patient Search feature. Click in the Patient Search box to view a list of
your 10 most recently accessed patients. If the patient is not on the list, enter the first few letters of the patient’s name or patient identifier into the type-ahead search box. Select the patient from the result list.
Alternatively, search for the patient on the Patients tab using the Find a Patient option. Click in the Patient
Search box to view a list of your 10 most recently accessed patients. If the patient is not on the list, enter the
first few letters of the patient’s name or patient identifier into the type-ahead search box. Select the patient from the result list.
2. The patient’s RelayClinical Record displays. On the Chart tab, click Notes on the blue secondary navigation bar.
3. To enable the Print action button, click the checkbox(es) to the left of the Progress Note(s) you would like to
print. To select all of this patient’s Progress Notes, click the checkbox to the left of the ‘Date’ header.
4. Click Print.
24
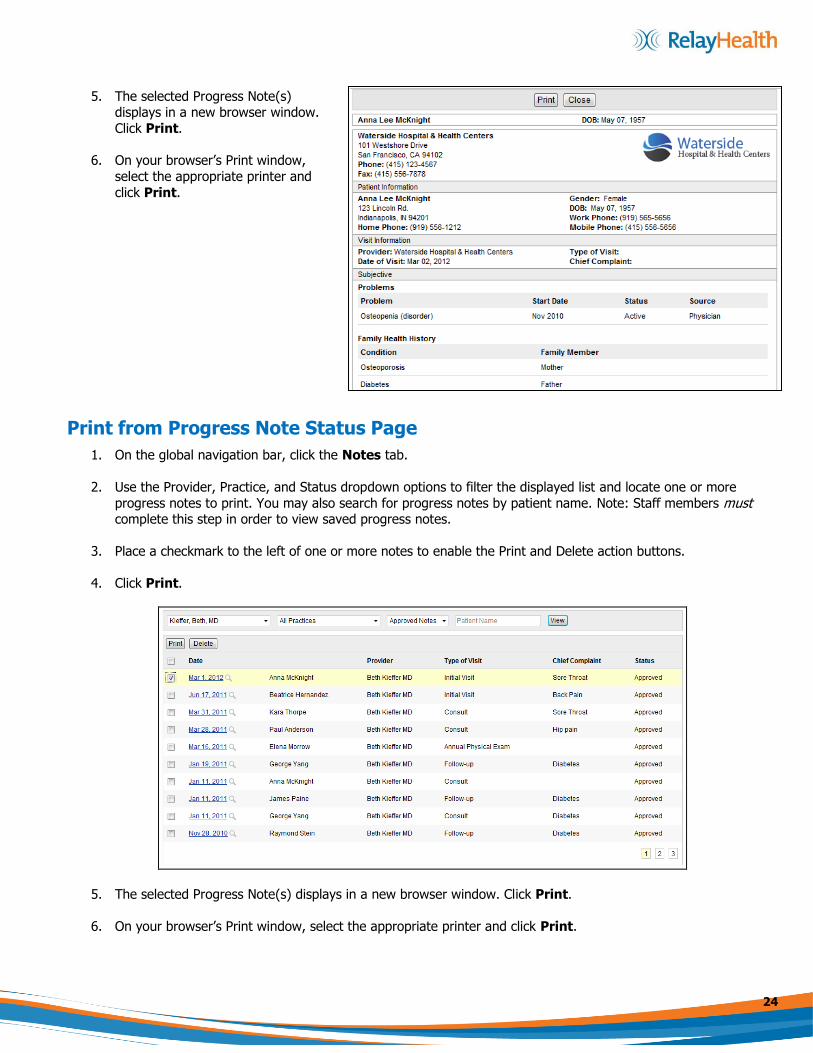
5. The selected Progress Note(s) displays in a new browser window.
Click Print.
6. On your browser’s Print window,
select the appropriate printer and
click Print.
Print from Progress Note Status Page
1. On the global navigation bar, click the Notes tab.
2. Use the Provider, Practice, and Status dropdown options to filter the displayed list and locate one or more
progress notes to print. You may also search for progress notes by patient name. Note: Staff members must complete this step in order to view saved progress notes.
3. Place a checkmark to the left of one or more notes to enable the Print and Delete action buttons.
4. Click Print.
5. The selected Progress Note(s) displays in a new browser window. Click Print.
6. On your browser’s Print window, select the appropriate printer and click Print.
25
Print from Displayed Note
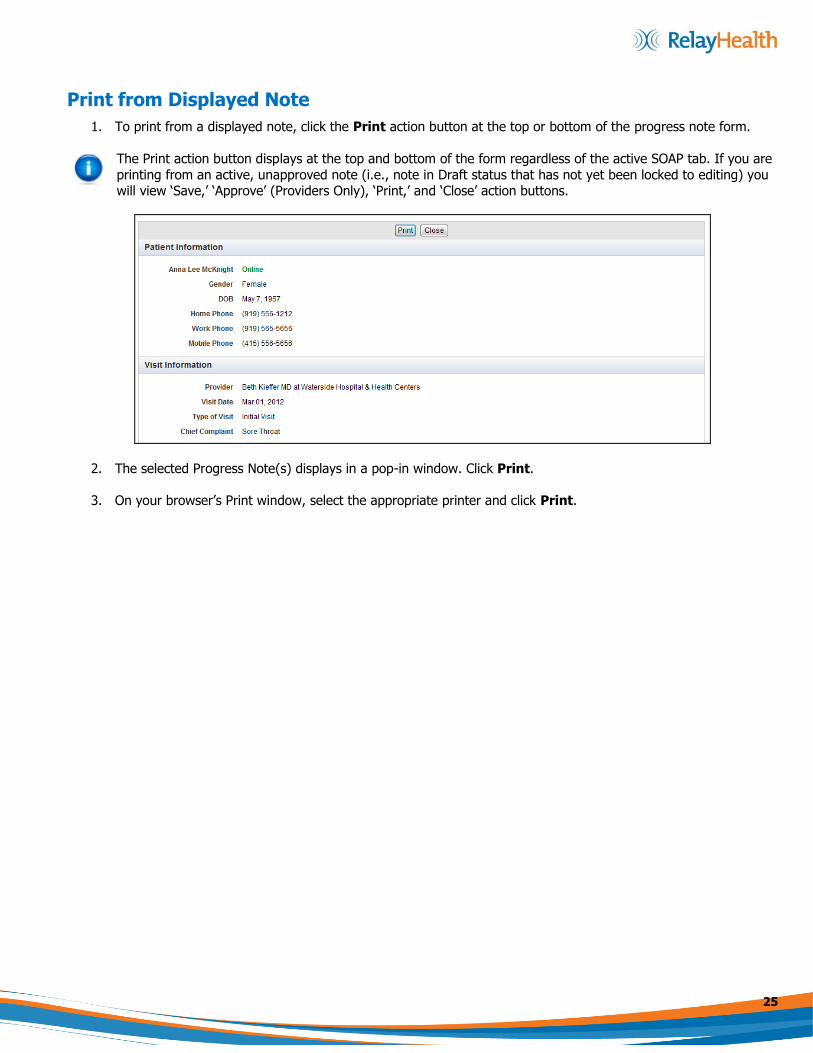
1. To print from a displayed note, click the Print action button at the top or bottom of the progress note form.
The Print action button displays at the top and bottom of the form regardless of the active SOAP tab. If you are
printing from an active, unapproved note (i.e., note in Draft status that has not yet been locked to editing) you will view ‘Save,’ ‘Approve’ (Providers Only), ‘Print,’ and ‘Close’ action buttons.
2. The selected Progress Note(s) displays in a pop-in window. Click Print.
3. On your browser’s Print window, select the appropriate printer and click Print.

26
Creating a Super Bill
The RelayClinical Documentation application provides a simple workflow that allows staff members to create Super Bills
for notes in Approved status. To create a Super Bill, follow the instructions below.
1. On the global navigation bar, click the Notes tab.
2. In the Progress Note Status area, use the Provider and Practice dropdowns to filter the display. You may also
search by Patient Name. Under Note Status dropdown, select Approved Notes. Click View.
3. Click the date of the note for which you will complete the Super Bill.
4. The approved progress note displays. Review the content and services provided during the patient encounter.
Under the Note section, click the Billing tab.

27
5. Enter the first few characters or numbers of the CPT Codes in the free-text, type-ahead search field and select the appropriate code from the result list. Alternatively, you can use the CPT Quick Pick dropdown list to select
the appropriate code for this encounter.
6. The service expands the form to display the selected CPT Code(s). If appropriate, enter a Modifier code or
description in the Modifier field and select the modifier from the result list.
7. Enter a Dx Code using the type-ahead search field. You
may search by entering the Diagnosis Code or by entering
a description. Select the appropriate code from the result list. The service requires at least one Diagnosis Code and
will allow up to eight for the entire Super Bill.
If the diagnosis is included in the patient’s RelayClinical
Record, you can select the diagnosis using the Dx Quick
Pick dropdown list instead.
8. Select a Primary Dx from the dropdown list. The list includes active Diagnosis entries from the patient’s
RelayClinical Record as well as entries included in this billing process.
9. If your organization has licensed and enabled integrated billing, under Options, click Send Super Bill to send the bill to your Practice Management/Billing system. Otherwise, click Print Super Bill to send the bill to your
local printer. See Appendix A: Sample Super Bill to review a sample Super Bill.
28
Configuring Progress Note Options
By default, unapproved progress notes created in the RelayClinical Documentation application will change status from
Draft to Overdue after 10 calendar days. Additionally, progress notes in Approved status are locked to editing by
providers and staff members after 30 calendar days. Users who have Practice Administrator privileges in the service may adjust these defaults, at the practice level, to an alternate number of calendar days using the instructions below.
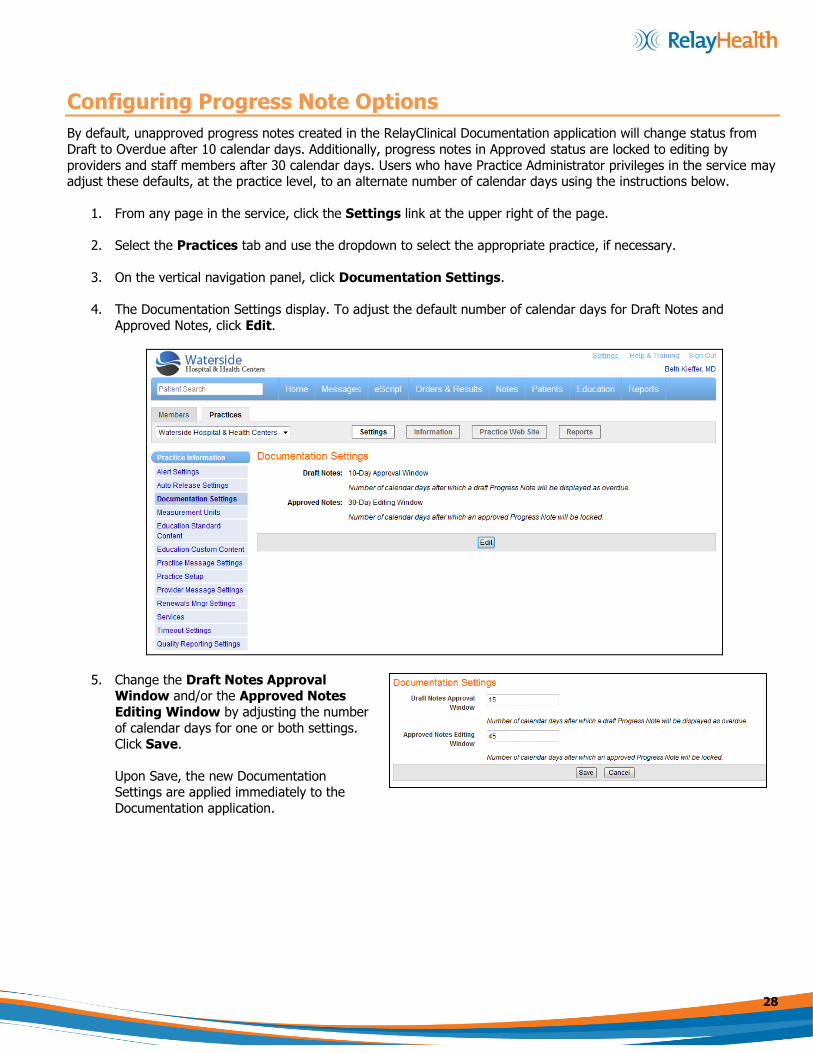
1. From any page in the service, click the Settings link at the upper right of the page.
2. Select the Practices tab and use the dropdown to select the appropriate practice, if necessary.
3. On the vertical navigation panel, click Documentation Settings.
4. The Documentation Settings display. To adjust the default number of calendar days for Draft Notes and
Approved Notes, click Edit.
5. Change the Draft Notes Approval Window and/or the Approved Notes
Editing Window by adjusting the number
of calendar days for one or both settings. Click Save.
Upon Save, the new Documentation Settings are applied immediately to the
Documentation application.

29
Appendix A: Sample Super Bill

30
Appendix B: Sample Clinical Summary

31
Appendix C: RelayClinical Documentation Templates
The templates listed below are currently available for use in the RelayClinical Documentation application. RelayHealth
continues to develop additional templates, which will be included in the service over upcoming releases.
Abdominal Pain
Allergic Rhinitis
Asthma, Adult
Asthma, Pediatric
Back Pain
Bronchitis, Adult
Chest Pain
Chronic Cough
Chronic Dyspnea
Chronic Obstructive Pulmonary Disease
Coronary Artery Disease
Depression
Diabetes, Intermediate
Ear Pain, Pediatric
Eye Problem, Acute
Gastroesophageal Reflux
General Adult, Comprehensive
General Adult, Intermediate
General Adult, Limited
General Behavioral Health
General Cardiovascular
General Child, Comprehensive
General Child, Intermediate
General Endocrinology
General Gastroenterology
General Genitourinary
General Hematology
General Infant, Intermediate
General Infant, Comprehensive
General Musculoskeletal
General Neurology
General Ophthalmology
General Otolaryngology
General Pulmonology
General Rheumatology
General Skin
General Surgery
General Urology
Headache
Heart Failure
Hyperlipidemia
Hypertension
Hyperthyroidism
Hypothyroidism
Influenza, Adult
Influenza, Pediatric
Knee Pain
Neck Pain
Osteoarthritis
Pharyngitis, Adult
Pharyngitis, Pediatric
Preoperative Evaluation
Preventive Care
Preventive Care, 18-39 Years, Female
Preventive Care 40 Yrs & Older, Female
Skin Rash
Sleep Apnea
Syncope
Upper Respiratory Infection, Adult
Upper Respiratory Infection, Pediatric
Urinary Tract Infection, Adult
Urinary Tract Infection, Pediatric
Wrist, Hand Pain
32
Appendix D: RelayClinical Documentation – FAQs
In my patient’s RelayClinical Record, I see several progress notes on the Notes page. How are the notes
organized?
If progress notes have been recorded previously for this patient, they display in reverse chronological order on the patient’s Chart Summary page under the Notes link. On this page, you can view the full list of progress notes. The
Status column indicates the note’s state (i.e., New, Draft, Approved, or Overdue). To review a previous note, click the note’s Date.
Additionally, the Chart Summary page includes a Notes module, which displays the five most recent progress notes recorded for this patient. You can click a note’s date to review a note in its entirety or click the ‘New’ link to begin a new
progress note.
Can I delete previously recorded notes?
You may optionally print or delete previously recorded notes that are in New, Draft, or Overdue states. The service will
not allow you to delete Approved notes. To enable the Print and Delete action buttons on the Notes page in the patient’s RelayClinical Record, check the box to the left of one or more progress note date(s) and click Print or Delete. The
Delete action removes a progress note from the displayed list; however, the RelayClinical service does not ever delete
data. The progress note will remain in the RelayClinical database indefinitely.
What is the maximum number of characters supported for the free-text areas under each note tab?
The service will support up to 5,000 characters in each SOAP note tab.
Can I copy a previously recorded note into a new progress note?
Yes. To simplify creating progress notes, the note creation workflow allows clinicians to create a new note by importing a progress note from a previous visit. Click the Import Previous Note link in the Visit Information section of the new
note to display a list of the patient’s new, draft, and approved notes for selection.
Can patients view progress notes in their health records?
No. When accessing their health records, patients will not view a Notes tab. However, if you make additions or edits to
the patient’s clinical data in the process of recording a progress note, the changes will appear in the patient’s view of his or her health record. For example, if you add a new medication allergy, record a new immunization, or record a new
diagnosis, these changes will be visible to the patient.
Can providers or staff members outside of my practice view a patient’s progress notes created within my practice?
Not directly within the service. Progress notes are viewable only to members of the creating practice. So if, for example, a patient’s record is linked to another provider via the Search My Entire Network workflow, neither the new provider nor
staff members in his or her practice will have access to the patient’s progress notes created in your practice. Please
note, however, the RelayClinical™ Referrals application allows providers and staff members to attach a progress note to an outgoing referral in Adobe .pdf format.
How do I remove a template or select a different template?
In order to remove a template, click on the Select Template dropdown and select “None.” To change a template, click
on the dropdown and select a different template. The service currently supports only one template per progress note. If you select a new template from the dropdown, the current template and all of its content will be deleted from the
progress note permanently.

33
How is the template list organized?
The template list is organized alphabetically into two categories: Frequently Used and All Templates. The service
recognizes an individual provider’s frequently used templates, and it will promote up to 15 templates to the top of the dropdown list under the Frequently Used heading. The Frequently Used list is followed by the All Templates list.
What is the Transition of Care feature and how is it used?
Transition of Care is an attestation feature required for ARRA Stage 1 Meaningful Use certification. This feature, which appears under a note’s ‘Objective’ tab, provides a simple checkbox noting ‘This visit was the result of a transition of care
for the patient.’ Similar to the Medication Reconciliation attestation feature, the display for the transition of care checkbox changes from red (unchecked) to green (checked) to indicate the item has been addressed.
What is the Quality of Care Measures feature and how is it used?
The Quality of Care Measures feature, which appears under the note’s ‘Plan’ tab, is a clinical decision support tool that
assists providers in tracking and managing patient specific interventions for due and overdue services. Providers can use
this component to improve patient care by addressing measures accompanied by red and yellow icons or to confirm that a patient is on track to receive scheduled care services. The feature also allows providers to attest to completing care
measure actions, edit measure criteria to reflect the patient’s progress, or record measure exclusions. Quality of Care Measures is enabled if your organization has licensed the RelayClinical Quality Reporting application.
How are measures selected for the Quality of Care Measures grid?
The Quality of Care Measures grid includes measures that are specific to the patient’s problem list, medication list, demographics, and laboratory results. The service applies standard measure rules when determining what measures
appear for an individual patient; however, providers have the option to include additional measures if they choose to do so or to exclude a patient from a measure, if appropriate.
What is the Clinical Summary and how does it work?
The Clinical Summary feature appears under a progress note’s ‘Plan’ tab and allows clinicians to record providing the
patient with a Clinical Summary within 72 hours of an encounter, as required for ARRA Stage 1 Meaningful Use. The
Clinical Summary itself includes clinical detail from the patient’s progress note (problems, allergies, medications, recent results, etc.) as well as content from the note’s Plan tab. See Appendix B: Sample Clinical Summary in this document.
Online patients receive the Clinical Summary by secure RelayClinical message immediately after note approval. For offline patients, clinicians can click a checkbox to attest to providing a Clinical Summary. For both offline and online
patients, clinicians will have the option to print a copy of the Clinical Summary to present to the patient during his or her
visit or to send via postal mail.
I don’t see the option to create an order under the Plan tab.
The RelayClinical Documentation application displays this option only if your organization has licensed RelayClinical Orders. If your organization has the Orders application enabled and you do not see this option under the Plan tab,
please speak to one of our RelayHealth Support representatives at 1-866-RELAY-ME (select option 1). However, if your
organization has not licensed Orders, please contact your Territory Director or Deployment Specialist to arrange for a demonstration and to discuss contracting options for this application.
I see a Report icon. What is it?
The Report icon, ( ) is a Meaningful Use Guidance Indicator. The indicator is intended to emphasize data entry
opportunities related to Meaningful Use reporting and appears throughout the Documentation application and in other areas of the service (e.g., Build Patient List, RelayClinical Record, etc.). Hover over the icon to learn about the specific
measure the icon highlights and the measure criteria.

34
Note that display of the icon is a practice-level configuration that can be turned on or off. If you do not see the icon, and would like to use this feature in your practice, please contact RelayHealth Support at 1-866-RELAY-ME (1-866-735-2963)
– Option 1 or contact your RelayHealth Deployment Specialist or Territory Director.