LSHTM Research Onlineresearchonline.lshtm.ac.uk/3797357/1/Worldwide... · LSHTM Research Online ... a
Catherine McGowan LONDON SCHOOL OF HYGIENE & TROPICAL MEDICINE JANUARY 2016
EpiDATA INTRODUCTION TO EpiDATA 3.1

CONTENTS
WHAT IS EpiDATA? .................................................................................................................................. 2
OPENING EPIDATA .................................................................................................................................. 2
THE EpiDATA INTERFACE ........................................................................................................................ 2
EpiDATA FILES ......................................................................................................................................... 2
CREATING AN EpiDATA FORM ................................................................................................................ 3
Before you begin ................................................................................................................................. 3
Creating a new questionnaire file ....................................................................................................... 3
Field Names ......................................................................................................................................... 3
Creating your questionnaire ............................................................................................................... 4
Previewing your questionnaire ........................................................................................................... 6
CREATING THE DATA ENTRY INTERFACE ................................................................................................ 6
Making edits to your data file ............................................................................................................. 6
DATA CHECKING ...................................................................................................................................... 6
Value Labels ........................................................................................................................................ 8
Type comment .................................................................................................................................. 10
Jumps ................................................................................................................................................ 11
Filling in skipped fields ...................................................................................................................... 12
DATA ENTRY .......................................................................................................................................... 14
Finding, deleting and undeleting records ......................................................................................... 15
DOUBLE ENTRY VALIDATION ................................................................................................................ 17
Setting up double entry .................................................................................................................... 17
Carrying out double entry ................................................................................................................. 18
Comparing your .rec files .................................................................................................................. 18
EXPORTING DATA .................................................................................................................................. 19

2
WHAT IS EpiDATA?
EpiData 3.1. Allows you to create a data collection form that you can use to enter, check, and export
your data.
OPENING EPIDATA
EpiData 3.1 can be accessed through the Novell Application Window (in the RESEARCH group) when
working at the School.
EpiDATA is not available in the Remote Desktop; however, EpiDATA is free and can be downloaded
onto personal computers from this link: www.epidata.dk.
THE EpiDATA INTERFACE
Below is the EpiDATA interface:
EpiDATA FILES
There are three types of EpiDATA files:
When you create a questionnaire in EpiDATA this is saved as a .QES file
When you create a data file and enter data into it this file is saved as a .REC file
If you decide to include data checks that check data *during* the data entry process (to reduce the
likelihood of making data entry errors) this is saved as a .CHK file.
If you make a questionnaire, enter data, and create data checks you will have three separate files. A
.QES, .REC, and a .CHK file.
All of your files should have the same file name but with different file extensions (e.g. Diabetes.QES,
Diabetes.REC, Diabetes.CHK).

3
CREATING AN EpiDATA FORM (.qes files)
There is a ‘work process’ for creating a data entry form in EpiDATA. The ‘work process’ is
represented by the ‘define data’, ‘make data file’, etc buttons on the toolbar.
Before you begin
Create an EpiDATA folder on your H: drive. It is good file management practice to put all your
EpiDATA files in the same place.
Creating a new questionnaire file
Click on DEFINE DATA at the top of the screen:
Select NEW.QES to start a new form or OPEN. QES to open an existing form. The file extension for
questionnaire files is always .QES.
Once you have opened a new file you will need to save it. Click FILE and select SAVE AS in order to
save the .QES file.
When you open a new form you will see several toolbar options below the work process tools.
Field Names
There are two field name settings in EpiDATA. You may have EpiDATA choose your field names for
you by choosing the first word in your question (e.g. ‘Onset of dizziness?’ would be automatically
given the variable name ‘Onset’). Alternately you can choose your own field names using curly
brackets (e.g. ‘Onset of {dizziness}?’ would be given the variable name ‘dizziness’).
New Open Save Print Undo Paste Preview Field pick list Code writer

4
To change the field name settings click
FILE and then OPTIONS and then select
the CREATE DATA FILE tab and choose
either FIRST WORD IN QUESTION IS FIELD
NAME or AUTOMATIC FIELD NAMES. You
may also choose the case of your field
names by selecting from the list on the
right of the CREATE DATA FILE tab.
Creating your questionnaire
When creating a questionnaire always follow conventions of good questionnaire design (e.g. avoid
complicated or overly long questions, define concepts *very* clearly, avoid jargon, avoid double-
barrelled questions, make sure the response lists include all possible choices).
Create your questionnaire in EpiDATA the way you would like it to appear on a piece of paper (even
if you are only using it for data entry).
To create your questionnaire simply begin typing your questionnaire.
You will need to enter your editable answer field *after* the question (i.e. on the same line). For
example:
INCORRECT
CORRECT
When you have finished writing your question you will need to insert a data place holder. To see a
list of the available data place holders click on the FIELD PICK LIST button at the top of the screen.
Did the patient have a confirmed negative test for Ebola?: <Y>
Did the patient have a confirmed negative test for Ebola?:
<Y>
This is the
Y/N place
holder
5
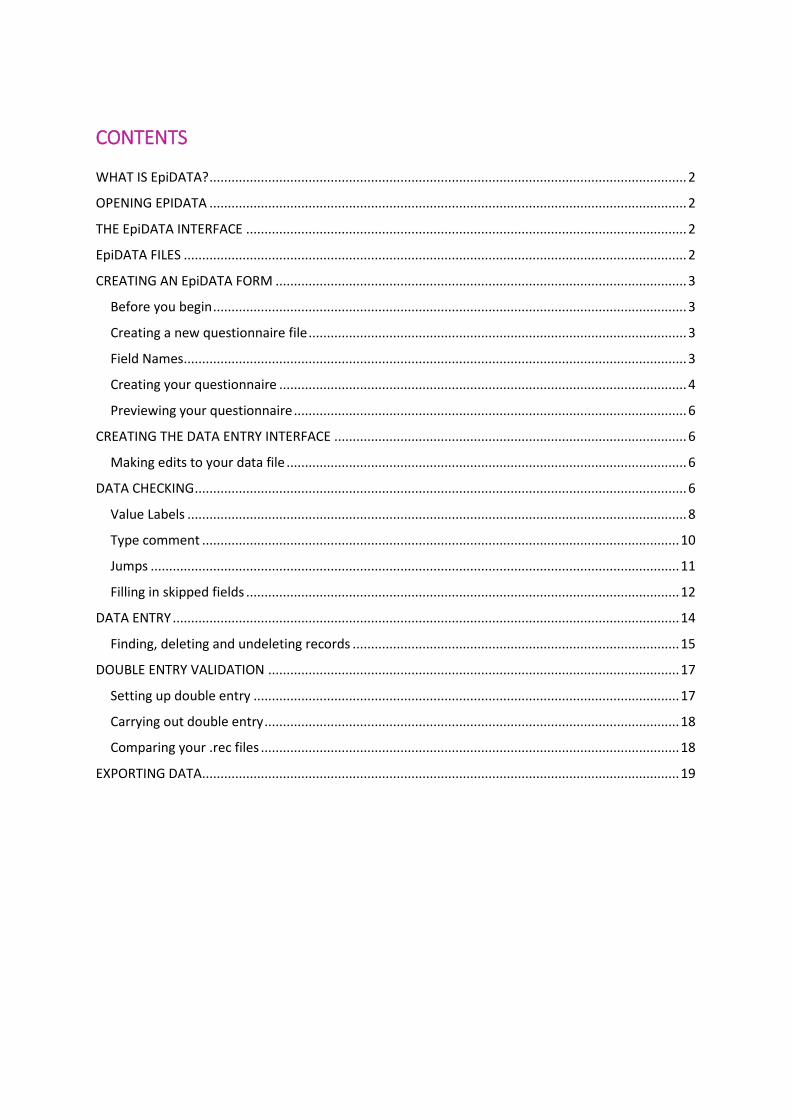
When you have reached the end of your question simply select
the type of field you wish to enter (i.e. numeric, text, date, other)
and select INSERT.
You can leave the FIELD PICK LIST box open while you complete
your questionnaire.
Below is an example of a questionnaire which has been created using AUTOMATIC FIELD NAMES (i.e.
curly brackets have been used to select the field names).
Title
The curly brackets tell
EpiDATA to name the
variable ‘patientid’.
The six hash marks are
the data place holder
for a six digit number.
These are simply
descriptors for the
above question about
final outcome. The
variable name will be
‘outcome’ and the
response must be a
single digit (the
descriptors indicate
that the response to
this question should
be either 1, 2, or 3).
This question will be
given the variable
name ‘negativeebola’
and the Boolean data
place holder (i.e. the
<Y>) indicates that
either ‘0’ or ‘N’ can be
entered here to
indicate NO, and
either ‘1’ or ‘Y’ can be
entered here to
indicate YES.
This question will be given
the variable name
‘medication1’ and the data
place holder indicated that
any text may be typed into
this field.
This question will be given
the variable name
‘dateofdischarge’ and the
data place holder indicates
that a date must be
entered here in the format
day/month/year.
6
Previewing your questionnaire
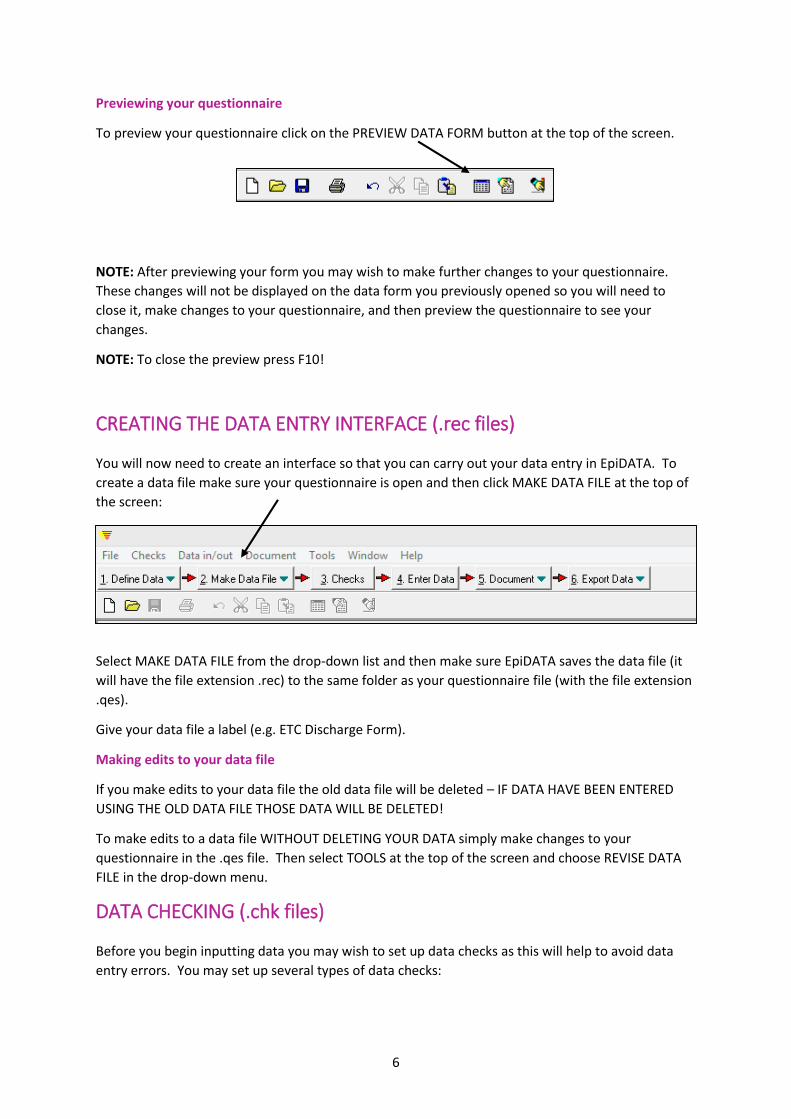
To preview your questionnaire click on the PREVIEW DATA FORM button at the top of the screen.
NOTE: After previewing your form you may wish to make further changes to your questionnaire.
These changes will not be displayed on the data form you previously opened so you will need to
close it, make changes to your questionnaire, and then preview the questionnaire to see your
changes.
NOTE: To close the preview press F10!
CREATING THE DATA ENTRY INTERFACE (.rec files)
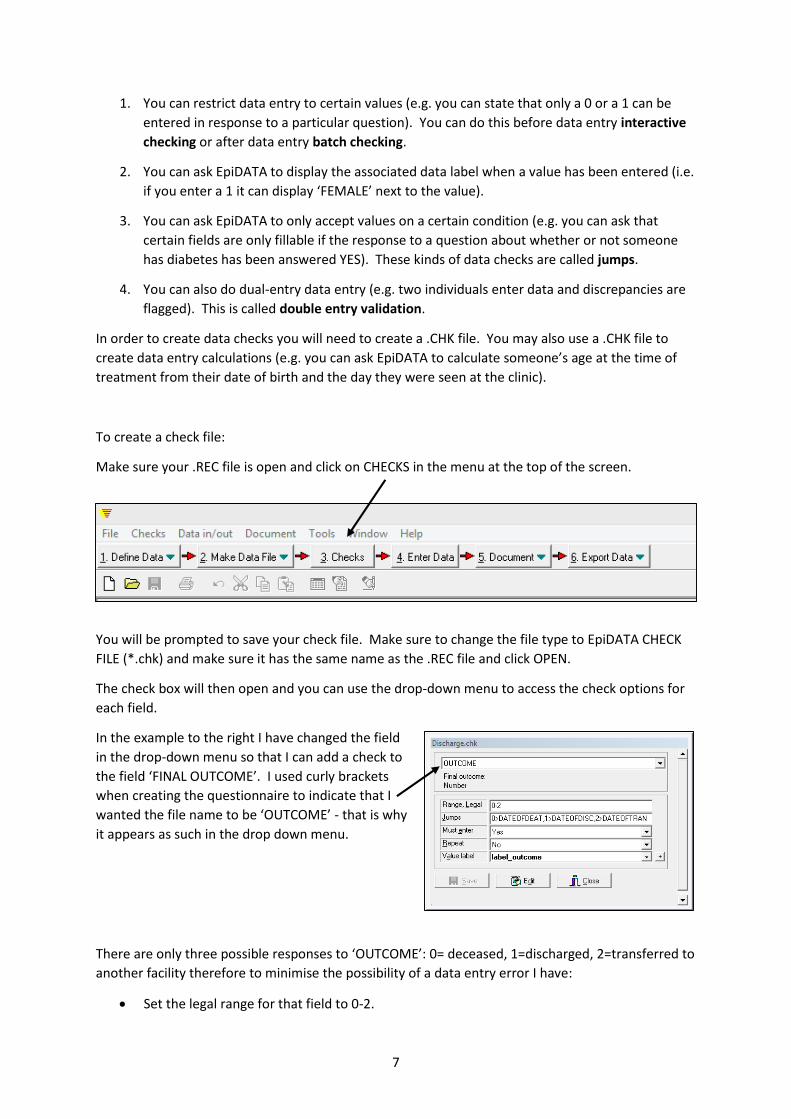
You will now need to create an interface so that you can carry out your data entry in EpiDATA. To
create a data file make sure your questionnaire is open and then click MAKE DATA FILE at the top of
the screen:
Select MAKE DATA FILE from the drop-down list and then make sure EpiDATA saves the data file (it
will have the file extension .rec) to the same folder as your questionnaire file (with the file extension
.qes).
Give your data file a label (e.g. ETC Discharge Form).
Making edits to your data file
If you make edits to your data file the old data file will be deleted – IF DATA HAVE BEEN ENTERED
USING THE OLD DATA FILE THOSE DATA WILL BE DELETED!
To make edits to a data file WITHOUT DELETING YOUR DATA simply make changes to your
questionnaire in the .qes file. Then select TOOLS at the top of the screen and choose REVISE DATA
FILE in the drop-down menu.
DATA CHECKING (.chk files)
Before you begin inputting data you may wish to set up data checks as this will help to avoid data
entry errors. You may set up several types of data checks:
7
1. You can restrict data entry to certain values (e.g. you can state that only a 0 or a 1 can be
entered in response to a particular question). You can do this before data entry interactive
checking or after data entry batch checking.
2. You can ask EpiDATA to display the associated data label when a value has been entered (i.e.
if you enter a 1 it can display ‘FEMALE’ next to the value).
3. You can ask EpiDATA to only accept values on a certain condition (e.g. you can ask that
certain fields are only fillable if the response to a question about whether or not someone
has diabetes has been answered YES). These kinds of data checks are called jumps.
4. You can also do dual-entry data entry (e.g. two individuals enter data and discrepancies are
flagged). This is called double entry validation.
In order to create data checks you will need to create a .CHK file. You may also use a .CHK file to
create data entry calculations (e.g. you can ask EpiDATA to calculate someone’s age at the time of
treatment from their date of birth and the day they were seen at the clinic).
To create a check file:
Make sure your .REC file is open and click on CHECKS in the menu at the top of the screen.
You will be prompted to save your check file. Make sure to change the file type to EpiDATA CHECK
FILE (*.chk) and make sure it has the same name as the .REC file and click OPEN.
The check box will then open and you can use the drop-down menu to access the check options for
each field.
In the example to the right I have changed the field
in the drop-down menu so that I can add a check to
the field ‘FINAL OUTCOME’. I used curly brackets
when creating the questionnaire to indicate that I
wanted the file name to be ‘OUTCOME’ - that is why
it appears as such in the drop down menu.
There are only three possible responses to ‘OUTCOME’: 0= deceased, 1=discharged, 2=transferred to
another facility therefore to minimise the possibility of a data entry error I have:
Set the legal range for that field to 0-2.

8
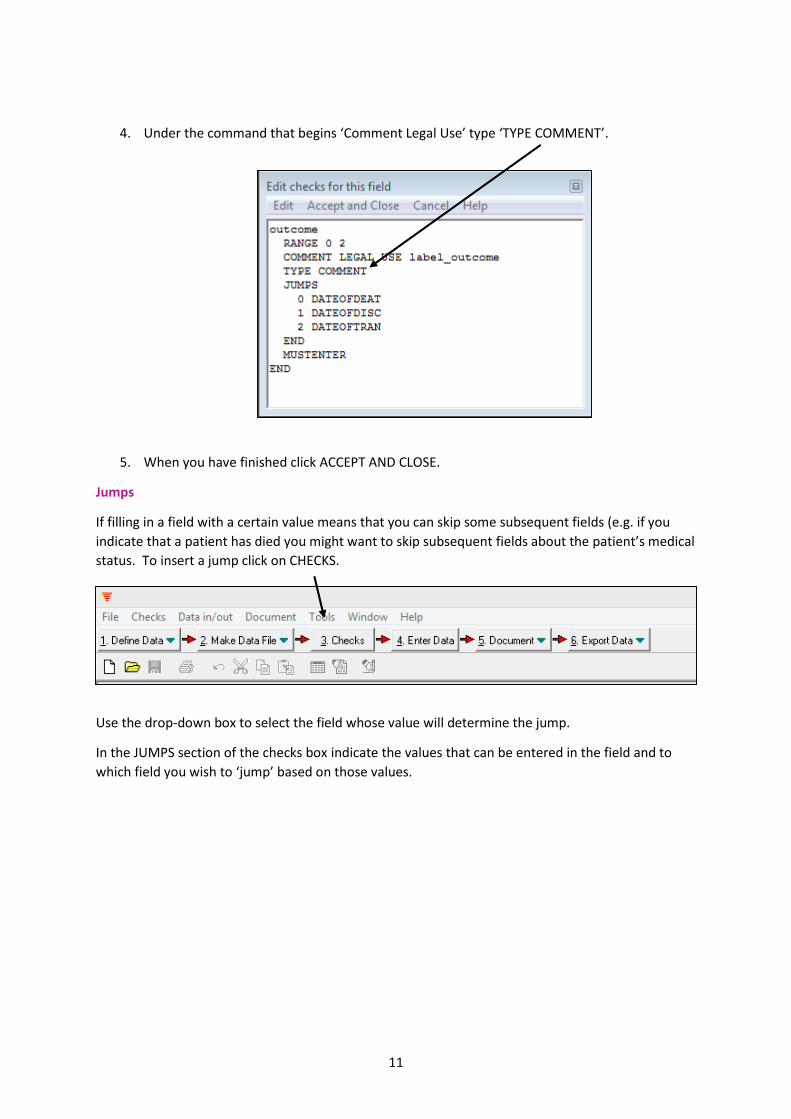
Since there are sections of the form that relate only to a certain outcome I have included jumps. So, I
have:
Told EpiData that if ‘outcome’ is 0 (i.e. the patient died) then jump to the field
DATEOFDEATH
Told EpiData that if the ‘outcome’ is 1 (i.e. the patient was discharged) then jump to the field
DATEOFDISC.
Told EpiData that if the ‘outcome’ is 2 (i.e. the patient was transferred to another facility)
then jump to the field DATEOFTRANSFER.
As this is a discharge form it is necessary to know why the individual was discharged. So, I have:
Made it so the ‘outcome’ (i.e. the reason for discharge) variable must be completed.
I have also made a value label and have applied it to this field.
Value Labels
You may wish to create value labels and apply them to your variables. If you have a field for sex
(with the value 0=male and 1=female) you will enter the data as 0 or 1 but you may wish to apply a
label so that when you export your EpiData file to a statistical package the data are already labelled
as Male or Female. You can also label your data after you have exported it.
You may also create one label that can be assigned to multiple variables. Once a label is created use
the drop down menu to apply it to other variables.
e.g. I have applied a Yes/No value label to
the variable ‘ursmoke’ which will look like
this when exported to Excel:
If I had not applied that value label the
data would have exported to Excel like
this:
To create a value label:

9
Click on CHECKS.
Click on the ‘+’ sign next to the value label drop down
box.
An Edit Value Label window will open:
By default EpiData will put the
name of the variable displayed in
your check file as the label name
(e.g. Label_patientid) but you can
delete this to change the name of
your label.
You will now need to enter the values and their labels (if your label includes a space you will need to
put the label in quotes):
When you have finished adding your labels click ACCEPT AND CLOSE.

10
Then you can assign your labels to your variables in the check window.
Type comment
If you have assigned value labels to your fields you can ask EpiData to show you the label for the
value you have entered after you have entered it using the ‘type comment’ command. This way you
can check to make sure you have entered the correct value.
e.g. When the value ‘1’ is
typed in the field ‘final
outcome’ EpiData displays the
label so that we can see that
the value that has been
entered indicates that the
patient was ‘discharged’.
To insert the ‘type comment’ command:
1. Open your checks by clicking CHECKS at the top of the screen.
2. Select the variable in the drop-down menu for which you would like EpiData to display the
label. Make sure your label has been applied in the value label box.
3. Click EDIT.
11
4. Under the command that begins ‘Comment Legal Use’ type ‘TYPE COMMENT’.
5. When you have finished click ACCEPT AND CLOSE.
Jumps
If filling in a field with a certain value means that you can skip some subsequent fields (e.g. if you
indicate that a patient has died you might want to skip subsequent fields about the patient’s medical
status. To insert a jump click on CHECKS.
Use the drop-down box to select the field whose value will determine the jump.
In the JUMPS section of the checks box indicate the values that can be entered in the field and to
which field you wish to ‘jump’ based on those values.

12
e.g. If the patient was not given
any medication on discharge
then it is unnecessary to fill in
the following four questions - it
would be quicker to skip to the
field asking about condoms.
The syntax to use the jumps box is #value#>#jump to field#. Separate commands with a comma (see
below).
e.g. if the response to the
question about whether or not
someone was given
medications on discharge is YES
then I have asked that the
cursor move to the next field
(i.e. asking about co-
amoxiclav), if the response is
NO then I have asked that the
cursor jump to the field asking
about condoms.
Filling in skipped fields
If filling in one field with a certain value means that other fields can be automatically completed then
it is faster, and potentially more accurate, to ask EpiData to auto-complete fields and then put your
cursor onto the next fillable field.

13
e.g. If I fill in ‘0’ in
response to the
question Was the
patient provided with
medication on
discharge then I would
ask EpiData to auto-
complete the following
four fields with ‘0’ and
place my cursor in the
field for Was patient
provided with condoms.
To auto-fill fields click CHECKS and then select the field that will determine if subsequent fields will
be auto-filled (e.g. ‘MEDICATION’ or Was the patient provided with medication on discharge):
Click EDIT.

14
The correct syntax for the auto-fill command is:
AFTER ENTRY
IF MEDICATION=0 THEN
COAMOXICLA=0
AMOXICILLI=0
AMODIAQUIN=0
CIPROFLOXA=0
ENDIF
END
NOTE: You will have to use a jump command if you want the cursor to appear in the field following
the last auto-filled field.
DATA ENTRY
When you have created your questionnaire and have completed your checks you may begin entering
your data. To enter your data click ENTER DATA.
Browse to your .rec file and click OPEN.
Enter your data by typing in the empty fields. Once you have entered your data the cursor will go to
the next field. If you are entering text you may have to select ENTER or TAB when you have finished
entering your text.
When you click in an empty field EpiData will show you the checks for that field at the bottom of the
screen. If you have attached value labels you can see them by clicking F9.
When no value is entered in a field this will be recognised as a missing value and will be given a ‘.’ in
the output.
When prompted to save your data click YES to save your record or click NO to make further changes.

15
Finding, deleting and undeleting records
To find a record using the record number:
1. In the ENTER DATA screen select GOTO (top left).
2. Select GOTO RECORD.
3. Enter the record number and click OK.
To find a record using specific values:
1. In the ENTER DATA screen select GOTO.
2. Select FIND RECORD.
3. In the top left cell select F4 to see a list of fields.
4. Double-click on the field you wish to search.
5. Type the search criteria in the criteria column.
6. Click OK.
EpiDATA will show you the first record that meets your search criteria. To scroll through the
remaining records that also meet your search criteria press F3.
16
To delete a record:
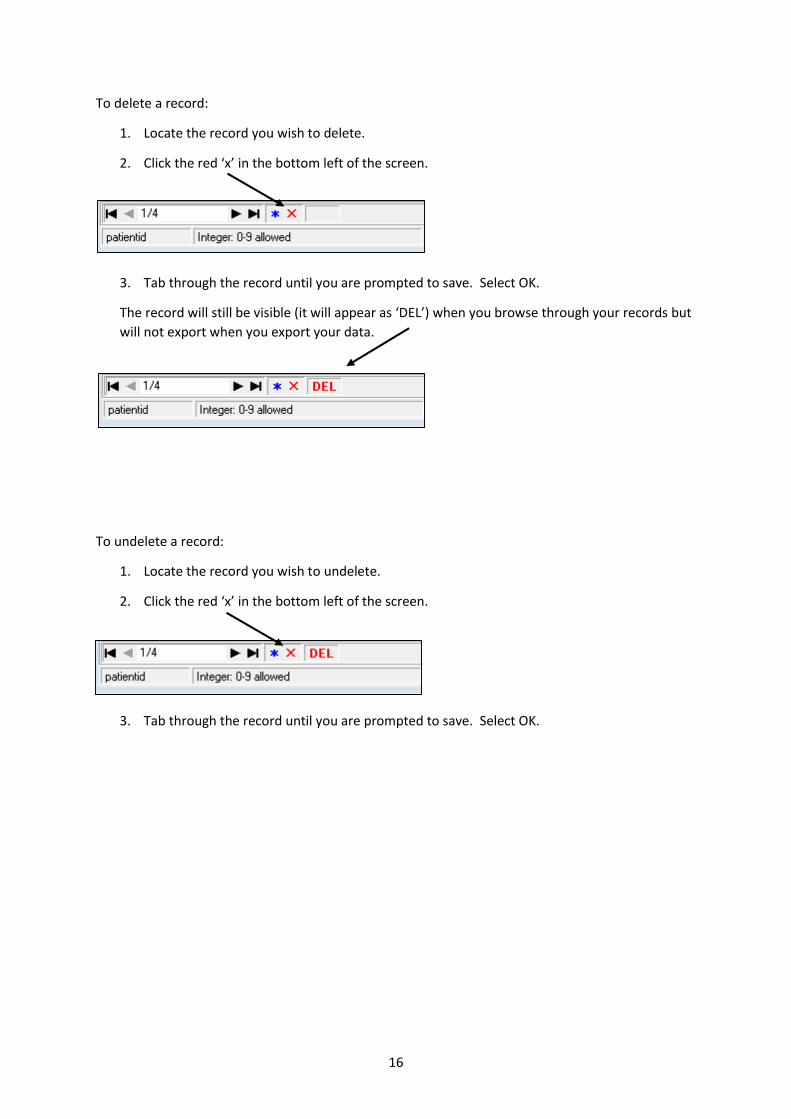
1. Locate the record you wish to delete.
2. Click the red ‘x’ in the bottom left of the screen.
3. Tab through the record until you are prompted to save. Select OK.
The record will still be visible (it will appear as ‘DEL’) when you browse through your records but
will not export when you export your data.
To undelete a record:
1. Locate the record you wish to undelete.
2. Click the red ‘x’ in the bottom left of the screen.
3. Tab through the record until you are prompted to save. Select OK.

17
DOUBLE ENTRY VALIDATION
Double entry is a good way to identify mistakes made during data entry. EpiDATA allows you to
make a copy of your .rec file, save it with a different name, enter the data a second time, and check
both files for inconsistencies.
Setting up double entry
Before you carry out double-entry you will need to create a
second .rec file and give it a different name. To create a
second .rec file:
1. Click TOOLS and select COPY
STRUCTURE.
2. Browse to the .rec file you
wish to duplicate and click OPEN.
3. Type a different file name into the end of the file path
and click OK.
Type here
Give the new
.rec file a
different name

18
Carrying out double entry
1. Click ENTER DATA and browse to
your new .rec file.
2. Enter your data a second
time (or have someone else
enter the data).
Comparing your .rec files
1. Click DOCUMENT and select VALIDATE
DUPLICATE FILES.
2. Browse to the original .rec file and then
to the second .rec file and click OK.
3. Make sure you tick the ‘primary key’
which is usually the ID number or unique
identifier for each record.
4. Click OK.
5. EpiDATA will now give you a
validation report which will
indicate the discrepancies
between the two files.
6. You will now have to go back to
the questionnaires to decide
which is the correct response
and then ensure that you make
any necessary changes to the original .rec
file before you export your data.

19
EXPORTING DATA
To export a .rec file:
1. Click EXPORT DATA.
2. Choose from the list of file formats.
3. Choose the .rec file you wish to
export and click OPEN.
4. Select the records you wish to
export (or select ALL RECORDS to
export everything) and the fields you
wish to export and select OK.