Enterprise Payment Solutions™ - Beaver...
104
Enterprise Payment Solutions™ JHA EPS SmartPay Express SM SmartPay Express for the Merchant September 2016
Transcript of Enterprise Payment Solutions™ - Beaver...

Enterprise Payment Solutions™ JHA EPS SmartPay ExpressSM
SmartPay Express for the Merchant
September 2016

Portions of this software: The MIT License (MIT) Permission is hereby granted, free of charge, to any person obtaining a copy of this software and associated documentation files (the "Software"), to deal in the Software without restriction, including without limitation the rights to use, copy, modify, merge, publish, distribute, sublicense, and/or sell copies of the Software, and to permit persons to whom the Software is furnished to do so, subject to the following conditions: The above copyright notice and this permission notice shall be included in all copies or substantial portions of the Software. THE SOFTWARE IS PROVIDED "AS IS", WITHOUT WARRANTY OF ANY KIND, EXPRESS OR IMPLIED, INCLUDING BUT NOT LIMITED TO THE WARRANTIES OF MERCHANTABILITY, FITNESS FOR A PARTICULAR PURPOSE AND NONINFRINGEMENT. IN NO EVENT SHALL THE AUTHORS OR COPYRIGHT HOLDERS BE LIABLE FOR ANY CLAIM, DAMAGES OR OTHER LIABILITY, WHETHER IN AN ACTION OF CONTRACT, TORT OR OTHERWISE, ARISING FROM, OUT OF OR IN CONNECTION WITH THE SOFTWARE OR THE USE OR OTHER DEALINGS IN THE SOFTWARE. AlaSQL ------ Copyright (c) 2014-2015 Andrey Gershun ([email protected]) & Mathias Rangel Wulff ([email protected]) Angular UI-Router ----------------- Copyright (c) 2013-2015 The AngularUI Team, Karsten Sperling AngularJS --------- Copyright (c) 2010-2015 Google, Inc. http://angularjs.org AngularJS UI Bootstrap ---------------------- Copyright (c) 2012-2015 the AngularUI Team angular-deferred-bootstrap -------------------------- Copyright (c) 2014 philippd angular-file-upload ------------------- Copyright (c) 2013 danialfarid angular-growl ------------- Copyright (c) 2013 Marco Rinck angular-idle ------------ Copyright (c) 2013 Mike Grabski angular-mask ------------ Copyright (c) 2014 Igor Rafael angular-translate ----------------- Copyright (c) <2014> <[email protected]> angular-zeroclipboard --------------------- Copyright (C) 2014 lisposter(Leigh Zhu) angularUtils ------------ Copyright (c) 2014 Michael Bromley Bootstrap --------- Copyright (c) 2011-2015 Twitter, Inc jasmine.js ---------- Copyright (c) 2008-2014 Pivotal Labs jQuery ------ jQuery Foundation, Inc. and other contributors Json.NET -------- Copyright (c) 2007 James Newton-King Mordernizr ----------

Generic MIT License Moment.js --------- Copyright (c) 2011-2015 Tim Wood, Iskren Chernev, Moment.js contributors Unity.MVC5 ---------- Copyright (c) 2013 FeedbackHound ui-grid ------- Copyright (c) 2012-2015 the AngularUI Team ZeroClipboard ------------- Copyright (c) 2009-2014 Jon Rohan, James M. Greene Apache License Licensed under the Apache License, Version 2.0 (the "License"); you may not use this file except in compliance with the License. You may obtain a copy of the License at http://www.apache.org/licenses/LICENSE-2.0 Unless required by applicable law or agreed to in writing, software distributed under the License is distributed on an "AS IS" BASIS, WITHOUT WARRANTIES OR CONDITIONS OF ANY KIND, either express or implied. See the License for the specific language governing permissions and limitations under the License. dotless ------- Copyright (c) 2009-2010 dotless project, http://www.dotlesscss.com unity ----- Generic Apache License, Version 2.0 Microsoft EULA -------------- Microsoft ASP.NET Identity Core Microsoft ASP.NET MVC Microsoft ASP.NET Razor Microsoft ASP.NET Web Optimization Framework Microsoft ASP.NET Web Pages Microsoft Token Validation Extension for Microsoft .Net Framework 4.5 Microsoft.Web.Infrastructure WebGrease NUnit License ------------- Copyright © 2002-2015 Charlie Poole Copyright © 2002-2004 James W. Newkirk, Michael C. Two, Alexei A. Vorontsov Copyright © 2000-2002 Philip A. Craig

© 1999-2016 Jack Henry & Associates, Inc.® i September 2016
SmartPay Express for the Merchant
Contents
Introduction ................................................................................................................................ 1
Workflow ........................................................................................................................ 2
Using SPE with Remote Deposit Complete and Remote Deposit Scan .......................... 3
Routes of Access ........................................................................................................... 3
System Requirements .................................................................................................... 3
Trusted Sites ....................................................................................................... 4
User Terminology ........................................................................................................... 7
Additional Resources ...................................................................................................... 8
The Admin: Overview ................................................................................................................. 9
Session Timeout Warning............................................................................................... 9
Logging In ...................................................................................................................... 9
Creating a Secret Question ................................................................................10
Choosing an Identification Phrase ......................................................................11
SPE User Management .................................................................................................12
Adding an SPE User ..........................................................................................12
Unlocking a User Account ..................................................................................13
Resetting a Password ........................................................................................13
Disabling a User Profile......................................................................................14
Deleting a User Profile .......................................................................................15
Listing Deleted Profiles ......................................................................................16
The SPE User Admin: Overview ...............................................................................................17
Working with Your SmartPay Express Users in SmartPay Business .............................17
Accepting the Master Service Agreement for Visa Checkout .........................................20
SmartPay Express for the Merchant User .................................................................................23
Session Timeout Warning..............................................................................................23
Logging In .....................................................................................................................23

© 1999-2016 Jack Henry & Associates, Inc.® ii September 2016
SmartPay Express for the Merchant
Creating a Secret Question ................................................................................24
Choosing an Identification Phrase ......................................................................25
Reporting Tools .............................................................................................................26
Creating a Transaction Status Report ................................................................27
Voiding a Transaction ........................................................................................29
Using the Report Builder Utility ..........................................................................29
Recurring Payment Reports ...............................................................................34
Creating the Credits and Debits to your Merchant Settlement Account Report ...39
Viewing PayPal and PayNearMe Transactions in SmartPay Business ...............43
Viewing Visa Checkout Transactions .................................................................45
Editing SPE Transactions ..............................................................................................46
Editing Customer Information ........................................................................................50
Viewing Customer Account Information and Payment Settings ..........................52
Searching for Transaction Information ...............................................................54
SmartPay Express: Overview ....................................................................................................56
System Requirements ...................................................................................................56
Session Timeout Warning ..................................................................................56
Making a One-Time (Quick Pay) Payment .....................................................................57
Making a One-Time Payment with PayPal .....................................................................63
Making a One-Time Payment with PayNearMe .............................................................66
Making a One-Time Payment with Visa Checkout .........................................................69
User Registration with SPE .......................................................................................................74
Resetting Your Password ...................................................................................76
Regaining Access If You Are Locked Out ..........................................................78
Updating Your Profile ....................................................................................................78
Adding a Payment Option ..................................................................................81
Deleting a Payment Option ................................................................................83
Making a Single Payment ..............................................................................................83
Maintaining Recurring Payments .......................................................................90

© 1999-2016 Jack Henry & Associates, Inc.® iii September 2016
SmartPay Express for the Merchant
Viewing Payment History ...................................................................................90
Creating a Single Payment with Pay Pal ........................................................................92
Reports .....................................................................................................................................95
Viewing and Editing Scheduled Payments .........................................................95
Creating a Transaction History Report ...............................................................96

© 1999-2016 Jack Henry & Associates, Inc.® 1 September 2016
SmartPay Express for the Merchant
Introduction SmartPay Express (SPE) is an application that allows your clients/customers, or tenants (referred to here as end users) to make checking account and/or credit card (if applicable) payments or donations online. The Admin user in your organization has the ability to create additional user profiles in order to help you manage these payments/donations from end users. Transactions from end users on your SPE payments site will flow into the payments system in JHA EPS SmartPay BusinessSM for you to manage on a day-to-day basis. Based on the privileges and roles provided to them, users within your organization can perform end user management tasks. This includes the ability to manage account information, transactions, and reporting. The ability to view, print, and export a list of end users is also available. Depending on your established settings, there are several payment methods available within the application.
Payment Method in SPE Description
Quick Pay A one-time payment from end users that does not require registration and does not maintain any contact, account, or password information. End users will have the option to register in the system if they wish, but registration is not required.
Single Payment A payment by a registered end user to a specific account/location.
Recurring Payment Similar to a payment plan, a registered end user can set up regularly scheduled payments, for the same amount, to be deducted from the end user’s account.
NOTE: The single and recurring payment options require end users to register and maintain contact and account information with the SPE site. This information includes an email address, password, and secret (security) question in case an end user forgets the password. Registration will also grant end users access to both historical and future scheduled (if applicable) payment reports.
End users can submit transactions using PayPal®, PayNearMe™, and Visa Checkout ® in addition to the services within SPE.
Payment Services Description
PayPal This option allows an end user to make payments using a PayPal account. End users will initiate a payment and be navigated to the PayPal site, where they confirm account information, confirm payment information, and are navigated back to the SPE site.

© 1999-2016 Jack Henry & Associates, Inc.® 2 September 2016
SmartPay Express for the Merchant
Payment Services Description
PayNearMe This option allows an end user to initiate a cash payment with PayNearMe. End users will use this option to specify payment information and a location where cash funds for the payment can be rendered. End users print a system-generated voucher and submit this voucher with the cash funds to the specified location.
Visa Checkout This option allows customers to select Visa Checkout on the SPE site to pay using a payment method they have stored in their Visa Checkout account.
Workflow The following figure demonstrates how the users and components of SPE work together. Admins, SPE User Admins, and SPE users within the organization who in turn help manage SPE end users (customers/clients) wishing to make payments/donations to the merchant/member organization.
FIGURE 1 - SPE WORKFLOW

© 1999-2016 Jack Henry & Associates, Inc.® 3 September 2016
SmartPay Express for the Merchant
Using SPE with Remote Deposit Complete and Remote Deposit Scan SPE is an application that can be joined with the Remote Deposit Complete™ (RDC) and/or Remote Deposit Scan™ (RDS) payments solutions. If you have SPE with RDC or RDS, you have a variety of functionality available, including:
• Editing customer/end user records.
• Editing customer/end user transactions.
• Listing and viewing transactions made with SPE in SmartPay Business.
DISCLAIMER: The ability to edit customer records and transactions created in SPE is provided through the Accounting role, which is created by default when adding SPE to RDC or RDS. The Accounting role can be found under the Customer Services privilege and must be assigned to users within your organization in order to edit SPE transactions. It is the responsibility of the merchant to obtain and retain the appropriate authorizations from SPE customers before saving changes to approved transactions.
For more information on all the additional features available to you with SPE and RDC/RDS, including reporting capabilities, please refer to the Remote Deposit Complete Handbook or Remote Deposit Scan Handbook.
Routes of Access For SPE, there are two main routes of access to the system, each providing different functions according to which user is accessing the system and what responsibilities a user has. The following is a brief description of the ways to access the system, and who typically uses each route.
• SmartPay Business: Admins use this portal to set up employees within your organization (referred to as SPE users) using the application and to assign them privileges and roles for specific tasks. SPE users access this portal to generate reports about end user transactions and to view transaction histories.
• SmartPay Express URL: A custom-branded URL you will need to provide to your end users, who navigate to this URL to make payments/donations. Your financial institution can also give this URL to you.
System Requirements In addition to a high-speed Internet connection, the application runs optimally on certain Internet browsers. The following browsers have been certified for SPE use. SmartPay Express URL:
© 1999-2016 Jack Henry & Associates, Inc.® 4 September 2016
SmartPay Express for the Merchant
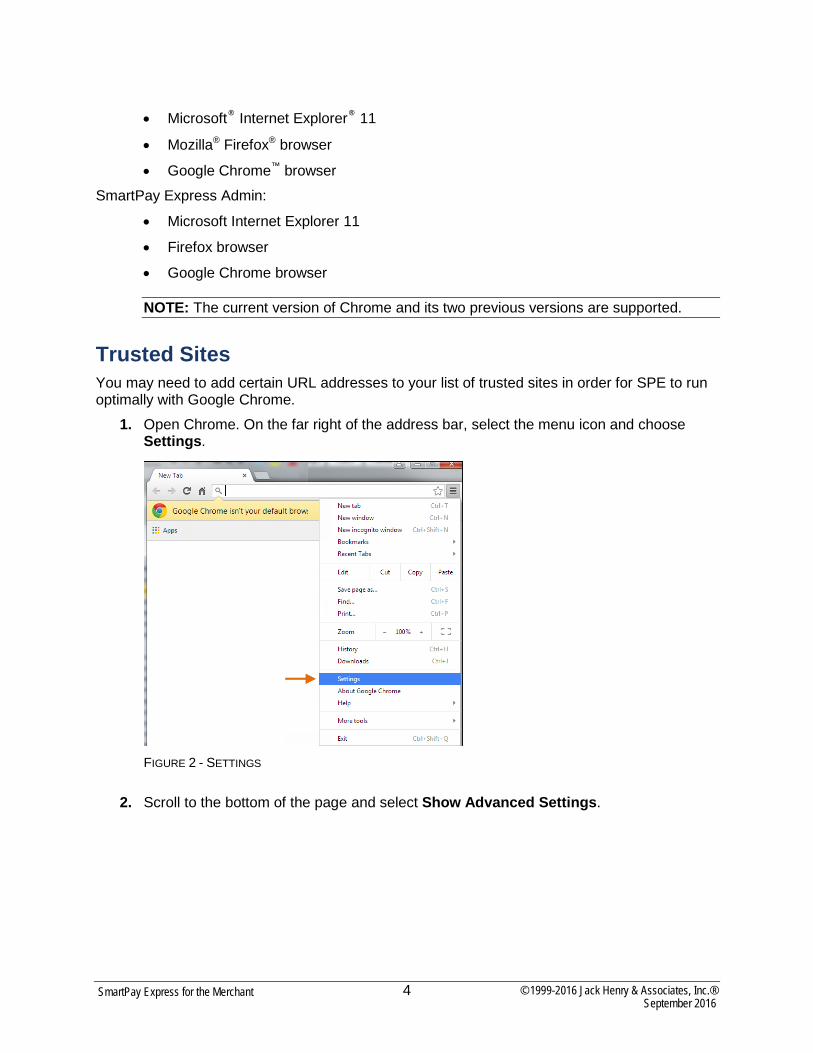
• Microsoft® Internet Explorer® 11
• Mozilla® Firefox® browser
• Google Chrome™ browser SmartPay Express Admin:
• Microsoft Internet Explorer 11
• Firefox browser
• Google Chrome browser
NOTE: The current version of Chrome and its two previous versions are supported.
Trusted Sites You may need to add certain URL addresses to your list of trusted sites in order for SPE to run optimally with Google Chrome.
1. Open Chrome. On the far right of the address bar, select the menu icon and choose Settings.
FIGURE 2 - SETTINGS
2. Scroll to the bottom of the page and select Show Advanced Settings.

© 1999-2016 Jack Henry & Associates, Inc.® 5 September 2016
SmartPay Express for the Merchant
FIGURE 3 - SHOW ADVANCED SETTINGS
3. Under the Network heading, select Change proxy settings.
4. From the Internet Properties window, under the Security tab, select the Trust Sites icon
to highlight it. Select the Sites option.

© 1999-2016 Jack Henry & Associates, Inc.® 6 September 2016
SmartPay Express for the Merchant
FIGURE 4 - TRUSTED SITES, SITES OPTIONS
5. In the Trusted Sites window, enter the URL https://smartpay.profitstars.com/express.admin and select Add.
a. Enter the URL for SmartPay Business and select Add.
FIGURE 5 - TRUSTED SITES URL
6. From the Trusted Sites window, select Close.

© 1999-2016 Jack Henry & Associates, Inc.® 7 September 2016
SmartPay Express for the Merchant
7. From the Internet Properties window, select OK.
User Terminology Throughout this document, the text will refer to certain parties and their responsibilities using the SPE application. The following terms will help define all the parties involved and the roles they play in relation to the SPE application.
• Admin User – A user profile with complete administrative responsibility to manage SPE User Admins and SPE users. An Admin will be able to perform the following tasks: create, delete, enable, or disable additional SPE User Admins and SPE users within your organization.
• SPE User Admin – A user profile within your organization with limited administrative responsibility meant for assisting additional users within your organization as well as end users. The Admin (see above) in your organization will need to assign the SPE User Admin role to a user’s profile in order to perform the following tasks.
• List all SPE end users; print and/or save (export) a list of SPE end users
• Reset an end user’s password and provide a temporary one
• Generate transaction and event reports (current and historical)
• Research transactions (current and historical)
• Void transactions
• Contact support (if applicable) Please see the section, “Assigning an SPE User Admin,” for more information.
NOTE: Your Admin will need to assign the SPE User Admin role to a user’s profile. Please see the section “Assigning an SPE User Admin” for more information. If you do not have access to this role, please send a request to your financial institution for the role to be enabled for your user profile.
• SPE User – A user profile within your organization with the ability to support SPE end users. An SPE user within your organization will be able to perform the following.
• Generate transaction reports (current and historical)
• Research transactions (current and historical)
• Generate a list of recurring payments, whether historical, current, or deactivated
• Void transactions
• Edit and/or disable recurring payments
• Generate a Credits and Debits to Your Merchant Settlement Account report
• Contact support (if applicable)
© 1999-2016 Jack Henry & Associates, Inc.® 8 September 2016
SmartPay Express for the Merchant
• End User – Your customers have the ability to make a payment/donation in a single occurrence or set up multiple payments/donations for future dates. End users are capable of the following.
• Make payments/donations as a one-time payment without registering in the system (Quick pay).
• Make a single payment/donation or schedule recurring payments/donations as a registered user. Create an account for checking account payments and/or credit card payments.
• List all accounts under the end user profile, which are available for export.
Additional Resources A section entitled “SmartPay Express: Overview” is available at the end of this document as supplemental material directed toward SPE end users, should you choose to provide it. It features directions on how to log in, make payments/donations, and create reports.
• PayPal support – 855-477-5689
• PayNearMe support – 888-714-0004
• Visa Checkout support – 800-847-2911

© 1999-2016 Jack Henry & Associates, Inc.® 9 September 2016
SmartPay Express for the Merchant
The Admin: Overview As the Admin, you have the responsibility to support users within your organization (referred to here as SPE users) as well as the capability of supporting your SPE end users. You will be provided with a URL address to SmartPay Business, as well as the URL to the SPE site, which you will provide to end users for them to make payments/donations. The following sections outline how to log in and set up SPE users within your organization.
Session Timeout Warning The system will automatically log users off who have been inactive for 30 minutes. A Session Timeout Warning page appears two minutes before a user is logged out and provides an opportunity to remain logged in. Select anywhere in the application to remain logged in.
FIGURE 6 - SESSION TIMEOUT WARNING
NOTE: Your menu options may differ slightly from those pictured throughout this document.
Logging In Once provided with your URL address, a user name, a temporary password, and the company name, you are ready to log in to the system. Save the URL to your favorites, as it is a route of access to the system.
1. Once at the provided URL address, complete the User Name, Password, and Company fields. Select Login.
2. The system will prompt you to change your password. Passwords expire every 90 days and are case-sensitive. Use the following guidelines when creating a new password:
• At least 1 uppercase letter
• At least 1 lowercase letter

© 1999-2016 Jack Henry & Associates, Inc.® 10 September 2016
SmartPay Express for the Merchant
• At least 1 number
• 8-15 characters long 3. Select Update Password.
Creating a Secret Question A secret question is a tool used when you forget your password and can have another temporary password generated and sent to an email address. Without an email address in a user’s profile, that user will not be able to answer a secret question for a new password for access into the system. The merchant admin will need to manually edit/enter an email address for each merchant user, so that the merchant user has the option to request a new password by answering a secret question in the application. Secret questions do not need to be a complete question or contain a question mark. Secret questions and answer are not case-sensitive fields. Once an admin has entered an email address for the merchant user profile, use the following steps to configure the secret question that will be asked of the user, before a new password can be generated and sent to the applicable email address. If the secret question is answered correctly, you will receive an email with a new temporary password.
NOTE: Single-sign on users will not need to establish a secret question.
1. Log in to the application, and select the user menu | My Settings, as shown below.
FIGURE 7 - MY SETTINGS
2. The system will prompt you for your current login password in order to reach the My Settings page. Once there, make changes to the Change Password, Secret Question, and/or Authorized Caller sections, as needed. Select Update when finished.

© 1999-2016 Jack Henry & Associates, Inc.® 11 September 2016
SmartPay Express for the Merchant
FIGURE 8 - MY SETTINGS PAGE
Choosing an Identification Phrase The EPS Support team answers questions about EPS products in the event you need additional help with an application. EPS takes support-related calls from users who have been designated as an authorized caller by the Admin user. If you have been designated as an authorized caller, you will need to set up an identification phrase and answer to verify your status when calling EPS Support for assistance. Authorized callers: For specific questions about an application, please contact our support team at 877-542-2244 or at [email protected]
NOTE: Non-authorized callers who contact EPS Support will be referred back to their first line of support.
1. Log in to the application, and select the user menu | My Settings. 2. The system will prompt you for your current login password in order to reach the My
Settings page. Make changes to the Identification Phrase sections, as needed. 3. Type the answer to the question in the Enter New Identification Response field, and
again in the Confirm New Identification Response field. EPS Support will verify this answer when you call. From this page, you can also make changes to your password or secret question and answer if needed.
4. Select Update when finished.

© 1999-2016 Jack Henry & Associates, Inc.® 12 September 2016
SmartPay Express for the Merchant
SPE User Management The Admin is responsible for creating user profiles for those completing tasks within your organization. The Admin is also responsible for updating those profiles, providing new passwords, unlocking users in the event they become locked out of the system, and deleting a user’s profile, if necessary.
NOTE: You may decide to create an SPE User Admin to help you manage other SPE users within your organization. To do so, you must first create an SPE user and assign the SPE User Admin role to that profile.
Adding an SPE User 1. Log in to the system, and select Admin | Users from the left main menu. 2. Select Add User and then choose Business User.
FIGURE 9 - ADD USER OPTION
3. Fill out the Add User Settings and the Privileges for this User sections. Note that a Temporary Password is displayed at the bottom of the page—provide this password to the user you are creating.
a. Select the Authorized Caller check box if this FI user will contact EPS for support, if necessary. Once enabled, the user will then be required to establish an Authorized Caller Identification Phrase that will be used by the EPS Customer Support representative to verify that the user is authorized before providing support. Callers who are not able to answer their identification phrase, or are not an authorized user will be directed to their financial institution for further assistance.
b. Under Privileges for this User, select the Customer Services privilege for this user to access information in the SPE application.
c. If this user will be working with branding and permission settings, payment services settings, or account validation, select the SmartPay Express privilege.
4. Select Update from the bottom of the page. 5. The roles within each of the privileges you selected appear. The Locations for this User
section also appears. Select the appropriate role(s) under each privilege.
© 1999-2016 Jack Henry & Associates, Inc.® 13 September 2016
SmartPay Express for the Merchant
a. For example, enable the Accounting role under the Customer Services privilege and the SPE User Admin role under the SmartPay Express privilege by selecting the check box next to each.
NOTE: As the SPB Admin, you may determine which of your users will have the role of SPE User Admin. The SPE User Admin can reset end user passwords, generate reports, edit or disable recurring payments, and view transaction details. Additionally, this role also allows the management of additional SPE users within your organization, including editing user profile information (including privileges/roles), deleting a profile, changing passwords, and unlocking profiles. The SPE User Admin role is available to assign to a user’s profile. You may also remove the role from a profile, if needed.
b. Select the check boxes next to each Location (account) this user will need to access. 6. Select Update from the bottom of the page. This user’s profile is now equipped with
privileges and roles.
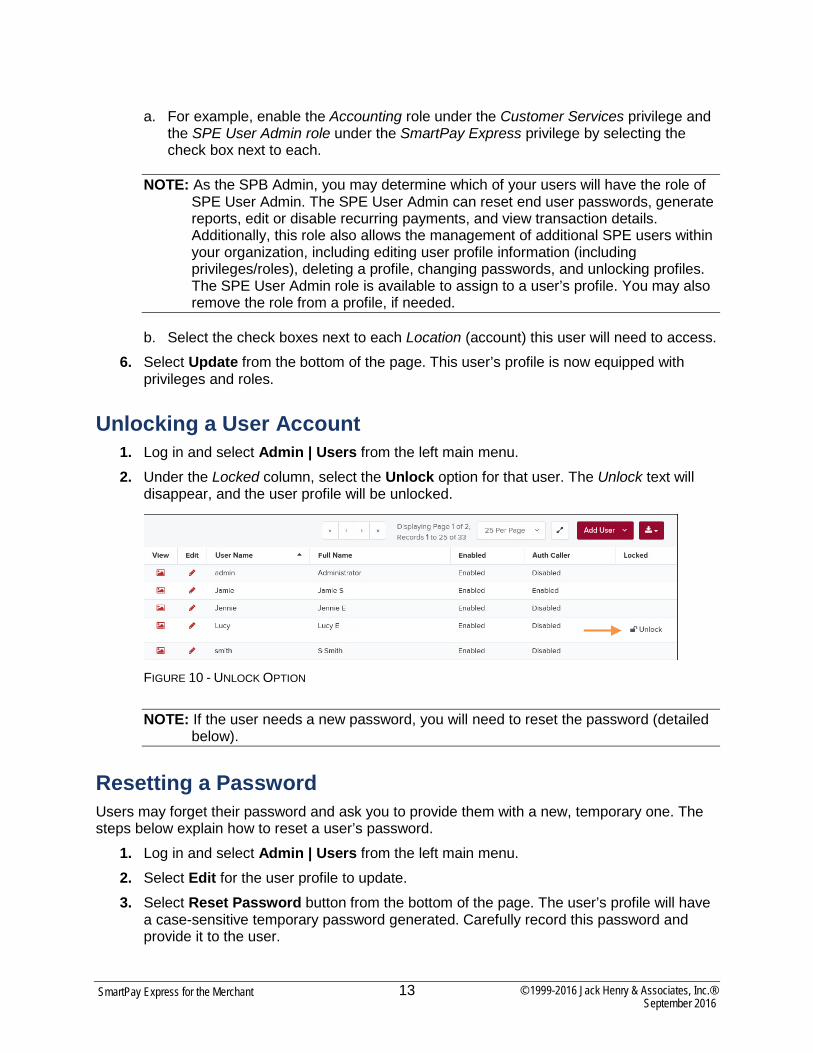
Unlocking a User Account 1. Log in and select Admin | Users from the left main menu. 2. Under the Locked column, select the Unlock option for that user. The Unlock text will
disappear, and the user profile will be unlocked.
FIGURE 10 - UNLOCK OPTION
NOTE: If the user needs a new password, you will need to reset the password (detailed below).
Resetting a Password Users may forget their password and ask you to provide them with a new, temporary one. The steps below explain how to reset a user’s password.
1. Log in and select Admin | Users from the left main menu. 2. Select Edit for the user profile to update. 3. Select Reset Password button from the bottom of the page. The user’s profile will have
a case-sensitive temporary password generated. Carefully record this password and provide it to the user.

© 1999-2016 Jack Henry & Associates, Inc.® 14 September 2016
SmartPay Express for the Merchant
FIGURE 11 - RESET PASSWORD BUTTON
Disabling a User Profile Disabling a user keeps the profile intact until access is re-enabled by the Admin User. The Admin may want to disable a user if a user is on leave for an extended period of time before working with the application again.
1. Log in to the system, and select Admin | Users from the left main menu. 2. Select Edit for the user profile you wish to disable. 3. Uncheck the Enabled box in the Update User Settings section. 4. Select Update to save all changes, as shown below.

© 1999-2016 Jack Henry & Associates, Inc.® 15 September 2016
SmartPay Express for the Merchant
FIGURE 12 – UNCHECK THE ENABLED OPTION
Deleting a User Profile Deleting a user profile will remove it from the list of users and make it inaccessible. The User Name for that profile cannot be utilized again for a different user. The profile will be categorized as a deleted user. To delete an FI admin, you must first remove the Administrator role from the user’s profile before completing the following steps.
1. Log in to the system and select Admin | Users from the left main menu. 2. Select Edit for the user profile to delete. 3. Select Delete User.
FIGURE 13 - DELETE USER OPTION
4. A prompt will ask you to confirm deleting the user. Select Yes.

© 1999-2016 Jack Henry & Associates, Inc.® 16 September 2016
SmartPay Express for the Merchant
FIGURE 14 - DELETE USER CONFIRMATION
Listing Deleted Profiles A list of the user profiles that you have deleted is available if you need to refer back to a previous user’s profile information. This list will also provide the profile’s audit history and any updates that may have been made to it.
1. Log in and select Admin | Users from the left main menu. 2. In the Merchant Users section, select the Deleted Users option under Filters. The list of
users will automatically update to display only deleted users. 3. Select Clear Filters to strip any filters from the list of users, as shown below.
FIGURE 15 - DELETED USERS FILTER

© 1999-2016 Jack Henry & Associates, Inc.® 17 September 2016
SmartPay Express for the Merchant
The SPE User Admin: Overview Users that have the SPE User Admin role have limited administrative responsibility to other members within your organization, who in turn assist end users. A user with the SPE User Admin role will be able to perform the following tasks.
• Generate transaction and event reports, current and historical
• Research transactions, current and historical
• Contact support (if applicable)
• List all SPE end users
• Reset an end user’s password and provide a temporary one
• Print and/or save (export) a list of SPE end users.
NOTE: Your menu options may differ slightly from those pictured in this document.
Working with Your SmartPay Express Users in SmartPay Business This section explains how to obtain a list of your customers, clients, or members (referred to as end users) that have set up account and user profiles through SPE. As the SPE User Admin, you will have the ability to list, enable/disable, and unlock any of your end user profiles, if necessary.
1. Log in to SmartPay Business, and select the Admin tab from the left navigational bar. 2. Select Users.
FIGURE 16 - USERS OPTION

© 1999-2016 Jack Henry & Associates, Inc.® 18 September 2016
SmartPay Express for the Merchant
3. To reactivate a disabled end user, select Edit for the user profile you wish to update.
FIGURE 17 - EDIT ICON
4. Check the Enabled option under Update User Settings.
FIGURE 18 - ENABLED OPTION
5. To disable an active SPE end user, uncheck the Enable option. 6. To reset an end user’s password, click the Reset Password button at the bottom of the
user profile page.

© 1999-2016 Jack Henry & Associates, Inc.® 19 September 2016
SmartPay Express for the Merchant
FIGURE 19 - RESET PASSWORD BUTTON
An email will be sent to both you and the SPE end user, confirming the request. A temporary password will appear at the bottom of the screen. Record the temporary password in case the user needs to refer to it in the future.
FIGURE 20 - RESET PASSWORD WINDOW
7. To save a copy of the listed SPE end users, select either the Microsoft Office® Excel® Workbook (.xls), comma-delimited file (CSV), or tab-delimited file (TSV) format from the Export icon at the top of the page.
FIGURE 21 - EXPORT MENU

© 1999-2016 Jack Henry & Associates, Inc.® 20 September 2016
SmartPay Express for the Merchant
Accepting the Master Service Agreement for Visa Checkout If as an organization you are accepting the Visa Checkout option as a payment service, there are a few steps you must first complete before the Visa Checkout option becomes available on your SPE site for customers to use. In order to activate Visa Checkout on your SPE site, you must accept the Master Service Agreement (MSA) presented in SPE Admin. You will need the SmartPay Express privilege and SPE Admin Portal User role assigned to your profile to complete this task. With this role, you must navigate to SPE Admin, where the MSA is housed.
1. Navigate to SPE Admin.
FIGURE 22 - LAUNCH SPE ADMIN
2. From the Welcome page, select the Payment Service tab.
NOTE: If as an organization you will be completing the branding and permissions settings for your SPE site, please refer to the SmartPay Express Admin for Branding and Permissions document.
FIGURE 23 - PAYMENT SERVICE TAB
© 1999-2016 Jack Henry & Associates, Inc.® 21 September 2016
SmartPay Express for the Merchant
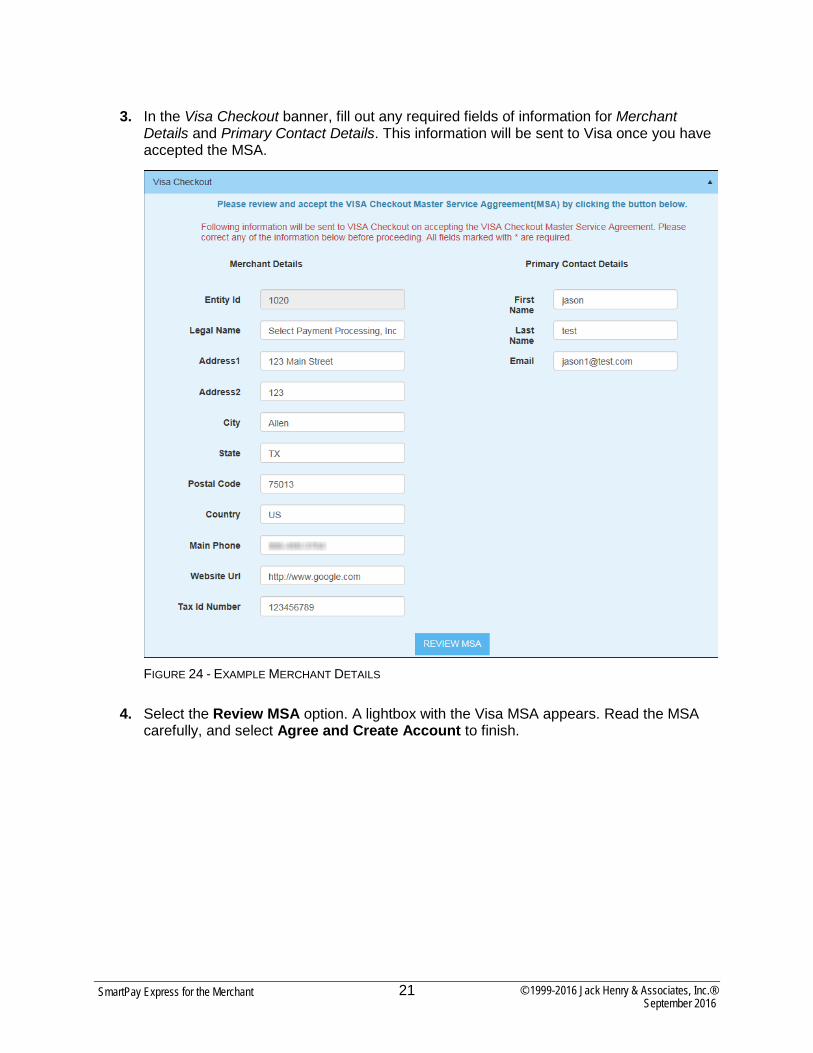
3. In the Visa Checkout banner, fill out any required fields of information for Merchant Details and Primary Contact Details. This information will be sent to Visa once you have accepted the MSA.
FIGURE 24 - EXAMPLE MERCHANT DETAILS
4. Select the Review MSA option. A lightbox with the Visa MSA appears. Read the MSA carefully, and select Agree and Create Account to finish.

© 1999-2016 Jack Henry & Associates, Inc.® 22 September 2016
SmartPay Express for the Merchant
FIGURE 25 - VISA CHECKOUT MSA
The Visa Checkout option will now be available for your SPE site. If at any time the financial institution will require you to review an updated MSA, you will need to navigate to the Payment Service tab in SPE and read/accept the new MSA in order to have the Visa Checkout option continue to appear on your site.
© 1999-2016 Jack Henry & Associates, Inc.® 23 September 2016
SmartPay Express for the Merchant
SmartPay Express for the Merchant User As an SPB user, you have the ability to support SPE based on the privileges and roles assigned to your profile, including one or more of the following tasks.
• Generate transaction reports (current and historical)
• Research transactions (current and historical)
• Generate a list of recurring payments, whether past payments, current payments, or deactivated payments
• Edit and/or disable settings for recurring payments
• Void transactions
• Generate a Credits and Debits to Your Merchant Settlement Account report
• Contact support (if applicable)
NOTE: Your menu options may differ slightly from those pictured throughout this document.
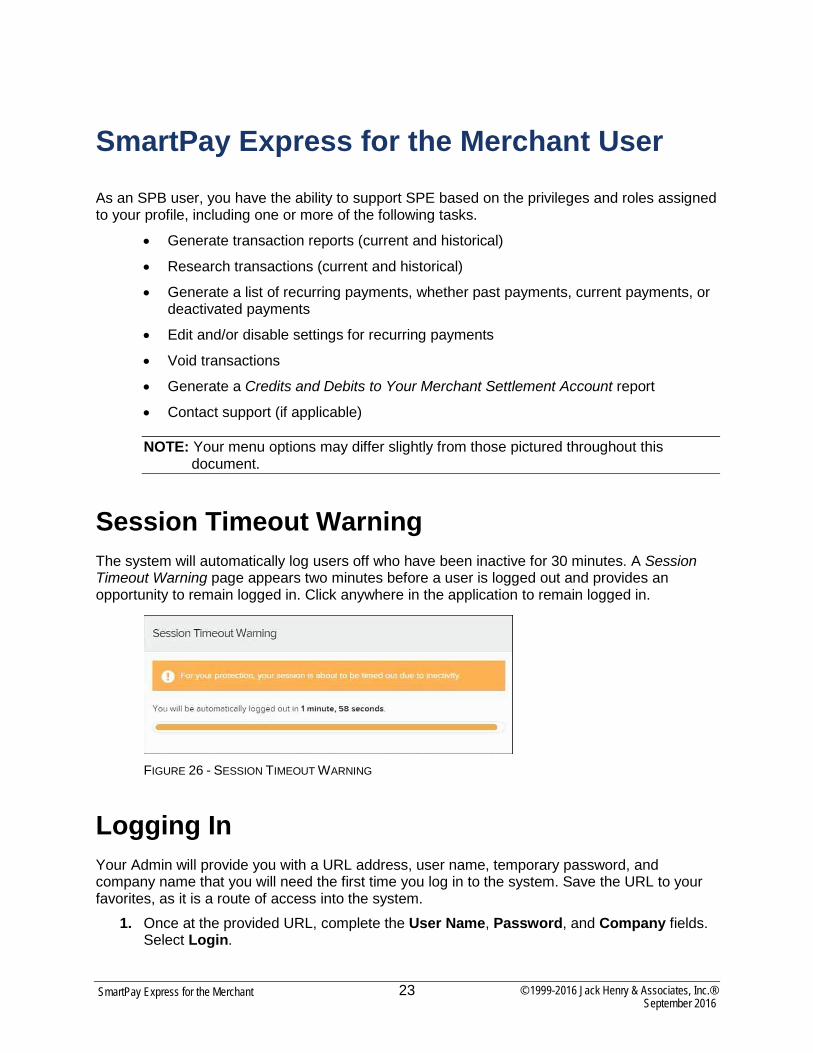
Session Timeout Warning The system will automatically log users off who have been inactive for 30 minutes. A Session Timeout Warning page appears two minutes before a user is logged out and provides an opportunity to remain logged in. Click anywhere in the application to remain logged in.
FIGURE 26 - SESSION TIMEOUT WARNING
Logging In Your Admin will provide you with a URL address, user name, temporary password, and company name that you will need the first time you log in to the system. Save the URL to your favorites, as it is a route of access into the system.
1. Once at the provided URL, complete the User Name, Password, and Company fields. Select Login.

© 1999-2016 Jack Henry & Associates, Inc.® 24 September 2016
SmartPay Express for the Merchant
2. The system will prompt you to change your password. Passwords expire every 90 days and are case-sensitive. Use the following guidelines when creating a new password:
• At least 1 uppercase letter
• At least 1 lowercase letter
• At least 1 number
• 8-15 characters in length 3. Select Update Password.
Creating a Secret Question A secret question is a tool used when you forget your password and can have another temporary password generated and sent to an email address. Without an email address in a user’s profile, that user will not be able to answer a secret question for a new password for access into the system. The Admin will need to manually edit/enter an email address for each merchant user, so that merchant user has the option to request a new password by answering a secret question in the application. Secret questions do not need to be a complete question or contain a question mark. Secret questions and answer are not case-sensitive fields. Once an Admin has entered an email address for the merchant user profile, use the following steps to configure the secret question that will be asked of the user, before a new password can be generated and sent to the applicable email address. If the secret question is answered correctly, you will receive an email with a new temporary password.
NOTE: Single sign-on users do not need to set up a secret question.
4. Log in to the application, and select the user menu | My Settings.
FIGURE 27 - MY SETTINGS OPTION
5. The system will prompt you for your current login password in order to reach the My Settings page. Once there, make changes to the Change Password, Secret Question, and/or Authorized Caller sections, as needed. Select Update when finished.

© 1999-2016 Jack Henry & Associates, Inc.® 25 September 2016
SmartPay Express for the Merchant
FIGURE 28 - MY SETTINGS PAGE
Choosing an Identification Phrase The EPS Support team answers questions about EPS products in the event you need additional help with an application. EPS takes support-related calls from users who have been designated as an authorized caller by the Admin user. If you have been designated as an authorized caller, you will need to set up an identification phrase and answer to verify your status when calling EPS Support for assistance. Authorized callers: For specific questions about an application, please contact our support team at 877-542-2244 or at [email protected]
NOTE: Non-authorized callers who contact EPS Support will be referred back to their first line of support.
1. Log in to the application, and select the user menu | My Settings. 2. The system will prompt you for your current login password in order to reach the My
Settings page. Make changes to the Identification Phrase sections, as needed. 3. Type the answer to the question in the Enter New Identification Response field, and
again in the Confirm New Identification Response field. EPS Support will verify this answer when you call. From this page, you can also make changes to your password or secret question and answer if needed. Select Update when finished.

© 1999-2016 Jack Henry & Associates, Inc.® 26 September 2016
SmartPay Express for the Merchant
Reporting Tools You can search for a specific user, a list of users, a specific transaction, or a list of transactions within the system. You will also be able to view transaction details, event history, and audit history. The capability to void and resolve transactions is also available to you. The following table lists the potential statuses for a transaction within the system.
Status Definition
Approved Payment information has been verified, and a transaction will be processed. This is the only status that does not subscribe to the 60-day rule, but instead displays all transactions in the approved state.
Awaiting Approval Payment information has been verified, but a secondary individual within the organization must approve the transaction before processing can occur.
Awaiting Capture A credit card transaction has been authorized, but a secondary individual within the organization must capture the transaction before processing.
Collected The collection system has recovered funds for an NSF check.
Declined A transaction has been declined by the system. The transaction will not be processed.
Disputed An account holder has disputed a transaction. The transaction will be charged back.
Error An internal error has occurred in the system. Please contact customer service.
In Collection An NSF transaction has occurred in the system. Additional attempts are being made to recover funds, plus any applicable fees.
In Research A transaction has been returned, and further research is required to determine the reason for the return.
Invalid/Closed Account A transaction has been returned because the bank account number was not valid or the account was closed. The transaction will be charged back.
Processed A transaction has been transmitted to the applicable network. Changes cannot be made to the transaction. PayPal transactions will automatically be placed in the Processed status.
Resolved An individual within the organization has marked the item as Resolved. No further processing will occur.

© 1999-2016 Jack Henry & Associates, Inc.® 27 September 2016
SmartPay Express for the Merchant
Status Definition
Suspended The system has suspended a transaction because the dollar amount or number of transactions exceeds the present limit.
Uncollected NSF The collection system was not able to recover the NSF transaction. The transaction will be charged back.
Voided An individual within the organization has marked a transaction as void, and the item will not be processed.
Creating a Transaction Status Report A Transaction Status report is a pre-defined report listing all transactions within a specific status. It automatically generates when you click a status link from the Current Transaction Summary located on the Dashboard of the application. The list will contain items that have been processed within the last 60 days and will give you access to individual transaction information. The report can be printed or saved (exported) into a Microsoft Office® Excel® spreadsheet (.xls), a tab-delimited file (.TSV), or a comma-delimited file (.CSV).
1. From the Dashboard page, select a status that appears as a link and contains values in the Current Transaction Summary. For example, select Approved.
FIGURE 29 - CURRENT TRANSACTION SUMMARY

© 1999-2016 Jack Henry & Associates, Inc.® 28 September 2016
SmartPay Express for the Merchant
2. A list of the first 25 (default value) transactions appears. To view details for a transaction, select the View link in the far left column for that transaction.
FIGURE 30 – VIEW COLUMN FOR APPROVED STATUS TRANSACTIONS
3. The Transaction Details page appears, including the Show Events and Show Audit History options.
FIGURE 31 - TRANSACTION DETAILS PAGE

© 1999-2016 Jack Henry & Associates, Inc.® 29 September 2016
SmartPay Express for the Merchant
Voiding a Transaction A transaction can be voided as long as it is still in a status of Approved, Awaiting Approval, or Suspended. Recall that an approved transaction will moved to the Processed status at the end of the closing day for your financial institution.
1. Log in to the application, and select a status from the Current Transaction Summary page that has not yet been processed. For example, click the Approved status link.
2. A report of approved transactions displays. Select the View link next to the transaction you would like to void.
3. From the Transaction Details page, select Actions | Void.
FIGURE 32 - VOIDING A TRANSACTION
4. The system will ask you to confirm voiding the transaction. Select Void. The transaction will be voided and appear as a Voided status on the Current Transaction Summary page until it is resolved.
FIGURE 33 - CONFIRMING VOIDING A TRANSACTION
Using the Report Builder Utility The report builder utility can be used to create one-time queries and custom recurring daily, weekly, and monthly reports for bookkeeping, historical research, and problem solving. There are two options when creating a customized report: New Report and New Shared Report. While both are customizable, the shared report is available to other users who have access to the system. Other users will be able to pull the shared report and use its settings to generate information. Only the user who created the shared report can delete it.
1. Log in to the application, and select Reports from the left main menu.

© 1999-2016 Jack Henry & Associates, Inc.® 30 September 2016
SmartPay Express for the Merchant
FIGURE 34 - REPORTS TAB
2. Click New Report or New Shared Report, if it will be available to others.
FIGURE 35 - REPORT BUILDER OPTIONS FOR NEW REPORTS
3. The Report page appears. In the top bar, enter a Title for the report. Fill in the report criteria in each of the four sections: Report Type, Date Range, Advanced, and Report Column headers.

© 1999-2016 Jack Henry & Associates, Inc.® 31 September 2016
SmartPay Express for the Merchant
FIGURE 36 – FOUR SECTIONS IN REPORT BUILDING
• Report Type - Designate if your report will be a Transaction Report based upon the current status of a transaction, or a Historical Event Report based upon past events a transaction has been through in the system.
• Date Range - In the Date Type field, select either Transactions Created or Effective Dates for the report, which will determine if the report displays transactions based upon the date they were created versus the date they took effect. Select a pre-specified date range using the Export Date Range option (ideal for recurring reports), or specify your own date range with the Start Date and Start Time and the End Date and End Time fields.
FIGURE 37 - DATE RANGE SECTION
© 1999-2016 Jack Henry & Associates, Inc.® 32 September 2016
SmartPay Express for the Merchant
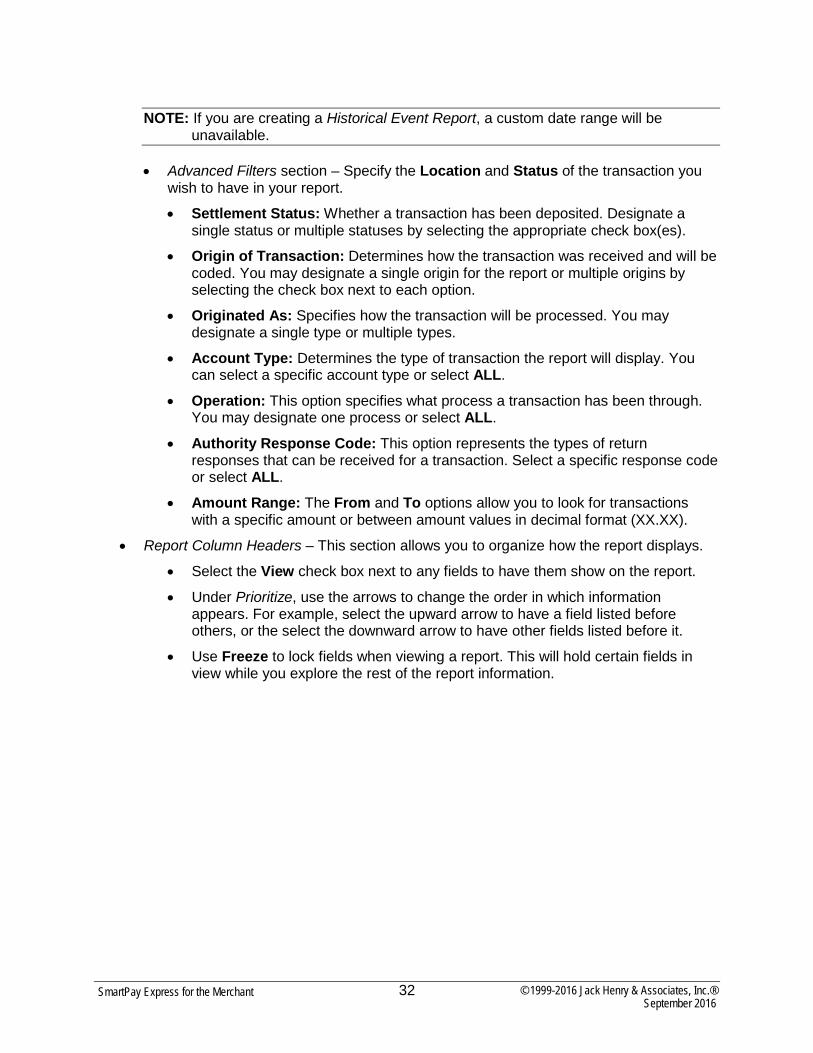
NOTE: If you are creating a Historical Event Report, a custom date range will be unavailable.
• Advanced Filters section – Specify the Location and Status of the transaction you wish to have in your report.
• Settlement Status: Whether a transaction has been deposited. Designate a single status or multiple statuses by selecting the appropriate check box(es).
• Origin of Transaction: Determines how the transaction was received and will be coded. You may designate a single origin for the report or multiple origins by selecting the check box next to each option.
• Originated As: Specifies how the transaction will be processed. You may designate a single type or multiple types.
• Account Type: Determines the type of transaction the report will display. You can select a specific account type or select ALL.
• Operation: This option specifies what process a transaction has been through. You may designate one process or select ALL.
• Authority Response Code: This option represents the types of return responses that can be received for a transaction. Select a specific response code or select ALL.
• Amount Range: The From and To options allow you to look for transactions with a specific amount or between amount values in decimal format (XX.XX).
• Report Column Headers – This section allows you to organize how the report displays.
• Select the View check box next to any fields to have them show on the report.
• Under Prioritize, use the arrows to change the order in which information appears. For example, select the upward arrow to have a field listed before others, or the select the downward arrow to have other fields listed before it.
• Use Freeze to lock fields when viewing a report. This will hold certain fields in view while you explore the rest of the report information.

© 1999-2016 Jack Henry & Associates, Inc.® 33 September 2016
SmartPay Express for the Merchant
FIGURE 38 - REPORT COLUMN HEADERS SECTION
4. At this time, you may choose to select the Share to All Users check box (as shown below) if you want to have this report available for other users to view. If you selected New Shared Report previously, this box will already be selected.
Alternatively, you may wish to save the report for your own use at a later time by selecting Save to My Reports. This option will both save the report and generate a report to view.
FIGURE 39 - SAVE AND RUN REPORT OPTIONS
The report displays results.
• Use the filters to change the report and then select Run Reports again, or you can print/export the report, as needed.
• Column headers in the report are selectable by organization. Select a column header to organize the report based on that column’s information, in either ascending order (designated by an upward arrow) or descending order (designated by a downward arrow).
• Select View to the left of an item to view more details about the transaction.
• To change the report template, adjust the report filters as desired, and then select Save to My Reports, which will save the filter options as a template for later use.
NOTE: Be sure to select the Share to All Users check box if you wish to save the report for others to use.
© 1999-2016 Jack Henry & Associates, Inc.® 34 September 2016
SmartPay Express for the Merchant
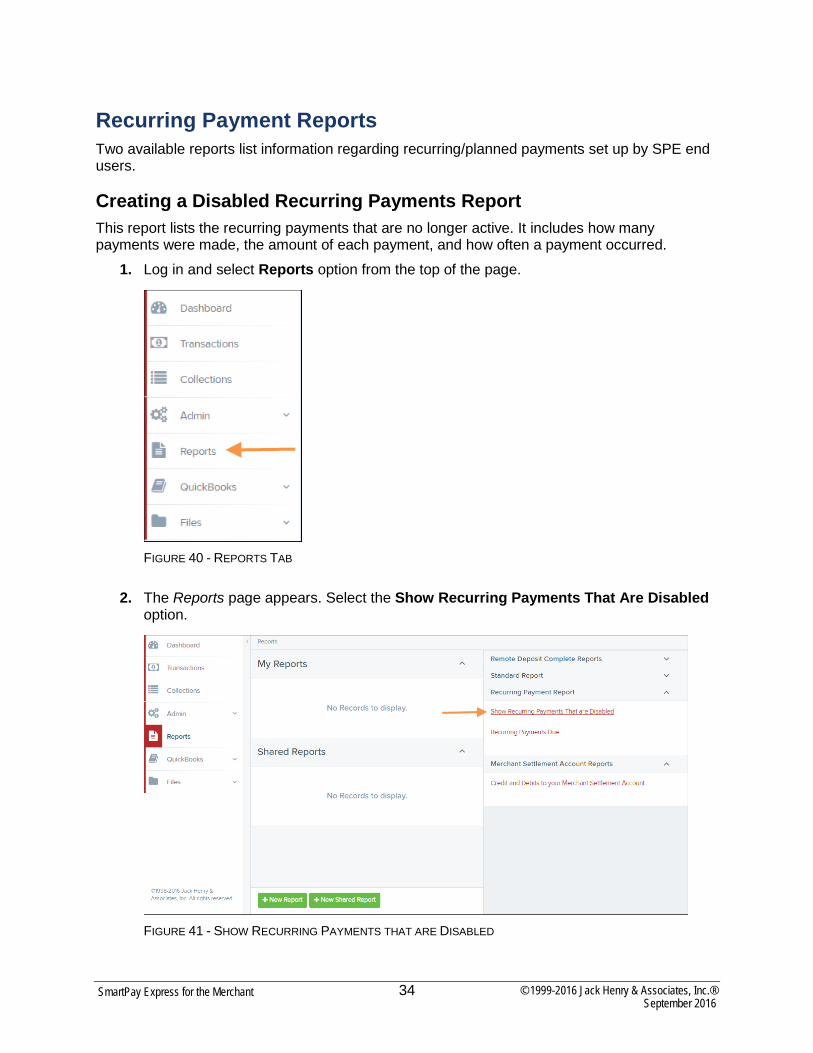
Recurring Payment Reports Two available reports list information regarding recurring/planned payments set up by SPE end users.
Creating a Disabled Recurring Payments Report This report lists the recurring payments that are no longer active. It includes how many payments were made, the amount of each payment, and how often a payment occurred.
1. Log in and select Reports option from the top of the page.
FIGURE 40 - REPORTS TAB
2. The Reports page appears. Select the Show Recurring Payments That Are Disabled option.
FIGURE 41 - SHOW RECURRING PAYMENTS THAT ARE DISABLED

© 1999-2016 Jack Henry & Associates, Inc.® 35 September 2016
SmartPay Express for the Merchant
3. The Recurring Payment Reports page appears. From the Location field, select from which location the report will pull information.
4. Select the Show Recurring Payments That Are Disabled link. The disabled recurring payments will display.
5. Select View to see audit history information about a specific recurring payment.
FIGURE 42 - DISABLED RECURRING PAYMENTS REPORT WITH VIEW OPTION
6. The Recurring Payment Information page appears.
FIGURE 43 - RECURRING PAYMENT INFORMATION PAGE

© 1999-2016 Jack Henry & Associates, Inc.® 36 September 2016
SmartPay Express for the Merchant
Creating a Recurring Payments Due Report and Editing a Recurring Payment This report lists those payments that are scheduled to take place or that have taken place already within the date range selected. This report includes the amount of each payment, payment frequency, next payment due date, number of payments made to date, and total number of payments to be made. If applicable, you may edit or disable the settings for a recurring payment from this report.
1. From the Reports page, select Recurring Payment Due.
FIGURE 44 - RECURRING PAYMENTS DUE REPORT
2. The Recurring Payment Reports page appears. From the Location field, select from which location the report will pull information.

© 1999-2016 Jack Henry & Associates, Inc.® 37 September 2016
SmartPay Express for the Merchant
FIGURE 45 - LOCATION OPTION FOR RECURRING PAYMENT REPORT
3. Select a date range for the report from the pre-set dates in the Quick Pick option, or designate a Start Date and End Date in MM/DD/YYYY format. You may also use the calendar option to designate a date.
4. Select the Recurring Payments Due link. The Recurring Payments page appears.
FIGURE 46 - RECURRING PAYMENTS DUE REPORT

© 1999-2016 Jack Henry & Associates, Inc.® 38 September 2016
SmartPay Express for the Merchant
5. To see an audit history for a specific payment, select View to the left of the payment. 6. The View Recurring Payment page appears. Select the Edit icon.
FIGURE 47 - EDIT ICON
7. The Recurring Payment Information page appears. Make any changes as needed, ensuring all required fields designated by an asterisk are completed. To disable the payment, uncheck the Enabled control.
FIGURE 48 – ENABLED CONTROL

© 1999-2016 Jack Henry & Associates, Inc.® 39 September 2016
SmartPay Express for the Merchant
Creating the Credits and Debits to Your Merchant Settlement Account Report The Credits and Debits to Your Merchant Settlement Account report is a date range report that identifies the deposits made on the indicated date(s). The report will also display the individual transaction amounts that make up a deposit and specific details of a transaction.
1. Log in to the application, and select Reports from the left-hand panel. 2. Select Credits and Debits to Your Merchant Settlement Account in the Merchant
Settlement Account Reports section of the right-hand panel.
FIGURE 49 - CREDITS AND DEBITS TO YOUR MERCHANT SETTLEMENT ACCOUNT
3. The Merchant Settlement Account Reports page appears. Select a Location to pull report information from.

© 1999-2016 Jack Henry & Associates, Inc.® 40 September 2016
SmartPay Express for the Merchant
FIGURE 50 - MERCHANT SETTLEMENT ACCOUNT REPORTS PAGE
4. Select a date range using either the Quick Pick option with a list of pre-set date ranges or the custom option by entering a Start Date and End Date in MM/DD/YYYY format. You may also use the calendar option to designate a date.
5. Select Credits and Debits to Your Merchant Settlement Account. The deposit batches matching your search criteria appear.
6. Select the View Details link to see the transaction(s) that make up the deposit total displayed below the report.

© 1999-2016 Jack Henry & Associates, Inc.® 41 September 2016
SmartPay Express for the Merchant
FIGURE 51 - REPORT RESULT WITH VIEW DETAILS OPTION
7. The transaction(s) appear. Select the View link under the Transaction Detail column to see specific details about the transaction(s).

© 1999-2016 Jack Henry & Associates, Inc.® 42 September 2016
SmartPay Express for the Merchant
FIGURE 52 - BATCH DETAILS WITH TRANSACTION DETAIL OPTION
8. The Transaction Details page appears. From this page, you can select a number of options to view more details about this transaction.
• Customer (ID): This link directs you to the Customer Information page, where details about the customer and an option to edit customer information are located.
• Show Events: The automated steps/processes a transaction has gone through. The most recent steps are displayed first and include the date/time the events took place in Central Time.
• Show Audit History: The manual interaction of the transaction. Details are displayed with the most recent steps first and includes the date/time processes took place in Central Time.

© 1999-2016 Jack Henry & Associates, Inc.® 43 September 2016
SmartPay Express for the Merchant
FIGURE 53 - TRANSACTION DETAILS PAGE
Viewing PayPal and PayNearMe Transactions in SmartPay Business PayPal transactions appear in the Processed status of the Transaction Status Report. PayPal transactions will also have the PayPal Invoice ID and the PayPal Payer ID displayed for reference.
PayNearMe transactions appear in the Awaiting Capture status once an end user initiates a payment online. Once the end user has provided the cash payment to an authorized retailer, the transaction will appear in the Processed status. If the end user does not render cash payment, the transaction will remain in the Awaiting Capture status.
1. From the home page, in the Transaction Status Summary report, select Processed.

© 1999-2016 Jack Henry & Associates, Inc.® 44 September 2016
SmartPay Express for the Merchant
FIGURE 54 - PROCESSED STATUS
2. A report listing the Processed status transactions appears. PayPal transactions will have PayPal listed in the Payment Type column of the report. Select the View option for the transaction you wish to view.
FIGURE 55 - PROCESSED TRANSACTIONS REPORT

© 1999-2016 Jack Henry & Associates, Inc.® 45 September 2016
SmartPay Express for the Merchant
The Transactions Details page appears. If you’ve selected to view a PayPal transaction, the Processor Ref.# field and PayPal Payer ID/PayPal Invoice ID is listed.
• PayPal Payer ID – A unique number assigned by PayPal to this particular customer/member profile
• PayPal Invoice ID – A unique number assigned by PayPal to this particular customer’s/member’s transaction
Viewing Visa Checkout Transactions Payments made using Visa Checkout can be filtered in your reports, so that you can view those specific transactions. When building a custom report, it is necessary to use the Originated As filter so that this column of information appears in your report.
1. On the Reports page, select New Report.
FIGURE 56 – NEW REPORT
2. Select Payment_Service_Visa Checkout from the Originated As section.

© 1999-2016 Jack Henry & Associates, Inc.® 46 September 2016
SmartPay Express for the Merchant
FIGURE 57 - PAYMENT SERVICE VISA CHECKOUT OPTION
Editing SPE Transactions You have the ability to edit customer transactions in SmartPay Business that have been made via SPE. A transaction’s amount and/or effective date can be altered if you have been assigned the correct roles and privileges. Editing capabilities for payments made via SPE require the Accounting role under the Customer Services privilege.
DISCLAIMER: The ability to edit customer records and transactions created by SPE users can be provided to users. The Accounting role must be assigned to your SPE users in order to edit SPE transactions. It is the responsibility of the merchant to obtain and retain the appropriate authorizations from SPE customers before saving any changes made to approved transactions.
Log in to SmartPay Business, and the Home page appears. The Current Transaction Summary will be featured on the page, which is a list of all transactions in the system within the past 60 days. A transaction can be in any number of statuses when it enters the system. The table below lists the potential status of any one transaction within the system. A transaction can only be edited when it has been placed in the Approved status.

© 1999-2016 Jack Henry & Associates, Inc.® 47 September 2016
SmartPay Express for the Merchant
Status Definition
Approved The transaction has been verified and will be processed at the designated cut-off time.
Processed The transaction has been transmitted to the appropriate network (ACH or Check 21). Changes can no longer be made, and the transaction can no longer be voided.
Collected (ACH Only) The transaction, originally returned NSF, has been re-presented to the Fed by ProfitStars, and funds were recovered.
Awaiting Capture Status for credit card transactions only.
Awaiting Approval The transaction has been verified, but the amount of the transaction exceeded the Dual Authorization limit of the user who created it. An authorized approver must review and either approve or void the transaction.
Declined The transaction has been declined by the EPS system and will not be processed. The transaction exceeded either Dual Authorization or Velocity (risk-management) limits.
Voided The transaction has been voided and will not be processed. A transaction may not be voided once the item is in the Processed status.
Error An internal error has occurred within the EPS system. Contact your first line of support.
In Collection (ACH Only) The transaction, returned NSF, is in the process of being re-presented to the Fed by ProfitStars.
In Research May be used by your support group.
Uncollected NSF (ACH Only) The transaction was returned to ProfitStars NSF by the Fed, and funds could not be recovered.
Suspended The transaction has been verified but has exceeded Velocity limits. An FI user must take further action on whether to approve or void the suspended transaction.
Disputed (ACH Only) The transaction was returned to ProfitStars by the Fed because the account holder at the receiving financial institution has disputed its validity. The transaction will be charged back (reversed).
Invalid/Closed Account (ACH Only) The transaction was returned to ProfitStars by the Fed because the account number at the receiving financial institution was invalid or because the account was closed.

© 1999-2016 Jack Henry & Associates, Inc.® 48 September 2016
SmartPay Express for the Merchant
Status Definition
Resolved The transaction has been moved into a Resolved status by a user to indicate that no further action related to the transaction is required. Transactions can be moved into a Resolved status from a status of Declined, Voided, Invalid/Closed Account, Disputed, Uncollected NSF, Error, or In Research.
1. From the home page, select the Approved link to view the transactions that have been approved for processing, but have not yet been processed through the system.
FIGURE 58 - CURRENT TRANSACTION SUMMARY, WITH APPROVED LINK INDICATED
2. A report with all of the approved transactions appears. Notice the indication, Approved, under the Status column. Select the View link to the left of the transaction you wish to edit.
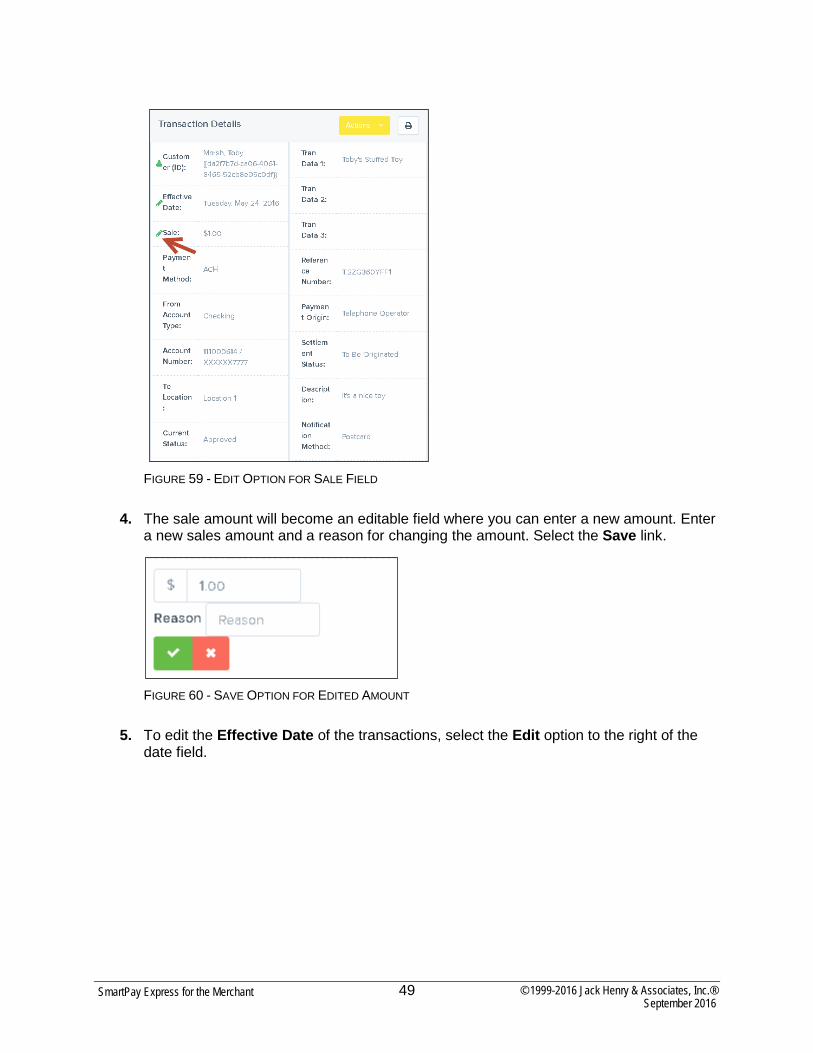
3. The Transaction Details page appears for that specific transaction. Select the Edit option next to the Sale field.
© 1999-2016 Jack Henry & Associates, Inc.® 49 September 2016
SmartPay Express for the Merchant
FIGURE 59 - EDIT OPTION FOR SALE FIELD
4. The sale amount will become an editable field where you can enter a new amount. Enter a new sales amount and a reason for changing the amount. Select the Save link.
FIGURE 60 - SAVE OPTION FOR EDITED AMOUNT
5. To edit the Effective Date of the transactions, select the Edit option to the right of the date field.

© 1999-2016 Jack Henry & Associates, Inc.® 50 September 2016
SmartPay Express for the Merchant
FIGURE 61 - EDIT OPTION FOR EFFECTIVE DATE
6. The Effective Date field will become a workable field where you can enter a new date. A calendar option appears for date selection, or you may type in a date in MM/DD/YYYY format.
7. Enter a new date and the Reason for changing the date. 8. Select the Save link next to the field.
FIGURE 62 - EDITING THE EFFECTIVE DATE
Editing Customer Information You have the ability to edit customer information, including name, contact information, account information, and whether the customer is an individual or business.
1. Log in to the application, and locate the Search tool at the top of the page. Designate a search filter to locate a customer using the drop-down arrow. You may search for customers with one of the following filters.

© 1999-2016 Jack Henry & Associates, Inc.® 51 September 2016
SmartPay Express for the Merchant
• Last/Company Name
• Customer Number (for customers with a home banking ID)
• Account Number (last 4 digits)
FIGURE 63 - SEARCH TOOL
2. The Search Results page appears. Select Edit for the customer you wish to change.
FIGURE 64 - SEARCH RESULTS, WITH EDIT OPTION INDICATED
3. The Customer Information page appears. Change any information as needed. The Relationship and Customer Type fields are the only required fields; however, the more information you input about customers, the easier it will be to locate and keep track of them. Click Update when finished.

© 1999-2016 Jack Henry & Associates, Inc.® 52 September 2016
SmartPay Express for the Merchant
FIGURE 65 – CUSTOMER INFORMATION PAGE
Viewing Customer Account Information and Payment Settings
1. From the Search Results page, select the View link for the customer you wish to view.
FIGURE 66 - VIEW OPTION FOR CUSTOMER SEARCH RESULTS
2. The Customer Information page appears, with basic information about the customer. Select Accounts from the top of the page to view account information.
© 1999-2016 Jack Henry & Associates, Inc.® 53 September 2016
SmartPay Express for the Merchant
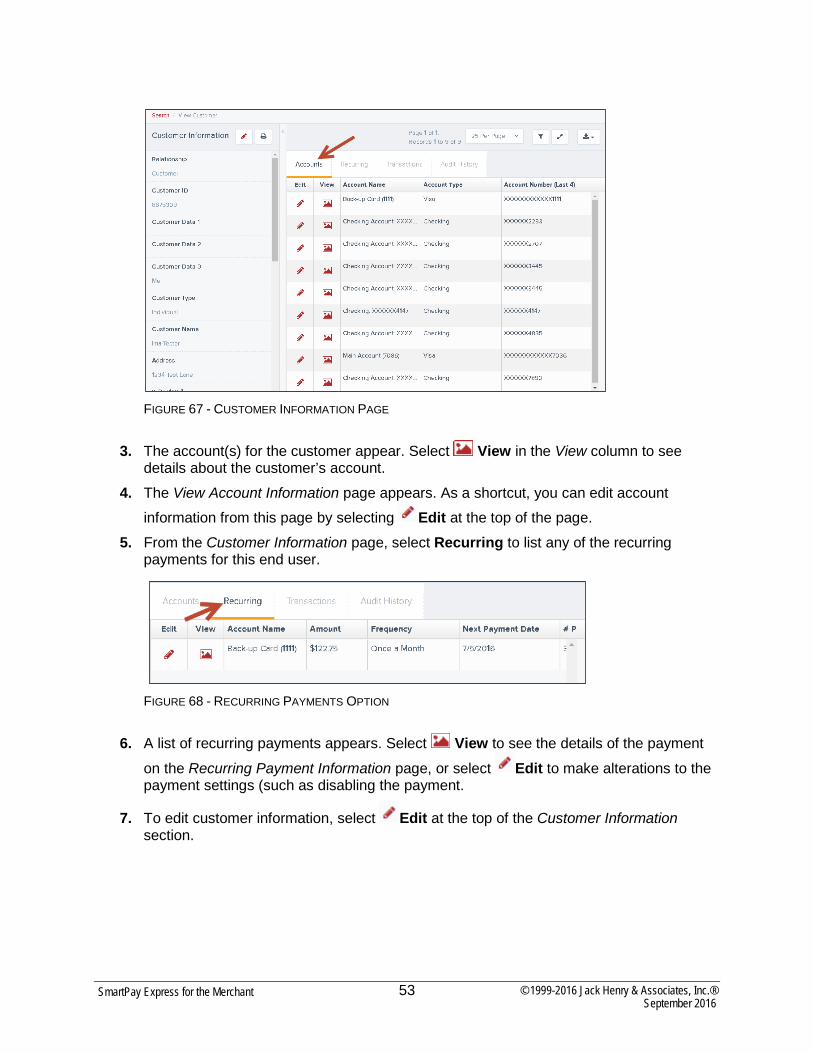
FIGURE 67 - CUSTOMER INFORMATION PAGE
3. The account(s) for the customer appear. Select View in the View column to see details about the customer’s account.
4. The View Account Information page appears. As a shortcut, you can edit account information from this page by selecting Edit at the top of the page.
5. From the Customer Information page, select Recurring to list any of the recurring payments for this end user.
FIGURE 68 - RECURRING PAYMENTS OPTION
6. A list of recurring payments appears. Select View to see the details of the payment
on the Recurring Payment Information page, or select Edit to make alterations to the payment settings (such as disabling the payment.
7. To edit customer information, select Edit at the top of the Customer Information section.

© 1999-2016 Jack Henry & Associates, Inc.® 54 September 2016
SmartPay Express for the Merchant
FIGURE 69 - EDIT CUSTOMER INFORMATION ICON
Searching for Transaction Information 1. From the top of the page in the Search field, click the drop-down arrow and select which
filter to search with under Find Transactions. Your settings may allow additional search filters.
FIGURE 70 - SEARCH FIELD FOR FINDING A TRANSACTION
2. Enter the entire Reference Number, Transaction Number, or optional search field. Click the search option, indicated with a ?.

© 1999-2016 Jack Henry & Associates, Inc.® 55 September 2016
SmartPay Express for the Merchant
3. The Search Results page appears. Select View to see more information about a transaction.
FIGURE 71 - SEARCH RESULTS WITH VIEW OPTION
4. The Transaction Details page appears, with Events and Audit History options.
FIGURE 72 - TRANSACTION DETAILS PAGE
© 1999-2016 Jack Henry & Associates, Inc.® 56 September 2016
SmartPay Express for the Merchant
SmartPay Express: Overview SmartPay Express gives you the ability to make payments or donations to any of your merchant/vendor’s accounts. These payments/donations can be in the form of a one-time (Quick Pay), single, and/or recurring transaction to be debited from either your checking account or charged to your credit card. One-time payments/donations can be created one of two ways:
• A Quick Pay transaction without signing in or registering as a user
• As an existing user with a login user name and password To set up a recurring payment, you will need to sign in and register your personal user information such as name, address, phone number, etc. Setting up a user registration will also allow you to identify the accounts you want to debit or charge for your payments/donations. You may also create single or recurring payments and view upcoming payments or those that have already been debited. Once set up, you will receive an email registration confirmation with a temporary password you need the first time upon logging in.
System Requirements The following browsers and platforms work with the SPE application. All options require a high-speed Internet connection.
• Microsoft Internet Explorer® 11
• Mozilla® Firefox® browser
• Google Chrome™ browser
NOTE: The SPE application allows for a number of customizable fields and labels according to the settings specified. Your menu options may differ slightly from those pictured throughout this document.
Session Timeout Warning The system will automatically log off users who have been inactive for 10 minutes. A Session Timeout Warning page appears two minutes before a user is logged out and provides an opportunity to remain logged in. Select OK to remain logged in.

© 1999-2016 Jack Henry & Associates, Inc.® 57 September 2016
SmartPay Express for the Merchant
FIGURE 73 - SESSION TIMEOUT WARNING
Making a One-Time (Quick Pay) Payment A Quick Pay or one-time payment allows you to make a payment without setting up and maintaining your account information. You may want to use this feature to pay a bill in its entirety at one time or make a one-time donation. This option is also advantageous if you have a yearly payment obligation which may change from year-to-year and a recurring payment is not ideal, or if you wish to refrain from storing your personal information in the system.
1. Navigate to the provided URL address. The business to you which you are making a donation/payment may also have a website with a link to the address.
2. Select the Quick Pay option. This may read differently for each website.
FIGURE 1 - EXAMPLE QUICK PAY OPTION
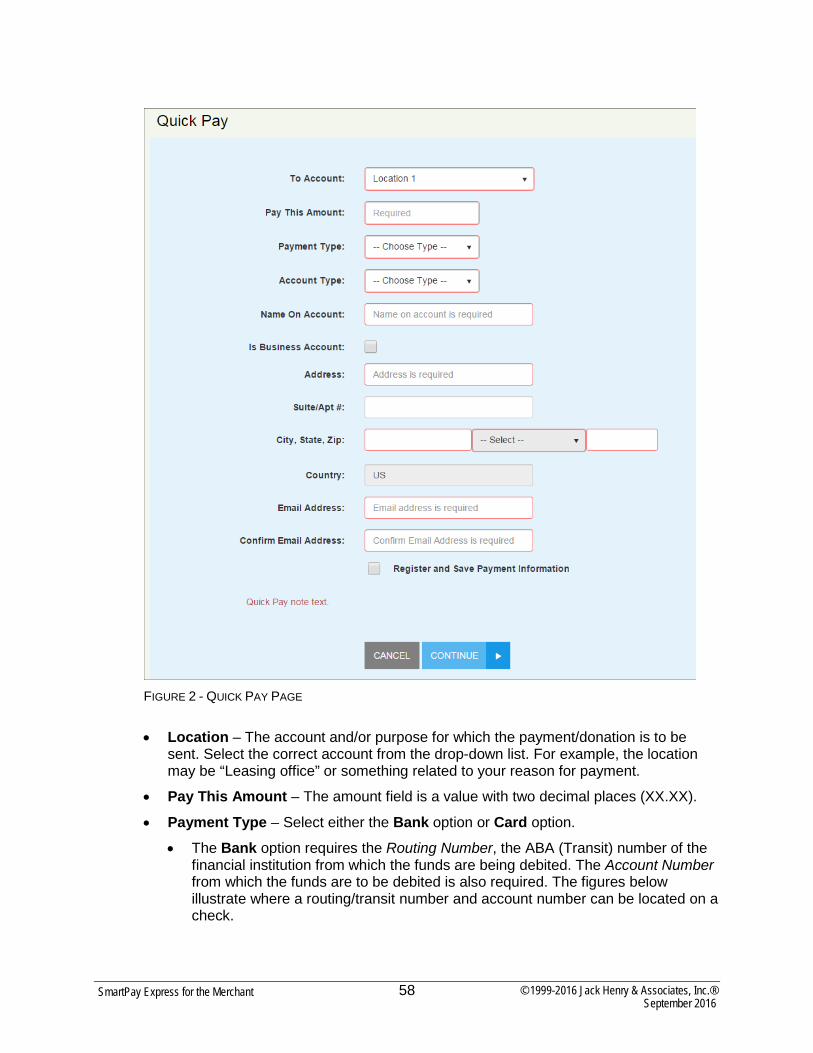
3. The Quick Pay page appears. Enter information in the required fields to create a debit transaction to a checking account. You may also opt to pay with a credit card. If at any time you wish to exit this page, select the Cancel option.
NOTE: All of the following fields may or may not appear, depending on your vendor’s established settings for accepting payments/donations.
© 1999-2016 Jack Henry & Associates, Inc.® 58 September 2016
SmartPay Express for the Merchant
FIGURE 2 - QUICK PAY PAGE
• Location – The account and/or purpose for which the payment/donation is to be sent. Select the correct account from the drop-down list. For example, the location may be “Leasing office” or something related to your reason for payment.
• Pay This Amount – The amount field is a value with two decimal places (XX.XX). • Payment Type – Select either the Bank option or Card option.
• The Bank option requires the Routing Number, the ABA (Transit) number of the financial institution from which the funds are being debited. The Account Number from which the funds are to be debited is also required. The figures below illustrate where a routing/transit number and account number can be located on a check.

© 1999-2016 Jack Henry & Associates, Inc.® 59 September 2016
SmartPay Express for the Merchant
FIGURE 3 - EXAMPLE CHECK WITH INDICATED ROUTING NUMBER
FIGURE 4 - EXAMPLE CHECK WITH INDICATED ACCOUNT NUMBER
• The Card option requires information in the Card Number field, which is the account number that appears on the credit card. Card payments also require information for the Expires On field. Select the month and year the credit card will expire.
• Account/Card Type – Select either Checking or Savings for a bank payment or one of the credit card processors provided for a card payment.
• Is Business Account – Select this check box if the account to be debited is a business account. Do not select this check box if the account is an individual or personal account.
• Name On Account – The name on the account to be debited. A value of all zeros is not valid.
• Address – Enter the street address associated with this account. • City, State, Zip – Enter the city, two-character abbreviation of your state or region,
and postal code associated with this account. • Email – Enter an email address associated with this account to which a payment
confirmation can be sent. • Confirm Email Address – Re-enter the email address associated with this payment.
Fill in any optional fields that may be displayed for the payment type you have selected, if desired.

© 1999-2016 Jack Henry & Associates, Inc.® 60 September 2016
SmartPay Express for the Merchant
• Description -– This field is alphanumeric and can hold up to 50 characters. It is used as a memo field to identify the transaction’s purpose or any transaction-related information, such as “June rent,” or “water bill”.
• Transaction Number – An alphanumeric field that can hold up to 50 characters and must be unique for each transaction. If left blank, the application will automatically assign a value. It is strongly recommended you leave this field blank unless it is required by your merchant/vendor for you to fill out.
• Check Number – If the payment will be produced from a check, enter the serial number of the check located either on the top right corner of the check or next to the routing and account information.
FIGURE 5 - CHECK NUMBER
• Transaction Optional Fields – Up to three optional fields may be available to capture additional information about the transaction. These fields may be required according to your creditor/organization/business.
• CVV Code – If you are making a payment with a credit card, enter the customer validation code that appears on the card. Depending on your merchant/vendor, this field may be required.
Figure 6 - CVV Code
• Suite/Apt # – Enter an apartment number associated with this account, if applicable.
• Country – Enter if other than U.S. 4. If you do not wish to register at this time, continue to step 5. If you wish to save your
payment information and register as a user, select the check box next to Register and Save Payment Information.

© 1999-2016 Jack Henry & Associates, Inc.® 61 September 2016
SmartPay Express for the Merchant
FIGURE 7 - OPTION FOR REGISTRATION
a. When you select to register as a user, additional information fields appear. Enter the appropriate information for the following required fields.
• Secret Question – Create a phrase, word, or question that can be used for identification purposes if a new temporary password needs to be requested. This is not a case-sensitive field and does not need to be in the form of a question.
• Secret Answer – Provide the answer to the secret question above. • Confirm Secret Answer – Re-type the secret answer. • Username – If this field is not automatically populated with the Email Address
information provided earlier on the page, enter your email address. b. Enter any optional information, if desired.
• Customer Number – An optional, numeric field that must be unique for each user registration. This field may be provided to you by your creditor/organization.
• Phone – Enter a telephone number in XXX-XXX-XXXX format. • Driver’s License – Enter your driver’s license number. • DL State – Enter the abbreviation of the state in which the driver’s license was
issued. • Social Security – Enter your Social Security number.
NOTE: This payment, once submitted, will be available for your viewing as a registered user.
5. If your merchant/vendor has enabled an added security, select the check box in the CAPTCHA field to verify that you are making a payment.
FIGURE 8 - CAPTCHA ADDED SECURITY

© 1999-2016 Jack Henry & Associates, Inc.® 62 September 2016
SmartPay Express for the Merchant
6. Select the Continue option at the bottom of the page.
7. The Confirmation page appears, providing you the opportunity to verify the data and authorize the transaction. Read the Authorization Agreement provided, and, if acceptable, select the Agree and Submit option at the bottom of the page.
FIGURE 9 - PAYMENT CONFIRMATION PAGE WITH SUBMIT OPTION
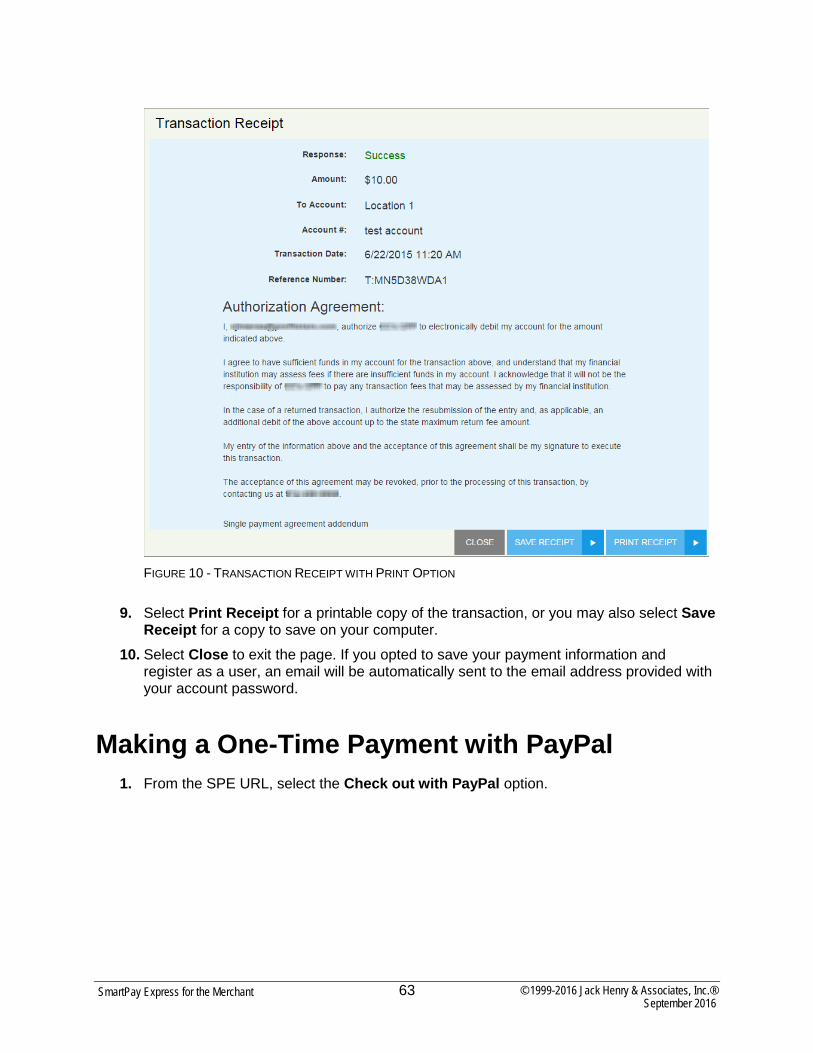
8. Once you have confirmed the payment, a Transaction Receipt appears, which can be printed for your records. This receipt will include the authorization agreement and a transaction Response field (see figure below) that indicates the status of the transaction. The following are potential responses that can appear.
• Success – The transaction was approved to be sent for processing.
• Error Internal – Contact your first line of customer support.
© 1999-2016 Jack Henry & Associates, Inc.® 63 September 2016
SmartPay Express for the Merchant
FIGURE 10 - TRANSACTION RECEIPT WITH PRINT OPTION
9. Select Print Receipt for a printable copy of the transaction, or you may also select Save Receipt for a copy to save on your computer.
10. Select Close to exit the page. If you opted to save your payment information and register as a user, an email will be automatically sent to the email address provided with your account password.
Making a One-Time Payment with PayPal 1. From the SPE URL, select the Check out with PayPal option.

© 1999-2016 Jack Henry & Associates, Inc.® 64 September 2016
SmartPay Express for the Merchant
FIGURE 11 - PAYPAL OPTION
2. The SPE payment page for PayPal appears. Select a location next to the To Account field. Enter the amount of the transaction in the Pay This Amount field. If a Convenience Fee Amount applies, that amount displays, as well. Select the Check out with PayPal option to continue.
FIGURE 12 - PAYPAL PAYMENT PAGE
3. The system will navigate you to the PayPal login page. Enter your information in the Email and PayPal password fields and select Log In.
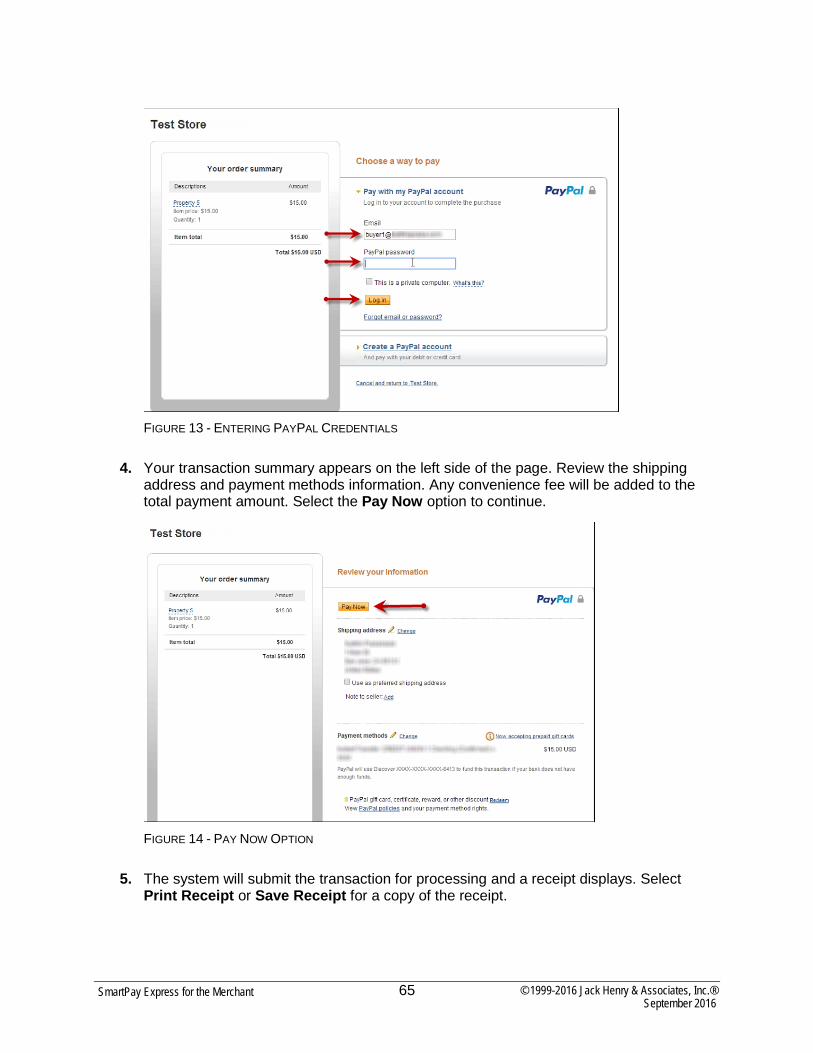
© 1999-2016 Jack Henry & Associates, Inc.® 65 September 2016
SmartPay Express for the Merchant
FIGURE 13 - ENTERING PAYPAL CREDENTIALS
4. Your transaction summary appears on the left side of the page. Review the shipping address and payment methods information. Any convenience fee will be added to the total payment amount. Select the Pay Now option to continue.
FIGURE 14 - PAY NOW OPTION
5. The system will submit the transaction for processing and a receipt displays. Select Print Receipt or Save Receipt for a copy of the receipt.
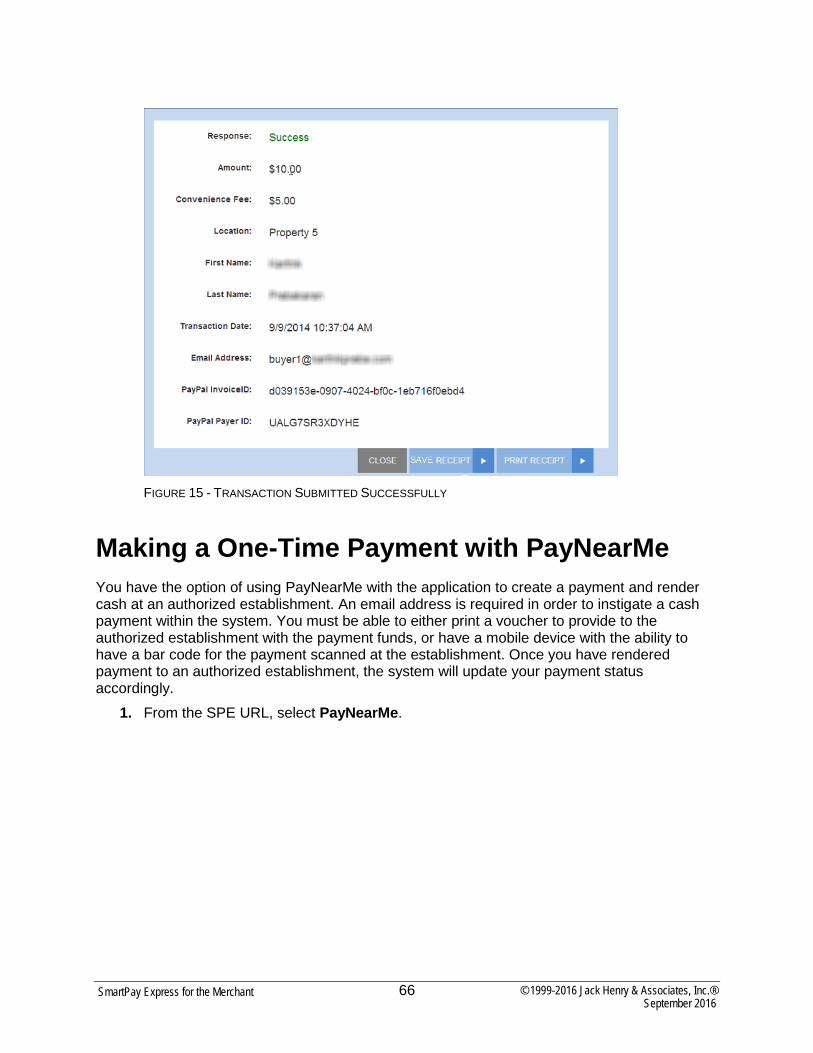
© 1999-2016 Jack Henry & Associates, Inc.® 66 September 2016
SmartPay Express for the Merchant
FIGURE 15 - TRANSACTION SUBMITTED SUCCESSFULLY
Making a One-Time Payment with PayNearMe You have the option of using PayNearMe with the application to create a payment and render cash at an authorized establishment. An email address is required in order to instigate a cash payment within the system. You must be able to either print a voucher to provide to the authorized establishment with the payment funds, or have a mobile device with the ability to have a bar code for the payment scanned at the establishment. Once you have rendered payment to an authorized establishment, the system will update your payment status accordingly.
1. From the SPE URL, select PayNearMe.

© 1999-2016 Jack Henry & Associates, Inc.® 67 September 2016
SmartPay Express for the Merchant
FIGURE 16 - SPE URL PAGE, PAYNEARME INDICATED
2. The PayNearMe page appears. Enter your information in the Email Address field where the payment confirmation from PayNearMe can be sent. Select a location where the payment will go toward in the To Account field. Enter a numerical value for the Pay This Amount field in XX.XX format. If this location extracts a Convenience Fee Amount, the amount will display. Select the PayNearMe option to continue.
FIGURE 17 - PAYNEARME PAGE
3. A response page appears. The system will create an order for your payment. Select the Order Identifier option.

© 1999-2016 Jack Henry & Associates, Inc.® 68 September 2016
SmartPay Express for the Merchant
FIGURE 18 - ORDER IDENTIFIER OPTION
4. The system will navigate you to a PayNearMe page. Enter a zip code to help identify eligible locations to make a cash payment. Select Pay to designate a payment location.
FIGURE 19 - PAYNEARME PAYMENT LOCATIONS
5. The system will provide you with the option to print a PaySlip that you can provide to the retailer. It contains the token number (also displayed on the site page) needed to render the cash payment. You may also select Use Mobile and use your smart phone mobile device as the PaySlip when making the cash payment.

© 1999-2016 Jack Henry & Associates, Inc.® 69 September 2016
SmartPay Express for the Merchant
NOTE: You will need to render a cash payment to the retailer in order to complete your payment.
FIGURE 20 - PRINT OR USE MOBILE FOR PAYSLIP
FIGURE 21 - PRINTABLE PAYSLIP
Making a One-Time Payment with Visa Checkout You have the option to use your Visa Checkout account to facilitate making a payment on the site.
1. From the payment site, select the Visa Checkout button.

© 1999-2016 Jack Henry & Associates, Inc.® 70 September 2016
SmartPay Express for the Merchant
FIGURE 22 - VISA CHECKOUT BUTTON
2. The system displays the Visa Checkout lightbox to start a payment. Enter your Username and Password for your Visa Checkout account, and select Sign In.
FIGURE 23 - VISA CHECKOUT LIGHTBOX, SIGN IN
3. Select the credit card you would like to use for this payment, and choose Continue.

© 1999-2016 Jack Henry & Associates, Inc.® 71 September 2016
SmartPay Express for the Merchant
FIGURE 24 - VISA CHECKOUT LIGHTBOX, PAYMENT SELECTION
4. The system will direct you to a payment page. Complete any required fields, such as Location, Amount, Email Address, and Confirm Email Address.
5. Select Continue. You will be able to review the payment information next.

© 1999-2016 Jack Henry & Associates, Inc.® 72 September 2016
SmartPay Express for the Merchant
FIGURE 25 - ENTERING REQUIRED INFORMATION
NOTE: If you selected a vendor location that does not support your card type, or would like to change which card to use for this payment, use the Change Card with Visa Checkout option to select another card you have registered with your Visa Checkout account.
FIGURE 26 - OPTIONS TO CHANGE CREDIT CARDS WITH VISA CHECKOUT
6. Review your payment information and agreement before selecting Agree and Submit to finish the payment.

© 1999-2016 Jack Henry & Associates, Inc.® 73 September 2016
SmartPay Express for the Merchant
FIGURE 27 - AGREE AND SUBMIT

© 1999-2016 Jack Henry & Associates, Inc.® 74 September 2016
SmartPay Express for the Merchant
User Registration with SPE If you are not making a payment at this time but wish to register your information in the system for future use, select the Create Account option from the splash page of the site. As a registered user, you may create single and/or recurring payments, maintain several accounts from which to create payments, draw reports on previous and/or scheduled payments, and maintain your user account information. Once you have registered, an email with your password will be sent to the provided email address. Your email address and provided temporary password are the credentials needed to log in to SmartPay Express.
FIGURE 28 - CREATE ACCOUNT OPTION
1. The User Registration page appears. Fill in the required fields designated with a red outline and any optional fields, as desired. The following fields are required for user registration.
• Username – Enter an email address to have as a username. This will be the email address you will enter when logging in to the system.
• First Name – Enter your first name.
• Last Name – Enter your last name.
• Secret Question – Create a phrase, word, or question that can be used for identification purposes if a new temporary password needs to be requested. This is not a case-sensitive field and does not need to be in the form of a question.
• Secret Answer – Provide the answer to the secret question above. • Confirm Secret Answer – Re-type the secret answer.
• Address – Enter your physical address. • City, State, Zip – Enter the city, state, and zip code for the physical address.

© 1999-2016 Jack Henry & Associates, Inc.® 75 September 2016
SmartPay Express for the Merchant
• Email Address – If this field is not automatically populated with the Username information provided earlier on the page, enter your email address.
• Confirm Email Address – Confirm your email address.
• CAPTCHA – As an added security, select the check box next to I’m not a robot. Once you have finished entering information, select Register.
FIGURE 29 - USER REGISTRATION PAGE

© 1999-2016 Jack Henry & Associates, Inc.® 76 September 2016
SmartPay Express for the Merchant
Resetting Your Password If you have forgotten your password to log in, but you are not locked out of the system, use the following steps to have a new temporary password sent to you via email. Upon logging in with the temporary password, you will need to update your password.
NOTE: Please see the next section, “Regaining Access If You Are Locked Out” for more information if you have entered your login credentials incorrectly at least five times.
1. Navigate to the payment site and select the Forgot Password? link.
FIGURE 30 – FORGOT PASSWORD? LINK
2. The Forgot Password page appears. Enter the User Name associated with your profile. If your vendor has enabled an added security, answer the question in the CAPTCHA field. Select Next.
FIGURE 31 – USER NAME/PASSWORD RETRIEVAL PAGE
3. The Secret Question page appears. Enter the answer to the secret question for this profile, and select Request Password.
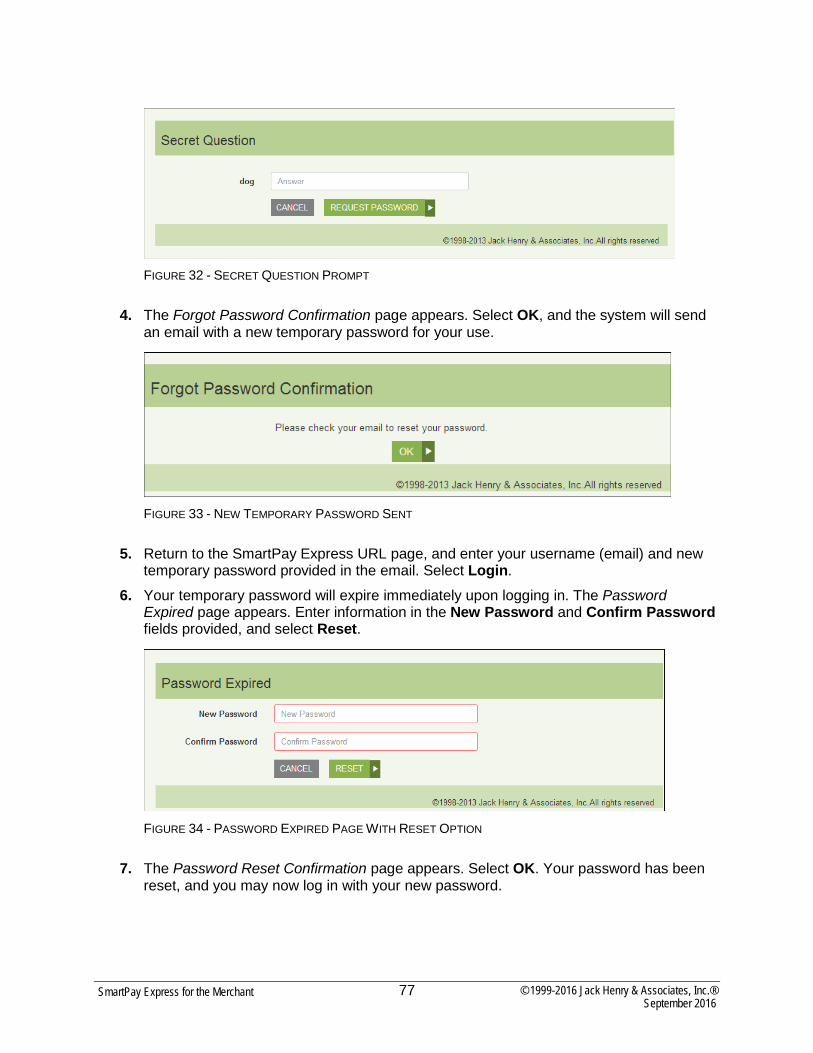
© 1999-2016 Jack Henry & Associates, Inc.® 77 September 2016
SmartPay Express for the Merchant
FIGURE 32 - SECRET QUESTION PROMPT
4. The Forgot Password Confirmation page appears. Select OK, and the system will send an email with a new temporary password for your use.
FIGURE 33 - NEW TEMPORARY PASSWORD SENT
5. Return to the SmartPay Express URL page, and enter your username (email) and new temporary password provided in the email. Select Login.
6. Your temporary password will expire immediately upon logging in. The Password Expired page appears. Enter information in the New Password and Confirm Password fields provided, and select Reset.
FIGURE 34 - PASSWORD EXPIRED PAGE WITH RESET OPTION
7. The Password Reset Confirmation page appears. Select OK. Your password has been reset, and you may now log in with your new password.
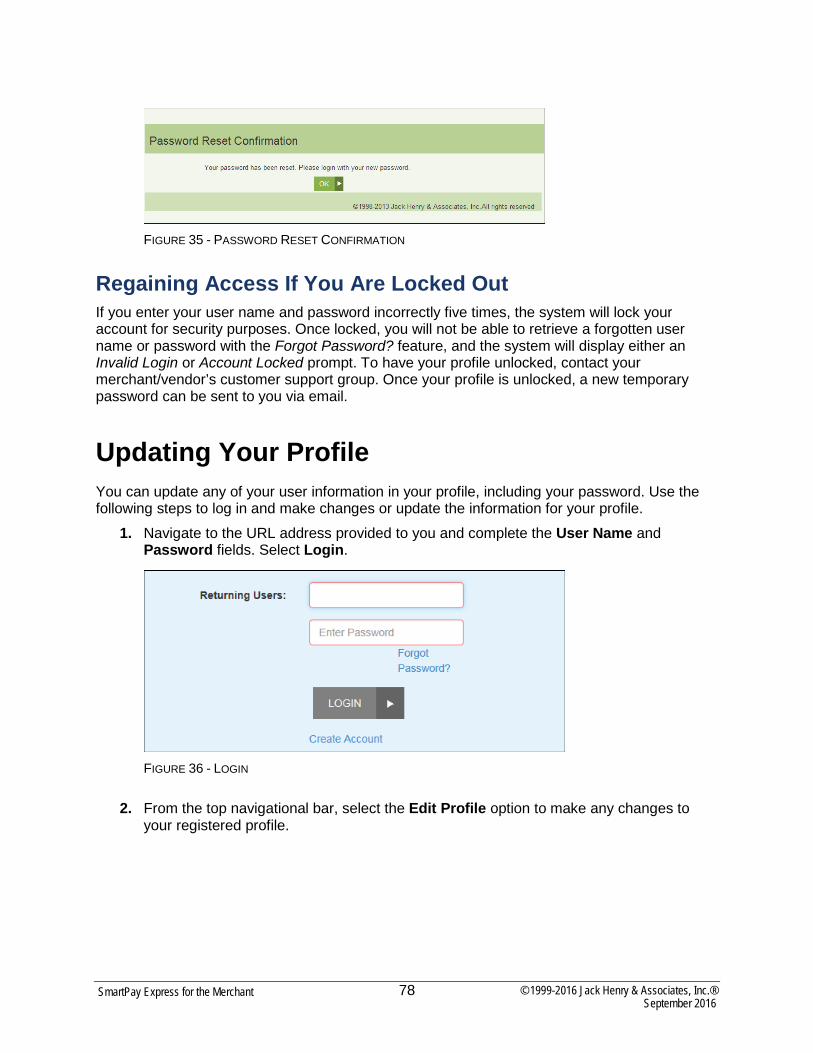
© 1999-2016 Jack Henry & Associates, Inc.® 78 September 2016
SmartPay Express for the Merchant
FIGURE 35 - PASSWORD RESET CONFIRMATION
Regaining Access If You Are Locked Out If you enter your user name and password incorrectly five times, the system will lock your account for security purposes. Once locked, you will not be able to retrieve a forgotten user name or password with the Forgot Password? feature, and the system will display either an Invalid Login or Account Locked prompt. To have your profile unlocked, contact your merchant/vendor’s customer support group. Once your profile is unlocked, a new temporary password can be sent to you via email.
Updating Your Profile You can update any of your user information in your profile, including your password. Use the following steps to log in and make changes or update the information for your profile.
1. Navigate to the URL address provided to you and complete the User Name and Password fields. Select Login.
FIGURE 36 - LOGIN
2. From the top navigational bar, select the Edit Profile option to make any changes to your registered profile.

© 1999-2016 Jack Henry & Associates, Inc.® 79 September 2016
SmartPay Express for the Merchant
FIGURE 37 - EDIT PROFILE OPTION
3. The User Profile page appears. This page contains four sections of information to update. Enter information for all required fields, indicated by a red outline. The first section is Personal Information, which contains contact information for the profile. Before moving on to the next section, select Update Personal Info at the bottom of this section.
• Select whether this is an Individual account or Business account.
• Email Address – Enter the email address associated with this profile.
• First Name – Enter the first name of the point of contact for the profile.
• Last Name – Enter the last name of the point of contact for the profile.
• Address (optional) – Enter the physical address for this profile.
• City, State, Zip (optional) – Enter information for the city, 2-character abbreviation of the state or region associated with the physical address, and postal zip code.
• Country – Specify the country associated with the profile.
• Phone – Enter the telephone number associated with the profile.
• DL Number – Enter your driver’s license number.
• DL State – Specify the state in which the driver’s license is valid.
• Social Security – Enter your Social Security number.
NOTE: Up to three additional informational fields may display, depending on the merchant/vendor’s requirements. If required, enter the requested information accordingly.
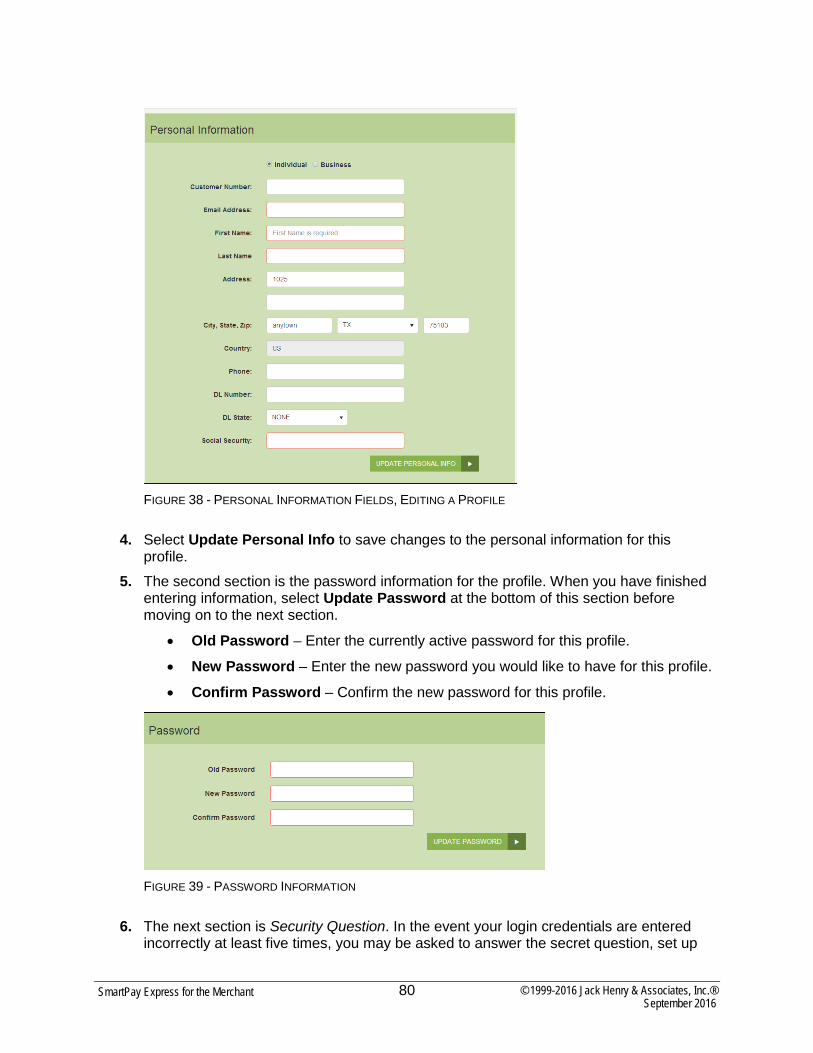
© 1999-2016 Jack Henry & Associates, Inc.® 80 September 2016
SmartPay Express for the Merchant
FIGURE 38 - PERSONAL INFORMATION FIELDS, EDITING A PROFILE
4. Select Update Personal Info to save changes to the personal information for this profile.
5. The second section is the password information for the profile. When you have finished entering information, select Update Password at the bottom of this section before moving on to the next section.
• Old Password – Enter the currently active password for this profile.
• New Password – Enter the new password you would like to have for this profile.
• Confirm Password – Confirm the new password for this profile.
FIGURE 39 - PASSWORD INFORMATION
6. The next section is Security Question. In the event your login credentials are entered incorrectly at least five times, you may be asked to answer the secret question, set up
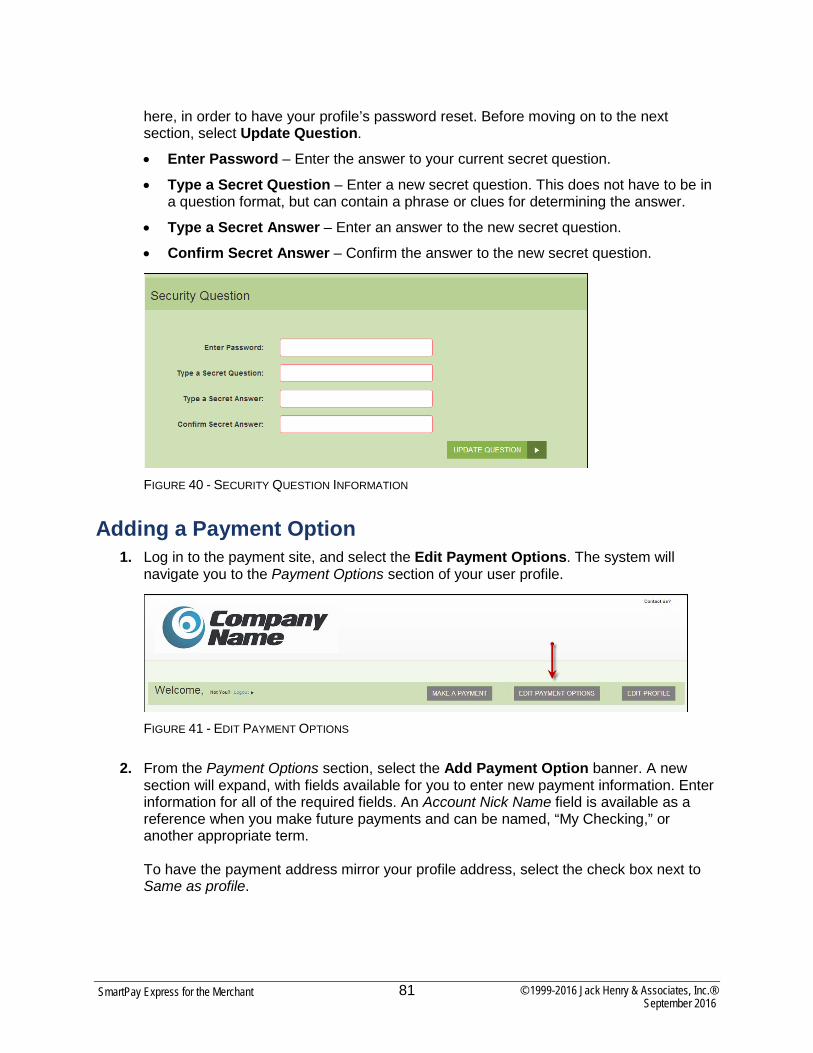
© 1999-2016 Jack Henry & Associates, Inc.® 81 September 2016
SmartPay Express for the Merchant
here, in order to have your profile’s password reset. Before moving on to the next section, select Update Question.
• Enter Password – Enter the answer to your current secret question.
• Type a Secret Question – Enter a new secret question. This does not have to be in a question format, but can contain a phrase or clues for determining the answer.
• Type a Secret Answer – Enter an answer to the new secret question.
• Confirm Secret Answer – Confirm the answer to the new secret question.
FIGURE 40 - SECURITY QUESTION INFORMATION
Adding a Payment Option 1. Log in to the payment site, and select the Edit Payment Options. The system will
navigate you to the Payment Options section of your user profile.
FIGURE 41 - EDIT PAYMENT OPTIONS
2. From the Payment Options section, select the Add Payment Option banner. A new section will expand, with fields available for you to enter new payment information. Enter information for all of the required fields. An Account Nick Name field is available as a reference when you make future payments and can be named, “My Checking,” or another appropriate term. To have the payment address mirror your profile address, select the check box next to Same as profile.

© 1999-2016 Jack Henry & Associates, Inc.® 82 September 2016
SmartPay Express for the Merchant
FIGURE 42 - ADDING A PAYMENT OPTION
3. Select the Add Payment Option at the bottom of the page.
You may return to Payment Options and make any changes to a payment option as needed. Select the Update option at the bottom of the section to save changes.
FIGURE 43 - UPDATE OPTION
NOTE: Changes cannot be made to a payment option once it has expired. For example, if a credit card has expired, you cannot update the expired payment option, but

© 1999-2016 Jack Henry & Associates, Inc.® 83 September 2016
SmartPay Express for the Merchant
will need to create a new payment option with updated information. It is recommended that you regularly maintain your payment options to avoid having expired information. Expired payment options will not be available for selection when making payments/donations.
Deleting a Payment Option 1. To delete a payment option, navigate to the Payment Options section of your user
profile, and select the Delete option.
FIGURE 44 - DELETING A PAYMENT OPTION
Making a Single Payment Payments and donations can be created individually or set up to reoccur at periodic intervals. They can be charged to either a credit card or taken from a checking or savings account. For any single payments dated for today’s date, you have the option to set up a recurring payment at periodic intervals.
1. Log in to SmartPay Express, and select Make a Payment from the top of the page.

© 1999-2016 Jack Henry & Associates, Inc.® 84 September 2016
SmartPay Express for the Merchant
FIGURE 45 - MAKE A PAYMENT OPTION
2. The Make Payment page appears. Enter the appropriate information in all the required fields outlined in red. Not all merchants/vendors require the same information.
• Pay This Amount – Enter the amount to be paid as a numerical value with two decimal places. For example, XX.XX.
• Location – Select where the funds will be sent. If only one location is available, it will become the default location for this payment.
• Pay from Account – Select a payment option you have where funds will be drawn. Expired accounts will not be listed. Please refer to the Edit Payment Options feature on the SPE site to maintain your account information regularly.
• Payment Date – Select the day of payment. You may also enter the following optional information, depending on the type of payment.
• Description – Enter a description for the payment.
• Check Number – If you are using a check for this particular account payment, enter the check number.
• Transaction Number – An alphanumeric field that must be unique for each transaction. If left blank, the system will automatically assign a value for this field. It is strongly recommended that you leave this field blank unless it is required by your creditor or organization.
• CVV Code (card payment) -– Enter the CVV verification code found on the back of the card. For American Express cards, this is located on the front of the credit card. Depending on your merchant/vendor, this field may be required.
• Transaction Optional Fields – Up to three optional fields may appear to capture additional information about the transaction. If required, fill in the appropriate field(s).

© 1999-2016 Jack Henry & Associates, Inc.® 85 September 2016
SmartPay Express for the Merchant
FIGURE 46 - MAKING A SINGLE PAYMENT
3. If you have scheduled a single payment to be made for the current date (today), you have the option of making this payment a series of recurring payments for the same amount. On the Make Payment page, select the recurring option. If not, proceed to the next step.
FIGURE 47 - MAKE RECURRING OPTION
a. Additional fields for the recurring payment process appear. Select values for the Frequency (once a month, every two weeks, etc.) of the recurring payment and the Payment Day (numerical calendar date) on which the funds will be drawn.

© 1999-2016 Jack Henry & Associates, Inc.® 86 September 2016
SmartPay Express for the Merchant
FIGURE 48 - MAKE RECURRING PAYMENT OPTIONS
b. Enter the Start Date of the first recurrence in MM/DD/YYYY format, or use the calendar option to specify a date.
c. Indicate the # Of Payments that will occur. Alternatively, you can select the check box next to Infinite Payment, which will set payments indefinitely until you decide to change the payment settings. The Next Payment Date field will display the day when the next payment will be taken.
NOTE: The value in the # Of Payments field indicates the number of recurring payments, not a single payment immediately. For example, a value of 3 will render three recurring payments beginning at the Start Date only.
4. If you also wish to include a single payment at this time in addition to setting up the recurring payments, select the check box next to Include a Single Payment Now.
5. Select Continue.

© 1999-2016 Jack Henry & Associates, Inc.® 87 September 2016
SmartPay Express for the Merchant
FIGURE 49 - PAY OPTION
6. The Confirm Payment page appears, with the opportunity to verify the data and authorize the payment. Read the Authorization Agreement provided, and select Agree And Submit.

© 1999-2016 Jack Henry & Associates, Inc.® 88 September 2016
SmartPay Express for the Merchant
FIGURE 50 - CONFIRMATION PAGE
7. The Transaction Receipt appears. Select Print Receipt to print a copy for your records. You may also select Save Receipt to save a PDF version of the receipt on your computer.

© 1999-2016 Jack Henry & Associates, Inc.® 89 September 2016
SmartPay Express for the Merchant
FIGURE 51 - TRANSACTION RECEIPT

© 1999-2016 Jack Henry & Associates, Inc.® 90 September 2016
SmartPay Express for the Merchant
Maintaining Recurring Payments When you log in to the payments site, you can view recurring payments you have set up in the system. These can be adjusted as needed.
1. To enable or disable a recurring transaction, log in and select the payment from the Recurring Transactions section on the home page.
2. Alter the details of the payment as needed, including amount, frequency of payment, and so on. Ensure that the check box next to the Enabled field is selected or deselected, depending on whether you wish to activate the payment at this time.
FIGURE 52 - ENABLE/DISABLE RECURRING PAYMENT
3. Select Submit to save all changes for this payment.
Viewing Payment History When you log in to the payments site, you can view past payments/transactions that you have made. For a custom report of payment history, select the Full Transaction History option.

© 1999-2016 Jack Henry & Associates, Inc.® 91 September 2016
SmartPay Express for the Merchant
FIGURE 53 - FULL TRANSACTION HISTORY OPTION
The Transaction History page appears. Complete the From Date and To Date values and select Run Report for a list of payment records.
FIGURE 54 - TRANSACTION HISTORY PAGE

© 1999-2016 Jack Henry & Associates, Inc.® 92 September 2016
SmartPay Express for the Merchant
Creating a Single Payment with Pay Pal As a registered user, you have the ability to make a payment with Pay Pal when logged in to the system.
1. Log in to the application. From the Welcome page, select Check out with PayPal.
FIGURE 55 - REGISTERED USER, PAYPAL OPTION
2. The PayPal page appears. Select a value for the To Account field and enter a numerical value in the Pay This Amount field in XX.XX format. Select Check out with PayPal.
FIGURE 56 - PAYPAL PAGE
3. The PayPal login page appears. Enter your PayPal credentials and select Log in to PayPal to continue making a payment.

© 1999-2016 Jack Henry & Associates, Inc.® 93 September 2016
SmartPay Express for the Merchant
FIGURE 57 - PAYPAL LOGIN PAGE
4. Your PayPal store appears. Select the Pay Now option.
FIGURE 58 - PAY NOW OPTION
A response page for your transaction appears. Submitted transactions have Success displayed in the Response field. Once you select Close, the transaction will appear in the Transaction History section of the Welcome page. You may also select Save Receipt or Print Receipt for a print-friendly receipt.

© 1999-2016 Jack Henry & Associates, Inc.® 94 September 2016
SmartPay Express for the Merchant
FIGURE 59 - SUCCESS RESPONSE FOR SUBMITTED TRANSACTION

© 1999-2016 Jack Henry & Associates, Inc.® 95 September 2016
SmartPay Express for the Merchant
Reports You have the ability to monitor and maintain your currently scheduled as well as historical payments by viewing the reports available. You may also choose to export reports into an Excel or PDF document.
Viewing and Editing Scheduled Payments 1. Log in to SmartPay Express. The Welcome page appears. Under the Scheduled
Payments section, select a scheduled payment to view its details.
FIGURE 60 - SCHEDULED PAYMENT
2. The payment details for the scheduled payment appear. You may make changes to the following fields in a scheduled single or recurring payment.
• Amount – The value of the payment in two-place decimal format (XX.XX).
• To – The location selected and where the transaction funds will be deposited
• Select Account – The account (bank or card) from where the transaction funds will be taken
• Frequency – This value reflects the frequency option selected when the recurring payment was first created
• Payment Day – This value reflects the frequency option originally selected when creating the recurring payment
• Start Date – The date when the first scheduled payment will take place
• # Of Payments – The total number of payments originally selected for this payment
• # Of Payments Made – This is the number of payments that have already been collected from the account information provided

© 1999-2016 Jack Henry & Associates, Inc.® 96 September 2016
SmartPay Express for the Merchant
• Next Recurrence – The date on which the next payment will be drawn
• Infinite Payment – Select the check box next to this option to make this recurring payment ongoing indefinitely
• Enabled – Select the check box next to this option to designate the payment as active. If you deselect this checkbox (empty), the payment will become disabled.
• Delete Payment – Select the check box next to this option to have the entire recurring payment deleted
3. Once you have made all changes as needed, select Submit to save changes.
FIGURE 61 - EDITING A SCHEDULED PAYMENT
Creating a Transaction History Report 1. Log in to the site, and select the Full Transaction History option at the bottom of the
page.
FIGURE 62 – FULL TRANSACTION HISTORY OPTION

© 1999-2016 Jack Henry & Associates, Inc.® 97 September 2016
SmartPay Express for the Merchant
2. A Transaction History appears. Enter values for the From Date field and To Date field in MM/DD/YYYY format, or you may use the calendar option. Select Run Report. The results appear in a list, with navigational options for longer reports.
FIGURE 63 – TRANSACTION HISTORY REPORT
NOTE: If you wish to export this report’s information, select a file type (Excel or PDF), and select Export. The document will generate with transaction information for the dates provided.
FIGURE 64 - EXPORT OPTION


![BEAVER PAGE - furharvesters.com · beaver page - 3-----|-----|----- con't eastern [ 18.00] | |](https://static.fdocuments.in/doc/165x107/5c12044b09d3f2602c8cd5df/beaver-page-beaver-page-3-cont-eastern-1800-.jpg)