Empire Co
9
Eliminate Disposal Of Old Mouldings RapidFit ® installs directly over old mouldings. Save Your Walls No need to tear out old moulding. Cut Install Time Use corner accessories for maximum time savings. Popular Styles RapidFit ® is available in a variety of popular patterns. The easy way to upgrade moulding. ™ ™
-
Upload
hanley-wood-exhibitions -
Category
Documents
-
view
214 -
download
0
description
RapidFit block moulding
Transcript of Empire Co

Eliminate Disposal OfOld MouldingsRapidFit® installs directlyover old mouldings.
Save Your WallsNo need to tear out old moulding.
Cut Install TimeUse corneraccessories for maximumtime savings.
Popular StylesRapidFit® is available in a variety of popular patterns.
The easy way to upgrade moulding.
1
™™
™™

Blocks add beauty and distinction to any moulding project. RapidFit® blocks add beauty and reduce installation time. They install over existing moulding and require only straight cuts on your RapidFit® moulding.
Block Install
Outside Corner
Middle1
23
Inside Corner
Rosette Outside Corner
MiddleInside Corner
Plinth single carved
Plinth dual carved
(A simple cut on the old base is required to install single carved plinth.)
Spacers close the gap between the old casing and RapidFit®
casing, and they provide easy alignment of the leading edge of
the new casing.
Spacers close the gap between
old base and RapidFit® base.
RapidFit® Base
Spacers
Old Base
RapidFit® Casing
Spacers
Old Casing
Transition (A simple cut on the old base is re-quired to install a Transition block)
Before
After After After
Install all RapidFit®
Blocks as shown bynailing into place.
Measure and cut RapidFit® Moulding to fit between installed blocks.
Place Spacers as needed and nail RapidFit®Moulding in place.
CasingCovers Existing Casing up to:
11/16" Th x 2-1/2" W
Base Covers Existing Base up to:
9/16" Th x 4-1/2" W
CrownCovers Existing Crown up to:
9/16" Th x 3-5/8" W
For use when ONLY upgrading
Base
For use when upgrading both casing and base. No cuts
required.

RapidFit® mouldings miter as easily as traditionalmouldings and there is no need to remove existing mouldings. Mitered corners provide a more traditional look and they result in a smaller project bill.
Miter Install
Mitered Outside Corner
Mitered Outside Corner
Mitered Inside Corner
Mitered Inside Corner1
2Spacers close the
gap between the old casing and RapidFit®
casing, and they provide easy alignment of the leading edge of
the new casing.
RapidFit® Base
Spacers
Old Base
RapidFit® Casing
Spacers
Old Casing
Transition(A simple cut on the old base is required for casing to extend to ground)
(A simple cut on the old base is required to install a Transition Block)
Before
After After
For use when ONLY upgrading
Base
Measure and miter corners.
Place Spacers as needed and nail RapidFit® Moulding in place.
CasingCovers Existing Casing up to:
11/16" Th x 2-1/2" W
Base Covers Existing Base up to:
9/16" Th x 4-1/2" W
CrownCovers Existing Crown up to:
9/16" x 3-5/8"
Spacers close the gap between
old base and RapidFit® base.
Mitered Door Corner
If updatingboth casing and
base, casing should be
installed first

Qty. Inside Corners _________ (determine number of inside corners)
Qty. Outside Corners _________ (determine number of outside corners)
Qty. Middle Blocks _________ (used between two pieces of RapidFit® base moulding)
1. Measure the total distance around all windows and doors. Compute how many feet of casing are needed to complete your project. Remember to add sufficient material to cover trim and waste (10% over is typically sufficient).
Windows and Doors: Total Inches _________ " / 12" = Total Feet _________ '
8' Casing Qty. _________ 12' Casing Qty. _________
2. Rosettes: Used at door and window corners. The number of Rosettes needed to complete your job will depend on the number of doorways and windows you are updating. Consider the illustration to the right when determining how many Rosettes you will need.
Total Rosette Qty. for Windows and Doors _________
3. Plinth Blocks: Plinth Blocks are used at the bottom of door casing, where base moulding meets door casing. Single Carved Plinth Blocks are to be used when upgrading your casing ONLY. Dual Carved Plinth Blocks are used when upgrading BOTH casing and base.
4. Spacers: Spacers act as a buffer between the heel of your old casing and RapidFit casing. Place Spacers every 6 inches. Each spacer is 1/8" thick and can be stacked on top of each other to fill in any gap.
Total Project Inches _________ / 6 in. = _________ of spacers needed / 50 per pack = _________ packages
1. Measure the total distance around your room, excluding openings for doors. Remember to add sufficient material to cover trim and waste (10% over is typically sufficient).
Room Measurements: Total Inches _________ " / 12" = Total Feet _________ '
8' Base Qty. _________ 12' Base Qty. _________
2. Transition Blocks: Transition Blocks are used to create a smooth transition between existing door casing applications and your newly upgraded base. Transition Blocks are packaged in pairs, one for each side of the door opening. They are not necessary if you are upgrading both casing and base.
_________ x 1 set Transition Blocks
3.
4. Spacers: Spacers act as a buffer between the face of your old base and RapidFit base. Place Spacers every 6 inches. Each spacer is 1/8” thick and can be stacked on top of each other to fill in any gap.
Total Project Inches _________ / 6 in. = _________ of spacers needed / 50 per pack = _________ packages
1. Measure the total distance around your room. Remember to add sufficient material to cover trim and waste (10% over is typically sufficient).
Room Measurements: Total Inches _________ " / 12" = Total Feet _________ '
8' Crown Qty. _________ 12' Crown Qty. _________
2.
Check ListBlock Installation
Number of Doors _________ x 1 set Single Carved Plinth Block
Number of Doors _________ x 1 set Dual Carved Plinth Block
or
Cas
ing
Bas
eC
row
n
4 corners requires 4 rosettes
2 corners requires 2 rosettes
Optionalplinth blocks
Qty. Inside Corners _________ (determine number of inside corners)
Qty. Outside Corners _________ (determine number of outside corners)
Qty. Middle Blocks _________ (used between two pieces of RapidFit® crown moulding)
Floor Plan
Inside Corner Blocks
Outside Corner Blocks

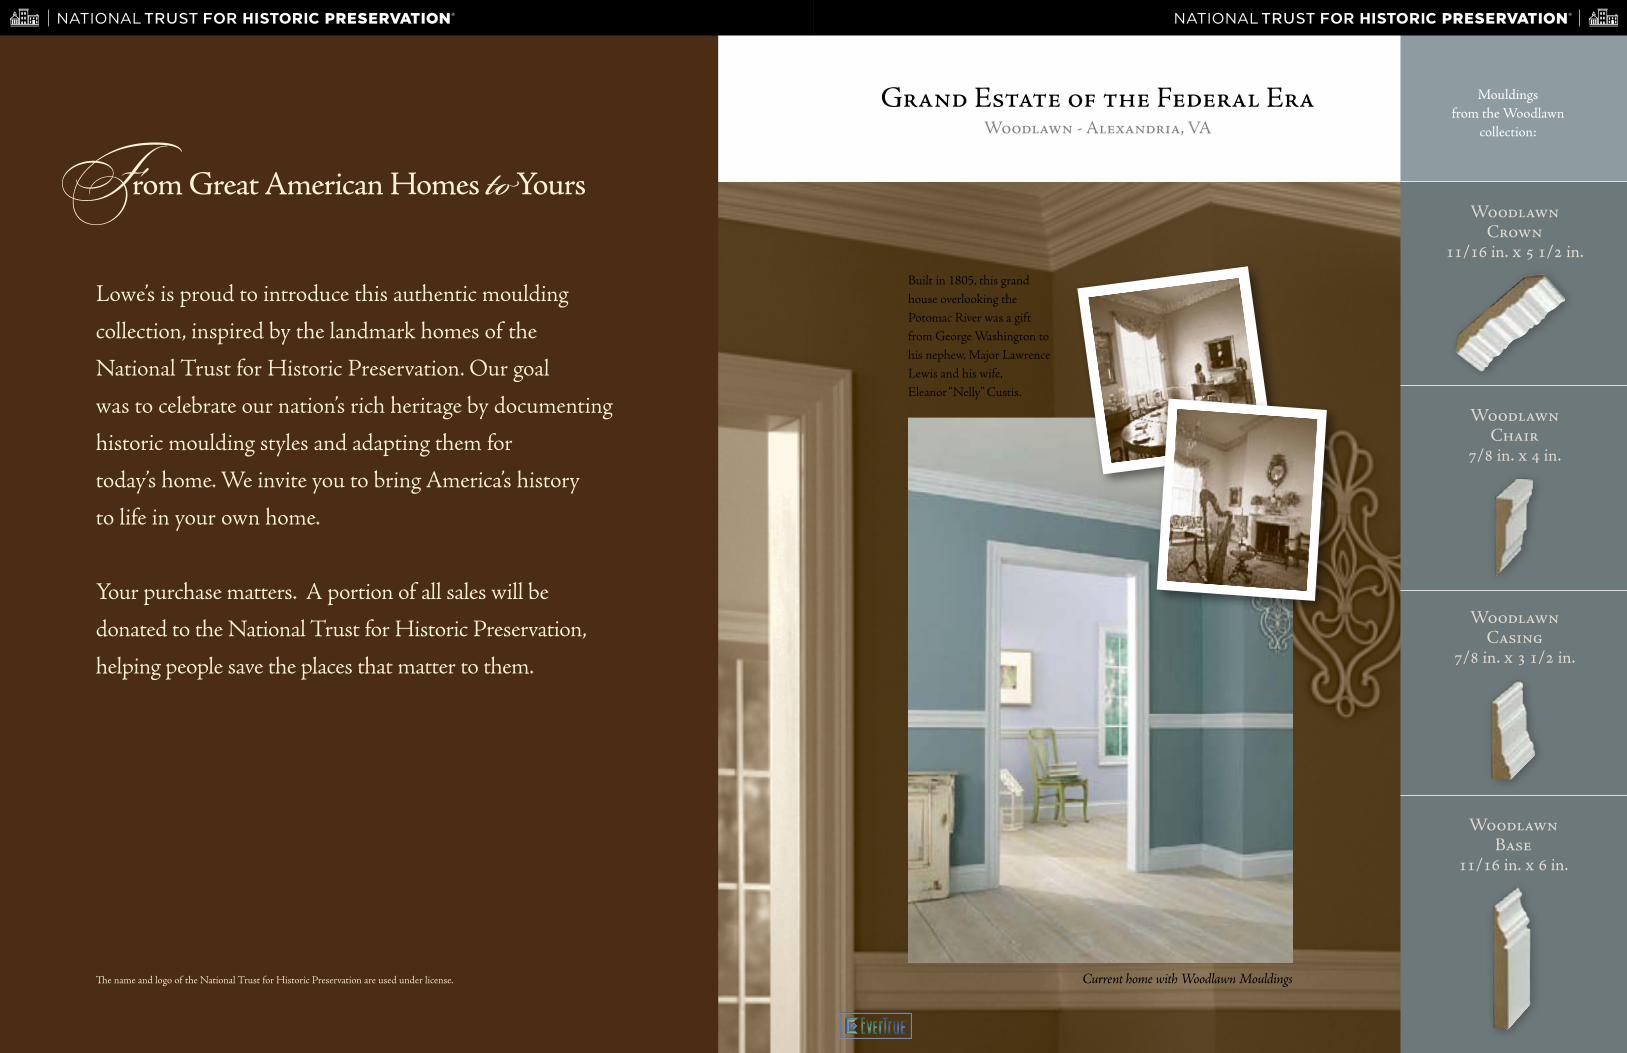
From Great American Homes to YoursAuthentic Mouldings Inspired by Landmark Homes of
the National Trust for Historic Preservation
FILEDATE
1102.0165.002. EverTrue Moulding08/06/04 sjl&ec 1
™™
™™
™™
WoodlawnChair
7/8 in. x 4 in.
WoodlawnCasing
7/8 in. x 3 1/2 in.
WoodlawnCrown
11/16 in. x 5 1/2 in.
WoodlawnBase
11/16 in. x 6 in.
Grand Estate of the Federal EraWoodlawn - Alexandria, VA
Built in 1805, this grand house overlooking the Potomac River was a gift from George Washington to his nephew, Major Lawrence Lewis and his wife, Eleanor “Nelly” Custis.
Current home with Woodlawn Mouldings
Mouldings from the Woodlawn
collection:
Lowe’s is proud to introduce this authentic moulding
collection, inspired by the landmark homes of the
National Trust for Historic Preservation. Our goal
was to celebrate our nation’s rich heritage by documenting
historic moulding styles and adapting them for
today’s home. We invite you to bring America’s history
to life in your own home.
Your purchase matters. A portion of all sales will be
donated to the National Trust for Historic Preservation,
helping people save the places that matter to them.
The name and logo of the National Trust for Historic Preservation are used under license.
From Great American Homes to Yours
1
™™
™™

Woodrow Wilson Chair
7/8 in. x 3 1/2 in.
Belle Grove Chair
7/8 in. x 2 1/2 in.
Woodrow Wilson Casing
7/8 in. x 3 1/2 in.
Belle Grove Casing
7/8 in. x 4 in.
Woodrow Wilson Crown
11/16 in. x 4 1/2 in.
Belle Grove Crown
11/16 in. x 6 in.
Woodrow Wilson Base
11/16 in. x 5 1/2 in.
Belle Grove Base
11/16 in. x 7 in.
Classical Presidential ResidenceWoodrow Wilson House - Washington, D.C.
In 1921, after leading the nation through the first World War, President Woodrow Wilson moved to this elegant Washington home.
Current home with Woodrow Wilson MouldingsCurrent home with Belle Grove Mouldings
Mouldings from the Woodrow Wilson
collection:
Mouldings from the Belle Grove
collection:
Once described as “the most splendid building west of
the Blue Ridge,” Belle Grove Plantation is one of the most
imposing and important structures in Virginia’s
historic Shenandoah Valley.
Historic American Plantation Belle Grove - Middletown, VA
1
™™
™™
1
™™
™™

Shadows-on-the-Teche Chair
7/8 in. x 3 in.
Chesterwood Chair
11/16 in. x 4 in.
Shadows-on-the-Teche Casing
7/8 in. x 4 in.
Chesterwood Casing
7/8 in. x 3 1/2 in.
Shadows-on-the-Teche Crown
11/16 in. x 6 in.
ChesterwoodCrown
7/8 in. x 5 in.
Shadows-on-the-Teche Base
11/16 in. x 7 in.
Chesterwood Base
11/16 in. x 6 in.
Southern PlantationShadows-on-the-Teche - New Iberia, LA
Built in 1834 as the home of a sugar planter, Shadows-on-the Teche combines the Clas-sic Revival and Louisiana Colonial styles. Situated on the banks of the Bayou Teche in the heart of Cajun Louisiana, the Shadows tells the story of life on a nineteenth-century southern Louisiana plantation.
Current home with Shadows-on-the-Teche MouldingsCurrent home with Chesterwood Mouldings
Mouldings from the Shadows-on-the-Teche collection:
Mouldings from the Chesterwood collection:
Chesterwood is the country home and studio of Daniel Chester French (1850-1931), sculptor
of many familiar public monuments including the statue of Abraham Lincoln for the Memorial
in Washington, DC, and The Minute Man in Concord, MA. His estate, nestled in the Berkshire
Hills of western Massachusetts, provided an inspirational retreat from urban New York,
where he lived six months out of the year.
Country Estate Chesterwood - Stockbridge, MA
1
™™
™™
1
™™
™™

Villa FinaleChair
7/8 in. x 3 in.
Villa FinaleCasing
7/8 in. x 4 1/2 in.
Villa FinaleCrown
7/8 in. x 5 1/2 in.
Villa FinaleBase
11/16 in. x 6 1/2 in.
Current home with Villa Finale Mouldings
Mouldings from the Villa Finale collection:
Villa Finale, a Texas Historical Landmark located in the historic King William
neighborhood, was built by a hardware merchant in 1876 and was the home of Walter Nold Mathis, a San Antonio preservationist and
collector, until 2005. The two-story cut limestone home is filled with Mr. Mathis’
extensive decorative arts collection.
Italianate Mansion Villa Finale - San Antonio, TX
How-To Tips for Moulding Installation
MITERING
A miter box and back saw or miter saw are tools commonly used to create an angle where two pieces of moulding join.
Trim each piece of moulding the opposite direction of the adjoining piece. For tightly mitered joints, nail and glue the pieces together. After the glue has set, it is safe to countersink the nails.
SPLICING
For long walls that a single piece of moulding will not accom-modate, splice your moulding together. Miter the joining ends at opposite 45° angles. This cut will make a scarf joint, the least noticeable way to join two pieces of moulding.
COPING
A coped joint is most commonly used at an inside corner. To create a coped joint, cut one piece square, butting it against the wall. Next, trim the adjoining piece at a 45° angle, exposing the profile. Follow the front curve of the profile, sawing at a 90° angle. For the best fit you may need to use sandpaper or a file to smooth and form the edges. When finished, the faces of your moulding profiles should fit perfectly.
FINISHING TIPS
Finishing techniques are a matter of personal preference. The following tips are sugges-tions that you may follow to install your moulding, but are not the only choices available.
1. Apply paint to the moulding before cutting or installing.
2. Measure the room and cut your moulding.
3. Install one piece at a time.
4. After all moulding is in place:a. Countersink with nail setb. Fill the nail holes with
wood puttyc. Touch up the finishd. Fill the gaps between
the wall and moulding with caulk
MITER BOX: BACKSAW
MITER SAW
allows you to cut perfect angles
the thin blade allows you to carve the end of a moulding to fit flush against another piece
available in various sizes and materials. The most common size used in moulding is 1-1/4 in. (3d) or 1-1/2 in. (4d) finishing nail. Select a galvanized or stainless steel nail for outdoor use
drives the nail below the wood surface without marring the moulding
allows you to drive a nail into a piece of moulding. Always wear safety goggles
can be used in place of a hammer and nails. Note: spring action staplers should not be used on moulding
use 25' tape measure for most applications
sandpaper, wood glue, wood filler, caulk, and paint or stain
Miter Box and Back Saw or Miter Saw:
Coping Saw:
Nails:
Nail Set:
Hammer:
Staple Gun and Staples:
Tape Measure:
Additional items you will use:
BASIC TOOLS YOU WILL NEED
PLANNING YOUR PROJECT
Measure the length of each wall, taking into account openings for windows and doors. Remember to add ten percent to the end total for mitering.
Moulding is available in a variety of lengths. Longer lengths of moulding, particularly in larger rooms, require fewer cuts making them easier to install. However, when selecting your lengths of moulding, keep in mind that you will have to transport the pieces.
1
™™
™™
1
™™
™™