EMERGENCY AIRWAY MANAGEMENT HANDBOOK · chamber from the reservoir bag. ... x Impeded lung...
48
St Vincent’s & Mater Health Campus EMERGENCY AIRWAY MANAGEMENT HANDBOOK Don Harrison Patient Safety Simulation Centre
Transcript of EMERGENCY AIRWAY MANAGEMENT HANDBOOK · chamber from the reservoir bag. ... x Impeded lung...

St Vincent’s & Mater Health Campus
EMERGENCY AIRWAY MANAGEMENT HANDBOOK
Don Harrison Patient Safety Simulation Centre

2
EMERGENCY AIRWAY MANAGEMENT HANDBOOK 6th Ed. 2015 Compiled by the staff of the Don Harrison Patient Safety Simulation Centre & Emergency Department of St Vincent’s Hospital, Sydney

3
CONTENTS
Airway assessment 4 Basic airway management 7 Bag ventilation 10 Endotracheal intubation 12 The laryngoscope 15 Direct laryngoscopy 18 Video laryngoscopy 19 Grades of laryngoscopy 20 Complications of laryngoscopy 21 Positioning 22 Peri intubation oxygenation 23 The rapid sequence induction 25 Airway checklist 27 Intubation drugs 28 Confirmation of ETT position 33 Securing the ETT 35 Complications of intubation 37 Post intubation management 38 Managing the difficult airway 40 Can’t intubate / can’t ventilate 41 The laryngeal mask (LMA) 42 Intubating LMA 44 Surgical airway 45 The Difficult Airway Trolley 47

4
AIRWAY ASSESSMENT
There are 3 considerations to airway assessment: 1. Ability to bag-valve-mask (BVM) ventilate2. Ability to intubate3. Ability to perform surgical airway
Traditional predictors of a difficult airway have not been validated in the ED setting. Although these predictors are still useful, there are many factors unique to the ED situation that renders all airways potentially difficult:
x History taking is often limited x Physical examination is often limited x Pre-oxygenation may be impossible or ineffective x Positioning may be difficult as a result of trauma / C-spine control x Airway may be partially obstructed by trauma, blood, vomit, etc x Patient may be uncooperative x Patient may already be hypoxic or haemodynamically compromised x Increased risk of aspiration due to fasting status, pain, opiates, etc
When a difficult airway is anticipated, a “preplanned” response can be initiated. x Personnel – experienced operator/s and skilled assistant/s x Equipment – difficult airway trolley containing replacements and
alternatives x Knowledge – algorithm, equipment and when/who to call for help
Airway management is time critical. There may not be time to make extensive preparations to manage an airway, or the difficulty may be unanticipated. The risk may be minimised by having routine safe practices, using a checklist and rehearsing difficult airway drills.

5
Airway Examination Several examination findings correlate with difficult mask ventilation or laryngoscopy. Positive findings tend to overestimate the chance of difficulty, but it is preferable to be over prepared than under prepared. Multiple abnormalities are more highly suggestive of difficulty. Negative findings do not exclude difficulty and so problems may still arise unexpectedly. Difficult mask ventilation Six risk factors for difficult mask ventilation have been defined: beard, age > 57 years, snoring, BMI > 26, Mallampatti III/IV and limited mandibular protrusion. A commonly used mnemonic for a quick assessment of ventilation difficulty is “BONES”
B Beard O Obesity N No teeth E Elderly S Stiffness
Difficult intubation The LEMON mnemonic can be used as a reminder:
L Look externally: Gestalt view – trauma, trismus, obesity E Evaluate 3:3:2 rule (below) M Mallampatti score (below) O Obstruction N Neck immobility: cervical collar, rheumatoid arthritis, surgery
Difficult surgical airway Look for factors which may obscure surgical landmarks. These can be remembered using the mnemonic SHORT.
S Surgery / Scar H Haematoma O Obesity R Radiation T Trauma / Tumour

6
3:3:2 Rule
x Inter-incisor distance ie. mouth opening (>3 fingers) o Measured with the mouth fully open and head extended.
x Hyo-mental distance (>3 fingers) o Measure from mental process to the hyoid o A thyro-mental distance < 6.5cms predicts a difficult intubation.
x Thyro-hyoid distance (>2 fingers) o Measure from the thyroid cartilage to the base of the mouth
Interincisor distance Hyomental distance Thyrohyoid distance Mallampatti examination The patient needs to be sitting upright, head neutral, mouth fully opened, tongue extended and not talking. We can rarely ascertain a true Mallampatti score in an ED patient requiring intubation but it should be done prior to procedural sedation.
x Class I : soft palate, fauces, uvula, anterior and posterior pillars x Class II : soft palate, fauces, uvula x Class III : soft palate, base of uvula x Class IV : hard palate
Neck immobility Short thick necks and conditions of the cervical spine, such as arthritis and previous surgery, can limit neck extension and make laryngoscopy difficult. Ability to Prognath The patient should be asked to put their lower teeth in front of their upper teeth.

7
BASIC AIRWAY MANAGEMENT Airway manoeuvres Head tilt, chin lift and jaw thrust help to open the airway by pulling the tongue off the back of the oropharynx. In patients with suspected cervical spine injury, this is limited to jaw thrust.
Æ Airway Adjuncts Oropharyngeal (Guedel) airway A Guedel airway sits behind the tongue to hold it off the back of the oropharynx. It will only be tolerated in the deeply unconscious patient. Sizing can be approximated from the middle of the incisors to the angle of the jaw. If it is too short it will not be effective. Too long and it can fold down the epiglottis over the airway or touch the vocal cords and stimulate laryngospasm.
A Correctly sized oral airway. B Too large folding back the epiglottis. C Too small to get behind the tongue
Insertion in adults is initially curved upwards to get over the tongue then twisted 180 degrees whilst advancing. Jaw thrust while simultaneously completing insertion can help ensure the Guedel gets behind the tongue. If any resistance is met, or the Guedel makes the airway more obstructed, it should be removed.

8
Nasopharyngeal airway (NPA) A nasopharyngeal airway is a soft pliable tube, with a slight concave curvature and proximal flange. It is designed to sit with the proximal flange just outside the nostril and the pharyngeal end above the level of the epiglottis, but under the base of the tongue. The distal end has a bevelled edge for ease of insertion and to increase the surface area of the open tip. Patients don’t need to be deeply unconscious to tolerate an NPA. Insertion can cause significant bleeding so needs to be done gently with lots of lubricant and avoided in patients with bleeding disorders. A vasoconstrictor spray prior to insertion may minimise bleeding. NPA insertion in a patient with a base of skull fracture has the potential to pass into the fracture and so this is a relative contraindication. The correct size is estimated from the nostril to the tragus. It is inserted through the nostril and angled directly posterior, not upwards. The bevelled tip should slide against the nasal septum. If resistance is encountered, a smaller airway or the other nostril may need to be used. Use of a safety pin, or similar, thru the proximal end of the tube should be considered to prevent the flange disappearing down the nostril.

9
Suction
The Yankauer Sucker is a hard, plastic device used to clear liquid from the oropharynx. It must be passed with care to avoid tissue damage and bleeding. It may cause gagging in conscious patients and dental damage if patients bite on it.
A Y-suction Catheter is a soft, pliable tube that can be used for suctioning through an oral or nasopharyngeal airway or, more commonly, down an endotracheal tube. Suction is applied when the side port is occluded.
Face Masks A clear plastic single use mask is well suited to the emergency department as vomit or secretions from the patient’s mouth can be readily visualised. The inflatable cushion seal allows a low-pressure seal to be made with the patient’s face. Some face masks will have a hook ring attached at the connector, which may be used for various harnesses (e.g. for use with CPAP). The pointed end sits on the bridge of the nose with the rounded end between the lower lip and the chin. The mask of choice should be the smallest size that seals adequately, to avoid excessive dead space. Adult masks are a size 3, 4 or 5 that corresponds to small, medium or large. The thumb and index finger of the non-dominant hand are placed either side of the universal connector. The other three fingers are placed under the mandible and pull the jaw up into the mask. The idea is to pull the face up to the mask as this opens the airway, rather than pushing the mask down onto the face. The little finger can be placed under the angle of the jaw to maintain jaw thrust. If it is difficult to maintain an adequate seal, both hands should be used to apply the mask with an assistant squeezing the bag.

10
BAG VENTILATION There are two types of bags for ventilation; self-inflating and flow-dependent. The Self-Inflating Bag
When the bag is compressed, gas is forced through a one-way valve to the patient via an applied facemask or airway device. Expired gas flows to the atmosphere via an expiratory valve. The bag re expands after being manually compressed, drawing oxygen into the chamber from the reservoir bag. If the reservoir bag is empty, room air is drawn in. A big advantage of using a self-inflating bag is the ability to ventilate a patient where fresh gas flow is not available or if an oxygen supply runs out. Self-inflating bags are designed for the delivery of positive pressure breaths when compressed, not as a source of free flowing oxygen to spontaneously breathing patients. Passive outlet flow is substantially less than provided inlet flow and is not a reliable source of oxygen. A simple facemask connected directly to wall oxygen should be used to deliver oxygen to spontaneously breathing patients. Self-inflating bags are available in 3 different sizes Adult >25kg 1600mL Paediatric 2.5 – 25kg 500mL Preterm <2.5kg 240mL

11
Complications of BVM ventilation
1. Gastric insufflation x Aspiration x Impeded lung expansion
2. Barotrauma x Pneumothorax x Pneumomediastinum
3. Hyperventilation x Hypocarbia causes cerebral vasoconstriction x Gas trapping in airways disease
4. Hyperinflation x Reduces venous return x Impedes coronary blood flow x Impairs cardiac filling
The Flow Dependent Bag
Mapleson F or Green bag circuit or T piece system or Open tail bag
This circuit requires oxygen flow via the tubing system. In fact, to prevent rebreathing, flow needs to be 2-3 times the patient’s minute volume. The bag has an open distal end. To deliver breaths, the open tail is pinched closed, the bag fills and can be squeezed. Partial occlusion during expiration provides some positive end-expiratory pressure (PEEP). This circuit has the advantage of being able to feel the compliance of the lung by the hand compressing the bag during inspiration. It does however require more training and frequent use to maintain the skill required to adequately ventilate a sick patient with appropriate levels of PEEP. Use in the emergency department should be limited to:
1. Intubated patients that are difficult to ventilate 2. Intubated patients that are breathing spontaneously prior to extubation.

12
ENDOTRACHEAL INTUBATION
A simple way to remember indications for intubation and ventilation is ABC:
x A - Airway o Protection eg reduced level of consciousness o Patency – airway burns, angiooedema, airway trauma
x B - Breathing o Inadequate oxygenation o Inadequate ventilation o Tracheal toilet
x C - Course of current condition o Expected to deteriorate (lung contusion, multi-trauma, burns etc) o Haemodynamically unstable o Patient transfer (radiology / other institution etc)
Equipment preparation A mnemonic for the equipment required is MALES.
M - Mask + bag - Monitoring: SaO2, NIBP, ECG, ETT CO2 - Medication: Induction agent, muscle relaxant, post-intubation drugs A - Airway: Oropharyngeal L - Laryngoscope E - ETT S - Suction
- Stylet or bougie - Stethoscope - Securing mechanism (Tie or tapes)
The Endotracheal tube The size of the tube is expressed in mm of internal diameter.
Average size male: 8.5 mm Average size female: 7.5 mm
A narrower tube increases resistance to gas flow so as large as possible that is suitable for the patient should be selected. In children, the ETT size is estimated with the formula age/4 + 4 with half sizes above and below available. Cuffed tubes often used, which can mean a half size smaller than predicted is required.

13
Features of the tube include:
x The bevelled angle is designed to face left, such that when the tube is inserted from the right side of the mouth it does not obstruct the view of the larynx. The tip of the bevel itself is rounded.
x Murphy’s eye on the opposite side of the bevel is a hole through the tube wall. It prevents complete tube obstruction should the bevel occlude.
x The cuff with inflation tube, pilot balloon and inflation valve provides a seal to prevent aspiration and to ensure no gas leaks during positive pressure ventilation. It also helps centre the tube and reduce trauma to the mucosa of the trachea. The pilot balloon is a tactile indicator of the pressure generated in the distal cuff. Cuff manometers can be used to quantify cuff pressure. A pressure of 25 cm of H20 allows protection from aspiration, without impairment of tracheal mucosal blood flow. Standard tubes have a low-volume high-pressure cuff design.
x Markings on the surface of the tube indicate the length from the tip of the tube to document and maintain depth of insertion.
x The radio opaque stripe allows visualisation on CXR. Checking the tube Once the tube is removed from the sterile packaging it should only be handled from the proximal connector end. The connector is usually only lightly attached to the tube for pre-cutting, so it will need to be firmly inserted. The cuff may be inspected and inflated, to assess that it maintains inflation pressure but with improved manufacturing techniques, inflating the cuff prior to use is more likely to cause a problem than find one. This is still controversial. The distal end of the tube may be lubricated, though the benefit of this is questionable.

14
Cuff inflation post insertion The cuff should be inflated with the minimal volume that will allow it to seal against the trachea with peak inspiratory pressure. This is assessed by listening for an audible inspiratory leak. Inflating the cuff further may lead to tracheal wall pressure and ischaemia. Withdrawing the tube without deflating the cuff can result in herniation of the cuff over the tip of the tube and cause obstruction. Intubation adjuncts Stylet Stylets are malleable rods used to mould endotracheal tubes into a position and aid control during tube insertion. They are made of aluminium with a plastic cover. The stylet is inserted so as its tip does not protrude past the end of the tube to avoid trauma from the tip of the stylet. The tube can then be shaped, such as with a bend at the distal end like a hockey stick. When the stylet is placed through the vocal cords, an assistant holds the stylet in place while the endotracheal tube is advanced into the trachea The stylet is removed while holding the endotracheal tube in place, to avoid accidentally pulling the endotracheal tube out.
Stylet moulded with a bend in the distal end, the “hockey stick” position.
Bougie The Eschmann tracheal tube introducer (aka Blue bougie) is not made of gum and is not elastic. The tip can be bent to approximately 35 degrees to facilitate passing around the back of the epiglottis. The tip of the bougie can run along the inside of the trachea, and the bumps of the tracheal rings felt, confirming position.
The bougie is inserted into the trachea first and then with the laryngoscope still in position, the ETT can be railroaded over it. The ETT may need to be rotated to facilitate this. Remove the bougie, while holding onto the endotracheal tube, so as to avoid pulling out the endotracheal tube.

15
THE LARYNGOSCOPE Standard laryngoscopes consist of a blade and a handle, which are attached together via a hinge pin connection. The handle contains batteries to supply the light source on the blade. When connection via the hinge pin is made, a metallic contact allows completion of the electrical circuit to the light source. Laryngoscope blades are available in a multitude of shapes and sizes. The components of a blade are the base, tongue, flange, web, light source and tip. The tongue is the main body of the blade and comes in two main forms, straight (eg Miller blade) or curved (eg Macintosh blade). The flange runs parallel to the tongue and is attached to the tongue via the web. Its purpose is to deflect interfering tissue. The tip is the distal end and may either be designed to directly pick up the epiglottis, such as in a straight blade, or to indirectly pick up the glottis by positioning in the vallecula, such as in a curved Macintosh blade. The light source tip is proximal to the tip of the blade, to illuminate the field of view. The Macintosh Laryngoscope The Macintosh laryngoscope is the most commonly used laryngoscope for intubation. It has a curved blade, designed to lock into the handle at 90 degrees. The curvature of the blade is used to lift the tongue anteriorly. The flange is designed to push the tongue over to the left side of the mouth. The tip is designed to sit in the vallecula, so as when laryngoscope is lifted anteriorly the hyoepiglottic ligament is tensed and the epiglottis indirectly lifted, exposing the larynx. Blades come in sizes 1-4, with #3 and #4 being the adult sizes.

16
Different laryngoscopes Miller blade The Miller blade is a straight blade designed to directly lift up the epiglottis and expose the larynx. It has a straight tongue, with a slight upward curvature at the tip. The cross-section of the blade is of a C.
The blade has a narrow vertical component, advantageous in patients with small mouth opening and in patients with prominent upper teeth. It is useful in patients with a large floppy epiglottis (children) or anterior larynx. If the blade is inserted too deeply the entire larynx will be lifted up and only the oesophagus visualised. The blade can be brought back slowly until the glottis falls into view.
A.The Miller blade is designed to scoop up the epiglottis and lift in directly anteriorly.
B. The Macintosh blade tip is place in the vallecula and indirectly lifts up the epiglottis by pulling up the hyoepiglottic ligament.

17
Kessell laryngoscope The Kessell blade is a modified Macintosh, with a greater angle between the handle and laryngoscope blade and a shorter handle. This allows easier insertion in patients where the handle may be abutting the sternum during insertion, such as obstetric patients, patients with large breasts and obese patients.
McCoy Laryngoscope The McCoy blade is another modification of the Macintosh which has a lever controlled flexible tip. This feature was designed to cause further indirect elevation of the epiglottis where direct visualisation of larynx was difficult. By pressing the lever added to the handle the tip would flex from the resting position, further elevating the epiglottis. The McCoy blade may improve the view where a grade II or III view is obtained. With a grade IV view it is unlikely to add any benefit. In a small proportion of patients the McCoy blade may result in a worse view. The technique for inserting a McCoy blade is similar to that of the Macintosh blade. Holding the handle close to the blade allows greater control of the attached lever. Once the blade tip is positioned in the vallecula the thumb of the left hand can compress the lever, causing the tip to flex.
The McCoy laryngoscope. Compressing the lever flexes the distal tip up.

18
DIRECT LARYNGOSCOPY The technique of laryngoscopy involves visualisation of the glottis to allow passing of an endotracheal tube.
The laryngoscope is held with the left hand and inserted in the right side of the mouth. Care should be taken during insertion to avoid the lower lip becoming caught between the laryngoscope blade and the lower incisor teeth. As the blade is inserted forward, the tongue is moved to the left hand side by the blade of the laryngoscope as the laryngoscope is moved into a central position. It is paramount that the flange of the laryngoscope picks up the entire tongue to ensure, not only a maximal view of the glottis, but also a view of the path through which the endotracheal tube will be placed. The laryngoscope can then be lifted. The lifting procedure should not involve any wrist movement, but rather the left arm lifting the laryngoscope at approximately 45 degrees to the long axis of the patient. If the laryngoscope is lifted by radially flexing the wrist the upper incisor teeth may be damaged. The epiglottis should be exposed and the tip of the laryngoscope placed in the vallecula, between the base of the tongue and the pharyngeal surface of the epiglottis. Lifting the laryngoscope will then tense the hyoepiglottic ligament, levering the epiglottis up and exposing the glottis.

19
VIDEO LARYNGOSCOPY The CMAC The Cmac is a video laryngoscope using a Macintosh shaped blade. This enables both the technique of direct laryngoscopy while also displaying a screen video view. The blade and handle are one fixed piece and come in different sizes equivalent to Macintosh blade sizes. At SVH ED there are size 3 and size 4 blades. The black plug is removed and the scope slides in to the handle for use. The black plug is reinserted after use and the handle blade is sent for cleaning. GLIDESCOPE® VIDEO LARYNGOSCOPE (GVL) The glidescope has a more sharply curved blade and gives a more anterior viewing angle that the standard cmac blade. The glidescope technique is different to direct laryngoscopy. The scope is inserted through a single use clear plastic blade. This is inserted midline and curved around the tongue to the vallecula to lift the epiglottis. There is minimal lifting of the tongue. Visualisation is from the screen only. The endotracheal tube needs to be sharply angled by a hockey shaped introducer in order to reach what can be seen by the camera. There are metal introducers that come with the glidescope that are the correct curvature or else a stylet can be shaped.

20
GRADES OF LARYNGOSCOPY (Cormack and Lehane)
x Grade I: Entire glottic aperture is seen x Grade II: Only a portion of the glottis is seen
o IIa – arytenoids and portion of cords o IIb – arytenoids alone
x Grade III: Epiglottis only x Grade IV: Palate only
. If the laryngoscope is placed too deeply, the entire larynx maybe lifted and the oesophagus exposed. If the laryngoscope is not placed deep enough into the vallecula, traction on the hyoepiglottic ligament will not be generated and the epiglottis will not be lifted to expose the glottis. If the laryngoscopic view is not good enough, the “BURP” manoeuvre can be applied. This uses external laryngeal pressure to manipulate the larynx into a more favourable position and involves Backward, Upward and Rightward Pressure applied to the thyroid cartilage. The laryngoscopist should manipulate the larynx with their right hand and when an optimal position is obtained can ask an assistant to maintain pressure in that position.
The tracheal tube can then be passed via the right side of the mouth so that the tube itself does not interfere with the view of the larynx. It is important to watch the tube pass through the vocal cords, because it is possible for the arytenoid cartilages to push the tip of the endotracheal tube posteriorly when pressed against them. This can result in the tube being flicked into the oesophagus. The tube should be inserted so that the cuff is just past the vocal cords and the black line on the tube just through the cords, which correlates to a tube length of approximately 21- 23 cm in an adult patient.

21
COMPLICATIONS OF LARYNGOSCOPY
x Dental damage o Dental damage can range from a chipped tooth to complete
dislodgement, with the potential danger of foreign body aspiration. o The state of dentition should be assessed through history and
examination where possible. The teeth at greatest danger are the upper incisors and as such care should be taken to avoid lifting the laryngoscope by radially flexing the wrist, which puts pressure on those teeth.
o Children aged 4 to 10 most commonly have loose teeth
x Cervical spine injury o Patients who have fractures or dislocations of their cervical spine, or
who have other pathogenic process leading to spinal instability should have care taken with mask ventilation and tracheal intubation. In particular, movements that extend the neck and head can be potentially dangerous.
o Manual in-line mobilisation has been shown to reduce spinal movement and secondary injury and should be used in all patients with known or suspected spinal injury.
o Cervical collars should be removed for intubation.
x Soft tissue damage o Damage to most areas of the upper airway has been reported. o Damage ranges from abrasions and simple lacerations to
haematomas and perforations. o In extreme cases bleeding can cause airway compromise o Nerve injuries to the lingual and superior laryngeal nerve have also
been reported.
22
POSITIONING
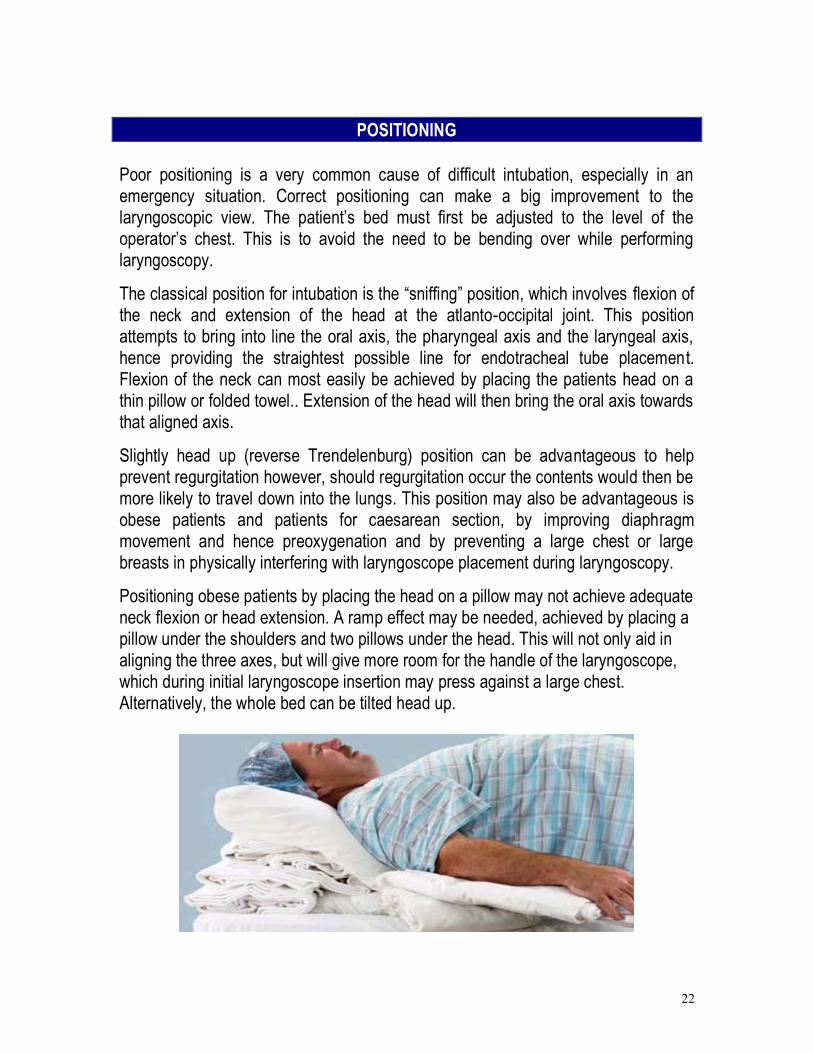
Poor positioning is a very common cause of difficult intubation, especially in an emergency situation. Correct positioning can make a big improvement to the laryngoscopic view. The patient’s bed must first be adjusted to the level of the operator’s chest. This is to avoid the need to be bending over while performing laryngoscopy.
The classical position for intubation is the “sniffing” position, which involves flexion of the neck and extension of the head at the atlanto-occipital joint. This position attempts to bring into line the oral axis, the pharyngeal axis and the laryngeal axis, hence providing the straightest possible line for endotracheal tube placement. Flexion of the neck can most easily be achieved by placing the patients head on a thin pillow or folded towel.. Extension of the head will then bring the oral axis towards that aligned axis.
Slightly head up (reverse Trendelenburg) position can be advantageous to help prevent regurgitation however, should regurgitation occur the contents would then be more likely to travel down into the lungs. This position may also be advantageous is obese patients and patients for caesarean section, by improving diaphragm movement and hence preoxygenation and by preventing a large chest or large breasts in physically interfering with laryngoscope placement during laryngoscopy.
Positioning obese patients by placing the head on a pillow may not achieve adequate neck flexion or head extension. A ramp effect may be needed, achieved by placing a pillow under the shoulders and two pillows under the head. This will not only aid in aligning the three axes, but will give more room for the handle of the laryngoscope, which during initial laryngoscope insertion may press against a large chest. Alternatively, the whole bed can be tilted head up.

23
PERI INTUBATION OXYGENATION
Pre-oxygenation The purpose of pre-oxygenation is to maximise the oxygen storage in the lungs and hence delay the time to desaturation in apnoea. The functional residual capacity (FRC) of a patient is the volume of gas in the lung at the end of normal tidal volume expiration. It has numerous important physiological roles, one of which is to act as an oxygen store. In a 70 kg person, the FRC is approximately two litres. If a patient is breathing room air, with an oxygen concentration of 21%, this equates to approximately 400 ml of oxygen. A 70 kg person has a basal metabolic rate of approximately 250ml/min of oxygen consumption; hence the FRC has an oxygen store of less than two minutes in a patient breathing room air. Pre-oxygenation increases the oxygen concentration of the FRC up to >90% hence the oxygen store lasts closer to 7 minutes. A TIGHT FITTING RESERVOIR FACEMASK ON HIGHEST FLOW OXYGEN IS THE RECOMMENDED SOURCE OF OXYGEN FOR PRE-OXYGENATION IN THE EMERGENCY DEPARTMENT. Patients with an adequate respiratory drive should receive pre-oxygenation for 3 minutes or take 8 maximal inhalation and exhalation breaths as this leads to an end-tidal oxygen concentration of over 90%. Patients should receive pre-oxygenation in a head- elevated position where ever possible. In a patient with significant lung pathology a longer time maybe needed to adequately pre-oxygenate and the end-tidal oxygen concentration may not rise above 60%. Patients with reduced FRC, such as obese or pregnant patients, will have a smaller oxygen store. Patients with increased oxygen consumption, such as children, pregnant women and unwell adults will use up their oxygen store more rapidly. Non invasive positive pressure ventilation may be required to assist pre-oxygenation in patients where high flow oxygen alone does not achieve acceptable oxygenation prior to intubation. These patients may also require bag/mask ventilation during induction to prevent rapid desaturation despite the theoretical risk of gastric insufflation by doing so.

24
Apnoeic Oxygenation Oxygen will continue to move from the alveoli to the blood stream at approximately 250mL/min as long as there is a sufficient supply of oxygen in the alveoli. Oxygen can be passively supplied by high flow oxygen via nasal prongs during intubation and is a form of apnoeic oxygenation. This can extend the duration of safe apnoea during intubation. High flow nasal prong oxygen (>15L) would not be tolerated in the awake patient due to desiccation of the nasal mucosa, but for the sedated patient in the short period of intubation it is not a problem. Each resuscitation bay in the Emergency Department at SVH has 3 oxygen ports. The low port is permanently connected to the ventilator. The two ports at the top are available during intubation. One of these should be connected to the oxygen reservoir mask for pre- oxygenation. The other should be connected to the self inflating bag for bag/mask or bag/ETT ventilation. As induction drugs are being administered to the patient, the oxygen connected to the reservoir mask for pre-oxygenation can be changed to nasal prongs applied to the patient in time for apnoeic oxygenation during intubation. Pre-oxygenation and apnoeic oxygenation should be performed whenever possible in all Emergency Department intubations. Weingart S, Levitan R Preoxygenation and Prevention of Desaturation during Emergency Airway Management Annals of Emergency Medicine Vol 59 Issue 3 March 2012 pp165-175

25
THE RAPID SEQUENCE INDUCTION (RSI)
RSI is the technique to rapidly secure the airway in a patient at risk of aspiration during the induction phase of anaesthesia. Traditionally, this involves bolus administration of predetermined doses of rapid onset sedative agent and muscle relaxant with simultaneous application of cricoid pressure. Bag mask ventilation is avoided to prevent the hypothesised risk of causing gastric insufflation, regurgitation and subsequent aspiration. Rapid sequence inductions, thus far, have not been proven beyond doubt to improve patient safety.
All emergency department patient are at risk for aspiration for a number of reasons including; unknown or inadequate fasting times and delayed gastric emptying from pain, anxiety and/or opiate analgesia.
Cricoid Pressure The theory behind cricoid pressure is that aspiration is prevented by occluding the oesophagus as it is compressed between the cricoid ring and C6 vertebral body. This has come into question with studies (see references below) showing that the oesophagus does not lie immediately between these two structures in most patients and cricoid pressure more often that not results in lateral displacement or incomplete oesophageal occlusion. Additionally, cricoid pressure has been shown to induce a reduction in lower oesophageal sphincter tone which may contribute to aspiration risk. Cricoid pressure is no longer a routine feature of RSI at St Vincent’s Hospital emergency department.
Bimanual laryngoscopy External manipulation of the larynx with the laryngoscopist’s right hand while performing laryngoscopy with the left hand can help to bring the larynx in to view. An assistant can help maintain this position to free up the laryngoscopist’s right hand to place the endotracheal tube. Neilipovitz D, No evidence for decreased incidence of aspiration after rapid sequence induction CAN J ANESTH 2007 (54: 9)748–764 Ellis D, Cricoid Pressure in Emergency Department Rapid Sequence Tracheal Intubations: A Risk-Benefit Analysis ANN EMERG MED. 2007;50:653-665

26
Rapid Sequence Induction technique Preparation
Can be remembered by the “7 P’s”
1. Personnelo Team leadero Intubatoro Airway assistanto Laryngeal manipulator on standbyo Person to administer drugso Scribeo In-line immobiliser for trauma patients
2. Preparationo Patient: IV access, optimum position, +/-consento Personnel: aware and capable of roleso Monitoring: SaO2, NIBP, ECG, EtCO2o Equipment and drugs (including difficult airway equipment and
emergency drugs)
3. Peri-oxygenateo Good face-mask sealo FiO2 100% for 3-5 minutes if possibleo Nasal prongs for high flow oxygenation during apnoea
4. Pretreatment analgesia
5. Paralysis with sedationo Thiopentone/ Propofol/ Ketamine/ Midazolamo Suxamethonium/ Rocuronium
6. Placement of ETT
7. Post-intubation careo Confirmation of ETT placemento Secure ETTo Ventilationo Ongoing sedation +/- paralysiso NGT/IDC/temperature control/positioning etc

27

28
INTUBATION DRUGS .
A “true” rapid sequence induction involves the use of the rapidly acting sedative-hypnotic thiopentone with suxamethonium as the paralysing agent, favoured for its rapid onset and termination of action. These agents, as well as those commonly used in a “modified” RSI are discussed here.
Thiopentone Thiopentone is a barbiturate, whose exact mode of action is unknown. It is postulated that it acts primarily at the post-synaptic junction to depress neurotransmitter activity in the reticular activating system. It also enhances chloride ion conductance in the absence of GABA. It has the following effects:
x CVS o Negative inotropic effectso Decreases systemic vascular resistance (SVR)o Both these effects combine to decrease blood pressure.
x Respiratory o A potent respiratory depressanto May also produce some bronchoconstriction (infrequently)
x CNS o Decreases cerebral blood flow and intracranial pressureo Anticonvulsant
x Other o Anaphylactoid reaction is severe in 1:20 000 patients.o Decreased intraocular pressureso Depression of intestinal activityo Decreases renal blood flow and increases ADH secretiono Slight transient decrease in serum potassium
Thiopentone is available as a 500mg powder vial that is made up to 20mL giving a 25mg/mL solution. The induction IV dose is 2-5 mg/kg, decreased in the elderly, hypovolaemic or shocked patient. It acts within one arm-brain circulation time with onset of action at about 30 seconds and peak at one minute and lasts 5 to 15 minutes.

29
Propofol Propofol enhances the function of glycine and GABA activated chloride channels, which in turn enhances spinal inhibition. Exact mode of action by which anaesthesia is induced is unknown. It has similar effects to thiopentone:
x CVS o Negative inotrope o Decreases SVR by up to 25% o No compensatory rise in heart rate o Decreases cardiac output by up to 20%
x Respiratory o Respiratory depression o Produces apnoea and obtundation of laryngeal reflexes. o Causes mild bronchodilatation in some patients.
x CNS o Decreased cerebral blood flow and intracranial pressure o Decrease in cerebral oxygen consumption which is an advantage
over thiopentone o Generally accepted as anticonvulsant but 1:50 000 incidence of
producing seizures o Myoclonic jerks occur occasionally (and may be confused with
seizure activity) x Other
o Possibly has some antiemetic properties via antagonism of gut dopamine receptors
o Produces pain on infusion, particularly if given via a smaller & more peripheral vein. Consider adding 1-2mL lignocaine 1% to the syringe to decrease pain on injection.
Propofol is a 10mg/mL solution. The induction IV dose is 1-2 mg/kg, with the same indications for reducing the dose as thiopentone. It’s onset of action is within one arm-brain circulation time with the peak effect at 90 seconds for a 2.5 mg/kg dose. Duration of hypnosis is dose dependent. Thiopentone vs. Propofol There is no concrete evidence to support the use of one over the other when it comes to RSI. To produce the same level of sedation, propofol generally causes more hypotension than thiopentone. There are some reports that Propofol provides better jaw relaxation and attenuation of laryngeal reflexes. However it all comes down to the individual’s experience with these two induction agents.

30
Ketamine This is a phencyclidine derivative, which acts as a dissociative anaesthetic agent, producing a cataleptic state with profound analgesia. It is increasingly used for induction of anaesthesia in the ED due to its relative preservation of airway reflexes, bronchodilatation and cardiovascular stability. Ketamine is the induction agent of choice in status asthmaticus and hypotensive patients. There was some controversy regarding its use in acute head injury as it has been thought to cause a rise in ICP in these patients. The evidence that this is significant is weak and the benefits of ketamine preventing hypotension and subsequent secondary brain injury far outweigh the risk. Ketamine is available in SVH ED as 200mg/2mL vial. This should be made up to 20mL giving a solution of 10mg/mL. The induction dose is 1-2 mg/kg IV, causing loss of consciousness in 30 seconds and peak effect at one minute. The clinical duration of action is 10-15 minutes. Midazolam / Fentanyl This combination of opiate and benzodiazepine has occasionally been used as a substitute for the induction agent. They are also used in conjunction with an induction agent to allow smaller doses to be used (and consequently less cardiovascular depression). Compared with other induction agents such as propofol, thiopentone & ketamine, these agents have slower onset of action & less predictable dose/response. This limits their usefulness in the Emergency Department setting.
x Midazolam is available at SVH ED as 5mg/mL vial. It is diluted to 5mg/5mL for IV use. (There are also 50mg/10mL vials for making up infusions). Midazolam when used as an induction agent is given at a dose of 0.1-0.3mg/kg. It has a rapid onset (1-3minutes) and approximately 30-60minute duration of action at this dose. It provides effective amnesia but NO analgesia and at these doses hypotension is common.
x Fentanyl is a short acting opiate with a fairly rapid onset of action (2-
6minutes). Due to its effectiveness at blunting the sympathetic response to laryngoscopy it has been used extensively by anaesthetists in large doses as an induction agent in cardiac surgery. It provides analgesia with minimal amnesia, so is well suited to be used in combination with midazolam.

31
Fentanyl is available at SVH ED as 100mcg/2mL vial that is diluted to 10mL giving 10mcg/mL. At induction doses (1-5mcg/kg) fentanyl causes profound respiratory depression and often apnoea which may be more prolonged than that caused by suxamethonium. It has a hypotensive effect which is synergistic with midazolam. Rarely chest wall rigidity occurs. This appears to be related to large doses and rapid injection, and its onset is soon after injection and NOT reversed by naloxone. Treatment requires the use of a paralytic agent.
Suxamethonium Suxamethonium remains the first line muscle relaxant for RSI. As a result of its depolarising nature, it has undesirable side effects, most of which can be remembered by the “6 P’s”:
1. Pain – Muscle pain post fasciculation, especially those who ambulate early 2. Pulse
o Bradycardia - especially with a second dose or in vagally active individuals (ie kids)
o Arrhythmias – effects of digoxin are enhanced 3. Pyrexia – malignant hyperthermia 4. Prolonged effect
o “Sux apnoea” due to a genetic variant of plasma cholinesterase – the “dibucaine number” (a test of the patient’s ability to metabolise sux) can be used to identify at-risk patients prior to elective procedures.
5. Potassium elevation o Exaggerated in patients with burns >5 days old, major muscle
denervation, severe muscular trauma, renal failure, severe abdominal sepsis and some congenital myopathies
6. Pressure o Raised intracranial pressure – attenuated by adequate sedation o Raised intraocular pressure – significance in penetrating eye injuries is
debated and generally benefits appear to outweigh the theoretical risk. o Raised intragastric pressure with lowering of lower oesophageal sphincter
tone – increased risk of aspiration.

32
Other adverse effects of suxamethonium include: o Anaphylactic/anaphylactoid reactions - has greatest incidence of
histamine release amongst all the neuromuscular blockers o Sustained jaw rigidity due to masseter spasm – cause unclear, but can be
reversed by administering a non-depolarising neuromuscular blocker. o Can provoke myasthenic crises o Rhabdomyolysis in some congenital myopathies
Suxamethonium comes as a 100mg/2mL vial and 2 vials are drawn up neat giving 200mg in 4mL (50mg/mL). Dose 1.5mg/kg, can be given IV or IM. Intense muscle relaxation is achieved within 45-60 seconds, preceded by a brief period of fasciculations. This response is most obvious in patients with greater muscle mass and may not be well appreciated in children under five and elderly patients. Adequate respirations recur at 5-10 minutes, with full recovery by 15 minutes. The duration of action of suxamethonium exceeds the time to desaturation, debunking the myth that “suxamethonium will wear off before desaturation occurs”. Suxamethonium should ideally be kept in refrigerator as it is unstable at room temperature. However if this is not possible, if protected from light, 90% of its activity will be retained at three months when kept at room temperature, after which it should be discarded. Rocuronium When suxamethonium is contraindicated (real or suspected), high-dose rocuronium is the alternative muscle relaxant of choice, due to its rapid onset of action (about 90 seconds). It is a non-depolarising agent with duration of action between 30-45 minutes. It can be reversed with sugammadex (see below). Rocuronium comes as 50mg in 5mL vial. The induction dose is 1mg/kg IV for RSI compared with 0.6mg/kg for an elective (non RSI) intubation. Sugammadex Sugammadex is a newly available reversal agent for rocuronium for use in emergency situations where paralysis must be immediately reversed. The dose for emergency use is 16mg/kg as an IV push. Sugammadex is available as 200mg in 2mL vials in a box of 10 vials in the drug cupboard. It is not for routine use and is still very expensive.

33
CONFIRMATION OF TUBE POSITION It is paramount to confirm that the endotracheal tube has been correctly placed in the trachea to avoid the dire consequences of an unrecognised oesophageal intubation. Visualising the endotracheal tube going through the cords is important, but not a guarantee that the tube will end up in the trachea, as it may flick back in the oesophagus if not inserted to an adequate depth. The best technique to confirm the endotracheal tube is in the trachea would be to place a fibre-optic bronchoscope through the tube and observe the tracheal rings, carina and bronchi stems. This, of course, is not practical for most intubations. Capnography The next most reliable sign is the use of capnography to confirm exhalation of carbon dioxide. This is considered the gold standard. The repetitive rise and fall of the capnogram trace with respiration confirms that the endotracheal tube is either in the trachea or down one bronchus.
Capnography is not without is limitations. In a patient with a cardiac arrest, where minimal carbon dioxide is perfused to the lung, the carbon dioxide trace may be absent or very reduced. In a patient with a sputum blockage of their endotracheal tube, or a kinked tube or severe bronchospasm there may not be enough exhaled volume of carbon dioxide to register on the capnogram. Generally, if there is no registered capnogram trace the endotracheal tube should be considered to be in the oesophagus, unless proven otherwise. The warm-up time for some monitors is significant, often in the order of 3-5 minutes, so initiation of the set-up must be early in the course of preparation for intubation.

34
Commercially available carbon dioxide detectors can be connected to an endo-tracheal tube where capnography is not available. It changes colour to indicate carbon dioxide is passing through.
x Purple – no CO2 x Beige – low level CO2 x Yellow – positive CO2
A false positive reading may be obtained following oesophageal intubation when the stomach has been insufflated during bag/mask ventilation. Six breaths should always be given before interpreting the colorimetric capnogram. This is to ensure stomach gas is washed out and therefore decreasing the incidence of false positives. Other signs used to confirm correct placement, though not as reliable, include:
x Auscultation of breath sounds in both axillae. x Absence of breath sounds over the stomach x Rise and fall of the chest x Normal compliance of the ventilation bag x Pulse oximetry
o Desaturation is a late sign of oesophageal intubation o A pre-oxygenated patient can take up to 5 minutes to desaturate.
x Misting of the endotracheal tube with the first few breaths It is also important to confirm that the endotracheal tube has not been inserted too far and entered a bronchus. Auscultation of both axillae should reveal bilateral breath sounds. If unilateral breath sounds are heard the endotracheal tube should be pulled back, incrementally one centimetre at a time, until bilateral breath sounds are heard. An approximate guide to insertion depth would be 21cm in an adult female and 22 cm in an adult male, with adjustments made on height. The marking of the endotracheal tube at the level of the teeth should be noted. If the endotracheal has been inserted too far it has a general tendency to go down the right main bronchus as that is the direction the tip of the bevel faces during insertion.

35
SECURING THE ENDOTRACHEAL TUBE
There are a number of reasons why an ETT is more likely to be dislodged inadvertently in the Emergency Department than elsewhere in the hospital. Tie needs to be tied tightly around the tube (not just looped) and this tied firmly around the patient. Care should be made to avoid too loose a tie, which may result in tube displacement out of the trachea and too tight a tie, which may result in pressure area formation, particularly at the angle of the mouth. In SVH emergency department, with few exceptions, all tubes are to be secured in the following manner:
1. Pass tie around neck and tie securely between nose & tube with a double throw to maintain tension.
2. Tie a firm reef knot below the ETT to prevent slipping of the tube.
3. Tie a second reef knot above ETT 4. Cut tape ends leaving 2.5-3cms of tie

36
Taping the ETT In uncommon instances, taping the ETT may be preferable. The concern with tying is usually impairing venous return from the head and so increasing intracranial pressure. Taping is not as secure as tying, particularly for ED patients that are being transferred between beds, scanner, etc. There needs to be a very good reason for taping rather than tying as tube dislodgement is potentially catastrophic for all patients. Tie can always be replaced by tape once the patient as finished all transfers and is then in the intensive care unit. Brown elastoplast is used in the style of “trouser legs” and secured to the maxilla, upper/lower lips and the tube. Friar’s balsam (a.k.a. Tinc. Benz.) can be applied to the skin and allowed to dry to create a better adhesive surface.
Securing the ETT using tape

37
COMPLICATIONS OF INTUBATION
Complications must be actively sought. If they are missed there is likely to be considerable mortality and morbidity encountered. The complications can be grouped by their times of occurrence as well as by system involved:
1. EARLY o Airway
x Failure to intubate x Laryngospasm x Upper airway trauma x Unrecognised oesophageal intubation
o Breathing x Right main bronchus intubation: may cause hypoxia/ unilateral
pulmonary oedema, pneumothorax x Aspiration
o Circulation x Hypo/hypertension x Arrhythmias x Cardiac arrest
o Other x Awareness under anaesthesia x Dental trauma x Spinal injury possible if unstable c-spine injury present and
inline stabilisation inadequate. Maximal movement occurs at level of occiput-C1 junction
2. INTERMEDIATE o Sinusitis o Pneumonia o Tube obstruction / dislodgement o Subglottic oedema secondary to trauma
3. LATE
o Subglottic stenosis o Tracheomalacia o Tracheo-oesophageal fistula o Vocal cord paralysis

38
POST-INTUBATION MANAGEMENT
Management is not complete despite successful intubation, confirmation of correct tube placement and securing of the tube. As we have rendered the patient unconscious and apnoeic, we are responsible for preventing further injury, managing pain, controlling their ventilation and continuing treatment of the underlying condition. General requirements include:
x Ongoing continuous cardiorespiratory monitoring x Airway maintenance
o Heat-moisture exchange (HME) filter – acts as an “artificial nose” preventing cross-contamination, providing bacterial and viral filtration, and provide patient humidification
o Suctioning o Monitoring of cuff pressure – excluding a leak and therefore inefficient
ventilation and increased aspiration risk, or excessive pressure with associated increased risk of pressure necrosis with prolonged intubation.
x Optimisation of ventilation o Initial ventilator settings should be made based on the patient’s weight
and clinical condition and are aimed at optimising oxygenation and ventilation, usually a tidal volume 7-10mL/kg and rate 10-14/min with FiO2 according to pO2.
o An ABG should be performed 30 minutes after the patient is placed on the ventilator and parameters should be adjusted accordingly. The blood gas will also allow assessment of correlation between the patient’s arterial and end-tidal CO2 measurements
x Ongoing sedation/analgesia +/- paralysis (discussed below) x Prevent environmental injury
o Prevention of pressure areas / corneal injury o Temperature control
x Decompression of stomach and bladder with naso/oro-gastric tube and indwelling catheter
x Ongoing management of underlying condition

39
Post-intubation sedation agents The most commonly used regimes in the ED are either propofol or a combination of an opiate and benzodiazepine (generally morphine and midazolam) given as an infusion. x Propofol has the advantage of rapid onset and offset, but with the downfall of
causing hypotension, especially if larger doses are required. It is given neat (10 mg/ml), as an infusion, generally at a rate of 1-3 mg/kg/hour – titrated to blood pressure and level of sedation. Propofol is not an analgesic, so pain relief will need to be in addition to sedation.
x Morphine and midazolam cause less haemodynamic disturbance but at the
expense of a much longer duration of action. This becomes an issue when repeated assessment of neurological function is necessary. At St Vincent’s Hospital the routine infusion is morphine 100mg and midazolam 100mg combined in 100mL (normal saline or dextrose 5%) so that 1mL contains 1mg of each.
x Ketamine can also be used as an ongoing infusion to maintain sedation. This is
most commonly used in status asthmaticus due to its bronchodilatory effects. Infusion rates are run between 4-6 mg/kg/hr. Emergence phenomena are common and may be ameliorated with benzodiazepines. Ketamine also has an opiate sparing effect when used as an analgesic alongside morphine in patients with severe burns.

40
MANAGING THE DIFFICULT AIRWAY
Inability to intubate a patient can be very stressful. Routine training in difficult airway drills maximises individual and team performance in these situations. “Can’t Intubate” The first attempt at intubation should be the best attempt. You do not need to wait until a failed first attempt before optimising the conditions. Before any attempt at intubation consider the safest option. Ask yourself, “Is this the right time? Is this the right place? Am I the right person to be doing this?” Both patient and operator positions should be optimised from the start. The patient needs to be adequately sedated and the vocal cords immobilised. External laryngeal manipulation can markedly improve laryngeal view. Use of simple airway equipment such as suction, a stylet or a bougie should be routine for an emergency department intubation and a difficult airway trolley should always be close by. Repeated attempts at laryngoscopy traumatise the airway causing bleeding and swelling. This can make laryngoscopy more difficult, hinder other airway management strategies and even cause airway obstruction. A second attempt at intubation needs to have conditions improved in some way – a more experienced operator, improved positions, improved sedation or paralysis, use of better fitting laryngoscope or use of video laryngoscopy. If intubation attempts are unsuccessful, maintaining oxygenation (saturation at least >90%) is the priority. This is done by BVM ventilation with 100% oxygen. A two-person technique is recommended to maximise position. Use of oropharyngeal and/or nasopharyngeal airways is routine (with exceptions) to maximise the airway patency. Maintaining oxygenation allows time for further assistance to arrive. It may allow time for paralysis to wear off and the patient to wake and breathe spontaneously, but the initially reason for intubation in the emergency department means this is usually not an alternative. Failure to maintain oxygenation by ventilation is now immediately life threatening and requires prompt initiation of the “can’t intubate, can’t ventilate” algorithm.

41
CAN’T INTUBATE / CAN’T VENTILATE
CALL FOR HELP Delegate preparation for cricothyroidotomy
MAXIMISE OXYGENATION x 2 person bag mask x Oral/ nasal airways x LMA insertion
CRICOTHYROIDOTOMY
Unable to oxygenate?

42
THE LARYNGEAL MASK AIRWAY (LMA) . The LMA is an important airway rescue device in the emergency department. LMA Classic (cLMA) The cLMA was the first model designed for routine anaesthesia.
The inflatable mask is designed to sit with the distal tip against the upper oesophageal sphincter, sides facing into the piriform fossae and the upper border along the base of the tongue. The mask sits at 30 degrees to the large-bore tube. Two vertical aperture bars sit across the entry of the tube at the mask to prevent the epiglottis from obstructing the lumen. The mask is inflated via a pilot tube and cuff, with a self sealing valve. The tube has a 15mm connector for a breathing circuit as its proximal end.
Cuff Aperture Bars
Valve
Inflation Pilot Balloon
Inflation Line
15mm Connector Airway Tube

43
LMA size Estimating the best size LMA is based on patient weight.
LMA size 1 1.5 2 2.5 3 4 5 6 Patient Weight
(kg) >5 5-10 10-20 20-30 30-50 50-70 70-100 >100
Insertion technique The original insertion description of the cLMA by Dr Brain in 1983 was without the aid of a laryngoscope with the head and neck in normal intubating position.
x Before use, the laryngeal mask should be inspected for defects and cuff inflation tested.
x Lubrication on the dorsum of the LMA assists with insertion. The anterior surface of the LMA should not be lubricated to prevent any lubricant flicking forward on the vocal cords and causing laryngospasm.
x The mask is either completely deflated or partially inflated according to the operator’s preference.
x With its lumen facing the tongue and held like a pen it is guided into the pharynx with the index finger, to help negotiate the angle behind the tongue.
x The use of jaw thrust by an assistant during insertion can aid in manoeuvring the LMA around the base of the tongue and into the hypopharynx.
x The design of the LMA is such that when the distal tip reaches the base of the hypopharynx further downward movement should not occur.
x Inflation of the cuff often causes a slight rise in the tube position, which helps to confirm placement.
x The tube should be firmly secured either with tapes or ties. Trouble shooting Mask malposition and air leak are a common problem. Most malpositions are easily diagnosed and corrected by reinsertion with a slightly different approach or a change in head and neck position. Poor compliance or reduced expiratory flow may indicate mechanical obstruction of the vocal cords or due to folding down of the epiglottis by the distal cuff. Assessment should include observing unobstructed inspiratory and expiratory flow and capnography.

44
THE INTUBATING LMA
The intubating LMA is a rigid, curved LMA that allows passage of a cuffed endotracheal tube. Insertion of the LMA is illustrated below.
The LMA cuff can then be inflated and ventilation performed to confirm a good position and to establish and maintain oxygenation. The intubating LMA comes with a reinforced ETT designed for passage inside the LMA. The intubating LMA comes in different sizes and so requires its respective ETT. The ETT will need lubrication. The distal end of the LMA has an epiglottis-elevating bar for ease of ETT insertion. The LMA is sufficiently short to allow the cuff of the endotracheal tube to pass through the vocal cords. Once the ETT is inserted an appropriate distance, cuff inflation and confirmation of ETT position is now indicated as for any intubation. The intubating LMA and reinforced ETT come with a “stabiliser rod” for removal of the LMA while leaving the ETT in place. This is awkward to perform and risks dislodging the airway in what may have already been a life-threatening situation. Attempting to remove the intubating LMA when it has been used as a rescue device is strongly discouraged. The LMA can simply be left in place.

45
THE SURGICAL AIRWAY
Cricothroidotomy is a procedure that is rarely required, but when it is indicated it needs to be performed promptly and without hesitation. It is indicated in the “can’t intubate and can’t ventilate” situation where oxygenation cannot be maintained. It is also indicated in supralaryngeal airway obstruction where intubation is not possible (e.g. angiooedema, trauma, burns). Severe desaturation should not last more than 30 seconds before the decision to perform a cricothyroidotomy is made.

46
Surgical airway technique There are cricothyroidotomy kits and devices available. You should be familiar with those that you intend to use. Open technique with minimal equipment should always be learnt so that it can be performed if kits are unavailable.
Recommendations for creation of the cricothyroidotomy vary slightly, but the principle is the same i.e. opening the cricothyroid membrane and placing a cuffed endotracheal tube in the trachea.
x Have the patient’s neck extended as much as possible; this is where you can remove the pillow!
x Identify the cricothyroid membrane as the notch between the thyroid cartilage above and the cricoid cartilage below.
x Make a vertical incision of ~15mm through the skin with thumb and forefinger stretching the skin laterally, so it parts as the skin is incised.
x Make a horizontal incision through the cricothyroid membrane. x Dilate this opening with artery forceps, dilator or gloved finger and insert a
bougie to hold the pathway open. x Railroad a size 6mm ETT (for an adult) over the bougie and pass the cuff just
into the trachea. x Remove the bougie, inflate the cuff and ventilate the patient. Confirm
placement and secure the tube
Complications x Bleeding x Creation of a false pathway x Damage to trachea and larynx

47
THE DIFFICULT AIRWAY TROLLEY AT SVH EMERGENCY DEPARTMENT
The contents are arranged using the MALES mnemonic. The trolley is kept in resuscitation bay 1.
M MASK DRAWER 1 Anaesthetic masks sizes 3, 4 and 5
Laryngeal Mask Airway (LMA) sizes 3, 4 and 5 Laryngeal Mask Airways (intubating) sizes 3, 4 and 5 Fast trach ETT sizes 7.0, 7.5 and 8.0 Magill's forceps x 1
A AIRWAYS DRAWER 2 Oropharyngeal airway sizes 4, 5 and 6
Nasopharyngeal Airway sizes 6.5, 7.0, 7.5 and 8.0 Green Anaesthetic Bag x 2
L DRAWER 3
LARYNGOSCOPES Macintosh Blade sizes 3 and 4 Miller Blade sizes 2 and 3 McCoy Blade x 1 Lubricant x 5 sachets and 4 x spare batteries
E DRAWER 4
ENDOTRACHEAL TUBES Endotracheal tubes sizes 6.0, 6.5, 7.0, 7.5, 8.0, 8.5 and 9.0 Blue bougie (Frova) Cook Airway Exchange catheter 14 Fr x 1 19Fr x 1Suctionaid tracheostomy sizes 6, 7 and 8
S SURGICAL AIRWAYS DRAWER 5 Cook Universal Emergency Cricothyrotomy Catheter Set x 1
Cook Melker Cricothrotomy set (cuffed size 5) x1 Betadine solution x 2 Lignocaine 1% + adrenaline x 5 vials 5ml Syringes x 2 19 g Drawing up needles x 2 23g needles x 2 Scalpel x 2 Trosseau Tracheal Dilator ENK Oxygen Flow Modulator x 1 Yankeur Sucker x 2 Tracheal suction catheters 2 x 10 Fr and 2 x 12 Fr

48