eBuilder Support Manualjira.ebuilder.com/eBuilder_Support_Manual_V5.pdf · 4 eBuilder Support...
32
Issued By Jira Admin Date 2014-05-12 Filename eBuilder Support Manual V-5 Security Confidential ©eBuilder Technology Centre - 2014 www.ebuilder.com eBuilder Support Manual
Transcript of eBuilder Support Manualjira.ebuilder.com/eBuilder_Support_Manual_V5.pdf · 4 eBuilder Support...

Issued By Jira Admin
Date 2014-05-12
Filename eBuilder Support Manual V-5
Security Confidential
©eBuilder Technology Centre - 2014 www.ebuilder.com
eBuilder Support Manual

1 eBuilder Support Manual
©eBuilder Technology Centre - 2014 www.ebuilder.com
Revision History
Rev Date User Status
PA1 2010-02-16 First preliminary version (Eng.) – Erik Sandell
PA2 2010-06-11 Updated version (Eng.) – Erik Sandell
PA3 2010-06-14 Added filters and Dashboards (Eng.) – Erik Sandell
2.0 2010-11-03 Updated for version 4.1.2 (Eng.) – Erik Sandell
3.0 2011-08-30 Updated for version 4.3.4 (Eng.) – Erik Sandell
4.0 2013-08-16 JIRA-Admin
Support Rewrite with latest version update (Eng.)
5.0 2014-05-12 JIRA-Admin
Support Updated to capture changes in Jira version 6 (Eng.)
Intellectual and Property Rights The information contained in this document represents the current view of eBuilder on the Issues
discussed as of the date of publication. Due to the fact that eBuilder must respond to changing market conditions, it should not be
interpreted to be a commitment on the part of eBuilder, and eBuilder cannot guarantee the accuracy of any information presented
after the date of publication. This document is for informational purposes only. eBuilder makes no warranties, express or implied,
as to the information in this document. eBuilder, Accelerator or other mentioned brand names are either registered trademarks or
trademarks of eBuilder in Sweden and/or other countries. Parts of the names of actual companies and products mentioned herein
may be the trademarks of their respective owners. No part of this document may be reproduced, electronically or mechanically
transmitted without the written permission from eBuilder.

2 eBuilder Support Manual
©eBuilder Technology Centre - 2014 www.ebuilder.com
Table of Contents
1 Introduction to JIRA ...................................................................................................................................................... 4
2 Administration .............................................................................................................................................................. 5
2.1 Logging In ............................................................................................................................................................. 5
2.2 Logging Out........................................................................................................................................................... 6
2.3 Online Help ........................................................................................................................................................... 6
2.4 Managing User Profile .......................................................................................................................................... 7
2.4.1 Adding User Avatar ....................................................................................................................................... 8
2.4.2 Editing Profile ............................................................................................................................................... 8
2.4.3 Changing Preferences ................................................................................................................................... 9
2.4.4 Reducing the Number of Email Notifications Received from the System .................................................... 9
3 Main Menu ................................................................................................................................................................... 10
4 Dashboard .................................................................................................................................................................. 10
4.1 Managing Dashboard ......................................................................................................................................... 10
4.1.1 Viewing Favorite Dashboards ..................................................................................................................... 11
4.1.2 Viewing My Dashboards ............................................................................................................................. 11
4.1.3 Viewing Popular Dashboards...................................................................................................................... 11
4.1.4 Searching Dashboards ................................................................................................................................ 11
4.2 Creating Dashboard ............................................................................................................................................ 12
4.3 Editing Dashboard .............................................................................................................................................. 13
4.3.1 Adding gadgets to Dashboard .................................................................................................................... 13
4.3.2 Editing Layout of Dashboard ...................................................................................................................... 14
4.3.3 Dashboard with Gadgets ............................................................................................................................ 14
4.4 Copying Dashboard ............................................................................................................................................ 15
4.5 Deleting Dashboard ............................................................................................................................................ 15
5 Issues .......................................................................................................................................................................... 15
5.1 Status of Issue..................................................................................................................................................... 16
5.2 Types of Issues .................................................................................................................................................... 16
5.3 Severity of Issues ................................................................................................................................................ 17
5.4 Priority of Issues ................................................................................................................................................. 17
5.5 Type of Issue ....................................................................................................................................................... 18

3 eBuilder Support Manual
©eBuilder Technology Centre - 2014 www.ebuilder.com
5.6 Creating an Issue ................................................................................................................................................ 18
5.6.1 Process after the Issue is created ............................................................................................................... 20
5.7 Monitoring Issues ............................................................................................................................................... 23
5.8 Commenting on Issues ....................................................................................................................................... 24
5.9 Searching an Issue .............................................................................................................................................. 24
5.10 Classification and Reopen count of Issue ........................................................................................................... 25
5.10.1 Classification of an Issue ............................................................................................................................. 25
5.10.2 Reopen Count of Issue ................................................................................................................................ 25
5.11 Activity Bar of an Issue ....................................................................................................................................... 25
5.11.1 All ................................................................................................................................................................ 26
5.11.2 Comments .................................................................................................................................................. 26
5.11.3 Work Log ..................................................................................................................................................... 26
5.11.4 History ........................................................................................................................................................ 26
5.11.5 Activity ........................................................................................................................................................ 27
5.11.6 Transition Summary ................................................................................................................................... 27
5.11.7 Reopening History ...................................................................................................................................... 27
5.11.8 Stateoscope ................................................................................................................................................ 27
5.12 Filters .................................................................................................................................................................. 28
5.12.1 Creating a filter ........................................................................................................................................... 28
5.12.2 Managing Filters ......................................................................................................................................... 28
5.12.3 Viewing Favorite Filters .............................................................................................................................. 29
5.12.4 Viewing My Filters ...................................................................................................................................... 29
5.12.5 Viewing Popular Filters ............................................................................................................................... 29
5.12.6 Searching Filters ......................................................................................................................................... 29
6 Service Level Agreement (SLA) ................................................................................................................................... 30

4 eBuilder Support Manual
©eBuilder Technology Centre - 2014 www.ebuilder.com
1 Introduction to JIRA
JIRA is the communication portal used at eBuilder to communicate with the external users. This enables the users to
actively participate in community, and enhance the quality and the easiness of communication. Also this is one of the
best quality assuring method which enables the user to monitor the progress of Issue tracking in a user friendly
manner. User is integrated with the newest update related to an event via email notifications, and this provides an
overview of entire summary in the Dashboard. JIRA is an efficient way to manage every possible data and information
related to a particular Issue at one single place.
Keywords: External Customer – Customer/External user to eBuilder, Assignee – The person who is responsible for
giving solution or information, Assignee name - Name of the assignee at that point, Reporter – The person who
created the ticket, Owner – The person who accountable for the ticket

5 eBuilder Support Manual
©eBuilder Technology Centre - 2014 www.ebuilder.com
2 Administration
2.1 Logging In
After creating the account, an email is sent to
specified email address.
Click “Set my password” to set the password within
next 24 hours.
After Clicking “Set my password”, the “Reset
Password” window is loaded.
To reset the password :
1. Type a New Password.
2. Confirm the Password by re typing.
3. Click “Reset” to reset the password.
After the password has been reset :
Click “log in” to log in to the newly created account.

6 eBuilder Support Manual
©eBuilder Technology Centre - 2014 www.ebuilder.com
2.2 Logging Out
2.3 Online Help
To Log Out from the JIRA account :
1. Click the drop down at the Profile Name.
2. Click “Log Out”.
There was only one drop down menu for profile,
Online Help, Log Out and etc. in previous version and
now there are two drop down menus.
By clicking “Online Help”, user can directly view the
Help Menu Of Atlassian.
User can have more information of JIRA by clicking
“About JIRA”.
The Other fields are not necessarily important for communicating with eBuilder support.
User can login, by typing the Username and Password
in the fields.
To Log In :
1. Type the Username.
2. Type the Password.
3. Click “Log In”.

7 eBuilder Support Manual
©eBuilder Technology Centre - 2014 www.ebuilder.com
2.4 Managing User Profile
User profile is the place, where the user can specify user name, password, e mail address, and many more settings.
To view profile settings :
Click the “Profile” at drop down of the Profile Name.
It will display the Summary of your profile.
Summary section contains the personal details,
personal preferences, and Assigned Open Issues
per project.
Click Edit Icon to edit personal details and
preferences.

8 eBuilder Support Manual
©eBuilder Technology Centre - 2014 www.ebuilder.com
2.4.1 Adding User Avatar
A user avatar is used as the figurehead for the user profile, to display the comments done by user on an Issue. User
avatar can be selected by the given avatar gallery, or it can be simply uploaded from the PC.
To add a user avatar :
Click on avatar icon on Details.
To upload a picture :
Click on “Browse”.
It is preferred to use a bust size photo as the profile
picture.
2.4.2 Editing Profile
The profile can be edited by clicking the edit icon. The display name of the user and email address can be changed, by
confirming the password.
The Password can be changed by clicking the “Change
Password”.
An email notification is sent, at every time the
password is updated.
User can view the group information that the user is
belonging to. “jira-users” is a general group that
includes every user in the system.

9 eBuilder Support Manual
©eBuilder Technology Centre - 2014 www.ebuilder.com
2.4.3 Changing Preferences
Page Size Number of Issues displayed per Issue navigator page.
Email Type The format of outgoing email.
Language The preferred language.
Time Zone Time zone used when showing date time information.
My Changes
Whether to email notifications of any changes.
Sharing Whether to share Filters & Dashboards by default.
Keyboard shortcuts
Whether all keyboard shortcuts will work.
Autowatch Issues, which the user create or comment on, will automatically be watched for future changes.
2.4.4 Reducing the Number of Email Notifications Received from the System
If the user needs to minimize the number of emails
received from eBuilder:
Set My Changes to “Do not Notify me”.
Set Autowatch to “Disabled”.

10 eBuilder Support Manual
©eBuilder Technology Centre - 2014 www.ebuilder.com
3 Main Menu
This is the navigation bar (horizontal bar), located at the top of the page.
This contains Dashboards, Projects, Issues, and Agile.
Agile is not necessarily relevant to the external users,
when communicating with eBuilder support team.
“Create Issue” was at top of the right corner in
previous version and now it appears in the middle of
the top with blue color.
4 Dashboard
Dashboard shows the most important information across the projects and groups. This is the very first screen seen,
after logging in to the JIRA account. Dashboards contain gadgets, which display information about projects,
assignments, and updates.
Dashboard is relating with the project, and it is recommended to add gadgets which are most important to user for
quick reference. For an example, user can place gadgets which show the all tickets related to project.
4.1 Managing Dashboard
User can neatly organize the Dashboard related information. The user is allowed to view and configure Dashboards
created by user, and shared Dashboards by other users.
1. Click drop down in “Dashboards” in Main
Menu.
2. Select “Manage Dashboards”.

11 eBuilder Support Manual
©eBuilder Technology Centre - 2014 www.ebuilder.com
4.1.1 Viewing Favorite Dashboards
The user can add Dashboards to Favorite, which are
created by him, and shared by other users.
To find Favorite Dashboards :
1. Click “Dashboards” in Main Menu.
2. Select “Manage Dashboards”.
3. Select “Favorite”.
4.1.2 Viewing My Dashboards
User can manage all Dashboards user owns.
To Find Dashboards owned by user :
1. Click “Dashboards” in Main Menu.
2. Select “Manage Dashboards”.
3. Select “My”.
4.1.3 Viewing Popular Dashboards
To Find most Popular Dashboards :
1. Click “Dashboards” in Main Menu.
2. Select “Manage Dashboards”.
3. Select “Popular”.
4.1.4 Searching Dashboards
To Search Dashboards :
1. Click “Dashboards” in Main Menu.
2. Select “Manage Dashboards”.
3. Select “Search”.
4. Type the name of the Dashboard.
5. Click “Search”.

12 eBuilder Support Manual
©eBuilder Technology Centre - 2014 www.ebuilder.com
4.2 Creating Dashboard
User can create a Dashboard, which can be customized as according to the user’s preferences.
To create a new Dashboard :
1. Go to Manage Dashboards.
2. Click ‘Create new dashboard’ which appears
on the top of the right side.
To customize the created dashboard, click tools icon and do relevant changes. If it is not your own dashboard, then you are not allowed to edit, share or delete the dashboard.
1. Type the name of the Dashboard.
2. Type a description of Dashboard.
3. To add the Dashboard to “Favorite”:
click on star.
Once the Dashboard is added to “Favorite”,
the user can view that in Dashboards’ main
screen.
4. Specify the sharing option. User can also
share the Dashboard with everyone.
5. Add shares to specify the groups that the
Dashboard is shared.
6. Click “Add” to create the Dashboard.

13 eBuilder Support Manual
©eBuilder Technology Centre - 2014 www.ebuilder.com
Note: Sharing with everyone makes the Dashboard visible to every user in the system. It is recommended to not to
share with everyone. Dashboard which is not shared with everyone, will avoid other users seeing the information
with respect to a considered project.
Note: If the user has any doubts with respect to Dashboard, user can contact eBuilder support to clarify doubts.
4.3 Editing Dashboard
If the user has started with a copied Dashboard, it already contains some gadgets. User can remove and replace them.
If the user has started with a brand new Dashboard, user has to add some gadgets.
4.3.1 Adding gadgets to Dashboard
To Add gadgets to Dashboard :
1. Click on “Add a new gadget”.
2. Select the Gadget.
3. Click “Add it Now”.
4. Click “Finish”.

14 eBuilder Support Manual
©eBuilder Technology Centre - 2014 www.ebuilder.com
Once you add a gadget, you can customize it by
using arrow icon of the relevant gadget.
4.3.2 Editing Layout of Dashboard
To edit the Layout of Dashboard :
1. Click “Edit Layout”.
2. Select the Layout.
3. Click “Close”.
4.3.3 Dashboard with Gadgets

15 eBuilder Support Manual
©eBuilder Technology Centre - 2014 www.ebuilder.com
4.4 Copying Dashboard
User can copy an existing Dashboard, which has been created by user, or shared by other users. This creates a same
Dashboard page as the existing Dashboard. Copying enables the user to reduce the effort and time consumed to create
a new complex Dashboard.
To copy an existing Dashboard :
1. Click the drop down in “Tools”.
2. Select “Copy Dashboard”.
4.5 Deleting Dashboard User can delete a Dashboard, only if he has created
that.
To delete Dashboard :
1. Click the drop down of “Tools” in Dashboard
home page.
2. Select “Delete Dashboard”.
3. Click “Delete”.
5 Issues
Issues are the tasks for the project. This could be a software bug, a change request, addition of a new feature etc. This
allows the users to report Issues came across, when testing a product. User can create and report an Issue, by
specifying the severity, priority, and type of Issue. Each Issue has a reporter (person who report the Issue) and assignee
(person who is responsible for resolving Issue). The owner of the Issue can be changed by eBuilder, in accordance with
the content of Issue.

16 eBuilder Support Manual
©eBuilder Technology Centre - 2014 www.ebuilder.com
5.1 Status of Issue
Status is the stage, which the Issue is currently at in its lifecycle workflow. Once the Issue is created, the status can be
changed. The most common statuses of an Issue can be briefed as follows.
Open
This is the initial status, which an Issue can occupy soon after created. Open Issues are ready for
assignee to start resolving. The default assignee would be the project lead of the project.
Note: A link will be displayed at the top with respect to the ticket, soon after it is created. Click the
link to view the ticket.
In Progress
This is the status after start working on Issue. In Progress Issue is being actively worked on at the
moment by the assignee. External Customers cannot change the status of an Issue from Open to In
Progress. It should be done by eBuilders.
Resolved
The Issue is identified and the resolution has been implemented. The Issue is then waiting to be verified
by the reporter. External Customers cannot Resolve an Issue and It should be done by eBuilders.
Reopened
This Issue was once 'Resolved', but is now being re-examining. User can reopen the Issue, if the user
has further doubts regarding with Issue.
Note: It is advised to reopen the Issue as a new ticket, rather than reopening the Issue at the same
ticket.
Closed
The Issue has been resolved, and then verified by the reporter.
Note: If the Issue is not closed within 10 days by the reporter, the Issue will be automatically closed.
This automatic closing of Issue is relevant only for some projects.
5.2 Types of Issues
The Issues can be in many types. The type of an Issue is project specific. Most common Issue type would be:
Incident - This can be any Issue.
Service Request - This requires performing a service.
Setup Request - This requires changing configuration
in the system (This is relevant only for some projects.
In here it is not displayed).
Customer Integration Request - This relates to
customer integration.

17 eBuilder Support Manual
©eBuilder Technology Centre - 2014 www.ebuilder.com
Change Request - This indicates a significant change to
the existing system.
5.3 Severity of Issues
Severity demonstrates the urgency of being resolved. The most common severity levels would be:
Crash - This demonstrates the highest severity. The user
will not be able to use the product, if this type of Issue
occurs.
Critical - These Issues are critical for system, and the
attention must be paid as soon as possible.
Major - These Issues have significant impact over the
system, but do not stop the functioning of rest of the
system.
Average - These Issues have relatively minor impact, but
care should be taken to fix the Issue.
Minor - Minor Issues indicate the least severity. This is the
default severity level defined for an Issue
5.4 Priority of Issues
Super High - This priority can be defined for Crash
and Critical Issues.
High - This can be defined for Major and Average
Issues.
Medium - This can be defined for Minor Issues. This
is the default priority defined for an Issue.
Low - This is comparatively low with Medium.
Very Low - This indicates the least priority.

18 eBuilder Support Manual
©eBuilder Technology Centre - 2014 www.ebuilder.com
5.5 Type of Issue
Incident - when something is "broken", i.e the
application is not behaving as expected.
Request - a pre-agreed normal request of a task to
be performed. Either a new password, a new user to
be created, reports to be sent.
How To - is guidance, either a short and quick
answer on how to do a certain thing, or a request to
train a new hire etc.
5.6 Creating an Issue
User can create and report an Issue, by specifying the severity, priority and type of Issue. To create an Issue, followings
must be followed.
An Issue can be directly created by clicking the “Create Issue” or by clicking the drop down of “Issues” at Main Menu.

19 eBuilder Support Manual
©eBuilder Technology Centre - 2014 www.ebuilder.com
Note: The configure field can be found at the top right corner. It is advised to set it as “All” fields.
Project This text field should be filed by the name of the project, in which the Issue was found.
Issue Type The type of an Issue is varying with the nature of Issue. The Issue type is related to project. This can
be varied with the SLA defined for the project.(SLA is discussed below)
Summary
Type of Issue
Summary is used as the title for overall Issues. A very short description of what the Issue is about. It
is advised to keep the summary simple, clear, and understandable.
Type of Issue should be provided when creating an issue.
Severity Severity demonstrates the urgency of being resolved. User should properly select the severity based
on the nature of Issue.
Priority User should carefully specify the priority that should be given to the Issue.
Description This field should be filled with a description which explains the Issue properly. It is recommended to

20 eBuilder Support Manual
©eBuilder Technology Centre - 2014 www.ebuilder.com
mention the names of the persons who raise the Issue, and to whom it should be addressed.
Attachment Attachment can be a screenshot, or anything that explain the Issue. This should be kept in an
understandable manner to the assignee. The maximum size of the attachment should not exceed
10MB.
Incident report If an incident report is not needed, set this to “Not Required”.
After filling the text fields’ click “Create” to create the Issue.
5.6.1 Process after the Issue is created
A link can be found at the top of the page soon after
creating Issue. Click on the link to directly view the Issue.
External customer will receive an alert email to the
specified address. This indicates the information of
attributes (Issue Type, Assignee, priority etc) of the newly
created Issue.
Note: Assignee Name is the name of the person
responsible for resolving the Issue at his/her point.

21 eBuilder Support Manual
©eBuilder Technology Centre - 2014 www.ebuilder.com
Once the assignee started working on Issue, the status
would be changed from Open to In Progress.
External customer will receive an alert email, which
notifies these changes.
Assignee can update the attributes of Issue (priority,
severity etc)
In this example, assignee has updated the priority from
Medium to High.
Once the Issue has been updated, external customer will
receive an alert email, which notifies these updates.
If the assignee of Issue needs more information, assignee
can request it by clicking Need Feedback. Then the status
will change to Waiting for feedback with new assignee,
external customer.
The external customer receives an alert email, which
indicates, that the work is no longer In Progress.
External Customer should return the feedback to eBuilder
by clicking “Return Feedback” at the Issue page.

22 eBuilder Support Manual
©eBuilder Technology Centre - 2014 www.ebuilder.com
Once the external customer sends the feedback to
eBuilder, an alert email will be received by external
customer, which notifies that the feedback is received.
The status of the Issue will be changed from Waiting for
feedback to In Progress.
The new assignee is the assignee from the eBuilder.
Once the assignee resolved the Issue, external customer
will receive an alert email, which notifies these updates.
The status will be changed from In Progress to Resolved.
The new assignee would be the external customer.
External customer can then close the Issue.
External customer will receive an alert email, which
notifies these newest updates.
The status would be changed from Resolved to Closed.
The transition of statuses for the Issue can be viewed
from the Activity of Issue.

23 eBuilder Support Manual
©eBuilder Technology Centre - 2014 www.ebuilder.com
5.7 Monitoring Issues
Monitoring (watching) allows the user to get the
updates of Issue. User can monitor many Issues of
project at the same time
To watch an Issue :
1. Go to the Issue.
2. Click the drop down in “More”.
3. Select “Watch Issue”.
To Stop watching Issue :
1. Go to Issue.
2. Click the drop down in “More”.
3. Select “Stop Watching”.
Summary of an issue will be displayed at the right side of
the particular issue. You can watch the issue by selecting
“Start watching this issue”. If you are already in the
watchers list, then it will show “Stop watching this issue”
instead of “Start watching this issue”. Once you click
“Stop watching this issue”, you will be removed from the
watchers.
“Assign to me” link is not available on the top of the
menu as previous version and in new version it can be
found here only.

24 eBuilder Support Manual
©eBuilder Technology Centre - 2014 www.ebuilder.com
5.8 Commenting on Issues
The user can comment on Issue.
To comment on an Issue :
1. Go to Issue.
2. Click on “Comment”.
3. Type the comment.
4. Click on “Add”.
Note: User can find the comment button at the bottom of the ticket with respect to Issue. User can limit the
audience for the Issue by making the use of sharing options.
5.9 Searching an Issue
To search for an Issue :
1. Click the drop down of Issues in Main Menu.
2. Select “Search for Issues”.
Once you click the “Search for Issues”, will display an
issue list relevant to your project. It is little bit different
with the previous version. Current view won’t display an
issue navigator as previous. You can change the view of
the window by selecting “Views” menu on the top right
corner.

25 eBuilder Support Manual
©eBuilder Technology Centre - 2014 www.ebuilder.com
You can search a particular issue by filtering circled area - Project, Type, Status… etc. It is the basic view of searching.
“Advanced” link will help to expand a basic filter. When you click the “Advanced”, it will allow you to type the query.
This query is not a normal SQL query. This is specific for JIRA.
5.10 Classification and Reopen count of Issue
5.10.1 Classification of an Issue
This is a classification of the Issue. This is done for reporting purpose. In this example the Issue is classified as a
Solution Issue, which is occurred as a database error.
5.10.2 Reopen Count of Issue
This displays the number of times that the Issue has been reopened by the external customer. The reopen history can
be viewed at the Activity Bar at the bottom of the ticket.
5.11 Activity Bar of an Issue
Activity bar can be found below the description of the Issue at the Issue page.

26 eBuilder Support Manual
©eBuilder Technology Centre - 2014 www.ebuilder.com
5.11.1 All
This displays the all updates with respect to a particular
ticket.
5.11.2 Comments
This displays only the comments with respect to the
considered Issue.
5.11.3 Work Log
This displays the work that has been logged on the Issue.
This indicates the time of work logged for a particular
Issue.
The accumulated time of work logged for the issue, can
also be viewed at the work log.
5.11.4 History
This displays activity history up to now, from the moment
that the Issue has been created.
History includes status changes, assignee changes,
comments, SLA changes etc.(SLA is explained below)

27 eBuilder Support Manual
©eBuilder Technology Centre - 2014 www.ebuilder.com
5.11.5 Activity
This displays the activities performed by the external
customer and responsible assignee.
5.11.6 Transition Summary
This filters out and displays the status transition summary
of the Issue.
5.11.7 Reopening History
This displays the reopening history of Issue.
5.11.8 Stateoscope
This displays the all actions, performer of
actions, and responsible assignees for
the Issue with respect to status
transitions.

28 eBuilder Support Manual
©eBuilder Technology Centre - 2014 www.ebuilder.com
5.12 Filters
A saved search is referred to as a filter. Filters enable to save the searches for future use.
5.12.1 Creating a filter
To create a filter use the Basic search or Advanced search.
To save a created filter, click “Save as” on the top
providing a name.
Note: Sharing with everyone makes the Filter visible to every user in the system. It is recommended to not to share
with everyone. Filter which is not shared with everyone, will avoid other users seeing the information with respect
to a considered project.
5.12.2 Managing Filters
This allows the user to view and configure filters, which are previously created. At the same time user can work with
filters that other users have shared.
To manage a Filter :
1. Click the drop down of the “Issues” in Main
Menu.
2. Select “Manage Filters”.
29 eBuilder Support Manual
©eBuilder Technology Centre - 2014 www.ebuilder.com
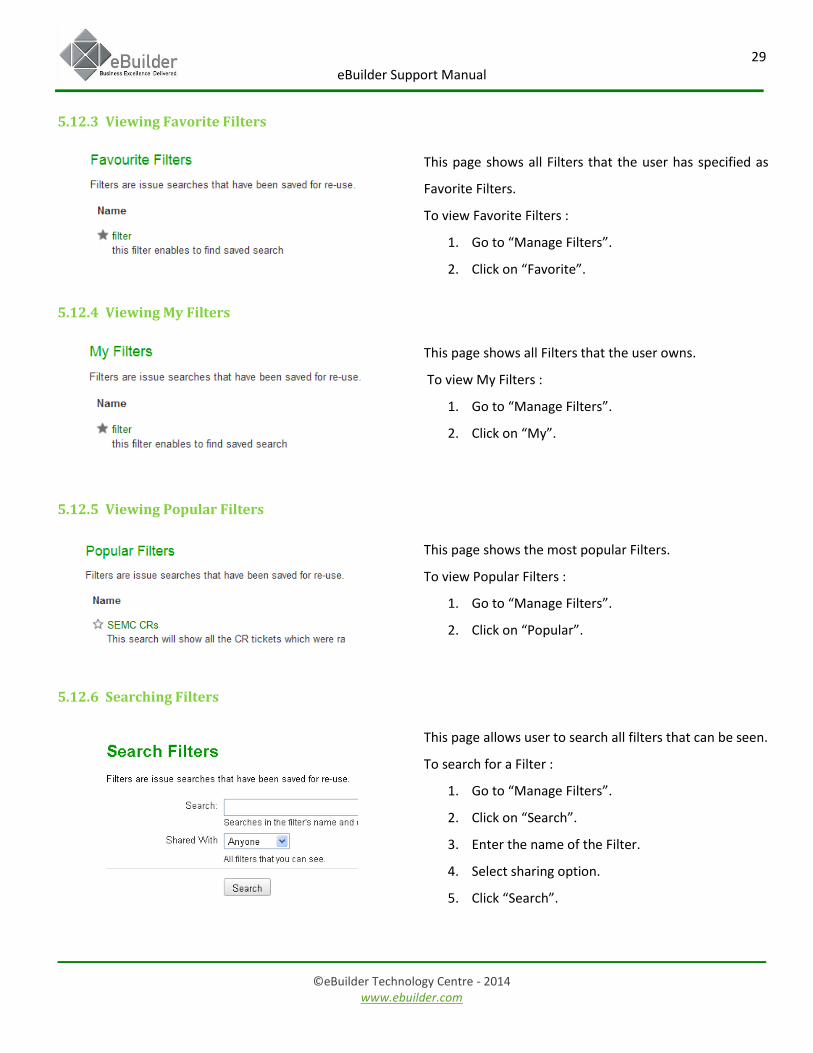
5.12.3 Viewing Favorite Filters
This page shows all Filters that the user has specified as
Favorite Filters.
To view Favorite Filters :
1. Go to “Manage Filters”.
2. Click on “Favorite”.
5.12.4 Viewing My Filters
This page shows all Filters that the user owns.
To view My Filters :
1. Go to “Manage Filters”.
2. Click on “My”.
5.12.5 Viewing Popular Filters
This page shows the most popular Filters.
To view Popular Filters :
1. Go to “Manage Filters”.
2. Click on “Popular”.
5.12.6 Searching Filters
This page allows user to search all filters that can be seen.
To search for a Filter :
1. Go to “Manage Filters”.
2. Click on “Search”.
3. Enter the name of the Filter.
4. Select sharing option.
5. Click “Search”.

30 eBuilder Support Manual
©eBuilder Technology Centre - 2014 www.ebuilder.com
6 Service Level Agreement (SLA)
The SLA is in accordance with the respective customer agreement. The lead times of SLA displayed in the Issue page
once the Issue has been created. SLA is determined based on the project, Issue type, and severity.
The following example demonstrates the SLA with respect to Issue type “Incident”.
These measurements will be varied with Issue Type
E.g. The Issue has been created and the status is Open
Agreement time for be In progress- 80hrs.
Consumed time - 3 sec.
Remaining time - 79hrs 59 min 57 sec.
Agreement time for being Resolved - 2340 hrs.
Consumed time - 3 sec.
Remaining time - 2339 hrs 59 min 57 sec.
These bars are visible from the moment the Issue has been created.
E.g. The Issue has completed the In progress status.
Agreement time for be In progress- 80hrs.
Consumed time - 5 hrs 22 min 21 sec.
Remaining time - 74hrs 37 min 39 sec.
The Issue is now pending to being Resolved.
Agreement time for being Resolved - 2340 hrs.
Consumed time - 5 hrs 22 min 21 sec.
Remaining time - 2334 hrs 37 min 19 sec.
These bars are activated, from the moment it change the
status from Open to In Progress.

31 eBuilder Support Manual
©eBuilder Technology Centre - 2014 www.ebuilder.com
The Issue has completed the In progress status.
Due date is 26/ Aug/ 2013.
Agreement time for be In progress - 80hrs.
Consumed time - 5 hrs 22 min 21 sec.
Remaining time - 74hrs 37 min 39 sec.
The Issue has been Resolved.
Due date is 15/ Aug/ 2014.
Agreement time for being resolved - 2340 hrs.
Consumed time - 6 hrs 47 min 48 sec.
Remaining time - 2333 hrs 12 min 12 sec.
Note: In some projects SLA status bar is visible, only for some Issue types. In few projects, Issue type is split, and for
each segment different SLAs has been defined.