E820 Elliptical Owner's Manual - SportsArt :: Home · 2013-01-02 · Read this owner's manual and...
30
SPORTS ART LIGHT COMMERCIAL GRADE E820 Elliptical Trainer Owner's Manual TABLE OF CONTENTS: 1. SAFETY GUIDELINES ........................................................................................ 2. INTRODUCTION.................................................................................................. 3. ASSEMBLING YOUR ELLIPTICAL TRAINER..................................................... List of parts........................................................................................................... Installation Requirements..................................................................................... Step by step instructions....................................................................................... Floor leveling adjustment...................................................................................... 4. EXERCISING ON YOUR ELLIPTICAL E820........................................................ Overview of Electronic Package............................................................................ Basic Operation..................................................................................................... Power Up The Elliptical...................................................................................... ........................................................................................................... .......................................................................................................... .................................................................................................... ............................................................................................ ................................................................................................ Pre-set Programs.................................................................................................. .............................................................................................................. ............................................................................................................. ..................................................................................................................... ............................................................................................................. ...................................................................................................... ...................................................................................................... ............................................................................................................. ......................................... ............................................................................................ Pause / Reset Key Function.................................................................................. Stop Key Function................................................................................................. System Default Setting.......................................................................................... ............................................................................... ........................................................................................................ 5. GUIDELINES FOR EXERCISE............................................................................ How long should I exercise.................................................................................. How often should I exercise................................................................................. 7. TROUBLE SHOOTING......................................................................................... Blank Display ........................................................................................................ Err 7 Message...................................................................................................... If the Load Does Not Respond Properly ............................................................... No Spm Reading.................................................................................................. 8. WIRING SCHEMATIC........................................................................................... Quick Start Select AGE Select WEIGHT Select Workout TIME Select PROGRAM MANUAL CUSTOM HILL RANDOM INT 1 Program INT 2 Program PLATEAU WT Loss (HRC 65%) / CARDIO (HRC 80%) PROGRAM COOL DOWN MODE Display Accumulated Distance Select Modify 6. MAINTAINING THE ELLIPTICAL E820................................................................ Cleaning Your Elliptical Trainer ............................................................................. 1 2 3 3 4 4 7 8 8 11 11 12 12 13 14 14 15 15 15 15 16 17 18 18 19 21 22 22 23 23 23 25 25 25 25 25 27 27 28 28 28 29
Transcript of E820 Elliptical Owner's Manual - SportsArt :: Home · 2013-01-02 · Read this owner's manual and...

SPORTS ART LIGHT COMMERCIAL GRADE E820 Elliptical Trainer Owner's Manual
TABLE OF CONTENTS:
1. SAFETY GUIDELINES ........................................................................................
2. INTRODUCTION..................................................................................................
3. ASSEMBLING YOUR ELLIPTICAL TRAINER..................................................... List of parts...........................................................................................................Installation Requirements.....................................................................................Step by step instructions.......................................................................................Floor leveling adjustment......................................................................................
4. EXERCISING ON YOUR ELLIPTICAL E820........................................................
Overview of Electronic Package............................................................................Basic Operation..................................................................................................... Power Up The Elliptical...................................................................................... ........................................................................................................... .......................................................................................................... .................................................................................................... ............................................................................................ ................................................................................................Pre-set Programs.................................................................................................. .............................................................................................................. ............................................................................................................. ..................................................................................................................... ............................................................................................................. ...................................................................................................... ...................................................................................................... ............................................................................................................. ......................................... ............................................................................................Pause / Reset Key Function..................................................................................Stop Key Function.................................................................................................System Default Setting.......................................................................................... ............................................................................... ........................................................................................................
5. GUIDELINES FOR EXERCISE............................................................................How long should I exercise..................................................................................How often should I exercise.................................................................................
7. TROUBLE SHOOTING......................................................................................... Blank Display........................................................................................................ Err 7 Message......................................................................................................
If the Load Does Not Respond Properly...............................................................No Spm Reading..................................................................................................
8. WIRING SCHEMATIC...........................................................................................
Quick StartSelect AGESelect WEIGHTSelect Workout TIMESelect PROGRAM
MANUALCUSTOMHILLRANDOMINT 1 ProgramINT 2 ProgramPLATEAUWT Loss (HRC 65%) / CARDIO (HRC 80%) PROGRAMCOOL DOWN MODE
Display Accumulated DistanceSelect Modify
6. MAINTAINING THE ELLIPTICAL E820................................................................Cleaning Your Elliptical Trainer.............................................................................
1
2
33447
88
11111212131414151515151617181819212222232323
252525
2525
2727282828
29

1
SAFETY GUIDELINES:
CAUTION:
Please read and follow the safety guidelines:
Keep this owner s manual for future use and reference.
Read this owner s manual and follow the instructions.
Assemble and operate the Sports Art E820 Elliptical Trainer on a solid, level surface.
Never allow children on or near the machine.
Check the machine before every use. Make sure all parts are assembled, and all nuts and bolts are tightened. Do not use the machine if the unit is disassembled in any way.
Keep your hands away from moving parts.
Do not place the machine or any parts near water or any liquid.
Wear proper workout clothing: Do NOT wear loose clothing. Do not wear shoes with leather soles or high heels. Tie all long hair back.
Don t rock the unit from side to side, and use care when mounting and dismounting the unit.
Do not use any accessories that aren t specifically recommended by the manufacturer. These might cause injuries or cause the unit to fail.
Work within your recommended exercise level. Do NOT work to exhaustion.
If you feel any pain or abnormal sensations, STOP YOUR WORKOUT. And consult your physician immediately.
The weight limit for this elliptical trainer is 330 LBS ( 150 KGS)
Allow sufficient space on both sides of the elliptical for users to mount and dismount the machine.
Please reserve a space for plug accessible when assembled or using the machine.
If any parts fail or are defective, please stop your workout immediately and contact your authorized dealer for repairs.
Before beginning any exercise program, you should consult with your doctor. It is recommended that you undergo a complete physical examination.
‧
‧
‧
‧
‧
‧
‧
‧
‧
‧
‧
‧
‧
‧
‧
‧
'
'
'
'

2
INSTRODUCTION:
Congratulations on purchasing one of the finest piece of light commercial exercise equipment on the market today, the Sports Art E820. Constructed of high quality materials and designed for years of trouble-free usage, the Sports Art E820 will be an integral part of your fitness regimen.
This outstanding equipment can provide varied choices and functions for your needs during exercise. But before using your Sports Art E820, we recommend that you familiarize yourself with this Owner's Manual. Whether you are a first time user of an elliptical trainer or a seasoned pro, understanding the correct use of the equipment will enhance your ability to achieve your exercise goals safely and successfully.
LEFT SUPPORT TUBE
ROCKING BAR
ADJUST LINKAGE
FLOOR LEVEL ADJUSTMENT
GLIDE RAIL
LEVEL SWITCH
UPPER BODY HANDLE BAR
TRANSPORST WHEEL
REAR COVER
FOOT PEDAL
ROCKING BAR COVER
RIGHT SUPPORT TUBE
STATIONARY HANDLE BAR
STRIDE SWITCHELECTRONICS DISPLAY
SUPPORT TUBE END CAP

3
ASSEMBLING YOUR ELLIPTICAL TRAINER:
List of Parts:
Caution: Help is recommended to assemble the E820 elliptical to avoid injury and to ensure safety to the unit.
Important: The packing for this unit was designed to protect it during shipment. Please store the original packaging in a safe place in case you need to ship the unit in the future.
Before assembling this machine, make sure that you have all the following items to be used for assemble E820 elliptical. If any items are missing, contact your authorized dealer.
1. Four 3/8" x L1" bolts - lift post and frame
2. Four 3/8" washers - lift post and frame
3. Two 3/8" x L3/4" bolts - lift post and frame
4. Two 5/16" x L1 3/4" bolts - moving bar and linkage
5. Two 5/16" washers - linkage
6. Four 5/16" x L19 bolts - support tube
7. Four 5/16" washers - support tube
8. Two 1/4" x L3/4" screws - rocking bar
9. Two 1/4" washers - rocking bar
10. Eight M5 x L12 PH screws - foot pedals
11. One M5 x L12 PH screw - rocking bar cover
12. Two M5 x L8 screws - water bottle holder
13. Double open end wrench 12 x 15
14. Hex Allen wrench M6
15. Hex Allen wrench M5
16. 2 - way Screwdriver
17. Hex Allen wrench M4

Installation Requirements:
Step by Step Instructions:
Read this owner's manual and follow the instructions contained herein. We suggest you to open out the folding covers on top and remove the parts inside, then remove the surrounding cover, then finally remove the frame.
When you remove E820 Elliptical Trainer from its box, first check to make sure all of the parts are present. Then, read through the assembly instructions before you begin.
1. Remove only the upper box and Styrofoam. (See Fig. 1)
2. Raise the main post into position. Screw the bolts and washers loosely for A & B parts on the frame. Then, raise the rocking bar (step ) and pedal carriage (step
) out of the box and place foot pedal on the ground (step ). (See Fig. 1)
3. Secure with the 3/8" bolts to the main post staring from the front (A part) to the side (B part). (See Fig. 1)
Note: Do not remove the upper box until you finished assembly Step 6. (Fig.4)
Styrofoam
Styrofoam
Box
Fig.1
4

4. Once the upright is fastened and tightened, place the glide rail over the Rocking Bar Roller. (See Fig 2)
5. Then fasten the screws under the glide rail. (See Fig. 3)
Fig.2
Fig.3
5

6. Attach the adjust linkage into its place on the rocking bar and secure with the screw, then cover with the stride adjust cover. (See Fig. 4) Then remove all the Styrofoam and packing material.
7. Attach the support tubes with the 1/4" x L 3/4" bolts to the upper tube mount. Use T-handle wrench to secure 5/16" bolts on the lower tube mount. Then cover with support tube end cap. (See Fig. 5)
Make sure the upper roller is located on the glide rail then fasten the foot pedals with screws. Secure the lower roller with the shaft and fasten the shaft by open-end wrench. (See Fig. 5)
Fig.4
Fig.5
6
8. Finally, insert the power cable plug into its holder. Then attach whole power set into the rear bottom and secure with the screws. (See Fig. 6)
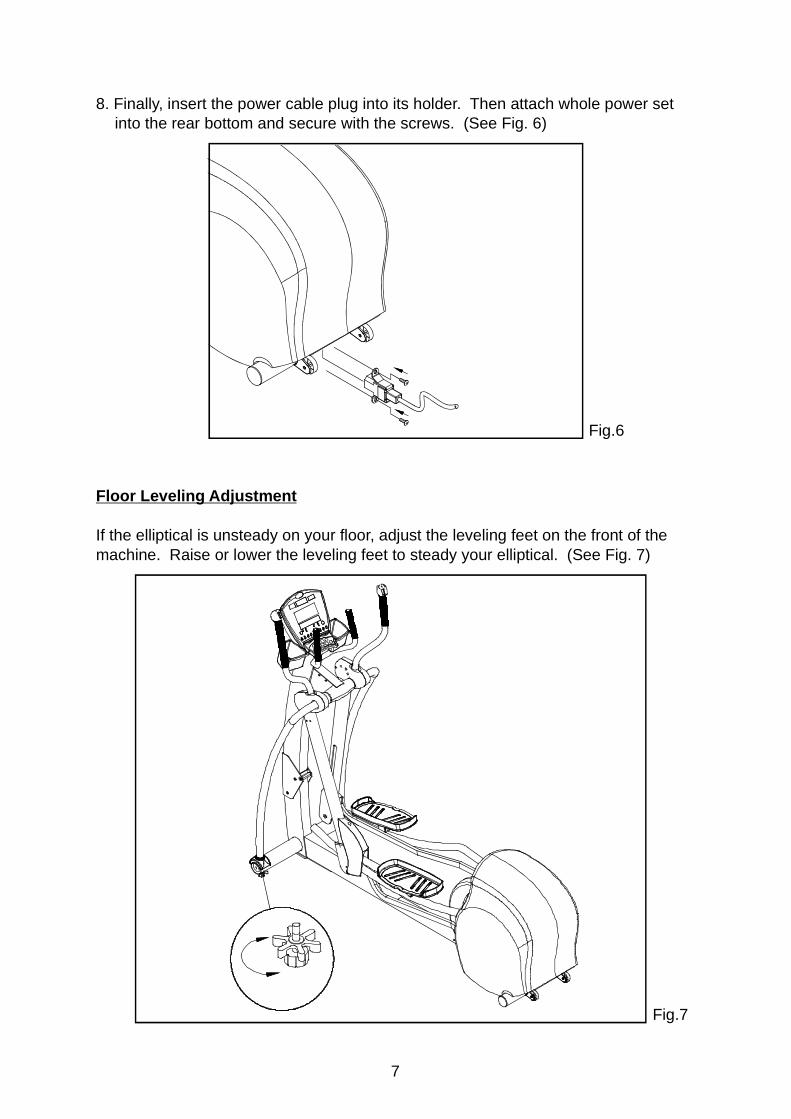
If the elliptical is unsteady on your floor, adjust the leveling feet on the front of the machine. Raise or lower the leveling feet to steady your elliptical. (See Fig. 7)
Floor Leveling Adjustment
Fig.7
Fig.6
7

8
EXERCISING ON THE E820 ELLIPTICAL TRAINER
We are pleased to introduce the new SPORTSART E820, an elliptical trainer designed for user comfort and convenience.
1. OVERVIEW OF THE ELECTRONICS PACKAGE
231
4
8
9
10
5
6
7
A B
C
D
E
F
G
H
I
J
E820
9
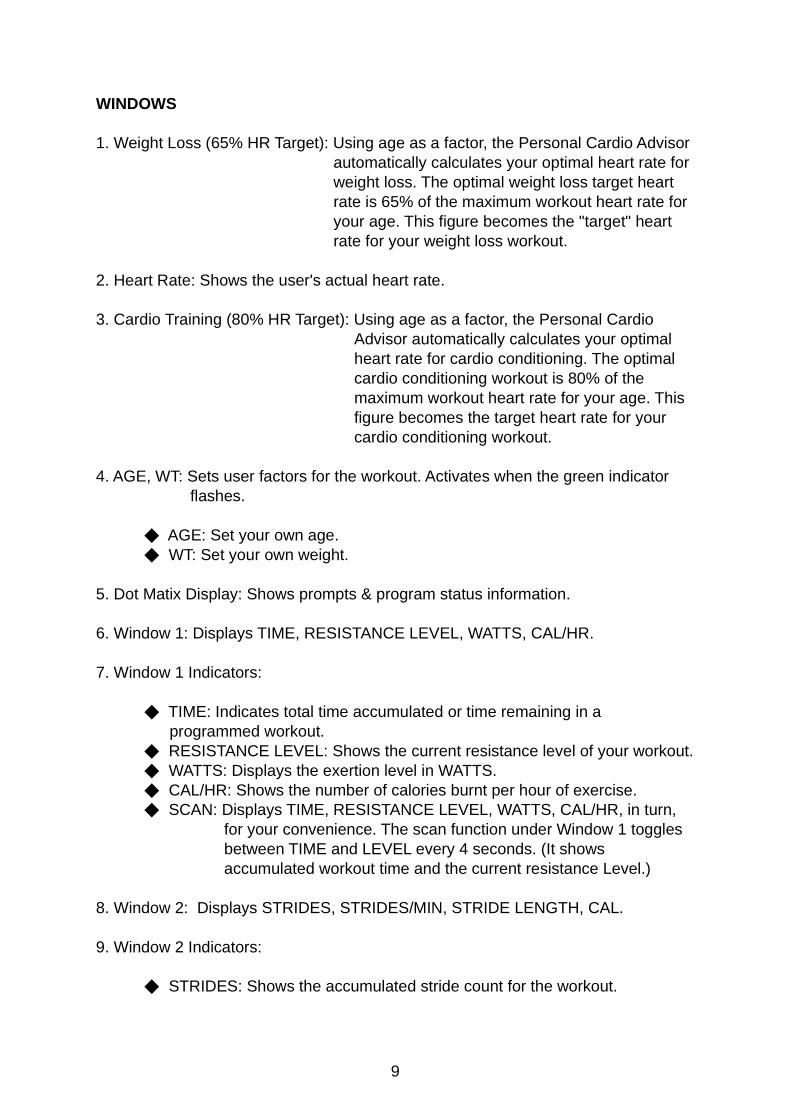
WINDOWS
1. Weight Loss (65% HR Target): Using age as a factor, the Personal Cardio Advisor automatically calculates your optimal heart rate for weight loss. The optimal weight loss target heart rate is 65% of the maximum workout heart rate for your age. This figure becomes the "target" heart rate for your weight loss workout.
2. Heart Rate: Shows the user's actual heart rate.
3. Cardio Training (80% HR Target): Using age as a factor, the Personal Cardio Advisor automatically calculates your optimal heart rate for cardio conditioning. The optimal cardio conditioning workout is 80% of the maximum workout heart rate for your age. This figure becomes the target heart rate for your cardio conditioning workout.
4. AGE, WT: Sets user factors for the workout. Activates when the green indicator flashes.
AGE: Set your own age. WT: Set your own weight.
5. Dot Matix Display: Shows prompts & program status information.
6. Window 1: Displays TIME, RESISTANCE LEVEL, WATTS, CAL/HR.
7. Window 1 Indicators:
TIME: Indicates total time accumulated or time remaining in a programmed workout.
RESISTANCE LEVEL: Shows the current resistance level of your workout. WATTS: Displays the exertion level in WATTS. CAL/HR: Shows the number of calories burnt per hour of exercise. SCAN: Displays TIME, RESISTANCE LEVEL, WATTS, CAL/HR, in turn,
for your convenience. The scan function under Window 1 toggles between TIME and LEVEL every 4 seconds. (It shows accumulated workout time and the current resistance Level.)
8. Window 2: Displays STRIDES, STRIDES/MIN, STRIDE LENGTH, CAL.
9. Window 2 Indicators:
STRIDES: Shows the accumulated stride count for the workout.
◆◆
◆
◆◆◆◆
◆

STRIDES/MIN: Indicates workout speed (strides per minutes). STRIDE LENGTH: Shows stride length. CAL: Displays overall caloric expenditure of the present workout. SCAN: Displays STRIDES, STRIDES/MIN, STRIDE LENGTH, CAL, in
turn, for user convenience.
10. Program Indicators: Light to indicate the activated program.
A. Switches between TIME, RESISTANCE LEVEL, WATTS, CAL/HR and SCAN.
B. Switches between STRIDES, STRIDES/MIN, STRIDE LENGTH, CAL and SCAN.
C. Press any program key to activate the related pre-set workout course. Current workout information (TIME, CAL., STRIDE, etc.) is retained even if you switch to another course in mid-workout.
D. Press to confirm entry of information.
E. Press to adjust the resistance level.
F. (1) Press STOP to end your workout. Workout data is displayed. (2) When cooling down, press STOP to exit the "cool down" mode. (Please see detailed information under ) G.
(1) Pause: Press PAUSE/RESET and stop exercising to retain program and workout memory. To return to your workout, press START or exercise for over 2 seconds.
(2) Reset: Press and hold PAUSE/RESET for 2 seconds. All data resets and the display returns to the startup screen.
(3) Clear User's record: Select User information and press PAUSE/ RESET to clear the user's record. Press to confirm erasion of the user memory.
(See Basic Operation No. 3. Select User for more detailed information.)
H. (1) Press START to enter USER settings.(2) In the PAUSE mode, press START or start exercising to resume your workout.
I. Press to adjust the stride length.
J. Press to start working out without setting USER, AGE, WEIGHT, TIME settings.
◆◆◆◆
▲▼
▲▼
▲▼
KEYPAD
Window 1 MODE:
Window 2 MODE:
Programs:
ENTER:
RESISTANCE LEVEL (UP & DOWN):
STOP:
Pre-Set Programs.
PAUSE/RESET:
START:
STRIDE (UP & DOWN):
QUICK START:
10

2. BASIC OPERATION
1. Power Up The Elliptical:
1-1: After you turn on unit power, the "E820" banner message appears on the dot matrix window. Press QUICK START to begin working out immediately, or press START to enter personal information.
AGE WT
"E820" Banner Message
1-2: When someone begins exercising, the orange dot flashes. The orange dot(s) flashes for 20 seconds and move to the left as the workout progresses. Dots flash for 20 seconds in all pre-set programs and manual except WT LOSS (HRC 65%) / CARDIO (HRC 80%) programs.
1-3: The following colors represent different course conditions.(a) Red dot - represents completed courses.(b) Orange dot - represents current position.(c) Green dot -represents upcoming courses.
Upcoming (green)
Completed (red) Current position (orange)
□ □ □ □ □ □ □ □ □ □ □ □ □ □ □ □ □ □ □ □ ▓ ▓ ▓ ▓ ▓ □ □ ▓ ▓ □ □ □ ▓ ▓ □ □ □ ▓ ▓ □ ▓ □ □ □ □ □ ▓ □ □ ▓ □ □ □ □ ▓ □ ▓ □ □ ▓ ▓ □ □ □ □ □ ▓ □ □ ▓ □ □ □ □ ▓ □ ▓ □ □ ▓ ▓ ▓ ▓ ▓ □ □ □ ▓ ▓ □ □ □ ▓ ▓ □ □ ▓ □ □ ▓ ▓ □ □ □ □ □ ▓ □ □ ▓ □ ▓ □ □ □ □ ▓ □ □ ▓ ▓ □ □ □ □ □ ▓ □ □ ▓ □ ▓ □ □ □ □ ▓ □ □ ▓ ▓ ▓ ▓ ▓ ▓ □ □ ▓ ▓ □ □ ▓ ▓ ▓ ■ □ □ ▓ ▓ □
USER AGE WT The flashing dot represents the user's present position.
□ □ □ □ □ □ □ □ □ □ □ □ □ □ □ □ □ □ □ □□ □ □ □ □ □ □ □ □ □ □ □ □ □ □ □ □ □ □ □□ □ □ □ □ □ □□ □ □ □ □ □ □ □ □ □ □ □ □□ □ □ □ □ □ □ □ □ □ □ □ □ □ □ □ □ □ □ □□ □ □ □ □ □ □ □ □ □ □ □ □ □ □ □ □ □ □ □□ □ □ □ □ ▓ ▓ ▓ ▓ ▓ ▓ ▓ ▓ ▓ ▓ ▓ ▓ ▓ ▓ ▓□ □ □ □ □ ▓ ▓ ▓ □ □ □ □ □ □ □ □ □ □ □ □□ □ □ □ □ ▓ ▓ ▓ □ □ □ □ □ □ □ □ □ □ □ □
Level 18~20Level 15~17Level 12~14Level 9~11Level 7~8Level 5~6Level 3~4Level 1~2
11
□ □ □ □ □ □ □ □ □ □ □ □ □ □ □ □ □ □ □ □
□ □ □ □ □ □ □ □ □ □ □ □ □ □ □ □ □ □ □ □
□ □ □ □ □ □ □ □ □ □ □ □ □ □ □ □ □ □ □ □
□ □ □ □ □ □ □ □ □ □ □ □ □ □ □ □ □ □ □ □
□ □ □ □ □ □ □ □ □ □ □ □ □ □ □ □ □ □ □ □
□ □ □ □ □ ▓ ▓ ▓ ▓ ▓ ▓ ▓ ▓ ▓ ▓ ▓ ▓ ▓ ▓ ▓
□ □ □ □ □ ▓ ▓ ▓ □ □ □ □ □ □ □ □ □ □ □ □
□ □ □ □ □ ▓ ▓ ▓ □ □ □ □ □ □ □ □ □ □ □ □

1-4: PEDAL TO START appears when no one exercises on the unit for over 10 seconds.
1-5: The height of the dots represent the resistance level: the higher the dots, the greater the resistance. The height of the dots automatically changes when resistance settings are changed.
Press the QUICK START key to start exercising without first inputting user information or press START key to enter user information.
2-1: After you start working out, the TIME window counts up from 00:00, and the default LEVEL setting is 5.
2-2: You can change resistance LEVEL or STRIDE settings by pressing at any time during your workout.
2-3: To operate a PROGRAM after a QUICK START workout has begun, press the key for the desired program. The default setting is 30:00. Press or to change the setting at any time, andpress ENTER or pedal for over 2 seconds to confirm your choice.
2-4: After completion of the workout, the unit enters the COOL DOWN mode.
After powering on the unit, press START key, the AGE indicator flashes. Age "35" appears in the dot matrix display window.
3 1: Press or to select your age, and then press ENTER to confirm your
choice.
3-2: The Personal Cardio Advisor uses age to automatically calculate target heart rate values for Weight Loss (65% HR Target) and Cardio Training (80% HR Target).
2. Quick Start:
3. Select AGE:
▲▼
▲ ▼
- ▲ ▼
12

NOTE:
NOTE:
The allowable age range is 10~99 years old.
AGE WT
Example shows the default age of 35. The Personal Cardio Advisor automatically calculates the target heart rate .
The WT indicator light flashes. A starting weight of "75(KG)" or "165(LB)" appears in the dot matrix display window. Press or to select your weight, and press ENTER to confirm your choice.
The allowable weight range is 30~150 KG or 66~330 LB.
AGE WT
Examples shows the default weight of 165 (LB) .
4. Select WEIGHT:
▲ ▼
□ □ □ □ ▓ □ □ □ □ □ □ □ □ □ □ □ □ □ □ □□ □ □ □ ▓ □ □ □ □ ▓ ▓ □ □ ▓ ▓ ▓ ▓ □ □ □□ □ □ ▓ ▓ □ □ □ ▓ □ □ □ □ ▓ □ □ □ □ □ □□ □ □ □ ▓ □ □ □ ▓ □ □ □□ ▓ □ □ □ □ □ □□ □ □ □ ▓ □ □ □ ▓ ▓ ▓ □ □ ▓ ▓ ▓ □ □ □ □□ □ □ □ ▓ □ □ □ ▓ □ □ ▓ □ □ □ □ ▓ □ □ □□ □ □ □ ▓ □ □ □ ▓ □ □ ▓ □ ▓ □ □ ▓ □ □ □□ □ ▓ ▓ ▓ ▓ ▓ □ □ ▓ ▓ □ □ □ ▓ ▓ □ □ □ □
□□▓□□□□□□□□□□□□□□□□□□□□□□□▓▓□□□▓▓▓▓□□□□□□□□□□▓□□▓□□▓□□□□□□□□□□□□□□□□▓□□▓□□□□□□□□□□□□□□▓▓▓□□▓▓▓□□□□□□□□□□□□□□▓□□□□□▓□□□□□□□□□□▓□□▓□□□□□▓□□□□□□□□□□□▓▓□□□▓▓▓□□□□□□
13
□ □ ▓ □ □ □ □ □ □ □ □ □ □ □ □ □ □ □ □ □□ □ □ □ □ □ ▓ ▓ □ □ □ ▓ ▓ ▓ ▓ □ □ □ □ □□ □ □ □ □ ▓ □ □ ▓ □ □ ▓ □ □ □ □ □ □ □ □□ □ □ □ □ □ □ □ ▓ □ □ ▓ □ □ □ □ □ □ □ □□ □ □ □ □ □ ▓ ▓ ▓ □ □ ▓ ▓ ▓ □ □ □ □ □ □□ □ □ □ □ □ □ □ ▓ □ □ □ □ □ ▓ □ □ □ □ □□ □ □ □ □ ▓ □ □ ▓ □ □ □ □ □ ▓ □ □ □ □ □□ □ □ □ □ □ ▓ ▓ □ □ □ ▓ ▓ ▓ □ □ □ □ □ □

5. Select Workout TIME:
6. Select PROGRAM:
The time indicator flashes. Window 1 displays the default workout time of 30:00 (30 minutes). Press or to select your desired workout time, and then press ENTER to confirm your choice.
If this is not the first time in use, Window 1 will display the time set by the previous user.
After workout TIME is set, TIME and STRIDE indicators light up. All of the PROGRAM indicators flash and the dot matrix window prompts "SELECT PROGRAM". Press the desired program to begin your workout.
▲ ▼
NOTE:
14

3. PRE-SET PROGRAMS
1. MANUAL:
Press MANUAL to enter this mode. MANUAL mode operation is the same as "QUICK START" operation; you can adjust the resistance level any time during your workout.
2. CUSTOM:
2-1: Press CUSTOM to enter this mode. There are 8 workout segments, and each segment lasts for one minute.
2-2: During your workout, press LEVEL or to adjust the desired resistance level of that segment. That setting will be retained for the corresponding segment throughout the workout.
2-3: If no one exercises on the unit for over 10 seconds, "STEP TO START" will scroll across the dot matrix window once, then previous workout data will appear. "STEP TO START" will scroll across the window every ten seconds until someone starts exercising on the unit.
CUSTOM mode consiss of 8 segments, each segment lasting 1 minute.
3. HILL:
3-1: The HILL program consists of 3 workout patterns: HILL 1, HILL 2, HILL 3. Press the "HILL" key to select your desired workout pattern: HILL 1 - > HILL 2 - > HILL 3.
3-2: Press RESISTANCE LEVEL or RESISTANCE LEVEL to change
resistance at any time during the workout. The resistance level changes only for upcoming segments. For example, if LEVEL is pressed to the maximum level, dots move to the highest position for upcoming segments.
▲ ▼
▲ ▼
▲
□ □ □ □ □ □ □ □ □ □ □ □ □ □ □ □ □ □ □ □□ □ □ □ □ □ □ □ □ □ □ □ □ □ □ □ □ □ □ □□ □ □ □ □ □ □ □ □ □ □ □ □ □ □ □ □ □ □ □□ □ □ □ □ □ □ □ □ □ □ □ ▓ ▓ ▓ □ □ □ □ □□ □ □ □ □ □ □ □ ▓ ▓ ▓ ▓ □ □ ▓ □ □ □ □ □□ □ □ ▓ ▓ ▓ □ □ ▓ □ □ □ □ □ ▓ ▓ ▓ ▓ □ □□ □ □ ▓ ▓ ▓ ▓ ▓ ▓ □ □ □ □ □ □ □ □ ▓ □ □▓ ▓ ▓ ▓ ▓ ▓ ▓ ▓ □ □ □ □ □ □ □ □ □ ▓ ▓ ▓
15

□ □ □ □ □ □ □ □ □ □ □ □ □ □ □ □ □ □ □ □□ □ □ □ □ □ □ □ □ □ □ □ □ □ □ □ □ □ □ □ □ □ □ □ □ □ □ □ □ □ □ □ □ □ □ □ ▓ ▓ ▓ □□ □ □ □ □ □ □ □ □ □ ▓ ▓ ▓ □ □ □ ▓ □ ▓ □ □ □ □ □ □ □ □ □ □ □ ▓ □ ▓ ▓ ▓ ▓ ▓ □ ▓ ▓□ □ □ □ □ □ □ ▓ ▓ ▓ ▓ □ □ □ □ □ □ □ □ □□ □ □ □ □ ▓ ▓ ▓ □ □ □ □ □ □ □ □ □ □ □ □□ □ □ □ □ ▓ ▓ ▓ □ □ □ □ □ □ □ □ □ □ □ □
□ □ □ □ □ □ □ ▓ ▓ ▓ ▓ ▓ ▓ ▓ ▓ ▓ ▓ ▓ ▓ ▓□ □ □ □ □ □ □ ▓ □ □ □ □ □ □ □ □ □ □ □ □□ □ □ □ □ □ □ ▓ □ □ □ □ □ □ □ □ □ □ □ □□ □ □ □ □ □ □ ▓ □ □ □ □ □ □ □ □ □ □ □ □□ □ □ □ □ □ □ ▓ □ □ □ □ □ □ □ □ □ □ □ □□ □ □ □ □ □ □ ▓ □ □ □ □ □ □ □ □ □ □ □ □□ □ □ □ □ ▓ ▓ ▓ □ □ □ □ □ □ □ □ □ □ □ □□ □ □ □ □ ▓ ▓ ▓ □ □ □ □ □ □ □ □ □ □ □ □
Example of a HILL program profile before changing to maximum resistance.
Example of a HILL program profile at maximum resistance. Note that the previous segment is unchanged, while the upcoming segment shows full resistance.
3-3: If no one exercises on the unit for over 10 seconds, "STEP TO START" will scroll across the dot matrix window once, then previous workout data will appear. "STEP TO START" will scroll across the window every ten seconds until someone starts exercising on the unit.
3-4: HILL program resistance level profiles follow:
HILL 1 2 4 6 8 6 4 2 4 6 8 6 4HILL 2 2 8 4 8 6 8 6 8 4 8 2 8HILL 3 2 4 6 8 10 12 14 12 10 8 6 4
4. RANDOM:
4-1:This program includes thousands of workout patterns. However, resistance can be adjusted at each segment by pressing LEVEL or , and the program illustration will change accordingly. The following is an exmple of a RANDOM resistance program.
: , , , , , , , , , , ,: , , , , , , , , , , ,: , , , , , , , , , , ,
▲ ▼
16
□ □ □ □ □ □ □ □ □ □ □ □ □ □ □ □ □ □ □ □

□ □ □ □ □ □ □ □ □ □ □ □ □ □ □ □ □ □ □ □□ □ □ □ □ □ □ □ □ □ □ □ □ □ □ □ □ □ □ □□ □ □ □ □ □ □ □ □ □ □ □ □ □ □ □ □ □ □ □□ □ □ □ □ □ □ □ □ □ ▓ ▓ ▓ □ □ □ □ □ □ ▓□ □ □ □ □ □ □ □ □ □ ▓ □ ▓ □ □ □ □ □ □ ▓□ □ □ □ □ □ □ ▓ ▓ ▓ ▓ □ ▓ □ □ □ ▓ ▓ ▓ ▓□ □ □ □ □ □ ▓ ▓ □ □ □ □ ▓ ▓ ▓ ▓ ▓ □ □ □□ □ □ □ □ □ ▓ ▓ □ □ □ □ □ □ □ □ □ □ □ □
□ □ □ □ □ □ □ □ □ □ □ □ □ □ □ □ □ □ □ □□ □ □ □ □ □ □ □ □ □ □ □ □ □ □ □ □ □ □ □□ □ □ □ □ □ □ □ □ □ □ □ □ □ □ □ □ □ □ □□ □ □ □ □ □ □ □ □ □ □ □ □ □ □ □ □ □ □ □□ □ □ □ □ □ □ □ □ □ ▓ ▓ ▓ □ □ □ ▓ ▓ ▓ □□ □ □ □ □ □ □ □ □ □ ▓ □ ▓ □ □ □ ▓ □ ▓ □□ □ □ □ □ □ □ ▓ ▓ ▓ ▓ □ ▓ ▓ ▓ ▓ ▓ □ ▓ ▓□ □ □ □ □ □ □ ▓ □ □ □ □ □ □ □ □ □ □ □ □
4-2: During a RANDOM workout program, press the RANDOM key and another random program will be activated.
4-3: If no one exercises on the unit for over 10 seconds, "STEP TO START" will
scroll across the dot matrix window once, then previous workout data will appear. "STEP TO START" will scroll across the window every ten seconds until someone starts exercising on the unit.
5. INT 1 Program:
5-1: INT 1 consists of two segments: segment 1 and segment 2. Each segment lasts for 1 minute. At the end of each segment, "GOING TO LEVEL XX" scrolls across the display. The display also beeps. An example of an INT 1 program follows.
5-2: The resistance level is set for each segment. For instance, if resistance is set at LEVEL 10 for segment 1, each segment 1 will have level 10 resistance for the duration of the workout. The same situation applies to segment 2. However, resistance can be adusted at any time during the workout. In this case, the new resistance level applies to that segment throughout the workout.
5-3: If no one exercises on the unit for over 10 seconds, "STEP TO START" will scroll across the dot matrix window once, then previous workout data will appear. "STEP TO START" will scroll across the window every ten seconds until someone starts exercising on the unit.
17
□ □ □ □ □ □ □ □ □ □ □ □ □ □ □ □ □ □ □ □

6. INT 2 Program:
6-1: INT 2 consists of two segments: segment 1 and segment 2. Segment 1 lasts for one minute. Segment 2 lasts for two minutes. At the end of each segment, "GOING TO LEVEL XX" scrolls across the display. The display also beeps. An example of an INT 2 program follows.
6-2: The resistance level is set for each segment. For instance, if resistance is set at LEVEL 10 for segment 1, each segment 1 will have level 10 resistance for the duration of the workout. However, resistance can be adusted at any time during the workout. In this case, the new resistance level applies to that segment throughout the workout.
6-3: If no one exercises on the unit for over 10 seconds, "STEP TO START" scrolls across the dot matrix window once, then previous workout data appears. "STEP TO START" scrolls across the window every ten seconds until someone starts exercising on the unit.
7. PLATEAU:
7-1: The PLATEAU program consists of 3 stages. The Stage 1 and Stage 3 each occupy 20% of the total workout time. And Stage 2 occupies 60% of the total workout time.
20% 60% 20%
(Stage 1) (Stage 2) (Stage 3)
7-2: Stage 1 resistance can increase from LEVEL 1 to LEVEL 12. Stage 2 applies the highest resistance level from Stage 1. Stage 3 decreases the resistance level to LEVEL 1. Consequently, the slope of Stage 1 and Stage 3 is based on the length of the workout time. The shorter the time, the steeperthe slope will be.
□ □ □ □ □ □ □ □ □ □ □ □ □ □ □ □ □ □ □ □□ □ □ □ □ □ □ □ □ □ □ □ □ □ □ □ □ □ □ □□ □ □ □ □ □ □ □ □ □ □ □ □ □ □ □ □ □ □ □□ □ □ □ □ □ □ □ □ □ □ □ □ □ □ □ □ □ □ □□ □ □ □ □ □ □ ▓ ▓ ▓ □ □ □ □ □ □ ▓ ▓ ▓ □□ □ □ □ □ □ □ ▓ □ ▓ □ □ □ □ □ □ ▓ □ ▓ □□ □ □ □ □ □ □ ▓ □ ▓ ▓ ▓ ▓ ▓ ▓ ▓ ▓ □ ▓ ▓□ □ □ □ □ □ □ ▓ □ □ □ □ □ □ □ □ □ □ □ □
18

7-3: If no one exercises on the unit for over 10 seconds, "STEP TO START" scrolls across the dot matrix window once, then previous workout information appears. "STEP TO START" scrolls across the window every ten seconds until someone starts exercising on the unit.
8. WT Loss (HRC 65%) / CARDIO (HRC 80% ) PROGRAM:
Heart Rate Control (HRC) includes two programs, one designed for weight loss and another designed for cardio conditioning. WT Loss is a low intensity workout whereas CARDIO is a high intensity workout. These workouts are designed to achieve optimal workout results. The Polar transmitter belt must be worn properly to operate heart rate control programs.
8-1: Select either WT Loss or CARDIO workout. Age must be input for the display to calculate Target Heart Rate. Input your age, then press ENTER to confirm your choice.
this procedure is skipped if the user has already input the age. ()
8-2: After age is input, the 65% HR Target and 80% HR Target windows show your target heart rates for weight loss and cardio conditioning, respectively.
8-3: If you wish to modify your target heart rate, first enter "SYSTEM DEFAULT SETTING". (Please refer to ). When the default setting is "YES", the words "MODIFY YOUR HEART RATE LIMIT" scroll across the display once and the prompt "MDFY" appears. A suggested target heart rate shows on the Heart Rate Window. Push keys to select your target heart rate, then press the ENTER key to confirm your choice. If you input a target heart rate that exceeds the minimum or maximum heart rate for your age, the minimum or maximum heart rate for your age is automatically adopted.
After the target heart rate is set, you can enter WT Loss (HRC 65%) / CARDIO (HRC 80% ) programs.
The target heart rate cannot be modified if the default setting is "NO".
8-4: In the WT Loss (HRC 65%) / CARDIO (HRC 80% ) program, the default resistance LEVEL is 5, and the default speed setting is 50 SPM. Once you start exercising, an orange speed bar appears. This bar reflects your actual speed. The longer the bar is, the faster the speed is. The arrow indicates your speed in comparison to the default speed.
Note:
Note:
See Select AGE in Basic Operation.
SYSTEM DEFAULT SETTING
▲▼
19

8-5: The Heart Rate Window displays your current heart rate value. A heart appears in the dot matrix window. An alternating green and red colored heart indicates that your heart rate signal is clear. However, if the display does not detect a heart rate signal, the heart remains green.
8-6: Once the heart rate is detected, the program compares it to the target heart rate and automatically increases the resistance level until the user's heart rate reaches the target.
8-7: After the user's actual heart rate reaches the target heart rate, "HEART RATE CONTROL" appears and the words "HEART RATE CONTROL STARTING" scroll across the dot matrix window. The resistance level is then adjusted automatically to keep the pulse at the target rate.
8-8: NO HEART RATE
A Polar transmitter belt must be worn properly during the workout to allow the heart rate signal to be successfully transmitted to the receiver located inside the display console. During your workout, a heart on the display flashes green and red to indicate a clear pulse signal. However, if the display does not detect a heart rate signal, the heart appears green, and the words "NO HEART RATE READING, PLEASE CHECK TRANSMITTER" scroll across the display.
8-9: NO MOTION SIGNAL
"STEP TO START" appears twice on the dot matrix window if no one exercises on the unit for more than 5 seconds. Resistance reverts to LEVEL 5 and the prompt "STEP TO START" appears every 5 seconds.
8-10: SCAN FUNCTION UNDER WINDOW 1
Under the WT Loss (HRC 65%) / CARDIO (HRC 80% ) program, Window 1 scans between TIME and LEVEL displays every 4 seconds. (Accumulated workout time appears when the TIME indicator lights. The resistance level appears when the resistance indicator lights.)
8-11: The following is an example of a target heart rate of 120 beats per minute.
20

□ □ □ □ □ □ □ □ □ □ □ □ □ □ □ □ □ □ □ □□▓▓□▓▓□□□□□▓□▓▓▓□▓▓▓▓▓▓▓▓▓▓□▓□□▓□□□▓□▓□▓□ ▓ ▓ ▓ ▓ ▓ □ □ ▓ □ □ ▓ □ ▓ ▓ ▓ □ ▓ □ ▓ □ □ ▓ ▓ ▓ □ □ □ ▓ □ □ ▓ □ ▓ □ □ □ ▓ □ ▓□ □ □ ▓ □ □ □ ▓ ▓ ▓ □ ▓ □ ▓ ▓ ▓ □ ▓ ▓ ▓□ □ □ □ □ □ □ □ ▓ □ □ □ □ □ □ □ □ □ □ □▓ ▓ ▓ ▓ ▓ ▓ ▓ □ □ □ □ □ □ □ □ □ □ □ □ □
9. COOL DOWN Mode:
After completing your desired workout program, the words "TOTAL TIME + AVERAGE HR" scroll across the dot matrix window. reports the accumulated TIME. reports accumulated CALORIES and STRIDES twice. The average HEART RATE appears on the Heart Rate window for your review.
9-1: After displaying the data, the display enters COOL DOWN mode. In the COOL DOWN mode, which lasts 5 minutes, the TIME indicator lights. In this mode, time counts down.
9-2: "GOING TO COOL DOWN" appears once on the dot matrix window, then the unit reverts to MANUAL mode. No program indicators light up. The resistance decreases automatically level by level until the minimum level is reached.
9-3: When the COOL DOWN mode ends, the display beeps once and the words "SELECT PROGRAM OR PRESS START" scroll across the dot matrix window. (Please refer to for more details or just press QUICK START to start the next workout.)
9-4: If you enter a PROGRAM through QUICK START without first establishing the USER ID, the display prompt "Select USER" appears after compeletion of the COOL DOWN process.
9-5: Under COOL DOWN mode, you can press MODE to see an instant display of the current workout settings. Only "RESISTANCE LEVEL ", "STOP", and "PAUSE/RESET" function in this mode.
Window 1Window 2
BASIC OPERATION 7. Select PROGRAM
▼
The lines of dots on the lower left indicate your actual speed.
Suggested (default) speed setting.
Target Heart
The heart color alternates between green and red to indicate that your heart rate signal is clear. If the display does not detect a heart rate signal, the heart color remains green.
21
□ □ □ □ □ □ □ □ □ □ □ □ □ □ □ □ □ □ □ □□ ▓ ▓ □ ▓ ▓ □ □ □ □ □ ▓ □ ▓ ▓ ▓ □ ▓ ▓ ▓▓ ▓ ▓ ▓ ▓ ▓ ▓ □ ▓ □ □ ▓ □ □ □ ▓ □ ▓ □ ▓□ ▓ ▓ ▓ ▓ ▓ □ □ ▓ □ □ ▓ □ ▓ ▓ ▓ □ ▓ □ ▓ □ □ ▓ ▓ ▓ □ □ □ ▓ □ □ ▓ □ ▓ □ □ □ ▓ □ ▓□ □ □ ▓ □ □ □ ▓ ▓ ▓ □ ▓ □ ▓ ▓ ▓ □ ▓ ▓ ▓□ □ □ □ □ □ □ □ ▓ □ □ □ □ □ □ □ □ □ □ □▓ ▓ ▓ ▓ ▓ ▓ ▓ □ □ □ □ □ □ □ □ □ □ □ □ □
□ □ □ □ □ □ □ □ □ □ □ □ □ □ □ □ □ □ □ □□ ▓ ▓ □ ▓ ▓ □ □ □ □ □ ▓ □ ▓ ▓ ▓ □ ▓ ▓ ▓ ▓ ▓ ▓ ▓ ▓ ▓ ▓ □ ▓ □ □ ▓ □ □ □ ▓ □ ▓ □ ▓ □ ▓ ▓ ▓ ▓ ▓ □ □ ▓ □ □ ▓ □ ▓ ▓ ▓ □ ▓ □ ▓ □ □ ▓ ▓ ▓ □ □ □ ▓ □ □ ▓ □ ▓ □ □ □ ▓ □ ▓□ □ □ ▓ □ □ □ ▓ ▓ ▓ □ ▓ □ ▓ ▓ ▓ □ ▓ ▓ ▓□ □ □ □ □ □ □ □ ▓ □ □ □ □ □ □ □ □ □ □ □▓ ▓ ▓ ▓ ▓ ▓ ▓ □ □ □ □ □ □ □ □ □ □ □ □ □

4. PAUSE / RESET KEY FUNCTION
5. STOP KEY FUNCTION:
1. During a workout, press "PAUSE" to temporarily stop your current workout.
(a) The word "PAUSE" scrolls across WINDOW 1 to WINDOW 2 once, and the program indicators extinguish.
(b) The previous workout information appears and the dot matrix window prompts "STEP TO START".
(c) If no one exercises on the unit and no one presses the START key, (a) and (b) appear again.
(d) Hold the START key or exercise for over 2 seconds to return to the original workout. All workout data will be retained.
2. Hold the PAUSE/RESET key for over 2 seconds to return to the startup mode.
During your workout, if you press "STOP", the following will occur.
1. "STOP" appears for 3 seconds. The display beeps. Then "TOTAL TIME + AVERAGE HR" scrolls across the dot matrix window. Window 1 shows accumulated time. Window 2 shows accumulated CALORIES and STRIDES twice. The average heart rate appears in the HEARTRATE window for your review.
2. After Window 2 shows accumulated CALORIES and STRIDES twice, the following occurs.
(a) If you enter a program by pressing the QUICK START key without establishing personal information, the display will prompt you to input. Or you can press QUICK START to start your next workout immediately.
(b) If you input personal information before starting your workout, all of the program indicators will flash and the words "SELECT PROGRAM OR PRESS START" scroll across the dot matrix window. Select the program you want or press QUICK START to immediately begin your next workout. If desired, press the START key to reset personal information.
3. If you press the STOP key in COOL DOWN mode, the unit responds as explained in 2.
4. With the exception of the conditions mentioned above, pressing the STOP key produces no results.
22

6. SYSTEM DEFAULT SETTING
1. Display Accumulated Distance:
After you power up the unit (before pressing any key), press LEVEL + + ENTER simultaneously for 3 seconds. Window 1 & 2 display the total accumulated strides, an 8-digit figure. The STRIDE indicator lights. Press ENTER to modify basic unit operation settings.
An 8-digit figure shows total strides.
2. Select MODIFY:
(1) "NO" is the default setting of MODIFY.
(2) Once in the default setting, "MODIFY HRC Y OR N" scrolls across the dox matrix window, then "MDF" appears.
(3) The HEARTRATE window shows either "NO" or "YES". Press or to modify your choice, then press ENTER. When "YES" appears, press ENTER to modify your target heart rate. Then, the starting banner screen, showing "E820", appears.
Select "YES" for modification. Select "NO" to reject modification.
▼ ▲
23

3. Display Range
RESISTANCE LEVEL 1 ~ 20 TIME 00 00 99 59 STRIDES 0000 9999 CAL 0.0 999.9 (K-CAL) CAL/HR 0 ~ 9999 SPM (STEP PER MINUTE) 5~150 WATTS 0~9999 HEART RATE RANGE 40-250 (BEATS) STRIDE LENGTH 450 650mm 11 level adjustments or
17.0 26.0 inch 10 level adjustments PROGRAMS MANUAL CUSTOM HILL RANDOM INT 1 INT 2
PLATEAU WT Loss CARDIO
4. Allowable Setting Range
LEVEL 1~ 20 TIME 05:00 ~ 99:00 (Unit: minute) AGE 10~90 WEIGHT 30 ~ 150Kg or 66 ~ 330LB STRIDE LENGTH 450 650mm 11 level adjustments or
17.0 26.0 inch 10 level adjustments
●
●
●
●
●
●
●
●
●
●
●
●
●
●
●
:︰ : ~ :
: ~: ~:
::
:: ~ ( )
~ ( ): 、 、 、 、 、 、
、 、
::: 。:
: ~ ( )~ ( )
24

GUIDELINES FOR EXERCISE
MAINTAINING YOUR ELLIPTICAL TRAINER
How long should I exercise?
How often should I exercise?
CLEANING YOUR ELLIPTICAL TRAINER
The duration of your exercise session is dependent on your fitness level. In general, it is recommended to maintain your heart rate in your training zone for at least 20 minutes to realize an aerobic benefit. It is recommended that before beginning any exercise program, you should consult with your doctor. This will aid in identifying your fitness level and how long you should exercise.
When first starting your workout, use the first several minutes to warm up, then slowly increase your workload. At the end of your workout, gradually decrease your workload, then exercise lightly as a cool down.
Aerobic exercises, to achieve the greatest benefits, should be performed 3-5 times a week. It is important to allow sufficient time, at least 24 hours, for your body to recover after exercise.
Your elliptical requires little maintenance. The elliptical trainer's low friction operation is dependent on keeping the unit as clean as possible. See Cleaning the elliptical trainer for more information.
Regular cleaning is recommended to keep your elliptical trainer at peak performance.Before your workout, use a dry cloth to clean the surface of the electronics display.
Note: Never pour liquids on the electronics display. Should water, for some reason, get on the electronics package, immediately blow dry the electronics package.
To clean your elliptical, use a mild cleaner and for safety make sure the unit is completely dry before operating.
It is recommended that you keep all liquids away from the unit during operation.Spillage of liquids onto or into the machine will void the warranty.
1. (a) Follow the steps 1 and 2 to remove the access cap. (Point A is where to press in step 1) (see fig.8)
(b) By pressing the stride adjustment switch to level the nut, and posit the lubrication valve to middle. (see fig.8-1)
Note: Execute the lubricating maintenance once per year, referring to the instructions attached.
25

(d) Follow the steps 3 and 4 to replace the access cap. (Point B is where to press in step 4) (see fig.8-3)
2. (a) Remove the access cap. (see fig.9)
(b) Refill with the lubrication tube and the lubrication valve. (see fig.9-1)
(c) Then, remove the lubrication tube. (see fig.9-2)
(d) Replace the access cap. (see fig.9-3)
26
Fig.8 Fig.8-1
Fig.8-2
Fig.9 Fig.9-1 Fig.9-2 Fig.9-3
Fig.8-3
step
step
Lubrication valve

TROUBLE SHOOTING
A. BLANK DISPLAY
If you turn on the POWER switch and there is no light, please follow steps to resolve the problem.
(a) Check if the power cord is plugged securely into the wall socket. (See Fig. 10)
(b) Check that the power switch on the rare end of the unit is in the "ON" position. The power switch should be lit.(See Fig. 10)
(c) If the power switch is not lit, replace the fuse (1A / 250V). Push on the fuse holder and turn it counter clockwise to remove the damaged fuse. (See Fig.10-1)Insert a new fuse into holder, push the fuse and holder into place, then turn the fuse holder clockwise to secure it. (See Fig.10-2~10-3)
(d) If there is still no display after completing the above steps, please contact your dealer for more information.
27
Fig.10
Fig.10-1
Fig.10-2
Fig.10-3
(To install a new fuse)(To remove an old fuse)
REMOVE THE DAMAGED FUSEFUSE = 110V=1Amp,ACF
220V=1Amp,ACF

B. ERR 7 MESSAGE: STRIDE ADJUSTMENT MALFUNCTION
C. IF THE LOAD DOES NOT RESPOND PROPERLY
D. NO SPM READING
ERR 7 is a self diagnostic code to alert you to a problem with the electronic stride adjustment mechanism.
(a) If you turn on the unit and ERR 7 appears on the display.
(b) When you are using the STRIDE keys to adjust the stride length, the stride adjustment does not work, and ERR 7 appears on the display.
Please contact your dealer immediately, and DO NOT use the unit. The stride adjustment mechanismis damaged and must be repaired or replaced.
If ERR 7 appears and blinks for couple seconds then the display returns to normal, OR you press the STRIDE keys to adjust the stride length and ERR 7 appears and blinks, please contact your dealer for further information because the stride system is damaged and should not be used.
If there is no load or the load does not respond properly when you press the LEVEL keys, please contact your dealer for further details.
If your display has no SPM reading during your workout, please contact your dealer for more details.
Do not attempt to repair or service the Sports Art E820 elliptical trainer, unless you are a factory authorized service professional. Such an attempt will automatically void the factory warranty.
▲▼
▲▼Caution:
Caution:
28

Wiring Schematic:
29
E820
Your Authorized Distributor
E820