
E-Verification User Manual
10
e-Verification User Manual Page 1 e-Verification of Returns User Manual
description
e-Verification_User_Manua
Transcript of E-Verification User Manual

e-Verification User Manual
Page 1
e-Verification of Returns
User Manual

e-Verification User Manual
Page 2
List of Abbreviations
Term Abbreviation
PAN Permanent Account Number
ITR Income Tax Return
AY Assessment Year
ITD Income Tax Department
CPC Centralized Processing Centre
EVC Electronic Verification Code
Table of Contents Introduction ....................................................................................................... 3
e-Verification process ........................................................................................ 3
Steps to e-Verify the Return ............................................................................... 3
Option 1: “I already have an EVC to e-Verify my return” ............................................ 4
Option 2: “I do not have an EVC and I would like to generate EVC to e-Verify
my return” ....................................................................................................................................... 5
Option 3: “I would like to generate Aadhaar OTP to e-Verify my return. .............. 8
Option 4: “I would like to send ITR-V/ I would like to e-Verify later.’ .................... 9

e-Verification User Manual
Page 3
Introduction Income Tax Return filed by the taxpayer is not treated as valid until it is verified by the taxpayer. In
the existing process, taxpayer can verify the return using Digitally Signed Certificate or by sending
signed ITR-V to CPC. As per Rule 12 vide Notification No. 41/2015, Income Tax department has
introduced e-Verification of returns as an alternate for ITR-V. Taxpayers who are NOT mandated to
use DSC are eligible for e-Verification.
e-Verification process Taxpayer has an option to e-Verify the return at the time of uploading / after uploading. In case of
already uploaded return, tax payer can still e-Verify the same through "e-File e-Verify Return"
option after login. Taxpayer can e-Verify the return using the below modes
EVC received in Registered Mobile number and e-mail.
Electronic Verification Code (EVC) is a 10 digit alphanumeric code which can be generated
through e-Filing portal and is valid for 72 hours.
Aadhaar OTP
Login to e-Filing through Net Banking
Steps to e-Verify the Return Login to e-Filing Portal
Click “e-File” Select “Upload Return” to upload a return.
Select the Assessment year, ITR name from the drop down and browse the XML to
be uploaded and click on submit button as shown below.

e-Verification User Manual
Page 4
Taxpayers are provided with four options as displayed below.
Option 1 – “I already have an EVC to e-Verify my return.”
Option 2 – “I do not have an EVC and I would like to generate EVC to e-Verify
my return.”
Option 3 – “I would like to generate Aadhaar OTP to e-Verify my return.”
Option 4 – “I would like to send ITR-V/ I would like to e-Verify later.”
Option 1: “I already have an EVC to e-Verify my return” Taxpayer once clicks on “I already have an EVC to e-Verify my return” the
below screen is displayed
Taxpayer need to enter the pre generated EVC in the provided text box and Click
“Submit “to e-Verify. No Further action required.

e-Verification User Manual
Page 5
Option 2: “I do not have an EVC and I would like to generate EVC to e-Verify my
return”
Taxpayer once clicks on “I do not have an EVC and I would like to generate
EVC to e-Verify my return”.
1. If the taxpayer’s income is less than 5 lakhs and if there is no refund, then the
below screen is displayed to the taxpayer
2. If the taxpayer’s income is more than 5 lakhs or if there is refund, then the
below screen is displayed to the taxpayer
e-Verification User Manual
Page 6
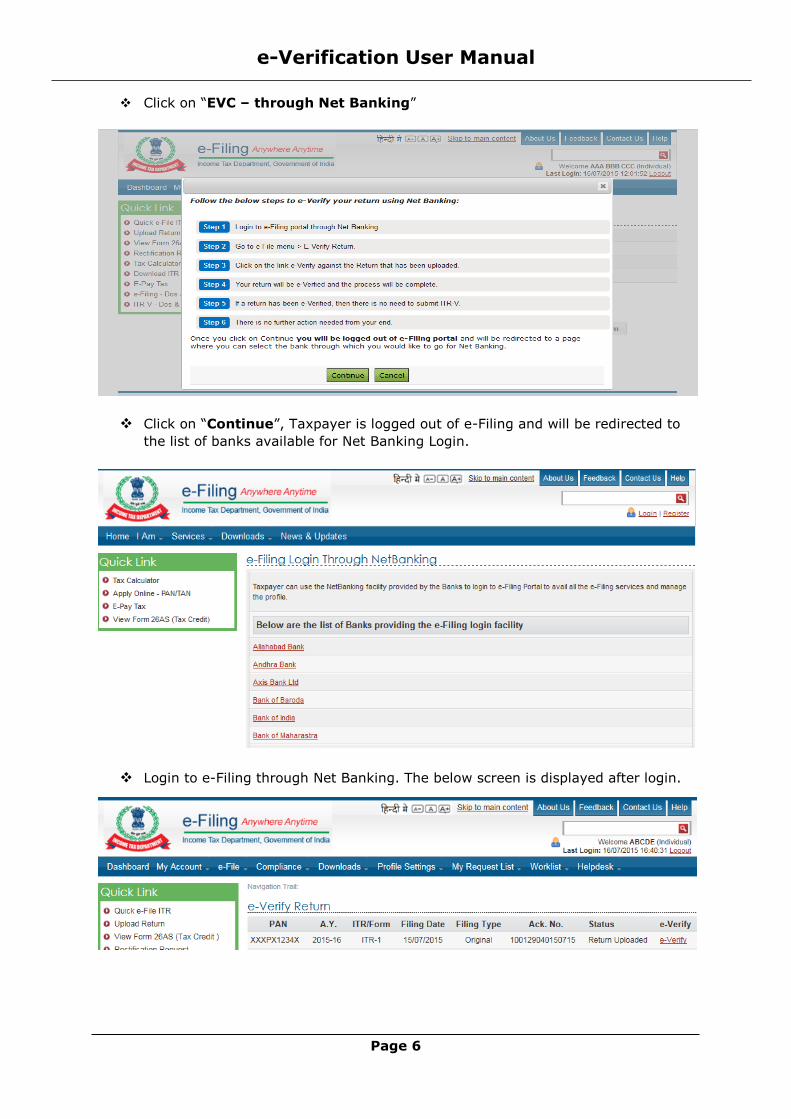
Click on “EVC – through Net Banking”
Click on “Continue”, Taxpayer is logged out of e-Filing and will be redirected to
the list of banks available for Net Banking Login.
Login to e-Filing through Net Banking. The below screen is displayed after login.

e-Verification User Manual
Page 7
Click on “e-Verify” link.
Confirm to e-Verify by clicking on Continue button.
Success message will be displayed. No further action is required.
EVC – To Registered Email Id and Mobile Number
Click “EVC – to Registered Email Id and Mobile Number” (This option would
be available for taxpayer whose Total income is Less than 5 Lakhs and there is no
Refund)
Enter the EVC received in your Mobile Number and Email Id in the provided text
box and Click “Submit”. No Further action is required.
e-Verification User Manual
Page 8
Success message will be displayed. No further action is required.
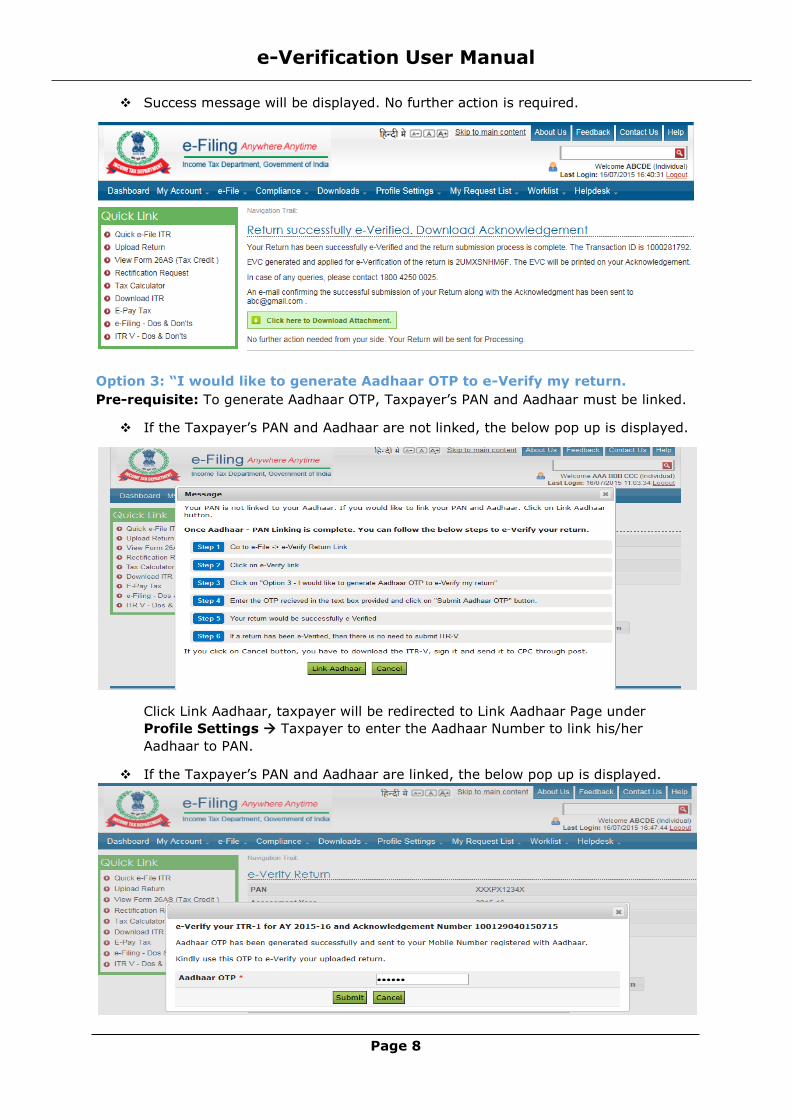
Option 3: “I would like to generate Aadhaar OTP to e-Verify my return.
Pre-requisite: To generate Aadhaar OTP, Taxpayer’s PAN and Aadhaar must be linked.
If the Taxpayer’s PAN and Aadhaar are not linked, the below pop up is displayed.
Click Link Aadhaar, taxpayer will be redirected to Link Aadhaar Page under
Profile Settings Taxpayer to enter the Aadhaar Number to link his/her
Aadhaar to PAN.
If the Taxpayer’s PAN and Aadhaar are linked, the below pop up is displayed.

e-Verification User Manual
Page 9
OTP is generated and sent to the Mobile Number registered with Aadhaar. Enter the OTP received in your Mobile Number in the provided text box.
Enter Aadhaar OTP in the text box provided and click on Submit. Success page is
displayed. No further action is required.
Option 4: “I would like to send ITR-V/ I would like to e-Verify later.’
If the taxpayer is not able to e-Verify at this moment because of any reason then tax
payer can choose Option 4 – “I would like to send ITR-V/ I would like to e-Verify later.”

e-Verification User Manual
Page 10
Click on Continue. Success page is displayed where the tax payer can
download the ITR-V.
Download the ITR-V, sign it manually and send it to CPC through post within
the time limit of 120 days from date of upload for your return to be treated as
a valid return.