Dynamic Conditioning Monthly A Progressive 5-Month … · ... glute activation, inchworms,...
30
© Copyright 2013 by Dan Kehlenbach. This article may not be reproduced or retransmitted in any form. 1 Dynamic Conditioning Monthly – A Progressive 5-Month Workout Plan Month 1: Base Conditioning Dynamic conditioning is a way to reap all the benefits of traditional resistance training, improve your athleticism and have a lot of fun in the process. This first article in the series provides an introduction to the dynamic conditioning template and an easy-to-follow workout program that will be built on over the next four phases. By Dan Kehlenbach, MS, CSCS, USA Cycling Level 3 Coach As you wind down the majority of your road riding, it’s time to start thinking about supplemental conditioning to prepare for next season. This five-part series of articles will provide you with a complete conditioning program spread out over five months to help increase your functional strength and power. Before we get into the specifics of the program, take some time and reflect on your performance this season. What went well and what didn’t go so well? What would you have done differently? Keep these points in mind as you progress through your program, since time spent in the gym can help not only with your riding, but with your overall health and fitness, as well. Also, if you had any injuries, consider a post-season physical or consultation. This is a great time to network with other sports medicine professionals (physicians, physical therapists, athletic trainers, etc.). Very often they may be able to provide some helpful advice that can be integrated into these workouts. One other note, especially to those of you might have done some of the workouts from my earlier eArticle, Designing Your Own Dynamic Conditioning Workout : These workouts will start off being fairly easy. Avoid the temptation to increase the volume
Transcript of Dynamic Conditioning Monthly A Progressive 5-Month … · ... glute activation, inchworms,...

© Copyright 2013 by Dan Kehlenbach. This article may not be reproduced or
retransmitted in any form.
1
Dynamic Conditioning Monthly – A Progressive
5-Month Workout Plan
Month 1: Base Conditioning
Dynamic conditioning is a way to reap all the benefits of traditional resistance
training, improve your athleticism and have a lot of fun in the process. This first
article in the series provides an introduction to the dynamic conditioning template and
an easy-to-follow workout program that will be built on over the next four phases.
By Dan Kehlenbach, MS, CSCS, USA Cycling Level 3 Coach
As you wind down the majority of your road riding, it’s time to start thinking
about supplemental conditioning to prepare for next season. This five-part series of
articles will provide you with a complete conditioning program spread out over five
months to help increase your functional strength and power.
Before we get into the specifics of the program, take some time and reflect on
your performance this season. What went well and what didn’t go so well? What would
you have done differently? Keep these points in mind as you progress through your
program, since time spent in the gym can help not only with your riding, but with your
overall health and fitness, as well. Also, if you had any injuries, consider a post-season
physical or consultation. This is a great time to network with other sports medicine
professionals (physicians, physical therapists, athletic trainers, etc.). Very often they may
be able to provide some helpful advice that can be integrated into these workouts.
One other note, especially to those of you might have done some of the workouts
from my earlier eArticle, Designing Your Own Dynamic Conditioning Workout: These
workouts will start off being fairly easy. Avoid the temptation to increase the volume

© Copyright 2013 by Dan Kehlenbach. This article may not be reproduced or
retransmitted in any form.
2
and intensity too quickly – there will be plenty of time for that later on. Let this phase be
basic and develop your foundation gradually.
Month one of this series of dynamic conditioning workouts is the base phase.
Here we’ll introduce (or re-introduce) fundamental exercises to develop a solid
foundation that will be built upon over the course of the entire program.
Month two is the basic strength phase, in which we’ll further develop your
overall strength to provide a solid platform for more advanced power-type exercises.
Month three we’ll focus on power, particularly functional power. The act of
pedaling a bike involves using one leg at a time, so we’ll concentrate on developing
unilateral power.
In month four, we’ll take the power you developed and convert that to cycling-
specific power-endurance featuring work capacity circuit-style workouts.
Month five, the maintenance phase, we’ll go over some strategies that will help
maintain your strength and power gains as you progress throughout the season without
interfering with your on-bike training and riding schedule.
As part of this article series, I am making myself be available for personal
consultations via phone, Skype, or FaceTime. If you have any questions regarding this
workout program, or need modifications to any of the exercises, please feel free to
contact me at [email protected] and we’ll set up a time to chat.
Review of Basic Concepts
In the earlier eArticle, I discussed the benefits of a dynamic conditioning workout
and how it differs from traditional weight training protocols. I used the example of kids
playing on the playground. What do they do? They run, jump, swing, climb, balance,

© Copyright 2013 by Dan Kehlenbach. This article may not be reproduced or
retransmitted in any form.
3
and quite simply have fun! You’ll never see them do something 10 times and rest for 45
seconds – they are always on the go, moving their bodies like they were designed to
move. Many gym workout routines lack that functional factor and unfortunately can
sometimes lead to boredom or perhaps even eventual dropout. A dynamic conditioning
program integrates balance, flexibility, stabilization, power, and movement drills, along
with traditional strength training exercise, to provide a comprehensive approach to
physical conditioning. Plus – it’s a blast!
Here’s one other key point: Even though this program is organized a bit
differently than other workouts, it will still follow the basic concepts of resistance
training as outlined by the National Strength and Conditioning Association: specificity,
overload, progression, individuality, and recovery/adaptation.
Workout Description
Throughout this series, we’re going to have two different workouts – workout
“A” and workout “B”. Here is workout A:
Workout A*
Phase 1
Focus
Foam Roll Quadriceps, Hamstrings, hips, calves, upper back. 10 repetitions
each
Static Stretching Focus on any particularly tight or problematic areas 30-60
seconds each
Dynamic Stretches/Movement Preparation Hip flexor, glute activation, inchworms, squat-to-stand, shoulder
wall slides, walking knee hug lunge/stationary lunge, lateral
squat/lateral lunge, elbow-to-instep
Movement Drills Easy jog, shuffles, low skips – 3 times through going 10 yards
each with 10 yard jog back to starting area

© Copyright 2013 by Dan Kehlenbach. This article may not be reproduced or
retransmitted in any form.
4
Phase 2
Focus
Core/Activation training Plank
“Prehabilitation” (Balance/stability
exercises)
3-way cone reach
Elastic or Power Exercises Jump to box
Repeat exercises in Phase 2 from top to bottom – 2 or 3 times through (depending on training week)
Phase 3
Focus
Lower-Body Split squat
Upper-Body Push Push-up
Upper-Body Pull Single arm row
Repeat exercises in Phase 3 from top to bottom – 2 or 3 times through (depending on training week)
Phase 4
Focus
Post-workout stretching, foam roll, and
metabolic flush
Foam roll on any tight/problematic areas, 10 minute easy
walk/cycle to promote recovery
*For set and repetition info, please see template included with this article
Phase One
Now let’s go through the workout in further detail. Phase One is designed as a
comprehensive warm-up, although it may feel like a workout in and of itself when you
first get started! We’re going to start with foam rolling different muscle groups
commonly affected by cycling: quadriceps, hamstrings, hips, calves, and upper back. For
your lower body, try to work on getting comfortable with rolling one leg at a time. It will
probably feel uncomfortable at first, but you’ll get a deeper and more substantial effect.

© Copyright 2013 by Dan Kehlenbach. This article may not be reproduced or
retransmitted in any form.
5
In the previous article, I included the lower back in the foam roll section. However,
currently there is some discussion and debate among practitioners regarding safety and
efficacy of foam rolling and the lumbar spine. If you have any low back pain and/or
concerns, consult a sports medicine specialist for some advice. Start with 10 fluid
repetitions for each muscle group:

© Copyright 2013 by Dan Kehlenbach. This article may not be reproduced or
retransmitted in any form.
6
After rolling comes static stretching. For years it was thought that static
stretching should be done only at the conclusion of the workout. Today, many soft tissue
experts are advocating that muscles must be stretched cold to promote long-term
elongation. For a more in-depth explanation, please see my eArticle Five-Minute Warm-
ups for Busy Cyclists. Focus on any problematic areas and stretch to the point of mild
discomfort – just like any other facets of training, stretching should be a challenge. You
should feel tension in the muscle(s), not the joint. If you don’t have any specific
problematic areas, nearly all cyclists can benefit from hamstring, hip flexor, adductors
(inner thigh) and hip rotators stretches:
Dynamic stretching is where we start taking your muscles through a specific range of motion
and getting your heart rate up. If you haven’t done these movements (or haven’t done them
for an extended period of time), don’t force the range of motion – it will come in time.
© Copyright 2013 by Dan Kehlenbach. This article may not be reproduced or
retransmitted in any form.
7
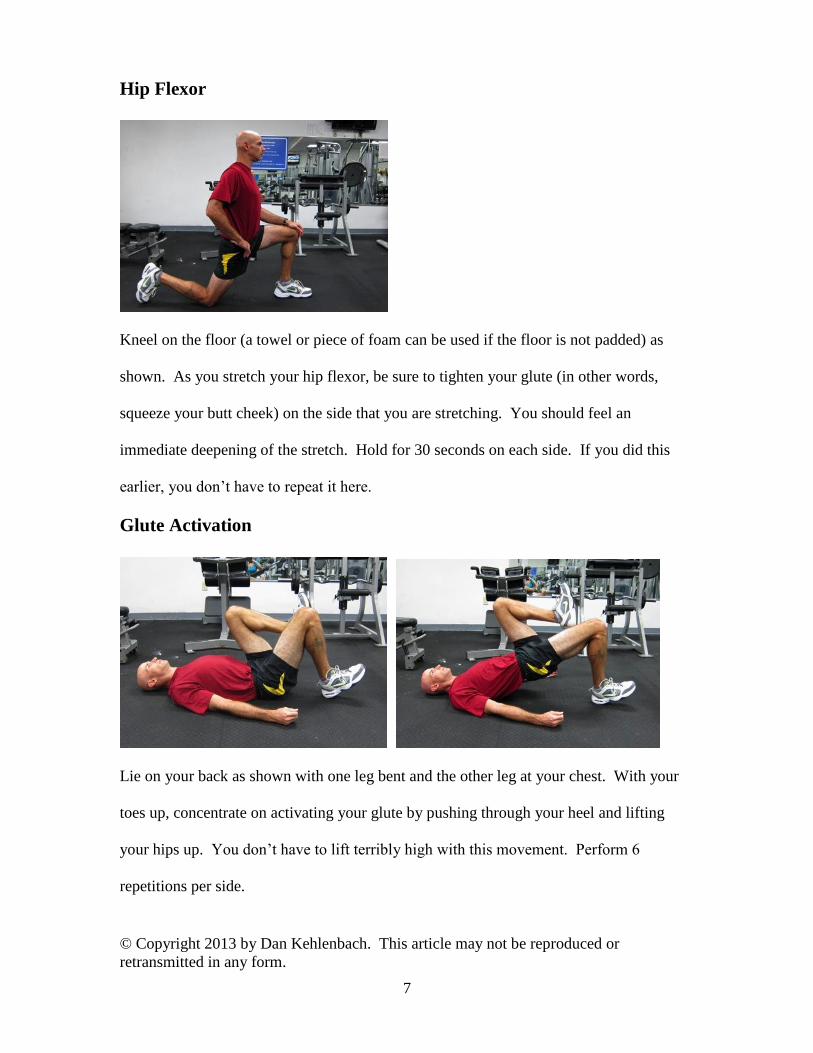
Hip Flexor
Kneel on the floor (a towel or piece of foam can be used if the floor is not padded) as
shown. As you stretch your hip flexor, be sure to tighten your glute (in other words,
squeeze your butt cheek) on the side that you are stretching. You should feel an
immediate deepening of the stretch. Hold for 30 seconds on each side. If you did this
earlier, you don’t have to repeat it here.
Glute Activation
Lie on your back as shown with one leg bent and the other leg at your chest. With your
toes up, concentrate on activating your glute by pushing through your heel and lifting
your hips up. You don’t have to lift terribly high with this movement. Perform 6
repetitions per side.
© Copyright 2013 by Dan Kehlenbach. This article may not be reproduced or
retransmitted in any form.
8
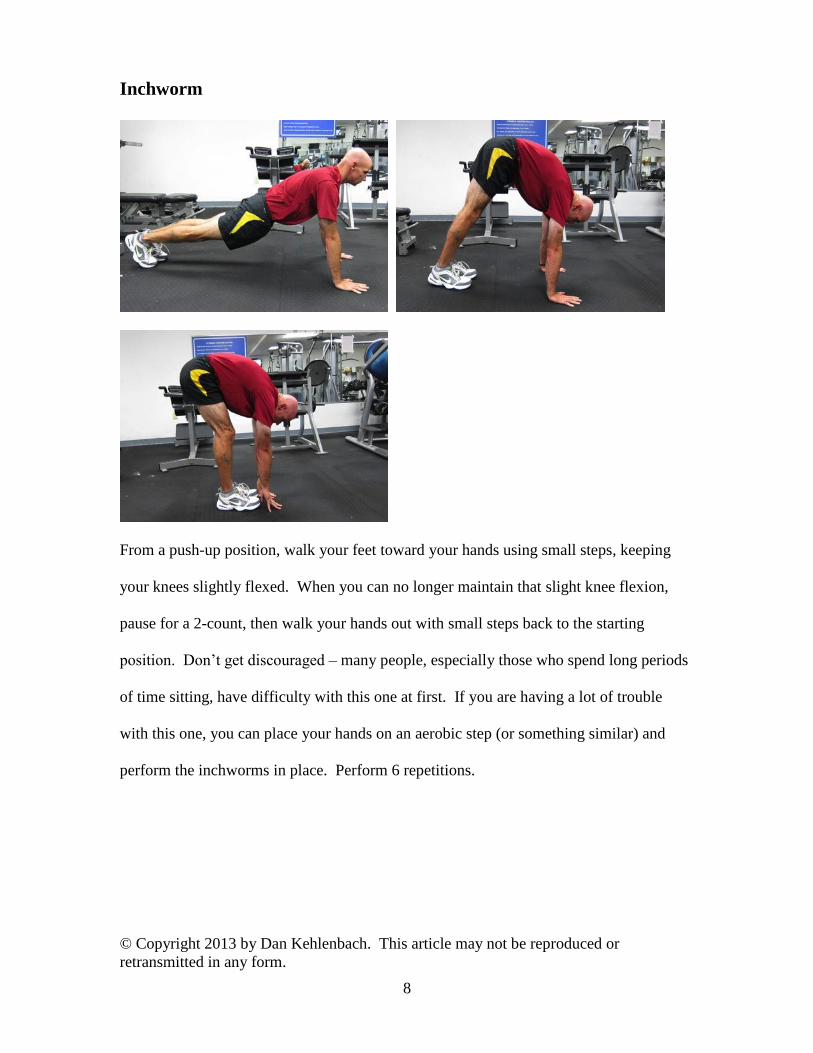
Inchworm
From a push-up position, walk your feet toward your hands using small steps, keeping
your knees slightly flexed. When you can no longer maintain that slight knee flexion,
pause for a 2-count, then walk your hands out with small steps back to the starting
position. Don’t get discouraged – many people, especially those who spend long periods
of time sitting, have difficulty with this one at first. If you are having a lot of trouble
with this one, you can place your hands on an aerobic step (or something similar) and
perform the inchworms in place. Perform 6 repetitions.

© Copyright 2013 by Dan Kehlenbach. This article may not be reproduced or
retransmitted in any form.
9
Squat-to-Stand
With your feet shoulder-width apart, reach down and grab your toes. If you can’t grab
your toes, go as low as you feel comfortable with. Drop your hips into a sumo-style
position, keeping your elbows inside your knees. Pause for a 2-count at the bottom, raise
your hands over your head as best as you can, and stand back up. Perform 6 repetitions.

© Copyright 2013 by Dan Kehlenbach. This article may not be reproduced or
retransmitted in any form.
10
Shoulder Wall Slide
Place your feet about one foot in front of a wall. Lean back and make sure your hips,
upper back and head are in contact with the wall. Reach up as high as you can and slide
your arms down the wall. As you slide your arms down, make sure your elbows and
hands (along with your hips, upper back and head) stay in contact with the wall. Go
down as far as your flexibility will allow. Perform 10 repetitions.

© Copyright 2013 by Dan Kehlenbach. This article may not be reproduced or
retransmitted in any form.
11
Walking Knee-Hug Lunge to Stationary Lunge
From a standing position, lift one knee to your chest and grasp your knee. Hold for a 2-
count and step into a lunge, keeping your knee directly over your ankle. Consciously
contract your backside glute. This will also help stretch your hip flexor. With one
continuous motion, step forward and repeat with the opposite leg. Perform 3 lunges per
leg. After the walking lunges, place your hands over your head as shown and perform 3
alternating stationary lunges per leg.

© Copyright 2013 by Dan Kehlenbach. This article may not be reproduced or
retransmitted in any form.
12
Lateral Squat to Lateral Lunge
Stand with your feet approximately double shoulder-width apart. Shift your weight to
one side and drop your hips down and back, keeping your knee over your toes and your
weight over your bent leg. Pause for a 2-count, return to the starting position and repeat
on the other side. Perform 3 repetitions each side. Then place your feet together and
perform 3 alternating lateral lunges per leg. Be sure to concentrate on your form. It is
very helpful if you can do this in front of a mirror. As you lunge, drop your hips down
and back just like the lateral squat – this will help keep your hips properly aligned.

© Copyright 2013 by Dan Kehlenbach. This article may not be reproduced or
retransmitted in any form.
13
Elbow-to-Instep
From a push up position, bring one foot to the outside of your hand. Lift up your hand
and drop your elbow toward your instep. Pause for a 2-count and return your hand and
foot. Repeat on the other side. Perform 6 repetitions on each side.
Movement drills
Okay, now it’s time to get moving! Find an open area and place two cones or
water bottles five yards (about 4m) apart. If you are doing this workout in a gym, ask the
staff if you can use an empty aerobic room or basketball/tennis/racquetball court. Here
we have three activities: Jog, shuffles and low skips. Start by jogging to the opposite
cone and back. Then, shuffle down and back to the cone. Make sure you face the same

© Copyright 2013 by Dan Kehlenbach. This article may not be reproduced or
retransmitted in any form.
14
direction so you perform a shuffle to the left and to the right. Finally, skip down to the
cone and back. Remember skipping? It’s a great activity for ankle strength, but it may
take a while getting used to. Repeat 2 or 3 times through (depending on your week of
training).
Phase 2
Forward Plank
For the first core exercise, we’re going to start with the forward plank. Pretty basic, but it
will serve as a starting point for future exercises. Make sure you keep proper alignment
throughout the prescribed time. Having a mirror or partner can help with maintaining
your form. Hold for the prescribed amount of time.
© Copyright 2013 by Dan Kehlenbach. This article may not be reproduced or
retransmitted in any form.
15
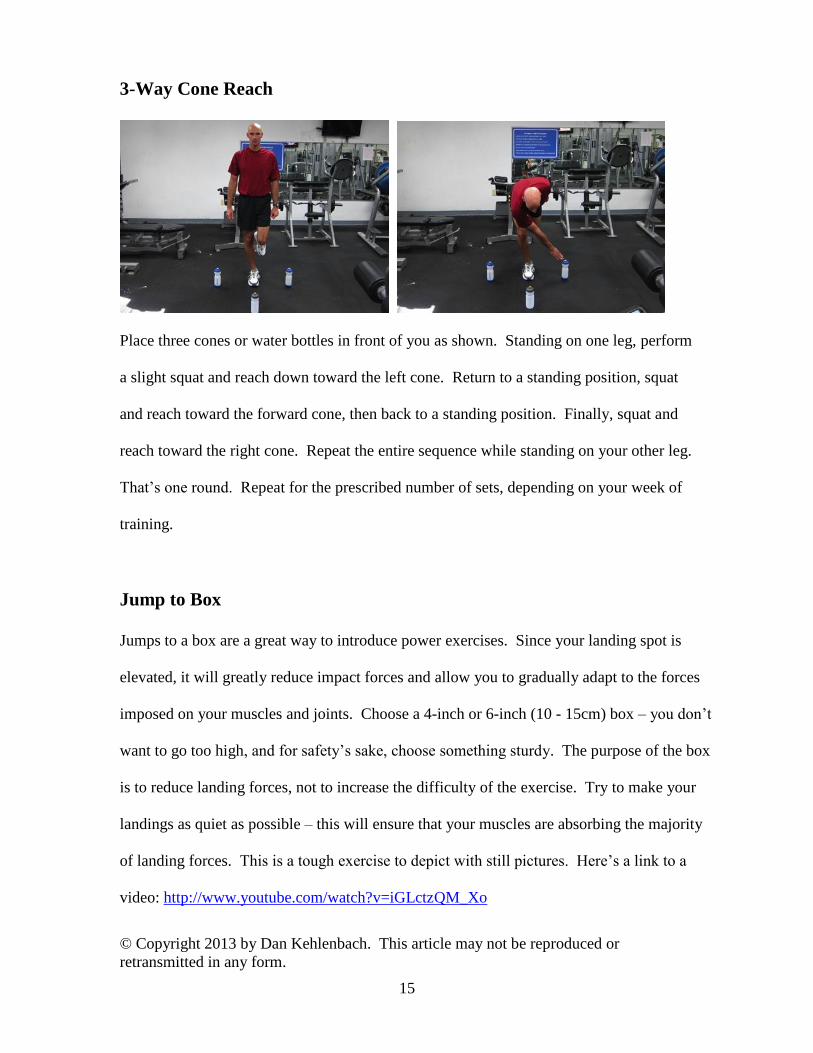
3-Way Cone Reach
Place three cones or water bottles in front of you as shown. Standing on one leg, perform
a slight squat and reach down toward the left cone. Return to a standing position, squat
and reach toward the forward cone, then back to a standing position. Finally, squat and
reach toward the right cone. Repeat the entire sequence while standing on your other leg.
That’s one round. Repeat for the prescribed number of sets, depending on your week of
training.
Jump to Box
Jumps to a box are a great way to introduce power exercises. Since your landing spot is
elevated, it will greatly reduce impact forces and allow you to gradually adapt to the forces
imposed on your muscles and joints. Choose a 4-inch or 6-inch (10 - 15cm) box – you don’t
want to go too high, and for safety’s sake, choose something sturdy. The purpose of the box
is to reduce landing forces, not to increase the difficulty of the exercise. Try to make your
landings as quiet as possible – this will ensure that your muscles are absorbing the majority
of landing forces. This is a tough exercise to depict with still pictures. Here’s a link to a
video: http://www.youtube.com/watch?v=iGLctzQM_Xo

© Copyright 2013 by Dan Kehlenbach. This article may not be reproduced or
retransmitted in any form.
16
Note: In the workout template included with this article, you’ll notice that the exercises
in Phase 2 are labeled A (forward plank), B (3-way cone reach), and C (jumps to box).
When you do the workout, start with planks, rest about one minute, move to the cone
reaches, rest, and then move on to jumps. Repeat in this fashion until your targeted
number of sets is completed.
Phase 3
Phase 3 is where we integrate more traditional strength-training exercises. You’ll
perform a lower body exercise, an upper body push, and an upper body pull.
Split Squat
Stand with a split stance as shown. The distance of your stance will vary depending on
your hip flexibility. Drop down into a split squat position, keeping the knee of your lead
leg behind your toes. Focus on your lead leg doing the work as you stand back up.
You’ll probably feel a stretch in the trailing leg – that’s okay. When you add weight with
this exercise, hold the weights as shown. When you hold dumbbells at shoulder level,
your center of gravity is raised, requiring more control and stability. Repeat for the
prescribed number of repetitions and switch legs.

© Copyright 2013 by Dan Kehlenbach. This article may not be reproduced or
retransmitted in any form.
17
Push-up
The old-fashioned push-up is not only a great upper body exercise; it’s a great core
exercise, as well. If push-ups are too difficult for you, place your hands on a workout
bench as shown above. Avoid doing the so-called “modified” push-up (from the knees
vs. the toes) as it doesn’t challenge your core as much compared to the traditional
positioning. Even if your hands are on the bench, your core is forced to engage more
than the “modified” push-up. If the stated numbers of reps are too easy, here are a couple
of ways to increase difficulty:
Elevate your feet with a bench, physioball, suspension trainer (TRX, Jungle Gym,
etc.)
Stack your feet one on top of the other
Raise one leg off the floor
Place your hands on an unstable surface (foam pad, BOSU)
Place one hand on a medicine ball
Note: If you have any shoulder concerns, you may want to consider limiting the range of
motion of your upper body pushing exercises to a 90-degree bend in your elbow. This
can help minimize undue stress on your shoulders.

© Copyright 2013 by Dan Kehlenbach. This article may not be reproduced or
retransmitted in any form.
18
Single arm row
Stand in front of a cable column with your feet about shoulder width apart and hips
slightly bent. Grab a handle and perform a standing row while keeping your body as still
as possible. Avoid the temptation of leaning forward and back to lift more weight.
Perform the prescribed number of repetitions and switch arms.
*Note: Rotate through exercises A, B, and C just like you did in Phase 2.
Phase 4
This phase will start the recovery process. Some days you might be tempted to skip it,
but try not to – your body will thank you for it, especially as the workouts increase in
difficulty. There’s no one specific way to incorporate post-workout recovery, so don’t be
afraid to experiment a bit. I’ve found it helpful to prescribe some light cardiovascular
exercise (5-10 minutes) as a metabolic flush, some foam rolling and some static
stretching.
© Copyright 2013 by Dan Kehlenbach. This article may not be reproduced or
retransmitted in any form.
19
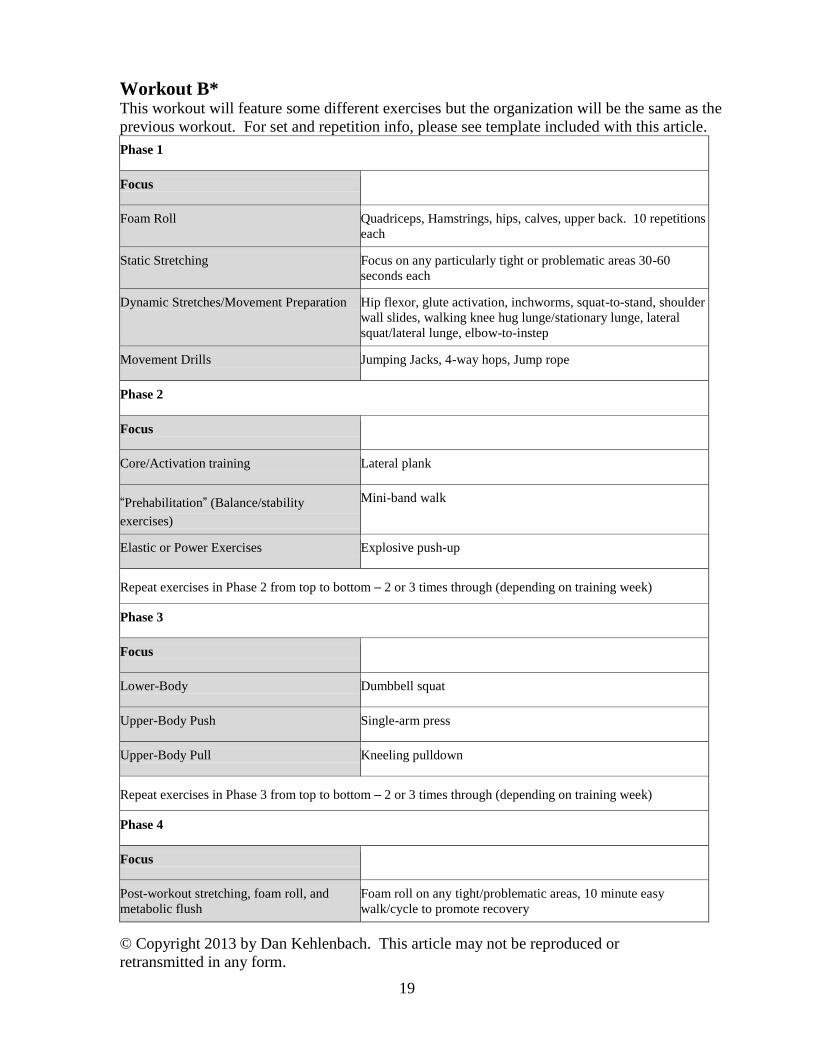
Workout B* This workout will feature some different exercises but the organization will be the same as the
previous workout. For set and repetition info, please see template included with this article.
Phase 1
Focus
Foam Roll Quadriceps, Hamstrings, hips, calves, upper back. 10 repetitions
each
Static Stretching Focus on any particularly tight or problematic areas 30-60
seconds each
Dynamic Stretches/Movement Preparation Hip flexor, glute activation, inchworms, squat-to-stand, shoulder
wall slides, walking knee hug lunge/stationary lunge, lateral
squat/lateral lunge, elbow-to-instep
Movement Drills Jumping Jacks, 4-way hops, Jump rope
Phase 2
Focus
Core/Activation training Lateral plank
“Prehabilitation” (Balance/stability
exercises)
Mini-band walk
Elastic or Power Exercises Explosive push-up
Repeat exercises in Phase 2 from top to bottom – 2 or 3 times through (depending on training week)
Phase 3
Focus
Lower-Body Dumbbell squat
Upper-Body Push Single-arm press
Upper-Body Pull Kneeling pulldown
Repeat exercises in Phase 3 from top to bottom – 2 or 3 times through (depending on training week)
Phase 4
Focus
Post-workout stretching, foam roll, and
metabolic flush
Foam roll on any tight/problematic areas, 10 minute easy
walk/cycle to promote recovery

© Copyright 2013 by Dan Kehlenbach. This article may not be reproduced or
retransmitted in any form.
20
Phase 1
The foam roll, static stretching and movement preparation in this workout is exactly the
same as Workout A. The movement drills are where we change things up a bit. Here
we’re going to do some callisthenic-types of exercises to help prepare your muscles and
joints for other power exercises in later months.
Jumping jacks
Nothing special – pretty straightforward here. However, while you are doing these
activities, try and focus on landing softly. Think “quiet feet.” This will help to ensure
that your muscles are absorbing the bulk of landing forces as opposed to your joints.
Perform the prescribed number of repetitions
4-way hops
Imagine that you are standing in the center of a clock face. Jump forward (about a foot or
so to get started) to the 12 o’clock position and jump back. Jump to the 3 o’clock
position and jump back. Jump back to the 6 o’clock position and jump back. Finally
jump to the 9 o’clock position and jump back. That’s 1 repetition. Repeat for the
prescribed number of repetitions. Here’s a video for reference:
http://www.youtube.com/watch?v=px_bHWkZtNs
Jump rope
Here’s another basic movement drill that you’ve probably tried at one time or another. If
you can’t seem to get the coordination, just pretend you have a rope and do ankle hops
instead.
© Copyright 2013 by Dan Kehlenbach. This article may not be reproduced or
retransmitted in any form.
21
Phase 2
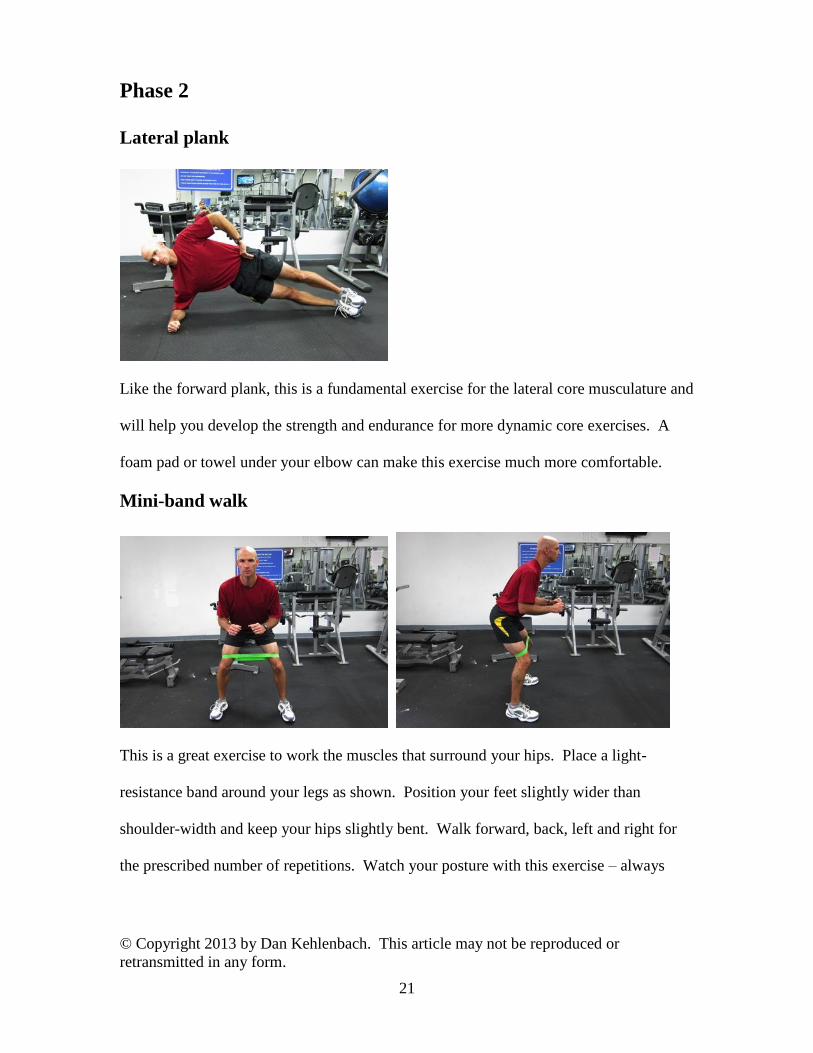
Lateral plank
Like the forward plank, this is a fundamental exercise for the lateral core musculature and
will help you develop the strength and endurance for more dynamic core exercises. A
foam pad or towel under your elbow can make this exercise much more comfortable.
Mini-band walk
This is a great exercise to work the muscles that surround your hips. Place a light-
resistance band around your legs as shown. Position your feet slightly wider than
shoulder-width and keep your hips slightly bent. Walk forward, back, left and right for
the prescribed number of repetitions. Watch your posture with this exercise – always

© Copyright 2013 by Dan Kehlenbach. This article may not be reproduced or
retransmitted in any form.
22
keep your torso upright and toes pointing straight ahead. The movement should come
from your hips, so avoid using momentum while you step.
Explosive push-up
An upper body plyometric exercise for cyclists? You bet! Cycling, particularly road
cycling, contributes very little to upper body strength and virtually nothing for power.
Also, keep in mind that an exercise program should benefit your overall health and well-
being, not just your riding. So if you like to play other sports or participate in other
activities, upper body power is important. For the first two workouts, we’re going to use
a workout bench so that your upper body can gradually adapt. Start as if you are going to
do a push-up, lower your upper body until your arms are approximately 90 degrees and
then explosively push off the bench. Carefully catch yourself (like lower body
plyometrics, try and cushion your landing with your upper body), and repeat for the
prescribed number of repetitions. This is also a tough exercise to depict with pictures.
Here is a video using a bench: http://www.youtube.com/watch?v=H-h6-hQjEI0
Here is a video using conventional technique:
http://www.coreperformance.com/knowledge/movements/push-up-plyometric-
continuous.html
*Note: Rotate through exercises A, B, and C just like the previous workout.

© Copyright 2013 by Dan Kehlenbach. This article may not be reproduced or
retransmitted in any form.
23
Phase 3
Dumbbell squat
Hold a pair of dumbbells as shown with your feet slightly wider than shoulder width
apart. As you descend, drop your hips down and back. Imagine that you are trying to sit
down into a chair that someone is slowly pulling away from you. The lower you go, the
further back your hips should go. There’s no one correct squat depth – everyone is
different and your hip structure and flexibility level will determine the depth of your
squats. Don’t force it. As your mobility and strength improves, you’ll become more
comfortable. Repeat for the prescribed number of repetitions.
© Copyright 2013 by Dan Kehlenbach. This article may not be reproduced or
retransmitted in any form.
24
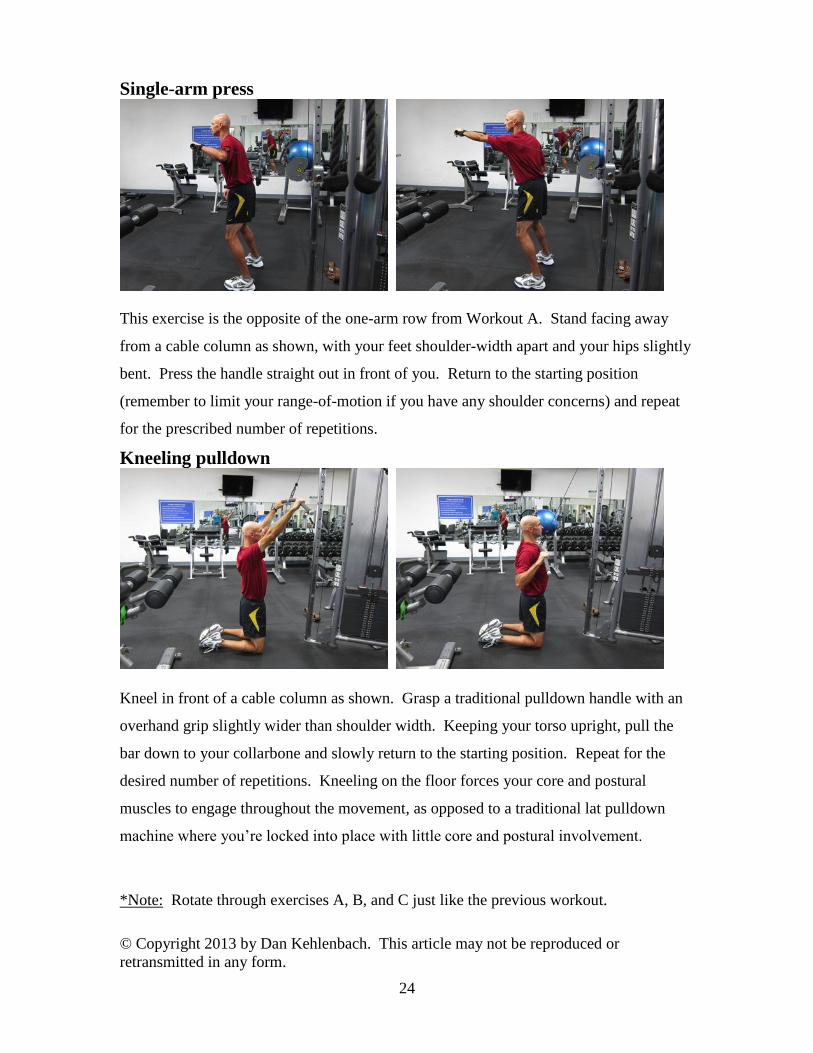
Single-arm press
This exercise is the opposite of the one-arm row from Workout A. Stand facing away
from a cable column as shown, with your feet shoulder-width apart and your hips slightly
bent. Press the handle straight out in front of you. Return to the starting position
(remember to limit your range-of-motion if you have any shoulder concerns) and repeat
for the prescribed number of repetitions.
Kneeling pulldown
Kneel in front of a cable column as shown. Grasp a traditional pulldown handle with an
overhand grip slightly wider than shoulder width. Keeping your torso upright, pull the
bar down to your collarbone and slowly return to the starting position. Repeat for the
desired number of repetitions. Kneeling on the floor forces your core and postural
muscles to engage throughout the movement, as opposed to a traditional lat pulldown
machine where you’re locked into place with little core and postural involvement.
*Note: Rotate through exercises A, B, and C just like the previous workout.

© Copyright 2013 by Dan Kehlenbach. This article may not be reproduced or
retransmitted in any form.
25
Phase 4
Post-workout foam rolling, stretches and metabolic flush similar to Workout A. Again,
don’t be afraid to experiment.
Workout Organization
Attached at the end of the article are two templates with six workouts for
Workouts A and B, along with blank logs that you can use for tracking your workouts. If
you don’t use these log sheets, that’s okay, but try and develop some sort of system to
track your workouts. There are many different apps available for tablets and
smartphones, you can come up with your own spreadsheet, or you can use a blank
notebook. I often have clients keep track of their workouts and their nutrition in a
notebook. That way, on any given day, I can look at their current and past nutrition and
training side-by-side to track their progress, identify positives and negatives, and adjust
their training programs accordingly.
Try and perform these workouts three times per week on non-consecutive days
(Mondays, Wednesdays, Fridays or Tuesdays, Thursdays, Saturdays, etc.). Here’s what a
month-long program will look like:
Week # Workout 1 Workout 2 Workout 3
1 A B A
2 B A B
3 A B A
4 B A B

© Copyright 2013 by Dan Kehlenbach. This article may not be reproduced or
retransmitted in any form.
26
Concluding note
I often get questions regarding how much weight to use, particularly with new
workout programs. The general rule of thumb is that the last couple of repetitions of an
exercise should be challenging to complete. If you have absolutely no difficulty
completing the prescribed number of repetitions in a set, it’s too easy. On the other hand,
if you can’t complete the repetitions utilizing proper form, technique and control, it’s
too heavy. Always, always, always put form, technique and control first. Since this is
the base month, use this phase to get familiar with the workout and its organization. Let
this phase be somewhat basic – that’s what it’s designed to be.
References
Baechle, T.R and Earle, R.W. (Eds.), Essentials of strength and conditioning (3rd
edition).
Champaign: Human Kinetics. 2008.
Boyle, M. Advances in functional training. Santa Cruz, On Target Publications, 2010.
McGill, S.M. Core training: Evidence translating to better performance. Strength and
Conditioning Journal. 32(3) 33-46. 2010.
About the Author
Dan Kehlenbach is certified as a Level 3 coach through USA Cycling and is a Certified
Strength and Conditioning Specialist (CSCS) with the National Strength and
© Copyright 2013 by Dan Kehlenbach. This article may not be reproduced or
retransmitted in any form.
27
Conditioning Association. Dan obtained his master’s degree in sports medicine at the
U.S. Sports Academy in Daphne, Alabama.
He is also the author of the RBR eArticles Dynamic Flexibility Training for Cyclists,
5-Minute Warm-ups for Busy Cyclists and Designing Your Own Dynamic Conditioning
Workout.
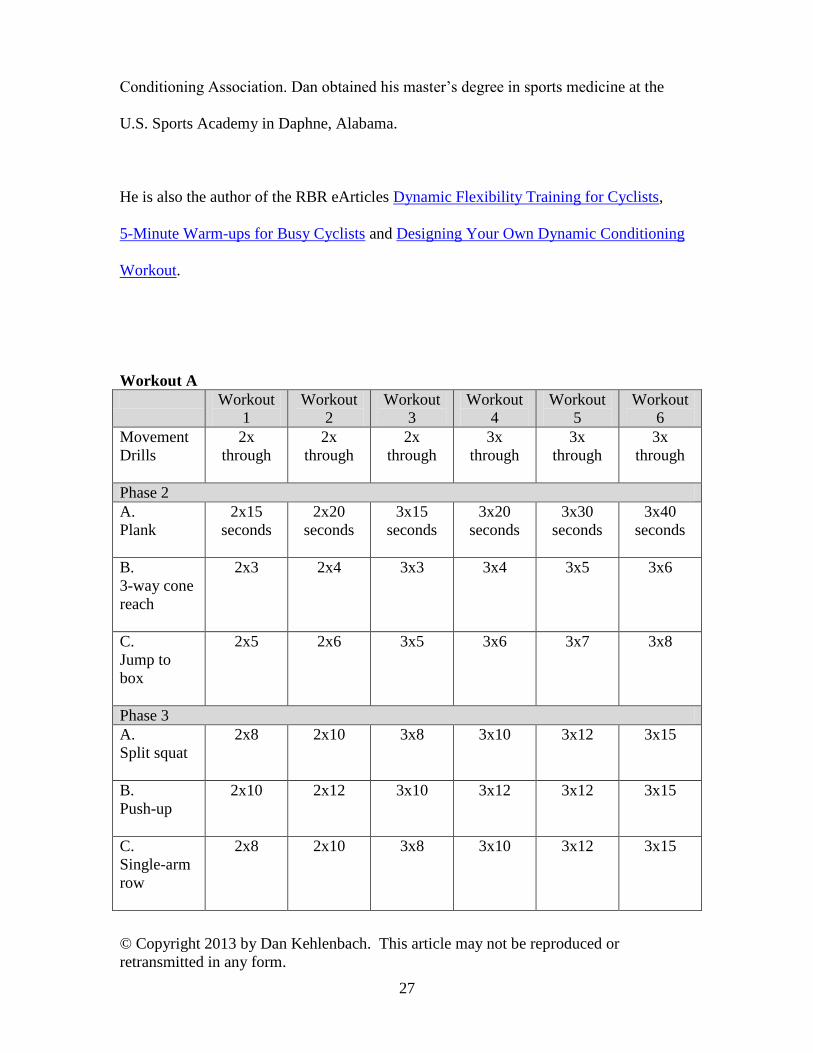
Workout A
Workout
1
Workout
2
Workout
3
Workout
4
Workout
5
Workout
6
Movement
Drills
2x
through
2x
through
2x
through
3x
through
3x
through
3x
through
Phase 2
A.
Plank
2x15
seconds
2x20
seconds
3x15
seconds
3x20
seconds
3x30
seconds
3x40
seconds
B.
3-way cone
reach
2x3 2x4 3x3 3x4 3x5 3x6
C.
Jump to
box
2x5 2x6 3x5 3x6 3x7 3x8
Phase 3
A.
Split squat
2x8 2x10 3x8 3x10 3x12 3x15
B.
Push-up
2x10 2x12 3x10 3x12 3x12 3x15
C.
Single-arm
row
2x8 2x10 3x8 3x10 3x12 3x15

© Copyright 2013 by Dan Kehlenbach. This article may not be reproduced or
retransmitted in any form.
28
Workout B
Workout
1
Workout
2
Workout
3
Workout
4
Workout
5
Workout
6
Movement
Drills*
15 JJ, 2H,
20 JR 2x
through
20 JJ, 3H,
25 JR 2x
through
20 JJ, 4H,
25 JR 2x
through
15 JJ, 3H,
20 JR 3x
through
20 JJ, 4H,
25 JR 3x
through
20 JJ, 4H,
25 JR 3x
through
Phase 2
A.
Lateral
plank
2x15
seconds
2x20
seconds
3x15
seconds
3x20
seconds
3x30
seconds
3x40
seconds
B.
Mini-band
walks
2x5 2x6 3x5 3x6 3x7 3x8
C.
Explosive
push-up
2x5
(bench)
2x6
(bench)
3x5 3x6 3x7 3x8
Phase 3
A.
Dumbbell
squat
2x8 2x10 3x8 3x10 3x12 3x15
B.
Single-arm
press
2x10 2x12 3x10 3x12 3x12 3x15
C.
Kneeling
pulldown
2x8 2x10 3x8 3x10 3x12 3x15
*Symbols for movement drills:
JJ – Jumping jacks
H – 4-way hops
JR – Jump rope

© Copyright 2013 by Dan Kehlenbach. This article may not be reproduced or
retransmitted in any form.
29
Blank Template – Workout A
Workout
1
Workout
2
Workout
3
Workout
4
Workout
5
Workout
6
Movement
Drills
Phase 2
A.
Plank
B.
3-way cone
reach
C.
Jump to
box
Phase 3
A.
Split squat
B.
Push-up
C.
Single-arm
row

© Copyright 2013 by Dan Kehlenbach. This article may not be reproduced or
retransmitted in any form.
30
Blank Template – Workout B
Workout
1
Workout
2
Workout
3
Workout
4
Workout
5
Workout
6
Movement
Drills
Phase 2
A.
Lateral
plank
B.
Mini-band
walks
C.
Explosive
push-ups
Phase 3
A.
Dumbbell
squat
B.
Single-arm
press
C.
Kneeling
pulldown