Drawing for the Absolute Beginner - A Clear & Easy Guide ...
131
drawing: Wh ab “ CF ra @) ginner A Clear &Easy Guide to “ Successful Drawing Mark and Mary Willenbrink
Transcript of Drawing for the Absolute Beginner - A Clear & Easy Guide ...

drawing: Wh ab “ CF
ra @) ginner A Clear & Easy
Guide to
“ Successful Drawing
Mark and Mary Willenbrink


Drawing for the Absolute Beginner


dr awin o a absolute beginner
| Ae & Easy Guide to
Successful Drawing
Mark and Mary Willenbrink
NORTH LIGHT BOOKS

About the Authors Mark Willenbrink is a freelance illustrator and fine artist whose work has been dis- played in fine art shows, with several paintings receiving awards. Mark also teaches art classes and workshops using demonstration, simple instructions and professional tricks to help his students achieve beautiful artwork they can be proud to display.
Mary Willenbrink has her master’s degree. She is a Christian counselor and author, but feels her highest calling is to be home to raise her children.
As a husband and wife team, Mark and Mary have authored and illustrated Water- color for the Absolute Beginner (North Light, 2003), and the book has been translated into several languages. Mark's writings and illustrations have been featured in a num- ber of other art instruction books. Mark is a contributing editor for Watercolor Magic Magazine. His regularly featured column, “Brush Basics” has been rated as a favorite among the magazine's readers.
Mark and Mary reside in Cincinnati, Ohio, with their three children.
Drawing for the Absolute Beginner. Copyright © 2006 by Mark and Mary Wit- lenbrink, Manufactured in China. All rights reserved. No patt of this book may be reproduced in any form or by any electronic or mechanical means including
information storage and retrieval systems without permission in writing from the publisher, except by a reviewer who may quote brief passages in a review. Published by North Light Books, an
.._ imprint of F4W Publications, Inc., 4700 East Galbraith Road, Cin cinnati, Ohio, 45236. (800) 289-0963. First Edition,
Other fine North Light Books are available from your local bookstore, art supply store or direct from the publisher,
10 09 08 54
DISTRIBUTED IN CANADA BY FRASER DIRECT 4100 Armstrong Avenue Georgetown, ON, Canada L7G5S4 Tel: (905) 877-4411
DISTRIBUTED IN THE U.K. AND EUROPE BY DAVID & CHARLES A _ Brunel House, Newton Abbot, Devon, TQ12 4PU, England Metric Conversion Chart Tel: (+44) 1626 323200, Fax: (+44) 1626 323319 Email: [email protected]
To convert to multiply by DISTRIBUTED IN AUSTRALIA BY CAPRICORN LINK Inches Centimeters 2.54 PO, Box 704, S, Windsor NSW, 2756 Australia Centimeters Inches o4 Tel: (02) 4577-3585 Feet Centimeters 30.5
Library of Congress Cataloging in Publication Data Gentimeters Feet 0s Willenbrink, Mark and Mary Yards Meters 09
Drawing for the Absolute Beginner / Mark and Mary Willenbrink.— 4st ed. Meters Yards 1 chi Sq. Inches Sq. Centimeters 6.45
Includes index. Sq. Centimeters Sq. Inches 0.16 ISBN-13: 978-1-58180-789-9 (pb. : alk. paper) Sq. Feet Sq, Meters 0.09 ISBN-13: 978-1-60061-601-3 (EPUB) ‘Sq. Meters ‘Sq. Feet 10.8
ISBN-10: 1-88180-789-9 (pb. : alk. paper) Sq. Yards Sq. Meters 08 1. Drawing—Technique. | Title. Sq. Meters Sq. Yards 12
aaBaT Ban aRe Pounds Kilograms 0.45 nS Kilograms Pounds 22 571.42'24928—d021 00-068694 pepe wae oa
Edited by Kelly Messerly marae! ances on36 Designed by Guy Kelly Production art by Lisa Holstein Production coordinated by Matt Wagner

Acknowledgments We woul like to thank those behind the scenes at F+W Pub- lications who have made this all possible: acquisitions editor, Pam Wissman; contracts manager, Julia Groh; editorial director, Jamie Markle; designer, Guy Kelly and production coordinator, Matt Wagner. We would also like to give a special thanks to Pam Wissman for her encouragement to write this book.
To our cherished editor, Kelly Messerly, we would like to give our heartfelt thanks. Your time, patience, talent and encourage- ment were wonderful! We could not have done this without you!
Thank you, Dorothy Frambes, Mike McGuire and Mary Helen Wallace for sharing your talents so they can be passed on to others.
We would like to thank our mothers, Clare Willenbrrink and Grace Patton, who have been such an encouragement to us in
our artistic pursuits. Also, thank you to our family and friends for your consistent support.
It is with great pride that we would like to acknowledge our three children for their patience and continuous support while we wrote this book. It is an honor to be your parents. Thank you, thank you, thank you!
It is our encouragement for each other and our unique insights that make this book special. It was fun to write together—which just proves that our marriage, like this book, is a work of art!
Lastly, we thank the Lord for His inspiration. We are all created in our Father's image to be creative, and with our creativity we praise Him.
Dedication Laus Deo Praise to God
We would like to dedicate this book to our fathers, Roy Willenbrink and Hugh (Bud) Patton, both of whom we love and miss greatly.

- Contents
8 Pencils
410 Paper and Drawing Board
41 Erasers
412 Additional Drawing Tools
Chapter 1 Sketching and Drawing
45. Holding the Pencil 46 Structural Sketches 48 Value Sketches
20 Black-and-White Sketches 22 Contour Sketches 24 Combining Approaches
Chapter 2 Principles of Good Drawing
27 Using Basic Shapes 38 Three-Point Perspective
28 Gauging Proportions 39 Hidden Horizons and 30 Measuring Angles Vanishing Points
31 Working From Reference 40 Locating Vanishing Points,
Materials 41 Atmospheric Perspective 32 Understanding Linear 42. Ellipses
Perspective 44 Arches and Roofs
34 One-Point Perspective 46 Reflections
36 Two-Point Perspective
Chapter 3 Value
49 Contrast 52 Light Effects
51 Creating Values 53 Plotting Shadows
Chapter 4 Practice the Techniques
55 Clouds and Grass 68 Boat
56 Leafy Trees 70 CatFace
57 Evergreen Trees 72 Side View of a Cat
58 Brick, Stone and Wood 74 Dog
60 Rocks 76 Cow
62 Plane 77 Swan
64 Train 78 Human Figures
66 Automobile 82 Faces
Chapter 5 Composition
87 Arranging the Elements Cropping and Formatting 88 88 Number of Elements Lines, Tangents and Shapes
Chapter 6 Let’s Draw
92 Still Life 94. Textured Metal 96 Scene in Perspective 98 Natural Textures 100 Using Contrast
4105 Expressive Portrait 4110 Telling a Story Through a
Drawing 416 Landscape 120 Seascape Composition
124 Glossary
126 Index

Do you remember when you got out your crayons and drew pictures as a child? Now maybe you are proudly displaying your children’s artwork on the refrigerator door. You love their pictures because you can see their unique expression in the art, even if it looks more like a Picasso than a Rembrandt. You were just as proud of your own artwork at one time but somewhere along the road of life you began to doubt your artistic abilities. Our belief is that everyone is an artist, and that includes you!
The skills necessary for drawing are not limited just to pencil and paper but can be used in other art forms. When you draw, you ate interpreting what you observe from your own perspec- tive. With the principles in this book, you will develop your observational skills, learn the proper tools to use, apply different
Pencils Pencil extender Erasers Angle ruler Pencil box ‘Small sketch pad Large drawing pad Drawing board Pencil sharpener eoronsans
Your Own Art Studio
techniques to your drawing and make use of some of the tricks professionals use every day.
You will learn more if you get out your drawing materials and become an active participant rather than if you just passively read through this book. The material is written to be used again and again. By doing the exercises more than once you will be able to witness the improvement of your artwork.
We hope you will regain that childlike passion for doing art and learning without critiquing yourself harshly. We won't make you hang it on the fridge, but we do suggest you save your art- work because it will show your progress and increase your confi- dence as you go.
You Need Only a Few Materials to Draw All you really need is a pencil and some paper, but afew other tools will make drawing easier where- ever you go. See pages 8-13 for more explanation of drawing materials.
With a few supplies, create your own drawing studio so you can work anywhere. Put your new studio in the park or in your living room. Sit down and rest the bottom edge of the drawing board on your knees. Use one hand to prop the drawing board and use the other hand to draw. Sit next to the subject, comparing your drawing to your subject as you work.

Peneils Though one pencil may look just like any other, there are many different types of pencils to choose from. Each has different uses to achieve a wide range of results. One difference among pencils is the core, which may be made of graphite, carbon or charcoal. | especially like the graphite (commonly mislabeled lead) pencil because it can easily be erased, it comes in many degrees of firmness and it does not easily smear. Carbon and charcoal pen- cils provide rich, dark colors but they don’t erase as well, smear easily and have a very soft feel. Black colored pencils don't ‘smear, but they don't erase well and have a firm but waxy feel.
Keep Your Pencil Choices Simple
4H, HB and 4B graphite pencils are used for the demonstra- tions in this book, but you may choose to use a different com- bination of pencil grades or a mechanical pencil for your own drawings apart from this book. If you are trying to duplicate the finished drawings in this book, make it easy on yourself and work with the same materials suggested, or you may end up frustrated, wondering why you achieved different results.
Pencil Hardness Hardness is another important quality to consider when select- ing pencils. Ratings, usually stamped on the pencils, range from H (hard) to B (soft), with F and HB in the middle. For the demos in this book, we will use 4H, HB and 4B graphite pencils. These
will provide a range in hardness without requiring you to keep.
track of an overwhelming number of pencils. 8B pencils create nice darks, but they are so soft that they need to be continually
sharpened. Woodless Pencils ye Woodless pencils have only a thin coating over their thick cores. This is a novel idea, but woodless pencils are prone to breaking, especially when car- ried in a pocket! Use pencils with wood surrounding the core instead. Runaway Pencils!
Use hex-shaped pencils instead of round pencils because round pencils roll and can get away from you.
Pencil Extender To get more miles out of your pencils, use a pencil extender on the end of a pencil that has been shortened by use.
HARDER
6H 7H 6H SH 4H SH OH OH F
Pencils Come in a Variety of Hardnesses

If you want to draw a thin line, you will need a sharp point on the tip of your pencil. You can sharpen your pencils in two ways: with a pencil sharpener or by hand, using a craft knife and a sandpaper pad.
Sharpened with a Pencil Sharpeners Are the Simplest pencil sharpener Way to Keep Pencils Sharp ‘Apencil sharpener is the quickest and easiest way to keep the tips of your pencils sharp.
Sharpened with a craft knife and sand- paper pad
A Craft Knife and Sandpaper Pad Reveal More of the Pencil’s Core For a controlled point that exposes more of the core, sharpen your pencil with a craft knife and sandpaper pad.
First Shape the Pencil With a Craft Knife Identifying Your Pencils Grip the pencil in one hand, with the point away from you, and the craft knife in the other. Push the thumb holding the pencil against the thumb the sides of your pencils, label the pencil ends with nail polish holding the knife to create leverage so the blade cuts into the pencil. Cut, then tum the pencil and repeat the process until you've worked ‘or.colored tape: Place the nal pollst;or tape toward thetop the area into a point. of the pencil, but avoid covering the rating stamp or placing it
where the pencil extender would cover it.
To avoid having to search and squint to read the markings on
SS
Then Sharpen the Core With a Sandpaper Pad | Sand the core back and forth on the sanding pad for a sharp point.

Paper ane] Papers for sketching and drawing vary in size, weight, surface texture (usually referred to as tooth) and content. They may also be categorized as either sketch or drawing paper. When choos- ing drawing paper, always choose an acid-free paper, or the paper may yellow over time. Sketch paper, as the name implies, is for sketching and usually has a paper weight of 50 to 70 Ibs. (105gsm to 150gsm). Drawing paper, which is for more finished art, usually comes in 90-Ib. (190gsm) weight. A small 6" x 4" (15cm x 10cm) pocket sketch pad is great for quick studies and ideas, while larger sketch pads are obviously needed for bigger
Drawing) Boare! sketches. Any drawing you begin may be completed as a keeper, so you may prefer to begin all your drawings using an 11" x 14" (28cm x 36cm) medium-tooth, acid-free, 90-Ib. (190gsm) draw- ing paper.
The lights and darks in a drawing are achieved by varying the amount of pressure applied to the pencil. Because of this, it is necessary to have a hard surface beneath the paper, ideally a drawing board. It offers a smooth, solid surface without surprise ruts or nicks, and it won't bend or give with pressure the way the cardboard back of a drawing pad can.
Sketching and Drawing Paper Use both a small sketch pad and a larger drawing pad. Tear out the indi- Vidual drawing pad sheets and use them on a drawing board.
Drawing Boards Provide a Hard, Smooth Surface Drawing boards can be bought with a clip attached to one end and a rub- ber band on the other to hold a sheet of paper in place.
Tracing Paper and Masking Tape
Use tracing paper to make a more refined sketch. Put the previous sketch under the top sheet of tracing paper. Use masking tape to secure the sheets of paper to each other, then carefully trace the desired elements of the image onto the tracing paper.

[srasers Erasers are the sort of thing to have with the idea that you will use them only sparingly. Each time you use an eraser, you risk smearing the drawing or damaging the paper.
Kneaded eraser
White vinyl eraser
Erasing shield
Kneaded Eraser The first eraser you get should be a kneaded eraser. These soft, putty-like erasers are very gentle to the paper's surface and leave few, if any, crumbs. To erase, first try pressing the eraser to the paper's surface; this is less damaging to the paper than rubbing the eraser back and forth.
White Vinyl Eraser Use a white vinyl eraser to remove hard-to-erase pencil lines. White vinyl erasers are more abrasive than kneaded erasers but will not stain the paper, as some colored erasers often do. White vinyl erasers leave behind strings rather than crumbs, making cleanup easy.
Erasing Shield Made of thin metal, an erasing shield masks the areas that are
not to be erased. To use it, with one hand firmly hold the shield
down over the area not to be disturbed and, with your other
hand, carefully erase over top of the shield.
f Avoid Using the Eraser at the End of Your Pencil
Never use the eraser at the end of a pencil. It may smear pencil lines and stain the paper.

Additional In addition to the basic supplies, there are other tools that will help make your drawing experience easier and more enjoyable.
Straightedge Using a straightedge will give you sharp, accurate lines when your subject is technical and requires precision. The precision froma straightedge would look awkward ina sketchy drawing, though. If you want straightedge accuracy without the tightness, use the straightedge during the sketching stage with a light pen- cil line, then draw over those lines more heavily freehand in the drawing stage.
‘Triangle Because itis larger than a ruler and has more surface area to atip, a triangle can be easy to use for drawing straight lines.
Tangle
Straightedge |
| ________}
equate
Must-Have Materials 4H, HB and 4B graphite pencils + Pencil sharpener + Sketch pad +11" x 14" (28cm x 26cm) medium- tooth drawing paper
sewing gauge + Small mirror + Erasing shield + Pencil extender
* Drawing board + Craft knife + Kneaded eraser + Sandpaper pad + White vinyl eraser + Tsquare
+ Fixative Optional, But Not to Be Overlooked —« Tracing paper + Straightedge, triangle or angle ruler + Masking tape + Light box
+ Dividers, proportional dividers or
rawing Tools ‘T-Square Using a triangle with a T-square hooked to the side edge of your board or drawing pad will help you draw more precise vertical, horizontal and diagonal lines. This method is best used for draw- ing technical subjects such as buildings in linear perspective (see pages 32-38).
Angle Ruler An angle ruler works like a ruler, but it can pivot to measure angles and can fold small enough to fit in a pencil box. See page 30 for instructions on using this tool to draw angles.
Dividers Dividers are used to observe and duplicate proportions from a photo or sketch. See page 29 for instructions on using standard dividers.
Angle ruler

Dividers
Proportional dividers:
Light box
Proportional Dividers Proportional dividers are used to proportionally enlarge or reduce aimage. (See page 29 for additional instruction.)
Sewing Gage A sewing gauge is an inexpensive tool that can be used to measure the proportions of a still life, three-dimensional subject matter, or when working from flat reference materials such as photographs.
Light Box Alight box allows you to work from a structural drawing without having to sketch guidelines directly on your drawing paper. This process is explained in more detail on page 24.
‘Sewing gauge
Faxative
Small Mirror Use a small mirror for self-portraits and for observing facial fea- tures. It is also handy for examining your artwork in reverse form. Looking at a drawing in reverse will allow you to see the compo- sition through fresh eyes.
Fixative Fixative is a spray applied to pencil drawings to prevent the artwork from smudging. It's used mostly for carbon or charcoal drawings, which tend to be powdery. For the demos in this book, fixative isn't necessary because you'll be drawing with graphite. Graphite is not likely to smear if the drawings are stored loosely, one on top of the other.

Sketching & Drawing
Sketching and drawing are two different things. A sketch is a work in prog-
ress. You may sketch to observe your subject matter or to resolve questions
regarding a drawing you are working on. A sketch may help you understand
the values of a subject, or gain more understanding of the subject's structure,
proportions and placement of its compositional elements. Sketches like these
may progress toward a more finished drawing. On the other hand, (no pun
intended!) drawing is an activity that is begun with the intention of producing a
finished piece of art.
With these definitions in mind, recognize that there are times to begin a
drawing with a sketch and there are times to begin a sketch without any inten-
tion of refining it into a finished drawing. As a beginner, if you are trying to do
more drawings than sketches, then you may be putting too much pressure
on yourself. Loosen up and enjoy learning four different
approaches to sketching and drawing: structural line
sketching, value sketching, black-and-white sketching
and contour sketching.
Let the Lines Guide You Line up your drawing board and paper with your subject and lightly sketch horizontal lines. These will guide you as you place your subject's features. Grab a friend and try it yourself!

Glolding the Peneill There are different ways to hold a pencil, depending on what type of strokes and lines you want to achieve. You may start out with loose, sketchy lines and progress to tighter, more controlled lines and shorter strokes. Here are some common hand grips
/
Cf, i-
Create Thick, Loose Lines For thick, loose lines, avoid using the point of the pencil. Instead, grip the pencil with your thumb and fingertip so that the pencil lead lies flat against the paper. Your fingertips should be elther just above the paper surface or gently resting on it. This may smear your previous pencil lines, so be careful. You will use your entire arm to draw these wide lines.
Create Thin, Controlled Lines For lines like these, grip the pencil as ina handwriting position, with the pencil rest- ing between your thumb, middle and index fingers. Your hand rests gently on the paper. For very thin lines, the pencil tip needs to come to a sharp point.
you can try as you sketch and draw. You may find something else that works better for you. You will find that pressure and grip affects the line results of your drawings. Generally, the more pressure you apply, the darker your line will be.
Create Thick, Tight Lines Apply more pressure to the point of the pencil by moving your index finger closer to the tip. Your fingertips may rest on the paper, though it isn't necessary that they do so for this stroke to be successful.
Create Long, Arcing Lines This grip is similar to the handwriting position, except you hold the pencil out at length. Use this grip to achieve wide, straight and arced lines. Let your hand rest gently on the paper.
Using a Frisket
A piece of paper can be used as a frisket to make an even edge for a set of pencil lines. This is also a great technique to use if you want to create a clean margin for your drawing. This method also works well for backgrounds.
Lift the Frisket Lift your frisket away. The pencil ines should look as if they start from one invisible line.
Cover the Drawing Place a piece of scrap or copier paper over your drawing. Start the line strokes on the scrap Paper and continue onto the drawing paper.

Structural Sketches Astructual sketch is the basic linework in which values and details are built upon. They are a great way to observe your sub- ject, and are often used as a basis for a more finished drawing. Astructural sketch is also an excellent way to loosen up before doing another type of sketch or drawing.
Focus on the Basic Structure A structural sketch will help you observe and understand the underlying structure of the subject. Here you will focus on the placement and pro- portions of the elements rather than on light or shadows (see page 18).

| MINI DEMONSTRATION
Astructural sketch helps you see how a subject is constructed. Look for basic shapes such as squares, rectangles and circles. Must-Have Materials Now ask yourself how they relate to one another. Before you pick 4H graphite pencil up your pencil to sketch your coffee cup, take a minute to study ies cinenen yoursubject. Kneaded eraser
Straightedge (optional for the first step, absolutely prohibited for the rest of the steps)
‘Structural guideline:
Use a 4H pencil to sketch the outer forms of the mug and the most relevant structural guidelines, such as those that
will indicate the placement of the rim, the bottom of the cup and the handle.
" Sketch the Basic Form and Structures
Add More Structural Lines 12 / Sketch the rim of the cup and the handle. Use the lines (~~ you drew in step one to help you add these additonal lines. Look for points where elements line up such as the rim of the cup and handle.
(>> Add Detail Lines to Finish __ “Add details such as the inner lines of the rim and handle. ‘e _—/ Erase any unnecessary guidelines with a kneaded eraser.

Value Sketches Values are the degrees of lights and darks in a drawing or paint- This blurs the structural lines and makes the lights and darks ing. A value sketch is used to observe a subject without much more noticeable. For a finished drawing that employs values, regard for structural or proportional accuracy. Here you focus on _it’s a good idea to do a structural sketch first to make sure the the lights and darks of your subject. One way to visually separate _ elements of your subject are in the right places. See page 24 for the structural lines from the values is to squint at your subject. more explanation of combining drawing approaches.
Use Layers of Shading for Value Sketches Begin a value sketch by first locating the areas of highlights, which will be left white. Then lightly shade the areas of overall values. The next step is to add more layers of shading for the middle values. Finally, add the darkest shading.
Using an Erasing Shield
Ifyou want to erase in a specific area of your drawing, use an erasing shield. Place the erasing shield over the region that is not to be erased. Gently begin erasing with a kneaded eraser. Use a white vinyl eraser if the kneaded eraser doesn't fully erase the first time.
a

Walle Sketch of a Goffiee Gup MINI DEMONSTRATION
In this exercise you will be focusing on values instead of lines.
The idea of a value sketch Is to define form through light and Must-Have Materials shadow instead of lines, so use shading to give your coffee cup 4B graphite pencil form. Remember, this is not intended to be a finished drawing, so | Drawing paper relax and enjoy the process. Kneaded eraser
| Sketch the Lighter Values >> Sketch the Middle Values Use a 4B pencil to sketch the lighter values, keeping the ~~ Continue adding layers for the midlle values, gradually
__ lightest ones the white of the paper. Use pencil strokes (__Igiving form to the sketch. that feel comfortable for you. They may be vertical, horizontal or even scribbles.
(Sketch the Dark Values 5 “Finish by adding more layers for the darkest values.
Use a kneaded eraser to lighten some areas if you think they need it.
o

BlackeandeWwWihite Sketches Black-and-white sketches are like value sketches, except that dark qualities. Also called chiaroscuro sketching, this type of
you focus on the contrasting blacks and whites and ignore the sketch is a good exercise for understanding what makes images
middle values. Your softest 4B pencil will work, but charcoal and visually identifiable with the most basic of values, black and white.
carbon pencils work especially well for this because of their rich,
Wire No Outlines or Middle Values Allowed No matter what part of the subject you're drawing, use only black and white forms to define it for a Chiarosuro drawing.
Avoid Smudges
As you are drawing, your hand glides over the paper surface and can smear the pencil ines. One solution to this is to use a slip sheet, which is a sheet of paper placed between your hand and the draw- ing surface. This way your hand does not rest directly on the drawing.

MINI DEMONSTRATION
No, it’s not a fancy type of coffee, it's a black-and-white sketch of ———— a coffee cup! This is like taking a value sketch to the extreme; no Must-Have Materials outlines and no middle values will be used to interpret the sub- ject. Use this method to examine a subject's most basic lights and darks.
Remember, this is just a study. Like a sketch, this is not intended to look like a finished drawing.
wl.
Anything from a 4B to 8B graphite, carbon or charcoal pencil Drawing paper Kneaded eraser
With a soft-lead pencil, sketch the most noticeable darks of the subject. In this case, the interior of the mug, along
the rim, and down the right on the outside of the mug are the darkest areas. Keep your pencil strokes close together so areas will look black.
1| Start With the Most Obvious Darks ~~ Add More Darks
Continue adding darks, using them to define the image.
~ Add a Background ~ “Finish adding darks to complete the mug. Add a back-
ground and some shadows to further define the image.

yy a
Gontour Sketches This type of sketch is also called a continuous line sketch because you draw with one continuous line, drawing outlines and defining value areas. Don't worry about accuracy. This is a fun exercise for loosening up before you draw, and it will sharpen your observation skills. Add more of a challenge by blocking your view of the sketch in progress, letting your hand guess at what the pencil line looks like on the paper. This is called blind contour sketching.
Continuous Line Sketch Once you start moving your pencil, don't lift it until the sketch is done.
—~
Blind Contour Sketch Blind Contour Sketches Help You Understand Your Subject This sketch was done by observing the subject without looking at the No one expects contour sketches to be identifiable. As Mary worked drawing paper. Block your view of the sketch with a piece of cardboard —_ through this sketch, she gained a real understanding of the contours of until you're finished. her coffee cup.

i MINI DEMONSTRATION
This sketch is done by placing the pencil onto the paper and not lifting it until the sketch is finished. Look for lines and shapes. Must-Have Materials Follow the contours that define the subject and the shadows around it. Doing a contour sketch is truly an exercise in putting observation into practice!
HB graphite pencil Drawing paper Kneaded eraser
7] Start Moving the Pencil (>> Continue the Pencil Movement Put an HB pencil to the paper and start moving it, Ae Keep moving the pencil so that the sketch is formed with following the contours of the subject without litingthe (la single line.
pencil from the paper.
>> Finish Up 42 =,“ Keep moving the pencil until the sketch is complete. i

Combining Approaches We've explored four different approaches to sketching and draw- ing. If you tried the value, black-and-white or contour sketch demos, you might be thinking your art didn’t turn out anything like you expected. Do not be discouraged and don't give up! You are already growing in your observation skills.
You can combine some of the different approaches to achieve amore finished drawing. For instance, start with a structural line sketch and then add values. During the structural sketch stage, you should look for the basic shapes (see page 27) and propor
Combine Approaches for a Finished Drawing Work out proportions with a structural sketch and placement of the elements in your composition. Add value changes to define form and shadow.
A Light Box Makes Combining Drawing Approaches Easy Do a structural sketch of your subject, erase obsolete guide lines and add detail lines defining the form and shadows. Use this sketch as the basis for a value sketch, black-and-white sketch or contour sketch. Place the sketch on a light box and then place your drawing paper on top of the sketch. Tum on the light box so the image of the sketch will be visible through the drawing paper. This will provide a framework for your subject so you don't have to sketch the structural guidelines onto the drawing paper.
tions (see pages 28-29) so you can be confident of their place- ment before you add the values.
Alight box is a device that allows you to see the structural lines for a drawing without having to draw them on the artwork itself. First, create a structural sketch of your subject. Place the structural sketch on the light box, then tape a piece of draw- ing paper to the structural line sketch. The image will be visible through the drawing paper to provide a foundation for your value, black-and-white and contour drawings.

Structural Line Sketch Value Drawing Using the These lines indicate highlights and shadows as well asthe structure ofthe Structural Line Sketch and Light Box subject. To use other drawing approaches, erase any obsolete markings. _A light box was used to backlight the structural sketch as a guide for this
value drawing.
Black-and-White Drawing (Chiaroscuro) Contour Drawing Using the Using the Structural Sketch and Light Box Structural Sketch and Light Box Alight box was used to backlight the structural sketch as a guide for this _A light box was used to backlight the structural sketch as a guide for this black-and-white drawing. contour drawing,

Principles of — Good Drawing
Good drawing does not come just from having a skilled or trained hand, but
also from your ability to observe your subject matter. In fact, one of the things
we love most about art is being able to see how each artist interprets a subject.
What is it that gives someone the ability to draw well? It is a matter of learning
basic principles, applying them consistently and training the eye to observe
the subject. Observing invovles noticing the basic shapes, proportions and val-
ues of objects rather than thinking of them as “buildings,” “trees” or “people.”
Once you have an understanding of the principles and have trained yourself
to observe, it is then only a matter of telling your hand to draw what your eye
sees, not what your mind thinks the subject should look like.

Using MINI DEMONSTRATION
Before you pick up a pencil to begin drawing, take time to observe your subject matter. Look for the basic shapes, then sketch them lightly on your drawing paper, working out the cor- rect proportions of those shapes and determining where each should be in relation to one another. If you have questions about the composition, do a few quick thumbnail sketches at this point. Once you decide where to place the major elements of your composition, take your sketch to the next step, adding structural details. Finally, add the values. This method of drawing will help ensure that the results will be proportionally correct.
(7) Look for the Basic Shapes
Look for circles, squares, tri- angles, ovals and rect- angles in your subject before you sketch.
(> Add Details to the Structural Sketch [Add the details including the columns and trim to the
——/ building, define the shape of the trees and add a row of shrubs in front of the building.
Basic Shapes
Must-Have Materials
HB graphite pencil Drawing paper Kneaded eraser
<> Sketch the fe Basic Structure
Start with the basic shapes and use them to work out pro- portions (see page 28) and composition (see page 86).
/ | Add the Values
C2 | | Add values over the lines to give the scene depth and
definition, and to make it look more realistic.
27

Gauging Proportions Gauging proportions is as simple as making sure that the width and height of the objects in your drawing are proportionally simi- lar to those in your reference. Believable art starts with correct proportions, so learning how to gauge proportions accurately will be invaluable. You don't need to know the actual inches or cen-
Gauging Proportions With a Pencil Gauging Proportions can be done by “mea- suring” each part of the subject with a pen- cil, Use the top of your thumb to make the distance from the end of the pencil. Now compare this measurement with those of other parts of the image. In this example, the teapot's height is equal to its width.
timeters; instead, measure the relative sizes of the elements to achieve an accurate representation of your subject.
There are many tools available for gauging proportions, from asimple pencil to tools made specifically for measuring, such as sewing gauges or dividers. Dividers, both standard and
Lock in Accurate Proportions To correctly gauge proportions in this manner, lock your arm straight in front of you, holding the pencil straight up. Look at the pencil and the subject you're measuring through one eye. A bent arm may result in inaccurate measurements because you may bend your arm at different angles from one measurement to another.

proportional, are used to gauge proportions of two-dimensional reference materials, such as photographs, rather than of three- dimensional objects, such as those in a still-life setup. Propor- tional dividers enable you to enlarge or reduce by measuring the reference with one end of the tool and then using the other end to determine the size of the image in your drawing.
Using Standard Dividers Measure the subject in your reference with the dividers and transfer the length to your surface. You can only measure a one-to-one ratio with standard dividers. If you wanted to enlarge this window to twice its size, you would have to double the divider's measurement.
Using a Sewing Gauge Align the edge of the object with the end of the sewing gauge, then move the slider up or down to mark the other edge. Transfer that measure- ment to your drawing.
Proportioning can be done loosely for a quick sketch or more precisely for a finished drawing. The subject also influences how accurate the drawing needs to be. You may be less concerned about the proportions of a tree than you are about the propor- tions of an automobile.
Using Proportional Dividers Proportional dividers are used not only to compare proportions but also to enlarge or reduce. Measure the subject in your reference with one end of the dividers, then use the other end to mark the measurement for your drawing. The notches in the center of the dividers let you determine just how much you want to enlarge or reduce the size of the image.
Get It Straight
Straight lines can be drawn using a straightedge or ruler. Another method is to place the side of the hand holding your pencil against the edge of your drawing surface, then glide your hand along the edge.

Wileasuning Angles Measuring angles sounds technical, but drawing angles mostly involves observation. If you want to take the guesswork out of drawing angles, use an angle ruler. Correct angles will make your drawings more successful.
Duplicate the Angle Transfer the Angle to Your Drawing First, duplicate the angle of the subject by aligning a pencil with it. Keeping the pencil at the same angle, hold it over the drawing and adjust
the sketch as needed.
Using an Angle Ruler ‘An angle ruler (see page 12) also can be used for duplicating angles. Line up the angle ruler with the subject, then hold it over the drawing. Then transfer the angle to the drawing by placing the angle ruler on the relevant area of the drawing and marking along it.

Images from books, magazines, greeting cards or the Internet that allow you to observe a particular subject are called reference materials. It is good to practice observing actual subjects such as the birds in your backyard. Firsthand observation will help you to capture the essence and nature of your subject. The problem with observing from life is that the subject, especially an animal, may not stay still for you. Moreover, the lighting and colors will constantly change. A still life, in which you set up your subject matter with a consistent light source, is another option. You can sit down and take your time observing your subject at your leisure—be sure to warn your family that the fruit bowl is being used for study, or your reference may be eaten by mistake!
Reference Materials Observation of a subject can be enhanced with reference material. Start a reference file by categorizing photos and magazine pictures in an accordion folder.
How to Approach a Challenging Drawing
Some subjects may seem so daunting, you may not know where to begin. Even finding the basic shapes, which is the best place to begin, may be hard. The following method may help.
Reterence material Trace the Basic Shapes
Lay a piece of tracing paper over your reference and trace the basic shapes of the image.
Basic-shapes reference
Inttial source reference
Use Your Tracing as a Reference Use the tracing as another reference to determine the placement of the shapes and their proportions as you begin the drawing.
wl

Understancing Linear Perspective Perspective is what gives the illusion of depth to a picture. It affects almost everything we see, if only in subtle ways, which is why it is important to have an understanding of how perspective works. Artists employ two types of perspective: linear and atmo- spheric (also called aeria). Linear perspective involves the use of converging lines and the manipulation of the size and placement of elements within a composition to create the illusion of depth and distance. Atmospheric perspective, which will be explained in more detail on page 41, relies not on lines but on variations in value and detail to achieve similar effects.
Horizon Line The first step in using linear perspective is to establish a horizon line where the land or water meets the sky. The placement of
the horizon influences the viewer's perception of a scene and determines where its sight lines should converge. Even when the
horizon line is not actually visible, its location must be clear or the
perspective of the scene may not be correct (see page 39).
Vanishing Points Vanishing points occur where parallel ines appear to converge, usually on the horizon. For example, when you look down a train track, the rails seem to converge in the distance. The place where the rails appear to meet is the vanishing point. A single drawing may contain several vanishing points—or none at all— depending on the location of elements within a scene and the vantage point of the viewer.
Vantage Point The best way to describe the vantage point is to say that itis the point from which the viewer observes a scene. In a drawing, the relationship between the location of subject elements (such as trees and buildings) and the horizon line will determine the eye level of the vantage point. In addition, the vantage point can influ- ence the mood of a scene (see page 33).
Vanishing point
Vanishing Points Avaanishing point occurs where parallel lines appear to meet in the distance. For instance, when you look down train tracks, the parallel lines of the rails seem to converge at a point on the horizon.

Dog's Eye Level Man's Eye Level : ‘ Overhead View Placing the horizon low makes the vantage Placing the horizon at the same level as the 4 point seem low. In this example, the vantage ©YeS of the man in the scene puts the van- blest inc imaschotnhyaiate de il pointis at the dog’s eye level. Notice thatthe tage point also at the man's eye level. In this oe sini ee se ered see aed
i example, the horizon line runs through the Usieseates we fearing Wah ie viewer's look horizon line goes through the eye of the dog. ae id fain Bar ha
Ca fala
Low Horizon, Low Vantage Point High Horizon, High Vantage Point With the horizon placed low, the subject may look taller and more massive A high horizon can give an unnatural feel to a subject that is normally than normal, viewed from eye level. Instead, bring the horizon line down to a more
natural vantage point.
Vantage Point Can Influence Mood
The placement of the horizon can influence the mood of a scene by creating a variety of sensations in the viewer. Placing the horizon unnaturally low will make the viewer feel as if he were looking up at the subject from a very low vantage point. Placing the horizon unnaturally high will make the viewer feel as if he were looking down on the subject from a great height.

One-Point Perspective One-point perspective is a simple form of linear perspective with only one vanishing point. Remember to always draw the horizon line first, then determine the placement of the vanishing point on the horizon, which should not be far from the center of the scene. First draw the horizon line, then determine the placement of your two vanishing points on either side of the paper on the horizon line. As you work out the perspective of the elements in the scene, extend the parallel lines either up or down toward the vanishing point, depending on the vantange point you want to create for the viewer.
vanishing point
Horizon.
Vanishing point
Parallel ines drawn so they mest at the
Let's Get Technical
Use a T-square or triangle with your drawing board. These tools will make technical and perspective drawings easier to do and more accurate.
‘These basic shapes could be the basis, for a building or other structure
Dog's Eye Level, One-Point Perspective Here the horizon line and vanishing point are both at the dog's eye level. Notice that all parallel lines below the dog's eye level angle up toward the vanishing point and all ines above the dog's eye level angle down.
Vanishing point
Horizon,
Draw these lines to the vanishing point, even Ifit doesn't feel right
Man's Eye Level, One-Point Perspective Here the horizon line is at the man’s eye level, so this view shows a vantage point at the same height as his eye level. All parallel lines below the man's eye level angle up toward the vanishing point and those above it angle down.

Vanishing point
Horizon
Parallel ines are angled up towards the vanishing point
Overhead View, One-Point Perspective In this view, the horizon is above both the man and the dog. The vantage point is somewhere above the man and the dog creating the feeling that the viewer is looking down on the scene. All parallel lines angle up to converge at the vanishing point.
Principles of Perspective
There are three important principles to keep in mind when you render linear perspective:
* Depth is expressed by size. Similar objects will appear bigger if they are positioned closer to the viewer than if they are placed farther away.
* Depth is expressed by obscurity. Objects closer to the viewer may hide from view, cover up or cancel out objects that are farther in the distance.
* Depth is expressed by convergence. Elements that are parallel to each other will appear to converge in the distance. The point of convergence is called the vanish- ing point. A scene with linear perspective may have an unlimited number of vanishing points, or none at all. |

Two-point perspective employs the same principles as one-point spective. The first object you draw will help you determine the perspective but with an additional vanishing point. Two-point relative sizes of any other objects in the composition. perspective can give a scene more depth than one-point per-
Extend the paralie! lines toward the two vanishing points,
Vanishing point Vanishing point
Horizon
Notice the man and the dog also have invisible parallel lines that need to be drawn Dog's Eye Level, Two-Point Perspective through just ike those of the boxes
Here, the horizon line is at the dog's eye level. The vantage point is also at the same level as the dog's eye, Just as in one-point perspective, all lines above the dog's eye level angle down toward the vanishing points and all lines below the dog's eye level angle up toward the vanishing points.
Vanishing point Vanishing point Extend the parallel lines toward the two vanishing points
= = ——______ Horizon | eee
(5 Man's Eye Level, Two-Point Perspective Here, the horizon line is at the man’s eye level; the vantage point is at the same level. All parallel lines above him angle down toward the vanishing points and all parallel ines below him angle up toward the vanishing points.

Horizon
Vanishing point Vanishing point
Overhead View, Two-Point Perspective Here, the horizon is above the man and his dog, creating the impression that the viewer is looking Parallel ines extend to converge : af tha tio voriohing pokts down on them. The vantage point is above the man and the dog. In this case all of the parallel lines are angled up toward the vanishing points.
Vanishing point Vanishing point
— 4 Two-Point Perspective, Two Vanishing Points These books are neatly stacked and lined up, so they share the same two vanishing points.
Vanishing points Vanishing points
of | ge |e
Two-Point Perspective, Many Vanishing Points Asimple stack of books may have many vanishing points. Each of these books has its own set of two vanishing points.

‘Three-Point Perspective Linear perspective may include many vanishing points, as shown by the staggered books on page 37. When you add more vanish- ing points to a scene, you also add drama and complexity to your composition. If you take a vanishing point and move it high above or far below the horizon, you will create three-point perspective.
Three-Point Perspective, Looking Down This drawing of tall buildings employs three vanishing points and a high horizon. The
Vanishing pont Fesulting perspective is extremely dramatic. Vanishing point
Vanishing point
— Vanishing point
Vanishing point
Three-Point Perspective, Looking Up Reversing the placement of the vanishing points and horizon line gives the viewer the impression of looking up at the buildings. Once again, every line is directed to one of the three vanishing points.
Vanishing point

licen hlorizons and Vanishing Points
Applying the principles of perspective to all objects ina scene keep your perspective accurate. If necessary, sketch the horizon is important, even though horizons and vanishing points aren't —_and vanishing points lightly with a pencil to make sure perspec- always noticeable. They may be hidden behind other elements _tive is applied to eveything in your drawing. Once you've estab- in the composition, but understanding where they are will help to lished perspective, erase your guidelines and finish the drawing.
Hide and Seek Even when the horizon or vanishing points in a scene are hidden, they still affect your drawing. You can easily find your horizon line and van- ishing points. If you draw lines from all the par- allel elements in this room, they will converge at the vanishing point. Now that you have discov- ered the vanishing point, you know the horizon line goes through that point in the scene.
Vanishing point
Vanishing point
Beyond the Horizon Though the subject is not bound to a horizon, this scene stil uses the principles of linear perspective,
8
The location of your vanishing points has an important effect on the vantage point of your drawing. The closer the vanishing points are to each other, the closer the object will appear to the viewer. The farther apart they are, the more distant the object will appear to the viewer.
Horizon
Tet Vanishing point Vanishing point
Close Vanishing Points, Close Vantage Point The vanishing points are close together, making the box appear close to the viewer. Notice how the sharp angles create a more exaggerated perspective,
Horizon
~ Vanishing point
i
Farther Vanishing Points, Farther Vantage Point The vanishing points are farther apart, making the angles less extreme.
Horizon
— Vanishing point Vanishing point —
————
Distant Vanishing Points, Distant Vantage Point With the vanishing points far apart, the box looks flat, almost without perspective. This will give the viewer the impression that the box is in the distance.
40

Atmospheric Perspective Atmospheric perspective, also referred to as aerial perspective, 1 uses definition and values to create the illusion of depth and dis- tance. Atmospheric perspective relies on the idea that the closer something is to the viewer, the more it is defined and the more its values contrast. For instance, trees close to the viewer will show more detail and more color variation than trees farther away.
|. Using Values to | Create Depth |) Inthis grouping of
trees, the value of the closest trees con-
trasts more against the background than
| those farther away.
Linear Perspective Only Depth in this scene relies on the size differences established by linear perspective, The larger wind- mill seems closer to the viewer than the smaller ones. Atmospheric perspective is not used to show the distance between the windmills.
Atmospheric Perspective Only All three windmills are the same size, so no lin- ear perspective is used. The only difference is the intensity of their values, which makes them look like they are progressively more distant, going from left to right.
Combined Perspectives By combining linear and atmospheric perspec- tives, the depth of the scene is expressed through size and value contrast.
is

[Sillip>ses MINI DEMONSTRATION
Acircle drawn in perspective becomes an ellipse because it follows the same principles as other shapes drawn in linear per- Must-Have Materials spective. An ellipse can be made by first sketching a square in perspective. The lines of the square will be used as the boundar- ies for the ellipse, because both a circle and a square are equally as wide as they are tall.
4H graphite pencil Drawing board Drawing paper Kneaded eraser White vinyl eraser
Horizon line Horizon line
= . a
\Vanishing point Vanishing point if Vanishing point Center point “
Vanishing point
_” | Sketch a Square in Perspective / Connect the Opposite Corners Sketch the horizon line, then place the vanishing points ~~” Sketch lines connecting the opposite ends of the square.
— onthe horizon. Now sketch a square in perspective by ( Each line will define the widest and narrowest parts of the using those vanishing points. ellipse. The intersection of these two lines is the center point of
the ellipse.
Horizon ine
Ellipses Don’t Have Points
Ellipses do not have points on the end. Their ends are round, even if the ellipse is rather flat. f
Vanishing point Vanishing point
Sketch In the Ellipse Sketch in the shape of the ellipse. Notice that the ellipse
is longest in relation to the longest center line.

[llipses In Use Ellipses can be drawn as vertical, horizontal and angled, but still use the same perspective principles. Remember the first step in drawing an ellipse is to sketch a square in linear perspective.
Sketch Cylinders Using Ellipses The ends of cylinders drawn in perspective are ellipses. First establish the horizon and vanish- ing points, then sketch the boxes, The ends of the boxes will be the boundaries for the ellips- es, Connect the ellipses to create the cylinders.
= S N
Xx N
Ellipses Are All Around Us Elipses that stand vertically can be drawn in a similar manner. Notice how the center lines direct the shape of each ellipse.

Arches ane] Roofs MINI DEMONSTRATION
Circles are not the only curved objects you must draw in per- spective. Arches are also quite common and need to follow the Wisi tive Melarais rules of perspective to look accurate. The peak of an arch is cen tered over the space between its supporting walls. The same is true of most roofs. To draw a roof in proper perspective, you will need to know how to find its the center point. Measuring with a ruler will not give you the correct center point as far as perspec- tive is concerned, which is why knowing how to find the center point is important. Try this little exercise to learn how to find the center point for a roof.
4H graphite pencil Drawing board Drawing paper Kneaded eraser White vinyl eraser
perc . Connect Opposite Corners of the Rectangle _/) Sketch a Rectangle In Perspective
Establish the horizon line, then the vanishing points _. (which are far off to the left and right). Sketch arectangle ("lof the rectangle, making two Xs. The intersection of these
in perspective. This will become the walls that support the roof. _lines are the center points for the sides.
~_” Sketch lines connecting the opposite corners of the sides
Add Vertical Lines “| Sketch the Top of the Roof
‘Sketch vertical lines up through the center of the Xs. Sketch a line for the top of the roof. If completely drawn,
/ These lines designate the center of the box’s side walls. | this line would converge with the other lines on the right
side of the box at the vanishing point far off to the right.

[1 Connect the Points
ite: Finish the Roof
“ Connect the lines from the top of
the roof to the side points. These lines will
make the roof ends.
Drawing Arches Drawing the arch of a doorway or the bottom curve of a suspension bridge is similar to draw-
Round out the top ing the roof of a building. For the doorway, find and sides to create the center point of the rectangle by connecting
the opposite corners of the rectangle. Make a vertical line straight up to establish the peak of the arch, The curve of a suspension bridge can be thought of as an arch with the curve at the bottom instead of at the top, so apply the same principles.
Center point
Center point

Reflections are an exciting element to draw because they double the beauty of a scene. The reflection shares the very same hori- zon and vanishing points as the images they are reflecting.
Reflections Are Perpendicular to Their Reflecting Surface Reflected images are perpendicular to the reflecting surface. The vertical ines show how both the trees and their reflected images are perpendicular to the surface of the water. This is most noticeable when the reflecting surface is smooth.
i Reflections Use the Same Perspective \ as the Objects They Reflect
In this pond scene, the same horizon and van- ishing points are used for both the bridge and its reflection. Itis not a repeat or reverse of the bridge, but a continuation.
Vanishing point
Horizon
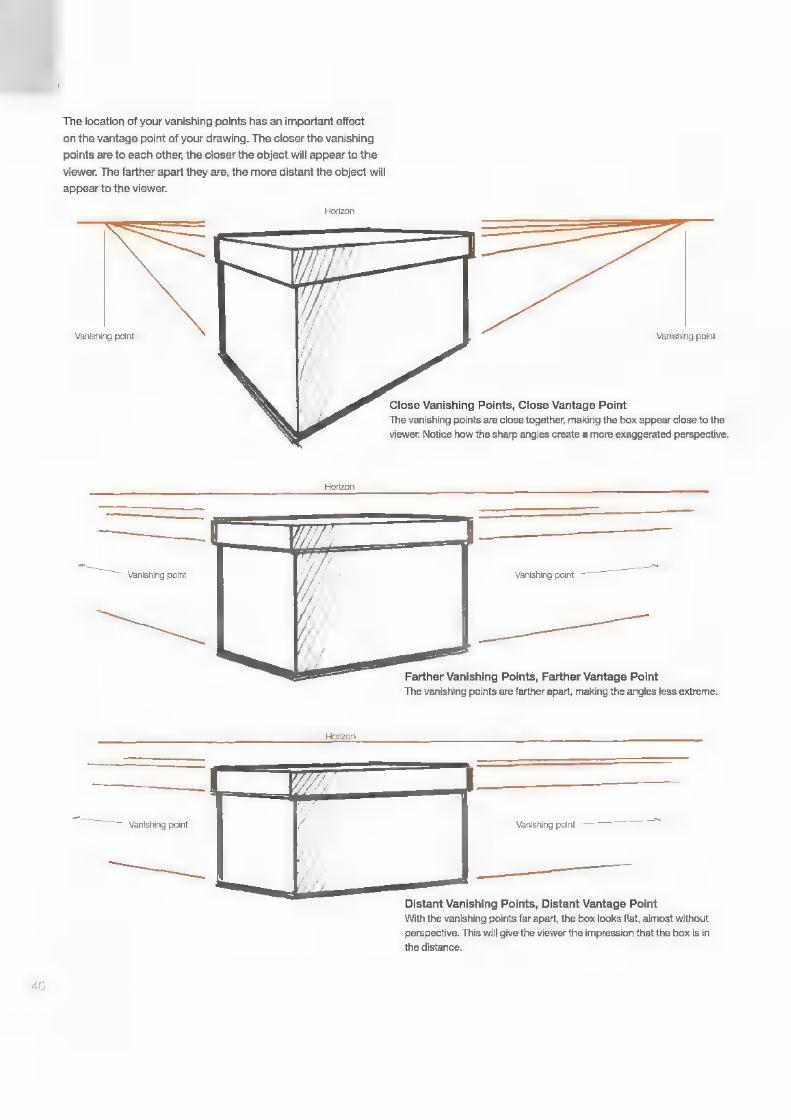
Reflection on a Rough Surface
When the reflection surface is rough, such as when there are waves on Distant Elements Can Be Reflected the surface of the water, the reflected image is broken up. This occurs The image reflected doesn't have to be near because some of the waves are not perpendicular to the image, causing or directly over the reflecting surface. The distortion to the image’s reflection. mountains are far away from the water, yet their
image is still reflected on its surface.
Reflections Can Be a Drawing’s Focus In this example, the reflection on a
car's wheel cover shows the sky, ground and trees. Even the person viewing it is visible in the center.
47

Values
Values are the degrees of light and darkness in a drawing. They give additional
form and depth to a basic structure. Observing the wide range of values that
make up your subject will give you a better understanding of how light creates
highlights and shadows on the form.
Observing Values Exercise ‘Take white foam shapes from your local craft store, set them up with ‘a good light source, then observe the characteristics of the shapes, the highlights and how the shadows fall. Notice the wide range of val- ues. You may need to paint the foam white to get an opaque surface that reflects light smoothly and accurately, Be sure to use latex paint, because spray enamel will melt Styrofoam.

Gonwast Differing values create contrasts that can affect the mood and composition of a drawing. The more extreme the difference between values, the greater the contrast. One way to achieve higher contrast in your drawing is to place your darks and lights side by side.
Value Contrast Creates Impact
It's All Relative Value contrasts are relative, They appear differently according to their environment. The small square on the far left may appear darker than the small ‘square on the near left, but both are the same val- ue. The square on the left appears darker because itis placed directly against the pure white of the paper, providing more contrast.
Adrawing done without much contrast will not have much impact and will look flat and pale. The white smoke of the rocket on the right looks brighter against the dark background, The drawing on the right uses richer values, creating more contrast.

Midaalstinog) @ Value Scale MINI DEMONSTRATION
You can use a value scale to compare the values of a scene with that of a drawing. Hold the value scale up to the subject and look through the holes punched along the side. Where do the values in the subject fall on the value scale? As you begin to compose a drawing (see page 86), it is always best to establish the highlights and very light areas. Sketch those in, then look for where the oth- ef values are in the subject. To fil in the other values, one option is to go from the lightest shades of the drawing to the darkest. Another way to map out the values is to fill In some of the darkest areas around the lightest areas, then work with the midtones last. Try each of these methods to see which one works best for you.
Draw a Rectangle Draw a2" x 6" (56cm x 15cm) rect- angle on a4" x 8" (10cm x 20cm)
piece of drawing paper. Add a line down the middle right of the rectangle as a guideline for the holes you will punch out in the last step.
“> Create the Lighter Values Cr X. Keeping the top white, use a 4H (~~ ‘pencil to create the lighter values with back-and-forth strokes.
>> Add the Middle Values __[“ Add the middle values with an ——/ HB pencil.
— Add the Darkest Values Use a 4B pencil for the dark- est values. With scissors,
trim around the rectangle pattern you drew, and punch seven holes along one side with a hole punch.
___| Map Out the Value i a ~~ Variations in Your
"~"/ Reference Photos Now you can hold your scale up toa picture or scene to judge the values as you work on your drawings.
Must-Have Materials
4H, HB, 4B graphite pencils 4" x 8" (10cm x 20cm) drawing paper Kneaded eraser Hole punch Scissors Ruler

Creating Values When you draw, you use lines to suggest light and dark values. Often type of stroke and the direction of the lines is deter- The grade of pencil, the sharpness of its point, the angle of the mined by the subject. When drawing wood, the pencil lines will point on the paper, the amount of pressure applied to the pencil, follow the direction of the grain; when drawing a cat, the direction and the surface of the paper all influence the values you create. _of the pencil lines will follow the contours of its body. Even the pencil strokes you use influence the values you create on the paper.
Individisal lines Individual lines, Back-and-forth lines Back-and-forth lines, Grosshatching Crosshatching, staggered staggered back-and-forth
Making the Grade Here are some basic lines strokes created with different pencil grades. Hard pencils are good for sharp, crisp line work, and they keep their points longer than soft pencils. Soft-grade pencils can make smooth, dark values. Consider duplicating these pencil strokes as an exercise, then get creative and invent other textures.
Different Folks Make
Different Strokes
Ifyou are right handed, itis natural for you to make lines moving from the upper right to the lower left. But lines may go any direction you like, depend- ing on what is comfortable for you and the effect you want to achieve.

oy Nu
Values are used to create the effects of light and shadow in a + Highlight. A highlight occurs where light reflects off an object. drawing. To make your drawings look realistic, you will need to In a drawing, this appears as a bright spot. replicate these different light effects. + Form Shadow. A shadow on an object that gives depth and + Light Source. Basically, the origin of the light. To determine dimension to its form.
the shading and shadows of a scene, it is important to deter- + Cast Shadow. A shadow that is cast or thrown by one object mine the position of the light source so you know from which onto another surface. direction the light is coming. The light source is usually the + Reflected Light. Light that bounces off a surface and adds sun or a lamp, so the light usually comes from the top. A light light to a region of the object that would otherwise be darker. source positioned at the top left or right will give more depth than one located straight above your subject.
Using Light Light source | Accurately Adds * Realism and Depth to Your Drawings
Highlight
Cast shadow
‘An Unnatural Light Source = It's more than just a bad haircut that made y Frankenstein's monster look scary. Placing the light source below the subject contributes to his fightening looks.
Reflacted tight
A Natural Light Source Moving the light source from below the subject to above gives the monster a less frightening appearance.

Plotting Shadows While the concept of plotting shadows may seem daunting, a basic understanding of it will help you to draw realistically. There are two primary methods of plotting a shadow. One is for when the light source is in the background and can be shown on the drawing; the other is for when the light source is in the fore- ground and cannot be seen directly. Both of these methods use the principles of linear perspective. You must also plot out the horizon line and vanishing points to be able to get the right per- spective for the shape of the object's shadow.
Light Source in the Background In this example, the light source is in the Vanishing point background. Notice that there is a line coming straight down from the light source to the hori-
Light source
Perpendicular line to determine the shadow’s
Direction of ight vanishing point
‘Shadiow's vanishing point
Vanishing point
Horizon zon. That point on the horizon is the shadow’s vanishing point. From this vanishing point, draw lines passing through the bottom corners of the cube. Next, draw lines from the light source passing through the top corners of the cube. The intersections between the shadow’s van- ishing point lines and the light source lines will make the shape of the shadow on the ground.
Direction of ight
Horizon
Vanishing point
Unseen Light Source in the Foreground Though the general direction of the light is assumed, the light source is so far away that it cannot be indicated in the drawing. Because of this, the direction of the light and where those lines would converge on the horizon will be a vanishing point. Then draw lines from this vanishing point and pass them through the bottom corners of the cube. Next, plot the lines coming from the vanishing point of the angle of the light source. Place this vanishing point below and perpendicular to the other vanishing point. From this point, draw lines that pass through the top corners of the cube. The intersection of these lines will form the shape of the shadow of the cube.
‘Shadow's vanishing point
Vanishing point
Light's vanishing point

_ Practice the Techniques
You will find certain subjects easier to draw than others. For instance, you may
have a knack for drawing faces but feel you can’t draw a building in perspec-
tive to save your life. When you don’t feel comfortable with a certain subject,
you will probably try to avoid it, but then you will not gain experience working
with that subject. Challenge yourself—give some of the lessons you may deem
more difficult a chance. You might even try some lessons more than once, then
compare the results from your first attempt with your last. | predict that you will
be amazed at the improvement in your drawing skills. You can draw all of these
examples with your 4H, HB and 4B pencils. Use the 4H and HB pencils for the
light and medium values and the 4B pencil for the darkest values.
Drawing Subjects Are Everywhere Be on the lookout for drawing subjects such as these rocks. This drawing was done from a photograph taken by one of my students, Jackie Chunko.
Study of Rocks Graphite on drawing paper 31" 14" @eom x 360m)
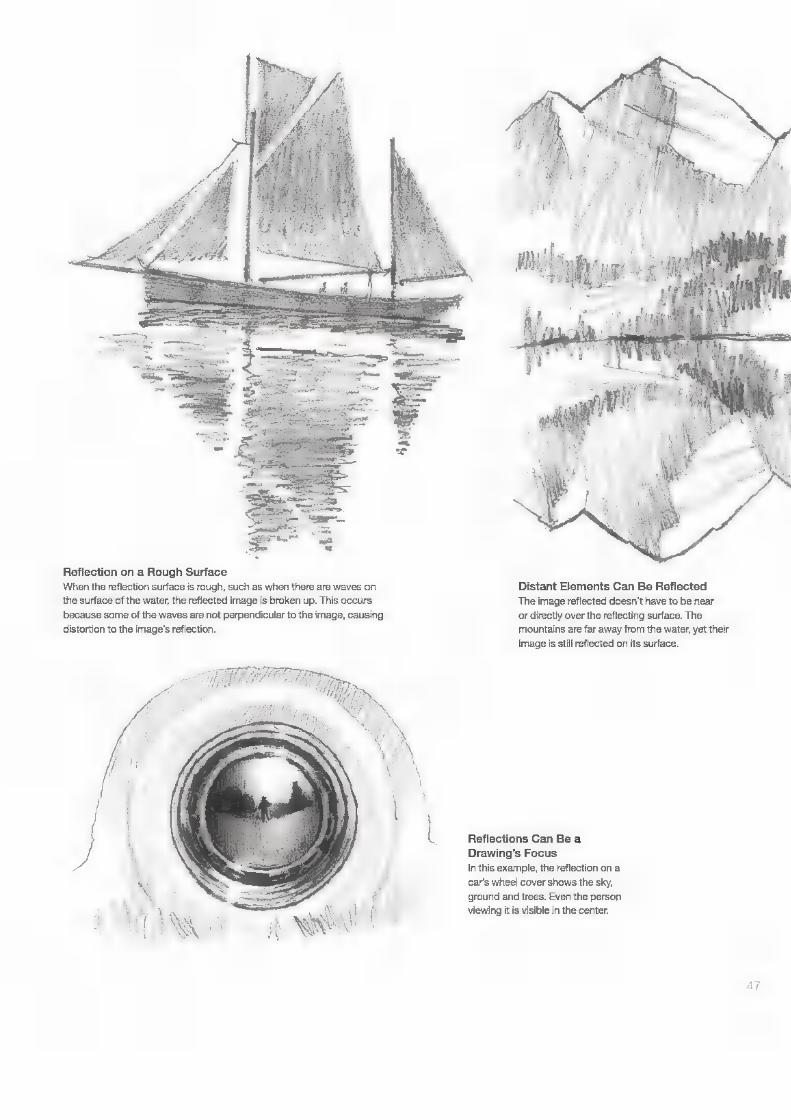
Clouds and Grass ‘The world around us offers an infinite number of subjects to
draw. Commonplace items such as clouds and grass can be interesting by themselves or as complements to other elements in a picture.
When drawing clouds, start by sketching the outline, but use subtle value changes to show the shape and depth of their
forms. You can achieve value changes by varying the type or pressure of your pencil strokes. Be particularly conscious of the location of your light source. Stormy days while the sun is still out are especially good for drawing clouds because there are so many sharp contrasts between the lights and darks of the sky.
Clouds in Sunlight With the light source above, the tops of the clouds appear lighter, while the undersides appear darker and shadowed. One way to leam how to draw clouds in suntight is to study the effects of light on something more solid, such as cotton balls.
Grass in Sunlight Line strokes can imply individual blades of grass. Use darker strokes to indicate shading and depth.
Clouds Blocking the Sunlight Clouds can be both translucent and opaque. When the light source is behind the clouds, the cloud in front of the sun will appear bright white around the thin, translucent edges where the light shines through it. The thicker parts of the cloud will appear darker because they are more opaque, blocking more of the light.
Grass in Sunlight and Shadow ‘The background grass is shown as a dark silhouette, whereas the fore- ground grass is suggested with light pencil strokes. Vary the direction and spacing of the lines to make the grass look more interesting.
a a

Bioeth unees ‘Trees may be the center of interest in a scene or just a back-
ground element. Each tree has a character all its own.
CHECK THis jaa Creating Values (p. 51) Holding the Pencil (p. 15)
Using Basic Shapes (p. 27)
\ f
Sketch the Basic Shape Start with the basic overall shape
\_ ofthe tree. Place the trunk toward the bottom of the page.
Drawing board Drawing paper Kneaded eraser
D) Sketch the Branches and Refine
Fe Shape ( sketch in some of the branches. Even if the branches are not visible in the final drawing, sketching them will help you understand both the structure of the tree and the placement of the leaves. Add more definition to the outer form of the tree by outlining the edges of the leaves.
>> Add the Leaves and Shading = < Erase any unnecessary lines.
Use a variety of back-and- forth lines to suggest the leaves. Make some lines darker than others to create shadows. Notice that the direction of the lines adds a sense of liveliness to an otherwise static sub- ject. Remove your initial outline with an eraser.
ee
Must-Have Materials Graphite pencil
Branch Out
Exposed branches can add interest to an otherwise ordinary tree. First sketch the branches of the tree, then erase the lines that are going to be covered by the leaves. Finally, shade inthe leaves.

SVeErgreeh Urees MINI DEMO RATION
Use the same basic steps to draw evergreens as you would use to draw leafy trees. When drawing a tree, examine the subject Must-Have Materials closely to capture its uniqueness. Graphite pencil
Drawing board
7 Kneaded eraser Holding the Pencil (p. 15) Creating Values (p. 51) Using Basic Shapes (p. 27)
\\ See,
1) Sketch the Basic Shape ‘Sketch the Branches (>> Add the Needles and Shading 1 Start with the basic overall shape Zz Sketch in the branches, noticing Erase any unnecessary lines. Use
and trunk. (_ ~ their direction. The branches angle eee a variety of staggered back-and- downward the farther down you place forth lines to suggest the needles of the them on the tree. Many trees are struc- tree. Apply some lines more heavily than tured like this, not only evergreens. others to create shading and depth.
Carry a Camera
Be on the lookout for interesting trees that you can photograph and use as references for future drawings.
4h

Brick, Stone ane Wooel Knowing how to draw different building materials such as brick, stone and wood comes in handy when you want to draw a Draw Anywhere, Anytime house. These elements add a range of textures that make your drawing more interesting. Besides, they're fun to draw. The really great thing about drawing is that once you have
the necessary materials, you can draw anywhere, anytime. Draw while you're waiting in line! Draw on the bus! Draw on your lunch break!
Bricks Up Close A subject viewed up close will display more texture than when viewed from a distance, so it should be drawn differently to show that detail, ‘To emphasize their worn appearance, draw old bricks with multidirectional lines of varied degrees of thickness.
Bricks at a Distance A distant view of bricks is drawn with minimal detail. Use back-and-forth line strokes to add values to the bricks. Add shadows under the individual bricks with heavy dark lines for a subtle sense of depth, Also create depth through the use of one-point perspective.

Fitted Stones Draw the massive fitted stones of an ancient Roman building with shading lines going in different directions to show texture. Make the joints of the stones dark to imply shadow and depth.
Rough Stones Use irregular shapes and sizes, varied line strokes and shading to create wall of rough stones. Add heavy, dark lines under the stones to imply shadow and depth. Notice the left end of the wall is set against a back- ground made of dark vertical line strokes to suggest a comer.
Wood Beams Draw wood grain using differing values and line strokes. Make the places where the wood was chipped out darker to suggest shadow and depth. Use semicircular lines to create the knots in the boards.
Wood Boards Draw weathered wood boards with coarse pen- cil strokes flowing in similar directions to show the grain. The spaces underneath and between the boards are dark to suggest depth.
a Oo

Rocks MINI DEMONSTRATION
3
Apply the same drawing principles and techniques that are used when drawing complex subjects to relatively simple subjects Must-Have Materials such as rocks. You can make the drawing more interesting by Graphite pencil varying the shapes and sizes of the rocks. Drawing board
Drawing paper eC TS OU
Holding the Pencil (p. 15) Creating Values (p. 51) Using Basic Shapes (p. 27) Light Effects (p. 52) Gauging Proportions (p. 28)
Sketch the Basic Shapes - | Sketch the outer shapes of the y /
rocks, varying the sizes and y shapes for interest.
i
Map Out the Lights and Darks foe Add lines to map out the lights and (darks on the rocks. In this case, the light comes from the upper right, so draw lines on the upper right areas of the rocks for the highlights and on the lower left areas for the darkest portions of the rocks.
(>> Add Shading and Shadows << Use consistent up-and-down
—/ pencil strokes so that the surface of the rocks will look smooth. Make the pencil strokes darker on the left side of the rocks to create shading and depth.

‘You may think that if you've seen one rock you've seen them all, but that just isn't true. Rocks offer a variety of shapes, sizes
and textures.
Coarse Rocks
‘The rough shaping of these rocks makes each one unique. This appears to be a simple drawing, but its subtle value changes make it challenging The outer shape of some of the background rocks is defined by the shading behind them.
Projecting Rocks These rocks jut upward, their top edges appearing light in value. Use back-and-forth lines to fill in the values, altering the pres- sure of some of the strokes to add shading and depth.

/ A Plane MINI DEMONSTRATION
PCOECK Tos OUT Must-Have Materials Holding the Pencil (p. 15) ‘Two-Point Perspective (p. 36)
Using a Frisket (p. 15) Ellipses (p. 42) Grephite pencil Using an Erasing Shield (p.18) Creating Values (p. 51) Drawing board Gauging Proportions (p. 28) Light Effects (p. 52) Drawing paper
Kneaded eraser
Sketch the Wings Add Lines for the Body First sketch the wings as a long Add lines for the basic structure of
box, using two-point perspective the fuselage and where the rudder as if looking down on the subject. and tail stop. These lines share the same
perspective as the wings.
Add More Elements Refine and Add Details nS ~ and Begin to Refine the Shape (A | smoot out the lines of the wings
‘Add boxes to indicate the place- and body and add details, includ- ment of the wheels and engine area. Draw ing the ellipses of the wheels, engine lines to better define the shapes of the compartment and propeller. rudder. Chisel out the fuselage and short- en the lower wing tips.
8

Draw A High-Speed Jet First draw the basic shapes in perspective to carve out the shape of the plane. Add highlights, shadows and details,
|= Add Shading on Erase any unnecessary lines, and
shade in the overall form. Make sure the lines shading the wings follow the same direction as the wings’ perspective. Add the darkest areas last, such as the shadow under the wings.
a

mi Train NI DEMONSTRATION
This type of steam engine is a Norfolk and Western 4-8-4. The
structural elements of this scene are drawn using one-point per-
spective. Make use of the principles of atmospheric perspective
as you apply the lights and darks. When you want to shade sub- jects like these, friskets and erasing shields may be handy tools
to use.
1CHECK THIS ¢ Sy Holding the Pencil (p. 15) Using a Frisket (p. 15) Using an Erasing Shield (p. 18) Gauging Proportions (p. 28)
One-Point Perspective (p. 34)
Creating Values (p. 51)
Sketch the Basic Shapes Draw the horizon line, with the vanishing point on the left
\___ side. Start with the basic shape in one-point perspective. Notice that all the vertical lines are perpendicular to the horizon at this stage.
Atmospheric Perspective (p. 41)
Must-Have Materials Graphite pencil Drawing board Drawing paper Kneaded eraser
>> Indicate the Basic Shapes of the Front Ye Fill the previously drawn square with a circle. Add other (“lines to indicate the basic shaping of the front of the engine.
(>) Add More Structural Lines __“ Add the more obvious lines, including the vertical lines
that define the individual cars. Add a cross in the upper middle of the circle, to mark the placement of the engine lights.
Add Details to the Train’s Structure
Add the tracks, wheels, engine light and smaller details
"_F'such as the handrail and the steps. Also add trim to the tops of the cars.

= Add Shading
[5 Erase any unnecessary lines, and —~ finish with shading. Use uniform up-and-down pencil strokes to make a smooth appearance. Create atmospheric perspective by drawing the closer por- tion of the train with more contrasts and details than the more distant portion.
Draw a Steam Engine Sketch the basic shapes, chisel out the shape of the train, and add feature lines. Next add the shading, paying close atten- tion to subtle value changes.

_ Auttiomelile i DEMONSTRATION
This is a Facel Vega, a French sports car built in the 1950s and 4960s. This is a fun lesson to practice dissecting your subjects by first looking for the basic shapes, remembering the rules of perspective.
Ck THIS OUT Holding the Pencil (p. 15) Ellipses (p. 42) Gauging Proportions (p. 28) Creating Values (p. 51) ‘Two-Point Perspective (p. 36)
Must-Have Materials Graphite pencil Drawing board Drawing paper Kneaded eraser
Sketch a basic box shape in two-point perspective. Take the time to get this right so the rest of the drawing will
work out accurately.
" Sketch the Basic Shapes Add the Top and Squares for the Wheels pees the top of the car to the basic shape. Draw squares
—Jiin perspective to indicate the wheels’ placement. This will help you draw the ellipses for the tires accurately. Like all the elements, the squares share the same perspective as the basic box shape.
(>, Add and Refine the Structural Lines __[~ Chisel out the shape of the car, and sketch in ellipses for “=the wheels. Add lines to mark the placement of the front elements such as the grill and headlights.
Add Details and Begin Shading
A Add details such as the headlights, grill, windows and
\_! interior. Keep in mind that the cutouts for the wheel are
shaped differently from the wheels themselves. Add some shad-
ing to the wheels and shadow under the car.

Add Details and Shade Add more details to complete the car, such as wheel covers and
chrome trim. Erase obsolete lines. Shade the form, using uniform line work to create asmooth appearance. Add another layer of darks to the wheels and shadows, giv- ing them more contrast against the lighter values of the car.
Creating a Shiny, Metallic Surface
Rich darks and graduated values give this Jaguar a shiny metallic appearance. Itis important to make uniform pencil lines to create the smooth, metallic look for the car's surface.

Boat MINI DEMONSTRATION
The graceful lines of boats and shimmering water reflections
inspire great compositions. For this demonstration, we'll start Must-Have Materials with a simple side view. Graphite pencil
i we = Drawing board
(CHECK THls OU! ead Holding the Pencil (p. 15) Gauging Proportions (p. 28) Kneaded eraser Using Basic Shapes (p. 27) Locating Vanishing Points (p. 40)
——___
Secon ee se 7) Sketch the the Lines of the Hull >> Finish the Basic Shape of the Hull
Start with the lines of the hull, which tilt slightly upward on fe and Indicate the Cabin
— the left side. leu ( Connect the ends to complete the basic shape of the hull.
Add lines to indicate the placement of the cabin.
See a fs} Add the Side of the Cabin and the Top of the Hull
— ia Draw the side of the cabin and the curve of the top of the A Add Details
Z| i Sane hull. The boat is viewed from the side and at a distance, Sketch in details, including windows, trim and the man.
making it look flat. 1
o

Shade to Finish Add values to the elements. Use long, straight pencil strokes on the
hull. Make the inside of the cabin dark.
Sketch a Rowboat Sketch the basic shapes in perspective, then add details and shading.

“Cat FACS Ai DEMONSTRATION
For those of you who are cat lovers, this demo will be lots of fun.
For those of you who prefer dogs (we know everyone falls under Must-Have Materials one of the two categories), go ahead and try this exercise, then Graphite pencil give the finished art to one of your cat-loving friends. This derno Drawinestioend offers a great way to develop your shading skills. Drawing Raper
Kneaded eraser
|CHECK THis OUT | Holding the Pencil (p. 15) Gauging Proportions (p. 28) Using Basic Shapes (p. 27) Creating Values (p. 51)
Sketch the Basic Shapes Place the Facial Elements 1 To draw the feline face, start with the basic outer oval, ‘Add more lines for the eyes, mouth and the top of the
two lines for the top and bottom of the eyes, and an ears, as well as a triangle for the nose. oval for the snout.
(>> Add the Ears and Neck (+ Add tines to indicate the ears and neck.
Sar
~ 3
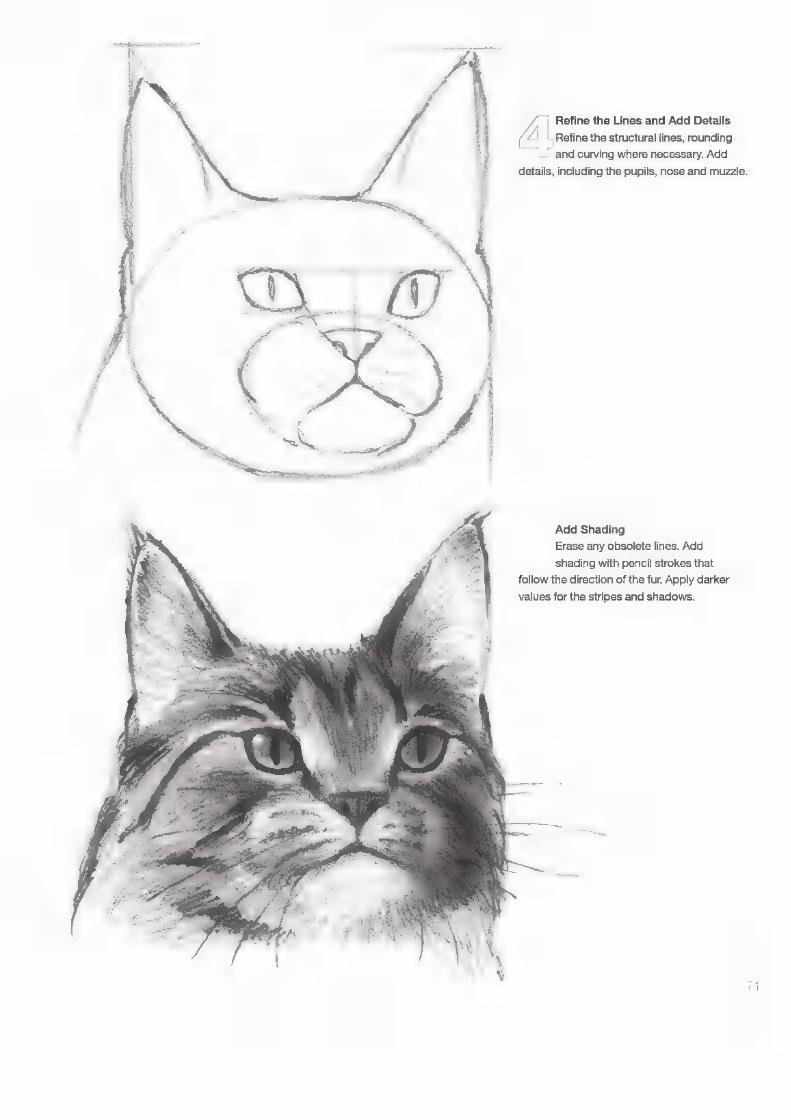
Refine the structural lines, rounding and curving where necessary. Add
details, including the pupils, nose and muzzle.
Al Refine the Lines and Add Details
A
Add Shading Erase any obsolete lines. Add shading with pencil strokes that
follow the direction of the fur. Apply darker values for the stripes and shadows.

_joude View of a Cat ant DEMONSTRATION
qualities in your drawings. In addition to helping you create Cats are as varied as people, and it is fun to capture their unique |
shape and texture, this demo will give you an opportunity to work Must-Have Materials Graphite pencil
on developing your proportioning skills. To sketch the legs and Drawing board body in the correct proportions, first sketch a baseline. A base- Drawing paper line is used to establish the placement of your subject and to Kneaded eraser help work out proportions of a drawing.
PCOEC kK T Roles Holding the Pencil (p. 15) Gauging Proportions (p. 28) Using Basic Shapes (p. 27) Creating Values (p. 51)
| ee ae
a | Sketch the Basic Body Shape (Add the Head Shape Draw a rectangle to suggest the a) Sketch an oval for the head. Posi- basic body structure. Take the ver- ee it so it just overlaps the top
tical lines all the way down to the baseline. horizontal line.
(>> Add the Neck and Legs [+ Add lines for the neck that con- —_/ nect the head to the body. Sketch
angled lines for the legs. See page 30 for instructions on how to transfer angles.
~ nN

) Complete the Body Al Draw the outline of the tail, and
“_F complete the legs. Lightly indicate the legs on the other side of the cat's body. Add the outline of the ears and position the eye and mouth. Erase any
obsolete lines.
___ Add the Shading and Details.
~~ | Use back-and-forth strokes to suggest the cat's TH Ce tt varying the lights and darks to imply form.
Add details to the eye, mouth, nose, ear and paws.
ro]

Side View of a Dog MINI DEMONSTRATION
Use the steps you practiced on the cat's body (see page 72) to draw a dachshund. Start with the basic overall structure and then add more features as your drawing progresses. While observ- ing dachshunds for this drawing, | became aware of how short dachshunds really are!
8 CTS OUT Holding the Pencil (p. 15) Gauging Proportions (p. 28) Using Basic Shapes (p. 27) Creating Values (p. 51)
Sketch lines to form the basic body and head structure,
| Sketch the Basic Shapes
including a baseline to establish where the feet will rest.
(>> Add Lines for the Body, Neck and Legs ©“ Connect the circles to form the shape of the body and = neck. Sketch lines that will indicate the muzzle and the
foreground legs.
| Must-Have Materials Graphite pencil Drawing board Drawing paper Kneaded eraser
(Add Circles for the Head and Body Zz Add circles for the head, chest and rear. This will help you (_ *—ishape the dog's overall form.
Refine Lines and Add Structural Details Al Refine the line work to further shape the dog’s body. Add ~~ I the eye, tail, ears and legs. Place the background legs so they are staggered in comparison to the foreground legs.

Add Fur, Details and Shading Erase any obsolete
lines. Shade the dog's glossy coat with short, uniform pencil strokes that follow the fur's direction. Add details to the eye, nose, mouth and paws.
Drawing Long Fur
Use long pencil strokes that follow the direction of the fur to shade in the coat for a longhaired dog. Make these pencil strokes less uniform than those used for a shorthaired dog. This will make the long fur look more textured.
~I a

Gow MINI DEMONSTRATION
Cows are incredible creatures. Besides giving us milk, cheese and meat, cows do amazing tricks, but no one knows about it Must-Have Materials because they pull these stunts only when no one is looking. Graphite pencil
ii ws i Drawing board
(CHECK [Tils OU! ped Holding the Pencil (p. 15) Gauging Proportions (p. 28) Kneaded eraser Using Basic Shapes (p. 27) Creating Values (p. 51)
%
_/) Sketch the Basic Shapes (>>> Indicate the Neck and Legs "| Sketch the basic shapes: a rectangle for the body and (Z Add lines for the neck and legs. Pay attention to the
a triangle for the head. Add a baseline to establish the ( —Iplacement and angles of these lines. Use a small circle to length of the legs. indicate the joint of the front knee.
=i
Bs Refine the Lines /, Add Shading and Finishing Details
__ &* Refine the line work to further shape the cow's body. Add Erase any extra lines. Add light shading to imply form, —— the eye, ears, tail and udders. ~~ _I using darker shading in the more shadowed places.
Make the coat'’s dark patches with semi-uniform back-and-forth
pencil strokes.
~

_jSwali NI DEMONSTRATION
The elegant lines of this swan makes it an interesting subject.
Enjoy practicing your skills with this mini demo and then consider Must-Have Materials using your drawing as a greeting card. Graphite pencil
Drawing board Drawing paper
TCHECK THIS OU] Miuaenee Holding the Pencil (p. 15) Measuring Proportions (p. 28) Using Basic Shapes (p. 27) Creating Values (p. 51)
(> Add the Neck and Beak Sketch the basic shapes of the head and body. Be con- (2 aS curved lines for the neck, then add the beak, paying
attention to the distance between the neck lines.
1} Sketch the Basic Shapes
scious of their proportions and placement.
(>> Sketch in the Feathers © Indicate the feather placement on the swan’s back, and
add the eye to the head.
Add Final Details and Shading Z|. Add the shading with short pencil strokes. Start with the ws lighter values, then add another layer of pencil strokes for the darker areas.
> 3}

~ a
People make fascinating subjects to draw. While at a mall, just look at all the different sizes, shapes and proportions of the people around you. Though you may observe that people come in many different “varieties,” there are basic principles that apply to all humans.
Male waist =
= Female waist
Midi tine
Proportions for Adults Though men are generally taller than women, they are shown as the ‘same height here for comparison. For both sexes, almost half the height is made up of the legs, with the tips of the hands falling to the mid-thigh region. The waist is lower in men than in women. Another difference is that men are generally bulkier and wider than women.

Middle line
Equal Height and Width For most adults, their height is equal to the width of their outstretched arms.
Proportions for Children Children are proportioned differently from adults, more noticeably in younger children. Their bodies are smaller in relation to their heads, and their legs are shorter, with the tops of their legs well below the middle line,
Figure Drawing Once you become familiar with basic body structure and pro- portions, you can draw more confidently, using a minimum of structural guidelines.
Structural Sketch
This sketch has its structural elements blocked in.
~ o

© Man Standing
a So
DEMONSTRATIO
As you draw the human figure, remember that almost half the
height of the body is the legs. Establish the middle line first, then
mark the top of the inseam. Pay attention to the head size, which Must-Have Materials takes up a little more than one-eighth of the overall height. A Graphite pencil common mistake in figure drawing is to make the head too large Drainestioerd and the legs too short. Drawer
in Kneaded eraser IC OECK Tos OUT Holding the Pencil (p. 15) Gauging Poportions (p. 28) Using Basic Shapes (p. 27) Creating Values (p. 51)
——
Establish the General Proportions (>> Sketch the Head and Legs Start with lines to indicate the placement and proportions. _~_ Most adults are about 7% heads high. The distance
__ Because the weight of the body in this example rests over {from the top line to the next lower line is one-eighth of the man’s right leg, include a vertical line that goes from the head _the overalll height. Make a line slightly lower and sketch an egg to the right foot. shape for the head, which should work out to about 7% units of
Add top, bottom and middle horizontal lines. Then sketch the overall height. You can use dividers if you want to check your aline halfway between the middle and top lines, then sketch proportions. Sketch in the legs, placing the top of the inseam just another line between the last line drawn and the top line. below the middle line.

> Add the Torso and Waist 3 << Sketch the basic shape of the
torso along with the waistline.
Add the Arms, Hands and Feet Add the arms, with the wrists falling
“at about the middle line and the fin- gertips reaching mid-thigh. Sketch a line for the placement of the eyes. Sketch in the feet along the baseline.
{
Sketch in Details
‘Sketch in the details, including
facial features and clothes.
Shade the Drawing
Add shading and details.
&

Face: Front View MINI DEMONSTRATION
To draw faces correctly, it's important to understand their basic structures and proportions. One way to do this is to use the width of the eye as a unit of measurement. These examples show generic proportions of an adult male of European origin. The features of individuals vary according to age, gender and ethnicity, if only in subtle ways.
Start with the basic shape egg- \__ shape of the head. It should be five
eye-widths wide by seven eye-widths high.
] Sketch the Basic Shape
“>> Add the Eye Line ve Sketch a horizontal line in the (“i middle of the face to place the eyes. Sketch a vertical line to establish the center of the face.
(>> Add Eye Shapes and Nose and _ |“ Mouth Lines \—/ sketch the eyes, leaving one eye- width between them. Add a line for the nose alittle less than half the distance from the eyes to the chin. Sketch a line for the mouth a little less than halfway between the line for the nose and chin.
vA Add Eyebrows and Lips Z Add a horizontal line above the eyes for the eyebrows and sketch
them in. Add the top and bottom lips.
= Add the Nose and Ears Add the base of the nose. The
"~~ / width of the nose aligns with the inside comers of the eyes. Add the ears, with the tops of the ears aligned with the eyebrows and the bottoms aligned with the base of the nose.
‘Fe Add Details |» Add details to the eyes and nose, —— along with the hair and neck.
General Face Width is about Proportions =!» Bayete al
Eyesare hattway ftom — crownto chin
Height is about 7 eye-widths

Face: Three-@Quarers Wiew MINI DEMONSTRATION
A three-quarters view of the face shows most of the face and | Must-Have Materials part of the side of the head. Keep in mind that the proportions Graphite pencil
and the placement of the elements are similar to the front view. Drawing board
Drawing paper Kneaded eraser
7) Sketch the Basic Shape Add the Eye Line (>> Add Eye Shapes and Lines for Sketch an egg-shape for the three- VZ2 ‘Add a slightly off-center horizontal___ “the Nose and Mouth quarters view with the chin slightly (“line for the eyes. Sketch a vertical © \——~ Sketch the shapes of the eyes
off-center toward the right. line through the middle of the eye lineto _with one eye-width between them. Add establish the center of the face. alline for the nose a little less than half
the distance from the eyes to the chin.
Sketch a line for the mouth a little less
than half the distance between the line for
the nose and the chin.
Add Eyebrows and Lips ‘i Add the Nose and Ear “> Add Details (& |,Addalline to place the eyebrows, | ~» Add the nose. Working down, (>) Add details to the eyes and nose, Li then sketch intheeyebrows: The “S2/thenose bridge should angleta along with the hair and neck. curve of the brows should follow the curve _ toward the center of the eyes and then of the eyes. Add the top and bottom lips. _angle out from the center to the base of
the nose. Add the ear, with the top align- ing with the eyebrows and the bottom aligning with the nose's base.
oo oo

MINI
@ S
Faces Side View DEMONSTRATION
Placing the elements for a side view of a face is similar to that for
the front and three-quarters view. As with all drawings, look for
proportions and places where the elements align. You may want to examine the proportions with a tool such as a pencil, dividers or a sewing gauge (see page 28).
Graphite pencil Drawing board Drawing paper Kneaded eraser
Must-Have Materials
_/ Sketch the Basic Shapes
Sketch a circle for the top and
middle portion of the head. Sketch
a vertical line down from the right side of
the circle for the front of the face. Add a
short horizontal line at the end of the verti-
cal line, slightly lower than the circle, as
the base of the chin.
—>» Add Lines for the Eye, Nose and Ear Sketch a horizontal line, halfway
between the top of the chin, the circle and the base of the chin, for the placement of the eye. Sketch a vertical line to the right of the circle to help with the placement of the nose. Another vertical line, coming from the center of the circle, will help with the placement of the ear.
(>> Add the Eye Shape and Lines __ “for the Nose and Mouth — sketch a triangle for the eye, plac- ing it about a third of the distance from the right edge of the circle to the vertical line for the ear. Sketch a horizontal line a little less than half the distance from the eye line to the chin line for the base of the ear, Add a short horizontal line a litle less than half the distance from the previously established nose line to the chin line to help place the mouth.
_/, | Add Eyebrows and Lips (© Add a horizontal line for the eye-
_ brow. Sketch the eyebrow, making it slightly curved. Add lines for the lips, connecting them to the vertical line in the front of the face.
{f= Add the Ear and |= Form the Profile ——/ Sketch the ear shape, placing it
slightly left of the central vertical line and from the brow line to the nose baseline. Form the profile of the face and complete the jawline, which ends near the lower right part of the ear.
(Ee Add Details
Add details to the eyes, ears and
—— nose. Add the hair and neck.

Drawing Uncividual Faces Most adult faces have similar overall proportions, with the differ- ences being most noticeable in the features such as the eyes, nose, ears and lips.
Ethnic Variations The ethnicity of a person can be developed by changing the features while using the same basic structure.
Age Variations For an elderly man or woman, draw the ears and nose larger, the chin longer and make noticeable wrinkles.
Child’s Face ; The proportions of a Women’s Features child's face are different When drawing a woman's face, follow the same from those of an adult. basic proportions and placement of features as
used for the generic male. The ears, nose and jawline are usually smaller and more delicate, the lips larger and more noticeable. Details such as earrings, eyeliner and hairstyle can also express femininity.
While the eyes of an adult are placed at the middle, a child's eyes are below the middle, creat ing a bigger forehead. The head itself is wide and the features small.
&

o
Composition
Composition involves the arrangement of the elements in an artwork. Though
composition is inherent to all art, good composition involves planning and fore-
thought. A strong composition entertains the viewer, while a weak composition
may make the viewer feel indifferent toward the artwork. A good composition is
cleverly planned to lead the viewer through the scene.
Aspects of composition include symmetry, the number and placement
of elements within the scene, and how the scene is framed. As you plan your
composition, you will also decide on a format, create a path for the viewer’s
eye, and look for trouble spots.
‘The Old Tractor Graphite on drawing paper 11" x 14" (280m x 360m)

Arranging thie Elements Symmetrical composition can be useful if you want to make your subject look orderly and structured, but it often comes across as bland. Asymmetrical composition is preferable because It makes the objects in your drawing seem more neutral.
Symmetrical Composition Asymmetrical Composition Using a Grid for Asymmetrical Though this scene is evenly balanced, it has Moving the tree off center makes the scene Composition
two strikes against it: the horizontal line splits asymmetrical. The viewer should find this more — Qne method for hieving balance in an asym-
‘the scene exactly in half, and because the tree appealing and realistic. metrical composition is to divide the picture
is placed in the middle of the composition, the into nine equal rectangles. Use the intersec- scene looks contrived. tions of these gridlines to locate major elements:
inthe scene.
Using Thumbnail Sketches
‘Thumbnail sketches allow you to plan what the finished drawing will look like. Examine the differing placement of lights and darks in these examples. Can you tell which thumbnail sketch was used as a guide for the Textured Metal demonstration (page 94)?
ea
a 4

a 8
Number of Slements ‘The number and placement of elements can affect the balance of the composition and by leading the viewer through the scene. An odd number is usually more interesting than an even number. Evens and odds can also refer to the number of elements reach- ing the edge of the artwork, which affects the way the viewer's eye travels in and out of the composition.
Even Number of Elements Odd Number of Elements ‘An even number of elements can seem uninteresting. The viewer's eye An odd number of elements is usually more interesting than an even has nowhere to go but from one fish to the other. number. This scene has an odd number of elements, with one dominant
and two subordinate elements. The viewer is first drawn to the big fish, then to the smaller fish, then back to the big fish.
Even Number of Elements at the Edge Odd Number of Elements at the Edge Evens and odds can also refer to the number of elements that reach the A simple change allows the buildings to touch the edge on the leff, right edge of the artwork. In this example, the buildings are touching the edge _and top, creating a more interesting composition. on the left and the right, making an even number.

Cropping and Formatting Some scenes contain too much visual information to include in a composition, and it can be hard to determine where to begin and what to leave out. By looking through a viewfinder, you can visu- ally crop the composition before you pick up the pencil. Once you have determined the area you want to include, you will find the drawing easier to manage.
Using a Viewfinder Using Your Fingers One method for planning a composition is to crop the scene with a view- Forming a rectangle with your fingers is another way to crop a scene finder, a piece of cardboard with a cutout like a window frame. This is without using any special equipment. especially helpful when working outdoors, when the subject may seem overwhelming and you don't know where to focus your attention,
Format Affects a Composition's Mood ‘The mood of a picture can be accentuated by its overall shape, or format. A horizontal format tends to give a stable, more serene feel, while a vertical format can feel more impressive or powerful.
Add Diagonals to Your Subject Diagonal lines and angled elements create a sense of action in a drawing.
foo) o

© 3
Leading lines guide the viewer through a composition. Lines can In art, a tangent is the unfortunate meeting of two or more be indicated through a pattern of elements, such as stepping similar lines or elements. Artists usually avoid tangents because stones that lead the viewer to another place in the composition. __ they can make a scene confusing. Leading lines can also guide the viewer to a focal point, which is the center of interest in a composition.
Good Use of Leading Lines In this example we are led back to the distant mountains.
Tangents Cause Confusion Tangents can be confusing for a viewer. This sketch has a tangent where the tree aligns with the end of the house, making it look as if the tree were part of the house.
Bad Use of Leading Lines Not all lines lead properly. They may lead the viewer right out of the scene.
Remedying a Tangent An easy remedy for this example is to move the tree slightly away from the corner of the house to avoid a tangent.
With this shape, ‘This shape makes itlsss The Shape of Your Subject Is Important it’s clear this is a dog clear what the subject 8 Make your drawing experience easier by looking for sub-
jects with an outer shape that is easy to identify. The form of a dog standing is more identifiable than the form of the same dog lying down. If you were to try to draw this dog lying down, the process of sketching and shading the dog's shape could become a bit taxing,

— Let’s . Draw
Be patient with yourself. Good drawing skills are developed through observa-
tion and practice. Try drawing the same demo more than once and compare
your results. You will probably be surprised by the level of improvement you
have made.
Each demo is done in two stages. In the first stage, you'll work through
structural drawing. In the second stage you'll apply values with pencil strokes.
As you work through these demos, write the date in the corner of each draw-
ing and sign it. By doing this, you will be able to see the progression of
your skills in your artwork. Save your artwork, even if you are tempted N
to throw it away or send it through a paper shredder. Sometimes
the frustration of working on a difficult lesson overshadows
the improvement that has taken place. By putting your
artwork aside to view later, you allow yourself the
opportunity to view it with a more objective eye,
when you are more likely to appreciate the skills
you have developed.
Mountain Man Graphite on drawing paper 14" x 11" (86cm x 28cm)
re)

© Still Life Astill life with fruit is always an interesting subject for interpreting forms through shading. This is a good demo for observing the play of light and shadow on common objects.
DEMONSTRATIO Light Effects (p. 52) Using Basic Shapes (p. 27) Gauging Proportions (p. 28)
(1) Sketch the Bananas Clip your paper to the drawing board. With a 4H pencil, sketch in the curved, oblong forms of the bananas. For
accuracy, draw the full shape of the farthest banana, even though its image is partially blocked by the banana in the foreground.
fe Define the Shapes of the Fruit
“Add stems and sketch the shapes of the individual apples _—/ and bananas. You can use dividers or a gauge here to
check your proportions.
© 8
Must-Have Materials
4H, HB, 4B graphite pencils #11" x 14" (28cm x 36cm) medi- um-tooth drawing paper « Drawing board * Kneaded eraser
Optional, But Not to Be Overlooked Dividers, proportional dividers or sewing gauge « Erasing shield « Pencil sharpener Value scale (see page 50) * White vinyl eraser
(>> Sketch the Apples (Zz Use the 4H pencil to sketch circles for the apples. To
determine the placement of the foreground circle, draw a
line under the foreground banana. Line up the foreground apple with the foreground banana.
ir |k
\ j i ‘ ‘a S
A Add Highlights and Shadow Lines / | Before using your pencil, observe the highlights and | shadows. With the 4H pencil, lightly sketch where the
highlights will go so you will remember to leave them white. Then sketch in where the shadows fall. Keep in mind that the primary light source is at the upper left.

= Add Light Values to the Apples (E Add Darker Values to the Apples and Lighter With the 4H pencil, add value and form to the apples with Values to the Bananas
Lee light lines that follow their contours. Use uniform pencil 2) With the HB pencil, darken the shadow areas of the strokes to make the surfaces look smooth. apples. With the 4H pencil, indicate the lighter values of the
bananas. Check your work with the value scale.
Add the Darker Values of rg the Bananas and Finish With
Shadows and Background With the HB pencil, shade the darker areas of the bananas. Use a 4B pencil to add shadows under the apples and bananas, with the darkest part closest to the fruit. Add the background value with a 4H pencil, using uniform pencil strokes. Make the apples slightly darker with a 4H pencil. Use the value scale to check your work and make any necessary adjust- ments. Sign and date your drawing.
Apples and Bananas lle Graphite on drawing paper 11" x 14* (@8om x 36cm)
. 8

© >
> Textured Metal
DEMONSTRATION/ ©
For this demonstration, you want a freehand look but may need
the guidance of a straightedge for steps one, two and four. Make Must-Have Materials
the lines you draw with a straightedge light so they won't be so 4H, HB, 4B graphite pencils * 11" x 14" (28cm x 36cm) medi-
noticable with the sketchy lines used to portray a weathered um-tooth drawing paper « Dividers, proportional dividers or
watering can.
Gauging Proportions (p. 28) Ellipses (p. 42) Light Effects (p. 52) Brick, Wood & Stone (p. 58)
_/~ Draw the Cylinder of the ~) Watering Can
With a 4H pencil, sketch a square, slightly tapered at the bottom. Draw a guideline above the square to help you place the top of the ellipse. Add height to the lines on the side, then sketch the top and bottom ellipses.
sewing gauge * Drawing board + Kneaded eraser
Optional, But Not to Be Overlooked Erasing shield * Pencil sharpener * Value scale (see page 50) + White vinyl eraser
A hohe \
Se -
“> Add the Spout and Handle (Add Details to the Watering Can (eZ / Use the 4H pencil to sketch the 4 Add an angled ellipse at the top,
lines for the spout. Use one of your \—~ ellipses around the central section proportioning tools to compare the spout —_as ribs, lines to connect the handle, and a width to the width of the cylinder, using _small cylinder for the end of the spout. this drawing as a reference. Add lines for the handle and a curved line for the top.
& | Add Details, Including the Leaves (4 ‘and Boards
\_! Add details, including the wire handle at the top and lines where the spout attaches to the body. Create the dent by changing the shape of the lines that form the ribbing. Sketch the leaf shapes around the can and vertical lines for the boards in the back- ground. Use a kneaded eraser to remove obsolete guidelines.

= Add Values to the Watering Can ~ Add Texture and Value to the Leaves and Boards
Add lines to indicate the structure of the leaves and | | > Shade the leaves, using an HB pencil for the soft line WA bows: (See page 59 for tips on drawing wood.) / work and a 4H pencil for light, thin ine work. With a 4H
With the 4H pencil, add the shading on the watering can with —_ pencil, add the appearance of wood grain to the boards. thin strokes going in many directions to create a weathered tex- ture. Because the light source is at the upper left, make the left side of the can lighter than the right side.
Give Your Line Work Character
Sketch over the lines you created with a straightedge to give them a more freehand look.
Using 4H, HB and 4B pencils, add darks and details. Pinch the end
of the kneaded eraser so it makes a point, and gently rub it on the paper to create lighter areas, such as the top of the ribs. Sign and date your artwork.
7/ Add Darks and Details
Watering Can Graphite on drawing paper 11" x 14" (280m x 36em)
2 &

© Scene in Perspective Though it may not be obvious, this scene uses two-point per- spective, so pay attention to the subtle angles of the wall and the gate. Proportion the gate correctly by using dividers, proportional dividers or a sewing gauge to compare the width of the gate's opening to the opening’s height.
PCOECK THs OUT | Gauging Proportions (p. 28) Rocks (p. 60) ‘Two-Point Perspective (p. 36)
DEMONSTRATIO
Must-Have Materials
4H, HB, 4B graphite pencils #11" x 14" (28cm x 36cm) medium-tooth drawing paper « Dividers, proportional dividers or sewing gauge * Drawing board * Kneaded eraser * Value scale (see page 50)
Optional, But Not to Be Overlooked Erasing shield * Pencil sharpener * White vinyl eraser
Sketch the Basic Lines of the Walk and Gate Start by sketching the stone walk and the opening for the gate using a 4H pencil. Use your proportioning skills and
tools to make sure the proportions are correct.
(>> Add the Foliage ~~” Lightly sketch the outer shapes of the foliage with a (sh pencil.
(>> Add Structural Details _.* Sketch the details of the gate, foliage and stones. Erase \—/ any unnecessary guidelines with a kneaded eraser.
oO
_/- | Start Adding Values 2) With your value scale as a reference for the rest of this
~~1_I demo, use a 4H pencil to add values to the gate. Direct your pencil ines to follow the grain of the wood. Make the values of the shadowed side of the gate gradate from dark at the top to light toward the bottom.

(= Add Values to the Foliage (& Add Values to the Ground and Stones ) With a 4H pencil, add values to the foliage. Draw the vari- |», Add values to the stonework and to the ground around ous types of leaves differently from one another, using 7 sil hetwean tia stories wit 24H panel. (Bae pede 5a
differing values and line strokes. Make the shadows behind the _for tips on creating the texture of stone.) leaves darker than the leaves themselves.
(Finish With Details and Darks Garden Gate if Add the finishing details and additional darks using 4H, HB Graphite on drawing paper 11° 14" (28m x 36m)
and 4B pencils. Check the range of your values with your value scale and darken areas as needed. Sign and date your drawing.
o 4

O Natural Textures
Q
DEMONSTRATIONY
This fun drawing explores different textures, such as tree bark and fur. This is another drawing that could easily be made into a greeting card, It could also be framed and given to your favorite niece or nephew.
HC K THis OU L | Using the Basic Shapes (p.27) Creating Values (p. 51) Gauging Proportions (p. 28)
_/) Sketch the Faces ~] Observe the basic shapes that make up the raccoons’
_ faces before beginning. Using a 4H pencil, sketch ovals to represent the outlines of the raccoon’s faces. Sketch verti- cal lines for the centers of their faces and horizontal lines for the placement of their eyes, which are below the middles of the ovals. Next, draw small ovals for the snouts.
(>> Erase Extra Lines 3) |<“ Erase guidelines with a kneaded or white vinyl eraser ] —— before continuing with your drawing.
Must-Have Materials
4H, HB, 4B graphite pencils #11" x 14" (28cm x 36cm) medi- um-tooth drawing paper « Drawing board + Kneaded eraser
Optional, But Not to Be Overlooked Dividers, proportional dividers or sewing gauge « Pencil sharpener « Value scale (see page 50) * White vinyl eraser
>> Continue Refining the Faces and Indicate the Tree YL Add shapes representing the eyes, ears and noses. Draw (the hole, trunk and small oval for the paw.
i] Add Details to the Raccoons ‘2\ \_ Add lines to indicate important details, including guide- ~~! lines to indicate the markings on the raccoons’ faces, the the paw and the tree bark.

~ Add Dark Values Now, using a 4B pencil, add the dark values. Keep small highlights in the eyes to suggest their glossiness.
| = Begin Adding Values LES stilt using a 4H pencil, begin adding the lighter values to 5 = es ‘the raccoons and the tree.
1
Add Middle Values and Finishing
} v/ Details Add fur and finishing details with
an HB pencil, checking the range of your values with the value scale. Lighten or darken areas as needed, Sign and date your drawing.
Little Rascals Graphite on drawing paper 11" x 14" (28cm x 360m)
Fs) o

© Using Contrast
DEMONSTRATIO
This demo shows how to rely more on value contrasts than on pencil outlines to define shapes. The light source in this scene is at the top right, but the snow also reflects light, making the wolf's outline light as well. This looks dramatic against the dark of the mountains. When collecting your supplies, include your value scale and proportioning devices so they will be handy when you need them.
Heiss CS THIS OUT | Using Basic Shapes (p. 27) Creating Values (p. 51) Gauging Proportions (p. 28) Lines, Tangents & Shapes (p. 90) Contrast (p. 49)
Must-Have Materials
4H, HB, 4B graphite pencils # 14" x 11" (@6cm x 28cm) medium-tooth drawing paper # Copier paper to be used as a friskett « Dividers, proportional dividers or sewing gauge * Drawing board * Kneaded eraser Value scale (see page 50) « White vinyl eraser
Optional, But Not to Be Overlooked Erasing shield * Pencil sharpener Scissors Straightedge, triangle or angle ruler
_/) Draw the Basic Shapes ") | Using a 4H pencil, sketch the basic shape of the body
and the slope of the hillside. Add a circle for the basic shape of the head. While you may be tempted to rush on to the next step, this is the time to pay attention to proportions so the finished drawing will be accurate. Use a proportioning device to check your work, making adjustments as necessary.
>> Sketch the Overall Shape of the Body ~~) With the 4H pencil, sketch the shape of the body, includ- (ing the legs, neck, ear, mouth, lower jaw and tail. Pay close attention to the placement of the line for the belly because this will affect how tall the legs appear. Check your work with a proportioning device and make adjustments as needed.

(>> Add Detail Lines to the Wolf _ “and Sketch the Mountains
’ Erase obsolete guidelines with your white vinyl eraser and add details to the face, including the eye and nose, with the 4H pencil. Suggest the texture of the coat with back-and-forth lines along the outline of the body and within the body itself. Sketch in the mountains. Pay attention to where the lines of the wolf meet the lines of the mountains, making sure you do not create unwanted tangents (see page 90).
/) Start Adding Values (© | With a 4H pencil, add shading to the wolf, letting your "LJ pencil strokes follow the direction of the fur. With the exception of the head, keep the outer edges of the wolf light to suggest the light from the sky and the light reflected off the snow. This is a good place to start referring to your value scale as you lay down lights and darks for the rest of this demo.

Add Darks and Details to the Wolf =) With the HB pencil, add the darker values to the coat and \— the shadow areas. Add facial details by darkening the eye, nose and mouth, leaving white spaces to indicate teeth. Add dots to the wolf's muzzle to suggest whiskers.
Add Lighter Values to the Distant Mountains | (5 Using the 4H pencil, make back-and-forth strokes, filing 7 in the mountains axcept for the area in direct sunight.

With the HB pencil, indicate the exposed rock of the
Uf Add the Darks of the Trees
mountains with short back-and-forth strokes.
(¢>> Add the Dark Background Trees (=< With a 48 pencil, use vertical pen- = cil strokes to add the dark areas
of the background trees, To do this, cut a piece of copier paper in the same curve as the hillside. Use this as a frisket to create a clean edge, as discussed on page 15.
108

Add Finishing Touches Call of the Wild ~) | Now to step back from your drawing to observe the range of lights and darks in the Graphite on drawing paper 14° 11" (Béom x 28cm) ey sky. Before you attempt to add the sky, consider practicing this step on a piece of scrap paper. Using a 4H pencil, add light values to the sky with long, horizontal lines. Start with light pressure at the top and gradually decrease the pressure as you work down. If you get frustrated, leave the sky white; your drawing will still be dramatic. Be encouraged. You can come back and try this again at a later date for better results. Either way, sign and date your drawing.

Expressive Portrait ) aC
Good art begins with an interesting subject. Be on the lookout for inspiring subjects because your best art will no doubt come from this inspiration. For portraits, sketch the facial structure first. Look into a mirror and use your own features as a guide. This will help you place elements such as the hat and beard with less guesswork. Apply line work in a rough and irregular manner to complement the rugged appearance of the subject.
1CHECK THis OUT | Gauging Proportions (p. 28) Face: Front View (p. 82) Human Figures (p. 78)
Sketch the Face With a 4H pencil, sketch the overall shape of the head and lines for the eyes and center of the face. The head is
viewed slightly from the side, making the center line of the face somewhat left of center. Sketch in lines for the mouth and nose. Add the eyes.
Must-Have Materials
4H, HB, 4B graphite pencils # 14" x 11" (@6cm x 28cm) medi- um-tooth drawing paper « Drawing board * Kneaded eraser
Optional, But Not to Be Overlooked Dividers, proportional dividers or sewing gauge « Pencil sharpener * Small mirror # Value scale (see page 50) * White vinyl eraser
(>> Sketch Facial Features and the Top of the Hat CZ Sketch facial features, including the eyebrows, ears, ( Those, lips, pupils, irises and creases around the eyes, using the 4H pencil. Now is the time to adjust the facial features, if necessary. | decided to make the nose shorter from what | originally sketched. Add the top of the hat and band. Notice that much of its form follows the shape of the head. Add a curved line to indicate the major fold of the hat.
m = ° z o 3 a > eat
° z

oy Add the Brim, Shoulders and Arms
ons a Using the 4H pencil, add the brim. Notice the sides are
——/ turned up. Add lines to indicate the arms and shoulders.
/) Add the Hair, Beard and Details | Sketch in the basic form of the hair, beard and mustache.
\_! Add details throughout the drawing, erasing the obsolete guidelines in the process with a kneaded eraser, Make minor adjustments to the hat, if necessary.
4
Use a Small Mirror
Consider looking in a mirror through- out this demo to observe your own features so you will better understand the structure and values of the face.

Add Values to the Face '~~ With the 4H pencil, add values to the face. Pay particular
"~/ attention to the eyes; they are the soul of a portrait. Con- tinue adding values to the face using the HB pencil for the darker places such as the creases near the eyes, the eyebrows and the nostrils. Leave the lightest areas on the cheeks completely white as highlights.
Shade the Underside of the Hat Now add values to the underside of the hat brim. Use
\9) back-and-forth strokes to indicate the shape of the hat’s underside. Use a 4H pencil for the light areas and an HB pencil for the dark, shadowy areas near the face.
o sf

(Add Details to the Top Portion of the Hat if Use a 4H pencil to add values to the top part of the hat.
Add fewer lines for the lighter areas. Use the HB pencil for the darker shadow areas under the band and for the very top fold of the hat.
>> Add Details to the Hair and Beard = With lots of squiggly lines, draw in the hair and beard
using 4H and HB pencils. Notice that the lighter areas have fewer lines.

Refine the Shirt and Add Finishing Details ‘| Add the shirt and suspenders with a 4H pencil for the lighter areas, an HB pencil for “—/ the darker areas. If you feel that you drew the shoulders too low, add more to them along the top. Add additional darks and details. Sign and date your drawing.
leus'pee |
Mountain Man Graphite on drawing paper 14" x 11" (@6em x 28cm)
Q o

Telling a Story Through a Drawing
DEMONSTRATIO
This is a great demo for learning more about how to draw people. Clothing and props can tell a story to add interest to a drawing.
iC OECK Tos OUT | Using a Frisket (p. 15) Face: % View (p. 83) Gauging Proportions (p. 28) Human Figures (p. 78)
Must-Have Materials
4H, HB, 4B graphite pencils #14" x 11" @6cm x 28cm) medi- um-tooth drawing paper Copier paper to be used as a frisket * Dividers, proportional dividers or sewing gauge * Drawing board * Kneaded eraser « Value scale (page 50)
Optional, But Not to be Overlooked Pencil sharpener * Scissors « White vinyl eraser
(7) Draw the Basic Shapes of the Head, Neck | and Shoulder
With a 4H pencil, sketch an egg-shape for the head, in three-quarters view. Sketch the neck and shoulders. Add a circle indicating the shoulder joint, Check your proportions with one of the proportioning tools.
“> Add the Arm and Hand 1) Add lines for the upper and lower forearm. For correct (*~‘proportions, compare the length of the upper and lower arm to the height of the head, using one of the proportioning tools. Sketch lines for the hand and basket. Add lines that indi- cate the ridges of the hand’s knuckles and thumb. At this stage, the hand should look like a mitten, since the individual fingers are not yet defined. Sketch lines to indicate the sides and bottom of the basket.
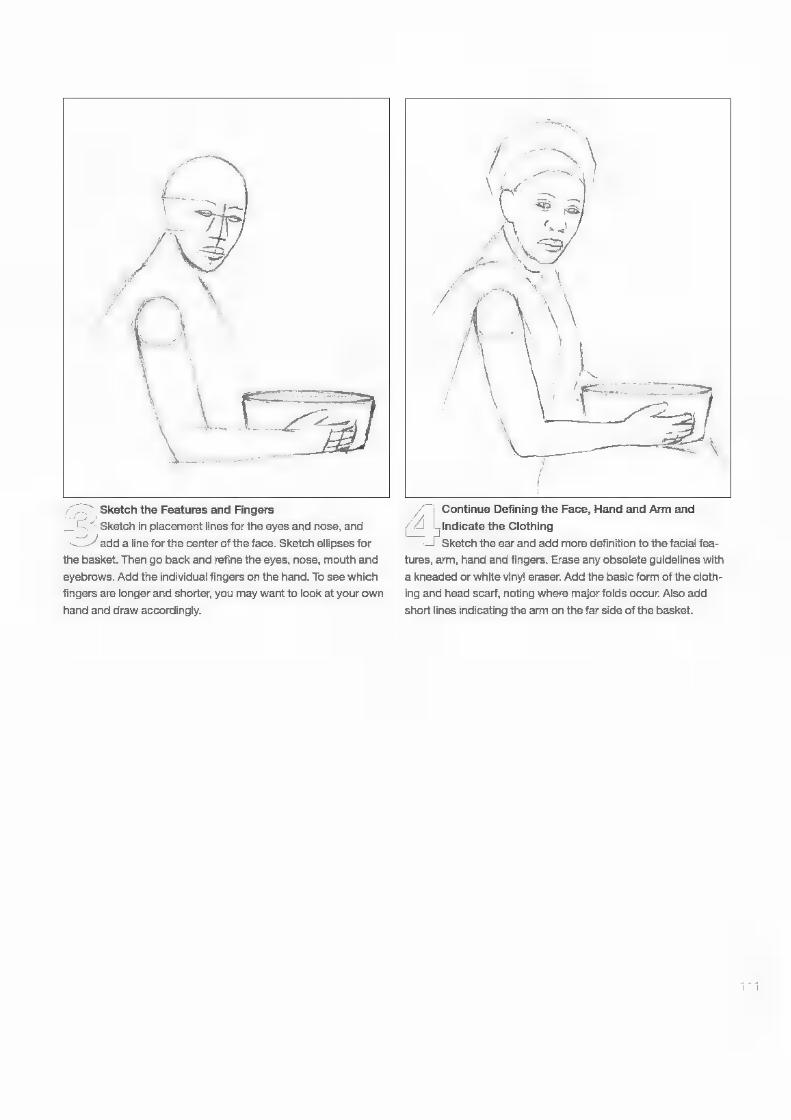
|
>> Sketch the Features and Fingers __ 4 Sketch in placement lines for the eyes and nose, and —— add a line for the center of the face. Sketch ellipses for
the basket, Then go back and refine the eyes, nose, mouth and eyebrows. Add the individual fingers on the hand. To see which fingers are longer and shorter, you may want to look at your own hand and draw accordingly.
~) Continue Defining the Face, Hand and Arm and ( OF laiscisstetie Clothing
I Sketch the ear and add more definition to the facial fea- tures, arm, hand and fingers. Erase any obsolete guidelines with a kneaded or white vinyl eraser. Add the basic form of the cloth- ing and head scart, noting where major folds occur. Also add short lines indicating the arm on the far side of the basket.

nN
Add Details and Begin Shading (& ‘Add Darker Values to the Face, =>») Sketch in the vegetables, the weave of the basket andthe | io Neck, Arms and Hands —~/ jewelry. Add details to the clothing, basket and ear. Erase \~/ With an HB pencil, darken the neck, the far side of the any obsolete guidelines with a kneaded or white vinyl eraser. face and under the nose and lips. Define the eyes and ear, dark- ‘Add very light lines to indicate value variations on the face, neck —_ening any area in shadow. Darken the arms and hand, making and arm. Use the value scale to check the appropriate value the farthest arm darker than the nearest arm. Use the value scale changes. Keep in mind that the light source is at the upper left, to check the values. Add a few details to the fingers, but keep the so shade accordingly. Lighten some of the pencil work on the details to a minimum as the fingers are mostly in shadow. forehead, cheek, nose and arm by gently pressing a kneaded eraser on these areas to lift some of the graphite.

(7 Add the Background With the HB pencil, begin adding the darks of the back-
|_| ground. Use the value scale to create the appropriate level of lights and darks. Confine your marks to the top and left sides of the background. To make a clean edge, use copier paper as a frisket and proceed with downward pencil strokes. After you've done some of the background with the frisket, remove it and continue putting in the background without the frisket, giving the border a rough, loose look.
(>> Darken the Background and Add Light Values “to the Clothing '\—/ Use the HB pencil to make up-and-down strokes to fur- ther darken the values of the background. With the 4H pencil, add the lighter values to the clothing. Add interest to the com- position by continuing the clothing on the left beyond where the dark of the background ends.

(GS Add Darks to the Clothing
With an HB pencil, add the darks to the clothing. Use the wy) value scale to help you add the appropriate values. The creases of the clothing will most likely be very dark.
Add Light Values to the Basket and Vegetables | (| With a 4H pencil start adding values to the basket, __| \—/ keeping some areas light to show the weave. Use
subtle value changes for the vegetables, with the lightest areas on the left.
Add Darks to the Basket and Vegetables and Add the Finishing Details With the HB pencil, add darker values to the basket
and vegetables. Use the value scale to see if you need to make any adjustments with the 4H and HB pencils. Make some areas, such as some of the clothing creases, even darker using a 4B pencil. Lighten any areas that are too dark by gently removing the graphite with the kneaded eraser. Sign and date your drawing.

Market Woman, Graphite on drawing paper 14" « 11" (@6om x 28cm)
a

© Landscape Composition
DEMONSTRATIO
To a beginner, full compositions can seem overwhelming. Just remember, most elaborate drawings are just a grouping of small- er drawings. This particular drawing is made up of three main subjects: the building, the tree left of the building and the sheep. Approach it with the idea that each is a separate drawing that contributes to the whole. Take your time, be patient with yourself and enjoy the process.
Gauging Proportions (p. 28) Measuring Angles (p. 30) ‘Two-Point Perspective (p. 36) Arches & Roofs (p. 44)
Creating Values (p. 51) Leafy Trees (p. 56) Brick, Stone & Wood (p. 58)
Must-Have Materials
4H, HB, 4B graphite pencils # 14" x 11" (@6cm x 28cm) medi- um-tooth drawing paper « Drawing board « Kneaded eraser © Straightedge, triangle or angle ruler Value scale (see page 50)
Optional, But Not to Be Overlooked Dividers, proportional dividers or sewing gauge Pencil sharpener * White vinyl eraser
_/) Draw the Basic Shapes ~) With a 4H pencil lightly sketch a rectangle for the basic
___ shape of the springhouse, then add a line for the roof’s edge and another line for the front corer of the house. This may bea good time to get out your straightedge to help you draw accurate lines. Sketch the grass line, tree trunk, leaf canopy and ovals for the sheeps' bodies.
(jd the Window, Door and Roof Lines “/ Using the 4H pencil and your straightedge, add the win-
—idow and door to the springhouse along with angles to the roof. You may want to use an angle ruler to check your angles.

>> Add Details to the Building and Tree & ~ With the 4H pencil, add more lines to define the spring- house, including additional overhang to the right side. Erase any unnecessary guidelines with a kneaded eraser. Sketch in more of the tree's structure, tapering the smaller branches that grow away from the trunk.
Add Definition to the Trees, Foliage and Sheep _.With a 4H pencil, add more branches. Sketch the basic
_T shapes of the tree’s foliage and the bushes and shrubs along the house. Sketch the heads and legs of the sheep.
- Z|
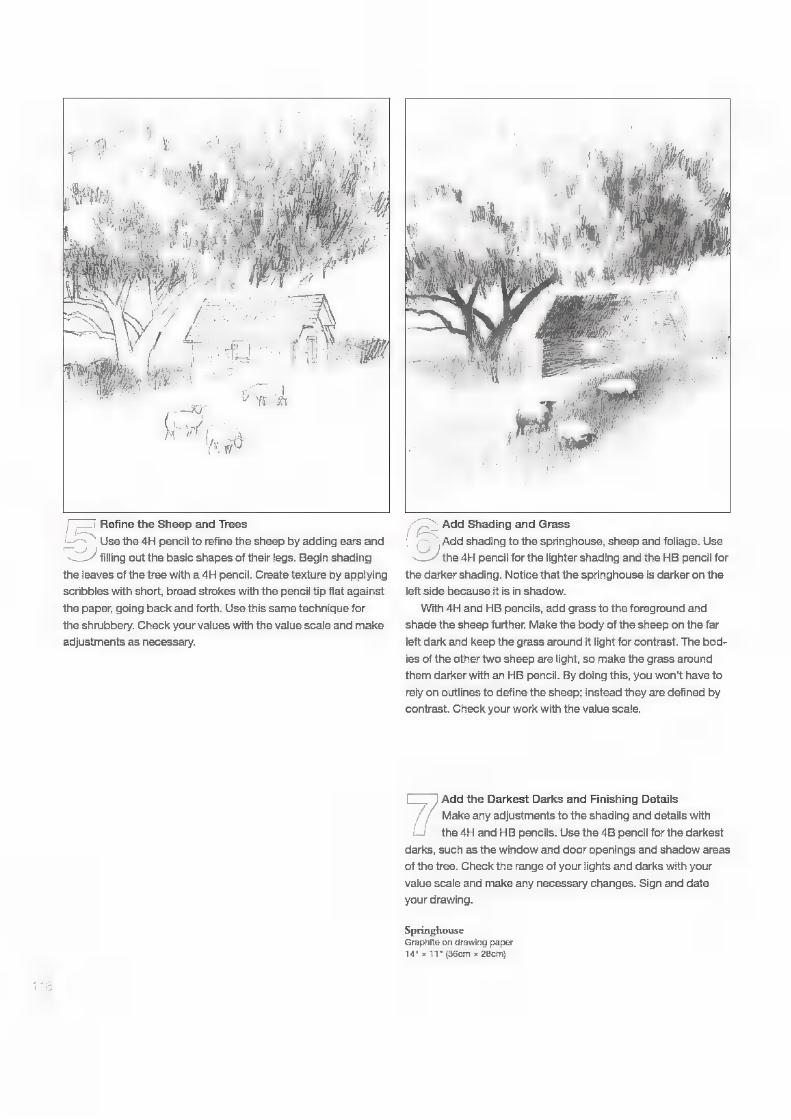
Refine the Sheep and Trees |< Use the 4H pencil to refine the sheep by adding ears and “= / tiling out the basic shapes of their legs. Begin shading the leaves of the tree with a 4H pencil. Create texture by applying scribbles with short, broad strokes with the pencil tip flat against the paper, going back and forth. Use this same technique for the shrubbery. Check your values with the value scale and make adjustments as necessary.
(=> Add Shading and Grass { Add shading to the springhouse, sheep and foliage. Use / the 4H pencil for the lighter shading and the HB pencil for
the darker shading. Notice that the springhouse is darker on the left side because it is in shadow.
With 4H and HB pencils, add grass to the foreground and shade the sheep further, Make the body of the sheep on the far left dark and keep the grass around it light for contrast. The bod- ies of the other two sheep are light, so make the grass around them darker with an HB pencil. By doing this, you won't have to rely on outlines to define the sheep; instead they are defined by contrast. Check your work with the value scale.
Make any adjustments to the shading and details with the 4H and HB pencils. Use the 4B pencil for the darkest
darks, such as the window and door openings and shadow areas of the tree. Check the range of your lights and darks with your
UY Add the Darkest Darks and Finishing Details
value scale and make any necessary changes. Sign and date your drawing.
Springhouse Graphite on drawing paper 14" 511" (6am x 280m)

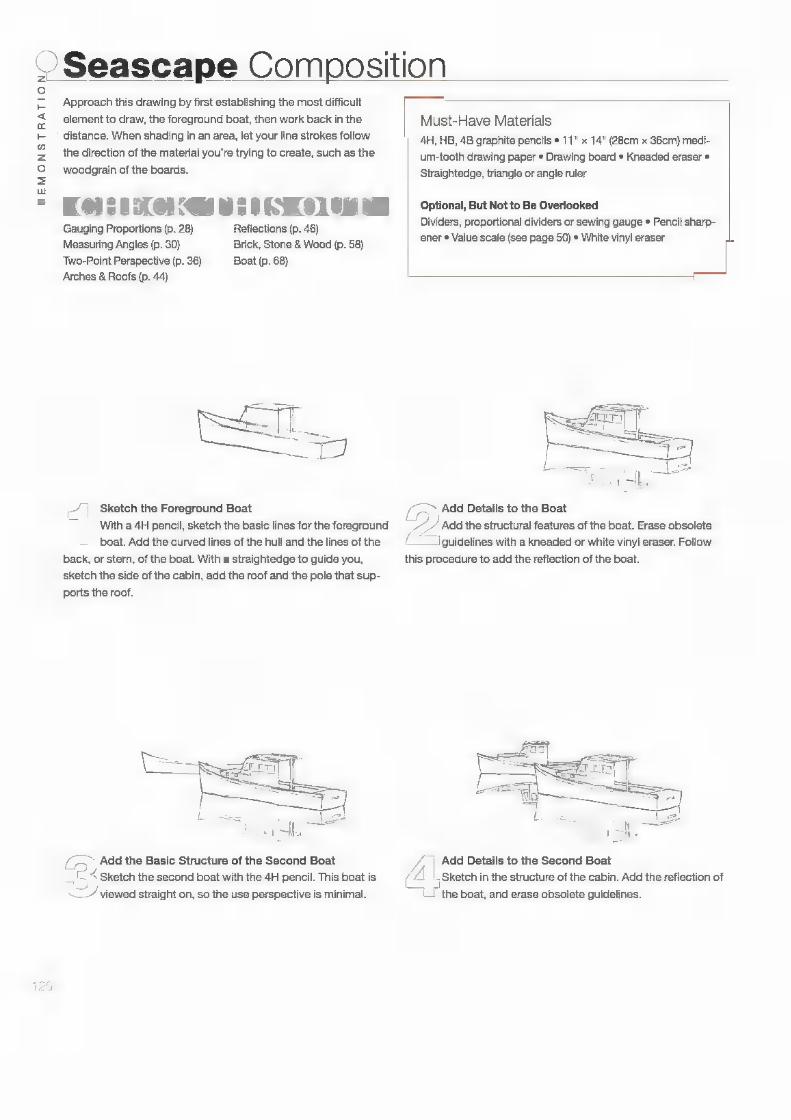
~ Seascape Composition S Approach this drawing by first establishing the most difficult element to draw, the foreground boat, then work back in the Must-Have Materials = _ distance, When shading n an area, et your line strokes follow 4H, HB, 4B graphite pencils © 11" x 14" (280m x 36cm) medi- 2 the direction of the material you're trying to create, such as the ‘uiistocth swig Bape s Drawing board’* Kneaded aramer's S) ‘wootgialh oft boatas. Straightedge, triangle or angle ruler a a
ODL) GE EO ROD BG optional, But Not to Be Overlooked Dividers, proportional dividers or sewing gauge ¢ Pencil sharp- Gauging Proportions (p. 28) Reflections (p. 46) sae Slate
Measuring Angles (p. 30) Brick, Stone & Wood (p. 58) ‘snere Value scale (eee page 50) je inyLerasey Two-Point Perspective (p.36) Boat (p. 68) Arches & Roofs (p. 44)
7) Sketch the Foreground Boat (>>) Add Details to the Boat ~] With a 4H pencil, sketch the basic lines for the foreground + ~/ Add the structural features of the boat. Erase obsolete boat. Add the curved lines of the hull and the lines ofthe / ~—iguidelines with a kneaded or white vinyl eraser. Follow
back, or stern, of the boat. With a straightedge to guide you, this procedure to add the reflection of the boat. sketch the side of the cabin, add the roof and the pole that sup- ports the roof.
rsh
ES Add the Basic Structure of the Second Boat 4, | Add Details to the Second Boat =] / " < Sketch the second boat with the 4H pencil. This boat is (¢ ai Sketch in the structure of the cabin. Add the reflection of
——/ viewed straight on, so the use perspective is minimal. "LJ the boat, and erase obsolete guidelines.
2

(| Sketch the Horizon and Begin the Building \—> You may want to use your straightedge for the following
steps. Use the 4H pencil to add the horizon line, then add the horizontal lines of the building. Notice that they would con- verge at a vanishing point far on the distant right.
ae
Form the Roofs and Gables
if Add the roofs and gables with the 4H pencil and a (1 straightedge. Some of the lines, such as the one coming
from the tallest roof peak, will go toward a vanishing point on the left side.
“> Add the Vertical Lines of the Building ‘> With the 4H pencil and a straightedge, sketch the verti- — cal ines of the building, Pay attention to thelr proportions
and placement.
Add Details to the Building's Structure : With the 4H pencil, add details to the building, includ-
ing windows, door and trim and the poles and stones to the pier. You may want to check your angles with an angle ruler. Erase any obsolete guidelines.
(6) Fe (©

Start Shading the Building and Stonework 2] (A Add the Darker Values “=; | Start shading the lighter side of the building and the 1 (>) to the Building and Stonework
stonework with a 4H pencil, remembering that the light Add the darker values to the roof, the chimney and source is at the upper right. Darken the stonework near the the darker sides of the building with 4H and HB pencils. Use the water line. Use the value scale to check your values as you work through the rest of these steps.
HB pencil for the darker areas, such as adding shadows under the building.
7] rll Continue Adding Darks co] (H) Start Adding Values to the Boats
| to the Building and Stonework 1 Zz = Add the lighter values of the boats with a 4H pen-
cil. Make the foreground boat darker than the sec- i
Continue adding more darks and details to the
ond boat for contrast. building and stonework with 4H and HB pencils, as necessary. Apply the darkest darks with the 4B pencil.
rR) iS

7) (>) Add Middle Values | {Ste the Boats Add the middle values of
the boats with the HB pencil. Clean up any smudges and erase any unnecessary lines with a kneaded eraser.
eT | Add Reflections and Final Darks and Details Rockport Harbor 4 \_ ada reflections with back-and-forth horizontal ‘Graphite‘on drawing paper
Sage 41" » 14" (28cm x 36cm) | ~~_Y strokes using a 4H pencil. Lightly indicate distant
water and trees near the horizon. Add some darks to the boats with a 4B pencil and darken much of the foreground boat with the 4H pencil. Add some simple seagull shapes with a 4H pencil. Sign and date your artwork.
yD a

@lossany
Acid-free paper. Paper that has not been processed with acid. Acid can cause paper to yellow over time.
Angle ruler. A small ruler that can fold in the middle to measure angles.
Asymmetrical. That which is not sym- metrical. In reference to art, something may be balanced without being sym- metrical.
Atmospheric perspective. The illusion of depth achieved through contrasts in value and definition.
Baseline. A line that establishes the placement of a subject and helps you work out the proportions of a drawing.
Blind contour sketch. A sketch or draw- ing done with a single line without looking at the paper.
Cast shadow. The shadow of an object that appears on a different surface or object.
Chiaroscuro. A sketch or drawing that defines the form of an object using only highly contrasting values, usually black and white, instead of with con- tour lines or shading.
Composition. The arrangement of ele- ments in an artwork.
Contour sketch (or Continuous line sketch). A sketch or drawing that is done with a single line.
Contrast. Differences between the values ina composition.
Craft knife. A small knife with a sharp, pointed, replaceable blade.
Crop. Determine the area of a scene to be included within an artwork.
Dividers. A handheld compasslike device for measuring and proportioning.
Drawing. A finished representation of a subject.
Drawing board. A smooth, sturdy board placed underneath the paper for sketching or drawing.
Drawing paper. Heavyweight paper, commonly 80 Ib. to 90 Ib. (170gsm to 190gsm), used for drawing.
Ellipse. The shape a circle takes on when viewed at an angle. Used to show per- spective.
Erasing shield. A thin metal shield used to mask areas that are not to be erased.
Eye level. See Vantage point.
Fixative. A spray applied to pencil draw- ings to prevent the artwork from smudging.
Focal point. The area or part of a paint- ing to which the composition leads the eye, also referred to as the center of interest.
Form shadow. A shadow on an object that gives the form more dimension.
Format. The overall shape of a composi- tion.
Frisket. A sheet of paper used as a shield to create an even edge or a clean mar- gin beside a set of pencil lines.
Gauge. To determine specific proportions of elements In a scene.
Graphite. A soft black substance used in the core of some pencils.
Highlight. An area of light on an object, usually placed in the direct path of the light.
Horizon line. The line where land or water meets the sky, in reference to linear perspective.
Kneaded eraser. A soft, pliable gray eraser.
Lead. The term mistakenly used for graphite in a pencil. Also the scale that rates the hardness or softness of the graphite.
Leading lines. A group of compositional elements used to form lines to direct the viewer's eye to centers of interest.
Light box. A device that shines light evenly through a translucent surface. This allows the viewer to see slides, transparencies or drawings laid on its surface.
Light source. The origin of the light shin ing on elements in a composition.
Linear perspective. Depth implied through line and the relative size of ele- ments in a composition.
Mechanical pencil. A pencil consisting ofa thin stick of graphite encased by aholder similar to a pen. Mechanical pencils need no sharpening.
One-point perspective. A type of linear perspective with one vanishing point.
Pad. A stack of sheets of paper attached at one side with glue or wire.
Paper weight. The thickness of a sheet of paper; common weights for sketch paper are 50 Ib. to 70 Ib. (105gsm to 150gsm). For drawing paper common weights are 80Ib to 90Ib (170gsm to 190gsm).
Pencil extender. A device that attaches to the end of a pencil that has been shortened by use, used to extend the pencils life.
Pencil sharpener. A mechanical device used to sharpen the ends of pencils.
Perspective. A technique that gives the illusion of depth to a flat picture.
Proportional dividers. Dividers that have points at both ends and are used for proportionally enlarging or reducing a hand-drawn image.
Reference materials. Pictures from various sources, used to examine a subject more closely, or from different angles, or under different conditions.
Reflected light. Light reflected off one ‘surface onto another.
‘Sandpaper pad. A very small pad of sandpaper sheets attached to a han- dle; used for sharpening pencil tips.

Sewing gauge. A hand-held device with amoveable marking guide that can be used for measuring proportions.
Sketch. A drawing in rough, unfinished form.
Sketch paper. Lightweight paper, com- monly 50 Ib. to 70 Ib. (105gsm to 150gsm), used for sketching.
Slip sheet. A sheet of paper placed over an unfinished drawing, under the draw- ing hand, to prevent the hand from smearing the graphite as it moves across the paper.
Straightedge. A metal ruler or similar tool used for drawing straight lines.
Structural sketch. The primary line work that the values (lights and darks) and line work of a drawing are built upon.
Symmetrical. Balanced composition, with equal elements placed as if reflected in a mirror.
Tangent. The unfortuante meeting of two similar compositional elements. Tangents usually detract from a com- position because they can confuse the viewer.
Three-point perspective. A type of lin- ear perspective with three vanishing points—two at the vantage point and one either above or below eye level.
Thumbnail sketch. A small, quick sketch.
Tooth. The roughness of a paper surface.
Tracing paper. Thin, translucent paper used in the process of drawing.
Triangle. A thin, transparent triangle formed out of plastic used for drawing lines.
‘square. A straightedge with a perpen- dicular attachment that allows the tool to glide along the side edge of a draw- ing board or paper pad.
‘Two-point perspective. A type of linear perspective with two vanishing points.
Values. Degrees of light and darkness in a sketch or drawing.
Value scale. A scale showing a range of values.
Value sketch. A thumbnail sketch used to. plan the lights and darks of a drawing.
Vanishing point. A point usually on the horizon line, at which parallel lines seem to converge.
Vantage point. The point from which the viewer observes a scene.
Viewfinder. A device used to crop a scene.
White vinyl eraser. A white, squarish eraser.

Index Aerial perspective. See Atmospheric
perspective Airplanes, 62-63 Angle ruler, 7, 12, 30 Angles, 89
gauging, 30 Arches, 44-45 Asymmetrical composition, 87 Atmospheric perspective, 41.
See also Perspective Automobiles, 66-67
Basic shapes, 24, 27
Black-and-white sketch, 14, 20-21,
24-25
Boats, 68-69, 120-23
Branches, 56-57 Brick, 58-59
Camera, 57 Carbon pencils, 8, 13 Cast shadow, 52 Cat
face, 70-71 side view, 72-73
Center point, 44-45 Charcoal pencils, 8, 13 Chiaroscuro, 20-21. See also
Black-and-white sketch Clouds, 55 Colored pencils, 8 Composition, 86-90 Continuous line sketch.
See Contour sketch Contour drawing, 25 Contour sketch, 14, 22-23 Contrast, 49, 100-04 Cows, 76 Craft knife, 9, 12 Cropping, 89
Depth, 35, 41. See also Perspective Dividers, 12-13, 28-29 Dog, side view, 74-75 Drawing, 14 Drawing board, 7, 10 Drawing pad, 7 Drawing paper, 10, 12 Drawing tools, 8-13
Elements arranging, 87 number of, 88
Ellipses, 42-43 Enlarging, 13 Erasers, 7, 11-12 Erasing shield, 11-12, 18 Evergreen trees, 57
Faces, 82-85, 105-109 Figure drawing, 78-81, 110-15 Fixative, 13 Focal point, 90 Form shadow, 52 Formatting, 89 Friskets, 15 Fruit, 92-93 Fur, 75
Garden scene, 96-97 Graphite pencils, 8 Grass, 55 Grid, 87
Harbor scene, 120-123 Hardness, of pencils, 8 Highlight, 52 Horizon line, 32-38, 53
Kneaded eraser, 11-12
Landscape, 116-119 Leading lines, 90 Leaves, 56 Light box, 12-13, 24-25 Light source, 52-53, 55 Linear perspective, 12, 41-43.
See also Perspective Lines
horizontal, 14 straight, 29 types of, 15
Masking tape, 10 Materials, 7-13 Mechanical pencils, 8 Mirror, 12-13, 106 Mood, 33,
Obscurity, and depth, 35,
Paper, 10, 12 Parallel elements, 35
Pencil box, 7
Pencil extender, 7-8, 12
Pencil sharpener, 7, 9, 12
Pencils, 7-8, 12
as gauge, 28 holding, 15 sharpening, 9
Perspective, 32-33, 35, 46
atmospheric, 41 ‘one-point, 34-35 two-point, 36-37
three-point, 38-39 Portraits. See Faces
Proportional dividers, 12-13, 28-29
Proportions, 13, 24, 27-28, 78-80
Raccoons, 98-99 Reducing, 13 Reference material, 31 Reflected light, 52 Reflections, 46-47 Rocks, 60-61 Ruler, 29
Sandpaper pad, 9, 12 Sewing gauge, 12-13, 29 Shadows, 48, 52-53, 55, 60 Shapes, 90 Size, relative, 35 Sketch pad, 7, 10, 12 Sketch paper, 10 Sketching, 14 Slip sheet, 20 Smudges, avoiding, 20 Spray fixative, 13 Still lifes, 31, 92-93 Stone, 58-59 Straight edge, 12, 29 Structural line sketch, 13-14, 16-17,
24-25, 27 Sunlight, 55 Swan, 77 Symmetrical composition, 87

Tangents, 90 Technical drawing, 34 Textures, 58-59, 94-95, 98-99 Thumbnail sketch, 87 Tooth, of paper, 10 Tracing paper, 10, 31 Trains, 64-65 Trees, 56-57 Triangle, 12, 34 Tsquare, 12, 34
Value drawing, 25 Value scale, 50 Value sketch, 14, 18-19, 24 Values, 27, 41, 48-53 Vanishing point, 32, 34-40, 53 Vantage point, 32-38 Viewfinder, 89
White vinyl eraser, 11-12 Wolf, 100-04 Wood, 58-59 Woodless pencils, 8

128
ry The Drawing Bible by Craig Nelson ISBN-13: 978-1-58180-620-5 ISBN-10: 1-58180-620-5 Hardcover with concealed wire-o binding, 304 pages, #33191 The Drawing Bible is the definitive drawing resource for all artists! Craig Nelson clearly explains basic drawing principles and shows you how to use a wide variety of drawing medi- ums, both black-and-white and color, Demon- strations and beautiful finished art throughout will instruct and inspire you, and the book's chunky size and spiral binding make it conve- nient to use and easy to carry anywhere.
REALISTIC [ge oe DRAWING
JS RICK PARKS.
CARRIE]
Secrets to Drawing Realistic Faces by Carrie Stuart Parks ISBN-13: 978-1-58180-216-0 ISBN-10: 1-58180-216-1 Paperback, 144 pages, #31995 Learn how to master proportions, map facial features accurately, and study shapes within composition to capture heightened realism and accuracy. Carrie uses clear step-by-step instructions, before-and-after examples from students, and proven drawing exercises used to train artists throughout the country.
Secrets to Realistic Drawing by Carrie Stuart & Rick Parks ISBN-13: 978-1-58180-649-6 ISBN-10: 1-58180-649-3 Paperback, 128 pages, #33238
A Treasury of Timesested fing Techniques and Advice
rem the ctor he dei Magen 8
Norte Boel
The Pencil Box From the editors of The Artist's Magazine and North Light Books ISBN-13: 978-1-58180-729-5 ISBN-10: 978-1-58180-729-5 Paperback, 128 pages, # 33403 Tap the proven techniques and collective draw- ing wisdom of over a dozen venerable Artist's Magazine and North Light artists! The Pencil Box covers materials, tips for improvement and dozens of drawing techniques. Includes 14 step-by-step demonstrations in a range of popular subjects, including landscapes, por- traits, still lifes and seascapes.
if you're an artist armed only with a pencil, this book is for you! Secrets to Realistic Drawing will have you creating lifelike drawings in no time by teaching you drawing principles in a clear and concise manner. The techniques, strategies and step-by-step demonstrations will help you quickly realize your artistic dreams.
These books and other fine North Light titles
are available at your local fine art retailer or
bookstores or from online suppliers.

DRAWING
“We hope you will regain that childlike passion for making
art and learning without critiquing yourself harshly. We
won't make you hang it on the fridge, but we do suggest
you save your artwork because it will show your progress
and increase your confidence as you go.”
—Mark and Mary Willenbrink
absolute beginner = A Clear & Easy Guide to Successful Drawing
This inspiring book makes drawing in a realistic style easier up to 9 full step-by-step demos. Each exercise builds on the than you may think and more fun than you ever imagined! previous one as you develop your skills, increase your confi- Authors Mark and Mary Willenbrink (Watercolor for the Absolute dence, and enjoy yourself along the way. The lessons you learn Beginner) cover it all—from choosing materials and the correct _ by drawing simple subjects such as coffee mugs, clouds and way to hold your pencil, to expert advice on the tricky stuff, like trees will help you take on progressively more challenging matter getting proportions and perspective right, drawing reflections, _like animals, still lifes, landscapes and portraits...the kinds of and designing strong compositions. subjects and scenes you've always dreamt of drawing.
At the heart of this book, a series of fun, hands-on exercises This book js just the ticket for budding artists of any age. It’s help you practice and perfect your strokes—24 mini-demos lead _ never too early or too late to discover the pure joy of drawing!
US $19.99
33465 (CAN $24.99) ISBN-13: 978-1-88180-789-9 ISBN-10: 1-58180-789-9
90000 z a
glirs15aiisor ses