District Data Coordinator Toolbox: Automating Data ... · Task Scheduler 4. Road map to ......
41
District Data Coordinator Toolbox: Automating Data Acquisition Using Database Connections in Excel Jason Schoeneberger, Ph.D. Senior Researcher & Task Lead
Transcript of District Data Coordinator Toolbox: Automating Data ... · Task Scheduler 4. Road map to ......
District Data Coordinator Toolbox: Automating Data Acquisition Using Database
Connections in Excel
Jason Schoeneberger, Ph.D.Senior Researcher & Task Lead

Prerequisite
For this presentation, we assume you have an established database connection. If not, please review the tool below, which is available on the REL Mid-Atlantic website:
District Data Coordinator Toolbox: Implementing Database Connections
in Excel
2

Taking the next step…
• You’re making use of a database connection(s) in Excel, and your increased efficiency resulted in more data requests from stakeholders
• Let us suppose some of those data needs are repetitive, or cyclical in nature– Maybe someone wants a report updated on a monthly or
weekly basis– Maybe data in the database is refreshed each evening,
and you want the latest available to you each morning• Let’s automate that data acquisition process!
3

Road map to automation
1. Enable our spreadsheet to accommodate macros2. Create an Excel macro using Visual Basic code3. Create a batch file containing instructions to tell
our computer to execute our Excel macro4. Schedule a task (running the batch file) using the
Task Scheduler
4

Road map to automation
Step 4. Schedule task with Task Scheduler
Step 3. Create batch file to execute Excel
Step 2.Create Excel macro in Visual Basic
Step 1.Enable macros in Excel
5

Data automation example
• To follow the steps in our road map to connectivity, let’s assume the following example:– District leadership is focused on monitoring student
mobility– As a result, several principals with highly-mobile
populations have requested a weekly summary report of enrollment at their middle schools
– They want to examine enrollment, disaggregated by grade level and student race/ethnicity
– The data we need to obtain are stored in an Access database
6

Report to be automated
• Below is the PivotTable we want to automatically refresh each week.
7
Enabling macros in Excel
• To automate the refresh of our PivotTable, we need to use some Visual Basic code and Excel macros
8

Save file as different type
1. Click ‘File’ at the top of the Excel sheet containing data and pivot table
2. Click ‘Save As’
29
1

Specify save location
• Navigate to the destination where you want to save the file
10

Specify Excel macro-enabled file type
1. Use drop-down to specify file type2. Choose Excel Macro-Enabled Workbook (*xlsm)3. Click Save
123
11

Enable Excel developer ribbon
1. Click ‘File’ at the top of the Excel sheet containing data and pivot table
2. Click ‘Options’
1
212
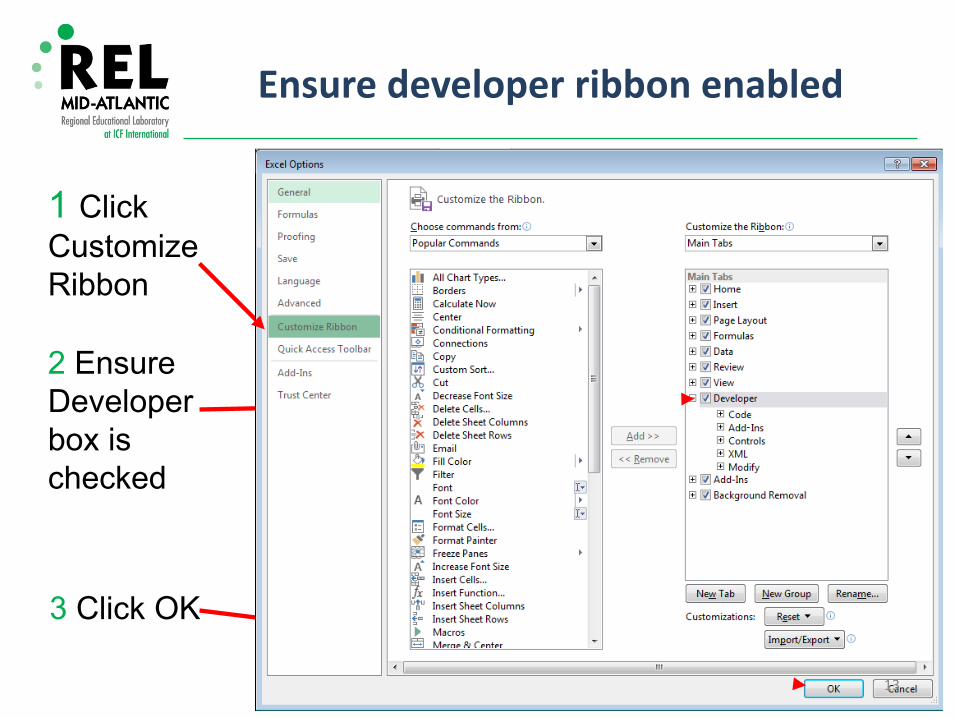
Ensure developer ribbon enabled
1 Click Customize Ribbon
2 Ensure Developer box is checked
3 Click OK
13

Creating an Excel macro
• Using the Developer tab, we will enter Visual Basic code to create an Excel macro that refreshes our PivotTable
14

Naming our macro
1. Click on the Developer tab at the top of Excel2. Click on the Macros button 1
23. Enter a name
(query_refresh) for the macro
4. Click Create
3
4
15

Entering Visual Basic code
• The ‘Sub’ denotes the beginning of the macro code• The ‘End’ denotes the end of the macro code
16
1. Click on ThisWorkbook2. Click between Sub and End statements to place cursor
1
2

Macro code for copy-pasting
• Below is the Visual Basic code to be copy-pasted into the query_refresh window, between Sub and End statements:
ActiveWorkbook.RefreshAll 'this refreshes the PivotTable
17

Save & close Visual Basic window
1. Click Save2. Click File-Close and Return to Microsoft Excel
2
1
18

Executing the macro
• To refresh data using the macro:1. Click on the Developer tab at the top of Excel2. Click on the Macros button
3. Select macro you wish to run
4. Click Run (Data Refreshes)
1
2 3
419
Creating a batch file
• Using Notepad or another text editor, we can create a batch (.vbs extension) file containing instructions informing our computer to execute our Excel macro
20

Opening Notepad
1. Click on the Windows icon2. Click All Programs3. Click on Accessories4. Click on Notepad
1
2
3
4
21

Batch file code for copy-pasting
• Below is the code to be copy-pasted into the batch fileOption ExplicitOn Error Resume NextExcelMacroExampleSub ExcelMacroExample()
Dim xl Set xl = CreateObject("Excel.Application") xl.Application.Workbooks.Open
"C:\Users\Jason\Desktop\connection_test\connection_gd_eth.xlsm"xl.Application.Visible = Truexl.Application.run
"'C:\Users\Jason\Desktop\connection_test\connection_gd_eth.xlsm'!query_refresh"xl.Application.displayalerts = falsexl.Activeworkbook.savexl.Activeworkbook.close
End Sub22

Creating the batch file
1. Specify your specific folder path and spreadsheet name 2. Specify the name you assigned your macro
2
1
3
3. Click File4. Click Save As
234

Saving the batch file
1. Navigate to your chosen folder2. Name your batch file (excel_batch_pivot), and enter ‘.vbs’
as the file extension3. Click Save4. Close
Notepad 1
2 3
24
4

Saving the batch file
1. Verify batch file was saved2. You can check that it works by double-clicking on the
batch file itself3. You should see Excel open briefly, then immediately close4. If there is an error in the code, you may get an error notice
12
25

Scheduling a task
• Now we can use the Task Scheduler to run our batch file, which executes the Excel macro and refreshes our PivotTable
26
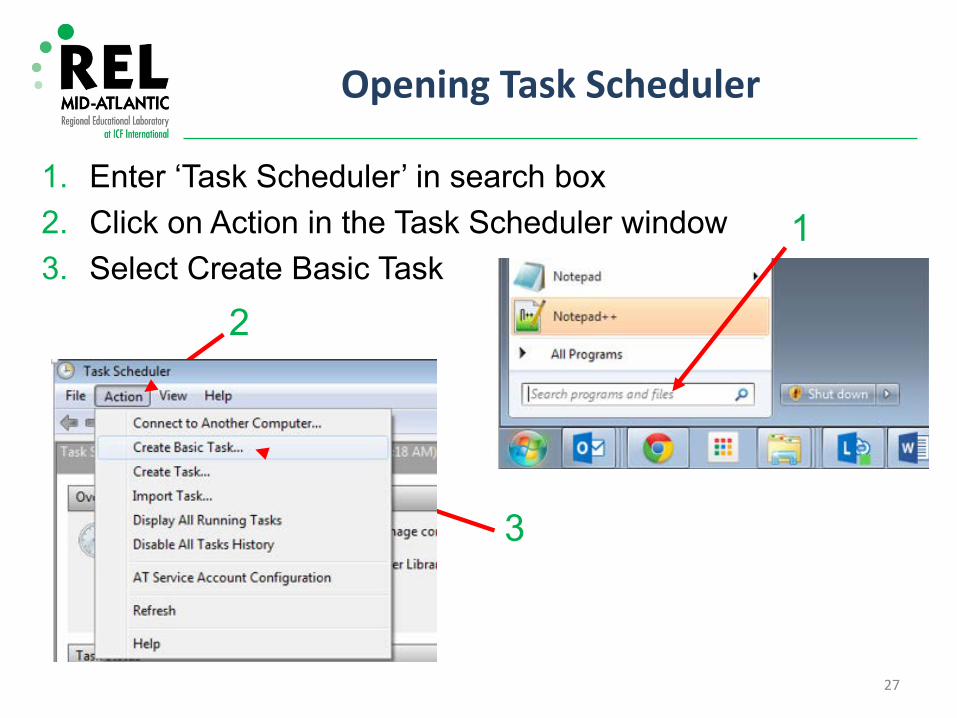
Opening Task Scheduler
1. Enter ‘Task Scheduler’ in search box2. Click on Action in the Task Scheduler window3. Select Create Basic Task
1
2
3
27

Naming the scheduled task
1. Enter a name for the scheduled task (e.g excel_query_refresh)
2. Click Next
2
28
1

Set frequency of scheduled task
1. Select how often you would like the refresh to occur(e.g. a weekly refresh for our principals in this example)
2. Click Next 1
2
29

Set time-of-day and recurrence of scheduled task
1. Specify the date to begin and time of day you would like to use
2. Specify the day of the week (e.g Friday) you want the refresh to occur
3. Click Next 1
3
2
30
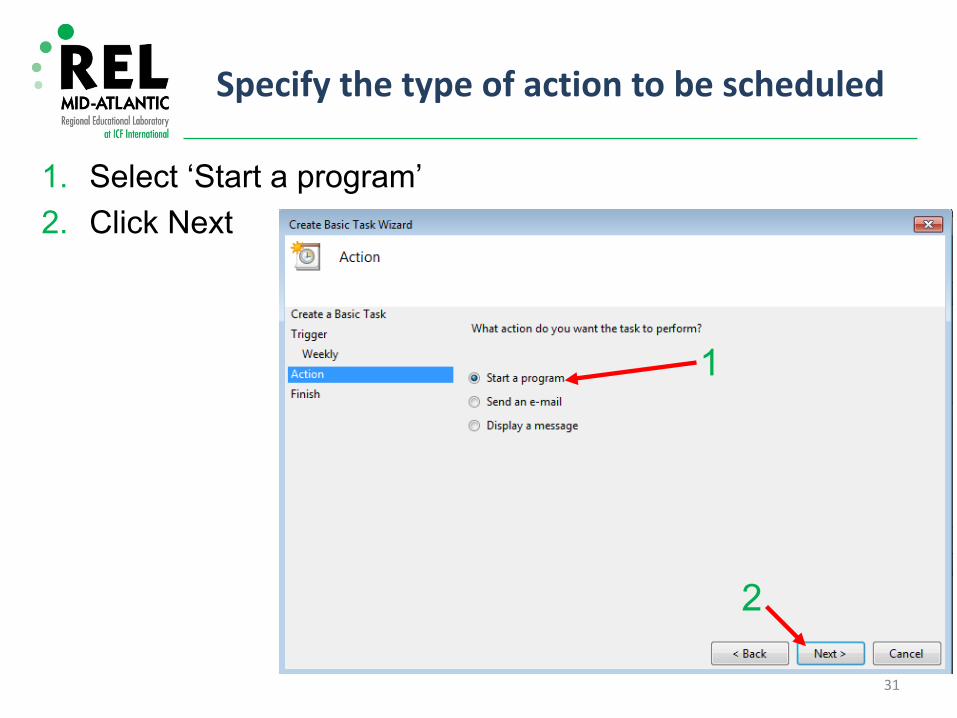
Specify the type of action to be scheduled
1. Select ‘Start a program’2. Click Next
1
2
31

Specify file scheduled task should execute
1. Click ‘Browse’ to navigate to folder location where ‘.vbs’ file is stored
1
32

Specify batch file to execute
1. Navigate to folder location where ‘.vbs’ file is stored2. Select the ‘.vbs’ file of interest3. Click Open
2
3
1
33

Specify file scheduled task should execute
1. Click Next
1
34

Review & finish scheduling task
1. Review properties of scheduled task:a) Name of scheduled taskb) Trigger timec) Action (batch file to execute)
2. Click Finish
2
1b
1c
35
1a
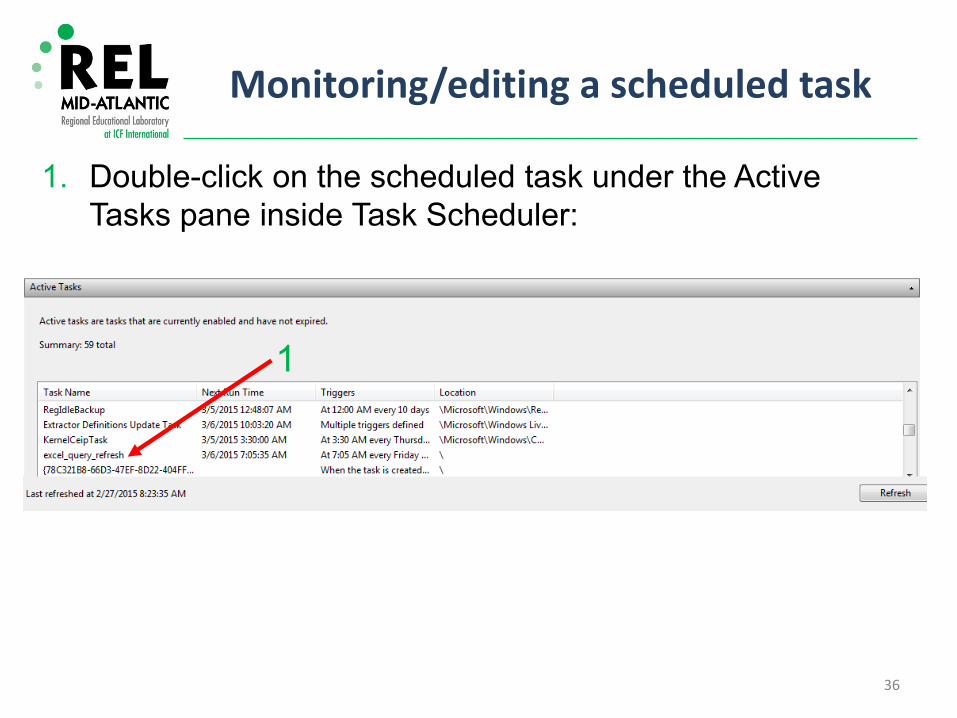
Monitoring/editing a scheduled task
1. Double-click on the scheduled task under the Active Tasks pane inside Task Scheduler:
1
36

Monitoring/editing a scheduled task
1. Click on the scheduled task under the Action Pane inside Task Scheduler:
2. Click on Action on the menu bar
3. Click on Properties to change the day, time or recurrence settings
– From here you can run, end, disable, delete and view the properties
3
37
1
2

Monitoring/editing a scheduled task
1. Using the tabs across the top of the Properties pane, you can edit various aspects of the scheduled task
2. On a particular tab, click Edit to change details about the scheduled task
3. Click OK when finished editing 2
3
1
38

Alignment of task trigger and file time stamp
1. Note trigger of 8:45 AM on Fridays2. Note time stamp on file when scheduled task runs
1
239

Potential problems
• If time stamp on file fails to update…– On initial use, check code in .vbs file to ensure no errors were
made in copy-paste– Was your computer inadvertently shut down or powered down at
the scheduled time?– Was the server or machine where database source is located
inadvertently shut down or powered down at the scheduled time?– Have there been any changes to the database source (e.g. Access
SQL), such as table name changes, connection information change (path or server name)?
40

Questions/Need help
Contact: Jason Schoeneberger, Ph.D.
Senior Researcher and Task Lead REL Mid-Atlantic at ICF International
[email protected] 704-307-9395
Please visit www.relmidatlantic.org for other data tools!
41