Dirt Devil Scorpion Turbo “…great for pets, cars, first apartments, newlyweds, urban living, and...
14
Dirt Devil Scorpion Turbo “…great for pets, cars, first apartments, newlyweds, urban living, and dorm rooms…” Remodeled by: Theodore Poscablo Maureen Meleka Karen Milideo Balachandran Ravindran
-
Upload
rebecca-gray -
Category
Documents
-
view
215 -
download
0
Transcript of Dirt Devil Scorpion Turbo “…great for pets, cars, first apartments, newlyweds, urban living, and...

Dirt Devil Scorpion Turbo“…great for pets, cars, first apartments, newlyweds, urban
living, and dorm rooms…”
Remodeled by:Theodore PoscabloMaureen Meleka
Karen MilideoBalachandran Ravindran

Original Model and Design Elements
• 4 Main Portions:– Fan Assembly and
Motor– Turbo Brush Assembly– Power Switch– Vacuum Housing
• Each of these portions of the vacuum consist of several smaller components (totaling 39 unique pieces) that work in conjunction with each other.

MOTOR AND FAN ASSEMBLY
-This part of the vacuum consists of a total of 19 parts.
Part # Part Name 1 Diffuser 2 Fan housing 3 Rubber Space4 Fan 5 Electromagnetic Current6 Motor 7 DC Motor Spacer/Spring 8 Magnet Casing 9 DC Motor Rubber Cover 10 Electromagnets 11 Magnet Housing Screws 12 Spacer #1 13 Diffuser Screws 14 Spacer #2 15 Spacer#3 16 Fan Nut 17 Black Wire 18 White Wire 19 Power Cord

POWER SWITCH
The power switch consists of 4 components:-20: Dust pan release-21: Outer Switch-22: Inner Switch-23: Dust Cover Release Spring
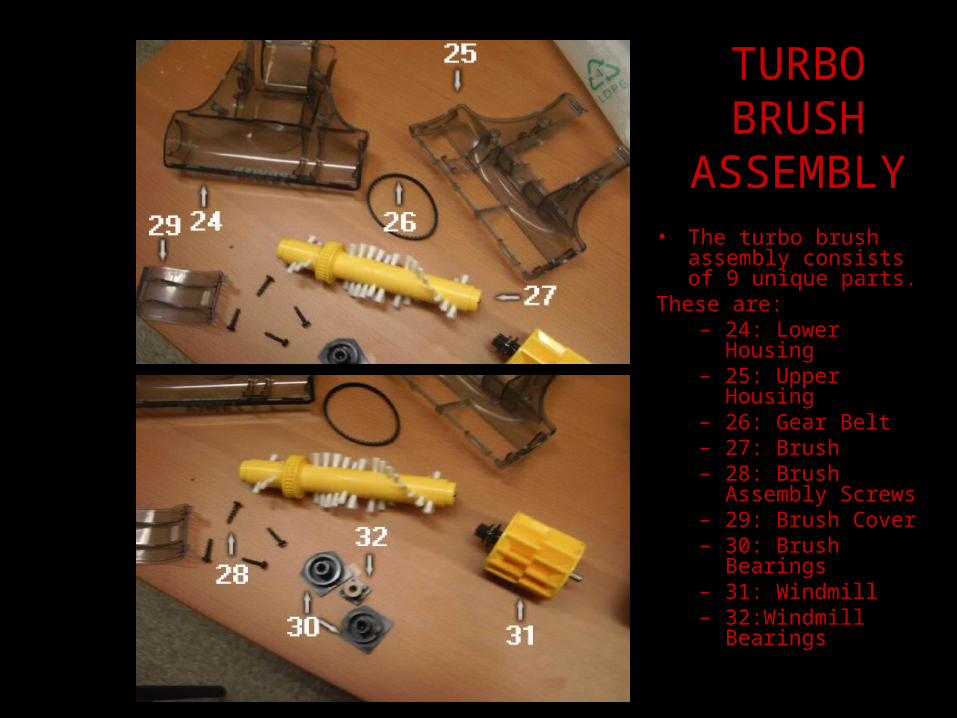
TURBO BRUSH
ASSEMBLY• The turbo brush
assembly consists of 9 unique parts.
These are: – 24: Lower
Housing– 25: Upper
Housing– 26: Gear Belt– 27: Brush– 28: Brush
Assembly Screws
– 29: Brush Cover– 30: Brush
Bearings– 31: Windmill– 32:Windmill
Bearings

VACUUM HOUSING• The vacuum’s
housing consists of 7 components. These are:– 33: Dust Pan– 34: Right
Outer Housing
– 35: Left Outer Housing
– 36: Filter– 37: Large
Screws– 38: Small
Screws– 39: Ring

Animation: Power Switch

Animation: Turbo Brush

Animation: Motor

Animation: Entire Vacuum

SURFACE MODELING• Due to the simple nature of the vacuum’s
mechanism and the complex nature of the curves of its housing, re-creation of the vacuum housing presented the greatest challenge.
• Tools involved in the creation of these surfaces include surface-blend, sweep, and various style tools, including the “surface modeling” tool.
• To use the surface modeling tool, one must take pictures of the piece from the front, side, and top and load them into ProEngineer. Then sketch along the curve of the picture and adjust the dimensions to those needed to make the model.
• The surface-blend tool is then used to create surfaces with the boundaries that were traced from the photograph.

Surface Modeling Continued
• To use this tool: Insert >>Style. Select the desired plane (front, right, top, etc)
• Open the desired photograph. It will attach to the plane you selected. Choose horizontal/vertical (as needed) in the Trace-Sketch box. Drag the lines to the top/bottom/sides of the photograph.
• Change dimensions as needed and select OK.• Draw curves on the desired plane (the same you first
selected). • Click on the “Create Curve” tool and sketch along the
photograph. Fix imperfections in the curve by using the “Edit Curves” tool. Hint: hold shift as you drag a point to make it lock on to nearby geometry.
• Hint: Use Analysis>Geometry>Curvature as you edit the curve.
• After drawing both the top and bottom/side curves, create an internal plane and create a curve connecting the side/top and bottom curves.
• Make a surface with the 3 curves using the “Create Surfaces from Boundary Curves” tool.
• For further styling, one can create an internal curve along which the geometry me be curved.
• Accept the style by clicking the check in the style toolbar.

Other Surface Modeling Tools: Sweep
• Sweep: to drag a protrusion or surface around a curve.
• To use sweep: Insert>Sweep>Protrusion (several other options may also be implemented).
• First, define the path of the sweep by either selecting all of the curves the sweep is to follow or by sketching it.
• After the trajectory is defined, the protrusion itself is defined via sketcher. Hint: avoid small curves, as ProEngineer’s sweep tool can not handle curves with small radii.
Other Surface Modeling Tools Continued: Surface Blend
• Surface Blend: To create irregularly shaped extrusions.
• To use this tool, one first creates several sketches on various datum planes.
• Click on the “Surface Blend” Tool. Select the first sketch. Press control and select each sketch in sequence.
• On each sketch click and drag the white dot to one side of the sketch (to get rid of twists).
• Click the check to accept the surface. • Fill the open ends of the blend and solidify.