40ch DWDM Mux Demux + Montior Port + 1310nm Port for 40G/100G

Ο...Ο De-mux and Re-mux a DVD Audio Track page 1 of 29
▬ DeMux and ReMux a DVD Audio Track ▬
a guide for beginners, by a beginner
If just the audio in a dvd needs editing, here is one way to pull your dvd apart and then glue it back together using 3 free tools, with no loss of existing video quality.
( note the warning below !) An alternative to the steps below might be to use an all-in-one video editing suite to import dvd files, add the edited audio track back into the video, add a template menu and chapter points, and then render the project back to dvd. But if the software does not use “smart” encoding correctly (or at all), the entire mpeg video track will be re-encoded and thus lose quality. So, if the video track does not need editing, you can demux and remux instead, and keep your video at the best possible quality. There are other free tools that can be used to do this as well. I like these for their simplicity – after setting a few options in each program, files can be processed with just a few mouse clicks. Each tool has advanced features and settings available, but this guide uses just basic procedures. Don’t be intimidated by the thirty-page length – much of it is screenshot illustrations.
<<>> A Warning ---
Using this guide, menu and chapter points from original dvd will *not* be copied.
You can create new chapter points, or obtain and use the times from source files.
You can create a new menu, as described later, possibly even basing it on screen-shots from source dvd menu.
Making a menu is the most demanding part of the entire procedure. Not difficult, but time-consuming. The software used in this guide has a basic menu-editing module ~~ no drag & drop, no full-screen view, and preview screen won’t show overlaid bitmaps.
Also, there are more advanced guides available which can tell you how to re-assign the source menu to the new dvd files, using other software.
I made a simple example menu for this guide, but for ordinary movies, I usually only create chapter points, and use the remote control to skip around.
<<>> End of warning
Are you ready to continue? ( truly, you can’t hurt anything, your original dvd disk will still be there unharmed, and you can try other procedures if you decide this way is not your way.)
Well then, away we go. This works for me; I hope it works for you as well.
the CountryMouse Nit-Picker At Large 01 November 2006
Did somebody say “De−Mouse” ???

Ο...Ο De-mux and Re-mux a DVD Audio Track page 2 of 29
You’ll accomplish your goal in four main stages.
1. Rip and DeMux/de-multiplex (split) the audio track and video track
into separate files on your hard-drive.
2. ( after you edit the audio track with your sound editor ) Convert audio to a dvd-compliant AC3 “elementary stream”.
3. Author and ReMux the dvd-compliant files into actual dvd files.
4. Burn those new files to a dvd disk.
Contents
Software pg 3
STAGE 1 – Demux Source Dvd
Decrypter Settings pg 4
Select source and destination pg 6
Demux (process the files) pg 7
STAGE 2 – Convert Audio (if needed)
Convert demuxed audio to Wav pg 9
Convert Wav to AC3 pg 12
STAGE 3 – Author a Basic Dvd
Chapter lists pg 13
Start the project pg 14
Audio Track Extras (language tags, audio sync) pg 15
Set Chapter Points pg 16
Optional Still Menu Menu Elements pg 18
Create menu mpeg2 file pg 19
Add menu to project pg 20
Edit menu pg 21 Pausing and Looping options Buttons – adding, assigning actions, editing
Navigation commands pg 25
Author the dvd (process the files) pg 26
STAGE 4 – Write DVD to Disk
Burn to disk with Decrypter or ImgBurn pg 28

Ο...Ο De-mux and Re-mux a DVD Audio Track page 3 of 29
.
All these tools (except WavePad) can be unzipped or installed to any folder you like. Click the names to go to download links. Installed sizes are noted.
Free Software tools used :
DVD Decrypter < 1 mb > to Rip and Demux dvd files into separate audio and M2V video files on your hard-drive. Decrypter can also burn ISO images to disk.
BeLight < 5 mb > to convert audio ( to wav for editing, to AC3 for authoring )
DvdAuthorGUI < 14 mb > to load M2V video and edited audio track, add chapter points, (add menu), remux tracks and create the dvd file-set, and (optionally) create ISO image ready to burn to disk.
<<>> As of this writing, use v 1.009 with improved Chapter Editor playback option.
Optional Tools :
ImgBurn < 1.2 mb > can create ISO images and burn ISO images to disk.
Or use Dvd Decrypter to burn ISO to disk.
Or, use *your* favorite burning application to burn ISO or dvd folder to disk.
ChapterXtractor < 370 kb > can generate list of chapter times from source dvd
Suggestions for free audio editors :
Audacity < 12 mb > ( my favorite ! )
WavePad < 1.5 mb > (be sure to use topmost download button for free version)
GoldWave demo < 5 mb > demo version allows 3000 commands before expiration
Suggestions for free graphics tools :
IrfanView < 1.3 mb > really a viewer, but you can crop, re-size, “colorize”, convert
formats, use a handful of effects plugins, and more. A great tool for quickie projects.
Paint.net < 11 mb > (requires NET Framework 2) offers drawing and clone tools, layers, alpha transparency, a nice basic effects collection. Under active development.
Windows Explorer Environment
Set Folder Options to view file extensions. This prevents confusion about files with identical names but different file extensions, which are frequent with video projects.
Open My Computer or Windows Explorer, go to Tools > Folder Options > View tab. UN-check “Hide file extensions for known file types”. I always use “Detail” view so I can click column headers to quickly sort by name, date, or file type. (I have never understood the attraction of fifty identical icons displaying truncated names….)

Ο...Ο De-mux and Re-mux a DVD Audio Track page 4 of 29
.
STAGE 1 DEMUX SOURCE DVD
Dvd Decrypter can be used to copy dvd vob files to hard drive, split as m2v video file and audio file.
For my example, I used a dvd that had been created from a vhs capture. .
ADJUST Dvd Decrypter SETTINGS
1. Go to Tools > Settings.
2. If you aren’t familiar with this program and don’t yet know what the settings do,
you can use default settings except the ones we cover in this step.
At bottom left of Settings window, click Defaults, when message asks for confirmation, click YES.

Ο...Ο De-mux and Re-mux a DVD Audio Track page 5 of 29
3. In the Settings window, click tab for IFO MODE
Click Enable Stream Processing to place a check-mark.
In File Splitting drop-down list, select NONE.
You can leave other settings at their defaults. Click OK.
The Chapter Information files are useful if you happen to be using one of the programs listed in right-hand pane; the chapter lists can be imported into those programs.

Ο...Ο De-mux and Re-mux a DVD Audio Track page 6 of 29
.
SELECT SOURCE FILES AND DESTINATION FOLDER
1. Back at the main window,
Go to Mode > Select IFO
2. In the SOURCE section, select desired dvd drive from the drop-down list.
3. After a few moments of analysis, Decrypter opens the dvd files.
The Input tab displays items selected.
By default, it will create a destination folder on its most-recently-used drive.
If you wish to save files elsewhere, in DESTINATION section, click folder icon; browse to or create another folder.
Here, I changed from L-drive to C-drive, and created a new “Stuart Little” folder, then a Video_TS sub-folder, although the sub-folder is not required.

Ο...Ο De-mux and Re-mux a DVD Audio Track page 7 of 29
.
PROCESS THE FILES
1. Set the processing parameters to demux the dvd ---
Click Stream Processing tab. Click Enable Stream Processing to place a check mark.
Click the Video stream to highlight it. At bottom of window, click DEMUX to select it.
Then click the Audio stream to highlight it. At bottom of window, click DEMUX to select it.
2. When ready, click the Decrypt green arrow at bottom left side of window.
3. The status window displays progress bar and time counters, and various
processing information. My 90-minute dvd was processed in 6 minutes.
When finished, dismiss message and close Decrypter.

Ο...Ο De-mux and Re-mux a DVD Audio Track page 8 of 29
4. As you will see by browsing to the newly created video and audio files,
Decrypter places a lot of relevent information in the file-name.
This information is also available in the text file “xxxx-Stream Information.txt.
Take note of the DELAY in the audio track, you’ll be needing this number to adjust audio synchronization when you author the dvd.
In this example, the delay is minus 101 milliseconds.
Perhaps you’ll want to re-name the files to something a bit less cumbersome, I re-named my files for easier handling.
�

Ο...Ο De-mux and Re-mux a DVD Audio Track page 9 of 29
.
STAGE 2 CONVERT AUDIO (if needed)
IF NEEDED, CONVERT AUDIO TO WAV FORMAT FOR EDITING
If audio is AC3 or MP2, you might have to convert to Wav for your audio editor.
I use BeLight to convert to Wav, and back after editing. It has a handy selection of pre-sets, which makes conversion a snap.
���� note --- on my pc monitor (maybe yours too?)
BeLight fills the entire vertical height so bottom control is hidden by task bar. I have to drag it upwards until top caption bar is almost out of sight, or, set taskbar to “auto-hide”, or, drag the taskbar to a vertical edge.
OPTIONS
If you like, change some of the Options, or leave at default.
I set Priority to Normal or High for faster processing, and do NOT multitask. In View > TABS, I un-select unused formats to reduce clutter.
OPEN AUDIO FILE
Click File >> Open,
browse to and open the audio track that was created by Dvd Decrypter.

Ο...Ο De-mux and Re-mux a DVD Audio Track page 10 of 29
SET PROCESSING PARAMETERS
1. By default BeLight saves to source folder with existing file name, new extension.
If desired, click File > Save, and browse to another folder and/or type in a new file name for the converted audio.
2. Go to Presets > WAV >>
--- My source is 2-channel AC3, so I select 2.0 WAV to process as stereo.
--- If source is 6-channel / surround-sound ---
• You can choose 2.0 WAV and let BeLight downmix it to stereo.
• Advanced users may wish to edit for surround-sound, so save as 5.1 (6-channel) wav, or six separate mono wav files.
• You can also convert 2-channel files this way, and edit a new surround-sound mix, but a surround system can usually emulate 6-channel surround-sound without all that work and increase in file size.
3. Click Output Sampling Rate to enable it, Select 48000 from list. Leave other main & Advanced Settings at defaults, or experiment . . .
Check http://www.doom9.org/index.html?/belight-advancedsettings.htm
for some information about adjusting gain/volume and more.
PROCESS THE FILE

Ο...Ο De-mux and Re-mux a DVD Audio Track page 11 of 29
The Info window displays “Transcoding is running” during the two passes of the progress bars, and time readouts show time elapsed and remaining.
My 90-minute track took approx 2 minutes for first pass, and 5 minutes for second.
When conversion finishes, click green arrow to return to main window, or, exit BeLight.

Ο...Ο De-mux and Re-mux a DVD Audio Track page 12 of 29
.
EDIT THE AUDIO FILE
Load the (converted) audio track into your preferred sound editor, and do what needs doing, whether that be noise-removal, normalizing volume levels, or mixing in a music or voice-over track on top of the existing audio.
When you save the edited file, be sure to save at 48,000 khz sample rate.
CONVERT WAV FILE TO AC3
DvdAuthorGui, used later in this guide to create the dvd, can only accept AC3 or MP2 audio files. You can use BeLight to convert your audio to AC3.
���� Tip --- When you encode video projects “from scratch”, keep in mind : PCM audio meets dvd standards, but AC3 compression makes a smaller audio file, leaving more bitrate available for the video track, thus, better picture quality. The 90-minute track in my example dvd weighed in at 995 mb for PCM Wav, but only 250 mb for AC3. 75% smaller! And better quality than mp2.
OPEN WAV FILE
Click File > Open, browse to and open the wav audio.
OR, from Windows Explorer, drag and drop the file to the open BeLight screen.
SET PROCESSING PARAMETERS
If desired, Cick File > Save, and browse to another folder and/or type in a new file name for the converted AC3 audio.
Click Output Sampling Rate to enable it, From drop-down list, select 48000. Leave other main & Advanced Settings at defaults, or experiment . . .
Go to Presets > AC3 >
Source is 2-channel, so I select AC3 2.0 - 256 kbps.
At least 256 kbps bitrate is recommended for “home-edited” audio tracks, although some users are happy with 224 or even 192. Above 384 is probably overkill.
PROCESS THE FILE
Click Start Processing.
Exit when the two-pass process is finished.

Ο...Ο De-mux and Re-mux a DVD Audio Track page 13 of 29
.
STAGE 3 AUTHOR A BASIC DVD
DVDAuthorGui, a wonderfully simple application, will re-mux the video and edited audio streams back together, and the mpeg video won’t undergo any re-encoding.
You can also, of course, use DAG to author video projects that have been encoded with an Mpeg encoder.
DAG also supports multiple titles (movies) and multiple selectable audio tracks and subtitle tracks, which may be of interest to advanced users. For this guide however, we are only working with a single video and audio track with no subtitles.
.
���� OPTIONAL STEP ���� determine chapter points before using DAG
If you aren’t nit-picky about chapter points, you can skip this and create them in DAG.
DvdAuthorGui can only put chapter points on I-frames (keyframes).
Chapters not set on an I-frame will be moved to the next available I-frame.
So, chapter points can move from where you intended. I-frames in my example clip occur every 15 frames (1/2 second), which could lead to chapters opening in the middle of a spoken word or other odd things.
USE ORIGINAL CHAPTER POINTS FROM SOURCE FILES ---
ChapterXtractor can obtain chapter points from source dvd IFO file. The interface is a bit awkward, you must use its vertical scrollbar to see controls at top and bottom. But it can generate a list in a few seconds
Click Format tab at top, scroll all the way down to see all controls at bottom.
Click Presets drop-down, select a “blank” numbered preset, such as Preset 7. Click the icon next to that so you can rename the preset (I used DAG). Change Header and Footer if desired (I blanked them out).
In the Format input box, type or copy & paste the following code:
%hh:%mm:%ss.%ms\n
Click the “Save Preset Format” icon to the right to save new preset for future use.
Click Open IFO button, open VTS_01_0.IFO from the folder with demuxed tracks.
Click Save Data to save the generated list as a text file. Close ChapterXtractor.
Next time, you can simply select the “DAG” preset you just created, Open IFO, and Save Data. Just a 3-step process.
OR, SELECT NEW CHAPTER POINTS ---
I load the M2V video clip into VirtualDub-Mpeg2, and use the slider to move to
desired chapters. Watch the frames indicator readout for I, B, and P frames.
Use keyboard arrow keys to advance to specific I-frame for the desired chapter point (it’s almost never exactly the frame I would have liked), and type times into Notepad, to be pasted into DAG chapter list later.
Times must be typed as HH:MM:SS.mss --- like this - 01:03:08.685
note the millisecond is preceded by a period, NOT a colon.

Ο...Ο De-mux and Re-mux a DVD Audio Track page 14 of 29
.
LOAD AUDIO AND VIDEO TRACKS IN DvdAuthorGui
1. Before loading files, you must choose the proper dvd format. After adding files, it
can’t be changed. If you select wrong, you must exit and re-open.
From the DVD Format drop-down list, select NTSC or PAL, same as source.
2. Click Add Title.
3. Select Video Stream window opens
It will accept M1V, M2V, and MPV elementary mpeg video streams, that is, video streams without audio) < FYI, DAG can also work with vob files and with dvd-compliant mpeg2 files >
Browse to and select the M2V video file that was created by DVD Decrypter.
4. Select Audio Stream window opens, by default opening the same folder that
contained the video file you just selected. (it will only accept AC3 and MP2 audio)
Browse to and select the “edited” AC3 track you converted earlier with BeLight.
Ο...Ο De-mux and Re-mux a DVD Audio Track page 15 of 29
.
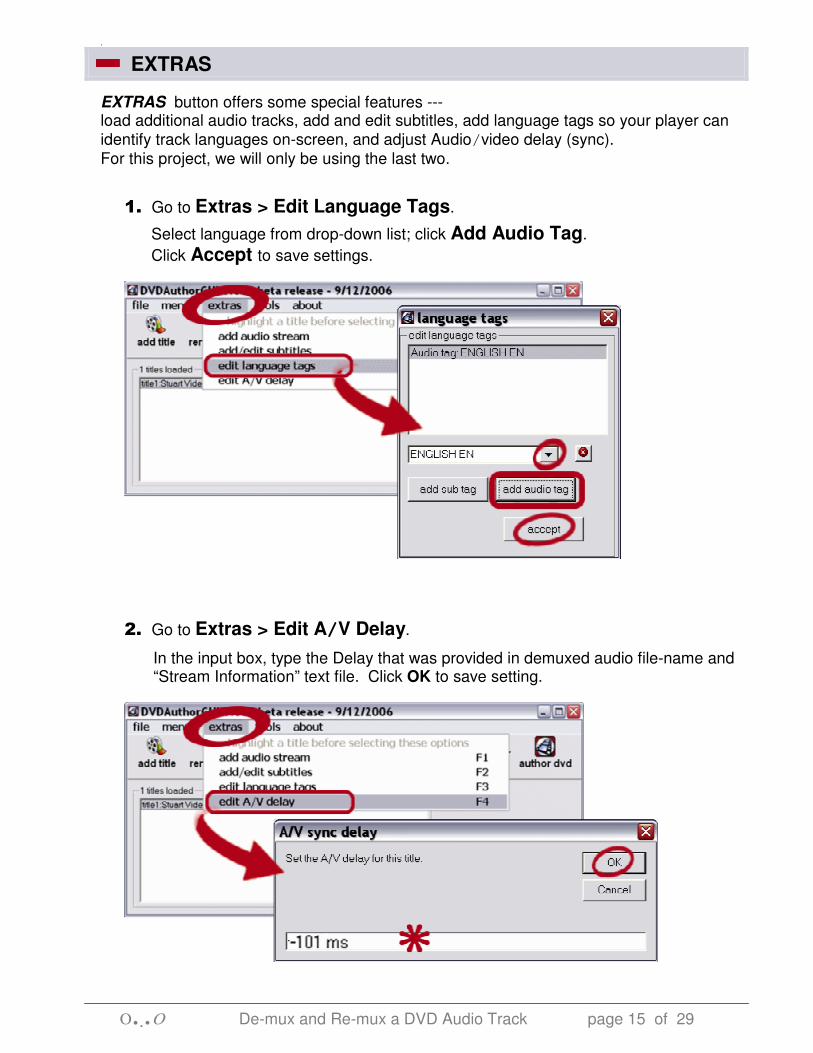
EXTRAS
EXTRAS button offers some special features --- load additional audio tracks, add and edit subtitles, add language tags so your player can identify track languages on-screen, and adjust Audio/video delay (sync).
For this project, we will only be using the last two.
1. Go to Extras > Edit Language Tags.
Select language from drop-down list; click Add Audio Tag.
Click Accept to save settings.
2. Go to Extras > Edit A/V Delay.
In the input box, type the Delay that was provided in demuxed audio file-name and “Stream Information” text file. Click OK to save setting.

Ο...Ο De-mux and Re-mux a DVD Audio Track page 16 of 29
.
SET CHAPTER POINTS
If you don’t want chapter markers, you can skip to page 26 and “Author the Dvd”.
v 1.009 has improved Visual Editor playback. Go to Tools > Use Alt Preview Decoder
1. Click on Title1 to select it, then click Chapters button.
2. You can enter the times directly into the list window, or use the Visual Editor
or any combination thereof ------------
A. Paste saved chapter list into the window, keeping the first entry of all zeros.
OR, type in times directly in the window, in format HH:MM:SS.Mss.
Click OK when the list is complete. You can re-open and edit list if needed.
B. To assign chapters in the Chapters Editor playback window ------------
At bottom of list window, click Visual Editor button to open the display.
Ο...Ο De-mux and Re-mux a DVD Audio Track page 17 of 29
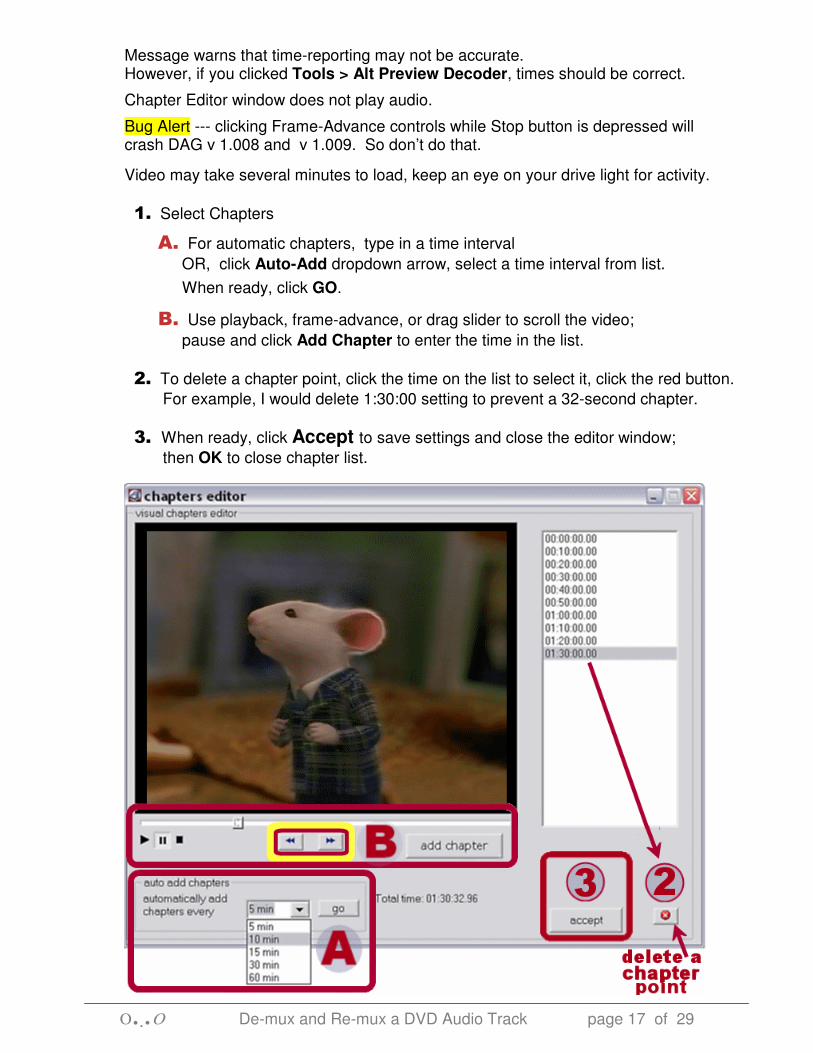
Message warns that time-reporting may not be accurate. However, if you clicked Tools > Alt Preview Decoder, times should be correct.
Chapter Editor window does not play audio.
Bug Alert --- clicking Frame-Advance controls while Stop button is depressed will crash DAG v 1.008 and v 1.009. So don’t do that.
Video may take several minutes to load, keep an eye on your drive light for activity.
1. Select Chapters
A. For automatic chapters, type in a time interval
OR, click Auto-Add dropdown arrow, select a time interval from list.
When ready, click GO.
B. Use playback, frame-advance, or drag slider to scroll the video;
pause and click Add Chapter to enter the time in the list.
2. To delete a chapter point, click the time on the list to select it, click the red button.
For example, I would delete 1:30:00 setting to prevent a 32-second chapter.
3. When ready, click Accept to save settings and close the editor window;
then OK to close chapter list.

Ο...Ο De-mux and Re-mux a DVD Audio Track page 18 of 29
.
���� OPTIONAL STEP ���� a simple Still Menu
If you don’t want a menu, you can skip to page 26 and “Author the Dvd”. Remember, you can simply use your remote control to jump to chapters and titles.
You can use DvdAuthorGui to add still or motion menus.
Refer to DvdAuthorGui ReadMe and its Home Page documentation for discussion of
motion menus, which are beyond the scope of this simple guide.
MENU ELEMENTS --- It’s not difficult to create a still menu from scratch. However, it will be more challenging
than using a menu template in a video-editing suite.
► The Background Graphic –
Create a jpeg, 720x480 (NTSC) or 720x576 (PAL).
A simple graphic, a screen-shot from the video, a scan of a child’s drawing . . .
Possibly, screen-shot the original dvd menu, and save yourself some work.
You can even use MS Paint, but you might find it easier to work with layers for aligning
elements --- using PhotoShop, PaintShopPro, maybe Paint.net.
For screenshots from dvd or m2v file, I use VirtualDubMpeg2 or PowerDVD player.
Media Player Classic can snap thumbnails, but I get better quality thumbs by using a
full-frame shot, crop out a a good representative piece approx 450x300 pixels, and re-
size smaller using PaintShopPro SmartSize.
The graphic must include elements to identify the menu actions.
For example, use text and/or graphics to indicate :
• movies or chapters to be selected for playback
• jump to other menus, such as multi-page chapter lists
• “Play Movie” to start movie, “Resume Movie” to resume playback
Keep vital information inside the “tv-safe” area.
Up to a 10%-wide border of your graphic could fall into the “overscan” area of some
television screens, and may be hidden from view. Don’t put buttons on outside edges.
► The Buttons – This doesn’t mean the thumbnail pictures or text elements, it means the HIGHLIGHTS
that only appear when that item is clicked on or selected.
DAG can create underline or rectangular outline highlights in 11 basic colors;
or it can import 4-bit 16-color bitmaps < Max of 4 colors can be used in the bitmap >
You can use custom color palettes for bitmaps, colors do NOT have to be Windows
“Standard 16”. DAG automatically sets the color #010101 to transparent,
that is, R=1, G=1, B=1. Use that color for transparent areas on buttons you create.
Check the samples in DAG “Button” folder to get some ideas.
► Optional Audio – If you’re using audio on your menu, choose a piece that loops smoothly, and won’t grate
on the ears with repetition.
Ο...Ο De-mux and Re-mux a DVD Audio Track page 19 of 29
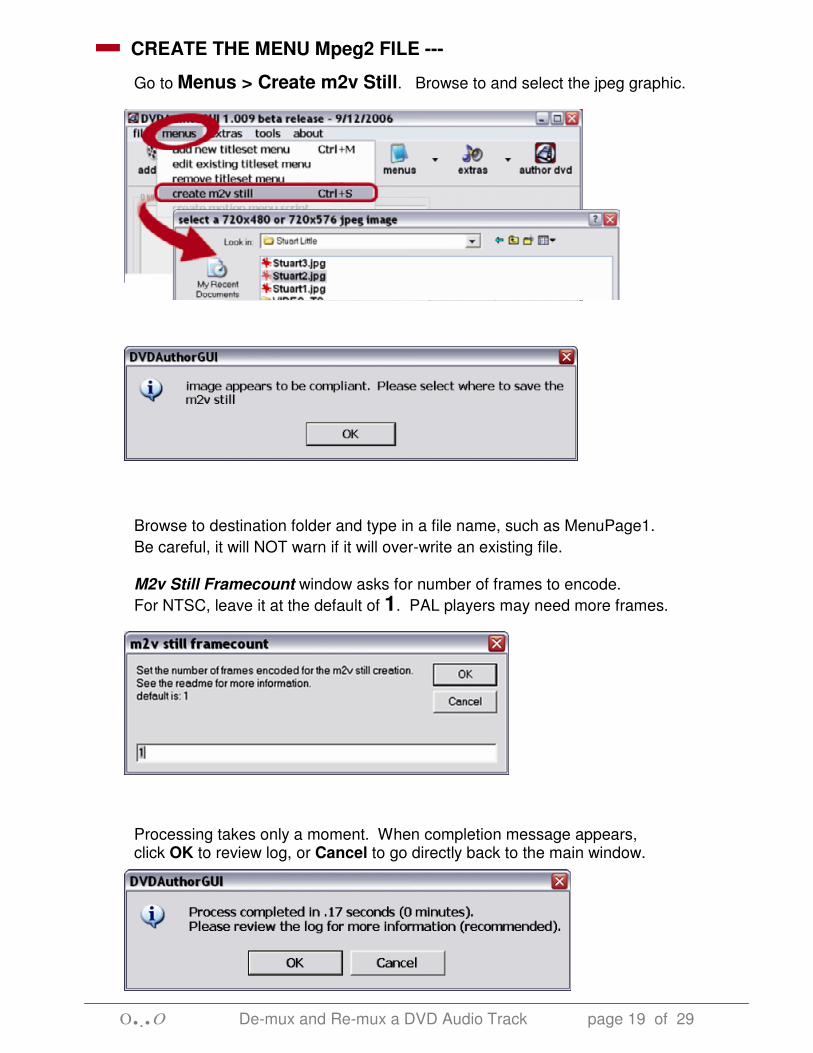
CREATE THE MENU Mpeg2 FILE ---
Go to Menus > Create m2v Still. Browse to and select the jpeg graphic.
Browse to destination folder and type in a file name, such as MenuPage1.
Be careful, it will NOT warn if it will over-write an existing file.
M2v Still Framecount window asks for number of frames to encode.
For NTSC, leave it at the default of 1. PAL players may need more frames.
Processing takes only a moment. When completion message appears, click OK to review log, or Cancel to go directly back to the main window.

Ο...Ο De-mux and Re-mux a DVD Audio Track page 20 of 29
ADD THE MENU TO THE PROJECT ---
Go to Menus > Add New Titleset Menu.
Browse to and select the menu m2v video track.
Browse to and select AC3 or Mp2 audio track for the menu, or click Cancel if you don’t want audio on menu.
The Menu Editor window will open with the new menu displayed.
���� note --- Titles (movie clips), chapter points, and menus will become available in the button Action list as they are added.
To simplify your editing work, you might want to add all these to the project before you start editing the first menu page. You can, of course, go back and re-edit menus as needed.
So, if you will have multiple menus, close the editor window, go back to Add New Titleset Menu, repeat adding menus until all are loaded into the project.

Ο...Ο De-mux and Re-mux a DVD Audio Track page 21 of 29
EDIT THE MENU ---
You will be using the Menu Editor window to add and edit button highlights, and assign actions to them.
When ready to begin, go to Menus > Edit Existing Titleset Menu.
Double-click a menu in the list window.
Menu Editor window opens with the background graphic displayed.
Click Advanced button at bottom right to enable additional controls.
It may look a bit overwhelming, but you’ll get acquainted in no time at all. The interface is pretty straight-forward, and most controls show tooltips.

Ο...Ο De-mux and Re-mux a DVD Audio Track page 22 of 29
► TIMEOUT AND LOOPING OPTIONS
When you begin a new project, by default, the menu is set to pause indefinitely, until user selects a button. If an audio track is included, the audio track will play through once, then menu continues to display with no audio. (not so good, huh?)
To change these settings, click “clock” icon to access Timeout Options window.
Un-check the “pause menu indefinitely” box.
Use slider to set the pause length, up to a max of 60 seconds
Assign an action from the drop-down list:
Loop; Jump to a title, chapter, or menu; Resume playback; or Exit.
Click Accept to save settings.
For my example, I set it to the length of the audio track, and set it to Loop.
► ADD BUTTONS
Click Add Button to assign first button.
Click Actions drop-down list, and select the action for the button.
The Action list includes all chapters, all menus, “Resume”, and “Exit”.
I set the first button to jump to the first chapter indicated on my graphic “Jump chapter 7”. This will be the “default” button that is active when the menu is opened by the user.
For my “Start Movie” button, I would assign “jump Title 1 Chapter 1”.
For my “Return to Movie” button, I would assign “Resume” to let playback pick up where it left off.
The Information list displays the button information, and updates as you adjust settings.

Ο...Ο De-mux and Re-mux a DVD Audio Track page 23 of 29
► EDIT BUTTONS Button highlights must be edited for color, size, and position.
Be sure you have selected the correct button in the Button List when you edit.
Action, colors, size, and position stay in effect for each button added until you change settings for the button.
A. From the Colors lists, choose colors for Highlight and for Select.
You can choose from eleven basic colors.
When encoded dvd is played, Highlight color shows when arrowed to, Select color shows when clicked.
Editor display only shows Highlight color, you won’t see the Select color until you encode the dvd. Use Highlight setting to check visiblity of your Select color.
B. Use Width and Height sliders to adjust the size.
Drag Height slider downward to increase height to create a rectangle outline.
Use Box Thickness slider to adjust line thickness (only works if Height is greater than default of 3 pixels)
C. Use Position sliders at the edge of the graphic display to adjust location.
���� Tips ---
Click a slider, and then use keyboard arrows to nudge slider for better control than dragging it with the mouse.
For very precise control, type pixel values in the input boxes at bottom of window (“Advanced” controls must be enabled)
Open the menu background jpeg in your graphics editor, and note the pixel coordinates where you want to place button highlights.

Ο...Ο De-mux and Re-mux a DVD Audio Track page 24 of 29
D. To use a bitmap image for the button ---
Click Use Bmp Button. Browse to and select the bitmap.
By default, the same image is loaded for both Highlight and Select.
To change a loaded bitmap, double-click the displayed image and browse to and select another. ( or click buttons Use Bitmap and/or Change Select )
In the example, I used a yellow arrow for Highlight bitmap, and white for Select.
To be more fancy, I could have made circular bitmap highlights to frame the round chapter number spots, but then there would have been no examples of
using the underline sliders. ☺
The bitmap image does not appear on menu display, only a placeholder outline.
Use the position sliders to set the button location, or type the pixel coordinates in the input boxes at bottom edge of window.
E. To go back to using outline/underline buttons,
click curved arrow Revert button at bottom
SAVE THE MENU ---
When you have the menu arranged to your satisfaction,
click Accept button in bottom right corner.
A message will warn if any buttons “intersect” (overlap), and you must correct those before it will save the menu settings.

Ο...Ο De-mux and Re-mux a DVD Audio Track page 25 of 29
NAVIGATION COMMANDS
Some brief notes about navigation commands –
You can use these options to set the sequence for movies and menus to play, and post-play behavior.
Default sets the first menu (if any) to have “First Play”, and the movie to “Exit” when playback is done, and of course, you can leave the default settings if you like.
You could set an intro video clip to have First Play, then jump to Main Menu or to the movie. You could set your movie to loop indefinitely by setting post command to Jump Title(nbr).
Click the Nav Cmds icon.
In the Editor window, select an action from the First Play drop-down list.
Highlight each movie Title listed, and choose an action from the Post-Command drop-down list on right side of window.
When you have all set as you like, click Accept to save.
Settings will revert to default if you remove or add any movie titles.
I set my movie to have First Play, and then to Call Menu when done. (just to be contrary)

Ο...Ο De-mux and Re-mux a DVD Audio Track page 26 of 29
AUTHOR THE DVD FILES
This step will remux the audio and video tracks, and convert them into actual dvd files.
1. Save project settings, so you won’t have to re-do everything if test dvd is not
satisfactory. File > Save Project >, browse to a folder and enter a project name.
2. if you prefer to use ISO image for burning, click File > Create ISO after authoring
to place a checkmark. If not using ImgBurn or Decrypter, you could burn the folder set to disk instead.
3. Go to File >> Author dvd… ~~~~~ OR click icon.
When next window opens, browse to hard-drive where you want to save the files.
Type in a name for the dvd, and Save.

Ο...Ο De-mux and Re-mux a DVD Audio Track page 27 of 29
The Progress Log window opens. DAG muxes (multiplexes) the audio and video streams into the mpg file that is the basis for the dvd. After it completes the mpg file, it will create the actual dvd folders and files. Finally, if you selected to create iso image, it will create the iso.
My 90-minute video, a 3-gb file, completed processing in 5 ½ minutes. (this was one of my first vhs captures, and I used a bitrate of only 3200 mbps because I didn’t know better. One day I will do it over, using 6500 mbps.)
TEST WITH SOFTWARE PLAYER
Use your favorite software player to test the dvd files. Review for picture quality, audio synchronization, etc. Check the chapter points. If you made a menu, test every button on every page.
Side note --- When I used a new software player, I didn’t realise at first that the maximum volume setting is rather low. That cost me a few extra re-renders, because I mistakenly thought the dvd audio track was created too quiet. Now I always check with two different players, and compare audio volume to a retail dvd.

Ο...Ο De-mux and Re-mux a DVD Audio Track page 28 of 29
STAGE 4 WRITE DVD TO DISK
It’s highly recommended to burn to a re-writable disk first, to test on a standalone player. Once you’re sure all is fine, burn again to a DVD R disk. The RW disk can be re-used many times for test burns, and can save you time, frustration, and wasted disks.
You may have a favorite burning application, but here’s a quick look at ImgBurn, which can build ISO images from files on hard-drive, and write (burn) ISO images to disk.
Dvd Decrypter can also write ISO to disk ~~ Use Mode > ISO > Write; then follow the same steps as ImgBurn.
SELECT SOURCE FILE AND DESTINATION DRIVE
Place a blank disk in the drive, and open ImgBurn.
Go to Mode > select Write.
In the Source section, click the folder icon to browse to the iso image.
In Destination section, select burner drive from the drop-down list.

De-mux and Re-mux a DVD Audio Track page 29 of 29
WRITE TO DISK
In the right-hand Disk Information window, note the supported write speeds.
In the Settings section, select a write speed from the drop-down list. I take the advice of some wise folks, and use the lowest speed the disk can support.
When ready, click the Write Button green arrow at bottom left.
The status window displays progress bar and time-counters, and various processing information.
When finished, dismiss the message box, and close ImgBurn.
STAGE 5 Enjoy your refurbished Dvd ! Ο.,.Ο