Design Process - Storyboarding Information Design...
17
Sabancı University - FASS - Introduction to Multimedia / Instructor: Murat Germen 1 Design Process - Storyboarding • Information Design - What is the product? Product definition , audience and environment , market research , planning the project, organize the content. • Interaction Design - How should it work? Design the navigation , types of interaction and controls and develop a working storyboard . • Presentation Design - What it looks like . Design the style , layout and produce a prototype . Presentation design is where the 2D Designer and Art Director start producing digital results. Design dos and don'ts Do • Create a grid for your layout • Select your fonts to work sympathetically with your text content and design • Split a page into two or three columns (if using A3 sized paper) so that the reader does not have to scan a wide stretch of text • Line up text and graphics so that there aren't too many 'ragged' edges to your page • Use graphics to enhance your design and to support your content • Create templates without any content to speed up page formation in later sessions • Use rule lines to separate different content sections of a page Page divided into two columns. Graphics used to enhance the design. Page divided into two columns. Graphics and text lined up so there aren't ragged edges. Page divided into three columns.
Transcript of Design Process - Storyboarding Information Design...
Sabancı University - FASS - Introduction to Multimedia / Instructor: Murat Germen 1
Design Process - Storyboarding • Information Design - What is the product? Product definition, audience and
environment, market research, planning the project, organize the content. • Interaction Design - How should it work? Design the navigation, types of interaction
and controls and develop a working storyboard. • Presentation Design - What it looks like. Design the style, layout and produce a
prototype. Presentation design is where the 2D Designer and Art Director start producing digital results.
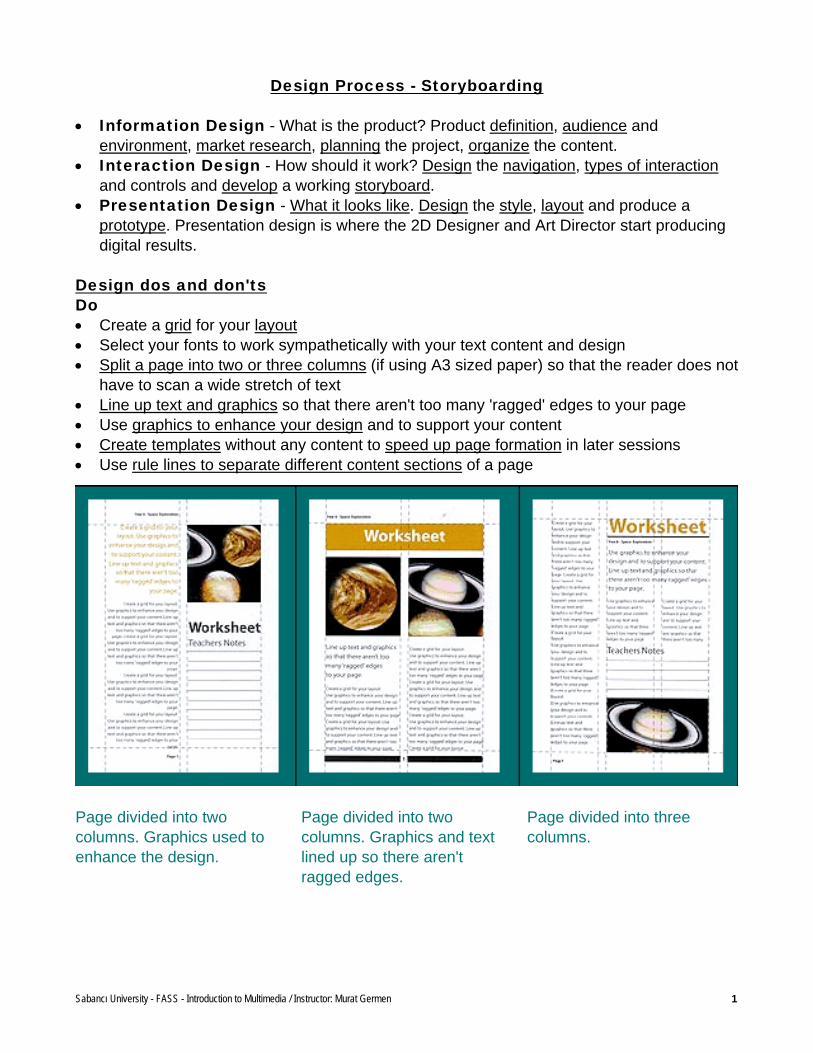
Design dos and don'ts Do • Create a grid for your layout • Select your fonts to work sympathetically with your text content and design • Split a page into two or three columns (if using A3 sized paper) so that the reader does not
have to scan a wide stretch of text • Line up text and graphics so that there aren't too many 'ragged' edges to your page • Use graphics to enhance your design and to support your content • Create templates without any content to speed up page formation in later sessions • Use rule lines to separate different content sections of a page
Page divided into two columns. Graphics used to enhance the design.
Page divided into two columns. Graphics and text lined up so there aren't ragged edges.
Page divided into three columns.
Sabancı University - FASS - Introduction to Multimedia / Instructor: Murat Germen 2
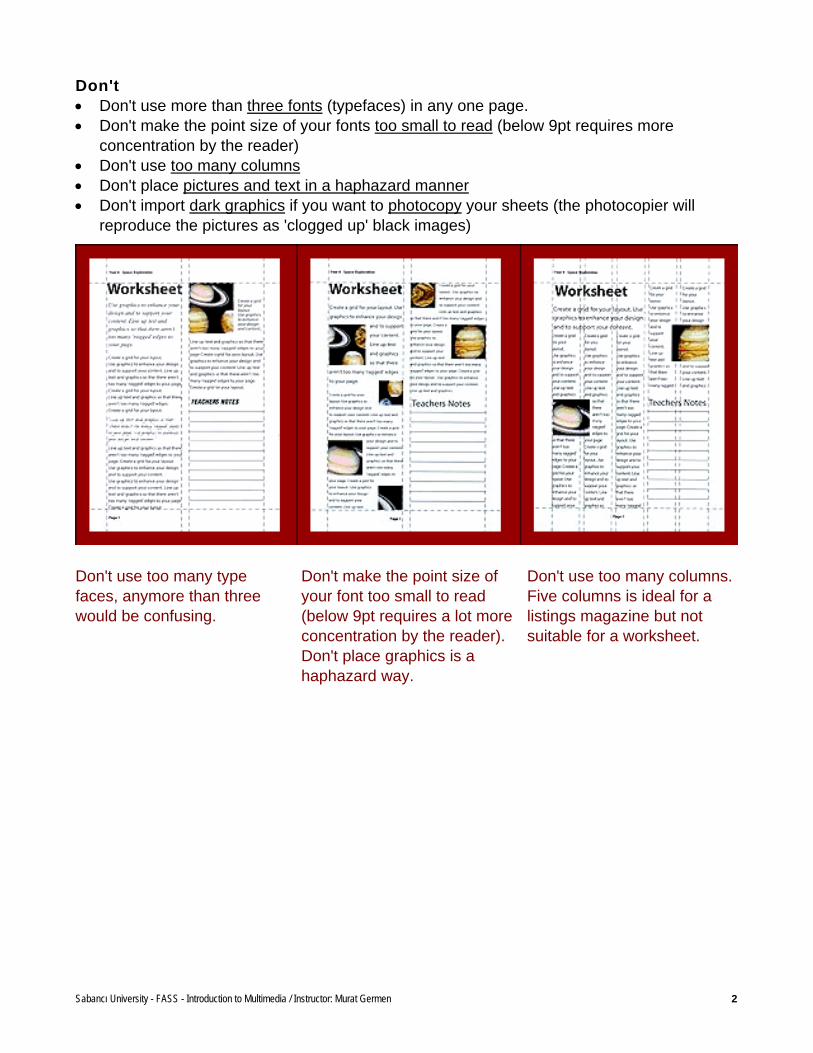
Don't • Don't use more than three fonts (typefaces) in any one page. • Don't make the point size of your fonts too small to read (below 9pt requires more
concentration by the reader) • Don't use too many columns • Don't place pictures and text in a haphazard manner • Don't import dark graphics if you want to photocopy your sheets (the photocopier will
reproduce the pictures as 'clogged up' black images)
Don't use too many type faces, anymore than three would be confusing.
Don't make the point size of your font too small to read (below 9pt requires a lot more concentration by the reader). Don't place graphics is a haphazard way.
Don't use too many columns. Five columns is ideal for a listings magazine but not suitable for a worksheet.
Sabancı University - FASS - Introduction to Multimedia / Instructor: Murat Germen 3
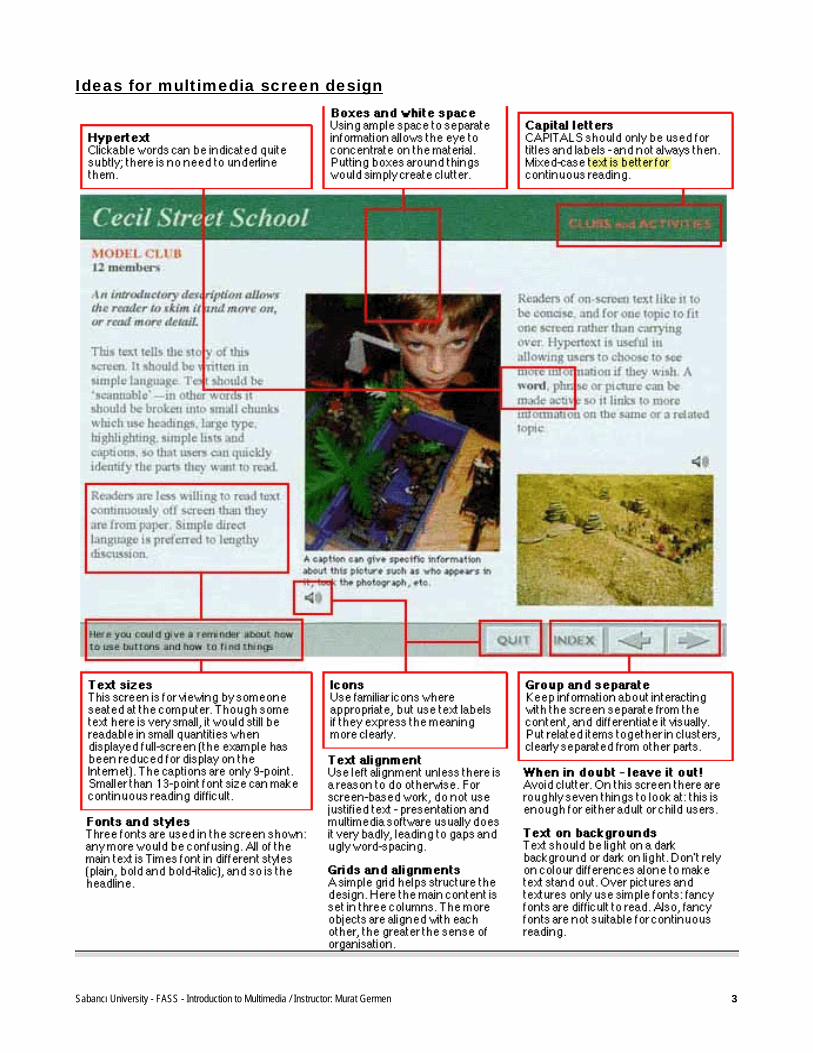
Ideas for multimedia screen design

Sabancı University - FASS - Introduction to Multimedia / Instructor: Murat Germen 4
Design 1. Typography We read by fixing our gaze on a small portion of text for a fraction of a second, then saccading to the next fixation point. Understanding the fixation and saccade (rapid intermittent eye movement) mechanisms will help you to make effective use of type. It is important to decide when serif and sans serif typefaces are appropriate, and relate this choice to display technology. • Spacing the characters in typeface, • Comparing the readability of ragged and justified type, • Choosing a line length, • Deciding whether to translate the concepts of page composition in conventional media into
the concepts of new media. 2. Illustration Technical subject material, and nontraditional presentation media, have strained the craft and the art of illustration during the last decade. Good choice of: • line weight, • typeface, type size, • shading, color. 3. Information design How the principles of perception and reproduction explained before are combined with the classic elements of visual design: ground, shape, size, texture, and type. Using examples from graphical user interfaces, web pages, three-dimensional interfaces, and other emerging interfaces, identify techniques that work and techniques that don't work; explain the reasons for their successes and failures. Interaction Concepts 1. Complex system with real-time interaction as human factors Primary Interaction Mode: A person is playing a part in controlling a complex realtime system. The interface is designed to provide information and control possibilities that are suited to the limitations of human performance and the demands of the task. • Airplane Cockpits • Integrated systems (e.g., air defense) 2. Batch processing Primary Interaction Mode: A user prepares data off line, submits it for a "run", and is given back an off line version of the results. Cycle time can be short but in many installations was hours or days. • This was the primary computer use mode in the 60s and early 70s 3. Dedicated function interfaces Primary Interaction Mode: Depends on the specific application. The interface has special devices, structure, and interaction potentials that are tailored to the task. • Early research (e.g., Sketchpad) • Original educated word processors with typing metaphor • Interactive games • Information appliances - special purpose small computing devices (e.g., TV/VCR
controllers)
Sabancı University - FASS - Introduction to Multimedia / Instructor: Murat Germen 5
4. General purpose time sharing or interactive OS Primary Interaction Mode: Alternating turns of typing (in standard character set) by user and system. User gives commands and system produces results, and/or system asks for data and user provides it. Can have elaborate languages for what the user can type, with corresponding flexibility in what is being controlled. • Conversational Interaction • Also for DOS and the like on personal computers • Interactive command line 5. Screen-based interaction Primary Interaction Mode: Machine provides a pre-planned structure (often branching) of screens with blanks to be filled in and menus that offer options to go to other screens. User fills in the blanks, use menu to go to other screens. • Common in data entry, service jobs, etc. • Multimedia - adds preprogrammed animation, video, audio • Includes "click and chirp" exploratory environments for kids • Most Web pages, including most uses of forms and Java 6. Graphical User Interface (GUI) Primary Interaction Mode: User initiates applications to create and modify complex objects (documents, spreadsheets, email messages, graphics, etc.) using pointing and menu selection. • Windows, Icons, Menus, and Pointing (WIMP) • Today's standard interface - Mac, Windows, Motif, NextStep, etc. • Pen-based interfaces are a variant on this, replacing typing with handwritten character
recognition while retaining the other elements 7. Multimodal Interactions Primary Interaction Mode: User combines natural interaction modes, such as speaking, gesturing, and WIMP elements, System responds in a "natural" way (based on how a person might respond to similar behavior). • GUI elements • Speech • Gesture 8. Virtual Reality Primary Interaction Mode: User is in an immersive visual (and sometimes auditory) environment that mimics being in a physical space. Input to the computer includes physical motions of the body, hands, etc., trying to correlate with the way that natural physical motions would affect the virtual space. • Immersive display • 3-D Physical input 9. Intelligent Agents Primary Interaction Mode: User interacts with the computer as if with a human, often with natural language, and with the expectation that high level and potentially vague or ambiguous requests will be responded to intelligently. • Natural language • Coaching • High-level instructions
Sabancı University - FASS - Introduction to Multimedia / Instructor: Murat Germen 6
Interactive Multimedia Processes Stages of creating an interactive multimedia program are: • Concept and Planning • Design • Prototype • Production The best advice about these processes is that planning is essential, and that you need to allow plenty of time for testing your concepts and prototypes on real users to make sure that your project is going to work. And KISS - "Keep It Super Simple". Concept and Planning You have the beginnings of an idea. The Concept and Planning stages are where you: • Define your user and target audience, and what their needs are. This is important for
determining the content style, interactivity and information in the program. • Try out a very small demo or "proof of concept" with potential users to see if the idea
works. • Scope (study carefully and in detail) the project based on your idea, to see if its feasible. • If the project is realistic within the available resources, commence planning and organizing
the project. Design The design of a program is usually a collaborative effort, because each team member brings a particular expertise that is necessary for a wholeness of approach, balancing the all technical, creative and information needs. The purpose of the design phase is to determine the structure, function and form of the key elements of the program, before committing resources to creating the work. There is more to design than merely choosing colors or making a button. In order to create a successful interface and interactive experience the design must progress through a process of analysis, planning and specification. The final outcome of the design stage should be a flowchart or storyboard, a script for each scene in the program, and possibly layouts or descriptions of style. Prototype Prototyping involves creating and testing a part of the project, usually for the purpose of refining the design. Because the aim of prototyping is to refine the ideas and design of the project, things are usually changed after tests with users, so it is wise to avoid spending too much time on content for a prototype. Often prototypes are samples of screens with limited interactivity, or low quality media, just to get the idea across. The process of design, prototype, evaluation, redesign may be repeated several times to refine and improve the product before committing to production. Final specifications and scripts are drawn up before production.
Sabancı University - FASS - Introduction to Multimedia / Instructor: Murat Germen 7
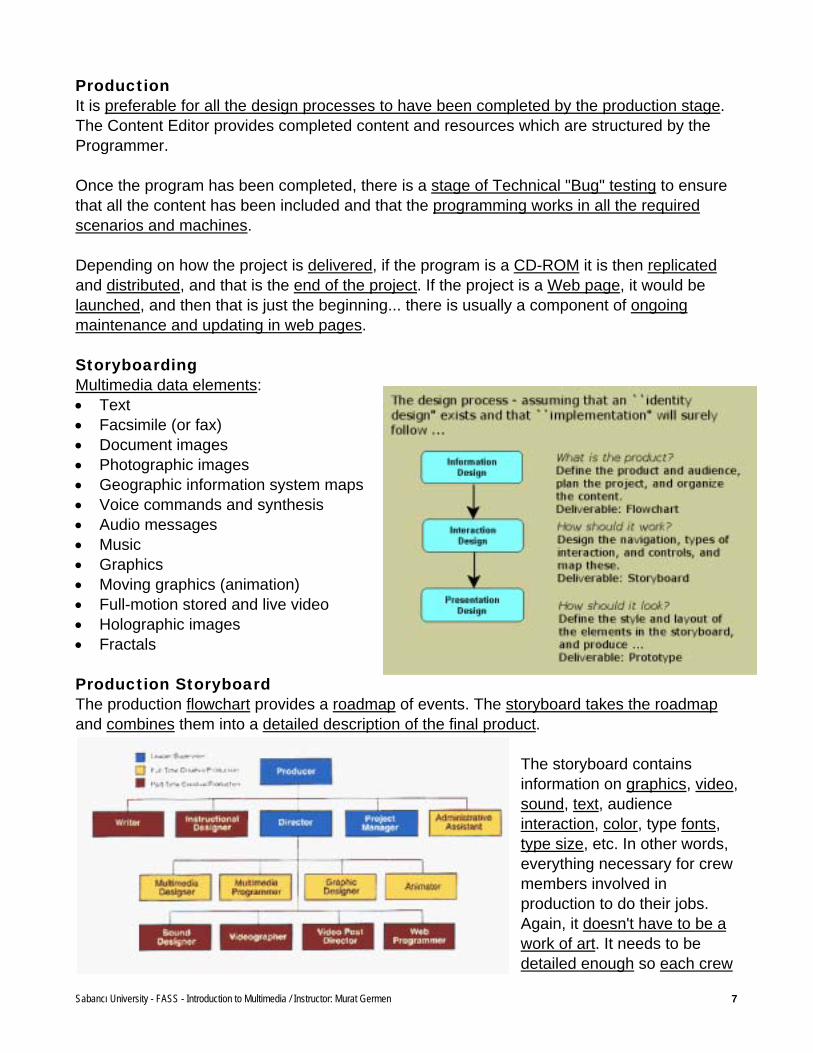
Production It is preferable for all the design processes to have been completed by the production stage. The Content Editor provides completed content and resources which are structured by the Programmer. Once the program has been completed, there is a stage of Technical "Bug" testing to ensure that all the content has been included and that the programming works in all the required scenarios and machines. Depending on how the project is delivered, if the program is a CD-ROM it is then replicated and distributed, and that is the end of the project. If the project is a Web page, it would be launched, and then that is just the beginning... there is usually a component of ongoing maintenance and updating in web pages. Storyboarding Multimedia data elements: • Text • Facsimile (or fax) • Document images • Photographic images • Geographic information system maps • Voice commands and synthesis • Audio messages • Music • Graphics • Moving graphics (animation) • Full-motion stored and live video • Holographic images • Fractals Production Storyboard The production flowchart provides a roadmap of events. The storyboard takes the roadmap and combines them into a detailed description of the final product.
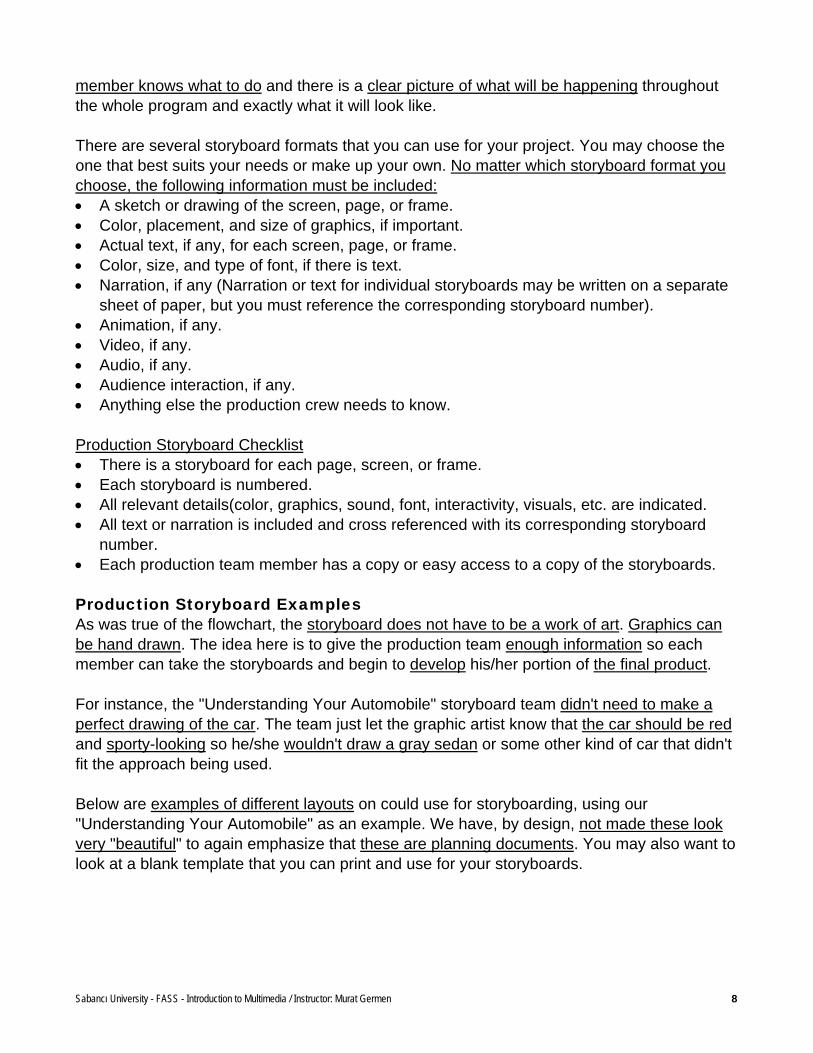
The storyboard contains information on graphics, video, sound, text, audience interaction, color, type fonts, type size, etc. In other words, everything necessary for crew members involved in production to do their jobs. Again, it doesn't have to be a work of art. It needs to be detailed enough so each crew
Sabancı University - FASS - Introduction to Multimedia / Instructor: Murat Germen 8
member knows what to do and there is a clear picture of what will be happening throughout the whole program and exactly what it will look like. There are several storyboard formats that you can use for your project. You may choose the one that best suits your needs or make up your own. No matter which storyboard format you choose, the following information must be included: • A sketch or drawing of the screen, page, or frame. • Color, placement, and size of graphics, if important. • Actual text, if any, for each screen, page, or frame. • Color, size, and type of font, if there is text. • Narration, if any (Narration or text for individual storyboards may be written on a separate
sheet of paper, but you must reference the corresponding storyboard number). • Animation, if any. • Video, if any. • Audio, if any. • Audience interaction, if any. • Anything else the production crew needs to know. Production Storyboard Checklist • There is a storyboard for each page, screen, or frame. • Each storyboard is numbered. • All relevant details(color, graphics, sound, font, interactivity, visuals, etc. are indicated. • All text or narration is included and cross referenced with its corresponding storyboard
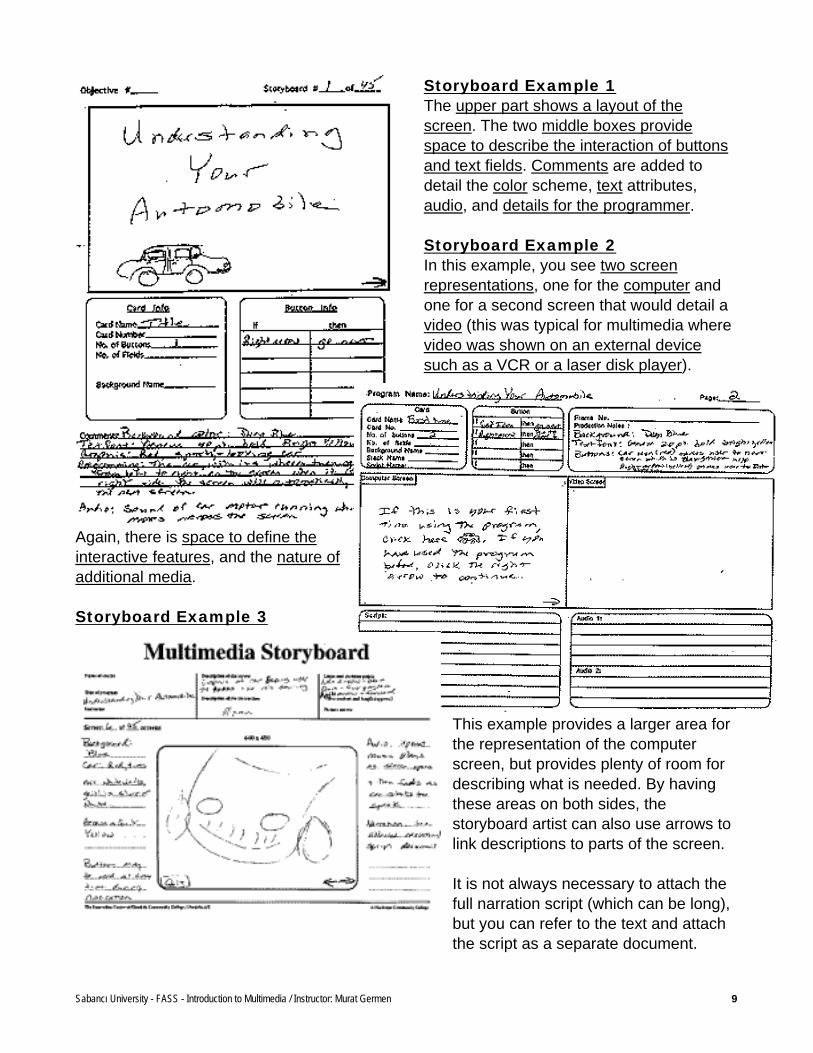
number. • Each production team member has a copy or easy access to a copy of the storyboards. Production Storyboard Examples As was true of the flowchart, the storyboard does not have to be a work of art. Graphics can be hand drawn. The idea here is to give the production team enough information so each member can take the storyboards and begin to develop his/her portion of the final product. For instance, the "Understanding Your Automobile" storyboard team didn't need to make a perfect drawing of the car. The team just let the graphic artist know that the car should be red and sporty-looking so he/she wouldn't draw a gray sedan or some other kind of car that didn't fit the approach being used. Below are examples of different layouts on could use for storyboarding, using our "Understanding Your Automobile" as an example. We have, by design, not made these look very "beautiful" to again emphasize that these are planning documents. You may also want to look at a blank template that you can print and use for your storyboards.
Sabancı University - FASS - Introduction to Multimedia / Instructor: Murat Germen 9
Storyboard Example 1 The upper part shows a layout of the screen. The two middle boxes provide space to describe the interaction of buttons and text fields. Comments are added to detail the color scheme, text attributes, audio, and details for the programmer. Storyboard Example 2 In this example, you see two screen representations, one for the computer and one for a second screen that would detail a video (this was typical for multimedia where video was shown on an external device such as a VCR or a laser disk player).
Again, there is space to define the interactive features, and the nature of additional media. Storyboard Example 3
This example provides a larger area for the representation of the computer screen, but provides plenty of room for describing what is needed. By having these areas on both sides, the storyboard artist can also use arrows to link descriptions to parts of the screen. It is not always necessary to attach the full narration script (which can be long), but you can refer to the text and attach the script as a separate document.
Sabancı University - FASS - Introduction to Multimedia / Instructor: Murat Germen 10
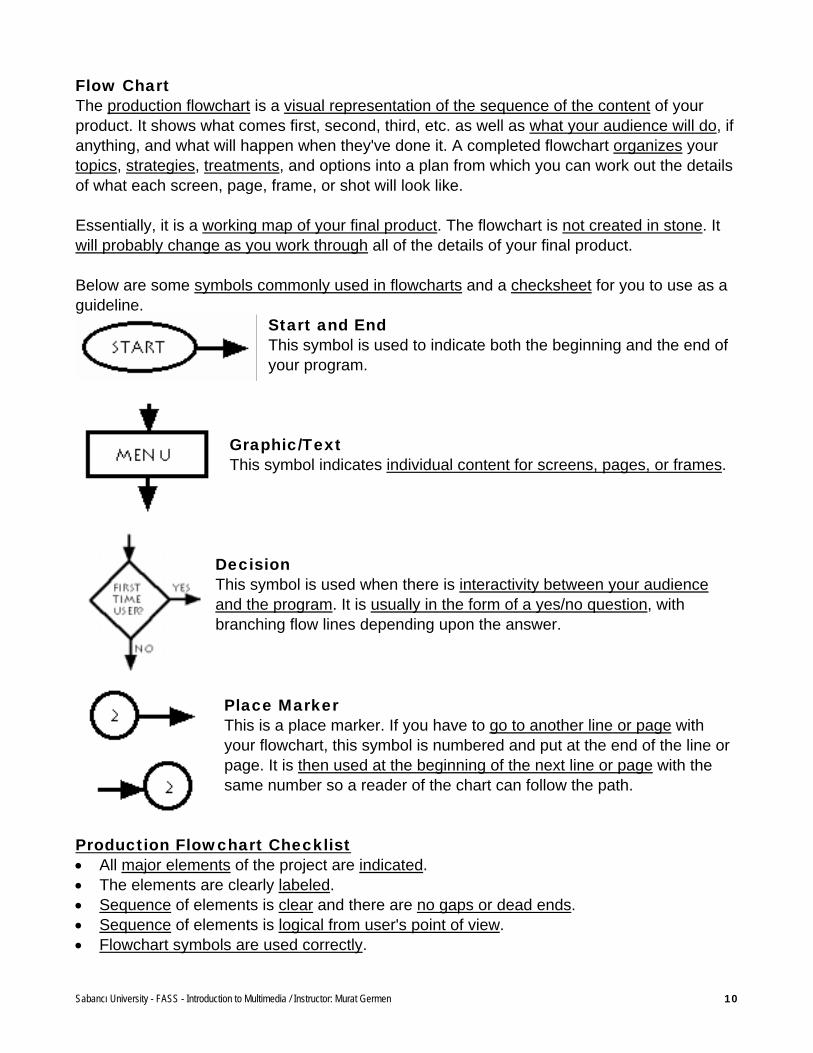
Flow Chart The production flowchart is a visual representation of the sequence of the content of your product. It shows what comes first, second, third, etc. as well as what your audience will do, if anything, and what will happen when they've done it. A completed flowchart organizes your topics, strategies, treatments, and options into a plan from which you can work out the details of what each screen, page, frame, or shot will look like. Essentially, it is a working map of your final product. The flowchart is not created in stone. It will probably change as you work through all of the details of your final product. Below are some symbols commonly used in flowcharts and a checksheet for you to use as a guideline.
Start and End This symbol is used to indicate both the beginning and the end of your program.
Graphic/Text This symbol indicates individual content for screens, pages, or frames.
Decision This symbol is used when there is interactivity between your audience and the program. It is usually in the form of a yes/no question, with branching flow lines depending upon the answer. Place Marker This is a place marker. If you have to go to another line or page with your flowchart, this symbol is numbered and put at the end of the line or page. It is then used at the beginning of the next line or page with the same number so a reader of the chart can follow the path.
Production Flowchart Checklist • All major elements of the project are indicated. • The elements are clearly labeled. • Sequence of elements is clear and there are no gaps or dead ends. • Sequence of elements is logical from user's point of view. • Flowchart symbols are used correctly.
Sabancı University - FASS - Introduction to Multimedia / Instructor: Murat Germen 11
Sabancı University - FASS - Introduction to Multimedia / Instructor: Murat Germen 12
Sabancı University - FASS - Introduction to Multimedia / Instructor: Murat Germen 13
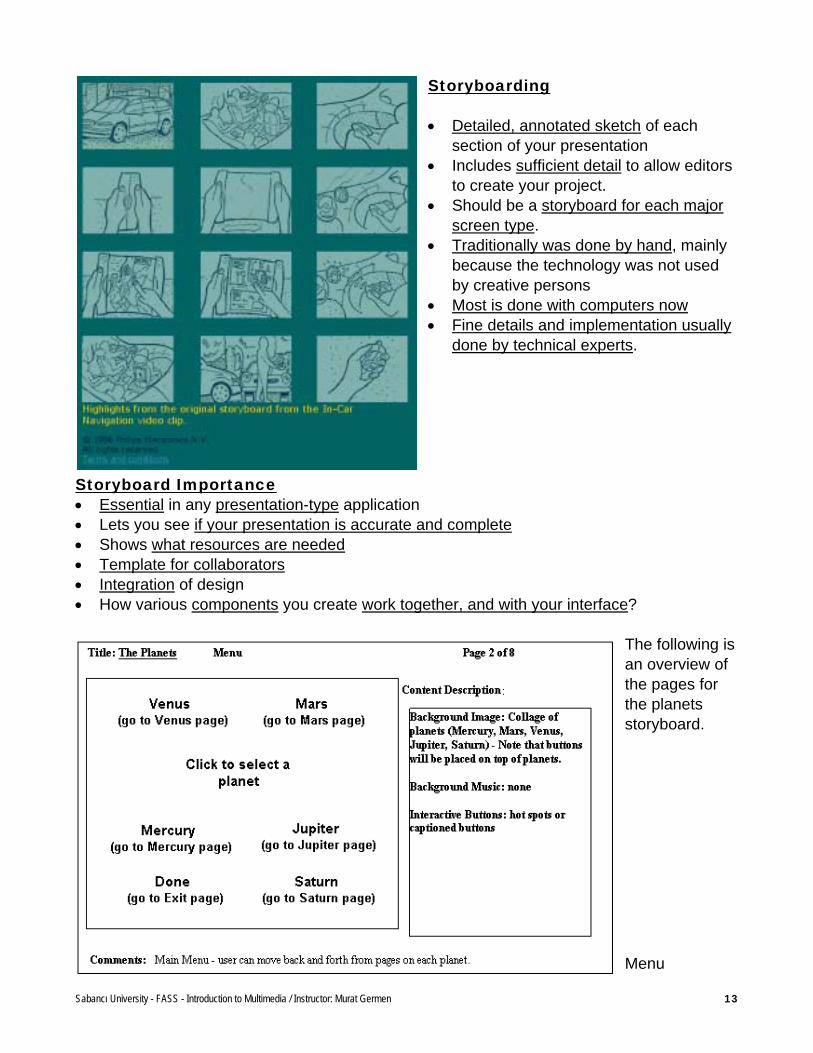
Storyboarding • Detailed, annotated sketch of each
section of your presentation • Includes sufficient detail to allow editors
to create your project. • Should be a storyboard for each major
screen type. • Traditionally was done by hand, mainly
because the technology was not used by creative persons
• Most is done with computers now • Fine details and implementation usually
done by technical experts.
Storyboard Importance • Essential in any presentation-type application • Lets you see if your presentation is accurate and complete • Shows what resources are needed • Template for collaborators • Integration of design • How various components you create work together, and with your interface?
The following is an overview of the pages for the planets storyboard. Menu
Sabancı University - FASS - Introduction to Multimedia / Instructor: Murat Germen 14
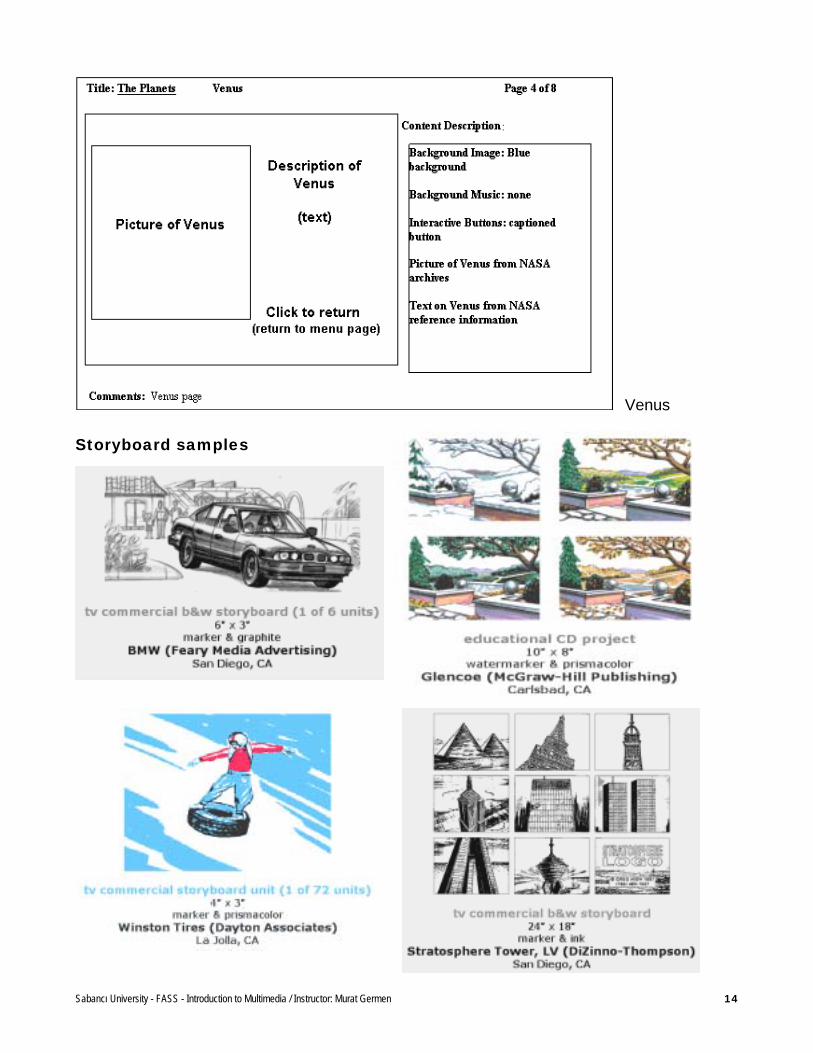
Venus
Storyboard samples
Sabancı University - FASS - Introduction to Multimedia / Instructor: Murat Germen 15
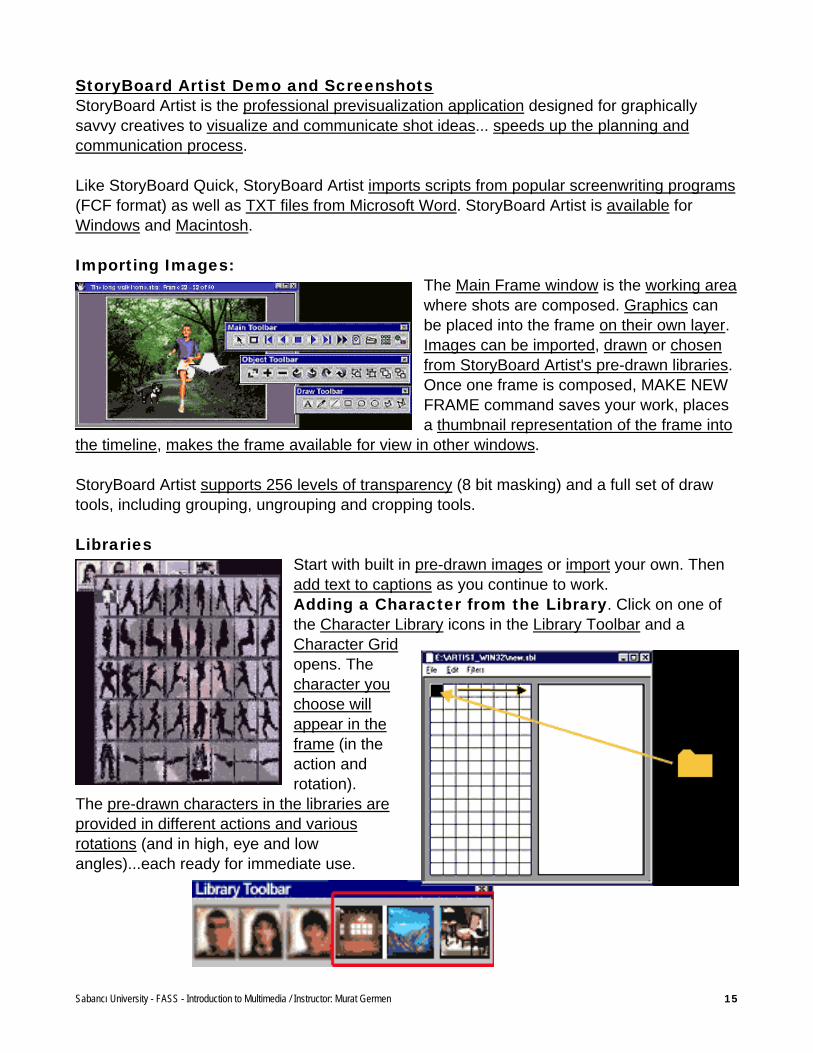
StoryBoard Artist Demo and Screenshots StoryBoard Artist is the professional previsualization application designed for graphically savvy creatives to visualize and communicate shot ideas... speeds up the planning and communication process. Like StoryBoard Quick, StoryBoard Artist imports scripts from popular screenwriting programs (FCF format) as well as TXT files from Microsoft Word. StoryBoard Artist is available for Windows and Macintosh. Importing Images:
The Main Frame window is the working area where shots are composed. Graphics can be placed into the frame on their own layer. Images can be imported, drawn or chosen from StoryBoard Artist's pre-drawn libraries. Once one frame is composed, MAKE NEW FRAME command saves your work, places a thumbnail representation of the frame into
the timeline, makes the frame available for view in other windows. StoryBoard Artist supports 256 levels of transparency (8 bit masking) and a full set of draw tools, including grouping, ungrouping and cropping tools. Libraries
Start with built in pre-drawn images or import your own. Then add text to captions as you continue to work. Adding a Character from the Library. Click on one of the Character Library icons in the Library Toolbar and a Character Grid opens. The character you choose will appear in the frame (in the action and rotation).
The pre-drawn characters in the libraries are provided in different actions and various rotations (and in high, eye and low angles)...each ready for immediate use.
Sabancı University - FASS - Introduction to Multimedia / Instructor: Murat Germen 16
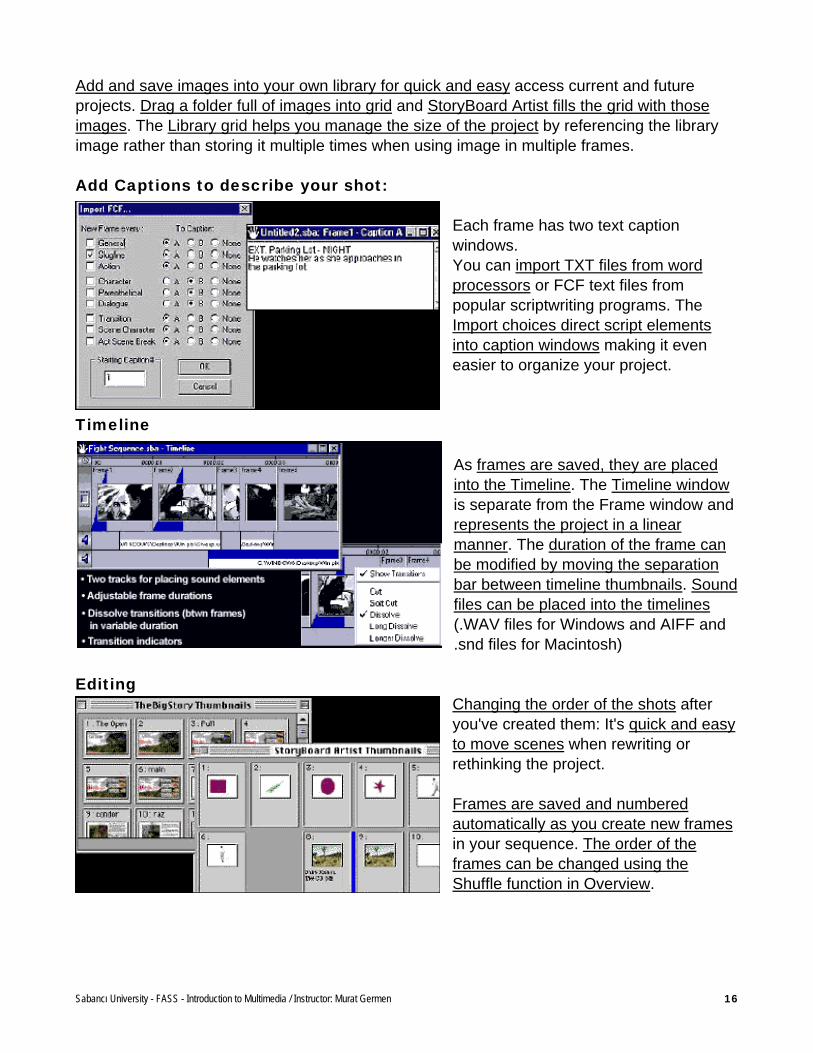
Add and save images into your own library for quick and easy access current and future projects. Drag a folder full of images into grid and StoryBoard Artist fills the grid with those images. The Library grid helps you manage the size of the project by referencing the library image rather than storing it multiple times when using image in multiple frames. Add Captions to describe your shot:
Each frame has two text caption windows. You can import TXT files from word processors or FCF text files from popular scriptwriting programs. The Import choices direct script elements into caption windows making it even easier to organize your project.
Timeline As frames are saved, they are placed into the Timeline. The Timeline window is separate from the Frame window and represents the project in a linear manner. The duration of the frame can be modified by moving the separation bar between timeline thumbnails. Sound files can be placed into the timelines (.WAV files for Windows and AIFF and .snd files for Macintosh)
Editing
Changing the order of the shots after you've created them: It's quick and easy to move scenes when rewriting or rethinking the project. Frames are saved and numbered automatically as you create new frames in your sequence. The order of the frames can be changed using the Shuffle function in Overview.
Sabancı University - FASS - Introduction to Multimedia / Instructor: Murat Germen 17
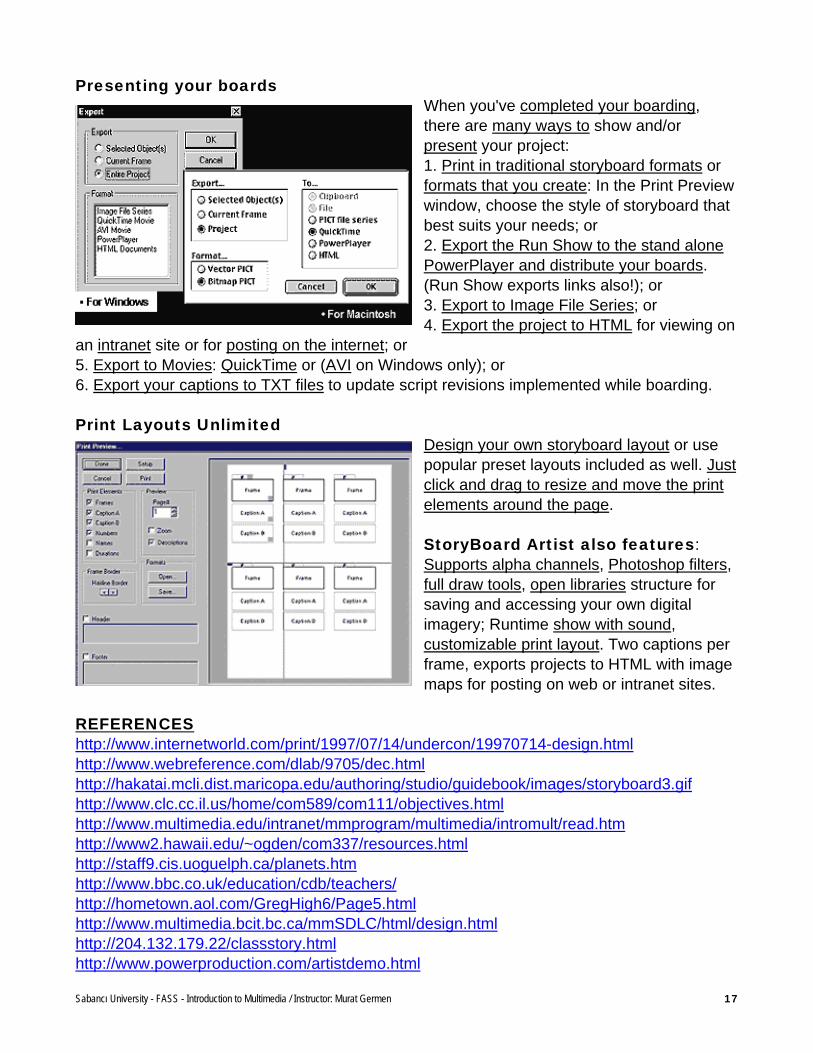
Presenting your boards When you've completed your boarding, there are many ways to show and/or present your project: 1. Print in traditional storyboard formats or formats that you create: In the Print Preview window, choose the style of storyboard that best suits your needs; or 2. Export the Run Show to the stand alone PowerPlayer and distribute your boards. (Run Show exports links also!); or 3. Export to Image File Series; or 4. Export the project to HTML for viewing on
an intranet site or for posting on the internet; or 5. Export to Movies: QuickTime or (AVI on Windows only); or 6. Export your captions to TXT files to update script revisions implemented while boarding. Print Layouts Unlimited
Design your own storyboard layout or use popular preset layouts included as well. Just click and drag to resize and move the print elements around the page. StoryBoard Artist also features: Supports alpha channels, Photoshop filters, full draw tools, open libraries structure for saving and accessing your own digital imagery; Runtime show with sound, customizable print layout. Two captions per frame, exports projects to HTML with image maps for posting on web or intranet sites.
REFERENCES http://www.internetworld.com/print/1997/07/14/undercon/19970714-design.html http://www.webreference.com/dlab/9705/dec.html http://hakatai.mcli.dist.maricopa.edu/authoring/studio/guidebook/images/storyboard3.gif http://www.clc.cc.il.us/home/com589/com111/objectives.html http://www.multimedia.edu/intranet/mmprogram/multimedia/intromult/read.htm http://www2.hawaii.edu/~ogden/com337/resources.html http://staff9.cis.uoguelph.ca/planets.htm http://www.bbc.co.uk/education/cdb/teachers/ http://hometown.aol.com/GregHigh6/Page5.html http://www.multimedia.bcit.bc.ca/mmSDLC/html/design.html http://204.132.179.22/classstory.html http://www.powerproduction.com/artistdemo.html