deployment Guide Configuring And Enabling Gss - Infoblox · DEPLOYMENT GUIDE Configuring and...
18
© 2016 Infoblox Inc. All rights reserved. Infoblox-DG-0141-00 Enabling and Configuring GSS-TSIG on NIOS - Dec 2016 Page 1 of 18 DEPLOYMENT GUIDE Configuring and Enabling GSS-TSIG on NIOS
Transcript of deployment Guide Configuring And Enabling Gss - Infoblox · DEPLOYMENT GUIDE Configuring and...
© 2016 Infoblox Inc. All rights reserved. Infoblox-DG-0141-00 Enabling and Configuring GSS-TSIG on NIOS - Dec 2016 Page 1 of 18
DEPLOYMENT GUIDE
Configuring and Enabling GSS-TSIG on NIOS
© 2016 Infoblox Inc. All rights reserved. Infoblox-DG-0141-00 Enabling and Configuring GSS-TSIG on NIOS - Dec 2016 Page 2 of 18
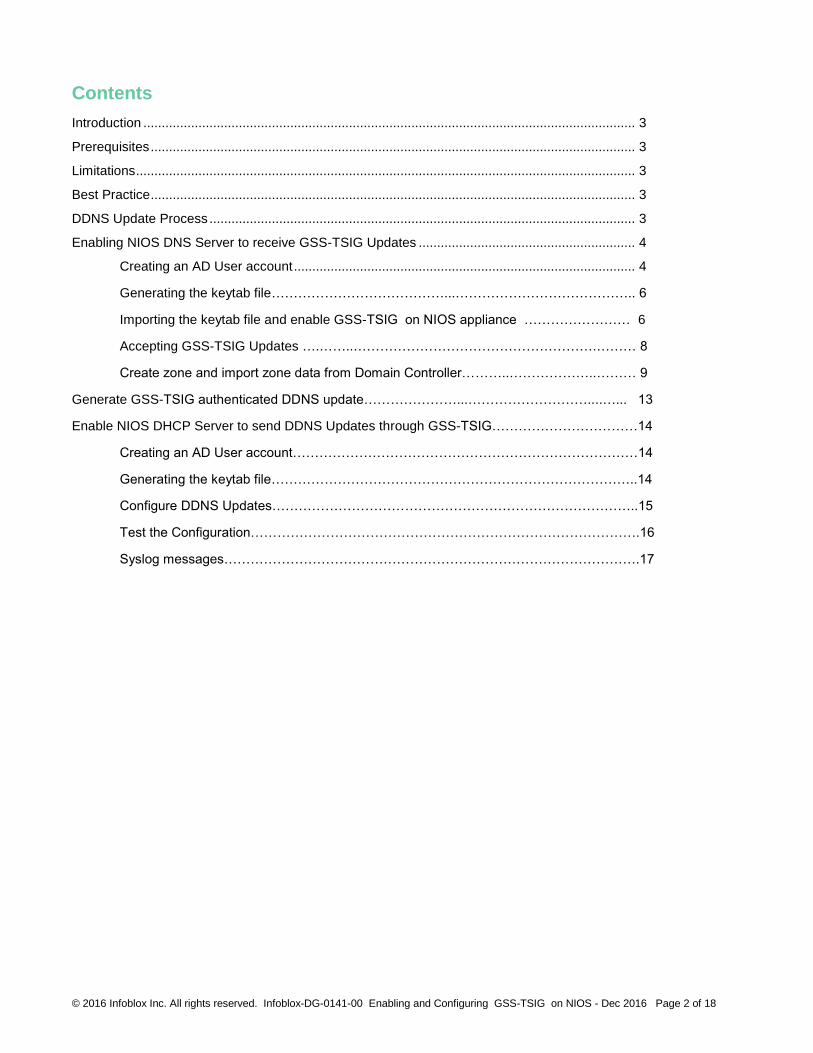
Contents
Introduction ...................................................................................................................................... 3
Prerequisites .................................................................................................................................... 3
Limitations ........................................................................................................................................ 3
Best Practice .................................................................................................................................... 3
DDNS Update Process .................................................................................................................... 3
Enabling NIOS DNS Server to receive GSS-TSIG Updates ........................................................... 4
Creating an AD User account ............................................................................................. 4
Generating the keytab file…………………………………...………………………………….. 6
Importing the keytab file and enable GSS-TSIG on NIOS appliance …………………… 6
Accepting GSS-TSIG Updates ….……..……………………………………………….……… 8
Create zone and import zone data from Domain Controller………..………………..……… 9
Generate GSS-TSIG authenticated DDNS update…………………...………………………....…... 13
Enable NIOS DHCP Server to send DDNS Updates through GSS-TSIG……………………………14
Creating an AD User account……………………………………………………………………14
Generating the keytab file………………………………………………………………………..14
Configure DDNS Updates………………………………………………………………………..15
Test the Configuration…………………………………………………………………………….16
Syslog messages………………………………………………………………………………….17

© 2016 Infoblox Inc. All rights reserved. Infoblox-DG-0141-00 Enabling and Configuring GSS-TSIG on NIOS - Dec 2016 Page 3 of 18
Introduction
GSS-TSIG (Generic Security Service Algorithm –Transaction Signature) is used to authenticate DDNS (Dynamic
Domain Name System) updates. It is an extension of TSIG authentication that uses the Kerberos v5
authentication system. There are a set of client/server negotiations to establish a “security context” and makes
use of a Kerberos server (Microsoft AD domain controller) that functions as the KDC (Kerberos Key Distribution
Center). The KDC provides session tickets and temporary session keys to users and computers within an Active
Directory Domain. An Infoblox NIOS (Network Identity Operating System) appliance is configured to accept GSS-
TSIG signed DDNS updates from multiple clients in a realm or multiple clients that belong to different AD domains
in which each domain has a unique GSS-TSIG key. Infoblox appliances acting as DHCP Servers can also update
DNS records when zones are managed on AD Domain Controllers via DDNS updates secured through using
GSS-TSIG.
Prerequisites
The following are prerequisites for GSS-TSIG support for secure dynamic DNS updates:
Functional 7.3 Infoblox Grid with a Grid Master (although GSS-TSIG support is available in prior releases the
NIOS 7.3 release adds service principal name tracking).
At least one Grid member with an active DNS license installed and the DNS service enabled.
At least one NIOS appliance acting as an authoritative DNS Server (Primary).
Microsoft Domain Controller to generate a keytab file.
The time must be in sync between Microsoft Domain Controller and NIOS DNS appliance with NTP enabled.
A Microsoft DNS server with an authoritative zone for the domain and domain controllers which have been
registered in the domain using this DNS server
A Windows client which is a member of the domain and is using the Infoblox server for DNS services
Limitations
Following general limitations apply:
A NIOS appliance serving DHCP can send GSS-TSIG authenticated DDNS updates to an external DNS
Server (such as an AD Domain Controller or another Infoblox Grid) or a NIOS appliance serving DNS can
accept GSS-TSIG authenticated updates from DHCP clients and servers. These two features are not
supported at the same time.
Best Practice
The following best practices will make deployment easier:
Set the Active Directory user account for the NIOS DNS server to have a never expiring password and
disable the ability of user to change the password. Otherwise the keytab file must be updated every time
the password expires and DDNS updates will fail until this is done. Instead, use your company’s process
for changing passwords in service type accounts.
The keytab file contains highly sensitive data for the NIOS appliance account. Ensure that you store and
transport its contents securely.
DDNS Update Process
• The DDNS client sends a DNS request to locate a domain controller and logs in to the domain controller. • The DDNS client automatically sends a DNS query for the Kerberos Server. • The NIOS appliance replies with the name of the Kerberos server. • The DDNS client automatically logs in to the Kerberos server. • The Kerberos server sends the client a TGT (ticket-granting ticket). • Using the TGT, the AD member requests a service ticket for the DNS server. • The Kerberos server replies with a service ticket for that server.

© 2016 Infoblox Inc. All rights reserved. Infoblox-DG-0141-00 Enabling and Configuring GSS-TSIG on NIOS - Dec 2016 Page 4 of 18
• The client sends an unauthenticated DDNS update, which is refused by the DNS server. • The DDNS client sends the DNS server a TKEY (transaction key) request:
o A transaction key record establishes shared secret keys for use with TSIG resource record. o The request includes the service ticket. The service ticket includes the appliance’s principal and
proposed TSIG key, along with other items such as ticket lifetime and a timestamp. o The DNS server responds with a DNS server-signed TSIG. o The DDNS client and NIOS appliance now have established a security context.
• The DDNS client sends an authenticated DDNS update. • The DNS server authenticates the DDNS update and processes it. • The DNS server sends a GSS-TSIG-authenticated response to the AD member, confirming the update.
Enabling NIOS DNS Server to Receive GSS-TSIG Updates
A NIOS appliance is configured to support Active Directory and accept secure DDNS updates from clients using
GSS-TSIG. It requires certain steps as given below:
1. Add a user account in Active Directory for the NIOS DNS Server.
2. Generate a keytab file on the AD Domain Controller using the newly created user account.
3. Import the keytab file to the Infoblox Grid.
4. Create a forward-mapping zone in NIOS and import the zone data from the AD domain controller.
5. Enable GSS-TSIG updates.
Creating an AD user account
In our example, we create a user account named ns in Active Directory that matches with the host name of the
NIOS appliance in the contoso.com domain. This account will be used to generate the keytab file which will be
exported to NIOS.
Login to a Microsoft Domain Controller using an account with account creation privileges in Active Directory.
1. Open the Active Directory Users and Computers Snap-in in the Server Manager
Right-click the Users OU, click New and click User.

© 2016 Infoblox Inc. All rights reserved. Infoblox-DG-0141-00 Enabling and Configuring GSS-TSIG on NIOS - Dec 2016 Page 5 of 18
2. Type the user information. In our example the login name is ns and is part of contoso.com domain. Click
Next.
Note: The name you enter in the User logon name field is the name that is later used to export the keytab
file. This is also the principal name. It’s better to use the hostname of the appliance for which the keytab
file is to be generated. In our example, the NIOS DNS appliance name is ns.contoso.com
3. Enter the password and enable the options “User cannot change password” and “Password never
expires”. Click Next.
4. Click Finish.
© 2016 Infoblox Inc. All rights reserved. Infoblox-DG-0141-00 Enabling and Configuring GSS-TSIG on NIOS - Dec 2016 Page 6 of 18
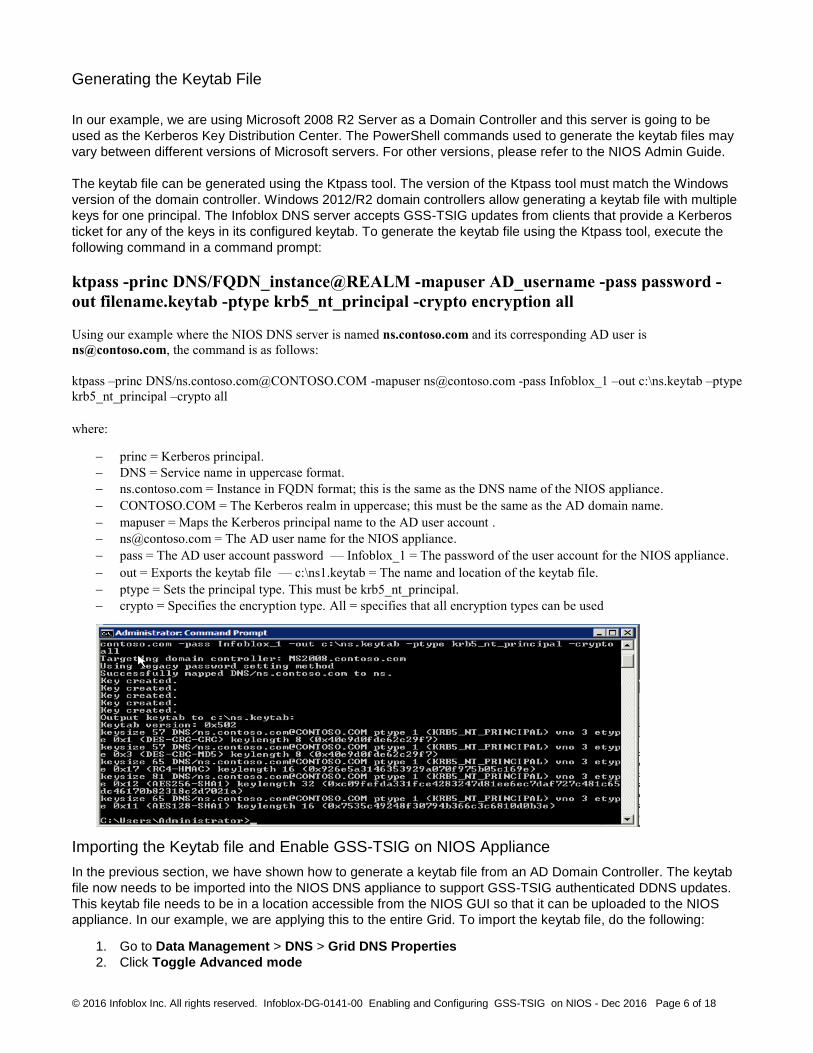
Generating the Keytab File
In our example, we are using Microsoft 2008 R2 Server as a Domain Controller and this server is going to be
used as the Kerberos Key Distribution Center. The PowerShell commands used to generate the keytab files may
vary between different versions of Microsoft servers. For other versions, please refer to the NIOS Admin Guide.
The keytab file can be generated using the Ktpass tool. The version of the Ktpass tool must match the Windows
version of the domain controller. Windows 2012/R2 domain controllers allow generating a keytab file with multiple
keys for one principal. The Infoblox DNS server accepts GSS-TSIG updates from clients that provide a Kerberos
ticket for any of the keys in its configured keytab. To generate the keytab file using the Ktpass tool, execute the
following command in a command prompt:
ktpass -princ DNS/FQDN_instance@REALM -mapuser AD_username -pass password -
out filename.keytab -ptype krb5_nt_principal -crypto encryption all
Using our example where the NIOS DNS server is named ns.contoso.com and its corresponding AD user is
[email protected], the command is as follows:
ktpass –princ DNS/[email protected] -mapuser [email protected] -pass Infoblox_1 –out c:\ns.keytab –ptype
krb5_nt_principal –crypto all
where:
princ = Kerberos principal.
DNS = Service name in uppercase format.
ns.contoso.com = Instance in FQDN format; this is the same as the DNS name of the NIOS appliance.
CONTOSO.COM = The Kerberos realm in uppercase; this must be the same as the AD domain name.
mapuser = Maps the Kerberos principal name to the AD user account .
[email protected] = The AD user name for the NIOS appliance.
pass = The AD user account password— Infoblox_1 = The password of the user account for the NIOS appliance.
out = Exports the keytab file— c:\ns1.keytab = The name and location of the keytab file.
ptype = Sets the principal type. This must be krb5_nt_principal.
crypto = Specifies the encryption type. All = specifies that all encryption types can be used
Importing the Keytab file and Enable GSS-TSIG on NIOS Appliance
In the previous section, we have shown how to generate a keytab file from an AD Domain Controller. The keytab
file now needs to be imported into the NIOS DNS appliance to support GSS-TSIG authenticated DDNS updates.
This keytab file needs to be in a location accessible from the NIOS GUI so that it can be uploaded to the NIOS
appliance. In our example, we are applying this to the entire Grid. To import the keytab file, do the following:
1. Go to Data Management > DNS > Grid DNS Properties
2. Click Toggle Advanced mode
© 2016 Infoblox Inc. All rights reserved. Infoblox-DG-0141-00 Enabling and Configuring GSS-TSIG on NIOS - Dec 2016 Page 7 of 18
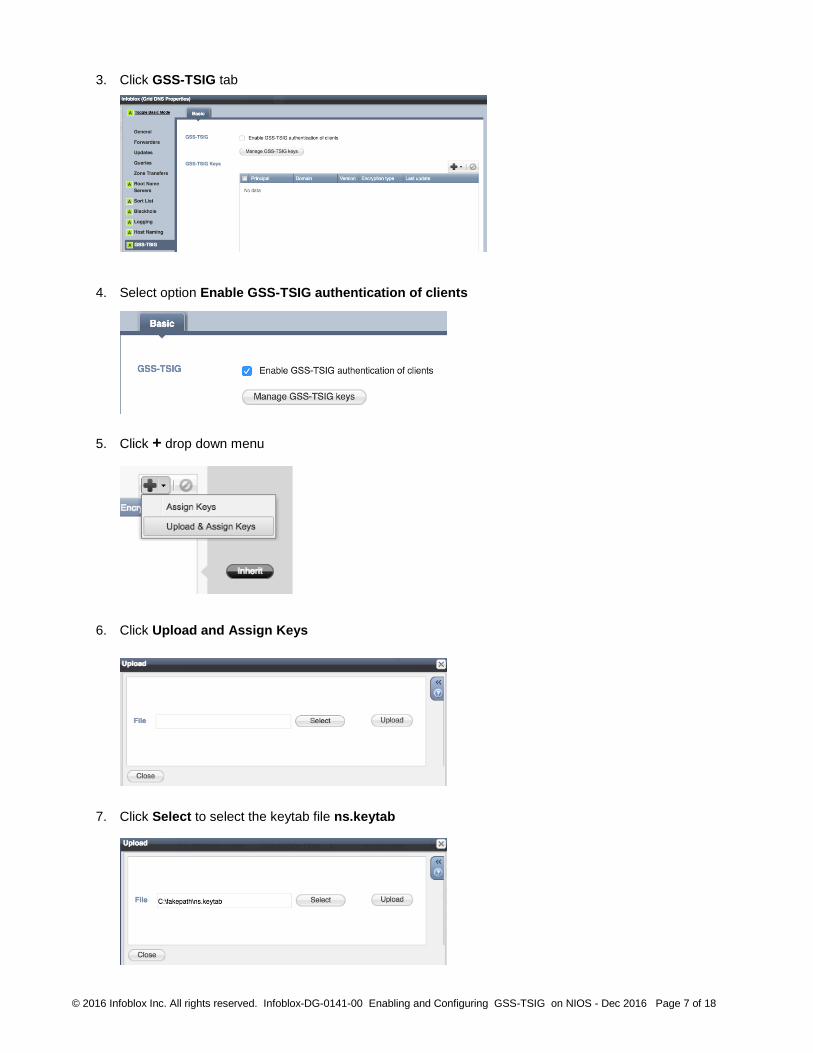
3. Click GSS-TSIG tab
4. Select option Enable GSS-TSIG authentication of clients
5. Click + drop down menu
6. Click Upload and Assign Keys
7. Click Select to select the keytab file ns.keytab
© 2016 Infoblox Inc. All rights reserved. Infoblox-DG-0141-00 Enabling and Configuring GSS-TSIG on NIOS - Dec 2016 Page 8 of 18
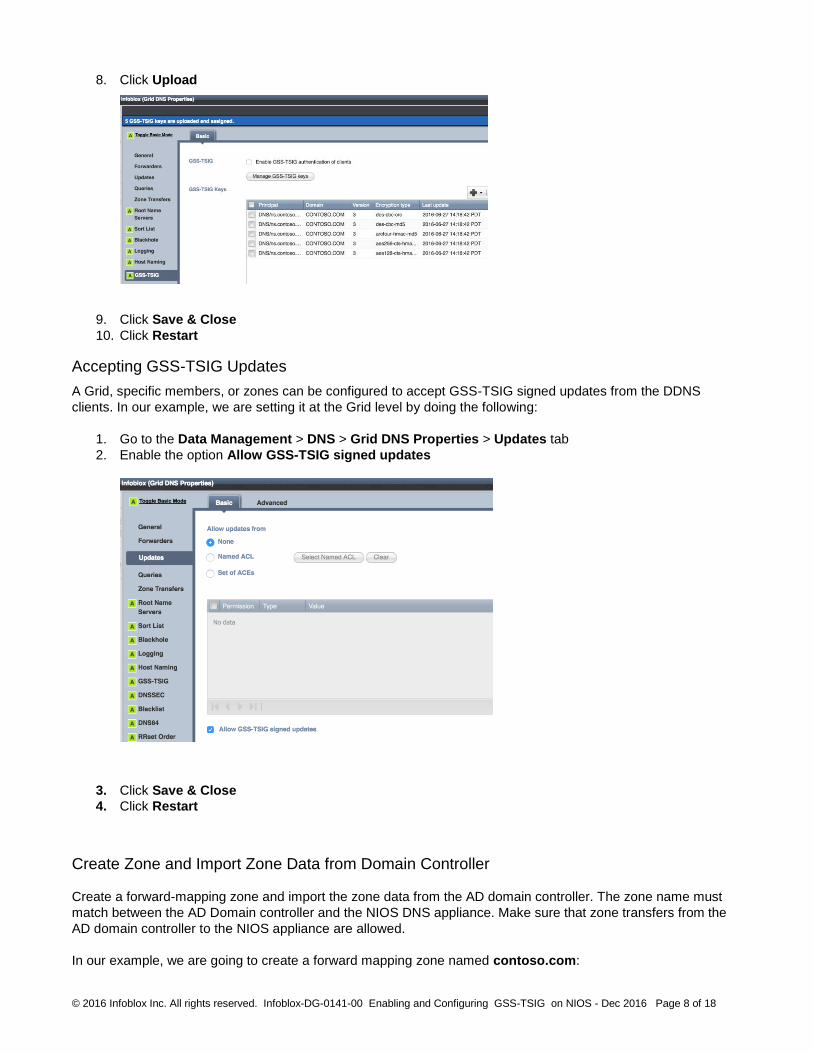
8. Click Upload
9. Click Save & Close
10. Click Restart
Accepting GSS-TSIG Updates
A Grid, specific members, or zones can be configured to accept GSS-TSIG signed updates from the DDNS
clients. In our example, we are setting it at the Grid level by doing the following:
1. Go to the Data Management > DNS > Grid DNS Properties > Updates tab
2. Enable the option Allow GSS-TSIG signed updates
3. Click Save & Close
4. Click Restart
Create Zone and Import Zone Data from Domain Controller Create a forward-mapping zone and import the zone data from the AD domain controller. The zone name must
match between the AD Domain controller and the NIOS DNS appliance. Make sure that zone transfers from the
AD domain controller to the NIOS appliance are allowed.
In our example, we are going to create a forward mapping zone named contoso.com:

© 2016 Infoblox Inc. All rights reserved. Infoblox-DG-0141-00 Enabling and Configuring GSS-TSIG on NIOS - Dec 2016 Page 9 of 18
1. Go to Data Management > DNS > Zones > Add > Zone > Authoritative Zone
2. Select option Add an authoritative forward-mapping zone
3. Click Next
4. Type contoso.com in the Name field
5. Click Next
6. Select option Use this set of name servers (In our example we are not using a Name Server Group,
though it can be used.)
© 2016 Infoblox Inc. All rights reserved. Infoblox-DG-0141-00 Enabling and Configuring GSS-TSIG on NIOS - Dec 2016 Page 10 of 18
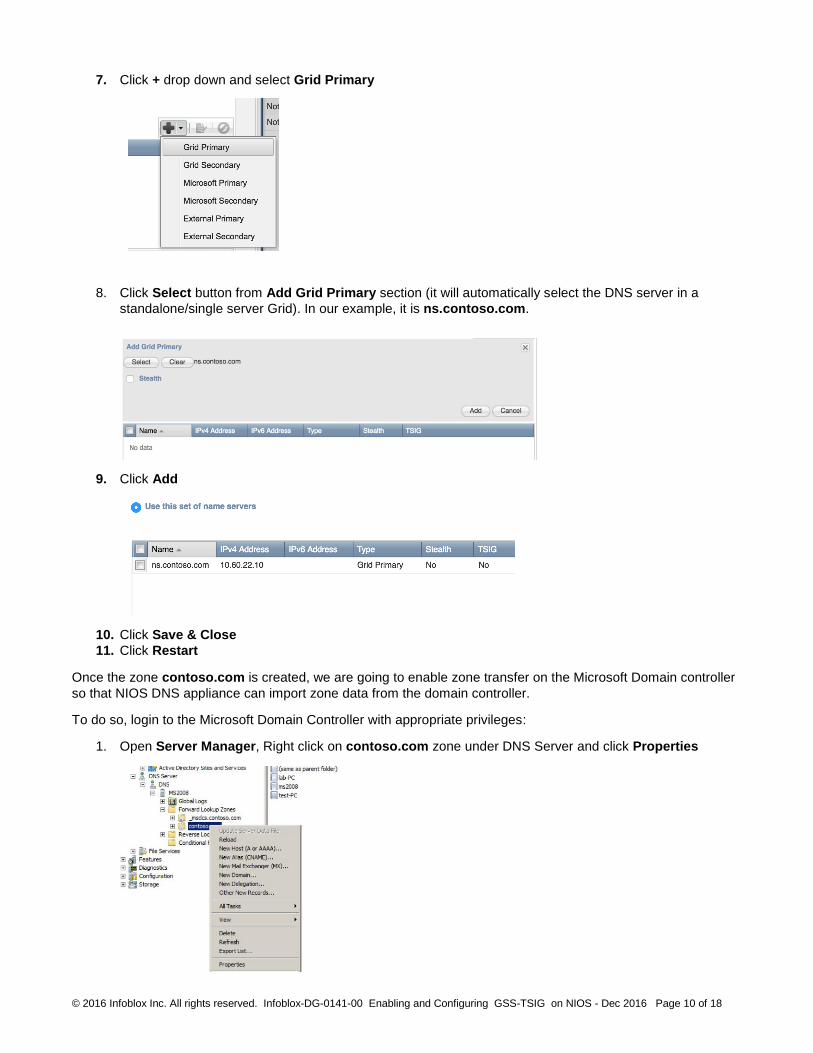
7. Click + drop down and select Grid Primary
8. Click Select button from Add Grid Primary section (it will automatically select the DNS server in a
standalone/single server Grid). In our example, it is ns.contoso.com.
9. Click Add
10. Click Save & Close
11. Click Restart
Once the zone contoso.com is created, we are going to enable zone transfer on the Microsoft Domain controller
so that NIOS DNS appliance can import zone data from the domain controller.
To do so, login to the Microsoft Domain Controller with appropriate privileges:
1. Open Server Manager, Right click on contoso.com zone under DNS Server and click Properties

© 2016 Infoblox Inc. All rights reserved. Infoblox-DG-0141-00 Enabling and Configuring GSS-TSIG on NIOS - Dec 2016 Page 11 of 18
2. Select the Zone Transfers tab and select Allow zone transfers. In our example, we are opting for the
more secure option of Only to the following servers.
3. Click Edit and type the IP address of the NIOS DNS appliance. In our example, it is 10.60.22.10.
4. Click OK
© 2016 Infoblox Inc. All rights reserved. Infoblox-DG-0141-00 Enabling and Configuring GSS-TSIG on NIOS - Dec 2016 Page 12 of 18
5. Click OK
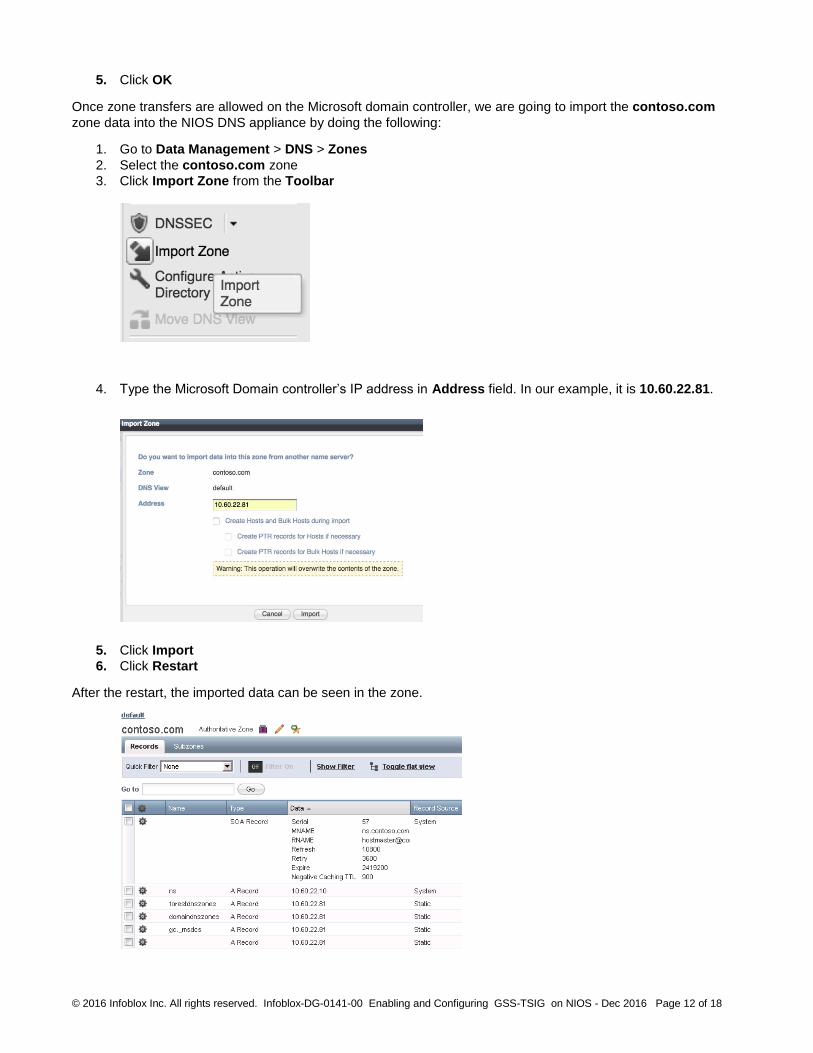
Once zone transfers are allowed on the Microsoft domain controller, we are going to import the contoso.com
zone data into the NIOS DNS appliance by doing the following:
1. Go to Data Management > DNS > Zones
2. Select the contoso.com zone
3. Click Import Zone from the Toolbar
4. Type the Microsoft Domain controller’s IP address in Address field. In our example, it is 10.60.22.81.
5. Click Import
6. Click Restart
After the restart, the imported data can be seen in the zone.

© 2016 Infoblox Inc. All rights reserved. Infoblox-DG-0141-00 Enabling and Configuring GSS-TSIG on NIOS - Dec 2016 Page 13 of 18
Generate GSS-TSIG authenticated update
You can now test a GSS-TSIG authenticated DDNS update from a client. In our example, we are using a
Windows 7 client named “test-pc” that is a member of the contoso.com domain. To generate the GSS-TSIG
based authenticated DDNS update, do the following:
From the Windows client, issue the following command at the command prompt:
1. ipconfig /registerdns
Note: The NIOS DNS appliance must be used by the Windows client for all DNS queries. In our case it is
10.60.22.10. Also note that Windows clients typically send an unsecure update followed by a secure (GSS-TSIG)
update, this can be changed by Windows Group Policy so that clients only perform secure updates.
To verify if the GSS-TSIG authenticated DDNS update is successful:
1. Go to zone contoso.com under Data Management > DNS > Zones
2. Verify if a Dynamic record has been created for the client. In our example, the two DDNS clients
registered their DNS records as lab-pc and test-pc.
For troubleshooting purposes, you can view the syslog for the DDNS transactions.
1. Navigate to Administration > Logs > Syslog
2. Enable toggle multi-line view.
3. Below shows a sample DDNS transaction.

© 2016 Infoblox Inc. All rights reserved. Infoblox-DG-0141-00 Enabling and Configuring GSS-TSIG on NIOS - Dec 2016 Page 14 of 18
Enabling NIOS DHCP Server to send DDNS Updates through GSS-TSIG
A NIOS DHCP appliance can be configured to send DDNS updates using GSS-TSIG authentication, on behalf of
its DHCP clients, to Microsoft DNS Servers as follows:
1. Add a user account in Active Directory for the NIOS DHCP Server.
2. Generate a keytab file on the AD Domain Controller using the newly created user account.
3. Import the keytab file to the Infoblox Grid.
4. Configure DDNS updates
Creating an AD user account
In our example, we create a user account named ib-gss-tsig-user in Active Directory. This account will be used to
generate the keytab file, which will be exported to NIOS.
Login to a Microsoft Domain Controller using an account with account creation privileges in Active Directory.
1. Open the Active Directory Users and Computers Snap-in in the Server Manager
Right-click the Managed Service Accounts OU, click New and User. Type the user information
Note: The name you enter in the User logon name field is the
name that is later used to export the keytab file. This is also
the principal name.
2. Click Next.
3. Enter the password and enable the options “User cannot change password” and “Password never
expires”. Click Next,

© 2016 Infoblox Inc. All rights reserved. Infoblox-DG-0141-00 Enabling and Configuring GSS-TSIG on NIOS - Dec 2016 Page 15 of 18
4. Click Finish
5. The newly created AD user account should be member of group DnsUpdateProxy or an account that
allows it to update records that have potentially been added by another DHCP server, such as the DNS
Admins.
Generating the Keytab File
Once the user account has been created the Keytab file can be generated using the Windows ktpass utility.
Note that any changes to the user account, such as changing the password, mean that the Keytab file needs to
be regenerated. The following is a format of the command to generate keytab file. The case sensitivity is
important.
ktpass -princ [email protected] -mapuser [email protected] -pass **** -out ib-gss-
tsig-user.tab -ptype krb5_nt_principal -crypto AES256-SHA1
In our example we used the command to generate keytab as follows,
C:\Users\administrator>ktpass -princ [email protected] -mapuser ib
[email protected] -pass !infobl0x -out ib-gss-tsig-user.tab -ptype k
rb5_nt_principal -crypto AES256-SHA1
Targeting domain controller: dc-01.contoso.com
Using legacy password setting method
Failed to set property 'servicePrincipalName' to 'ib-gss-tsig-user' on Dn 'CN=In
foblox GSS TSIG User,CN=Managed Service Accounts,DC=contoso,DC=com': 0x13.
WARNING: Unable to set SPN mapping data.
If ib-gss-tsig-user already has an SPN mapping installed for ib-gss-tsig-user, t
his is no cause for concern.
Key created.
Output keytab to ib-gss-tsig-user.tab:
Keytab version: 0x502
keysize 81 [email protected] ptype 1 (KRB5_NT_PRINCIPAL) vno 3 ety
pe 0x12 (AES256-SHA1) keylength 32 (0x685effa0c1119b5e0c1e2b89560433d20b1ae8b80d
32f45668389a8712dd131b)
Once the keytab file is generated, please refer to the previous section “Importing the keytab file and Enable
GSS-TSIG on NIOS Appliance” to import the keytab file in NIOS.
Configure DDNS Updates
Once the keytab file is generated and imported, the DDNS updates are configured in Grid DHCP Properties and
in a separate control option called Configure DDNS under Toolbar.
1. Go to Data Management > DHCP > Networks and under Toolbar, click Grid DHCP Properties > IPv4
DDNS
© 2016 Infoblox Inc. All rights reserved. Infoblox-DG-0141-00 Enabling and Configuring GSS-TSIG on NIOS - Dec 2016 Page 16 of 18
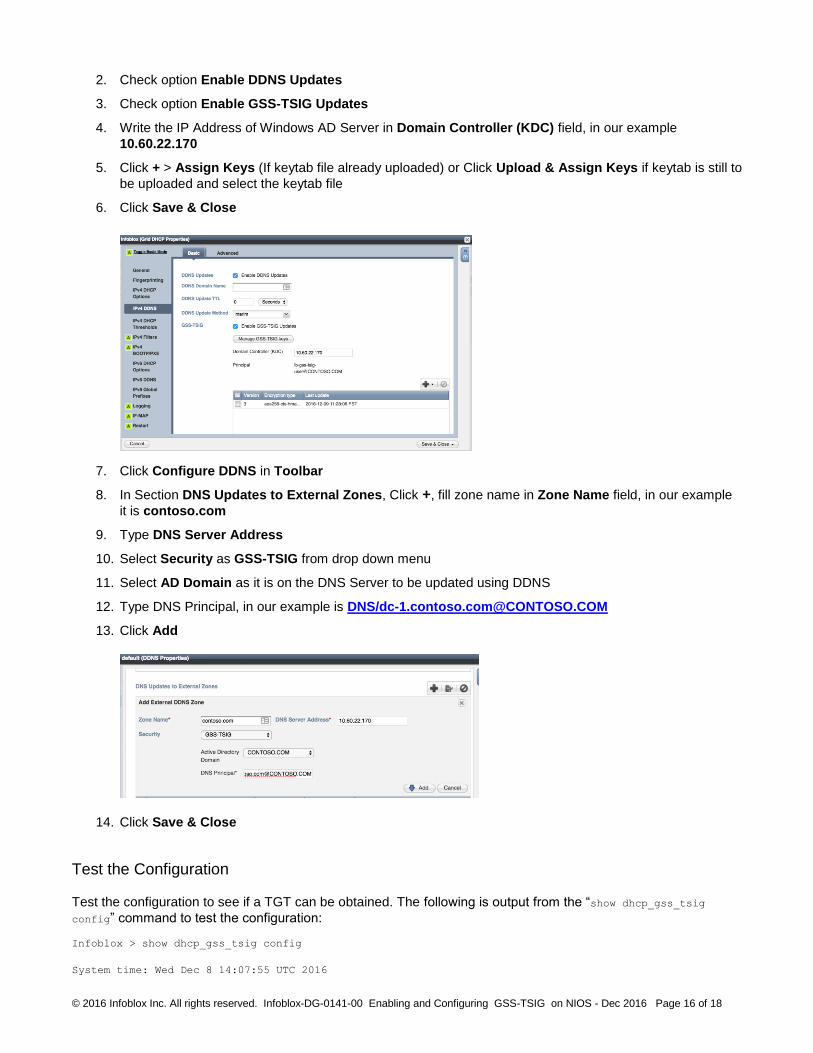
2. Check option Enable DDNS Updates
3. Check option Enable GSS-TSIG Updates
4. Write the IP Address of Windows AD Server in Domain Controller (KDC) field, in our example
10.60.22.170
5. Click + > Assign Keys (If keytab file already uploaded) or Click Upload & Assign Keys if keytab is still to
be uploaded and select the keytab file
6. Click Save & Close
7. Click Configure DDNS in Toolbar
8. In Section DNS Updates to External Zones, Click +, fill zone name in Zone Name field, in our example
it is contoso.com
9. Type DNS Server Address
10. Select Security as GSS-TSIG from drop down menu
11. Select AD Domain as it is on the DNS Server to be updated using DDNS
12. Type DNS Principal, in our example is DNS/[email protected]
13. Click Add
14. Click Save & Close
Test the Configuration Test the configuration to see if a TGT can be obtained. The following is output from the “show dhcp_gss_tsig
config” command to test the configuration:
Infoblox > show dhcp_gss_tsig config
System time: Wed Dec 8 14:07:55 UTC 2016
© 2016 Infoblox Inc. All rights reserved. Infoblox-DG-0141-00 Enabling and Configuring GSS-TSIG on NIOS - Dec 2016 Page 17 of 18
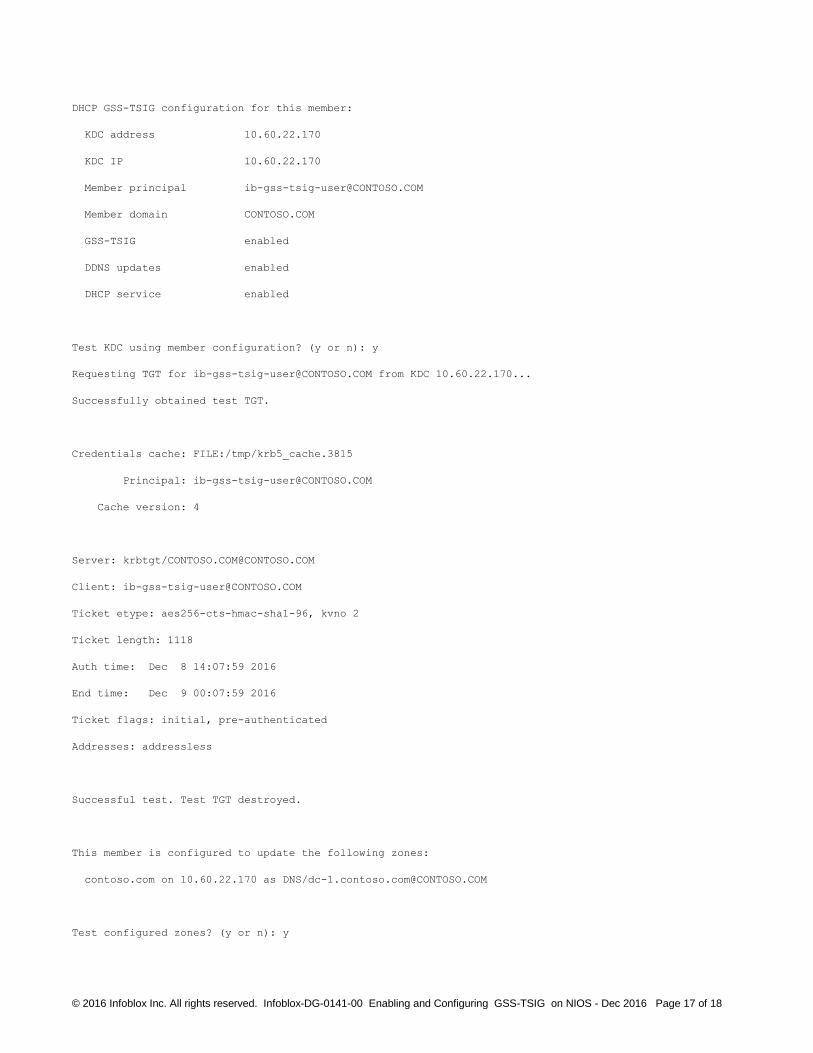
DHCP GSS-TSIG configuration for this member:
KDC address 10.60.22.170
KDC IP 10.60.22.170
Member principal [email protected]
Member domain CONTOSO.COM
GSS-TSIG enabled
DDNS updates enabled
DHCP service enabled
Test KDC using member configuration? (y or n): y
Requesting TGT for [email protected] from KDC 10.60.22.170...
Successfully obtained test TGT.
Credentials cache: FILE:/tmp/krb5_cache.3815
Principal: [email protected]
Cache version: 4
Server: krbtgt/[email protected]
Client: [email protected]
Ticket etype: aes256-cts-hmac-sha1-96, kvno 2
Ticket length: 1118
Auth time: Dec 8 14:07:59 2016
End time: Dec 9 00:07:59 2016
Ticket flags: initial, pre-authenticated
Addresses: addressless
Successful test. Test TGT destroyed.
This member is configured to update the following zones:
contoso.com on 10.60.22.170 as DNS/[email protected]
Test configured zones? (y or n): y
© 2016 Infoblox Inc. All rights reserved. Infoblox-DG-0141-00 Enabling and Configuring GSS-TSIG on NIOS - Dec 2016 Page 18 of 18
Next zone is contoso.com on 10.60.22.170.
Test this zone? (y or n): y
Testing external zone contoso.com on NS 10.60.22.170...
DNS principal is DNS/[email protected].
Derived FQDN is dc-1.contoso.com.
FQDN resolves to nameserver IP.
SOA for contoso.com has MNAME dc-1.contoso.com.
Nameserver is authoritative for zone.
Zone contoso.com appears valid.
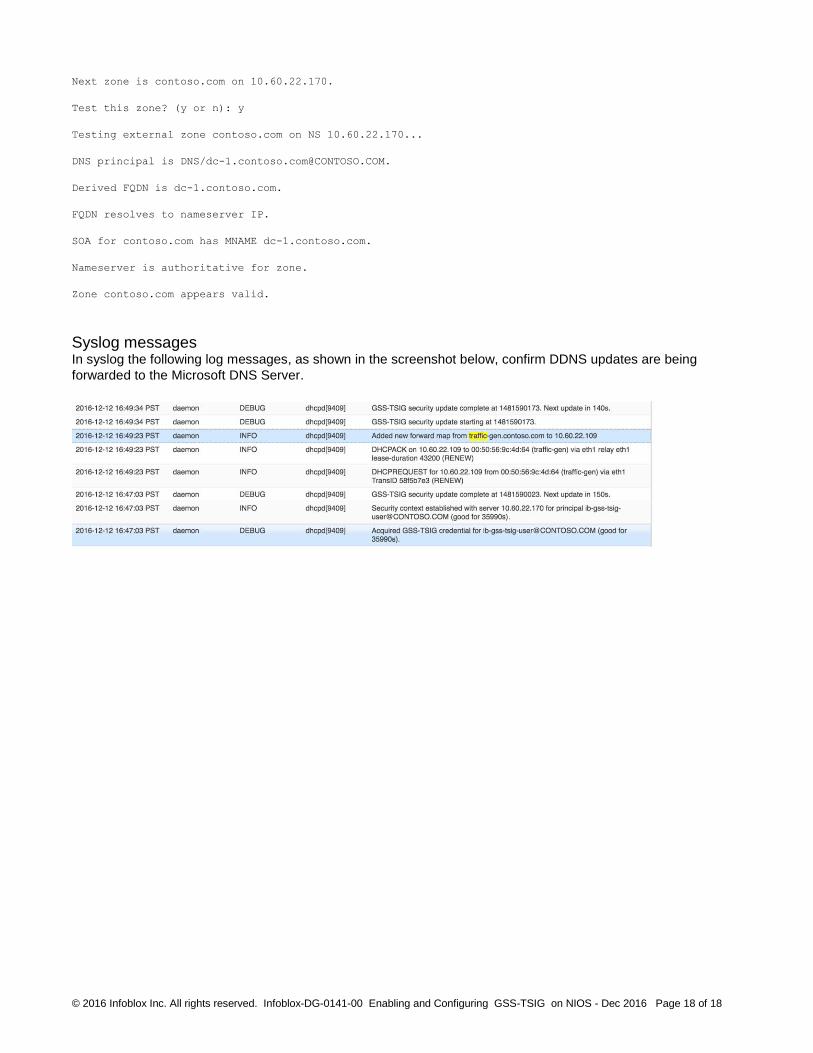
Syslog messages In syslog the following log messages, as shown in the screenshot below, confirm DDNS updates are being
forwarded to the Microsoft DNS Server.