Decorative Paper Clips (Photoshop Elements)
8
Page 1 Decorative Paper Clips, © 2009 Scrapper’s Guide, all rights reserved. Decorative Paper Clips (Photoshop Elements) Tip of the Week by Sara Horton on July 20, 2009 A few days ago, I received a paper and stationery catalog in the mail. A confirmed paper-aholic, I “ooohed” and “aahhed” appropriately over the beautiful patterned papers, but it was the decorative paper clips that really caught my eye—the little embellished circles peeking up over the clipped papers. I thought about how fun it would be to use these clips as digital scrapbook embellishments and set about recre- ating them right away. With the array of Custom Shapes and Brushes already available in Photoshop Elements, creating your own custom paper clips is just a few clicks away! Step 1: Create the circle Begin by creating a new document at 300 pixels per inch by selecting File > New > Blank File. For the sample, I created a 3x3- inch document in RGB Color Mode with a transparent background. Press the letter D on the keyboard. is is the shortcut for selecting the default Foreground and Background colors: black and white.
Transcript of Decorative Paper Clips (Photoshop Elements)

Page 1 Decorative Paper Clips, © 2009 Scrapper’s Guide, all rights reserved.
Decorative Paper Clips (Photoshop Elements)
Tip of the Week by Sara Horton on July 20, 2009
A few days ago, I received a paper and stationery catalog in the mail. A confirmed paper-aholic, I “ooohed” and “aahhed” appropriately over the beautiful patterned papers, but it was the decorative paper clips that really caught my eye—the little embellished circles peeking up over the clipped papers. I thought about how fun it would be to use these clips as digital scrapbook embellishments and set about recre-ating them right away.
With the array of Custom Shapes and Brushes already available in Photoshop Elements, creating your own custom paper clips is just a few clicks away!
Step 1: Create the circle
Begin by creating a new document at 300 pixels per inch by selecting File > New > Blank File. For the sample, I created a 3x3- inch document in RGB Color Mode with a transparent background.
Press the letter D on the keyboard. This is the shortcut for selecting the default Foreground and Background colors: black and white.

Page 2 Decorative Paper Clips, © 2009 Scrapper’s Guide, all rights reserved.
Get the Custom Shape Tool. The Custom Shape Tool shares a space on the Toolbar with the Rectangle Tool. Click and hold the Rectangle tool to reveal the hidden tools beneath it. Scroll down to select the Custom Shape Tool.
With the Custom Shape Tool selected, make the following choices in the Options Bar:
Click the Create a New Shape Layer icon (the first icon in the row to the right of the Shape drop-down menu.) Select the solid Circle shape from the Shape Picker drop-down menu. To see larger thumbnails and more shape options, click the right-facing double-arrow at the top, right corner of the drop-down Shape Picker. Choose Large Thumbnails and All Elements Shapes.
Once you’ve clicked on the Circle shape, close the Shape Picker menu. Holding the Shift key, click and drag out the circle on your document. Holding the Shift key keeps the circle perfectly round.
Page 3 Decorative Paper Clips, © 2009 Scrapper’s Guide, all rights reserved.
Step 2: Create the clip
Ctrl Click (Mac: Cmd Click) the thumbnail of the circle shape layer in the Layers palette. This places a selec-tion around your circle.
Next, create a new transparent layer above the circle shape layer by clicking the Create a New Layer icon at the top of the Layers Palette.
You’ll want the clip to be larger than the circle, so choose Select > Modify > Expand. In the Expand Selec-tion dialog box, type Expand by 30 pixels then click OK to confirm the expansion.
Making sure that the new, transparent layer is highlighted in the Layers Palette, choose Edit > Stroke (Out-line) Selection. In the Stroke dialog box, choose your desired settings. For the sample, I used Width: 30px, Color: black, and Location: Outside. I left the Blend Mode: Normal and Opacity: 100%. Click OK to create an outline around your circle shape.

Page 4 Decorative Paper Clips, © 2009 Scrapper’s Guide, all rights reserved.
Press Ctrl D (Mac: Cmd D) to deselect - remove the selection from around the clip.
Step 3: Fasten the clip to the circle
In this step, you’ll create a circle to connect the clip and the circle shape. Instead of using the Custom Shape tool, use the Ellipse tool that shares a position on the toolbar with the Custom Shape tool. (Incidentally, you could choose to use the Ellipse tool to create the shape in Step 1 as well. Now you’ll have two options for creating a circle shape!) Get the Ellipse tool and choose Create a new Shape Layer in the Options Bar. Shift as you drag out a small circle that connects the clip to the circle shape.
To digitally glue the three layers together, choose Layer > Merge Visible.
Step 4: Recolor the decorative clip
At this point, you may wish to recolor the clip by selecting the clip layer in the Layers palette. Press Ctrl U (Mac: Cmd U) on the keyboard to activate the Hue/Saturation Dialog box. Click the Colorize box before moving the Hue and Lightness and Saturation sliders to select a new color. When you are satisfied with your color, click OK. (Note: Move the Lightness slider to the right before moving the Hue and Saturations slid-ers.)
Page 5 Decorative Paper Clips, © 2009 Scrapper’s Guide, all rights reserved.
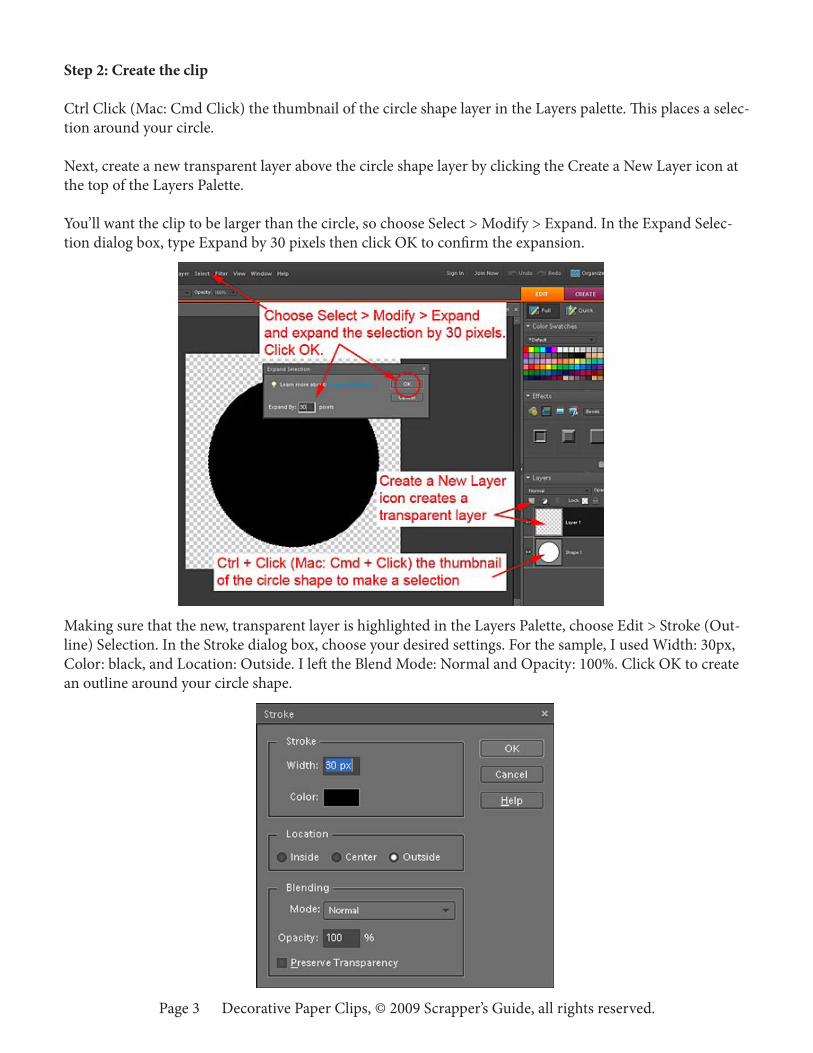
To make the clip look a little more realistic, apply a Bevel layer style. Locate the Effects Palette. Choose Layer Styles (the second icon from the left) and then select Bevels from the drop-down menu.
Double-click Simple Inner from the Bevel Picker to give the clip dimension.
Step 5: Decorate the clip
This is the fun and creative step: customizing the clip to match your page theme.
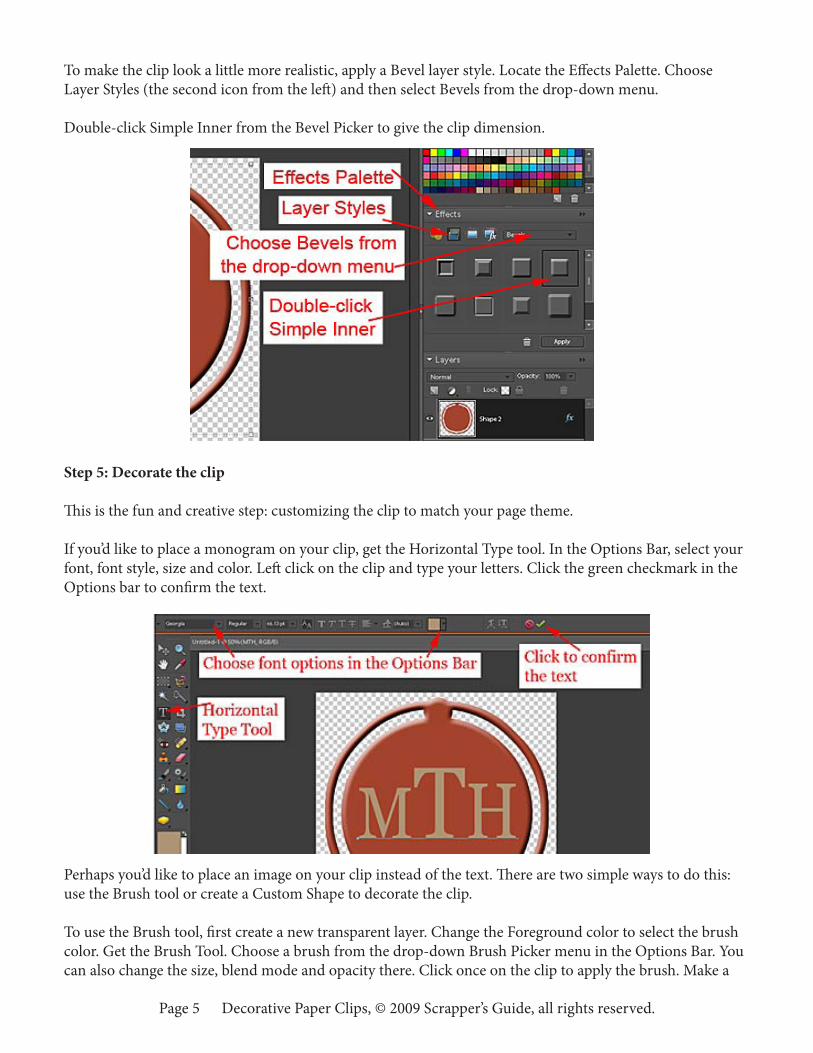
If you’d like to place a monogram on your clip, get the Horizontal Type tool. In the Options Bar, select your font, font style, size and color. Left click on the clip and type your letters. Click the green checkmark in the Options bar to confirm the text.
Perhaps you’d like to place an image on your clip instead of the text. There are two simple ways to do this: use the Brush tool or create a Custom Shape to decorate the clip.
To use the Brush tool, first create a new transparent layer. Change the Foreground color to select the brush color. Get the Brush Tool. Choose a brush from the drop-down Brush Picker menu in the Options Bar. You can also change the size, blend mode and opacity there. Click once on the clip to apply the brush. Make a

Page 6 Decorative Paper Clips, © 2009 Scrapper’s Guide, all rights reserved.
new transparent layer for each brush stroke so that they can be easily removed if you decide later that you want to change the decor.
Instead of using a brush image, you can get the Custom Shape tool. In the Options Bar, select a shape from the Shape Picker drop-down menu. Also click Create a new shape layer and select your color. Hold the Shift key as you drag out the shape over your clip. Use the Move tool to reposition the shape if necessary.
Try using the Eraser tool to cut a shaped hole in the center of the clip, or apply a chrome style to make it ap-pear metallic.

Page 7 Decorative Paper Clips, © 2009 Scrapper’s Guide, all rights reserved.
You can even decorate the clip with digital stickers, bits of patterned paper, photos, or ephemera. Shaped clips are fun, too. Just choose a different Custom Shape in Step 1 or Create an alphabet clip using text in-stead of a Custom Shape.
When you’re finished adding designs to your paper clip, choose Merge Visible from the Layers palette flyout menu. Use the Move tool to move it onto your scrapbook page and place it over the edge of a paper or photo. Use the Eraser tool with a hard, round brush to erase away any section of the clip part that would be underneath another layer in your finished page. This makes the clip appear as though it is actually clipped to a paper instead of sitting on top of the page.
Have some fun playing with digital clips this week and be sure to share your own creations in the gallery.

Page 8 Decorative Paper Clips, © 2009 Scrapper’s Guide, all rights reserved.
Credits: page by Sara HortonFont: GeorgiaBook of Memories Layered Template No. 5 by Katie Pertiet at Designer Digitals
If you enjoyed this Tip of the Week, be sure to sign up to receive the Digital Scrapper Tip of the Week newsletter.
For training in more Advanced Topics (at rock bottom prices), become a Premier member!
Leap Frog To The Next Level!
Tired of learning a bit here and a bit there? Our CD, Learn Digital Scrapbooking, takes you step-by-step from rank beginner to confident digital scrapbooker in a frac-tion of the time!
Find out more and get a free sample video lesson.