data exchange 3
106
Data Exchange 3 The easy way to turn your data into valuable information. VERSION 3.0 12-21-2017
Transcript of data exchange 3

Data Exchange 3 The easy way to turn your data into valuable information.
VERSION 3.0
12-21-2017

DATA EXCHANGE 3 1
8/1/2018 COPYRIGHT 2017 ADVANCED ENGINEERING, INC. WWW.ADVENG.COM
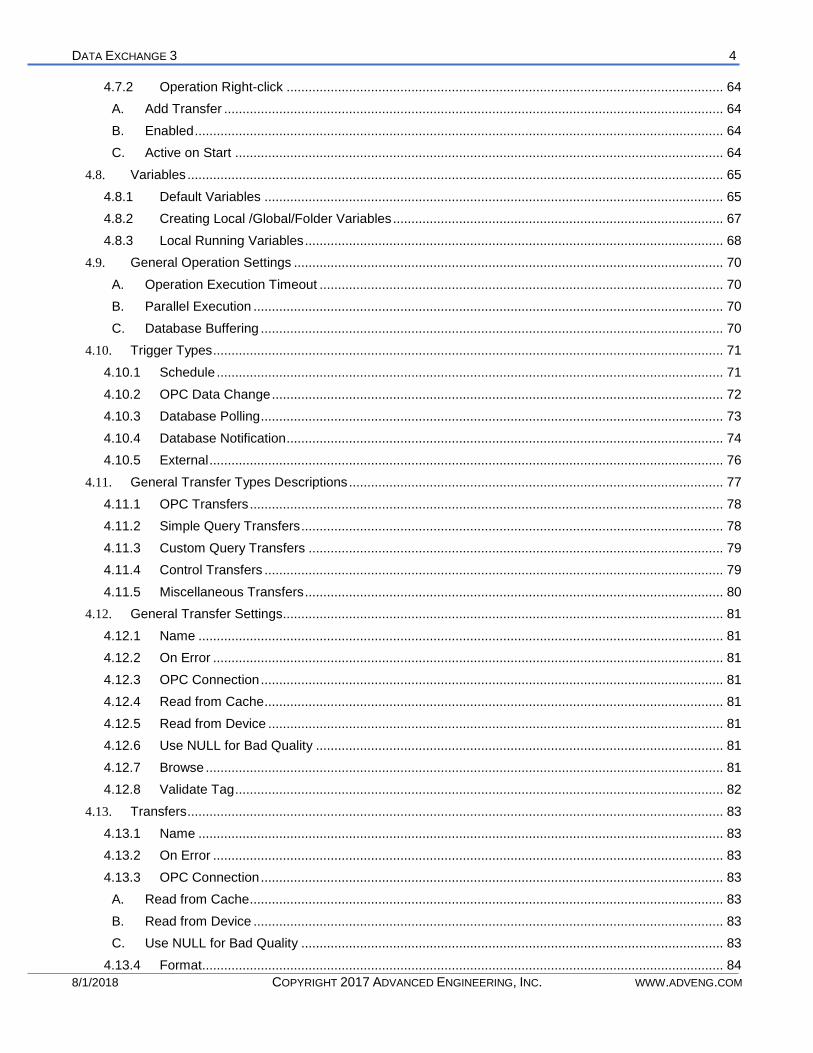
TABLE OF CONTENTS
SECTION 1. Overview ..................................................................................................................................... 6
1.1. MAIN GOALS .............................................................................................................................................6
1.2. How it Works ...............................................................................................................................................6
Data Exchange 3 Engine .................................................................................................................................7
1.3. Main Definitions ..........................................................................................................................................8
1.4. Platforms .....................................................................................................................................................9
1.4.1 Database Systems ..............................................................................................................................9
1.4.2 Operating Systems .............................................................................................................................9
1.5. Minimum System Requirements .................................................................................................................9
1.6. Notes for Users of Previous Versions of Data Exchange II, 2, and 2.5 ................................................... 10
SECTION 2. Data Exchange 3 Installation .................................................................................................... 11
2.1. Data Exchange Application Features ...................................................................................................... 11
2.1.1 Installation Features to Install .......................................................................................................... 11
A. Management ........................................................................................................................................ 11
B. Triggers ................................................................................................................................................ 11
C. Service ................................................................................................................................................. 11
D. MatrikonOPC Simulation Server .......................................................................................................... 11
E. Remote OPC Service .......................................................................................................................... 11
2.1.2 Installation Steps ............................................................................................................................. 12
2.2. Firewall Settings ...................................................................................................................................... 15
2.3. Data Exchange 3 Registration ................................................................................................................. 16
2.3.1 Automatic Authorization ................................................................................................................... 17
2.3.2 Manual Authorization ....................................................................................................................... 19
SECTION 3. Data Exchange 3 Manager ....................................................................................................... 24
3.1. Overview .................................................................................................................................................. 24
3.2. Engine ...................................................................................................................................................... 24
3.3. Engine Configuration Settings ................................................................................................................. 26
A. Process Priority .................................................................................................................................... 26
B. Master Timer Interval ........................................................................................................................... 26
C. Maximum Threads ............................................................................................................................... 26
D. Max Queued Instanced per Operation ................................................................................................ 26
E. Trace Level .......................................................................................................................................... 26
F. Port ...................................................................................................................................................... 27
G. Web Server .......................................................................................................................................... 27
3.4. Remote OPC Service Configuration Settings .......................................................................................... 27
3.5. Engine Control (Engine Menu Item) ........................................................................................................ 28
A. Connect… ............................................................................................................................................ 28
B. New Configuration… ............................................................................................................................ 29

DATA EXCHANGE 3 2
8/1/2018 COPYRIGHT 2017 ADVANCED ENGINEERING, INC. WWW.ADVENG.COM
C. Add Existing Configuration… ............................................................................................................... 29
D. Restart All Configurations .................................................................................................................... 29
E. Start All Configurations ........................................................................................................................ 29
F. Stop All Configurations ........................................................................................................................ 30
G. Recent Connections ............................................................................................................................ 30
H. Settings ................................................................................................................................................ 30
I. Exit ....................................................................................................................................................... 30
3.6. Engine Configuration Control (Tree Menu - Right Click) ......................................................................... 31
A. Edit ....................................................................................................................................................... 31
B. Rename ............................................................................................................................................... 31
C. Validate ................................................................................................................................................ 31
D. Upload from Engine ............................................................................................................................. 32
E. Restart/Start/Stop ................................................................................................................................ 33
F. Remove ................................................................................................................................................ 33
3.7. Operations Tab ........................................................................................................................................ 33
3.8. Events Tab ............................................................................................................................................... 35
A. Filtering Events .................................................................................................................................... 36
B. Clear All Events ................................................................................................................................... 36
C. Max Entries .......................................................................................................................................... 36
3.9. Configurations .......................................................................................................................................... 36
3.9.1 Configuration Control ....................................................................................................................... 37
A. Edit ....................................................................................................................................................... 37
B. Rename ............................................................................................................................................... 37
C. Compare to Local ................................................................................................................................ 38
D. Upload from Engine ............................................................................................................................. 38
E. Restart/Start/Stop ................................................................................................................................ 38
F. Remove ................................................................................................................................................ 38
3.9.2 Offline Folder Configuration Control ................................................................................................ 39
A. Connect to Engine ............................................................................................................................... 39
B. New Configuration… ............................................................................................................................ 39
C. Add Existing Configuration… ............................................................................................................... 39
D. Open Folder ......................................................................................................................................... 40
E. Delete Folder ....................................................................................................................................... 40
F. Refresh ................................................................................................................................................ 40
3.9.3 Offline File Configuration Control .................................................................................................... 41
A. Edit ....................................................................................................................................................... 41
B. Rename ............................................................................................................................................... 41
C. Validate ................................................................................................................................................ 41
D. Compare to Engine .............................................................................................................................. 41
E. Download to Engine ............................................................................................................................. 42
F. Delete ................................................................................................................................................... 42

DATA EXCHANGE 3 3
8/1/2018 COPYRIGHT 2017 ADVANCED ENGINEERING, INC. WWW.ADVENG.COM
3.10. Operation Control .................................................................................................................................... 43
3.10.1 Reset Counters ................................................................................................................................ 43
3.10.2 View Events ..................................................................................................................................... 43
3.10.3 Verbose Mode ................................................................................................................................. 43
3.10.4 Active ............................................................................................................................................... 43
3.10.5 Start Operation ................................................................................................................................ 43
SECTION 4. Data Exchange Editor ............................................................................................................... 44
4.1. File Menu ................................................................................................................................................. 45
4.3. New Configuration Wizard ....................................................................................................................... 48
4.3.1 Connect to Engine ........................................................................................................................... 48
4.3.2 Add OPC Server .............................................................................................................................. 50
4.4. Databases ................................................................................................................................................ 52
4.4.1 Build the Database Connection ....................................................................................................... 52
A. Provider ................................................................................................................................................ 53
B. Connection ........................................................................................................................................... 54
C. Read Schema ...................................................................................................................................... 56
D. Connection Timeout ............................................................................................................................. 56
E. Show Links........................................................................................................................................... 56
F. Test ...................................................................................................................................................... 56
G. Database Notification Triggers ............................................................................................................ 56
H. Database CLR Integration ................................................................................................................... 56
4.4.2 Database Configuration Menu ......................................................................................................... 57
A. Refresh ................................................................................................................................................ 57
B. Delete ................................................................................................................................................... 57
C. Revert .................................................................................................................................................. 57
D. Find ...................................................................................................................................................... 57
E. Replace ................................................................................................................................................ 57
4.5. OPC Servers ............................................................................................................................................ 58
4.5.1 Add an OPC Server ......................................................................................................................... 58
4.5.2 Optimize OPC Groups ..................................................................................................................... 60
4.5.3 Show Links....................................................................................................................................... 60
4.5.4 OPC Server Configuration Menu ..................................................................................................... 60
A. Delete ................................................................................................................................................... 61
B. Revert .................................................................................................................................................. 61
C. Find ...................................................................................................................................................... 61
D. Replace ................................................................................................................................................ 61
4.6. Web Services ........................................................................................................................................... 61
4.6.1 Web Service..................................................................................................................................... 61
4.6.2 Heads UP......................................................................................................................................... 62
4.7. Operations ............................................................................................................................................... 63
4.7.1 Folders ............................................................................................................................................. 63
DATA EXCHANGE 3 4
8/1/2018 COPYRIGHT 2017 ADVANCED ENGINEERING, INC. WWW.ADVENG.COM
4.7.2 Operation Right-click ....................................................................................................................... 64
A. Add Transfer ........................................................................................................................................ 64
B. Enabled ................................................................................................................................................ 64
C. Active on Start ..................................................................................................................................... 64
4.8. Variables .................................................................................................................................................. 65
4.8.1 Default Variables ............................................................................................................................. 65
4.8.2 Creating Local /Global/Folder Variables .......................................................................................... 67
4.8.3 Local Running Variables .................................................................................................................. 68
4.9. General Operation Settings ..................................................................................................................... 70
A. Operation Execution Timeout .............................................................................................................. 70
B. Parallel Execution ................................................................................................................................ 70
C. Database Buffering .............................................................................................................................. 70
4.10. Trigger Types ........................................................................................................................................... 71
4.10.1 Schedule .......................................................................................................................................... 71
4.10.2 OPC Data Change ........................................................................................................................... 72
4.10.3 Database Polling .............................................................................................................................. 73
4.10.4 Database Notification ....................................................................................................................... 74
4.10.5 External ............................................................................................................................................ 76
4.11. General Transfer Types Descriptions ...................................................................................................... 77
4.11.1 OPC Transfers ................................................................................................................................. 78
4.11.2 Simple Query Transfers ................................................................................................................... 78
4.11.3 Custom Query Transfers ................................................................................................................. 79
4.11.4 Control Transfers ............................................................................................................................. 79
4.11.5 Miscellaneous Transfers .................................................................................................................. 80
4.12. General Transfer Settings........................................................................................................................ 81
4.12.1 Name ............................................................................................................................................... 81
4.12.2 On Error ........................................................................................................................................... 81
4.12.3 OPC Connection .............................................................................................................................. 81
4.12.4 Read from Cache ............................................................................................................................. 81
4.12.5 Read from Device ............................................................................................................................ 81
4.12.6 Use NULL for Bad Quality ............................................................................................................... 81
4.12.7 Browse ............................................................................................................................................. 81
4.12.8 Validate Tag ..................................................................................................................................... 82
4.13. Transfers .................................................................................................................................................. 83
4.13.1 Name ............................................................................................................................................... 83
4.13.2 On Error ........................................................................................................................................... 83
4.13.3 OPC Connection .............................................................................................................................. 83
A. Read from Cache ................................................................................................................................. 83
B. Read from Device ................................................................................................................................ 83
C. Use NULL for Bad Quality ................................................................................................................... 83
4.13.4 Format .............................................................................................................................................. 84
DATA EXCHANGE 3 5
8/1/2018 COPYRIGHT 2017 ADVANCED ENGINEERING, INC. WWW.ADVENG.COM
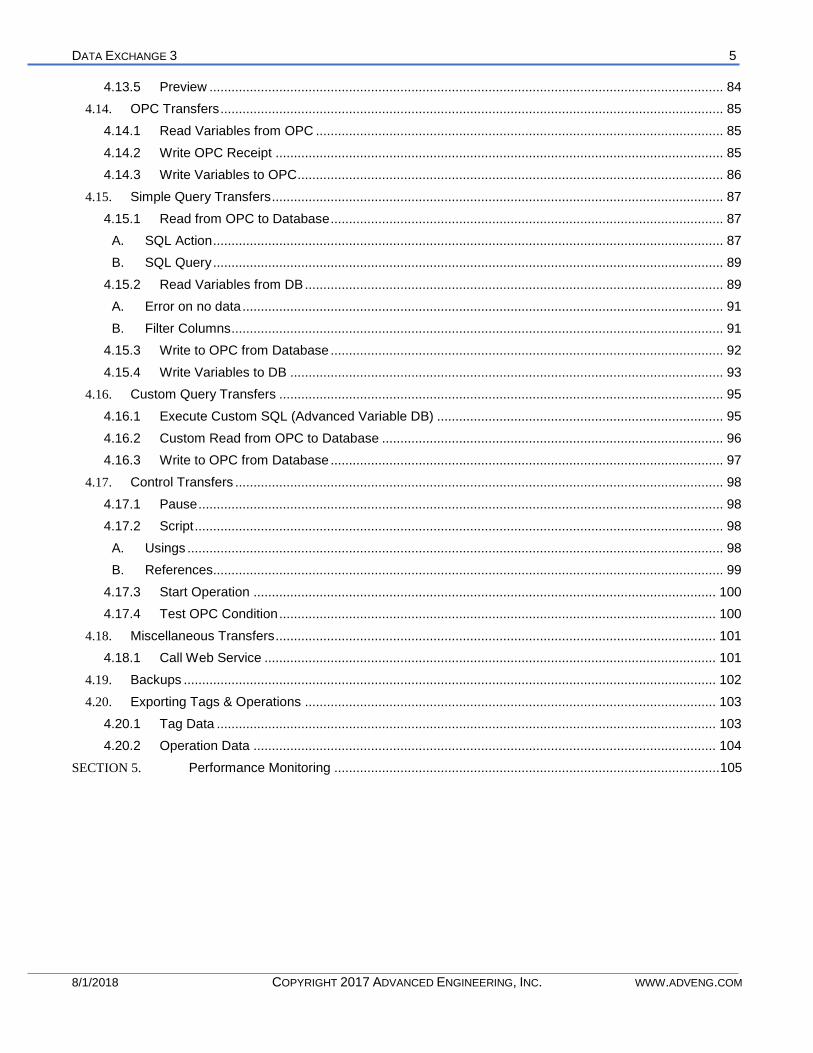
4.13.5 Preview ............................................................................................................................................ 84
4.14. OPC Transfers ......................................................................................................................................... 85
4.14.1 Read Variables from OPC ............................................................................................................... 85
4.14.2 Write OPC Receipt .......................................................................................................................... 85
4.14.3 Write Variables to OPC .................................................................................................................... 86
4.15. Simple Query Transfers ........................................................................................................................... 87
4.15.1 Read from OPC to Database ........................................................................................................... 87
A. SQL Action ........................................................................................................................................... 87
B. SQL Query ........................................................................................................................................... 89
4.15.2 Read Variables from DB .................................................................................................................. 89
A. Error on no data ................................................................................................................................... 91
B. Filter Columns ...................................................................................................................................... 91
4.15.3 Write to OPC from Database ........................................................................................................... 92
4.15.4 Write Variables to DB ...................................................................................................................... 93
4.16. Custom Query Transfers ......................................................................................................................... 95
4.16.1 Execute Custom SQL (Advanced Variable DB) .............................................................................. 95
4.16.2 Custom Read from OPC to Database ............................................................................................. 96
4.16.3 Write to OPC from Database ........................................................................................................... 97
4.17. Control Transfers ..................................................................................................................................... 98
4.17.1 Pause ............................................................................................................................................... 98
4.17.2 Script ................................................................................................................................................ 98
A. Usings .................................................................................................................................................. 98
B. References........................................................................................................................................... 99
4.17.3 Start Operation .............................................................................................................................. 100
4.17.4 Test OPC Condition ....................................................................................................................... 100
4.18. Miscellaneous Transfers ........................................................................................................................ 101
4.18.1 Call Web Service ........................................................................................................................... 101
4.19. Backups ................................................................................................................................................. 102
4.20. Exporting Tags & Operations ................................................................................................................ 103
4.20.1 Tag Data ........................................................................................................................................ 103
4.20.2 Operation Data .............................................................................................................................. 104
SECTION 5. Performance Monitoring ......................................................................................................... 105

DATA EXCHANGE 3 6
8/1/2018 COPYRIGHT 2017 ADVANCED ENGINEERING, INC. WWW.ADVENG.COM
SECTION 1. OVERVIEW
1.1. MAIN GOALS
Data Exchange 3 (abbreviated DXC3) provides simple and intuitive tools to design complex communication between databases and industrial devices. With no programming effort or extensive knowledge of databases, Data Exchange gathers process data for later analysis. Data Exchange 3 can move data between an industrial device, such as a PLC, and a database. This occurs in a variety of ways based on the process needs and complexity.
1.2. HOW IT WORKS
Data Exchange 3 communicates with industrial devices using OPC. OPC is an industry standard communication interface to industrial devices. OPC servers are identified by a unique OPC server name. For example:
Software OPC Server Name
RSLinx (local computer) RSLinx OPC Server
RSLinx (Remote computer) RSLinx Remote OPC Server
Simatic NET OPC.SimaticNET
WinAC OPCServer.WinAC
WinCC OPCServer.WinCC
Consult the documentation of the specific OPC server for more information.
Data Exchange 3 communicates with databases using OLE DB. OLE DB is an industry standard communication interface to databases. OLE DB providers for most popular databases come with Microsoft Windows.
A diagram of a system that connects several different databases with a number of PLCs is shown. OPC servers and databases can be located on the same machine as Data Exchange 3 or they can reside on other machines on the network.
The user creates Configurations using the Data Exchange 3 Editor. The Configurations define the database connections, OPC connections, and the data transfers. The Data Exchange 3 Engine can run multiple Configurations at once, and each Configuration can be independently controlled.
Data Exchange 3 consists of the following components:
• Data Exchange 3 Engine (Service)
• Data Exchange 3 Remote OPC Service (Service)
• Data Exchange 3 Editor (Application)
• Data Exchange 3 Manager (Application)
• Data Exchange 3 Web Manager (Optionally enabled Web Interface)
• MatrikonOPC Server for Simulation (Optional)

DATA EXCHANGE 3 7
8/1/2018 COPYRIGHT 2017 ADVANCED ENGINEERING, INC. WWW.ADVENG.COM
Figure Example of communication diagram.
The Data Exchange 3 Engine runs as a service on Windows platforms. The Data Exchange 3 Manager allows the user to configure and load a configuration. This tells the engine how, when, and where to move the data.
OPC Server
Database
(Microsoft Access)
Database
(Microsoft SQL Server)
Database
(Oracle)
OPC Server
HeadsUp Server
P L C
P L C
P L C
Da
P L C
P L C
P L C
Data Exchange 3 Engine Running Configurations
Data Exchange 3
Manager, Web Manager,
& Editor
OLE DB Provider
OLE DB Provider
OLE DB Provider
Andon Display
Andon Display
Andon Display

DATA EXCHANGE 3 8
8/1/2018 COPYRIGHT 2017 ADVANCED ENGINEERING, INC. WWW.ADVENG.COM
1.3. MAIN DEFINITIONS
Configuration – a file that holds all the information needed to run Data Exchange 3 Engine. The user builds this file using Data Exchange 3 Editor.
Databases – a collection of database connections. Each database connection contains all the information needed to connect to the database.
OPC Servers – a collection of OPC connections. Each OPC connection contains all the information needed to connect to the OPC server (usually a PLC or other industrial device).
Web Services – a collection of web service connections. Each web service connection contains all the information needed to connect to the web server. Web services include SOAP, JSON, Socket, and HeadsUp services.
Operations – a collection of operations. Each operation consists of a Trigger, and a set of Transfers. The Trigger tells Data Exchange 3 Engine WHEN to start a particular operation. Each Transfer tells the Data Exchange 3 Engine WHAT and WHERE to move. Information may be passed between transfers through the use of variables.
Events – a collection of event messages that are saved in the Windows Event Log, and viewable within the Data Exchange 3 Manager. The main purpose of Events is for diagnostics.
Databases
Operations
Transfer
Trigger
OPC Servers
Variables
Web Services
Events
DATA EXCHANGE 3 9
8/1/2018 COPYRIGHT 2017 ADVANCED ENGINEERING, INC. WWW.ADVENG.COM
1.4. PLATFORMS
1.4.1 DATABASE SYSTEMS
Data Exchange 3 can connect to any database available using the OLE DB providers available on your Microsoft Windows computer. These include drivers for ODBC, Oracle and SQL Server. Database Notification Triggers and Database CLR Integration require SQL Server.
1.4.2 OPERATING SYSTEMS
The Data Exchange engine runs as a service under Microsoft Server 2012, Windows 7, Windows 8 and Windows 10. It is a 32-bit application that will run on 64-bit operating systems.
1.5. MINIMUM SYSTEM REQUIREMENTS
Windows Operating System
.NET Framework 4.7
IE11, Edge or Chrome for Web Manager
Database
Database Notification Triggers SQL Server 2008 R2 or greater
Database CLR Integration SQL Server 2012 or greater
MatrikonOPC
Microsoft .NET Framework 1.1 with Service Pack 1

DATA EXCHANGE 3 10
8/1/2018 COPYRIGHT 2017 ADVANCED ENGINEERING, INC. WWW.ADVENG.COM
1.6. NOTES FOR USERS OF PREVIOUS VERSIONS OF DATA EXCHANGE II AND
2.5
✓ The Data Exchange 3 Manager and Editor can now can be installed on different computers than the Data Exchange 3 Engine. Data Exchange 3 Remote OPC Service greatly simplifies OPC communications between computers.
✓ A new Data Exchange 3 Web Manager can perform most of the functions of the Data Exchange 3 Manager.
✓ Navigation of the Operations and Transfers are now all done through the Tree Menu. Individual saving of Operation and Transfer settings is no longer needed. The Configuration must still be saved manually.
✓ Operations, Transfers, and Schedules can be copied and pasted within a Configuration or between Configurations.
✓ Backup Configurations are stored in the same file as the Configuration.
✓ When using OPC tags in Transfers, single quotes around the OPC tags are no longer used because Data Exchange 3 will add the single quotes as needed.
✓ The Data Exchange 3 Engine will use NULL for values when appropriate.
✓ Data Exchange now includes the use of scoped variables.
✓ New Trigger types, Transfer types, and other features.
✓ Configurations can be validated before downloading to the engine.
✓ Enhanced Search, Search and Replace, and new Revert feature.
✓ Because Data Exchange 3 works with the MatrikonOPC Explorer, a simple click will now allow you view the real-time OPC data values of a Transfer, Operation, or all Operations.

DATA EXCHANGE 3 11
8/1/2018 COPYRIGHT 2017 ADVANCED ENGINEERING, INC. WWW.ADVENG.COM
SECTION 2. DATA EXCHANGE 3 INSTALLATION
2.1. DATA EXCHANGE APPLICATION FEATURES
There are 5 different features that can be installed. These can all be installed on the same or on different computers. The Service (i.e. Data Exchange 3 Engine) is licensed per installation.
2.1.1 INSTALLATION FEATURES TO INSTALL
A. Management
This installs Data Exchange 3 Manager and Data Exchange 3 Editor.
B. Triggers
This installs only the drivers required by External Triggers and Database CLR Integration.
C. Service
This installs the Data Exchange 3 Engine that is run as a service. It is recommended to install the MatrikonOPC Simulation Server with this feature.
D. MatrikonOPC Simulation Server
This installs the following:
MatrikonOPC Server for Simulation
MatrikonOPC Analyzer
MatrikonOPC Explorer
E. Remote OPC Service
This installs the Data Exchange 3 Remote OPC Service that is run as a service. It is recommended to install the MatrikonOPC Simulation Server with this feature.

DATA EXCHANGE 3 12
8/1/2018 COPYRIGHT 2017 ADVANCED ENGINEERING, INC. WWW.ADVENG.COM
2.1.2 INSTALLATION STEPS
Run Data Exchange 3 Setup v{version number}.exe
Agree with License terms Select features to install
Click Next button Click Install button
MatrikonOPC starts its installation MatrikonOPC installation being processed
Click Next button

DATA EXCHANGE 3 13
8/1/2018 COPYRIGHT 2017 ADVANCED ENGINEERING, INC. WWW.ADVENG.COM
Accept the license agreement Select the type of Setup.
Click Next > button Choose Complete Setup by default
Click Next > button
Select destination folder Select Start Menu settings
Recommend using default setting as shown Recommend using default settings as shown
Click Next > button Click Next > button

DATA EXCHANGE 3 14
8/1/2018 COPYRIGHT 2017 ADVANCED ENGINEERING, INC. WWW.ADVENG.COM
Select Password Click Next > button
Recommend using default settings as shown
Click Next > button
Processing Installation Click Finish > button

DATA EXCHANGE 3 15
8/1/2018 COPYRIGHT 2017 ADVANCED ENGINEERING, INC. WWW.ADVENG.COM
Processing Installation Click Finish button
Installation is now complete. Firewall settings may require configuration
The installation log file is located at:
C:\package.log
2.2. FIREWALL SETTINGS
Starting Data Exchange 3 Manager or Manager may automatically cause Windows to request permissions to modify the firewall.

DATA EXCHANGE 3 16
8/1/2018 COPYRIGHT 2017 ADVANCED ENGINEERING, INC. WWW.ADVENG.COM
Manual Firewall Settings
Process Description
DXC3 Data Exchange 3 Engine
DXC3 Control
Data Exchange 3 Remote OPC
Data Exchange 3 Editor
Data Exchange 3 Manager
Default Ports used by Data Exchange 3
• 5130 Data Exchange 3 Engine - HTTP Web Manager and Web Service (used by Triggers)
• 5131 Remote OPC Service - Net TCP Web Service (used by the Engine)
• 5132 Remote OPC Service - HTTP Web Service
• 5139 Data Exchange 3 Engine - Management Interface (used by the Manager)
Database and OPC Servers may require firewall settings particular to the specific application.
2.3. DATA EXCHANGE 3 REGISTRATION
Each running instance of the Data Exchange 3 Engine must be registered to enable full functionality. Configurations will be stopped automatically every 2 days if the Engine is in Demo mode.
Initially Data Exchange 3 Manager will prompt for Activation

DATA EXCHANGE 3 17
8/1/2018 COPYRIGHT 2017 ADVANCED ENGINEERING, INC. WWW.ADVENG.COM
Activation can also be started by selecting Register in the Help menu.
2.3.1 AUTOMATIC AUTHORIZATION
Automatic authorization will attempt to connect to the Advanced Engineering web site and authorize the serial number entered.

DATA EXCHANGE 3 18
8/1/2018 COPYRIGHT 2017 ADVANCED ENGINEERING, INC. WWW.ADVENG.COM
Enter Serial Number
Click Authorize
If unable to Authorize, perform the Manual Authorization

DATA EXCHANGE 3 19
8/1/2018 COPYRIGHT 2017 ADVANCED ENGINEERING, INC. WWW.ADVENG.COM
2.3.2 MANUAL AUTHORIZATION
Enter Serial Number
DATA EXCHANGE 3 20
8/1/2018 COPYRIGHT 2017 ADVANCED ENGINEERING, INC. WWW.ADVENG.COM
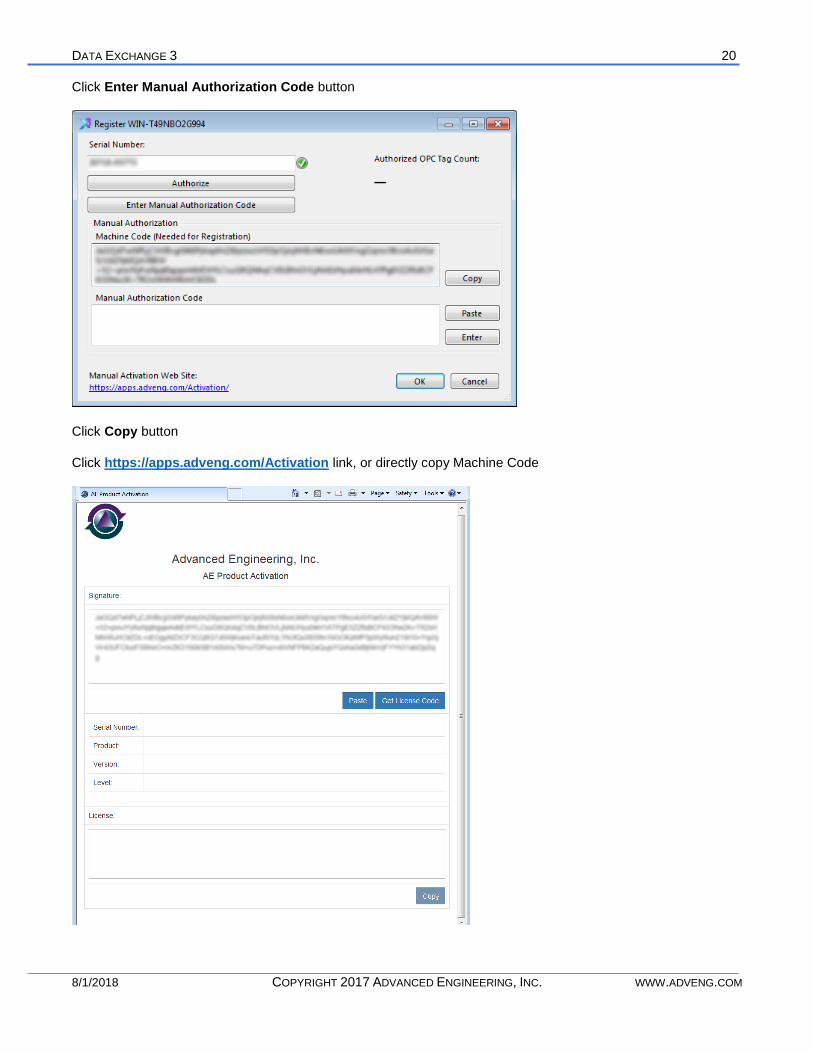
Click Enter Manual Authorization Code button
Click Copy button
Click https://apps.adveng.com/Activation link, or directly copy Machine Code

DATA EXCHANGE 3 21
8/1/2018 COPYRIGHT 2017 ADVANCED ENGINEERING, INC. WWW.ADVENG.COM
Paste Machine Code from Data Exchange 3 Registration into box under Signature
Click Get License Code button
Copy text under License

DATA EXCHANGE 3 22
8/1/2018 COPYRIGHT 2017 ADVANCED ENGINEERING, INC. WWW.ADVENG.COM
Paste License from AE Product Registration Website into Manual Authorization Code
Click Enter button
Tags are either unique OPC items or unique Variables used in a configuration. The number of allowed tags is determined by your license.
Click OK button

DATA EXCHANGE 3 23
8/1/2018 COPYRIGHT 2017 ADVANCED ENGINEERING, INC. WWW.ADVENG.COM
Click OK button
Bottom left of Data Exchange 3 Manager form displays the current registration status.

DATA EXCHANGE 3 24
8/1/2018 COPYRIGHT 2017 ADVANCED ENGINEERING, INC. WWW.ADVENG.COM
SECTION 3. DATA EXCHANGE 3 MANAGER
3.1. OVERVIEW
Data Exchange Manager controls the configurations that are running inside the local or remote Data Exchange engine, and create new configurations.
When the Data Exchange Manager starts, if the engine is running it will connect to the engine on the local computer automatically. The lower left status bar will display the status of the engine. The status bar will read, “Not connected to the Data Exchange 3 Service” if the local Data Exchange engine is stopped.
3.2. ENGINE
In most environments, Data Exchange is configured to start automatically when the server starts. Access Control Panel -> Administrative Tools -> Services to manually start and stop the engine.

DATA EXCHANGE 3 25
8/1/2018 COPYRIGHT 2017 ADVANCED ENGINEERING, INC. WWW.ADVENG.COM
The top section of the dropdown contains information about the configurations currently downloaded to the Data
Exchange Engine. A play icon next to a configuration file name indicates that this configuration file is running
inside the engine. A stop icon indicates a configuration file that is stopped.
If the local copy in the configuration directory for the user logged into the machine is newer than the copy in the engine, an asterisk will appear next to the configuration name.
Clicking on the configuration running in the engine will create an offline copy of the configuration file and place it in the localhost directory. If you are connected to a remote server, the file will be created in a folder with the same name as the remote server.
If the local file is newer than the file in the localhost directory and you click on the configuration in the engine, you will be prompted with a message announcing the different versions of the file.

DATA EXCHANGE 3 26
8/1/2018 COPYRIGHT 2017 ADVANCED ENGINEERING, INC. WWW.ADVENG.COM
3.3. ENGINE CONFIGURATION SETTINGS
Configuration settings for the Engine are set in the Manager using the Engine Settings. The configuration settings are also available by executing the Data Exchange Engine 3 executable DXC3.exe.
A. Process Priority
Sets the priority given to allocating processor time to the Data Exchange 3 Engine. Changing this setting will affect the performance of Data Exchange 3 Engine and indirectly affect other applications.
B. Master Timer Interval
Sets the timer that is used to for scheduling within the Data Exchange 3 Engine. If less resolution is required, a higher value can be set.
C. Maximum Threads
Sets the maximum threads that can be used to process operations at one time. All configurations share this pool.
D. Max Queued Instanced per Operation
Sets the maximum number of queued instances per Operation. Operations exceeding the maximum queued number will be dropped.
E. Trace Level
Allows setting for additional detailed logging of Events. Changes to this setting takes affect when this dialog window is closed by clicking OK
None Default, no extra Event Logging
Engine Include additional detailed logging for the Engine.
Operations Includes Engine Trace Level, plus sets the Detail Logging for all Operations.

DATA EXCHANGE 3 27
8/1/2018 COPYRIGHT 2017 ADVANCED ENGINEERING, INC. WWW.ADVENG.COM
This will cause a large number of events to be logged, and is intended for temporary usage.
F. Port
Sets the port used by the DXC3 Manager and DXC3 Editor to communicate with the DXC3 Engine. If DXC3 is running in parallel with a previous version of Data Exchange, the Port may need to be changed from default port of 5139.
G. Web Server
The Web Server allows a RESTful Web Services interface with the DXC3 Engine. There is a web version Manager that is available on this port if the Web Service is enabled.
3.4. REMOTE OPC SERVICE CONFIGURATION SETTINGS
Configuration settings for the Data Exhange 3 Remote OPC Service are available by executing the Data Exchange 3 Remote OPC Service executable DXC3OPCRemote.exe.

DATA EXCHANGE 3 28
8/1/2018 COPYRIGHT 2017 ADVANCED ENGINEERING, INC. WWW.ADVENG.COM
3.5. ENGINE CONTROL (ENGINE MENU ITEM)
A. Connect…
Connect allows you to connect to the local Data Exchange engine or a remote one. To connect to a remote DXC engine, type in the name of the server (or IP Address) and press Enter. Be sure Windows Firewall allows the Data Exchange Manager to connect to the engine (default port 5139). To connect to the engine on the same computer running the manager, enter “localhost” for the server name. The port for the Engine can be specified by using this format: “localhost:5139”. Select “Connect” to connect to the engine.
The Manager can only connect to one engine at a time. Only one instance of the Data Exchange Manager can run on a computer at one time.
Once the Manager connects to an engine, the status message in the lower left of the Manager main window will read, “Connected to engine”.

DATA EXCHANGE 3 29
8/1/2018 COPYRIGHT 2017 ADVANCED ENGINEERING, INC. WWW.ADVENG.COM
B. New Configuration…
Creates a new configuration file in the Local Configurations Folder and adds the configuration to the engine as well as add it under configurations. The Data Exchange 3 Editor is automatically opened with the new configuration for editing. If changes are made the configuration will need to be downloaded to the engine.
C. Add Existing Configuration…
Add Existing Configuration adds it to the engine however; it will not start the configuration running until you select it to start. Adding a configuration to the engine does not add the file under Configurations. If you double-click on the configuration, it will be added to the Configuration directory and editable.
D. Restart All Configurations
Restart All restarts all configurations that are currently started. It will not start a stopped configuration.
E. Start All Configurations
Starts all DXC configurations uploaded to the selected Engine.

DATA EXCHANGE 3 30
8/1/2018 COPYRIGHT 2017 ADVANCED ENGINEERING, INC. WWW.ADVENG.COM
F. Stop All Configurations
Stops all running configurations.
G. Recent Connections
List of recently connected Data Exchange Engines that can be clicked to connect to the displayed connection.
H. Settings
See the Engine Configuration Settings for details.
I. Exit
Exits the application

DATA EXCHANGE 3 31
8/1/2018 COPYRIGHT 2017 ADVANCED ENGINEERING, INC. WWW.ADVENG.COM
3.6. ENGINE CONFIGURATION CONTROL (TREE MENU - RIGHT CLICK)
is the name of the Engine to which the Data Exchange Manager is connected. Right-mouse click on a configuration that has been downloaded to the engine to reveal the pop-up menu with options on controlling the configuration.
A. Edit
Selecting Edit will display the details of the configuration in the Data Exchange Editor. Data Exchange will not allow you to open the Editor more than once for the same configuration file.
B. Rename
Rename the selected configuration file. If a file with that name already exists, an error will occur. Changing the name of an offline file will not affect the file (if any) currently running in the engine.
C. Validate
Validate will confirm that all connections to databases and OPC servers are working properly. In this example, DXC does not have a connection to the database and has logged errors for each operation that uses the database:

DATA EXCHANGE 3 32
8/1/2018 COPYRIGHT 2017 ADVANCED ENGINEERING, INC. WWW.ADVENG.COM
Fixing the connection to the database produces a valid configuration message:
D. Upload from Engine
If the configuration file does not exist on this computer or it is out of date with what is running, Upload the file from the engine.
If the local file is newer than what is running in the engine you will be prompted with a message:

DATA EXCHANGE 3 33
8/1/2018 COPYRIGHT 2017 ADVANCED ENGINEERING, INC. WWW.ADVENG.COM
E. Restart/Start/Stop
To change the runtime status of the configuration file, select Restart, Start or Stop. DXC Manager will not prompt if you are sure.
If you start or restart a configuration and if the local file is newer than the file uploaded to the engine, Data Exchange will prompt to upload the latest version.
F. Remove
To remove a configuration from the engine, select Remove and click Yes to the confirmation prompt. The configuration stops if it is running and is removed from the engine. This will not affect the other configurations that are running.
3.7. OPERATIONS TAB
The Operations tab displays the operations that are currently running in the engine. If there is nothing running or you are not connected, the window will be blank. For additional details, please refer to the Data Exchange Runtime Features section of this document.

DATA EXCHANGE 3 34
8/1/2018 COPYRIGHT 2017 ADVANCED ENGINEERING, INC. WWW.ADVENG.COM
Last Status: Last status is the last code returned for the operation. Valid codes are:
0 – Unknown
1 – Success
2 – Failure
3 – Timeout
4 - Inactive
Verbose: Enables verbose event logging, which will generate additional event messages.
Active: Allows dynamically enabling and disabling the operations.
Start: Allows manually trigger the operation to start.
Run: The number of times the operation executed.
Queued: The number of operations that have been queued and waiting to run.
In Process: The number of operations that are current running.
Succeeded: The number of times the operation ran successfully.
Failed: The number of times the operation ran successfully. An operation will fail if there is an issue with the configuration of the operation, i.e. a variable is unavailable.
Timed Out: The number of times the operation timed out while executing. This occurs any time the operation takes longer than the specified timeout value, for example, if a database connection time occurs.
Dropped: The number of times the operation began execution and could not complete. For example, for operations that are not set for parallel execution may drop operations if the previous execution of the operation is still executing.
Run Time: The amount of time the last execution of the operation.
Avg. Run: The average duration of the execution of the operation.
Max. Run: The longest duration of the execution of the operation.
Min. Run: The shortest duration of the execution of the operation.

DATA EXCHANGE 3 35
8/1/2018 COPYRIGHT 2017 ADVANCED ENGINEERING, INC. WWW.ADVENG.COM
3.8. EVENTS TAB
The Events tab displays all system events occurring on the computer to which you are connected.
The Pause button stops the auto scrolling of the events. When scrolling is paused the button changes to a Play
button. Press Play to continue auto scrolling.
Select to refresh the list of events. If you select Refresh, it un-pauses Auto Scrolling.
turns on or off Auto scrolling. If Auto scrolling is on, the box has a border around it. If it is off it does not. AutoScroll maintains the highlight of the element in the list that’s selected so it will not disappear from the screen.
Use to export the Event Log to an Excel file. Give the file a name and press Save to store the file to the computer.

DATA EXCHANGE 3 36
8/1/2018 COPYRIGHT 2017 ADVANCED ENGINEERING, INC. WWW.ADVENG.COM
To search for a specific event, enter a word or phrase in the search text box to search
in the event log. To clear the search results, press the button.
A. Filtering Events
To turn on or off viewing of the three types of events toggle the event type buttons at the bottom of the window.
B. Clear All Events
The button will clear all messages from the event log.
C. Max Entries
The button controls the number of messages stored in the Event Log
3.9. CONFIGURATIONS
The configuration section contains the list of configuration files on the local computer. These files by default are user specific and are stored in the user’s document folders. If additional users have accounts on this computer and have configuration files, those will not show here.

DATA EXCHANGE 3 37
8/1/2018 COPYRIGHT 2017 ADVANCED ENGINEERING, INC. WWW.ADVENG.COM
If you click on the configuration currently running in the engine and the engine is a different version than what is in the current user’s directory, Data Exchange will warn that you will be editing the local file. If you wish to edit/view what is in the engine, download the file from the engine to the local user directory.
If a configuration file is loaded into the engine and the local file is newer than the file in the engine, an asterisk (*) will appear next to the configuration file name.
DO NOT delete the directories under Configurations. If the directories are deleted than, you will not be able to create new configurations and any configurations within the deleted directories will be lost. If a directory is mistakenly deleted, shut down Data Exchange Manager and start again. This will recreate required directories.
3.9.1 CONFIGURATION CONTROL
Highlight a configuration file in the engine and select the configuration menu to edit the configuration, rename the file, upload it to the computer, remove it from the engine or change is run status.
A. Edit
Selecting Edit will display the details of the configuration in the Data Exchange Editor.
B. Rename
Allows you to rename a configuration file. If the file is loaded into the engine, Data Exchange will prompt the user if the name of that file should also be changed.

DATA EXCHANGE 3 38
8/1/2018 COPYRIGHT 2017 ADVANCED ENGINEERING, INC. WWW.ADVENG.COM
C. Compare to Local
Compares the configuration running in the Data Exchange 3 Engine with the configuration stored in the Local Configurations Folder. The differences are highlighted in the Data Exchange 3 Editor along with comments added to the object names. Operations are highlighted if differences are found within the items of the Operations. Transfers are also highlighted if differences are found. Items such as schedules are not highlighted, and are only indicated by the highlighting of the Operation.
D. Upload from Engine
If the configuration file does not exist on this computer or it is out of date with what is running Upload the file from the engine.
E. Restart/Start/Stop
To change the runtime status of the configuration file, select Restart, Start or Stop. DXC Manager will not prompt if you are sure.
F. Remove
To remove a configuration from the engine select Remove and click Yes to the confirmation prompt. The configuration stops if it is running and deleted from the engine. This will not affect the other configurations that are running.

DATA EXCHANGE 3 39
8/1/2018 COPYRIGHT 2017 ADVANCED ENGINEERING, INC. WWW.ADVENG.COM
3.9.2 OFFLINE FOLDER CONFIGURATION CONTROL
Selecting the Configuration menu while configuring Data Exchange files will allow you to add and edit configurations to the local computer only. Nothing uploads to the engine until Upload is selected.
A. Connect to Engine
Connect to Engine is enabled if a configuration folder is highlighted. It allows you to connect to an engine with the same name.
B. New Configuration…
New Configuration will add a new configuration to the local host. Give the Configuration file a name and select OK
The DXC Editor will appear allowing for configuration of the new file.
C. Add Existing Configuration…
To move configurations from another engine or location select “Add Existing Configuration” and navigate to the file location. Click on the file name and select Open.

DATA EXCHANGE 3 40
8/1/2018 COPYRIGHT 2017 ADVANCED ENGINEERING, INC. WWW.ADVENG.COM
D. Open Folder
To locate the configuration files on your computer click Open Folder. This will navigate you to the directory that holds the configuration files. The current configuration as well as backups are all stored in the same .DXC file simplifying moving the files.
Create New Folders to organize Data Exchange files. Data Exchange will not recognize and subdirectories off localhost or any other directories located under “Data Exchange Configurations”
E. Delete Folder
Directories existing under “Data Exchange Configurations” may be deleted. The localhost directory can be deleted however; you will not be allowed to create more configurations unless you recreate the directory.
F. Refresh
Use Refresh to refresh the list of files in the offline folder. This may be necessary if files are added to a folder using Windows Explorer.
DATA EXCHANGE 3 41
8/1/2018 COPYRIGHT 2017 ADVANCED ENGINEERING, INC. WWW.ADVENG.COM
3.9.3 OFFLINE FILE CONFIGURATION CONTROL
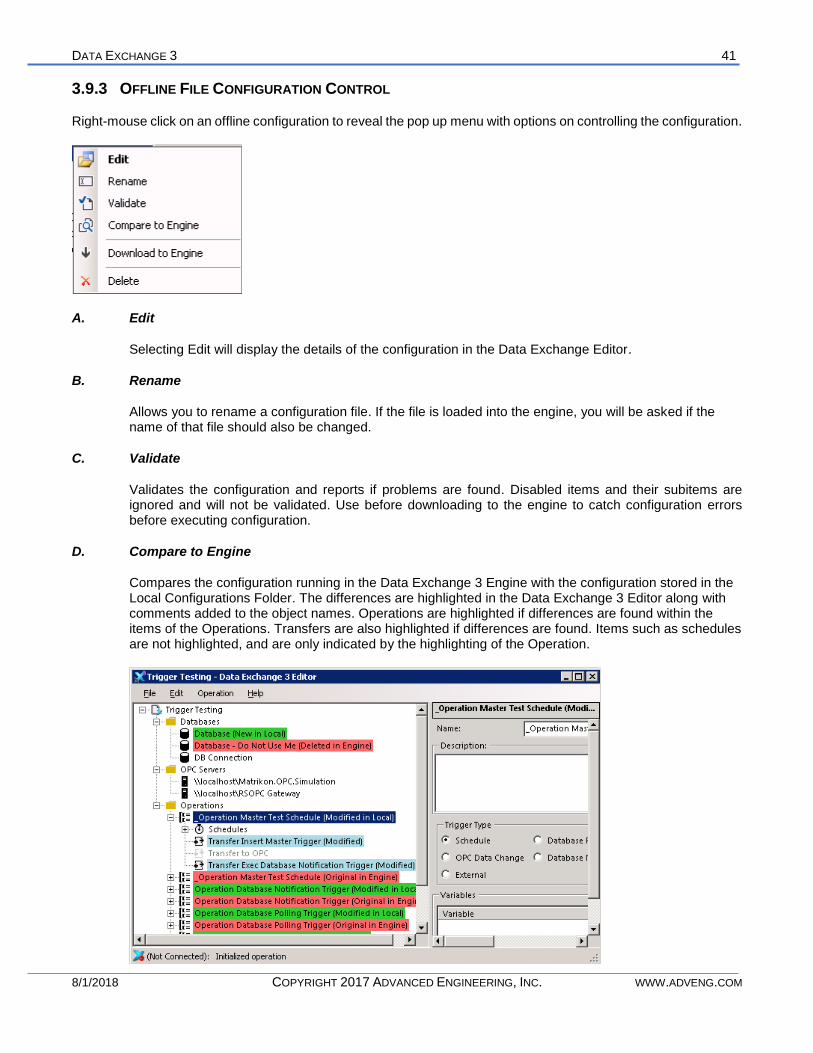
Right-mouse click on an offline configuration to reveal the pop up menu with options on controlling the configuration.
A. Edit
Selecting Edit will display the details of the configuration in the Data Exchange Editor.
B. Rename
Allows you to rename a configuration file. If the file is loaded into the engine, you will be asked if the name of that file should also be changed.
C. Validate
Validates the configuration and reports if problems are found. Disabled items and their subitems are ignored and will not be validated. Use before downloading to the engine to catch configuration errors before executing configuration.
D. Compare to Engine
Compares the configuration running in the Data Exchange 3 Engine with the configuration stored in the Local Configurations Folder. The differences are highlighted in the Data Exchange 3 Editor along with comments added to the object names. Operations are highlighted if differences are found within the items of the Operations. Transfers are also highlighted if differences are found. Items such as schedules are not highlighted, and are only indicated by the highlighting of the Operation.
DATA EXCHANGE 3 42
8/1/2018 COPYRIGHT 2017 ADVANCED ENGINEERING, INC. WWW.ADVENG.COM
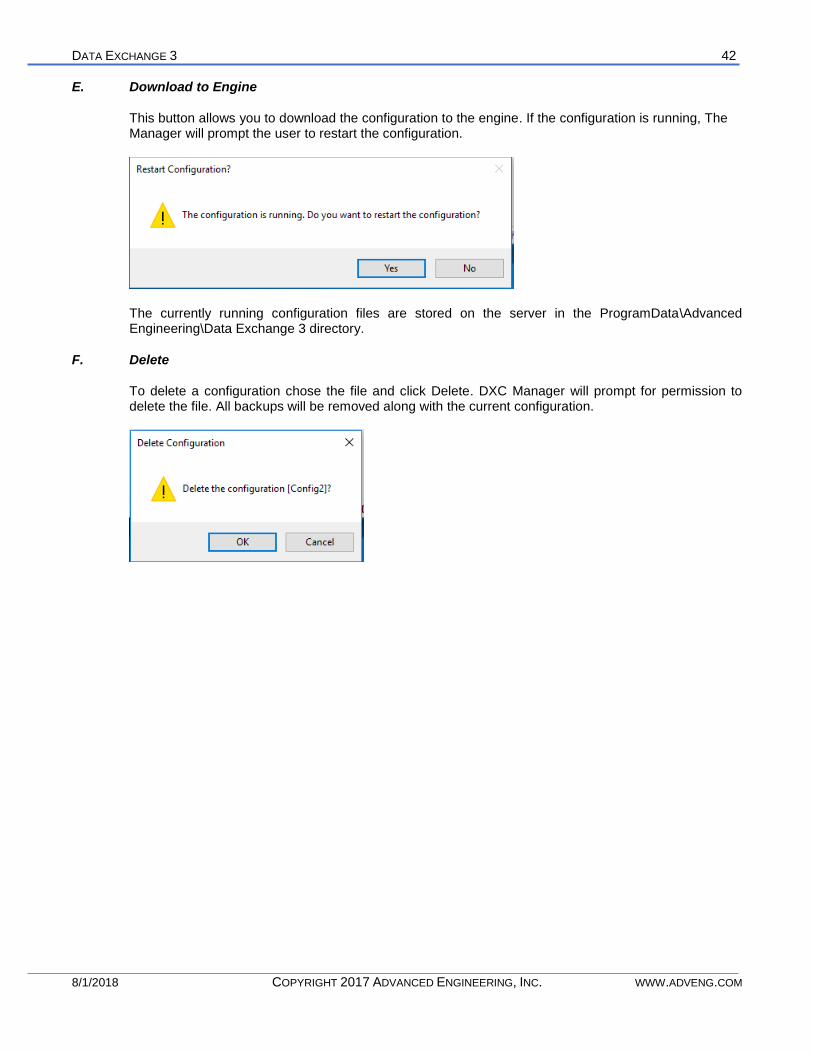
E. Download to Engine
This button allows you to download the configuration to the engine. If the configuration is running, The Manager will prompt the user to restart the configuration.
The currently running configuration files are stored on the server in the ProgramData\Advanced Engineering\Data Exchange 3 directory.
F. Delete
To delete a configuration chose the file and click Delete. DXC Manager will prompt for permission to delete the file. All backups will be removed along with the current configuration.

DATA EXCHANGE 3 43
8/1/2018 COPYRIGHT 2017 ADVANCED ENGINEERING, INC. WWW.ADVENG.COM
3.10. OPERATION CONTROL
Operation control is available when you are clicked on a configuration loaded into the engine.
3.10.1 RESET COUNTERS
Resets the runtime counter information on the Operations page for the Configuration file.
3.10.2 VIEW EVENTS
Displays the Events tab for the highlighted operation in the current Configuration file.
In this example, I selected the Operation_Mat operation inside the config1.dxc configuration file. This operation generated errors due to a lost connection with the database.
Only the event messages for Operation_Mat are displayed. To view all events, clear the search box by clicking on the X next to the search box.
3.10.3 VERBOSE MODE
Click Verbose Mode to turn on additional debug printing.
3.10.4 ACTIVE
Displays the current Active status of an operation. Unclick the checkbox to deactivate the operation and prevent it from running.
3.10.5 START OPERATION
Triggers the selected operation to run.

DATA EXCHANGE 3 44
8/1/2018 COPYRIGHT 2017 ADVANCED ENGINEERING, INC. WWW.ADVENG.COM
SECTION 4. DATA EXCHANGE EDITOR
You can invoke the Data Exchange Editor from a shortcut or from the Data Exchange Manager.
A DXC configuration file consists of three different components that are required to store OPC data to a database. These are database connection, OPC Server and Operations to transfer the data between the database and OPC Server.
Double-click the shortcut to invoke the editor. A blank configuration file is displayed.
Backups to Keep
The .dxc file contains the current configuration file as well as maintains the backups so that moving files from one computer to another requires you to copy only one file. You can choose the number of the configuration backups to keep. By default, the number of backups to maintain is 3.
Tag Count
Tag count of the configuration as it applies to the license. This includes both OPC tags and Variables.

DATA EXCHANGE 3 45
8/1/2018 COPYRIGHT 2017 ADVANCED ENGINEERING, INC. WWW.ADVENG.COM
4.1. FILE MENU
Validate
Validates the configuration and reports if problems are found. Disabled items and their subitems are ignored and will not be validated. Use before downloading to the engine to catch configuration errors before executing configuration.
Compare to Engine
Compares the configuration running in the Data Exchange 3 Engine with this configuration. The differences are highlighted in the Data Exchange 3 Editor along with comments added to the object names. Operations are highlighted if differences are found within the items of the Operations. Transfers are also highlighted if differences are found. Items such as schedules are not highlighted, and are only indicated by the highlighting of the Operation.
Revert All Changes
Removes all changes to the configuration file since the last save.
Recent Configurations
Lists previously opened configurations.
Manage Backups
To restore a backup, select “Manage Backups” from the Configuration drop down menu.

DATA EXCHANGE 3 46
8/1/2018 COPYRIGHT 2017 ADVANCED ENGINEERING, INC. WWW.ADVENG.COM
To restore a backup, select the specific configuration file to restore. Data Exchange will save the current version of the file as the newest backup file.
The Description column contains the description information typed into the Editor. The description helps document the versions of the configuration file to simplify restoring backups.
Clear Highlights
To clear the highlighted items displayed in a search, select “Clear Highlights” to un-highlight the selected text.
Export Tags/Operations
The Editor allows you to export the tags and the operations to an Excel file. Tags are sorted based on OPC Server. For each tag, the Trigger and Transfers are identified. The Operations spreadsheet lists each Operation along with each trigger, transfer name and transfer type.
Sample of the Operation spreadsheet:
Name Type Description
/
Operation_Kep Schedule
Read from OPC to Database Simple OPC Read
Operation_Mat Schedule
Read from OPC to Database Simple OPC Read

DATA EXCHANGE 3 47
8/1/2018 COPYRIGHT 2017 ADVANCED ENGINEERING, INC. WWW.ADVENG.COM
Sample of the Tags spreadsheet:
Server Tag Operation and Transfer Description
\\\
Operation_Kep.trigger
Operation_Mat.trigger
\\VIRT1-ELA\Kepware.KEPServerEX.V6
Simulation Examples.Functions.Ramp1 Operation_Kep.Read from OPC to Database
Simulation Examples.Functions.Random4 Operation_Kep.Read from OPC to Database
Simulation Examples.Functions.Sine1 Operation_Kep.Read from OPC to Database
\\VIRT1-ELA\Matrikon.OPC.Simulation.1
Random.Real4 Operation_Mat.Read from OPC to Database
Random.Real8 Operation_Mat.Read from OPC to Database
Recent Configurations
Displays recent Configurations. Click on a Configuration to open it.
Connect to Engine
Connects the Data Exchange 3 Editor to the Data Exchange 3 Engine. Some features will be limited when the Data Exchange 3 Editor is disconnected from the Data Exchange 3 Engine. When connected to the Engine, this menu item becomes Disconnect from Engine.
Disconnect from Engine
Disconnects the Data Exchange 3 Editor from the Data Exchange 3 Engine. Some features will be limited when the Data Exchange 3 Editor is disconnected from the Data Exchange 3 Engine. When disconnected from the Engine, this menu item becomes Connect to Engine.
Download to Engine
Downloads this configuration file to the engine. If the configuration is already running, you will be required to confirm restarting of the configuration.
Recent Connections
Displays recent Data Exchange 3 Engine connections. Click on a displayed connection to connect to the selected Data Exchange 3 Engine.
DATA EXCHANGE 3 48
8/1/2018 COPYRIGHT 2017 ADVANCED ENGINEERING, INC. WWW.ADVENG.COM
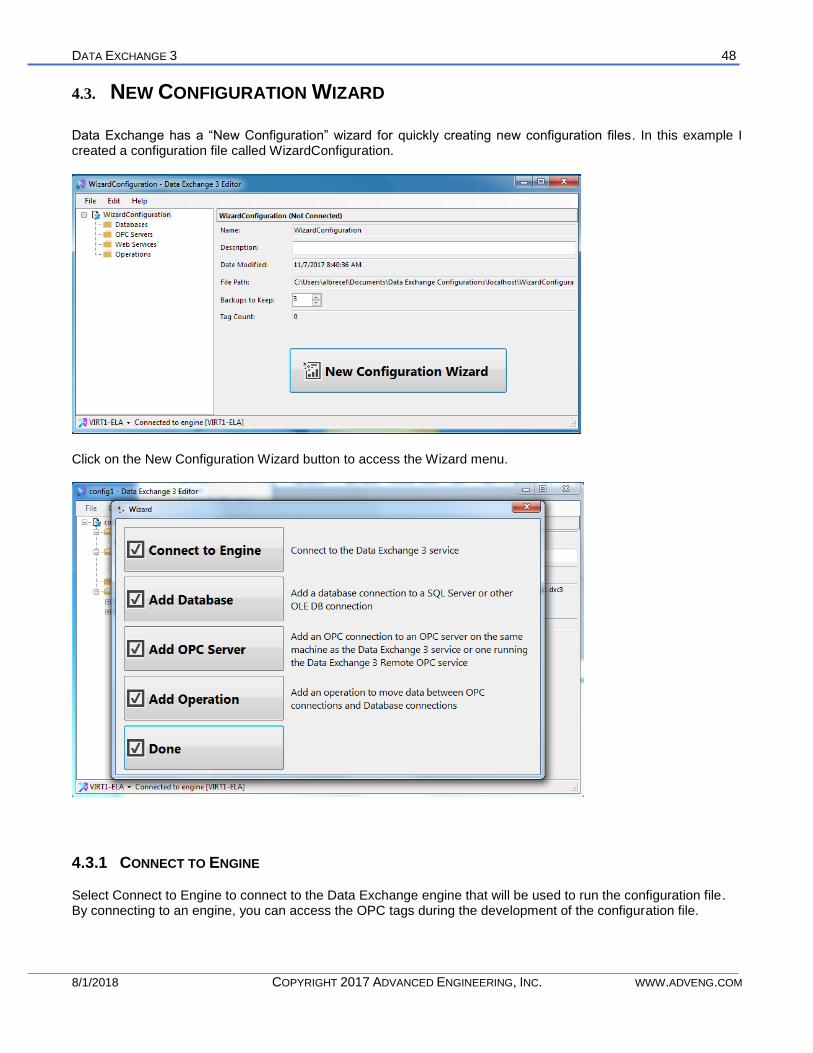
4.3. NEW CONFIGURATION WIZARD
Data Exchange has a “New Configuration” wizard for quickly creating new configuration files. In this example I created a configuration file called WizardConfiguration.
Click on the New Configuration Wizard button to access the Wizard menu.
4.3.1 CONNECT TO ENGINE
Select Connect to Engine to connect to the Data Exchange engine that will be used to run the configuration file. By connecting to an engine, you can access the OPC tags during the development of the configuration file.

DATA EXCHANGE 3 49
8/1/2018 COPYRIGHT 2017 ADVANCED ENGINEERING, INC. WWW.ADVENG.COM
Add Database Create a connection to a database. To communicate with SQL Server, use the SQL Server Native Client 11.0 or Microsoft OLE DB Provider for SQL Server.
Enter relevant database connection information.
Select “Test Connection” to confirm a valid connection has been created to the database.

DATA EXCHANGE 3 50
8/1/2018 COPYRIGHT 2017 ADVANCED ENGINEERING, INC. WWW.ADVENG.COM
4.3.2 ADD OPC SERVER
Create a connection to a local or remote OPC Server. Connections to remote OPC are through the Data Exchange remote OPC service or DCOM. DCOM is not recommended but in some cases, may be necessary.
Local OPC Server
The local option will connect to the localhost and display all registered OPC servers for the computer.

DATA EXCHANGE 3 51
8/1/2018 COPYRIGHT 2017 ADVANCED ENGINEERING, INC. WWW.ADVENG.COM
Remote OPC Server/Remote OPC DCOM Enter the computer name or IP address to view the OPC servers on a remote computer.
Add Operation All that’s left to create are operations for your Data Exchange configuration. Click Operation to create an empty operation then Done.

DATA EXCHANGE 3 52
8/1/2018 COPYRIGHT 2017 ADVANCED ENGINEERING, INC. WWW.ADVENG.COM
4.4. DATABASES
To create a database connection right-mouse click on “Databases” or select menu Database -> Add Database.
The user may create as many database connections as needed. Each database connection has an alias which is used to reference the database.
Type a name for the database connection and press enter to begin configuring the connection. To communicate with SQL Server, use the SQL Server Native Client 11.0 or Microsoft OLE DB Provider for SQL Server. See the Wizard section of the manual to see the Native Client used. Here we will use Microsoft OLE DB Provider.
4.4.1 BUILD THE DATABASE CONNECTION
Press “Build Connection String” to build the connection. Select “Microsoft OLE DB Provider for SQL Server” to create a connection to a SQL Server database and press Next to continue.

DATA EXCHANGE 3 53
8/1/2018 COPYRIGHT 2017 ADVANCED ENGINEERING, INC. WWW.ADVENG.COM
A. Provider
A data provider is used for connecting to a database, executing commands, and retrieving results. Once a provider
is selected, a connection is defined and stored within the Configuration file. Passwords stored in the Configuration
file are encrypted.

DATA EXCHANGE 3 54
8/1/2018 COPYRIGHT 2017 ADVANCED ENGINEERING, INC. WWW.ADVENG.COM
B. Connection
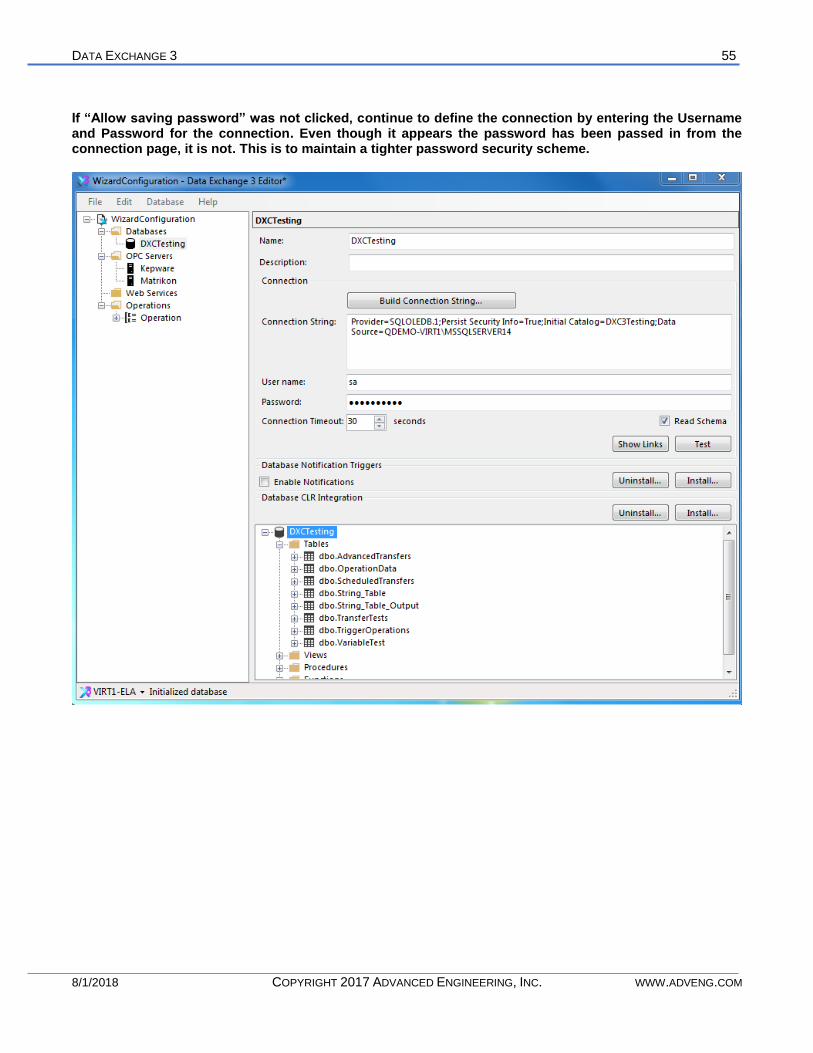
Enter the database name, user name and password. DXC does not carry over the username and database from the database configuration window UNLESS “Allow saving password” is clicked. If “Allow saving” is not clicked, entering the username and password in this screen will not affect what is defined in the previous screen and will not be stored as part of the connection string.
Use the Advanced and All tabs to configure any additional settings. Test the connection and press OK. All data will be stored into the configuration for the database. Pressing OK returns you to the DXC Editor.
DATA EXCHANGE 3 55
8/1/2018 COPYRIGHT 2017 ADVANCED ENGINEERING, INC. WWW.ADVENG.COM
If “Allow saving password” was not clicked, continue to define the connection by entering the Username and Password for the connection. Even though it appears the password has been passed in from the connection page, it is not. This is to maintain a tighter password security scheme.

DATA EXCHANGE 3 56
8/1/2018 COPYRIGHT 2017 ADVANCED ENGINEERING, INC. WWW.ADVENG.COM
C. Read Schema
By checking the Read Schema box DXC will allow you to view the database schema in the Database Monitoring portion of the window.
Disable Schema Reading prevents the Data Exchange Manager from extracting the database schema and saving it into the configuration file. This is a useful feature when Data Exchange connects to a database that has many tables with multiple columns per table. In this case, the schema information can seriously increase the size of the configuration file with irrelevant information. The disadvantage of this selection is the absence of information needed to show columns and data types for simple transfers. If you plan to create only advanced transfers in your configuration, do not select this check box.
To refresh the schema, re-click the Read Schema button.
D. Connection Timeout
Data Exchange uses the Connection Timeout property to terminate the connection to the database if the database is not available.
If the Connection Timeout is larger the timeout set for the Operation, the operation timeout is the timeout used for the connection.
E. Show Links
Selecting Show Links will highlight every transfer that is using this database connection. To clear the highlights, select “Clear Highlights” from the Configuration menu.
F. Test
Tests the connection to the database with the username and password entered on the Database configuration page.
G. Database Notification Triggers
Click Enabled Notifications Turns on the ability to use Database Notifications as a trigger option for operations. NEED MORE DETAIL HERE
Select Install to Install generate the SQL scripts that must be executed within the SQL Server to allow Database Notifications to be used as an operation trigger. Select Uninstall to generate a script to turn off Notifications.
H. Database CLR Integration
NEED MORE DETAIL HERE . Select Install to Install generate the SQL scripts that must be executed within the SQL Server to allow CLR Integration. Select Uninstall to generate a script to turn off CLR Integration. Requires SQL Server 2012 or greater.

DATA EXCHANGE 3 57
8/1/2018 COPYRIGHT 2017 ADVANCED ENGINEERING, INC. WWW.ADVENG.COM
4.4.2 DATABASE CONFIGURATION MENU
A. Refresh
Refreshes the connection information page.
B. Delete
Deletes the selected database.
C. Revert
Select Revert to remove the latest changes to the Database configuration.
D. Find
Search for a string within the configuration file. Narrow the search field by selecting different areas of the configuration file to search.
E. Replace
Replace instances of a string in the configuration file.

DATA EXCHANGE 3 58
8/1/2018 COPYRIGHT 2017 ADVANCED ENGINEERING, INC. WWW.ADVENG.COM
4.5. OPC SERVERS
The user may create as many OPC connections as needed.
When browsing for OPC Servers, Data Exchange 3 is using OPC Servers browsing capabilities. Some old OPC Servers do not have that feature and will not show up in the list.
When “Use Registry Scan” check box is selected Data Exchange 3 will scan the computer(s) Registry instead of OPC Servers. This is slower than to scan servers, but can give you more complete picture, because some servers (especially the old ones) do not have browsing capabilities.
“Minimize number of OPC groups” check box is dealing with OPC group organization. When this box is NOT SELECTED Data Exchange 3 creates as many OPC group as there are Transfers and OPC Triggers in your configuration.
When this box is SELECTED Data Exchange 3 tries to minimize the number of OPC Groups presented to the OPC Servers by grouping items based on the update time interval and access method. Select this box if you have OPC Performance problems when dealing with large configurations.
IMPORTANT! When accessing remote OPC servers, make sure that the Data Exchange 3 service is set to log on with an account that has permissions to access the remote computer. For more information about accessing remote OPC servers see the section “Remote OPC Connections” later in this manual.
Data Exchange 3 can connect to remote OPC servers using Microsoft’s DCOM technology. DCOM uses Windows security to validate requests from remote computers. This security is configured with the program Distributed COM Configuration Properties (DCOMCNFG). To launch this program type dcomcnfg in the Run dialog accessible from the Start menu.
4.5.1 ADD AN OPC SERVER
An OPC Server is a software application that responds to requests for information and provides data to one or more OPC Clients based on a standard protocol to facilitate interoperability between systems.

DATA EXCHANGE 3 59
8/1/2018 COPYRIGHT 2017 ADVANCED ENGINEERING, INC. WWW.ADVENG.COM
Click the button and select an OPC Server.
For this example, we have connected to the Matrikon OPC Server that comes as part of the install for Data Exchange.

DATA EXCHANGE 3 60
8/1/2018 COPYRIGHT 2017 ADVANCED ENGINEERING, INC. WWW.ADVENG.COM
4.5.2 OPTIMIZE OPC GROUPS
Some OPC Servers such as RSLinx do not like many OPC Groups to be created. Instead it prefers many tags, few groups. Other OPC Servers prefer many groups, few tags. Optimize OPC Groups tells Data Exchange to create as few groups as possible
4.5.3 SHOW LINKS
Selecting Show Links will highlight every transfer that is using this OPC Server. To clear the highlights, select “Clear Highlights” from the Configuration menu.
4.5.4 OPC SERVER CONFIGURATION MENU

DATA EXCHANGE 3 61
8/1/2018 COPYRIGHT 2017 ADVANCED ENGINEERING, INC. WWW.ADVENG.COM
A. Delete
Deletes an OPC Server. You cannot delete a configuration that is in use.
B. Revert
Select Revert to remove the latest changes to the Database configuration.
C. Find
Search for a string within the configuration file. Narrow the search field by selecting different areas of the configuration file to search.
D. Replace
Replace instances of a string in the configuration file.
4.6. WEB SERVICES
??
4.6.1 WEB SERVICE

DATA EXCHANGE 3 62
8/1/2018 COPYRIGHT 2017 ADVANCED ENGINEERING, INC. WWW.ADVENG.COM
4.6.2 HEADS UP

DATA EXCHANGE 3 63
8/1/2018 COPYRIGHT 2017 ADVANCED ENGINEERING, INC. WWW.ADVENG.COM
4.7. OPERATIONS
Operations are blocks of work in the configuration file. Each Operation has a trigger and transfers. The trigger initiates the work that is defined by the transfers in the Operation.
Some buttons are disabled if the Engine is not running such as selecting and validating tags. Explain…
4.7.1 FOLDERS
Data Exchange allows users to group operations into folders to organize. Select New Folder and give the folder a name. Folders may be renamed. If you change a folder name and an operation in that folder is invoked by another Operation using the “Start Operation” transfer type, you will need to point to the new name for the Operation.
Add an operation to a folder or to the main Operations folder by right clicking and selecting Add Operation.

DATA EXCHANGE 3 64
8/1/2018 COPYRIGHT 2017 ADVANCED ENGINEERING, INC. WWW.ADVENG.COM
4.7.2 OPERATION RIGHT-CLICK
A. Add Transfer
Creates a transfer for this operation.
B. Enabled
Allows you to enable/disable an operation from running. This Enabled state can only be changed by changing the setting and restarting the configuration.
C. Active on Start
Active on Start allows you to enable an operation but will prevent that operation from being executed until the “Active” checkbox is checked during runtime.

DATA EXCHANGE 3 65
8/1/2018 COPYRIGHT 2017 ADVANCED ENGINEERING, INC. WWW.ADVENG.COM
4.8. VARIABLES
Data Exchange supports two types of variables, local and global.
Global variables are defined for all of the operations in a configuration file. These variables are reset when Data Exchange starts the configuration file. Every operation has access to these variables. Local variables are defined inside an Operation therefore can only be used by that operation. If variables are set during an operation, that data is not stored between calls to the operation. The variables are reset to their defaults.
Every operation has a default set of variables available for use in transfers, however every Trigger type does not produce a value in every variable. For example, TriggerTime is only available for operations running on a recurring timer. If another operation tries to access this variable a message will be displayed in the Event Viewer:
Couldn't find variable [_TriggerTime]
Common scope rules apply to variables created in Data Exchange. If a variable created within an operation has the same name as a global variable, the local variable will be accessed.
Variables created at the folder level are globals WITHIN the Operations defined in that folder. They are not available to other to Operations in other folders.
o Variables declared in the main Operations Folder are globally scoped o Automatic Variables are only locally scoped o Variables declared in a specific Operation are scoped to all instances of the operation o When execution is passed to a different operation, currently available variables are passed also
4.8.1 DEFAULT VARIABLES
$_Configuration
The name of the configuration file.
$_ConfigurationStartTime
The last start time of the configuration file.
$_EngineVersion
Version of the DXC Engine currenting running this configuration file.
$_FromMidnightMS
The number of milliseconds elapsed since midnight.
$_IntervalMS
The number of milliseconds elapsed since the last time the engine started.
$_MachineName
The name of the computer that is running DXC3.
$_Operation
The name of the current operation.

DATA EXCHANGE 3 66
8/1/2018 COPYRIGHT 2017 ADVANCED ENGINEERING, INC. WWW.ADVENG.COM
$_OperationInstance
The instance number of the execution of this operation.
$_OperationStartTime
The start time for the operation.
$_Transfer
The name of the current transfer.
$_TriggerTime
The time the operation triggered to start. This variable is available for operations that run on a recurring timer.
$CurrentTime
The current time on the computer running DXC3.
$Param1, $Param2, $Param3, $Param4, $Param5, $Param6, $Param7, $Param8, $Param9, $Param10
Parameters used for External Operation Triggers.
As an example, Variable1 is defined within an Operation, a Folder and as a Global which is accessible by all operations. The table below displays the runtime results for operations using this variable.
Operations
Variable1 = “This is the Global Value”
Folder1
Variable1 = “This is the Folder1 Value”
Operation1
Variable1 = “This is Operation1 Value”
Operation2
Folder2
OperationA
OperationB
OperationII

DATA EXCHANGE 3 67
8/1/2018 COPYRIGHT 2017 ADVANCED ENGINEERING, INC. WWW.ADVENG.COM
Operation Value of Variable1
Operation1 This is Operation1 Value
Operation2 This is the Folder1 Value
OperationA This is the Global Value
OperationB This is the Global Value
OperationII This is the Global Value
4.8.2 CREATING LOCAL /GLOBAL/FOLDER VARIABLES
To avoid conflict with the internal Data Exchange variables and to avoid confusion as to which variables are local to an operation or are global, etc., follow a naming convention different from the internal variables.
EG:
Global Variables: g_VariableName or gVariableName
Folder Variables: f_VariableName or fVariableName
Operation Variables: o_VariableName or oVariableName
If some variables will act like constants, keep those variables upper case to distinguish them from modifiable variables. For example, a global constant would look like g_CONSTANTNAME or gCONSTANTNAME.

DATA EXCHANGE 3 68
8/1/2018 COPYRIGHT 2017 ADVANCED ENGINEERING, INC. WWW.ADVENG.COM
4.8.3 LOCAL RUNNING VARIABLES
Certain Transfer types will create variables that can be used in the Operation. Simple OPC Read creates runtime variables for every OPC Tag that is read during the transfer.
In this example, OPC Tags are read during the Simple OPC Read transfer below. Variables representing the OPC tags are created and can be used in subsequent Transfers.

DATA EXCHANGE 3 69
8/1/2018 COPYRIGHT 2017 ADVANCED ENGINEERING, INC. WWW.ADVENG.COM
Next, create a “Write Variables to DB” transfer. This transfer has access to the internal variables created to contain the values of the OPC tags from the previous transfer.

DATA EXCHANGE 3 70
8/1/2018 COPYRIGHT 2017 ADVANCED ENGINEERING, INC. WWW.ADVENG.COM
4.9. GENERAL OPERATION SETTINGS
A. Operation Execution Timeout
The maximum amount of time it should take an operation to complete. If an operation hangs Data Exchange will terminate the operation and the status of the operation will be set to failed.
If the Connection Timeout is larger the timeout set for the Operation, the amount of potential time left to execute is used as the timeout for the connection.
B. Parallel Execution
Parallel execute allows multiple operations to execute at the same time. Data Exchange will not wait for the previous operation to finish before it begins execution of the next. During asynchronous mode, operations can finish out of order.
If parallel execution is disabled, a second operation will not start and therefore will be dropped. The drop status is recorded on the Operations tab for the configuration:
The number of operations that can be performed at the same time is based on system resources. If the engine runs out of resources, error messages will be displayed announcing operations cannot execute.
C. Database Buffering
Data Exchange can buffer data destined for a database if it cannot connect to the database.
None
Database buffering is disabled.
Memory
Database buffering is stored internally within Data Exchange. If Data Exchange is restarted the buffered data is deleted and not sent to the database.
File
Database buffering is stored in a file in the Data Exchange runtime directory. If Data Exchange is restarted the buffered data remains. Once a connection is established with the database, the data is transferred to the database.

DATA EXCHANGE 3 71
8/1/2018 COPYRIGHT 2017 ADVANCED ENGINEERING, INC. WWW.ADVENG.COM
4.10. TRIGGER TYPES
There are several types of triggers for DXC Operations. These are:
• Schedule: Triggers an operation on an interval, when the configuration file starts or at one specific time/date.
• OPC Data Change: Triggers an operation when an OPC tag changes value or when it meets a specific condition.
• Database Polling: Triggers an operation based on input from the database.
• Database Notification: Triggers are generated by Data Exchange 3 using a Subscription to SQL Server Notification Services. This allows triggers to be created by Transact-SQL statements. Requires SQL Server 2008 or greater.
• External: Triggers are generated by other programs that communicate directly with the Data Exchange 3 Engine. The program will specify the required Data Exchange 3 Configuration, Operation, and Parameters.
Operations can only have one trigger. If the same Operation must be triggered on multiple conditions, the Start Operation Transfer type can be used to invoke the Operation from other Operations. More on this in the Transfers portion of the manual.
4.10.1 SCHEDULE
Several types of time-based Schedules are available in Data Exchange. The Schedule Trigger can have multiple Schedules. Multiple types of Schedules can be combined in the same Schedule Trigger.
One Time
Triggers can be scheduled for specific dates and times. For example, if an event must happen at 10pm on the last day of the month, create a trigger for January 31 at 10pm, February 28 at 10pm etc.
Configuration Start
Trigger occurs only when a configuration starts in the engine.
Recurring
A recurring event is any event that occurs more than once, according to a pre-defined rule such as weekly, daily, or hourly.

DATA EXCHANGE 3 72
8/1/2018 COPYRIGHT 2017 ADVANCED ENGINEERING, INC. WWW.ADVENG.COM
4.10.2 OPC DATA CHANGE
Trigger an operation based on the value range or specific value of an OPC Tag or the change event of that OPC Tag.
Browse
Browses the tags in the OPC Server and allows you to select one to use in this trigger. An error will occur if Data Exchange cannot connect to the OPC Server.
Note: Some OPC Servers allow you to select a folder name while others do not. Data Exchange does not restrict what is selected so take caution in not selecting something invalid.
Validate Tag
Verifies that the OPC Tag is good and Data Exchange can read the value.
Note: Some OPC Servers will always return that all tags are valid regardless of whether they are valid or not.
Poll Rate
The duration between checks for the trigger condition for an Operation. The minimum poll rate is dependent on the OPC Server.
Every data change
Trigger the operation any time the value of the OPC tag changes.
Only when the value is
Trigger the operation when the value of an OPC tag equals a specific value or if one of the following conditions is true:
=
<>
>
>=
<
<=

DATA EXCHANGE 3 73
8/1/2018 COPYRIGHT 2017 ADVANCED ENGINEERING, INC. WWW.ADVENG.COM
OPC Trigger Tag
The variable $_Trigger can be used in the subsequent transfers of the trigger instead of re-reading the OPC Tag. The variable $_Trigger will contain the value of the OPC Tag at the time of the trigger.
Special Note
If you change the Operation’s Trigger Type to a different type of trigger, the OPC Tag will be cleared.
4.10.3 DATABASE POLLING
Triggers an operation if a query statement returns at least one row.
Poll Rate:
The frequency at which the database is queried. The minimum is 50ms.
Timeout:
The maximum amount of time for the query to execute.
Preview:
Allows the user to view and execute the polling trigger query.

DATA EXCHANGE 3 74
8/1/2018 COPYRIGHT 2017 ADVANCED ENGINEERING, INC. WWW.ADVENG.COM
4.10.4 DATABASE NOTIFICATION
Description:
Database Notification Triggers allow the database to trigger a Data Exchange Operation with minimal delay. Any or all of the default parameters (Param1 – Param10) along with any other Data Exchange variables can be passed to the Data Exchange Operation.
Requirements:
Database Notification Triggers must be installed and enabled. This is done in the database connection configuration of the Data Exchange 3 Editor.
Triggers are generated by executing the stored procedure dxc3.usp_TriggerOperation, and passing the appropriate parameters to the procedure. The example below shows how to execute dxc3.usp_TriggerOperation, and the example can be used if you want to pass individual parameters without using XML.

DATA EXCHANGE 3 75
8/1/2018 COPYRIGHT 2017 ADVANCED ENGINEERING, INC. WWW.ADVENG.COM
Example stored procedure to create a Database Notification Trigger using individual parameters:
SET ANSI_NULLS ON GO SET QUOTED_IDENTIFIER ON GO CREATE PROCEDURE [dbo].[usp_TriggerOperationIndividualParams]( @machine_name [nvarchar](255), @configuration_name [nvarchar](255), @operation_name [nvarchar](max), @Param1 NVARCHAR(MAX) = NULL, @Param2 NVARCHAR(MAX) = NULL, @Param3 NVARCHAR(MAX) = NULL, @Param4 NVARCHAR(MAX) = NULL, @Param5 NVARCHAR(MAX) = NULL, @Param6 NVARCHAR(MAX) = NULL, @Param7 NVARCHAR(MAX) = NULL, @Param8 NVARCHAR(MAX) = NULL, @Param9 NVARCHAR(MAX) = NULL, @Param10 NVARCHAR(MAX) = NULL ) AS BEGIN DECLARE @Variables XML; SET @Variables = ( SELECT @Param1 AS Param1, @Param2 AS Param2, @Param3 AS Param3, @Param4 AS Param4, @Param5 AS Param5, @Param6 AS Param6, @Param7 AS Param7, @Param8 AS Param8, @Param9 AS Param9, @Param10 AS Param10 FOR XML PATH ); EXECUTE [dxc3].[usp_TriggerOperation] @machine_name ,@configuration_name ,@operation_name ,@Variables; END

DATA EXCHANGE 3 76
8/1/2018 COPYRIGHT 2017 ADVANCED ENGINEERING, INC. WWW.ADVENG.COM
4.10.5 EXTERNAL
VB.Net Example:
'Add Reference to DXC3Lib.dll and DXC3Interface.dll 'Target framework: .NET Framework 4.6.2 Private Function ExternalTrigger() As Boolean Dim DXCEngineConnection As DXC3.DataExchange = Nothing Dim sURL As String = "tcp://192.168.10.52:5138/Management" Dim Params As Object() = New Object(9) {} DXCEngineConnection = DirectCast(System.Activator.GetObject(GetType(DXC3.DataExchange), sURL), DXC3.DataExchange) Params(0) = "Param 1 Value" Params(1) = "Param 2 Value" Params(2) = "Param 3 Value" Params(3) = "Param 4 Value" Params(4) = "Param 5 Value" Params(5) = "Param 6 Value" Params(6) = "Param 7 Value" Params(7) = "Param 8 Value" Params(8) = "Param 9 Value" Params(9) = "Param 10 Value" 'Parameters ConfigurationName, OperationName, ParameterValues ExternalTrigger = DXCEngineConnection.StartOperation("Trigger Testing", "Operation External Trigger", Params) End Function
C#.Net Example:
//Add Reference to DXC3Lib.dll and DXC3Interface.dll //Target framework: .NET Framework 4.6.2 private bool ExternalTrigger() { DXC3.DataExchange DXCEngineConnection = null; string sURL = "tcp://192.168.10.52:5138/Management"; object[] Params = new object[10]; DXCEngineConnection = (DXC3.DataExchange)System.Activator.GetObject(typeof(DXC3.DataExchange), sURL); Params[0] = "Param 1 Value"; Params[1] = "Param 2 Value"; Params[2] = "Param 3 Value"; Params[3] = "Param 4 Value"; Params[4] = "Param 5 Value"; Params[5] = "Param 6 Value"; Params[6] = "Param 7 Value"; Params[7] = "Param 8 Value"; Params[8] = "Param 9 Value"; Params[9] = "Param 10 Value"; //Parameters ConfigurationName, OperationName, ParameterValues return DXCEngineConnection.StartOperation("Trigger Testing", "Operation External Trigger", Params); }

DATA EXCHANGE 3 77
8/1/2018 COPYRIGHT 2017 ADVANCED ENGINEERING, INC. WWW.ADVENG.COM
4.11. GENERAL TRANSFER TYPES DESCRIPTIONS
Transfers are the action portion of the Operation.
Data Exchange 3 offers several ways of creating transfers. Users not knowledgeable in database architecture and SQL can build configurations using simple transfer types. Advanced users knowledgeable in database architecture and SQL can build configurations using advanced transfer types.

DATA EXCHANGE 3 78
8/1/2018 COPYRIGHT 2017 ADVANCED ENGINEERING, INC. WWW.ADVENG.COM
4.11.1 OPC TRANSFERS
These transfers are read and write to the OPC Server without using a database connection.
OPC: Read Variables from OPC – allows the user to move data from the OPC Server to variables that are created within an operation. These variables can be used in subsequent transfers in the operation.
OPC: Write OPC Receipt – allows the user to write a constant value to the OPC server. This transfer is used for feedback. It usually is placed at the end of the operation and it tells the industrial device that all transfers in this operation were successfully executed.
OPC: Write Variables to OPC – allows the user to move data stored in operation variables to the OPC Server.
4.11.2 SIMPLE QUERY TRANSFERS
Simple query transfers are for users unfamiliar with database queries. The Editor screen for these operations creates simple queries for reading and writing data to a database.
Simple Query: Read from OPC to Database – allows the user to move data from the OPC server to the database. This transfer is used to collect the information from the factory floor and is helpful for product traceability, data acquisition, process history, etc.
Simple Query: Read Variables from DB – allows the user to move data from the database to variables that are created within an operation. This transfer is used to store data that will be used in a transfer executed later in the operation.
Simple Query: Write to OPC from Database – allows the user to move data from the database to the OPC server. This transfer is used to download data to an industrial device. Example uses of this transfer are recipe downloads, changeover information, and product information downloads.
Simple Query: Write Variables to DB – allows the user to move data stored in operation variables to the database.

DATA EXCHANGE 3 79
8/1/2018 COPYRIGHT 2017 ADVANCED ENGINEERING, INC. WWW.ADVENG.COM
4.11.3 CUSTOM QUERY TRANSFERS
Custom Query: Execute Custom SQL – allows an advanced user to write a custom SQL statement. The SQL statement can be a complicated query or a stored procedure that does not use OPC server data. Variables that contain OPC data can be used. Data Exchange 3 assists in writing this statement by supplying a list of database objects (tables, views, stored procedures). This transfer type is used when OPC server data access is not required.
Custom Query: Read from OPC to Database – allows an advanced user to write a custom SQL statement. The SQL statement can be a complicated query or a stored procedure that uses OPC server data for parameters. Data Exchange 3 assists in writing this statement by supplying a list of database objects (tables, views, stored procedures). This transfer type is used in the same situations as the Simple Read from OPC to Database, but it is much more flexible.
Custom Query: Write to OPC from Database – allows an advanced user to write a custom SQL statement. The SQL statement can be a complicated query or a stored procedure that uses OPC server data for parameters. The results of the SQL statement can be mapped to items in the OPC server. Data Exchange 3 assists in writing this statement by supplying a list of the database objects (tables, views, stored procedures). This transfer type is used in the same situations as the Simple Write to OPC from Database transfer, but it is much more flexible.
4.11.4 CONTROL TRANSFERS
Control: Pause - This transfer allows you to pause the operation execution. It is useful when the operation has some interaction between the device (PLC) and Data Exchange 3 computer. Good example of this transfer usage would be a sequence of three transfers in one operation.
1. Setting a value in the PLC by using Write OPC Receipt transfer.
2. Operation Pause transfer to allow PLC to prepare the data.
3. Reading the data from the PLC.
Control: Script – This transfer allows custom C#, JavaScript, and Visual Basic scripts to be written.
Control: Start Operation – This transfer allows you to call an operation in the middle of another operation.
Control: Test OPC Condition – The transfer allows you to check the status of an OPC item to determine whether to proceed with the rest of the operation. If the condition is true, the operation proceeds to the next transfer, if it is false, it is redirected to the selected transfer. This transfer is emulating “If ….. else” logic. This can be useful, for example, to only log data from a machine when it is running or when different data needs to be collected depending on the some bit status.

DATA EXCHANGE 3 80
8/1/2018 COPYRIGHT 2017 ADVANCED ENGINEERING, INC. WWW.ADVENG.COM
4.11.5 MISCELLANEOUS TRANSFERS
Miscellaneous: Call Web Service –

DATA EXCHANGE 3 81
8/1/2018 COPYRIGHT 2017 ADVANCED ENGINEERING, INC. WWW.ADVENG.COM
4.12. GENERAL TRANSFER SETTINGS
Many of the Transfers are similar and therefore have the same configuration settings.
4.12.1 NAME
Name of the transfer.
4.12.2 ON ERROR
If an error occurs while processing a transfer, the entire operation can be terminated or continue.
Operation Failure: The operation fails and is terminated after the failure of this transfer.
Operation Success: The operation fails and is terminated however, it returns success. The remainder of the operation will not execute. An error will be generated in the event log for the transfer that caused the error.
Next Transfer: Executes the next transfer in the list.
[Specific Transfers]: Operation can continue with a specific transfer.
4.12.3 OPC CONNECTION
Name of the OPC Server to use in this operation. Only one OPC Server can be used in a transfer.
4.12.4 READ FROM CACHE
Data Exchange can read the cache of the OPC Server. The OPC Server will reply with the value it already has in its memory, rather than read it from the source device. Reading Cache is faster than reading from the device.
4.12.5 READ FROM DEVICE
If checked, reading from the device guarantees a fresh value for the OPC tag. Device reads are slower than Cache reads.
4.12.6 USE NULL FOR BAD QUALITY
If a bad quality code is read from the OPC Server return NULL instead of potentially old or bad data.
4.12.7 BROWSE
Browses the tags in the OPC Server and allows you to select one to use in this operation. An error will occur if Data Exchange cannot connect to the OPC Server.

DATA EXCHANGE 3 82
8/1/2018 COPYRIGHT 2017 ADVANCED ENGINEERING, INC. WWW.ADVENG.COM
Some OPC Servers allow you to select a folder name while others do not. Data Exchange does not restrict what is selected so take caution in not selecting something invalid.
In this example, I selected “Simulation Items” folder in the Matrikon OPC Server. Selecting “Validate Tag” will return an “Invalid Tag” message.
4.12.8 VALIDATE TAG
Verifies that the OPC Tag is good and Data Exchange can read the value.

DATA EXCHANGE 3 83
8/1/2018 COPYRIGHT 2017 ADVANCED ENGINEERING, INC. WWW.ADVENG.COM
4.13. TRANSFERS
Transfers have several common settings in which to control their execution. Some transfers may not have all of these options.
4.13.1 NAME
Name of the transfer.
4.13.2 ON ERROR
If an error occurs while processing a transfer, the entire operation can be terminated or continue.
Operation Failure: The operation fails and is terminated after the failure of this transfer.
Operation Success: The operation fails and is terminated however, it returns success. The remainder of the operation will not execute. An error will be generated in the event log for the transfer that caused the error.
Next Transfer: Executes the next transfer in the list.
[Specific Transfers]: Operation can continue with a specific transfer.
4.13.3 OPC CONNECTION
Name of the OPC Server to use in this operation. Only one OPC Server can be used in a transfer.
A. Read from Cache
Data Exchange can read the cache of the OPC Server. The OPC Server will reply with the value it already has in its memory, rather than read it from the source device. Reading Cache is faster than reading from the device.
B. Read from Device
If checked, reading from the device guarantees a fresh value for the OPC tag. Device reads are slower than Cache reads.
C. Use NULL for Bad Quality
If a bad quality code is read from the OPC Server return NULL instead of potentially old or bad data.

DATA EXCHANGE 3 84
8/1/2018 COPYRIGHT 2017 ADVANCED ENGINEERING, INC. WWW.ADVENG.COM
4.13.4 FORMAT
Allows you to format the data sent to the OPC Server.
4.13.5 PREVIEW
To preview the variables in a write or to test a transfer, select Preview. Select Execute to run the transfer.

DATA EXCHANGE 3 85
8/1/2018 COPYRIGHT 2017 ADVANCED ENGINEERING, INC. WWW.ADVENG.COM
4.14. OPC TRANSFERS
The OPC Transfers do not require a connection to a database. They read and write data between an OPC Server and variables defined within the Data Exchange configuration.
4.14.1 READ VARIABLES FROM OPC
Reads OPC tags and stores them into Data Exchange variables.
See the General Transfer Settings section for details on the common transfer parameters.
4.14.2 WRITE OPC RECEIPT
Writes a fixed value to an OPC Tag. If the value specified is inconsistent with the data type for the OPC Tag, an error condition will occur.
See the General Transfer Settings section for details on the common transfer parameters.
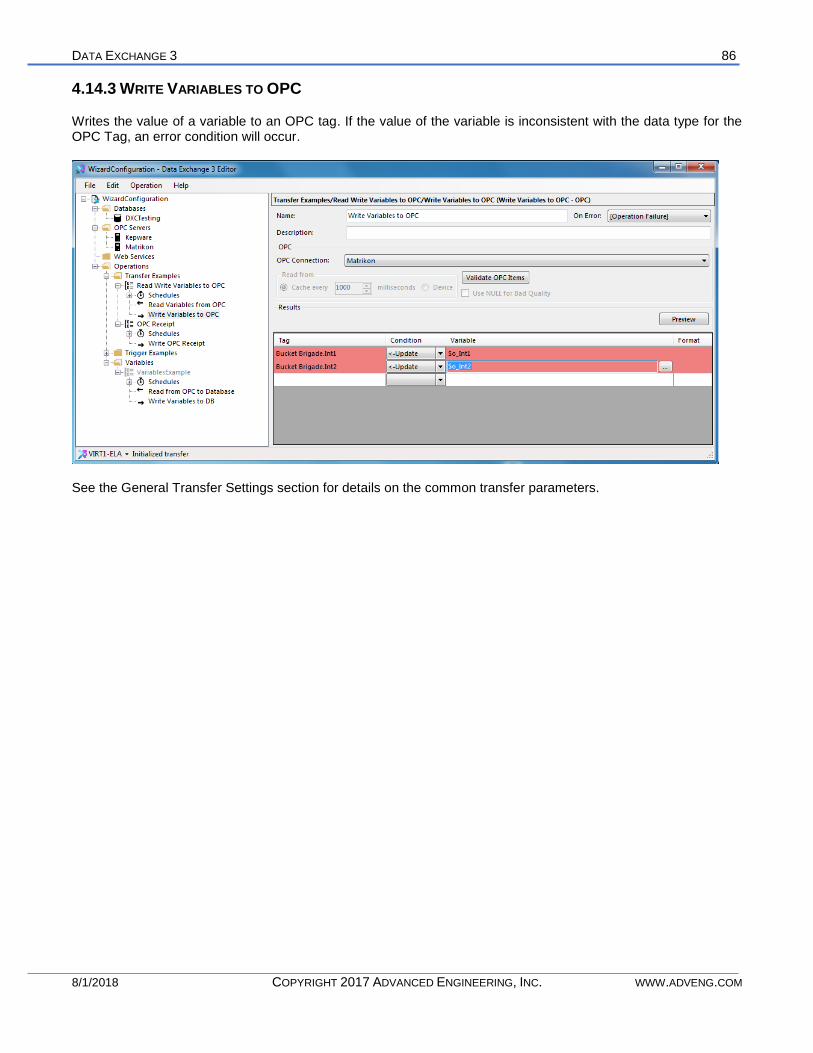
DATA EXCHANGE 3 86
8/1/2018 COPYRIGHT 2017 ADVANCED ENGINEERING, INC. WWW.ADVENG.COM
4.14.3 WRITE VARIABLES TO OPC
Writes the value of a variable to an OPC tag. If the value of the variable is inconsistent with the data type for the OPC Tag, an error condition will occur.
See the General Transfer Settings section for details on the common transfer parameters.

DATA EXCHANGE 3 87
8/1/2018 COPYRIGHT 2017 ADVANCED ENGINEERING, INC. WWW.ADVENG.COM
4.15. SIMPLE QUERY TRANSFERS
The Simple Query Transfers are transfers that do not require the user to program the SQL Server code specifically. Queries by selecting the table for the query and the columns.
4.15.1 READ FROM OPC TO DATABASE
Uses OPC Tag and Variable values to modify a database table. Select the table in which to use in the transfer. You may select other tables without losing the information you have entered in the previous table. If tables contain the same column names, the tag information entered in a previous table will be saved to any table containing the same column name.
See the General Transfer Settings section for details on the common transfer parameters.
A. SQL Action
Insert
Inserts the values of OPC Tags and Variables into the database.
Update
Updates the records in a database with the values of the specified OPC Tags and Variables. Where conditions are not available in Simple OPC Reads. If this transfer should only affect rows that meet specific criteria, use the Advanced OPC Read Transfer type. To convert this transfer to an advanced transfer right-mouse click on the transfer name and select “Convert to Advanced”

DATA EXCHANGE 3 88
8/1/2018 COPYRIGHT 2017 ADVANCED ENGINEERING, INC. WWW.ADVENG.COM

DATA EXCHANGE 3 89
8/1/2018 COPYRIGHT 2017 ADVANCED ENGINEERING, INC. WWW.ADVENG.COM
Delete
Deletes the records in a database. Where conditions are not available in Simple OPC Reads. If this transfer should only affect rows that meet specific criteria, use the Advanced OPC Read Transfer type. To convert this transfer to an advanced transfer right-mouse click on the transfer name and select “Convert to Advanced”
B. SQL Query
If you cannot see the actual SQL code, select the up arrow to see the query.
4.15.2 READ VARIABLES FROM DB
Reads data from the database and stores it in Data Exchange Variables. If the data returned to the variables must meet specific criteria, specific data is returned by using the Filter Columns.
If a query returns more than one row, only the first row is stored into the variables. Any other rows returned are not used.
See the General Transfer Settings section for details on the common transfer parameters.
In this example, 3 variables are created. String1, String2, String3. String1 is the variable that will be used to filter the data returned to DXC. Table “String_Table_Output” contains data that will be returned to the operation if the WHERE condition is true. Select Preview to display the variables used in this operation:

DATA EXCHANGE 3 90
8/1/2018 COPYRIGHT 2017 ADVANCED ENGINEERING, INC. WWW.ADVENG.COM
Make sure there is data in the table and enter a value for String1 that corresponds to a row in the table.
Selecting Execute runs the query and returns the row of data that includes “Apple” in the String1 column:
If two rows match then both rows will be returned. However, Data Exchange will only use the first returned row.

DATA EXCHANGE 3 91
8/1/2018 COPYRIGHT 2017 ADVANCED ENGINEERING, INC. WWW.ADVENG.COM
A. Error on no data
There are multiple ways to continue processing of the rest of the operation. Uncheck “Error on no data” if this condition is not an error and if processing of the operation should continue. This will cause the operation to complete successfully. If you would like to capture the “no data” event, check “Error on no data” but change the On Error condition to “Next Transfer” so that the operation will continue.
B. Filter Columns
Use Filter Columns to return a specific data set from the database. Only Data Exchange variables are used to filter returned data. If it is necessary to have the value come from an OPC Server or another database, store the value into a variable before calling this transfer.
SQL Query
If you cannot see the actual SQL code, select the up arrow to see the query.

DATA EXCHANGE 3 92
8/1/2018 COPYRIGHT 2017 ADVANCED ENGINEERING, INC. WWW.ADVENG.COM
4.15.3 WRITE TO OPC FROM DATABASE
Write data from a database to an OPC Server.
SQL Query
If you cannot see the actual SQL code, select the up arrow to see the query.

DATA EXCHANGE 3 93
8/1/2018 COPYRIGHT 2017 ADVANCED ENGINEERING, INC. WWW.ADVENG.COM
4.15.4 WRITE VARIABLES TO DB
Write Data Exchange Variables to a database.
SQL Action
Insert
Inserts the values of Data Exchange Variables into the database.
Update
Updates the records in a database with the values of the specified Variables. Where conditions are not available in Variable DB Writes. If this transfer should only affect rows that meet specific criteria, use the Advanced OPC Read Transfer type. To convert this transfer to an advanced transfer right-mouse click on the transfer name and select “Convert to Advanced.”
Delete
Deletes the records in a database. Where conditions are not available in Variable DB Writes. If this transfer should only affect rows that meet specific criteria, use the Advanced OPC Read Transfer type. To convert this transfer to an advanced transfer right-mouse click on the transfer name and select “Convert to Advanced.”
SQL Query
If you cannot see the actual SQL code, select the up arrow to see the query.

DATA EXCHANGE 3 94
8/1/2018 COPYRIGHT 2017 ADVANCED ENGINEERING, INC. WWW.ADVENG.COM
In this example, the operation has two defined variables:
The variables are filled with OPC data in the previous transfer:

DATA EXCHANGE 3 95
8/1/2018 COPYRIGHT 2017 ADVANCED ENGINEERING, INC. WWW.ADVENG.COM
4.16. CUSTOM QUERY TRANSFERS
4.16.1 EXECUTE CUSTOM SQL (ADVANCED VARIABLE DB)
Create custom queries using Data Exchange Variables.

DATA EXCHANGE 3 96
8/1/2018 COPYRIGHT 2017 ADVANCED ENGINEERING, INC. WWW.ADVENG.COM
4.16.2 CUSTOM READ FROM OPC TO DATABASE
Read data from an OPC Server and store in a database table.

DATA EXCHANGE 3 97
8/1/2018 COPYRIGHT 2017 ADVANCED ENGINEERING, INC. WWW.ADVENG.COM
4.16.3 WRITE TO OPC FROM DATABASE
Write OPC Server data to a database.

DATA EXCHANGE 3 98
8/1/2018 COPYRIGHT 2017 ADVANCED ENGINEERING, INC. WWW.ADVENG.COM
4.17. CONTROL TRANSFERS
4.17.1 PAUSE
Pauses the Operation for the specified amount of time. The minimum amount of time the operation can be paused is 1 millisecond.
4.17.2 SCRIPT
Script operations allow you to create custom code into your operation. Code may be written in C#, JavaScript or Visual Basic.
A. Usings
NEED INFO HERE

DATA EXCHANGE 3 99
8/1/2018 COPYRIGHT 2017 ADVANCED ENGINEERING, INC. WWW.ADVENG.COM
B. References
NEED INFO HERE

DATA EXCHANGE 3 100
8/1/2018 COPYRIGHT 2017 ADVANCED ENGINEERING, INC. WWW.ADVENG.COM
4.17.3 START OPERATION
Call an operation from within another operation. If the invoked operation uses variables, those variables must be defined in the calling operation.
Wait for Operation to Complete
Click the Wait to have the operation wait for the called operation to complete before continuing. If the sequence of actions inside the operation do not matter, leave the button unchecked.
4.17.4 TEST OPC CONDITION
Checks the value of an OPC tag and calls a transfer according to its Boolean value. Once the specified transfer is executed, the remainder of the transfers in the operation are executed.
In this example, operation TestCondition begins with transfer Test OPC Condition that checks the value of OPC Tag Bucket Brigade.Int1. If the value of the tag is 0, the TransferOnlyIfFALSE is executed, followed by the remaining transfers in the operation. If the value of the tag is not equal to 0, TransferOnlyIfFALSE is ignored, and the remaining transfers in the operation are executed.
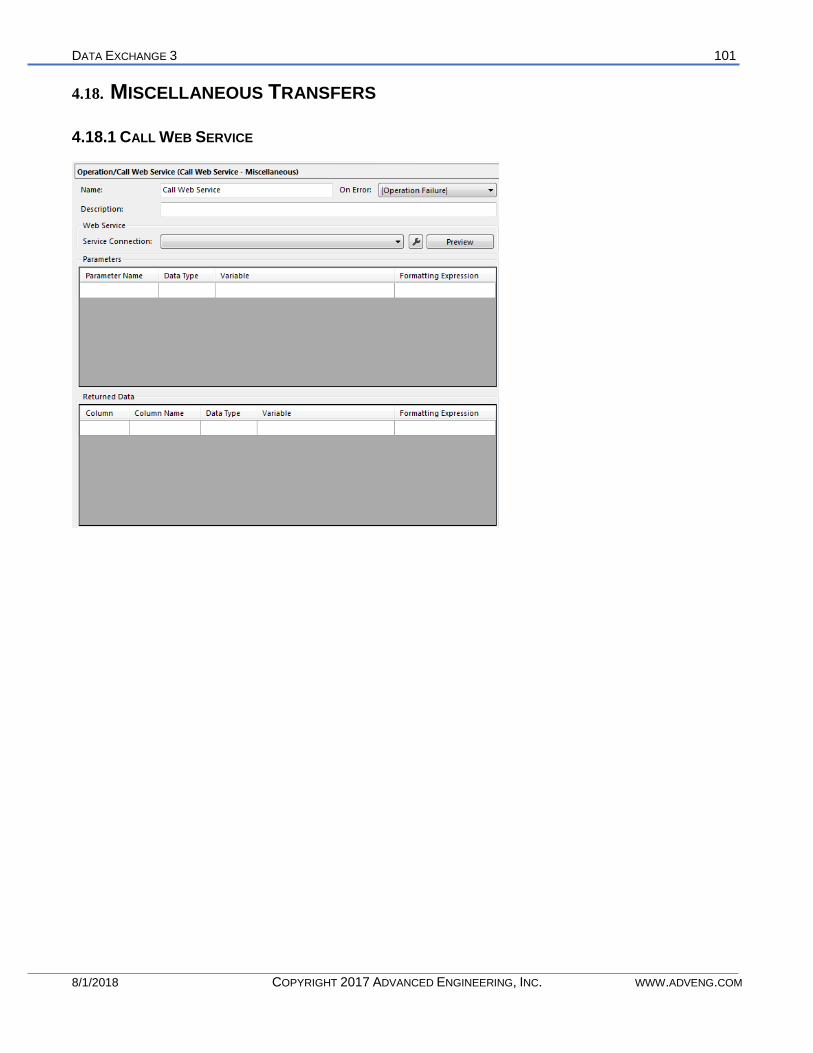
DATA EXCHANGE 3 101
8/1/2018 COPYRIGHT 2017 ADVANCED ENGINEERING, INC. WWW.ADVENG.COM
4.18. MISCELLANEOUS TRANSFERS
4.18.1 CALL WEB SERVICE

DATA EXCHANGE 3 102
8/1/2018 COPYRIGHT 2017 ADVANCED ENGINEERING, INC. WWW.ADVENG.COM
4.19. BACKUPS
During initial setup of a Data Exchange file, the configuration page will appear. This page displays the current name of the file, date, description and the number of backups to keep. All backups as well as the currently running file are stored in the .dxc3 file created and modified using the editor.
To view the backups select “Manage Backups” from the Configuration menu. Adding a description for each new version of the configuration file helps document your system.
To revert to an older version of the configuration file, save the current version of the file, select the version in which to revert and select Open. Save this version under the same file name or Save AS another file.

DATA EXCHANGE 3 103
8/1/2018 COPYRIGHT 2017 ADVANCED ENGINEERING, INC. WWW.ADVENG.COM
4.20. EXPORTING TAGS & OPERATIONS
The Editor allows you to export all the tags and operations that are used in the Configuration file.
4.20.1 TAG DATA
\\VIRT1-ELA\Matrikon.OPC.Simulation.1
Bucket Brigade.ArrayOfString[0] CustomSQLOperations/Write to OPC.Write to OPC from Database
Bucket Brigade.ArrayOfString[0] Write to OPC from Database.Write to OPC from Database
Bucket Brigade.ArrayOfString[1] CustomSQLOperations/Write to OPC.Write to OPC from Database
Bucket Brigade.ArrayOfString[1] Write to OPC from Database.Write to OPC from Database
Bucket Brigade.ArrayOfString[2] CustomSQLOperations/Write to OPC.Write to OPC from Database
Bucket Brigade.ArrayOfString[2] Write to OPC from Database.Write to OPC from Database
Bucket Brigade.Int1 CustomSQLOperations/Custom SQL.Read Variables from OPC
Bucket Brigade.Int1 Transfer Examples/Read Write Variables to OPC.Read Variables from OPC
Bucket Brigade.Int1 Variables/VariablesExample.Read Variables from OPC
Bucket Brigade.Int2 CustomSQLOperations/Custom SQL.Read Variables from OPC
Bucket Brigade.Int2 Transfer Examples/Read Write Variables to OPC.Read Variables from OPC
Bucket Brigade.Int2 Variables/VariablesExample.Read Variables from OPC
Bucket Brigade.UInt1 Transfer Examples/Read Write Variables to OPC.Write Variables to OPC
Bucket Brigade.UInt2 Transfer Examples/Read Write Variables to OPC.Write Variables to OPC
Random.Boolean ControlOperations/TestCondition.Test OPC Condition
Random.Int1 CustomSQLOperations/Read OPC to Database.Read from OPC to Database
Random.Int1 OPC to DB.Read from OPC to Database
Random.Int1 Transfer Examples/OPC Receipt.Write OPC Receipt
Random.Int2 CustomSQLOperations/Read OPC to Database.Read from OPC to Database
Random.Int2 OPC to DB.Read from OPC to Database
Random.Int4 CustomSQLOperations/Read OPC to Database.Read from OPC to Database
Random.Int4 OPC to DB.Read from OPC to Database

DATA EXCHANGE 3 104
8/1/2018 COPYRIGHT 2017 ADVANCED ENGINEERING, INC. WWW.ADVENG.COM
4.20.2 OPERATION DATA
ControlOperations
Pause Schedule
PauseOneSecond Operation Pause
ScriptOperation Schedule
IncrementGlobal Run Script
Write Variables to DB Variable DB Write
StartOperation Schedule
Start Operation Start Operation
TestCondition Schedule
Test OPC Condition Test OPC Condition
TransferOnlyIfFALSE Simple OPC Read
TransferDataToDatabase Simple OPC Read
Write OPC Receipt Write OPC Receipt
CustomSQLOperations
Custom SQL Schedule
Read Variables from OPC Variable OPC Read
Execute Custom SQL Advanced Variables DB
Read OPC to Database Schedule
Read from OPC to Database Advanced OPC Read
Write to OPC Schedule
Write to OPC from Database Advanced OPC Write

DATA EXCHANGE 3 105
8/1/2018 COPYRIGHT 2017 ADVANCED ENGINEERING, INC. WWW.ADVENG.COM
SECTION 5. PERFORMANCE MONITORING
Local Computer
DXC3