Table of Contents • Index • Reviews • Reader Reviews • Errata Oracle SQL Tuning Pocket

Oracle Integrated Lights Out Manager (ILOM) 3.0
Daily Management – Web Procedures Guide
Part No.: E21446-02August 2012

Copyright © 2008, 2009, 2010, 2011, 2012, Oracle and/or its affiliates. All rights reserved.This software and related documentation are provided under a license agreement containing restrictions on use and disclosure and are protected byintellectual property laws. Except as expressly permitted in your license agreement or allowed by law, you may not use, copy, reproduce, translate,broadcast, modify, license, transmit, distribute, exhibit, perform, publish, or display any part, in any form, or by any means. Reverse engineering,disassembly, or decompilation of this software, unless required by law for interoperability, is prohibited.The information contained herein is subject to change without notice and is not warranted to be error-free. If you find any errors, please report them to usin writing.If this is software or related software documentation that is delivered to the U.S. Government or anyone licensing it on behalf of the U.S. Government, thefollowing notice is applicable:U.S. GOVERNMENT END USERS. Oracle programs, including any operating system, integrated software, any programs installed on the hardware,and/or documentation, delivered to U.S. Government end users are "commercial computer software" pursuant to the applicable Federal AcquisitionRegulation and agency-specific supplemental regulations. As such, use, duplication, disclosure, modification, and adaptation of the programs, includingany operating system, integrated software, any programs installed on the hardware, and/or documentation, shall be subject to license terms and licenserestrictions applicable to the programs. No other rights are granted to the U.S. Government.This software or hardware is developed for general use in a variety of information management applications. It is not developed or intended for use in anyinherently dangerous applications, including applications that may create a risk of personal injury. If you use this software or hardware in dangerousapplications, then you shall be responsible to take all appropriate fail-safe, backup, redundancy, and other measures to ensure its safe use. OracleCorporation and its affiliates disclaim any liability for any damages caused by use of this software or hardware in dangerous applications.Oracle and Java are registered trademarks of Oracle and/or its affiliates. Other names may be trademarks of their respective owners.Intel and Intel Xeon are trademarks or registered trademarks of Intel Corporation. All SPARC trademarks are used under license and are trademarks orregistered trademarks of SPARC International, Inc. AMD, Opteron, the AMD logo, and the AMD Opteron logo are trademarks or registered trademarks ofAdvanced Micro Devices. UNIX is a registered trademark of The Open Group.This software or hardware and documentation may provide access to or information on content, products, and services from third parties. OracleCorporation and its affiliates are not responsible for and expressly disclaim all warranties of any kind with respect to third-party content, products, andservices. Oracle Corporation and its affiliates will not be responsible for any loss, costs, or damages incurred due to your access to or use of third-partycontent, products, or services.
Copyright © 2008, 2009, 2010, 2011, 2012, Oracle et/ou ses affiliés. Tous droits réservés.Ce logiciel et la documentation qui l’accompagne sont protégés par les lois sur la propriété intellectuelle. Ils sont concédés sous licence et soumis à desrestrictions d’utilisation et de divulgation. Sauf disposition de votre contrat de licence ou de la loi, vous ne pouvez pas copier, reproduire, traduire,diffuser, modifier, breveter, transmettre, distribuer, exposer, exécuter, publier ou afficher le logiciel, même partiellement, sous quelque forme et parquelque procédé que ce soit. Par ailleurs, il est interdit de procéder à toute ingénierie inverse du logiciel, de le désassembler ou de le décompiler, excepté àdes fins d’interopérabilité avec des logiciels tiers ou tel que prescrit par la loi.Les informations fournies dans ce document sont susceptibles de modification sans préavis. Par ailleurs, Oracle Corporation ne garantit pas qu’ellessoient exemptes d’erreurs et vous invite, le cas échéant, à lui en faire part par écrit.Si ce logiciel, ou la documentation qui l’accompagne, est concédé sous licence au Gouvernement des Etats-Unis, ou à toute entité qui délivre la licence dece logiciel ou l’utilise pour le compte du Gouvernement des Etats-Unis, la notice suivante s’applique :U.S. GOVERNMENT END USERS. Oracle programs, including any operating system, integrated software, any programs installed on the hardware,and/or documentation, delivered to U.S. Government end users are "commercial computer software" pursuant to the applicable Federal AcquisitionRegulation and agency-specific supplemental regulations. As such, use, duplication, disclosure, modification, and adaptation of the programs, includingany operating system, integrated software, any programs installed on the hardware, and/or documentation, shall be subject to license terms and licenserestrictions applicable to the programs. No other rights are granted to the U.S. Government.Ce logiciel ou matériel a été développé pour un usage général dans le cadre d’applications de gestion des informations. Ce logiciel ou matériel n’est pasconçu ni n’est destiné à être utilisé dans des applications à risque, notamment dans des applications pouvant causer des dommages corporels. Si vousutilisez ce logiciel ou matériel dans le cadre d’applications dangereuses, il est de votre responsabilité de prendre toutes les mesures de secours, desauvegarde, de redondance et autres mesures nécessaires à son utilisation dans des conditions optimales de sécurité. Oracle Corporation et ses affiliésdéclinent toute responsabilité quant aux dommages causés par l’utilisation de ce logiciel ou matériel pour ce type d’applications.Oracle et Java sont des marques déposées d’Oracle Corporation et/ou de ses affiliés.Tout autre nom mentionné peut correspondre à des marquesappartenant à d’autres propriétaires qu’Oracle.Intel et Intel Xeon sont des marques ou des marques déposées d’Intel Corporation. Toutes les marques SPARC sont utilisées sous licence et sont desmarques ou des marques déposées de SPARC International, Inc. AMD, Opteron, le logo AMD et le logo AMD Opteron sont des marques ou des marquesdéposées d’Advanced Micro Devices. UNIX est une marque déposée d’The Open Group.Ce logiciel ou matériel et la documentation qui l’accompagne peuvent fournir des informations ou des liens donnant accès à des contenus, des produits etdes services émanant de tiers. Oracle Corporation et ses affiliés déclinent toute responsabilité ou garantie expresse quant aux contenus, produits ouservices émanant de tiers. En aucun cas, Oracle Corporation et ses affiliés ne sauraient être tenus pour responsables des pertes subies, des coûtsoccasionnés ou des dommages causés par l’accès à des contenus, produits ou services tiers, ou à leur utilisation.
PleaseRecycle

Contents
Using This Documentation ix
Web Interface Overview 1
About the Web Interface 1
Browser and Software Requirements 2
Supported Web Browsers 2
Network Addresses Accepted by Oracle ILOM 3
Examples for Entering an IPv6 Address 3
CMM and Server SP Web Interface Connection 4
Oracle ILOM Welcome Page 4
Server SP Web Interface Components 5
CMM Web Interface 6
Web Interface Navigation Tabs 8
Navigation Tab Descriptions 9
Jump Links 13
Logging In to and Out of Oracle ILOM and Displaying Banner Messages(Web) 15
Before Your Initial Login 16
▼ Log In Using the Root User Account (Web) 17
▼ Log In to Oracle ILOM With User Account (Web) 18
▼ Log Out of Oracle ILOM (Web) 19
▼ Display Banner Messages on Login Page (Web) 19
iii

Configuring Network, Secure Shell, and Local Interconnect Settings (Web) 21
Configuring Network Settings (Web) 22
Requirements for Network Settings (Web) 22
▼ View and Configure IPv4 Network Settings (Web) 24
▼ View and Configure Dual-Stack IPv4 and IPv6 Network Settings(Web) 25
▼ Test IPv4 or IPv6 Network Configuration (Web) 30
▼ Assign Host Name and System Identifier (Web) 31
▼ View and Configure DNS Settings (Web) 31
▼ View and Configure Baud Rate for Serial Port (Web) 32
▼ Configure x86 Host Serial Port Owner (Web) 33
▼ Enable HTTP or HTTPS Web Access (Web) 34
▼ Upload the SSL Certificate (Web) 36
Configuring Secure Shell Settings 37
▼ Enable or Disable SSH 37
▼ Generate a New SSH Key 37
▼ Restart the SSH Server 38
Configuring the Local Interconnect Interface (Web) 38
Requirements for Configure Local Interconnect 39
▼ Configure the Local Interconnect Interface (Web) 40
Managing User Accounts (Web) 43
Configuring User Accounts (Web) 44
▼ Configure Single Sign On (Web) 44
▼ Set the Session Time-Out (Web) 45
▼ Add User Accounts and Assign Roles (Web) 45
▼ Modify a User Account (Web) 48
▼ Delete a User Account (Web) 49
▼ View User Sessions (Web) 50
iv Oracle ILOM 3.0 Web Procedures Guide • August 2012

Configuring SSH Keys (Web) 50
▼ Add an SSH Key (Web) 50
▼ Delete an SSH Key (Web) 52
Configuring Active Directory (Web) 53
▼ View and Configure Active Directory Settings (Web) 53
▼ Configure Active Directory Groups (Web) 58
▼ Troubleshoot Active Directory Authentication and Authorization(Web) 61
Configuring Lightweight Directory Access Protocol (LDAP) 63
▼ Configure LDAP Server Settings (Web) 63
▼ Configure Oracle ILOM for LDAP (Web) 64
Configuring LDAP/SSL Settings (Web) 65
▼ View and Configure LDAP/SSL Settings (Web) 65
▼ Configure LDAP/SSL Tables (Web) 69
▼ Troubleshoot LDAP/SSL Authentication and Authorization (Web)72
Configuring RADIUS (Web) 73
▼ Configure RADIUS Settings (Web) 74
Managing Component Status and Service Actions (Web) 77
▼ View Component Status Information (Web) 77
▼ Prepare to Remove a Component (Web) 79
▼ Return a Component to Service (Web) 79
▼ Enable or Disable Components (Web) 80
▼ Clear Faults Detected by Oracle ILOM (Web) 80
Monitoring System Sensors and Managing the Event Log (Web) 83
▼ View Sensor Readings (Web) 83
▼ Configure System Indicators (Web) 84
▼ Configure Clock Settings (Web) 85
Contents v

▼ Configure Time Zone Settings (Web) 86
▼ Filter Event Log Output (Web) 86
▼ View and Clear Oracle ILOM Event Log (Web) 88
▼ Configure Remote Syslog Receiver IP Addresses (Web) 89
Monitoring Storage Components and Zone Manager (Web) 91
Requirements for Monitoring Storage Components 91
▼ View and Monitor RAID Controller Details (Web) 92
▼ View and Monitor Details for Disks That Are Attached to RAIDControllers (Web) 94
▼ View and Monitor RAID Controller Volume Details (Web) 95
Enabling or Disabling Zone Manager for SAS-2 Storage Devices 96
Managing System Alerts and Email Notifications (Web) 97
Managing Alert Rule Configurations (Web) 98
Requirements for Configuring Alert Rules 98
▼ Create or Edit Alert Rules (Web) 98
▼ Disable an Alert Rule (Web) 100
▼ Send Test Alert for Specific Alert Rules (Web) 100
Configuring SMTP Client for Email Notification Alerts (Web) 101
▼ Enable SMTP Client for Email Alerts (Web) 101
Power Monitoring and Management of Hardware Interfaces (Web) 103
Summary of Power Management Feature Updates (Web) 104
Monitoring System Power Consumption (Web) 106
Requirements for Monitoring Power Consumption (Web) 106
▼ Monitor System Power Consumption (Web) 107
▼ Monitor Individual Power Supply Consumption (Web) 108
▼ Monitor Power History Statistics (Web) 108
Configuring Power Policy Settings to Manage Server Power Usage (Web) 110
vi Oracle ILOM 3.0 Web Procedures Guide • August 2012

Requirements for Configuring the Power Policy (Web) 110
▼ Configure Power Consumption Policy (Web) 111
▼ Configure Server Power Policy For Power Capping (Web) 112
Configuring Power Consumption Threshold Notifications (Web) 114
▼ View and Configure Notification Thresholds Using the WebInterface 114
Monitoring and Configuring Component Power Allocation Distributions(Web) 115
Requirements for Power Allocation Distributions (Web) 115
▼ View Server Component Power Allocations (Web) 116
▼ Configure Server Power Limit Properties as of Oracle ILOM 3.0.8(Web) 117
▼ View CMM Component Power Allocations 120
▼ Configure Permitted Power for Blade Slots in CMM as of Oracle ILOM3.0.6 123
▼ Configure Grant Limit for Blade Slots in CMM as of Oracle ILOM3.0.10 124
Configuring Server Power Limit Properties (Web) 126
▼ Configure Server Power Limit Properties (Web) 126
Monitoring or Configuring CMM Power Supply Redundancy (Web) 129
▼ View or Configure CMM Power Supply Redundancy Properties(Web) 129
Managing Remote Hosts Redirection and Securing the Oracle ILOM RemoteConsole (Web) 131
Web Procedures for Redirecting Remote Host KVMS 131
Managing Remote Hosts Power States (Web) 133
Controlling Power States From Remote Server SP or CMM (Web) 134
▼ Control Power State of Remote Host Server Using Server SP (Web)134
▼ Control Power State of Remote Chassis Using the CMM WebInterface 135
Contents vii

Managing Host Control of Boot Device on x86 Systems (Web) 135
Requirements for Host Boot Device (Web) 136
▼ Configure Host Boot Device (Web) 136
Managing TPM and LDom States on SPARC Servers (Web) 139
Controlling the TPM State on SPARC Servers (Web) 139
▼ Control TPM State on a SPARC Server (Web) 139
Managing LDom Configurations on SPARC Servers (Web) 141
Requirements for SPARC LDom Configurations (Web) 141
▼ View Stored LDom Configurations on SPARC T3 Series Server (Web)142
▼ Configure Host Power to Stored LDom Configurations (Web) 143
▼ Specify Host Power to a Stored LDom Configuration (Web) 143
Diagnosing IPv4 or IPv6 Oracle ILOM Connection Issues 145
Diagnosing Oracle ILOM Connection Issues 145
Manual Host OS Configuration Guidelines for Local Interconnect Interface147
Configuring Internal USB Ethernet Device on Host OS 147
Index 153
viii Oracle ILOM 3.0 Web Procedures Guide • August 2012

Using This Documentation
This web interface procedures guide describes the Oracle Integrated Lights OutManager (ILOM) daily management features that are common to Oracle’s Sunrackmounted servers, server modules, and CMMs supporting Oracle ILOM 3.0.
For further information about the features presented in this guide, use this guide inconjunction with other guides in the Oracle ILOM 3.0 Documentation Library. Thisguide is written for technicians, system administrators, authorized service providers,and users who have experience managing system hardware.
This chapter includes the following topics:
■ “Related Documentation” on page ix
■ “Documentation Feedback” on page x
■ “Oracle ILOM 3.0 Version Numbers” on page x
■ “Support and Accessibility” on page xi
Related Documentation
Documentation Links
All Oracle products http://www.oracle.com/documentation
Oracle Integrated Lights Out Manager(ILOM) 3.0 Documentation Library
http://www.oracle.com/pls/topic/lookup?ctx=ilom30
ix

Documentation FeedbackProvide feedback on this documentation at:
http://www.oracle.com/goto/docfeedback
Oracle ILOM 3.0 Version NumbersOracle ILOM 3.0 uses a firmware version numbering scheme that helps you toidentify the firmware version you are running on your server or CMM. Thisnumbering scheme includes a five-field string, for example, a.b.c.d.e, where:
■ a - Represents the major version of Oracle ILOM.
■ b - Represents a minor version of Oracle ILOM.
■ c - Represents the update version of Oracle ILOM.
■ d - Represents a micro version of Oracle ILOM. Micro versions are managed perplatform or group of platforms. See your platform Product Notes for details.
■ e - Represents a nano version of Oracle ILOM. Nano versions are incrementaliterations of a micro version.
For example, Oracle ILOM 3.1.2.1.a would designate:
■ Oracle ILOM 3 as the major version of Oracle ILOM
■ Oracle ILOM 3.1 as a minor version of Oracle ILOM 3
■ Oracle ILOM 3.1.2 as the second update version of Oracle ILOM 3.1
■ Oracle ILOM 3.1.2.1 as a micro version of Oracle ILOM 3.1.2
■ Oracle ILOM 3.1.2.1.a as a nano version of Oracle ILOM 3.1.2.1
System management, single systemmanagement (SSM) security, anddiagnostic documentation
http://www.oracle.com/technetwork/documentation/sys-mgmt-networking-190072.html
Oracle Hardware Management Pack 2.0 http://docs.oracle.com/cd/E19960-01/index.html
Note: To locate Oracle ILOM 3.1 documentation that is specific to your Sun server platform,see the Oracle ILOM section of the administration guide that is available for your server.
Documentation Links
x Oracle ILOM 3.0 Web Procedures Guide • August 2012

Tip – To identify the Oracle ILOM firmware version installed on your Sun server orCMM, click System Information --> Versions in the web interface, or type version inthe command-line interface.
Support and Accessibility
Description Links
Access electronic supportthrough My Oracle Support
http://support.oracle.com
For hearing impaired:http://www.oracle.com/accessibility/support.html
Learn about Oracle’scommitment to accessibility
http://www.oracle.com/us/corporate/accessibility/index.html
Using This Documentation xi

xii Oracle ILOM 3.0 Web Procedures Guide • August 2012

Web Interface Overview
Related Information
■ Oracle ILOM 3.0 Daily Management Concepts, Oracle ILOM overview
■ Oracle ILOM 3.0 Daily ManagementCLI Procedures, CLI overview
■ Oracle ILOM 3.0 Protocol Management Reference , SNMP overview
■ Oracle ILOM 3.0 Protocol Management Reference, IPMI overview
■ Oracle ILOM 3.0 Maintenance and Diagnostics, maintenance and diagnosticsoverview
■ Oracle ILOM 3.0 Feature Updates and Release Notes, new or updated features
About the Web InterfaceThe Oracle ILOM web interface is accessible through a browser and uses a standardinterface. The Oracle ILOM web interface enables you to monitor and manage localand remote systems. One of the most powerful features of Oracle ILOM is the abilityto redirect the server's graphical console to a local workstation or laptop system.When you redirect the host console, you can configure the local system's keyboardand mouse to act as the server's keyboard and mouse. You can also configure the
Description Links
Identify requirements for using OracleILOM’s web interface
• “About the Web Interface” on page 1• “Browser and Software Requirements” on page 2
Compare Oracle ILOM’s server SPand CMM web interface components
• “CMM and Server SP Web Interface Connection”on page 4
Learn about Oracle ILOM’s webinterface tabs and the functions youperform from them
• “Web Interface Navigation Tabs” on page 8
1

diskette drive or CD-ROM drive on the remote system as a device virtuallyconnected to your Oracle Sun system. You can access these features using the OracleILOM Remote Console application.
Browser and Software RequirementsRefer to the following topics for a list of supported web browsers and networkaddresses accepted by the Oracle ILOM web interface.
■ “Supported Web Browsers” on page 2
■ “Network Addresses Accepted by Oracle ILOM” on page 3
Supported Web BrowsersThe web interface has been tested successfully with recently released Mozilla Firefox,and Internet Explorer web browsers, and may be compatible with other webbrowsers.
Oracle ILOM supports the browsers listed in the following table.
TABLE: Supported Web Browsers
Operating System Web Browser
Oracle Solaris (9 and 10) • Mozilla 1.4 and 1.7• Firefox 1.x and later
Linux (Red Hat, SuSE, Ubuntu, Oracle) • Mozilla 1.x and later• Firefox 1.x and later• Opera 6.x and later
Microsoft Windows (98, 2000, XP, Vista) • Internet Explorer 5.5, 6.x, and 7.x• Mozilla 1.x and later• Firefox 1.x and later• Opera 6.x and later
Macintosh (OSX v10.1 and above) • Internet Explorer 5.2• Mozilla 1.x and later• Firefox 1.x and later• Safari – all
2 Oracle ILOM 3.0 Web Procedures Guide • August 2012

Note – Oracle ILOM comes preinstalled on your Sun system and includes theRemote Console application. To run the Oracle ILOM Remote Console, you musthave the Java 1.5 Runtime Environment (JRE 1.5) or later version of the JRE softwareinstalled on your local client. To download the JRE software, go tohttp://java.com. For a list of web browsers and operating systems supported bythe Oracle ILOM Remote Console, refer to the Oracle ILOM 3.0 Remote RedirectionConsoles CLI and Web Guide.
Network Addresses Accepted by Oracle ILOMAs of Oracle ILOM 3.0.12 or later, the following network addresses are accepted bythe Oracle ILOM interfaces.
Note – When entering an IPv6 address or Link-Local IPv6 address, the address mustbe enclosed within brackets to work correctly.
■ IPv4 address. 10.8.183.106
■ IPv6 address. [fec0:a:8:b7:214:4fff:5eca:5f7e/64]
■ Link-Local IPv6 address. [e80::214:4fff:feca:5f7e/64]
■ DNS host domain address. company.com
Examples for Entering an IPv6 AddressWhen you specify an IPv6 address in a URL with a web browser or when youtransfer a file, the IPv6 address must be enclosed in brackets to work correctly. Whenyou specify an IPv6 address to log in to Oracle ILOM using an SSH connection, theIPv6 address should not be enclosed in brackets.
Examples:
■ When entering the URL in a web browser, type:
https://[ipv6address]
■ When establishing an Oracle ILOM CLI session using SSH and the default OracleILOM root user account, type:
ssh root@ipv6address
Note that when you specify an IPv6 address to log in to Oracle ILOM using anSSH connection, the IPv6 address should not be enclosed in brackets.
■ When transferring a file using the CLI load -source command and tftp, type:
Web Interface Overview 3

load -source tftp://[ipv6address]filename.extension
For additional information about entering IPv6 addresses, refer to the Oracle ILOM3.0 Daily Management – Concepts Guide. For help with diagnosing IPv4 and IPv6connection issues, see “Diagnosing IPv4 or IPv6 Oracle ILOM Connection Issues”on page 145.
CMM and Server SP Web InterfaceConnectionTopics discussed in this section include:
■ “Oracle ILOM Welcome Page” on page 4
■ “Server SP Web Interface Components” on page 5
■ “CMM Web Interface” on page 6
Oracle ILOM Welcome PageTo establish a web interface connection to Oracle ILOM on the CMM or server SP,specify the IP address of the CMM or server SP in the web browser. A welcome pageappears prompting you to enter a user name and password.
4 Oracle ILOM 3.0 Web Procedures Guide • August 2012

Server SP Web Interface ComponentsThe main Oracle ILOM web page for the server SP organizes the settings you canview or configure for that server within the tabs appearing at the top of the page, asshown in the following example. For a description of the CMM Oracle ILOM webinterface, see “CMM Web Interface” on page 6.
Note – The Oracle ILOM web interface navigation tabs differ slightly depending onthe Oracle ILOM features implemented on a specific platform and on the OracleILOM version currently installed on your system. Therefore, you might have accessto different tabs from those described in this section. For information about theOracle ILOM interface for your system, refer to your Oracle ILOM supplement orplatform administration guide.
FIGURE: Oracle ILOM Web Interface Main Page
Each web interface page has three main sections: the masthead, the navigation tabs,and the content area.
The masthead provides the following buttons and information on each page of theweb interface:
■ About button – Click to view product and copyright information.
Web Interface Overview 5

■ User field – Displays the user name of the current user of the web interface andthe user’s role.
■ Server field – Displays the host name of the Oracle ILOM SP or CMM.
■ Refresh button – Click to refresh the information in the content area of the page.The Refresh button does not save new data that you might have entered orselected on the page.
■ Log Out button – Click to end the current session of the web interface.
The Oracle ILOM web interface navigation structure includes first and second-leveltabs that you can click to open a specific page. For example, when you click afirst-level tab, one or more second-level tabs might display that provide you withfurther options. The content area is where you find information about a specificfeature or operation.
CMM Web InterfaceThe Oracle ILOM web page for the CMM includes:
■ The Navigation pane on the left side of the screen that lists visible entries only forcomponents that are present and manageable in the chassis.
■ A Chassis view and inventory table appear on the right side of the screen whenthe Chassis entry in the navigation pane is selected. The Chassis view displays thefront and rear view of the chassis. The Chassis Inventory table providesinformation about the manageable chassis components present in the chassis.
6 Oracle ILOM 3.0 Web Procedures Guide • August 2012

■ The CMM management settings appear in the right side of the screen when aCMM entry is selected in the navigation pane. The settings you can view orconfigure for the CMM are organized in the eight tabs appearing at the top of thepage, as shown in the following example.
Web Interface Overview 7

Note – For details about the CMM Zoning Management features available in OracleILOM as 3.0.10, refer to the Oracle ILOM) 3.0 CMM Administration Guide For Sun Blade6000 and Sun Blade 6048 Modular Systems.
■ The Blade management settings appear in the right side of the screen when ablade entry in the navigation pane is selected. If you are managing a blade withmultiple Service Processors (SPs), an Node entry for each dedicated SP appears inthe navigation pane, as shown in the following example.
The settings you can view or configure for an individual blade SP are organized inthe seven tabs appearing in the right side of the Oracle ILOM Web Interface page, asshown in the previous example.
For more information about the tabs described in this section, see “Web InterfaceNavigation Tabs” on page 8.
Web Interface Navigation TabsTopics discussed in this section include:
■ “Navigation Tab Descriptions” on page 9
■ “Jump Links” on page 13
8 Oracle ILOM 3.0 Web Procedures Guide • August 2012

Navigation Tab DescriptionsThe following table describes the web interface tabs that you can use to access OracleILOM functions.
Note – The Oracle ILOM web interface navigation tabs differ slightly depending onthe Oracle ILOM features implemented on a specific server platform and on theOracle ILOM firmware version currently installed on your server or CMM. Therefore,you might have access to different tabs from those described in the following table.For information about the Oracle ILOM interface for your system, refer to yourOracle ILOM supplement or platform administration guide.
First-level Tab Second and Third-level Tabs What You Can Do Applicable To
System Information
Overview View the product name, part or serial number,host power state, system status state, BIOSversion, SP host name, system uptime, IPaddress, and Oracle ILOM version that isrunning.• Host Power state offers you the ability to
control the system power state• System Status state offers you the ability to
view faulted hardware• SysFW Information (SPARC only) indicates
the system firmware version embedded onthe server
Server SPCMM
Components View the names, types, and status of thecomponents that Oracle ILOM is monitoring.
Server SPCMM
Fault Management View information about components that are ina faulted state.
Server SPCMM
Identification Information Enter or change the service processoridentification information by assigning a hostname or system identifier.
Server SPCMM
Banner Messages View and configure a message that appearsprior to log in and login message that appearsafter user log-in.
Server SPCMM
Session Timeout View the session time-out or change the sessiontime-out parameter.
Server SPCMM
Web Interface Overview 9

Versions View the SP file system version, the SP firmwareversion, SP firmware build number, and SPfirmware date.
Server SPCMM
System Monitoring
Sensor Readings View the name, type, and reading of the sensors. Server SPCMM
Indicators View the name and status of the indicators andLEDs.
Server SPCMM
Event Logs View various details about each particularevent, including the event ID, class, type,severity, date and time, and description of theevent.
Server SPCMM
Power Management
Consumption View power consumption metrics for actualpower and permitted power, as well as setpower consumption thresholds to generateemail alerts or SNMP notifications.
Server SPCMM
Allocation View system power requirements for capacityplanning.This tab was previously named Distributionprior to Oracle ILOM 3.0.10.
Server SPCMM
Limit View or configure server power limits.This tab was previously named Budget prior toOracle ILOM 3.0.8.
Server SP
Settings Configure policy options for powerconsumption on SPARC servers.
SPARC
Redundancy View and configure CMM power supplyredundancy options.This tab became available as of Oracle ILOM3.0.6.
CMM
Statistics View power statistical data for CMM and servermodules (blades).
CMM
History View a history of rolling averages for powerconsumption.
Server SPCMM
Storage
First-level Tab Second and Third-level Tabs What You Can Do Applicable To
10 Oracle ILOM 3.0 Web Procedures Guide • August 2012

RAID --> Controllers View information for RAID controllers. To getfurther details, click the controller name.
Server SP
RAID --> Disks View information for all disks attached to RAIDcontrollers. To view further details, click thedisk name.
Server SP
RAID --> Volumes View information for RAID volumes. To viewfurther details, click the volume name.
Server SP
Zoning Enable or disable Zone Manager settings andreset the Zone Manager password.
CMM
Configuration
System ManagementAccess --> Web Server
Edit or update the web server settings, such asthe HTTP web server or the HTTP port.
Server SPCMM
System ManagementAccess --> SSL Certificate
View information about the default SSLcertificate, or optionally find and enter a newSSL certificate.
Server SPCMM
System ManagementAccess --> SNMP
Edit or update SNMP settings Server SPCMM
System ManagementAccess --> SSH Server
Configure Secure Shell (SSH) server access andkey generation.
Server SPCMM
System ManagementAccess --> IPMI
Use a command-line interface to monitor andcontrol your server platform, as well as toretrieve information about your server platform.
Server SPCMM
System ManagementAccess --> CLI
Configure the CLI settings. The SessionTime-out value indicates the number of idleminutes that can lapse before automatic CLIlogout occurs.
Server SPCMM
System ManagementAccess --> WS-Man
Configure the WS-Management settings.WS-Management is a Web Services andSOAP-based protocol for managing servers anddevices.
Server SP
Alert Management View details about each alert and change the listof configured alerts.
Server SPCMM
Network View and edit the IPv4 and IPv6 networksettings for Oracle ILOM and for localinterconnect interface settings.
Server SPCMM
DNS Specify host names, and have those host namesresolved into IP addresses using the DomainName Service (DNS).
Server SPCMM
First-level Tab Second and Third-level Tabs What You Can Do Applicable To
Web Interface Overview 11

Serial Port View and edit the baud rate of the internal andexternal serial ports.
Server SPCMM
Clock View and edit the Oracle ILOM clock timemanually, or synchronize the Oracle ILOM clockwith an NTP server.
Server SPCMM
Timezone Specify a particular timezone so thattimestamps displayed by the service processorcan be correlated to logs created elsewhere (forexample, in the Oracle Solaris OperatingSystem).
Server SPCMM
Syslog Configure the server addresses to which thesyslog messages will be sent.
Server SPCMM
SMTP Client Configure the state of the SMTP client, which isused for sending email notifications of alerts.
Server SPCMM
Policy Enable or disable settings that control thebehavior of the system, such as power-onpolicies.
Server SPCMM
User Management
Active Sessions View the users currently logged in to OracleILOM, as well as the type of session users haveinitiated.
Server SPCMM
User Accounts Add, delete, or modify local Oracle ILOM useraccounts.
Server SPCMM
LDAP Configure Oracle ILOM access for LDAP users. Server SPCMM
LDAP/SSL Configure Oracle ILOM access for LDAP userswith enhanced security settings enabled bySecure Socket Layer (SSL) technology.
Server SPCMM
RADIUS Configure Oracle ILOM access for RADIUSusers.
Server SPCMM
Active Directory Configure Oracle ILOM access for ActiveDirectory users
Server SPCMM
Remote Control
Redirection Manage the host remotely by redirecting thesystem console to your local machine.
Server SPCMM
First-level Tab Second and Third-level Tabs What You Can Do Applicable To
12 Oracle ILOM 3.0 Web Procedures Guide • August 2012

Jump LinksAs of Oracle ILOM 3.0.3, jump links were added on some web pages for easiernavigation to sub-sections within a page. An example of an Oracle ILOM web pagethat includes jump links is shown in the following figure.
KVMS Enable or disable the remote management stateof the keyboard, video, mouse, or storagedevice.
Server SP
Remote Power Control Select a power state: Immediate Power Off,Graceful Shutdown and Power Off, Power On,Power Cycle, or Reset.
Server SPCMM
Diagnostics Enable or disable diagnostics for x64processor-based systems or SPARCprocessor-based systems.
Server SP
Host Control View and configure the host controlinformation. Configure the boot device at thenext system power-on.
Server SP
Maintenance
Firmware Upgrade Start the process to obtain an upgrade of theOracle ILOM firmware.
Server SPCMM
Backup/Restore Backup and restore the service processorconfiguration to a remote host or removablestorage device in a secure manner.
Server SPCMM
Reset SP Reset the service processor. Server SP
ConfigurationManagement
Manage the service processor configurationdata.
Server SPCMM
Reset Components Reset chassis monitoring modules and serviceprocessors.
CMM
Snapshot Collect environmental, log, error, and FRUIDdata and send it to a USB thumb drive, anexternal host using CLI, or as a downloaded file.
Server SPCMM
First-level Tab Second and Third-level Tabs What You Can Do Applicable To
Web Interface Overview 13

14 Oracle ILOM 3.0 Web Procedures Guide • August 2012

Logging In to and Out of OracleILOM and Displaying BannerMessages (Web)
Related Information
■ Oracle ILOM 3.0 Quick Start, logging in to Oracle ILOM
■ Oracle ILOM 3.0 Quick Start, mandatory setup tasks (web)
■ Oracle ILOM 3.0 Daily Management CLI Procedures, logging in to Oracle ILOM
■ Oracle ILOM 3.0 Daily Management CLI Procedures, banner messages
■ Oracle ILOM 3.0 Daily Management Concepts, banner messages
Description Links
Identify requirements for logginginto to Oracle ILOM.
• “Before Your Initial Login” on page 16
Procedure for logging in to OracleILOM using the default root useraccount
• “Log In Using the Root User Account (Web)” onpage 17
Procedure for logging in to OracleILOM using a user account
• “Log In to Oracle ILOM With User Account (Web)”on page 18
Procedure for logging out ofOracle ILOM
• “Log Out of Oracle ILOM (Web)” on page 19
Procedure for configuring bannermessages to appear on the OracleILOM Login page
• “Display Banner Messages on Login Page (Web)” onpage 19
15

Before Your Initial LoginPrior to performing the procedures in this section, you should ensure that thefollowing requirements are met.
■ Ensure that a physical network management connection to the system (server orCMM) is established. For instructions about how to establish a physicalconnection to the SER MGT or NET MGT port on your system, refer to theinstallation guide provided with your server or CMM.
The login procedures in this section assume you are logging in to the Oracle ILOMweb interface through a physical network connection.
Note – Alternatively, for Oracle Sun servers supporting a Local InterconnectInterface connection, you can connect directly to ILOM from the host operatingsystem. For more details about connecting to ILOM using a Local InterconnectInterface connection, see “Configuring the Local Interconnect Interface (Web)” onpage 38.
■ Obtain the server SP or CMM network address.
Oracle ILOM, by default, will automatically attempt to obtain and assign an IPv4or IPv6 address for the server SP or CMM. To determine the default IP addressassigned to the server SP or CMM, establish a local serial management connectionto the server SP or CMM and view the /network (or /network/ipv6) properties.
For more information about how to establish a local serial managementconnection to Oracle ILOM, refer to the Oracle ILOM 3.0 Quick Start Guide orrefer to the documentation provided with your Sun server or Sun blade chassissystem
For information about modifying the default IP address assigned to your server SPor CMM, see “Configuring Network Settings (Web)” on page 22.
■ Obtain an Oracle ILOM user account.
If you are setting up Oracle ILOM for this first-time, use the default root accountand changeme password to log in. It is highly recommended after your system isset up that a new user account is created for each Oracle ILOM user. For moreinformation about setting up user accounts, see “Configuring User Accounts(Web)” on page 44.
16 Oracle ILOM 3.0 Web Procedures Guide • August 2012

▼ Log In Using the Root User Account(Web)1. In the web browser address bar, type the network address for the server SP or
CMM.
Examples:
■ IPv4 network address example:
http://10.8.183.106
■ IPv6 network address example:
http://[fec0:a:8:b7:214:4fff:5eca:5f7e/64]
For more information about network addresses accepted by Oracle ILOM, see“Network Addresses Accepted by Oracle ILOM” on page 3. For help withdiagnosing Oracle ILOM connection issues, see “Diagnosing IPv4 or IPv6 OracleILOM Connection Issues” on page 145.
The web interface Login page appears.
Logging In to and Out of Oracle ILOM and Displaying Banner Messages (Web) 17

2. Type the root user name and password. For instance, the default root username and password provided with Oracle ILOM are as follows:
User name: root
Password: changeme
3. Click Log In.
The Version page in the web interface appears.
▼ Log In to Oracle ILOM With UserAccount (Web)1. In the web browser address bar, type the network address for the server SP or
CMM.
Examples:
■ IPv4 network address example:
http://10.8.183.106
■ IPv6 network address example:
http://[fec0:a:8:b7:214:4fff:5eca:5f7e/64]
For more information about network addresses accepted by Oracle ILOM, see“Network Addresses Accepted by Oracle ILOM” on page 3. For help withdiagnosing Oracle ILOM connection issues, see “Diagnosing IPv4 or IPv6 OracleILOM Connection Issues” on page 145.
The web interface Login page appears.
18 Oracle ILOM 3.0 Web Procedures Guide • August 2012

2. Type your Oracle ILOM user name and password.
3. Click Log In.
The Oracle ILOM web interface appears, displaying the Version page.
▼ Log Out of Oracle ILOM (Web)● Click the Log Out button in the Oracle ILOM web interface.
The Log Out button is located in the top right corner of the web interface. Do notuse the Log Out button on your web browser to exit Oracle ILOM.
▼ Display Banner Messages on LoginPage (Web)Before You Begin
Logging In to and Out of Oracle ILOM and Displaying Banner Messages (Web) 19

■ The Admin (a) role is required for you to configure banner messages in OracleILOM.
■ The server must be running Oracle ILOM firmware version 3.0.8 or later.
Follow these steps to configure banner messages.
1. Log in to the Oracle ILOM SP web interface or the Oracle ILOM CMM webinterface.
2. In the Oracle ILOM web interface, click System Information --> BannerMessages.
3. In the Banner Message page, do the follow:
4. Click Message Acceptance check box to enable the system to display the bannermessage(s).
5. Click Save.
Task Instructions
To create a banner message to appearon the Login page
Enter the message in the Connect Message textbox.
To create banner message to appear ina dialog box after users log in to OracleILOM.
Enter the message in the Login Message text box.
20 Oracle ILOM 3.0 Web Procedures Guide • August 2012

Configuring Network, Secure Shell,and Local Interconnect Settings(Web)
Related Information
■ Oracle ILOM 3.0 Quick Start, establish a network management connection
■ Oracle ILOM 3.0 Quick Start, modify default network settings
■ Oracle ILOM 3.0 Daily Management Concepts, network communication settings
■ Oracle ILOM 3.0 Daily Management Concepts, switch serial port console output
■ Oracle ILOM 3.0 Daily Management CLI Procedures, configure network settings
■ Oracle ILOM 3.0 Daily Management CLI Procedures, configure secure shell settings
■ Oracle ILOM 3.0 Daily Management CLI Procedures, configure serial port sharing
■ Oracle ILOM 3.0 Protocol Management Reference, configure network settings
■ Oracle ILOM 3.0 Daily Management CLI Procedures, configure the local interconnectinterface
Description Links
Configure network properties for IP, host name,DNS, serial port output, as well as HTTP webaccess.
• “Configuring Network Settings (Web)”on page 22
Manage secure shell settings. • “Configuring Secure Shell Settings” onpage 37
Manage the local interconnect interface settingsin Oracle ILOM
• “Configure the Local InterconnectInterface (Web)” on page 40
21

Configuring Network Settings (Web)
Requirements for Network Settings (Web)Review the following information before you view or configure Oracle ILOMnetwork settings.
Description Links Platform Feature Support
Identify requirements formanaging Oracle ILOM’snetwork settings
• “Requirements for NetworkSettings (Web)” on page 22
• x86 system server SP• SPARC system server
SP• CMM
Manage and test IPv4 orIPv6 settings
• “View and Configure IPv4Network Settings (Web)” onpage 24
• “View and Configure Dual-StackIPv4 and IPv6 Network Settings(Web)” on page 25
• “Test IPv4 or IPv6 NetworkConfiguration (Web)” on page 30
• x86 system server SP• SPARC system server
SP• CMM
Manage host name,DNS, and serial portsettings
• “Assign Host Name and SystemIdentifier (Web)” on page 31
• “View and Configure DNS Settings(Web)” on page 31
• “View and Configure Baud Ratefor Serial Port (Web)” on page 32
• x86 system server SP• SPARC system server
SP• CMM
Manage serial portsharing settings on x86hosts
• “Configure x86 Host Serial PortOwner (Web)” on page 33
•
• x86 servers SP
Manage HTTP andHTTPS settings, andupload SSL certificates
• “Enable HTTP or HTTPS WebAccess (Web)” on page 34
• “Upload the SSL Certificate (Web)”on page 36
• x86 system server SP• SPARC system server
SP• CMM
22 Oracle ILOM 3.0 Web Procedures Guide • August 2012

Network Environment Before You Begin
IPv4-only • To easily locate Oracle ILOM on the network, you should ensurethe same IP address is always assigned to Oracle ILOM. OracleILOM by default will attempt to obtain IPv4 network settingsusing DHCP.
Dual-stack IPv4 andIPv6
• Oracle ILOM is shipped with IPv4 DHCP and IPv6 Statelessdefault network settings.
• Verify that your server or CMM has Oracle ILOM firmware 3.0.12or later installed.
• The IPv4 network state must always be enabled in order forOracle ILOM to operate in an IPv4 network environment or in adual-stack IPv4 and IPv6 network environment.
• For IPv6 Stateless auto-configurations, Oracle ILOM (3.0.12 orlater) requires a network router to be configured for IPv6.
• For DHCPv6 auto-configuration options, Oracle ILOM (3.0.14 orlater) requires a network DHCPv6 server to provide the IPv6address(es) and DNS information for the device.Note. DHCP and DHCPv6 are separate protocols. In a dual-stacknetwork environment, DHCP and DHCPv6 operate as follows: (1)the DHCPv6 server can provide IPv6 addresses to a networknode and the network node always uses the IPv6 protocol tocommunicate with a DHCPv6 server; and (2) the DHCP servercan provide IPv4 addresses to a network node and the networknode will always use the IPv4 protocol to communicate with aDHCP server
• For DHCP and DHCPv6 auto-configurations, you should chooseto receive the DNS information from either an IPv6 DHCP serveror from an IPv4 DHCP server, but not from both.You can manually configure the settings for the DNS name serverin Oracle ILOM. For instructions, see “View and Configure DNSSettings (Web)” on page 31.
Note - For a list of legacy Sun platform servers not supporting IPv6configurations in Oracle ILOM, refer to Legacy Sun Systems NotSupporting IPv6 in the Oracle ILOM 3.0 Daily Management ConceptsGuide.
Network settingsdescribed in thissection
• You need to have the Admin (a) role enabled to modify anyserver SP or CMM network properties or options.
Configuring Network, Secure Shell, and Local Interconnect Settings (Web) 23

▼ View and Configure IPv4 Network Settings(Web)Before You Begin
■ Review the “Requirements for Network Settings (Web)” on page 22.
Note – This procedure provides instructions for configuring Oracle ILOM to operatein an IPv4-only network environment. If you are configuring Oracle ILOM to operatein an dual-stack IPv4 and IPv6 network environment, see “View and ConfigureDual-Stack IPv4 and IPv6 Network Settings (Web)” on page 25.
To view and configure IPv4 network settings, follow these steps:
1. Log in to the Oracle ILOM SP or CMM web interface.
2. Click Configuration --> Network.
The Network Settings page appears.
3. You can have DHCP assign IP addresses automatically, or you can choose toassign the addresses manually.
■ To automatically obtain an IP address, click the radio button next to DHCP. Seethe following figure.
■ To manually set a static IP address, complete the information in the NetworkSettings page; use the descriptions in the following table.
24 Oracle ILOM 3.0 Web Procedures Guide • August 2012

4. Click Save for your settings to take effect.
Settings are considered pending until you click Save. Changing the IP address willend your Oracle ILOM session.
You are prompted to close your web browser.
5. Log back in to Oracle ILOM using the new IP address.
Note – If you changed the network settings, you might need to log back in with anew browser session.
▼ View and Configure Dual-Stack IPv4 and IPv6Network Settings (Web)Before You Begin
■ Review the “Requirements for Network Settings (Web)” on page 22.
Note – This procedure provides instructions for configuring Oracle ILOM to operatein a dual-stack IPv4 and IPv6 network environment. If you are configuring OracleILOM to operate in an IPv4-only network environment, refer to “View and ConfigureIPv4 Network Settings (Web)” on page 24.
Item Description
State Click the check box to enable the network state.
MAC Address The SP’s media access control (MAC) address is set at thefactory. The MAC address is a hardware address that isunique to each networked device. The MAC address isprovided on a label on the SP or CMM, on the CustomerInformation Sheet included in the ship kit, and in the BIOSSetup screen.
IP Discovery Mode Click the Static radio button to manually assign an IP address,netmask, and gateway.
IP Address Type the server’s IP address. The IP address is a unique namethat identifies the system on a TCP/IP network.
Netmask Type the subnet mask of the network on which the SP resides.
Gateway Type SP’s gateway access address.
Configuring Network, Secure Shell, and Local Interconnect Settings (Web) 25

To view and configure dual-stack IPv4 and IPv6 network settings, follow these steps:
1. Log in to the Oracle ILOM SP or CMM web interface.
2. Navigate to the IPv4 and IPv6 network settings that are available on theNetwork tab.
For example:
■ On a server SP, click Configuration --> Network.
■ On a CMM, do the following:
■ Select the blade SP (in the left pane), then (in the right pane) clickConfiguration --> Network.
Note – The dual-stack IPv4 and IPv6 settings cannot be edited at the CMM level inthe Oracle ILOM web interface. To edit the dual-stack IPv4 and IPv6 properties at theCMM level, you must use the Oracle ILOM CLI. For details, see the Oracle ILOM 3.0Daily Management – CLI Procedures Guides.
The following illustration shows the Oracle ILOM SP network settings for IPv4and IPv6.
26 Oracle ILOM 3.0 Web Procedures Guide • August 2012

3. Verify that the network State is enabled.
Note – The network State setting is enabled by default for both IPv4 and IPv6. Ifnecessary, you can optionally disable (unchecked) the network State for IPv6.However, the IPv4 network State must always be enabled in order for Oracle ILOMto operate in an IPv4 network environment or within a dual-stack IPv4 and IPv6network environment.
4. To manually configure a static IPv4 address, perform these steps
Configuring Network, Secure Shell, and Local Interconnect Settings (Web) 27

5. To enable DHCP to automatically assign an IPv4 address, select the IPv4 DHCPradio button.
6. To manually configure a static IPv6 address, type the IP address for the devicein the IPv6 address text box.
The input parameters for specifying the IPv6 static IP and netmask is:
<IPv6_address>/<subnet mask length in bits>
For example:
fec0:a:8:b7:214:4fff:feca:5f7e/64
Note – IPv6 supports the assignment of multiple IP addresses for a device.Therefore, you can manually configure a single static IPv6 address in Oracle ILOM,as well as enable one or more of the IPv6 auto-configuration options in Oracle ILOMif desired.
7. To enable one or more of the IPv6 auto-configuration options, select theappropriate option(s) described below.
Steps Description
a. Enable the Static radio button for IPv4.
b. Type the IP address for the device in the IP address text box.
c. Type the subnet mask of the network on which the device resides.
d. Type the device gateway access address.
28 Oracle ILOM 3.0 Web Procedures Guide • August 2012

Note – As of Oracle ILOM 3.0.14 or later, you can enable the option for Statelessauto-configuration to run at the same time as when the option for DHCPv6Stateless is enabled or as when the option for DHCPv6 Stateful is enabled.However, the auto-configuration options for DHCPv6 Stateless and DHCPv6Stateful should not be enabled to run at the same time.
Note – When you enable the auto-configuration for either DHCPv6 Stateful orDHCPv6 Stateless, Oracle ILOM will identify in the Network Settings page theDHCP unique ID for the DHCPv6 server that was last used to retrieve the DHCPinformation.
8. Click Save to apply the changes made.
All changes to the network settings are considered pending within the OracleILOM session until you click Save.
Note – Changing the static IP address on the device (SP or CMM) will end all activeOracle ILOM sessions to the device. A message will appear prompting you to closeyour browser session. You will need to log back in to Oracle ILOM using the newlyassigned static IP address.
IPv6 Auto-ConfigurationOption Description
Stateless
(enabled by default)When enabled, the Stateless auto-configuration option is runto learn the IPv6 Stateless addresses for the device from thenetwork IPv6 router.
DHCPv6 Stateless When enabled, the DHCPv6 Stateless auto-configuration optionis run to learn the DNS information for the device from thenetwork DHCPv6 server.Note - The DHCPv6 Stateless auto-configuration option isavailable in Oracle ILOM as of 3.0.14.
DHCPv6 Stateful When enabled, the DHCPv6 Stateful auto-configuration optionis run to learn the IPv6 address(es) and DNS information for thedevice from the network DHCPv6 server.Note - The DHCPv6 Stateful auto-configuration option isavailable in Oracle ILOM as of 3.0.14.
Configuring Network, Secure Shell, and Local Interconnect Settings (Web) 29

Note – IPv6 addresses learned for the device from any of the IPv6auto-configuration options will not affect any of the active Oracle ILOM sessions tothe device. You can verify the newly learned auto-configured addresses on theNetwork tab.
9. To test the IPv4 or IPv6 network configuration from Oracle ILOM, use theNetwork Test Tools (Ping or Ping6). For details, see “Test IPv4 or IPv6 NetworkConfiguration (Web)” on page 30.
▼ Test IPv4 or IPv6 Network Configuration (Web)Before You Begin
■ Review the “Requirements for Network Settings (Web)” on page 22.
To test the configuration for IPv4 or IPv6, follow these steps:
1. Log in to the Oracle ILOM SP or CMM web interface.
2. In the web interface page, click Configuration --> Network.
3. In the Network Settings page, click the Tools button appearing at the bottom ofthe page.
The Test Tools dialog appears.
4. In the Test Tools dialog, specify the following information:
Field Description
Test Type • Select Ping to test the IPv4 network configuration.or• Select Ping6 to test the IPv6 network configuration.
Destination Type the IP address of a device on your network (the test is sent to thisdestination on your network).If the test failed, an error message appears. On some Oracle servers if thetest succeeded a succeed message appears.
30 Oracle ILOM 3.0 Web Procedures Guide • August 2012

▼ Assign Host Name and System Identifier (Web)Before You Begin
■ Review the “Requirements for Network Settings (Web)” on page 22.
To assign host name and system identifier, follow these steps:
1. Log in to the ILOM SP or CMM web interface.
2. Click System Information --> Identification Information.
The Identification Information page appears.
3. In the SP host name field, type the SP host name.
The host name can contain up to 60 characters.
4. In the SP System Identifier field, type the text that you will use to identify thesystem.
The system identifier can consist of a text string using any standard keyboard keysexcept quotation marks.
5. In the SP System Contact field, type the name of a person you will contact.
The system contact can consist of a text string using any standard keyboard keysexcept quotation marks.
6. In the SP System Location field, type the text that describes the physicallocation of the system.
The system location can consist of a text string using any standard keyboard keysexcept quotation marks.
7. Click Save for your settings to take effect.
▼ View and Configure DNS Settings (Web)Before You Begin
■ Review the “Requirements for Network Settings (Web)” on page 22.
To view and configure DNS settings, follow these steps:
1. Log in to the ILOM SP web interface or the CMM ILOM web interface.
2. Click Configuration --> DNS.
The DNS Configuration page appears.
3. You can have DHCP assign the DNS name server and search path automatically,or you can choose to assign the addresses manually.
Configuring Network, Secure Shell, and Local Interconnect Settings (Web) 31

■ To automatically assign the addresses, enable the checkbox next to Auto DNSvia DHCP.
■ To manually assign the addresses, complete the DNS name server and DNSsearch path text boxes. See the following figure.
▼ View and Configure Baud Rate for Serial Port(Web)Before You Begin
■ Review the “Requirements for Network Settings (Web)” on page 22.
To view and configure serial port baud rate, follow these steps:
1. Log in to the Oracle ILOM SP or CMM web interface.
2. Click Configuration --> Serial Port.
The Serial Port Settings page appears.
32 Oracle ILOM 3.0 Web Procedures Guide • August 2012

3. View the baud rate for the internal host serial port and the external serial port.
4. From the Host Serial Port Baud Rate drop-down list, select the baud rate for theinternal serial port
For x64 systems, this setting must match the setting for serial port 0, COM1, or/dev/ttyS0 on the host operating system.
The baud rate value must match the speed that was specified for the BIOS serialredirection feature (default is 9600 baud) and the speed used for the boot loaderand operating system configuration.
To connect to the system console using Oracle ILOM, you must set the default hostserial settings (9600 baud, 8N1 [eight data bits, no parity, one stop bit], no flowcontrol).
5. From the External Serial Port Baud Rate drop-down list, select the baud rate forthe external serial port.
This setting must match the baud rate on the RJ-45 serial port on the Oracle Sunserver.
6. Click Save for your changes to take effect.
▼ Configure x86 Host Serial Port Owner (Web)Before You Begin
■ Review the “Requirements for Network Settings (Web)” on page 22.
Configuring Network, Secure Shell, and Local Interconnect Settings (Web) 33

Note – To determine whether serial port sharing is supported for your server, referto the platform Oracle ILOM Supplement guide or Platform Administration guideprovided for your server.
Caution – You should set up a network management connection to the SP beforeattempting to switch the serial port owner to the host server. If a networkmanagement connection is not set up to the server SP, and the serial port owner waschanged from the SP to the host server, you will not be able to use the ILOM CLI orweb interface to return the SP as the serial port owner. In order to return the serialport owner to the SP, you will need to restore access to ILOM through the serialmanagement port on the server. For more details about accessing ILOM through theserial management (SER MGT) port on your server, see the platform documentationsupplied with your server.
To configure the host serial port owner on an x86 platform server, follow these steps:
1. Log in to the Oracle ILOM SP web interface.
2. Select the Configuration --> Serial Port.
The Serial Port Settings page appears.
3. In the Serial Port Settings page, select Host Server as the serial port owner.
Note – The service processor is the default serial port owner property value.
4. Click Save for the changes to take effect.
Note – Changing the "serial port owner" and saving this change might result in thefollowing benign error: Can not change serial settings - the serialconsole in use. This error occurs if there is an active session on the serial port.However, changes to the port owner, as well as any changes to the port speed willtake affect in Oracle ILOM.
5. Connect a serial host to the server.
For details on how to attach devices to the server, see the platform documentationsupplied with your server.
▼ Enable HTTP or HTTPS Web Access (Web)Before You Begin
34 Oracle ILOM 3.0 Web Procedures Guide • August 2012

■ Review the “Requirements for Network Settings (Web)” on page 22.
To enable HTTP or HTTPS web access, follow these steps:
1. Log in to the Oracle ILOM SP or CMM web interface.
2. Click Configuration --> System Management Access --> Web Server.
The Web Server Settings page appears.
3. Perform one of the following:
■ To enable HTTP, select Enabled from the HTTP Webserver: drop-down list.
■ To automatically redirect HTTP connections to HTTPS, select Redirect HTTPConnection to HTTPS from the HTTP Webserver: drop-down list
■ To disable HTTP, select Disabled from the HTTP Webserver: drop-down list
■ To enable HTTPS, select the checkbox for HTTPS Web Server Enabled.
The HTTPS web server is enabled by default.
Note – If you disable HTTP or select Redirect HTTP Connection to HTTPS, and thendisable HTTPS, you will be unable to access the Oracle ILOM web interface. Torestore access, use the CLI /SP/services/http or /SP/services/httpscommands, as described in “Enable HTTP or HTTPS Web Access“ in the Oracle ILOM3.0 CLI Procedures Guide.
4. Assign an HTTP or HTTPS port number.
5. Click Save.
Configuring Network, Secure Shell, and Local Interconnect Settings (Web) 35

▼ Upload the SSL Certificate (Web)Before You Begin
■ Review the “Requirements for Network Settings (Web)” on page 22.
■ Oracle ILOM does not apply changes to the SSL certificate and key until both theSSL Certificate and key have been uploaded.
Note – Oracle ILOM provides a default SSL certificate and self-signed key forHTTPS access. Optionally, you can upload a different SSL certificate and matchingprivate key. Ensure that you can access the new certificate and key through yournetwork or local file system.
To upload the SSL certificate, follow these steps:
1. Log in to the Oracle ILOM SP or CMM web interface
2. Click Configuration --> System Management Access --> SSL Certificate.
The SSL Certificate Upload page appears.
3. Type the file name of the new SSL certificate or click the Browse button tosearch for a new SSL certificate.
The file name has a .pem file extension. The service processor does not supportpass-phrase-encrypted certificates.
4. Click the Upload button to obtain the selected SSL certificate.
The SSL Certificate Upload Status dialog box appears.
5. After you have uploaded the certificate and private key, click the OK button toreset the Oracle ILOM web server and begin using the new SSL certificate.
The Oracle ILOM web server must be reset for the new certificate to take effect.
36 Oracle ILOM 3.0 Web Procedures Guide • August 2012

Configuring Secure Shell Settings
▼ Enable or Disable SSHBefore You Begin
Note – SSH is enabled by default in Oracle ILOM.
■ To configure Secure Shell (SSH) settings, you need the Admin (a) role enabled.
To enable or disable SSH, follow these steps:
1. Log in to the Oracle ILOM SP or CMM web interface
2. Click Configuration --> System Management Access --> SSH Server.
The SSH Server Settings page appears.
3. To enable the SSH server, click the Enabled check box next to State.
4. Click Save for your settings to take effect.
▼ Generate a New SSH KeyBefore You Begin
■ To configure Secure Shell (SSH) settings, you need the Admin (a) role enabled.
To generate a new SSH Key, follow these steps:
1. Log in to the Oracle ILOM SP or CMM web interface
Description Links Platform Feature Support
Manage Secure Shellsettings
• “Enable or Disable SSH” onpage 37
• “Generate a New SSH Key”on page 37
• “Restart the SSH Server” onpage 38
• x86 system server SP• SPARC system server SP• CMM
Configuring Network, Secure Shell, and Local Interconnect Settings (Web) 37

2. Click Configuration --> System Management Access --> SSH Server.
The SSH Server Settings page appears.
3. Select RSA by clicking the Generate RSA Key button, or select DSA by clickingthe Generate DSA Key button.
Click OK or Cancel when you are prompted.
The new key will take effect immediately for new connections.
▼ Restart the SSH Server
Note – Restarting the SSH server will end any existing SSH connections.
To restart the SSH server, follow these steps:
1. Log in to the Oracle ILOM SP or CMM web interface.
2. Click Configuration --> System Management Access --> SSH Server.
The SSH Server Settings page appears.
3. Click the Restart button to restart the SSH server.
Configuring the Local InterconnectInterface (Web)
Description Links Platform Feature Support
Identify requirements forconfiguring the localinterconnect interface
• “Requirements for ConfigureLocal Interconnect” onpage 39
• x86 system server SP• SPARC system server SP
Configure the LocalInterconnect Interface
• “Configure the LocalInterconnect Interface (Web)”on page 40
38 Oracle ILOM 3.0 Web Procedures Guide • August 2012

Requirements for Configure Local InterconnectThe following requirements must be met before you perform the proceduresdescribed in this section.
■ Review the concepts describing the use of a Local Interconnect Interface betweenthe Oracle ILOM SP and the host OS. For details, refer to “Local InterconnectInterface: Local Connection to Oracle ILOM From Host ” in the Oracle ILOM 3.0Daily Management Concepts Guide.
■ Review the Oracle ILOM descriptions for the Local Host Interconnectconfiguration settings. For details, refer to “Local Host Interconnect ConfigurationSettings in Oracle ILOM” in the Oracle ILOM 3.0 Daily Management Concepts Guide.
■ Verify that your server is running Oracle ILOM 3.0.12 or a later version of OracleILOM.
■ Verify that your platform supports the Local Interconnect Interface. Refer to yourplatform server Oracle ILOM supplement guide or administration guide.
Note – The settings in Oracle ILOM for the Local Interconnect Interface are notsupported on the CMM.
■ Automatic configuration of the Local Interconnect Interface requires the HostManaged (hostmanaged) setting in Oracle ILOM to be enabled (set to True), aswell as the installation of the Oracle Hardware Management Pack 2.1.0 or latersoftware on the server. For more information about installing the Oracle HardwareManagement Pack 2.1.0 software, refer to the Oracle Server Hardware ManagementPack User’s Guide.
■ Manual configuration of the Local Interconnect Interface between the OracleILOM SP and the host operating system requires the Host Managed(hostmanaged) setting in Oracle ILOM to be disabled (set to False), as well asother configuration settings to be set on the host operating system.
For guidelines for configuring the host OS connection point on the LocalInterconnect Interface, see “Manual Host OS Configuration Guidelines for LocalInterconnect Interface” on page 147.
■ The host operating system must support the internal USB Ethernet device that ispresented from the Oracle ILOM SP. Therefore, prior to configuring the LocalInterconnect Interface in Oracle ILOM, you should verify that an internal USBEthernet device driver was included in the operating system distribution andinstalled on your server. If an internal USB Ethernet device driver was notinstalled by the operating system distribution, you can obtain the device driver foryour operating system from the Oracle Hardware Management Pack 2.1.0software. For more details, refer to the Oracle Server Hardware Management PackUser’s Guide.
Configuring Network, Secure Shell, and Local Interconnect Settings (Web) 39

■ Network parameter changes to the settings in Oracle ILOM for the LocalInterconnect Interface are considered pending until you commit the changes in theOracle ILOM. For example, in the Oracle ILOM CLI, you must issue thecommitpending=true command to save the pendingipaddress and thependingipnetmask under the network/interconnect target. In the OracleILOM web interface, network parameter changes entered on the Configure USBEthernet Parameters dialog box are committed after you click Save.
■ An Oracle ILOM user account with Admin (a) role privileges is required in orderto change any of the settings in Oracle ILOM for the Local Interconnect Interface.
■ To determine the operating systems supported on your server, refer to theplatform server installation guide or operating system guide.
▼ Configure the Local Interconnect Interface (Web)Before You Begin
■ Review the “Requirements for Configure Local Interconnect” on page 39
To configure the local interconnect interface using the Oracle ILOM web interface,follow these steps:
1. Log in to the Oracle ILOM SP web interface.
2. In the web interface page, click Configuration --> Network.
3. In the Network Settings page, scroll down the page until you see the sectionlabeled “Local Host Interconnect,” then click Configure.
The dialog box to configure the USB Ethernet Parameters appears.
40 Oracle ILOM 3.0 Web Procedures Guide • August 2012

4. To configure the assignment of the non-routable IPv4 addresses to theconnection points on the Local Interconnect Interface, you can choose to:
■ Automatically assign non-routable IPv4 addresses to each connection point onthe Local Interconnect Interface by enabling the check box for True HostManagement.
■ When you enable the Host Managed property setting, you also must install theOracle Hardware Management Pack 2.1.0 (or later) software on your server andaccept the installation default for enabling Local Oracle ILOM Interconnect. Formore information, refer to the section about configuring the Local Oracle ILOMInterconnect in the Oracle Server Hardware Management Pack User’s Guide
■ Manually assign non-routable IPv4 addresses to each connection point on theLocal Interconnect Interface by specifying the following properties in theConfigure USB Ethernet Parameters dialog:
Configuring Network, Secure Shell, and Local Interconnect Settings (Web) 41

Note – To prevent the Oracle Hardware Management Pack software fromauto-configuring the Local Interconnect Interface between the Oracle ILOM SP andthe host OS, the Host Managed must be cleared (disabled). To prevent the use of theLocal Interconnect Interface between the Oracle ILOM SP and the host OS, both theHost Managed check box and the State check box must be cleared (disabled).
5. To commit the changes entered on the Configure USB Ethernet Parametersdialog box, click Save.
Note – If you chose to manually configure the Local Interconnect Interface in OracleILOM without the use of the Oracle Hardware Management Pack 2.1.0 or latersoftware, you will need to perform some additional configuration on the hostoperating system. For general details about these additional host OS configurationsettings, see “Manual Host OS Configuration Guidelines for Local InterconnectInterface” on page 147.
Field Instructions and Description
Host Managed Clear the check box for Host Managed to disable the host managedmode.
State Click the check box for State to manually enable the local interconnectmode between the Oracle ILOM SP and the host OS.The State is, by default, disabled.
IP Address Oracle ILOM, by default, provides a default non-routable IPv4 addressfor the Oracle ILOM SP connection point on the Local InterconnectInterface.This default IPv4 address (169.254.182.76) should not be changed unless aconflict exists in your network environment with this IPv4 address.
NetMask Oracle ILOM, by default, provides a default IPv4 Netmask address forthe Oracle ILOM SP connection point on the Local Interconnect Interface.This default IPv4 Netmask (255.255.255.0) address should not be changedunless a conflict exists in your network environment with this address.
42 Oracle ILOM 3.0 Web Procedures Guide • August 2012
Managing User Accounts (Web)
Related Information
■ Oracle ILOM 3.0 Quick Start, add user account
■ Oracle ILOM 3.0 Daily Management Concepts, user account management
■ Oracle ILOM 3.0 Daily Management Concepts, guidelines for managing useraccounts
■ Oracle ILOM 3.0 Daily Management CLI Procedures, recover a lost password
■ Oracle ILOM 3.0 Daily Management CLI Procedures, manage user accounts
■ Oracle ILOM 3.0 Protocol Management Reference, manage user accounts
Description Links
Configure user accounts • “Configuring User Accounts (Web)” on page 44
Configure SSH user key • “Configuring SSH Keys (Web)” on page 50
Configure Active Directorysettings
• “Configuring Active Directory (Web)” on page 53
Configure LDAP settings • “Configuring Lightweight Directory Access Protocol(LDAP)” on page 63
Configure LDAP/SSL settings • “Configuring LDAP/SSL Settings (Web)” on page 65
Configure RADIUS settings • “Configuring RADIUS (Web)” on page 73
43

Configuring User Accounts (Web)
▼ Configure Single Sign On (Web)Before You Begin
■ To set properties for Single Sign On, you need the Admin (a) role enabled.
To enable or disable single sign on, follow these steps:
1. Log in to the Oracle ILOM SP or CMM web interface.
2. Click User Management --> User Accounts.
The User Account Settings page appears.
3. Click the check box next to Enable Single Sign On to enable the feature, or clearthe check box to disable the feature.
Description Links Platform Feature Support
Manage Oracle ILOM’ssingle sign on and usersession settings
• “Configure Single Sign On(Web)” on page 44
• “Set the Session Time-Out(Web)” on page 45
• x86 system server SP• SPARC system server SP• CMM
Manage Oracle ILOMuser accounts and roles
• “Add User Accounts andAssign Roles (Web)” onpage 45
• “Modify a User Account(Web)” on page 48
• “Delete a User Account(Web)” on page 49
• “View User Sessions (Web)”on page 50
• x86 system server SP• SPARC system server SP• CMM
44 Oracle ILOM 3.0 Web Procedures Guide • August 2012

▼ Set the Session Time-Out (Web)
Note – The session time-out setting controls the amount of time an Oracle ILOMsession will remain idle before logging out. The session time-out setting does notpersist after you log out of the current Oracle ILOM session. You must reset thesession time-out each time you log in to the Oracle ILOM web interface.
Before You Begin
■ To set properties for session time-out, you need the Admin (a) role enabled.
To set the session time-out property value, follow these steps:
1. Log in to the Oracle ILOM SP or CMM web interface.
2. Click System Information --> Session Time-Out.
The Session Time-Out page appears.
3. In the Session Time-Out drop-down list, select a preferred time-out increment(15 mins, 30 mins, 1 hr, or 3 hrs).
4. Click Apply to save your changes.
▼ Add User Accounts and Assign Roles (Web)Before You Begin
■ To set properties for User Management (user accounts and roles), you need theUser Management (u) role enabled.
To add a user account and assign privileges (roles), follow these steps:
1. Log in to the Oracle ILOM SP or CMM web interface.
2. Click User Management --> User Accounts.
The User Account Settings page appears.
3. In the Users table, click Add.
The Add User dialog box appears.
Managing User Accounts (Web) 45

4. Complete the following information:
a. In the User Name text box, specify a name for this user account.
b. In the Roles drop-down list, select a user role profile (administrator, operator,or advanced).
User role profile descriptions follow.
User Role Descriptions
User role profiles User role profile permissions granted (web)
Administrator When selected, the Administrator role profile in the Oracle ILOM web interfaceautomatically grants read and write permissions to the following user rolepermissions.• Admin (a)• User Management (u)• Console (c)• Reset and Host Control (r)• Read only (o)For definitions of roles supported by the Administrator role profile, see the userrole definitions listed in this table under User role permissions granted.
46 Oracle ILOM 3.0 Web Procedures Guide • August 2012

Operator When selected, the Operator role profile in the Oracle ILOM web interfaceautomatically grants the following user role permissions:• Console (c)• Reset and Host Control (r)• Read only (o)For definitions of roles granted by the Operator role profile, see the user roledefinitions listed in this table under User role permissions granted.
Advanced When selected, the Advanced role profile in the Oracle ILOM web interfaceautomatically grants Read Only (o) permissions to all Oracle functions and enablesyou to assign all or any combination of the following role permissions of interest:• Admin (a)• User Management (u)• Console (c)• Reset and Host Control (r).• Services (s)For definitions of roles granted by the Advanced role profile, see the user roledefinitions listed in this table under User role permissions granted.
User roles User role permissions granted (CLI)
(a) Admin (a). Read and write permissions are granted to all Oracle ILOM systemmanagement functions with the exception of the functions that would require theAdmin to have these additional user roles enabled: User Management (u), Resetand Host Control (r), Console (c), and Services (s).
(u) User Management (u). Read and write permissions are granted to a user for allOracle ILOM user account management functions.
(c) Console (c). Read and write permissions are granted to a user to perform theseRemote Console management functions: manage Remote Console lock options,manage SP console history log options, launch and use Oracle ILOM RemoteConsole, and launch and use Oracle ILOM Storage Redirection CLI.
(r) Reset and Host Control (r). Read and write permissions are granted to a user toperform these remote host management functions: host boot device control, runand configure diagnostics utilities, reset SP, reset CMM, component managementservice actions, fault management actions, SPARC TPM management actions, anddownloads of SNMP MIBs.
(o) Read Only (o). Read only permissions are granted to a user to view the state of allILOM configuration properties. In addition, write permissions are granted to a userto change only the password and session time-out properties assigned to their ownuser account.
(s) Services (s). Read and write permissions are granted to a user to assist Oracleservice engineers if on-site service is required.
User Role Descriptions
Managing User Accounts (Web) 47

c. In the New Password text box, type a password for this user account.
The password must be at least 8 characters and no more than 16 characters. Thepassword is case-sensitive. Use alphabetical, numeric, and special characters forbetter security. You can use any character except a colon. Do not include spacesin passwords.
d. In the Confirm Password text box, retype the password previously entered inthe New Password text box.
e. Click Save to create the user account.
The User Account Settings page refreshes. The newly created user accountappears on the User Account Settings page.
▼ Modify a User Account (Web)
Note – You can modify a user account by changing the user’s password, and theuser’s network and serial privileges.
Before You Begin
■ To set properties for User Management (user accounts and roles), you need theUser Management (u) role enabled.
To modify a user account, follow these steps:
1. Log in to the Oracle ILOM SP or CMM web interface.
2. Click User Management --> User Accounts.
The User Account Settings page appears.
3. In the Users table, enable the radio button next to the user account you want tomodify and click Edit.
A dialog box appears listing the role assigned.
(aucro) A combination of all these users roles (aucro) grant read and write permissions to auser to perform backup and restore configuration functions.Note - aucro is equivalent to the Administrator user role profile in the webinterface.
User Role Descriptions
48 Oracle ILOM 3.0 Web Procedures Guide • August 2012

4. Modify the role assigned to a user.
Note that when the Advanced role is selected, a user can select any of the sixavailable roles. However, if you selected Administrator or Operator, Oracle ILOMwill automatically assign the roles. For example, the two following figures identifythe roles assigned by Oracle ILOM for Administrator and Operator.
5. In the New Password text box, specify a new password for this user account.
The password must be between 8 and 16 characters. The password iscase-sensitive. Use alphabetical, numeric, and special characters for better security.You can use any character except a colon. Do not include spaces in passwords.
6. In the Confirm New Password text, retype the password previously entered inthe New Password text box.
7. Click Save for the changes to take effect, or click Close to return to the previoussettings.
The User Account Settings page refreshes with your changes.
▼ Delete a User Account (Web)Before You Begin
■ To set properties for User Management (user accounts and roles), you need theUser Management (u) role enabled.
To delete a user account, follow these steps:
1. Log in to the Oracle ILOM SP or CMM web interface.
2. Click User Management --> User Accounts.
The User Account Settings page appears.
3. Enable the radio button next to the user account you want to delete.
4. In the Users table, click Delete.
A confirmation dialog box appears.
Managing User Accounts (Web) 49

5. Click OK to delete the account or click Cancel to stop the deletion process.
The User Account Settings page refreshes.
▼ View User Sessions (Web)1. Log in to the Oracle ILOM SP or CMM web interface.
2. Click User Management --> Active Sessions.
The Active Sessions page appears listing the name of the user account, user roleassigned, session start-time, session type, and the session mode.
Configuring SSH Keys (Web)
▼ Add an SSH Key (Web)
Note – The SSH key settings in Oracle ILOM enable you to automate passwordauthentication.
Before You Begin
■ To change other user SSH keys, you need the User Management (u) role enabled.However, you can configure your own SSH key with the Read Only (o) roleenabled.
To add an SSH key, follow these steps:
1. Log in to the Oracle ILOM SP or CMM web interface.
2. Click User Management --> User Accounts.
The User Accounts Setting page appears.
Description Links Platform Feature Support
Manage SSH keysettings in the OracleILOM web interface
• “Add an SSH Key (Web)” onpage 50
• “Delete an SSH Key (Web)”on page 52
• x86 system server SP• SPARC system server SP• CMM
50 Oracle ILOM 3.0 Web Procedures Guide • August 2012

3. In the User Account Settings page, scroll down to the SSH table and click Add.
The SSH key add screen appears.
4. In the User drop-down list, select the name of the user account.
5. In the Transfer Method drop-down list, select a transfer method.
The following transfer methods are available:
■ Browser
■ TFTP
■ FTP
■ SFTP
■ SCP
■ HTTP
■ HTTPS
6. If you select the Browser transfer method, click Browse and browse to thelocation of the SSH key. Proceed to Step 9.
7. If you select the TFTP transfer method, the prompts shown in the followingfigure appear and you must provide the following information, then proceed toStep 9:
■ Host – Enter the remote host IP address or, if you have DNS configured, thename of the remote host.
■ Filepath – Enter the path to which to save the configuration file in the format:directoryPath/filename.
Managing User Accounts (Web) 51

8. If you select the SCP, FTP, SFTP, HTTP, or HTTPS transfer method, the promptsshown in the next figure, appear and you must provide the followinginformation, then proceed to Step 9:
■ Host – Enter the remote host IP address or, if you have DNS configured, thename of the remote host.
■ Filepath – Enter the path to which to save the configuration file in the format:directoryPath/filename.
■ Username – Enter the user name of your account on the remote system.
■ Password – Enter the password for your account on the remote system.
9. To add the SSH key to the selected user account, click Load.
The SSH key is added to the user account.
▼ Delete an SSH Key (Web)
Note – The SSH key settings in Oracle ILOM enable you to automate passwordauthentication.
Before You Begin
■ To change other user SSH Keys, you need the User Management (u) role enabled.However, you can configure your own SSH Key with the Read Only (o) roleenabled.
To delete an SSH key, follow these steps:
52 Oracle ILOM 3.0 Web Procedures Guide • August 2012

1. Log in to the Oracle ILOM SP or CMM web interface.
2. Click User Management--> User Accounts.
The User Account Settings page appears.
3. Scroll down to the SSH keys section at the bottom of the page, select a user, andclick Delete.
A confirmation dialog box appears.
4. Click OK.
The SSH key is deleted.
Configuring Active Directory (Web)
▼ View and Configure Active Directory Settings(Web)Before You Begin
■ To configure Active Directory settings, you need the User Management (u) roleenabled.
■ To configure the Expanded Search Mode property, the server or CMM must berunning Oracle ILOM firmware version 3.0.4 or later.
■ To configure the Strict Credential Error Mode property, the server or CMM mustbe running Oracle ILOM firmware version 3.0.10 or later.
To view and configure Active Directory settings, follow these steps:
Description Links Platform Feature Support
Manage andtroubleshoot ActiveDirectory settings in theOracle ILOM webinterface
• “View and Configure ActiveDirectory Settings (Web)” onpage 53
• “Configure Active DirectoryGroups (Web)” on page 58
• “Troubleshoot ActiveDirectory Authentication andAuthorization (Web)” onpage 61
• x86 system server SP• SPARC system server SP• CMM
Managing User Accounts (Web) 53

1. Log in to the Oracle ILOM SP or CMM web interface.
2. Click User Management --> Active Directory.
The Active Directory page appears. There are three sections to the ActiveDirectory page, as shown in the following figures.
■ The top section, which includes targets and properties:
■ The middle section, which includes the primary certificate information:
■ The bottom section, which includes the Active Directory tables:
54 Oracle ILOM 3.0 Web Procedures Guide • August 2012

3. Configure the Active Directory settings appearing in the top section of theActive Directory Settings page.
See the following table for a description of the Active Directory settings.
Property Default Description
State Disabled Enabled | Disabled
Roles (none) Administrator | Operator | Advanced | noneAccess role granted to all authenticated Active Directoryusers. This property supports the legacy roles ofAdministrator or Operator, or any of the individual roleID combinations of a, u, c, r, o, and s. For example,aucros, where a=Admin, u=User Management, c=Console, r=Reset and Host Control, o=Read-Only, ands=Service. If you do not configure a role, the ActiveDirectory server is used to determine the role.
Address 0.0.0.0 IP address or DNS name of the Active Directory server. IfDNS name is used, then DNS must be configured andoperational.
Port 0 Port used to communicate with the server. Ifautoselect is selected, the port is set to 0.Available in the unlikely event of a non-standard TCPport being used.
Timeout 4 Time-out value in seconds.Number of seconds to wait for individual transactions tocomplete. The value does not represent the total time ofall transactions because the number of transactions candiffer depending on the configuration.This property allows for tuning the time to wait when aserver is not responding or is unreachable.
Managing User Accounts (Web) 55

4. Click Save in the top section of the Active Directory settings page for yoursettings to take effect.
5. View the Active Directory certificate information in the middle section of theActive Directory settings page.
See the following table for a description of Active Directory certificate settings.
StrictCertificateMode
Disabled Enabled | DisabledIf enabled, the server certificate contents are verified bydigital signatures at the time of authentication.Certificate must be loaded before Strict Certificate Modecan be set to enabled.
DNS LocatorMode
Disabled Enabled | DisabledIf enabled, an attempt to locate the Active Directoryserver is performed, based on the DNS locator queriesthat are configured.
ExpandedSearch Mode
Disabled Enabled | DisabledAs of Oracle ILOM 3.0.4, an expanded search mode isavailable. When enabled, you can use the expandedsearch mode to control the search for user entries.Different searches are attempted if the more specificuserPrincipleName search does not immediatelysucceed.If disabled, the userPrincipleName is expected to have afully qualified domain name (FQDN) suffix.
StrictCredentialError Mode
Disabled Enabled | DisabledAs of Oracle ILOM 3.0.10, the Strict Credential ErrorMode is available.If the mode is set to disabled (cleared check box),user-credential errors are retried on other servers that areavailable (either configured through the alternate servertable or found by DNS queries). The disabled stateallows users from separate, disjoint domains to log in toOracle ILOM as long as that domain authenticationserver is available.If the mode is set to enabled (checked check box), acredential error reported from any server fails those usercredentials after the first authentication attempt showingthe user-credential error.
Log Detail None None | High | Medium | LowSpecifies the amount of diagnostics that go into the eventlog.
Property Default Description
56 Oracle ILOM 3.0 Web Procedures Guide • August 2012

6. If Strict Certificate Mode is enabled, perform the following steps:
Note – If Strict Certificate Mode is disabled, data will continue to be protected but acertificate is not required to be uploaded.
a. Complete the “Certificate File Upload” section by specifying the requiredparameters to upload the certificate file.
b. Click the Load Certificate button.
c. When the certificate is loaded, click the “details” link to show the followinginformation.
Property Displays Description
CertificateFile Status
Certificate notpresent
Read-only indicator of whether a certificate exists.
CertificateFile Status
Certificatepresent(details)
Click the (details) link to view certificate informationabout issuer, subject, serial number, valid from, valid to,and version.
Transfer Method Required Parameters
Browser File Name
TFTP HostFilepath
FTP HostFilepathUsernamePassword
SCP HostFilepathUsernamePassword
Item Description
Issuer Certificate Authority who issued the certificate.
Subject Server or domain for which the certificate is intended.
Managing User Accounts (Web) 57

▼ Configure Active Directory Groups (Web)Before You Begin
■ To configure Active Directory settings, you need the User Management (u) roleenabled.
■ To configure the Expanded Search Mode property, the server or CMM must berunning Oracle ILOM firmware version 3.0.4 or later.
■ To configure the Strict Credential Error Mode property, the server or CMM mustbe running Oracle ILOM firmware version 3.0.10 or later.
To configure Active Directory tables, follow these steps:
1. Log in to the Oracle ILOM SP or CMM web interface.
2. Click User Management --> Active Directory.
The Active Directory page appears.
3. At the top of the Active Directory page, click the link to access the category oftable you want to configure:
■ Admin Groups
■ Operator Groups
■ Custom Groups
■ User Domains
■ Alternate Servers
■ DNS Locator Queries
4. Enable the radio button of the individual table, and then click Edit.
5. Enter the required data into the tables.
In the following tables, default data shows the expected format of the ActiveDirectory data.
■ Admin Groups table:
Use the Admin Groups table to view and configure properties for one or moreMicrosoft Active Directory Admin Groups. Supported formats for configuringAdmin Groups include:
Valid From Date when the certificate becomes valid.
Valid Until Date when the certificate becomes invalid.
Serial Number Serial number of the certificate.
Version Version number of the certificate.
58 Oracle ILOM 3.0 Web Procedures Guide • August 2012

Note – The name field supports up to 128 characters. If the chosen format is over 128characters, you should use one of the other supported formats with fewer characters.
■ Distinguished Name (DN) Format – CN=admingroup,OU=Groups,DC=domain,DC=company,DC=com.
For example:
CN=SpSuperAdmin,OU=Groups,DC=sales,DC=east,DC=oracle,DC=com
■ Simple Name Format – admingroup
■ NT-Style Name – domain\admingroup
■ Domain Format – DC=domain,DC=company,DC=com\admingroup
■ Operator Groups table:
Use the Operator Groups table to view and configure the Microsoft ActiveDirectory Operator groups. Supported formats for configuring operator groupsinclude: Distinguished Name (DN) format, Simple Name format, or NT-StyleName.
CN=SpSuperOper,OU=Groups,DC=sales,DC=east,DC=oracle,DC=com
■ Custom Groups table:
Use the Custom Groups table to view and configure properties for one or moreMicrosoft Active Directory custom groups . Supported formats for configuringcustom groups include: Distinguished Name (DN) format, Simple Nameformat, or NT-Style Name.
Example Gustom Group Name: custom_group_1
Configurable User Roles: Admin, User Management, Console, Resetand Host Control, Read Only (aucro)
■ User Domains table:
Use the User Domain table to view and configure properties for one or moreMicrosoft Active Directory User Domains.
User domains are the authentication domains used to authenticate a user. Whenthe user logs in, the name used is formatted in the specific domain nameformat. User authentication is attempted based on the user name that is enteredand the configured user domains.
For example:
■ The principle format used in the first attempt to authenticate the user
<USERNAME>@sales.east.oracle.com
■ The Distinguished Name format is used if the first attempt to authenticatethe user failed.
Managing User Accounts (Web) 59

CN=<USERNAME>,CN=Users,DC=sales,DC=east,DC=oracle,DC=com
■ Alternate Servers table:
Use the Alternate Server table to view and configure properties for MicrosoftActive Directory Alternate Servers.
Alternate Servers configurations provide redundancy as well as a choice forwhen different servers are needed to isolate domains. If a certificate is notsupplied, but is required, the top-level primary certificate is used. The alternateservers have the same rules and requirements as the top-level certificate mode.Each server has its own certificate status, and its own certificate command toretrieve the certificate if it is needed.
The following image shows an Alternate Servers table with a certificate presentin ID 2:
The following certificate information is displayed when you click on the“details” link:
ID Address Port Certificate Status
1 - 0 certificate notpresent
2 10.8.136.165 0 certificate present(details)
Item Description
Issuer Certificate Authority who issued the certificate.
Subject Server or domain for which the certificate is intended.
Valid From Date when the certificate becomes valid.
Valid Until Date when the certificate becomes invalid.
Serial Number Serial number of the certificate.
Version Version number of the certificate.
60 Oracle ILOM 3.0 Web Procedures Guide • August 2012

■ DNS Locator Queries Table:
Use the DNS Locator Queries table to view and configure Microsoft ActiveDirectory DNS Locator Queries.
The DNS Locator Queries table queries DNS servers to learn about the hosts touse for authentication.
The DNS Locator service query identifies the named DNS service. The port IDis generally part of the record, but you can override it by using the format<PORT:636>. Also, named services specific for the domain being authenticatedcan be specified by using the <DOMAIN> substitution marker. For example:
■ _ldap._tcp.gc._msdcs.<DOMAIN>.<PORT:3269>
■ _ldap._tcp.dc._msdcs.<DOMAIN>.<PORT:636>
Note – DNS and DNS Locator Mode must be enabled for DNS Locator Queries towork.
6. Click Save for your changes to take effect.
▼ Troubleshoot Active Directory Authenticationand Authorization (Web)Before You Begin
■ To configure Active Directory settings, you need the User Management (u) roleenabled.
■ To configure the Expanded Search Mode property, the server or CMM must berunning Oracle ILOM firmware version 3.0.4 or later.
■ To configure the Strict Credential Error Mode property, the server or CMM mustbe running Oracle ILOM firmware version 3.0.10 or later.
To troubleshoot the active directory authentication and authorization, follow thesesteps:
1. Log in to the Oracle ILOM SP or CMM web interface.
2. Click User Management --> Active Directory.
The Active Directory page appears.
3. In the Log Detail drop-down list, select the level of detail that you would likethe event log to capture.
Choices are None, High, Medium, Low, and Trace.
4. Click Save to save your changes.
Managing User Accounts (Web) 61

5. Attempt an authentication to generate events. Follow these steps:
a. From the System Monitoring tab select Event Logs.
b. In the Filter drop-down list, select Custom Filter.
c. In the Event Class drop-down list, select ActDir.
d. Click OK.
All Active Directory events will appear in the event log.
62 Oracle ILOM 3.0 Web Procedures Guide • August 2012

Configuring Lightweight DirectoryAccess Protocol (LDAP)
▼ Configure LDAP Server Settings (Web)Before You Begin
■ To modify the LDAP Server settings in Oracle ILOM, you need the UserManagement (u) role enabled.
To configure the LDAP Server settings, follow these steps:
1. Ensure that all user accounts authenticating to Oracle ILOM have user accountpasswords stored in a crypt format.
Oracle ILOM only supports LDAP authentication for passwords stored in one ofthe following two variations of crypt formats.
userPassword: {CRYPT}ajCa2He4PJhNo
or
userPassword: {CRYPT}$1$pzKng1$du1Bf0NWBjh9t3FbUgf46.
2. Add object classes posixAccount and shadowAccount, and populate therequired property values for this schema (RFC 2307). See the following table fora description of the required property values.
Description Links Platform Feature Support
Manage LDAP settingsin the Oracle ILOM webinterface
• “Configure LDAP ServerSettings (Web)” on page 63
• “Configure Oracle ILOM forLDAP (Web)” on page 64
• x86 system server SP• SPARC system server SP• CMM
Required Property Description
uid User name for logging in to Oracle ILOM
uidNumber Any unique number
gidNumber Any unique number
Managing User Accounts (Web) 63

3. Configure the LDAP server to enable LDAP server access to Oracle ILOM useraccounts.
Either enable your LDAP server to accept anonymous binds, or create a proxyuser on your LDAP server that has read-only access to all user accounts that willauthenticate through Oracle ILOM.
See your LDAP server documentation for more details.
▼ Configure Oracle ILOM for LDAP (Web)Before You Begin
■ To modify LDAP settings in Oracle ILOM, you need the User Management (u) roleenabled.
To configure Oracle ILOM for LDAP, follows these steps:
1. Log in to the Oracle ILOM SP or CMM web interface.
2. Click User Management --> LDAP.
The LDAP Settings page appears.
3. In the LDAP settings page, specify values for the following properties:
■ State – Click the Enabled check box to authenticate LDAP users.
■ Role – In the Role drop-down list, specify a default LDAP user role(Administrator, Operator. or Advanced roles).
■ Address – In the Address text box, type the IP address or the DNS host namefor the LDAP server.
■ Port – In the Port text box, accept the default LDAP port number (389) ormodify the default port number.
■ Searchbase – In the Searchbase text box, type the branch of your LDAP serverto search for users.
■ Bind DN – In the Bind DN text box. type the Distinguished Name (DN) of aread-only proxy user on the LDAP server. Oracle ILOM must have read-onlyaccess to your LDAP server to search and authenticate users.
■ Bind Password – In the Bind Password text box, type the password of theread-only user.
userPassword Password
homeDirectory Any value (this property is ignored by Oracle ILOM)
loginShell Any value (this property is ignored by Oracle ILOM)
Required Property Description
64 Oracle ILOM 3.0 Web Procedures Guide • August 2012

4. Click Save for your changes to take effect.
5. To verify that LDAP authentication works, log in to Oracle ILOM using anLDAP user name and password.
Note – Oracle ILOM searches local users before LDAP users. If an LDAP user nameexists as a local user, Oracle ILOM uses the local account for authentication.
Configuring LDAP/SSL Settings (Web)
▼ View and Configure LDAP/SSL Settings (Web)Before You Begin
■ To modify LDAP/SSL settings in Oracle ILOM, you need the User Management(u) role enabled.
■ To modify the Optional User Mapping property, the server must be runningOracle ILOM firmware version 3.0.4 or later.
To view and configure LDAP/SSL settings, follow these steps:
1. Log in to the Oracle ILOM SP or CMM web interface.
2. Click User Management --> LDAP/SSL.
The LDAP/SSL page appears. There are three sections to the LDAP/SSL page.
■ The top section, which includes targets and properties:
Description Links Platform Feature Support
Manage LDAP/SSLsettings in the OracleILOM web interface
• “View and ConfigureLDAP/SSL Settings (Web)”on page 65
• “Configure LDAP/SSL Tables(Web)” on page 69
• “Troubleshoot LDAP/SSLAuthentication andAuthorization (Web)” onpage 72
• x86 system server SP• SPARC system server SP• CMM
Managing User Accounts (Web) 65

■ The middle section, which includes certificate information:
■ The bottom section, which includes the LDAP/SSL tables:
3. Configure the LDAP/SSL settings displayed in the top section of the LDAP/SSLSettings page.
See the following table for a description of the LDAP/SSL settings.
66 Oracle ILOM 3.0 Web Procedures Guide • August 2012

Property (Web) Default Description
State Disabled Enabled | Disabled
Roles (none) Administrator | Operator | Advanced | (none)Access role granted to all authenticated LDAP/SSLusers. This property supports the legacy roles ofAdministrator or Operator, or any of the individual roleID combinations of a, u, c, r, o and s. For example,aucros, where a=Admin, u=User Management, c=Console, r=Reset and Host Control, o=Read-Only, ands=Service. If you do not configure a role, the LDAP/SSLserver is used to determine the role.
Address 0.0.0.0 IP address or DNS name of the LDAP/SSL server.
Port 0 Port used to communicate with the server. If autoselectoption is enabled, then the port is set to 0.Available in the unlikely event of a non-standard TCPport being used.
Timeout 4 Time-out value in seconds.Number of seconds to wait for individual transactions tocomplete. The value does not represent the total time ofall transactions because the number of transactions candiffer depending on the configuration.This property allows for tuning the time to wait when aserver is not responding or is unreachable.
StrictCertificateMode
Disabled Enabled | DisabledIf enabled, the server certificate contents are verified bydigital signatures at the time of authentication.Certificate must be loaded before Strict Certificate Modecan be set to enabled.
Optional UserMapping
Disabled Enabled | DisabledAs of Oracle ILOM 3.0.4, optional user mapping isavailable. If enabled, alternative attributes other than theDistinguished Name (DN) can be used for usercredential authentication. Use this property to convert asimple user login name to the DN for user credentialvalidation.Click edit to enable and modify the User AttributeMapping Parameters dialog, then click Save.
Log Detail None None | High | Medium | LowSpecifies the amount of diagnostics that go into the eventlog.
Managing User Accounts (Web) 67

4. Click Save in the top section of the LDAP/SSL settings page to save any changesmade to this section.
5. View the LDAP/SSL certificate information in the middle section of theLDAP/SSL settings page.
See the following table for a description of LDAP/SSL certificate settings.
6. If Strict Certificate Mode is enabled, perform the following steps:
Note – When Strict Certificate Mode is disabled, the data will continue be protectedbut a certificate is not required.
a. Complete the “Certificate File Upload” section by specifying the followingrequired parameters for uploading the certificate file
b. To upload the certificate, click the Load Certificate button.
c. When the certificate is loaded, click the (details) to view the followinginformation about the certificate:
Property Displays Description
CertificateFile Status
Certificate notpresent
Read-only indicator of whether a certificate exists.
CertificateFile Status
Certificatepresent (details)
Click the (details) link to view certificate informationabout the issuer, subject, serial number, valid from, validto, and version.
Transfer Method Required Parameters
Browser File Name
TFTP HostFilepath
FTP HostFilepathUsernamePassword
SCP HostFilepathUsernamePassword
68 Oracle ILOM 3.0 Web Procedures Guide • August 2012

▼ Configure LDAP/SSL Tables (Web)Before You Begin
■ To modify LDAP/SSL settings in Oracle ILOM, you need the User Management(u) role enabled.
■ To modify the Optional User Mapping property, the server must be runningOracle ILOM firmware version 3.0.4 or a later.
To configure LDAP/SSL tables, follow these steps:
1. Log in to the Oracle ILOM SP or CMM web interface.
2. Click User Management --> LDAP/SSL.
The LDAP/SSL page appears.
3. At the bottom of the LDAP/SSL page, click the link to access the category oftable you want to configure:
■ Admin Groups
■ Operator Groups
■ Custom Groups
■ User Domains
■ Alternate Servers
4. Enable the radio button of the individual table, and then click Edit.
5. Enter the required data in the tables.
In the following tables, default data shows the expected format of the LDAP/SSLdata.
■ Admin Groups table:
Item Description
Issuer Certificate Authority who issued the certificate.
Subject Server or domain for which the certificate is intended.
Valid From Date when the certificate becomes valid.
Valid Until Date when the certificate becomes invalid.
Serial Number Serial number of the certificate.
Version Version number of the certificate.
Managing User Accounts (Web) 69
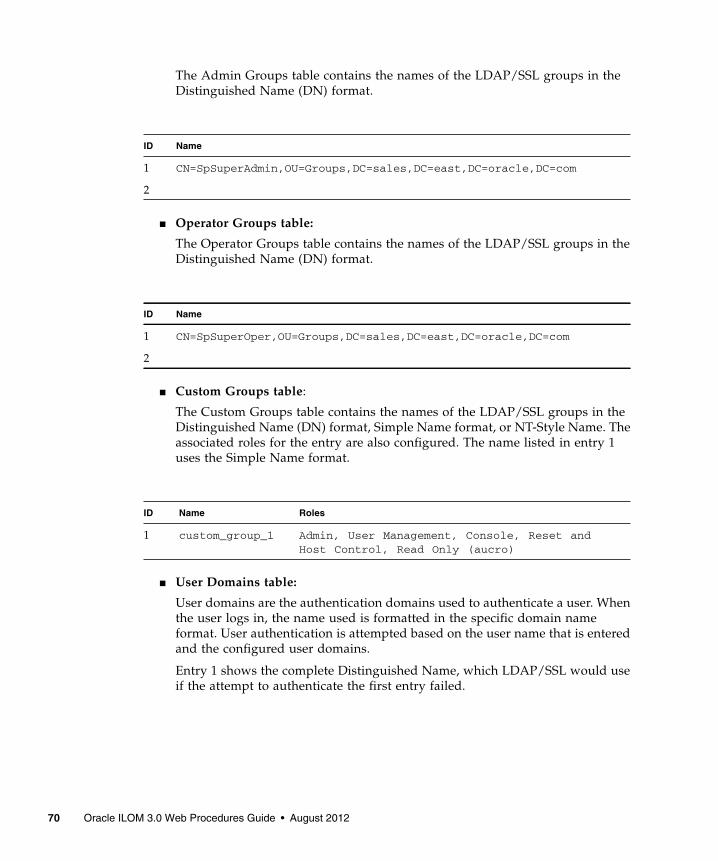
The Admin Groups table contains the names of the LDAP/SSL groups in theDistinguished Name (DN) format.
■ Operator Groups table:
The Operator Groups table contains the names of the LDAP/SSL groups in theDistinguished Name (DN) format.
■ Custom Groups table:
The Custom Groups table contains the names of the LDAP/SSL groups in theDistinguished Name (DN) format, Simple Name format, or NT-Style Name. Theassociated roles for the entry are also configured. The name listed in entry 1uses the Simple Name format.
■ User Domains table:
User domains are the authentication domains used to authenticate a user. Whenthe user logs in, the name used is formatted in the specific domain nameformat. User authentication is attempted based on the user name that is enteredand the configured user domains.
Entry 1 shows the complete Distinguished Name, which LDAP/SSL would useif the attempt to authenticate the first entry failed.
ID Name
1 CN=SpSuperAdmin,OU=Groups,DC=sales,DC=east,DC=oracle,DC=com
2
ID Name
1 CN=SpSuperOper,OU=Groups,DC=sales,DC=east,DC=oracle,DC=com
2
ID Name Roles
1 custom_group_1 Admin, User Management, Console, Reset andHost Control, Read Only (aucro)
70 Oracle ILOM 3.0 Web Procedures Guide • August 2012

■ Alternate Servers table:
The Alternate Servers table provides redundancy for authentication. If acertificate is not supplied, but is required, the top-level primary certificate isused. The alternate servers have the same rules and requirements as thetop-level certificate mode. Each server has its own certificate status, and its owncertificate command to retrieve the certificate if it is needed.
The following image shows an Alternate Servers table with a certificate presentin ID 2:
The following information is displayed when you click on the “details” link:
ID Domain
1 UID=<USERNAME>,OU=people,DC=oracle,DC=com
2
ID Address Port Certificate Status
1 - 0 certificate notpresent
2 - 0 certificate notpresent
3 10.7.143.246 0 certificate present(details)
Item Description
Issuer Certificate Authority who issued the certificate.
Subject Server or domain for which the certificate is intended.
Valid From Date when the certificate becomes valid.
Managing User Accounts (Web) 71

▼ Troubleshoot LDAP/SSL Authentication andAuthorization (Web)Before You Begin
■ To modify LDAP/SSL settings in Oracle ILOM, you need the User Management(u) role enabled.
■ To modify the Optional User Mapping property, the server must be runningOracle ILOM firmware version 3.0.4 or a later.
To troubleshoot LDAP/SSL authentication, follow these steps:
1. Log in to the Oracle ILOM SP or CMM web interface.
2. Click User Management --> LDAP/SSL.
The LDAP/SSL page appears.
3. In the Log Detail drop-down list, select the level of detail that you would likethe event log to capture.
Choices are None, High, Medium, Low, and Trace.
4. Click Save to save your changes.
5. Attempt an authentication to generate events, by performing these steps:
a. Select System Monitoring --> Event Logs.
b. In the Filter drop-down list, select Custom Filter.
Valid Until Date when the certificate becomes invalid.
Serial Number Serial number of the certificate.
Version Version number of the certificate.
72 Oracle ILOM 3.0 Web Procedures Guide • August 2012

c. In the Event Class drop-down list, select LdapSsl.
d. Click OK for your changes to take effect.
All LDAP/SSL events will appear in the event log.
Configuring RADIUS (Web)
Description Links Platform Feature Support
Manage RADIUSsettings in the OracleILOM web interface
• “Configure RADIUS Settings(Web)” on page 74
• x86 system server SP• SPARC system server SP• CMM
Managing User Accounts (Web) 73

▼ Configure RADIUS Settings (Web)Before You Begin
■ To modify the RADIUS settings in Oracle ILOM, you must have the UserManagement (u) role enabled.
To modify the RADIUS settings, follow these steps:
1. Log in to the Oracle ILOM SP or CMM web interface.
2. Click User Management --> RADIUS.
The RADIUS Settings page appears.
3. In the RADIUS Settings page, specify values for the following web properties:
74 Oracle ILOM 3.0 Web Procedures Guide • August 2012

4. Click Save for your changes to take effect.
Property(Web) Default Description
State Disabled Enabled | DisabledSpecifies whether the RADIUS client is enabled ordisabled.
Role Operator Administrator | Operator | Advanced RolesAccess role granted to all authenticated RADIUS users.This property supports the legacy roles of Administratoror Operator, or any of the individual role IDcombinations of a, u, c, r, o, and s. For example,aucros, where a=Admin, u=User Management, c=Console, r=Reset and Host Control, o=Read Only, and s=Service.
Address 0.0.0.0 IP address or DNS name of the RADIUS server. If theDNS name is used, DNS must be configured andfunctional.
Port 1812 Specifies the port number used to communicate with theRADIUS server. The default port is 1812.
SharedSecret
(none) Specifies the shared secret that is used to protect sensitivedata and to ensure that the client and server recognizeeach other.
Managing User Accounts (Web) 75

76 Oracle ILOM 3.0 Web Procedures Guide • August 2012

Managing Component Status andService Actions (Web)
Related Information
■ Oracle ILOM 3.0 Daily Management Concepts, fault management
■ Oracle ILOM 3.0 Daily Management CLI Procedures, manage component status andservice actions
▼ View Component Status Information(Web)To view component status information, follow these steps:
1. Log in to the Oracle ILOM SP or CMM web interface.
2. Click System Information --> Components.
The Component Management page appears.
Description Links
Web procedures for viewingand managing systemcomponent information andservice actions.
• “View Component Status Information (Web)” onpage 77
• “Prepare to Remove a Component (Web)” on page 79• “Return a Component to Service (Web)” on page 79• “Enable or Disable Components (Web)” on page 80• “Clear Faults Detected by Oracle ILOM (Web)” on
page 80
77

3. When a component is faulted, a radio button will appear to the left of thecomponent name. Click on the radio button to check the fault status. If a radiobutton does not appear next to a component’s name, click on the name of acomponent to verify the status.
A dialog box appears with information about the selected component. See thefollowing figure.
78 Oracle ILOM 3.0 Web Procedures Guide • August 2012

▼ Prepare to Remove a Component(Web)Before You Begin
■ To manage system component operations in Oracle ILOM, the Reset and HostControl (r) role must be enabled.
To prepare the removal of a system component, follow these steps:
1. Log in to the Oracle ILOM SP or CMM web interface.
2. Select System Information --> Components.
The Component Management page appears.
3. Select the radio button next to the component that you want to remove.
Components without radio buttons cannot be removed.
4. From the Actions drop-down list, select Prepare to Remove.
▼ Return a Component to Service (Web)Before You Begin
■ To manage system component operations in Oracle ILOM, the Reset and HostControl (r) role must be enabled.
Follow these steps to return a component to service:
1. Log in to the Oracle ILOM SP or CMM web interface.
2. Select System Information --> Components.
The Component Management page appears.
3. Select the radio button next to the component you want to return to service.
4. From the Actions drop-down list, select Return to Service.
Managing Component Status and Service Actions (Web) 79

▼ Enable or Disable Components (Web)Before You Begin
■ To manage system component operations in Oracle ILOM, the Reset and HostControl (r) role must be enabled.
To enable or disable components, follow these steps:
1. Log in to the Oracle ILOM SP or CMM web interface.
2. Select System Information --> Components.
The Component Management page appears.
3. Select the radio button next to the component you want to enable or disable.
4. From the Actions drop-down list, select either Enable or Disable.
The component is enabled or disabled, depending on your selection.
▼ Clear Faults Detected by Oracle ILOM(Web)Before You Begin
■ To clear faults in Oracle ILOM, you need the Admin (a) role enabled, and theserver SP or CMM must be running Oracle ILOM firmware version 3.0.3 or later.
To view or clear faults using the Oracle ILOM web interface, follow these steps:
1. Log in to the Oracle ILOM SP or CMM web interface.
2. To view the status of faulted components detected by Oracle ILOM, do thefollowing:
a. Click System Information --> Fault Management.
The Fault Management page appears, listing faulted components by ID, FRU,and time-stamp.
b. To view additional information about the faulted component, click thefaulted component ID.
Additional information about the faulted component appears in a dialog.
80 Oracle ILOM 3.0 Web Procedures Guide • August 2012

Note – Alternatively, you can view the fault status for a component in theComponent Management page. In the Component Management page, select thecomponent name to view the fault status information.
3. Fix or replace the faulted component in the system.
After fixing or replacing the faulted component, you should clear the fault statusin Oracle ILOM.
4. To clear the status of faulted components shown in Oracle ILOM, do thefollowing:
a. Click the System Information --> Components tab.
b. In the Component Management page, enable the radio button next to thefaulted component, and then click Clear Faults.
Managing Component Status and Service Actions (Web) 81

82 Oracle ILOM 3.0 Web Procedures Guide • August 2012

Monitoring System Sensors andManaging the Event Log (Web)
Related Information
■ Oracle ILOM 3.0 Daily Management Concepts, system monitoring and alertmanagement
■ Oracle ILOM 3.0 Daily Management CLI Procedures, monitor system sensors,indicators, and event logs
■ Oracle ILOM 3.0 Protocol Management Reference, inventory and componentmanagement
▼ View Sensor Readings (Web)To view sensor readings in Oracle ILOM, follow these steps:
1. Log in to the Oracle ILOM SP or CMM web interface.
Description Links
View sensor properties fromOracle ILOM
• “View Sensor Readings (Web)” on page 83
Manage system indicators, clock,and time-zone settings in OracleILOM
• “Configure System Indicators (Web)” on page 84• “Configure Clock Settings (Web)” on page 85• “Configure Time Zone Settings (Web)” on page 86
Filter, view, clear, and configureevent logs from Oracle ILOM
• “Filter Event Log Output (Web)” on page 86• “View and Clear Oracle ILOM Event Log (Web)” on
page 88• “Configure Remote Syslog Receiver IP Addresses
(Web)” on page 89
83

2. Click System Monitoring --> Sensor Readings.
The Sensor Readings page appears.
Note – If the server is powered off, many components will appear as “no reading.”
3. In the Sensor Readings page, do the following:
a. Locate the name of the sensor you want to configure.
b. Click the name of the sensor to view the property values associated with thatsensor.
For specific details about the type of discrete sensor targets you can access, as wellas the paths to access them, consult the user documentation provided with the Sunserver platform.
▼ Configure System Indicators (Web)Before You Begin
■ To configure the indicator state in Oracle ILOM, you need the User Management(u) role enabled.
To configure the system indicator states, follow these steps:
1. Log in to the Oracle ILOM SP or CMM web interface.
2. Click System Monitoring --> Indicators.
The Indicators page appears.
Note – If the server is powered off, many indicators will appear as “no reading.”
3. In the Indicators page, perform the following steps:
a. Locate the name of the indicator you want to configure.
b. To change the state of an indicator, click the radio button associated with theindicator that you want to change. Then in the Actions list box and selecteither Turn LED Off or Set LED to Fast Blink.
A dialog appears prompting you to confirm the change.
c. Click OK to confirm the change.
84 Oracle ILOM 3.0 Web Procedures Guide • August 2012

▼ Configure Clock Settings (Web)Before You Begin
■ To set clock settings in Oracle ILOM, you need the Admin (a) role enabled.
■ You need the IP address of your NTP server to complete this procedure.
To configure the clock settings, follow these steps:
1. Log in to the Oracle ILOM SP or CMM web interface.
2. Click Configuration --> Clock.
The Clock Settings page appears.
3. In the Clock Settings page, do one of the following:
■ View the existing settings.
■ Manually configure the date and time of the host server SP. See Step 4.
■ Synchronize the date and time of the host server SP with an NTP server. SeeStep 5.
4. To manually set the date and time of the host server SP, follow these steps:
a. In the Date text box, type the date in the format mm/dd/yy.
b. In the Time list boxes, set the hour and minutes.
c. Go to Step 6.
5. To configure an IP address of an NTP server and enable synchronization, followthese steps:
a. Click the Enabled check box next to Synchronize Time Using NTP.
b. In the Server 1 text box, type the IP address of the primary NTP server youwant to use.
c. (Optional) In the Server 2 text box, type the IP address of the secondary NTPserver you want to use.
6. Click Save for your changes to take effect.
Refer to your Oracle Sun server platform user documentation for platform-specificclock information about whether:
■ The current time in Oracle ILOM persists across reboots of the SP.
■ The current time in Oracle ILOM can be synchronized with the host at hostboot time.
Monitoring System Sensors and Managing the Event Log (Web) 85

■ There is a real-time clock element that stores the time.
▼ Configure Time Zone Settings (Web)Before You Begin
■ To set clock time-zone settings in Oracle ILOM, you need the Admin (a) roleenabled.
To configure a property value for the time-zone setting, follow these steps:
1. Log in to the Oracle ILOM SP or CMM web interface.
2. Click Configuration --> Timezone.
The Timezone Settings page appears.
3. In the Timezone drop-down list, specify the appropriate time-zone setting.
Consult your Oracle Sun server platform user documentation for platform-specificclock information about whether:
■ The current time in Oracle ILOM persists across reboots of the SP.
■ The current time in Oracle ILOM can be synchronized with the host at hostboot time.
■ There is a real-time clock element that stores the time.
▼ Filter Event Log Output (Web)To filter Oracle ILOM event log output, follow these steps:
1. Log in to the Oracle ILOM SP or CMM web interface.
2. Click System Monitoring --> Event Logs.
The Event Log page appears.
86 Oracle ILOM 3.0 Web Procedures Guide • August 2012

3. In the Filter list box on the Event Log page, click one of the following standardfilters:
■ All Events
■ Class: Fault
■ Type: Action
■ Severity: Down
■ Severity: Critical
4. Alternatively, you can specify the following parameters for a Custom Filter.
Event Class Event Type Severity
Developer Log Debug
Email Connection Down
Captive Shell Send Critical
Backup Command Entered Major
Restore State Minor
Reset Action
Chassis Fault
Audit Repair
IPMI Warning
Monitoring System Sensors and Managing the Event Log (Web) 87

▼ View and Clear Oracle ILOM EventLog (Web)Before You Begin
■ To clear the Oracle ILOM event log, you need the Admin (a) role enabled.
1. Log in to the Oracle ILOM SP or CMM web interface.
2. Click System Monitoring --> Event Logs.
The Event Log page appears.
3. In the Event Log page, perform any of the following:
■ Page through entries – Use the page navigation controls at the top and thebottom of the table to navigate forward and back through the available data inthe table.
Note that selecting a greater number of entries might cause the web interface torespond slower than selecting a fewer number of entries.
■ View the entries in the display by scrolling through the list – The followingtable provides descriptions about each column appearing in the log.
Fault
System
ActDir
Event Class Event Type Severity
88 Oracle ILOM 3.0 Web Procedures Guide • August 2012

■ Clear the event log – To clear the event log, click the Clear Event Log button. Aconfirmation dialog appears. In the confirmation dialog, click OK to clear theentries.
Note – The Oracle ILOM event log accumulates many types of events, includingcopies of IPMI entries. Clearing the Oracle ILOM event log clears all entries in thelog, including the IPMI entries. However, clearing the Oracle ILOM event log entrieswill not clear the actual entries posted directly to an IPMI log.
▼ Configure Remote Syslog Receiver IPAddresses (Web)Before You Begin
■ To set remote syslog receiver IP addresses, you need the Admin (a) role enabled.
Column Label Description
Event ID The number of the event, in sequence from number 1.
Class/Type • Audit/ Log – Commands that result in a configuration change.Description includes user, command, command parameters, andsuccess/fail.
• IPMI/Log – Any event that is placed in the IPMI SEL is also put in themanagement log.
• Chassis/State – For changes to the inventory and general system statechanges.
• Chassis/Action – Category for shutdown events for servermodule/chassis, hot insert/removal of a FRU, and Reset Parametersbutton pressed.
• Fault/Fault – For Fault Management faults. Description gives the timethe fault was detected and suspect component.
• Fault/Repair – For fault repairs. Description gives component.
Severity Debug, Down, Critical, Major, or Minor.
Date/Time The day and time the event occurred. If the Network Time Protocol (NTP)server is enabled to set the Oracle ILOM time, the Oracle ILOM clock willuse Universal Coordinated Time (UTC).
Description A description of the event.
Monitoring System Sensors and Managing the Event Log (Web) 89

To configure the remote syslog receiver IP addresses, follow these steps:
1. Log in to the Oracle ILOM SP or CMM web interface.
2. Click Configuration --> Syslog.
The Syslog page appears.
3. In the IP Address 1 and 2 fields, type the IP addresses for the two locations towhich you want to send syslog data.
4. Click Save for your settings to take effect.
90 Oracle ILOM 3.0 Web Procedures Guide • August 2012

Monitoring Storage Componentsand Zone Manager (Web)
Related Information
■ Oracle ILOM 3.0 Daily Management Concepts, storage monitoring
■ Oracle ILOM 3.0 Daily Management CLI Procedures, monitoring storage components
■ Oracle ILOM 3.0 CMM Administration, zone manager
Requirements for Monitoring StorageComponents■ Some Oracle servers might not support the storage monitoring functions that are
described in this chapter. To determine whether the storage monitoring feature isenabled on your platform server, see the platform Oracle ILOM supplement guideor the platform server administration guide.
Description Links
View and monitor storage detailsfor HDDs and RAID controllers
• “Requirements for Monitoring StorageComponents” on page 91
• “View and Monitor RAID Controller Details (Web)”on page 92
• “View and Monitor Details for Disks That AreAttached to RAID Controllers (Web)” on page 94
• “View and Monitor RAID Controller VolumeDetails (Web)” on page 95
Manage Zone Manager settings forSAS-2 storage devices that areinstalled in Sun Blade 6000 or 6048series modular systems
• “Enabling or Disabling Zone Manager for SAS-2Storage Devices” on page 96
91

■ For Oracle servers supporting the storage monitoring feature, you must downloadand install a hardware management pack prior to using the storage monitoringfeatures in Oracle ILOM. For information about how to download this hardwaremanagement pack, see Oracle Server Hardware Management Pack User’s Guide.
■ The server must be running Oracle ILOM firmware version 3.0.8 or a later version.
■ For conceptual information and examples on viewing and monitoring storagecomponents, see the Oracle ILOM 3.0 Daily Management Concepts Guide.
▼ View and Monitor RAID ControllerDetails (Web)Before You Begin
■ Review the “Requirements for Monitoring Storage Components” on page 91.
To view and monitor RAID controller details, follow these steps:
1. Log in to the Oracle ILOM SP web interface.
2. In the Oracle ILOM web interface, click Storage --> RAID --> Controllers.
The Controller Monitoring page appears listing the configuration details for theRAID controllers installed on your system.
92 Oracle ILOM 3.0 Web Procedures Guide • August 2012

3. To access additional details about an installed RAID controller, do thefollowing:
■ To access FRU properties and values, click the RAID controller name.
A dialog appears listing the RAID controller FRU properties and values.
■ To access topology information about a RAID controller, select the radio buttonnext to the RAID controller name, then click Show Topology. The topologydetails for that RAID controller appear.
Monitoring Storage Components and Zone Manager (Web) 93

▼ View and Monitor Details for DisksThat Are Attached to RAID Controllers(Web)Before You Begin
■ Review the “Requirements for Monitoring Storage Components” on page 91.
To view and monitor details about storage disks attached to RAID controllers, followthese steps:
1. Log in to the Oracle ILOM SP web interface.
2. In the Oracle ILOM web interface, click Storage --> RAID --> Disks.
The Disks Monitoring page appears listing the configuration details for the disksattached to RAID controllers.
94 Oracle ILOM 3.0 Web Procedures Guide • August 2012

3. To view the FRU properties and values associated with a disk, click the diskname.
A dialog appears listing the disk FRU properties and values.
▼ View and Monitor RAID ControllerVolume Details (Web)Before You Begin
■ Review the “Requirements for Monitoring Storage Components” on page 91.
To view and monitor RAID controller volume details, follow these steps:
1. Log in to the Oracle ILOM SP web interface.
2. In the Oracle ILOM web interface, click Storage --> RAID --> Volumes.
The Volume Monitoring page appears listing the configuration details for theRAID volumes configured on the RAID controllers.
Monitoring Storage Components and Zone Manager (Web) 95

3. To view the FRU properties and values associated with a volume, click thevolume name.
A dialog appears listing the volume properties and values.
Enabling or Disabling Zone Manager forSAS-2 Storage DevicesIf you are using Oracle Sun Blade 6000 or Sun Blade 6048 Modular Systems, a newzone management feature was added as of Oracle ILOM 3.0.10. The zonemanagement feature is available for SAS-2 storage devices that are installed in OracleSun Blade 6000 or Sun Blade 6048 Modular Systems. For more information abouthow to manage SAS-2 chassis storage devices from Oracle ILOM, refer to the OracleILOM 3.0 CMM Administration Guide for Sun Blade 6000 and Sun Blade 6048 ModularSystems.
96 Oracle ILOM 3.0 Web Procedures Guide • August 2012

Managing System Alerts and EmailNotifications (Web)
Related Information
■ Oracle ILOM 3.0 Daily Management Concepts, system monitoring and alertmanagement
■ Oracle ILOM 3.0 Daily Management CLI Procedures, manage system alerts
■ Oracle ILOM 3.0 Protocol Management Reference, inventory and componentmanagement
Description Links
Identify requirements formanaging system alerts
• “Managing Alert Rule Configurations (Web)” on page 98
Notify recipient of a systemalerts using email
• “Configuring SMTP Client for Email Notification Alerts(Web)” on page 101
97

Managing Alert Rule Configurations(Web)
Requirements for Configuring Alert Rules■ If you are defining an Email Notification alert, the outgoing email server used to
send the email notification must be configured in Oracle ILOM. If an outgoingemail server is not configured, Oracle ILOM will not be able to successfullygenerate Email notifications.
■ If you are defining an SNMP v3 trap alert, the SNMP user name must be definedin Oracle ILOM as an SNMP user. If the user is not defined as an SNMP user, thereceiver of the SNMPv3 alert will not be able to decode the SNMP alert message.
■ To manage alert rule configurations, you need the Admin (a) role enabled.
■ To issue a test email alert from Oracle ILOM, the platform server or CMM must berunning Oracle ILOM firmware version 3.0.4 or a later firmware version.
▼ Create or Edit Alert Rules (Web)Before You Begin
■ Review the “Requirements for Configuring Alert Rules” on page 98.
T o configure alert rules in the Oracle ILOM web interface, follow these steps:
1. Log in to the Oracle ILOM SP or CMM web interface.
Description Links Platform Feature Support
Identify requirements formanaging alerts
• “Requirements forConfiguring Alert Rules” onpage 98
• x86 system server SP• SPARC system server SP• CMM
Manage alert ruleconfigurations
• “Create or Edit Alert Rules(Web)” on page 98
• “Disable an Alert Rule (Web)”on page 100
• “Send Test Alert for SpecificAlert Rules (Web)” onpage 100
98 Oracle ILOM 3.0 Web Procedures Guide • August 2012

2. Click Configuration --> Alert Management.
The Alert Settings page appears.
3. In the Alert Settings page, do the following:
a. Enable the radio button for the alert rule you want to create or edit.
b. In the Actions list box, select Edit.
A dialog appears displaying the property values associated with the alert rule.
c. In the properties dialog box, specify values for an alert type, alert level, andalert destination.
If the alert type you specify is for IPMI Pet, you need to define an IPMI Petdestination address.
If the alert type you specify is for SNMP trap, you need to define an SNPMPdestination address and port, as well as the SNMP version and communityname.
If the alert type you specify is for Email, you need to define a destination emailaddress, and, if applicable, optional settings for filters and custom send options.
Note – You can specify one destination address for each alert rule type.
For more information about the property values you can specify for an alertrule, refer to section about alert management in the Oracle ILOM 3.0 DailyManagement Concepts Guide.
d. Click Save to apply the values specified and to close the properties dialog.
Managing System Alerts and Email Notifications (Web) 99

▼ Disable an Alert Rule (Web)Before You Begin
■ Review the “Requirements for Configuring Alert Rules” on page 98.
To disable an alert rule in the Oracle ILOM web interface, follow these steps:
1. Log in to the Oracle ILOM SP or CMM web interface.
2. Click Configuration --> Alert Management.
The Alert Settings page appears.
3. In the Alert Settings page, enable the radio button for the alert rule you want todisable, and then in the Actions list box, click Edit.
A dialog appears presenting properties you can define about the alert rule.
4. In the properties dialog box, click Disabled in the Alert Levels list box.
5. Click Save to apply your changes and to close the properties dialog.
▼ Send Test Alert for Specific Alert Rules (Web)Before You Begin
■ Review the “Requirements for Configuring Alert Rules” on page 98.
To send a test email alert for one or more alert rules, follow these steps:
1. Log in to the Oracle ILOM SP or CMM web interface.
2. Click Configuration --> Alert Management.
3. In the Alert Settings page, perform the following steps to send a test email alert:
a. Enable the radio button next to each alert rule that you want to test.
b. Click the Test Rule button to send a text email alert to the alert ruledestination.
Note – For each alert rule, one of the following alert types can be configured: IPMIPET destination address, Email destination address, and SNMP trap destinationaddress. To configure the alert type, refer to “Create or Edit Alert Rules (Web)” onpage 98.
100 Oracle ILOM 3.0 Web Procedures Guide • August 2012

Configuring SMTP Client for EmailNotification Alerts (Web)
▼ Enable SMTP Client for Email Alerts (Web)Before You Begin
■ To enable SMTP clients, you need the Admin (a) role enabled.
■ To generate configured email notification alerts, you must enable the Oracle ILOMclient to act as an SMTP client to send the email alert messages.
■ Prior to enabling the Oracle ILOM client as an SMTP client, determine the IPaddress and port number of the outgoing SMTP email server that will process theemail notification.
1. Log in to the Oracle ILOM SP or CMM web interface.
2. Click Configuration --> SMTP Client.
The SMTP Client page appears.
3. In the SMTP Client page, specify the following settings to enable the sendingof Email Notification alerts.
4. Click Save to apply the SMTP settings.
Description Links Platform Feature Support
Notify recipient ofsystem alerts usingemail
• “Enable SMTP Client forEmail Alerts (Web)” onpage 101
• x86 system server SP• SPARC system server SP• CMM
SMTP Setting Description
SMTP State Enable the SMTP State check box.
SMTP Server IP Type the IP address of the outgoing SMTP email server that will processthe email notifications.
SMTP Port Type the port number of the outgoing SMTP email server.
Managing System Alerts and Email Notifications (Web) 101

102 Oracle ILOM 3.0 Web Procedures Guide • August 2012

Power Monitoring and Managementof Hardware Interfaces (Web)
Related Information
■ Oracle ILOM 3.0 Daily Management Concepts, power consumption
■ Oracle ILOM 3.0 Daily Management CLI Procedures, monitor and manage powerconsumption
■ Oracle ILOM 3.0 Protocol Management Reference, monitor and manage powerconsumption
Description Links
Identify power monitoring andmanagement feature updates perOracle ILOM firmware pointrelease
• “Summary of Power Management Feature Updates(Web)” on page 104
Perform power monitoring andmanagement of hardwareinterfaces from Oracle ILOM
• “Monitoring System Power Consumption (Web)” onpage 106
• “Configuring Power Policy Settings to ManageServer Power Usage (Web)” on page 110
• “Configuring Power Consumption ThresholdNotifications (Web)” on page 114
• “Monitoring and Configuring Component PowerAllocation Distributions (Web)” on page 115
• “Configuring Server Power Limit Properties (Web)”on page 126
• “Monitoring or Configuring CMM Power SupplyRedundancy (Web)” on page 129
103

Summary of Power Management FeatureUpdates (Web)The following table identifies power management feature enhancements anddocumentation updates made since Oracle ILOM 3.0.
TABLE: Power Management Feature Updates
New or EnhancedFeature
FirmwarePoint Release Documentation Updates
For Updated WebProcedures, See:
Monitor powerconsumptionmetrics
Oracle ILOM3.0
• New terms and definitions for powermanagement metrics
• New System Monitoring --> Power ManagementConsumption Metric properties
• New CLI and web procedures added formonitoring device power consumption
• “Monitoring SystemPower Consumption(Web)” on page 106
Configure powerpolicy properties
Oracle ILOM3.0
• New power policy properties explained.• New CLI and web procedures added for
configuring power policy settings
• “Configuring PowerPolicy Settings toManage ServerPower Usage (Web)”on page 110
Monitor powerconsumptionhistory
Oracle ILOM3.0.3
• New power consumption history metrics• New CLI and web procedures added for
monitoring power consumption
• “Monitor PowerHistory Statistics(Web)” on page 108
Configure powerconsumptionnotificationthresholds
Oracle ILOM3.0.4
• New power consumption notification thresholdsettings
• New CLI and web procedures added forconfiguring the power consumption thresholds
• “Configuring PowerConsumptionThresholdNotifications (Web)”on page 114
Monitorallocation powerdistributionmetrics
Oracle ILOM3.0.6
• New component allocation distribution metrics• New CLI and web procedures added for
monitoring power allocations• New CLI and web procedures added for
configuring permitted power for blade slots
• “Monitoring andConfiguringComponent PowerAllocationDistributions (Web)”on page 115
Configure powerbudget properties
Oracle ILOM3.0.6
• New power budget properties• New CLI and web procedures added for
configuring power budget properties
• “Configuring ServerPower LimitProperties (Web)” onpage 126
104 Oracle ILOM 3.0 Web Procedures Guide • August 2012

Configure powersupplyredundancyproperties forCMM systems
Oracle ILOM3.0.6
• New power supply redundancy properties forCMM systems
• New CLI and web procedures added forconfiguring power supply redundancy propertieson CMM systems
• “Monitoring orConfiguring CMMPower SupplyRedundancy (Web)”on page 129
Server powerAllocation tabreplacesDistribution tab
Oracle ILOM3.0.8
• Oracle ILOM web Allocation tab replacesDistribution tab for server SPs
• New web procedure added for viewing serverpower allocation properties
• “Monitoring andConfiguringComponent PowerAllocationDistributions (Web)”on page 115
Server Limit tabReplaces Budgettab
Oracle ILOM3.0.8
• Oracle ILOM web Limit tab replaces Budget tabfor server SPs
• New web procedure added for configuringpower limit properties
• “Configuring ServerPower LimitProperties (Web)” onpage 126
Web interfacelayout update forCMM powermanagement
Oracle ILOM3.0.10
• New top-level tab added to Oracle ILOM webinterface for power management
• Revised Oracle ILOM web Power Consumptiontab properties for CMMs
• Oracle ILOM web Allocation tab replacesDistribution tab for CMMs
• Power Management Metrics tab removed fromCMM Oracle ILOM web interface
• Updated web procedure for configuring a grantlimit for blade slots (previously known asallocatable power)
• “Monitor SystemPower Consumption(Web)” on page 107
• “View CMMComponent PowerAllocations” onpage 120
• “Configure GrantLimit for Blade Slotsin CMM as of OracleILOM 3.0.10” onpage 124
• “View CMMComponent PowerAllocations” onpage 120
PowerManagementStatistic tab
Oracle ILOM3.0.14
• The Power Statistics table on the History tab wasmoved to a Power Management --> Statistics tab
• “Monitor PowerHistory Statistics(Web)” on page 108
TABLE: Power Management Feature Updates (Continued)
New or EnhancedFeature
FirmwarePoint Release Documentation Updates
For Updated WebProcedures, See:
Power Monitoring and Management of Hardware Interfaces (Web) 105

Monitoring System Power Consumption(Web)
Requirements for Monitoring Power Consumption(Web)Prior to performing the procedures described in this section, you should ensure thatthe following requirements are met:
■ Review the power monitoring terminology defined in the Oracle ILOM 3.0 DailyManagement Concepts Guide.
■ Review the web interface enhancements described in the section about systempower consumption metrics in the Oracle ILOM 3.0 Daily Management ConceptsGuide.
Note – The power consumption features described in this section might not beimplemented on the platform server or CMM that you are using. To determinewhether the power consumption features described in this section are supported onyour server or CMM, see the Oracle ILOM supplement or administration guideprovided for your server or CMM.
Description Links Platform Feature Support
Review theprerequisites formonitoring systempower consumption.
• “Requirements forMonitoring PowerConsumption (Web)” onpage 106
• x86 server SP• SPARC server• CMM
Monitor power consumptionproperties from Oracle ILOM.
• “Monitor System PowerConsumption (Web)” onpage 107
• “Monitor Individual PowerSupply Consumption(Web)” on page 108
Monitor power consumptionhistory from Oracle ILOM
• “Monitor Power HistoryStatistics (Web)” onpage 108
106 Oracle ILOM 3.0 Web Procedures Guide • August 2012

■ To access the power consumption metrics provided in Oracle ILOM the servermust be running Oracle ILOM firmware version 3.0 or later. To access the powerconsumption history metrics provided in Oracle ILOM, the server must berunning Oracle ILOM firmware version 3.0.3 or later. To access the enhancedpower consumption properties and the threshold notification properties providedin Oracle ILOM, the server must be running Oracle ILOM firmware version 3.0.4or later.
Note – Power consumption history is provided using the Oracle ILOM CLI and webinterfaces. This information is not available through IPMI or SNMP.
▼ Monitor System Power Consumption (Web)Before You Begin
■ Review the “Requirements for Monitoring Power Consumption (Web)” onpage 106.
To monitor the total system power consumption, follow these steps:
1. Log in to the Oracle ILOM SP or CMM web interface.
2. In the Oracle ILOM web interface, do one of the following:
■ If the server or CMM is running Oracle ILOM firmware version 3.0.3 or later,click Power Management -->Consumption.
■ If the server or CMM is running an earlier firmware version that is prior toOracle ILOM 3.0.3, click System Monitoring --> Power Management.
The Power Consumption page appears.
Note – The ability to monitor power varies depending on the platform serverimplementation for this feature. Refer to the Oracle ILOM supplement or platformadministration guide for platform-specific details or procedures about this feature.
3. In the Power Consumption page, you can view power metrics provided foractual power, target limit, and peak permitted.
Note – The properties on the Power Consumption page were updated for server SPsas of Oracle ILOM firmware version 3.0.8, and for CMMs as of Oracle ILOMfirmware version 3.0.10. For more information about these properties, refer to thesection about web enhancements for power metrics in the Oracle ILOM 3.0 DailyManagement Concepts Guide.
Power Monitoring and Management of Hardware Interfaces (Web) 107

▼ Monitor Individual Power Supply Consumption(Web)● See the instructions for viewing sensors in“View Sensor Readings (Web)” on
page 83.
▼ Monitor Power History Statistics (Web)Before You Begin
■ Review the “Requirements for Monitoring Power Consumption (Web)” onpage 106.
To monitor the power history statistics, follow these steps:
1. Log in to Oracle ILOM SP or CMM web interface.
2. In the Oracle ILOM web interface, do one of the following:
■ If the server or CMM is running Oracle ILOM firmware prior to Oracle ILOM3.0.3, click System Monitoring --> Power Management, and then click thePower History link.
108 Oracle ILOM 3.0 Web Procedures Guide • August 2012

■ If the server or CMM is running Oracle ILOM firmware version 3.0.3 or later,click Power Management --> History.
■ If the server or CMM is running Oracle ILOM firmware version 3.0.14 or later,click Power Management --> Statistics to view the power statistics, or clickPower Management --> History to view the power history.
Refer to the section about power monitoring terminology in the Oracle ILOM 3.0Daily Management Concepts Guide for definitions describing the power monitoringhistory terms.
Note – The Statistic table available on the History tab as of Oracle ILOM firmwareversion 3.0.3 was moved to the Statistic tab in Oracle ILOM firmware version 3.0.14.
CMM Power History Example
3. To view a sample data set of power consumed by a device for a specificduration, click the link appearing under the Sample Set column in the PowerHistory table.
Power Monitoring and Management of Hardware Interfaces (Web) 109

Configuring Power Policy Settings toManage Server Power Usage (Web)
Requirements for Configuring the Power Policy(Web)Prior to performing the procedures described in this section, you should ensure thatthe following requirements are met:
■ Review the power monitoring terminology defined in the Oracle ILOM 3.0 DailyManagement Concepts Guide.
■ Review the web interface enhancements described in the section about powerpolicy settings in the Oracle ILOM 3.0 Daily Management Concepts Guide.
Note – The power policy features described in this section might not beimplemented on the platform server that you are using. To determine whether thepower policy features described in this section are supported on your server, refer tothe Oracle ILOM supplement or administration guide provided for your server.
■ To configure the power consumption policy properties in Oracle ILOM for x86servers, you must have Admin (a) role privileges enabled, and the server must berunning Oracle ILOM firmware version 3.0.3 or earlier.
Description Links Platform Feature Support
Review theprerequisites forconfiguring the powerpolicy and usageproperties
• “Requirements forConfiguring the PowerPolicy (Web)” onpage 110
• x86 server SP• SPARC servers
Configure policy tocontrol powerconsumption
• “Configure PowerConsumption Policy(Web)” on page 111
• x86 server SP (prior to OracleILOM 3.0.4)
• SPARC servers
Configure policy tocontrol power capping
• “Configure ServerPower Policy For PowerCapping (Web)” onpage 112
• x86 server SP• SPARC servers
110 Oracle ILOM 3.0 Web Procedures Guide • August 2012

■ To configure the power consumption policy properties in Oracle ILOM for SPARCservers, you must have Admin (a) role privileges enabled, and the server must berunning Oracle ILOM firmware version 3.0 or later.
■ To configure the policy for powering capping on the Limit tab of the webinterface, you must have Admin (a) role privileges enabled, and the server mustbe running Oracle ILOM firmware version 3.0.8 or later.
▼ Configure Power Consumption Policy (Web)Before You Begin
■ Review the “Requirements for Configuring the Power Policy (Web)” on page 110.
To configure the power consumption policy for an Oracle Sun server, follow thesesteps:
1. Log in to the Oracle ILOM SP web interface.
2. In the Oracle ILOM web interface, do one of the following:
■ If the server is running firmware earlier than Oracle ILOM 3.0.3, click SystemMonitoring --> Power Management to view the Power Policy settings.
Note – The Power Policy settings on the Power Management Consumption pagewere removed from the Oracle ILOM web interface for x86 servers as of Oracle ILOM3.0.4.
■ If the server is running Oracle ILOM firmware version 3.0.4 or later on a SPARCserver, click Power Management --> Settings to view the Power Policy settings.
3. In the Power Policy list box, click either Performance or Elastic.
■ Performance – The system is allowed to use all of the power that is available.
■ Elastic – The system power usage is adapted to the current utilization level. Forexample, the system will power up or down just enough system components tokeep relative utilization at 70 percent at all times, even if workload fluctuates.
Power Monitoring and Management of Hardware Interfaces (Web) 111

Note – The Power Policy settings were removed in Oracle ILOM 3.0.4 from the weband CLI interface for x86 servers.
4. To apply the new setting, click Save.
▼ Configure Server Power Policy For PowerCapping (Web)Before You Begin
■ Review the “Requirements for Configuring the Power Policy (Web)” on page 110.
To configure the server power limit for power capping, follow these steps:
1. Log in to the Oracle ILOM SP web interface.
2. In the Oracle ILOM web interface, click Power Management --> Limit.
112 Oracle ILOM 3.0 Web Procedures Guide • August 2012

3. In the Power Limit page, configure the policy settings for power capping asdescribed in the following table.
Note – For best power capping performance, the default values are recommendedfor all advanced server power limit properties.
4. To apply the power limit property changes, click Save.
Property Description
Policy The Policy property enables you to configure the powercapping policy. In the Policy property, specify which ofthe following types of power capping you want to apply:• Soft - Only cap if actual power exceeds target limit. If
you enabled the soft cap option, you can configure thegrace period for capping actual power to within thetarget limit.- System default. This option, when selected, appliesthe default optimum grace period property values thatis specified by the platform server.or- Custom. This option, when selected, applies the graceperiod property value specified by the user.
• Hard - Fixed cap keeps peak permitted power undertarget limit. If you enable this hard cap option, powercapping is permanently set on the server without agrace period.
Violation Actions The Violation Actions property enables you to specify thesettings you want Oracle ILOM to take if the power targetlimit is not achieved within the specified power policygrace period.You can choose to specify one of the following actions:• None. If you enable this option and the power target
limit is not achieved, Oracle ILOM will display a statuserror message to notify you that Oracle ILOM is unableto achieve the power capping limit specified.
or• Hard Power Off. If you enable this option and the
power target limit is not achieved, Oracle ILOM takesthe following actions:* Displays a status error message.* Initiates a hard-power-off of the server.
Note - The default option for Violation Actions is None.
Power Monitoring and Management of Hardware Interfaces (Web) 113

Configuring Power ConsumptionThreshold Notifications (Web)
▼ View and Configure Notification ThresholdsUsing the Web InterfaceBefore You Begin
■ Review the power monitoring terminology defined in the Oracle ILOM 3.0 DailyManagement Concepts Guide.
■ The platform server or CMM must be running Oracle ILOM firmware version3.0.4 or later.
■ You must have the Admin (a) role enabled in Oracle ILOM to modify the powerconsumption configuration variables.
1. Log in to the Oracle ILOM SP or CMM web interface.
2. In the web interface page, click Power Management --> Consumption.
The Power Consumption page appears.
3. In the Power Consumption page, perform the following steps:
a. Click (check) the Enabled check box for Notification Threshold (1) or (2).
b. Based on your system requirements, type a notification threshold wattagevalue in the Watts text box.
c. To apply these changes, click Save.
Description Links Platform Feature Support
View or configurepower consumptionnotification thresholdsfrom Oracle ILOM
• “View and ConfigureNotification ThresholdsUsing the WebInterface” on page 114
• x86 servers• SPARC servers• CMM
114 Oracle ILOM 3.0 Web Procedures Guide • August 2012

Monitoring and Configuring ComponentPower Allocation Distributions (Web)
Requirements for Power Allocation Distributions(Web)■ Review the power monitoring terminology defined in the Oracle ILOM 3.0 Daily
Management Concepts Guide.
■ Review the conceptual information about Component Allocation PowerDistribution in the Oracle ILOM 3.0 Daily Management Concepts Guide.
■ The platform server or the CMM must be running Oracle ILOM firmware version3.0.6 or later. Where noted, some procedures described in this section require theserver SP or CMM to be running Oracle ILOM firmware version 3.0.10 or later.
■ You must have the admin (a) role enabled in Oracle ILOM to modify powerconsumption or allocation configuration property values.
Description Links Platform Feature Support
Review theprerequisites forconfiguring thecomponent powerallocations
• “Requirements for PowerAllocation Distributions (Web)”on page 115
• x86 servers• SPARC servers• CMM
View componentallocation metricsfor server or CMM
• “View Server Component PowerAllocations (Web)” on page 116
• “View CMM Component PowerAllocations” on page 120
• x86 servers• SPARC servers• CMM
Configurepermitted powerfor blade slots inchassis
• “Configure Permitted Power forBlade Slots in CMM as of OracleILOM 3.0.6” on page 123
• “Configure Grant Limit for BladeSlots in CMM as of Oracle ILOM3.0.10” on page 124
• CMM
Power Monitoring and Management of Hardware Interfaces (Web) 115

Note – As of Oracle ILOM firmware version 3.0.8, the server SP Power Management--> Distribution tab was renamed to Allocation. As of Oracle ILOM firmware version3.0.10, the CMM Power Management --> Distribution tab was renamed to Allocation.
▼ View Server Component Power Allocations(Web)Before You Begin
■ Review the “Requirements for Power Allocation Distributions (Web)” on page 115.
To review the server component power allocations, follow these steps:
1. Log in to the Oracle ILOM SP web interface.
2. In the web interface, do one of the following:
■ If the server is running ILOM firmware version 3.0.6, click Power Management--> Distribution.
■ If the server is running Oracle ILOM firmware version 3.0.8 or later, click PowerManagement --> Allocation.
The Power Distribution or Power Allocation Plan page appears.
116 Oracle ILOM 3.0 Web Procedures Guide • August 2012

3. In the allocation power tables, view the following system power requirementsfor power capacity planning:
■ System Power Map – This table reflects the total power allocated value inwattage for the following system power properties: Allocated Power, InstalledHardware Minimum, Peak Permitted Power, and Target Limit.
■ Per Component Power Map – This table reflects the allocated power wattagevalue for each server component category (for example, memory) and eachserver component (for example ME_PO_D0). It also identifies whether theallocated power value can be capped.
▼ Configure Server Power Limit Properties as ofOracle ILOM 3.0.8 (Web)Before You Begin
■ Review the “Requirements for Power Allocation Distributions (Web)” on page 115.
Power Monitoring and Management of Hardware Interfaces (Web) 117

To set power limit properties for servers running Oracle ILOM firmware version 3.0.8or later, follow these steps:
1. Log in to the Oracle ILOM SP web interface.
2. In the Oracle ILOM web interface, click Power Management --> Limit tabs.
Note – The Power Management --> Distribution tab was renamed to Limit as ofOracle ILOM 3.0.8.
The Power Limit page appears.
3. In the Power Limit page, view or modify any of the following power limitproperties.
Power Limit Property Description
Power Limiting Enable this property to enable the power limit configuration.
118 Oracle ILOM 3.0 Web Procedures Guide • August 2012

Note – For best power capping performance, the default values are recommendedfor all advanced server power limit properties.
4. To apply the power limit property changes, click Save.
Target Limit Set a target limit in watts or as a percentage. This value should reflecta range between the installed hardware minimum power and theallocated power.Note - You can view the installed hardware minimum power valueand the allocated power value on the power management -->allocation tab.
Policy The Policy property enables you to configure the power cappingpolicy. In the policy property, specify which of the following types ofpower capping you want to apply:• Soft - Only cap if actual power exceeds target limit. If you enabled
the soft cap option, you can configure the grace period for cappingactual power to within the target limit.- System Default. This option, when selected, applies the defaultoptimum grace period property values that is specified by theplatform server.or- Custom. This option, when selected, applies the grace periodproperty value specified by the user.
• Hard - Fixed cap keeps peak permitted power under target limit. Ifyou enable the hard cap option, power capping is permanentlyapplied without a grace period.
Violation Actions The Violation Actions property enables you to specify the settings youwant Oracle ILOM to take if the power target limit cannot be achievedwithin the set grace period.You can choose to specify one of the following actions:• None. If you enable this option and the power target limit is not
achieved, Oracle ILOM will display a status error message to notifyyou that Oracle ILOM is unable to achieve the power capping limitspecified.
or• Hard Power Off. If this option is chosen and the power target limit
is not achieved, Oracle ILOM takes the following actions:* Display a status error message.* Initiates a hard-power-off of the server.
Note - The default option for Violation Actions is None.
Power Limit Property Description
Power Monitoring and Management of Hardware Interfaces (Web) 119

▼ View CMM Component Power AllocationsBefore You Begin
■ Review the “Requirements for Power Allocation Distributions (Web)” on page 115.
To view the CMM component power allocations in the Oracle ILOM web interface,follow these steps:
1. Log in to the Oracle ILOM CMM web interface.
2. In the left pane of the CMM web interface page, select CMM then do one of thefollowing:
■ If the CMM is running Oracle ILOM firmware version 3.0.6 or later, select thePower Management --> Distribution tabs.
■ If the CMM is running Oracle ILOM firmware version 3.0.10 or later, selectPower Management --> Allocation tabs.
Note – The CMM Power Management --> Distribution tab was renamed toAllocation in Oracle ILOM firmware version 3.0.10.
The CMM Power Allocation Plan page appears.
120 Oracle ILOM 3.0 Web Procedures Guide • August 2012

3. In the CMM Power Allocation page, view the power allocation values.
■ For Oracle ILOM firmware version 3.0.6 or later, the CMM power allocationvalues appear as follows:
Power Monitoring and Management of Hardware Interfaces (Web) 121

■ For Oracle ILOM firmware version 3.0.10 or later, the CMM power allocationvalues appear as follows:
Updated PropertyName Details
AllocatedPower
Total power allocated value in wattage for all power-consuming CMMcomponents in the system chassis.
AllocatablePower
Total remaining power (watts) available from CMM to allocate to bladeslots.
Blade SlotPowerDistribution
View power allocation values for:• Allocated Power – Total power (watts) allocated to the server module
(blade) in this slot. The CMM always allocates enough power tohandle an unengaged I/O server module, whether or not an I/Oserver module is present.
• Permitted Power – Maximum power allocation permitted for a servermodule in this blade slot.
Note - To modify the permitted power allocated to a server module slot,refer to the “Configure Permitted Power for Blade Slots in CMM as ofOracle ILOM 3.0.6” on page 123.
ComponentPowerDistribution
View allocated power for each non-blade component in the system.
Updated PropertyName Details
GrantablePower(renamedproperty)
Allocatable Power in Oracle ILOM 3.0.6 was renamed to GrantablePower in Oracle ILOM firmware version 3.0.10.Grantable Power indicates the total remaining power (watts) availablefrom the CMM to allocate to blade slots without exceeding grant limit.
Grant Limit(renamedproperty)
Permitted Power in Oracle ILOM 3.0.6 was renamed to Grant Limit inOracle ILOM firmware version 3.0.10.Grant Limit represents the maximum power the system will grant to ablade slot. For instructions for setting the grant limit on a blade, see“Configure Permitted Power for Blade Slots in CMM as of Oracle ILOM3.0.6” on page 123.
Granted Power(renamedproperty)
Allocated Power in Oracle ILOM 3.0.6 was renamed to Granted Power inOracle ILOM firmware version 3.0.10.Granted Power represents the sum of the maximum power consumed byeither a single server component (such as a memory module), a categoryof server components (all memory modules), or all serverpower-consuming components.
122 Oracle ILOM 3.0 Web Procedures Guide • August 2012

▼ Configure Permitted Power for Blade Slots inCMM as of Oracle ILOM 3.0.6Before You Begin
■ Review the “Requirements for Power Allocation Distributions (Web)” on page 115.
To configure the permitted blade slot power in the Oracle ILOM web interface,follow these steps:
1. Log in to the Oracle ILOM CMM web interface.
2. In the left pane of the web interface page, click CMM, and then click PowerManagement --> Distribution.
3. Scroll down to the Blade Slot Power Distribution table.
4. In the Blade Slot Power Distribution table, do the following.
a. Enable the radio buttons next to the blade slots that you want to modify.
b. Click Edit.
A dialog appears listing information about the Allocated and Permitted Powervalue.
Power Monitoring and Management of Hardware Interfaces (Web) 123

c. In the dialog, modify the Permitted Power value, and then click Save.
Note – To prevent server module from powering-on, you can set the PermittedPower value to 0.
▼ Configure Grant Limit for Blade Slots in CMM asof Oracle ILOM 3.0.10Before You Begin
■ Review the “Requirements for Power Allocation Distributions (Web)” on page 115.
To configure the blade slot grant limit in the Oracle ILOM CMM web interface,follow these steps:
1. Log in to the Oracle ILOM CMM web interface.
2. In the left pane of the web interface page, select CMM, and then in the rightpane of the web interface page, click Power Management --> Allocation.
The CMM Power Allocation page appears.
3. Scroll down to the Blade Slot Grants table.
124 Oracle ILOM 3.0 Web Procedures Guide • August 2012

4. In the Blade Slot Grants table, do the following.
a. Enable the radio buttons next to the blade slot that you want to modify.
b. Click Edit.
A dialog appears listing power configuration information for the blade.
c. In the Grant Limit list box, choose to use the default slot maximum grantlimit (1200 watts), or click Custom and type a power grant value and clickSave.
Note – To prevent the blade from powering-on, you can set the Grant Limit value to0.
Power Monitoring and Management of Hardware Interfaces (Web) 125

Configuring Server Power LimitProperties (Web)
▼ Configure Server Power Limit Properties (Web)Before You Begin
■ Review the power monitoring terminology defined in the Oracle ILOM 3.0 DailyManagement Concepts Guide.
■ Review the conceptual information about server power limit (or server powerbudget) in the Oracle ILOM 3.0 Daily Management Concepts Guide.
■ The platform server must be running Oracle ILOM firmware version 3.0.6 or laterto configure the server power limit properties.
■ You must have the admin (a) role enabled in Oracle ILOM to modify powermanagement configuration property values.
Note – As of Oracle ILOM firmware version 3.0.8, the server SP Power Management--> Budget tab was renamed to Limit.
1. Log in to the Oracle ILOM SP web interface.
2. In the Oracle ILOM web interface, do one of the following:
■ If the platform server is running Oracle ILOM firmware version 3.0.6, clickPower Management --> Budget.
■ If the platform server is running Oracle ILOM firmware version 3.0.8 or later,click Power Management --> Limit.
3. In the Power Limit page, view or modify the power limit properties describedin the following table.
Description Links Feature Platform Support
Manage server power limitproperties from OracleILOM
• “Configure Server PowerLimit Properties (Web)” onpage 126
• x86 Server SP• SPARC Server
126 Oracle ILOM 3.0 Web Procedures Guide • August 2012

Power Limit Property Description
Power Limiting Enable this property to enable the power limitconfiguration.Note - Power limiting was previously named ActivationState on the Budget tab in Oracle ILOM 3.0.6.
Target Limit Set a target limit in watts or as a percentage. This valueshould reflect a range between the Installed HardwareMinimum Power and the Allocated Power.Note - In Oracle ILOM firmware version 3.0.6, the Budgettab option for Target Limit was previously named PowerLimit.Note - You can view the installed hardware minimumpower value and the allocated power value on the PowerManagement --> Allocation tab.
Power Monitoring and Management of Hardware Interfaces (Web) 127

Note – For best power capping performance, the default values are recommendedfor all advanced server power limit properties.
Status Error Message The status error message read-only property only appearson the Limit page when Oracle ILOM fails to achieve thepower limit that was configured.Note - The status error message read-only property waspreviously named Status on the Budget tab in OracleILOM firmware version 3.0.6.
Policy The Policy property enables you to configure the powercapping policy. In the Policy property, specify which ofthe following types of power capping you want to apply:• Soft - Only cap if actual power exceeds Target Limit.
If you enabled the soft cap option, you can configurethe grace period for capping actual power to within thetarget limit.- System Default. This option, when selected, appliesthe default optimum grace period property values thatis specified by the platform server.or- Custom. his option, when selected, applies the graceperiod property value specified by the user.
• Hard - Fixed cap keeps Peak Permitted power underTarget Limit. If you enable the hard cap option, powercapping is permanently applied without a grace period.
Note - The Policy was previously named Time Limit onthe Budget tab in Oracle ILOM firmware version 3.0.6.
Violation Actions The Violation Actions property enables you to specify thesettings you want Oracle ILOM to take if the power targetlimit is not achieved within the set grace period.You can choose to specify one of the following actions:• None. If you enable this option and the power target
limit is not achieved, Oracle ILOM will display a statuserror message to notify you that Oracle ILOM is unableto achieve the power capping limit specified.
or• Hard-Power Off. If you enable this option and the
power target limit is not achieved, Oracle ILOM takesthe following actions:* Display a status error message.* Initiates a hard-power-off of the server.
Note - The default option for Violation Actions is None.
Power Limit Property Description
128 Oracle ILOM 3.0 Web Procedures Guide • August 2012

4. To apply the power limit property changes, click Save.
Monitoring or Configuring CMM PowerSupply Redundancy (Web)
▼ View or Configure CMM Power SupplyRedundancy Properties (Web)Before You Begin
■ Review the power monitoring terminology defined in the Oracle ILOM 3.0 DailyManagement Concepts Guide.
■ Review the conceptual information about power supply redundancy for CMMsystems in the Oracle ILOM 3.0 Daily Management Concepts Guide.
■ The server must be running Oracle ILOM firmware version 3.0.6 or later toconfigure the CMM power supply redundancy properties.
■ You must have the admin (a) role enabled in Oracle ILOM to modify powermanagement configuration property values.
To view or configure the CMM power supply redundancy property values, followthese steps:
1. Log in to the Oracle ILOM CMM web interface.
2. In the left pane of the CMM web interface, click CMM, and then in the rightpane of the web interface page, click Power Management --> Redundancy.
The Power Management Redundancy page appears.
3. In the Redundancy page, view or configure the properties.:
■ Power Supply Redundancy Policy – Select the number of power supplies toallocate for redundancy.
Description Links Feature Platform Support
Manage CMM powersupply redundancyproperties from OracleILOM
• “View or Configure CMMPower Supply RedundancyProperties (Web)” onpage 129
• CMM
Power Monitoring and Management of Hardware Interfaces (Web) 129

■ None – To reserve no power supplies.
■ N+N – To reserve half of the power supplies.
Note – When you change the redundancy policy, this change affects the amount ofpower the CMM is permitted to allocate to server modules (blades). The chassisPermitted Power is set to the power that the available power supplies can provideminus the redundant power available. In addition, when there is no redundantpower available to the system, a loss of a power supply will cause the system toreduce the Permitted Power. If the system reduces the permitted power below thepower that had already been allocated, you should immediately take steps to turn offthe server modules to reduce the allocated power.
■ Redundant Power – This value is provided by the system. It represents theavailable power that is not allocated.
4. To apply the changes made, click Save.
130 Oracle ILOM 3.0 Web Procedures Guide • August 2012

Managing Remote HostsRedirection and Securing the OracleILOM Remote Console (Web)
Related Information
■ Oracle ILOM 3.0 Remote Redirection Consoles, remote host management Options
■ Oracle ILOM 3.0 Remote Redirection Consoles, manage remote hosts storageRedirection
■ Oracle ILOM 3.0 Remote Redirection Consoles, secure the Oracle ILOM RemoteConsole
Web Procedures for Redirecting RemoteHost KVMSThe Oracle ILOM Remote Console, available from the web interface, provides remoteredirection for the following devices: keyboard, video, mouse, and storage devices.To use the Oracle ILOM Remote Console, you must have the Console (c) role enabledin Oracle ILOM.
As of ILOM 3.0.16, the information describing how to use Oracle ILOM RemoteConsole was moved to the Oracle ILOM 3.0 Remote Redirection Consoles CLI and WebGuide. For detailed instructions for using the Oracle ILOM Remote Console, refer tothese topics:
Description Links
Details for locating instructions forusing the Oracle ILOM RemoteConsole.
• “Web Procedures for Redirecting Remote HostKVMS” on page 131
131

■ Oracle ILOM 3.0 Remote Redirection Consoles, initial set up tasks to support theOracle ILOM Remote Console
■ Oracle ILOM 3.0 Remote Redirection Consoles, redirecting devices using the OracleILOM Remote Console
■ Oracle ILOM 3.0 Remote Redirection Consoles, securing the Oracle ILOM RemoteConsole.
132 Oracle ILOM 3.0 Web Procedures Guide • August 2012

Managing Remote Hosts PowerStates (Web)
Related Information
■ Oracle ILOM 3.0 Daily Management Concepts, remote host management options
■ Oracle ILOM 3.0 Daily Management CLI Procedures, manage remote hosts powerstates
■ Oracle ILOM 3.0 Daily Management CLI Procedures, manage BIOS boot device
■ Oracle ILOM 3.0 Daily Management CLI Procedures, manage host server console
Description Links
Control the power state of aremote server module or CMM
• “Controlling Power States From Remote Server SPor CMM (Web)” on page 134
Control x86 Host boot devicesettings
• “Managing Host Control of Boot Device on x86Systems (Web)” on page 135
133

Controlling Power States From RemoteServer SP or CMM (Web)
▼ Control Power State of Remote Host ServerUsing Server SP (Web)Before You Begin
■ To control the power state of the remote host server, you need the Admin (a) roleenabled.
To control the power state of a remote host server, follow these steps:
1. Log in to the Oracle ILOM SP web interface.
2. Click the Remote Power Control tab.
The Server Power Control page appears.
3. From the Server Power Control page, you can remotely control the power stateof a host server by selecting one of the following options from the Action menu:
■ Reset – This option immediately reboots the remote host server.
■ Immediate Power Off – This option immediately turns off the power on theremote host server.
■ Graceful Shutdown and Power Off – This option shuts down the OS gracefullyprior to powering off the remote host server.
■ Power On (default) – This option turns on full power to the remote host server.
■ Power Cycle – This option immediately turns off the power on the remote hostserver, then applies full power to the remote host server.
Description Links Platform Feature Support
Control the power stateof the remote host server
• “Control Power State ofRemote Host Server UsingServer SP (Web)” on page 134
• x86 system server SP• SPARC system server SP
Control the power stateof the remote CMM
• “Control Power State ofRemote Chassis Using theCMM Web Interface” onpage 135
• CMM
134 Oracle ILOM 3.0 Web Procedures Guide • August 2012

▼ Control Power State of Remote Chassis Usingthe CMM Web InterfaceBefore You Begin
■ To control the power state of the remote chassis and its system components, youneed the admin (a) role enabled.
To control the power state of the chassis and its system components, follow thesesteps:
1. Log in to the Oracle ILOM CMM web interface.
2. Click the Remote Power Control tab.
The Server Power Control page appears.
3. From the CMM Remote Power Control page, you can remotely control thepower state of the chassis and its system components by selecting the radiobutton next to /CH (Chassis) or /CH/BL# (individual blade slot #) then selectingone of the following options from the Action menu:
■ Immediate Power Off – This option immediately turns off the power to thechassis components, including the blades.
■ Graceful Shutdown and Power Off – This option attempts to bring the OSdown gracefully on the blades, then cuts power to the system components.
■ Power On – This option gives full power to the chassis and blades, subject tosystem policies.
■ Power Cycle – This option powers off the blade, then automatically powers thesystem back on (not applicable to /CH).
Managing Host Control of Boot Deviceon x86 Systems (Web)
Description Link Platform Feature Support
Review the prerequisites • “Requirements for Host BootDevice (Web)” on page 136
• x86 system server SP
Override host bootdevice order in BIOS
• “Configure Host Boot Device(Web)” on page 136
Managing Remote Hosts Power States (Web) 135

Requirements for Host Boot Device (Web)■ To modify the host boot device configuration property value, you must have the
Reset and Host Control (r) role enabled in Oracle ILOM.
■ The host control BIOS boot device feature in Oracle ILOM is supported on x86system SPs. This feature is not supported on the CMM or on SPARC system SPs.For information about Oracle ILOM Host Control boot options on SPARC systems,review to the platform server Oracle ILOM supplement guide or platformadministration guide.
▼ Configure Host Boot Device (Web)Before You Begin
■ Review the “Requirements for Host Boot Device (Web)” on page 136
To override the BIOS boot device setting from Oracle ILOM web interface, followthese steps:.
1. Log in to the Oracle ILOM SP web interface.
2. Click Remote Control --> Host Control.
The Host Control page appears.
3. In the Host Control page, click the Next Boot Device list box and specify a bootdevice option.
Possible boot device options available:
■ default – Setting the value to default means that there is no override to theBIOS settings. Setting to default will also clear any previously chosenselection.
■ pxe – Setting the value to pxe means that at the next host boot, the BIOS bootorder settings will be temporarily bypassed and instead the host will boot fromthe network, following the PXE boot specification.
136 Oracle ILOM 3.0 Web Procedures Guide • August 2012

■ disk – Setting the value to disk means that at the next host boot, the BIOS bootorder settings will be temporarily bypassed and instead the host will boot fromthe first disk as determined by BIOS. The specific disk chosen depends onconfiguration. Typically, hosts use this option by default and the host's behaviormight not change by selecting this option.
■ diagnostic – Setting the value to diagnostic means that at the next host boot,the BIOS boot order settings will be temporarily bypassed and instead the hostwill boot into the diagnostic partition, if configured.
■ cdrom – Setting the value to cdrom means that at the next host boot, the BIOSboot order settings will be temporarily bypassed and instead the host will bootfrom the attached CD-ROM or DVD device.
■ bios – Setting the value to bios means that at the next host boot, the BIOS bootorder settings will be temporarily bypassed and instead the host will boot intothe BIOS Setup screen.
4. To apply your changes, click Save.
Managing Remote Hosts Power States (Web) 137

138 Oracle ILOM 3.0 Web Procedures Guide • August 2012

Managing TPM and LDom States onSPARC Servers (Web)
Related Information
■ Oracle ILOM 3.0 Daily Management Concepts, remote host management options
■ Oracle ILOM 3.0 Daily Management CLI Procedures, manage TPM and LDom stateson SPARC servers
Controlling the TPM State on SPARCServers (Web)
▼ Control TPM State on a SPARC Server (Web)Before You Begin
Description Links
Control the TPM state on a SPARCserver
• “Controlling the TPM State on SPARC Servers(Web)” on page 139
Manage Logical Domain (LDom)configurations on SPARC servers
• “Managing LDom Configurations on SPARCServers (Web)” on page 141
Description Link Platform Feature Support
Control the TPM state ona SPARC server
• “Control TPM State on aSPARC Server (Web)” onpage 139
• SPARC system server SP
139

■ The TPM feature in Oracle ILOM is available for SPARC servers only.
■ The SPARC server should be running a version of Oracle Solaris that supportsTPM.
For more information about configuring TPM support in Oracle Solaris, refer tothe Oracle Solaris documentation or the platform documentation shipped withyour server.
■ You must be using Oracle ILOM 3.0.8 or a later version on the SPARC server SP.
■ You need to have the Reset and Host Control (r) role enabled in Oracle ILOM tomodify the TPM settings.
To control the TPM state on a SPARC server, following these steps:
1. Log in to the Oracle ILOM SP web interface.
2. Click the Remote Control --> TPM tab.
The TPM Settings page appears.
3. In the TPM Settings page, do one of the following:
■ To enable the TPM state and activate this enabled state on the SPARC server thenext time it is powered on, select True for the following TPM settings:
■ Enable – Click (check) the Enable True check box to enable the TPM state onthe SPARC server.
■ Activate – Click (check) the Activate True check box to activate theconfiguration change on the SPARC server the next time the server powerson.
or
■ To purge (disable) an enabled TPM state on the SPARC server the next time theserver powers on, select True for following three TPM settings:
■ Enable – Clear the Enable True check box to disable the TPM state on theSPARC.
■ Activate – Click (check) the Activate True check box to activate theconfiguration change on the SPARC server.
■ Forceclear – Click (check) the Forceclear True check box to purge the enabledTPM state from the SPARC server the next time the server powers on.
140 Oracle ILOM 3.0 Web Procedures Guide • August 2012

Managing LDom Configurations onSPARC Servers (Web)
Requirements for SPARC LDom Configurations(Web)To view and manage the Oracle ILOM settings for stored LDom configurations, thefollowing requirements must be met:
■ You must access Oracle ILOM on a SPARC server that has the appropriate OracleILOM point release firmware installed (see Note below).
Note – Oracle ILOM firmware version 3.0.12 or later is required to view the LDomtargets and properties from a SPARC T3 Series server. Oracle ILOM firmware version2.0.0 or later is required to: (1) specify which LDom configuration is used on the hostSPARC server, and (2) to manage the boot property values for the control domainfrom the host SPARC server.
■ You must have the Oracle VM Server for SPARC (Logical Domains Manager) 2.0or later software installed on your host SPARC server.
Descriptions Links Platform Feature Support
Review the prerequisites • “Requirements for SPARCLDom Configurations (Web)”on page 141
• SPARC system server SP
View and manage OracleILOM settings for storedLDom configurations
• “View Stored LDomConfigurations on SPARC T3Series Server (Web)” onpage 142
• “Configure Host Power toStored LDom Configurations(Web)” on page 143
• “Specify Host Power to aStored LDom Configuration(Web)” on page 143
Managing TPM and LDom States on SPARC Servers (Web) 141

■ The host SPARC server must have saved LDom configurations. For instructions onhow to create and save LDom configurations on a host SPARC server, see theLogical Domains 1.3 Administration Guide.
■ You must have the Remote Host Reset and Host Control (r) role enabled in OracleILOM to modify the LDom host domains property values.
▼ View Stored LDom Configurations on SPARC T3Series Server (Web)Before You Begin
■ Review the “Requirements for SPARC LDom Configurations (Web)” on page 141
To view LDom configurations on a SPARC T3 series server, follow these steps:
1. Log in to the Oracle ILOM web interface on a SPARC T3 Series Server.
2. In the web interface, click Remote Host --> Host Domains.
3. In the Domain Configurations table, you can view a list of LDomConfigurations currently saved in LDom Manager.
4. To commit the changes made on the Host Domain page, click Save.
142 Oracle ILOM 3.0 Web Procedures Guide • August 2012

▼ Configure Host Power to Stored LDomConfigurations (Web)Before You Begin
■ Review the “Requirements for SPARC LDom Configurations (Web)” on page 141.
To configure host power to the stored LDom configurations, follow these steps:
1. Log in to the Oracle ILOM web interface on a SPARC server.
2. In the web interface, click Remote Host --> Host Domains.
3. In the Host Domain page, enable or disable the Auto Boot or Boot Guest checkboxes.
By default, the Auto Boot check box for the host control domain and guestdomains are set to enabled (boots when server is powered-on or reset).
Disabling the auto-boot property value on the control domain will preventautomatic reboots and stop the control domain at the OpenBoot ok prompt afterthe next power-on or reset. Disabling the boot guests property value for the guestdomains will prevent the guest domains from booting after the next power-on orreset.
▼ Specify Host Power to a Stored LDomConfiguration (Web)Before You Begin
■ Review the “Requirements for SPARC LDom Configurations (Web)” on page 141.
To specify host power to a stored LDom configuration, follow these steps:
1. Log in to the Oracle ILOM web interface on a SPARC server.
2. In the web interface, click Remote Host --> Host Boot Mode.
Managing TPM and LDom States on SPARC Servers (Web) 143

3. In the Host Boot Mode Settings page, specify the following information tooverride the default method the server uses to boot.
4. To commit the changes made on the Host Boot Mode Settings page, click Save.
Field Instructions and Description
State In the State list box, select one of the following options:• Normal. At next reset, this option will retain the current NVRAM
variable settings.• Reset NVRAM. At next reset, this option will return all OpenBoot
variables to default settings.The State dictates the boot mode at reset.Note - The Reset NVRAM value will return to normal after the nextserver reset or 10 minutes. The Config and Script properties do not expireand will be cleared upon the next server reset or manually by leaving thefields blank.
Script Specify a boot script.The script controls the host server OpenBoot PROM firmware method ofbooting. It does not affect the current /HOST/bootmode setting.
LDOM Config Specify a saved LDom configuration file name.
144 Oracle ILOM 3.0 Web Procedures Guide • August 2012

Diagnosing IPv4 or IPv6 OracleILOM Connection Issues
The following topic provides solutions to help resolve common problems whenaccessing Oracle ILOM using IPv6.
■ “Diagnosing Oracle ILOM Connection Issues” on page 145
Diagnosing Oracle ILOM ConnectionIssuesIf you are experiencing difficulties with connecting to Oracle ILOM when using IPv6,use the information provided in TABLE: Common IPv6 Connection Problems andSuggested Resolutions on page 145 to help resolve common problems whenaccessing Oracle ILOM using IPv6.
TABLE: Common IPv6 Connection Problems and Suggested Resolutions
IPv6 Common ConnectionProblems Suggested Resolution
Unable to access theOracle ILOM webinterface using an IPv6address.
Ensure that the IPv6 address in the URL is enclosed by brackets, for example:https://[fe80::221:28ff:fe77:1402]
Unable to download a fileusing an IPv6 address.
Ensure that the IPv6 address in the URL is enabled by brackets, for example:load -source tftp://[fec0:a:8:b7:214:rfff:fe01:851d]desktop.pkg
145

Unable to access OracleILOM using IPv6 from anetwork client.
If on a separate subnet, try the following:• Verify that Oracle ILOM has a dynamic or static address (not just a Link-Local
address).• Verify that the network client has IPv6 address configured (not just a Link-Local
address).If on the same or separate subnet, try the following• Ensure that setting for IPv6 State is enabled on the Network Settings Page in
the Oracle ILOM web interface or under the /SP/network/ipv6 target in theOracle ILOM CLI.
• Run ping6 in a restricted shell.• Run traceroute in a restricted shell.
Unable to access OracleILOM from a clientwithin a dual-stack IPv4and IPv6 networkenvironment.
Ensure that the following settings are enabled:• State. You can enable the setting for State on the Network Settings page in the
Oracle ILOM web interface or under the /SP/network target in the CLI.• IPv6 State. You can enable the setting for IPv6 State on the Network Settings
page in the Oracle ILOM web interface or under the /SP/network/ipv6 target.
Unable to access OracleILOM using IPv4 from anetwork client.
Ensure that the setting for State is enabled on the Network Settings page in theOracle ILOM web interface or under the /SP/network target in the Oracle ILOMCLI.
TABLE: Common IPv6 Connection Problems and Suggested Resolutions (Continued)
IPv6 Common ConnectionProblems Suggested Resolution
146 Oracle ILOM 3.0 Web Procedures Guide • August 2012

Manual Host OS ConfigurationGuidelines for Local InterconnectInterface
The following topic provides guidelines for manually configuring a non-routableIPv4 address for the host OS connection point on the Local Interconnect Interface.
■ “Configuring Internal USB Ethernet Device on Host OS” on page 147
Configuring Internal USB EthernetDevice on Host OSIf you chose to manually configure a non-routable IPv4 address for the Oracle ILOMSP connection point on the Local Interconnect Interface, you will also need tomanually configure a non-routable IPv4 address for the host OS connection point onthe Local Interconnect Interface. General guidelines, per operating system, forconfiguring a static non-routable IPv4 address for the host OS connection point areprovided in the following table. For additional information about configuring IPaddresses on the host operating system, consult the vendor operating systemdocumentation.
Note – Oracle ILOM will present the internal USB Ethernet device installed on yourserver as an USB Ethernet interface to the host operating system.
147

148 Oracle ILOM 3.0 Web Procedures Guide • August 2012

TABLE: General Guidelines for Configuring Internal USB Ethernet Device on Host OS
Operating System General Guidelines
Windows Server 2008 After Windows discovers the internal USB Ethernet device, you will most likely beprompted to identify a device driver for this device. Since no driver is actuallyrequired, identifying the .inf file should satisfy the communication stack for theinternal USB Ethernet device. The .inf file is available from the Oracle HardwareManagement Pack 2.1.0 software distribution. You can download this managementpack software from the Oracle software product download page (www.oracle.com)as well as extract the .inf file from the Management Pack software. For additionalinformation about extracting the .inf file from the Management Pack software, seethe Oracle Server Hardware Management Pack User’s Guide.After applying the .inf file from the Oracle Hardware Management Pack 2.1.0software distribution, you can then proceed to configure a static IP address for the hostOS connection point of the Local Interconnect Interface by using the MicrosoftWindows Network configuration option located in the Control Panel (Start -->Control Panel).For more information about configuring an IPv4 address in Windows 2008, see theMicrosoft Windows Operating System documentation or the Microsoft Tech Net site ().
Linux Most supported Linux operating system installations on an Oracle Sun platform serverinclude the installation of the device driver for an internal Ethernet device.Typically, the internal USB Ethernet device is automatically discovered by the Linuxoperating system. The internal Ethernet device typically appears as usb0. However,the name for the internal Ethernet device might be different based on the distributionof the Linux operating system.The instructions below demonstrate how to configure a static IP addresscorresponding to usb0, which typically represents an internal USB Ethernet devicefound on the server:\>lsusb usb0
\> ifconfig usb0 169.254.182.77
\> ifconfig usb0 netmask 255.255.255.0
\> ifconfig usb0 broadcast 169.254.182.255
\> ifconfig usb0
\> ip addr show usb0
Note - Rather than performing the typical ifconfig steps, it is possible to script theconfiguration of the interface. However, the exact network scripts vary among theLinux distributions. Typically, the operating version of Linux will have examples tomodel the network scripts.For more information about how to configure an IP address for device using a Linuxoperation system, see the Linux operating system documentation.
Manual Host OS Configuration Guidelines for Local Interconnect Interface 149

Oracle Solaris Most Oracle Solaris Operating System installations on a Oracle Sun platform serverinclude the installation of the device driver for an internal USB Ethernet device. If thisdriver was not supported, you can extract this driver from the Oracle HardwareManagement Pack 2.1.0 or later software. For information about how to extract theOracle Solaris-specific OS driver for the Ethernet interface, see the Oracle ServerHardware Management Pack User’s Guide.Typically, the internal USB Ethernet device is automatically discovered by the OracleSolaris operating system. The internal Ethernet device typically appears as usbecm0.However, the name for the internal Ethernet device might be different based on thedistribution of the Oracle Solaris operating system.After the Oracle Solaris Operating System recognizes the local USB Ethernet device,the IP interface for the USB Ethernet device needs to be configured.The following instructions demonstrate how to configure a static IP addresscorresponding to usbecm0, which typically represents an internal USB Ethernet devicefound on the server.• Type the following command to plumb the IP interface or unplumb the IP interface:ifconfig usbecm0 plumb
ifconfig usbecm0 unplumb
• Type the following commands to set the address information:ifconfig usbecm0 netmask 255.255.255.0 broadcast169.254.182.255 169.254.182.77
• To set up the interface, type:ifconfig usbecm0 up
• To bring the interface down, type:ifconfig usbecm0 down
• To show the active interfaces, type:ifconfig -a
• To test connectivity, ping the Oracle Solaris host or the SP internal USB Ethernetdevice.ping <IPv4 address of Oracle Solaris Host>ping <IPv4 address of SP-Ethernet USB>
Note - Rather than performing the typical ifconfig steps, it is possible to script theconfiguration of the interface. However, the exact network scripts can vary among theOracle Solaris distributions. Typically, the operating version will have examples tomodel the network scripts.For more information about how to configure a static IP address for a device using theOracle Solaris Operating System, refer to the Oracle Solaris Operating Systemdocumentation.
TABLE: General Guidelines for Configuring Internal USB Ethernet Device on Host OS (Continued)
Operating System General Guidelines
150 Oracle ILOM 3.0 Web Procedures Guide • August 2012

Note – If the internal USB Ethernet device driver was not included in your operatingsystem installation, you can obtain the device driver for the Ethernet device from theOracle Hardware Management Pack 2.1.0 or later software. For more informationabout extracting this file from the Management Pack, refer to the Oracle ServerHardware Management Pack User’s Guide.
Manual Host OS Configuration Guidelines for Local Interconnect Interface 151

152 Oracle ILOM 3.0 Web Procedures Guide • August 2012

Index
AActive Directory
certificate, 56certificate file upload, 57configuring, 53event class, 62
event class custom filter, 62strict certificate mode, 57tables, 58
Admin Groups, 58Alternate Servers, 60Custom Groups, 59DNS Locator Queries, 61Operator Groups, 59User Domains, 59
troubleshooting, 61Administrator role, 49alert rules
creating or editing, 98disabling, 100
alertsgenerating email notification, 101
automatic IP address, 24
Bbaud rate
setting, 33browser and software requirements, 2
Cclock settings
configuring, 85components
enabling and disabling, 80monitoring, 83preparing to remove, 79returning to service, 79
viewing status information, 77create or edit alert rules, 98
DDistinguished Name (DN) format, 59Domain Name Service (DNS)
viewing and configuring, 31
Eevent log
custom filters, 72filtering output, 86
Hhost name
assigning, 31host power state
controlling, 133, 134HTTP or HTTPS web access
enabling, 34 to 35
LLDAP
configuring ILOM for LDAP, 64configuring the LDAP server, 63object classes, 63
LDAP/SSLadmin groups, 69alternate servers, 69certificate file upload, 68configure, 65custom groups, 69event class, 73operator groups, 69tables, 69
Admin Groups, 69Alternative Servers, 71
153

Custom Groups, 70Operator Groups, 70User Domains, 70
troubleshooting authentication andauthorization, 72
user domains, 69web interface tables, 69
load certificate, 68logging in to ILOM, 15logging out of ILOM
using the web interface, 19
Nnetwork settings
pending and active properties, 23viewing and configuring, 24
OOperator role, 49
Pport ID, 61power consumption
monitoring, 106monitoring individual power supply, 108monitoring system, 107
profilechoosing, 46
RRADIUS
configuring, 73remote hosts
managing, 131managing power states, 133
remote syslog, 89remove certificate, 68root user account, 17
SSecure Shell (SSH) settings
configuring, 37enabling or disabling, 37generating new key, 37restarting the server, 38
Secure Socket Layer (SSL) certificate
uploading certificate, 36sensor readings, 83serial port output
switch using ILOM web interface, 34serial port, internal
setting baud rate, 33session time-out
resetting, 45setting, 45
single sign onconfiguring, 44
SMTP client, 101enabling, 101
SPARC serversmanaging TPM and LDom states, 139
SSH key, 37adding, 50configuring, 50deleting, 52supported transfer methods, 51
browser, 51FTP, 51HTTP, 51HTTPS, 51SCP, 51SFTP, 51TFTP, 51
static IP address, 24storage components
monitoring, 91system contact field, 31system identifier
assigning, 31system identifier field, 31system indicators, 84system location field, 31
Ttimezone settings
configuring, 86viewing or setting, 86
Uuser account
adding, 45assigning roles, 45
154 Oracle ILOM 3.0 Web Procedures Guide • August 2012

configuring, 48deleting, 49root, 17
user accountsconfigure, 44
user profilemodifying, 49
user sessionsviewing, 50
Wweb interface
buttons, 5components, 5overview, 1
supported browsers, 2
Index 155

156 Oracle ILOM 3.0 Web Procedures Guide • August 2012