DA-9000 USER MANUAL DA-9000 can be connected to external audio devices for playback and recording....
23
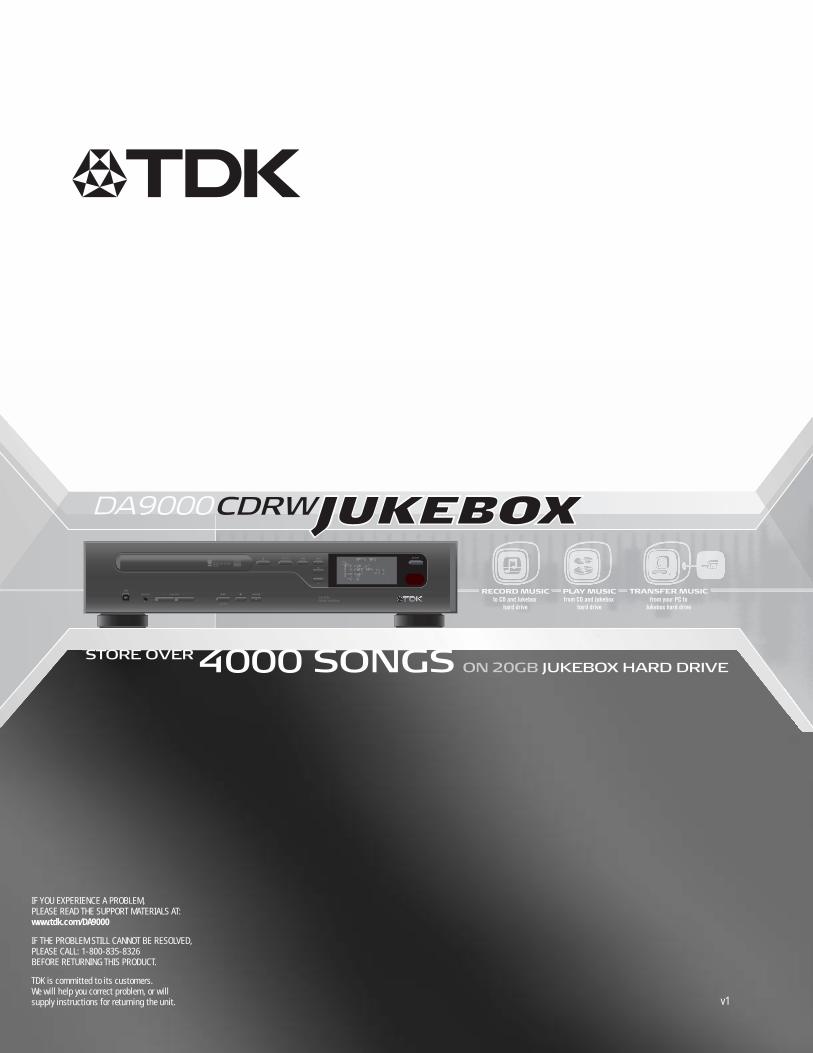
IF THE PROBLEM STILL CANNOT BE RESOLVED, PLEASE CALL: 1-800-835-8326 BEFORE RETURNING THIS PRODUCT. v1 TDK is committed to its customers. We will help you correct problem, or will supply instructions for returning the unit. IF YOU EXPERIENCE A PROBLEM, PLEASE READ THE SUPPORT MATERIALS AT: www.tdk.com/DA9000 STORE OVER 4000 SONGS ON 20GB JUKEBOX HARD DRIVE
Transcript of DA-9000 USER MANUAL DA-9000 can be connected to external audio devices for playback and recording....
IF THE PROBLEM STILL CANNOT BE RESOLVED,PLEASE CALL: 1-800-835-8326BEFORE RETURNING THIS PRODUCT.
v1
TDK is committed to its customers.We will help you correct problem, or willsupply instructions for returning the unit.
IF YOU EXPERIENCE A PROBLEM, PLEASE READ THE SUPPORT MATERIALS AT:www.tdk.com/DA9000
STORE OVER 4000 SONGS ON 20GB JUKEBOX HARD DRIVE

GREETINGSTHANK YOU FOR PURCHASING THE DA-9000. ENJOY YOUR CDRW JUKEBOX.
MODIFICATIONS NOT AUTHORIZED BY THE MANUFACTURER MAY VOID USERS AUTHORITY TO OPERATE THIS DEVICE.
FCC NOTICETHIS EQUIPMENT HAS BEEN TESTED AND FOUND TO COMPLY WITH THE LIMITS FOR A CLASS B DIGIT AL DEVICE, PURSUANT TO PART 15 OF THE FCC
RULES. THESE LIMITS
ARE DESIGNED TO PROVIDE REASONABLE PROTECTION AGAINST HARMFUL INTERFERENCE IN A RESIDENTIAL INSTALLATION. THIS EQUIPMENT GENERATES, USES, AND
CAN RADIATE RADIO FREQUENCY ENERGY, AND, IF NOT INSTALLED AND USED IN ACCORDANCE WITH THE INSTRUCTIONS, MAY CAUSE HARMFUL INTERFERENCE TO RADIO
COMMUNICATIONS. HOWEVER, THERE IS NO GUARANTEE INTERFERENCE WILL NOT OCCUR IN A PARTICULAR INSTALLATION. IF THIS EQUIPMENT CAUSES HARMFUL INTER-
FERENCE TO RADIO OR TELEVISION RECEPTION, WHICH CAN BE DETERMINED BY TURNING THE EQUIPMENT OFF AND ON, THE USER IS ENCOURAGED TO TRY TO COR-
RECT THE INTERFERENCE BY ONE OR MORE OF THE FOLLOWING MEASURES:
REORIENT OR RELOCATE THE RECEIVING ANTENNA.
INCREASE THE SEPARATION BETWEEN THE EQUIPMENT AND RECEIVER.
CONNECT THE EQUIPMENT INTO AN OUTLET ON A CIRCUIT DIFFERENT FROM THAT TO WHICH THE RECEIVER IS
CONNECTED.
CONSULT THE DEALER OR AN EXPERIENCED RADIO/TV TECHNICIAN FOR HELP.
SAFETYTHIS UNIT EMPLOYS A LASER. DUE TO THE RISK OF EYE INJURY, ONLY A QUALIFIED SERVICE PERSON SHOULD REMOVE THE COVER OR ATTEMPT TO SERVICE THIS
DEVICE. TO REDUCE THE RISK OF FIRE OR ELECTRIC SHOCK, DO NOT EXPOSE THIS APPARATUS TO RAIN OR MOISTURE.
NEVER MAKE OR CHANGE CONNECTIONS WHEN THE POWER IS STILL SWITCHE D ON.
IMPORTANT SAFETY INSTR UCTIONS1. READ THESE INSTRUCTIONS.
2. KEEP THESE INSTRUCTIONS.
3. HEED ALL WARNINGS.
4. FOLLOW ALL INSTRUCTIONS.
5. DO NOT USE THIS APPARATUS NEAR WATER.
6. CLEAN ONLY WITH DRY CLOTH IN IMPORTANT SAFETY INSTRUCTIONS.
7. DO NOT BLOCK ANY OF THE VENTILATION OPENINGS - INSTALL IN ACCORDANCE WITH THE MANUFACTURERÕS INSTRUCTIONS.
8. DO NO INSTALL NEAR ANY HEAT SOURCES SUCH AS RADIATOR, HEAT REGISTERS, STOVES OR OTHER APPARATUS (INCLUDING AMPLIFIERS) THAT PRODUCE HEAT.
9. DO NOT DEFEAT THE SAFETY PURPOSE OF THE POLARIZED OR GROUNDING-TYPE PLUG. A POLARIZED PLUG HAS TWO BLADES WITH ONE WIDER
THAN THE OTHER. A GROUNDING TYPE PLUG HAS TWO BLADES AND A THIRD GROUNDING PRONG. THE WIDE BLADE OR THE THIRD PRONG IS PROVIDED FOR YOUR SAFETY. IF THE PROVIDED PLUG DOES NOT FIT INTO YOUR OUTLE T , CONSULT AN ELECTRICIAN FOR REPLACEMENT OF THE
OBSOLETE OUTLET.
10. PROTECT THE POWER CORD FROM BEING WALKED ON OR PINCHED PARTICULARLY AT PLUGS CONVENIENCE RECEPTACLES, AND THE POINT
WHERE THEY EXIT FROM APPARATUS.
11. ONLY USE ATTACHMENT/ACCESSORIES SPECIFIED BY THE MANUFACTURER.
12. USE ONLY WITH THE CART, STAND, TRIPOD BRACKET OR TABLE SPECIFIED BY THE MANUFACTURER, OR SOLD WITH THE APPARATUS. WHEN A
CART IS USED, USE CAUTION WHEN MOVING THE CART/APPARATUS COMBINATION TO AVOID INJURY FROM TIP-OVER.
13. UNPLUG THIS APPARATUS DURING LIGHTENING STORMS OR WHEN UNUSED FOR LONG PERIODS OF TIME.
14. REFER ALL SERVICING TO QUALIFIED SERVICE PERSONNEL. SERVICING IS REQUIRED WHEN THE APPARATUS HAS BEEN DAMAGED IN ANY
WAYS, SUCH AS POWER-SUPPLY CORD OR PLUG IS DAMAGED, LIQUID HAS BEEN SPILLED OR OBJECT HAS FALLEN INTO THE APPARATUS, THE
APPARATUS HAS BEEN EXPOSED TO RAIN OR MOISTURE, DOES NOT OPERATE NORMALLY , OR HAS BEEN DROPPED.
IF THE JUKEBOX SUDDENLY FROZE OR HAS NO RESPONSE, IT MAY BE CAUSED BY ELECTROST ATIC PHENOMENON. IN THIS CIRCUMSTANCE, PLEASE FOLLOW THE
PROCEDURES BELOW FOR RECOVERY:
1. SWITCH OFF THE JUKEBOX POWER ON THE BACK PANEL.
2. TURN ON THE POWER ON THE BANK PANEL AGAIN AND POWER ON THE MAIN UNIT.
FCC RULES & WARNING:THIS DEVICE COMPLIES WITH PART 15 OF THE FCC RULES. OPERATION IS SUBJECT TO THE FOLLOWING TWO CONDITIONS:
1. THIS DEVICE MAY NOT CAUSE HARMFUL INTERFERENCE; AND
2. THIS DEVICE MUST ACCEPT ANY INTERFERENCE RECEIVED INCLUDING INTERFERENCE THAT MAY CAUSE UNDESIRED OPERATION.
CHANGES OR MODIFICATIONS NOT EXPRESSLY APPROVED BY THE PARTY RESPONSIBLE FOR COMPLIANCE COULD VOID THE USERÕS AUTHORITY TO OPERATE THE
EQUIPMENT
CAUTION: USE OF ANY CONTROLS, ADJUSTMENTS, OR PROCEDURES OTHER THAN THOSE SPECIFIED HEREIN MAY RESULT IN HAZARDOUS RADIATION EXPOSURE.
CAUTION: THESE SERVICING INSTRUCTIONS ARE FOR USE BY QUALIFIED SERVICE PERSONNEL ONLY. TO REDUCE THE RISK OF ELECTRIC SHOCK, DO NOT
PERFORM ANY SERICING OTHER THAN THAT CONTAINED IN THE OPERATING INSTRUCTIONS UNLESS YOU ARE QUALIFIED TO DO SO.
.
WARNING:UNDER NO CIRCUMSTANCES SHOULD YOU ATTEMPT TO REPAIR THE JUKEBOX YOURSELF AS THIS WILL EXPOSE YOU TO UNNECESSARY HAZARDS.
NO OUT DOOR USE FOR THE JUKEBOX.
SAVE YOUR BOX! IF YOU NEED TO SHIP THE DA-9000
BACK TO TDK, SEND IT PACKAGED IN THE ORIGINAL
BOX (IF POSSIBLE). TDK CANNOT ASSUME LIABILITY
FOR ANY DAMAGE YOUR DA-9000 SUSTAINS DURING
SHIPMENT. PLEASE SHIP IT IN THE SAFEST MANNER
POSSIBLE.
CAUTION: TO DISCONNECT THE UNIT FROM AN
ELECTRICAL CURRENT, PULL OUT THE AC POWER
CORD.
CAUTION: USE OF CONTROLS OR ADJUSTMENTS OR
PERFORMANCE OF PROCEDURES OTHER THAN THOSE
SPECIFIED HEREIN MAY RESULT IN HAZARDOUS
RADIATION EXPOSURE.
15. APPARATUS SHALL NOT BE EXPOSED TO DRIPPING OR SPLASHING AND NO OBJECTS FILLED WITH LIQUIDS, SUCH AS VASES, SHALL BE PLACED
ON THE APPARATUS.

SECTION 1 : Device Connections . . . . . . . . . . . . . . . . . . . . . . . . . . . . . . . . . . . . . . . . . . 1
SECTION 2 : Player & Remote Controls . . . . . . . . . . . . . . . . . . . . . . . . . . . . 3
SECTION 3 : Playback Guide. . . . . . . . . . . . . . . . . . . . . . . . . . . . . . . . . . . . . . 5
SECTION 4 : Recording Guide . . . . . . . . . . . . . . . . . . . . . . . . . . . . . . . . . . . . . . . . . . . . . . 7
SECTION 5 : Additional Features. . . . . . . . . . . . . . . . . . . . . . . . . . . . . . . . . . . . . . . . . . 11
SECTION 6 : TDK PC Transfer Software Guide . . . . . . . . . . . . . . . . . . . . . . . . . . . 13
SECTION 7 : Troubleshooting. . . . . . . . . . . . . . . . . . . . . . . . . . . . . . . . . . . . . . . . . . . . . . 15
SECTION 8 : Specifications & Box Contents . . . . . . . . . . . . . . . . . . . . . . . . . . . . . 17

WHAT THE DA-9000 CDRW JUKEBOX DOESThe DA-9000 is an extremely flexible digital jukebox (with internal hard drive), Audio CD recorder and CD player.
Here are few examples of things you can do with the DA-9000:• Play Audio CD, MP3 CD, CD-R and CD-RW discs.• Play MP3 files and non-compressed audio from the DA-9000’s internal hard drive. • Use the internal Gracenote CDDB® (CD database) to check for information, such as disc and song titles.• Rip audio from a CD to the DA-9000’s internal hard drive. • Record audio to the DA-9000’s internal hard drive from an external source.• Transfer MP3 audio files from and to a PC.• Record from the DA-9000’s internal hard drive to CD-R and CD-RW discs (requires Audio type media; see the
“Important CD Recording Information” section below for more information).
IMPORTANT CD RECORDING INFORMATIONOnly discs bearing the CD-R Digital Audio or CD-RW Digital Audio logos (see examples below) can be recorded bythis unit.
Discs intended for computer recording cannot be recorded by the DA-9000.

The DA-9000 can be connected to external audio devices for playback and recording. It can also be connectedto a PC, enabling file transfer between the PC and the DA-9000.
SECTION 1: DEVICE CONNECTIONS 1
OPTICAL IN (MD, DAT, etc)
IN(AV RECEIVER)
OUT
[C]
[A][B]
REAR PANEL CONNECTIONS
[A] AUDIO OUT/AUDIO INTo enable hearing the DA-9000, connect an analog cable (RCA type) between the DA-9000’s LINE OUT jacks and the LINE IN (or TAPE IN) jacks on an amplification devicesuch as a receiver. To record audio into the DA-9000, connect an analog cable (RCAtype) between the DA-9000’s LINE IN jacks and the LINE OUT (or TAPE OUT) jacks on asource device, such as a receiver or a tape deck.
NOTE: Most turntables cannot be connected directly to the DA-9000. See “About Recording from Your Turntable” on page 9 formore information.
[B] OPTICAL OUTTo record from the DA-9000 into an external device, such as a mini disc player, connectan optical digital cable (not included) between the DA-9000’s OPTICAL DIGITAL OUT portand the external device’s OPTICAL DIGITAL IN port.
[C] POWER Plug the power cord of the DA-9000 into a power outlet.
NOTE: The connection configuration discussed here is typical, but other configura-tions are also possible. For instance, the DA-9000’s OPTICAL DIGITAL OUT port canbe connected to the OPTICAL DIGITAL IN port on an A/V receiver to provide highestpossible quality playback through the receiver.

2 DA 9000: USER MANUAL
[D] [E]
FRONT PANEL CONNECTIONS
[D] USBBefore MP3 audio files can be transferred from/to your PC, a USB cable must be con-nected between the DA-9000’s USB port and a USB port on your PC.
[E] HEADPHONESTo listen through headphones, plug headphones into the unit’s front-panel jack.
IMPORTANT NOTE: After you’ve finished transferring files, disconnectthe USB cable. When the USB cable is connected, the DA-9000 is ina passive mode, and cannot perform most of its functions.
IMPORTANT NOTE: The included TDK PC Transfer Software must beused to transfer files between a PC and the DA-9000. For moreinformation, see page 13.
CAUTION: Listening to headphones at high volumes cancause hearing loss. Before you place headphones on yourears, verify that the headphones’ volume isn’t dangerouslyloud.
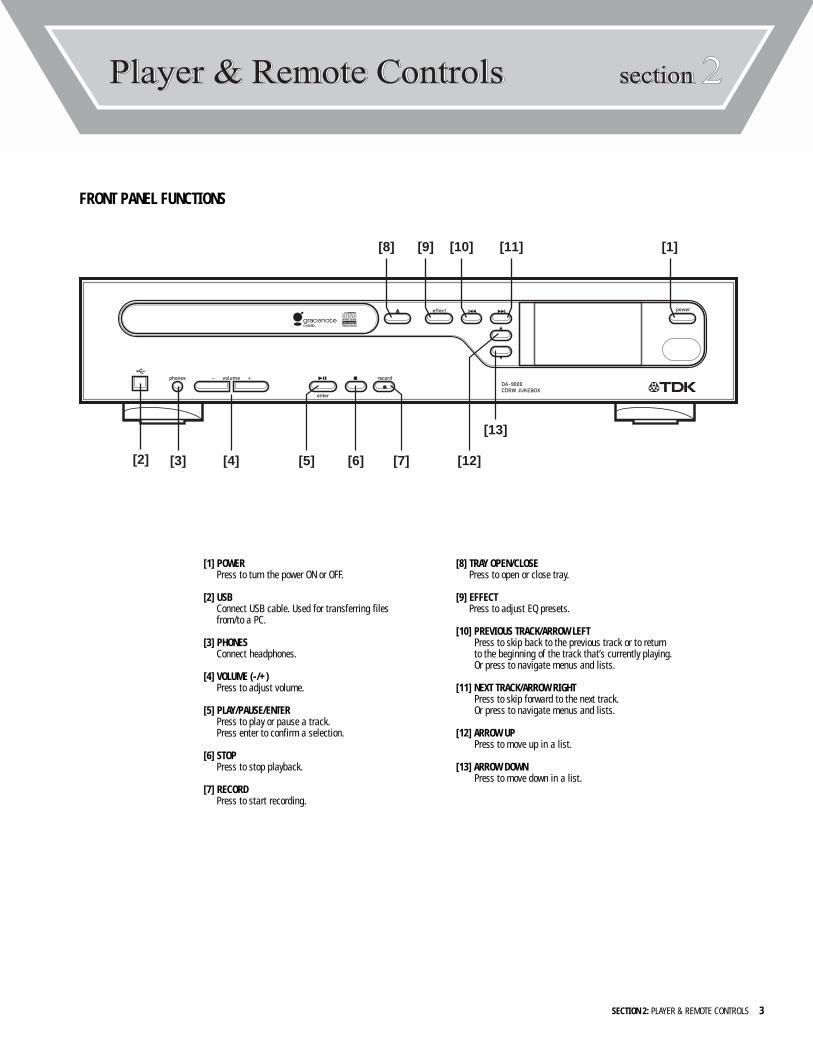
SECTION 2: PLAYER & REMOTE CONTROLS 3
[2] [3] [4] [6][5] [12]
[13]
[7]
[8] [9] [10] [1][11]
[8] TRAY OPEN/CLOSEPress to open or close tray.
[9] EFFECTPress to adjust EQ presets.
[10] PREVIOUS TRACK/ARROW LEFTPress to skip back to the previous track or to return to the beginning of the track that’s currently playing.Or press to navigate menus and lists.
[11] NEXT TRACK/ARROW RIGHTPress to skip forward to the next track.Or press to navigate menus and lists.
[12] ARROW UPPress to move up in a list.
[13] ARROW DOWNPress to move down in a list.
[1] POWERPress to turn the power ON or OFF.
[2] USBConnect USB cable. Used for transferring files from/to a PC.
[3] PHONESConnect headphones.
[4] VOLUME (-/+)Press to adjust volume.
[5] PLAY/PAUSE/ENTERPress to play or pause a track.Press enter to confirm a selection.
[6] STOPPress to stop playback.
[7] RECORDPress to start recording.
FRONT PANEL FUNCTIONS

[1] POWERPress to turn the power ON or OFF.
[2] SEARCHPress to activate the track search feature.
[3] CLEARPress to clear editing information.
[4] CDDBPress to activate Gracenote® CD database lookup for the current album.
[5] INFOPress to view CDDB information that has previously been retrieved.
[6] PROGPress to view the temporary list (includes marked songs).
[7] EFFECTPress to adjust EQ presets.
[8] MODEPress to change playback modes (normal, random, intro and repeat modes).
[9] SAVEPress to save temporary list as a playlist, or to save edited information.
[10] MARKPress to mark a selected track. Marked tracks appear in the temporary list.
[11] DELETEPress to delete selected items.
[12] RECPress to rip a CD to the internal hard drive.
[13] BURN CDPress to burn a CD.
[14] TRAY OPEN/CLOSEPress to open or close the disc tray.
[15] ALPHANUMERIC KEYSPress to enter track information, search for tracks, etc.
[16] CAPPress to toggle between upper case and lower case text entry.
[17] * (asterisk)Press to enter special characters when editing information.
[18] MAINPress to load Main Menu.
[19] ARROW UP/ARROW DOWN/ARROW LEFT/ARROW RIGHTPress to navigate menus and lists.
[20] ENTERPress to confirm a selection.
[21] STOPPress to stop playback.
[22] PLAY/PAUSEPress to play or pause a track.
[23] VOLUME (-/+)Press to adjust volume.
[24] PREVIOUS TRACKPress to skip back to the previous track or to return to the beginning of the track that’s currently playing.
[25] NEXT TRACKPress to skip forward to the next track.
[26] TRACK SCAN BACK/FORWARDPress to scan through a track that’s currently playing.
4 DA 9000: USER MANUAL
[1]
[2]
[3]
[4]
[16]
[6]
[5]
[7]
[10]
[8]
[21][9]
[11]
[24]
[12] [13] [14]
[19]
[17][18]
[20]
[15]
[25]
[22]
[23]
[26]
REMOTE CONTROL FUNCTIONS
POWERING ON/OFF
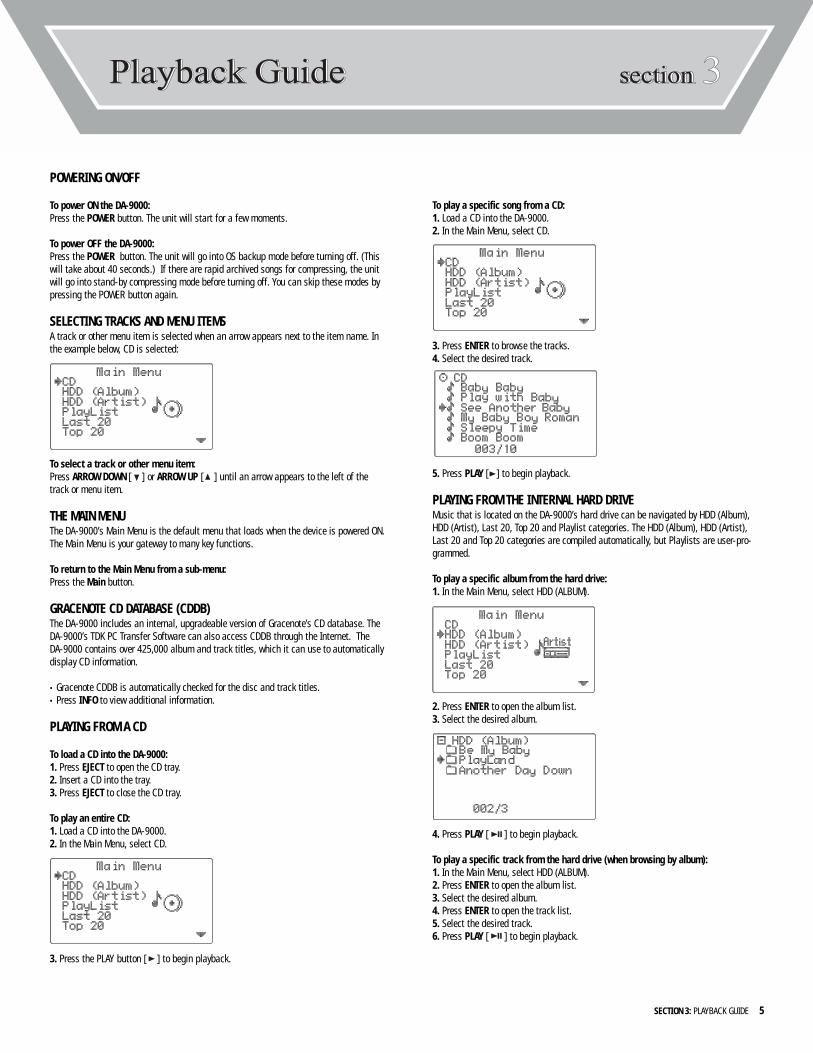
To power ON the DA-9000: Press the POWER button. The unit will start for a few moments.
To power OFF the DA-9000:Press the POWER button. The unit will go into OS backup mode before turning off. (Thiswill take about 40 seconds.) If there are rapid archived songs for compressing, the unitwill go into stand-by compressing mode before turning off. You can skip these modes bypressing the POWER button again.
SELECTING TRACKS AND MENU ITEMSA track or other menu item is selected when an arrow appears next to the item name. Inthe example below, CD is selected:
To select a track or other menu item:Press ARROW DOWN [ ] or ARROW UP [ ] until an arrow appears to the left of thetrack or menu item.
THE MAIN MENUThe DA-9000’s Main Menu is the default menu that loads when the device is powered ON.The Main Menu is your gateway to many key functions.
To return to the Main Menu from a sub-menu:Press the Main button.
GRACENOTE CD DATABASE (CDDB)The DA-9000 includes an internal, upgradeable version of Gracenote’s CD database. TheDA-9000’s TDK PC Transfer Software can also access CDDB through the Internet. TheDA-9000 contains over 425,000 album and track titles, which it can use to automaticallydisplay CD information.
• Gracenote CDDB is automatically checked for the disc and track titles. • Press INFO to view additional information.
PLAYING FROM A CD
To load a CD into the DA-9000:1. Press EJECT to open the CD tray.2. Insert a CD into the tray.3. Press EJECT to close the CD tray.
To play an entire CD:1. Load a CD into the DA-9000. 2. In the Main Menu, select CD.
3. Press the PLAY button [ ] to begin playback.
To play a specific song from a CD:1. Load a CD into the DA-9000.2. In the Main Menu, select CD.
3. Press ENTER to browse the tracks.4. Select the desired track.
5. Press PLAY [ ] to begin playback.
PLAYING FROM THE INTERNAL HARD DRIVEMusic that is located on the DA-9000’s hard drive can be navigated by HDD (Album),HDD (Artist), Last 20, Top 20 and Playlist categories. The HDD (Album), HDD (Artist),Last 20 and Top 20 categories are compiled automatically, but Playlists are user-pro-grammed.
To play a specific album from the hard drive:1. In the Main Menu, select HDD (ALBUM).
2. Press ENTER to open the album list.3. Select the desired album.
4. Press PLAY [ ] to begin playback.
To play a specific track from the hard drive (when browsing by album):1. In the Main Menu, select HDD (ALBUM).2. Press ENTER to open the album list.3. Select the desired album.4. Press ENTER to open the track list.5. Select the desired track.6. Press PLAY [ ] to begin playback.
SECTION 3: PLAYBACK GUIDE 5

To play a specific track from the hard drive (when browsing by artist):1. In the Main Menu, select HDD (ARTIST).
2. Press ENTER to open the artist list.3. Select the desired artist.4. Press ENTER to open the track list.5. Select the desired track.6. Press PLAY [ ] to begin playback.
To play a specific track from the hard drive (when browsing by playlist):1. In the Main Menu, select PLAYLIST.
2. Press ENTER to open the playlist list. 3. Select the desired playlist.4. Press ENTER to open the track list.5. Select the desired track.6. Press PLAY [ ] to begin playback
To play a specific track from the hard drive (when browsing by last 20 or top 20):1. In the Main Menu, select LAST 20 or TOP 20.2. Press ENTER to open the list of 20 tracks.3. Select the desired track.4. Press PLAY [ ] to begin playback.
To play a specific playlist from the hard drive:1. In the Main Menu, select PLAYLIST.2. Press ENTER to open the playlist list.3. Select the desired playlist.4. Press PLAY [ ] to begin playback.
To play the Last 20 or Top 20 tracks from the hard drive:1. In the Main Menu, select LAST 20 or TOP 20. 2. Press PLAY [ ] to begin playback of the 20 tracks.
To play all tracks by a specific artist from the hard drive:1. In the Main Menu, select HDD (ARTIST).2. Press ENTER to open the artist list.3. Select the desired artist.4. Press PLAY [ ] to begin playback.
To play all playlists from the hard drive:1. In the Main Menu, select PLAYLIST.2. Press PLAY [ ] to begin playback.
To play the entire hard drive by album:1. In the Main Menu, select HDD (ALBUM).2. Press PLAY [ ] to begin playback.
To play the entire hard drive by artist:1. In the Main Menu, select HDD (ARTIST).2. Press PLAY [ ] to begin playback.
CREATING A PLAYLISTA playlist is a user-defined group of songs that can quickly be selected for playback. Tocreate a playlist, mark the desired tracks, open the temporary list to view the markedtracks, unmark any undesired tracks, then save the playlist. See below for details.
To create a playlist:1. Select a track that’s located on the DA-9000’s hard drive.2. Press MARK.
• Repeat steps 1-2 until all desired tracks have been marked.• Marked tracks will have a dot [•] after the title.
3. Press PROG.• The temporary list will open. It will contain the marked tracks.• If you wish to unmark a track, press MARK while the marked track is selected.
4. Press SAVE.• A default name will be assigned to the playlist.
5. If you want to edit the playlist name, press ENTER.6. Use the remote’s alphanumeric keypad to enter the new playlist name. Use the
ARROW RIGHT [ ] and ARROW LEFT [ ] buttons to move the cursor as needed.
7. Press SAVE.
EQUALIZATION (EQ) PRESETSThe DA-9000 features multiple equalization (EQ) presets, each of which delivers a dif-ferent blend of bass, treble and mid-range.
To select an EQ preset:1. Press EFFECT.
• The current EQ preset mode will be displayed.2. Repeatedly press EFFECT until the desired EQ preset mode is selected.
PLAYBACK MODESThe DA-9000 features four playback modes. They are as follows:
NORMAL normal playbackREPEAT ONE the current track will repeat continuouslyREPEAT ALL all tracks in the folder or CD will repeat continuouslyRANDOM tracks in the folder or CD will be randomly playedINTRO the first 20 seconds of each track in the folder or CD will be played
To change the playback mode:1. Press MODE.
• The current playback mode will be displayed.2. Repeatedly press MODE until the desired playback mode is selected.
PLAYING AN EXTERNAL SOURCE THROUGH THE DA-9000’S LINE INPUTSAn external audio playback source, such as a tape deck can be played through the DA-9000. This configuration could be used to free up an input on your A/V receiver, forinstance.
To play an external source through the DA-9000:1. Connect the external source to the DA-9000’s line in ports.2. In the DA-9000’s Main Menu, select LINE IN. 3. Play the external source.4. Press the DA-9000’s PLAY [ ] button to enable playback of the external
source through the DA-9000.
NOTE: Playlists are user-created. Until you create aplaylist, no playlists will be available for playback.
6 DA 9000: USER MANUAL

RECORDING TO THE INTERNAL HARD DRIVEThe DA-9000 enables “ripping” (transferring) music from CD to the internal hard drive.The unit also allows recording from external sources to the internal hard drive.
When you record to the internal hard drive, you have the option of choosing the recordingoption. The options are as follows:
AUDIO CD RECORDING OPTIONSRAPID ARCHIVE: The tracks will quickly be ripped to the internal
hard drive. Encoding to the MP3 format will be performed when the unit is in stand-by mode.
COMPRESS: The tracks will be simultaneously ripped and encoded to the MP3 format.
PLAY AND COMPRESS: The tracks will be simultaneously played, ripped and encoded to the MP3 format.
MP3 CD RECORDING OPTIONSRAPID ARCHIVE: The MP3 tracks will quickly be archived to the
internal hard drive. PLAY AND ARCHIVE: The MP3 tracks will be simultaneously played,
archived to the internal hard drive.
After setting the recording option, you have the option of setting the bit-rate(amount of compression). The choices are as follows:
128 KBPS: The tracks will be converted to the MP3 format. This is the lowest quality option, but the tracks will have the smallest file sizes.
320 KBPS: The tracks will be converted to the MP3 format, medium quality and file sizes.
CD QUALITY:: The tracks will remain non-compressed and will have the same audio quality as the original CD. The tracks will have the largest file sizes.
To rip (transfer) an entire AudioCD to the DA-9000’s hard drive:1. In the Main Menu, select CD.2. Press REC. 3. Select the desired recording option.
SECTION 4: RECORDING GUIDE 7
• The DA-9000 will display a menu of available bit rates.
4. Select the desired bit rate. 5. Press REC. to begin ripping the CD to the internal hard drive.
To rip (transfer) an entire MP3 CD to the DA-9000’s hard drive:1. In the Main Menu, select CD.2. Press REC.3. Select the desired RECORDING option.
4. Press REC. to begin ripping the CD to the internal hard drive.
To rip (transfer) specific tracks from an Audio CD to the DA-9000’s internal harddrive:1. In the Main Menu, select CD.2. Press ENTER.3. Select a desired track and press MARK.
• Repeat until all desired tracks have been marked.• Marked tracks will have a dot [•] after the title.
4. Press PROG.5. Press REC.6. Select the desired recording option.
7. The DA-9000 will display a menu of the available bit rates.
8. Select the desired bit rate.9. Press REC. to begin ripping the CD to the internal hard drive.
NOTE: MP3 CDs will be recorded to the internal hard drive as is. The bit rate cannot be selected.
NOTE: The CD QUALITY option is not available when the COMPRESS recordingoption has been selected.

7. Press ENTER.• The DA-9000 will check the disc for available capacity.
8. With BURN highlighted, press ENTER to begin burning.• After the disc has been burned, the CD tray will open automatically.
To record MP3 tracks from the DA-9000’s hard drive to an MP3 CD:1. Load a blank Audio CD-R or Audio CD-RW into the DA-9000.2. In the Main Menu, select HDD (ARTIST) or HDD (ALBUM). 3. Press ENTER to open the artists list or albums list.4. Select the desired artist or album. 5. Press BURN CD.
• You will be prompted to select the type of CD to be burned.
6. Select DATA CD.7. Press ENTER.
• The DA-9000 will check the disc for available capacity.
8. With BURN highlighted, press ENTER.• After the disc has been burned, the CD tray will open automatically.
8 DA 9000: USER MANUAL
NOTE: It is not possible to burn non-compressed tracks (such as WAV files) ontoan MP3 CD from the DA-9000’s hard drive.
NOTE: After audio tracks have been recorded, the CD willautomatically be finalized. After finalization, it will notbe possible to add additional tracks.
To rip (transfer) specific tracks from an MP3 CD to the DA-9000’s internal hard drive:1. In the Main Menu, select CD.2. Press ENTER.3. Select a folder that contains the desired track(s) and press ENTER. 4. Select a desired track and press MARK.
• Repeat until all desired tracks have been marked.• Marked tracks will have a dot [•] after the title.
5. Press PROG.6. Press REC.7. Select the desired recording option.8. Press REC. to begin ripping the tracks to the internal hard drive
To record from an external source to the DA-9000’s internal hard drive:1. Connect the audio source device to the DA-9000’s audio inputs.2. In the Main Menu, select LINE IN.3. Press REC.4. Select COMPRESS BIT RATE.
5. Press REC. to begin recording the external source.
BURNING TO CD-R OR CD-RW FROM THE INTERNAL HARD DRIVEOnly discs bearing the CD-R Digital Audio or CD-RW Digital Audio logo (see examplesbelow) can be burned by the DA-9000. CD-R and CD-RW discs designed for computer usecan’t be burned by the DA-9000.
To record audio tracks from the DA-9000’s hard drive to a CD:1. Load a blank Audio CD-R or Audio CD-RW into the DA-9000.2. In the Main Menu, select HDD (ARTIST) or HDD (ALBUM). 3. Press ENTER to open the artists list or albums list.4. Select the desired artist or album. 5. Press BURN CD.
• You will be prompted to select the type of CD to be burned.
6. Select AUDIO CD.
NOTE: DA-9000’s Auto Track Detection will automatically insert tracksbetween music.
NOTE: The DA-9000 features Auto Track Detection. This allows the unit to automatically create a new track on the CD that’s being recorded when a new track starts on the source CD.
NOTE: Both MP3 and Audio tracks can be burned as anAudio CD. DA-9000 will temporally decompress MP3tracks for burning.
NOTE: After MP3 tracks have been recorded, the CD will remain open, allowingadditional tracks to be added in new recording sessions.

Some turntables have a built-in preamplifier. If yoursdoes, connecting will be quite simple as illustrated below:
If your turntable doesn’t have a built-in preamplifier (most don’t), the turntable can be connected to a separate preamplifier that’s connected to the DA-9000’s inputs.
Some AV receivers have a built-in phono preamp. If yours does, you can connect as follows:
THE TEMPORARY LISTThe temporary list contains tracks that have been marked. The temporary list is clearedwhenever the unit is powered OFF. From the temporary list, you can create a playlist (see“CREATING A PLAYLIST” on page 6 for more information), or you can record the tracks toCD.
To mark tracks:1. Select the track you wish to mark.2. Press MARK.
• The track will be added to the temporary list.
To open the temporary list:Press PROG.
To record various tracks from the DA-9000’s hard drive to a mix CD:1. Load a blank Audio CD-R or CD-RW into the DA-9000.2. Mark the tracks you wish to record onto the mix CD.3. Press PROG. to open the temporary list.
• To remove an undesired track, select the track and press MARK.4. Press BURN CD.
• You will be prompted to select the type of CD to be burned.
5. Select DATA CD or AUDIO CD.6. Press ENTER.
• The DA-9000 will check the disc for available capacity.
7. With BURN highlighted, press ENTER to begin burning.• After the disc has been burned, the CD tray will open automatically.
ERASING A CD-RWCD-RW discs can be erased and rewritten with new content. An erased CD-RW disc canbe rewritten as an MP3 CD or as a standard CD. CD-R type discs cannot be erased.
To erase a CD-RW:1. In the Main Menu, select SYSTEM.2. Press ENTER.3. Select ERASE DISC.4. With YES selected, press ENTER.
COPYING A CDIf you want to make a backup copy of a CD, follow this process:1. Rip the CD to the DA-9000’s internal hard drive. 2. Record the tracks from the internal hard drive to an Audio CD or MP3 CD.
NOTE: Non-compressed audio tracks cannot be recordedonto an MP3 Data CD.
ABOUT THE SERIAL COPY MANAGEMENT SYSTEMThis unit complies with the Serial Copy Management System (SCMS) standard. Thisstandard was created to restrict digital-to-digital copying to only the first generation.The basic rules governing this system are as follows:
1. A digital recording can be made through a digital input connection from a digital source such as a CD, DAT or MD onto a recordable audio CD-R, audio CD-RW, MD or DAT. However, second and later generation copies cannot be recorded digitally.
2. When an analog source such as an FM broadcast is digitally recorded by using a CD-R, CD-RW, MD or DAT, this recorded source can be digitally recorded on another CD-R, CD-RW, MD or DAT. However, further digital copying is prohibited.
RECORDING FROM YOUR TURNTABLE
Visit the Knowledge Bank at www.tdk.com for more information on archiving your vinylcollection.
SECTION 4: RECORDING GUIDE 9
NOTE: Due to copy protection, it may not be possible to make copies of some CDs.

10 DA 9000: USER MANUAL
THIS PAGE INTENTIONALLY LEFT BLANK

SECTION 5: ADDITIONAL FEATURES 11
EDITING TITLES (ALBUM, ARTIST, SONG & PLAYLIST)The DA-9000 allows editing album, artist, song and playlist titles.
To edit a title:1. Select the title.2. Press INFO.3. Press ENTER.
• Use ARROW UP [ ], ARROW DOWN [ ], ARROW RIGHT [ ] and/or ARROW LEFT [ ] to move the cursor as needed. Press CLEAR to erase characters.
4. Using the alphanumeric keypad, enter the new title.• Press the CAPS key to toggle from lower- to upper-case letters.
5. When finished, press SAVE.
SEARCHING
To search for an album, artist or track by title:1. Press SEARCH.2. Select search by ALBUM, ARTIST or SONG.3. Use the alphanumeric keypad to enter the title.4. When finished, press SAVE.
• If found, the display will show the title.5. Press ENTER to view the album or press PLAY [ ] to play the track.
To search for an album, artist or track by number:1. In the album, artist or track list, locate the number that represents the album, artist
or track you want to select.2. Using the alphanumeric keypad, enter the number.
• Press CLEAR to backspace as needed.3. Press SAVE.
• The album, artist or track will now be selected.
COMPRESSING FILES STORED ON THE INTERNAL HARD DRIVERapid Archived files that are stored on the DA-9000’s hard drive can be compressed.Rapid Archived files have a music note next to the file name, while compressed fileshave a music note with an “M” shaped tail.
To compress tracks on the DA-9000’s internal hard drive:1. Select the desired track or folder.2. Press REC.3. Press ENTER to begin compressing.
DELETING (BY TRACK OR FOLDER) WITH THE REMOTEYou can use the remote control to delete individual tracks, entire albums, entire artistsand playlists. The TDK PC Transfer Software can also be used to delete content.
To delete with the remote control:1. Select the track or folder you want to delete.2. Press DELETE.3. Confirm by selecting YES and pressing ENTER.
SYSTEM MENUThe System Menu provides access to several DA-9000 options.
To access the System Menu:1. In the Main Menu, select SYSTEM.2. Press ENTER.
To configure voice prompt:1. Access the System Menu.2. Select VOICE PROMPT.
3. Press ENTER. 4. Select DISABLE, or ENABLE.5. Press ENTER.
To check the internal hard drive’s capacity:1. Access the System Menu.2. Select HDD CAPACITY.3. Press ENTER.
To check the DA-9000’s firmware version:1. Access the System Menu.2. Select DA-9000 INFO.3. Press ENTER.
To adjust the DA-9000’s default recording compression setting:1. Access the System Menu.2. Select RECORD OPTIONS.3. Press ENTER.4. Select LINE-IN RECORDING or CD RECORDING.5. Repeatedly press ARROW RIGHT [ ] until the desired compression rate is selected.
To format the internal hard drive:1. Access the System Menu.2. Select FORMAT HDD.3. Press ENTER.4. Confirm by selecting YES and pressing ENTER.
UPGRADING THE INTERNAL GRACENOTE CDDBGo to www.tdk.com/DA9000 for instructions on upgrading the internal CDDB.
UPGRADING THE INTERNAL FIRMWAREGo to www.tdk.com/DA9000 for instructions on upgrading the firmware.
NOTE: When Voice Prompt is enabled, a voice will announce when recording to theinternal hard drive has been completed. Currently, this feature does not apply to CDburning.

12 DA 9000: USER MANUAL
THIS PAGE INTENTIONALLY LEFT BLANK

The TDK PC Transfer Software (included) must be used to transfer files between the DA-9000 and your PC.
Install the TDK PC Transfer Software before connecting the USB cable.
3. Drag the files from the window on the left side and drop them in the window on the right side.• The files will be transferred.
• If you wish to interrupt the file transfer, click the TDK PC Transfer Software’s CANCELbutton.
To find titles with the Internet version of Gracenote CDDB:
1. Click the TDK PC Transfer Software’s CDDB icon. 2. If prompted, follow the instructions to register for Gracenote CDDB.3. The TDK PC Transfer Software will automatically detect any untitled albums on the
DA-9000’s internal hard drive. 4. You will be asked if you would like to automatically match any untitled albums.5. Click YES.
• The TDK PC Transfer Software will connect to Gracenote CDDB and will automatically retrieve all potential matches over the Internet (requires live Internet connection).
• Potential matches will appear in the bottom (POTENTIAL MATCHES) window.6. If a match appears in the POTENTIAL MATCHES window, highlight the match and
click ACCEPT.
NOTE: Only MP3 files can be transferred with the TDK PC Transfer Software.
NOTE: When the DA-9000 isn’t connected to your computer, you must use theDA-9000’s internal version of Gracenote CDDB to find titles.
SECTION 6: TDK PC TRANSFER SOFTWARE GUIDE 13
To install the TDK PC Transfer Software:1. Load the included installation CD-ROM into your computer’s CD-ROM drive.2. If the installer does not automatically launch, do the following in Windows:
a. Double click MY COMPUTERb. Double click the TDK PC Transfer Software CD-ROM icon. c. Double click Setup.exe.
3. Follow the on-screen prompts to complete installation.
After completing installation of the TDK PC Transfer Software, connect one end of the USBcable to the DA-9000. Connect the other end to a USB port on your PC. When the DA-9000has detected the connection, USB will be displayed on the unit’s front panel LCD.
After connecting the USB cable, run the TDK PC Transfer Software.
To run the TDK PC Transfer Software:In Windows, click START, PROGRAMS, TDK PC TRANSFER SOFTWARE.• The software will launch.
To transfer tracks from your PC to the DA-9000’s internal hard drive:1. Run the TDK PC Transfer Software.• The files located on your PC’s hard drive will appear in the window on the left side. • The files located on the DA-9000’s internal hard drive will appear in the window on the
right side.
2. In the window on the left side, click to highlight files you want to transfer from your PC to the DA-9000’s internal hard drive.• The entire folder, multiple files or a single file can be selected.
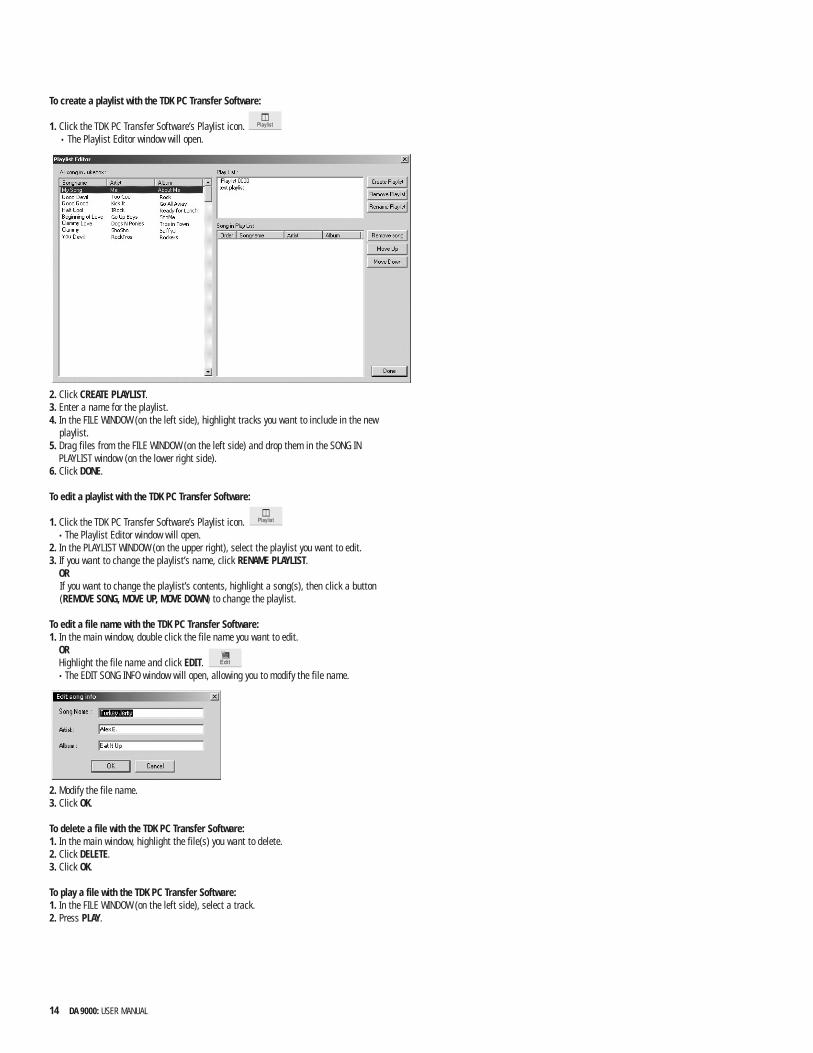
To create a playlist with the TDK PC Transfer Software:
1. Click the TDK PC Transfer Software’s Playlist icon.• The Playlist Editor window will open.
2. Click CREATE PLAYLIST.3. Enter a name for the playlist.4. In the FILE WINDOW (on the left side), highlight tracks you want to include in the new
playlist. 5. Drag files from the FILE WINDOW (on the left side) and drop them in the SONG IN
PLAYLIST window (on the lower right side). 6. Click DONE.
To edit a playlist with the TDK PC Transfer Software:
1. Click the TDK PC Transfer Software’s Playlist icon.• The Playlist Editor window will open.
2. In the PLAYLIST WINDOW (on the upper right), select the playlist you want to edit. 3. If you want to change the playlist’s name, click RENAME PLAYLIST.
ORIf you want to change the playlist’s contents, highlight a song(s), then click a button (REMOVE SONG, MOVE UP, MOVE DOWN) to change the playlist.
To edit a file name with the TDK PC Transfer Software:1. In the main window, double click the file name you want to edit.
ORHighlight the file name and click EDIT.• The EDIT SONG INFO window will open, allowing you to modify the file name.
2. Modify the file name.3. Click OK.
To delete a file with the TDK PC Transfer Software:1. In the main window, highlight the file(s) you want to delete.2. Click DELETE. 3. Click OK.
To play a file with the TDK PC Transfer Software:1. In the FILE WINDOW (on the left side), select a track.2. Press PLAY.
14 DA 9000: USER MANUAL

SECTION 7: TROUBLESHOOTING 15
ISSUE:• The DA-9000 will not burn my tracks to a CD-R or CD-RW.
CAUSE(S)/SOLUTION(S):• The DA-9000 complies with SCMS copy protection. This means that copies of digital
copies can’t be made.• The DA-9000 requires Audio (aka “Music”) type CD-R or CD-RW discs. Data type discs
for computer recording cannot be recorded by the unit. • There isn’t enough space for your tracks left on the CD-R or CD-RW. If the disc is a
CD-RW, you can erase and rewrite it.• You can't record more than 99 sessions on an MP3 CD.• You can't record more than 99 tracks on an Audio CD.
ISSUE:• The CD-R or CD-RW I recorded with the DA-9000 can’t be played in my CD (or DVD)
player.
CAUSE(S)/SOLUTION(S):• Your CD (or DVD) player may not support CD-R or CD-RW discs. Check with the player’s
manufacturer.
ISSUE:• The DA-9000 still seems like it’s ON after I’ve turned it OFF.
CAUSE(S)/SOLUTION(S):• This is normal. The unit enters an OS backup mode, then enters a stand-by mode.
While in stand-by mode, tasks may be performed. For instance, rapid archived tracks may be encoded while the DA-9000 is in stand-by mode. You may hear the hard drive running.
ISSUE:• The unit doesn’t operate properly or seems to have crashed.
CAUSE(S)/SOLUTION(S):• While it’s far more reliable than a PC, the DA-9000 does have a processor and other
PC-like components. If the unit seems to have frozen, wait a few minutes, unplug the unit, wait a few seconds, plug the unit back in and power ON.
ISSUE:• DA-9000 will not power ON.
CAUSE(S)/SOLUTION(S):• Verify that the DA-9000 is connected to a working power outlet.• Disconnect the USB cable.• Disconnect the power cord, wait a few minutes, reconnect the power cord and power
ON.
ISSUE:• The remote control’s battery is drained after the remote hasn’t been used for a while.
CAUSE(S)/SOLUTION(S):• Remove the remote’s batteries if you won’t be using the remote for a few weeks.
ISSUE:• I can’t play music from CD.
CAUSE(S)/SOLUTION(S):• Make sure the CD is loaded properly (label side up).• If the disc is a CD-R or CD-RW, make sure the disc has been recorded and finalized.• Verify that the CD isn’t dirty or scratched.
ISSUE:• I can’t transfer tracks between the DA-9000 and my PC.
CAUSE(S)/SOLUTION(S):• The TDK PC Transfer Software must be installed and used to transfer the tracks.• Connect the USB cable to the DA-9000 and to your PC.• Only MP3 files can be transferred.
If you are experiencing difficulties with the DA-9000, please read this entire section. Many issues can be easilysolved after reading this section.

16 DA 9000: USER MANUAL
THIS PAGE INTENTIONALLY LEFT BLANK

SECTION 8: SPECIFICATIONS & BOX CONTENTS 17
Physical Size 430 x 300 x 95 mm (16.9 x 11.8 x 3.7 inches) (L x W x H)
Weight (Net) 6 kg (13.2 lbs)
Weight (Gross) 7.25 kg (15.9 lbs)
Hard Drive Capacity 20 GB
LCD LED backlight
Size: 67mm x 38mm (Visual Area)
Electrical AC Voltage AC 120V, 60Hz
Max Power 55 W
Supported Playable Format Compatible CD Type Audio CD, CD-ROM, MP3 CD, CD-R, CD-RW
Audio Format CD-DA
Data Format CD-ROM MODE 1, CD-ROM MODE 2 F1
Supported Recording FormatsAudio Format CD-DA (Disc-At-Once)
Writable CD Types CD-R for Audio, CD-RW for Audio
Data Format Mode 1 (Session-At-Once with multisession support)
File system for Data CD conforms to ISO9660 with Joliet Extension
Others Data Transfer Port USB Port
Digital Audio Out Optical SPDIF Consumer format
Analog Audio In/Out RCA
Database Upgradable Gracenote CDDB® Music Recognition Service
Digital Audio Format MP3, WAV at 44.1kHz
Frequency Range 20Hz - 20kHz
Signal to Noise Ratio 90 dB
Total Harmonic Distortion < 0.1%
Main Unit
Remote UnitBattery Two (2) AA type
The DA-9000 has upgradeable firmware. Should a firmware upgrade be released, you will be able to download it fromwww.tdk.com/DA-9000. Instructions for upgrading the firmware will be provided.

18 DA 9000: USER MANUAL
BOX CONTENTSThe DA-9000 is shipped with the following items in its box:One (1) TDK PC Transfer Software CD-ROMOne (1) Remote ControlOne (1) USB CableOne (1) RCA Type Stereo Audio CableTwo (2) AA Batteries for the Remote ControlProduct Support Materials

TDK LIMITED WARRANTY – TDK DA-9000One Year Limited Warranty for Hardware90 Day Limited Warranty for Software
TDK Electronics Corporation ("TDK") warrants to the end-user customer that this product, exclusive of software (referred to hereinas "Hardware" or "Product") will be free from defects in material and workmanship for a period of one (1) year from date of pur-chase. If TDK receives notice of any such defects during the warranty period, TDK will, at its option, either repair or replace theProduct which it finds to be defective at no charge (except for shipping and insurance). Repair of defective Product may be witheither new or rebuilt replacement parts that will be warranted for the remainder of the original warranty period. Any exchangedparts under this warranty will become the property of TDK. Replacement Product may be either new or reconditioned. If theProduct is discontinued and no longer available, then it may be replaced with Product determined by TDK to be of similar valueand performance.
TDK warrants to the end-user customer that the TDK-branded software included with the Product, when properly installed andused will operate in substantial conformance with the user manual for a period of ninety (90) days from the date of purchase. IfTDK receives notice of defective software during the warranty period, TDK will replace the TDK software media which it finds to bedefective at no charge (except for shipping and insurance.)
Any software other than TDK Software included with the Product is supplied on an “As IS” basis and without any representationor warranties of any kind, whether express or implied, including but not limited to the implied warranties of merchantability, fit-ness for a particular purpose, title, and non-infringement. Please refer to any documentation included with such software foryour rights and obligations with respect to that software.
TDK does not warrant that the operation of the Product will be uninterrupted or error free. This Limited Warranty does not apply todefects resulting from (1) acts of God, accident, misuse, abuse, negligence, abnormal, or unusually heavy use; (2) improperinstallation, operation, testing, or maintenance; (3) power failure or connection to improper voltage supply; or (4) attemptedrepair by any party other than TDK. This Limited Warranty does not apply when the malfunction results from the use of theProduct in conjunction with other products, software, or accessories, or where it is determined by TDK that there is no fault withthe Product itself. This Limited Warranty is invalid if the factory applied serial number has been altered or removed from theProduct.
This Limited Warranty extends only to the original end-user customer and is not transferable to any subsequent purchaser. ThisLimited Warranty is valid only within the United States. For areas outside the United States, contact the authorized dealer fromwhom you purchased the Product to determine what warranty, if any, applies.
In order to obtain warranty service, you must deliver the Product to TDK freight prepaid, in either its original package or packag-ing providing a degree of protection equivalent to that of the original packaging, along with proof of purchase. (Please contactTDK at the number listed below or in the manual for further information.)
TDK MAKES NO OTHER WARRANTIES, EXPRESS OR IMPLIED, INCLUDING BUT NOT LIMITED TO THE WARRANTIES OF MERCHANTABIL-ITY ,FITNESS FOR A PARTICULAR PURPOSE, OR NON INFRINGEMENT OF THIRD PARTY RIGHTS. TO THE EXTENT THAT ANY IMPLIEDWARRANTIES APPLY, DESPITE THEIR EXCLUSION UNDER THIS LIMITED WARRANTY, SUCH WARRANTIES SHALL BE LIMITED TO THEDURATION OF THE EXPRESS WARRANTIES PROVIDED HEREUNDER.
THE REMEDIES PROVIDED UNDER THIS LIMITED WARRANTY ARE THE SOLE AND EXCLUSIVE REMEDIES. TDK’S LIABILITY UNDER ANYLEGAL THEORY FOR ANY LOSS OR DAMAGE IN ANY WAY RELATED TO THE PRODUCT SHALL IN NO EVENT EXCEED THE PURCHASEPRICE OF THE PRODUCT. IN NO EVENT SHALL TDK BE LIABLE FOR ANY INCIDENTAL OR CONSEQUENTIAL DAMAGES RESULTINGFROM USE OF THE PRODUCT.
Some states do not allow limitations on how long an implied warranty lasts or any exclusion or limitation of incidental or conse-quential damages, so the above limitations and exclusions may not apply to you. This warranty gives you specific legal rights,and you may have other rights which vary from state to state.
TDK Electronics Corp.901 Franklin Ave.Garden City, NY 115301-800-835-8326
TDK LIMITED WARRANTY 19