Cylinders
18
CYLINDER TECHNIQUE Jana Ewy STEP-BY-STEP WITH
description
Create cylinder shaped Beads, Bars and Bangles Step-by-Step with Jana Ewy
Transcript of Cylinders

CYLINDER TECHNIQUE
Jana EwySTEP-BY-STEP WITH
STEP-BY-STEP JANA EWY
All Rights Reserved Jana Ewy
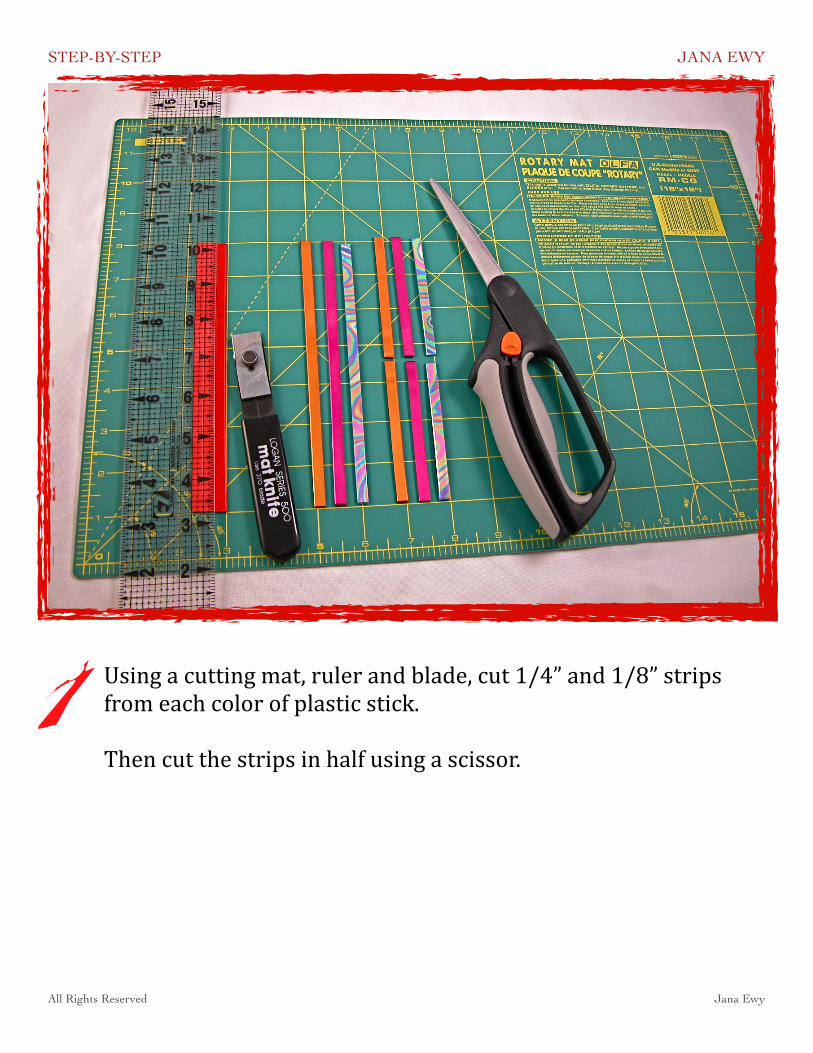
Using a cutting mat, ruler and blade, cut 1/4” and 1/8” strips from each color of plastic stick.
Then cut the strips in half using a scissor. 1

STEP-BY-STEP JANA EWY
All Rights Reserved Jana Ewy
Pre heat the griddle.
Place the baking sheet onto the griddle.
One at a time, in a color pattern of your choosing, place the plastic strips onto the baking sheet. Make sure each strip is stuck in place before adding the next. Try to press each strip tightly against the one before, to prevent any gaps.
2

STEP-BY-STEP JANA EWY
All Rights Reserved Jana Ewy
Continue until enough strips have been added, to measure approximately 7”. The full length of of the pan... if you are using a little gold pan from Nordic Wear.
Remove the pan from the heat and allow the plastic to cool completely.
3

STEP-BY-STEP JANA EWY
All Rights Reserved Jana Ewy
Place the cooled plastic sheet, back onto the cutting mat and trim off the uneven edges.
Continue to cut the plastic into three 1” wide strips. This will allow you to create a straight, a curved and a round cylinder.
4

STEP-BY-STEP JANA EWY
All Rights Reserved Jana Ewy
Place the silicone sheet onto the griddle.
Position the plastic strip, right side down onto the center of the silicone sheet and allow the plastic to soften. You will notice as the plastic softens it becomes very shiny. It is important that you watch this process closely.
5

STEP-BY-STEP JANA EWY
All Rights Reserved Jana Ewy
As soon as the entire strip is shiny, remove the silicone sheet from the heat.
Place the silicone sheet onto your counter or work surface.
Carefully lay the rubber tubing along the top edge of the softened plastic strip.
6

STEP-BY-STEP JANA EWY
All Rights Reserved Jana Ewy
Moisten your ,ingers with water, to prevent sticking to the plastic.
Begin to roll the plastic up and around the tubing. Continue until all of the plastic is wrapped around the tubing.
Now you can use your ,ingers and the palms of your hands to roll the cylinder back and forth on the silicone sheet. Paying close attention to secure and seal the overlap.
Once you are happy with the look of your cylinder, pick it up by the extended ends of the tubing. Pulling it straight and taunt, quickly run it under the ,low of cold water from the faucet. This will quickly harden the outside of the cylinder allowing you to lay it down, in order to ,inish the cooling process without the fear of it getting marred.
7

STEP-BY-STEP JANA EWY
All Rights Reserved Jana Ewy
To create the curved bar:
Repeat steps 5, 6 and most of step 7. Instead of pulling the tubing straight and taunt, you are going to allow the tubing to form a nice “U” shaped curve, think about the curve of your neck line. Once you are happy with the shape, carefully lower the cylinder into a bath of icy cold water. This will harden the plastic very quickly. Allow the cylinder to rest in the water for a few more minutes before removing.
8

STEP-BY-STEP JANA EWY
All Rights Reserved Jana Ewy
To create the round bangle:
Repeat steps 5, 6 and most of step 7. This time you are going to wrap the tubing around a jar, forming a circle. Once you are happy with the shape, while still holding on to the extended ends of the tubing with your Singer, carefully lower the jar into the bath of icy cold water. This will harden the plastic very quickly. Allow the cylinder to slide off the jar and rest in the water for a few more minutes before removing.
9

STEP-BY-STEP JANA EWY
All Rights Reserved Jana Ewy
Once all of the cylinders have cooled and the plastic has completely hardened. Remove the rubber tubing by pulling on each of the exposed ends until the seal within the cylinder has been broken. You will know when this has happened, as the tubing will slide out. The circle for the bangle will be a little more difSicult to remove, because of the shape, just be patient.
10

STEP-BY-STEP JANA EWY
All Rights Reserved Jana Ewy
Your three cylinders should look something like this.11

STEP-BY-STEP JANA EWY
All Rights Reserved Jana Ewy
Here are a few other color combinations to try.12

STEP-BY-STEP JANA EWY
All Rights Reserved Jana Ewy
Place the cylinders onto the cutting matt and trim off the uneven ends, using a craft blade or a utility knife. I prefer using the craft blade for this. You do need to put a little muscle behind it in order to cut through the plastic. Just do it carefully. Continue to cut the cylinders into the sizes you desire for your intended projects. There are several designs here to inspire you.
13

STEP-BY-STEP JANA EWY
All Rights Reserved Jana Ewy
Once you have a design idea in mind, gather all of your components together and get started. Here I have chosen the components to do a three-‐piece set.
Necklace -‐ Bracelet -‐ Earrings.14

STEP-BY-STEP JANA EWY
All Rights Reserved Jana Ewy
The Sinished designs.12

STEP-BY-STEP JANA EWY
All Rights Reserved Jana Ewy
TOOLS & MATERIALS
• Friendly Plastic 7” sticks: In the colors of your choice
• Matte knife• Acrylic ruler• Cutting mat• Scissor• Griddle set at 200-300
degrees• Non stick baking sheet• Silicone baking sheet liner,
cut to size: 3”x 9”• 8” length of 1/8” (4mm)
Rubber tubing, sold by the foot at Hobby stores
• Large bowl of cold water • Craft blade or utility knife• Round nose and needle
nose jewelry pliers• Wire cutters • Needle tool• Jewelry supplies and
findings: stringing wire, clear elastic cording, head pins, wire, bead caps, spacer beads, chain, clasps, ear wires, jump rings and assorted beads.
FRIENDLY PLASTIC CYLINDERS

STEP-BY-STEP JANA EWY
All Rights Reserved Jana Ewy
For more information and design inspiration, visit:
My Blog&
Just Bananas.com
for Friendly Plastic Designer Sticks and related supplies, visit:
the Friendly Plastic supply store
FRIENDLY PLASTIC CYLINDERS