CW-Sim Operating Manual - Mitsubishi Electric...The manual describes the system configuration,...
102
CW-Sim(VxWorks Simulator for CW Workbench) Operating Manual -SW1DNC-CWSIM-E -SW1DNC-CWSIMSA-E CW-Sim was jointly developed by Mitsubishi and Wind River Systems, Inc.
Transcript of CW-Sim Operating Manual - Mitsubishi Electric...The manual describes the system configuration,...

CW-Sim(VxWorks Simulator for CW Workbench) Operating Manual
-SW1DNC-CWSIM-E-SW1DNC-CWSIMSA-E
CW-Sim was jointly developed by Mitsubishi and Wind River Systems, Inc.


1
SAFETY PRECAUTIONS(Read these precautions before using this product.)
Before using this product, please read this manual and the relevant manuals carefully and pay full attention
to safety to handle the product correctly.
In this manual, the safety precautions are classified into two levels: " WARNING" and " CAUTION".
Under some circumstances, failure to observe the precautions given under " CAUTION" may lead to
serious consequences.
Make sure that the end users read this manual and then keep the manual in a safe place for future
reference.
[Design Precautions]
[Startup and Maintenance Precautions]
WARNINGTo control external devices, configure an interlock circuit in the user program to ensure that the entire
system will always operate safely.
Especially, in the case of a control to a remote external device, immediate action cannot be taken for
a problem due to a communication failure.
To prevent this, configure an interlock circuit in the user program, and determine corrective actions to
be taken between external devices in case of a communication failure.
CAUTIONTo control external devices, configure an interlock circuit in the user program to ensure that the entire
system will always operate safely.
Especially, in the case of a control to a remote external device, immediate action cannot be taken for
a problem due to a communication failure.
To prevent this, configure an interlock circuit in the user program, and determine corrective actions to
be taken between external devices in case of a communication failure.
WARNINGWhen connecting any external device during operations of CW-Sim and CW-Sim Standalone,
ensure the safety. Improper operation may damage machines or cause accidents.
WARNING
CAUTION
Indicates that incorrect handling may cause hazardous conditions,
resulting in death or severe injury.
Indicates that incorrect handling may cause hazardous conditions,
resulting in minor or moderate injury or property damage.

2
CONDITIONS OF USE FOR THE PRODUCT
(1) Mitsubishi CW-Sim/CW-Sim Standalone ("the PRODUCT") shall be used in conditions;
i) where any problem, fault or failure occurring in the PRODUCT, if any, shall not lead to any major
or serious accident; and
ii) where the backup and fail-safe function are systematically or automatically provided outside of
the PRODUCT for the case of any problem, fault or failure occurring in the PRODUCT.
(2) The PRODUCT has been designed and manufactured for the purpose of being used in general
industries.
MITSUBISHI SHALL HAVE NO RESPONSIBILITY OR LIABILITY (INCLUDING, BUT NOT
LIMITED TO ANY AND ALL RESPONSIBILITY OR LIABILITY BASED ON CONTRACT,
WARRANTY, TORT, PRODUCT LIABILITY) FOR ANY INJURY OR DEATH TO PERSONS OR
LOSS OR DAMAGE TO PROPERTY CAUSED BY the PRODUCT THAT ARE OPERATED OR
USED IN APPLICATION NOT INTENDED OR EXCLUDED BY INSTRUCTIONS, PRECAUTIONS,
OR WARNING CONTAINED IN MITSUBISHI'S USER, INSTRUCTION AND/OR SAFETY
MANUALS, TECHNICAL BULLETINS AND GUIDELINES FOR the PRODUCT.
("Prohibited Application")
Prohibited Applications include, but not limited to, the use of the PRODUCT in;
• Nuclear Power Plants and any other power plants operated by Power companies, and/or any
other cases in which the public could be affected if any problem or fault occurs in the PRODUCT.
• Railway companies or Public service purposes, and/or any other cases in which establishment of
a special quality assurance system is required by the Purchaser or End User.
• Aircraft or Aerospace, Medical applications, Train equipment, transport equipment such as
Elevator and Escalator, Incineration and Fuel devices, Vehicles, Manned transportation,
Equipment for Recreation and Amusement, and Safety devices, handling of Nuclear or
Hazardous Materials or Chemicals, Mining and Drilling, and/or other applications where there is a
significant risk of injury to the public or property.
Notwithstanding the above, restrictions Mitsubishi may in its sole discretion, authorize use of the
PRODUCT in one or more of the Prohibited Applications, provided that the usage of the PRODUCT
is limited only for the specific applications agreed to by Mitsubishi and provided further that no
special quality assurance or fail-safe, redundant or other safety features which exceed the general
specifications of the PRODUCTs are required. For details, please contact the Mitsubishi
representative in your region.

3
INTRODUCTION
Thank you for purchasing CW-Sim/CW-Sim Standalone.
This manual explains about the product.
Before using this product, please read this manual and the relevant manuals carefully and develop familiarity with the
functions and performance of CW-Sim/CW-Sim Standalone and applicable modules to handle the product correctly.
RELEVANT MANUALS
The manuals related to the product are listed below.
Please place an order as needed.
*1 : The material related to VxWorks 6.4 (target operating system with Q12DCCPU-V)*2 : The material related to VxWorks 6.8 (target operating system with Q24DHCCPU-V/-VG)
Manual
<Manual No. and model code>Description
CW Workbench Operating Manual
<SH-080982ENG, 13JU71>
The manual describes system configuration, specifications, functions,
and troubleshooting of CW Workbench.
MELSEC-Q C Controller Module User's Manual
<SH-081130ENG, 13JZ75>
The manual describes the system configuration, specifications,
functions,handling methods, wiring, troubleshooting, and programming
and function of C Controller module (Q24DHCCPU-V, Q24DHCCPU-VG,
Q24DHCCPU-LS, Q26DHCCPU-LS, and Q12DCCPU-V (Extended
mode)).
C Controller Module User's Manual
(Hardware Design, Function Explanation)
<SH-080766ENG, 13JY80>
The manual describes the system configuration, specifications,
functions, handling methods, wiring, and troubleshooting of
Q12DCCPUV(Basic mode) and Q06CCPU-V.
Wind River VxWorks Simulator 6.0 USER'S GUIDE (Japanese)
Wind River VxWorks Simulator 6.1 USER'S GUIDE (English)*1
Wind River VxWorks Simulator 6.8 USER'S GUIDE (English)*2
The manuals describe specifications, usage methods, troubleshooting,
and relevant documents of Wind River VxWorks Simulator that is the
base for this product.
Refer to the manuals for the same functions as Wind River VxWorks
Simulator.
A PDF file of the manuals is stored on the CD-ROM disc of the product.

CONTENTS
4
CONTENTS
SAFETY PRECAUTIONS . . . . . . . . . . . . . . . . . . . . . . . . . . . . . . . . . . . . . . . . . . . . . . . . . . . . . . . . . . . . . 1CONDITIONS OF USE FOR THE PRODUCT . . . . . . . . . . . . . . . . . . . . . . . . . . . . . . . . . . . . . . . . . . . . . 2INTRODUCTION . . . . . . . . . . . . . . . . . . . . . . . . . . . . . . . . . . . . . . . . . . . . . . . . . . . . . . . . . . . . . . . . . . . . 3RELEVANT MANUALS . . . . . . . . . . . . . . . . . . . . . . . . . . . . . . . . . . . . . . . . . . . . . . . . . . . . . . . . . . . . . . . 3MANUAL PAGE ORGANIZATION . . . . . . . . . . . . . . . . . . . . . . . . . . . . . . . . . . . . . . . . . . . . . . . . . . . . . . . 7GENERIC TERMS AND ABBREVIATIONS. . . . . . . . . . . . . . . . . . . . . . . . . . . . . . . . . . . . . . . . . . . . . . . . 9TERMS . . . . . . . . . . . . . . . . . . . . . . . . . . . . . . . . . . . . . . . . . . . . . . . . . . . . . . . . . . . . . . . . . . . . . . . . . . 10PRODUCT ORGANIZATION. . . . . . . . . . . . . . . . . . . . . . . . . . . . . . . . . . . . . . . . . . . . . . . . . . . . . . . . . . 10
CHAPTER 1 OVERVIEW 11
1.1 Features . . . . . . . . . . . . . . . . . . . . . . . . . . . . . . . . . . . . . . . . . . . . . . . . . . . . . . . . . . . . . . . . . . 11
CHAPTER 2 SYSTEM CONFIGURATION 13
2.1 Device Configuration . . . . . . . . . . . . . . . . . . . . . . . . . . . . . . . . . . . . . . . . . . . . . . . . . . . . . . . .13
2.2 Communication Paths Available for CW-Sim/CW-Sim Standalone . . . . . . . . . . . . . . . . . . . . . 14
2.3 Relevant Modules . . . . . . . . . . . . . . . . . . . . . . . . . . . . . . . . . . . . . . . . . . . . . . . . . . . . . . . . . . .14
CHAPTER 3 OPERATING ENVIRONMENT 15
CHAPTER 4 SPECIFICATIONS 16
4.1 Specifications of CW-Sim and CW-Sim Standalone. . . . . . . . . . . . . . . . . . . . . . . . . . . . . . . . .16
4.2 Differences from C Controller Module . . . . . . . . . . . . . . . . . . . . . . . . . . . . . . . . . . . . . . . . . . .16
CHAPTER 5 PACKING LIST 17
5.1 Packing List . . . . . . . . . . . . . . . . . . . . . . . . . . . . . . . . . . . . . . . . . . . . . . . . . . . . . . . . . . . . . . . 17
5.2 Preparation before Using CW-Sim . . . . . . . . . . . . . . . . . . . . . . . . . . . . . . . . . . . . . . . . . . . . . .18
5.3 Preparation before Using CW-Sim Standalone . . . . . . . . . . . . . . . . . . . . . . . . . . . . . . . . . . . .19
CHAPTER 6 PROCEDURE OVERVIEW 20
6.1 From Installation of CW-Sim to Debugging of Programs . . . . . . . . . . . . . . . . . . . . . . . . . . . . .20
6.2 From Installation of CW-Sim to Execution of Programs . . . . . . . . . . . . . . . . . . . . . . . . . . . . . .22
CHAPTER 7 PERMANENT LICENSE 23
7.1 Obtaining Permanent License . . . . . . . . . . . . . . . . . . . . . . . . . . . . . . . . . . . . . . . . . . . . . . . . . 23
7.2 Applying Permanent License . . . . . . . . . . . . . . . . . . . . . . . . . . . . . . . . . . . . . . . . . . . . . . . . . . 24
7.3 Deleting Permanent License. . . . . . . . . . . . . . . . . . . . . . . . . . . . . . . . . . . . . . . . . . . . . . . . . . .25
7.4 Re-applying Permanent License. . . . . . . . . . . . . . . . . . . . . . . . . . . . . . . . . . . . . . . . . . . . . . . .26
CHAPTER 8 INSTALLATION AND UNINSTALLATION 28
8.1 Installation of CW-Sim . . . . . . . . . . . . . . . . . . . . . . . . . . . . . . . . . . . . . . . . . . . . . . . . . . . . . . . 28
8.1.1 Preparation before installation . . . . . . . . . . . . . . . . . . . . . . . . . . . . . . . . . . . . . . . . . . . . . . . . 28
8.1.2 How to install CW-Sim . . . . . . . . . . . . . . . . . . . . . . . . . . . . . . . . . . . . . . . . . . . . . . . . . . . . . . 30
8.1.3 Operations after installation . . . . . . . . . . . . . . . . . . . . . . . . . . . . . . . . . . . . . . . . . . . . . . . . . . 35

5
8.1.4 After installation . . . . . . . . . . . . . . . . . . . . . . . . . . . . . . . . . . . . . . . . . . . . . . . . . . . . . . . . . . . 35
8.2 Uninstallation of CW-Sim . . . . . . . . . . . . . . . . . . . . . . . . . . . . . . . . . . . . . . . . . . . . . . . . . . . . .36
8.3 Installation of CW-Sim Standalone . . . . . . . . . . . . . . . . . . . . . . . . . . . . . . . . . . . . . . . . . . . . . .36
8.4 Uninstallation of CW-Sim Standalone. . . . . . . . . . . . . . . . . . . . . . . . . . . . . . . . . . . . . . . . . . . .37
CHAPTER 9 APPLYING PATCH 38
9.1 How to Obtain Patch. . . . . . . . . . . . . . . . . . . . . . . . . . . . . . . . . . . . . . . . . . . . . . . . . . . . . . . . . 39
9.2 How to Apply Patch. . . . . . . . . . . . . . . . . . . . . . . . . . . . . . . . . . . . . . . . . . . . . . . . . . . . . . . . . . 39
CHAPTER 10 VxWorks NETWORK DAEMON SETTINGS 41
10.1 Windows 7 or later . . . . . . . . . . . . . . . . . . . . . . . . . . . . . . . . . . . . . . . . . . . . . . . . . . . . . . . . . . 41
10.2 Windows Vista . . . . . . . . . . . . . . . . . . . . . . . . . . . . . . . . . . . . . . . . . . . . . . . . . . . . . . . . . . . . .47
10.3 Windows XP . . . . . . . . . . . . . . . . . . . . . . . . . . . . . . . . . . . . . . . . . . . . . . . . . . . . . . . . . . . . . . .51
CHAPTER 11 CREATING AND BUILDING PROJECT 55
11.1 Creating Project . . . . . . . . . . . . . . . . . . . . . . . . . . . . . . . . . . . . . . . . . . . . . . . . . . . . . . . . . . . .55
11.1.1 Creating new project . . . . . . . . . . . . . . . . . . . . . . . . . . . . . . . . . . . . . . . . . . . . . . . . . . . . . . . 55
11.1.2 Creating project using sample program . . . . . . . . . . . . . . . . . . . . . . . . . . . . . . . . . . . . . . . . . 62
11.2 Building Project. . . . . . . . . . . . . . . . . . . . . . . . . . . . . . . . . . . . . . . . . . . . . . . . . . . . . . . . . . . . . 66
11.2.1 How to build new project . . . . . . . . . . . . . . . . . . . . . . . . . . . . . . . . . . . . . . . . . . . . . . . . . . . . 66
11.2.2 Building project using sample program . . . . . . . . . . . . . . . . . . . . . . . . . . . . . . . . . . . . . . . . . 66
CHAPTER 12 PROGRAM DEBUGGING WITH CW-Sim 67
12.1 VxWorks Network Daemon Startup . . . . . . . . . . . . . . . . . . . . . . . . . . . . . . . . . . . . . . . . . . . . .67
12.2 Simulator Startup . . . . . . . . . . . . . . . . . . . . . . . . . . . . . . . . . . . . . . . . . . . . . . . . . . . . . . . . . . . 68
12.3 Debugging Program . . . . . . . . . . . . . . . . . . . . . . . . . . . . . . . . . . . . . . . . . . . . . . . . . . . . . . . . .71
CHAPTER 13 EXECUTION OF SAMPLE PROGRAM WITH CW-Sim 73
13.1 VxWorks Network Daemon Startup . . . . . . . . . . . . . . . . . . . . . . . . . . . . . . . . . . . . . . . . . . . . .73
13.2 Creating Simulator . . . . . . . . . . . . . . . . . . . . . . . . . . . . . . . . . . . . . . . . . . . . . . . . . . . . . . . . . . 73
13.3 Simulator Settings. . . . . . . . . . . . . . . . . . . . . . . . . . . . . . . . . . . . . . . . . . . . . . . . . . . . . . . . . . .75
13.4 Execution of Sample Program . . . . . . . . . . . . . . . . . . . . . . . . . . . . . . . . . . . . . . . . . . . . . . . . . 76
CHAPTER 14 EXECUTION OF PROGRAM WITH CW-Sim Standalone 78
14.1 VxWorks Network Daemon Startup . . . . . . . . . . . . . . . . . . . . . . . . . . . . . . . . . . . . . . . . . . . . .78
14.2 Simulator Startup . . . . . . . . . . . . . . . . . . . . . . . . . . . . . . . . . . . . . . . . . . . . . . . . . . . . . . . . . . . 79
CHAPTER 15 TROUBLESHOOTING 81
15.1 Installation. . . . . . . . . . . . . . . . . . . . . . . . . . . . . . . . . . . . . . . . . . . . . . . . . . . . . . . . . . . . . . . . . 82
15.2 Installation Using Temporary License . . . . . . . . . . . . . . . . . . . . . . . . . . . . . . . . . . . . . . . . . . . .84
15.3 License . . . . . . . . . . . . . . . . . . . . . . . . . . . . . . . . . . . . . . . . . . . . . . . . . . . . . . . . . . . . . . . . . . .85
15.4 Simulator Startup . . . . . . . . . . . . . . . . . . . . . . . . . . . . . . . . . . . . . . . . . . . . . . . . . . . . . . . . . . . 86
6
APPENDIX 88
Appendix 1 VxWorks Component List . . . . . . . . . . . . . . . . . . . . . . . . . . . . . . . . . . . . . . . . . . . . . . . .88
Appendix 1.1 VxWorks 6.8 component list (Q24DHCCPU-V/-VG) . . . . . . . . . . . . . . . . . . . . . 88
Appendix 1.2 VxWorks 6.4 component list (Q12DCCPU-V). . . . . . . . . . . . . . . . . . . . . . . . . . 89
Appendix 2 QBF_Simulator Bus Interface Functions (Stub) . . . . . . . . . . . . . . . . . . . . . . . . . . . . . . .90
Appendix 3 Support . . . . . . . . . . . . . . . . . . . . . . . . . . . . . . . . . . . . . . . . . . . . . . . . . . . . . . . . . . . . . . 93
Appendix 3.1 Technical support assistance service regarding C Controller module . . . . . . . . . . 93
INDEX 94
REVISIONS . . . . . . . . . . . . . . . . . . . . . . . . . . . . . . . . . . . . . . . . . . . . . . . . . . . . . . . . . . . . . . . . . . . . . . . 96TRADEMARKS . . . . . . . . . . . . . . . . . . . . . . . . . . . . . . . . . . . . . . . . . . . . . . . . . . . . . . . . . . . . . . . . . . . . 98

7
MANUAL PAGE ORGANIZATION
The following illustration is for explanation purpose only, and should not be referred to as an actual documentation.
Operating procedures
Two styles of descriptions are used in this manual as below:
(1) When there is only one operation
• Menu bar [File] [New]
(2) When there are steps
1. Select [Start] [All Programs] [Wind River] [CW Workbench] [CW Workbench].
2. Specify a folder of storage location of workspace for "Workspace:".
Indicates the section
of currently open page.
Indicates the chapter of
currently open page.
indicates
the particular
attention.
indicates
the useful tip.
Remark

8
Symbols used in this manual
The following shows the symbols used in this manual with descriptions and examples.
No. Symbol Description Example
[ ] Menu name on a menu bar [Project]
Toolbar icon
" " Screen name or item name on a screen "Build tool:"
<< >> Tab name on a screen <<Build Tools>>
Button on a screen
− Keyboard key
− Reference page −
− Reference manual −
1
4
5
2
3

9
GENERIC TERMS AND ABBREVIATIONS
Unless otherwise specified, this manual uses the following generic terms and abbreviations.
Generic term/abbreviation Description
Q24DHCCPU-V The abbreviation for Q24DHCCPU-V C Controller module.
Q24DHCCPU-VG The abbreviation for Q24DHCCPU-VG C Controller module.
Q12DCCPU-V The abbreviation for Q12DCCPU-V C Controller module.
Q12DCCPU-V (Basic mode)
Status that Q12DCCPU-V is initialized with the basic mode For Q12DCCPU-V (Basic
mode), refer to the following manual.
C Controller Module User's Manual (Hardware Design, Function Explanation)
Q12DCCPU-V (Extended mode)
Status that Q12DCCPU-V is initialized with the extended mode For Q12DCCPU-V
(Extended mode), refer to the following manual.
MELSEC-Q C Controller Module User's Manual
C Controller module The generic term for Q24DHCCPU-V, Q24DHCCPU-VG, and Q12DCCPU-V.
Setting/monitoring tools for the C
Controller module
The generic term for Setting/monitoring tools for the C Controller module shown below.
• Q24DHCCPU-V, Q24DHCCPU-VG, and Q12DCCPU-V (Extended mode)
SW4PVC-CCPU
• Q12DCCPU-V (Basic mode)
SW3PVC-CCPU
VxWorks The real-time operating system manufactured by Wind River Systems, Inc.
Wind River Workbench The generic term for Wind River Workbench manufactured by Wind River Systems, Inc.
CW Workbench
The engineering tool for C Controller module.
The generic term for OEM products of Wind River without the runtime analysis tool and
simulation functions (VxSim) of Wind River Workbench; a subset of Wind River
Workbench.
• Q24DHCCPU-V and Q24DHCCPU-VG
SW1DND-CWWLQ24-E, SW1DND-CWWLQ24-EZ, SW1DND-CWWLQ24-EVZ
• Q12DCCPU-V
SW1DND-CWWLQ12-E, SW1DND-CWWLQ12-EZ, SW1DND-CWWLQ12-EVZ
VxSim The generic term for the VxWorks simulator functions of Wind River Workbench.
CW-Sim
The abbreviation for the VxWorks simulator that can operate the C Controller module
program on a personal computer with CW Workbench installed, without connecting to
the actual machine (target).
CW-Sim StandaloneThe abbreviation for the VxWorks simulator that can operate C Controller module
program even on a personal computer without CW Workbench installed.
RTP
The abbreviation for Real Time Process Project, one of the project types of Wind River's
Workbench.
RTP is a process executed on the VxWorks real time processor that creates VxWorks
6.x user mode applications.
Windows® 7 or later The generic term for Windows® 7, Windows® 8, Windows® 8.1, Windows® 10
Personal computer The generic term for personal computers where Windows® operates.

10
TERMS
Unless otherwise specified, this manual uses the following terms.
PRODUCT ORGANIZATION
The following shows the C Controller-compatible software.
: Applicable, : Not applicable
*1 First five digits of serial number*2 For Q12DCCPU-V earlier than "15102", the mode cannot be changed. Q12DCCPU-V earlier than "15102" is regarded
as the basic mode in this manual.
Term Description
Dedicated function libraryThe generic term for bus interface function, MELSEC data link function, and C Controller
module dedicated function.
Bus interface function
Dedicated function library offered by C Controller module.
This function is used when executing the following:
• Input from or output to I/O modules controlled by the C Controller module
• Access to the buffer memory of an intelligent function module
• The readout or control of the C Controller module status
MELSEC data link function
Dedicated function library offered by C Controller module.
This function is used when writing to/reading from a device of other programmable
Controller CPUs connected via network or configured with multiple CPUs.
C Controller module
dedicated function
Dedicated function library that controls C Controller module.
This function is used when reading the C Controller module status, controlling LED, and
accessing to resources such as time and battery backup RAM.
This function can be used for Q24DHCCPU-V and Q24DHCCPU-VG C Controller modules.
It can not be used in Q12DCCPU-V C Controller module.
Supported
software
C Controller
Q24DHCCPU-V
Q24DHCCPU-VGQ12DCCPU-V
- "15102" or later *1Earlier than
"15102" *1
- Extended mode Basic mode *2
SW1DND-CWWLQ24-E
SW1DND-CWWLQ12-E

11
CHAPTER 1 OVERVIEW
1
1.1 Feature
s
CHAPTER 1 OVERVIEW
CW-Sim and CW-Sim Standalone are products to simulate programs for VxWorks system on a personal computer.
CW-Sim and CW-Sim Standalone is an OEM product of Wind River Systems, Inc. The product has only basic functions
required for simulation, as a subset product of Wind River Workbench 3.2.
Indications and operations of the common functions are all the same as those for Wind River Workbench.
To debug any program containing the dedicated function library provided by C Controller module, create the stub on your own.The sample stub program can be found on the CW-Sim CD-ROM (SW1DNC-CWSIM-ECD).
Remark
This manual describes operations to perform simulation.For operations other than simulation, refer to the following manual.CW Workbench Operating manual
1.1 Features
CW-Sim/CW-Sim Standalone has the following features.
• VxWorks system can be simulated without the C Controller module.
• The program quality and device safety can be improved before actual operations.
• This product can be used for debugging of a system consisting of more than one personal computer and
training.
Simulator SimulatorSimulator
Ethernet
Personal computer 1: Control system
Windowsapplication
Personal computer 2: Information processing system
Personal computer 4: Information processing system
Personal computer 3: Information processing system
Simulator

12
• The difference between CW-Sim and CW-Sim Standalone is described below.
• The differences between CW-Sim, CW-Sim Standalone, and Wind River's Wind River Workbench simulator
functions (VxSim) are described below.
*1 : CW-Sim is also uninstalled by the CW Workbench uninstaller.
CW-Sim CW-Sim Standalone
Programs can be simulated and debugged on a personal
computer with CW Workbench installed.
Programs can be simulated on a personal computer without CW
Workbench installed, but programs cannot be debugged.
: Available, —: Unavailable
Item Function Description CW-SimCW-Sim
StandaloneVxSim
Introduction and
management
Install and UninstallInstallation and uninstallation by the
wizard.*1 —
License management License key authentication —
Compiler
Diab compilerBuild as Wind River compiler by
SIMNTdiab— —
GNU compilerBuild as Wind River GNU compiler by
SIMNTgnu —
Startup Start script Script is executed at startup.
VxWorks function
Real Time Process (RTP)Program(s) required for Real Time
system are executed.— —
Multi tasking
System functions including task
management, inter-task communication
and event transmission/reception are
used.
POSIX standard interfaceInterface specified for IEEE Std 1003.1
(base standard) is used.
I/O systemStandard interfaces are used for access
to various devices.
Local file systemMS-DOS-compatible file system (dosFs)
is used.
Error detection and reporting Software failure debugging
Shared data areaMemory is mutually shared between
processes.— —
Shared libraryShared library containing codes and
data is used.— —
VxMP
(Shared memory object)
Shared memory that realizes high-
speed synchronization/communication
between tasks executed on different
CPUs is used.
— —
VxFusion
(Distributed message queue)
Dispersion mechanism on different
CPUs based on VxWorks message
queue is used.
— —
Wind River System ViewerSystem Viewer command server of
VxWorks is used.— —
Simulated
hardware
VxWorks consoleShell console by VxWorks system tasks
is used.
System timerTimer generated from core clock used in
VxWorks is used.
Memory Management Unit
(MMU)
Virtual memory is managed
independent of MMU architecture of
CPUs.
Non-volatile RAM
(NVRAM)Non-volatile RAM areas are simulated.
Virtual disc support Disc block device is simulated.
Time stamp driverWind River System Viewer is used to
display time frame.— —
Real time clockTime and calendar are updated and
controlled.
Virtual networkLink to virtual network and external
network by network daemon

13
CHAPTER 2 SYSTEM CONFIGURATION
2
2.1 Device
Configuration
CHAPTER 2 SYSTEM CONFIGURATION
This section explains the system configuration of CW-Sim and CW-Sim Standalone.
2.1 Device Configuration
A simulation environment for CW-Sim can be established by installing CW Workbench and CW-Sim to the personal
computer.
A simulation environment for CW-Sim Standalone can be established by the execution file of CW-Sim Standalone*1
and VxWorks image/symbol files*2.
*1 : CW-Sim Standalone's execution file can be copied from CW-Sim Standalone CD-ROM (SW1DNC-CWSIMSA-ECD).*2 : VxWorks image/symbol files can be copied from CW-Sim CD-ROM (SW1DNC-CWSIM-ECD).
Programs running on the simulator can be interlocked with superior server, microcomputer device, and C Controller
module via Ethernet.
CW Workbench CW-Sim
CW-Sim simulation environment
Superior
server
Microcomputer
device
C Controller module
CW-Sim Standalone
(Execution file)
CW-Sim
(VxWorks image file)
CW-Sim Standalone simulation environment
Ethernet
14
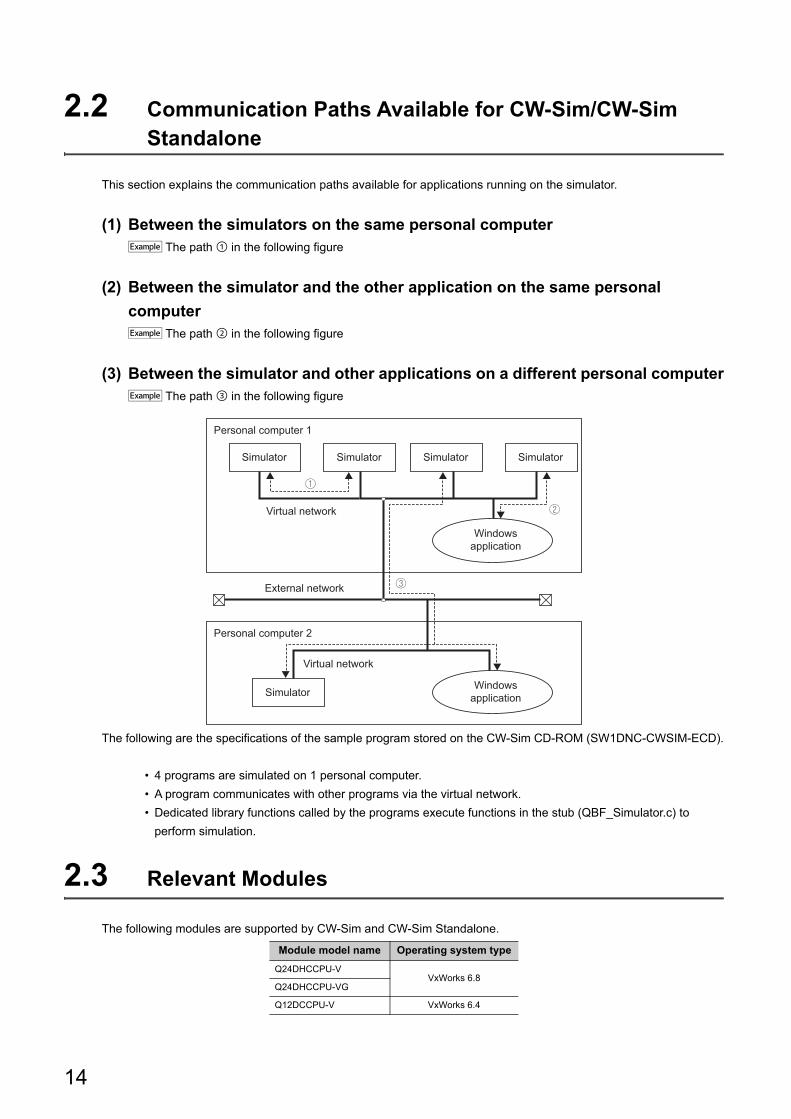
2.2 Communication Paths Available for CW-Sim/CW-Sim Standalone
This section explains the communication paths available for applications running on the simulator.
(1) Between the simulators on the same personal computer The path in the following figure
(2) Between the simulator and the other application on the same personal
computer The path in the following figure
(3) Between the simulator and other applications on a different personal computer The path in the following figure
The following are the specifications of the sample program stored on the CW-Sim CD-ROM (SW1DNC-CWSIM-ECD).
• 4 programs are simulated on 1 personal computer.
• A program communicates with other programs via the virtual network.
• Dedicated library functions called by the programs execute functions in the stub (QBF_Simulator.c) to
perform simulation.
2.3 Relevant Modules
The following modules are supported by CW-Sim and CW-Sim Standalone.
Module model name Operating system type
Q24DHCCPU-VVxWorks 6.8
Q24DHCCPU-VG
Q12DCCPU-V VxWorks 6.4
Simulator
Virtual network
Virtual network
External network
Simulator
Simulator
Simulator Simulator
Windows
application
Personal computer 1
Personal computer 2
Windows
application

15
CHAPTER 3 OPERATING ENVIRONMENT
3
CHAPTER 3 OPERATING ENVIRONMENT
Below is a list of the operating environment of a personal computer where CW-Sim and CW-Sim Standalone can be
operated.
*1 : When the following functions are used, this product may not run properly. • Application start-up in Windows compatibility mode • Fast user switching • Remote desktop • Windows XP Mode • Windows Touch or Touch • Tablet mode • Virtual Desktops
*2 : In the following cases, the screen of this product may not work properly. • The size of the text and/or other items on the screen are changed to values other than default values (such as 96
DPI, 100%, and 9 pt).*3 : Log on as a user with the Administrator attribute when installing and uninstalling CW-Sim.*4 : TCP/IP is required.*5 : 64-bit version only.*6 : The operating systems support CW-Sim with software version "D" or later. As for CW-Sim Standalone, software version
"C" or later is supported.Check the software version with the alphabet at end of the character string written in the DATE column of a DVD-ROM. (Example: 1710AD indicate that the software version is "D".)
*7 : 32-bit version only.
Item Description
ComputerPC/AT-compatible personal computer in which the following operating systems can be
operated.
CPU Intel® CoreTM2 Duo 2GHz or higher is recommended.
Memory requirements 1G byte or more (2G bytes or more is recommended)
Hard disk spaceInstall size: HDD 4G bytes or more
Executable size: Virtual memory 512MB or more
Display 1024-by-768 resolution or higher
Disk drive CD-ROM drive
Interface Ethernet 10BASE-T/100BASE-TX/1000BASE-T
Operating system *1,*2,*3,*4
(Japanese/English)
• Windows 10 (Home, Pro, Enterprise, Education, IoT Enterprise 2016 LTSB*5)*6
• Windows 8.1, Windows 8.1 (Pro, Enterprise)*6
• Windows 8, Windows 8 (Pro, Enterprise)*6
• Windows 7 (Professional, Ultimate, Enterprise)*7
• Windows Vista® (Ultimate, Business, Enterprise)*7
• Windows XP® (Professional SP3 or later)*7

16
CHAPTER 4 SPECIFICATIONS
4.1 Specifications of CW-Sim and CW-Sim Standalone
Below are specifications of CW-Sim and CW-Sim Standalone.
4.2 Differences from C Controller Module
This section explains differences from C Controller module that should be considered in user program development for
using CW-Sim and CW-Sim Standalone.
(1) Floating point functionThe hardware floating point function is not supported.
Use the following ANSI floating point function.
*1 : If any ANSI floating point function other than those listed above is used, a symbol error occurs in loading.
(2) C Controller module dedicated function libraryThe dedicated function library (Bus interface function, MELSEC data link function, and C Controller module
dedicated function) cannot be simulated.
To debug any program containing these functions, create a stub or delete the caller.
Remark
For more information, refer to the following manual that can be found on the CW-Sim CD-ROM (SW1DNC-CWSIM-ECD). Wind River VxWorks Simulator User's Guide
ItemSpecifications
CW-Sim CW-Sim Standalone
Product name CW-Sim CW-Sim Standalone
Operating system of applicable host
machineRefer to "Operating environment" (Page 15, CHAPTER 3)
Applicable C Controller module Refer to "Relevant Module" (Page 14, Section 2.3)
Building GNU compiler (SIMNTgnu) —
License format Node locked Runtime
Document Wind River VxWorks Simulator Help document
Available ANSI floating point function*1
acos(), asin(), atan(), atan2(), cos(), cosh(), exp(), fabs(), floor(), fmod(), log(), log10(), pow(), sin(), sinh(),
sqrt(), tan(), tanh()

17
CHAPTER 5 PACKING LIST
5
5.1 Packing List
CHAPTER 5 PACKING LIST
5.1 Packing List
The following items are included with CW-Sim and CW-Sim standalone.
Check that all the items are included before use.
(1) Items included
*1 : The CD-ROM is not included with the additional license product.To install CW-Sim, the CD-ROM included with the CW-Sim product with license is required.
(2) Contents of CW-Sim CD-ROM
*1 : The VxWorks image file contains Telnet and FTP services. To access these services, use the following account. (Account(s) can be added by using the loginUserAdd() function.)
• User name: target • Password: password
Model name Item Qty.
SW1DNC-CWSIM-E
(CW-Sim product with license)
CD-ROM (SW1DNC-CWSIM-ECD) 1
Before Using the Product 1
License Certificate 1
End-User Software License Agreement 1
Permanent License Application Form (sample) 1
SW1DNC-CWSIM-EZ
(CW-Sim product with additional
license*1)
Before Using the Product 1
License Certificate 1
End-User Software License Agreement 1
Permanent License Application Form (sample) 1
SW1DNC-CWSIMSA-E
(CW-Sim Standalone)
CD-ROM (SW1DNC-CWSIMSA-ECD) 1
License Certificate 1
End-User Software License Agreement 1
Content Description Storage location
CW-Sim install image An install image file of CW-Sim\
\images
VxWorks
Image file
Symbol file
VxWorks image file*1 and symbol file.
• VxWorks 6.8: "vxWorks_6_8", "vxWorks_6_8.sym"
• VxWorks 6.4: "vxWorks_6_4", "vxWorks_6_4.sym"
\VxWorks
Relevant document
Relevant manuals of VxWorks simulator and Wind River Workbench
(PDF)\docs
A license notice (PDF) of the third party used in CW-Sim \3rd_party_licensor_notices
Manual CW-Sim Operating Manual (PDF) \Manual\English
Permanent License
Application Form
Application form for permanent license file acquisition and host
machine transfer (PermanentLicenseApplicationForm.xls).
This is used to apply for a permanent license and transfer of the
host machine.
\
Sample program A sample program for the simulator \Samples\English

18
(3) Contents of CW-Sim Standalone CD-ROM
5.2 Preparation before Using CW-Sim
The following are the items to be prepared before using CW-Sim.
(1) Development environmentPrepare a personal computer with CW Workbench installed.
Enter the host name within 2 to 15 alphanumeric characters for a personal computer.
For required operating specifications of the personal computer, refer to the following section.
Page 15, CHAPTER 3
(2) CW-Sim CD-ROM (SW1DNC-CWSIM-ECD)Prepare the CW-Sim CD-ROM included with the product with license (SW1DNC-CWSIM-E).
The CD-ROM is required to install CW-Sim.
(3) License AgreementAn LAC described in the License Agreement is required to install CW-Sim by using a temporary license.
An LAC and a product ID described in the License Agreement are also required to apply for a permanent license.
Prepare the License Agreement included with CW-Sim.
(4) Permanent license fileA permanent license file is required to install CW-Sim by using a permanent license.
To acquire a permanent license file, use a Permanent License Application Form stored on the CW-Sim CD-ROM
(SW1DNC-CWSIM-ECD) and send us the form.
(5) Internet connectionAn Internet connection is required to install CW-Sim by using a permanent license.
Acquire a 31-day temporary license via the Internet.
Content Description Storage location
CW-Sim Standalone
execution fileAn execution file of CW-Sim Standalone \CWSIMSA
Sample program A sample program for the simulator \Samples
Relevant document A license notice (PDF) of the third party used in CW-Sim \3rd_party_licensor_notices
Readme.txt The ways to obtain the CW-Sim Operating Manual are described. \

19
CHAPTER 5 PACKING LIST
5
5.3 Preparation befo
re Using C
W-S
im S
tandalone
5.3 Preparation before Using CW-Sim Standalone
The following are the items to be prepared before using CW-Sim Standalone.
(1) Development environmentEnter the host name within 2 to 15 alphanumeric characters for a personal computer.
For required operating specifications of the personal computer, refer to the following section.
Page 15, CHAPTER 3
(2) CW-Sim Standalone CD-ROM (SW1DNC-CWSIMSA-ECD)Prepare the CW-Sim CD-ROM included with the product with SW1DNC-CWSIMSA-E.
The CD-ROM is required to install CW-Sim standalone.
(3) CW-Sim CD-ROM (SW1DNC-CWSIM-ECD)Prepare the CW-Sim CD-ROM included with the product with license (SW1DNC-CWSIM-E).
This will be used to copy the VxWorks image/symbol files.

20
CHAPTER 6 PROCEDURE OVERVIEW
6.1 From Installation of CW-Sim to Debugging of Programs
The following is the operating procedure from the installation of CW-Sim to the debugging of programs.
● Installation using a permanent licenseThis installation is for users with a permanent license (regular license).All the functions of CW-Sim can be used for unlimited duration.
● Installation using a temporary licenseThis installation is for users with a temporary license acquired on the Internet.All the functions of CW-Sim can be used for 31 days after the installation.
To the next page
Obtain a permanent license.
Apply for a permanent license.
Apply a permanent license.
Apply a permanent license is sent later
to the development environment
(personal computer).
Installation of CW-Sim
How do you install the product?
Installation of CW Workbench
Use the permanent license file for installation
Obtain a permanent license file
in advance
Use the temporary license file for installation
Prepare an Internet connection.
Page 20, Point in this section Page 20, Point in this section
Page 24, Section 7.2
Page 28, Section 8.1
Page 23, Section 7.1
CW Workbench Operating manual

21
CHAPTER 6 PROCEDURE OVERVIEW
6
6.1 From
Installation of CW
-Sim
to Debugging of P
rograms
Apply a patch.
Information and services
For further information and services, please consult your local Mitsubishi representative.
From the previous page
Set a VxWorks network daemon.
Configure network settings to use the VxWorks network daemon.
Create a project.
Create a user program project and perform programming.
Build.
Build the user program.
Debug.
Debug the user program.
Page 38, CHAPTER 9
Page 41, CHAPTER 10
Page 55, Section 11.1
Page 66, Section 11.2
Page 67, CHAPTER 12

22
6.2 From Installation of CW-Sim to Execution of Programs
The following is the operating procedure from the installation of CW-Sim Standalone to the execution of programs.
Set a VxWorks network daemon.
Configure network settings to use the VxWorks network daemon.
Installation of CW-Sim Standalone
Copy the set of execution files from the CD-ROM to a local folder of the personal computer.
Create a project.
Create a user program project and perform programming.
Build.
Build the user program.
Execute.
Execute the user program.
Page 36, Section 8.3
Page 41, CHAPTER 10
Page 55, Section 11.1
Page 66, Section 11.2
Page 78, CHAPTER 14

23
CHAPTER 7 PERMANENT LICENSE
7
7.1 Obtaining P
ermanent License
CHAPTER 7 PERMANENT LICENSE
7.1 Obtaining Permanent License
A permanent license is required to use CW-Sim for unlimited duration.
Follow the instructions shown below to obtain a permanent license.
Fill out the Permanent License Application
Form. 1
Start obtaining a permanent license.
Completed.
Permanent License
Application Form
Permanent
license file
Obtain a Permanent License Application
Form on the CD-ROM.
�Refer to the Permanent License Application Form (sample)
included with the product for how to acquire host machine
information.
�Refer to the Permanent License Application Form (sample)
included with the product for how to fill out the form.
Directly enter information on the Application Form stored on
the CD-ROM (PermanentLicenseApplicationForm.xls on the
Permanent License Application Form).
Apply the permanent license file to the
development environment (personal
computer).
A permanent license file will be e-mailed
to you.
Send the Application Form to the address
described on the form.
Obtain host information on the development
environment (personal computer) where
CW-Sim is used.
Will be
replied
within
5 working
days
Page 24, Section 7.2

24
7.2 Applying Permanent License
Apply the acquired permanent license file to the personal computer specified for "Host machine information" on the
application form.
Follow the instructions shown below to apply the permanent license file.
If "zwrsLicense1.lic" already exists in the "license" folder, rename the file "zwrsLicense1.lic" by incrementing the last number by 1. "zwrsLicense2.lic", "zwrsLicense3.lic"…
Terminate CW Workbench.
Start CW Workbench.
Start applying a permanent license.
Yes
No
Completed
CW Workbench is running.
License file
"zwrsLicense1.lic"
Copy the obtained permanent license file
on the license folder of CW Workbench.
Note: Do not store the license file in folders other than the one
specified above and use the file when applying the license
file to the development environment (personal computer).
�Below is a license folder when CW Workbench is installed
on the C drive without changing the folder of the installation
location.
C:\WindRiver\license

25
CHAPTER 7 PERMANENT LICENSE
7
7.3 Deleting P
ermanent Licen
se
7.3 Deleting Permanent License
Follow the instructions shown below to delete the current permanent license for license transfer.
Terminate CW Workbench.
Start deleting the permanent license.
Yes
No
Completed
CW Workbench is running.
License file
"zwrsLicense1.lic"
Recycle bin
Completely delete the permanent license
file "zwrsLicense1.lic" from the license
folder of CW Workbench.
(Delete the permanent license file saved
as a backup file as well.)
�Delete all the files in the license folder of CW Workbench.
C:\WindRiver\license

26
7.4 Re-applying Permanent License
Another permanent license is required on a new personal computer for license transfer due to reasons such as when
the personal computer where CW-Sim has been installed crashed.
Follow the instructions shown below to re-apply a permanent license and transfer the host machine.
�For how to obtain host information, refer to
the Permanent License Application Form
(sample).
To the next page
No
Yes
Obtain host information on the personal
computer where CW-Sim is used.
Obtain a License Transfer Certification
Agreement Form on the CD-ROM.
Delete the current permanent license
file.
(Delete the permanent license file
saved as a backup file as well.)
Uninstall CW-Sim on the current personal
computer.
Start license transfer.
Has the
personal computer
crashed?
Page 36, Section 8.2
Page 25, Section 7.3

27
CHAPTER 7 PERMANENT LICENSE
7
7.4 Re-applying P
ermanent License
Remark
If you have lost the License Agreement and do no know the Product ID, contact your local Mitsubishi service center or representative and give them information filled out on the Permanent License Application Form.
• Name of the representative person, department name, and company name • E-mail address • Target CPU
From the previous page
Completed
Will be replied within
5 working days
License Transfer Certification Agreement
Permanent license file
FAX
Install CW-Sim on the new personal computer using the new permanent license.
Directly enter information on the License Transfer Certification Agreement Form stored on the CD-ROM (PermanentLicenseApplicationForm.xls on the License Transfer Certification Agreement Form).
A permanent license file will be e-mailed to you.
Fax the License Transfer Certification Agreement Form with your signature to your local Mitsubishi service center or representative where you purchased the product.
Fill out the License Transfer Certification Agreement Form.
Page 28, Section 8.1

28
CHAPTER 8 INSTALLATION AND
UNINSTALLATION
8.1 Installation of CW-Sim
This section explains how to install the product, how to operate, and precautions.
Unless operations differ depending on the operating system, windows and dialog boxes of Windows® 7 are used for
explanations.
8.1.1 Preparation before installation
(1) Log on as a user with the Administrator attribute.
(2) Check CW Workbench is installed on the personal computer.
(3) Insert the CD-ROM (SW1DNC-CWSIM-ECD) into the personal computer,
the installer automatically starts.If the installer does not automatically start, double-click "setup.exe" on the CD-ROM to start it.
● Do not execute more than one "setup.exe" at the same time, or the product may not be properly installed.
● If the installation was not completed properly, uninstall the product and execute "setup.exe" again.

29
CHAPTER 8 INSTALLATION AND UNINSTALLATION
8
8.1 Installation of C
W-S
im8.1.1 P
reparation before installation
(4) For installation on Windows Vista® or Windows® 7 or later, a dialog box asking
whether to enable or disable User Account Control appears.Click "Allow" or "Yes" to continue the installation.
• For Windows Vista®
• For Windows® 7 or later
● Stop all other applications running on Windows® before installation.
● The installer may not operate the functions properly due to the automatic start of update programs of the operating system or any other software, such as Windows Update or Java Update. Change the setting to disable the automatic start of update programs before installation.
● CW-Sim cannot be overwritten by installation. To uninstall it, uninstall CW Workbench first. Reinstall CW Workbench and then install CW-Sim.
● To install CW-Sim using a temporary license, it can be obtained via the Internet. Before installation, check that the personal computer can be connected to the Internet.(If the personal computer is connected to the Internet via a proxy server, check the IP address and port number in advance. They are required to be set during installation.)Installation by a temporary license is not allowed without the Internet connection. Obtain the permanent license before installation. (Page 23, Section 7.1)
Click "Allow".
Click the button.

30
8.1.2 How to install CW-Sim
Insert the CW-Sim CD-ROM (SW1DNC-CWSIM-ECD)
into the CD drive to start the installer.
1. After the installer is started, execute one of the
following operations and click the
button.
• Enter a folder name of the installation
location.
• Click the button to select a
folder of the installation location from the
tree view.
● About installation locationFor CW-Sim, select the same installation location as that of CW Workbench.
2. Click the button.
To the next page

31
CHAPTER 8 INSTALLATION AND UNINSTALLATION
8
8.1 Installation of C
W-S
im8.1.2 H
ow to install C
W-S
im
From the previous page
3. Click the button.
To update the installer or this product, select the checkboxes
of "Checkon-line for latest updates for this installer" and
"Checkon-line for latest Wind River product updates". The
latest installer or the product is downloaded and updated.
If the personal computer is connected to the Internet via a proxy server, check the box of "Connect to internet using proxy server" and configure the proxy server setting set for the Internet connection on the personal computer.
4. Select "I ACCEPT the terms of this license
agreement." and click the button.
To the next page

32
5. To continue the installation, select one of the following procedures.
If the permanent license file is not obtained
• Installation using a temporary license (a personal computer can be connected to the Internet)
(Page 32 (1))
If the permanent license file is obtained
• Installation using a permanent license
(Page 33 (4))
Installation using a temporary license
From the previous page
(1) Select "Temporary install key (requires an Internet
connection)" and click the button.
● If "Temporary install key" is selected, the Internet is required to acquire "Temporary install key". Execute the installation on a personal computer connected to the Internet.
● If the personal computer is connected to the Internet via a proxy server, configure the proxy server setting.( Page 31, Point in this section)If "Temporary install key" is selected without configuring the proxy server setting, installation does not proceed.
(2) Check the content of "Note" on the window. Select
either "Ethernet Adapter" or "Disk Serial Number" for
the Host ID and click the button.
To the next page

33
CHAPTER 8 INSTALLATION AND UNINSTALLATION
8
8.1 Installation of C
W-S
im8.1.2 H
ow to install C
W-S
im
Installation using a permanent license
From the previous page
(3) Enter a License Authorization Code (LAC) and user
information listed below and click the
button.
Use alphanumeric characters for the LAC and user information.(Items with a * mark on the window must be entered correctly.)
Go to the step 6 ( Page 34)
(4) Select "Permanent install key file" and click the
button.
Select the permanent license from the tree view. Then
click the button.
Go to the step 6 ( Page 34)
LAC:License Authorization Code
(described in the License Agreement included with CW-Sim)
User Name: User name
Company: Company name
Address1: Address (such as town name and block number)
Address2: Building name, etc. (can be left blank)
City: City
State: State
Country: Country
Zip Code: Zip code
E-mail: E-mail address
Phone: Phone number

34
6. Check that all items are selected and click the
button.
If the check box is or , keep clicking the box
until it changes to .
7. Click the button.
8. Click the button.
To the next page

35
CHAPTER 8 INSTALLATION AND UNINSTALLATION
8
8.1 Installation of C
W-S
im8.1.3 O
perations after installation
8.1.3 Operations after installation
(1) Copying VxWorks image/symbol filesCopy the VxWorks image/symbol files (Page 17, Section 5.1 (2)) stored in the "VxWorks" folder on the CD-
ROM (SW1DNC-CWSIM-ECD) to the local folder.
Destination local folder example
• C:\CCPUSIM
(2) Registering with Exception List of Windows® Firewall
If Windows® Firewall is enabled, refer to the following section and check the settings.
Page 87, Section 15.4 (4)
8.1.4 After installation
Once CW-Sim is installed, the following shortcut is registered with the Start menu.
• For Q24DHCCPU-V/-VG (VxWorks 6.8)
Select [Wind River] [Documentation]*2 [VxWorks 6.8]*2
[VxWorks Simulator User's Guide, 6.8] from Windows® Start*1
*1 : Select [All apps] on the Start screen or [Start] [All Programs]/[All apps].
*2 : Does not appear in Windows® 8 or later.
From the previous page
9. Click the button.
Completed

36
8.2 Uninstallation of CW-Sim
CW-Sim is also uninstalled when CW Workbench is uninstalled.
(Uninstallation of CW-Sim alone is not allowed.)
● For CW Workbench uninstallation operations, refer to the following manual.CW Workbench Operating Manual
● On the "Select features to uninstall" screen that appears in CW Workbench uninstallation operations, select all boxes as shown below.
8.3 Installation of CW-Sim Standalone
The installer is not supplied with CW-Sim Standalone.
Copy files from the following CD-ROM to the local folder.
Destination local folder example
• C:\CCPUSIM
(1) CD-ROM (SW1DNC-CWSIMSA-ECD)Copy the "CWSIMSA" and "Samples" folders (Page 18, Section 5.1 (3)) to the local folder.
(2) CD-ROM (SW1DNC-CWSIM-ECD)Copy the VxWorks image/symbol files (Page 17, Section 5.1 (2)) stored in the "VxWorks" folder to the local
folder.
(3) Registering with Exception List of Windows® Firewall
If Windows® Firewall is enabled, refer to the following section and check the settings.
Page 87, Section 15.4 (4)

37
CHAPTER 8 INSTALLATION AND UNINSTALLATION
8
8.4 Uninstallation of C
W-S
im S
tandalone
8.4 Uninstallation of CW-Sim Standalone
The uninstaller is not supplied with CW-Sim Standalone.
Delete all files copied to the local folder.
38
CHAPTER 9 APPLYING PATCH
This section explains how to apply a patch in case it is released.
Unless operations differ depending on the operating system, windows and dialog boxes of Windows® 7 are used for
explanations.
● Log on as a user with the Administrator attribute.
● Terminate CW-Sim and CW Workbench before applying a patch.
● Do not stop the processing during patch application.Apply the patch again if the processing has been stopped.
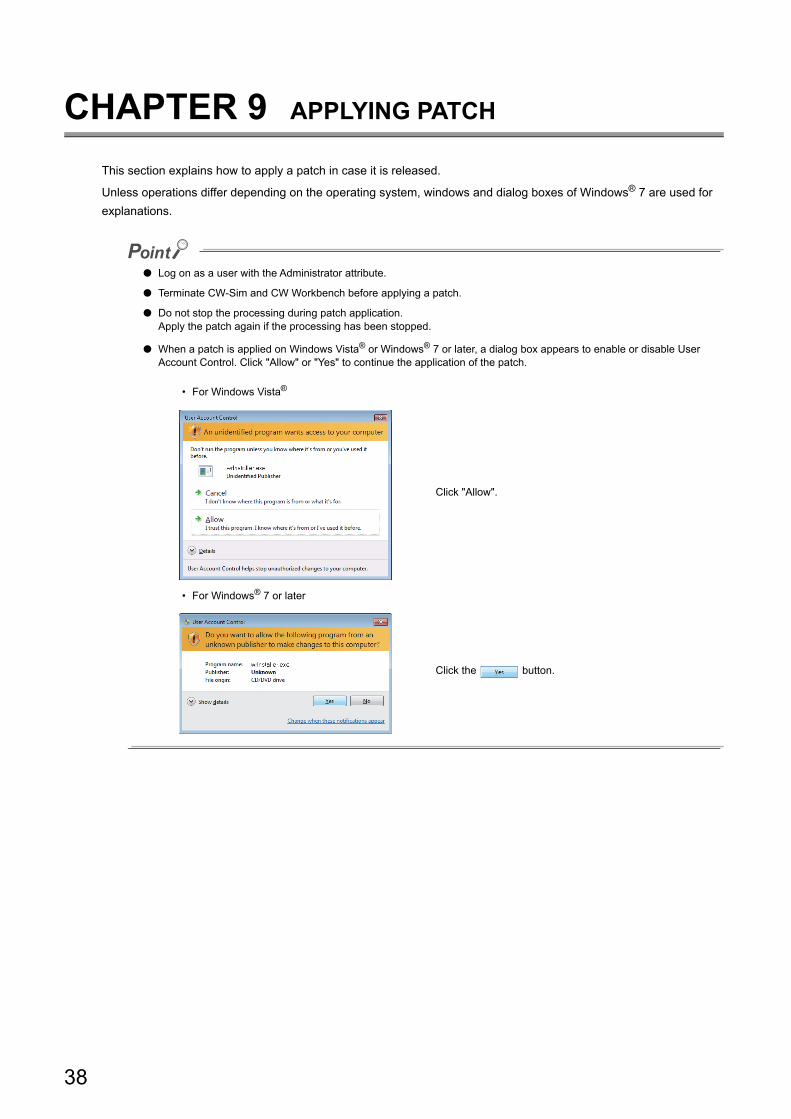
● When a patch is applied on Windows Vista® or Windows® 7 or later, a dialog box appears to enable or disable User Account Control. Click "Allow" or "Yes" to continue the application of the patch.
• For Windows Vista®
• For Windows® 7 or later
Click "Allow".
Click the button.

39
CHAPTER 9 APPLYING PATCH
9
9.1 How
to Obtain P
atch
9.1 How to Obtain Patch
(1) Download a patch file from the site described below. Information and services
For further information and services, please consult your local Mitsubishi representative.
(2) Extract the downloaded file and store it in the updates folder (in the folder of
the installation location of CW-Sim). When the installation location of CW-Sim is C:\WindRiver, the storage location of the patch is
C:\WindRiver\updates.
9.2 How to Apply Patch
1. Select [Wind River] [Product Maintenance]*2
[Installation at X YYYY] from Windows® Start*1.
*1 : Select [All apps] on the Start screen or [Start] [All Programs]/[All apps].
*2 : Does not appear in Windows® 8 or later.
● X and YYYY of [Installation at X YYYY] mean: X: The drive to which the product has been installed YYYY: The folder to which the product has been installed
If the folder of the installation location specified at the time of installation is C:\WindRiver, the menu name is [Installation at C WindRiver].
2. Select "Patch" and click the button.
To the next page

40
From the previous page
3. Check that the patch to be installed has been
selected.
Click the button.
If the patch to be installed is not displayed, check whether the storage location of the patch file is correct. • Patch file storage location
<Install folder for CW Workbench>\updates
4. Click the button.
Completed

41
CHAPTER 10 VxWorks NETWORK DAEMON SETTINGS
10
10.1 Window
s 7 or later
CHAPTER 10VxWorks NETWORK DAEMON
SETTINGS
To use the VxWorks network daemon on the simulator, configure the following 3 settings.
1. Routing and Remote Access service setting
2. Network driver setting
3. TCP/IP setting
10.1 Windows 7 or later
(1) Setting Routing and Remote Access service
1. Select [Control Panel] [System and Security]
[Administrative Tools] [Service] from Windows®
Start*1, and double-click "Routing and Remote
Access".
*1 : Select [All apps] on the Start screen or [Start] [All Programs]/[All apps].
2. Select "Automatic" for "Startup type" and click the
button.
3. Click the button.
4. When the "Service status" becomes "Start", click
the button.
Completed
42
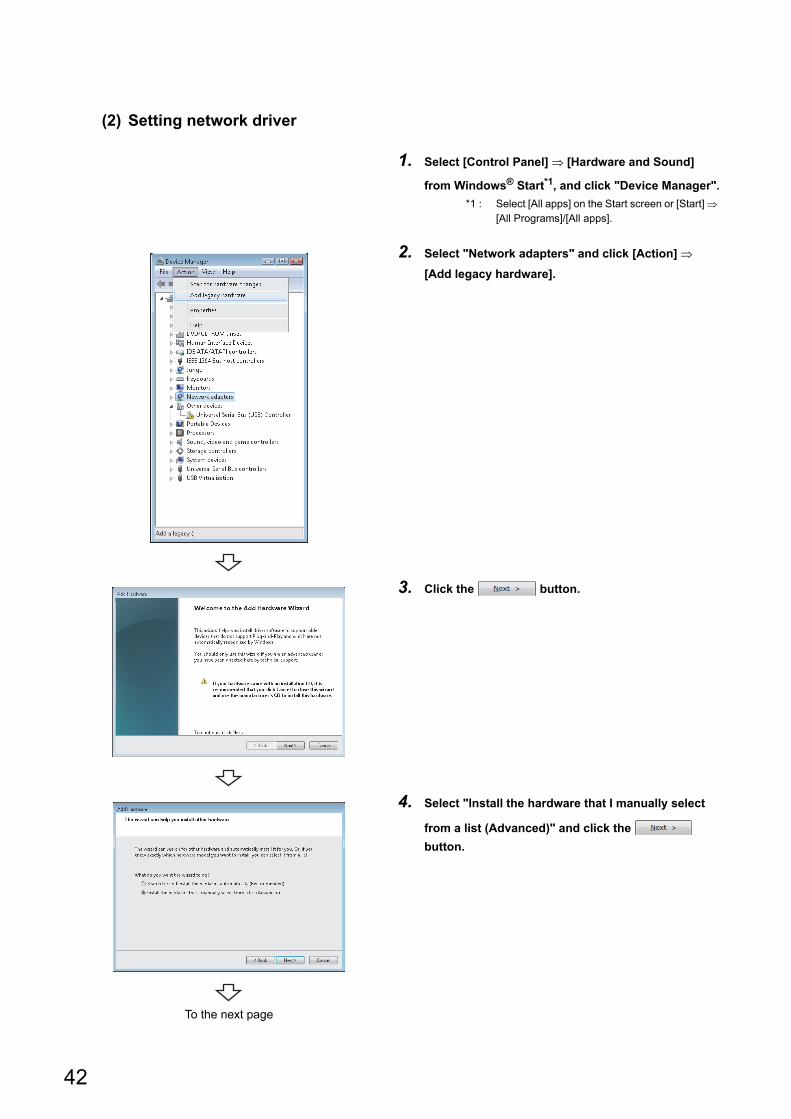
(2) Setting network driver
1. Select [Control Panel] [Hardware and Sound]
from Windows® Start*1, and click "Device Manager".
*1 : Select [All apps] on the Start screen or [Start] [All Programs]/[All apps].
2. Select "Network adapters" and click [Action]
[Add legacy hardware].
3. Click the button.
4. Select "Install the hardware that I manually select
from a list (Advanced)" and click the
button.
To the next page

43
CHAPTER 10 VxWorks NETWORK DAEMON SETTINGS
10
10.1 Window
s 7 or later
From the previous page
5. Select "Network adapters" and click the
button.
6. Click the button.
7. Click the button.
To the next page

44
From the previous page
8. Select "wrtap.inf" and click the button.
Remark
● If the installation folder of CW-Sim is "C:\WindRiver", the folder for "wrtap.inf" is set as follows: • For Q24DHCCPU-V/-VG (VxWorks 6.8)
→32-bit operating system: C:\WindRiver\vxworks-6.8\host\x86-win32\bin→64-bit operating system: C:\WindRiver\vxworks-6.8\host\x86-win32\bin\x86_64
• For Q12DCCPU-V (VxWorks 6.4) → 32-bit operating system: C:\WindRiver\vxworks-6.4\host\x86-win32\bin→ 64-bit operating system: C:\WindRiver\vxworks-6.4\host\x86-win32\bin\x86_64
● For CW-Sim Standalone, it is the local folder to which the files are copied. (Page 36, Section 8.3) • When the local folder is "C:\CCPUSIM"
→ 32-bit operating system: C:\CCPUSIM\CWSIMSA\vxsimnetd→ 64-bit operating system: C:\CCPUSIM\CWSIMSA\vxsimnetd\x86_64
9. Click the button.
10. Select "WindRiver WRTAP" and click the
button.
To the next page

45
CHAPTER 10 VxWorks NETWORK DAEMON SETTINGS
10
10.1 Window
s 7 or later
From the previous page
11. Click the button.
If the following message box appears, click "Install this
driver software anyway".
12.Click the button.
Completed

46
(3) Setting TCP/IP
1. Select [Control Panel] [Network and Internet]
[View network status and tasks] from Windows®
Start*1, and click "Change adapter settings".
*1 : Select [All apps] on the Start screen or [Start] [All Programs]/[All apps].
2. Click the local area connection with device name
"WindRiver WRTAP". In the menu that pops up,
select [Properties].
3. Select "Internet Protocol Version 4 (TCP/IPv4)" and
click the button.
4. Select "Use the following IP address:" and set "IP
address" and "Subnet mask".
In this example, the following virtual network
information is used.
IP address: 192.168.2.254
Subnet mask: 255.255.255.0
5. Click the button.
Completed

47
CHAPTER 10 VxWorks NETWORK DAEMON SETTINGS
10
10.2 Window
s Vista
10.2 Windows Vista
(1) Setting Routing and Remote Access service
(2) Setting network driver
1. Select [Start] [Control Panel] [System and
Maintenance] [Administrative Tools] [Service],
and double-click "Routing and Remote Access".
2. Select "Automatic" for "Startup type" and click the
button.
3. Click the button.
4. When the "Service status" becomes "Start", click
the button.
Completed
1. Select [Start] [Control Panel] [Hardware and
Sound], and click the "Device Manager".
2. Select "Network adapters" and click [Action]
[Add legacy hardware].
To the next page

48
From the previous page
3. Click the button.
4. Select "Install the hardware that I manually select
from a list (Advanced)" and click the
button.
5. Select "Network adapters" and click the
button.
6. Click the button.
7. Click the button.
To the next page

49
CHAPTER 10 VxWorks NETWORK DAEMON SETTINGS
10
10.2 Window
s Vista
From the previous page
8. Select "wrtap.inf" and click the button.
For details of the "wrtap.inf" folder, refer to the following
remark.
Page 44, Remark in this section
9. Click the button.
10.Select "WindRiver WRTAP" and click the
button.
11. Click the button.
If the following message box appears, click "Install this
driver software anyway".
12.Click the button.
Completed

50
(3) Setting TCP/IP
1. Select [Start] [Control Panel] [Network and
Internet] [View network status and tasks], and
click "Manage network connections".
2. Click the local area connection with device name
"WindRiver WRTAP". In the menu that pops up,
select [Properties].
3. Select "Internet Protocol Version 4 (TCP/IPv4)" and
click the button.
4. Select "Use the following IP address:" and set "IP
address" and "Subnet mask".
In this example, the following virtual network
information is used.
IP address: 192.168.2.254
Subnet mask: 255.255.255.0
5. Click the button.
Completed

51
CHAPTER 10 VxWorks NETWORK DAEMON SETTINGS
10
10.3 Window
s XP
10.3 Windows XP
(1) Setting Routing and Remote Access service
(2) Setting network driver
1. Select [Start] [Control Panel] [Administrative
Tools] [Service], and double-click "Routing and
Remote Access".
2. Select "Automatic" for "Startup type" and click the
button.
3. Click the button.
4. When the "Service status" becomes "Start", click
the button.
Completed
1. Select [Start] [Control Panel] [Add Hardware].
2. Click the button.
3. Select "Yes, I have already connected the hardware"
and click the button.
To the next page

52
From the previous page
4. Select "Add a new hardware device" and click the
button.
5. Select "Install the hardware that I manually select
from a list (Advanced)" and click the
button.
6. Select "Network adapters" and click the
button.
7. Click the button.
8. Click the button.
To the next page
53
CHAPTER 10 VxWorks NETWORK DAEMON SETTINGS
10
10.3 Window
s XP
From the previous page
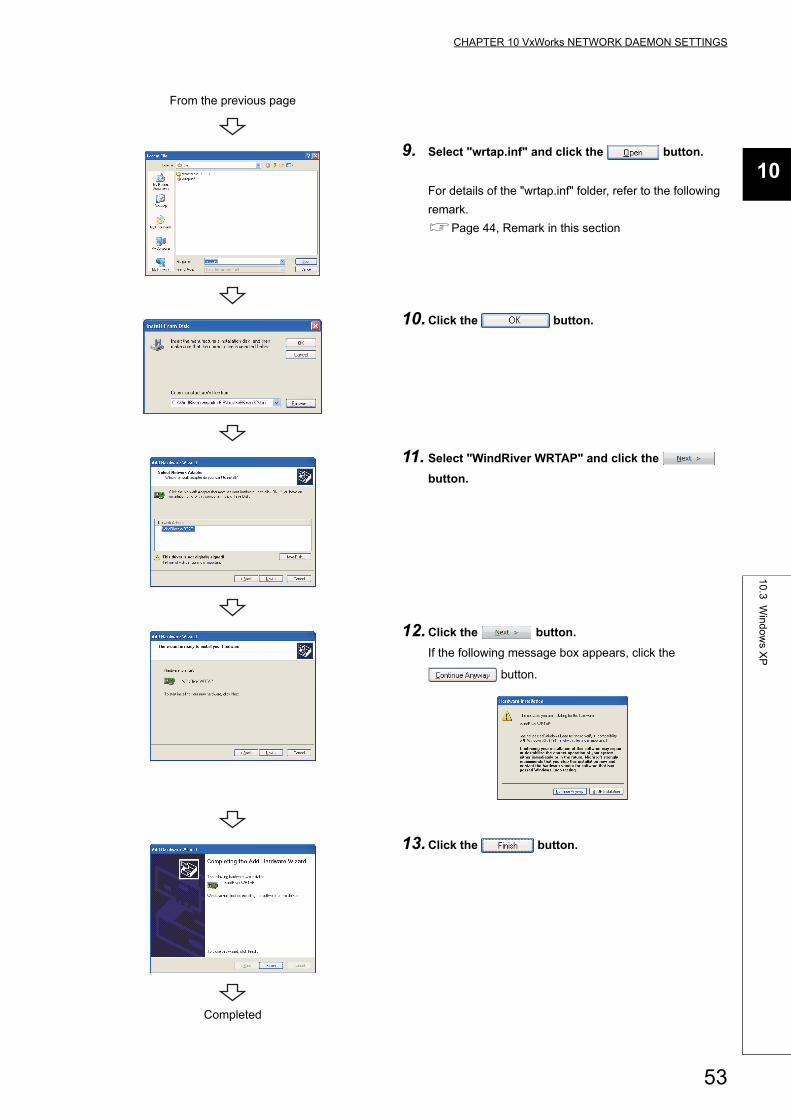
9. Select "wrtap.inf" and click the button.
For details of the "wrtap.inf" folder, refer to the following
remark.
Page 44, Remark in this section
10.Click the button.
11. Select "WindRiver WRTAP" and click the
button.
12.Click the button.
If the following message box appears, click the
button.
13.Click the button.
Completed

54
(3) Setting TCP/IP
1. Select [Start] [Control Panel] [Network
Connections].
2. Click the local area connection with device name
"WindRiver WRTAP". In the menu that pops up,
select [Properties].
3. Select "Internet Protocol (TCP/IP)" and click the
button.
4. Select "Use the following IP address:" and set "IP
address" and "Subnet mask".
In this example, the following virtual network
information is used.
IP address: 192.168.2.254
Subnet mask: 255.255.255.0
5. Click the button.
Completed

55
CHAPTER 11 CREATING AND BUILDING PROJECT
11
11.1 Creating P
roject11.1.1 C
reating new project
CHAPTER 11 CREATING AND BUILDING PROJECT
11.1 Creating Project
11.1.1 Creating new project
(1) How to create a new project1. Select [Wind River] [CW Workbench]*2 [CW
Workbench] from Windows® Start*1.
*1 : Select [All apps] on the Start screen or [Start] [All Programs]/[All apps].
*2 : Does not appear in Windows® 8 or later.
2. Enter a folder of storage location of workspace for
"Workspace:".
"C:\CCPUSIM\" has been entered here as an
example.
Clicking the button starts CW
Workbench.
Remark
A message box shown below may appear. Click the button.
3. Select from the menu bar [File] [New]
[Project...].
4. Select "VxWorks Downloadable Kernel Module
Project" under "VxWorks 6.x" and click the
button.
To the next page

56
From the previous page
5. Select the following item for "Target operating
system:". Click the button.
• For Q24DHCCPU-V/-VG
Wind River VxWorks 6.8
• For Q12DCCPU-V
Wind River VxWorks 6.4
If there is no need to configure settings, this screen may
not appear.
6. Enter a project name for "Project name:" and click
the button.
"UserProject" has been entered here as an
example.
If characters that cannot be used or a project name that is already used are entered for "Project name:", an error text
appears on the header of the window and the button becomes disabled.
a space is included a project name that is already used is entered
In addition, a space entered at the end of the project name is dropped. "UserProject " "UserProject"
A project created

57
CHAPTER 11 CREATING AND BUILDING PROJECT
11
11.1 Creating P
roject11.1.1 C
reating new project
(2) How to set project properties for CW-Sim and CW-Sim Standalone1. On the "Project Explorer" window, select a project
where properties should be set. With the project
selected, select from the menu bar [Project]
[Properties].
2. Select [Build Properties] from the tree view to the
left on the window, and click the <<Build Support
and Specs>> tab.
Check that only "SIMNTgnu" has been selected for
"Available and enable build specs:".
If "SIMNTgnu" is not displayed, select [File] [Switch
Workspace] [Other...], and switch to a new
workspace to create a project.
● When the project has been imported, options other than "SIMNTgnu" may be displayed for "Available and enable build specs:".Since CW-Sim and CW-Sim Standalone support only "SIMNTgnu", clear any other check boxes.
3. Select "Build Properties" from the tree on the left of
the window.
Open the <<Build Paths>> tab and click the
button.
To the next page

58
Remark
The include folders differ depending on the C Controller module or Setting/monitoring tools for the C Controller module to be used. For details, refer to the following table.
*1 When Setting/monitoring tools for the C Controller module is installed in "C:\MELSEC".
From the previous page
4. Click the button.
5. Select the include folder on the "Select directory"
window.
Click the button.
C Controller moduleSetting/monitoring tools for
the C Controller moduleInclude folder *1
Q24DHCCPU-V
SW4PVC-CCPUC:\MELSEC\CCPU4\Q24DHCCPU-V\Include
Q24DHCCPU-VG
Q12DCCPU-V (Extended mode) C:\MELSEC\CCPU4\Q12DCCPU-V\Include
Q12DCCPU-V (Basic mode) SW3PVC-CCPU C:\MELSEC\CCPU\DVx\Include
6. Check that the folder specified on the "Select
directory" window has been selected.
Click the button.
To the next page

59
CHAPTER 11 CREATING AND BUILDING PROJECT
11
11.1 Creating P
roject11.1.1 C
reating new project
From the previous page
7. Check that the include path of MELSEC added to
"Include directories" in "Include paths:" appears.
Click the button.
Click the button. If the following message box appears, click the button.
Properties setting completed

60
(3) How to add a file to a project1. On the "Project Explorer" window, right-click a
project where a file is added. Select from the pop-up
menu [New] [File].
Various files can be added to the project using the new file addition function ([File] [New] [File] on the menu bar)or the project pop-up menu [Refresh].However, note the following before adding files to the project:
● Do not add projects with the same name as the project name.
● If a file with the same name as the project name exists in the project, change the file name on Explorer and execute the project pop-up menu [Refresh].
• Do not use the "Rename" function of CW Workbench to rename the file. • If the "Rename" function of CW Workbench is used to rename the file, an build error occurs and the project must
be created again.
2. Enter a file name of a source file for "File name:".
Click the button.
"Sample.c" has been entered here as an
example.
To the next page

61
CHAPTER 11 CREATING AND BUILDING PROJECT
11
11.1 Creating P
roject11.1.1 C
reating new project
(4) How to import an existing projectFor the procedure to import an existing project, refer to the following manual.
CW Workbench Operating Manual
From the previous page
• Enter a file name with extension (.c, .h, .cpp, .hpp) for "File name:" • Do not use two-byte characters for a file name. Do not execute the compile for a file that has a name including
two-byte characters, or a compile error occurs. • If characters that cannot be used or a project name that is already used are entered for "File name:", an error
text appears on the header of the window and the button becomes disabled.
3. Edit the source files on the "Editor" window.
If the dedicated function library is used in the user
program, include a header file of the dedicated function
library.
[CAUTION]
The dedicated function library cannot be used with the
simulator. To perform debugging on the simulator,
create a stub for the dedicated function library or delete
the caller.
A sample stub is included in the sample program stored
on the CW-Sim CD-ROM (SW1DNC-CWSIM-ECD).
(Page 17, Section 5.1 (2))
Remark
● For Q24DHCCPU-V/-VG, include the following dedicated function libraries. • Bus interface function: "QbfFunc.h" • MELSEC data link function: "Mdfunc.h" • C Controller module dedicated function: "CcpuFunc.h"
● For Q12DCCPU-V, include the following dedicated function libraries. • Bus interface function: "QbfFunc.h" • MELSEC data link function: "Mdfunc.h"
A file added
62
11.1.2 Creating project using sample program
(1) Sample program configurationThis section explains the sample programs provided on the CW-Sim CD-ROM (SW1DNC-CWSIM-ECD) and the
system configuration when the sample program is executed.
• The system consists of 4 simulators, each of which is connected to the virtual network.
• On each simulator, the bus interface functions in the dedicated function library stub (QBF_Simulator) and
user programs using socket communication are running.
For QBF_Simulator, the following device memory is simulated.
User program
Virtual network
Task
Personal computer 1
Library
Function call
Socket communicationQBF_SimulatorDevice memory
Simulator
No.0
Simulator
No.1
Simulator
No.2
Simulator
No.3
gpsDevArea
Input signal (X)
Output signal (Y)
1024 bytes
(8192 points)
1024 bytes
(8192 points)
63
CHAPTER 11 CREATING AND BUILDING PROJECT
11
11.1 Creating P
roject11.1.2 C
reating project using samp
le program
(2) Sample program operations
(a) Sample program operations (simulator No.0)
1. Establish the TCP/IP connections with the previous (No.3) and next (No.1) simulators.
2. Monitor X0 through X8192, and if X is turned ON, turn ON the Y data with the same device number.
3. Send the ON-detected device number of X in the step 2 to the next simulator (No.1) using the
socket communication.
4. If the ON notification of X is received from the previous simulator (No.3), inversely output the Y
data with the device number as same as the ON-notified device number of X.
5. Read the X data with the ON-notified device number and transfer the same data to the next
simulator (No.1) if the status is ON.
6. Repeat the steps 1 through 5.
These operations turn the Y devices ON and OFF repeatedly.
(b) Sample program operations (simulators No.1 through No.3)
1. Establish the TCP/IP connections with the previous and next simulators.
2. If the ON notification of X is received from the previous simulator, inversely output the Y data with
the ON-notified device number plus 1 for the simulator No.1, Y data with the ON-notified device
number plus 2 for the simulator No.2, and Y data with the ON-notified device number plus 3 for the
simulator No.3.
3. Transfer the ON notification received in the step 2 to the next simulator.
4. Repeat the steps 2 and 3.
These operations turn the Y devices ON and OFF repeatedly.
(3) Sample program preparationCopy the sample program (Page 17, Section 5.1 (2)) stored on the CW-Sim CD-ROM (SW1DNC-CWSIM-
ECD) to a local folder.
Source folder and destination folder examples
• Source folder: <CD-ROM drive>:\Samples\English\simulation (all folders and files)
• Destination folder: C:\CCPUSIM

64
(4) Opening a sample program1. Select [Wind River] [CW Workbench]*2 [CW
Workbench] from Windows® Start*1.
*1 : Select [All apps] on the Start screen or [Start] [All Programs]/[All apps].
*2 : Does not appear in Windows® 8 or later.
2. Specify the folder to which the sample program was
copied for "Workspace:". (A folder can be also
selected from the tree view by clicking the
button.)
Clicking the button starts CW
Workbench.
"C:\CCPUSIM\simulation" has been entered here
as an example.
3. Create a new project as shown in the procedure
from step 3 to 6 below.
Page 55, Section 11.1.1 (1)
The following four projects are the projects to be newly
created.
• simulation_0
• simulation_1
• simulation_2
• simulation_3
4. Set the property of each project by following the
procedure shown in the section below.
Page 57, Section 11.1.1 (2)
Remark
The sample program is for VxWorks 6.8 (Q24DHCCPU-V/-VG). To open it in CW Workbench for VxWorks 6.4 (Q12DCCPU-V), convert it for VxWorks 6.4 (Q12DCCPU-V) by following the displayed messages.
To the next page

65
CHAPTER 11 CREATING AND BUILDING PROJECT
11
11.1 Creating P
roject11.1.2 C
reating project using samp
le program
To the next page
5. Double-clicking the sample program
"UserProgram.c" in the "Project Explorer" window
allows you to view/edit the sample program.
In this sample program, the stub for some bus interface
functions is defined in "QbfFunc.h".
Add a stub as necessary.
Completed

66
11.2 Building Project
11.2.1 How to build new project
For the procedure to build a new project, refer to the following manual.
CW Workbench Operating Manual
11.2.2 Building project using sample program
The following is the procedure to build a project using the sample program.
For details of errors displayed after building the project and execution files to be generated, refer to the following manual.CW Workbench Operating Manual
1. On the "Project Explorer" window, right-click on a
project name to be built. In the menu that pops up,
select [Refresh].
This sample program contains the following 4 projects:
• simulation_0
• simulation_1
• simulation_2
• simulation_3
Perform [Refresh] for all projects.
2. On the "Project Explorer" window, right-click on a
project name to be built. In the menu that pops up,
select [Rebuild Project].
This sample program contains the following 4 projects:
• simulation_0
• simulation_1
• simulation_2
• simulation_3
Perform [Rebuild Project] for all projects.
Build completed

67
CHAPTER 12 PROGRAM DEBUGGING WITH CW-Sim
12
12.1 VxW
orks Netw
ork Da
emon S
tartup
CHAPTER 12PROGRAM DEBUGGING WITH CW-
Sim
12.1 VxWorks Network Daemon Startup
This section explains the procedure to startup the VxWorks network daemon after CW Workbench and CW-Sim are
installed to "C:\WindRiver".
(1) Create a VxWorks network configuration file. A text file "vxsimnetd.conf" is created in "C:\CCPUSIM" here as an example.
Contents of "vxsimnetd.conf" are as follows:
SUBNET_START sub2 {
SUBNET_ADDRESS = "192.168.2.0";
SUBNET_EXTERNAL = yes;
SUBNET_EXTPROMISC = yes;
};
● Modify the contents of "vxsimnetd.conf" as necessary by referring the following. WindRiver VxWorks Simulator User's Guide
● A sample of "vxsimnetd.conf" is stored in the folder "\samples\English" on the CW-Sim CD-ROM (SW1DNC-CWSIM-ECD).
(2) Startup the VxWorks network daemon.
Select [Accessory] [Command Prompt] from Windows® Start*1.
*1 : Select [All apps] on the Start screen or [Start] [All Programs]/[All apps].
● Startup the VxWorks network daemon only once after the personal computer startup.
● Do not close the above command prompt during debugging. Otherwise, the network daemon closes.
1. To change the current directory to the installation
folder of CW-Sim, enter the following command.
• For Q24DHCCPU-V/-VG
→ "cd C:\WindRiver\vxworks-6.8\host\x86-win32\bin"
• For Q12DCCPU-V
→ "cd C:\WindRiver\vxworks-6.4\host\x86-win32\bin"
2. To startup the VxWorks network daemon, enter the
following command.
→ "vxsimnetd -f C:\CCPUSIM\vxsimnetd.conf -s"
68
12.2 Simulator Startup
1. Click the "Define a connection to remote system"
button on the "Remote Systems" window.
2. Select the "Wind River VxWorks 6.x Simulator
Connection" under "VxWorks 6.x" and click the
button.
3. Select the following item for "Target platform" and
click the button.
• For Q24DHCCPU-V/-VG:
→ "Wind River VxWorks 6.8"
• For Q12DCCPU-V:
→ "Wind River VxWorks 6.4"
If there is no need to configure settings, this screen may
not appear.
To the next page

69
CHAPTER 12 PROGRAM DEBUGGING WITH CW-Sim
12
12.2 Sim
ulator Startup
From the previous page
4. Select "Custom simulator" under "Select boot file
name" and enter the path to the VxWorks image file
and file name.
The destination of the VxWorks image file is set
to "C:\CCPUSIM" here as an example.
(Page 35, Section 8.1.3)
5. Click the button.
6. Click the button.
7. Set the IP address and default gateway of the virtual
network for "Other VxWorks simulator options".
The following virtual network information is used
here as an example.
• IP address: "192.168.2.1"
• Default gateway: "192.168.2.254"
Settings in this case should be as follows:
→ "-d simnet -e 192.168.2.1 -g 192.168.2.254"
8. Click the button.
To the next page

70
From the previous page
9. When the connection to the simulator is
established, the tree to the left is displayed on the
"Remote Systems" window and the "Target
Console" screen appears.
Simulator startup completed

71
CHAPTER 12 PROGRAM DEBUGGING WITH CW-Sim
12
12.3 Debugging P
rogram
12.3 Debugging Program
1. On the "Project Explorer" window, select a project
to debug and click "▼" at the right of the debug icon
( ).
2. In the menu that pops up, select [Debug
Configurations...].
3. Double-click "VxWorks Kernel Task"
This operation creates a new debug configuration.
4. Click the <<Downloads>> tab and check the .out file
to be downloaded.
If the .out file of the project selected in the step 1 is not
registered, click the button to register it.
To the next page

72
For the operations after starting the debugging, refer to the following manual. CW Workbench Operating Manual
From the previous page
5. Click the <<Launch Context>> tab and select the
connection target set in the step 9 on Page 70.
6. Specify the function to start debugging for "Entry
Point" and click the button.
Debugging started

73
CHAPTER 13 EXECUTION OF SAMPLE PROGRAM WITH CW-Sim
13
13.1 VxW
orks Netw
ork Da
emon S
tartup
CHAPTER 13EXECUTION OF SAMPLE PROGRAM
WITH CW-Sim
13.1 VxWorks Network Daemon Startup
For the procedure to startup the VxWorks network daemon, refer to the following section.
Page 67, Section 12.1
13.2 Creating Simulator
The sample program uses 4 simulators vxsim0 to vxsim3.
Perform the following operations 4 times to create simulators vxsim0 to vxsim3.
1. Click the "Define a connection to remote system"
button on the "Remote Systems" window.
2. Select "Wind River VxWorks 6.x Simulator
Connection" under "VxWorks 6.x" and click the
button.
3. Select the following item for "Target platform" and
click the button.
• For Q24DHCCPU-V/-VG:
→ "Wind River VxWorks 6.8"
• For Q12DCCPU-V:
→ "Wind River VxWorks 6.4"
If there is no need to configure settings, this screen may
not appear.
To the next page

74
From the previous page
4. Select "Custom simulator" under "Select boot file
name" and enter the path to the VxWorks image file
and file name.
The destination of the VxWorks image file is set
to "C:\CCPUSIM" here as an example.
(Page 35, Section 8.1.3)
5. Click the button.
6. When the connection to the simulator is
established, the "Target Console" screen appears.
7. Click the "Disconnect" button on the "Remote
Systems" window and close the "Target Console"
screen.
A simulator created
75
CHAPTER 13 EXECUTION OF SAMPLE PROGRAM WITH CW-Sim
13
13.3 Sim
ulator Settings
13.3 Simulator Settings
Perform the following operations 4 times to configure the settings for simulators vxsim0 to vxsim3.
1. On the "Remote Systems" window, right-click on
the simulator (vxsim0 to vxsim3). In the menu that
pops up, select [Properties].
2. On the <<Miscellaneous Options>> tab, specify the
storage folder of the "STARTUP.CMD" file for
"VxSim temporary directory".
The storage location of the sample program is
set to "C:\CCPUSIM\simulation" here as an example.
(Page 63, Section 11.1.2 (3))
• For vxsim0
→ "C:\CCPUSIM\simulation\simulation_0"
• For vxsim1
→ "C:\CCPUSIM\simulation\simulation_1"
• For vxsim2
→ "C:\CCPUSIM\simulation\simulation_2"
• For vxsim3
→ "C:\CCPUSIM\simulation\simulation_3"
[CAUTION] For the project to be debugged, leave the
above settings blank.
3. Set the IP address and default gateway of the virtual network for "Other VxWorks simulator options".
The following examples are the settings of "Other VxWorks simulator options" with the default gateway set to
"192.168.2.254".
IP address of vxsim0 (No.0): "192.168.2.1" → "-d simnet -e 192.168.2.1 -g 192.168.2.254"
IP address of vxsim1 (No.1): "192.168.2.2" → "-d simnet -e 192.168.2.2 -g 192.168.2.254"
IP address of vxsim2 (No.2): "192.168.2.3" → "-d simnet -e 192.168.2.3 -g 192.168.2.254"
IP address of vxsim3 (No.3): "192.168.2.4" → "-d simnet -e 192.168.2.4 -g 192.168.2.254"
To change the IP address settings, change the IP address definitions in the sample program and rebuild the project.
4. Click the button.
CW-Sim setting completed

76
13.4 Execution of Sample Program
1. On the "Remote Systems" window, select the
simulator (vxsim0 to vxsim3) and click the
"Connect" button to startup CW-Sim.
Startup CW-Sim in the following order:
• vxsim3 (No.3)
• vxsim2 (No.2)
• vxsim1 (No.1)
• vxsim0 (No.0)
2. Executing the X_On() function on the "Target
Console" screen of vxsim0 starts the operations of
the sample program.
Entering "X_On(10)" turns X10 ON, and ON/OFF
of the Y devices starts.
ON/OFF status of the Y devices is displayed on the "Target Console" screen of vxsim1 to vxsim3. • "*" = ON • "0" = OFF • "-" = Not displayed
Sample program executed

77
CHAPTER 13 EXECUTION OF SAMPLE PROGRAM WITH CW-Sim
13
13.4 Execution
of Sam
ple P
rogram
Remark
For operations of the sample program, refer to the following figure.
Simulator_0 Simulator_1
Simulator_3 Simulator_2
Inverse Yn Inverse Y (n+1)
Inverse Y (n+3) Inverse Y (n+2)
"n" is notified using the socket communication
"n" is notified using the socket communication
"n" is
no
tified
usin
g th
e s
ocke
t co
mm
un
ica
tion
"n" is
no
tified
usin
g th
e s
ocke
t co
mm
un
ica
tion
X number (n) turned ON by Shell is detected
Shell
gpsDevArea
Input signal (X)
Output signal (Y)
Turn Xn
ON
Y (n+3)Y (n+2)
Y (n+1)Yn
Xn

78
CHAPTER 14EXECUTION OF PROGRAM WITH CW-
Sim Standalone
This chapter explains how to execute programs using CW-Sim Standalone.
14.1 VxWorks Network Daemon Startup
This section explains the procedure to startup the VxWorks network daemon when CW-Sim Standalone is installed
under "C:\CCPUSIM".
(1) Create a VxWorks network configuration file.Refer to the following section.
Page 67, Section 12.1 (1)
(2) Startup the VxWorks network daemon.
Select [Accessory] [Command Prompt] from Windows® Start*1.
*1 : Select [All apps] on the Start screen or [Start] [All Programs]/[All apps].
● Startup the VxWorks network daemon only once after the personal computer startup.
● Do not close the above command prompt during simulation. Otherwise, the network daemon closes.
1. To change the current directory to the installation
folder of CW-Sim Standalone, enter the following
command.
→ "cd C:\CCPUSIM\CWSIMSA\vxsimnetd"
2. To startup the VxWorks network daemon, enter the
following command.
→ "vxsimnetd.exe -f C:\CCPUSIM\Samples\vxsimnetd.conf -s"

79
CHAPTER 14 EXECUTION OF PROGRAM WITH CW-Sim Standalone
14
14.2 Sim
ulator Startup
14.2 Simulator Startup
This section explains the procedure to startup the simulator from the command prompt.
In this example, the following virtual network information is used.
• IP address: "192.168.2.1"
• Default gateway: "192.168.2.254"
1. To change the current directory to the installation folder of CW-Sim Standalone, enter the
following command.
• For Q24DHCCPU-V/-VG:
→ "cd C:\CCPUSIM\CWSIMSA\vxsim68"
• For Q12DCCPU-V:
→ "cd C:\CCPUSIM\CWSIMSA\vxsim64"
2. To startup the simulator, enter the following command.
• For Q24DHCCPU-V/-VG:
→ "vxsim68-nl.exe -f C:\CCPUSIM\vxWorks_6_8 -d simnet -e 192.168.2.1 -g 192.168.2.254"
• For Q12DCCPU-V:
→ "vxsim64-nl.exe -f C:\CCPUSIM\vxWorks_6_4 -d simnet -e 192.168.2.1 -g 192.168.2.254"
● To startup multiple simulatorsSpecify a processor number in the "-p" option.
● If ""STARTUP.CMD" file dose not exit" is displayed at the simulator startup and the script is not executed,change the current directory to the folder containing the script file "STARTUP.CMD" and enter the following command.
• For Q24DHCCPU-V/-VG:→ "C:\CCPUSIM\CWSIMSA\vxsim68\vxsim68-nl.exe -f C:\CCPUSIM\vxWorks_6_8 -d simnet -e 192.168.2.1 -g 192.168.2.254"
• For Q12DCCPU-V:→ "C:\CCPUSIM\CWSIMSA\vxsim64\vxsim64-nl.exe -f C:\CCPUSIM\vxWorks_6_4 -d simnet -e 192.168.2.1 -g 192.168.2.254"
● For argument of each command, refer to the following manual. • For Q24DHCCPU-V/-VG:
Wind River VxWorks Simulator User's Guide, 6.8 • For Q12DCCPU-V:
Wind River VxWorks Simulator User's Guide, 6.1
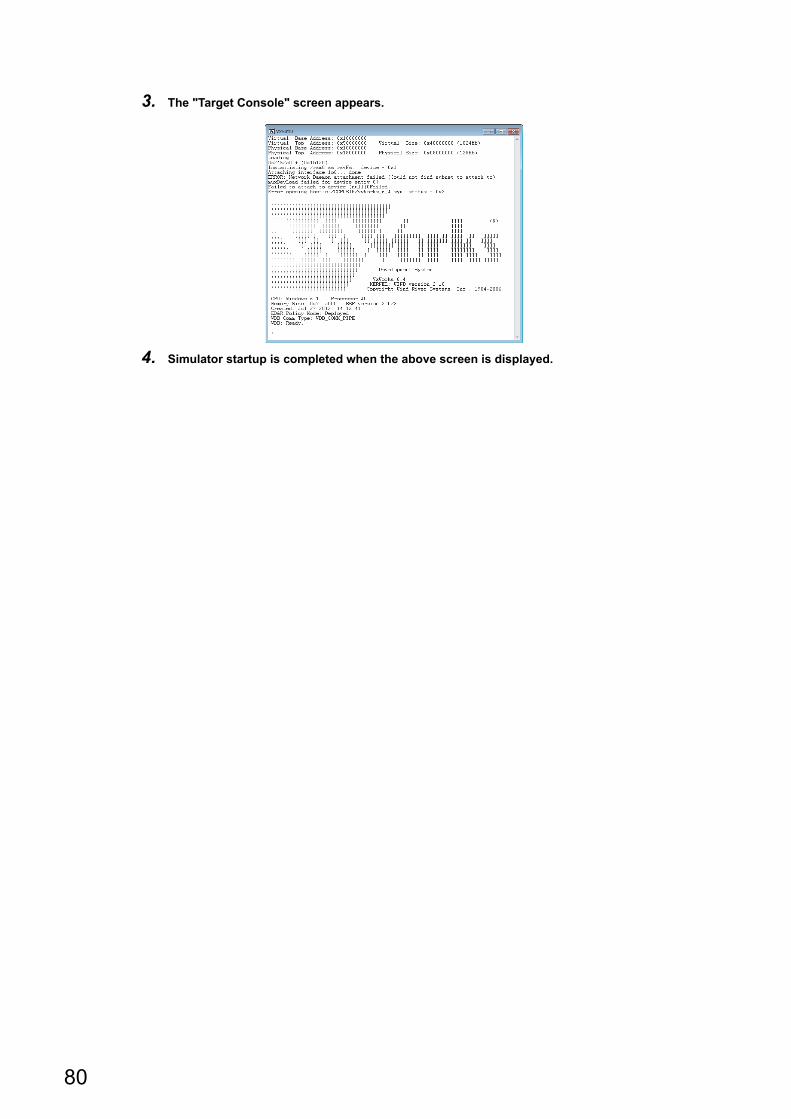
80
3. The "Target Console" screen appears.
4. Simulator startup is completed when the above screen is displayed.

81
CHAPTER 15 TROUBLESHOOTING
15
CHAPTER 15TROUBLESHOOTING
The following table lists errors that occur during use of CW-Sim and their solutions.
Category Problem Reference
Installation
The CW-Sim installer has stopped working half way through. Or the installer has
terminated suddenly during installation.
CW Workbench
Operating Manual
When selecting a license file, the message "Your Product Activation File does not
have a valid install key for any Products on Disk. Please re-enter a new Product
Activation File." appears and installation fails.
Page 82, Section 15.1 (1)
After installation, an error is output in "setup.log" and the simulator does not operate
normally.Page 83, Section 15.1 (2)
Installation using a
temporary licenseAfter an LAC code and user information are entered and the button is
clicked, an error message appears and the installation does not progress.Page 84, Section 15.2 (1)
License
You have received a permanent license file, but do not know how to use it. Page 85, Section 15.3 (1)
You do not know how to delete a permanent license file. Page 85, Section 15.3 (2)
The message "Checking License…ERROR" appears and the simulator does not start. Page 85, Section 15.3 (3)
CW Workbench
startup
The message "The install root of your Wind River Workbench installation could not be
located!" appears and CW Workbench does not start.CW Workbench
Operating ManualThe message "Workspace in use or cannot be created, choose a different one."
appears and CW Workbench does not start.
The displayed contents do not change after patch application.
Simulator startup
The option "Wind River VxWorks 6.x Simulator Connection" is not included in the
"Define a connection to remote system" settings.Page 86, Section 15.4 (1)
In VxWorks 6.4, the simulator system time varies from the actual time. Page 86, Section 15.4 (2)
At the startup of VxWorks network daemon, the warning "WARNING:subnet(***)
external configuration failed (can't find a WRTAP network connection to use)." or the
error "[SC] OpenSCManager FAILED 5: Access denied" appears and the virtual
network is not enabled.
Page 87, Section 15.4 (3)
Network communication with the simulator cannot be established. Page 87, Section 15.4 (4)
Building
An error "command not found" has occurred and the build is not executed.
CW Workbench
Operating Manual
An error "no input files", "No Such file", or "No such file or directory" has occurred.
An error "Build target "/yyyy/nnnn_partialImage" used in build target "yyyy" not found"
has occurred and the build is not executed.
The following build errors have occurred:
"xxx.sh: syntax error near unexpected token 'yyy_partialImage/Debug/Objects/nnn'"
"xxx.sh: cannot execute binary file"
"Makefile:xxx: *** missing separator. Stop"
"No rule to make target ***, needed by `***. Stop."
"yy.o: command not found - No such file or directory"
.out file is not created.
The build terminates with a message "Generation of makefiles started."

82
15.1 Installation
(1) When selecting a license file, the message "Your Product Activation File does
not have a valid install key for any Products on Disk. Please re-enter a new
Product Activation File." appears and installation fails.An error has occurred in license file checking during CW-Sim installation.
Possible causes and recovery methods of the license error are described below.
(a) Not a license file of CW-Sim
A license file of a different product such as CW Workbench may be used.
• Recovery method
Check the license file and apply the license file for CW-Sim.
(b) CW-Sim is already installed
• Recovery method
Uninstall CW Workbench and CW-Sim to delete the license file and then reinstall CW Workbench and CW-
Sim.
(c) Invalid license is used
If the host information registered in acquisition of permanent license is incorrect, a license error occurs.
● When "MAC" is used as host machine information for permanent license applicationRecheck the Host ID of the personal computer on which CW-Sim is used.
● When "DISK" is used as host machine information for permanent license applicationAn error occurs if any DISK serial number other than C drive is specified as Host ID.Specify the DISK serial number of the C drive as Host ID.If the personal computer is equipped with more than one drive, do not specify any DISK serial number other than that of the C drive as Host ID.
• Recovery method in case of wrong Host ID
Use "PermanentLicenseApplicationForm.xls" that can be found on the CD-ROM to transfer the host
machine. Host ID to be entered is as follows.
→ Enter the wrong Host ID registered previously for "Current license".
→ Enter the correct Host ID to be registered for "New license".
• Recovery method in case of correct Host ID
Please contact your local Mitsubishi service center or representative from whom you purchased CW-Sim.

83
CHAPTER 15 TROUBLESHOOTING
15
15.1 Installation
(2) After installation, an error is output in "setup.log" and the simulator does not
operate normally.CW Workbench may not be installed, or CW-Sim is installed in a folder other than the CW Workbench installation
folder.
Excerpts from error messages output in "setup.log"
Response action is described below.
1. Uninstall CW-Sim.
Perform uninstallation from "Product Maintenance".
Select [Wind River] [Product Maintenance]*2 [Installation at X YYYY] from Windows® Start*1, and
uninstall all items.*1 : Select [All apps] on the Start screen or [Start] [All Programs]/[All apps].
*2 : Does not appear in Windows® 8 or later.
● X and YYYY of [Installation at X YYYY] mean: X: The drive to which the product has been installed YYYY: The folder to which the product has been installed
If the folder of the installation location specified at the time of installation is C:\WindRiver, the menu name is [Installation at C WindRiver].
2. If CW Workbench is not installed, install CW Workbench.
3. Reinstall CW-Sim in the same folder as the CW Workbench installation folder.
Error during execution of postinstall command: [Ljava.lang.String;@13a0067, : java.io.IOException: Cannot run
program "C:\WindRiver\setup\bspinstall.bat":CreateProcess error=3, The system cannot find the path specified
Error during execution of postinstall command: [Ljava.lang.String;@f0761a, : java.io.IOException: Cannot run program
"C:\WindRiver\setup\postinstall.bat":CreateProcess error=3, The system cannot find the path specified
Command C:\WindRiver\vxworks-6.4\setup\mit_vxsim_postinstall.bat terminated with exit status: 1. It issues the
following output on standard out: [], and the following output on standard err: [The system cannot find the path specified
Error during execution of postinstall command: [Ljava.lang.String;@127f4f9, : java.io.IOException: Cannot run program
"C:\WindRiver\vxworks-6.8\setup\vx_postinstall.bat": CreateProcess error=2, The system cannot find the path specified

84
15.2 Installation Using Temporary License
(1) After an LAC code and user information are entered and the button
is clicked, an error message appears and the installation does not progress. • Error message
• Action
The following table describes how to respond to the error text displayed in the "Error Message" dialog box.
Error text Action
HTTP Server: Bad Gateway
The HTTP server you are trying to access may not be responding properly.
Try to install the product later.
If the problem still remains, try to install the product another day.
Unknown Host:
The personal computer in use may be connected to the Internet via a proxy server.
Use the button and go back to the "Installer-Online Update Settings"
window. Check the box of "Connect to internet using proxy server" and configure the
proxy server setting.
Unable to read repository atThe personal computer in use may not be connected to the Internet.
Check that the personal computer can be connected to the Internet.
Install the product on the personal computer being connected to the Internet.
When the personal computer is connected via a proxy server, conduct the measure of
the error text (Unknown Host) above.Unable connect to repository

85
CHAPTER 15 TROUBLESHOOTING
15
15.3 License
15.3 License
(1) You have received a permanent license file, but do not know how to use it.Store the obtained permanent license file in the license folder in the personal computer where CW Workbench
has been installed.
Page 24, Section 7.2
(2) You do not know how to delete a permanent license file.Delete all the files in the license folder in the personal computer where CW Workbench has been installed.
Page 25, Section 7.3
(3) The message "Checking License …ERROR" appears and the simulator does
not start.An error has occurred in license file checking during CW-Sim startup.
Possible causes and recovery methods of the license error are described below.
(a) Expiration of trial period
If CW-Sim is used with a temporary license, the license error occurs after 31 days from installation of CW-Sim.
• Recovery method
Obtain the permanent license and overwrite the obtained license file to use CW-Sim.
(b) Invalid license is used
If the host information registered in acquisition of permanent license is incorrect, a license error occurs. For
details, refer to the following section.
Page 82, Section 15.1 (1)(c)

86
15.4 Simulator Startup
(1) The option "Wind River VxWorks 6.x Simulator Connection" is not included in
the "Define a connection to remote system" settings.Data before installation of CW-Sim may be left in CW Workbench cache.
Add "-clean" as an argument at the startup of CW Workbench to clear the cache.
It is not necessary to clear the cache every time.After the cache is cleared, delete "-clean" added on the screen in the step 2.
(2) In VxWorks 6.4, the simulator system time varies from the actual time.Correction of the clock rate setting may be needed depending on the personal computer operating environment.
(The default clock rate setting value is "60".)
Execute the sysClkRateSet() function on the "Target Console" screen to correct the time to the actual time.
To change the clock rate setting to "64"
"sysClkRateSet(64)"
1. Right-click the CW Workbench shortcut on Desktop.
In the menu that pops up, select [Properties].
2. Add a space at the end of "Target" in the CW
Workbench property and then enter "-clean" after
the space.
Click the button.
3. Double-click the CW Workbench shortcut on the
desktop and startup CW Workbench.
Cache cleared

87
CHAPTER 15 TROUBLESHOOTING
15
15.4 Sim
ulator Startup
(3) At the startup of VxWorks network daemon, the warning
"WARNING:subnet(***) external configuration failed (can't find a WRTAP
network connection to use)." or the error "[SC] OpenSCManager FAILED 5:
Access denied" appears and the virtual network is not enabled.In the command prompt, commands must be executed with the administrative right.
To execute commands with the administrative right, launch the command prompt by following the procedure
below.
1. Select [Accessory] from Windows® Start*1.
*1 : Select [All apps] on the Start screen or [Start] [All Programs]/[All apps].
2. Right-click [Command Prompt]. In the menu that pops up, select [Run as administrator].
(4) Network communication with the simulator cannot be established.
If Windows® Firewall is enabled, "VxSim Network Daemon" must be registered to the firewall exception list.
For checking and setting procedures for the firewall exception list, refer to the following manual.
Setting/Monitoring Tools for C Controller Module Operating Manual
To register "VxSim Network Daemon" to the exception list by following the setting procedure of the above manual, click the "Browse" button on the screen for adding programs and select "vxsimnetd.exe".
Remark
● If the installation folder of CW Workbench and CW-Sim is "C:\WindRiver", the folder for "vxsimnetd.exe" is set as follows: • For Q24DHCCPU-V/-VG
→ "C:\WindRiver\vxworks-6.8\host\x86-win32\bin" • For Q12DCCPU-V
→ "C:\WindRiver\vxworks-6.4\host\x86-win32\bin"
● For CW-Sim Standalone, it is the local folder to which the files are copied. (Page 36, Section 8.3) • When the local folder is "C:\CCPUSIM"
→ "C:\CCPUSIM\CWSIMSA\vxsimnetd"

88
APPENDIX
Appendix 1 VxWorks Component List
This section explains components whose operations run differently on CW-Sim and CW-Sim Standalone among
VxWorks components implemented on C Controller module.
Remark
For all VxWorks components implemented on C Controller module, refer to the following manual. MELSEC-Q C Controller Module User's Manual
Appendix 1.1 VxWorks 6.8 component list (Q24DHCCPU-V/-VG)
Difference Description Name
Addition Write-protect vector table INCLUDE_PROTECT_VEC_TABLE
Deletion
WDB network connection INCLUDE_WDB_COMM_NETWORK
Built-in symbol table INCLUDE_STANDALONE_SYM_TBL
PCI Bus Show Routines INCLUDE_PCI_BUS_SHOW
PCI Bus legacy Auto Configuration Routines INCLUDE_PCI_OLD_CONFIG_ROUTINES
Peripheral Component Interconnect Bus INCLUDE_PCI_BUS
Processor Local Bus INCLUDE_PLB_BUS
Intel PRO/1000 VxBus Enhanced Network Driver INCLUDE_GEI825XX_VXB_END
Generic PHY driver INCLUDE_GENERICPHY
Intel ICH SATA Controller INCLUDE_DRV_STORAGE_INTEL_ICH
Intel ICH SATA Controller Show Routines INCLUDE_DRV_STORAGE_INTEL_ICH_SHOW
MII bus controller module INCLUDE_MII_BUS
Pentium PCI host controller INCLUDE_PENTIUM_PCI
Sio Channel Utilities INCLUDE_SIO_UTILS
vxBus Aux Clk Support INCLUDE_VXB_AUX_CLK
vxBus Sys Clk Support INCLUDE_VXB_SYS_CLK
vxBus Timer Support INCLUDE_TIMER_SYS
vxBus Timestamp Support INCLUDE_VXB_TIMESTAMP
EHCI Init INCLUDE_EHCI_INIT
EHCI Start INCLUDE_EHCI_BUS
USB Host Stack Init INCLUDE_USB_INIT
EHCI INCLUDE_EHCI
USB Host Stack INCLUDE_USB
Thermal Monitor and Geyserville III suppport INCLUDE_THERM_MONITOR
General BSP macros INCLUDE_BSP_MACROS
32-bit physical address space INCLUDE_MMU_P6_32BIT
USB GEN2 Helper Init INCLUDE_USB_GEN2_HELPER
USB GEN2 Mass Storage Init INCLUDE_USB_GEN2_STORAGE_INIT
USB GEN2 Mass Storage INCLUDE_USB_GEN2_STORAGE

89
APPENDIX
A
Appendix 1 V
xWorks C
ompon
ent ListA
ppendix 1.2 VxW
orks 6.4 componen
t list (Q12D
CC
PU
-V)
Appendix 1.2 VxWorks 6.4 component list (Q12DCCPU-V)
Difference Description Name
AdditionDirect access to host filesystem INCLUDE_PASSFS
VxSim virtual disk to emulate a VxWorks disk driver INCLUDE_VIRTUAL_DISK

90
Appendix 2 QBF_Simulator Bus Interface Functions (Stub)
This section explains the stub provided in the sample program.
This function performs the simulation by using the variable in the sample program (gpsDevArea), instead of accessing
to actual input signal (X) and output signal (Y).
(1) QBF_OpenSimulates open bus. (No processing)
• Argument:
• Return value: 0
(2) QBF_CloseSimulates closed bus. (No processing)
• Argument:
• Return value: 0
Function name Description Reference
QBF_Open Simulates open bus. Page 90, (1) in this section
QBF_Close Simulates closed bus. Page 90, (2) in this section
QBF_X_In_BitEx Simulates readout of input signal (X) by bits (1 point). Page 91, (3) in this section
QBF_X_In_WordEx Simulates readout of input signal (X) by words (16 points). Page 91, (4) in this section
QBF_Y_Out_BitEx Simulates output of output signal (Y) by bits (1 point). Page 91, (5) in this section
QBF_Y_Out_WordEx Simulates output of output signal (Y) by words (16 points). Page 92, (6) in this section
QBF_Y_In_BitEx Simulates readout of output signal (Y) by bits (1 point). Page 92, (7) in this section
QBF_Y_In_WordEx Simulates readout of output signal (Y) by words (16 points). Page 92, (8) in this section
Argument name Description IN/OUT
unit Dummy IN
path Dummy OUT
Argument name Description IN/OUT
path Dummy IN
gpsDevArea
Input signal (X)
Output signal (Y)
1024 bytes
(8192 points)
1024 bytes
(8192 points)

91
APPENDIX
A
Appendix 2 Q
BF
_Sim
ulator Bus In
terface Fun
ctions (Stub)
(3) QBF_X_In_BitExReads the input signal (X) from the memory (gpsDevArea) by bits (1 point).
• Argument:
• Return value:
Normal end 0
Abnormal end -203 (input number/output number error)
(4) QBF_X_In_WordExReads the input signal (X) from the memory (gpsDevArea) by words (16 points).
• Argument:
• Return value:
Normal end 0
Abnormal end -203 (input number/output number error)
Abnormal end -204 (I/O access size error)
Abnormal end -210 (read area size error)
(5) QBF_Y_Out_BitExWrites the output signal (Y) into the memory (gpsDevArea) by bits (1 point).
• Argument:
• Return value:
Normal end 0
Abnormal end -203 (input number/output number error)
Argument name Description IN/OUT
path Dummy IN
sFlg Dummy IN
usXno Input number (X) IN
pusData Read data (0: OFF, 1: ON) OUT
Argument name Description IN/OUT
path Dummy IN
sFlg Dummy IN
usXno Start input number (X) IN
usSize Number of read words IN
pusDataBuf Read data OUT
usBufSizeSize of data storage area
(pusDataBuf) (by words)IN
Argument name Description IN/OUT
path Dummy IN
sFlg Dummy IN
usYno Output number (Y) IN
usData Write data (0: OFF, 1: ON) IN

92
(6) QBF_Y_Out_WordExWrites the output signal (Y) into the memory (gpsDevArea) by words (16 points).
• Argument:
• Return value:
Normal end 0
Abnormal end -203 (input number/output number error)
Abnormal end -204 (input access size error)
(7) QBF_Y_In_BitExReads the output signal (Y) from the memory (gpsDevArea) by bits (1 point).
• Argument:
• Return value:
Normal end 0
Abnormal end -203 (input number/output number error)
(8) QBF_Y_In_WordExReads the output signal (Y) from the memory (gpsDevArea) by words (16 points).
• Argument:
• Return value:
Normal end 0
Abnormal end -203 (input number/output number error)
Abnormal end -204 (I/O access size error)
Abnormal end -210 (read area size error)
Argument name Description IN/OUT
path Dummy IN
sFlg Dummy IN
usYno First output number (Y) IN
usSize Number of written words IN
pusDataBuf Written data IN
usBufSize Dummy (0 fixed) IN
Argument name Description IN/OUT
path Dummy IN
sFlg Dummy IN
usYno Output number (Y) IN
pusData Read data (0: OFF, 1: ON) OUT
Argument name Description IN/OUT
path Dummy IN
sFlg Dummy IN
usYno Start output number (Y) IN
usSize Number of read words IN
pusDataBuf Read data OUT
usBufSizeSize of data storage area
pusDataBuf (by words)IN

93
APPENDIX
A
Appendix 3 S
upportA
ppendix 3.1 Technical support assistan
ce service regard
ing C C
ontroller m
odule
Appendix 3 Support
Appendix 3.1 Technical support assistance service regarding C Controller module
For technical support assistance service regarding C Controller module, refer to the table below.
If you are not sure which type the inquiry belongs to, please contact us. Please note that inquiries other than MELSEC-
related inquiries may not be able to be answered.
Type Inquiry Where to contact
MELSEC-
related
• Functions and specifications of C Controller module
• Specifications and usage of the dedicated function library
provided by Mitsubishi Electric Corporation
• Setting/monitoring tools for the C Controller module, and
functions and specifications of CW Workbench, CW-Sim
and CW-Sim Standalone.
• Functions and specifications of the Mitsubishi products to
be used with C Controller module (such as units and
MELSOFT)
Information and services
For further information and services, please consult your
local Mitsubishi representative
Operating
system-
related
• Functions and specifications of VxWorks, API functions
provided by VxWorks, and general inquiries regarding
programming related to VxWorks
• Functions and specifications of Wind River Workbench and
Tornado
Wind River Systems, Inc.
URL: http://www.windriver.com
Plug-in
software-
related
• Inquiries regarding the plug-in software to be used with CW
Workbench or Wind River WorkbenchPlug-in software manufacturer

94
INDEX
A
Applying Permanent License . . . . . . . . . . . . . . . . . 24
B
Building project using sample program . . . . . . . . . . 66Bus interface function . . . . . . . . . . . . . . . . . . . . . . 10
C
C Controller module . . . . . . . . . . . . . . . . . . . . . . . . 9C Controller module dedicated function . . . . . . . . . 10Communication Paths Available for CW-Sim/CW-Sim Standalone . . . . . . . . . . . . . . . . . . . . . . . . . . . . . 14Contents of CW-Sim CD-ROM . . . . . . . . . . . . . . . 17Contents of CW-Sim Standalone CD-ROM . . . . . . . 18Creating new project . . . . . . . . . . . . . . . . . . . . . . 55Creating project using sample program . . . . . . . . . 62Creating Simulator . . . . . . . . . . . . . . . . . . . . . . . . 73CW Workbench . . . . . . . . . . . . . . . . . . . . . . . . . . . 9CW-Sim . . . . . . . . . . . . . . . . . . . . . . . . . . . . . . . . 9CW-Sim product with additional license . . . . . . . . . 17CW-Sim product with license. . . . . . . . . . . . . . . . . 17CW-Sim simulation environment . . . . . . . . . . . . . . 13CW-Sim Standalone. . . . . . . . . . . . . . . . . . . . . . 9,17CW-Sim Standalone simulation environment. . . . . . 13
D
Debugging Program . . . . . . . . . . . . . . . . . . . . . . . 71Dedicated function library . . . . . . . . . . . . . . . . . . . 10Deleting Permanent License . . . . . . . . . . . . . . . . . 25Differences from C Controller Module. . . . . . . . . . . 16
E
Execution of Sample Program . . . . . . . . . . . . . . . . 76
F
firewall exception list . . . . . . . . . . . . . . . . . . . . . . 87
H
How to Apply Patch . . . . . . . . . . . . . . . . . . . . . . . 39How to build new project . . . . . . . . . . . . . . . . . . . . 66How to Obtain Patch . . . . . . . . . . . . . . . . . . . . . . 39
I
Installation at X YYYY . . . . . . . . . . . . . . . . . . . 39,83Installation of CW-Sim . . . . . . . . . . . . . . . . . . . . . 28Installation of CW-Sim Standalone. . . . . . . . . . . . . 36Installation using a permanent license . . . . . . . . . . 33Installation using a temporary license. . . . . . . . . . . 32
M
MELSEC data link function . . . . . . . . . . . . . . . . . . 10
O
Obtaining Permanent License . . . . . . . . . . . . . . . . 23Opening a sample program. . . . . . . . . . . . . . . . . . 64OPERATING ENVIRONMENT . . . . . . . . . . . . . . . 15
Q
QbfFunc.h. . . . . . . . . . . . . . . . . . . . . . . . . . . . . . 65QBF_Simulator Bus Interface Functions (Stub) . . . . 90
R
Re-applying Permanent License . . . . . . . . . . . . . . 26
S
Sample program configuration . . . . . . . . . . . . . . . 62Sample program operations . . . . . . . . . . . . . . . . . 63Sample program preparation. . . . . . . . . . . . . . . . . 63Setting network driver . . . . . . . . . . . . . . . . 42,47,51Setting Routing and Remote Access service . . . . . . . . . . . . . . . . . . . . . . . . . . . . . . . . 41,47,51Setting TCP/IP . . . . . . . . . . . . . . . . . . . . . 46,50,54Simulator Settings . . . . . . . . . . . . . . . . . . . . . . . . 75Simulator Startup. . . . . . . . . . . . . . . . . . . . . . . 68,79SPECIFICATIONS. . . . . . . . . . . . . . . . . . . . . . . . 16STARTUP.CMD . . . . . . . . . . . . . . . . . . . . . . . 75,79
T
TROUBLESHOOTING . . . . . . . . . . . . . . . . . . . . . 81
U
Uninstallation of CW-Sim . . . . . . . . . . . . . . . . . . . 36Uninstallation of CW-Sim Standalone. . . . . . . . . . . 37
V
VxSim . . . . . . . . . . . . . . . . . . . . . . . . . . . . . . . . . 9VxSim Network Daemon . . . . . . . . . . . . . . . . . . . 87vxsimnetd.conf . . . . . . . . . . . . . . . . . . . . . . . . 67,78vxsimnetd.exe . . . . . . . . . . . . . . . . . . . . . . . . . . . 87VxWorks. . . . . . . . . . . . . . . . . . . . . . . . . . . . . . . . 9VxWorks 6.4 component list . . . . . . . . . . . . . . . . . 89VxWorks 6.8 component list . . . . . . . . . . . . . . . . . 88VxWorks NETWORK DAEMON SETTINGS . . . . . . 41VxWorks Network Daemon Startup . . . . . . . 67,73,78
W
Wind River Systems, Inc. . . . . . . . . . . . . . . . . . . . 93Wind River Workbench. . . . . . . . . . . . . . . . . . . . . . 9

I
4
3
4
7
8
95
WindRiver WRTAP . . . . . . . . . . . 44,46,49,50,53,54wrtap.inf . . . . . . . . . . . . . . . . . . . . . . . . . . . 44,49,53
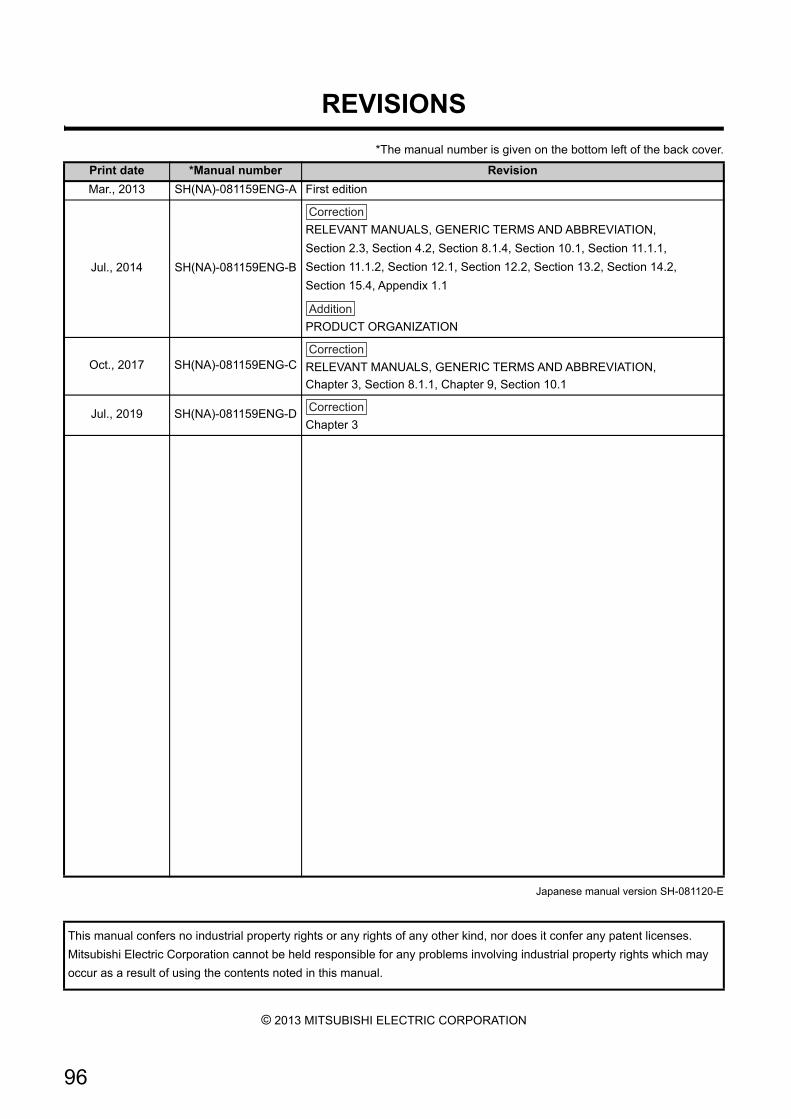
96
REVISIONS
*The manual number is given on the bottom left of the back cover.
Japanese manual version SH-081120-E
© 2013 MITSUBISHI ELECTRIC CORPORATION
Print date *Manual number Revision
Mar., 2013 SH(NA)-081159ENG-A First edition
Jul., 2014 SH(NA)-081159ENG-B
RELEVANT MANUALS, GENERIC TERMS AND ABBREVIATION,
Section 2.3, Section 4.2, Section 8.1.4, Section 10.1, Section 11.1.1,
Section 11.1.2, Section 12.1, Section 12.2, Section 13.2, Section 14.2,
Section 15.4, Appendix 1.1
PRODUCT ORGANIZATION
Oct., 2017 SH(NA)-081159ENG-C RELEVANT MANUALS, GENERIC TERMS AND ABBREVIATION,
Chapter 3, Section 8.1.1, Chapter 9, Section 10.1
Jul., 2019 SH(NA)-081159ENG-DChapter 3
This manual confers no industrial property rights or any rights of any other kind, nor does it confer any patent licenses.
Mitsubishi Electric Corporation cannot be held responsible for any problems involving industrial property rights which may
occur as a result of using the contents noted in this manual.
Correction
Addition
Correction
Correction

97
Memo

98
TRADEMARKS
Microsoft, Windows Vista, and Windows XP are either registered trademarks or trademarks of Microsoft Corporation in the
United States and/or other countries.
Intel and Pentium are either registered trademarks or trademarks of Intel Corporation in the United States and/or other
countries.
Oracle and Java are registered trademarks of Oracle and/or its affiliates.
VxSim, VxWorks, and Wind River are either registered trademarks or trademarks of Wind River Systems, Inc.
Adobe, Acrobat, and Reader are either registered trademarks or trademarks of Adobe Systems Incorporated in the United
States and/or other countries.
The company names, system names and product names mentioned in this manual are either registered trademarks or
trademarks of their respective companies.
In some cases, trademark symbols such as '™' or '®' are not specified in this manual.


SH(NA)-081159ENG-D(1907)KWIX
MODEL: SW1DNC-CWSIM-O-E
MODEL CODE: 13JU77
Specifications subject to change without notice.
When exported from Japan, this manual does not require application to theMinistry of Economy, Trade and Industry for service transaction permission.
HEAD OFFICE : TOKYO BUILDING, 2-7-3 MARUNOUCHI, CHIYODA-KU, TOKYO 100-8310, JAPANNAGOYA WORKS : 1-14 , YADA-MINAMI 5-CHOME , HIGASHI-KU, NAGOYA , JAPAN