Customizing Terminal and Printer Type Files with ... · Customizing Terminal and Printer Type Files...
68
Customizing Terminal and Printer Type Files with Workstation Configurator HP 3000 MPE/iX Computer Systems Edition 5 Customer Order Number 5959-2870 32022-90031 E0294 Printed in: U.S.A. February 1994
Transcript of Customizing Terminal and Printer Type Files with ... · Customizing Terminal and Printer Type Files...
Customizing Terminal and Printer TypeFiles with Workstation Configurator
HP 3000 MPE/iX Computer Systems
Edition 5
Customer Order Number 5959-2870
32022-90031E0294
Printed in: U.S.A. February 1994

NoticeThe information contained in this document is subject to changewithout notice.
Hewlett-Packard makes no warranty of any kind with regard to thismaterial, including, but not limited to, the implied warranties ofmerchantability or fitness for a particular purpose. Hewlett-Packardshall not be liable for errors contained herein or for direct, indirect,special, incidental or consequential damages in connection with thefurnishing or use of this material.
Hewlett-Packard assumes no responsibility for the use or reliability ofits software on equipment that is not furnished by Hewlett-Packard.
This document contains proprietary information which is protected bycopyright. All rights reserved. Reproduction, adaptation, or translationwithout prior written permission is prohibited, except as allowed underthe copyright laws.
Restricted Rights Legend
Use, duplication, or disclosure by the U.S. Government is subject torestrictions as set forth in subparagraph (c) (1) (ii) of the Rights inTechnical Data and Computer Software clause at DFARS 252.227-7013.Rights for non-DOD U.S. Government Departments and Agencies areas set forth in FAR 52.227-19 (c) (1,2).
Hewlett-Packard Company3000 Hanover StreetPalo Alto, CA 94304 U.S.A.
© Copyright 1990–1994, 1998 by Hewlett-Packard Company
Contents
3
1. Introducing Workstation ConfiguratorWhat is Workstation Configurator? . . . . . . . . . . . . . . . . . . . . . . . . . . . 12What is a Terminal or Printer Type file? . . . . . . . . . . . . . . . . . . . . . . . 13Why Use Workstation Configurator? . . . . . . . . . . . . . . . . . . . . . . . . . . 14What Characteristics are Modifiable? . . . . . . . . . . . . . . . . . . . . . . . . . 15
XON/XOFF Protocol . . . . . . . . . . . . . . . . . . . . . . . . . . . . . . . . . . . . . . 15Block Mode . . . . . . . . . . . . . . . . . . . . . . . . . . . . . . . . . . . . . . . . . . . . . 15Read Trigger . . . . . . . . . . . . . . . . . . . . . . . . . . . . . . . . . . . . . . . . . . . . 16Special Characters . . . . . . . . . . . . . . . . . . . . . . . . . . . . . . . . . . . . . . . 16
Backspace . . . . . . . . . . . . . . . . . . . . . . . . . . . . . . . . . . . . . . . . . . . . 16Cancel Line . . . . . . . . . . . . . . . . . . . . . . . . . . . . . . . . . . . . . . . . . . . 16End-of-Record . . . . . . . . . . . . . . . . . . . . . . . . . . . . . . . . . . . . . . . . . 16Subsystem Break . . . . . . . . . . . . . . . . . . . . . . . . . . . . . . . . . . . . . . 17
Echo . . . . . . . . . . . . . . . . . . . . . . . . . . . . . . . . . . . . . . . . . . . . . . . . . . . 17Form Feed . . . . . . . . . . . . . . . . . . . . . . . . . . . . . . . . . . . . . . . . . . . . . . 17Subsystem Response to Backspace . . . . . . . . . . . . . . . . . . . . . . . . . . 17Typeahead. . . . . . . . . . . . . . . . . . . . . . . . . . . . . . . . . . . . . . . . . . . . . . 17Printer Control . . . . . . . . . . . . . . . . . . . . . . . . . . . . . . . . . . . . . . . . . . 18Vertical Format Control . . . . . . . . . . . . . . . . . . . . . . . . . . . . . . . . . . . 18
2. Modifying a Terminal or Printer Type FileStep 1: Starting Workstation Configurator . . . . . . . . . . . . . . . . . . . . . 20Step 2: Naming the Terminal Type File . . . . . . . . . . . . . . . . . . . . . . . . 21Step 3: Configuring Flow Control . . . . . . . . . . . . . . . . . . . . . . . . . . . . . 22Step 4: Configuring Special Characters . . . . . . . . . . . . . . . . . . . . . . . . 25Step 5: Assigning Control . . . . . . . . . . . . . . . . . . . . . . . . . . . . . . . . . . . 27Step 6: Assigning Printer Control. . . . . . . . . . . . . . . . . . . . . . . . . . . . . 29Step 7: Modifying a Vertical Format Control (VFC) File . . . . . . . . . . . 31Step 8: Defining Vertical Format Control (VFC) . . . . . . . . . . . . . . . . . 32
3. Using a New Terminal or Printer Type FileLinking Terminal and Printer Type Files to Ldev Numbers. . . . . . . . 36
Rebooting the Host and the DTC. . . . . . . . . . . . . . . . . . . . . . . . . . . . 37Using Terminal Type Files in Logon Strings . . . . . . . . . . . . . . . . . . . . 39Using the ENV = Parameter when Printing . . . . . . . . . . . . . . . . . . . . 40
4. Workstation Configurator — Screen and Field DefinitionMain Menu . . . . . . . . . . . . . . . . . . . . . . . . . . . . . . . . . . . . . . . . . . . . . . . 42
Fields . . . . . . . . . . . . . . . . . . . . . . . . . . . . . . . . . . . . . . . . . . . . . . . . . . 42Convert MPE V Termtype . . . . . . . . . . . . . . . . . . . . . . . . . . . . . . . . . . . 44
Fields . . . . . . . . . . . . . . . . . . . . . . . . . . . . . . . . . . . . . . . . . . . . . . . . . . 44Flow Control. . . . . . . . . . . . . . . . . . . . . . . . . . . . . . . . . . . . . . . . . . . . . . 45
Fields . . . . . . . . . . . . . . . . . . . . . . . . . . . . . . . . . . . . . . . . . . . . . . . . . . 45Special Characters . . . . . . . . . . . . . . . . . . . . . . . . . . . . . . . . . . . . . . . . . 47
Fields . . . . . . . . . . . . . . . . . . . . . . . . . . . . . . . . . . . . . . . . . . . . . . . . . . 47Control . . . . . . . . . . . . . . . . . . . . . . . . . . . . . . . . . . . . . . . . . . . . . . . . . . 49
Fields . . . . . . . . . . . . . . . . . . . . . . . . . . . . . . . . . . . . . . . . . . . . . . . . . . 49Printer Control. . . . . . . . . . . . . . . . . . . . . . . . . . . . . . . . . . . . . . . . . . . . 51

4
Contents
Fields . . . . . . . . . . . . . . . . . . . . . . . . . . . . . . . . . . . . . . . . . . . . . . . . . . 51VFC File Selection . . . . . . . . . . . . . . . . . . . . . . . . . . . . . . . . . . . . . . . . . 53
Fields . . . . . . . . . . . . . . . . . . . . . . . . . . . . . . . . . . . . . . . . . . . . . . . . . . 53VFC and Initialization. . . . . . . . . . . . . . . . . . . . . . . . . . . . . . . . . . . . . . 55
Fields . . . . . . . . . . . . . . . . . . . . . . . . . . . . . . . . . . . . . . . . . . . . . . . . . . 55
A. Error Messages
B. Control Character Mnemonics
C. Terminal Type Files
Glossary
Index

Figures
5
Figure 2-1 . Main Screen . . . . . . . . . . . . . . . . . . . . . . . . . . . . . . . . . . . . . . . . . . . . . . . . . . . . . . . . . . . .21Figure 2-2 . Flow Control Screen . . . . . . . . . . . . . . . . . . . . . . . . . . . . . . . . . . . . . . . . . . . . . . . . . . . . .22Figure 2-3 . Special Characters Screen. . . . . . . . . . . . . . . . . . . . . . . . . . . . . . . . . . . . . . . . . . . . . . . . .25Figure 2-4 . Control Screen . . . . . . . . . . . . . . . . . . . . . . . . . . . . . . . . . . . . . . . . . . . . . . . . . . . . . . . . . .27Figure 2-5 . Printer Control Screen . . . . . . . . . . . . . . . . . . . . . . . . . . . . . . . . . . . . . . . . . . . . . . . . . . .29Figure 2-6 . VFC File Selection Screen . . . . . . . . . . . . . . . . . . . . . . . . . . . . . . . . . . . . . . . . . . . . . . . . .31Figure 2-7 . VFC and Initialization Screen . . . . . . . . . . . . . . . . . . . . . . . . . . . . . . . . . . . . . . . . . . . . .32Figure 4-1 . Main Screen . . . . . . . . . . . . . . . . . . . . . . . . . . . . . . . . . . . . . . . . . . . . . . . . . . . . . . . . . . . .42Figure 4-2 . Flow Control Screen . . . . . . . . . . . . . . . . . . . . . . . . . . . . . . . . . . . . . . . . . . . . . . . . . . . . .44Figure 4-3 . Special Characters Screen. . . . . . . . . . . . . . . . . . . . . . . . . . . . . . . . . . . . . . . . . . . . . . . . .45Figure 4-4 . Control Screen . . . . . . . . . . . . . . . . . . . . . . . . . . . . . . . . . . . . . . . . . . . . . . . . . . . . . . . . . .47Figure 4-5 . Printer Control Screen . . . . . . . . . . . . . . . . . . . . . . . . . . . . . . . . . . . . . . . . . . . . . . . . . . .49Figure 4-6 . VFC File Selection Screen . . . . . . . . . . . . . . . . . . . . . . . . . . . . . . . . . . . . . . . . . . . . . . . . .51Figure 4-7 . VFC and Initialization Screen . . . . . . . . . . . . . . . . . . . . . . . . . . . . . . . . . . . . . . . . . . . . .53

6
Figures

Tables
Table B-1. Control Character Mnemonics . . . . . . . . . . . . . . . . . . . . . . . . . . . . . . . . . . . . . . . . . . . . . .63Table C-1. Terminal Type Files . . . . . . . . . . . . . . . . . . . . . . . . . . . . . . . . . . . . . . . . . . . . . . . . . . . . . . .65

9
PrefaceWorkstation Configurator is a utility program used to define terminaland printer type files. Specifically, it can be used to:
• Modify terminal or printer type files.
• Examine terminal or printer type files.
• Convert MPE V termtypes to MPE/iX format.
NOTE MPE/iX, Multiprogramming Executive with Integrated POSIX, is thelatest in a series of forward-compatible operating systems for theHP 3000 line of computers.
In HP documentation and in talking with HP 3000 users, you willencounter references to MPE XL, the direct predecessor of MPE/iX.MPE/iX is a superset of MPE XL. All programs written for MPE XL willrun without change under MPE/iX. You can continue to use MPE XLsystem documentation, although it may not refer to features added tothe operating system to support POSIX (for example, hierarchicaldirectories).
Finally, you may encounter references to MPE V, which is the operatingsystem for HP 3000s, not based on the PA-RISC architecture. MPE Vsoftware can be run on the PA-RISC HP 3000s (Series 900) in what isknown as compatibility mode.
Skills and TasksCustomizing Terminal and Printer Type Files with WorkstationConfigurator will be of greatest value to the person responsible for theoverall operation and reliability of an MPE/iX system. This person isusually called the system administrator or system manager, and needsto be able to prepare devices for operation and to configure thecomputer to recognize asynchronous devices.
Guide To This ManualCustomizing Terminal and Printer Type Files with WorkstationConfigurator is divided into the following Chapters and Appendixes:
• Chapter 1, “Introducing Workstation Configurator,” presents anoverview of the Workstation Configurator software.
• Chapter 2, “Modifying a Terminal or Printer Type File,” givesinformation and lists the steps to modify a terminal or printer typefile.
• Chapter 3, “Using a New Terminal or Printer Type File,” explainsthe different ways to use the new file.

10
• Chapter 4, “Workstation Configurator — Screen and FieldDefinition,” defines the menus used to modify a terminal or printertype file and displays each screen.
• Appendix A, “Error Messages,” lists error messages and causes andactions for each message.
• Appendix B, “Control Character Mnemonics,” gives information andlists control characters.
• Appendix C, “Terminal Type Files,” describes the characteristics ofthe terminal and printer type files supplied in the MPE/iX operatingsystem.
Helpful ManualsWhen using Customizing Terminal and Printer Type Files withWorkstation Configurator, these manuals should be available forreference:
• Configuring Systems for Terminals, Printers, and Other SerialDevices (32022-61000). This manual describes how terminals andprinters are connected to the HP 3000 (900 Series) computer. Itincludes an explanation of how terminal and printer input/output(I/O) is controlled by the MPE/iX operating system, and presents anoverview of the hardware and software needed to accomplishcommunications in an asynchronous serial mode.
• Asynchronous Serial Communications Programmer’s ReferenceManual (32022-61001). This manual documents a subset of thesystem-supplied intrinsics available through the native mode ofMPE/iX. The intrinsics are those that are particularly useful for theprogrammatic control of asynchronous devices.
• Using the Node Management Services (NMS) Utilities(32022-61005). This is a reference manual that has detailedinformation about the NMS Utilities, including NMMGR.
• DTC Planning Guide. This manual gives an overview of the DTCfamily, the management platforms, and the connections possible.
• DTC Technical Reference Manual. This manual covers the technicaldetails of the DTC, including protocol implementations andlimitations, explanations of how connections are established, andinformation on event logging.

11
1 Introducing WorkstationConfigurator
This chapter focuses on an explanation of Workstation Configurator,including the following:
• A list of the configurable characteristics in a terminal or printer typefile.
• A definition of each configurable characteristic.

12 Chapter 1
Introducing Workstation ConfiguratorWhat is Workstation Configurator?
What is Workstation Configurator?Workstation Configurator is a utility program used to define and saveterminal and printer type files. It can also be used to modify or inspectexisting terminal or printer type files.
The utility, TTUTIL.PUB.SYS will run on any HP 3000 (900 Series)computer. It is an interactive, menu-driven program; it uses a set ofVPLUS/3000 screens.
System operator (OP) and privilege mode (PM) capabilities are requiredto run this program.

Chapter 1 13
Introducing Workstation ConfiguratorWhat is a Terminal or Printer Type file?
What is a Terminal or Printer Type file?Terminal and printer type files are files that the system uses to definethe relationship between the terminal or printer and the device driveron the Datacommunications and Terminal Controller (DTC). Someexamples of the type of information defined by a terminal or printertype file includes flow control for inbound and outbound data, whetherthe terminal operates in block mode, and how the computer responds tothe backspace character.
It is not necessary to understand terminal or printer type files in orderto operate terminals or printers, but it is useful to know they exist.Refer to Appendix C, “Terminal Type Files,” for a list of terminal andprinter type files supplied in the MPE/iX operating system.

14 Chapter 1
Introducing Workstation ConfiguratorWhy Use Workstation Configurator?
Why Use Workstation Configurator?Users sometimes need to alter the terminal or printer type file whencommunication is initiated because the port was configured into theinput/output system with a terminal or printer type file that is notsuited to their use. Often, this is true for dial-up modem ports, wheremany different terminals share a single port, but at different times.
Workstation Configurator lets you modify the characteristics of aterminal or printer port. Multiple files can exist that define differentcharacteristics for one port. The HP 3000 system enables terminaloperators to temporarily alter the terminal or printer type for a port inorder to change a terminal port’s characteristics.
WARNING Users of Workstation Configurator can create terminal orprinter type files without restrictions. Proper and efficientoperation of devices using a user-created terminal or printertype file is the responsibility of the user. For example, aterminal type file that specifies no flow control mechanism willcreate data overruns on the device.

Chapter 1 15
Introducing Workstation ConfiguratorWhat Characteristics are Modifiable?
What Characteristics are Modifiable?Use Workstation Configurator to specify the following characteristicsfor a terminal or printer port:
• The XON/XOFF protocol.
• The read trigger.
• Block mode.
• Special characters.
• Echo.
• Form feed.
• DTC response to backspace.
• Typeahead.
• Printer control.
• Vertical Format Control.
Each of these is described in detail on the following pages.
XON/XOFF ProtocolThe XON/XOFF protocol is controlled by the device, rather than by thedevice driver. The driver sends data to the device in a continuousstream. If the device can no longer accept data (because of being putoffline, filling its buffer, running out of paper, etc.), it sends the XOFFcharacter to the driver. The driver then stops sending data to thedevice. When the device is able to accept data again, it sends the XONcharacter to the driver and the driver resumes data transmission.
Use Workstation Configurator to specify if a timer should be startedwhen the XOFF character is received. If a timer is started and thetimer expires before the XON character is received, a message isprinted on the system console stating that the device is offline. Thetimer duration can be specified from 1 to 255 seconds.
Block ModeBlock mode is a method of transferring data from a terminal to thecomputer. Instead of sending each character as it is typed, the terminalbuffers a line or more of data and sends an entire block of data whenthe terminal user finishes entering it.
Using Workstation Configurator, the type (or types) of block mode alongwith the block mode alert and block trigger characters can be specified.

16 Chapter 1
Introducing Workstation ConfiguratorWhat Characteristics are Modifiable?
Read TriggerThe read trigger character is used to tell the terminal when to sendcharacters to the driver. This character is normally the DC1 character.
Using Workstation Configurator, any character can be specified as theread trigger character. If the device requires a multiple charactersequence for a read trigger, the first number minus one (n-1 )characters can be sent to the device through a write and the lastcharacter can be made the read trigger character.
Special CharactersThere are several characters that have special significance to the driver.These characters cause the driver to take special actions.
With Workstation Configurator, defining characters to cause a specialaction is possible. The characters that have special significance to thedriver are as follows:
• Backspace.
• Cancel line.
• End-of-Record.
• Subsystem break.
Each of these are described in the pages that follow.
BackspaceThis special function is entered by pressing [Backspace] . If enabled,backspace causes the cursor to back up one space, but it does not erasethe character.
Cancel LineThis special function is entered by pressing [CTRL]-[X] . Cancel deletesthe current line. The system verifies the cancellation by printing threeexclamation marks (!!! ), followed by a carriage return and a line feed.
End-of-RecordThis function takes place during a read. When a read is issued, it hasan expected length associated with it. By entering an end-of-record(EOR) character, the read can be terminated before the full number ofcharacters has been entered. With Workstation Configurator, two typesof EOR characters can be specified.
With the first type, the EOR character terminates the read, but it is notincluded in the data returned to the program doing the read or theactual count of characters. The read is returned with good (CCE) status.

Chapter 1 17
Introducing Workstation ConfiguratorWhat Characteristics are Modifiable?
The second type is the same as the Additional EOR specified throughthe FCONTROL(25) intrinsic. The character is included in both the dataand the actual count of the number of bytes returned. The read isreturned with a special status (a returned condition code of CCL on theread and a file system error number of FSERR 31), indicating that theread was terminated by the additional EOR character. The terminalcursor is not affected.
Subsystem BreakThe subsystem break function enables you to interrupt the execution ofa local program or subsystem command. The subsystem breakcharacter is invoked by pressing [CTRL]-[Y] . Using WorkstationConfigurator, one subsystem break character can be specified.
EchoEcho allows terminal input to be echoed back to the terminal screen bythe computer as it is received. With Workstation Configurator, theinitial setting for echo (either on or off ) can be specified. Whenever theterminal type is set, the initial setting for echo will take effect.
NOTE Applications exist that set echo before the terminal type is selected. Forapplications to function correctly, the program needs to select theterminal type first, and then set echo as desired (if it is different thanthe default
Form FeedThe form feed character is usually contained in the carriage controlsent to the hard copy printer. Some hard copy printer will not accept theform feed character. Workstation Configurator can be used to replacethe form feed character with a character that the hard copy printer willaccept. In most instances, the form feed character is replaced with theline feed character.
Subsystem Response to BackspaceWhen echo is enabled, a backspace is echoed to the terminal screenwhich might cause some action to the data on the screen. An additionalresponse might be required from the system for better cursorpositioning. The default for backspace causes the cursor to backup onespace, but it does not erase the character. Workstation Configurator canbe used to specify that the character should be erased.
TypeaheadTypeahead allows the terminal user to continuously enter data withouthaving to wait for the system to process the data and return theMPE/iX prompt (: ). Typeahead echo mode determines whether input

18 Chapter 1
Introducing Workstation ConfiguratorWhat Characteristics are Modifiable?
characters will be echoed to the terminal screen once or twice (the firstecho occurs as the data is typed ahead; the second echo occurs when thedata is used in subsequent reads). Using Workstation Configurator,typeahead can be enabled and the choice of one or two echoes of inputcharacters can be specified.
Printer ControlWhen a printer acts as a spooled system printer, different people canuse the printer in different ways. In order to insure that one user whochanges the printer’s characteristics (such as margins, tabs, or printdensity) does not affect the next user who does not want to use thosecharacteristics, an initialization string can be specified.
An initialization string sets the printer to a known and repeatablestate. When a device (configured as a printer) is first opened, theinitialization string (up to 120 characters) is automatically sent to theprinter by the driver. For spooled printers, this occurs at the beginningof every spool file sent to the printer.
Printer control functions provide control for printers. UsingWorkstation Configurator, an initialization string can be defined, andparameters can specify the status wait-time, the status retries, and theFOPEN wait-time. The status wait-time and status retries customize thestatus request protocol. FOPEN wait-time maintains a remoteconnection over multiple print (spool) files.
Vertical Format ControlMany line printers allow the use of Vertical Format Control (VFC). VFCinstructs a printer to skip to a predetermined place on the page withcertain carriage control directives instead of counting and displaying anumber of blank lines and spaces.
Up to 16 VFC channels can be supported by a device with each channelrepresenting one or more places within the vertical page. Each channelperforms a standard skip function such as skip to top of next page, skipone line, skip to next quarter page, and so forth. Some serial printersallow the use of VFC through a set of character sequences. To skip to aparticular VFC channel, the corresponding character sequence is sentto the device.
With Workstation Configurator, each VFC character sequence (up to 16)can be defined. When one of the VFC carriage controls is used, thedriver generates the character sequence necessary to move the printercarriage to the proper channel.
19
2 Modifying a Terminal or PrinterType File
This chapter provides step-by-step instructions for modifying terminalor printer type files. Terminal and printer type files define the softwareoperating characteristics of the terminals and printers directly orremotely attached to Datacommunications and Terminal Controllers(DTCs). The MPE/iX operating system has multiple terminal andprinter type files that have various settings, such as different recordwidth sizes and bits per second (bps). By following the steps in thischapter, the MPE/iX terminal and printer type files can be customizedto match the operation requirements of the attached device.
When modifying a terminal or printer type file, start with one of thefiles supplied in the MPE/iX operating system. Refer to Appendix C,“Terminal Type Files,” to choose a file that has the same basicfunctionality as the file that needs to be created. Rename this file andthen make modifications to it, as required.
If, for example, a file needs to be created to work with buffered networkprinters, use printer type 26 as the base file for the modifications. If thedevice is a terminal attached to a PAD, use the PAD terminal type file(terminal type 24) as the base file for the modifications. Using similarbase files will limit the number of modifications required because theircontents already define similar software operating characteristics.
For additional information on terminal and printer type files, refer toConfiguring Systems for Terminals, Printers, and Other Serial Devices.
NOTE For the remainder of this chapter, both terminal and printer type fileswill be generically referred to as terminal type files.

20 Chapter 2
Modifying a Terminal or Printer Type FileStep 1: Starting Workstation Configurator
Step 1: Starting Workstation ConfiguratorWorkstation Configurator is initiated by typing :RUNTTUTIL.PUB.SYS at the MPE/iX prompt (: ) and pressing the [Return]key. System operator (OP) and privilege mode (PM) capabilities arerequired to run this program.
On each subsequent screen, modify the fields that appear in inversevideo. Information can be entered only in these areas, since the rest ofthe screen is protected against modifications. Refer to Appendix B,“Control Character Mnemonics,” for a list of the mnemonics that can beentered into the fields that appear in inverse video.
Some fields will list default values. Use these values if they areacceptable, or enter new values and data specific to the terminal orprinter type file being created.

Chapter 2 21
Modifying a Terminal or Printer Type FileStep 2: Naming the Terminal Type File
Step 2: Naming the Terminal Type FileThe Main Menu screen is shown in Figure 2-1.
Figure 2-1 Main Screen
Type the name of the terminal type file you want to modify in theTerminal type file name field. This is the renamed terminal orprinter type file from the MPE/iX operating system that has the samebasic functionality as the file that will be created. Verify that M (Modify)is displayed in the File option field. Press the [Enter] key.

22 Chapter 2
Modifying a Terminal or Printer Type FileStep 3: Configuring Flow Control
Step 3: Configuring Flow ControlThe Flow Control screen is shown in Figure 2-2. Steps for both enablingand disabling the XON/XOFF protocol, defining the typeahead bufferbehavior, and specifying a type of block mode and a read triggercharacter are given below.
Figure 2-2 Flow Control Screen
To enable the XON/XOFF protocol:
1. Verify that the cursor is in the Driver uses an XON/XOFFprotocol (Y,N) field. Terminals and printers use the XON/XOFFprotocol to tell the HP 3000 that they cannot accept any more dataand when they are ready to accept data again. Type Y.
2. Press the [Tab] key to move the cursor to the Timer enabled?(Y,N) field.
3. Verify that the cursor is in the Timer enabled (Y,N) field. If thetimer is enabled and it expires before an XON is received from theterminal or printer, a message saying the device is offline is printedon the system console.
4. Type Y.
5. Verify that the cursor is in the Timer period (seconds) field.

Chapter 2 23
Modifying a Terminal or Printer Type FileStep 3: Configuring Flow Control
6. Type the number of seconds, from 1 to 255, that the timer will beenabled for. This is the amount of time the HP 3000 will wait for theXON from the terminal or printer.
To disable the XON/XOFF protocol:
1. Verify that the cursor is in the Does driver use an XON/XOFFprotocol (Y,N) field. Type N.
To specify the typeahead buffer behavior:
1. Verify that the cursor is in the Typeahead buffer behavior forsending second XOFF field. The HP 3000 sends an XOFF to theterminal when its typeahead buffer is full. The value entered in thisfield specifies how often the HP 3000 will send an XOFF, after itstypeahead buffer is full.
2. Type 0 to delay sending an XOFF to the terminal after thetypeahead buffer is full. If 0 is entered, the HP 3000 will wait to sendan XOFF until 16 characters are received. HP recommends delayingthe sending of an XOFF if data switches are used in the computernetwork.
3. Type 1 to specify that an XOFF should be sent to the terminal aftereach character is received when the terminal buffer is full.
To configure block mode:
1. Press the [Tab] key to move the cursor to the Block mode support(N, L, P, B) field. Type the first letter of the block mode that thisterminal type file will use. The types of block mode are none, line,page, or both.
2. Verify that the cursor is in the Characters: alert field. This isthe character that the terminal uses to alert the system that a blockof data is coming.
3. Type the alert character for this terminal type file. In mostinstances, this character is the DC2.
4. Verify that the cursor is in the Characters: trigger field. This isthe character that the system uses to tell the terminal that it isready to receive the data.
5. Type the trigger character for this terminal type file. In mostinstances, this character is the DC1.
To configure a read trigger character:
1. Press the [Tab] key to move the cursor to the Read triggercharacter field. This character tells the terminal that the HP 3000is ready to receive data.

24 Chapter 2
Modifying a Terminal or Printer Type FileStep 3: Configuring Flow Control
2. Type the read trigger character for this terminal type file. The readtrigger character entered here must be the same read triggercharacter entered for block mode. In most instances, this character isthe DC1.
After all the data has been modified on this screen, press the [Enter] keyand then the Next Form [F6] function key.
Chapter 2 25
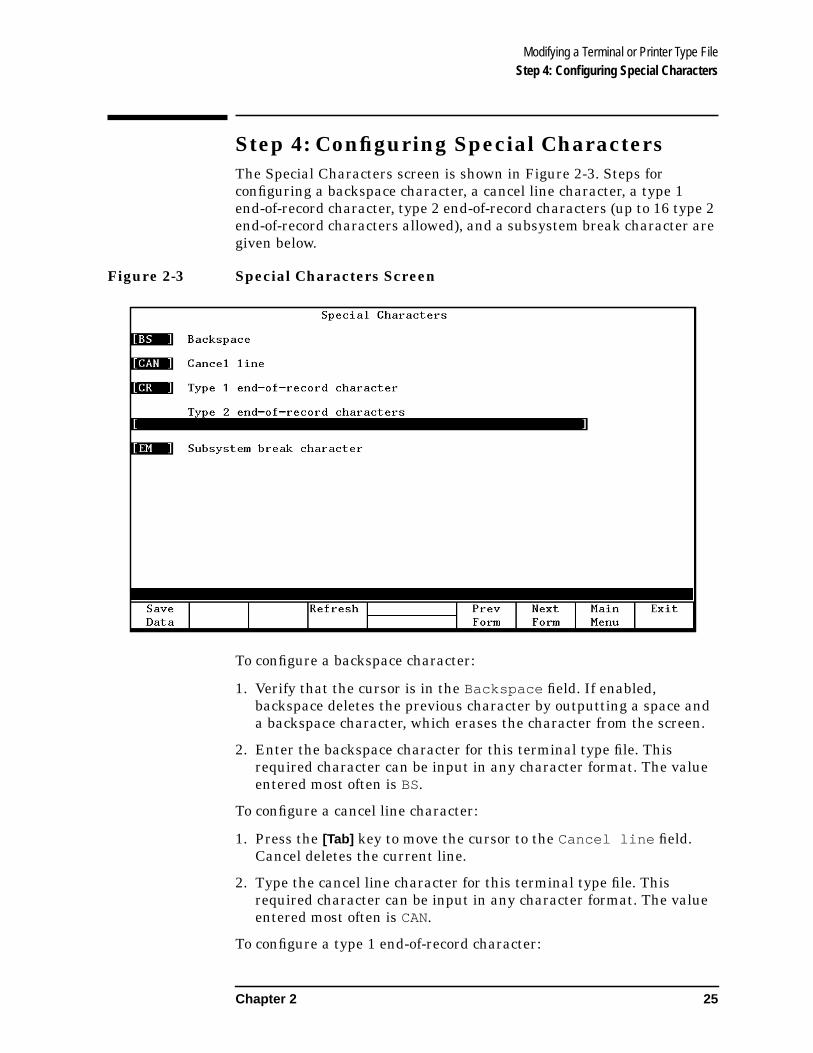
Modifying a Terminal or Printer Type FileStep 4: Configuring Special Characters
Step 4: Configuring Special CharactersThe Special Characters screen is shown in Figure 2-3. Steps forconfiguring a backspace character, a cancel line character, a type 1end-of-record character, type 2 end-of-record characters (up to 16 type 2end-of-record characters allowed), and a subsystem break character aregiven below.
Figure 2-3 Special Characters Screen
To configure a backspace character:
1. Verify that the cursor is in the Backspace field. If enabled,backspace deletes the previous character by outputting a space anda backspace character, which erases the character from the screen.
2. Enter the backspace character for this terminal type file. Thisrequired character can be input in any character format. The valueentered most often is BS.
To configure a cancel line character:
1. Press the [Tab] key to move the cursor to the Cancel line field.Cancel deletes the current line.
2. Type the cancel line character for this terminal type file. Thisrequired character can be input in any character format. The valueentered most often is CAN.
To configure a type 1 end-of-record character:

26 Chapter 2
Modifying a Terminal or Printer Type FileStep 4: Configuring Special Characters
1. Press the [Tab] key to move the cursor to the Type 1end-of-record character field. This character works like a linefeed, but no carriage return occurs.
2. Modify the default to list the end-of-record character for thisterminal type file. This character is optional. The value most oftenentered is CR.
To configure type 2 end-of-record characters:
1. Press the [Tab] key to move the cursor to the Type 2end-of-record characters field. When a type 2 end-of-recordcharacter is configured, the read is returned with a special statusthat indicates that the read was terminated by the additionalend-of-record character.
2. Enter the additional end-of-record characters. This is optional. Up to16 type 2 end-of-record characters may be configured. Leave a blankbetween each mnemonic when you enter the field.
To configure a subsystem break character:
1. Press the [Tab] key to move the cursor to the Subsystem breakcharacter field. Subsystem break interrupts the execution of alocal program or subsystem command.
2. Enter the subsystem break character for this terminal type file. Thischaracter is optional. The value most often entered is EM.
After the data has been modified on this screen, press the [Enter] keyand the Next Form [F6] function key.

Chapter 2 27
Modifying a Terminal or Printer Type FileStep 5: Assigning Control
Step 5: Assigning ControlThe Control screen is shown in Figure 2-4. What follows are steps forturning initial echo on or off and for defining form feed, backspace, andtypeahead behavior.
Figure 2-4 Control Screen
To turn initial echo on or off:
1. Verify that the cursor is in the Initial echo (ON,OFF) field.Echo allows terminal input to be echoed back to the terminal screenby the computer as the input is received.
2. Type to enable initial echo. Type OFF to disable initial echo.
To specify whether form feed is allowed to be output to a terminal:
1. Press the [Tab] key to move the cursor to the Form feed allowedin output carriage control (Y/N) field. This character isusually contained in the carriage control sent to the hard copydevice. Some hard copy devices will not accept the form feedcharacter.
2. Type Y if the form feed character should be sent to the hard copydevice.

28 Chapter 2
Modifying a Terminal or Printer Type FileStep 5: Assigning Control
3. If the hard copy device will not accept the form feed character,type N. Verify that the cursor is in the Replacement characterfor form feed field. Enter the replacement character for formfeed, usually LF.
To specify a response to the backspace character:
1. Press the [Tab] key to move the cursor to the System response tobackspace field. When echo is enabled, a backspace is sent to theterminal which might cause some action on the terminal’s screen. Anadditional response might be required from the system for bettercursor positioning.
2. Type 1 to back the cursor up one space, but entering 1 will not erasethe character.
3. Enter 5 to back the cursor up one space and erase the character.
To turn typeahead on or off:
1. Press the [Tab] key to move the cursor to the Is typeaheadenabled (Y,N) field. Typeahead allows the terminal user tocontinuously enter data without having to wait for the system toprocess the data and return the MPE prompt (: ).
2. Type Y to turn typeahead on. Type N to turn typeahead off.
To specify typeahead echo mode:
1. Press the [Tab] key to move the cursor to the Typeahead EchoMode field. The value entered here determines whether the inputcharacters will be echoed to the terminal’s screen once or twice.
2. Type 0 if the input characters should be echoed to the terminal’sscreen twice. Type 1 if the input characters should be echoed to theterminal’s screen once.
After the data has been modified on this screen, press the [Enter] keyand the Next Form [F6] function key.

Chapter 2 29
Modifying a Terminal or Printer Type FileStep 6: Assigning Printer Control
Step 6: Assigning Printer ControlThe Printer Control screen is shown in Figure 2-5. Steps for definingthe number of status requests that should be attempted, the length oftime to wait for a reply, the number of requests to attempt, and theamount of time to wait before sending a disconnect request are givenbelow.
Figure 2-5 Printer Control Screen
To turn on or off status request efficiency mode:
1. Verify that the cursor is in the Status request efficiencymode enabled (Y,N) field. This protocol specifies the number ofrequests per write the HP 3000 should send to the printer.
2. Type Y to enable status request efficiency mode. Type N to disablestatus request efficiency mode.
3. If status request efficiency mode is disabled, verify that the cursor isin the Frequency of status requests field. Enter a number tospecify the number of requests per write the HP 3000 should send tothe printer.
To configure the amount of time the HP 3000 should wait for a reply:

30 Chapter 2
Modifying a Terminal or Printer Type FileStep 6: Assigning Printer Control
1. Press the [Tab] key to move the cursor to the Wait time forreply to status request (5..180 seconds) field. Enter atime that is long enough for the status request reply to return duringpeak periods of network traffic.
2. Type the number of seconds, from 5 to 180.
To configure the number of retries that are made when the wait timer:
1. Press the [Tab] key to move the cursor to the Read retries forXON and status request reply (0..100 retries) field.When the wait time for a reply to status expires, the driver sends amessage to the console and retries the read for as many attempts asare specified here.
2. Type the number of read retries, from 0 to 100.
To specify the number of seconds to wait before sending a disconnectrequest to a remote printer port:
1. Press the [Tab] key to move the cursor to the Wait time forFOPEN before disconnect (0..90 seconds or 99,99=infinite) field.
2. Type the number of seconds from 0 to 90, or type 99 if the HP 3000should wait indefinitely.
To specify if duplex printing is supported:
1. Press the [Tab] key to move the cursor to the Does the printersupport duplex printing field.
2. Specify yes or no for duplex printing.
After the data has been entered on this screen, press the [Enter] key andthe Next Form [F6] function key.

Chapter 2 31
Modifying a Terminal or Printer Type FileStep 7: Modifying a Vertical Format Control (VFC) File
Step 7: Modifying a Vertical Format Control(VFC) FileThe VFC File Selection screen is shown in Figure 2-6. Steps formodifying a VFC file are given below.
Figure 2-6 VFC File Selection Screen
Type the name of the vertical format control file you want to modify inthe VFC file name field. Verify that M (Modify) is displayed in theFile option field. Press the [Enter] key.

32 Chapter 2
Modifying a Terminal or Printer Type FileStep 8: Defining Vertical Format Control (VFC)
Step 8: Defining Vertical Format Control(VFC)The VFC and Initialization screen is shown in Figure 2-7. Steps fordefining an initialization string that will set the printer to a known andrepeatable state are given below.
Figure 2-7 VFC and Initialization Screen
To specify whether an initialization string will be sent to a printer:
1. Verify that the cursor is in the Device to be initialized(Y,N) field. Initializing the printer sets it to a known andrepeatable state. The settings that an initialization string mightdefine include the margins, the fonts, and the column width.
2. Type N if the printer should not be initialized when files are sent toit.
3. Type Y if the printer should be initialized when files are sent to it.Verify that the cursor is in the Initialization String field.
4. Enter the initialization string. A maximum of 120 characters can beentered. Remember to surround the initialization string with quotes.
To configure VFC channels on the printer:

Chapter 2 33
Modifying a Terminal or Printer Type FileStep 8: Defining Vertical Format Control (VFC)
1. Press the [Tab] key to move the cursor to the Is VFC defined forthe device (Y,N) field. Up to 16 VFC channels can be configured.Each channel performs a standard function such as “skip to top ofnext page” or “skip one line.”
2. Type N if VFC channels are not required for this printer.
3. Type Y if VFC channels are required for this printer. Verify that thecursor is in the String field.
4. Enter the VFC strings. A maximum of 16 characters can be entered,per string. Remember to surround each string with quotes.
After the data has been entered on this screen, press the Save Data[F1] function key and the Exit [F8] function key to leave WorkstationConfigurator.

34 Chapter 2
Modifying a Terminal or Printer Type FileStep 8: Defining Vertical Format Control (VFC)

35
3 Using a New Terminal or PrinterType File
The terminal or printer type file created with Workstation Configuratoris almost ready for use. This chapter explains the different ways ofusing the new terminal or printer type file. One option is topermanently associate a terminal or printer type file with a logicaldevice number (ldev number). Another option is to use a terminal orprinter type file for the duration of a session; this is accomplished byspecifying the file name when the session is first established.

36 Chapter 3
Using a New Terminal or Printer Type FileLinking Terminal and Printer Type Files to Ldev Numbers
Linking Terminal and Printer Type Files toLdev NumbersOne way to use a new terminal or printer type file is to associate theterminal type or printer type file with a profile name and then associatethe profile name with an ldev number. This information is stored in theNMCONFIG.PUB.SYS file. The NMCONFIG.PUB.SYS file defines theHP 3000’s configuration.
The Node Management Configuration Services (NMMGR) is the toolused to modify the NMCONFIG.PUB.SYS file. For information on usingNMMGR, refer to Using the Node Management Services (NMS)Utilities. For detailed information on adding terminal and printer typefiles to the NMCONFIG.PUB.SYS file, refer to Configuring Systems forTerminals, Printers, and Other Serial Devices.
Follow the steps below to add a new terminal or printer type file toNMCONFIG.PUB.SYS file.
1. Start NMMGR by typing NMMGR at the MPE prompt (: ). Nodemanager (NM) and network administrator (NA) capabilities arerequired to run this program.
2. Verify that NMCONFIG.PUB.SYS is the configuration file name used.
3. Press the Open Config [F1] function key to go to the Main screen.
4. Use the direct branching utility to reach the Profile Selection screen.If using host-based management, type @DTS.PROFILE in theNMMGR command line. If using PC-based management, [email protected] in the NMMGR command line. Press the [Enter] key.The DTS Profile Selection screen is displayed.
5. Type a new profile name in the Profile name field.
6. Verify that the cursor is in the Type field. Type terminal if the newfile is a terminal type file or printer if the new file is a printer typefile.
7. Press the Add [F5] function key. Either the DTS Printer Profilescreen or the DTS Terminal Profile screen is displayed, depending onthe type of profile specified in step 5.
8. Enter the new terminal or printer type file name in the Terminal orPrinter Type File Name field.
9. Modify the configurable variables, as necessary. Press the SaveData [F6] function key. Press the Prior Screen [F8] twice to moveto the Host Configuration screen.
10.Press the Go To DTC [F2] function key. The DTC ConfigurationSelection screen is displayed.
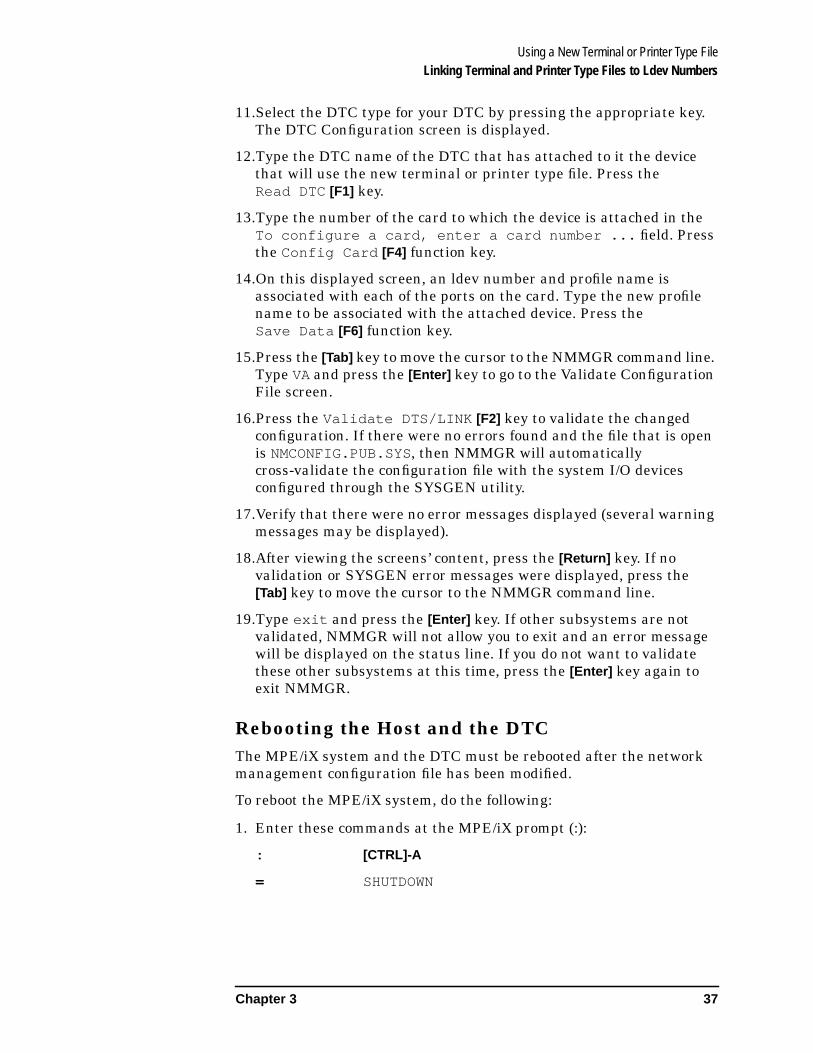
Chapter 3 37
Using a New Terminal or Printer Type FileLinking Terminal and Printer Type Files to Ldev Numbers
11.Select the DTC type for your DTC by pressing the appropriate key.The DTC Configuration screen is displayed.
12.Type the DTC name of the DTC that has attached to it the devicethat will use the new terminal or printer type file. Press theRead DTC[F1] key.
13.Type the number of the card to which the device is attached in theTo configure a card, enter a card number ... field. Pressthe Config Card [F4] function key.
14.On this displayed screen, an ldev number and profile name isassociated with each of the ports on the card. Type the new profilename to be associated with the attached device. Press theSave Data [F6] function key.
15.Press the [Tab] key to move the cursor to the NMMGR command line.Type VA and press the [Enter] key to go to the Validate ConfigurationFile screen.
16.Press the Validate DTS/LINK [F2] key to validate the changedconfiguration. If there were no errors found and the file that is openis NMCONFIG.PUB.SYS, then NMMGR will automaticallycross-validate the configuration file with the system I/O devicesconfigured through the SYSGEN utility.
17.Verify that there were no error messages displayed (several warningmessages may be displayed).
18.After viewing the screens’ content, press the [Return] key. If novalidation or SYSGEN error messages were displayed, press the[Tab] key to move the cursor to the NMMGR command line.
19.Type exit and press the [Enter] key. If other subsystems are notvalidated, NMMGR will not allow you to exit and an error messagewill be displayed on the status line. If you do not want to validatethese other subsystems at this time, press the [Enter] key again toexit NMMGR.
Rebooting the Host and the DTCThe MPE/iX system and the DTC must be rebooted after the networkmanagement configuration file has been modified.
To reboot the MPE/iX system, do the following:
1. Enter these commands at the MPE/iX prompt (:):
: [CTRL]-A
= SHUTDOWN

38 Chapter 3
Using a New Terminal or Printer Type FileLinking Terminal and Printer Type Files to Ldev Numbers
2. The system will display various shutdown messages. Wait until thefollowing message is displayed on the screen:
Shutdown of operation system complete
3. Enter these commands:
[CTRL]- B
CM> RS
4. Answer YES to the question: Restart the system? .
The system will reset and display the ISL prompt. Type thefollowing command to start the system:
ISL> START NORECOVERY
NOTE [CTRL]-A means press the [CTRL] key and the A key simultaneously.
Shutdown normally takes several minutes.
5. To reset the DTC, turn off the power and then turn on the poweragain for the DTC. You should reboot the DTC after rebooting theMPE/iX system.
You may also use TermDSM, an online diagnostic program forhost-managed DTCs, to reset the DTC. Refer to TroubleshootingTerminal, Printer, and Serial Device Connections for moreinformation.

Chapter 3 39
Using a New Terminal or Printer Type FileUsing Terminal Type Files in Logon Strings
Using Terminal Type Files in Logon StringsA terminal type file can be specified in the logon string. When aterminal type file is specified in the logon string, the file is associatedwith the ldev number for the duration of the session. The :HELLOcommand accepts either a terminal type number or a terminal type filename with the ;TERM=parameter. For example, the following logonallows the terminal user called TEMPUSER.TEST to use the terminaltype file called MYTERM.
:HELLO TEMPUSER.TEST;TERM=MYTERM
If a terminal type file is specified in the logon string, that file remainsactive until the :BYE command is entered. Unless a terminal type file isspecified in the logon string, the configured terminal type file associatedwith that ldev number is used until the :BYE command is entered.
40 Chapter 3
Using a New Terminal or Printer Type FileUsing the ENV = Parameter when Printing
Using the ENV = Parameter when PrintingIf the default printer type file is not suited to your needs, specify adifferent printer type file with the parameter. For example, if yourprinter type file specifies the laserjet and you want to print to theplotter, use this parameter.
When using this parameter, a printer type file other than theconfigured one can be specified. For printers, this parameter specifies aprinter type file other than the configured one. The syntax for thisparameter is as follows:
FILE filename;DEV=deviceclass;ENV=filename

41
4 Workstation Configurator —Screen and Field Definition
This chapter defines and illustrates each screen of the WorkstationConfigurator and provides a discussion of each field on the screen.

42 Chapter 4
Workstation Configurator — Screen and Field DefinitionMain Menu
Main MenuThe Main Menu screen as shown in Figure 4-1, allows you to completethe following tasks:
• Name the terminal type file.
• Specify the type of function you want to perform on the file.
• Go to the screen or form you want to modify.
Figure 4-1 Main Screen
FieldsThe Main Menu screen lists the following fields:
• Terminal type file name . This field will contain the name of theterminal or printer type file. Enter a valid file name for the file youwant to create, modify, or view. Valid file names contain up to threeparts, each of which contains from one to eight alphanumericcharacters, the first of which must be alphabetic. The file name mustbe in the following format:
filename[.groupname[.acctname]]
The default groupname and acctname are the logon group andaccount. Before any other menu can be accessed, this field mustcontain a valid file name.

Chapter 4 43
Workstation Configurator — Screen and Field DefinitionMain Menu
• File option . This field lets you to specify whether you want tocreate a new file, modify an existing file, or view the data in anexisting file.
If you enter either M (Modify) or V (View), information from the fileentered in the Terminal type file name field is copied into thework area of the utility. To modify the file, you must have writeaccess for this file. However, to view a file, you only need read access.
If you specify C (Create), a new file is created and saved. The file isthen automatically reopened when the modify option is specified.
• Go to form . This field lets you pick the next screen (or form) to goto for terminal type information. The following screens can beaccessed to create (or modify) a terminal type file:
• Convert MPE V Termtype
• Flow Control
• Special Characters
• Control
• Printer Control
• VFC Definition

44 Chapter 4
Workstation Configurator — Screen and Field DefinitionConvert MPE V Termtype
Convert MPE V TermtypeThe Convert MPE V Termtype screen is the second WorkstationConfigurator screen. To select this screen, enter X in the Go to formfield on the Main Menu screen and press the [Enter] key. The FlowControl screen shown in Figure 4-2 is then displayed.
Figure 4-2 Flow Control Screen
FieldsThe Convert MPE V Termtype screen lists only one field.
Convert MPE V termtype file to MPE/iX format (Y/N) . Usethis field to convert an MPE V termtype file to MPE/iX format.
NOTE After the termtype file has been converted to MPE/iX format, the filecannot be ported back to HP 3000 MPE V systems. Additionally, whentermtype files are converted from MPE V to MPE/iX format, thetermtype files might not function as they did on the MPE V system.Refer to the Asynchronous Serial Communications Programmer’sReference Manual for information on the differences between MPE Vand MPE/iX.
Chapter 4 45
Workstation Configurator — Screen and Field DefinitionFlow Control
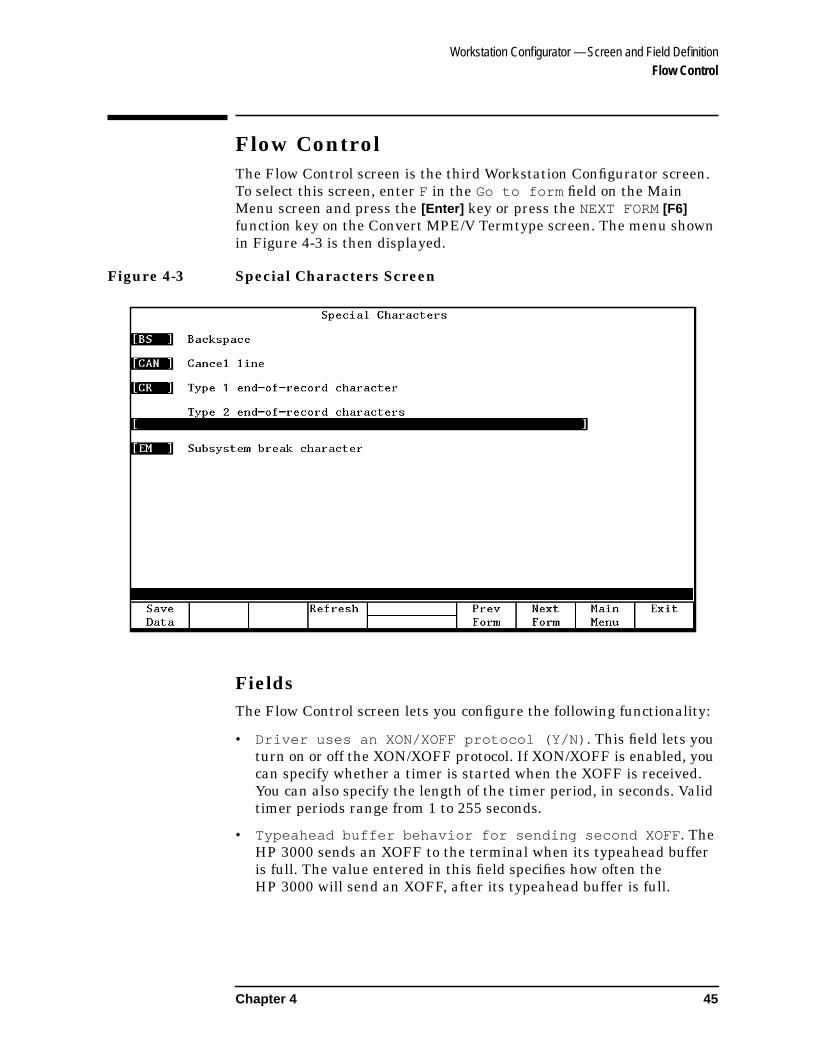
Flow ControlThe Flow Control screen is the third Workstation Configurator screen.To select this screen, enter F in the Go to form field on the MainMenu screen and press the [Enter] key or press the NEXT FORM[F6]function key on the Convert MPE/V Termtype screen. The menu shownin Figure 4-3 is then displayed.
Figure 4-3 Special Characters Screen
FieldsThe Flow Control screen lets you configure the following functionality:
• Driver uses an XON/XOFF protocol (Y/N) . This field lets youturn on or off the XON/XOFF protocol. If XON/XOFF is enabled, youcan specify whether a timer is started when the XOFF is received.You can also specify the length of the timer period, in seconds. Validtimer periods range from 1 to 255 seconds.
• Typeahead buffer behavior for sending second XOFF . TheHP 3000 sends an XOFF to the terminal when its typeahead bufferis full. The value entered in this field specifies how often theHP 3000 will send an XOFF, after its typeahead buffer is full.

46 Chapter 4
Workstation Configurator — Screen and Field DefinitionFlow Control
• 0 — delayed . If 0 is entered, the HP 3000 will wait to send anXOFF until 16 characters are received after the typeahead bufferis full. HP recommends delaying the sending of an XOFF if dataswitches are used in the computer network.
• 1 — immediate . If 1 is entered, the HP 3000 will send an XOFFafter each character is received when the typeahead buffer is full.
• Block mode support . This field lets you configure the type of blockmode your terminal will use. The types of block mode are none, line,page, or both. If block mode is used, the values for the block modetrigger and alert characters are displayed.
• Read trigger character . This field lets you configure the readtrigger character. This character lets the terminal know that theHP 3000 system is ready to receive data. If the field is left empty,then no trigger character is written by the driver at the beginning ofa read.
NOTE The block mode read trigger character and the read trigger charactershould be the same. For example, if the block mode read triggercharacter is DC1, then the read trigger character should be DC1.
Chapter 4 47
Workstation Configurator — Screen and Field DefinitionSpecial Characters
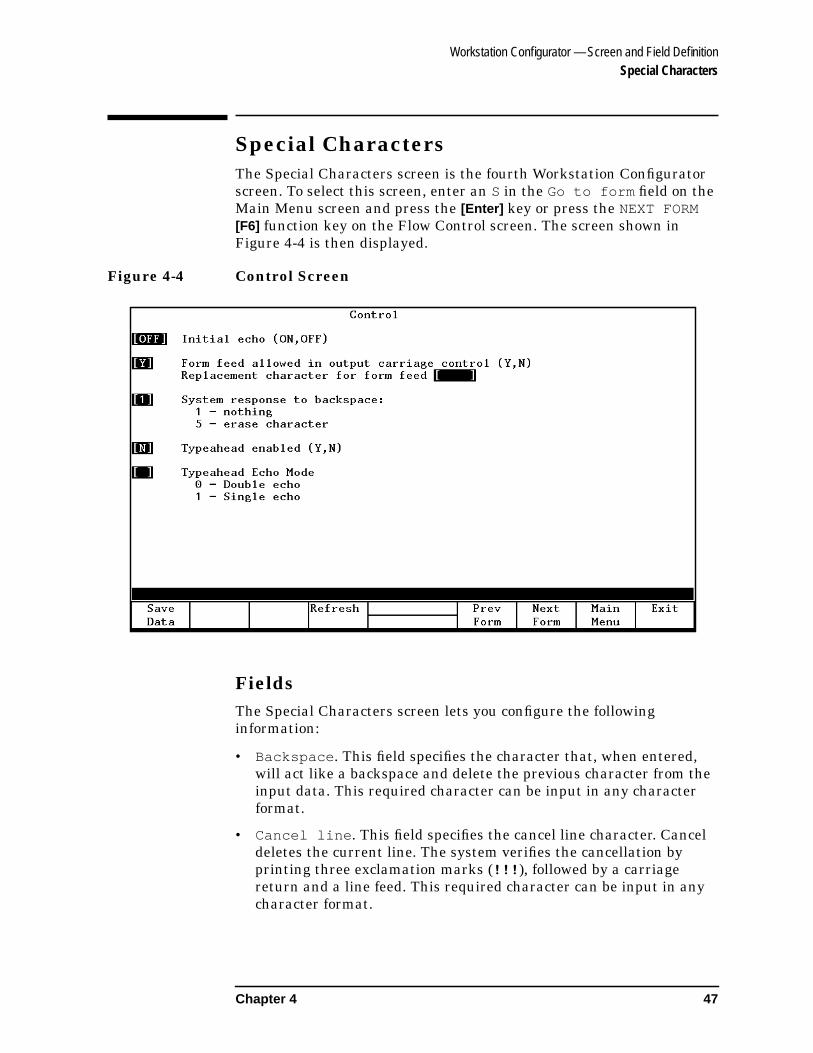
Special CharactersThe Special Characters screen is the fourth Workstation Configuratorscreen. To select this screen, enter an S in the Go to form field on theMain Menu screen and press the [Enter] key or press the NEXT FORM[F6] function key on the Flow Control screen. The screen shown inFigure 4-4 is then displayed.
Figure 4-4 Control Screen
FieldsThe Special Characters screen lets you configure the followinginformation:
• Backspace . This field specifies the character that, when entered,will act like a backspace and delete the previous character from theinput data. This required character can be input in any characterformat.
• Cancel line . This field specifies the cancel line character. Canceldeletes the current line. The system verifies the cancellation byprinting three exclamation marks (!!! ), followed by a carriagereturn and a line feed. This required character can be input in anycharacter format.

48 Chapter 4
Workstation Configurator — Screen and Field DefinitionSpecial Characters
• Type 1 End-of-record character . This character terminatesthe read, but is not included in the data returned to the programdoing the read or the actual count of characters. The end of record(EOR) character is optional.
• Type 2 End-of-record characters . When this character isconfigured, the read is returned with a special status that indicatesthat the read was terminated by the additional end-of-recordcharacter. The character is included in both the data and the actualcount of number of bytes returned. The terminal cursor is notaffected. The end of record (EOR) character is optional. Up to sixteentype 2 end-of-record characters may be configured.
• Subsystem break characters . Subsystem break allows you tointerrupt the execution of a local program or subsystem command.The subsystem break character is optional.
Chapter 4 49
Workstation Configurator — Screen and Field DefinitionControl
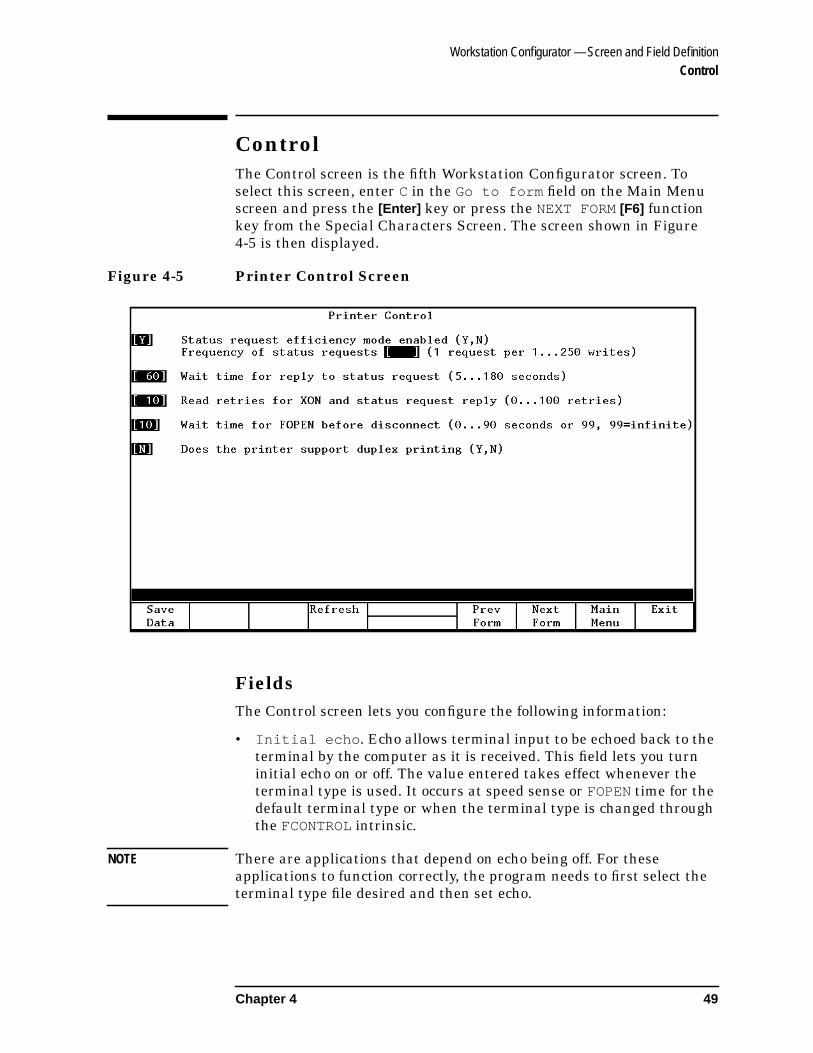
ControlThe Control screen is the fifth Workstation Configurator screen. Toselect this screen, enter C in the Go to form field on the Main Menuscreen and press the [Enter] key or press the NEXT FORM[F6] functionkey from the Special Characters Screen. The screen shown in Figure4-5 is then displayed.
Figure 4-5 Printer Control Screen
FieldsThe Control screen lets you configure the following information:
• Initial echo . Echo allows terminal input to be echoed back to theterminal by the computer as it is received. This field lets you turninitial echo on or off. The value entered takes effect whenever theterminal type is used. It occurs at speed sense or FOPEN time for thedefault terminal type or when the terminal type is changed throughthe FCONTROL intrinsic.
NOTE There are applications that depend on echo being off. For theseapplications to function correctly, the program needs to first select theterminal type file desired and then set echo.

50 Chapter 4
Workstation Configurator — Screen and Field DefinitionControl
• Is form feed allowed in output data (Y,N) . Replacementcharacter for form feed . These fields let you specify whetherform feed will be included in output data. If form feed is not includedin output data, then you must supply a character that will replacethe form feeds (FFs) in the data stream. Typically, you should enterLF.
• System response to backspace . This field lets you configure aresponse to the backspace character. The responses and theirmeanings are displayed below the backspace response field.
In all cases, when echo is enabled, a backspace is echoed to theterminal screen which might cause some action to the data on theterminal screen. An additional response from the system might berequired for better cursor positioning.
• 1 — nothing . This is the default and it causes the cursor tobackup one space if echo is enabled but it does not erase thecharacter.
• 5 — erase character . This response is to output a space and abackspace character, which erases the character from the display.
NOTE If echo is disabled, then the selected response will not occur.
• Is typeahead enabled? (Y,N) . Typeahead allows the terminaluser to continuously enter data without having to wait for thesystem to process the data and return the MPE prompt (: ). Thisfield lets you turn on or off typeahead by entering either Y or N.
• Typeahead Echo Mode . The value entered here determineswhether the input characters will be echoed to the terminal’s screenonce or twice.
• 0 — Double echo . If 0 is entered, the HP 3000 will echo thecharacters twice to the terminal’s screen.
• 1 — Single echo . If 1 is entered, the HP 3000 will echo thecharacters once to the terminal’s screen.
Chapter 4 51
Workstation Configurator — Screen and Field DefinitionPrinter Control
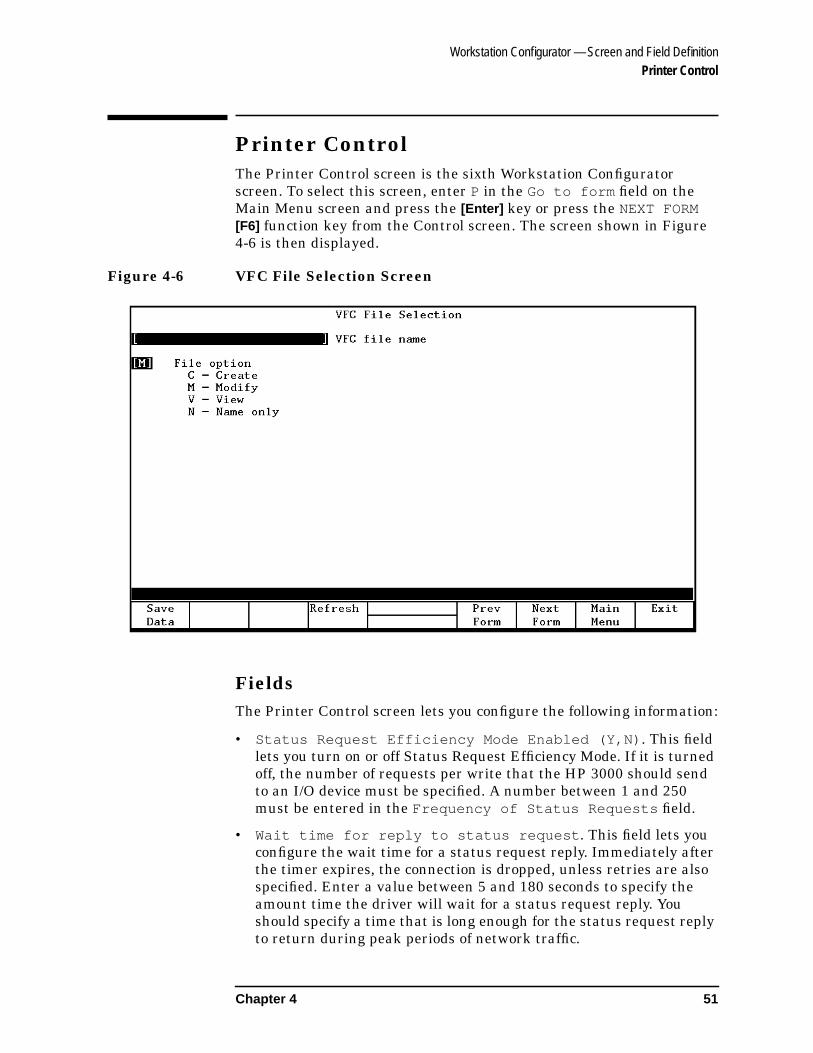
Printer ControlThe Printer Control screen is the sixth Workstation Configuratorscreen. To select this screen, enter P in the Go to form field on theMain Menu screen and press the [Enter] key or press the NEXT FORM[F6] function key from the Control screen. The screen shown in Figure4-6 is then displayed.
Figure 4-6 VFC File Selection Screen
FieldsThe Printer Control screen lets you configure the following information:
• Status Request Efficiency Mode Enabled (Y,N) . This fieldlets you turn on or off Status Request Efficiency Mode. If it is turnedoff, the number of requests per write that the HP 3000 should sendto an I/O device must be specified. A number between 1 and 250must be entered in the Frequency of Status Requests field.
• Wait time for reply to status request . This field lets youconfigure the wait time for a status request reply. Immediately afterthe timer expires, the connection is dropped, unless retries are alsospecified. Enter a value between 5 and 180 seconds to specify theamount time the driver will wait for a status request reply. Youshould specify a time that is long enough for the status request replyto return during peak periods of network traffic.

52 Chapter 4
Workstation Configurator — Screen and Field DefinitionPrinter Control
• Read retries for XON and status request reply . This fieldlets you specify the number of status request retries made when thewait timer expires. When the wait time for reply to status requestexpires, the driver sends a message to the console and retries theread for as many attempts as are specified in this field. When thenumber of attempts is equal to this value, the printer input/output(I/O) is aborted. Enter a value between 0 and 100 to specify thenumber of read retries. If a value of 0 is entered, the printer I/O isaborted as soon as the timer expires. No retries are attempted.
• Wait time for FOPEN before disconnect . This field lets youspecify the number of seconds the HP 3000 system should waitbefore sending a disconnect request to the printer port. Enter avalue between 0 and 90 to specify the number of seconds to wait. If avalue of 0 is entered, the connection is dropped immediately afterthe file is sent.
• Does the printer support duplex printing? This fieldspecifies if the printer will support duplex printing, which is theability to print on both the front and back sides of the printer paper.The LaserJet 2D, LaserJet 3D, and LaserJet 3SI are examples ofthree PCL (Printer Control Language) laser printers that supportduplex printing. Specify yes or no to duplex printing. Refer toConfiguring Systems for Terminals, Printers, and Other SerialDevices for more information on duplex printing.
Chapter 4 53
Workstation Configurator — Screen and Field DefinitionVFC File Selection
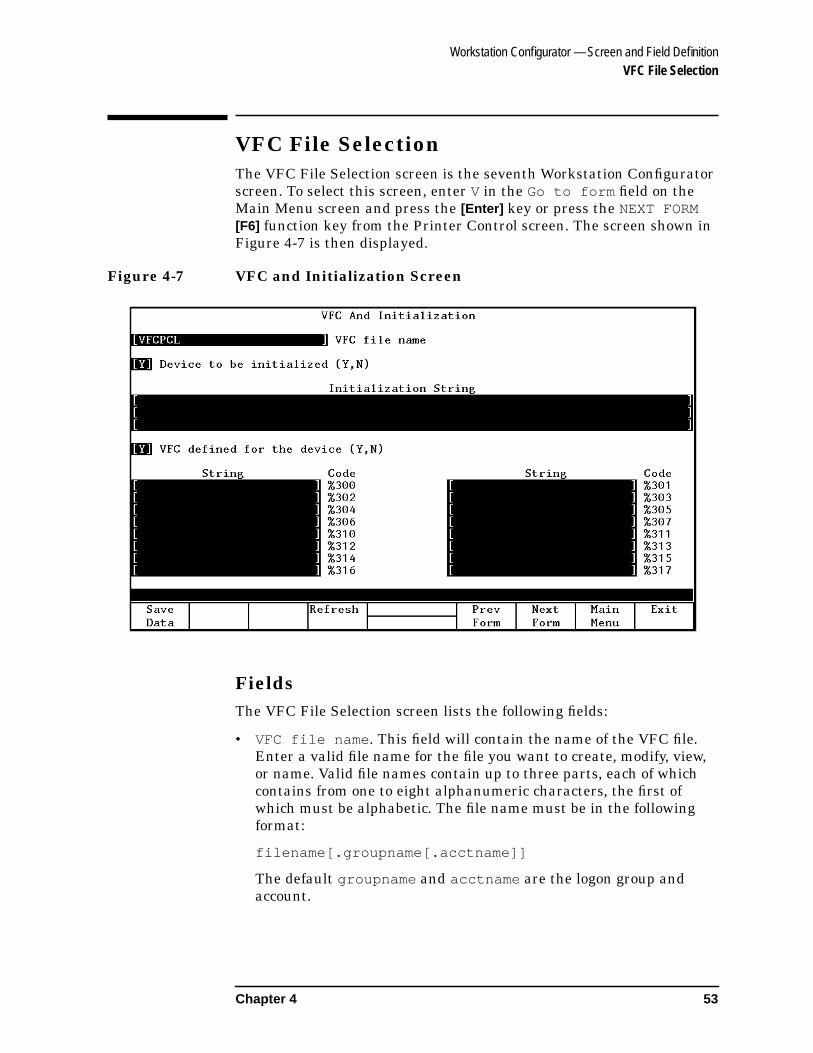
VFC File SelectionThe VFC File Selection screen is the seventh Workstation Configuratorscreen. To select this screen, enter V in the Go to form field on theMain Menu screen and press the [Enter] key or press the NEXT FORM[F6] function key from the Printer Control screen. The screen shown inFigure 4-7 is then displayed.
Figure 4-7 VFC and Initialization Screen
FieldsThe VFC File Selection screen lists the following fields:
• VFC file name . This field will contain the name of the VFC file.Enter a valid file name for the file you want to create, modify, view,or name. Valid file names contain up to three parts, each of whichcontains from one to eight alphanumeric characters, the first ofwhich must be alphabetic. The file name must be in the followingformat:
filename[.groupname[.acctname]]
The default groupname and acctname are the logon group andaccount.

54 Chapter 4
Workstation Configurator — Screen and Field DefinitionVFC File Selection
• File option . This field lets you to specify whether you want tocreate a new file, modify an existing file, view the data in an existingfile, or assign a new name to the VFC file.
If you enter either M (Modify) or V (View), information from the fileentered in the VFC file name field is copied into the work area ofthe utility. To modify the file, you must have write access for this file.However, to view a file, you only need read access.
If you specify C (Create), a new file is created and saved. The file isthen automatically reopened when the modify option is specified.
If you specify N (Name only), the name of the VFC file is placed inthe terminal type file, without accessing the VFC file. (The N optionis invalid if the VFC file has not yet been defined.)
Chapter 4 55
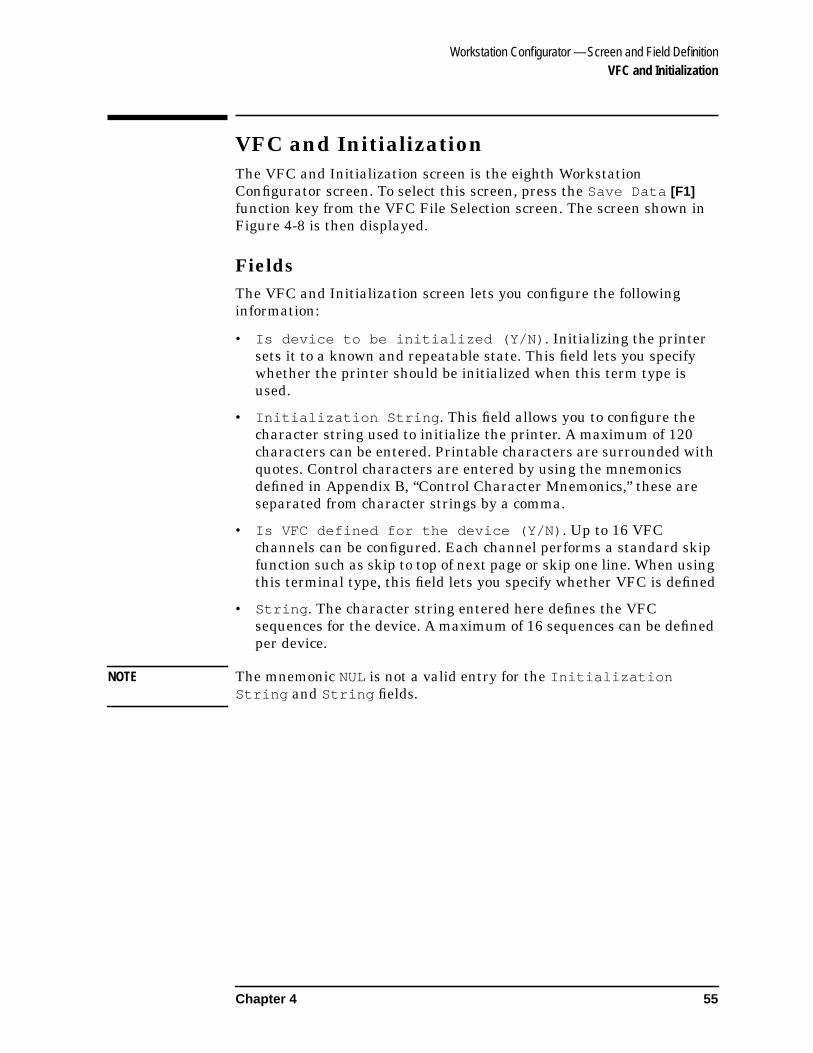
Workstation Configurator — Screen and Field DefinitionVFC and Initialization
VFC and InitializationThe VFC and Initialization screen is the eighth WorkstationConfigurator screen. To select this screen, press the Save Data [F1]function key from the VFC File Selection screen. The screen shown inFigure 4-8 is then displayed.
FieldsThe VFC and Initialization screen lets you configure the followinginformation:
• Is device to be initialized (Y/N) . Initializing the printersets it to a known and repeatable state. This field lets you specifywhether the printer should be initialized when this term type isused.
• Initialization String . This field allows you to configure thecharacter string used to initialize the printer. A maximum of 120characters can be entered. Printable characters are surrounded withquotes. Control characters are entered by using the mnemonicsdefined in Appendix B, “Control Character Mnemonics,” these areseparated from character strings by a comma.
• Is VFC defined for the device (Y/N) . Up to 16 VFCchannels can be configured. Each channel performs a standard skipfunction such as skip to top of next page or skip one line. When usingthis terminal type, this field lets you specify whether VFC is defined
• String . The character string entered here defines the VFCsequences for the device. A maximum of 16 sequences can be definedper device.
NOTE The mnemonic NUL is not a valid entry for the InitializationString and String fields.

56 Chapter 4
Workstation Configurator — Screen and Field DefinitionVFC and Initialization

57
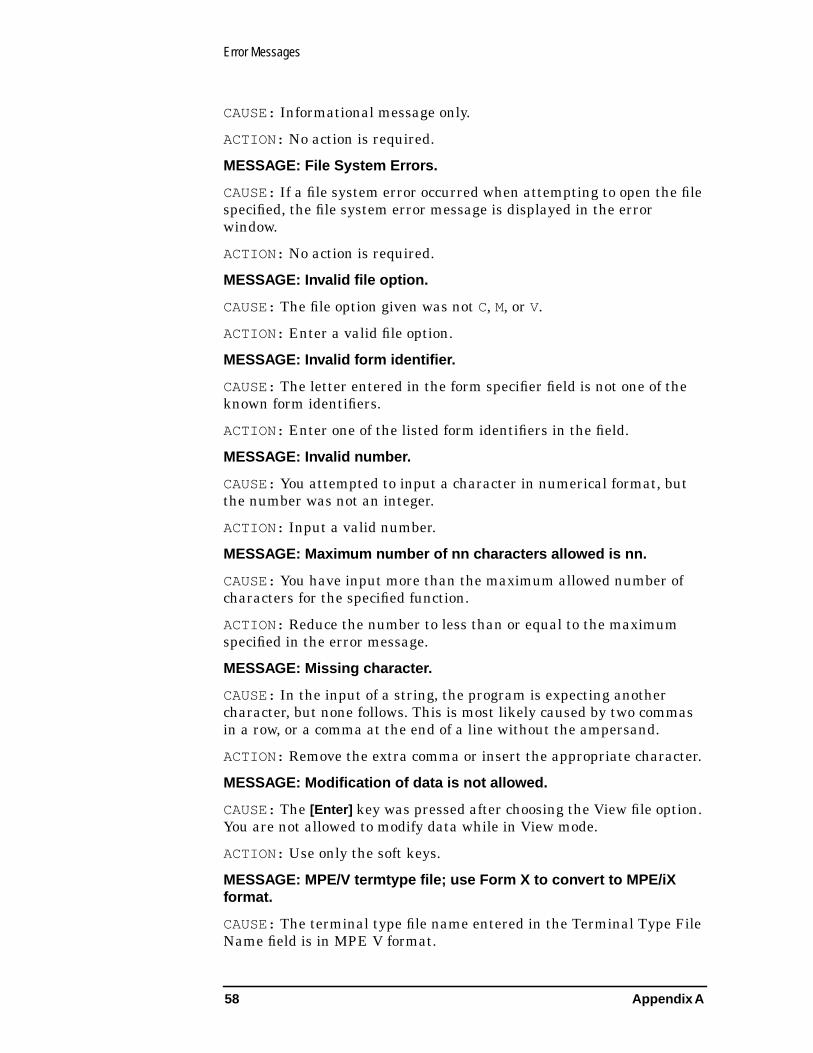
A Error Messages
The error messages listed in this appendix can occur while enteringdata for a terminal type or printer type file. Messages are displayed ininverse video on the bottom line of the screen. If the error(s) are relatedto a field (or fields) on the screen, the fields are highlighted in fullbright, inverse video. If more than one field contains an error, only theerror message for the first highlighted field is displayed.
MESSAGE: Character already has other function.
CAUSE: The character entered has been defined elsewhere to have adifferent special meaning. Each character can have only one specialfunction.
ACTION: Choose a different character for this special function, orrelease this character for use by selecting a different character for theother special function.
MESSAGE: Character value out of range.
CAUSE: The character input was out of the range of characters allowedfor that function.
ACTION: Input a character within the range.
MESSAGE: File is damaged; checksum error.
CAUSE: The file has been damaged so that the checksum is no longervalid. The utility still reads the data from the file into the work area,and when saving the data back to the file, a correct checksum isgenerated.
ACTION: Press the [Enter] key again to go to the form selected. Verifythe data on the screen.
MESSAGE: File is not a valid VFC file.
CAUSE: The file name specified is not a valid VFC file.
ACTION: Specify a file which is a VFC file.
MESSAGE: File is not a valid terminal type file.
CAUSE: The file specified is not a valid terminal type file.
ACTION: Specify a file which is a valid terminal type file.
MESSAGE: Invalid file name.
CAUSE: The file name specified does not meet the requirements for anHP 3000 file name. It might be because the name starts with anon-alphabetic character or contains non-alphanumeric characters.
ACTION: Enter a valid file name.
MESSAGE: File converted to MPE/iX format.
58 Appendix A
Error Messages
CAUSE: Informational message only.
ACTION: No action is required.
MESSAGE: File System Errors.
CAUSE: If a file system error occurred when attempting to open the filespecified, the file system error message is displayed in the errorwindow.
ACTION: No action is required.
MESSAGE: Invalid file option.
CAUSE: The file option given was not C, M, or V.
ACTION: Enter a valid file option.
MESSAGE: Invalid form identifier.
CAUSE: The letter entered in the form specifier field is not one of theknown form identifiers.
ACTION: Enter one of the listed form identifiers in the field.
MESSAGE: Invalid number.
CAUSE: You attempted to input a character in numerical format, butthe number was not an integer.
ACTION: Input a valid number.
MESSAGE: Maximum number of nn characters allowed is nn.
CAUSE: You have input more than the maximum allowed number ofcharacters for the specified function.
ACTION: Reduce the number to less than or equal to the maximumspecified in the error message.
MESSAGE: Missing character.
CAUSE: In the input of a string, the program is expecting anothercharacter, but none follows. This is most likely caused by two commasin a row, or a comma at the end of a line without the ampersand.
ACTION: Remove the extra comma or insert the appropriate character.
MESSAGE: Modification of data is not allowed.
CAUSE: The [Enter] key was pressed after choosing the View file option.You are not allowed to modify data while in View mode.
ACTION: Use only the soft keys.
MESSAGE: MPE/V termtype file; use Form X to convert to MPE/iXformat.
CAUSE: The terminal type file name entered in the Terminal Type FileName field is in MPE V format.

Appendix A 59
Error Messages
ACTION: Convert the MPE V termtype file to MPE/iX format.
MESSAGE: MESSAGE = Response must be in the range from nn tonn.
CAUSE: The field contains a value that is not within the range specified.
ACTION: Enter a value within the correct range.
MESSAGE: MESSAGE = Response must be None, Line, Page, or Both.
CAUSE: The field requires N, L, P, or B as a valid response, but adifferent value was input.
ACTION: Change the value to N, L, P, or B.
MESSAGE: MESSAGE = Response must be ON or OFF.
CAUSE: The only valid entries for this field are ON and OFF, but someother value was entered.
ACTION: Change the value to either ON or OFF.
MESSAGE: MESSAGE = Response must be YES or NO.
CAUSE: The field requires either a Y or an N as a valid response, but adifferent value was input.
ACTION: Change the value to either ON or OFF.
MESSAGE: Termtype file is already in MPE/iX format.
CAUSE: Because the terminal type file is already in MPE/iX format,there is no reason to convert it to MPE/iX format.
ACTION: No action is required.
MESSAGE: The field can only contain digits.
CAUSE: The field is designed to accept only positive integers. The valueentered contains characters other than digits.
ACTION: Enter a positive integer in the field.
MESSAGE: The required field is empty.
CAUSE: The specified field requires a value and nothing was entered.
ACTION: Enter a value in the field.
MESSAGE: There is no next form.
CAUSE: The Next Form function key was pressed when at the lastform menu, and there is no next form.
ACTION: Do not press the Next Form function key at the last form.
MESSAGE: There is no previous form.
CAUSE: The Prev Form function key was pressed when at the MainMenu or when the VFC option was selected. There is no previous form.
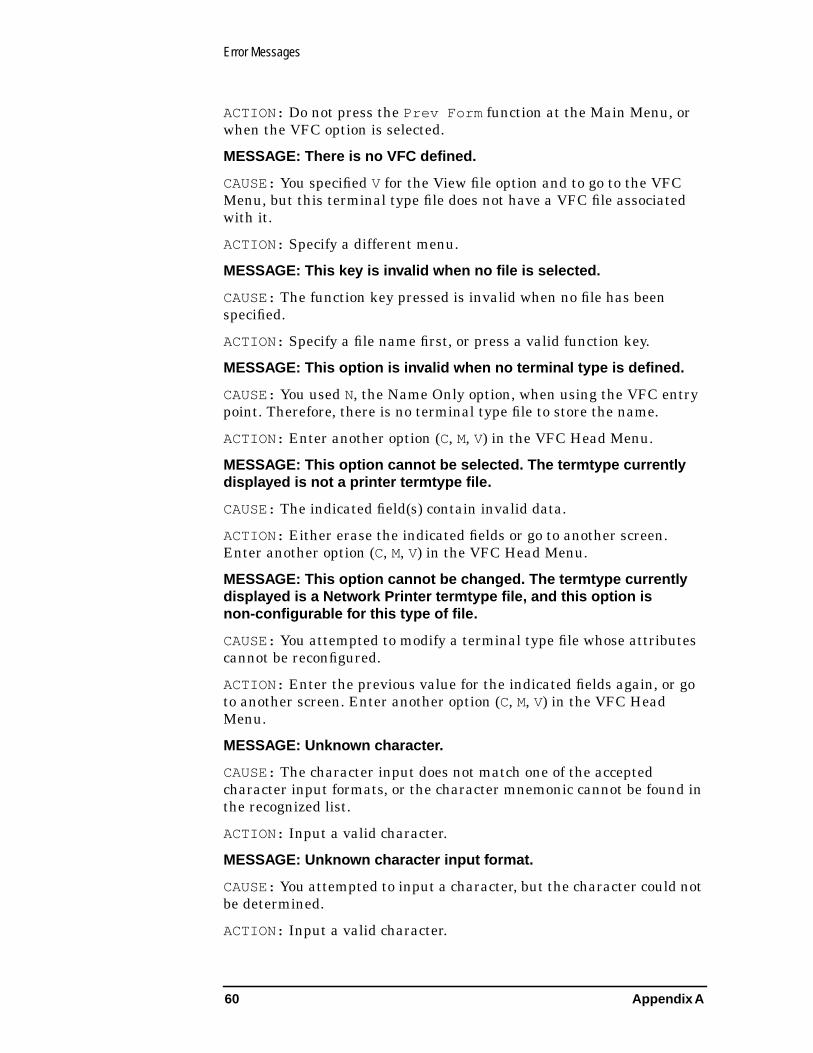
60 Appendix A
Error Messages
ACTION: Do not press the Prev Form function at the Main Menu, orwhen the VFC option is selected.
MESSAGE: There is no VFC defined.
CAUSE: You specified V for the View file option and to go to the VFCMenu, but this terminal type file does not have a VFC file associatedwith it.
ACTION: Specify a different menu.
MESSAGE: This key is invalid when no file is selected.
CAUSE: The function key pressed is invalid when no file has beenspecified.
ACTION: Specify a file name first, or press a valid function key.
MESSAGE: This option is invalid when no terminal type is defined.
CAUSE: You used N, the Name Only option, when using the VFC entrypoint. Therefore, there is no terminal type file to store the name.
ACTION: Enter another option (C, M, V) in the VFC Head Menu.
MESSAGE: This option cannot be selected. The termtype currentlydisplayed is not a printer termtype file.
CAUSE: The indicated field(s) contain invalid data.
ACTION: Either erase the indicated fields or go to another screen.Enter another option (C, M, V) in the VFC Head Menu.
MESSAGE: This option cannot be changed. The termtype currentlydisplayed is a Network Printer termtype file, and this option isnon-configurable for this type of file.
CAUSE: You attempted to modify a terminal type file whose attributescannot be reconfigured.
ACTION: Enter the previous value for the indicated fields again, or goto another screen. Enter another option (C, M, V) in the VFC HeadMenu.
MESSAGE: Unknown character.
CAUSE: The character input does not match one of the acceptedcharacter input formats, or the character mnemonic cannot be found inthe recognized list.
ACTION: Input a valid character.
MESSAGE: Unknown character input format.
CAUSE: You attempted to input a character, but the character could notbe determined.
ACTION: Input a valid character.

Appendix A 61
Error Messages
MESSAGE: Unknown string input format.
CAUSE: You attempted to input a string, but the input could not bedecoded.
ACTION: Enter in the correct string.
MESSAGE: User does not have write access to file.
CAUSE: You specified M, for the Modify file option, but you do not havewrite access to the file. Therefore, you cannot modify it.
ACTION: Specify a different file, or use the View option.
MESSAGE: WARNING: data not saved.
CAUSE: You tried to exit or specify another file name after modifyingthe current file but without saving the modifications made.
ACTION: Press the Save Data function key if you want to save themodifications. If not, type EXIT at the command line or press the [Enter]key a second time to perform the desired operation.

62 Appendix A
Error Messages

63
B Control Character Mnemonics
The following Table B-1 lists the mnemonic, its octal value, thecharacter; and the meaning.
Table B-1 Control Character Mnemonics
MNEMONIC OCTAL CHARACTER MEANING
NUL 0 [CTRL]-@ Null
SOH 1 [CTRL]-A Start of Heading
STX 2 [CTRL]-B Start of Text
ETX 3 [CTRL]-C End of Text
EOT 4 [CTRL]-D End of Transmission
ENQ 5 [CTRL]-E Enquiry
ACK 6 [CTRL]-F Acknowledge
BEL 7 [CTRL]-G Bell
BS 10 [CTRL]-H Backspace
HT 11 [CTRL]-I Horizontal Tabulation
LF 12 [CTRL]-J Line Feed
VT 13 [CTRL]-K Vertical Tabulation
FF 14 [CTRL]-L Form Feed
CR 15 [CTRL]-M Carriage Return
SO 16 [CTRL]-N Shift Out
SI 17 [CTRL]-O Shift In
DLE 20 [CTRL]-P Data Link Escape
DC1 21 [CTRL]-Q Device Control 1
DC2 22 [CTRL]-R Device Control 2
DC3 23 [CTRL]-S Device Control 3
DC4 24 [CTRL]-T Device Control 4
NAK 25 [CTRL]-U Negative Acknowledge
SYN 26 [CTRL]-V Synchronous Idle
ETB 27 [CTRL]-W End of Transmission Block
CAN 30 [CTRL]-X Cancel
EM 31 [CTRL]-Y End of Medium
SUB 32 [CTRL]-Z Substitute

64 Appendix B
Control Character Mnemonics
ESC 33 [CTRL]-[ Escape
FS 34 [CTRL]-\ File Separator
GS 35 [CTRL]-] Group Separator
RS 36 [CTRL]- Record Separator
US 37 [CTRL] Unit Separator
DEL 177 [DEL] Delete
MNEMONIC OCTAL CHARACTER MEANING

65
C Terminal Type Files
Table C-1 describes available terminal type and printer type files andthe attributes associated with each.
Table C-1 Terminal Type Files
*Block mode may be enabled by escape sequences sent by anapplication program.
Terminal Type
XON/XOFF
TypicalWorkstation
BlockMode
BackSpaceReply Comments
10 Opt HP Terminal Yes* None
18 Opt Non-HP terminal No None No DC1 sent to startread. No statuschecking.
18 Yes Non-HP printer N/A N/A No status checking.
24 Opt PAD terminal No None
21 Yes Serial spooledprinter
N/A N/A Uses 7 bits. Sendsstatus request onFOPEN, FCLOSE,and DCLOSE.
22 Yes Serial spooledprinter
N/A N/A Uses 8 bit pass-through. Sendsstatus request onFOPEN, FCLOSE,and DCLOSE.
26 Yes Networked serialspooled printer
N/A N/A Sends status requeston FOPEN,FCLOSE, andDCLOSE. Performsstatus retry.
44 Yes Non-HP printer N/A N/A No status checking.Wait time of 20seconds for FOPENbefore disconnect

66 Appendix C
Terminal Type Files

Index
Index 67
Aalert characters, 46
Bbackspace character, 13
configuring, 25, 47configuring system response to,
28, 50special character, 16
block mode, 13, 15block mode alert, 15, 23, 46block mode trigger, 15, 23, 46configuring, 23, 46
block of data, 15block trigger characters, 15BYE command, 39
Ccancel line
configuring, 25, 47special character, 16
cancel line character, 25carriage control, 18carriage return, 16condition code of CCL, 17control, 43
Control screen, 27, 49convert MPE V termtype files, 43
Convert MPE V Termtypescreen, 44
Ddata stream, 50data transmission, 15Datacommunications and
Terminal ControllerDTC, 13
DC1 character, 16default values, 20dial-up modem ports, 14disconnect request, 30, 52driver, 46DTC, 13
response to backspace, 15duplex printing, 30, 52
Eecho, 15, 17, 27, 50end-of-record
configuring characters, 25, 48special character, 16type 1, 25type 1 character, 16, 48type 2 characters, 17, 26, 48
FFCONTROL, 49FCONTROL(25), 17file name, 42, 53file option, 42flow control, 13, 43
Flow Control screen, 22, 45form feed, 15, 27, 50
HHELLO command, 39
Iinbound traffic, 13initial echo, 49initialization string, 18, 32input/output system, 14
Lline feed, 16logon string, 39
MMain Menu screen, 21, 42margins, 18menu-driven program, 12MPE V termtype files, 44multiple character sequence, 16
Nnetwork management
configuration file, 37network traffic, 51NMMGR, 36
Ooffline, 15outbound data, 13
Pprint density, 18printer control
disconnect request, 30duplex printing, 30initialization string, 32Printer Control screen, 29, 51read retries, 30reply wait time, 29status request efficiency, 29VFC channels, 32wait timer, 30
printer type file, 12, 19, 31naming, 21
printers, 13, 15, 18
printer carriage, 18printer control, 15, 43Printer Control screen, 29, 51
Rread retries, 30, 52read trigger, 15, 16
read trigger character, 16, 23,46
reboot DTC, 37reboot system, 37reply wait time, 29
Sscreens
Control, 27, 49Convert MPE V Termtype, 44Flow Control, 22, 45Main Menu, 21, 42Printer Control, 29, 51Special Characters, 25, 47VFC and Initialization, 32, 55VFC File Selection, 31, 53
special characters, 43additional EOR character, 17Special Characters screen, 25,
47speciall characters, 15speed sense, 49spool file, 18
spooled printers, 18standard skip function, 18status request
status request reply, 51status request timer, 52
status request efficiency, 29subsystem break, 16subsystem break character, 26,
48subsystem command, 17
system console, 15
Ttabs, 18terminal type, 12, 14terminal type file, 12, 19, 21, 31,
39, 42, 53terminal type file name, 39
terminal type number, 39terminals, 13TTUTIL program, 12type 1 EOR character, 25, 48type 2 EOR characters, 26, 48typeahead, 15, 18, 28, 50

68 Index
Index
VVertical Format Control
VFC, 18vertical format control, 15VFC, 18, 43
carriage controls, 18channels, 18, 32character sequence, 18VFC and Initialization screen,
32, 55VFC File Selection screen, 31,
53VPLUS/3000 screens, 12
Wwait timer, 30, 52Workstation Configurator, 12, 15,
20
XXON/XOFF protocol, 15, 45
XOFF character, 15XON character, 15