
Custom Infotype Creation - archive.sap.com DEVELOPER NETWORK ... You just can’t go in the module...
21
Custom Infotype Creation – Tips and Tricks with Radio Buttons and Check Boxes SAP DEVELOPER NETWORK | sdn.sap.com BUSINESS PROCESS EXPERT COMMUNITY | bpx.sap.com © 2007 SAP AG 1 Custom Infotype Creation – Tips and Tricks with Radio Buttons and Check Boxes Applies to: SAP HR ECC 5.0 onwards Summary This tutorial explains – how to create a custom infotype and how to put graphical input entries like check boxes and radio buttons in an infotype. Normally when you create an infotype with graphical entries like check boxes and radio buttons, it lets you create them but when you open the infotype in PA30, those graphical fields become grayed or inactive permanently. This tutorial explains how to make these fields functional. It also explains a bit about how you can make certain text fields active or inactive depending upon checkbox or radio button clicks. Author: Mr. Ribhu Ahuja Company: TCS – Tata Consultancy Services Created on: 23 April, 2007 Author Bio Ribhu Ahuja is currently working as a SAP HR ABAP consultant for TCS since last year.
Transcript of Custom Infotype Creation - archive.sap.com DEVELOPER NETWORK ... You just can’t go in the module...

Custom Infotype Creation – Tips and Tricks with Radio Buttons and Check Boxes
SAP DEVELOPER NETWORK | sdn.sap.com BUSINESS PROCESS EXPERT COMMUNITY | bpx.sap.com © 2007 SAP AG 1
Custom Infotype Creation – Tips and Tricks with Radio Buttons and Check Boxes
Applies to: SAP HR ECC 5.0 onwards
Summary This tutorial explains – how to create a custom infotype and how to put graphical input entries like check boxes and radio buttons in an infotype. Normally when you create an infotype with graphical entries like check boxes and radio buttons, it lets you create them but when you open the infotype in PA30, those graphical fields become grayed or inactive permanently. This tutorial explains how to make these fields functional. It also explains a bit about how you can make certain text fields active or inactive depending upon checkbox or radio button clicks. Author: Mr. Ribhu Ahuja Company: TCS – Tata Consultancy Services Created on: 23 April, 2007
Author Bio
Ribhu Ahuja is currently working as a SAP HR ABAP consultant for TCS since last year.

Custom Infotype Creation – Tips and Tricks with Radio Buttons and Check Boxes
SAP DEVELOPER NETWORK | sdn.sap.com BUSINESS PROCESS EXPERT COMMUNITY | bpx.sap.com © 2007 SAP AG 2
Table of Contents Custom Infotype creation, tips and tricks......................................................................................... 3
Adding a new field to the infotype: ............................................................................................. 11 Changing the look and feel of the infotype:................................................................................ 14
Related Content............................................................................................................................. 20 Disclaimer and Liability Notice....................................................................................................... 21

Custom Infotype Creation – Tips and Tricks with Radio Buttons and Check Boxes
SAP DEVELOPER NETWORK | sdn.sap.com BUSINESS PROCESS EXPERT COMMUNITY | bpx.sap.com © 2007 SAP AG 3
Custom Infotype creation, tips and tricks You can create a custom infotype through the transaction PM01. The number range for custom infotypes starts from 9001 to 9999. SAP has reserved infotypes numbers from 0000 to 9000 for its standard infotypes. For creating an infotype say Interview details, goto transaction PM01 and type any infotype number from 9001 to 9999
• Select the ‘Employee Infotype’ radio button. • Select the ‘PS Structure’ from sub objects box. • Click on the edit button below… A separate table maintenance window appears. • Create a PS structure with all the fields you want on the Infotype. Whatever fields you will put in this
PS structure will come in the infotype as input fields.

Custom Infotype Creation – Tips and Tricks with Radio Buttons and Check Boxes
SAP DEVELOPER NETWORK | sdn.sap.com BUSINESS PROCESS EXPERT COMMUNITY | bpx.sap.com © 2007 SAP AG 4
In the above figure, I have put 3 fields as types – char 1. I will convert these fields, check boxes or radio buttons later. It is to be noted that you have to put all the fields which you want to make input enabled in the PS structure. It will be explained in detail at a later stage. Now we have to give the enhancement type of the PS Structure.

Custom Infotype Creation – Tips and Tricks with Radio Buttons and Check Boxes
SAP DEVELOPER NETWORK | sdn.sap.com BUSINESS PROCESS EXPERT COMMUNITY | bpx.sap.com © 2007 SAP AG 5
Choose Can be Enhanced – radio button and click on copy.
• Now Save and Activate the PS structure. • Go back to the initial screen of PM01. • Click on ‘Generate Objects’ push button. Now few message boxes appear – click on green check
box on them. Finally you reach the ‘Infotype Characteristics’ screen.

Custom Infotype Creation – Tips and Tricks with Radio Buttons and Check Boxes
SAP DEVELOPER NETWORK | sdn.sap.com BUSINESS PROCESS EXPERT COMMUNITY | bpx.sap.com © 2007 SAP AG 6
• Click on ‘New Entries’ Button. You see the ‘Details of added entries’ Screen. • Enter your Infotype number and short text. • Here we have to set different Infotype Characteristics as per the requirement. (Better open another
session with some standard Infotype’s infotype characteristics screen and use as the reference to fill yours).

Custom Infotype Creation – Tips and Tricks with Radio Buttons and Check Boxes
SAP DEVELOPER NETWORK | sdn.sap.com BUSINESS PROCESS EXPERT COMMUNITY | bpx.sap.com © 2007 SAP AG 7
• Save your entries. Click on the back button to go to the initial screen of PM01. • Click on ‘Technical Attributes’. Infotype list screen appears. • Click on ‘Change’ (pencil) button. It gives you a warning. Click on the green tick mark. • Click on ‘Position’ button and browse to your infotype. In our case it would be 9005.

Custom Infotype Creation – Tips and Tricks with Radio Buttons and Check Boxes
SAP DEVELOPER NETWORK | sdn.sap.com BUSINESS PROCESS EXPERT COMMUNITY | bpx.sap.com © 2007 SAP AG 8
• Select your Infotype and click on ‘Detail’ (magnifying glass) button. • Give ‘T591A’ as subtype table. • Give ‘T591S’ as subtype txt tab.

Custom Infotype Creation – Tips and Tricks with Radio Buttons and Check Boxes
SAP DEVELOPER NETWORK | sdn.sap.com BUSINESS PROCESS EXPERT COMMUNITY | bpx.sap.com © 2007 SAP AG 9
• Give your subtype field as subtype field if you want to keep subtypes in this infotype. • Save and come back to PM01 initial screen. • Now the Infotype is created and ready to use and is in its basic form.
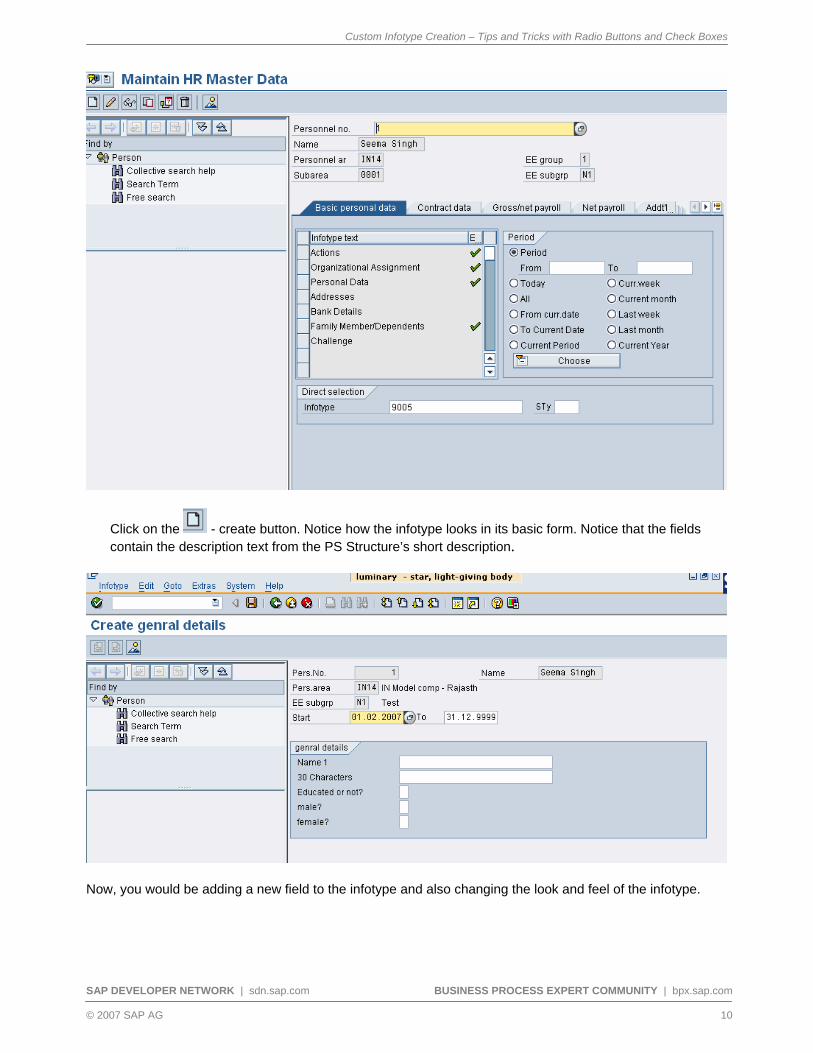
To see how infotype looks in its basic form, go to PA30, enter a personal number and give infotype number as 9005.
Custom Infotype Creation – Tips and Tricks with Radio Buttons and Check Boxes
SAP DEVELOPER NETWORK | sdn.sap.com BUSINESS PROCESS EXPERT COMMUNITY | bpx.sap.com © 2007 SAP AG 10
Click on the - create button. Notice how the infotype looks in its basic form. Notice that the fields contain the description text from the PS Structure’s short description.
Now, you would be adding a new field to the infotype and also changing the look and feel of the infotype.

Custom Infotype Creation – Tips and Tricks with Radio Buttons and Check Boxes
SAP DEVELOPER NETWORK | sdn.sap.com BUSINESS PROCESS EXPERT COMMUNITY | bpx.sap.com © 2007 SAP AG 11
Adding a new field to the infotype:
Go to PM01 and give the infotype number as 9005. Choose the PS Structure radio button. Now add a new field – say employer as shown.
Check and activate the structure again. When you activate the PS structure, it will give you some warnings:

Custom Infotype Creation – Tips and Tricks with Radio Buttons and Check Boxes
SAP DEVELOPER NETWORK | sdn.sap.com BUSINESS PROCESS EXPERT COMMUNITY | bpx.sap.com © 2007 SAP AG 12
The warnings state that we have to define the enhancement categories of P9005 and PA9005. The infotype generally contains 2 structures and 1 database table. The structures for our infotype are PS9005 and P9005. PS structure is for the account of creating input fields in the dialogue program of infotype and P structure – P9005 contains entries in infotype at runtime. This P structure is created by the system itself while generating the objects of an infotype. The database table for our infotype is PA table – PA9005. This table contains all the ‘time stamped’ entries of the infotype. When you save the infotype entry, it gets stored in the PA table. This table is also created by the system itself while generating the objects of an infotype. The enhancement categories of the P structure and PA table are to be given.
Open transaction SE11 in a separate window. Open the structure P9005 in the change mode and click on Extras Enhancement category. Choose ‘Can be enhanced’ (character type or numeric) and click on copy (green tick mark).Check and activate the structure. Now, in the same way, give the enhancement category of the table – PA9005. Choose ‘Can be enhanced’ (character type or numeric) and click on copy (green tick mark). Notice that the system allows you to open the structure P9005 and table PA9005 in the change mode. It is the case since it is the custom infotype. Now again activate the PS structure. This time, it will not give any warnings. Now click on back. On the PM01 screen, the system gives a warning:
Custom Infotype Creation – Tips and Tricks with Radio Buttons and Check Boxes
SAP DEVELOPER NETWORK | sdn.sap.com BUSINESS PROCESS EXPERT COMMUNITY | bpx.sap.com © 2007 SAP AG 13
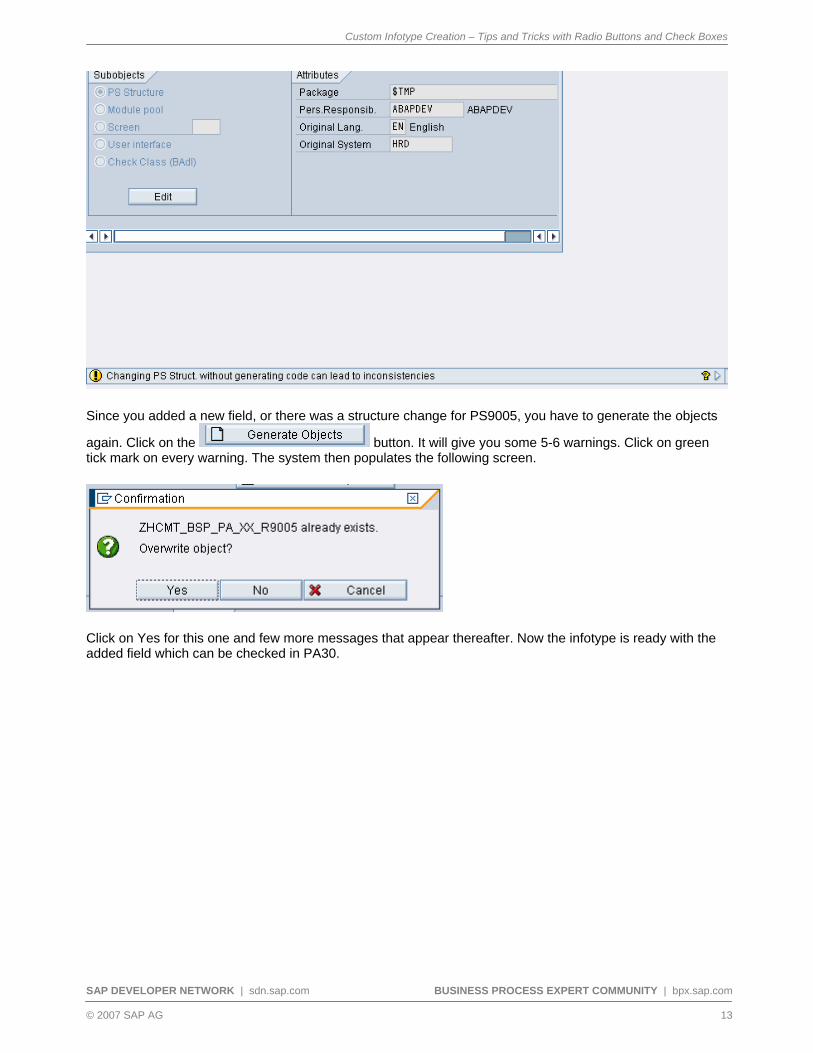
Since you added a new field, or there was a structure change for PS9005, you have to generate the objects
again. Click on the button. It will give you some 5-6 warnings. Click on green tick mark on every warning. The system then populates the following screen.
Click on Yes for this one and few more messages that appear thereafter. Now the infotype is ready with the added field which can be checked in PA30.

Custom Infotype Creation – Tips and Tricks with Radio Buttons and Check Boxes
SAP DEVELOPER NETWORK | sdn.sap.com BUSINESS PROCESS EXPERT COMMUNITY | bpx.sap.com © 2007 SAP AG 14
Changing the look and feel of the infotype:
Now you want to make the third field – ‘Educated or not’ a check box and ‘male’ n ‘female’ fields as radio buttons so that only one of these can be selected. You just can’t go in the module pool and create a new radio button or check box on the screen. If you do so, and activate the program, the check box or radio button will be inactive or grayed in PA30. Hence you have to ‘convert’ a particular single character field into the radio button or check box.
Go to PM01 and give 9005 as the infotype number. Choose the ‘Screen’ radio button and click on
button. It takes you to the module pool dialogue screen 2000 of infotype 9005.

Custom Infotype Creation – Tips and Tricks with Radio Buttons and Check Boxes
SAP DEVELOPER NETWORK | sdn.sap.com BUSINESS PROCESS EXPERT COMMUNITY | bpx.sap.com © 2007 SAP AG 15
Click on the change button. Now you are in the flow logic of the program. Click on button. It takes you to the screen layout of the infotype.
Change the text description of the fields you want to change and delete the text fields for the entries for which you want to make a check box or radio button as shown.

Custom Infotype Creation – Tips and Tricks with Radio Buttons and Check Boxes
SAP DEVELOPER NETWORK | sdn.sap.com BUSINESS PROCESS EXPERT COMMUNITY | bpx.sap.com © 2007 SAP AG 16
Now right click on the first field (educated?) of the three which you can convert to a checkbox, and choose convert checkbox left button.
This would convert the input field to the check box. Now double click on the check box and give the Text description as ‘Educated?’.

Custom Infotype Creation – Tips and Tricks with Radio Buttons and Check Boxes
SAP DEVELOPER NETWORK | sdn.sap.com BUSINESS PROCESS EXPERT COMMUNITY | bpx.sap.com © 2007 SAP AG 17
Don’t forget to give a Function Code to this check box if you want to perform any action when user clicks this check box e.g. disabling a particular field when the check box is unchecked and enabling the same if the check box is checked. You can write the code for the same in the pbo module.
Now you will convert the second and third fields to radio buttons. Here too, give the FctCode if you want to perform any action when user clicks the radio button. In case of radio buttons, FctCode is necessary. If you don’t do so, and activate the screen, you will see both the radio buttons selected in PA30, infotype 9005 and will not be able to deselect any one of them.
After both the input boxes are converted to radio buttons, give their text description by double clicking each of them.
Custom Infotype Creation – Tips and Tricks with Radio Buttons and Check Boxes
SAP DEVELOPER NETWORK | sdn.sap.com BUSINESS PROCESS EXPERT COMMUNITY | bpx.sap.com © 2007 SAP AG 18
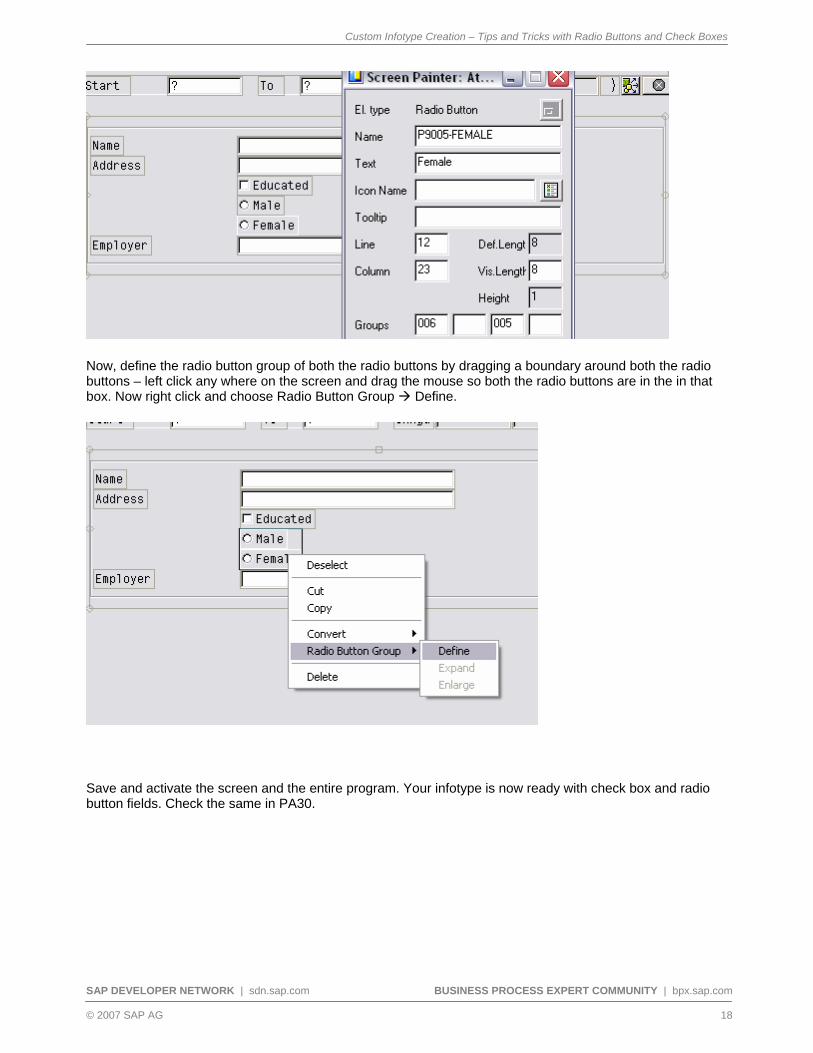
Now, define the radio button group of both the radio buttons by dragging a boundary around both the radio buttons – left click any where on the screen and drag the mouse so both the radio buttons are in the in that box. Now right click and choose Radio Button Group Define.
Save and activate the screen and the entire program. Your infotype is now ready with check box and radio button fields. Check the same in PA30.

Custom Infotype Creation – Tips and Tricks with Radio Buttons and Check Boxes
SAP DEVELOPER NETWORK | sdn.sap.com BUSINESS PROCESS EXPERT COMMUNITY | bpx.sap.com © 2007 SAP AG 19
Custom Infotype Creation – Tips and Tricks with Radio Buttons and Check Boxes
SAP DEVELOPER NETWORK | sdn.sap.com BUSINESS PROCESS EXPERT COMMUNITY | bpx.sap.com © 2007 SAP AG 20
Related Content www.sap-img.com www.erpgenie.com www.sdn.sap.com

Custom Infotype Creation – Tips and Tricks with Radio Buttons and Check Boxes
SAP DEVELOPER NETWORK | sdn.sap.com BUSINESS PROCESS EXPERT COMMUNITY | bpx.sap.com © 2007 SAP AG 21
Disclaimer and Liability Notice This document may discuss sample coding or other information that does not include SAP official interfaces and therefore is not supported by SAP. Changes made based on this information are not supported and can be overwritten during an upgrade. SAP will not be held liable for any damages caused by using or misusing the information, code or methods suggested in this document, and anyone using these methods does so at his/her own risk. SAP offers no guarantees and assumes no responsibility or liability of any type with respect to the content of this technical article or code sample, including any liability resulting from incompatibility between the content within this document and the materials and services offered by SAP. You agree that you will not hold, or seek to hold, SAP responsible or liable with respect to the content of this document.


![[XLS] · Web viewWill convert OTF to ASCII or PDF ... HR Time Record- Infotype 2010 ... Time Quota Compensation Infotype- Database Table PA0419 HR Master record- Manual tax ...](https://static.fdocuments.in/doc/165x107/5ae744ba7f8b9a87048f0cd8/xls-viewwill-convert-otf-to-ascii-or-pdf-hr-time-record-infotype-2010-.jpg)
