
CRYSTAL REPORTS 8.5 QUICK GUIDE - Qmuzik Technologiesapps.qmuzik.com/Training/qm8pdf/Crystal...
34
CRYSTAL REPORTS 8.5 QUICK GUIDE Course Assignment REVISION 1
Transcript of CRYSTAL REPORTS 8.5 QUICK GUIDE - Qmuzik Technologiesapps.qmuzik.com/Training/qm8pdf/Crystal...

CRYSTAL REPORTS 8.5
QUICK GUIDE Course Assignment
REVISION 1

1.1 COPYRIGHT © 1997 BY QMUZIK
All rights reserved. The contents, nor any part thereof, nor the format, the configuration or
any other aspect thereof may be copied, transformed, reworked, reverse engineered, stored or
transmitted, irrespective of the mode or method thereof, or in any other way be dealt with
other than only with the express prior written permission of QMuzik.
Table of Contents
2 INTRODUCTION ......................................................................................................................... 2
2.1 CRYSTAL REPORTS ENGINE OVERVIEW ................................................................................. 2
3 THE CRYSTAL REPORTS DESIGNER................................................................................... 3
3.1 THE DESIGN AREA ................................................................................................................. 3 3.2 INSERTING AND FORMATTING OBJECTS ................................................................................. 6 3.3 PREVIEWING REPORTS ........................................................................................................... 9 3.4 EXERCISE: CREATE A BASIC TEMPLATE ................................................................................ 10
4 CREATING A BASIC CRYSTAL REPORT .......................................................................... 11
4.1 SETTING UP AND USING DATABASE DATA (TABLES & VIEWS) ............................................... 11 4.2 SUMMARIZING, SORTING AND GROUPING DATA .................................................................. 13 4.3 FILTERING DATA AND PARAMETERS .................................................................................... 16 4.4 FORMULA FIELDS AND MANIPULATING DATA ..................................................................... 18 4.5 RUNNING TOTALS ................................................................................................................ 19 4.6 GRAPHS AND CHARTS .......................................................................................................... 20
5 EXTENDED CRYSTAL REPORTS ......................................................................................... 22
5.1 SUB REPORTS ....................................................................................................................... 22 5.2 USING STORED PROCEDURES ............................................................................................... 24 5.3 CONDITIONAL FORMATTING AND ADVANCED SCRIPTING .................................................... 25 5.4 EXERCISE: CREATE THE COMPLETE PACKAGE ...................................................................... 27
6 SETTING UP A CRYSTAL REPORT IN QMUZIK .............................................................. 28
6.1 COMPANY REPORTS CONFIGURATION .................................................................................. 28 6.2 RUNNING A REPORT IN COMPANY REPORTS ........................................................................ 30
7 FURTHER INFORMATION .................................................................................................... 32
2
2 Introduction
2.1 Crystal Reports Engine Overview
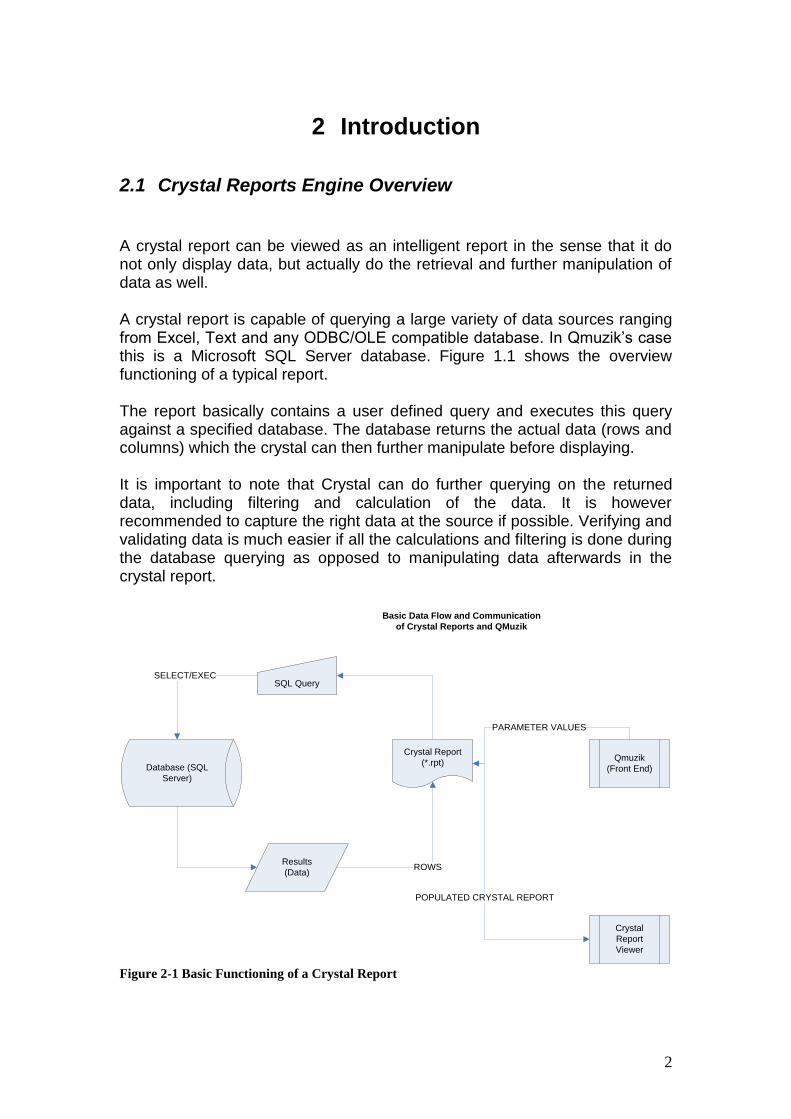
A crystal report can be viewed as an intelligent report in the sense that it do not only display data, but actually do the retrieval and further manipulation of data as well. A crystal report is capable of querying a large variety of data sources ranging from Excel, Text and any ODBC/OLE compatible database. In Qmuzik’s case this is a Microsoft SQL Server database. Figure 1.1 shows the overview functioning of a typical report. The report basically contains a user defined query and executes this query against a specified database. The database returns the actual data (rows and columns) which the crystal can then further manipulate before displaying. It is important to note that Crystal can do further querying on the returned data, including filtering and calculation of the data. It is however recommended to capture the right data at the source if possible. Verifying and validating data is much easier if all the calculations and filtering is done during the database querying as opposed to manipulating data afterwards in the crystal report.
Crystal Report
(*.rpt)Database (SQL
Server)
Results
(Data)
SQL QuerySELECT/EXEC
ROWS
Qmuzik
(Front End)
PARAMETER VALUES
Basic Data Flow and Communication
of Crystal Reports and QMuzik
Crystal
Report
Viewer
POPULATED CRYSTAL REPORT
Figure 2-1 Basic Functioning of a Crystal Report

3
3 The Crystal Reports Designer
3.1 The Design Area
Figure 3-1 Crystal Designer
The main interface of Crystal Reports consists of the menu bars on top and the design area below the menus. The design area represents a typical page divided into sections. The width and height of the page is defined by the printer’s page size settings (File -> Printer Setup, Figure 2-2). The first step when designing a new report is to decide on the page size and layout, for example whether the report is portrait or landscape and A4 or Letter etc.
4
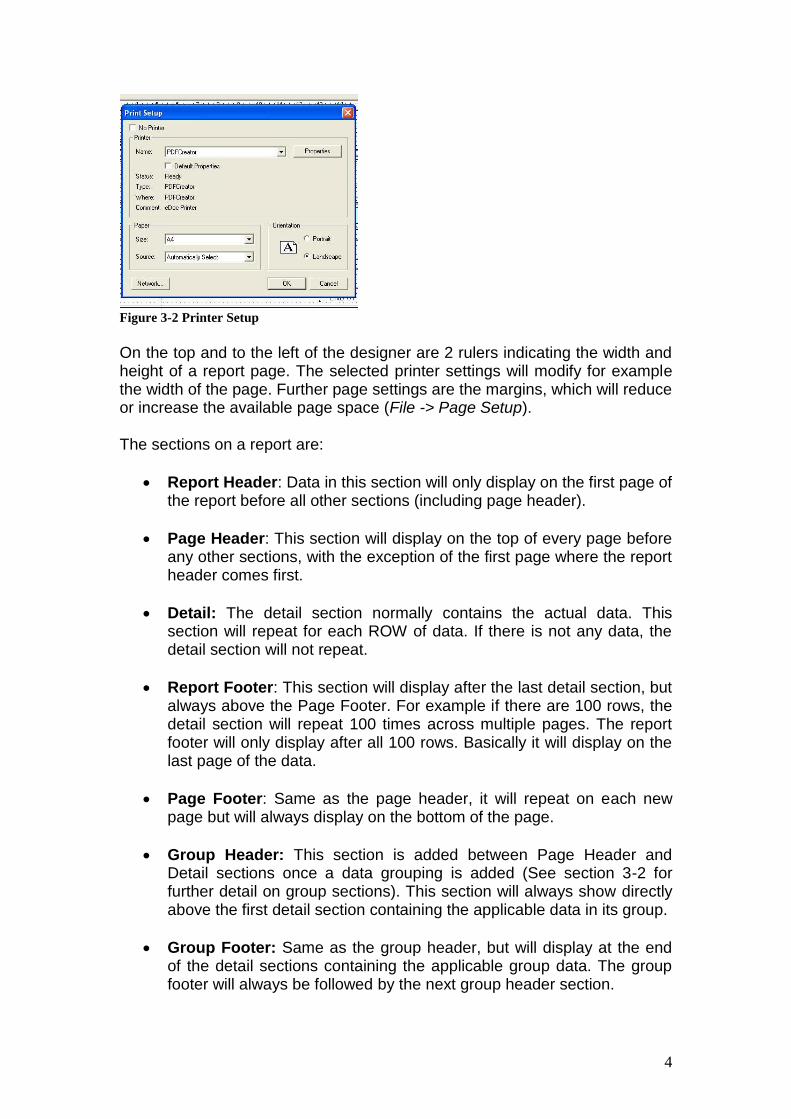
Figure 3-2 Printer Setup
On the top and to the left of the designer are 2 rulers indicating the width and height of a report page. The selected printer settings will modify for example the width of the page. Further page settings are the margins, which will reduce or increase the available page space (File -> Page Setup). The sections on a report are:
Report Header: Data in this section will only display on the first page of the report before all other sections (including page header).
Page Header: This section will display on the top of every page before any other sections, with the exception of the first page where the report header comes first.
Detail: The detail section normally contains the actual data. This section will repeat for each ROW of data. If there is not any data, the detail section will not repeat.
Report Footer: This section will display after the last detail section, but always above the Page Footer. For example if there are 100 rows, the detail section will repeat 100 times across multiple pages. The report footer will only display after all 100 rows. Basically it will display on the last page of the data.
Page Footer: Same as the page header, it will repeat on each new page but will always display on the bottom of the page.
Group Header: This section is added between Page Header and Detail sections once a data grouping is added (See section 3-2 for further detail on group sections). This section will always show directly above the first detail section containing the applicable data in its group.
Group Footer: Same as the group header, but will display at the end of the detail sections containing the applicable group data. The group footer will always be followed by the next group header section.
5
It is important to note that the report header always displays first, but the page footer will be the final section to display on a given report. Sections can be further divided or split to accomplish a variety of effects including organizing data for easy maintenance or to conditionally hide a group of objects contained in a section. If a section is divided, it will be named as for example “Page Header A” and “Page Header B”. The same display order rules apply for split sections. Sections can be formatted by right clicking in the grey area on the left indicating the sections or by using the section expert (Format -> Section).
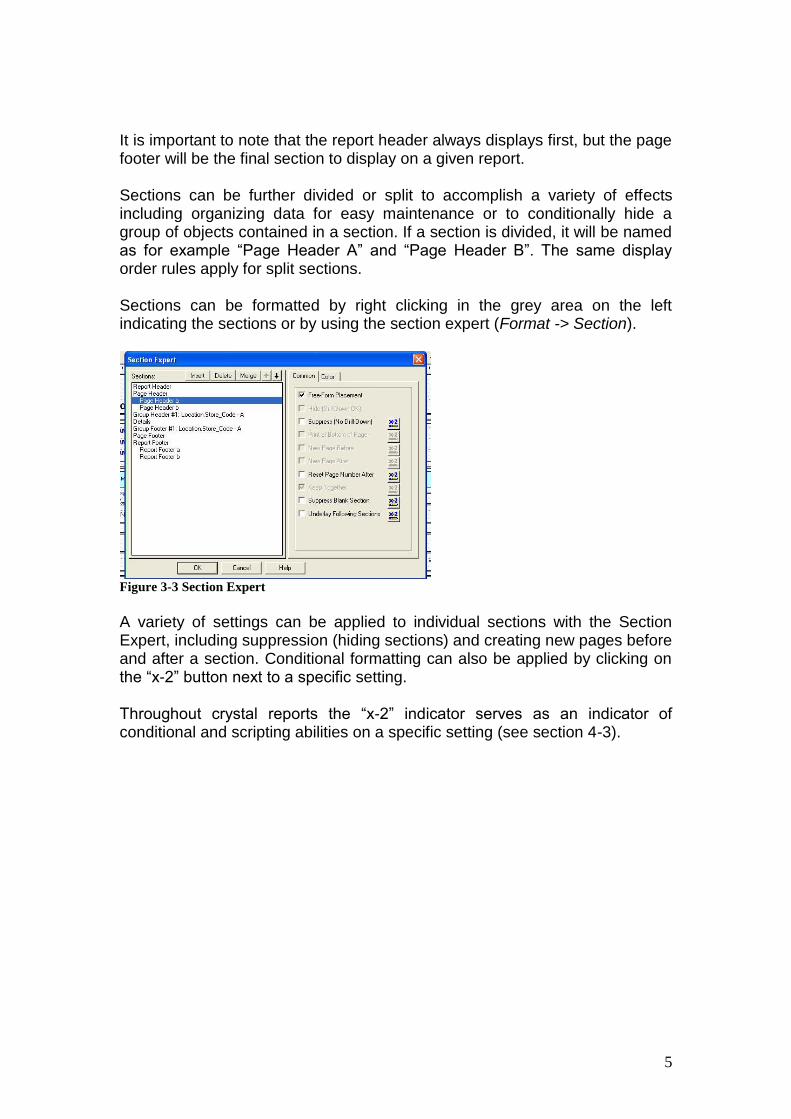
Figure 3-3 Section Expert
A variety of settings can be applied to individual sections with the Section Expert, including suppression (hiding sections) and creating new pages before and after a section. Conditional formatting can also be applied by clicking on the “x-2” button next to a specific setting. Throughout crystal reports the “x-2” indicator serves as an indicator of conditional and scripting abilities on a specific setting (see section 4-3).

6
3.2 Inserting and Formatting Objects
All insert-able objects can be found on the “Insert” Menu. Typical objects include Text Objects, Charts, Lines, Boxes and Pictures. To insert an object, select it from the menu and click on the designer to place it.
Figure 3-4 Insert Menu
Figure 3-5 Inserting Objects
Data specific objects such as database fields, formula fields and parameters can be found under “Field Objects” on the Insert Menu. A new window, called the “Field Explorer” will display these additional objects including various
7
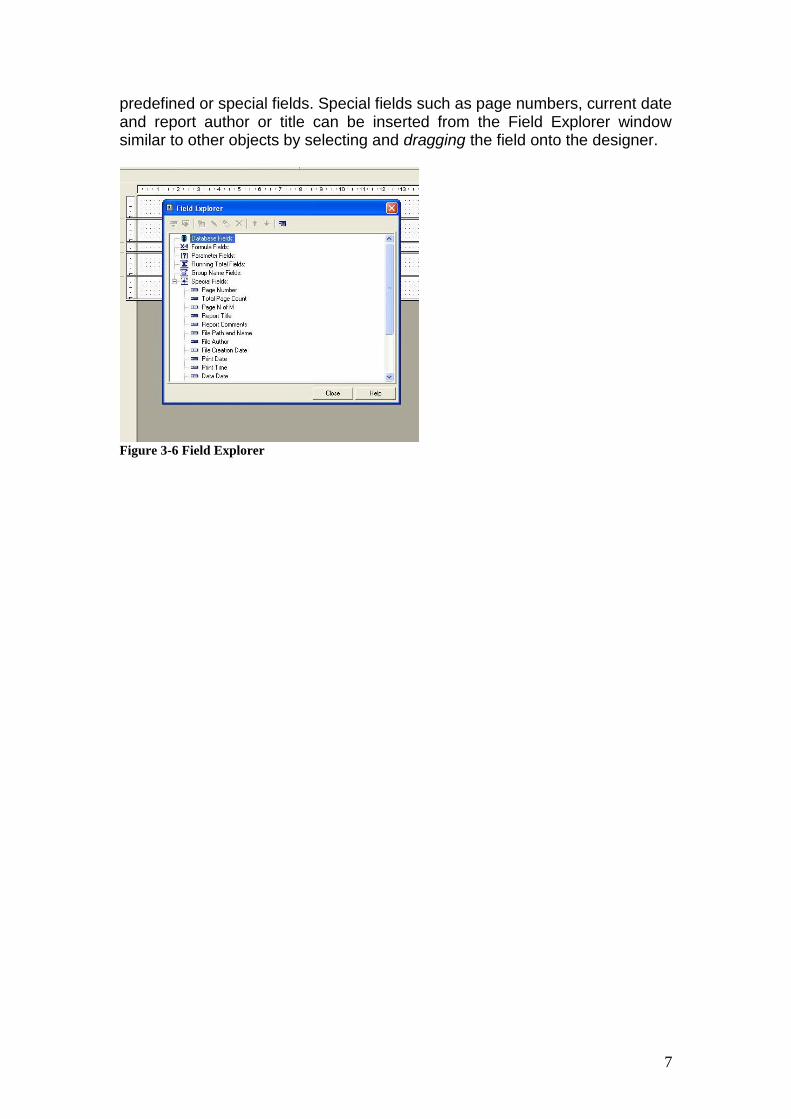
predefined or special fields. Special fields such as page numbers, current date and report author or title can be inserted from the Field Explorer window similar to other objects by selecting and dragging the field onto the designer.
Figure 3-6 Field Explorer
8
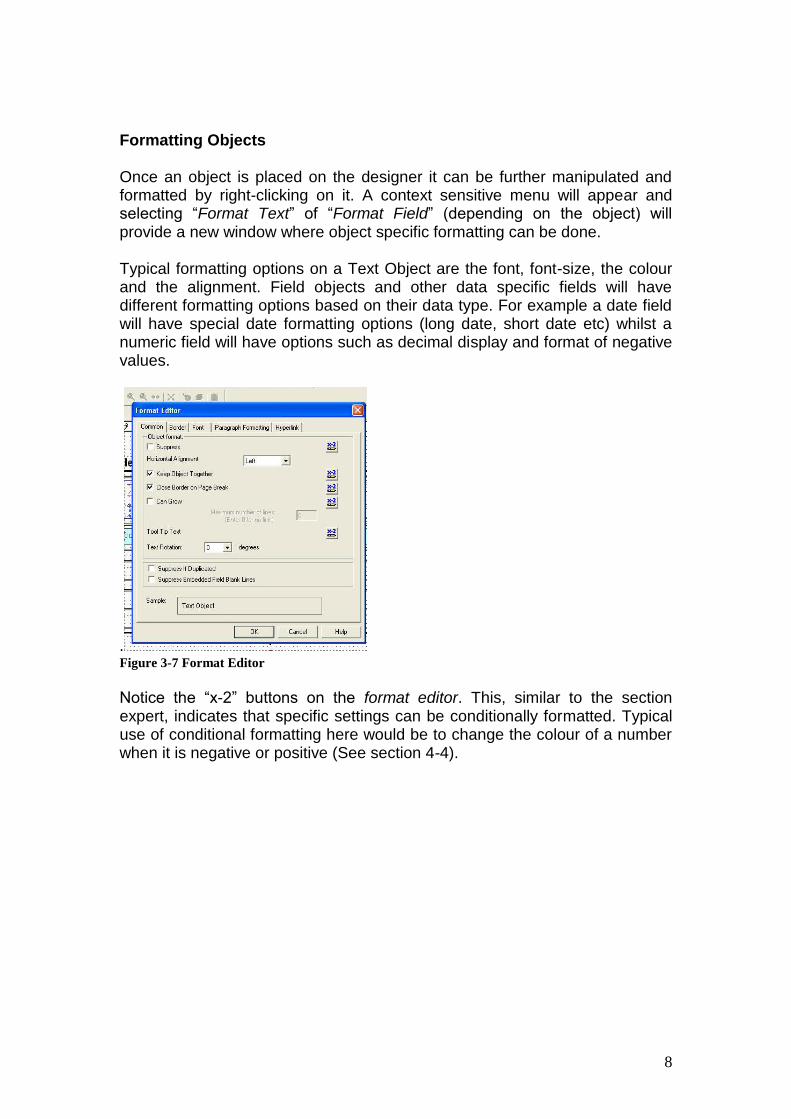
Formatting Objects
Once an object is placed on the designer it can be further manipulated and formatted by right-clicking on it. A context sensitive menu will appear and selecting “Format Text” of “Format Field” (depending on the object) will provide a new window where object specific formatting can be done. Typical formatting options on a Text Object are the font, font-size, the colour and the alignment. Field objects and other data specific fields will have different formatting options based on their data type. For example a date field will have special date formatting options (long date, short date etc) whilst a numeric field will have options such as decimal display and format of negative values.
. Figure 3-7 Format Editor
Notice the “x-2” buttons on the format editor. This, similar to the section expert, indicates that specific settings can be conditionally formatted. Typical use of conditional formatting here would be to change the colour of a number when it is negative or positive (See section 4-4).
9
3.3 Previewing Reports
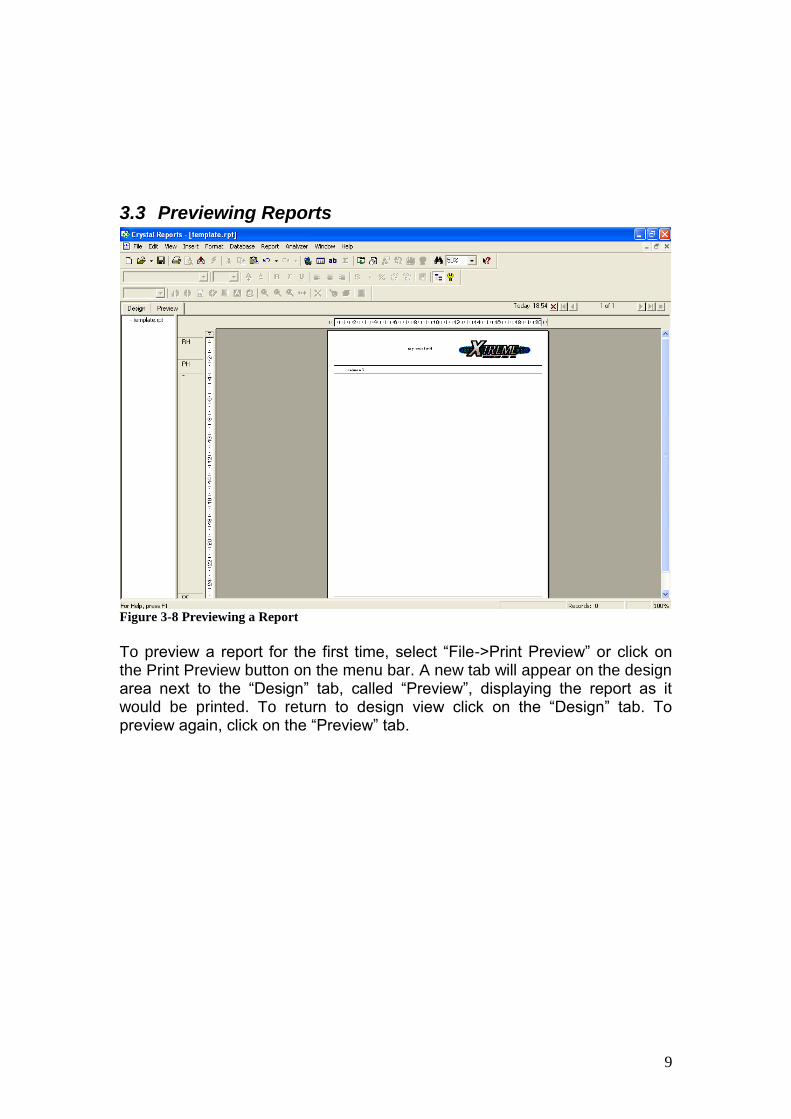
Figure 3-8 Previewing a Report
To preview a report for the first time, select “File->Print Preview” or click on the Print Preview button on the menu bar. A new tab will appear on the design area next to the “Design” tab, called “Preview”, displaying the report as it would be printed. To return to design view click on the “Design” tab. To preview again, click on the “Preview” tab.
10
3.4 Exercise: Create a basic template
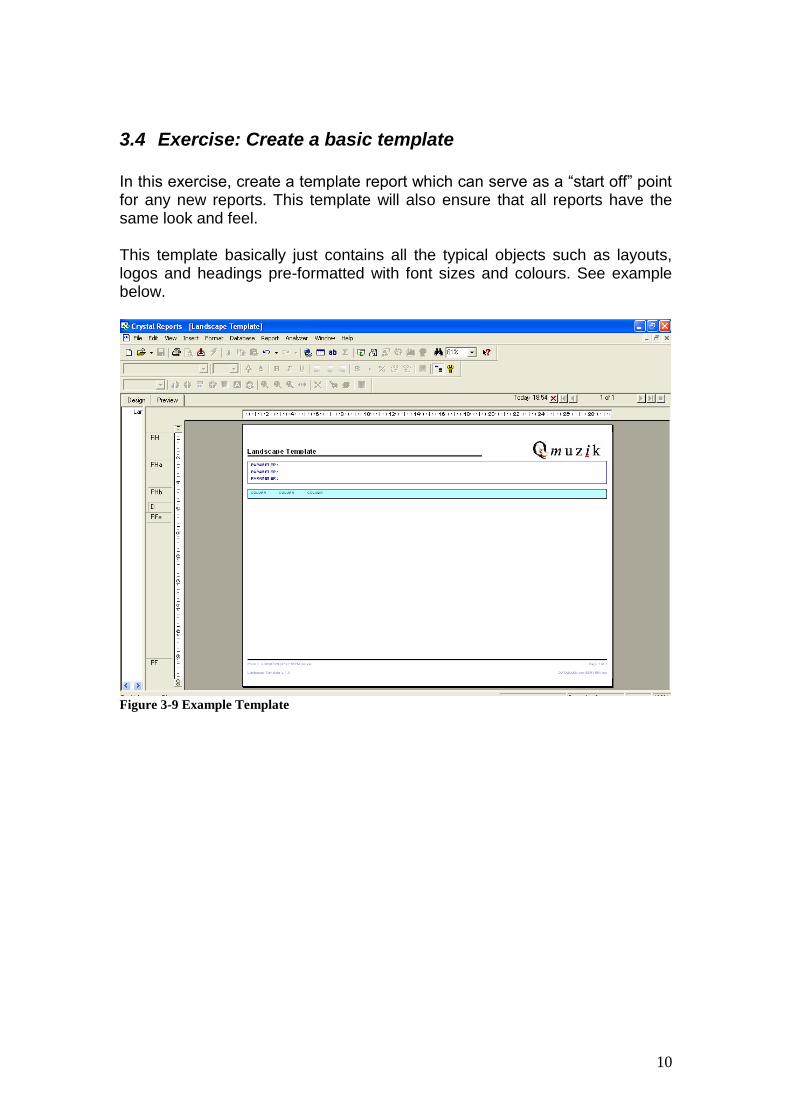
In this exercise, create a template report which can serve as a “start off” point for any new reports. This template will also ensure that all reports have the same look and feel. This template basically just contains all the typical objects such as layouts, logos and headings pre-formatted with font sizes and colours. See example below.
Figure 3-9 Example Template
11
4 Creating a Basic Crystal Report
4.1 Setting up and using database data (tables & views)
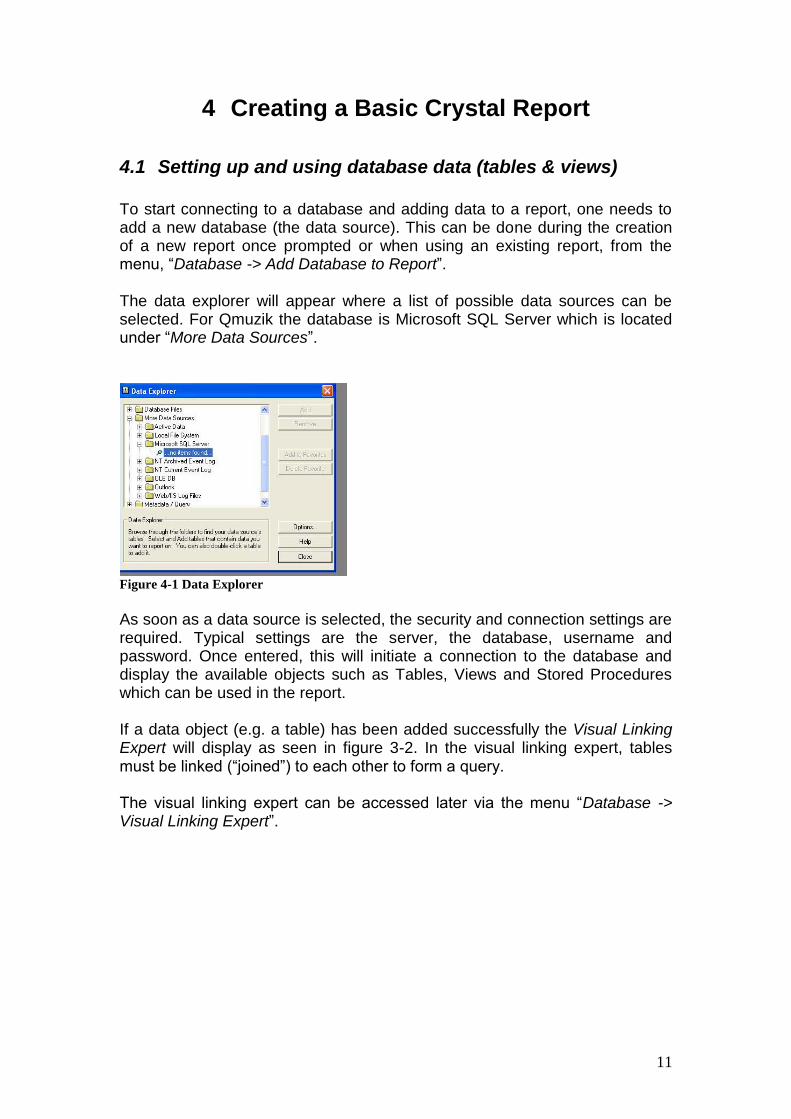
To start connecting to a database and adding data to a report, one needs to add a new database (the data source). This can be done during the creation of a new report once prompted or when using an existing report, from the menu, “Database -> Add Database to Report”. The data explorer will appear where a list of possible data sources can be selected. For Qmuzik the database is Microsoft SQL Server which is located under “More Data Sources”.
Figure 4-1 Data Explorer
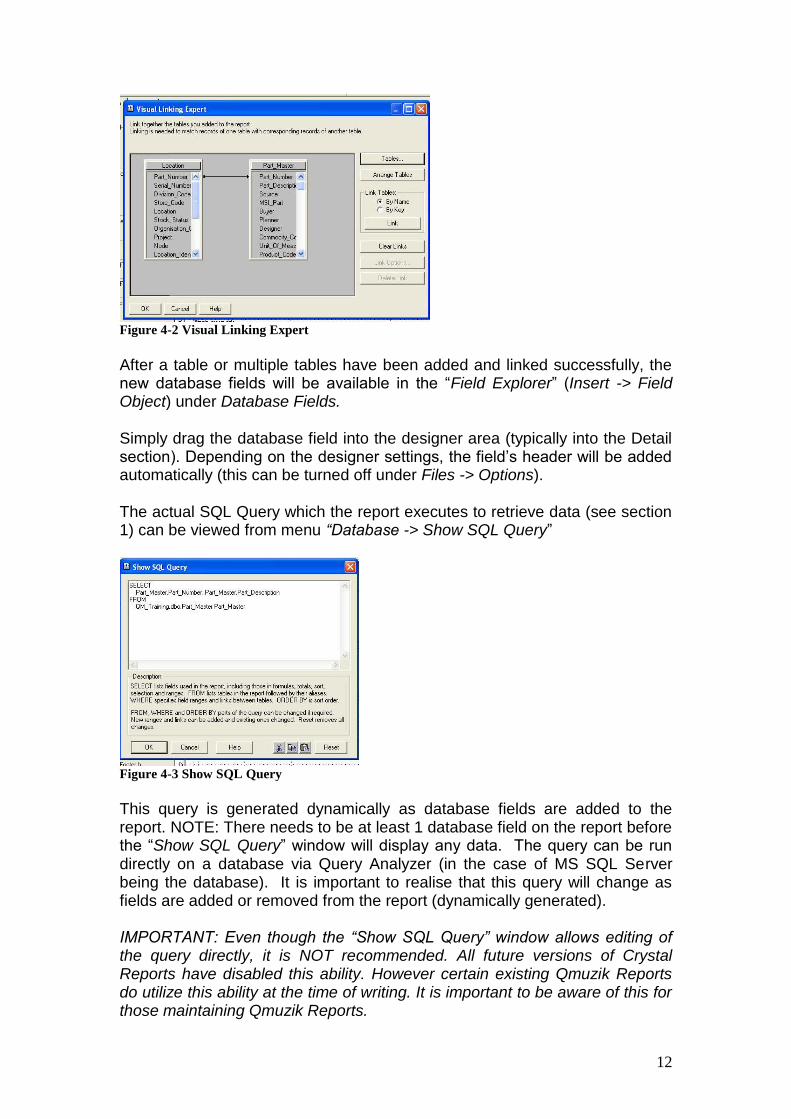
As soon as a data source is selected, the security and connection settings are required. Typical settings are the server, the database, username and password. Once entered, this will initiate a connection to the database and display the available objects such as Tables, Views and Stored Procedures which can be used in the report. If a data object (e.g. a table) has been added successfully the Visual Linking Expert will display as seen in figure 3-2. In the visual linking expert, tables must be linked (“joined”) to each other to form a query. The visual linking expert can be accessed later via the menu “Database -> Visual Linking Expert”.
12
Figure 4-2 Visual Linking Expert
After a table or multiple tables have been added and linked successfully, the new database fields will be available in the “Field Explorer” (Insert -> Field Object) under Database Fields. Simply drag the database field into the designer area (typically into the Detail section). Depending on the designer settings, the field’s header will be added automatically (this can be turned off under Files -> Options). The actual SQL Query which the report executes to retrieve data (see section 1) can be viewed from menu “Database -> Show SQL Query”
Figure 4-3 Show SQL Query
This query is generated dynamically as database fields are added to the report. NOTE: There needs to be at least 1 database field on the report before the “Show SQL Query” window will display any data. The query can be run directly on a database via Query Analyzer (in the case of MS SQL Server being the database). It is important to realise that this query will change as fields are added or removed from the report (dynamically generated). IMPORTANT: Even though the “Show SQL Query” window allows editing of the query directly, it is NOT recommended. All future versions of Crystal Reports have disabled this ability. However certain existing Qmuzik Reports do utilize this ability at the time of writing. It is important to be aware of this for those maintaining Qmuzik Reports.
13
4.2 Summarizing, Sorting and Grouping Data
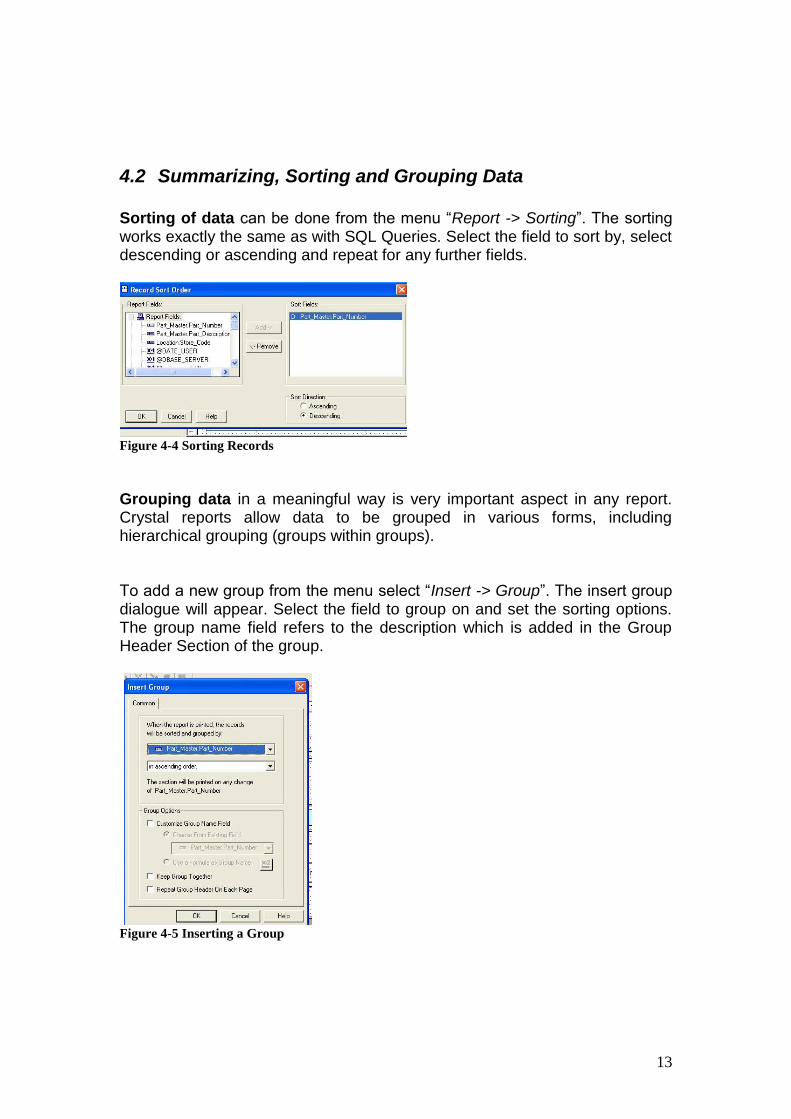
Sorting of data can be done from the menu “Report -> Sorting”. The sorting works exactly the same as with SQL Queries. Select the field to sort by, select descending or ascending and repeat for any further fields.
Figure 4-4 Sorting Records
Grouping data in a meaningful way is very important aspect in any report. Crystal reports allow data to be grouped in various forms, including hierarchical grouping (groups within groups).
To add a new group from the menu select “Insert -> Group”. The insert group dialogue will appear. Select the field to group on and set the sorting options. The group name field refers to the description which is added in the Group Header Section of the group.
Figure 4-5 Inserting a Group

14
Once the group is added 2 new sections will appear around the Detail section in the designer (Group Header and Group Footer).
Figure 4-6 Group Sections
Multiple groups can be added by repeating mentioned process. Each group will have its own group header and footer section pairs (see figure 3-6). Groups can be modified by right clicking on the left section grey area and clicking “Change Group” on the context menu. Groups can be switched around by clicking and holding on a group section in the left section area and dragging the group inside or outside the other group. The sections will automatically switch around. Summarising data includes doing various calculations on existing data such as totals, counting, averages and grand totals.

15
To add a summary from the menu click “Insert -> Summary”.
Figure 4-7 Inserting Summary Fields
Alternately a summary can be created by right clicking the field you wish to summarise and selecting “Insert -> Summary” from the context menu. On the “Insert Summary” dialogue, select the field to be summarised and the summary type (max, min, count, sum, average etc). Also choose where the summary should be calculated and placed. Options include a specified group, all groups (subtotals) and grand total (at the end of the report). The summary fields will automatically be inserted in the selected sections (normally in the group footers and report footer) below the detail field.
Figure 4-8 Summary Example
16
4.3 Filtering Data and Parameters
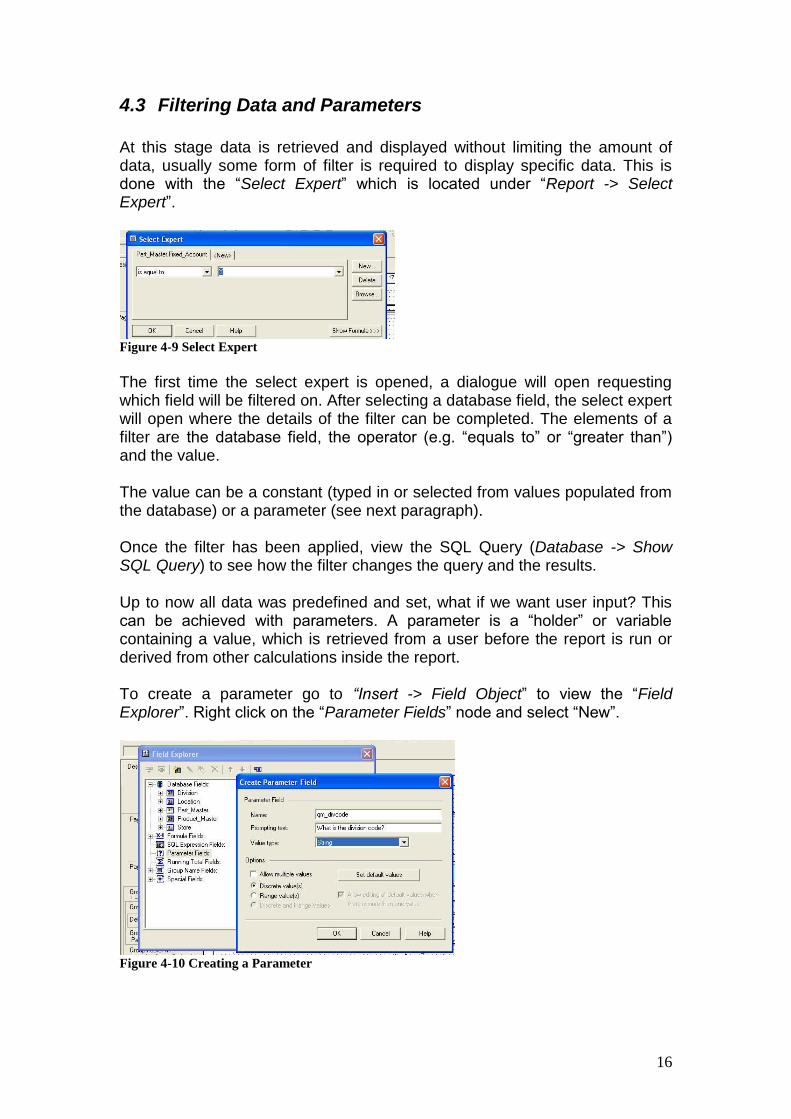
At this stage data is retrieved and displayed without limiting the amount of data, usually some form of filter is required to display specific data. This is done with the “Select Expert” which is located under “Report -> Select Expert”.
Figure 4-9 Select Expert
The first time the select expert is opened, a dialogue will open requesting which field will be filtered on. After selecting a database field, the select expert will open where the details of the filter can be completed. The elements of a filter are the database field, the operator (e.g. “equals to” or “greater than”) and the value. The value can be a constant (typed in or selected from values populated from the database) or a parameter (see next paragraph). Once the filter has been applied, view the SQL Query (Database -> Show SQL Query) to see how the filter changes the query and the results. Up to now all data was predefined and set, what if we want user input? This can be achieved with parameters. A parameter is a “holder” or variable containing a value, which is retrieved from a user before the report is run or derived from other calculations inside the report. To create a parameter go to “Insert -> Field Object” to view the “Field Explorer”. Right click on the “Parameter Fields” node and select “New”.
Figure 4-10 Creating a Parameter
17
The create parameter field dialogue is used to define the parameter. The data type (string, numeric, date etc) and the parameter name is the more important settings required.
NOTE: Qmuzik is not compatible with all the Crystal Parameter Types, it is recommended to use Type “String” wherever possible.
The parameter name as defined in this dialogue is of utmost importance to Qmuzik when the report is set up in Company Reports (see section 5).
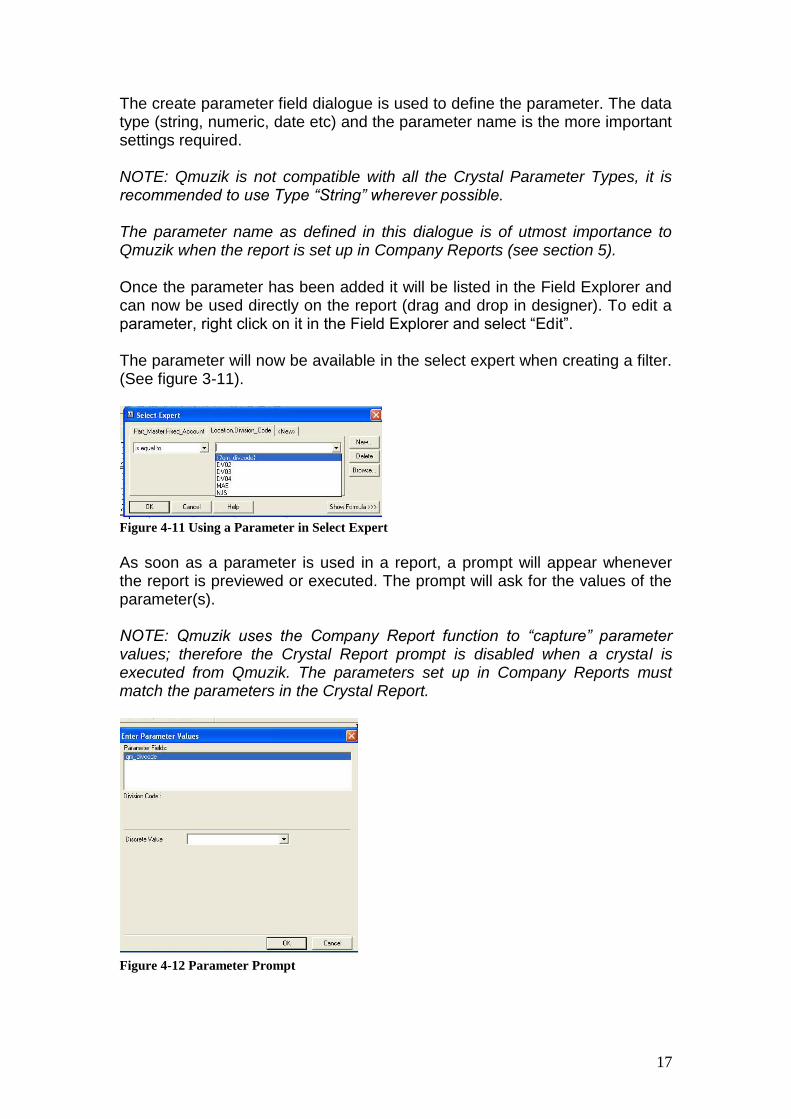
Once the parameter has been added it will be listed in the Field Explorer and can now be used directly on the report (drag and drop in designer). To edit a parameter, right click on it in the Field Explorer and select “Edit”. The parameter will now be available in the select expert when creating a filter. (See figure 3-11).
Figure 4-11 Using a Parameter in Select Expert
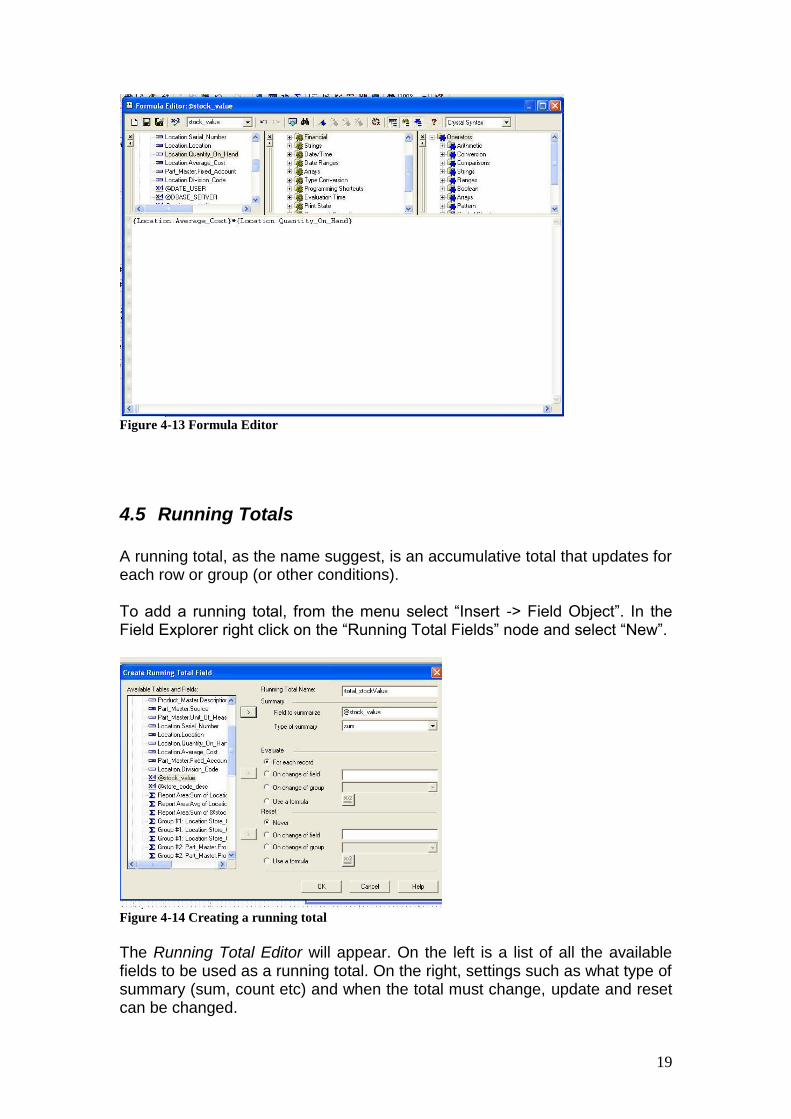
As soon as a parameter is used in a report, a prompt will appear whenever the report is previewed or executed. The prompt will ask for the values of the parameter(s). NOTE: Qmuzik uses the Company Report function to “capture” parameter values; therefore the Crystal Report prompt is disabled when a crystal is executed from Qmuzik. The parameters set up in Company Reports must match the parameters in the Crystal Report.
Figure 4-12 Parameter Prompt

18
To enter parameter values, select the parameter in the “Parameter Fields” box (if there is more than one) and type its value in the “Discrete Value” box. If default values were defined in the Parameter Setup it will be listed and can be selected. This is useful for testing a report.
4.4 Formula Fields and Manipulating Data
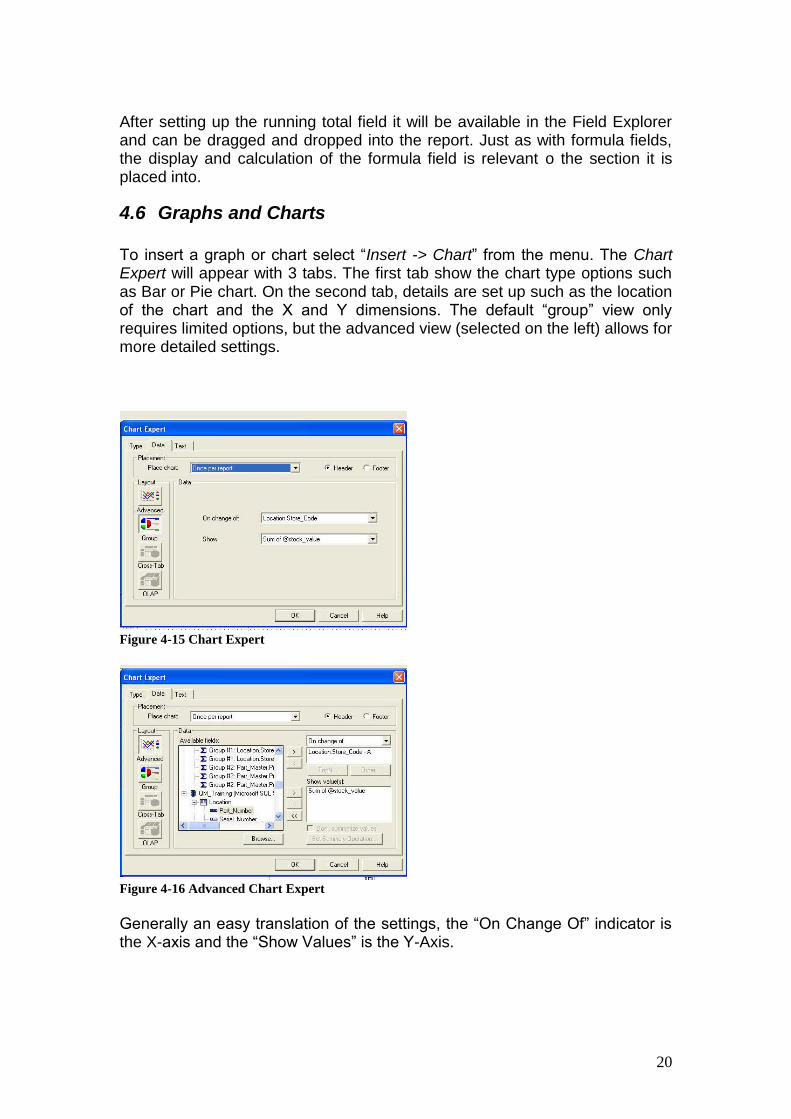
A formula field is basically a calculation based on database data. The calculation can include mathematical calculations or even various string tasks (concatenation or trimming). To create a formula field, from the menu select “Insert -> Field Object”. In the “Field Explorer”, right click on the “Formula Fields” node and click “New”. Type in the formula name and then the “Formula Editor” window will display. The formula editor contains (see figure 3-13)
Top left: All the available fields for use in calculations
Top middle: All the mathematical functions such as “sum” or “average”, formatting functions, conversion functions and a multitude of advanced predefined formulas.
Top right: All the operators such as “+” or “concatenate” which combines functions and fields.
The rest of the editor consists of an open area where the user can type expressions and scripts. Fields can be dragged and dropped from the top left window; functions and operators can also be dragged and dropped from their appropriate windows. Alternately everything can be type manually.
The formula is validated by clicking the “x-2 with green check” button. Save and close the formula editor upon completion. The formula field will be available in the Field Explorer and can be added to the report by dragging and dropping it into the appropriate section in the designer. NOTE: The formula field’s calculation is relevant to the SECTION it is placed in. If it is placed in the detail section it will do the calculation for each row, if it’s in the report header it will only do a calculation on the first page once.
19
Figure 4-13 Formula Editor
4.5 Running Totals
A running total, as the name suggest, is an accumulative total that updates for each row or group (or other conditions). To add a running total, from the menu select “Insert -> Field Object”. In the Field Explorer right click on the “Running Total Fields” node and select “New”.
Figure 4-14 Creating a running total
The Running Total Editor will appear. On the left is a list of all the available fields to be used as a running total. On the right, settings such as what type of summary (sum, count etc) and when the total must change, update and reset can be changed.
20
After setting up the running total field it will be available in the Field Explorer and can be dragged and dropped into the report. Just as with formula fields, the display and calculation of the formula field is relevant o the section it is placed into.
4.6 Graphs and Charts
To insert a graph or chart select “Insert -> Chart” from the menu. The Chart Expert will appear with 3 tabs. The first tab show the chart type options such as Bar or Pie chart. On the second tab, details are set up such as the location of the chart and the X and Y dimensions. The default “group” view only requires limited options, but the advanced view (selected on the left) allows for more detailed settings.
Figure 4-15 Chart Expert
Figure 4-16 Advanced Chart Expert
Generally an easy translation of the settings, the “On Change Of” indicator is the X-axis and the “Show Values” is the Y-Axis.

21
Figure 4-17 Example Charts
Once placed, Charts can be moved into different sections (with different results) and further formatted like any other object by right clicking and selecting the appropriate options. Charts have many formatting options relating to grids, legends, fonts and titles all found on the right-click context menu.
22
5 Extended Crystal Reports
5.1 Sub Reports
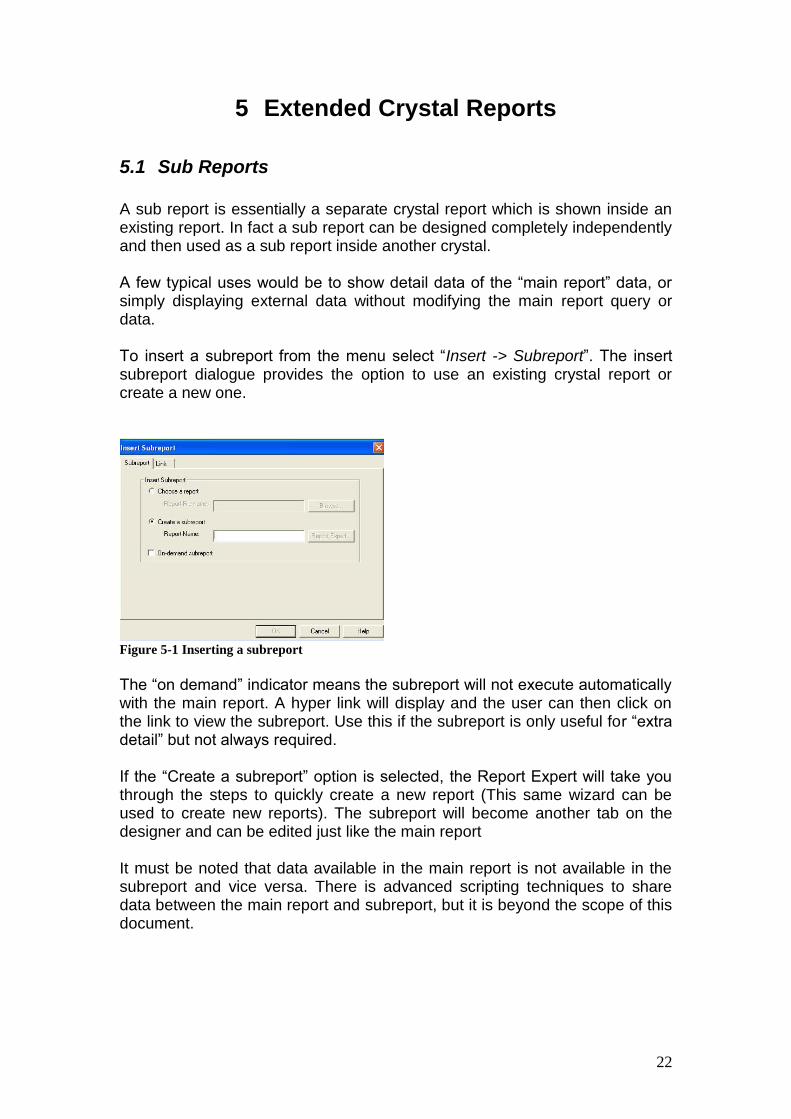
A sub report is essentially a separate crystal report which is shown inside an existing report. In fact a sub report can be designed completely independently and then used as a sub report inside another crystal. A few typical uses would be to show detail data of the “main report” data, or simply displaying external data without modifying the main report query or data. To insert a subreport from the menu select “Insert -> Subreport”. The insert subreport dialogue provides the option to use an existing crystal report or create a new one.
Figure 5-1 Inserting a subreport
The “on demand” indicator means the subreport will not execute automatically with the main report. A hyper link will display and the user can then click on the link to view the subreport. Use this if the subreport is only useful for “extra detail” but not always required.
If the “Create a subreport” option is selected, the Report Expert will take you through the steps to quickly create a new report (This same wizard can be used to create new reports). The subreport will become another tab on the designer and can be edited just like the main report It must be noted that data available in the main report is not available in the subreport and vice versa. There is advanced scripting techniques to share data between the main report and subreport, but it is beyond the scope of this document.
23
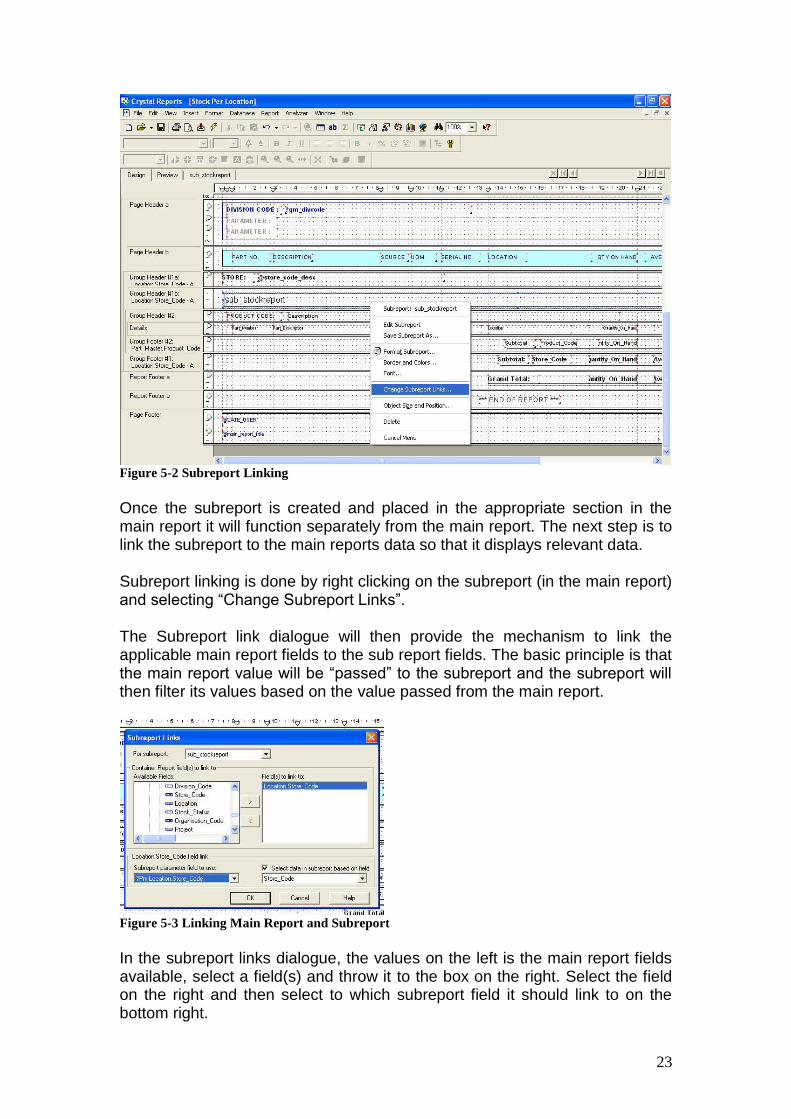
Figure 5-2 Subreport Linking
Once the subreport is created and placed in the appropriate section in the main report it will function separately from the main report. The next step is to link the subreport to the main reports data so that it displays relevant data. Subreport linking is done by right clicking on the subreport (in the main report) and selecting “Change Subreport Links”. The Subreport link dialogue will then provide the mechanism to link the applicable main report fields to the sub report fields. The basic principle is that the main report value will be “passed” to the subreport and the subreport will then filter its values based on the value passed from the main report.
Figure 5-3 Linking Main Report and Subreport
In the subreport links dialogue, the values on the left is the main report fields available, select a field(s) and throw it to the box on the right. Select the field on the right and then select to which subreport field it should link to on the bottom right.

24
The subreport will automatically create a parameter which is used in a filter as seen on the bottom left. NOTE: Sub reports can also contain custom parameters which can be linked to main report values. Parameters will be listed on the left, there is an existing bug in Crystal 8.5 where the drop down will not open more than one line, to scroll use the up-down arrows on the drop down to scroll to the parameter.
Figure 5-4 Example subreport
5.2 Using Stored Procedures
Stored Procedures can be used instead of Tables and Views as data source. The advantage of stored procedures includes the ability to do complex data calculations and formatting in the stored procedure before the data received into the report. This also pushes the work and calculations to the database instead of into the crystal which may increase performance at the end user. It is recommended to use Stored Procedures when a lot of data manipulation and calculations are required. Even though Crystal Reports are capable, via scripting and formula fields, to do similar data manipulation it is extremely difficult to maintain and validate data if a lot of formulas are contained inside the report.
By default Stored Procedures are not available in the “Add Database” dialog. To turn this on, go into “File -> Options -> Database Tab -> Show Stored Procedures”. Now when adding a table or view, stored procedures will also be available.
25
A few important factors of Stored Procedures:
A stored procedure can have its own parameters. If this is the case, crystal will AUTOMATICALLY add these parameters into the report. When the report is previewed, crystal will also prompt for these values.
Only 1 stored procedure can be used per report, no further joining are possible. Therefore the stored procedure must contain all the data needed.
Crystal executes the stored procedure to determine the available fields. If the stored procedure have multiple result sets or its output changes depending on the parameters used it is important to use the CORRECT parameter values when adding the stored procedure the first time.
5.3 Conditional Formatting and Advanced Scripting
As mentioned in previous sections (see Formula Fields), any setting or formatting option containing the “x-2” button can contain “Script behind” or conditional scripts relating to the setting. The scripting abilities in crystal reports are quite extensive and can contain any official programming structures such as “if-then-else” and “for loops”. Almost any combination of calculation and data manipulation can be done through scripting, either via Formula Fields or Conditional Formatting buttons. There are currently two languages available in Crystal to use for scripting and it can be used interchangeably. The Crystal Language resembles Java syntax whilst the Basic syntax resembles Visual Basic. Detail on scripting syntax and language is beyond the scope of this document. Example of conditional formatting: Select a numeric database field placed on report, right click and select “Format Field”. Select the “Font” Tab and click on the “x-2” button next to “Color”.
26
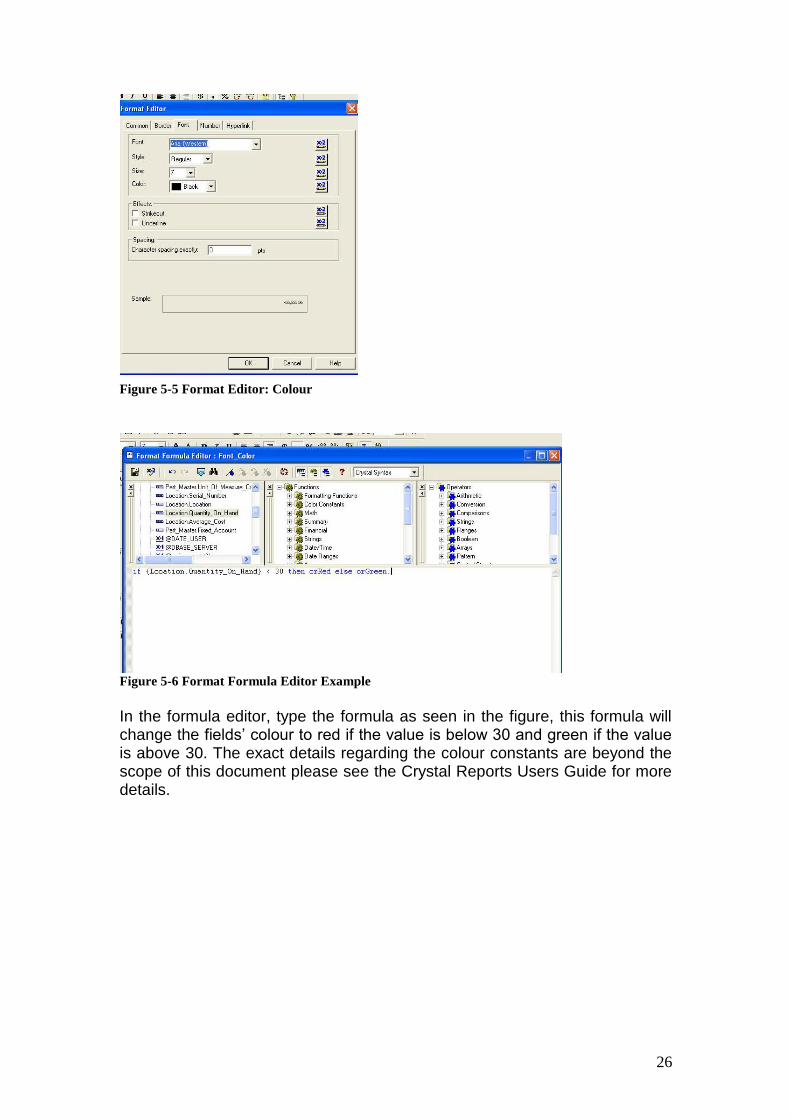
Figure 5-5 Format Editor: Colour
Figure 5-6 Format Formula Editor Example
In the formula editor, type the formula as seen in the figure, this formula will change the fields’ colour to red if the value is below 30 and green if the value is above 30. The exact details regarding the colour constants are beyond the scope of this document please see the Crystal Reports Users Guide for more details.

27
Figure 5-7 Example Conditional Formatting
5.4 Exercise: Create the complete package
Create a report using the various objects, including charts and parameters based on Qmuzik Tables and data. See the example in figure 4-8.
Figure 5-8 The End Result
28
6 Setting up a Crystal Report in Qmuzik
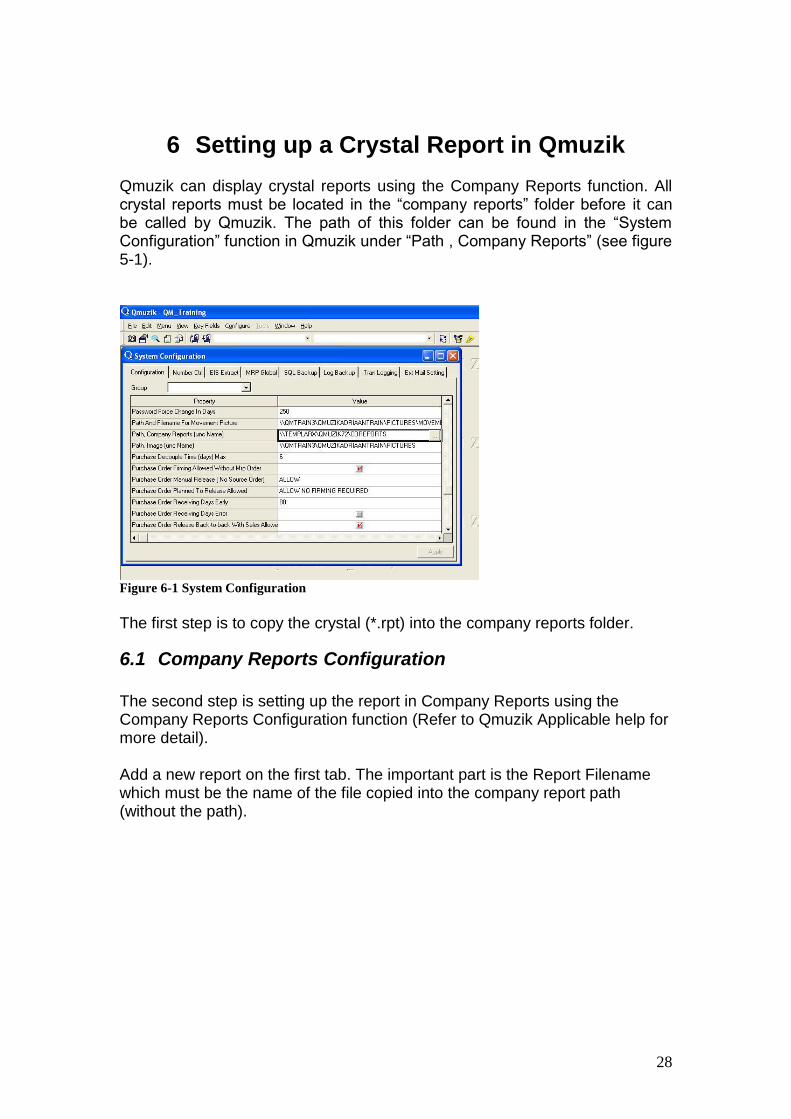
Qmuzik can display crystal reports using the Company Reports function. All crystal reports must be located in the “company reports” folder before it can be called by Qmuzik. The path of this folder can be found in the “System Configuration” function in Qmuzik under “Path , Company Reports” (see figure 5-1).
Figure 6-1 System Configuration
The first step is to copy the crystal (*.rpt) into the company reports folder.
6.1 Company Reports Configuration
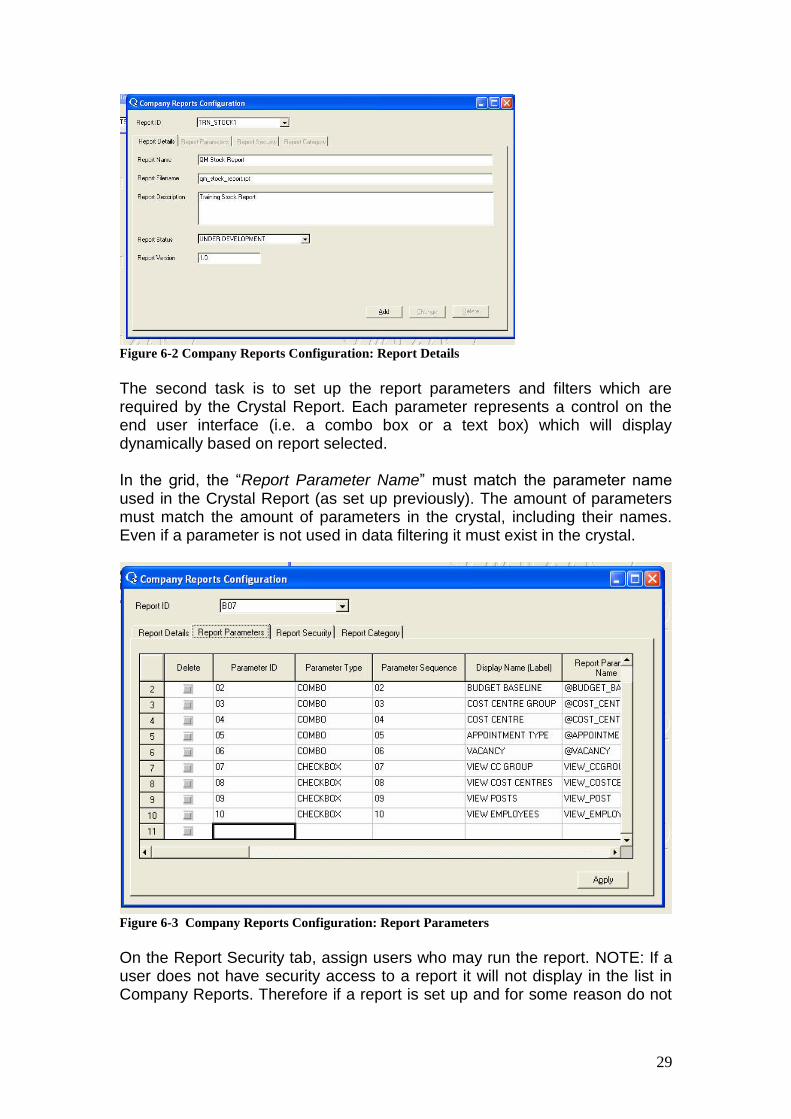
The second step is setting up the report in Company Reports using the Company Reports Configuration function (Refer to Qmuzik Applicable help for more detail). Add a new report on the first tab. The important part is the Report Filename which must be the name of the file copied into the company report path (without the path).
29
Figure 6-2 Company Reports Configuration: Report Details
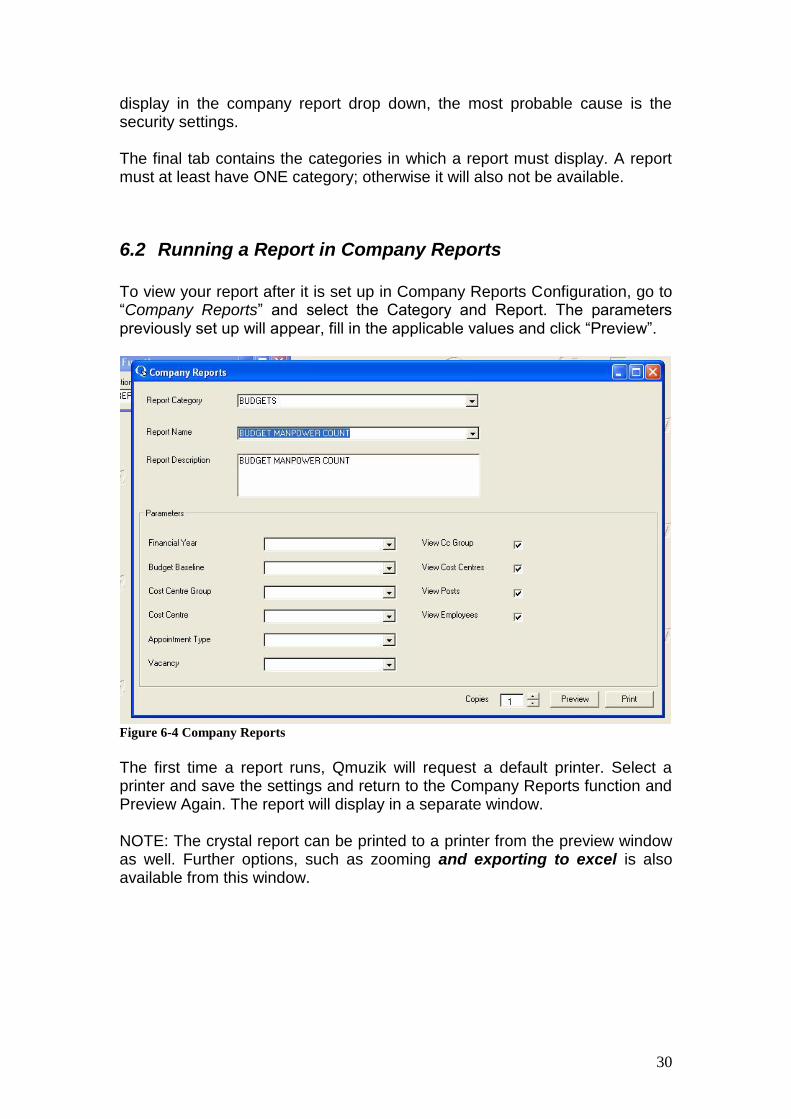
The second task is to set up the report parameters and filters which are required by the Crystal Report. Each parameter represents a control on the end user interface (i.e. a combo box or a text box) which will display dynamically based on report selected. In the grid, the “Report Parameter Name” must match the parameter name used in the Crystal Report (as set up previously). The amount of parameters must match the amount of parameters in the crystal, including their names. Even if a parameter is not used in data filtering it must exist in the crystal.
Figure 6-3 Company Reports Configuration: Report Parameters
On the Report Security tab, assign users who may run the report. NOTE: If a user does not have security access to a report it will not display in the list in Company Reports. Therefore if a report is set up and for some reason do not
30
display in the company report drop down, the most probable cause is the security settings.
The final tab contains the categories in which a report must display. A report must at least have ONE category; otherwise it will also not be available.
6.2 Running a Report in Company Reports
To view your report after it is set up in Company Reports Configuration, go to “Company Reports” and select the Category and Report. The parameters previously set up will appear, fill in the applicable values and click “Preview”.
Figure 6-4 Company Reports
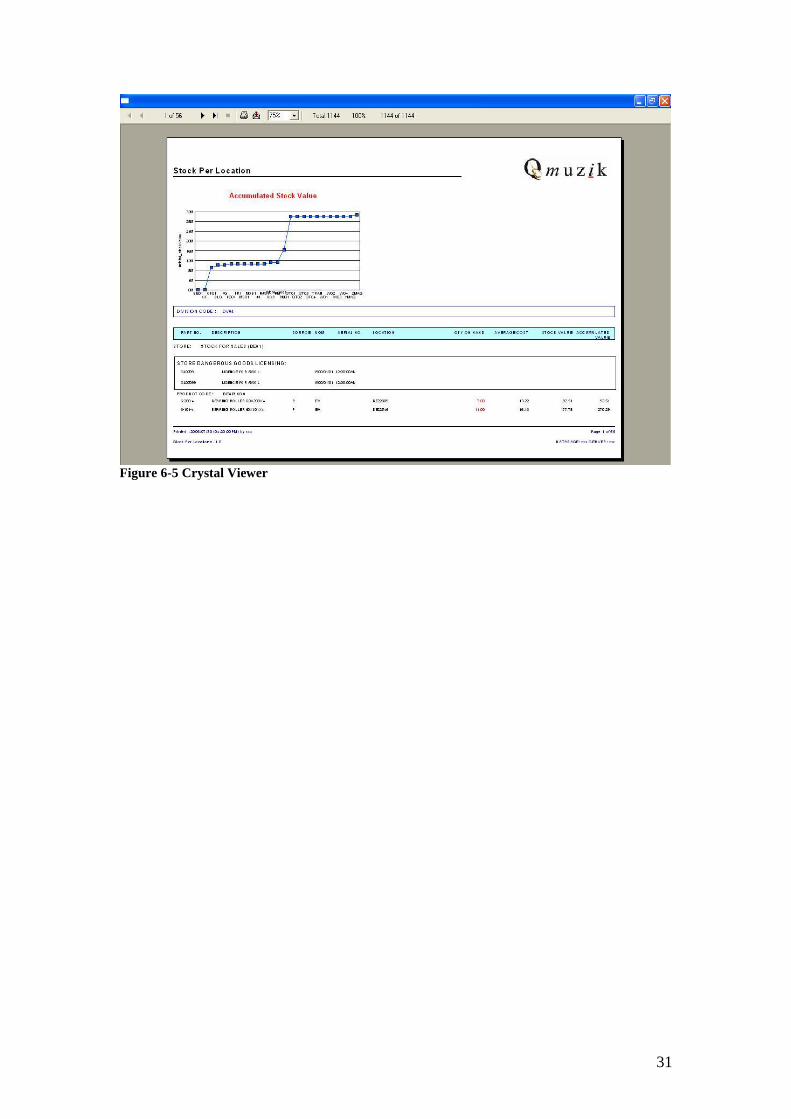
The first time a report runs, Qmuzik will request a default printer. Select a printer and save the settings and return to the Company Reports function and Preview Again. The report will display in a separate window. NOTE: The crystal report can be printed to a printer from the preview window as well. Further options, such as zooming and exporting to excel is also available from this window.
31
Figure 6-5 Crystal Viewer

32
7 Further Information
Business Objects (Crystal Reports) : : http://www.businessobjects.com
QMuzik : http://www.qmuzik.com
Crystal Reports 8.5 User’s Guide: Seagate Software (Now Business
Objects).