CrushFTP4 Documentation · Welcome to the CrushFTP4 documentation! The documentation is laid out so...
17
CrushFTP4 Documentation Welcome to the CrushFTP4 documentation! The documentation is laid out so that it is easily searchable. It follows the order as such: WebInterface, Main Window, Preferences, UserManager, and User Data File Structure. Each tab of CrushFTP is listed in this document so that you can just search on the tab's name to easily find its section. Every field is listed as well so you may also search on individual settings of the server or user manager too. Training Videos There is a quick start video to get you up and running very easily with CrushFTP. The video is only a few minutes long, but it runs through everything you need to do to get your server up and running. There are also more advanced videos showing you how to use some of the WebInterface, remote administration, setting of a domain name that point to your server, using the built in reports, and a few of the plugins. They are definitely worth checking out. You will just need Quicktime 7 to view them since they are using the H.264 codec to allow for high quality in a very small size. There is no charge for the videos. WebInterface The webInterface is a special folder next to the CrushFTP application. It contains the files used to generate the CrushFTP WebinterFace when using a web browser to connect to CrushFTP using the HTTP:// protocol. The entire WebInterface can be customized and personalized through the CrushFTP UserManager. This allows you to brand the CrushFTP interface to look like you want. There is a video available for download on my website that demonstrates the WebInterface abilities. Downloads with HTTP also support resuming an interrupted download as long as the browser supports it. Below is an example picture of the WebInterface from my demo site: https://www.crushftp.com/demo/ (login and password is "demo".) The WebInterface allows a user to very easily browse files with a web browser, choose files to download, and either download the files individually, or have CrushFTP zip them all as a single file as a user downloads them. My video demonstrates downloading a folder with 400 files in it in just a matter of seconds. The WebInterface also allows a user to use the browser uploader to upload files, or the advanced CrushUploader to upload multiple files at once. It even supports drag and drop / copy and paste so the user can easily upload files. The video demonstrates uploading a folder with 400 files in it as a single .zip that's done automatically on the fly in just a matter of seconds. Its much faster than normal FTP when dealing with many files. The CrushFTP Uploader also supports resume uploads. So if a transfer fails in the middle, it will attempt to restart where it left off. Or if you close your browser and re-open it, it can still resume from where it left off. Resume uploads are also supported on items that are being zipped automatically. As long as you don't change the files being zipped, an automatic .zip can be resumed. Forgot Password The WebInterface also has the ability to allow users to request their password when they forget it. They still need to know their username though. To allow this to work, you must first configure your server to allow this. In the main preferences, you can set the default SMTP server, SMTP user, and SMTP password. The email address where the password will be sent is the email in the upper right of the Events tab of the User Manager. Lastly, you must grant the email password option under the admin tab of the User Manager. Once that is setup, then passwords can be emailed out when requested.
Transcript of CrushFTP4 Documentation · Welcome to the CrushFTP4 documentation! The documentation is laid out so...
CrushFTP4 DocumentationWelcome to the CrushFTP4 documentation! The documentation is laid out so that it is easily searchable. It follows the order as such: WebInterface, Main Window, Preferences, UserManager, and User Data File Structure. Each tab of CrushFTP is listed in this document so that you can just search on the tab's name to easily find its section. Every field is listed as well so you may also search on individual settings of the server or user manager too.
Training VideosThere is a quick start video to get you up and running very easily with CrushFTP. The video is only a few minutes long, but it runs through everything you need to do to get your server up and running. There are also more advanced videos showing you how to use some of the WebInterface, remote administration, setting of a domain name that point to your server, using the built in reports, and a few of the plugins. They are definitely worth checking out. You will just need Quicktime 7 to view them since they are using the H.264 codec to allow for high quality in a very small size. There is no charge for the videos.
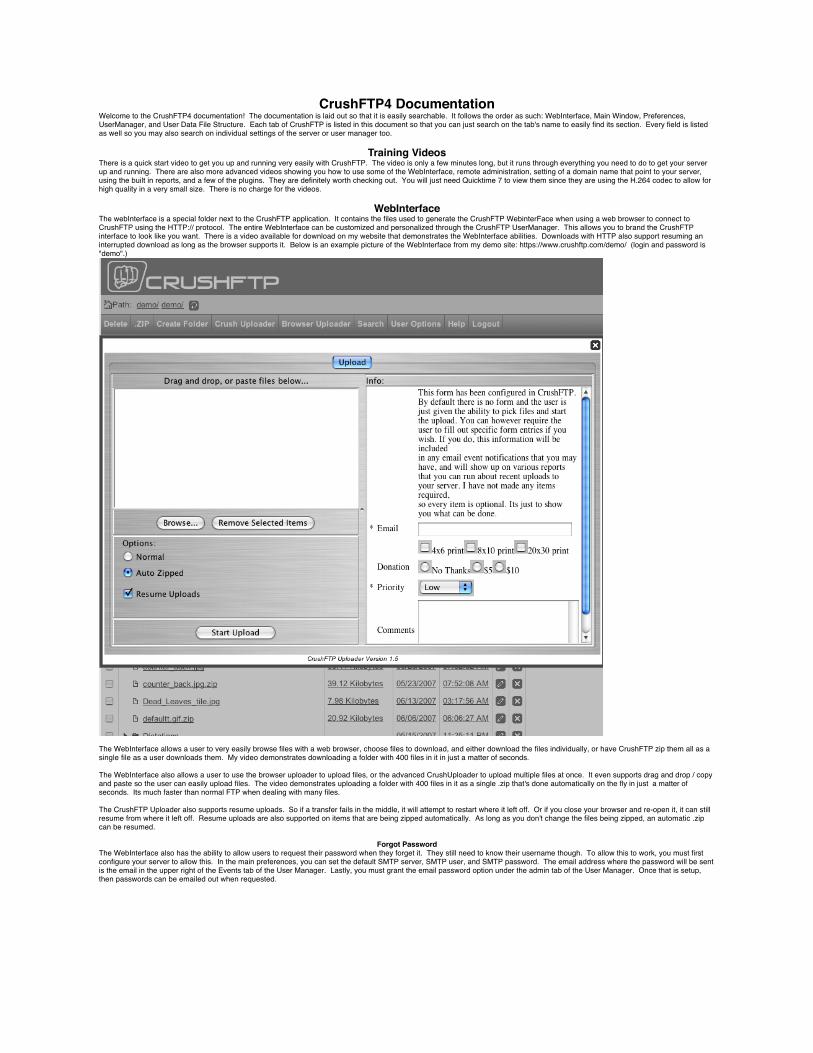
WebInterfaceThe webInterface is a special folder next to the CrushFTP application. It contains the files used to generate the CrushFTP WebinterFace when using a web browser to connect to CrushFTP using the HTTP:// protocol. The entire WebInterface can be customized and personalized through the CrushFTP UserManager. This allows you to brand the CrushFTP interface to look like you want. There is a video available for download on my website that demonstrates the WebInterface abilities. Downloads with HTTP also support resuming an interrupted download as long as the browser supports it. Below is an example picture of the WebInterface from my demo site: https://www.crushftp.com/demo/ (login and password is "demo".)
The WebInterface allows a user to very easily browse files with a web browser, choose files to download, and either download the files individually, or have CrushFTP zip them all as a single file as a user downloads them. My video demonstrates downloading a folder with 400 files in it in just a matter of seconds.
The WebInterface also allows a user to use the browser uploader to upload files, or the advanced CrushUploader to upload multiple files at once. It even supports drag and drop / copy and paste so the user can easily upload files. The video demonstrates uploading a folder with 400 files in it as a single .zip that's done automatically on the fly in just a matter of seconds. Its much faster than normal FTP when dealing with many files.
The CrushFTP Uploader also supports resume uploads. So if a transfer fails in the middle, it will attempt to restart where it left off. Or if you close your browser and re-open it, it can still resume from where it left off. Resume uploads are also supported on items that are being zipped automatically. As long as you don't change the files being zipped, an automatic .zip can be resumed.
Forgot PasswordThe WebInterface also has the ability to allow users to request their password when they forget it. They still need to know their username though. To allow this to work, you must first configure your server to allow this. In the main preferences, you can set the default SMTP server, SMTP user, and SMTP password. The email address where the password will be sent is the email in the upper right of the Events tab of the User Manager. Lastly, you must grant the email password option under the admin tab of the User Manager. Once that is setup, then passwords can be emailed out when requested.
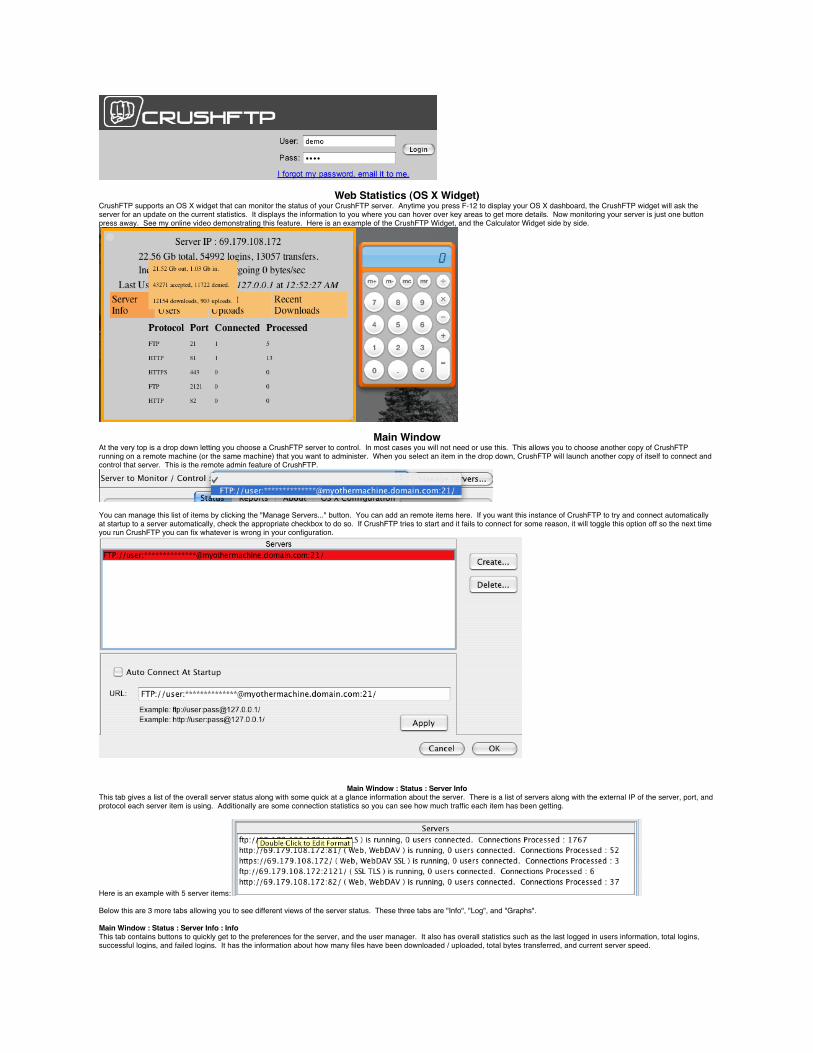
Web Statistics (OS X Widget)CrushFTP supports an OS X widget that can monitor the status of your CrushFTP server. Anytime you press F-12 to display your OS X dashboard, the CrushFTP widget will ask the server for an update on the current statistics. It displays the information to you where you can hover over key areas to get more details. Now monitoring your server is just one button press away. See my online video demonstrating this feature. Here is an example of the CrushFTP Widget, and the Calculator Widget side by side.
Main WindowAt the very top is a drop down letting you choose a CrushFTP server to control. In most cases you will not need or use this. This allows you to choose another copy of CrushFTP running on a remote machine (or the same machine) that you want to administer. When you select an item in the drop down, CrushFTP will launch another copy of itself to connect and control that server. This is the remote admin feature of CrushFTP.
You can manage this list of items by clicking the "Manage Servers..." button. You can add an remote items here. If you want this instance of CrushFTP to try and connect automatically at startup to a server automatically, check the appropriate checkbox to do so. If CrushFTP tries to start and it fails to connect for some reason, it will toggle this option off so the next time you run CrushFTP you can fix whatever is wrong in your configuration.
Main Window : Status : Server InfoThis tab gives a list of the overall server status along with some quick at a glance information about the server. There is a list of servers along with the external IP of the server, port, and protocol each server item is using. Additionally are some connection statistics so you can see how much traffic each item has been getting.
Here is an example with 5 server items:
Below this are 3 more tabs allowing you to see different views of the server status. These three tabs are "Info", "Log", and "Graphs".
Main Window : Status : Server Info : InfoThis tab contains buttons to quickly get to the preferences for the server, and the user manager. It also has overall statistics such as the last logged in users information, total logins, successful logins, and failed logins. It has the information about how many files have been downloaded / uploaded, total bytes transferred, and current server speed.
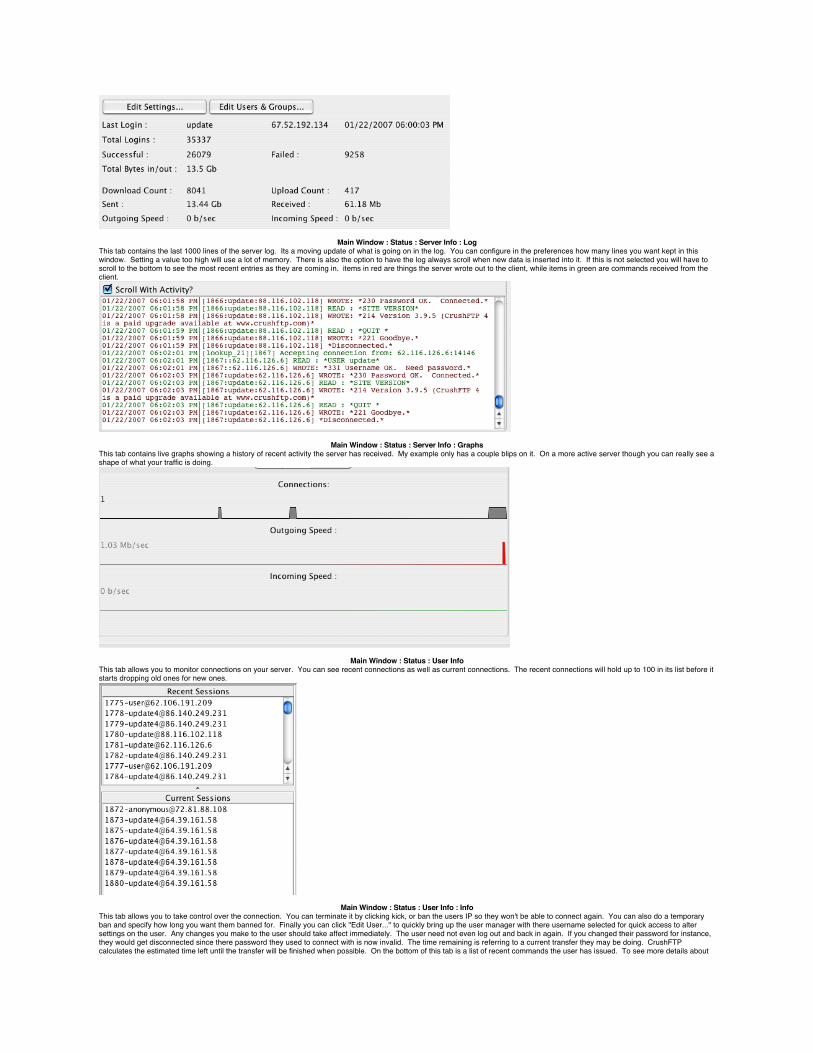
Main Window : Status : Server Info : LogThis tab contains the last 1000 lines of the server log. Its a moving update of what is going on in the log. You can configure in the preferences how many lines you want kept in this window. Setting a value too high will use a lot of memory. There is also the option to have the log always scroll when new data is inserted into it. If this is not selected you will have to scroll to the bottom to see the most recent entries as they are coming in. items in red are things the server wrote out to the client, while items in green are commands received from the client.
Main Window : Status : Server Info : GraphsThis tab contains live graphs showing a history of recent activity the server has received. My example only has a couple blips on it. On a more active server though you can really see a shape of what your traffic is doing.
Main Window : Status : User InfoThis tab allows you to monitor connections on your server. You can see recent connections as well as current connections. The recent connections will hold up to 100 in its list before it starts dropping old ones for new ones.
Main Window : Status : User Info : InfoThis tab allows you to take control over the connection. You can terminate it by clicking kick, or ban the users IP so they won't be able to connect again. You can also do a temporary ban and specify how long you want them banned for. Finally you can click "Edit User..." to quickly bring up the user manager with there username selected for quick access to alter settings on the user. Any changes you make to the user should take affect immediately. The user need not even log out and back in again. If you changed their password for instance, they would get disconnected since there password they used to connect with is now invalid. The time remaining is referring to a current transfer they may be doing. CrushFTP calculates the estimated time left until the transfer will be finished when possible. On the bottom of this tab is a list of recent commands the user has issued. To see more details about

the commands, you can click on the log tab to see all the details.
Main Window : Status : User Info : LogThis tab is the same as the server log above, except it only contains the individual users session information. The main server log can be a little mixed showing every users activity as it is happening.
Main Window : ReportsThis tab contains the reporting interface of CrushFTP. There are many built in reports that you can run to monitor what your server is doing, and what your users are doing. Its vastly easier to get a summary view of your server with the reports than by searching through the log. Here are a few of the reports that are available.
Each report that you choose may or may not have configuration items that go with it. There are also some more general configuration choices such as start and end date that apply to every report. The specific options for each report show up on the bottom section. You may or may not see the section for refreshing the information. This section only appears when you are using remote administration. You can choose to have the report exported as a CSV file, otherwise by default it will be HTML. You can run the report by clicking the run button, or choose to save it to a specific location.
There is also an advanced scheduling interface for the reports. This lets you configure the reports once, and set a schedule of when you want that report configuration run. The interface is flexible letting you choose days of the month, weekdays, time of day, etc. It works by setting up the report under the setup tab, then clicking the snapshot button to generate a schedule for the report. You can click the test schedule button to verify everything is filled out and sample what the report will look like.
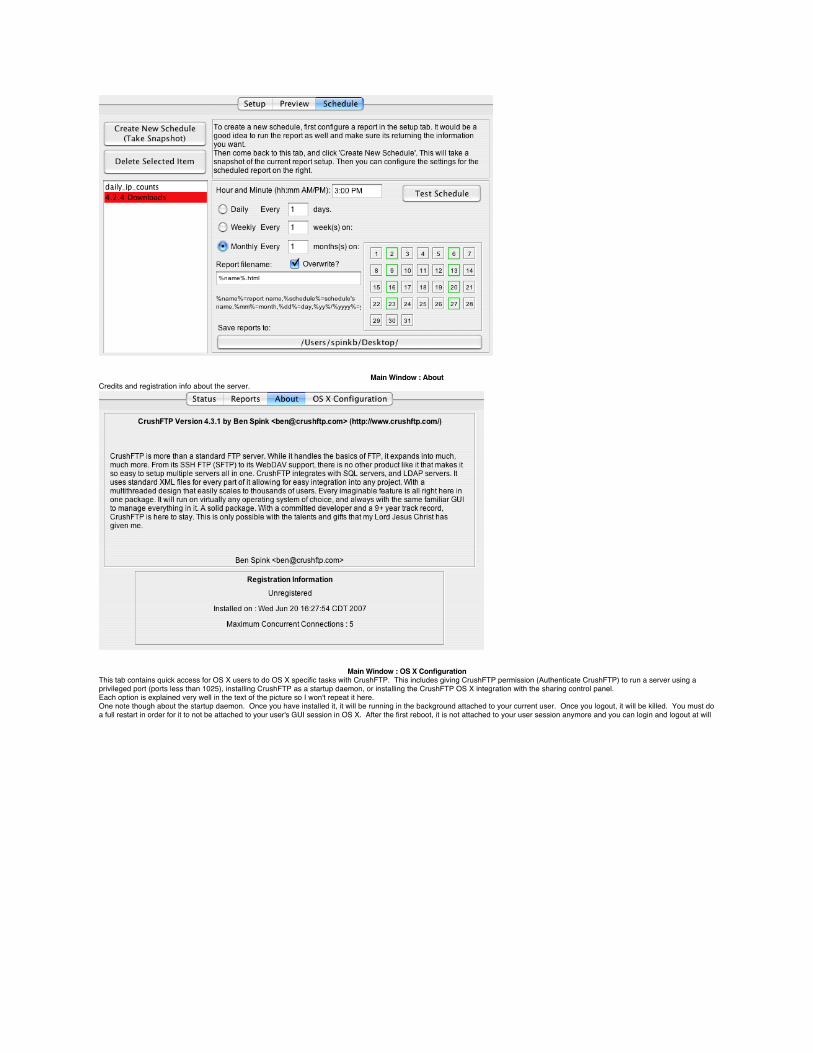
Main Window : AboutCredits and registration info about the server.
Main Window : OS X ConfigurationThis tab contains quick access for OS X users to do OS X specific tasks with CrushFTP. This includes giving CrushFTP permission (Authenticate CrushFTP) to run a server using a privileged port (ports less than 1025), installing CrushFTP as a startup daemon, or installing the CrushFTP OS X integration with the sharing control panel.Each option is explained very well in the text of the picture so I won't repeat it here.One note though about the startup daemon. Once you have installed it, it will be running in the background attached to your current user. Once you logout, it will be killed. You must do a full restart in order for it to not be attached to your user's GUI session in OS X. After the first reboot, it is not attached to your user session anymore and you can login and logout at will
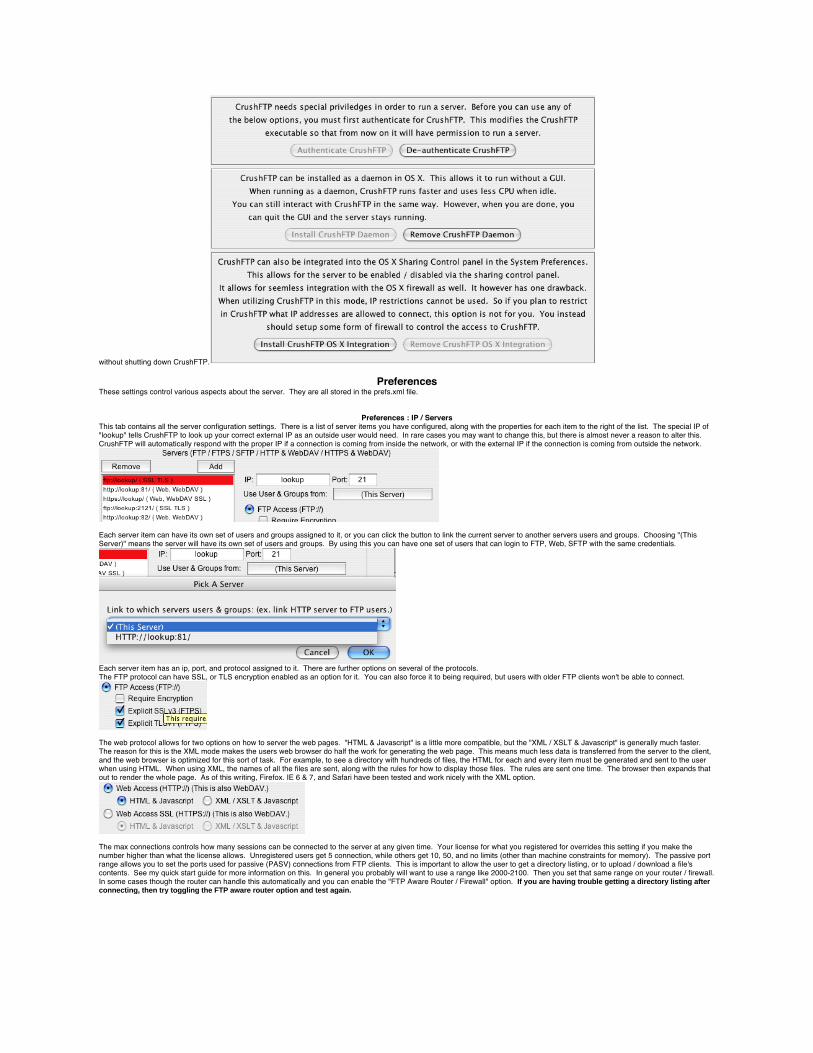
without shutting down CrushFTP.
PreferencesThese settings control various aspects about the server. They are all stored in the prefs.xml file.
Preferences : IP / ServersThis tab contains all the server configuration settings. There is a list of server items you have configured, along with the properties for each item to the right of the list. The special IP of "lookup" tells CrushFTP to look up your correct external IP as an outside user would need. In rare cases you may want to change this, but there is almost never a reason to alter this. CrushFTP will automatically respond with the proper IP if a connection is coming from inside the network, or with the external IP if the connection is coming from outside the network.
Each server item can have its own set of users and groups assigned to it, or you can click the button to link the current server to another servers users and groups. Choosing "(This Server)" means the server will have its own set of users and groups. By using this you can have one set of users that can login to FTP, Web, SFTP with the same credentials.
Each server item has an ip, port, and protocol assigned to it. There are further options on several of the protocols.The FTP protocol can have SSL, or TLS encryption enabled as an option for it. You can also force it to being required, but users with older FTP clients won't be able to connect.
The web protocol allows for two options on how to server the web pages. "HTML & Javascript" is a little more compatible, but the "XML / XSLT & Javascript" is generally much faster. The reason for this is the XML mode makes the users web browser do half the work for generating the web page. This means much less data is transferred from the server to the client, and the web browser is optimized for this sort of task. For example, to see a directory with hundreds of files, the HTML for each and every item must be generated and sent to the user when using HTML. When using XML, the names of all the files are sent, along with the rules for how to display those files. The rules are sent one time. The browser then expands that out to render the whole page. As of this writing, Firefox. IE 6 & 7, and Safari have been tested and work nicely with the XML option.
The max connections controls how many sessions can be connected to the server at any given time. Your license for what you registered for overrides this setting if you make the number higher than what the license allows. Unregistered users get 5 connection, while others get 10, 50, and no limits (other than machine constraints for memory). The passive port range allows you to set the ports used for passive (PASV) connections from FTP clients. This is important to allow the user to get a directory listing, or to upload / download a file's contents. See my quick start guide for more information on this. In general you probably will want to use a range like 2000-2100. Then you set that same range on your router / firewall. In some cases though the router can handle this automatically and you can enable the "FTP Aware Router / Firewall" option. If you are having trouble getting a directory listing after connecting, then try toggling the FTP aware router option and test again.
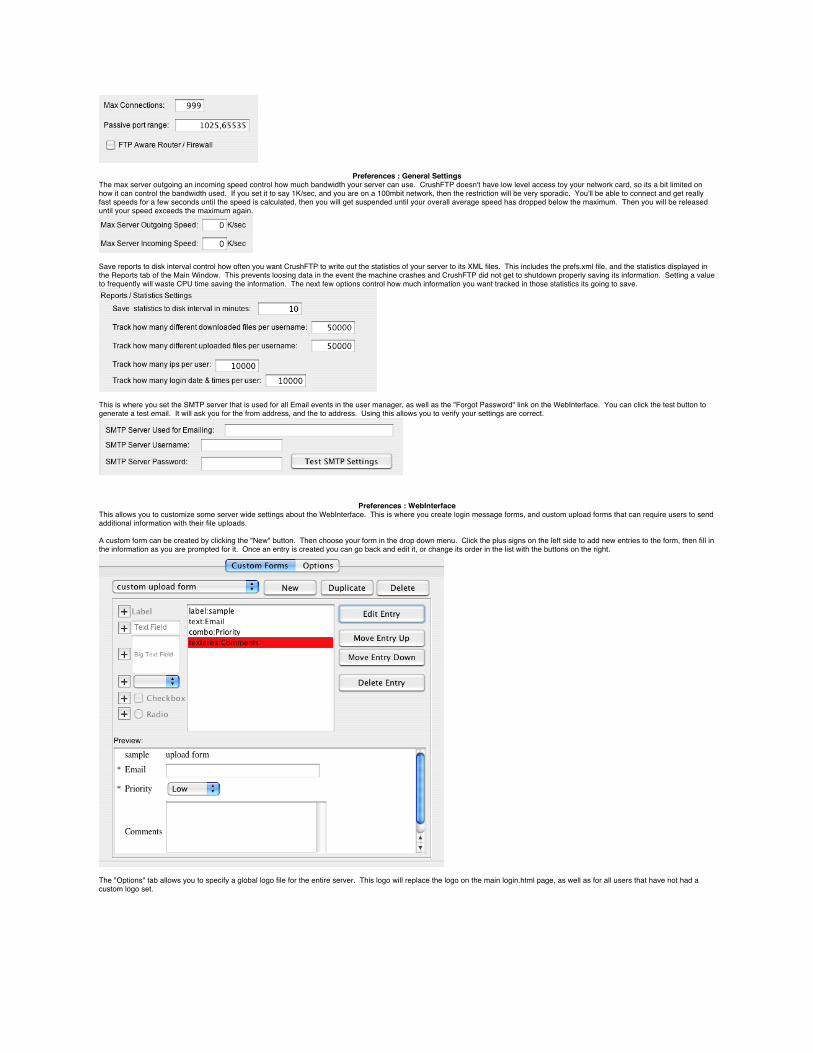
Preferences : General SettingsThe max server outgoing an incoming speed control how much bandwidth your server can use. CrushFTP doesn't have low level access toy your network card, so its a bit limited on how it can control the bandwidth used. If you set it to say 1K/sec, and you are on a 100mbit network, then the restriction will be very sporadic. You'll be able to connect and get really fast speeds for a few seconds until the speed is calculated, then you will get suspended until your overall average speed has dropped below the maximum. Then you will be released until your speed exceeds the maximum again.
Save reports to disk interval control how often you want CrushFTP to write out the statistics of your server to its XML files. This includes the prefs.xml file, and the statistics displayed in the Reports tab of the Main Window. This prevents loosing data in the event the machine crashes and CrushFTP did not get to shutdown properly saving its information. Setting a value to frequently will waste CPU time saving the information. The next few options control how much information you want tracked in those statistics its going to save.
This is where you set the SMTP server that is used for all Email events in the user manager, as well as the "Forgot Password" link on the WebInterface. You can click the test button to generate a test email. It will ask you for the from address, and the to address. Using this allows you to verify your settings are correct.
Preferences : WebInterfaceThis allows you to customize some server wide settings about the WebInterface. This is where you create login message forms, and custom upload forms that can require users to send additional information with their file uploads.
A custom form can be created by clicking the "New" button. Then choose your form in the drop down menu. Click the plus signs on the left side to add new entries to the form, then fill in the information as you are prompted for it. Once an entry is created you can go back and edit it, or change its order in the list with the buttons on the right.
The "Options" tab allows you to specify a global logo file for the entire server. This logo will replace the logo on the main login.html page, as well as for all users that have not had a custom logo set.
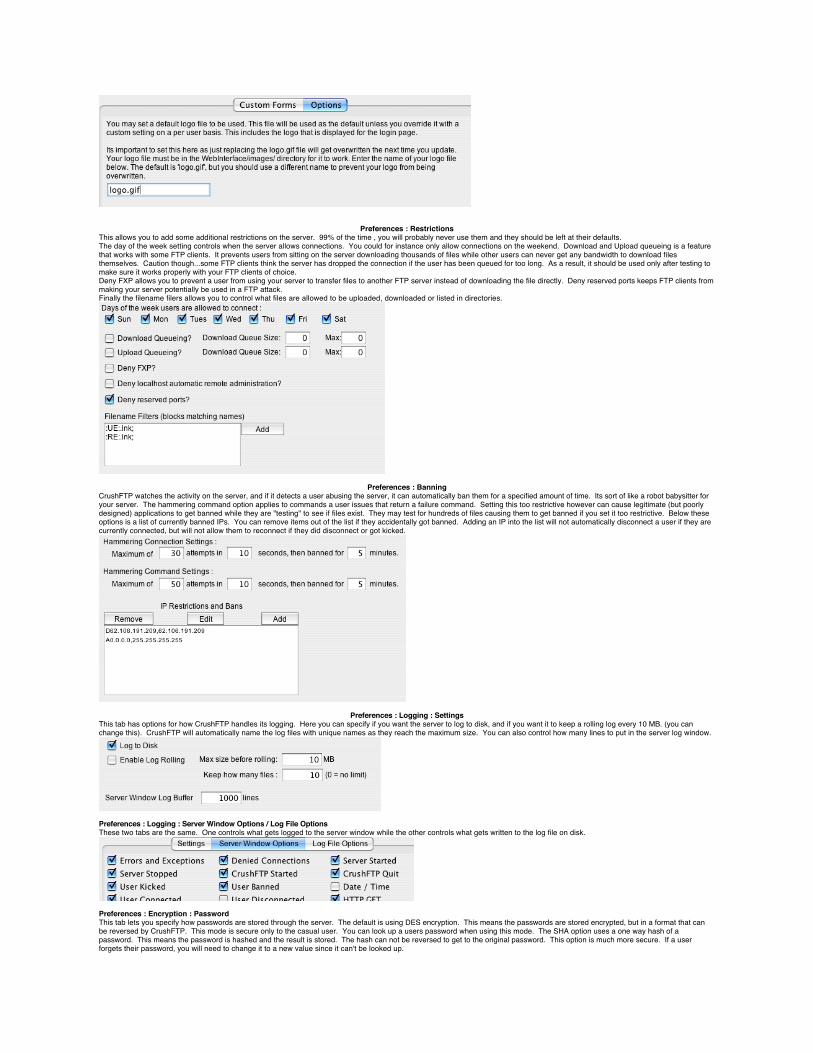
Preferences : RestrictionsThis allows you to add some additional restrictions on the server. 99% of the time , you will probably never use them and they should be left at their defaults.The day of the week setting controls when the server allows connections. You could for instance only allow connections on the weekend. Download and Upload queueing is a feature that works with some FTP clients. It prevents users from sitting on the server downloading thousands of files while other users can never get any bandwidth to download files themselves. Caution though...some FTP clients think the server has dropped the connection if the user has been queued for too long. As a result, it should be used only after testing to make sure it works properly with your FTP clients of choice.Deny FXP allows you to prevent a user from using your server to transfer files to another FTP server instead of downloading the file directly. Deny reserved ports keeps FTP clients from making your server potentially be used in a FTP attack.Finally the filename filers allows you to control what files are allowed to be uploaded, downloaded or listed in directories.
Preferences : BanningCrushFTP watches the activity on the server, and if it detects a user abusing the server, it can automatically ban them for a specified amount of time. Its sort of like a robot babysitter for your server. The hammering command option applies to commands a user issues that return a failure command. Setting this too restrictive however can cause legitimate (but poorly designed) applications to get banned while they are "testing" to see if files exist. They may test for hundreds of files causing them to get banned if you set it too restrictive. Below these options is a list of currently banned IPs. You can remove items out of the list if they accidentally got banned. Adding an IP into the list will not automatically disconnect a user if they are currently connected, but will not allow them to reconnect if they did disconnect or got kicked.
Preferences : Logging : SettingsThis tab has options for how CrushFTP handles its logging. Here you can specify if you want the server to log to disk, and if you want it to keep a rolling log every 10 MB. (you can change this). CrushFTP will automatically name the log files with unique names as they reach the maximum size. You can also control how many lines to put in the server log window.
Preferences : Logging : Server Window Options / Log File OptionsThese two tabs are the same. One controls what gets logged to the server window while the other controls what gets written to the log file on disk.
Preferences : Encryption : PasswordThis tab lets you specify how passwords are stored through the server. The default is using DES encryption. This means the passwords are stored encrypted, but in a format that can be reversed by CrushFTP. This mode is secure only to the casual user. You can look up a users password when using this mode. The SHA option uses a one way hash of a password. This means the password is hashed and the result is stored. The hash can not be reversed to get to the original password. This option is much more secure. If a user forgets their password, you will need to change it to a new value since it can't be looked up.
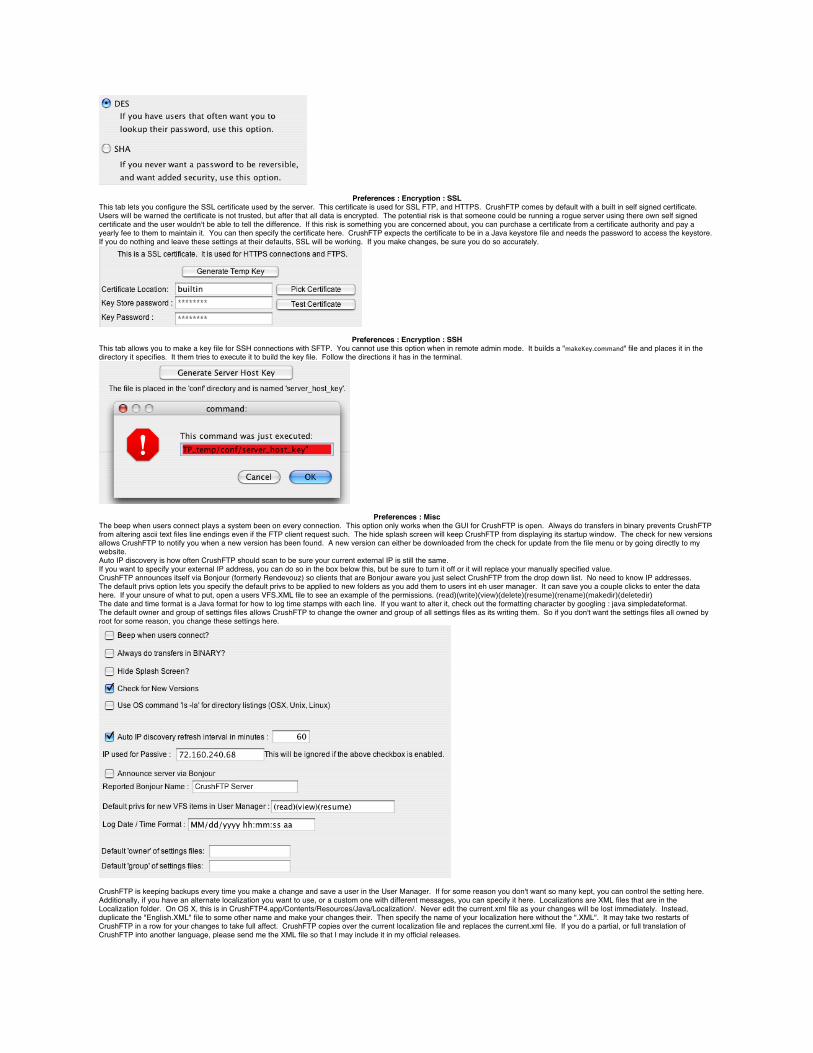
Preferences : Encryption : SSLThis tab lets you configure the SSL certificate used by the server. This certificate is used for SSL FTP, and HTTPS. CrushFTP comes by default with a built in self signed certificate. Users will be warned the certificate is not trusted, but after that all data is encrypted. The potential risk is that someone could be running a rogue server using there own self signed certificate and the user wouldn't be able to tell the difference. If this risk is something you are concerned about, you can purchase a certificate from a certificate authority and pay a yearly fee to them to maintain it. You can then specify the certificate here. CrushFTP expects the certificate to be in a Java keystore file and needs the password to access the keystore. If you do nothing and leave these settings at their defaults, SSL will be working. If you make changes, be sure you do so accurately.
Preferences : Encryption : SSHThis tab allows you to make a key file for SSH connections with SFTP. You cannot use this option when in remote admin mode. It builds a "makeKey.command" file and places it in the directory it specifies. It them tries to execute it to build the key file. Follow the directions it has in the terminal.
Preferences : MiscThe beep when users connect plays a system been on every connection. This option only works when the GUI for CrushFTP is open. Always do transfers in binary prevents CrushFTP from altering ascii text files line endings even if the FTP client request such. The hide splash screen will keep CrushFTP from displaying its startup window. The check for new versions allows CrushFTP to notify you when a new version has been found. A new version can either be downloaded from the check for update from the file menu or by going directly to my website.Auto IP discovery is how often CrushFTP should scan to be sure your current external IP is still the same.If you want to specify your external IP address, you can do so in the box below this, but be sure to turn it off or it will replace your manually specified value.CrushFTP announces itself via Bonjour (formerly Rendevouz) so clients that are Bonjour aware you just select CrushFTP from the drop down list. No need to know IP addresses.The default privs option lets you specify the default privs to be applied to new folders as you add them to users int eh user manager. It can save you a couple clicks to enter the data here. If your unsure of what to put, open a users VFS.XML file to see an example of the permissions. (read)(write)(view)(delete)(resume)(rename)(makedir)(deletedir)The date and time format is a Java format for how to log time stamps with each line. If you want to alter it, check out the formatting character by googling : java simpledateformat.The default owner and group of settings files allows CrushFTP to change the owner and group of all settings files as its writing them. So if you don't want the settings files all owned by root for some reason, you change these settings here.
CrushFTP is keeping backups every time you make a change and save a user in the User Manager. If for some reason you don't want so many kept, you can control the setting here. Additionally, if you have an alternate localization you want to use, or a custom one with different messages, you can specify it here. Localizations are XML files that are in the Localization folder. On OS X, this is in CrushFTP4.app/Contents/Resources/Java/Localization/. Never edit the current.xml file as your changes will be lost immediately. Instead, duplicate the "English.XML" file to some other name and make your changes their. Then specify the name of your localization here without the ".XML". It may take two restarts of CrushFTP in a row for your changes to take full affect. CrushFTP copies over the current localization file and replaces the current.xml file. If you do a partial, or full translation of CrushFTP into another language, please send me the XML file so that I may include it in my official releases.
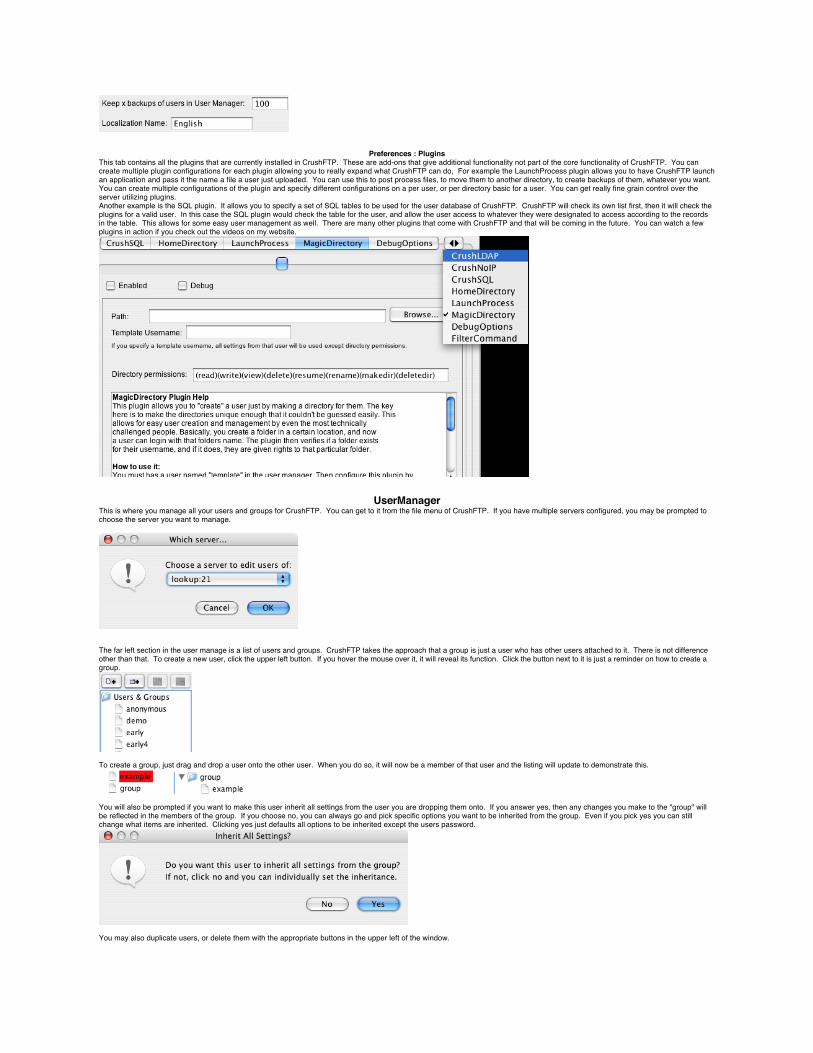
Preferences : PluginsThis tab contains all the plugins that are currently installed in CrushFTP. These are add-ons that give additional functionality not part of the core functionality of CrushFTP. You can create multiple plugin configurations for each plugin allowing you to really expand what CrushFTP can do, For example the LaunchProcess plugin allows you to have CrushFTP launch an application and pass it the name a file a user just uploaded. You can use this to post process files, to move them to another directory, to create backups of them, whatever you want. You can create multiple configurations of the plugin and specify different configurations on a per user, or per directory basic for a user. You can get really fine grain control over the server utilizing plugins.Another example is the SQL plugin. It allows you to specify a set of SQL tables to be used for the user database of CrushFTP. CrushFTP will check its own list first, then it will check the plugins for a valid user. In this case the SQL plugin would check the table for the user, and allow the user access to whatever they were designated to access according to the records in the table. This allows for some easy user management as well. There are many other plugins that come with CrushFTP and that will be coming in the future. You can watch a few plugins in action if you check out the videos on my website.
UserManagerThis is where you manage all your users and groups for CrushFTP. You can get to it from the file menu of CrushFTP. If you have multiple servers configured, you may be prompted to choose the server you want to manage.
The far left section in the user manage is a list of users and groups. CrushFTP takes the approach that a group is just a user who has other users attached to it. There is not difference other than that. To create a new user, click the upper left button. If you hover the mouse over it, it will reveal its function. Click the button next to it is just a reminder on how to create a group.
To create a group, just drag and drop a user onto the other user. When you do so, it will now be a member of that user and the listing will update to demonstrate this.
You will also be prompted if you want to make this user inherit all settings from the user you are dropping them onto. If you answer yes, then any changes you make to the "group" will be reflected in the members of the group. If you choose no, you can always go and pick specific options you want to be inherited from the group. Even if you pick yes you can still change what items are inherited. Clicking yes just defaults all options to be inherited except the users password.
You may also duplicate users, or delete them with the appropriate buttons in the upper left of the window.

Always remember to click the "Save All Changes Made" button after editing a user. If you forget CrushFTP will prompt you asking if you want to save changes.
UserManager : Setup
Clicking on a user enables access to edit their settings to the right of the user list. You can edit their username, set their password, or choose to have CrushFTP assign whatever password they use on their first login to be their password from then on.
Below this is the setup for the user's virtual file system (VFS). The left side has a list of directories you can browse that represent your local machines hard drives and servers. This is the "Server's Files". Double click on an item to open it. Use the drop down menu to go back up a level. In general, you will only use this list if you are connected with remote administration. You can drag items from this left side over to the right side which is the users VFS. So for instance, I could drag "Crush" over to the right.
The top item here is a drop down list of users. You can use this to make this setting inherit its value from the user you choose. By leaving it as "(this user)", it is not inheriting from anyone and has its own setting. In the VFS below it, I have added the single item named "Crush" which is a hard drive on my system. Its displayed as a "VDir" because its a virtual directory. If I double click on it, you will see the real contents of it and their types will be either "DIR" or "FILE". You may also right click on items in this list to edit their properties, or to assign an event to the folder. See below for what event options are available. This VFS area supports drag and drop. Either from the left side of the user manager, or directly from the Finder / Explorer to this area. This makes it extremely easy to just drop a folder and the user now has access to it.
The items to the right are the permissions for the selected item. I have given full access to the folder "Crush". Most of the permissions are self explanatory.The resume permission allows users to resume a transfer, either upload or download. Invisible makes an item "hidden" from the users view. If you tell them its there though, they can still access it by typing in the path to it manually. To remove access to an item completely, you need to make it invisible, and turn off all other options. Encode, means the item will always be encoded in MacBinary format even if the user does not use a FTP client that requests it as such. Purge partial goes along with a settings we will get to later. It will remove uploads that didn't complete after a specified amount of time. Purge all will remove all uploaded files after a specified amount of time. Bypass queue allows users to download for example a read me file without being placed in a waiting queue if one is configured in the server preferences. Free ratio allows for the same sort of function, but it refers to if you have a ratio set. An finally Quota is a integer value for how many credits the user has available for this directory. A quota is only calculated based on files that come in and out of the CrushFTP server. If you make changes to the directory locally, it will not be reflected here.The "Inherit / Reset" button removes any custom settings on the selected item, and makes it inherit its permissions from its parent.
If you want to control access for items contained inside the root item, you may do so. Browse to a folder you want to change the access on, and click the appropriate access for it. Items appearing in gray on the left are items that are not Virtual items, but real items. You cannot change their names or get properties on them. You can however change there permissions. You'll notice on the right side the options are gray. This is because the item selected (Desktop) is inheriting its setting from the parent item. If I change a checkbox here, then the items will no longer be gray as its not inheriting anymore. If you want to go back to inheriting, click the "Inherit / Reset" button.
VFS Linking and ChainingThis advanced feature allows you to have a master user or group that shares its VFS with other users. This means you can make a change once, and all users who are linking to the VFS will now have the change. You might wonder what the difference is between this and the normal inheriting another users VFS? The differences i you can chain multiple users VFS together to make a single larger VFS. So a user could be a member of the "uploads" group, and a member of the "admin" group, and a member of the "downloads" group. While another user may only be a member of the "downloads" group. The option by default is hidden. You must expand the minimized pane thats on the bottom of the VFS list.
Then you will see something similar to this. In this example, I have added the "update" group's VFS to my "demo" users normal file system.
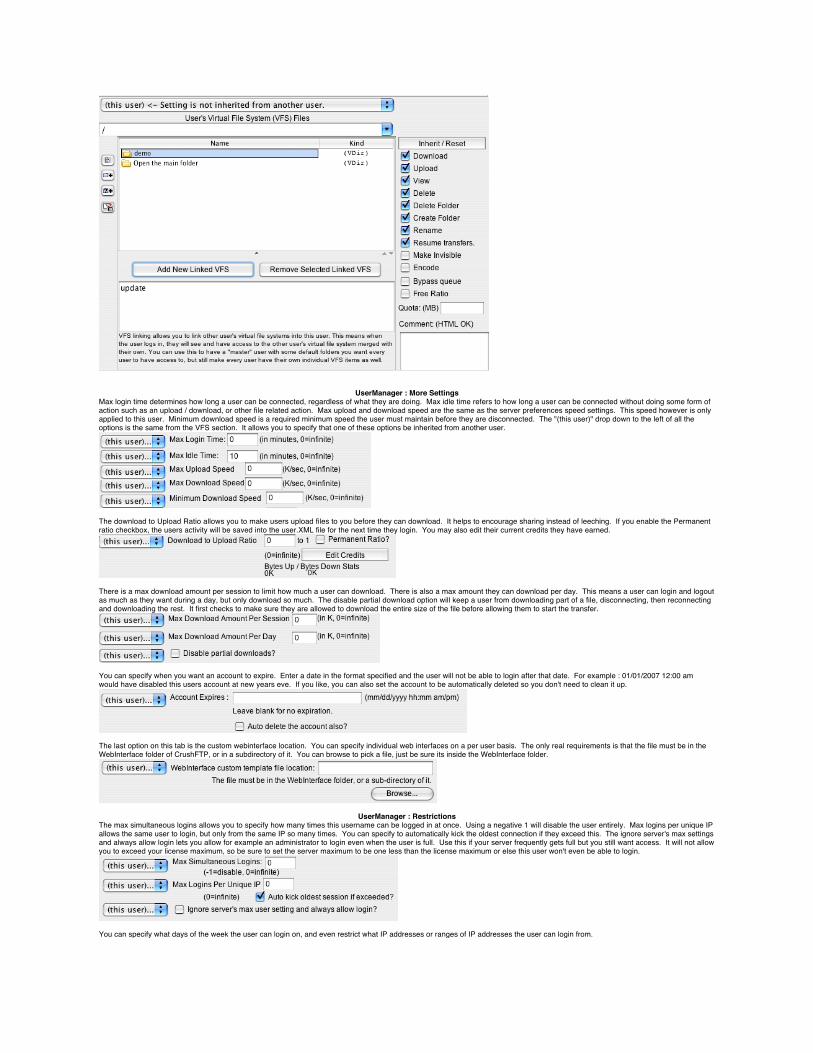
UserManager : More SettingsMax login time determines how long a user can be connected, regardless of what they are doing. Max idle time refers to how long a user can be connected without doing some form of action such as an upload / download, or other file related action. Max upload and download speed are the same as the server preferences speed settings. This speed however is only applied to this user. Minimum download speed is a required minimum speed the user must maintain before they are disconnected. The "(this user)" drop down to the left of all the options is the same from the VFS section. It allows you to specify that one of these options be inherited from another user.
The download to Upload Ratio allows you to make users upload files to you before they can download. It helps to encourage sharing instead of leeching. If you enable the Permanent ratio checkbox, the users activity will be saved into the user.XML file for the next time they login. You may also edit their current credits they have earned.
There is a max download amount per session to limit how much a user can download. There is also a max amount they can download per day. This means a user can login and logout as much as they want during a day, but only download so much. The disable partial download option will keep a user from downloading part of a file, disconnecting, then reconnecting and downloading the rest. It first checks to make sure they are allowed to download the entire size of the file before allowing them to start the transfer.
You can specify when you want an account to expire. Enter a date in the format specified and the user will not be able to login after that date. For example : 01/01/2007 12:00 am would have disabled this users account at new years eve. If you like, you can also set the account to be automatically deleted so you don't need to clean it up.
The last option on this tab is the custom webinterface location. You can specify individual web interfaces on a per user basis. The only real requirements is that the file must be in the WebInterface folder of CrushFTP, or in a subdirectory of it. You can browse to pick a file, just be sure its inside the WebInterface folder.
UserManager : RestrictionsThe max simultaneous logins allows you to specify how many times this username can be logged in at once. Using a negative 1 will disable the user entirely. Max logins per unique IP allows the same user to login, but only from the same IP so many times. You can specify to automatically kick the oldest connection if they exceed this. The ignore server's max settings and always allow login lets you allow for example an administrator to login even when the user is full. Use this if your server frequently gets full but you still want access. It will not allow you to exceed your license maximum, so be sure to set the server maximum to be one less than the license maximum or else this user won't even be able to login.
You can specify what days of the week the user can login on, and even restrict what IP addresses or ranges of IP addresses the user can login from.
The require encryption option will deny the user the opportunity to send their password if they are not using a secure connection. When a user goes to login, if this option is enabled, CrushFTP won't accept their username if they aren't using a secure connection (SSL).
UserManager : AdminThese options allow access for an administrator to do various things. The SITE commands allows access from a FTP client to do some basic server administration from a command line. The server Remote Admin settings allow you to control who can connect and control the server with its GUI, or who can do the same but from the web interface.
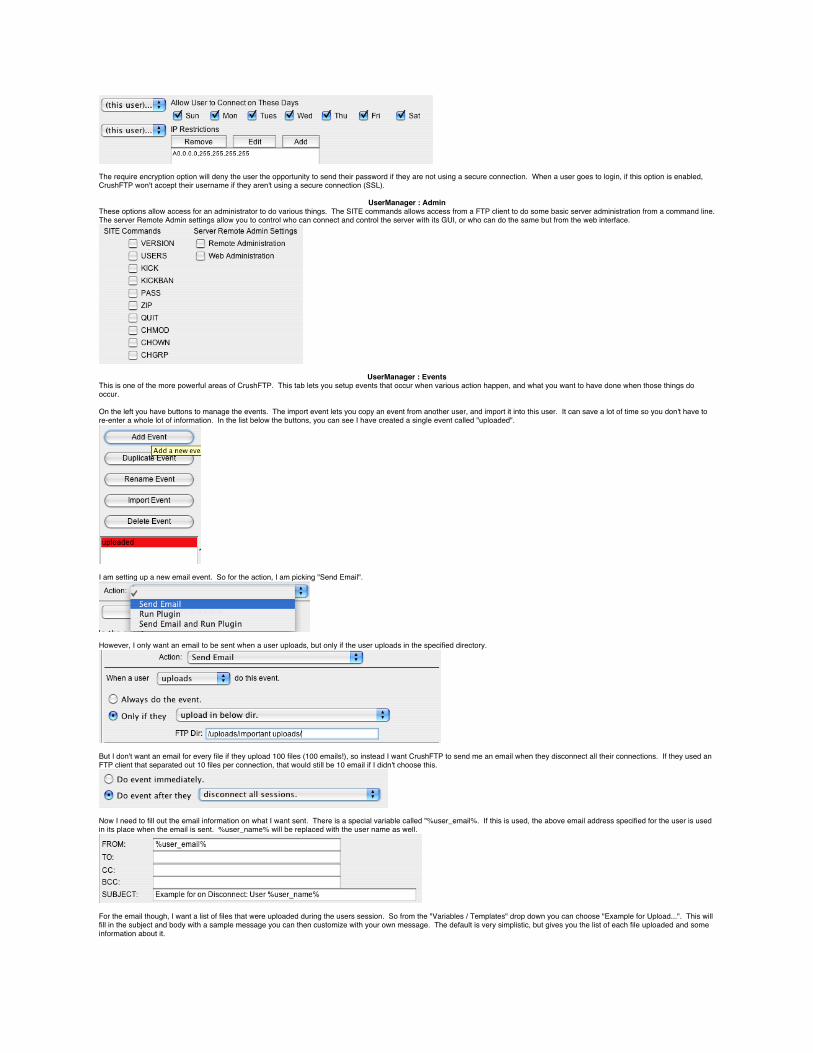
UserManager : EventsThis is one of the more powerful areas of CrushFTP. This tab lets you setup events that occur when various action happen, and what you want to have done when those things do occur.
On the left you have buttons to manage the events. The import event lets you copy an event from another user, and import it into this user. It can save a lot of time so you don't have to re-enter a whole lot of information. In the list below the buttons, you can see I have created a single event called "uploaded".
I am setting up a new email event. So for the action, I am picking "Send Email".
However, I only want an email to be sent when a user uploads, but only if the user uploads in the specified directory.
But I don't want an email for every file if they upload 100 files (100 emails!), so instead I want CrushFTP to send me an email when they disconnect all their connections. If they used an FTP client that separated out 10 files per connection, that would still be 10 email if I didn't choose this.
Now I need to fill out the email information on what I want sent. There is a special variable called "%user_email%. If this is used, the above email address specified for the user is used in its place when the email is sent. %user_name% will be replaced with the user name as well.
For the email though, I want a list of files that were uploaded during the users session. So from the "Variables / Templates" drop down you can choose "Example for Upload...". This will fill in the subject and body with a sample message you can then customize with your own message. The default is very simplistic, but gives you the list of each file uploaded and some information about it.
Everything inside the "<LINE></LINE>" tags will be repeated for each and every file uploaded. So in our example, there would be one email with 100 lines of text, each with the name and information about the file uploaded.
Don't forget to click apply, or your settings for the event will not be saved!
If instead of an email event I had chosen a plugin, or an email and plugin, then you would get the option to specify what plugin, or plugin config you wanted to run.
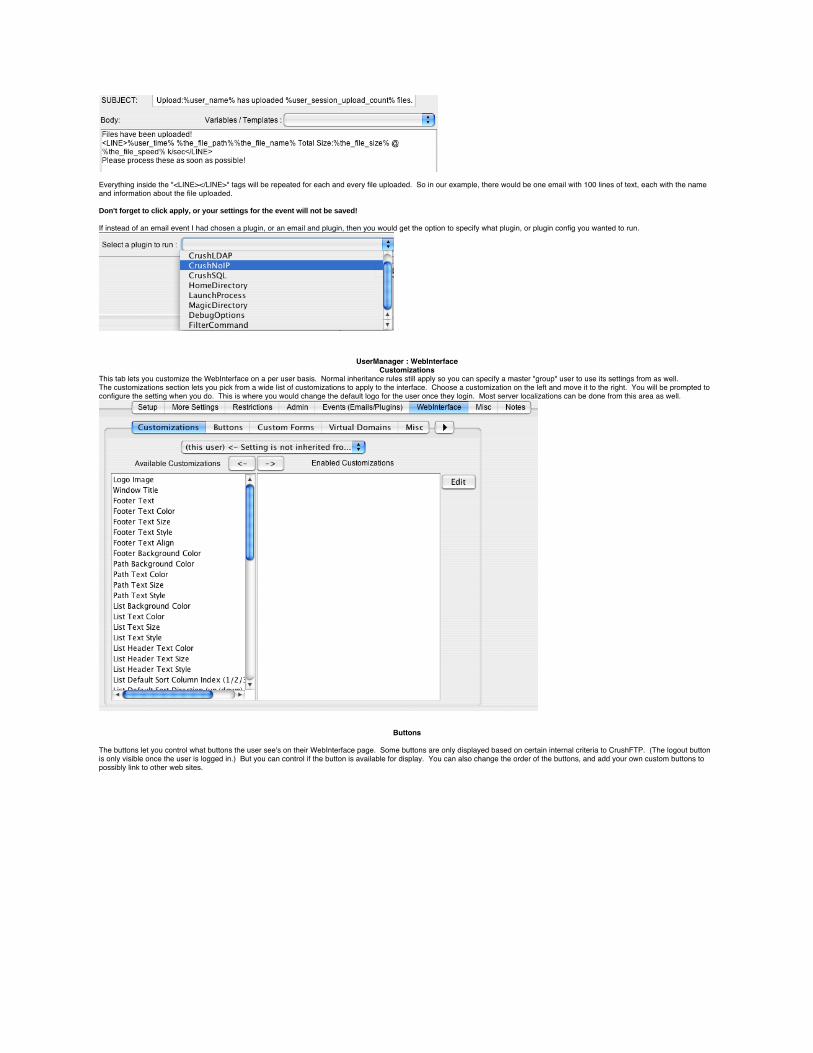
UserManager : WebInterfaceCustomizations
This tab lets you customize the WebInterface on a per user basis. Normal inheritance rules still apply so you can specify a master "group" user to use its settings from as well.The customizations section lets you pick from a wide list of customizations to apply to the interface. Choose a customization on the left and move it to the right. You will be prompted to configure the setting when you do. This is where you would change the default logo for the user once they login. Most server localizations can be done from this area as well.
Buttons
The buttons let you control what buttons the user see's on their WebInterface page. Some buttons are only displayed based on certain internal criteria to CrushFTP. (The logout button is only visible once the user is logged in.) But you can control if the button is available for display. You can also change the order of the buttons, and add your own custom buttons to possibly link to other web sites.
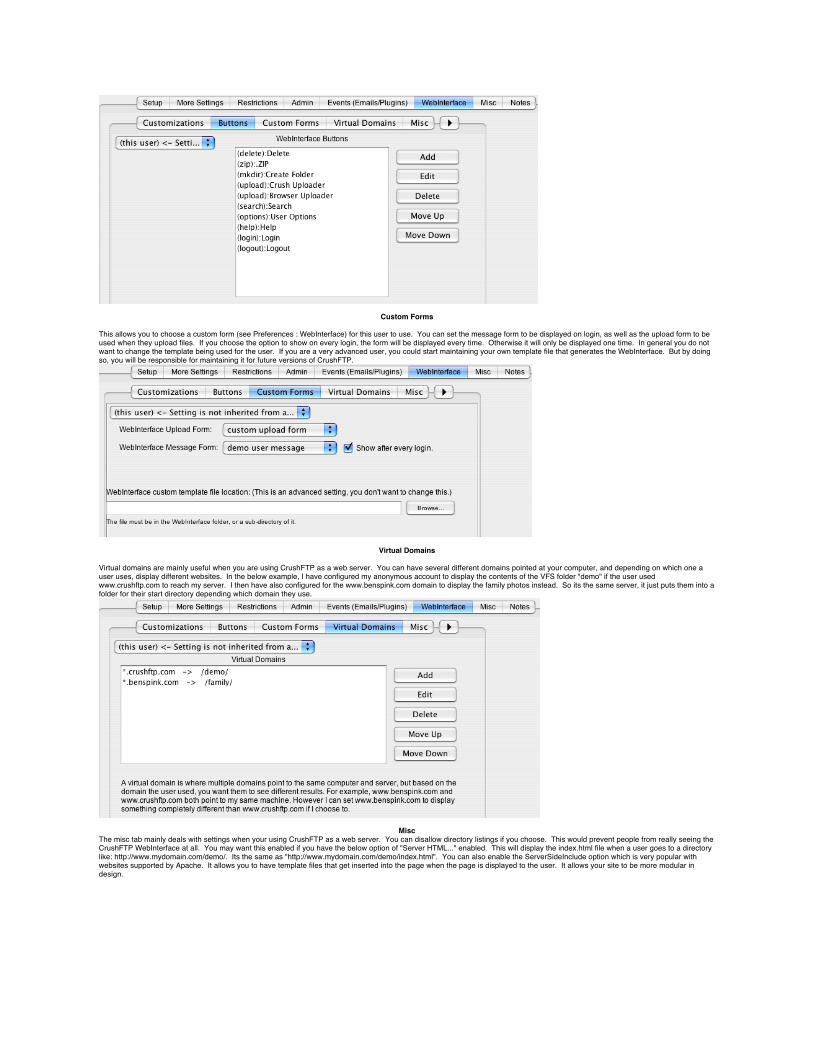
Custom Forms
This allows you to choose a custom form (see Preferences : WebInterface) for this user to use. You can set the message form to be displayed on login, as well as the upload form to be used when they upload files. If you choose the option to show on every login, the form will be displayed every time. Otherwise it will only be displayed one time. In general you do not want to change the template being used for the user. If you are a very advanced user, you could start maintaining your own template file that generates the WebInterface. But by doing so, you will be responsible for maintaining it for future versions of CrushFTP.
Virtual Domains
Virtual domains are mainly useful when you are using CrushFTP as a web server. You can have several different domains pointed at your computer, and depending on which one a user uses, display different websites. In the below example, I have configured my anonymous account to display the contents of the VFS folder "demo" if the user used www.crushftp.com to reach my server. I then have also configured for the www.benspink.com domain to display the family photos instead. So its the same server, it just puts them into a folder for their start directory depending which domain they use.
MiscThe misc tab mainly deals with settings when your using CrushFTP as a web server. You can disallow directory listings if you choose. This would prevent people from really seeing the CrushFTP WebInterface at all. You may want this enabled if you have the below option of "Server HTML..." enabled. This will display the index.html file when a user goes to a directory like: http://www.mydomain.com/demo/. Its the same as "http://www.mydomain.com/demo/index.html". You can also enable the ServerSideInclude option which is very popular with websites supported by Apache. It allows you to have template files that get inserted into the page when the page is displayed to the user. It allows your site to be more modular in design.
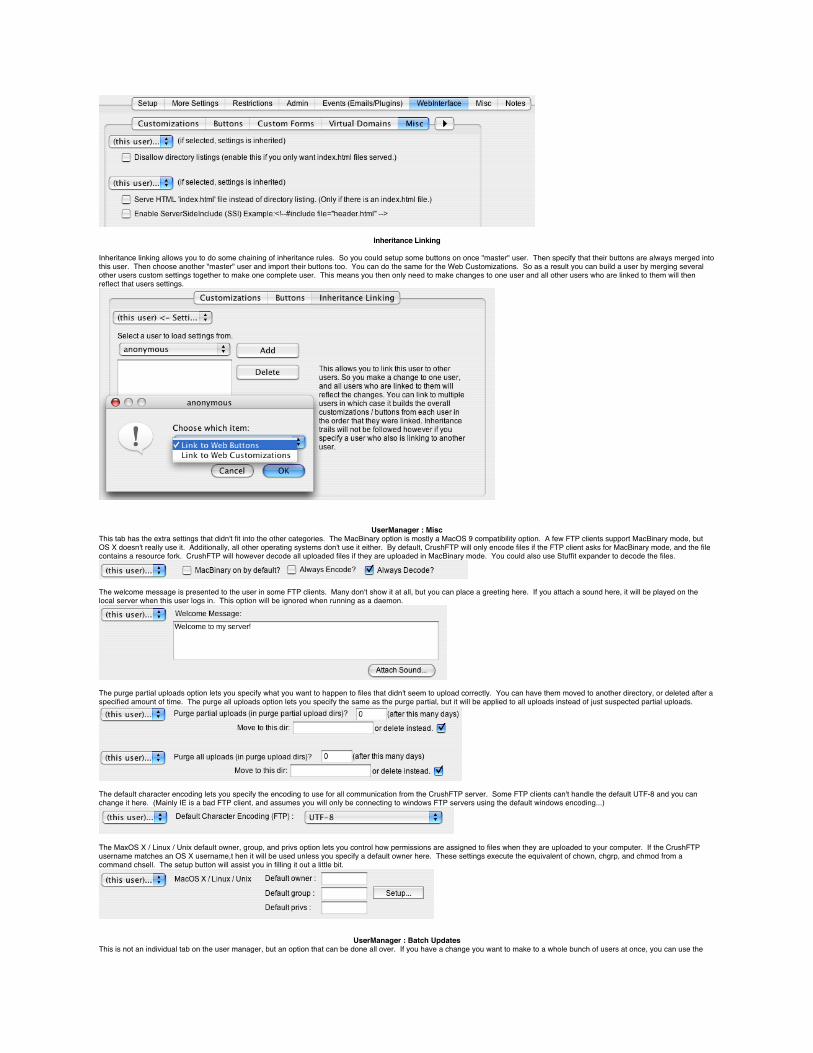
Inheritance Linking
Inheritance linking allows you to do some chaining of inheritance rules. So you could setup some buttons on once "master" user. Then specify that their buttons are always merged into this user. Then choose another "master" user and import their buttons too. You can do the same for the Web Customizations. So as a result you can build a user by merging several other users custom settings together to make one complete user. This means you then only need to make changes to one user and all other users who are linked to them will then reflect that users settings.
UserManager : MiscThis tab has the extra settings that didn't fit into the other categories. The MacBinary option is mostly a MacOS 9 compatibility option. A few FTP clients support MacBinary mode, but OS X doesn't really use it. Additionally, all other operating systems don't use it either. By default, CrushFTP will only encode files if the FTP client asks for MacBinary mode, and the file contains a resource fork. CrushFTP will however decode all uploaded files if they are uploaded in MacBinary mode. You could also use Stuffit expander to decode the files.
The welcome message is presented to the user in some FTP clients. Many don't show it at all, but you can place a greeting here. If you attach a sound here, it will be played on the local server when this user logs in. This option will be ignored when running as a daemon.
The purge partial uploads option lets you specify what you want to happen to files that didn't seem to upload correctly. You can have them moved to another directory, or deleted after a specified amount of time. The purge all uploads option lets you specify the same as the purge partial, but it will be applied to all uploads instead of just suspected partial uploads.
The default character encoding lets you specify the encoding to use for all communication from the CrushFTP server. Some FTP clients can't handle the default UTF-8 and you can change it here. (Mainly IE is a bad FTP client, and assumes you will only be connecting to windows FTP servers using the default windows encoding...)
The MaxOS X / Linux / Unix default owner, group, and privs option lets you control how permissions are assigned to files when they are uploaded to your computer. If the CrushFTP username matches an OS X username,t hen it will be used unless you specify a default owner here. These settings execute the equivalent of chown, chgrp, and chmod from a command chsell. The setup button will assist you in filling it out a little bit.
UserManager : Batch UpdatesThis is not an individual tab on the user manager, but an option that can be done all over. If you have a change you want to make to a whole bunch of users at once, you can use the
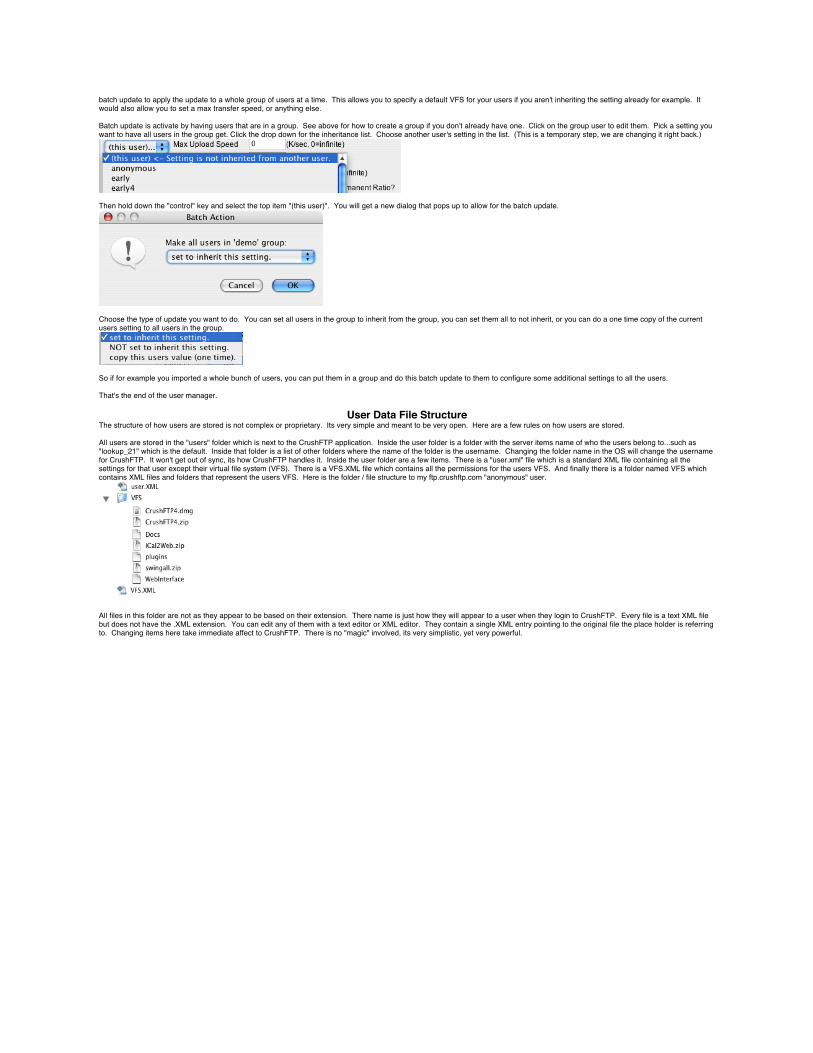
batch update to apply the update to a whole group of users at a time. This allows you to specify a default VFS for your users if you aren't inheriting the setting already for example. It would also allow you to set a max transfer speed, or anything else.
Batch update is activate by having users that are in a group. See above for how to create a group if you don't already have one. Click on the group user to edit them. Pick a setting you want to have all users in the group get. Click the drop down for the inheritance list. Choose another user's setting in the list. (This is a temporary step, we are changing it right back.)
Then hold down the "control" key and select the top item "(this user)". You will get a new dialog that pops up to allow for the batch update.
Choose the type of update you want to do. You can set all users in the group to inherit from the group, you can set them all to not inherit, or you can do a one time copy of the current users setting to all users in the group.
So if for example you imported a whole bunch of users, you can put them in a group and do this batch update to them to configure some additional settings to all the users.
That's the end of the user manager.
User Data File StructureThe structure of how users are stored is not complex or proprietary. Its very simple and meant to be very open. Here are a few rules on how users are stored.
All users are stored in the "users" folder which is next to the CrushFTP application. Inside the user folder is a folder with the server items name of who the users belong to...such as "lookup_21" which is the default. Inside that folder is a list of other folders where the name of the folder is the username. Changing the folder name in the OS will change the username for CrushFTP. It won't get out of sync, its how CrushFTP handles it. Inside the user folder are a few items. There is a "user.xml" file which is a standard XML file containing all the settings for that user except their virtual file system (VFS). There is a VFS.XML file which contains all the permissions for the users VFS. And finally there is a folder named VFS which contains XML files and folders that represent the users VFS. Here is the folder / file structure to my ftp.crushftp.com "anonymous" user.
All files in this folder are not as they appear to be based on their extension. There name is just how they will appear to a user when they login to CrushFTP. Every file is a text XML file but does not have the .XML extension. You can edit any of them with a text editor or XML editor. They contain a single XML entry pointing to the original file the place holder is referring to. Changing items here take immediate affect to CrushFTP. There is no "magic" involved, its very simplistic, yet very powerful.