Creating Files for Preps From InDesign CS3 (Windows)
14
Creating Files for Preps From Adobe InDesign CS3 for Windows Guide English 731-012823-EN Rev A
-
Upload
ivan-buovac -
Category
Documents
-
view
228 -
download
0
Transcript of Creating Files for Preps From InDesign CS3 (Windows)
8/6/2019 Creating Files for Preps From InDesign CS3 (Windows)
http://slidepdf.com/reader/full/creating-files-for-preps-from-indesign-cs3-windows 1/14
Creating Files for PrepsFrom Adobe InDesign CS3 for Windows
GuideEnglish
731-012823-EN Rev A

8/6/2019 Creating Files for Preps From InDesign CS3 (Windows)
http://slidepdf.com/reader/full/creating-files-for-preps-from-indesign-cs3-windows 2/14
Copyright
© Kodak, 2007. All rights reserved.
This document is also distributed in Adobe Systems Incorporated's PDF (Portable Document Format). Youmay reproduce the document from the PDF file for internal use. Copies produced from the PDF file must bereproduced in whole.
TrademarksKodak, Creo, eCentral, Preps, SmartMarks, Prinergy, Prinergy Evo, and Brisque are trademarks of Kodak.
Adobe, Acrobat, Adobe Illustrator, Distiller, Photoshop, PostScript, and PageMaker are trademarks of Adobe Systems Incorporated.
Apple, AppleShare, AppleTalk, iMac, ImageWriter, LaserWriter, Mac OS, Power Macintosh, and TrueTypeare registered trademarks of Apple Computer, Inc. Macintosh is a trademark of Apple Computer, Inc.,registered in the U.S.A. and other countries.
PANTONE, Hexachrome, PANTONE Hexachrome, and PANTONE MATCHING SYSTEM are the propertyof Pantone, Inc.
XEROX is a trademark of XEROX CORPORATION.
http://graphics.kodak.com/ 731-01283A-EN Rev ARevised November 2007
8/6/2019 Creating Files for Preps From InDesign CS3 (Windows)
http://slidepdf.com/reader/full/creating-files-for-preps-from-indesign-cs3-windows 3/14
Creating Files for PrepsBefore you use Kodak® Preps® digital imposition software to process afile created in Adobe® InDesign® Creative Suite 3 (CS3) software, youmust export it from InDesign as either a device-independentPostScript® file or a Portable Document Format (PDF) file.
This document gives you the recommended settings for creating themost compatible files for use with Preps. Other prepress softwaremight require different settings.
This guide is organized into the following sections:
• Generating PostScript Files, next section
• Generating PDF Files on page 9
Generating PostScript FilesDevice-independent files are composite PostScript files that complywith the Adobe Document Structuring Convention (DSC), whichmeans they do not contain any output device-specific information andare page independent (all information required for each page is
contained within that page)
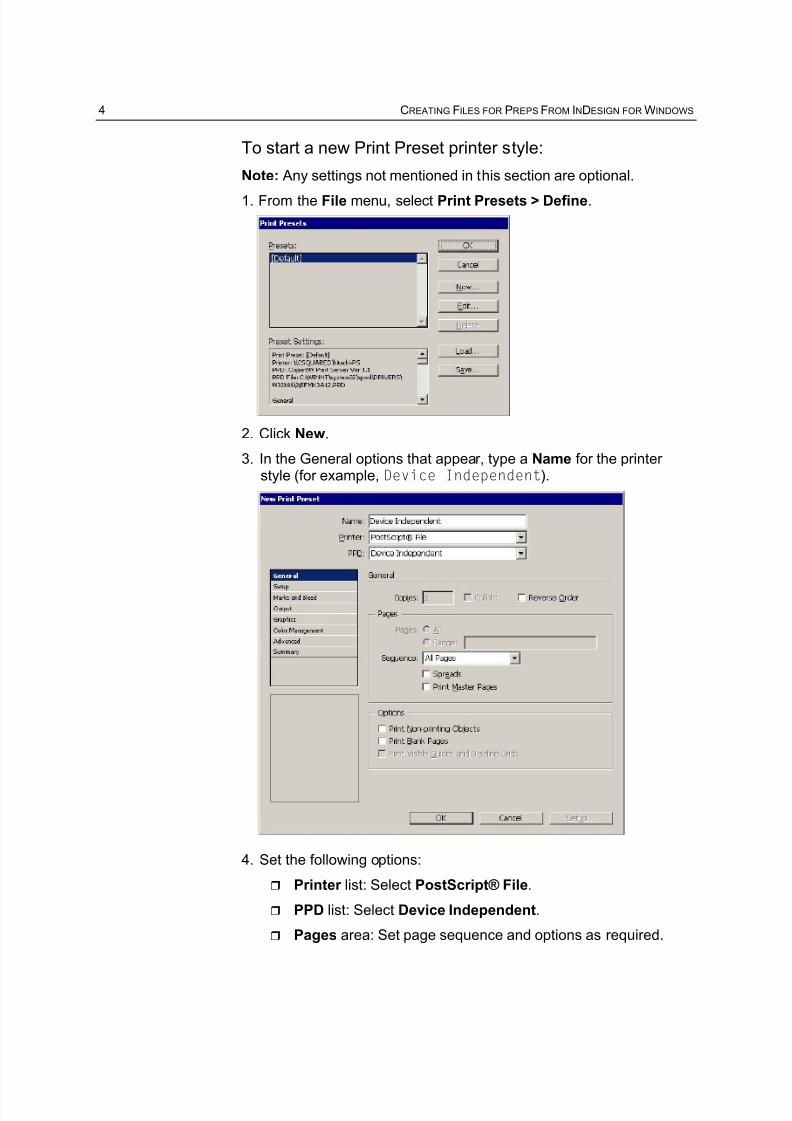
To ensure consistent printing to PostScript files, we recommend thatyou create a preset printer style. A printer style allows you torepeatedly use a range of selected printer options without needing toreconfigure options each time that you create a PostScript file.
8/6/2019 Creating Files for Preps From InDesign CS3 (Windows)
http://slidepdf.com/reader/full/creating-files-for-preps-from-indesign-cs3-windows 4/14
8/6/2019 Creating Files for Preps From InDesign CS3 (Windows)
http://slidepdf.com/reader/full/creating-files-for-preps-from-indesign-cs3-windows 5/14
5
To set up the Marks and Bleed options:
1. In the main options list at the left, select Marks and Bleed.
Note: Setup and Output contain no options when you are creatinga device-independent PostScript file.
2. In the Marks area, clear all check boxes.
3. In the Bleed and Slug area, select the Use Document BleedSettings check box, or clear this check box and type the bleed
amount in the boxes. The default setting is 0. We recommend0.125 inches (9 points).
8/6/2019 Creating Files for Preps From InDesign CS3 (Windows)
http://slidepdf.com/reader/full/creating-files-for-preps-from-indesign-cs3-windows 6/14
6 CREATING FILES FOR PREPS FROM INDESIGN FOR WINDOWS
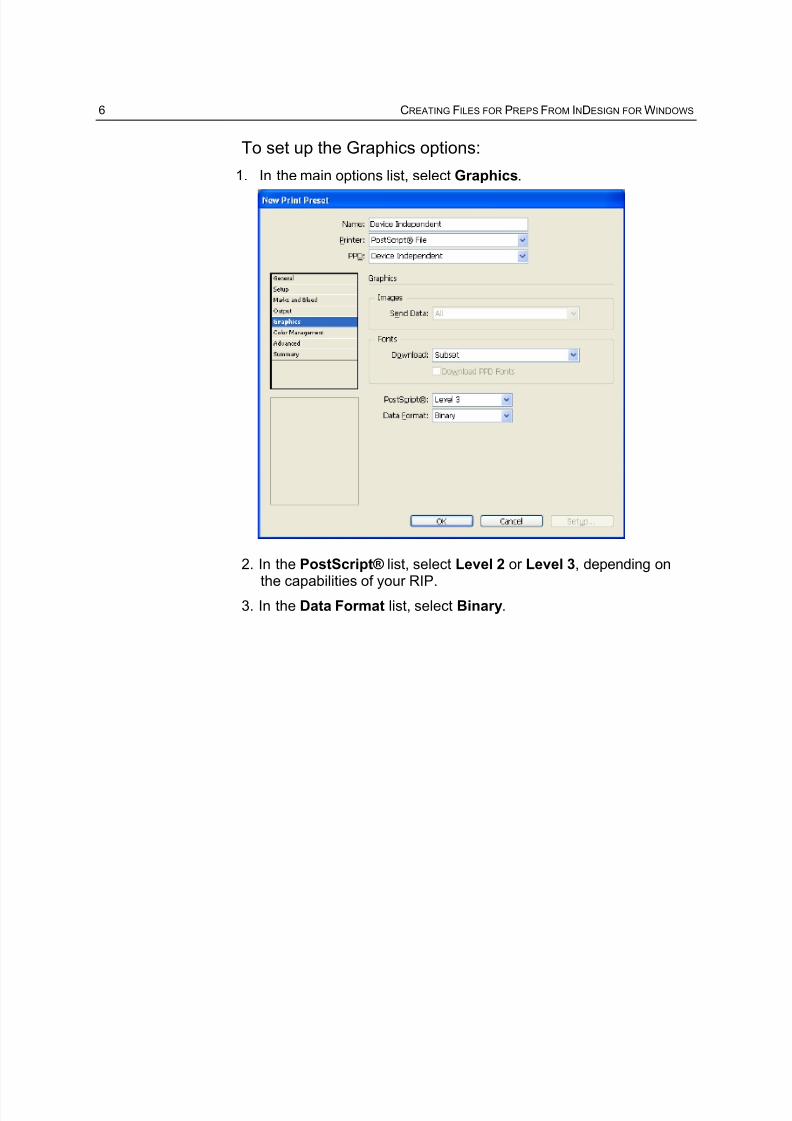
To set up the Graphics options:
1. In the main options list, select Graphics.
2. In the PostScript® list, select Level 2 or Level 3, depending onthe capabilities of your RIP.
3. In the Data Format list, select Binary.

8/6/2019 Creating Files for Preps From InDesign CS3 (Windows)
http://slidepdf.com/reader/full/creating-files-for-preps-from-indesign-cs3-windows 7/14
7
To set up the Color Management options:
1. In the main options list, select Color Management.
2. In the Print Space area’s Profile list, select Document CMYK.
8/6/2019 Creating Files for Preps From InDesign CS3 (Windows)
http://slidepdf.com/reader/full/creating-files-for-preps-from-indesign-cs3-windows 8/14
8 CREATING FILES FOR PREPS FROM INDESIGN FOR WINDOWS
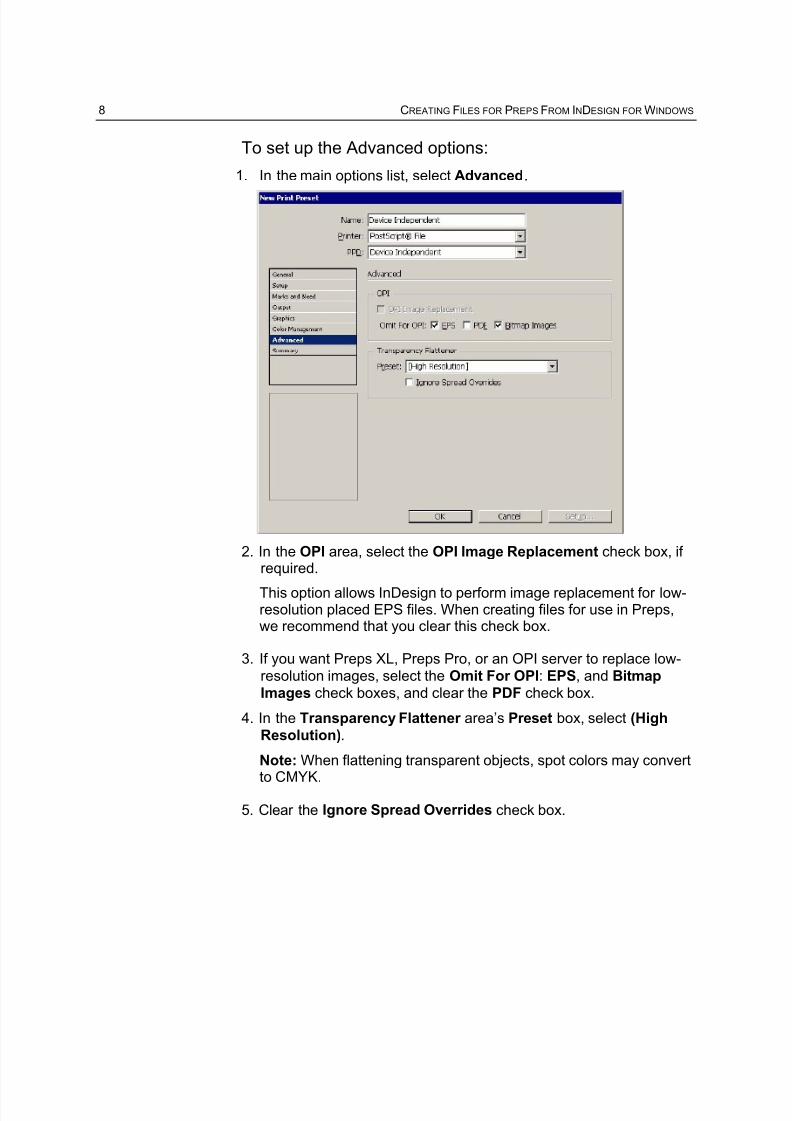
To set up the Advanced options:
1. In the main options list, select Advanced.
2. In the OPI area, select the OPI Image Replacement check box, if required.
This option allows InDesign to perform image replacement for low-resolution placed EPS files. When creating files for use in Preps,we recommend that you clear this check box.
3. If you want Preps XL, Preps Pro, or an OPI server to replace low-resolution images, select the Omit For OPI: EPS, and BitmapImages check boxes, and clear the PDF check box.
4. In the Transparency Flattener area’s Preset box, select (HighResolution).
Note: When flattening transparent objects, spot colors may convertto CMYK.
5. Clear the Ignore Spread Overrides check box.
8/6/2019 Creating Files for Preps From InDesign CS3 (Windows)
http://slidepdf.com/reader/full/creating-files-for-preps-from-indesign-cs3-windows 9/14
9
To finish creating the Print Presets printer style:
Click OK. The printer style is saved.
To generate a PostScript file for Preps:
With the document open in InDesign, from the File menu, select
Print Presets > Device Independent (style name).
You have created a prepress PostScript file from an InDesign CS3document, and you can now add the file to a Preps job.
Generating PDF FilesYou can export PDF files as version 1.3 files or later from InDesignCS3. If you use PDF 1.4 or later files, the Preps Preferences > PDF
tab’s Adobe ® Acrobat ® setting must be set to Acrobat 5 or later.
Note also:
• When you save a PDF file from Adobe InDesign CS3, the pagesize is determined by the settings in the InDesign File menu’s
Document Setup options.
• You can use Adobe Acrobat to crop PDF files. If the documentcontains bleeds, select a larger page size in Document Setup,and then use offsets in Preps to correctly position the pages.
8/6/2019 Creating Files for Preps From InDesign CS3 (Windows)
http://slidepdf.com/reader/full/creating-files-for-preps-from-indesign-cs3-windows 10/14
10 CREATING FILES FOR PREPS FROM INDESIGN FOR WINDOWS
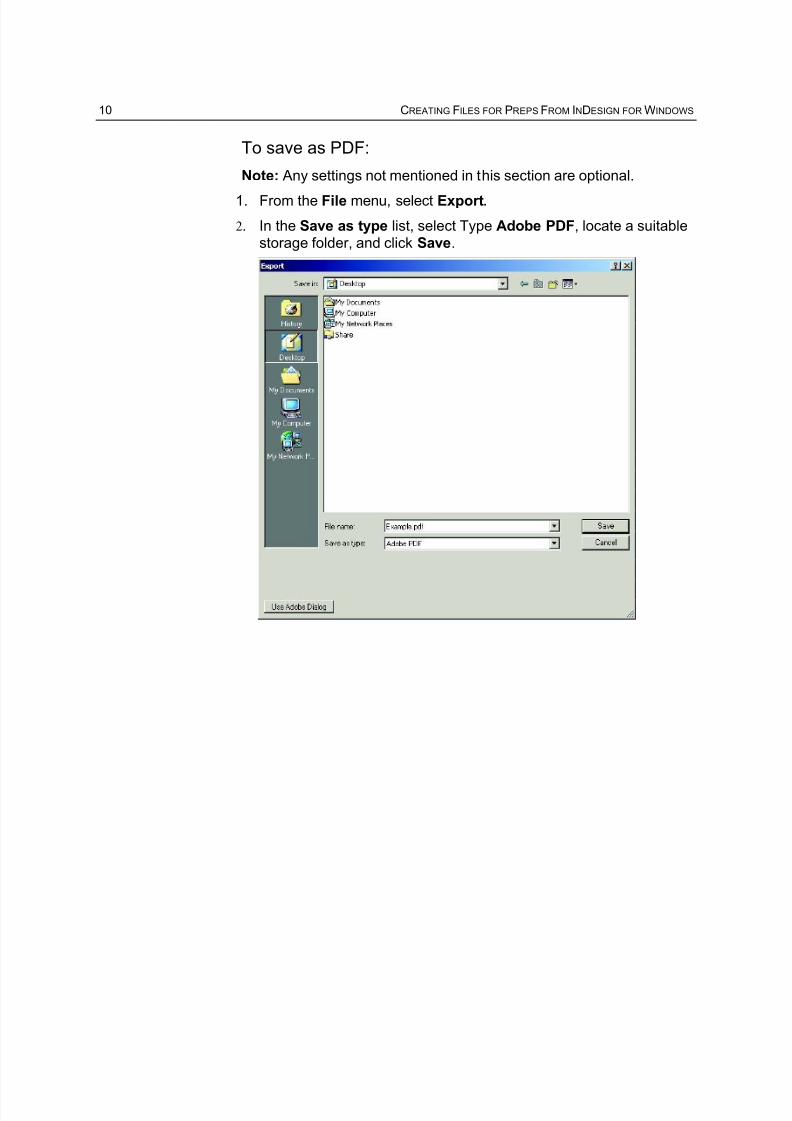
To save as PDF:
Note: Any settings not mentioned in this section are optional.
1. From the File menu, select Export.
2. In the Save as type list, select Type Adobe PDF, locate a suitablestorage folder, and click Save.
8/6/2019 Creating Files for Preps From InDesign CS3 (Windows)
http://slidepdf.com/reader/full/creating-files-for-preps-from-indesign-cs3-windows 11/14
11
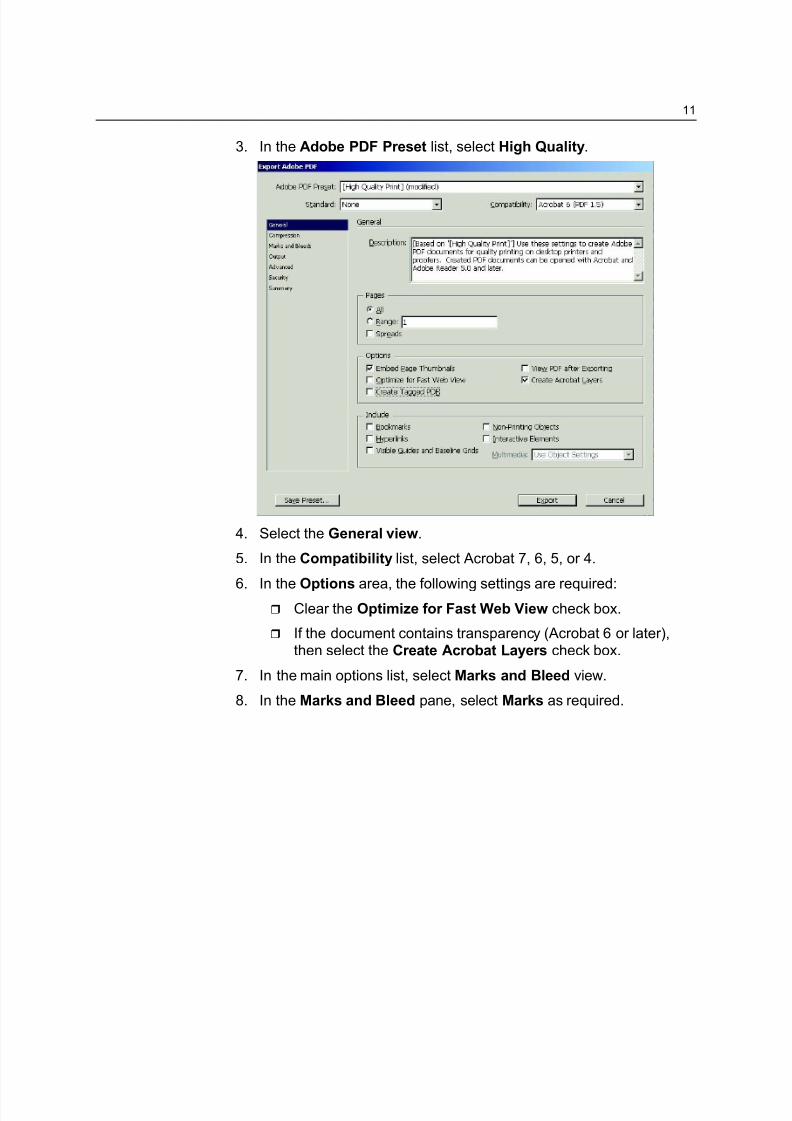
3. In the Adobe PDF Preset list, select High Quality.
4. Select the General view.
5. In the Compatibility list, select Acrobat 7, 6, 5, or 4.
6. In the Options area, the following settings are required: Clear the Optimize for Fast Web View check box.
If the document contains transparency (Acrobat 6 or later),then select the Create Acrobat Layers check box.
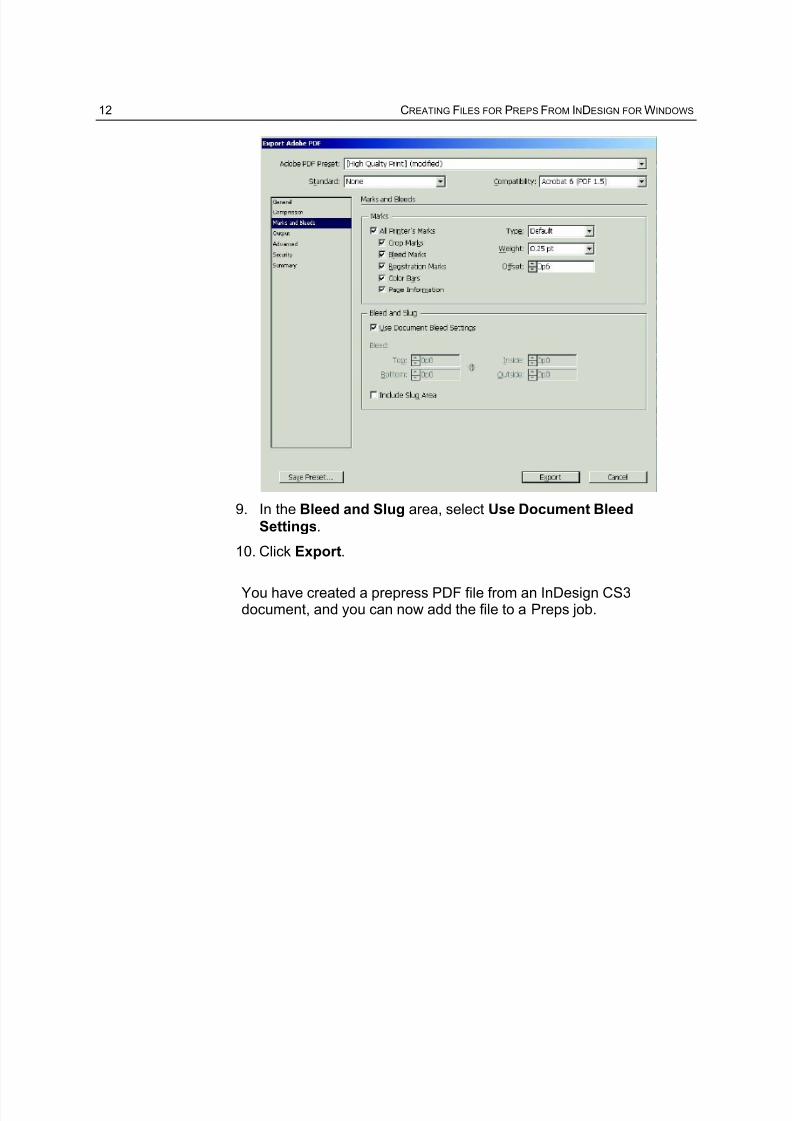
7. In the main options list, select Marks and Bleed view.
8. In the Marks and Bleed pane, select Marks as required.
8/6/2019 Creating Files for Preps From InDesign CS3 (Windows)
http://slidepdf.com/reader/full/creating-files-for-preps-from-indesign-cs3-windows 12/14
12 CREATING FILES FOR PREPS FROM INDESIGN FOR WINDOWS
9. In the Bleed and Slug area, select Use Document Bleed
Settings.
10. Click Export.
You have created a prepress PDF file from an InDesign CS3document, and you can now add the file to a Preps job.

8/6/2019 Creating Files for Preps From InDesign CS3 (Windows)
http://slidepdf.com/reader/full/creating-files-for-preps-from-indesign-cs3-windows 13/14

8/6/2019 Creating Files for Preps From InDesign CS3 (Windows)
http://slidepdf.com/reader/full/creating-files-for-preps-from-indesign-cs3-windows 14/14
Eastman Kodak Company343 State StreetRochester, NY 14650 U.S.A.
© Kodak, 2007. All rights reserved.TM: Kodak
To learn more about solutions from Kodak, visithttp://graphics.kodak.com.
Subject to technical change without notice.