
Creating and Using Data Entry Forms -...
22
In this chapter • Learn to create forms • Use forms to view and edit data • Find the data you need in form view 8 Creating and Using Data Entry Forms Your database performs many tasks, and storing data is just one of them. After you have tables, you need a way to enter and modify data. The most efficient way to work with your data is through forms. Forms let you determine what data is displayed and what types of changes you can make to it. A properly designed form will help you enter data more quickly and accurately. If you’re creating an Access application to replace a process that currently uses paper forms, you can design your Access forms to look just like the paper forms. This will help ease the transition from paper to computer. You can also apply rules that limit the type of data the form accepts, which protects the data from some typos and other human errors.
Transcript of Creating and Using Data Entry Forms -...

In this chapter
• Learn to create forms
• Use forms to view and edit data
• Find the data you need in form view
8
Creating and Using
Data Entry Forms
Your database performs many tasks, and storing data is just one of
them. After you have tables, you need a way to enter and modify data.
The most efficient way to work with your data is through forms. Forms
let you determine what data is displayed and what types of changes you
can make to it.
A properly designed form will help you enter data more quickly and
accurately. If you’re creating an Access application to replace a process
that currently uses paper forms, you can design your Access forms to
look just like the paper forms. This will help ease the transition from
paper to computer. You can also apply rules that limit the type of data
the form accepts, which protects the data from some typos and other
human errors.
12 0789729407 CH08 8/26/03 8:10 AM Page 127

At this point in your adventure, you have a few tablesand queries, and now you’re ready to advance toforms. In the next section, you’ll create a couple ofdata entry forms for your gardening databaseusing a few of the wizards that come with Access.
Creating Simple FormsAs with many other things in Access, there is morethan one way to create a form. You can choosefrom the following three ways:
■ You can use an AutoForm wizard, whichautomatically creates a form displaying allthe data in a table or query.
■ You can use the Form wizard, which auto-matically creates a form after you specifywhich fields you want the form to display(and a few formatting choices).
■ You can create a form from scratch in design view.
The Wizard WayWithout a doubt, the quickest and easiest way to create a form is to let Access do thework for you—use a wizard whenever you can. The two types of form wizards are asfollows:
■ AutoForm Wizard—Creates a specific type of form and displays all thedata in a table or query, without asking you any questions.
■ Form Wizard—Lets you choose the type of form it produces and which datathe form displays.
The AutoForm WizardFive AutoForm wizards are available, and each one automatically creates a specifictype of form:
■ Columnar—Stacks the fields, one on top of the other, beginning with thefirst field in the table or query until all the fields are lined up in a single col-umn.
■ Tabular—Aligns the fields beside each other in a row, positioning the firstfield in the table or query at the far left and adding subsequent fields in thesame order they appear in the table or query.
128 ABSOLUTE BEGINNER’S GUIDE TO MICROSOFT OFFICE ACCESS 2003
You can download theChapter 8.mdb sample file,
which is inclusive of all the exam-ples in this chapter, from http://www.quepublishing.com/. If youwant to follow along with ourexamples, download Chapter7.mdb.
12 0789729407 CH08 8/26/03 8:10 AM Page 128

■ Datasheet—Displays all the fields in the tableor query in the familiar table (or datasheet)row and column format. The form will lookjust like a table.
■ PivotTable—The wizard opens the form inPivotTable view. (We won’t review this wiz-ard in this book.)
■ PivotChart—The wizard opens the form inPivotChart view. (We won’t review this wiz-ard in this book.)
To quickly create a data entry form based on thePlants table, follow these steps:
1. Click the Tables shortcut in the Object bar,and then select the Plants table in theDatabase window.
2. Select Form from the Insert menu. Or, click the drop-down arrow next to theNew Object button on the main Access toolbar and select Form from the listthat appears.
3. In the resulting New Form dialog box, select the AutoForm: Columnaritem, as shown in Figure 8.1, and click OK. Or, you can simply double-clickthe wizard. If you didn’t choose the table beforehand, you can do so now byselecting a table or query from the drop-down control at the bottom of thedialog box.
CHAPTER 8 CREATING AND USING DATA ENTRY FORMS 129
The PivotTable andPivotChart forms are for
advanced analysis of largeamounts of data. You won’t needto use them in this book.
FIGURE 8.1
Select the
AutoForm:
Columnar
Wizard from
the New Form
dialog box.
4. Save the resulting form, shown in Figure 8.2, by clicking the Save button onthe Form view toolbar. Then, enter the name Plants in the Save As dialog boxand click OK.
12 0789729407 CH08 8/26/03 8:10 AM Page 129

Figures 8.3 and 8.4 show two more forms. Specifically,we used the AutoForm: Tabular Wizard to base aform on the Catalogs table and the AutoForm:Datasheet Wizard to base a form on the Types table.Creating these forms will help you practice with theAutoForm feature and show you the variety of formsyou can get with a minimal amount of effort.Sometimes, though, you’ll find that AutoForms justaren’t good enough for what you want to do with thedatabase. We’ll show you how to create more com-plex and customized forms in the rest of the chapter.
130 ABSOLUTE BEGINNER’S GUIDE TO MICROSOFT OFFICE ACCESS 2003
FIGURE 8.2
A columnar
form stacks the
controls verti-
cally.
Inherited lookup field
In Chapter 6, “Tappingthe Power of Relationships,”
you added a lookup field to theTypeID field in the Plants table. Wetold you then that a form willinherit a lookup field, and that’s justwhat happened with the Plantsform. The TypeID control in theform shown in Figure 8.2 is acombo box control—you can tell bythe drop-down arrow to the rightof the control. You’ll learn moreabout combo box controls inChapter 13, “Customizing Forms.”
FIGURE 8.3
The tabular
form aligns the
controls in the
same row.
FIGURE 8.4
Datasheet forms
look just like a
table (or
datasheet).
12 0789729407 CH08 8/26/03 8:10 AM Page 130

About SubformsYou might have noticed that the New Object button’s list includes an AutoFormitem, but you didn’t select it in the previous example. This wizard automatically pro-duces a columnar form similar to the AutoForm: Columnar Wizard used earlier. Butthere’s an important difference between these two wizards: The wizard in the NewObject list includes a table’s relationships in the finished form. As you’ll see, the rela-tionship between tables translates into a relationship between forms. Specifically, theresulting form has a subform (an embedded form within the main form) that dis-plays related data.
We’ll show the difference between these two forms in the following steps. Let’s usethe AutoForm Wizard on the New Object list to base a form on the Catalogs table.To do so, follow these steps:
1. Click the Tables shortcut in the Object bar, and then Select Catalogs in theDatabase window.
2. Open the New Object button’s drop-down list and select AutoForm. Figure8.5 shows the new form. Note that the wizard uses the name of the maintable (Catalogs) as the title of the form, even though the form shows datafrom both the Catalogs table and the Plants table. Save this form asCatalogsAndPlants.
CHAPTER 8 CREATING AND USING DATA ENTRY FORMS 131
FIGURE 8.5
The AutoForm
Wizard accom-
modates the
relationship
between the
Catalogs and
Plants tables.
The related subform
The main form
This form is special because it includes data from both the Catalogs and the Plantstables, even though you didn’t tell the wizard to do so. That’s because the wizardencountered the relationship between the two tables and included a subform to dis-play the related plant information for the current catalog.
12 0789729407 CH08 8/26/03 8:10 AM Page 131

The main form displays the catalog records, and thesubform displays plants where the primary/foreignkey value in the two tables matches. In otherwords, the subform displays any plants where theCatalogName field matches the value in the mainform’s Name field. This might or might not be whatyou want. Just remember, you can always dumpthe form and use one of the other AutoForm wiz-ards. Or, you can use the Form Wizard to exercise abit more control over the results. Close the formbefore continuing. You’ll learn more about buildingand customizing subforms in Chapter 13.
The Form WizardThe Form Wizard creates the form for you butallows you to set limits to the data the form willdisplay. You start the wizard the same way you doan AutoForm wizard, except in the New Form dia-log box, you select Form Wizard.
Now, let’s look at the options the Form Wizardenables you to select as you create a new form.Specifically, we’ll base a form on both the Typesand Plants tables. To do so, follow these steps:
1. Display the New Form dialog box by selecting Form from the New Objectbutton’s drop-down list or selecting Form from the Insert menu.
2. Select Form Wizard in the New Form dialog box.
3. Select Types from the drop-down control, and click OK.
4. The Available Fields list displays all the fields in the Types table. You’ll movethe fields you want to add to the form to the Selected Fields list by clickingone of the arrow buttons the same way that you did with the Simple QueryWizard in Chapter 7, “Retrieving Data with Queries.” The single arrow button(>) moves one field at a time; the double arrow button (>>) moves all thefields to the Selected Fields list. For this example, click the double arrow but-ton to move all the fields to the Selected Fields list, as shown in Figure 8.6.
5. Now, let’s add some data from the Plants table. To do so, simply select Table:Plants from the Tables/Queries drop-down list, which updates the AvailableFields list accordingly. Move the CommonName, LatinName, andCatalogName fields to the Selected Fields list, as shown in Figure 8.7. ClickNext to continue.
132 ABSOLUTE BEGINNER’S GUIDE TO MICROSOFT OFFICE ACCESS 2003
If you used the NewObject list’s version of the
AutoForm to create a form basedon the Plants table, it will not cre-ate a subform, even though thattable has two relationships: onewith Catalogs and one with Types.The wizard creates a subform whenthe form you specify contains theprimary key value in a relationship.The primary key in Plants is notrelated to any other table—only thePlants table’s foreign key values arerelated to the other tables.
12 0789729407 CH08 8/26/03 8:10 AM Page 132

6. Because you selected fields from more than one table, the wizard offers threeways to display the related data. The wizard defaults to displaying the plantrecords data in a subform and shows you a schematic picture of this option.
7. To see the other options, select the By Plants item in the list to the left, andthe wizard updates the sample form to the right accordingly. Notice that thewizard also selects the Single Form option at the bottom of the dialog box.Reselect the By Types item and click the Linked Forms option to view thatsample, which creates two linked forms. Be sure to reselect the Form withSubForm(s) option before clicking Next to continue.
8. The next window enables you to choose the type of form you want: Tabular,Datasheet, PivotTable, or PivotChart. Select Tabular, and click Next.
CHAPTER 8 CREATING AND USING DATA ENTRY FORMS 133
FIGURE 8.6
Include both
fields from the
Types table.
Select a table or query
Move all fields
FIGURE 8.7
Include three
fields from the
Plants table.
Move one field at a time
Select the Plants table
12 0789729407 CH08 8/26/03 8:10 AM Page 133

9. At this point, you can choose from any number of autoformats. An autofor-mat lets you set the default colors and fonts for a form, among other things.The wizard defaults to Standard, and that’s the format we’ll keep. Click Nextwithout changing this option. (You can learn more about autoformats inChapter 13.)
10. In the last window, rename the form and the subform TypesMain andPlantsSub, respectively, as shown in Figure 8.8. You can also select to open theform in form view so you can start entering data or in design view, where youcan modify the form’s design. (It’s common to tweak the product of a wizard.)Open the form in form view by clicking Finish without changing the wizard’s selection.
134 ABSOLUTE BEGINNER’S GUIDE TO MICROSOFT OFFICE ACCESS 2003
FIGURE 8.8
Name the two
forms (the main
form and sub-
form) and click
Finish.
The new form, shown in Figure 8.9 lists the type possibilities in the main form. Thesubform displays the plant records for the type that’s current in the main form.
You’ll see that forms contain the same navigation buttons that you’re already famil-iar with from datasheets. If you click the Next Record navigation button on the sub-form (refer to Figure 8.9), the selection arrow in the left margin of the subformadvances one row, from Black-Eyed Susan to Cosmos. If you click the Next Recordnavigation button on the main form to display a new type, the subform updates theplant records accordingly. As you can see in Figure 8.10, type 2 (edible plants) cur-rently has no related plant records. Close the form.
12 0789729407 CH08 8/26/03 8:10 AM Page 134

CHAPTER 8 CREATING AND USING DATA ENTRY FORMS 135
FIGURE 8.9
The wizard has
produced a form
that displays the
plant names in
a subform.
Next record for subform
SubformMain form
Next record for main form
FIGURE 8.10
As yet, no edible
plants exist in
the database.
Creating a Form in Design ViewYou don’t need a wizard to create a form. Although the wizards do a good job, some-times simply starting from scratch can be more efficient. When this is the case, opena blank form in design view and start adding controls. To open a blank form indesign view, do the following:
1. Select Form from the Insert menu. Or, select Form from the New Object but-ton’s drop-down list.
2. Design view is the default option in the resulting New Form dialog box, andthis is the option you want.
3. If you didn’t specify a table or query in step 1, select the appropriate table orquery now in the drop-down control.
4. Click OK to open a blank form in design view, as shown in Figure 8.11.
In Chapter 13, you’ll learn how to customize a form in design view by adding andformatting controls and formatting the form itself. For now, just close the form with-out saving it.
12 0789729407 CH08 8/26/03 8:10 AM Page 135

Quick Error Detection with Error-CheckingAccess 2003’s new error-checking smart tag warns you when you make commonform and report errors. (You can learn more about smart tags in Chapter 5,“Building Your First Tables.”) If you’re familiar withExcel 2002, you may be familiar with the featurealready, as Excel 2002 uses a similar smart tag topoint out spreadsheet errors. In this section, you’llmake a mistake on purpose, just so you can experi-ence the error-checking smart tag:
1. Open the Plants form in design view byclicking the Forms shortcut in the Databasewindow, selecting Plants, and then clickingDesign in the Database Window toolbar.
2. In form view, double-click theCommonName control to display that control’s properties in the Properties window.
3. Click the All Tab. The Control Source prop-erty is currently CommonName because thiscontrol is bound to the CommonName fieldin the Plants table. Change that setting toanything other than the name of a validfield in the Plants table. As you can see inFigure 8.12, we entered Test (there is no fieldnamed Test).
136 ABSOLUTE BEGINNER’S GUIDE TO MICROSOFT OFFICE ACCESS 2003
Although you’ll beworking more closely with
forms in Chapter 13, now is thetime to learn about this built-insmart tag. As you work throughour examples in each chapter, you may launch one of thesesmart tags and you’ll need toknow what it is and how to getrid of it.
FIGURE 8.11
A blank form in
design view.
12 0789729407 CH08 8/26/03 8:10 AM Page 136

Entering Data Through FormsNow that you know how to create a form, let’s learn how to use it to enter and mod-ify data. First, open the Plants form by clicking the Forms shortcut on the Objectbar and double-clicking Plants in the Database window. You’ll see that some of theuser interface for a form resembles the user interface you’ve already seen for tablesand queries, but there are new things here as well. The form shown in Figure 8.13can tell you a lot, such as
■ The title bar displays the form’s name and purpose.
■ The record selector points out the active record. The sample form displaysonly one record at a time, but that isn’t always the case. For example, in thesubform in Figure 8.9 you can see more than one record at a time. On thisform, the current record is for Black-eyed Susan.
■ The navigation bar displays the number of records and enables you to browsethrough those records. The current record is the first record of seven.
CHAPTER 8 CREATING AND USING DATA ENTRY FORMS 137
FIGURE 8.12
Enter a field
name that
doesn’t exist to
display the error
smart tag.
Enter an invalidControl Source property
Click the smart tag icon
4. When you press Enter or try to move to another field, Access displays a smarttag icon next to the problem control in the form. Clicking the icon displays alist of possible errors and solutions, as shown in Figure 8.12. In this case, theerror is an invalid Control Source property. Among other actions, you canselect Edit the Control’s Control Source Property to automatically select andhighlight the Control Source property in the Properties window, or you canignore the error. For now, just close the form without saving the change.
12 0789729407 CH08 8/26/03 8:10 AM Page 137

Navigating Fields and RecordsIn a table or query, you might refer to a particular column of data as a field. Formsuse controls to display data. Right now the form displays the records you entereddirectly into the Plants table in earlier chapters.
When you open a form, Access selects the first control in the form. For instance, whenyou open the Plants form, Access selects the CommonName control—you can tellbecause the actual entry is highlighted. To move from one control to the next, simplypress the Tab key. Sometimes the Enter key performs the same function, but notalways, so the preferred method is the Tab key. For example, press the Tab key onceto select the LatinName control. Then, press Enter to select the Notes control. Whilein the Notes memo field, pressing Enter simply moves the insertion point to the nextline in the memo field. To move to the next control, the Picture control, you mustpress the Tab key. Table 8.1 lists helpful keystroke combinations for navigating aform, and Table 8.2 contains combinations for navigating in a form with a subform.
TABLE 8.1 Keyboard Shortcuts for Navigating ControlsPress Result
F5+number Selects a specific record
Tab Moves to the next field
Shift+Tab Moves to the previous field
End Moves to the last field in the current record
138 ABSOLUTE BEGINNER’S GUIDE TO MICROSOFT OFFICE ACCESS 2003
FIGURE 8.13
A basic form can
give you a lot of
information
about your data.
Navigation Bar
Title Bar
First Record
New Record
Total Number of Records
Last Record
Previous RecordNext Record
Current Record Number
Record Selector
12 0789729407 CH08 8/26/03 8:10 AM Page 138

Ctrl+End Moves to the last field in the last record
Home Moves to the first field in the current record
Ctrl+Home Moves to the first field in the first record
Ctrl+Page Down Moves to the current field in the next record
Ctrl+Page Up Moves to the current field in the previous record
TABLE 8.2 Keyboard Shortcuts for Navigating Between a Main Formand a Subform
Press Result
Tab Enters the subform from the field that precedes the subform in the main form
Shift+Tab Returns to the subform from the field following the subform in the main form
Ctrl+Tab Exits the subform and moves to the next field in the main form or nextrecord
Ctrl+Shift+Tab Exits the subform and moves to the field that precedes the subform in themain form or previous record
Did you notice that the Notes control displayed a scrollbar when you selected it?That’s because that control is based on a memo data type (at the table level). Wechose that data type because it can store a lot more text than the normal text datatype.
When you’re ready to see the next record, simply click the Next Record button onthe navigation bar. Or, keep pressing the Tab key until the last control is selected,which in this case is the CatalogName control. Then, press Tab one more time.When you do, Access displays the next record.
Entering data is simple: Just select a field and type the data. When you’re done,press Tab or Enter, as the case may be. For example, with the Calendula record cur-rent, select the Notes control and enter the following text: This plant loves coolerweather and full sun but will tolerate a hot spot if you keep well watered. You can
expect lots of blooms well into fall. When you’re done, press Tab to select thePicture control. Right now, none of your records are displaying pictures, but you canfix that by following these steps:
1. With the Picture control selected, select Object from the Insert menu. (Youcan also right-click the Picture control and select Insert Object from theresulting submenu.)
CHAPTER 8 CREATING AND USING DATA ENTRY FORMS 139
Press Result
12 0789729407 CH08 8/26/03 8:10 AM Page 139

2. Click the Create from File option to the left of the dialog box.
3. Click the Browse button to locate the picture file you want to display. Werecommend you store pictures in the same folder with your database. Whenyou find the correct graphics file, double-click it. Or, select it and click OK.Access will display the name of the graphic file in the File control, as shownin Figure 8.14. Click the Link option only if you plan to modify the graphicfile. In this case, you won’t be modifying the pictures, so don’t select it.
140 ABSOLUTE BEGINNER’S GUIDE TO MICROSOFT OFFICE ACCESS 2003
FIGURE 8.14
Browse to the
graphic file that
you want to dis-
play with the
current record.
4. Click OK.
5. The control will probably display a small version of the file in the upper-leftcorner, as shown in Figure 8.15. If this happens, click the Properties buttonon the Form view toolbar.
FIGURE 8.15
Sometimes, the
control displays
a small version
of the file.
6. In the Properties list for the Bound Object Frame, open the Size Mode prop-erties drop-down list and select Stretch, as shown in Figure 8.16. The defaultis Clip.
12 0789729407 CH08 8/26/03 8:10 AM Page 140

7. Close the Properties window, and the controlshould display a full view of the file. You’lllearn more about control properties inChapter 13.
8. Repeats steps 1–4 to embed pictures of eachplant.
9. When you’re done, close the form and saveit when prompted. You’re not saving thedata you just entered; Access automaticallysaves the new picture data. Remember dur-ing step 6 when you changed the Size Modeproperty? That’s what you’re saving now.
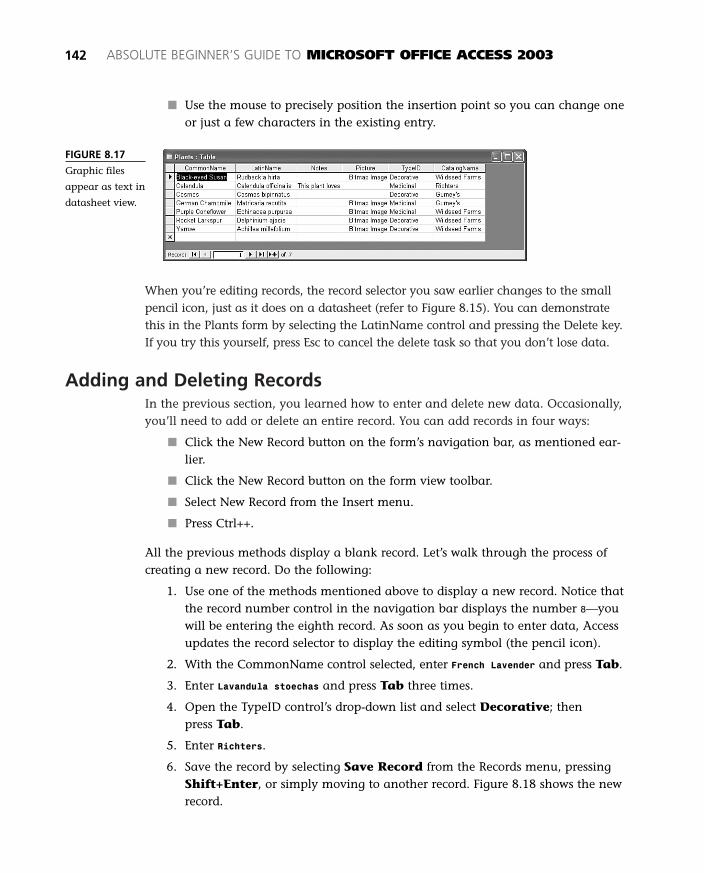
You might be curious about how a picture looks indatasheet view, so open the Plants table after youenter a few (or all) of the picture files. Figure 8.17shows the Plants table after inserting a picture foreach record. Each picture entry is a bitmap image.A table doesn’t actually display a picture the sameway a form or report does.
Of course, you won’t always be adding new datavia forms. Sometimes you’ll delete data or replacean entry with something new. Fortunately, it’s allvery easy in a form. When you select a control, theform automatically highlights the entry. At thispoint, you can do any of the following:
■ Press Delete to delete the entry.
■ Start typing to replace the entry.
CHAPTER 8 CREATING AND USING DATA ENTRY FORMS 141
FIGURE 8.16
Select the Stretch
Size Mode prop-
erty.
Did you notice that theCommonName label to the
left of that control isn’t completelyvisible? (Depending on your sys-tem’s display properties, this mightnot occur in your form, so don’tworry if it doesn’t.) That’s just oneof the small annoyances you’ll runinto when using a wizard; it simplydidn’t allow enough room. InChapter 13, you’ll learn how tomodify controls that don’t behavethe way you want them to.
Graphic files vary greatly, andthere’s no way to guarantee thequality of each file from record torecord. You can improve a picture,but that’s a bit beyond the scopeof this chapter.
12 0789729407 CH08 8/26/03 8:10 AM Page 141
When you’re editing records, the record selector you saw earlier changes to the smallpencil icon, just as it does on a datasheet (refer to Figure 8.15). You can demonstratethis in the Plants form by selecting the LatinName control and pressing the Delete key.If you try this yourself, press Esc to cancel the delete task so that you don’t lose data.
Adding and Deleting RecordsIn the previous section, you learned how to enter and delete new data. Occasionally,you’ll need to add or delete an entire record. You can add records in four ways:
■ Click the New Record button on the form’s navigation bar, as mentioned ear-lier.
■ Click the New Record button on the form view toolbar.
■ Select New Record from the Insert menu.
■ Press Ctrl++.
All the previous methods display a blank record. Let’s walk through the process ofcreating a new record. Do the following:
1. Use one of the methods mentioned above to display a new record. Notice thatthe record number control in the navigation bar displays the number 8—youwill be entering the eighth record. As soon as you begin to enter data, Accessupdates the record selector to display the editing symbol (the pencil icon).
2. With the CommonName control selected, enter French Lavender and press Tab.
3. Enter Lavandula stoechas and press Tab three times.
4. Open the TypeID control’s drop-down list and select Decorative; then press Tab.
5. Enter Richters.
6. Save the record by selecting Save Record from the Records menu, pressingShift+Enter, or simply moving to another record. Figure 8.18 shows the newrecord.
142 ABSOLUTE BEGINNER’S GUIDE TO MICROSOFT OFFICE ACCESS 2003
FIGURE 8.17
Graphic files
appear as text in
datasheet view.
■ Use the mouse to precisely position the insertion point so you can change oneor just a few characters in the existing entry.
12 0789729407 CH08 8/26/03 8:10 AM Page 142

Deleting a record is even easier. After selectingthe appropriate record in your form, use one ofthe following methods to delete that record:
■ Click the Record Selector and then pressthe Delete key.
■ Select Delete Record from the Edit menu.
■ Click the Delete Record button on theform view toolbar.
After you attempt to delete the record, Access dis-plays a confirmation message. You’d click Yes todelete the record, or you’d click No to cancel thedelete task. Right now, click No because you don’twant to delete the record.
Finding Information with FormsIn Chapter 6, you learned how to sort and limitthe results of a query. You can also sort and limitdata in a form; we’ll show you how to do so inthis section.
Sorting Records in a FormDo you remember setting the sort order for aquery in Chapter 7? In the design grid, you selectedAscending, Descending, or None in a field’s sort cell. When you ran the query,Access presented the records in the appropriate order. Sorting in a form is very simi-lar, but there’s no sort cell.
Let’s look at a quick example using your Plants form. The form sorts the records bythe CommonName field because that field is the primary key for the Plants table.
CHAPTER 8 CREATING AND USING DATA ENTRY FORMS 143
FIGURE 8.18
You haven’t
entered a picture
of your new
plant yet.
tipIf you change your mind
while you’re entering arecord, you can press Esctwice to delete the recordbefore it’s saved.
You won’t always want toview existing records while enter-ing new ones. When that’s thecase, select Data Entry from theRecords menu and Access willremove existing data from the formand update the record numbers inthe navigation bar. To return therecords, select Remove Filter/Sortfrom the Records menu.
Not all forms allow you to enternew records. If the New Recordbutton is disabled, you’ll know theform is just for browsing and edit-ing existing data.
12 0789729407 CH08 8/26/03 8:10 AM Page 143

When you assign a primary key, Access automatically defines an index for that field and an index sorts the data according to the field’s data type. Forinstance, if the field is text, the data sorts alphabetically.
Let’s temporarily rearrange your plant records bysorting them by their LatinName entries. To doso, follow these steps:
1. Select the LatinName control for anyrecord.
2. Click the Sort Ascending button on theForm view toolbar. Figure 8.19 shows theresults. As you can see by the navigationcontrols, the first record is no longer Black-eyed Susan; instead it is Yarrow. If you browse the records, you’ll find them in alphabetical order according to the LatinName entries.
144 ABSOLUTE BEGINNER’S GUIDE TO MICROSOFT OFFICE ACCESS 2003
Don’t assign a primarykey just to sort data.From our discussion inChapter 4, “Planning aDatabase,” you mightremember that a primary key’s func-tion is to uniquely identify arecord—sorting is just a by-product.
caution
FIGURE 8.19
Sorting the
records by the
LatinName
entries.
Sort tasks are temporary, unless you save thesorted form. In that case, Access remembers thenew sort order the next time you open the form.To remove a temporary sort you’ve saved, selectRemove Filter/Sort from the Records menu.
Using Filter by SelectionThe Filter by Selection feature in forms is similarto the table feature you learned about inChapter 5. You simply select a control and applythe filter—Access does the rest. The main differenceis that the Filter by Selection feature limits the records it displays by eliminating allrecords that don’t match the entry in the current control.
tipA quick sort can filter
records. It doesn’t limit therecords, but it does groupthe records by the sort field.You can then browse a par-
ticular group without firstapplying a more complex
filter or query.
12 0789729407 CH08 8/26/03 8:10 AM Page 144

Now, let’s suppose you want to browse only the decorative plants. To do so, followthese steps:
1. Select the TypeID control in the first record (or any record that displaysDecorative in the TypeID control).
2. Select Records, Filter, Filter by Selection, or click the Filter bySelection button on the Form view toolbar. Figure 8.20 shows the results ofthe filter, and five records match the selected control (Decorative).
CHAPTER 8 CREATING AND USING DATA ENTRY FORMS 145
FIGURE 8.20
Use the Filter by
Selection feature
to limit the
records in your
form.
Notice that the navigation bar has updated the number of records. Specifically,there’s a total of five records instead of eight. In addition, the toolbar now displaysthe text (Filtered). That way, you know you’re looking at an incomplete set ofrecords. To remove the record, click the Remove Filter button or select RemoveFilter/Sort from the Records menu. Do that now to return your form to normal.
Using Filter by FormThe Filter by Form feature is similar to the Filter by Selection feature but more com-plex. Using this feature, you can specify the actual value that Access will attempt tomatch, instead of relying on existing data. You can also refer to more than one control.
Let’s illustrate this filtering feature by finding the medicinal plants you purchasedfrom Wildseed Farms. Do the following:
1. Select Records, Filter, Filter by Form, or click the Filter by Form buttonon the Form view toolbar.
2. Access displays the filtering form shown in Figure 8.21. Access remembers thelast filter, which is why an entry exists in the TypeID control—that’s a leftover from the Filter by Selection exercise in the last section. You should clearany existing filters before you apply a filter by clicking the Clear Grid but-ton on the Filter/Sort toolbar.
12 0789729407 CH08 8/26/03 8:10 AM Page 145

3. Select Medicinal from the TypeID control.
4. Select the CatalogName control, and Accessdisplays a drop-down arrow to the right.Click it to display the possible entries bywhich you could filter. Then selectWildseed Farms.
5. Click the Apply Filter tool on theFilter/Sort toolbar to display the filtered setof records. The form shows only medicinalplants from Wildseed Farms.
The filtered set contains only one record—PurpleConeflower. To remove the filter, click the RemoveFilter button on the Form view toolbar or selectRemove Filter/Sort from the Records menu.Remove the filter now.
Using the Find Dialog BoxSo far, you’ve sorted and filtered. You can also search for a particular value in arecord using the Find dialog box. This feature is similar to the Filter by Selection fea-ture, but it doesn’t filter the results and all the records are still available to you. Let’suse this feature to find the record for purple coneflower. Follow these steps:
1. From any record other than the record for Purple Coneflower, select theCommonName control. Then select Find from the Edit menu or pressCtrl+F.
146 ABSOLUTE BEGINNER’S GUIDE TO MICROSOFT OFFICE ACCESS 2003
FIGURE 8.21
Using the Filter
by Form feature
to find all your
medicinal plants
purchased from
Wildseed Farms.
You might have noticedthat the Remove Filter and
Apply Filter buttons use the sameicon. Don’t let that confuse youbecause you can’t make a mistakeby clicking the button at thewrong time. The buttons performthe appropriate task.
12 0789729407 CH08 8/26/03 8:10 AM Page 146

The record you see in Figure 8.22 might not be theonly record that matches your entry. In this case it is,but if it weren’t, you’d click Find Next again to seethe next matching entry and continue doing sountil you found the record you were searching for.Close the Find and Replace dialog box when you’redone searching.
The Find and Replace feature lets you qualify asearch by specifying the field you’re searching,specifying just how much of the entry you want toconsider, determining the direction of the search,matching the letter case, and considering any for-matting.
CHAPTER 8 CREATING AND USING DATA ENTRY FORMS 147
FIGURE 8.22
Access displays
the first match-
ing record when
you click the
Find Next
button.
Throughout this chap-ter, all the forms have been
based on tables, but don’t forgetthat you can also base a form on aquery. Doing so provides a perma-nent means of filtering and sortingthe form’s data. Eventually, youmight find that you seldom base aform on a table and that you rely agreat deal on queries to providethe data for your forms.
2. Enter Purple Coneflower as the data to find.
3. Click Find Next, and Access displays the record shown in Figure 8.22. Youmight need to move the Find and Replace dialog box to see the results of thesearch.
12 0789729407 CH08 8/26/03 8:11 AM Page 147

148 ABSOLUTE BEGINNER’S GUIDE TO MICROSOFT OFFICE ACCESS 2003
The Absolute MinimumStoring data may be the purpose of a database, but it’s your job to enter and main-tain that data. Forms are the best way to enter new data, modify existing data, andeven delete unwanted data. In this chapter, you learned to do the following:
■ Create forms using wizards
■ Navigate forms and enter new data
■ Modify existing data
■ Sort, filter, and search records
12 0789729407 CH08 8/26/03 8:11 AM Page 148