Creating a Luggage Tag with Adobe...
12
1 Creating a Luggage Tag with Adobe Illustator and the Full Spectrum Laser Cutter Goal Design a Luggage Tag with your name, contact information and a picture. New Skills • Create an Adobe Illustrator file (.ai) • Use the Selection, Shape, and Type tools • Combine Shapes with the Pathfinder Window • Trace a shape by hand with the Pen tool or • Trace a shape automatically with the Live Trace/Image Trace tool. Part 1 – Creating the Luggage Tag Shapes 1. Open Adobe Illustrator and click File > New. Make your file name starts with your name. Set the size of the artboard to Letter. Doublecheck that the Units are set to Millimeters. Important: Under Advanced, set the Color Mode to RGB. Click OK.
Transcript of Creating a Luggage Tag with Adobe...

1
Creating a Luggage Tag with Adobe Illustator and the Full Spectrum Laser Cutter
Goal
Design a Luggage Tag with your name, contact information and a picture.
New Skills • Create an Adobe Illustrator file (.ai) • Use the Selection, Shape, and Type tools • Combine Shapes with the Pathfinder Window • Trace a shape by hand with the Pen tool or • Trace a shape automatically with the Live Trace/Image Trace tool.
Part 1 – Creating the Luggage Tag Shapes
1. Open Adobe Illustrator and click File > New. Make your file name starts with your name. Set the size of the artboard to Letter. Double-‐check that the Units are set to Millimeters. Important: Under Advanced, set the Color Mode to RGB. Click OK.

2
2. In the top-‐left corner of the window, click and hold the Rectangle Tool, and
select the Rounded Rectangle tool from the drop-‐down menu.
3. Set the fill colour to empty (the red / symbol means “no colour”). Set the stroke colour to be black. Set the stroke thickness to 0.25 pt. Leave the other options as their default values.
4. Click in the middle of the artboard to create a rounded rectangle shape. Set the width, height, and corner radius as shown below:

3
5. Create a second Rounded Rectangle with width and height of 37.7 mm.
6. Select the Selection tool in the top-‐left corner in the tool panel.
7. Select the second rectangle (the smaller one). Hover the cursor slightly outside of one of the corners. The cursor will become a rotator as shown below.
8. Hold Shift, and drag the rotator to spin the square to be at a 45-‐degree angle so it looks like this:
9. Using the Selection tool, drag the diamond to line up with the larger rectangle
and create the basic shape of the tag as show below.
Tip: Holding Shift makes the rotator snap to the nearest 45-‐degree angle. In this case that’s what we need, but you could rotate the shape to any other angle by letting go of shift.

4
10. Hold command and shift and click on both shapes so that they are both selected:
11. Click the Window menu, then open the Pathfinder window. This window lets us manage paths and shapes and connect them in different ways.
12. Click the Unite button (on the left side under shape modes) to join the shapes and create a single tag shape.

5
13. Click and hold the rounded rectangle tool in the toolbar again, and this time select the Ellipse tool. This lets us create circles and ellipses.
14. Holding shift and option on the keyboard, click and drag to create a small hole on the tag. Choose a size you think is appropriate and check that the colour and stroke weight settings are the same as in step 3.
15. Make sure the circle is selected, then in the Pathfinder window, choose Minus Front (the second option under shape modes). It may look like nothing has changed, but the whole tag is all one shape now. Yay!
Congratulations! You’ve learned:
ü How to use the Shape tool to create Rounded Rectangles and Ellipses. ü How to use the Select tool to move and resize shapes. ü How to change the colour and weight (thickness) of the stroke (outline) and fill
of the shapes. ü How to combine shapes using the pathfinder window

6
Part 2 – Engraving Text and Basic Shapes
In this section, we’ll add your name, contact information to your luggage tag.
1. Click and hold the shape tool (Ellipse Tool) and select the Rectangle Tool.
2. Click the Stroke-‐Colour menu button. Open the Swatch Libraries Menu Under Default Swatches, choose Basic RGB.
3. Make the stroke colour RGB Red. Make sure you choose from the Basic RGB Swatch! Keep this window open. We’ll use it again in a minute.
Why did we do that?
A “swatch” is a set of colours. The original swatch wouldn't have worked with the laser cutter! Now we’re
choosing from the right set of colours.
7
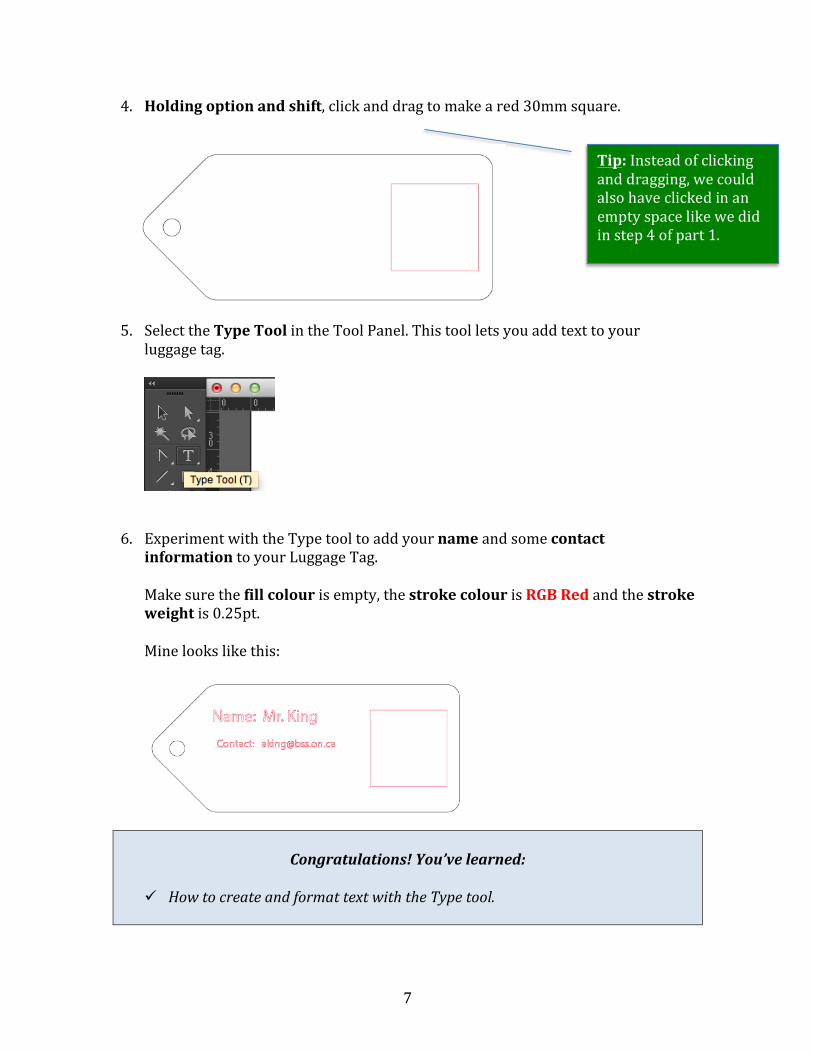
4. Holding option and shift, click and drag to make a red 30mm square.
5. Select the Type Tool in the Tool Panel. This tool lets you add text to your luggage tag.
6. Experiment with the Type tool to add your name and some contact information to your Luggage Tag. Make sure the fill colour is empty, the stroke colour is RGB Red and the stroke weight is 0.25pt. Mine looks like this:
Congratulations! You’ve learned:
ü How to create and format text with the Type tool.
Tip: Instead of clicking and dragging, we could also have clicked in an empty space like we did in step 4 of part 1.

8
Part 3 – Tracing Images to Make Paths
There are 2 ways to trace shapes in Illustrator.
If the shape is very simple and only an outline, you can use the Pen Tool to trace
around it “by hand”. This is Explained in Part 3A.
If you want to trace over a more complicated image, you need to use the Live Trace tool. This is explained in Part 3B.
3A – Tracing Using the Pen Tool
1. Now find a small, simple shape from your computer or the Internet. It’s best if it’s just an outline of something. To make it easier to find good images, you may want to use Google’s Search Tools to refine your search results to Black and White, and Line Drawing images only.
Here are some examples of good choices:

9
2. Drag the image into the square on your luggage tag and resize it to fit using the Selection Tool.
3. Select the Pen Tool from the Tools Panel.
4. By clicking at corners, trace the outline of the image you chose. You are creating a “path” with the Pen. When you’ve gone all the way around the image, close the path by clicking on the first point you made.
Note: You could also delete the rectangle by selecting it and pressing the delete key.

10
5. Using the Selection Tool, Select the Image you traced over. Press the Delete key to get rid of it. Make sure you don't delete the Path you just made! (Type Command+Z to Undo) You should have something like this. Feel free to experiment with some of the other shapes and tools in Illustrator to add more lines and shapes.
Tip: Remember that everything you make black will be cut by the laser
printer.
Everything you make red will be engraved on the surface.

11
3B – Tracing Using the Live Trace Tool
1. This time we can use slightly more complicated shapes. They still need to be black and white line drawings but they don’t need to be outline-‐only shapes. Again, you may want to use Google’s Search Tools to refine your search results. Here are examples of good choices:
2. Drag the image into the square on your luggage tag and resize it to fit using the Selection Tool.
3. Select the image. If you have Illustrator Version CS5 (most of you do), you’ll see a button that says “Live Trace.” If you have version CS6, this feature has been renamed to “Image Trace”.
a. On CS5: Click the Live Trace button on the top bar.
OR a. On CS6: Click the Image Trace button on the
top bar.
Note: You could also delete the rectangle by selecting it and pressing the delete key.
Tip: If you’re happy with the way the trace turned out, you can move on to the next step.
If not, undo the trace with Command+Z, then use the drop-‐down triangle beside the button to redo the trace with different preset styles. If you change settings with the Live Trace window, make sure you set the trace mode to Stroke instead of Fill.

12
b. Select the path you just created, and click Expand.
c. Set the fill colour of the path to empty, the stroke colour to red, and the stroke weight to 0.25.
Here’s my final product.
Congratulations! You’ve learned:
ü How to use the Pen tool to trace a path by hand. ü How to use the Live Trace/Image Trace tool to automatically trace an image.
Part 4 – Saving and Sharing the File
1. Save the file using the filename you chose in step 1 of part 1.
2. Upload the file to your Google Drive account and share it with your teacher!
3. Celebrate! You’re done! YAY!
If you ended up with a line around the edge of the image that you didn’t want, Hold Control and Click it, click Ungroup, and then with
ONLY the Rectangle selected, press the Delete Key.

![The Development of Reusable Luggage Tag with the Internet ...€¦ · aviation industry. DeVries [9] evaluated the state of RFID to solve the tracking of luggage in airports and airlines.](https://static.fdocuments.in/doc/165x107/600e3edb7e8a1c7a0512f018/the-development-of-reusable-luggage-tag-with-the-internet-aviation-industry.jpg)