Created on March 14, 2014 - Attachmatedocs.attachmate.com/reflection/2014/r1/deploymentguide.pdf ·...
91
Created on March 14, 2014
Transcript of Created on March 14, 2014 - Attachmatedocs.attachmate.com/reflection/2014/r1/deploymentguide.pdf ·...

Created on March 14, 2014

Installation and Deployment Guide

iii
Contents
Design and Prepare for Deployment 7 System Requirements 8 Create an Administrative Installation Point 9 Install Reflection on a Workstation 10 Set up a Shortcut to the Attachmate Customization Tool 11 Attachmate Installation Tools 12
Customize Reflection 15 Customize a Session Document 16 Customize the Workspace 17 Create a Secure Session Document 21
Connect Using SSL/TLS 21 Connect using Secure Shell (SSH) 23 Connect Using Kerberos 26 Set up a SOCKS or HTTP Proxy Server Session 27 Connect to an HP NonStop/Tandem Host 29
Package Sessions and Custom Settings Files 32
Lock Down Features and Controls 35 Customize Access to Settings 36 Using Microsoft Group Policy 37
Install Group Policy Templates 38 Set Access with Group Policy 39
Protect Data and Privacy 41 Add Trusted Locations 42 Configure Information Privacy 43 Configure API and Macro Security 44
Customize User and Group Access 45 Edit Access Files in Permissions Manager 49 Restrict Actions (actions.access) 50 Customized Files and Where to Deploy Them 56
Modify the Installation 61 Create a Transform 62 Change the Installation Directory 63 Modify Setup Properties 64 Add/Modify Registry Data 64 Select Features, Components, and Languages 65 Add (Chain) Installations and Run Programs 66
Install the Reflection Help 67
iv
Predefined System Folders 68 Apply a Transform to Your Installation 69
Deploy Reflection 71 Deploy with the Attachmate Setup Program 72 Deploy with MSI 73 Deploy an MSI File Independently 74 Publish with Active Directory 74 Deploy with System Center Configuration Manager 75
Deploy with Reflection Security Gateway 77 Connect to Hosts using the Reflection Security Proxy 78
Connect using Client Authorization 79 Connect using Pass Through Mode 81 Connect using End-to-End Encryption in 3270 Sessions 82
Make Sessions Available to Users from Administrative WebStation 84 How Users Start Sessions from the Reflection Management Server 85 Modify a Session Created in Administrative WebStation 85 Deploy MSI Packages from Reflection Security Gateway 86 Enable Usage Metering 87
Maintain Reflection 89 Distribute Software Updates 89 Remove an Installation 90 Repair an Installation 91

v
© 2014 Attachmate Corporation. All rights reserved.
No part of the documentation materials accompanying this Attachmate software product may be reproduced, transmitted, transcribed, or translated into any language, in any form by any means, without the written permission of Attachmate Corporation. The content of this document is protected under copyright law even if it is not distributed with software that includes an end user license agreement. The content of this document is furnished for informational use only, is subject to change without notice, and should not be construed as a commitment by Attachmate Corporation. Attachmate Corporation assumes no responsibility or liability for any errors or inaccuracies that may appear in the informational content contained in this document.
Attachmate and the Attachmate logo are registered trademarks and DATABridge is a trademark of Attachmate Corporation in the USA.
All other trademarks, trade names, or company names referenced herein are used for identification only and are the property of their respective owners.
A copy of the Attachmate software license agreement governing this product can be found in a 'license' file in the root directory of the software distribution.
Third party notices (if any) can be found in a 'thirdpartynotices' file in the root directory of the software distribution.
Attachmate Corporation 705 5th Ave South, Suite 1100 Seattle, WA 98104 USA +1.206.217.7100 http://www.attachmate.com


7
Design and Prepare for Deployment
This guide can help you design and prepare your Attachmate Reflection 2014 deployment. Regardless of the approach you take, most deployments follow the same basic workflow.
Before you deploy Reflection, we recommend that you do the following:
Review the hardware and operating system requirements (page 8).
Set up an environment for customization, testing, and deployment (page 9).
Familiarize yourself with Attachmate's customization tools (page 12).
C H A P T E R 1

Installation and Deployment Guide
8
System Requirements
Requirements for Attachmate Reflection 2014 can vary, depending on your hardware and other software components present. For complete information about deploying Reflection in virtualized environments and other supported platforms, see Technical Note 2698 (http://support.attachmate.com/techdocs/2698.html).
Processor 2 GHz, 32-bit or 64-bit (1.5 GHz or higher multi-core, 32-bit or 64-bit recommended)
System memory (RAM)
1 GB (2 GB recommended)
Operating system and platform
One of the following:
Microsoft Windows 8.1 Pro 32-bit and 64-bit
Microsoft Windows 7 Enterprise 32-bit and 64-bit
Microsoft Windows 7 Ultimate 32-bit and 64-bit
Microsoft Windows Vista Enterprise, SP1 32-bit and 64-bit
Microsoft Windows Vista Ultimate, SP1 32-bit and 64-bit
Microsoft Windows Server 2012 R1 or R2 with Remote Desktop Services (for multi-user environments)
Microsoft Windows Server 2008 R1 or R2 with Windows Terminal Server (for multi-user environments) 32-bit and 64-bit for R1 (64-bit only for R2)
Microsoft Windows Server 2003 R2 with Windows Terminal Server (for multi-user environments) 32-bit and 64-bit
Additional software requirements
To use the Office integration features in Reflection, Microsoft Office 2007 or later must be installed.
Prerequisite software — Microsoft .NET Framework
Reflection 2014 R1 requires .NET Framework 4.0 or later (4.5 is recommended). If the .NET Framework isn't installed, the Attachmate Setup Program will install version 4.0 on all systems except Microsoft Windows Server 2008 R1 and later.

Design and Prepare for Deployment
9
Notes:
If you install Reflection directly with MSI and the product features you install do not require .NET 4, you may add the SKIPDOTNET=1 property to the command line to bypass this test condition.
If you install with an MSI directly on Windows XP clients, before you deploy make sure that these clients have the Microsoft Windows Installer 3.1. Although Windows Installer 3.1 is optional, you should update your version of Windows Installer to take full advantage of the features available in Windows Installer 3.1.
Microsoft Windows Installer 3.1
The Microsoft Windows Installer (MSI) version 3.1 is distributed with Reflection 2014. This is applicable to Windows XP only. If you run the Attachmate Setup Program on Windows XP, the wizard determines whether Windows Installer 3.1 is installed, and automatically updates it if necessary.
Microsoft Visual Basic for Applications (VBA)
Reflection 2014 supports Microsoft VBA 6.5. If you select to install this feature in the Attachmate Setup Program, it is automatically installed. If you install Reflection 2014 directly with MSI or with a deployment tool and you want to install this feature, you must install it directly, using the core VBA 6.5 MSI and an appropriate language specific MSI (these MSIs are in the Prerequisites folder, in the distribution media).
Create an Administrative Installation Point
Use this procedure to create an administrative installation point on a networked file server. This places all of the administrative tools and installation files you need to customize and install Reflection to a single location.
To create an administrative install point
1 Download the Reflection installation files.
2 Create a network share on a network file server.
3 From the root directory of the installation files, double-click setup.exe.
This starts the Attachmate Setup Program.
4 Click Continue and accept the license.

Installation and Deployment Guide
10
5 From the Advanced tab, click Create an Administrative install image on a server.
6 Click Continue.
The File Location tab is selected.
7 Browse to the network share you want to use for the administrative install image.
Important! Be sure to specify a UNC path for the network share. For example: \\share_name\administrative_install_point
8 Click Install Now.
9 The next step in preparing a test environment is to install Reflection on a workstation (page 10).
Notes:
Administrative install images are typically created in a file server folder but you can create them in any folder on a local hard disk. This is useful for testing purposes.
If you prefer to use a command line instead of the Attachmate Setup Program graphical interface, you can create an administrative install point as follows:
path_to_setup_file\setup.exe /install /admin TARGETDIR=UNC_path_to_administrative_installation_point
If you prefer to install Reflection on your workstation first, you cannot use the installation program graphical interface to create the administrative install image. Instead, you must install it from the command line as follows:
path_to_setup_file_on_your_workstation\setup.exe /install /admin TARGETDIR=UNC_path_to_administrative_installation_point
Install Reflection on a Workstation
After you create an administrative installation point, you'll need to install Reflection on a workstation so that you can open and run Reflection. If you plan to customize Reflection, you will use this installation to create custom configuration files.

Design and Prepare for Deployment
11
To install Reflection on a workstation
1 On the workstation, navigate to the network share where you have created the administrative installation point, and double-click setup.exe.
2 From the Attachmate Setup Program, click Continue, and then accept a license.
3 The following steps are optional:
a) To personalize the installation, click the User Information tab and enter the name, organization, and Volume Purchase Agreement (VPA) number, if you have one. (VPA numbers, which are issued by Attachmate, are used by customer support to expedite service requests.)
b) To change the default installation folder or the default user data directory, click the File Location tab and browse to the folder you want to use.
c) To select which features, components, or languages are installed, click the Feature Selection tab. The default installation does not include all feature and components.
4 Click Install Now.
Set up a Shortcut to the Attachmate Customization Tool
The Attachmate Customization Tool (ACT) is designed to be opened from a command line. However, you can create a desktop shortcut that opens this tool. This will save time when you are working with the tool.
To create a shortcut that opens ACT
1 On your administrative installation point, right-click the setup.exe file, and choose Create Shortcut.
2 Right-click the shortcut and choose Properties.
3 In the Target box, add the /admin option to the end of the command line. For example:
\\myServer\adminInstallPoint\setup.exe /admin
CAUTION: Make sure that the path in the Target box conforms to the Uniform Naming Convention (UNC) format and does not include drive letters. Drive letters can cause problems if you try to use the shortcut on other workstations.
4 Rename the shortcut and save it on the desktops of your workstation and the server you use for your administrative installation point.
5 To start ACT, double-click the shortcut, and in the Select Customization dialog box, choose which mode you want to open.
To start ACT from a command line
1 On a command line, change to the administrative installation point and enter:

Installation and Deployment Guide
12
<path_to_setup>\setup.exe /admin
2 In the Select Customization dialog box, choose which mode you want to open (Transform or Custom installer).
Attachmate Installation Tools
Reflection uses the Microsoft Windows Installer application installation and configuration service. The Windows Installer gets installation information from a relational database, which is saved and deployed as a Microsoft MSI file. When you deploy an MSI file to a user workstation, the Windows Installer on the workstation accesses the information in the MSI file to perform the installation.
Use the following tools to customize and deploy Reflection. These tools are installed as part of the administrative install image.
Attachmate Setup Program
The Attachmate Setup Program (setup.exe) is the recommended tool for installing and deploying Reflection.
Setup.exe has a command-line interface that you can run from a command line, a batch file, or a deployment tool. You can type command-line options to set installation parameters and limit user interaction as Reflection is installing, or use command-line options to prepare Reflection for installation by users. Command-line installations may have additional system requirements (page 8).
To see a list of available command-line parameters, type:
setup.exe /?
Attachmate Customization Tool
This tool is accessed by running setup.exe in administrator mode. The Attachmate Customization Tool lets you create the following files:
Transform file (MST). This file modifies the default installation. This lets you customize Reflection for separate departments or groups. You can upgrade Reflection without removing these customized files.
Companion installer package (MSI). This is a package containing the customized configuration settings and files that you choose to deploy with the installation (or independently). Companion packages show up as independent entries in the Windows list of installed applications. To customize Reflection, see Customize the Workspace (page 17).
Permissions Manager
This is a feature of the Attachmate Customization Tool's custom installer mode that lets you restrict configuration settings and features in the workspace and in session documents. Your changes are saved to .access files which are automatically included in the companion installer package (.msi). There are different access files for mainframe, AS/400, UNIX/OpenVMS, and application-wide settings. Plus, there is a separate access file for actions (page 50), which affects the ability to create new session documents or show the UI Designer.
You can edit .access files by running Permissions Manager (page 49).

Design and Prepare for Deployment
13

15
Customize Reflection
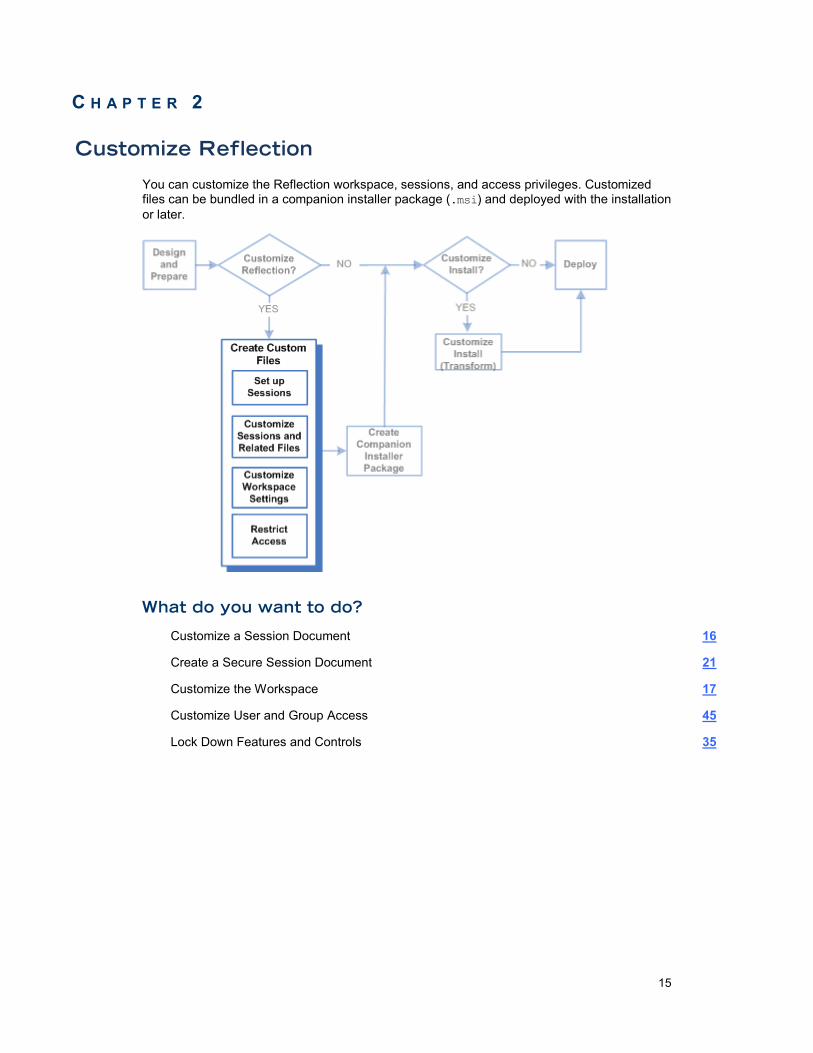
You can customize the Reflection workspace, sessions, and access privileges. Customized files can be bundled in a companion installer package (.msi) and deployed with the installation or later.
What do you want to do?
Customize a Session Document 16
Create a Secure Session Document 21
Customize the Workspace 17
Customize User and Group Access 45
Lock Down Features and Controls 35
C H A P T E R 2

Installation and Deployment Guide
16
Customize a Session Document
Use this procedure to customize a session document file (that is, change its default settings for text input, appearance, macros, hotspots and other settings). Custom settings are saved to a separate file which must be deployed with the session document file.
To configure security settings for a session document file, see Create a Secure Session Document (page 21). Security settings are saved in the session document file.
To customize a session
1 Open a Reflection session (for example, mySession.rd3x).
2 From the Quick Access toolbar, click the Document Settings button and make the changes you want.
The following steps (a through h) illustrate how to create a custom settings file — a keyboard map file that assigns the Ctrl+E key combination to the Erase EOF Send Key.
a) In the Settings dialog box, under Input Devices, click Manage Keyboard Map.
b) In the Manage Keyboard Map dialog box, click Create a new keyboard map from an existing keyboard map file.
c) Select a keyboard map file to use as a template for your new file (for example, Default 3270.xkb).
d) To configure the session to use the custom keyboard file, select the check box Use the new file in the current session document, and then click OK.
e) In the Keyboard Mapper dialog box, hold down the Ctrl key and then press the E key to enter Ctrl+E in this box.
f) Click the Select Action button, and from the Action list, scroll down and select Send Key.
g) Under Action parameters, from the Key list, select Erase EOF and click OK. The Ctrl+E key combination appears in the Keyboard Mapper table.
h) Click OK and save the new keyboard map to the Keyboard Maps folder as myKeyboardMap.xkb. If you are prompted that this is not a secure location, click Yes. (The file is saved in your Documents\Attachmate\Reflection\Keyboard Maps folder.)
You can "package" the keyboard map file and other settings file in a companion installer package for deployment (page 32).

Customize Reflection
17
Customize the Workspace
You can change the appearance and basic functionality of the main Reflection window in a variety of ways. For example, you can specify startup macros and actions, trusted locations, and privacy filters. You might change the appearance by opening Reflection in browser mode or with the Ribbon closed.
Use the Attachmate Customization Tool to configure most of the custom workspace settings.
To create a custom workspace
1 From your administrative installation point, open the Attachmate Customization Tool from a shortcut (page 11) or by typing the following command line:
<path_to_setup>\setup.exe /admin
2 From the Select Customization dialog box, select Create a new Companion installer, and then click OK.

Installation and Deployment Guide
18
3 From the navigation pane, click Specify install locations.
4 Under Installation type, select Installs only for the user who installs it.
5 On the navigation pane, click Modify user settings.
6 From the list of Application - Settings, select Reflection 2014 - Workspace Settings and then click Define.
The Reflection Workspace Settings open in a separate window.

Customize Reflection
19
7 Under Workspace Settings, click Configure Workspace Settings.

Installation and Deployment Guide
20
8 In the Configure Workspace Settings dialog box, under UI Preferences, for Arrange documents as, select Windows and click OK.
9 To set the product Help to open from the local drive, select Configure Workspace Attributes and under Help System, select Use installed help system.
10 Save the companion package file (.msi) and close the Attachmate Customization Tool. You can deploy the companion file as it is, or you can edit it to add additional files.
Custom settings are automatically saved in the Application.settings file. The companion installer file is automatically configured to deploy this file to [AppDataFolder]\Attachmate\Reflection\Workspace\data_folder (for a single user) or to [CommonAppDataFolder]\Attachmate\Reflection\Workspace\data_folder (for all users)
where data_folder is specific to the version of Reflection. For example, for Reflection 2014 R1, this folder is R2014_R1.
Important: Workspace files can be deployed only to individual users. If you deploy Reflection to a computer that has more than one user, a separate deployment is required for each user.

Customize Reflection
21
Create a Secure Session Document
When you create a Reflection session document, configure it to use the security protocols your organization requires. Security settings are saved in the session document file.
This connection type Supports these protocols
3270 terminal or printer
5250 terminal or printer
SSL/TLS, SOCKS
6530 terminal* SSL/TLS, Secure Shell
VT terminal or FTP Client SSL/TLS, Secure Shell, Kerberos, SOCKS, HTTP
* Requires a separate add-on (page 29).
Topics in this section:
Connect to Hosts using the Reflection Security Proxy 78
Connect Using Kerberos 26
Connect using Secure Shell (SSH) 23
Connect Using SSL/TLS 21
Set up a SOCKS or HTTP Proxy Server Session 27
Connect to an HP NonStop/Tandem Host 29
Connect Using SSL/TLS The Secure Sockets Layer protocol (SSL) and its compatible successor, the Transport Layer Security protocol (TLS), enable a client and server to establish a secure, encrypted connection over a public network. When you connect using SSL/TLS, the client authenticates the server before making a connection, and all data passed between Reflection and the server is encrypted. Depending on the server configuration, the server may also authenticate the client.
Attachmate Reflection 2014 supports SSL/TLS connections for IBM 3270, IBM 5250, and VT terminals.
Note: SSL/TLS connections use digital certificates for authentication. Depending on how your certificate was issued and the way your host is configured, you may need to install a host and/or personal certificate before you can connect using SSL/TLS.
Before you start
Make sure your system has an SSL/TLS host (server or servers) and that you know how certificates are handled for your server.
The following instructions show how to configure a connection for a host that requires server authentication (but not client authentication) and uses a certificate from a trusted certification authority (CA).
This procedure shows how to import the certificate into the Reflection certificate store. To set up this connection, you need:

Installation and Deployment Guide
22
The SSL/TLS host name
A user name and password
The port used by the SSL/TLS server
Access to a CA certificate for the server
To configure a secure terminal session using SSL/TLS
1 Open the Create New Document dialog box.
The steps depend on your user interface mode.
User Interface Mode Steps
Ribbon or Reflection Browser From the Quick Access Toolbar, click the New
Document button.
Mobile UI Tap the Folder icon and then under File, select New.
2 From the Create New Document dialog box, select a session template and click Create.
3 For Host Name/IP Address, enter the fully qualified host name.
Note: By default, the host name you enter must exactly match one of the host names entered in either the CommonName or the SubjectAltName field of the host's certificate. The setting Certificate host name must match host being contacted is configured from the PKI Configuration dialog box. Leave this setting selected for maximum security.
4 In the Port box, set the port your host uses for SSL/TLS connections. In most cases you will have to change the default port value. Contact the host system administrator for this information. (For connections to an AS/400, the SSL/TLS port will typically be 992.)
5 Select Configure additional settings, and then click OK.
6 Do one of the following:
• If you are setting up a 3270 and 5250 terminal session, under Host Connection, click Set Up Connection Security. Then, in the Configure Advanced Connection Settings dialog box, click Security Settings.
• If you are setting up a VT terminal session, click Configure Connection Settings, confirm Network Connection Type is set to Telnet, and click the Back arrow. Then, under Host Connection, click Set Up Connection Security.
7 From the Security Properties dialog box, select the SSL/TLS tab, and select Use SSL/TLS security.
8 (Optional) To specify the minimum allowable level of encryption for SSL/TLS connections, select a level in the Encryption strength list. The connection fails if this level cannot be provided.

Customize Reflection
23
Note: If you select Default, any encryption level is permitted, and Reflection negotiates with the host system to choose the strongest encryption level supported by both the host and the PC.
9 (Optional) Click Configure PKI.
The PKI Configuration dialog box opens, from which you can manage the digital certificates used for authentication.
a) Click Reflection Certificate Manager.
b) In the Reflection Certificate Manager dialog box, select the Trusted Certificate Authorities tab.
c) Click Import and browse to select the CA certificate for the server.
d) Modify default settings as required. (For example, to use only the Reflection store, you might choose to clear Use System Certificate Store for SSL/TLS connections. When this option is selected, Reflection looks for certificates in both the Reflection store and the Windows certificate store.)
When you customize any of the default PKI settings, the pki_config file is created.
e) Close the Certificate Manager dialog box and click OK to close the other open dialog boxes.
The imported certificate is saved in the trust_store.p12 file.
f) After a connection is established, click the Save button on the Quick Access toolbar and save the session document.
Connect using Secure Shell (SSH) You can configure Secure Shell connections when you need secure, encrypted communications between a trusted host and your PC over an insecure network. Secure Shell connections ensure that both the client user and the host computer are authenticated; and that all data is encrypted. Passwords are never sent over the network in a clear text format as they are when you use Telnet, FTP, or rlogin. You can use this procedure to connect securely to UNIX and Linux hosts.
Note: Secure Shell connections are available for VT terminal sessions.
Before you start
By default, Secure Shell connections use public key authentication for the host and username/password authentication for the user. To configure a connection using these defaults, you need to make sure your system has a Secure Shell server or servers and that you know the following information:
The host name.
The User name and password.
The port used by the Secure Shell server (the default is 22).

Installation and Deployment Guide
24
To configure a secure terminal session using Secure Shell (SSH)
1 Open the Create New Document dialog box.
The steps depend on your user interface mode.
User Interface Mode Steps
Ribbon or Reflection Browser From the Quick Access Toolbar, click the New
Document button.
Mobile UI Tap the Folder icon and then under File, select New.
2 From the Create New Document dialog box, select the VT Terminal template and click Create.
3 In the Create New dialog box, under Connection:
• Select Secure Shell.
The Port value changes to 22, which is the standard port for Secure Shell connections. If you need to connect to a different port, select Configure additional settings, or use the procedure below to change the default Secure Shell settings.
• (Optional) Enter the Host name/IP address. If you omit this, you will be prompted for a host name when you connect.
• (Optional) Enter your User name. If you omit this, you will be prompted for a host name when you connect.
4 Click OK.
5 The first time you connect, you are prompted to verify the host hey authenticity. Verify the host key fingerprint and select Always.
Note: Host authentication (performed with public key authentication) enables the Secure Shell client to reliably confirm the identity of the Secure Shell server. If the host public key is not installed on the client, the host fingerprint is displayed and users are prompted to contact the system administrator to verify the fingerprint. This confirmation prevents risk of a "man-in-the-middle" attack, in which another server poses as the host. After the host key is added to the client, Attachmate Reflection 2014 can authenticate the server without requiring user confirmation, and the unknown host prompt does not appear again. The key is saved in a file called known_hosts, which is created in the folder personal_documents_folder\Attachmate\Reflection\.ssh.
6 When prompted, enter your password.
7 Click the Save button on the Quick Access toolbar and save the session document.
The file is saved in [PersonalFolder]\Attachmate\Reflection.
Customize Reflection
25
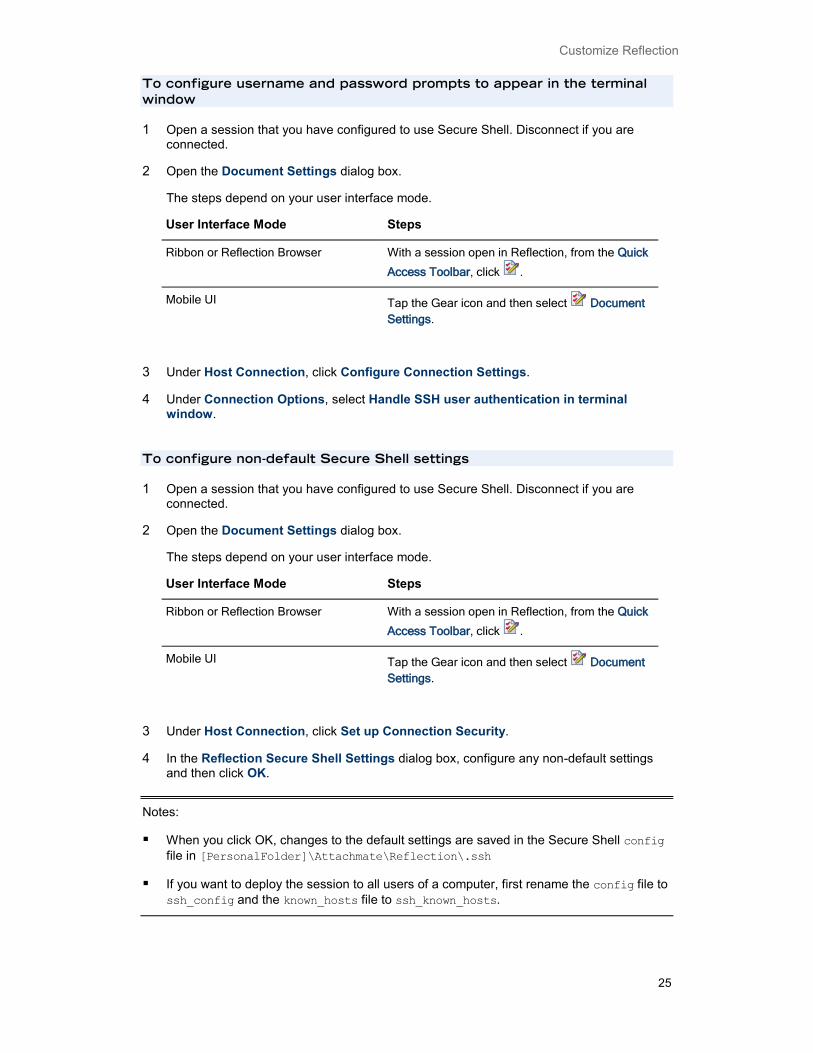
To configure username and password prompts to appear in the terminal window
1 Open a session that you have configured to use Secure Shell. Disconnect if you are connected.
2 Open the Document Settings dialog box.
The steps depend on your user interface mode.
User Interface Mode Steps
Ribbon or Reflection Browser With a session open in Reflection, from the Quick
Access Toolbar, click .
Mobile UI Tap the Gear icon and then select Document Settings.
3 Under Host Connection, click Configure Connection Settings.
4 Under Connection Options, select Handle SSH user authentication in terminal window.
To configure non-default Secure Shell settings
1 Open a session that you have configured to use Secure Shell. Disconnect if you are connected.
2 Open the Document Settings dialog box.
The steps depend on your user interface mode.
User Interface Mode Steps
Ribbon or Reflection Browser With a session open in Reflection, from the Quick
Access Toolbar, click .
Mobile UI Tap the Gear icon and then select Document Settings.
3 Under Host Connection, click Set up Connection Security.
4 In the Reflection Secure Shell Settings dialog box, configure any non-default settings and then click OK.
Notes:
When you click OK, changes to the default settings are saved in the Secure Shell config file in [PersonalFolder]\Attachmate\Reflection\.ssh
If you want to deploy the session to all users of a computer, first rename the config file to ssh_config and the known_hosts file to ssh_known_hosts.
Installation and Deployment Guide
26
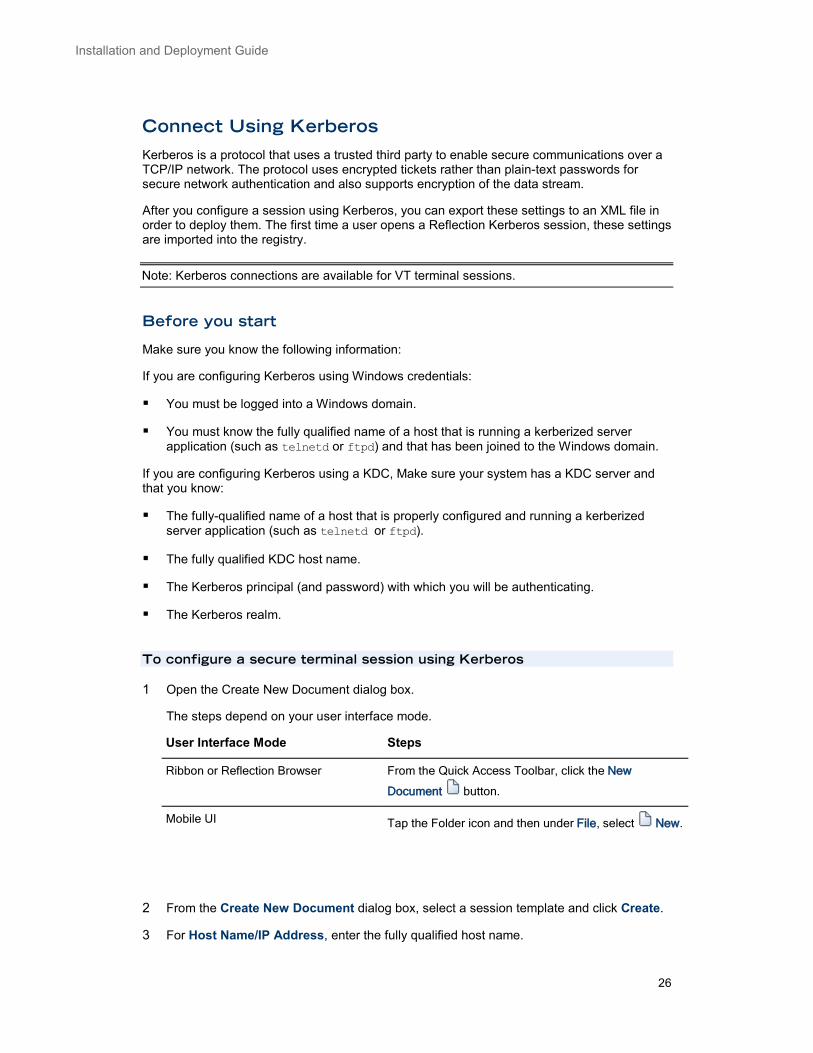
Connect Using Kerberos Kerberos is a protocol that uses a trusted third party to enable secure communications over a TCP/IP network. The protocol uses encrypted tickets rather than plain-text passwords for secure network authentication and also supports encryption of the data stream.
After you configure a session using Kerberos, you can export these settings to an XML file in order to deploy them. The first time a user opens a Reflection Kerberos session, these settings are imported into the registry.
Note: Kerberos connections are available for VT terminal sessions.
Before you start
Make sure you know the following information:
If you are configuring Kerberos using Windows credentials:
You must be logged into a Windows domain.
You must know the fully qualified name of a host that is running a kerberized server application (such as telnetd or ftpd) and that has been joined to the Windows domain.
If you are configuring Kerberos using a KDC, Make sure your system has a KDC server and that you know:
The fully-qualified name of a host that is properly configured and running a kerberized server application (such as telnetd or ftpd).
The fully qualified KDC host name.
The Kerberos principal (and password) with which you will be authenticating.
The Kerberos realm.
To configure a secure terminal session using Kerberos
1 Open the Create New Document dialog box.
The steps depend on your user interface mode.
User Interface Mode Steps
Ribbon or Reflection Browser From the Quick Access Toolbar, click the New
Document button.
Mobile UI Tap the Folder icon and then under File, select New.
2 From the Create New Document dialog box, select a session template and click Create.
3 For Host Name/IP Address, enter the fully qualified host name.

Customize Reflection
27
4 Select Configure additional settings, and then click OK.
5 Under Host Connection, click Set Up Connection Security.
6 From the Security Properties dialog box, click the Kerberos tab, and select Reflection Kerberos.
Note: Unless your PC has a Kerberos Manager configuration file installed, the Reflection Kerberos Initial Configuration dialog box is displayed the first time you use Reflection Kerberos. You must specify default Kerberos settings in this dialog box before you can make a connection.
7 Do one of the following:
Select Use Windows logon values.
-OR-
Enter values for Default Principal, Default Realm, and KDC host name.
1 Click OK to close the Reflection Kerberos Initial Configuration dialog box.
2 Configure any additional Kerberos options that you want to use for this connection and click OK to close the Security Properties dialog box.
3 Click OK to close the Settings for VT dialog box and initiate the connection. When prompted, enter your password.
4 After a connection is established, click the Save button on the Quick Access toolbar and save the session document.
5 Click OK to close the open dialog boxes and return to the workspace.
Set up a SOCKS or HTTP Proxy Server Session You can configure sessions to connect through a SOCKS proxy server or an HTTP server.
Notes:
SOCKS is supported for VT, 3270, and 5250 terminals.
HTTP is supported only for VT terminals.
Before you start
Make sure your system has a proxy server or servers and that you know the following information:
If you are setting up a connection to a SOCKS server, know the proxy server address and protocol version.
If you are setting up a connection to an HTTP server, know the proxy server address and port.

Installation and Deployment Guide
28
To set up a session to connect through a SOCKS proxy server or an SSL/TLS server
1 Open the Create New Document dialog box.
The steps depend on your user interface mode.
User Interface Mode Steps
Ribbon or Reflection Browser From the Quick Access Toolbar, click the New
Document button.
Mobile UI Tap the Folder icon and then under File, select New.
2 From the Create New Document dialog box, select a document template and click Create.
3 In the Create New Terminal Document dialog box, under Connection, enter the Host name/IP address.
4 Click Configure additional settings and then click OK.
5 In the Settings dialog box, under Host Connection, click Setup Connection Security.
6 If you are configuring a 3270 or 5250 terminal session, in the Configure Advanced Connection Settings dialog box, Under Security, click Security Settings.
7 On the Security Properties dialog box Proxy tab, select Use proxy server and then select the proxy type:
• SOCKS (supported for VT, 3270, and 5250 terminals).
• HTTP (supported only for VT).
8 Click Configure.
9 If you want to designate only one HTTP proxy server, configure the session for the proxy server as follows:
To configure… Do this
SOCKS Enter the Server address and the Protocol version.
HTTP Enter the server Address and Port.
If you want to use authentication that requires a user name and password, select Basic authentication and enter the user name for the proxy server. (If this is not selected, no authentication is used.)
10 If you want to configure more than one proxy server or configure specific destination routes, leave the fields in the HTTP (or SOCKS) proxy group blank and click Advanced.

Customize Reflection
29
Connect to an HP NonStop/Tandem Host Use the procedures in this topic to configure Reflection 2014 to connect to an HP NonStop Tandem host. To connect to this host, the Reflection for NonStop 2014 Add-On must be deployed with the Reflection 2014 base product.
During installation of the base product, Reflection 2014 will remove EXTRA! 6530 Client Option 7.x – 9.x and the Reflection for 2008 or 2011 NonStop Add-On, if detected.
Note: The Reflection for NonStop 2014 Add-On does not support the conversion of user settings, like session files and macros, created with EXTRA! 6530 Client Option.
Obtaining and Installing the Product
Maintained customers are eligible to download the latest product releases from the Attachmate Download Library web site: https://download.attachmate.com/Upgrades/
Important! The Reflection for NonStop 2014 Add-On must be installed after Reflection is installed. The Add-On installer does not currently support an automated administrative installation. For more details about the Add-On, see Technical Note 2707 (http://support.attachmate.com/techdocs/2707.html).
To create a 6530 session
1 From the Reflection Workspace, open the Create New Document dialog box.
The steps depend on your user interface mode.
User Interface Mode Steps
Ribbon or Reflection Browser From the Quick Access Toolbar, click the New
Document button.
Mobile UI Tap the Folder icon and then under File, select New.

Installation and Deployment Guide
30
2 From the Create New Document dialog box, select the 6530 terminal template and click Create.
3 In the 6530 Terminal Document Settings, enter the fully-qualified host name and port number for your host.
4 Select the check box for Configure additional settings and click OK.

Customize Reflection
31
5 In the 6530 Settings dialog box, configure the appropriate settings for your host.
6 Save the session document file (.rd6).

Installation and Deployment Guide
32
Package Sessions and Custom Settings Files
After you customize Reflection, bundle the customized session and settings files into a deployable companion installer package (.msi).
You can deploy companion installer packages separately or you can add them to a customized installation. You can also create and install packages at any time after the initial installation. Companion installer packages are displayed as independent entries in the Windows Add\Remove Programs list and can be installed or uninstalled independently of Reflection. If you support several business units that require their own customized configuration files, you can create a companion installer package for each business unit.
Companion installer packages have no built-in user interface except a standard progress bar.You can also create and Deploy MSI Packages from Reflection Security Gateway (page 86).
To create a companion installer package
1 Note the locations of custom configuration files you've created.
From your administrative installation point, open the Attachmate Customization Tool from a shortcut or by typing the following command line:
<path_to_setup>\setup.exe /admin
2 In the Select Customization dialog box, open the companion installer view:
• If you created a companion installer package earlier, select Open an existing Setup file or Companion installer, click OK, and then browse to select the file.
• If you have not created a companion installer package, select Create a new Companion installer.
3 On the left, click Specify install locations, and specify the Installation type. This setting will affect the list of available folder locations on the Add files panel.

Customize Reflection
33
Note: In Reflection 2011 R1, all installations are user-specific.
4 On the left, click Add files.
5 At the bottom of the panel, from the Add files to menu, select the appropriate system folder (page 68) for the file you're adding. The available locations are determined by the installation type you chose in step 4. For the list of locations where Reflection expects to find configuration files, see Table 1.
6 Click in the Add files to box and type the rest of the path. The final entry should be one of the following:
• [PersonalFolder]\Attachmate\Reflection\keyboards
• [ProgramFilesFolder]\Attachmate\Reflection\keyboards
Important! The folder location you add must already exist on all target computers.
7 Click the Add button, browse to Users\<username>\Documents\Attachmate\Reflection\keyboards to select myKeyboardMap.xkb, and click Open.
8 Repeat step 8 to add any other files to this folder location.
9 Repeat steps 6-8, as needed, to add files to other folder locations.
10 From the navigation pane, click Specify package information.
• In the Add/Remove name box, type the package name that will appear in the Windows Programs and Features control panel.
• In the Organization name box, enter the name of your department.
11 From the File menu, save the file as myConfigFiles.msi on the administrative installation point.

35
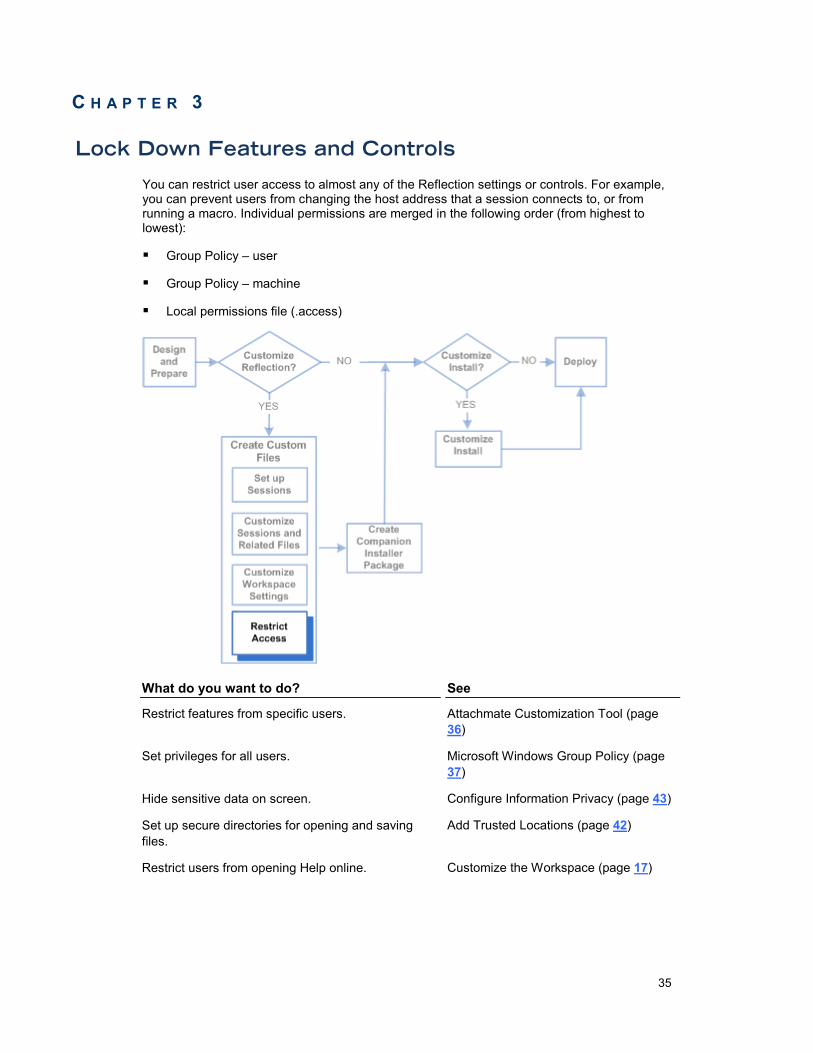
Lock Down Features and Controls
You can restrict user access to almost any of the Reflection settings or controls. For example, you can prevent users from changing the host address that a session connects to, or from running a macro. Individual permissions are merged in the following order (from highest to lowest):
Group Policy – user
Group Policy – machine
Local permissions file (.access)
What do you want to do? See
Restrict features from specific users. Attachmate Customization Tool (page 36)
Set privileges for all users. Microsoft Windows Group Policy (page 37)
Hide sensitive data on screen. Configure Information Privacy (page 43)
Set up secure directories for opening and saving files.
Add Trusted Locations (page 42)
Restrict users from opening Help online. Customize the Workspace (page 17)
C H A P T E R 3
Installation and Deployment Guide
36
Customize Access to Settings
Use this procedure to configure user access to certain features in Reflection.
1 From your administrative installation point, open the Attachmate Customization Tool from a shortcut (page 11) or by typing the following command line:
<path_to_setup>\setup.exe /admin
2 From the ACT navigation pane, click Specify install locations.
3 Under Installation type, select Installs only for the user who installs it.
4 From the navigation pane, click Modify user settings.
5 Under Application – Settings, select Reflection 2014 – actions.access and then click Define.
Permissions Manager opens in a separate window. This tool displays all of the controls (actions) and settings that can be restricted, organized into groups.
6 In the Items list, scroll down to showAutoCompleteSettingsAction. Then, under Accessibility, on the drop-down menu, choose Restricted.
7 Click Next, accept the default values, and then click Finish.
The settings are automatically saved in the actions.access file. The companion installer file is automatically configured to deploy this file to [AppDataFolder]\Attachmate\Reflection\Workspace\<data_folder>.
Note: The <data_folder> name is specific to the version of Reflection.
8 From the File menu, choose Save As and save the companion installer file on the administrative installation point as myConfigFiles.msi. Then, from the File menu, choose Exit.

Lock Down Features and Controls
37
Using Microsoft Group Policy
As an administrator, you can limit users' ability to modify their workspace or session documents by setting permissions from the Microsoft Group Policy Management Console using group policy templates.
Note: To use this feature, you must be running Windows 8, Windows 7, Windows Vista, Windows XP SP1, or Windows Server 2003 R2 or later on an administrative machine. For more information about managing group policy, see Managing Group Policy ADMX Files Step-by-Step Guide (http://technet.microsoft.com/en-us/library/cc709647(v=ws.10).aspx).
Reflection installs a set of group policy templates (ADM and ADMX files) to the following directory:
\Program Files\Attachmate\Reflection\Configuration\GroupPolicy
ADMX files
ADMX files are divided into language-neutral files (.admx) and language-specific resource files (.adml), available to all Group Policy administrators. These factors allow Group Policy tools to adjust their UI according to the administrator's configured language. (In Reflection 2014 Release 2, only US English files are included.)
Reflection setup.exe installs ADMX files to:
...\install_dir\Configuration\GroupPolicy\ADMX
It installs ADML files to the following directory: ...\install_dir\Configuration\GroupPolicy\ADMX\en-us
Reflection provides the following ADMX Group Policy files. Each of these files has a corresponding ADML language file.
This file Controls access to
ACTIONS.admx Actions
APPLICATION.admx Reflection Workspace
RD3X.admx Mainframe terminal
RD5X.admx AS/400 terminal
RDOX.admx UNIX/OpenVMS terminal
ReflectionWorkspace.admx Root-level ADMX file
Note: This directory also includes the ReflectionPCIDSS.admx file. This file is used to configure information privacy through Group Policy and is not used to control access.
ADM files
ADM files contain the Group Policy definitions and resource strings in the same file.
Reflection setup.exe installs ADM files to:
Installation and Deployment Guide
38
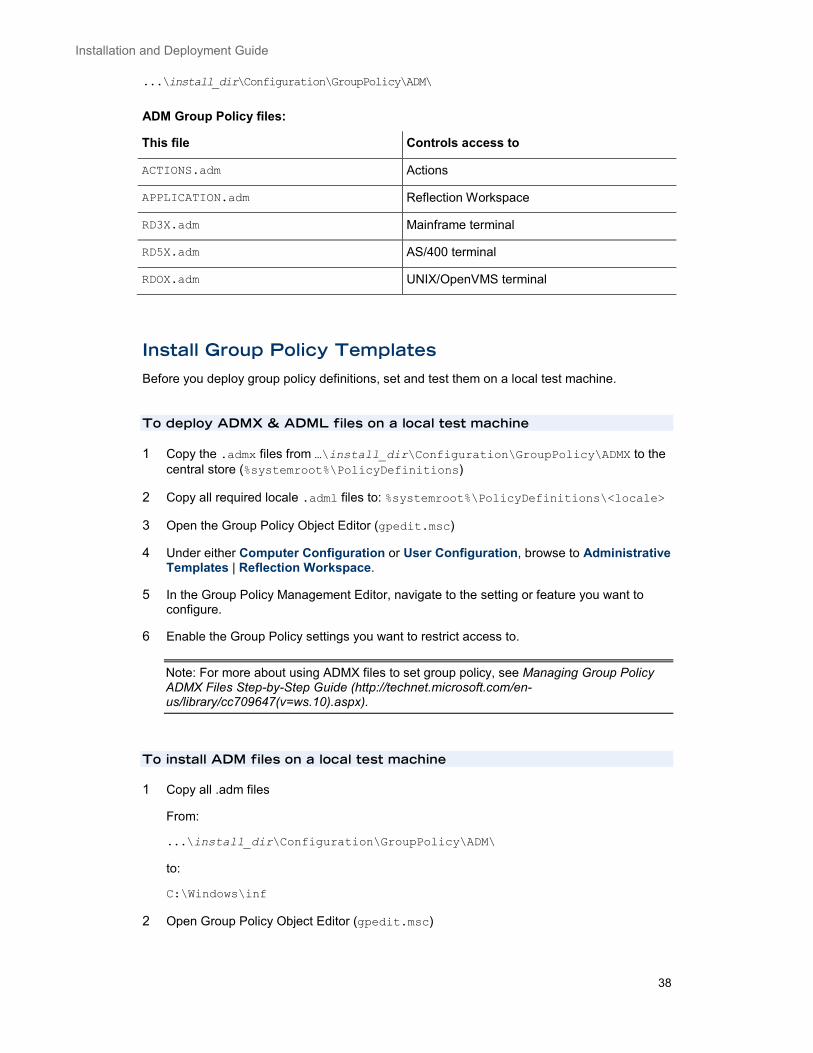
...\install_dir\Configuration\GroupPolicy\ADM\
ADM Group Policy files:
This file Controls access to
ACTIONS.adm Actions
APPLICATION.adm Reflection Workspace
RD3X.adm Mainframe terminal
RD5X.adm AS/400 terminal
RDOX.adm UNIX/OpenVMS terminal
Install Group Policy Templates Before you deploy group policy definitions, set and test them on a local test machine.
To deploy ADMX & ADML files on a local test machine
1 Copy the .admx files from …\install_dir\Configuration\GroupPolicy\ADMX to the central store (%systemroot%\PolicyDefinitions)
2 Copy all required locale .adml files to: %systemroot%\PolicyDefinitions\<locale>
3 Open the Group Policy Object Editor (gpedit.msc)
4 Under either Computer Configuration or User Configuration, browse to Administrative Templates | Reflection Workspace.
5 In the Group Policy Management Editor, navigate to the setting or feature you want to configure.
6 Enable the Group Policy settings you want to restrict access to.
Note: For more about using ADMX files to set group policy, see Managing Group Policy ADMX Files Step-by-Step Guide (http://technet.microsoft.com/en-us/library/cc709647(v=ws.10).aspx).
To install ADM files on a local test machine
1 Copy all .adm files
From:
...\install_dir\Configuration\GroupPolicy\ADM\
to:
C:\Windows\inf
2 Open Group Policy Object Editor (gpedit.msc)

Lock Down Features and Controls
39
3 Under either User Configuration or Computer Configuration, Right-click on Administrative Templates and select Add/Remove Templates.
4 Click Add, select the Reflection ADM files you need to add, and then click Open.
The Reflection ADM files are listed in the Add/Remove Templates dialog box, in the Current Policy Templates list.
5 Under either Computer Configuration or User Configuration, browse to Administrative Templates | Classic Administrative Templates (ADM) | Reflection Workspace.
6 In the Group Policy Management Editor, navigate to the setting or feature you want to configure.
7 Enable the Group Policy settings to which you want to restrict access.
Notes: Registry keys are added when policy settings are Enabled. When Not Configured or Disabled, no key is present. For more about using ADM files to set group policy, see Add or remove an Administrative Template (.adm file) http://technet.microsoft.com/en-us/library/cc739134.aspx.
Set Access with Group Policy
To set access with Group Policy Object Editor
1 In the Group Policy Management Editor, navigate to the setting or feature you want to configure.

Installation and Deployment Guide
40
The following example shows all shipping ADMX files loaded into the GPO Editor under User Configuration. Group Policies can be set at the machine (Computer Configuration) or user (User Configuration) levels.
2 Enable the Group Policy settings you want to use.
The following example shows the following:
• The current node is the RD3X Document\Connection\TN3270Basic group.
• All the settings for this group are listed in the right-hand panel.

Lock Down Features and Controls
41
• The Restrict ConnectionTimeout setting policy is Enabled. This setting for 3270 display sessions is restricted (it requires UAC elevation on Windows 8, Windows 7, and Vista computers and is disabled on Windows XP computers).
Registry keys are added when policy settings are Enabled. These keys remain in the registry when policy settings are Disabled. No key is present when policy settings are Not Configured.
The following example shows the registry corresponding to the example above, with the Restrict ConnectionTimeout setting policy setting enabled.
HKEY_CURRENT_USER\Software\Policies
Protect Data and Privacy
Use the Trust Center to protect your working environment from information theft, and your data from potential damage caused by opening documents from non-trusted sources.
What do you want to do? See
Define locations from which you can safely open (and store) documents.
Add Trusted Locations (page 43)
Mask sensitive data (such as credit card numbers) with privacy filters.
Configure Information Privacy (page 43)
Installation and Deployment Guide
42
Control access to the Reflection API and control the execution of actions invoked by a macro or API call.
Configure API and Macro Security (page 44)
Add Trusted Locations A trusted location is a directory that is designated as a secure source for opening files. By default, Reflection Attachmate Reflection 2014 allows users to open documents only in directories specified as trusted locations in the Reflection settings. Attachmate Reflection 2014 specifies three trusted locations in the workspace Application.settings file in the program directory.
When you add other locations, these locations are saved in the Application.settings file in the user data directory folder. If you add trusted locations, you will need to deploy this file.
To set up a trusted location
1. On a workstation on which you have installed Reflection, open the Attachmate Customization Tool from a desktop shortcut (if you set up a shortcut) or from a command line as follows:
<path_to_setup>\setup.exe /admin
2. In the Select Customization dialog box, select Create a new Companion installer, and then click OK.
3. On the navigation pane, click Specify install locations.
4. Under Installation type, select Installs only for the user who installs it.
5. On the navigation pane, click Modify User Settings.
6. In the Make changes to user settings panel, under Application - Settings, select Reflection 2014 Workspace Settings and then click Define.
7. Under Trust Center, click Specify Trusted Locations and then click Add new location.
8. Under Path, browse to the location you want to add.
9. To trust all folders within the trusted location, click Subfolders.
10. Click OK to close the Reflection Workspace dialog box.
11. Save the companion file on your administrative installation point.
Custom settings are automatically saved in the Application.settings file. The companion installer file is automatically configured to deploy this file to [AppDataFolder]\Attachmate\Reflection\Workspace\data_folder (for a single user) or to [CommonAppDataFolder]\Attachmate\Reflection\Workspace\data_folder (for all users)
where data_folder is specific to the version of Reflection. For example, for Reflection 2014 R1, this folder is R2014_R1.

Lock Down Features and Controls
43
Configure Information Privacy With Reflection Information Privacy, you can protect sensitive data such as credit card Primary Account Numbers (PANs), phone numbers, and US Social Security numbers. Information Privacy allows you to configure Reflection so that the sensitive data is not displayed on the screen or in productivity features, such as Screen History. It also allows you to require secure connections.
You can configure Information Privacy with the Attachmate Customization Tool or with Group Policy.
To set up Information Privacy with the Attachmate Customization Tool
1 From your administrative installation point, open the Attachmate Customization Tool from a shortcut (page 11) or by typing the following command line:
<path_to_setup>\setup.exe /admin
2 In the Select Customization dialog box, select Create a new Companion installer, and then click OK.
3 On the navigation pane, click Specify install locations.
4 Under Installation type, select Installs only for the user who installs it.
5 On the navigation pane, click Modify User Settings.
6 In the Make changes to user settings panel, under Application - Settings, select Reflection 2014 Workspace Settings and then click Define.
7 Under Trust Center, click Set Up Information Privacy.
8 Follow the instructions in Set Up Information Privacy Dialog Box and in the Setting up Information Privacy (http://support.attachmate.com/manuals/reflection2014.html) pdf.
If you need to... Do this...
Redact certain patterns of data that are outside the realm of credit card formats (e.g., US Social Security numbers).
Set up Privacy Filter Redaction Rules and Privacy Filters.
Redact credit card Primary Account Numbers (PANs) to meet PCI DSS requirements.
PCI DSS (Payment Card Industry Data Security Standard) is a worldwide standard comprising technology requirements and process requirements designed to prevent fraud and is published by PCI Security Standards Council, LLC (https://www.pcisecuritystandards.org/). All companies who handle credit cards are likely to be subject to this standard.
Set up Primary Account Number (PAN) Redaction Rules and Primary Account Number (PAN) Detection Rules.
Require secure connections (as may be required for PCI DSS compliance).
Set up PCI DSS Rules.
9 When you have finished configuring Information Privacy, click OK.

Installation and Deployment Guide
44
Custom settings are automatically saved in the Application.settings file. The companion installer file is automatically configured to deploy this file to [AppDataFolder]\Attachmate\Reflection\Workspace\data_folder (for a single user) or to [CommonAppDataFolder]\Attachmate\Reflection\Workspace\data_folder (for all users)
where data_folder is specific to the version of Reflection. For example, for Reflection 2014 R1, this folder is R2014_R1.
To set up Information Privacy with Group Policy
1. Copy the following files to the central store as follows:
Copy these files To
ReflectionPCIDSS.admx and ReflectionWorkspace.admx in:
…\install_dir\Configuration\GroupPolicy\ ADMX
%systemroot%\PolicyDefinitions
ReflectionPCIDSS.adml and ReflectionWorkspace.adml in:
…\install_dir\Configuration\GroupPolicy\ ADMX\en-us
%systemroot%\PolicyDefinitions\ <locale>
2. Open the Group Policy Object Editor (gpedit.msc).
3. Under either the Computer Configuration or User Configuration branch, browse to Administrative Templates | Reflection Workspace | Information Privacy.
4. In the Information Privacy panel, select and edit the policy settings.
Note: If you want to include the default regular expressions used for Custom Detection Rules and Custom Exception Expressions, you must add these expressions through the Group Policy editor. For detailed instructions, see Technical Note 2576 (http://support.attachmate.com/techdocs/2576.html): Adding Regular Expressions for Custom Detection Rules and Custom Exception Expressions to Group Policy.
Configure API and Macro Security You can enable the Attachmate Reflection 2014 .NET API, and specify corresponding settings.
To set up API and macro and security
1 From your administrative installation point, open the Attachmate Customization Tool from a shortcut (page 11) or by typing the following command line:
<path_to_setup>\setup.exe /admin

Lock Down Features and Controls
45
2 In the Select Customization dialog box, select Create a new Companion installer, and then click OK.
3 On the navigation pane, click Specify install locations.
4 Under Installation type, select Installs only for the user who installs it.
5 On the navigation pane, click Modify User Settings.
6 In the Make changes to user settings panel, under Application - Settings, select Reflection 2014 Workspace Settings and then click Define.
7 Under Trust Center, click Set Up API and Macro Security.
8 Configure the API settings as follows:
To Select
Prevent custom applications from accessing this installation. Disable .Net API
Determine if Reflection legacy macros are supported, and to determine which legacy API has preference for the GetObject() method used to retrieve API COM objects. (Reflection supports multiple APIs, but can accept GetObject() calls for only one type of legacy API object at a time.)
Legacy API preference
9 Under Action Permissions, specify what you want to happen if an action that has been restricted through Group Policy or the Permissions Manager is initiated through a macro or API call.
To Select
On a computer running Windows 8 or Windows 7, select to control restricted actions with User Account Control (UAC). -or- On a computer running Windows XP, select to prevent restricted actions from running.
Require elevated rights; do not execute on XP
Select to run restricted actions that are initiated through a macro or API call as expected. The same actions won't run if they are initiated through the user interface.
Execute the action
Customize User and Group Access
You can use the Attachmate Customization Tool (ACT) to lock down access when you create your companion installer package. The resulting .access files are automatically saved to the correct directory and included in the companion installer package. If you need to make changes, you can modify these .access files by opening the existing Companion installer in ACT or by using Permissions Manager (page 49).
You can also lock down features using Microsoft Group Policy. For more information, see Lock Down Features and Controls (page 35).

Installation and Deployment Guide
46
To set user and group access in ACT
1 From your administrative installation point, open the Attachmate Customization Tool from a shortcut (page 11) or by typing the following command line:
<path_to_setup>\setup.exe /admin
2 In the Select Customization dialog box, select Create a new Companion installer.
3 On the left pane, select Specify install locations.

Lock Down Features and Controls
47
4 Under Installation type, select Installs only for the user who installs it.
5 In the left pane, select Modify user settings.
Under Application - Settings, the Permissions Manager displays groups of configurable items. These configurable items are listed by their internal names, which may not exactly match the user interface item. The item's Accessibility indicates whether the user can configure the item (Full) or if administrator assistance is required to configure the item (Restricted).
6 In the Make changes to user settings pane, select one of the .access options and click Define.
7 In Permissions Manager, under Groups, select the group of settings you want to control access to (for example, Document\Connection\TN3270Basic).
8 In the Items box, in the Accessibility column for the item (or items) you want to restrict, click Full and then select Restricted from the drop down menu.

Installation and Deployment Guide
48
In the following example, the Accessibility level for DeviceName, Host, and Port is Restricted. The resulting rd3x.access file limits access to these three settings.
9 Under Additional security options, select how to control session file encryption:
To do this Select
Configure all sessions so that users can open only encrypted display session files.
User can open only encrypted session files
Configure all sessions so that users can save a display session only if it is encrypted.
User can save only encrypted session files
10 From the File menu, choose Save As and save the companion installer package.
The companion installer package automatically specifies to deploy this .access file to [AppDataFolder]\Attachmate\Reflection\Workspace\data_folder.
Note: The name of the data_folder is R2014_versionName. (For example, the data_folder name in Reflection 2014 R1 is R2014_R1.)
By default, [AppDataFolder] is defined as:
(Windows 8, 7 and Vista) Users\<yourUserName>\AppData\Roaming\
(Windows XP) Documents and Settings\<yourUserName>\Application Data\
Notes:
Make sure to set file access rights on .access files to prevent users from deleting, replacing, or editing them.
To deploy files to this folder, you will need to use a deployment tool that allows you to install the companion installer package as the user.

Lock Down Features and Controls
49
When accessing a setting via an API, such as executing a macro, a setting with restricted access cannot be modified. (When attempting to set a restricted setting via an API, an error is logged.)
Edit Access Files in Permissions Manager You can lock down access by editing .access files outside of the Attachmate Customization Tool. This requires that you manually package and install the customized .access files.
this is one way of locking down files but that also Group Policy can be used and then provide a link to Lock Down Features and Controls (the Group Policy section). The Lock Down Features and Controls section references and recommends using .access files so something similar in Edit Access File in Permission Manager.
The following access file templates are distributed with Attachmate Reflection 2014:
This File Controls access to…
actions.access Attachmate Reflection 2014 actions (for example, Auto Complete)
application.access Attachmate Reflection 2014 workspace settings
rd3x.access Attachmate Reflection 2014 3270 terminal settings
rd5x.access Attachmate Reflection 2014 5250 terminal settings
rdox.access Attachmate Reflection 2014 VT terminal settings
Important: Be sure to set file access rights on .access files that you deploy to prevent users from deleting, replacing, or editing them.
To set access with Permissions Manager
1 On a workstation to which you have installed Reflection, log on as administrator and in the Attachmate Reflection 2014 install folder, run AccessConfig.exe.
2 When prompted to create a new permission file, or edit an existing one, choose Create new permission file.
3 When prompted with a list of access file templates, choose the type of permission file to create.
4 Under Groups, select the type of setting to control access to (for example, the Document\Connection\TN3270Basic group).
5 In the Items box, in the Accessibility field for the item (or items) you want to restrict, click Full and then select Restricted from the drop down menu.
6 If you are configuring rd3x.access, rd5x.access, or rdox.access files, under Additional security options, select how to control session file encryption:

Installation and Deployment Guide
50
To do this Select
Configure all sessions so that users can open only encrypted display session files.
User can open only encrypted session files
Configure all sessions so that users can save a display session only if it is encrypted.
User can save only encrypted session files
7 Make sure to deploy the .access files to [AppDataFolder]\Attachmate\Reflection\ Workspace\R2014_version.
Important!
To deploy files to the R2014_version folder, your deployment tool must allow you to install the companion installer package as the user.
Setting session encryption options in an .access file affects only the associated session type. For example, limiting users to opening only encrypted session files in rd3x.access only affects 3270 terminal session files, and not 5250 session files..
When accessing a setting via an API, such as executing a macro, a setting with restricted access cannot be modified. (When attempting to set a restricted setting via an API, an error is logged.)
Restrict Actions (actions.access) In many cases, an action can be accessed multiple ways. For example, you can restrict access to the Clipboard Settings action (clipboardSettingsAction). However, if the user has access to the Document Settings action (settingsAction), Clipboard settings will still be accessible.
Item Name UI Description
appointmentAction Create an Outlook appointment that includes the selected host data in the message field.
backHistoryAction View the previous host screen in ready-only mode.
clearAllAction Remove all text from the display memory, including what's on the screen.
clearDisplayAction Remove all text from the screen. By default, Reflection saves this text to the display memory.
clearSelectionAction Clear the selection by clicking somewhere.
clipboardSettingsAction Open the Clipboard Settings dialog box to configure settings that control how the Cut, Copy, and Paste functions work.
closeAction Close the current document.
codePageSettingsAction Open the Select Host Code Page dialog box to specify

Lock Down Features and Controls
51
the host code page for your display session.
connectAction Connect to the host for the current session document.
connectDisconnectAction Connect to the host for the current session document, and then invoke again to disconnect.
contactAction Create a new contact in Outlook that includes the selected host data in the Notes field.
contextMenuEditorAction Open the Context Menu Editor.
copyAction Copy the selected text to the Clipboard.
copyAppendAction Add the selected text to the Clipboard.
cutAction Delete the selected text and copy it to the Clipboard.
cutAppendAction Delete the selected text and add it to the Clipboard.
disconnectAction Disconnect from the host for the current session document.
emailMessageAction Create an Outlook e-mail message that includes the selected host data.
exitAction Quit the application.
fileTransferAction Open the Transfer dialog box.
forwardHistoryAction View the next screen in your screen history sequence.
ftpFileTransferAction Open Reflection FTP Client.
fullScreenViewAction Hide the Ribbon, and expand the workspace to fill your computer screen.
globalSettingsAction Open the Reflection workspace configuration settings.
Workspace configuration settings affect all terminal session and Web page documents opened in Reflection. Workspace configuration settings include security, file locations, and other settings related to Reflection.
helpAction Open Help from the main workspace Help button.
hostConnectionSettingsAction Configure the host connection for the current session document.
hotspotsSettingsAction Open the Set Up Hotspot Display Settings dialog box.
keyboardExtendSelection Extend the screen selection using the keyboard.
keyboardMapperAction Display the keyboard map.
launchApplicationAction Launch an external application from the Reflection workspace using a customized UI element.
launchSupportWebsiteAction Open the Attachmate Support site from the Help menu.
launchVbaAction Open the Visual Basic editor to create a VBA macro based on objects defined by the active session.

Installation and Deployment Guide
52
layoutCascadeAction Arrange all open document windows in a cascade. The title bar of each window remains visible.
layoutHorizontalAction Arrange all open document windows horizontally.
layoutSettingsAction Open the Layout Settings dialog box.
layoutVerticalAction Arrange all open document windows vertically.
lightPenAction Simulate a light pen selection with your mouse or keyboard.
macroSecurityAction Set macro security options to protect a macro from accidental changes.
mainframeTransferChunkAction
Open the Transfer Settings dialog box.
manualCaptureAction Manually capture the current screen.
mapKeystrokeAction Open the Keyboard Mapper to associate a keystroke with a host terminal key or to create a keyboard shortcut.
modelSettingsAction Open the basic host connection settings page to specify the terminal model you want to emulate.
moveCursorAction Move the cursor with a mouse click.
moveHostCursorAction Move the cursor by sending the correct arrow keys to the host so that it moves the cursor relative to its current position.
newDocumentAction Create a new document of any kind from the Workspace menu or the Quick Access toolbar.
nextWindowAction Make the next document or task pane active.
noteAction Create an Outlook "sticky" note that includes the selected host data.
officeToolsPaneAction Open the Office Tools task pane.
openAction Open any kind of document from the Workspace menu or the Quick Access toolbar.
openURLAction Open a Web page from within Reflection.
pageSetupAction Open the Page Setup dialog box.
pasteAction Paste data from the Clipboard to the current cursor location.
pasteNextAction Insert the remaining text in the paste next buffer within the host application.
pauseMacroAction Pause a recording macro.
playBackTraceAction Select a trace file to play back.
playNextTraceRecordAction Play the next record in the current trace file.
playPreviousTraceRecordActio Play the previous record in the current trace file.

Lock Down Features and Controls
53
n
printAction Print the current document from the Workspace menu or the Quick Access toolbar.
printSetupAction Open the Print Setup dialog box.
processRUOTraceAction Process a trace file to generate a Reflection Basic script file, or to add system details to the text format report.
quickKeysAction Open a gallery of buttons that you can click to send PA keys, PF keys, or other commands to the host.
quickPrintAction Print the current document without opening the Print dialog box.
recentTypingPaneAction Open the Recent Typing task pane.
recordMacroAction Record a macro.
runEBEditAction Run EXTRA! Basic Editor.
runHostExplorerMacro Run a macro that contains Hummingbird Basic commands.
runLegacyExtraMacroAction Open an EXTRA! file that contains macros, and select one to run.
runLegacyMacroAction Run an embedded legacy Reflection macro.
runLegacyMacroWithDataAction
Run an embedded legacy Reflection macro with data. (This allows the user to type parameters to execute with the macro.)
runLegacyRBEditAction Run Reflection Basic Editor.
runLegacyRBMacroAction Run a legacy Reflection Basic macro.
runLegacyReflectionMacroAction
Run an external legacy Reflection macro.
runMacroAction Run a Reflection Workspace macro.
runPCommMacroAction Open an IBM Personal Communications file that contains a macro.
RunQWSMacroAction Open a QWS3270 file that contains a macro.
runRCLScriptAction Run an RCL script.
runRumbaMacroAction Open a RUMBA file that contains macros, and select one to run.
runSupportToolAction Runs a utility to help Attachmate Support collect Reflection application data
saveAction Save the current document from the Workspace menu or the Quick Access toolbar.
saveAsAction Save the current document with a new name or location.
saveLayoutAction Save the current layout.

Installation and Deployment Guide
54
saveRSFTAction Save the current document configuration as a template.
scratchPadPaneAction Open the Scratch Pad task pane.
screenHistoryPaneAction Open the Screen History task pane.
selectAllAction Select all data on the screen.
sendHostKeyAction Send a preconfigured key to the host.
sendHostTextAction Send some preconfigured text to the host.
sendWordAction Send the word at the current cursor location to the host, followed by a Return (VT) or an Enter (3270/5250) key. This is typically mapped to a mouse button.
settingsAction Open the document settings from the Workspace menu or the Quick Access toolbar.
setupLoggingAction Open the Logging Settings dialog box.
showAPIGuideAction Open the .NET API Guide.
showAPIHelpAction Open the .NET API Help.
showAutoCompleteSettingsAction
Open the Configure Auto Complete dialog box.
showAutoExpandAction Open the Configure Auto Expand dialog box.
showContextMenuAction Open the context menu. This is the default action of the right mouse button.
showHelpAboutAction Show the About dialog from the Help menu.
showLiveScreenAction Return to the current host screen for your session from anywhere in the screen history sequence.
showMouseMapperAction Open the Mouse Mapper.
showPrivacyFilterAction Open the Set Up Privacy Filters dialog box.
showProductivitySettingsAction
Open the Configure Productivity Defaults dialog box.
showRecentTypingSettingsAction
Open the Configure Recent Typing dialog box.
showScreenHistorySettingAction
Open the Configure Screen History dialog box.
showSpecificContextMenuAction
Specifies the context menu to open when the action is performed.
showSpellCheckAction Open the Configure Spell Checking dialog box.
showUIDesignerAction Open the UI Designer to customize your Ribbon.
showVBAGuideAction Open the VBA Guide.
showVBAHelpAction Open the VBA Help.
spellCheckFieldAction Check spelling in the currently active host field.

Lock Down Features and Controls
55
spellCheckScreenAction Check spelling in the current host screen.
startLoggingAction Turn logging on for a VT session.
startTraceAction Create a new trace and begin the trace process.
stopLoggingAction Turn logging off for a VT session.
stopMacroAction Stop the currently running macro.
stopTraceAction Stop the currently active trace.
taskAction Create an unscheduled Outlook task that includes the selected host data in the task body field.
terminalAppearanceSettingsAction
Open the Configure Terminal Settings dialog box.
themeSettingsAction Open the Manage Themes dialog box.
toggleMacroRecordAction Record your actions in a VBA macro.
togglePauseMacroAction Pause the macro recording process.
toggleRibbonStateAction Hide the Ribbon, then invoke again to show the Ribbon.
undoAction Undo the last cut or paste.
vbaMacroDialogAction Open the Run Macro dialog box to select a macro to run.
wordDocumentAction Create a Word document that includes the selected host data.
Installation and Deployment Guide
56
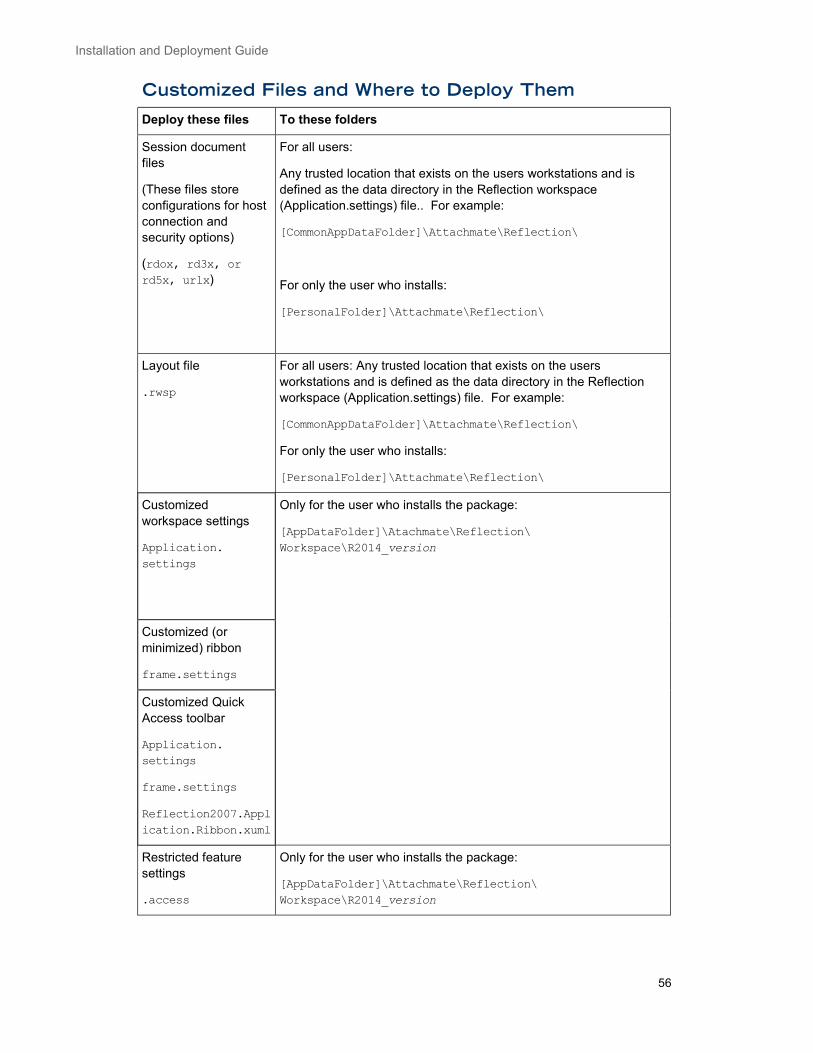
Customized Files and Where to Deploy Them
Deploy these files To these folders
Session document files
(These files store configurations for host connection and security options)
(rdox, rd3x, or rd5x, urlx)
For all users:
Any trusted location that exists on the users workstations and is defined as the data directory in the Reflection workspace (Application.settings) file.. For example:
[CommonAppDataFolder]\Attachmate\Reflection\
For only the user who installs:
[PersonalFolder]\Attachmate\Reflection\
Layout file
.rwsp
For all users: Any trusted location that exists on the users workstations and is defined as the data directory in the Reflection workspace (Application.settings) file. For example:
[CommonAppDataFolder]\Attachmate\Reflection\
For only the user who installs:
[PersonalFolder]\Attachmate\Reflection\
Customized workspace settings
Application. settings
Only for the user who installs the package:
[AppDataFolder]\Atachmate\Reflection\ Workspace\R2014_version
Customized (or minimized) ribbon
frame.settings
Customized Quick Access toolbar
Application. settings
frame.settings
Reflection2007.Application.Ribbon.xuml
Restricted feature settings
.access
Only for the user who installs the package:
[AppDataFolder]\Attachmate\Reflection\ Workspace\R2014_version

Lock Down Features and Controls
57
Deploy these files To these folders
Kerberos settings
Rscrb5.xml
For all users: Any trusted location that exists on the users workstations and is defined as the data directory in the Reflection workspace (Application.settings) file. By default, these directories are:
[CommonAppDataFolder]\Attachmate\Reflection
Only for the user who installs the package:
[AppDataFolder]\Attachmate\
These locations are required if you want the Kerberos settings to be configured automatically the first time a user uses Reflection Kerberos.
Secure Shell User-specific files
config
known_hosts
[PersonalFolder]\Attachmate\Reflection\.ssh
Secure Shell User-specific files
Reflection Certificate Manager settings:
.pki_config
[PersonalFolder]\Attachmate\Reflection\.pki
Secure Shell User-specific files
Reflection Trusted Certificate Authorities:
trust_store.p12
[PersonalFolder]\Attachmate\Reflection\.pki
Secure Shell Global files
Global Secure Shell client configuration file:
ssh_config
Global known hosts file: .ssh_known_hosts
Any trusted location that exists on the users workstations and is defined as the data directory in the Reflection workspace (Application.settings) file.. For example:
[CommonAppDataFolder]\Attachmate\Reflection

Installation and Deployment Guide
58
Deploy these files To these folders
Set up Secure Shell and SSL Global files
pki_config
trust_store.p12
A .pki subdirectory of the data directory. If a shared store exists, trusted roots are read exclusively from the shared store. Trusted roots you have configured for individual user accounts no longer have any effect. For example: [CommonAppDataFolder]\Attachmate\Reflection\.pki
FTP user-specific files
settings.rfw
For all users:
Any trusted location that exists on the users workstations and is defined as the data directory in the Reflection workspace (application.settings) file. For example: [CommonAppDataFolder]\Attachmate\Reflection\
For only the user who installs: [PersonalFolder]\Attachmate\Reflection\
rftp.xml [AppDataFolder]\Attachmate\Reflection
Custom keyboard map file
.xkb
For all users: A Keyboard Maps folder in a trusted location that exists on the users workstations and is defined as the data directory in the Reflection workspace (Application.settings) file. For example:
[CommonAppDataFolder]\Attachmate\Reflection\Keyboard Maps
For only the user who installs:
[PersonalFolder]\Attachmate\Reflection\ Keyboard Maps
Custom mouse map file
.xmm
For all users:
A Mouse Maps folder in any trusted location that exists on the users workstations and is defined as the data directory in the Reflection workspace (Application.settings) file.. For example:
[CommonAppDataFolder]\Attachmate\Reflection\Mouse Maps
For only the user who installs:
[PersonalFolder]\Attachmate\Reflection\ Mouse Maps
Define virtual buttons in terminal sessions
Hotspot files
.xhs
For all users:
A Hotspots Maps folder in any trusted location that exists on the users workstations and is defined as the data directory in the Reflection workspace (Application.settings) file.. For example:
[CommonAppDataFolder]\Attachmate\Reflection\Hotspots Maps
For only the user who installs:
[PersonalFolder]\Attachmate\Reflection\ Hotspots Maps

Lock Down Features and Controls
59
Deploy these files To these folders
Custom Ribbon Interface files
.xuml
For all users:
A CustomUI folder in any trusted location that exists on the users workstations and is defined as the data directory in the Reflection workspace (Application.settings) file.. For example:
[CommonAppDataFolder]\Attachmate\Reflection\CustomUI
For only the user who installs:
[PersonalFolder]\Attachmate\Reflection\ CustomUI
Custom appearance of a session
Theme files (if you use a custom file)
.themex
For all users:
A Themes folder in any trusted location that exists on the users workstations and is defined as the data directory in the Reflection workspace (Application.settings) file.. For example:
[CommonAppDataFolder]\Attachmate\Reflection\Themes
For only the user who installs:
[PersonalFolder]\Attachmate\Reflection\ Themes
Custom Office Productivity features
Word and PowerPoint templates
.dotx or. ppt
User templates .rsft [AppDataFolder]\Attachmate\Reflection\ Workspace\R2014_version\templates


61
Modify the Installation
You can customize how Reflection is installed, such as specifying the installation directory, removing or adding commands from the Windows Uninstall or change a program list, and other options. To do this, use the Attachmate Customization Tool to create a transform file (.mst) and then deploy it with the base installation package.
What do you want to do?
Create a Transform 62
Change the Installation Directory 63
Modify Setup Properties 64
Add/Modify Registry Data 64
Select Features, Components, and Languages 65
Add (Chain) Installations and Run Programs 66
Apply a Transform to Your Installation 69
C H A P T E R 4
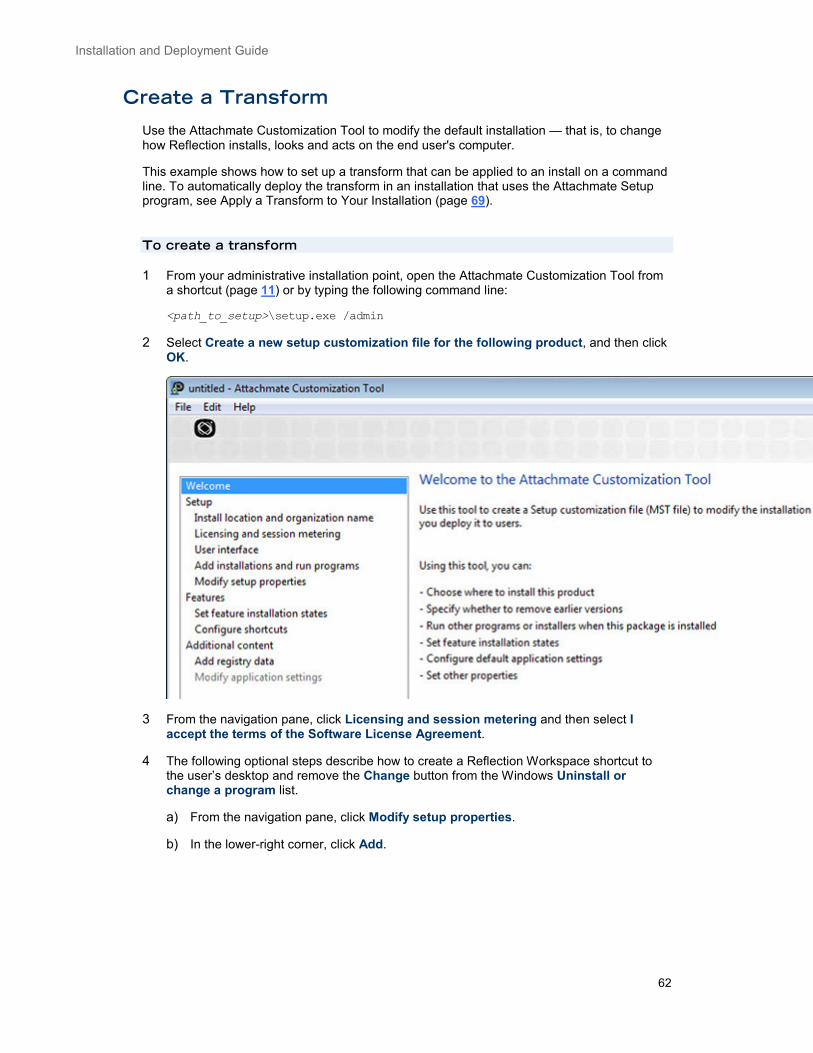
Installation and Deployment Guide
62
Create a Transform
Use the Attachmate Customization Tool to modify the default installation — that is, to change how Reflection installs, looks and acts on the end user's computer.
This example shows how to set up a transform that can be applied to an install on a command line. To automatically deploy the transform in an installation that uses the Attachmate Setup program, see Apply a Transform to Your Installation (page 69).
To create a transform
1 From your administrative installation point, open the Attachmate Customization Tool from a shortcut (page 11) or by typing the following command line:
<path_to_setup>\setup.exe /admin
2 Select Create a new setup customization file for the following product, and then click OK.
3 From the navigation pane, click Licensing and session metering and then select I accept the terms of the Software License Agreement.
4 The following optional steps describe how to create a Reflection Workspace shortcut to the user’s desktop and remove the Change button from the Windows Uninstall or change a program list.
a) From the navigation pane, click Modify setup properties.
b) In the lower-right corner, click Add.
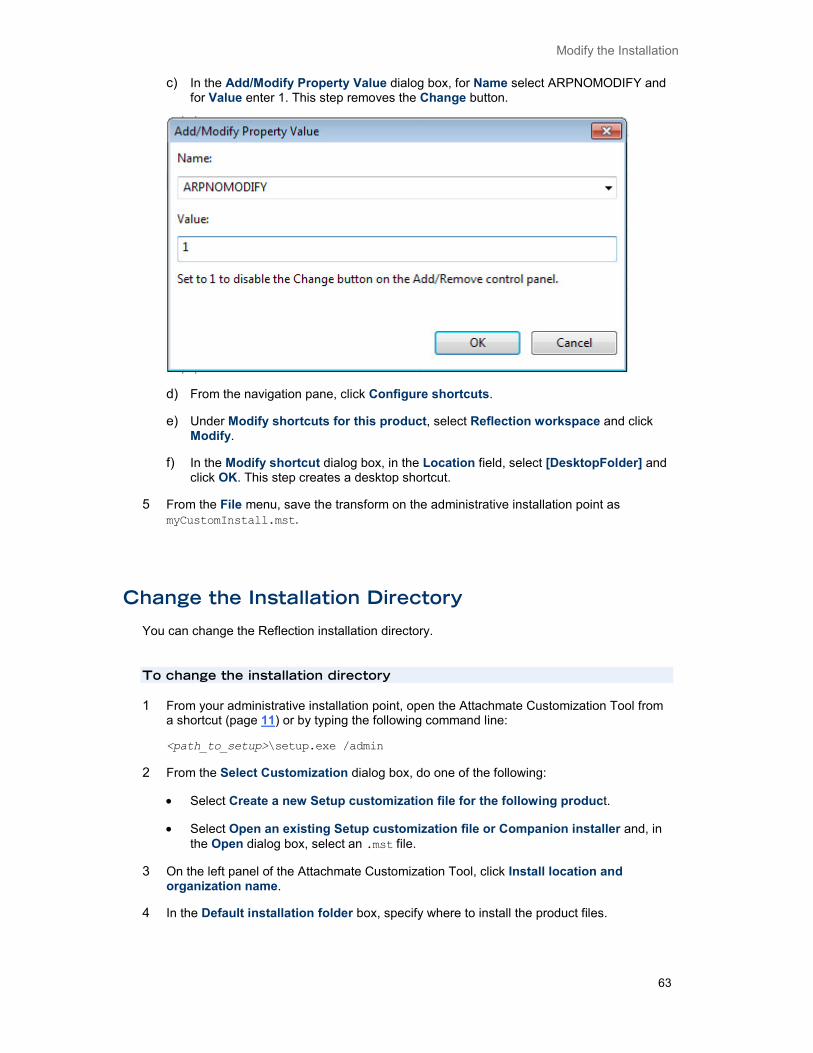
Modify the Installation
63
c) In the Add/Modify Property Value dialog box, for Name select ARPNOMODIFY and for Value enter 1. This step removes the Change button.
d) From the navigation pane, click Configure shortcuts.
e) Under Modify shortcuts for this product, select Reflection workspace and click Modify.
f) In the Modify shortcut dialog box, in the Location field, select [DesktopFolder] and click OK. This step creates a desktop shortcut.
5 From the File menu, save the transform on the administrative installation point as myCustomInstall.mst.
Change the Installation Directory
You can change the Reflection installation directory.
To change the installation directory
1 From your administrative installation point, open the Attachmate Customization Tool from a shortcut (page 11) or by typing the following command line:
<path_to_setup>\setup.exe /admin
2 From the Select Customization dialog box, do one of the following:
• Select Create a new Setup customization file for the following product.
• Select Open an existing Setup customization file or Companion installer and, in the Open dialog box, select an .mst file.
3 On the left panel of the Attachmate Customization Tool, click Install location and organization name.
4 In the Default installation folder box, specify where to install the product files.

Installation and Deployment Guide
64
Note: List items that refer to folders (for example, [ProgramMenuFolder]) are pre-defined folder keywords. You can create customized directories by adding new folder names with typical directory syntax (such as, [ProgramFilesFolder]\My Folder). Alternatively, you can enter a fully qualified path (for example, C:\Program Files\My Folder), as long as that location is known to exist on the target machine.
Modify Setup Properties
In some cases you may want to customize your installation using Windows Installer (MSI) properties that support features not configurable on other Attachmate Customization Tool panels. For example, the installer property ARPHELPLINK, sets the URL used by the support link in the Programs and Features list.
If you want to create a custom (non-default) user data location that will be used by all installed Reflection products, specify the product-specific property WRQ_USERDIR. This property affects only those applications whose default user data directory is %personalfolder%\Attachmate\Reflection. Reflection applications that use this default data location include: Reflection Workspace, Reflection FTP Client, Reflection Kerberos Manager, Reflection Key Agent, Reflection IBM Printer, and Reflection X (legacy). Reflection X Advantage does not use this user data location.
To modify installation properties
1 From your administrative installation point, open the Attachmate Customization Tool from a shortcut (page 11) or by typing the following command line:
<path_to_setup>\setup.exe /admin
2 From the Select Customization dialog box, select any of the startup options. You can modify installer properties in both transforms (.mst) and companion installers (.msi).
3 From the Attachmate Customization Tool navigation pane, select Modify setup properties.
4 Click Add to open the Add/Modify Property Value dialog box.
5 In the Name box, use the drop-down list to select commonly-used public properties that are standard to the Windows Installer. Select an item in the list to see a brief description of the selected property. For additional information about Windows Installer properties, see the Microsoft Windows Installer Guide (http://msdn.microsoft.com/en-us/library/windows/desktop/aa372845(v=vs.85).aspx). Some Attachmate products support additional properties that do not appear in the drop-down list. You can configure these properties by manually entering the property name.
6 From the File menu, select Save As and save the file to the same folder as the installer package file for Reflection (setup.exe).
Add/Modify Registry Data
Getting there
1 From your administrative installation point, open the Attachmate Customization Tool from a shortcut or by typing the following command line:
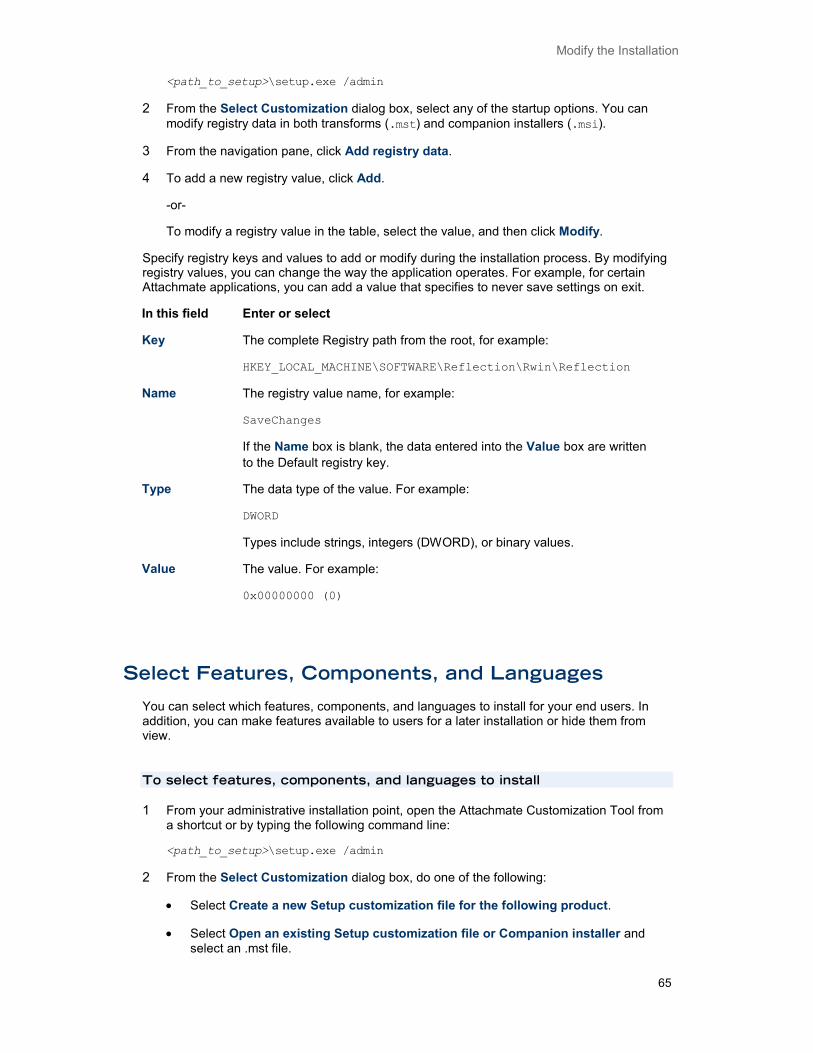
Modify the Installation
65
<path_to_setup>\setup.exe /admin
2 From the Select Customization dialog box, select any of the startup options. You can modify registry data in both transforms (.mst) and companion installers (.msi).
3 From the navigation pane, click Add registry data.
4 To add a new registry value, click Add.
-or-
To modify a registry value in the table, select the value, and then click Modify.
Specify registry keys and values to add or modify during the installation process. By modifying registry values, you can change the way the application operates. For example, for certain Attachmate applications, you can add a value that specifies to never save settings on exit.
In this field Enter or select
Key The complete Registry path from the root, for example:
HKEY_LOCAL_MACHINE\SOFTWARE\Reflection\Rwin\Reflection
Name The registry value name, for example:
SaveChanges
If the Name box is blank, the data entered into the Value box are written to the Default registry key.
Type The data type of the value. For example:
DWORD
Types include strings, integers (DWORD), or binary values.
Value The value. For example:
0x00000000 (0)
Select Features, Components, and Languages
You can select which features, components, and languages to install for your end users. In addition, you can make features available to users for a later installation or hide them from view.
To select features, components, and languages to install
1 From your administrative installation point, open the Attachmate Customization Tool from a shortcut or by typing the following command line:
<path_to_setup>\setup.exe /admin
2 From the Select Customization dialog box, do one of the following:
• Select Create a new Setup customization file for the following product.
• Select Open an existing Setup customization file or Companion installer and select an .mst file.

Installation and Deployment Guide
66
3 From the Attachmate Customization Tool navigation pane, select Set feature installation states, and for each feature, choose from the following states:
Choose To do this
Feature will be installed on local hard drive
Add a feature to the installation.
Note: Some features listed under a selected feature may not be included when you select to install the higher-level feature. The features that are included are the recommended defaults. If you select the higher level feature a second time, all sub-features will be included.
Feature will be installed when required
Advertise a feature.
Feature will be unavailable Leave a feature uninstalled. End users will still be able to select and install the item from the Windows Program and Features or the Add or Remove Programs control panel.
Feature will be hidden from view Leave a feature uninstalled and hidden. The feature will not appear in the Windows Program and Features or the Add or Remove Programs control panel.
Add (Chain) Installations and Run Programs
Reflection makes it easy to "chain" installs. You can set up an install to run companion install packages automatically before or after the primary installation. You can also specify to run other scripts or programs. For example, the Reflection product Help is available as a separate program (.msi) that you can add to the base product installation. See Install the Reflection Help (page 67).
Note: This method of chaining installations applies only to installs performed with setup.exe. It does not apply to installs that use the MSI command-line method.
To chain installations and programs
1 From your administrative installation point, open the Attachmate Customization Tool from a shortcut (page 11) or by typing the following command line:
<path_to_setup>\setup.exe /admin
2 Select Create a new setup customization file for the following product, and then click OK.
3 From the navigation pane, select User Interface and then select Use this customization with interactive installs using setup.exe.
4 From the navigation pane, select Add installations and run programs.
5 Click Add.

Modify the Installation
67
The Add/Modify Program Entry dialog box opens.
6 In the Target list, enter or select the folder where the program .exe file or the .msi file resides, and then enter the executable to run. For example:
msiexec.exe
7 Under Arguments, enter the command-line arguments to execute. For example:
/i my_installation.msi
8 To specify when to run the program, select one of the following:
• Run this program after base product has been installed
• Run this program before the base product has been installed.
Note: For most cases, select Run this program after the base product has been installed. If you select Run this program before the base product has been installed and the program fails, Reflection is not installed.
9 Repeat these steps to add other programs or .msi files.
10 To change the execution sequence, use the arrows next to Move in the lower-left area of the pane. To remove a program from the list, select it in the list and click Remove.
Install the Reflection Help By default, the Reflection Help browser opens from the Attachmate website. To open the Help from the local hard drive you must install the product Help after installing Reflection and change the Reflection Workspace (page 17) settings.
To configure the Reflection Workspace to open Help locally
1 Open the Reflection Workspace Settings dialog box.
The steps depend on your user interface mode.
User Interface Mode Steps
Ribbon (Office 2007) On the Reflection button , choose Reflection Workspace Settings.
Ribbon (Office 2010) On the File menu, choose Reflection Workspace Settings.
Reflection Browser On the Reflection menu, choose Settings and then Reflection Workspace Settings.
Mobile UI Tap the Gear icon and then select Reflection Workspace Settings.
2 Under Workspace Settings, select Configure Workspace Attributes.
3 Under Help System, select Use installed help system.

Installation and Deployment Guide
68
If Reflection can't find the help files on the local drive, it will start your default browser and open the help files from Attachmate.com.
To install the Help locally
Do one of the following:
• On a workstation where Reflection is already installed, from the installation image, open the HelpInstaller folder and double-click setup.exe.
- or -
• Chain the Help installer to the main installation, selecting Run this program after base product has been installed. For more information, see Add (Chain) Installations and Run Programs (page 66).
Note: If you install Reflection to a Windows Server and Enhanced Security (IE ESC) is enabled, viewing the Help will result in security prompts each time you open a page. To resolve this problem, do the following:
1 Turn off Internet Explorer Enhanced Security for users and administrators.
2 Turn Off Internet Explorer Enhanced Security on Windows 2008 Server.
3 Enable scripting for Internet Explorer. See Technical Note 2293 (http://support.attachmate.com/techdocs/2293.html).
Predefined System Folders When you configure destination locations using Attachmate Customization Tool, your options include a list of supported Windows system folder properties (http://msdn.microsoft.com/en-us/library/aa372057.aspx?ppud=4). During installation, the Windows installer expands these to show the appropriate location for your operating system. Default system folder locations for newer Windows operating systems (including Windows 8, Windows 7 and Windows Server 2008) are shown below.
The list of available folders for adding files to a companion installer depends on whether you are installing for all users (the default) or for individual users. (Configure this option using the Specify install locations pane.)
All-user installations
Property name Default Windows location Default path using Windows variables
[CommonAppDataFolder] C:\ProgramData %programdata%
[CommonDocumentsFolder] C:\Users\Public\Documents %windir%
[CommonFilesFolder] C:\Program Files\Common Files
%ProgramFiles%\Common Files
[ProgramFilesFolder] C:\Program Files %ProgramFiles%
[RootDrive] C:\ \

Modify the Installation
69
[WindowsFolder] C:\Windows %windir%
Individual user installations
Property name Default Windows location Path using Windows variables
[AppDataFolder] C:\Users\<user>\AppData\Roaming\
%appdata%
[LocalAppDataFolder] C:\Users\<user>\AppData\Local\
%localappdata%
[PersonalFolder] C:\Users\<user>\Documents\ %userprofile%\documents
[RootDrive] C:\ \
[%UserProfile] C:\Users\<user> %userprofile%
Apply a Transform to Your Installation
If you have created a transform to customize how Reflection is installed, you need to deploy the transform with the primary installation. (This is in contrast to companion installation packages, which can be chained with the primary installation or installed separately.) Any install started with setup.exe or with command-line installs can include a transform.
To add the transform to installs started with setup.exe
1 Start Attachmate Customization Tool and select Create a new Setup customization file for the following product.
2 Go to the User interface panel.
3 Select Use this customization with interactive installs using setup.exe.
When you save your transform with this option selected, the Attachmate Customization Tool automatically updates the setup.ini file to apply the transform to the Reflection installation by adding the following line to the [Setup] section:
CustomTransform=<your_transform.mst>
This modification to setup.ini means that any install using setup.exe (using either the interactive user interface or using setup.exe on a command line) will automatically apply this transform.
4 Save the transform to the default location (the folder that includes setup.exe).
The transform can now be deployed to end users via the setup.exe file. (Users can run setup.exe directly or setup.exe can be called from a script or initiated from a command line.)
Note: If the setup.ini file already specifies the transform file you want to install (as noted in step 3 of the previous procedure) do not specify the transform on the command line.

Installation and Deployment Guide
70
To add the transform to a setup.exe command-line install
From the command line, use the following syntax:
<path_to_setup>\setup.exe /install TRANSFORMS=<transform.mst>

71
Deploy Reflection
This chapter provides instructions on deploying Reflection, companion installer packages, and the API.
What do you want to do?
Deploy with the Attachmate Setup Program 72
Deploy with MSI 73
Publish with Active Directory 74
Deploy with System Center Configuration Manager 75
Deploy with Reflection Security Gateway 77
Install the Reflection Help 67
Maintain Reflection 89
C H A P T E R 5

Installation and Deployment Guide
72
Deploy with the Attachmate Setup Program
The Attachmate Setup Program (setup.exe) is the recommended tool for installing and deploying Reflection.
Setup.exe has a command-line interface that you can run from a command line, a batch file, or a deployment tool. You can type command-line options to set installation parameters and limit user interaction as Reflection is installing, or use command-line options to prepare Reflection for installation by users. Command-line installations may have additional system requirements (page 8).
To see a list of available command-line parameters, type:
setup.exe /?
To install a companion installer package with the Setup program, add it to a transform and then apply that transform to setup.exe. This "chains" the companion installer package to the main installation. You can set the package to deploy before or after the main installation.
The following procedures show command-line options commonly used for deployment, including switches for silent installations.
To deploy Reflection “out-of-the-box”
Use this command to deploy Reflection with default settings.
At a command prompt on a test workstation, enter:
path_to_administrative_installation_point\setup.exe /install
To perform a silent installation
At a command prompt, change to the directory in which the setup.exe file resides and do one of the following:
To perform Type
A silent install that displays a progress bar and disables the Cancel button
setup.exe /install /passive
A silent install with no display setup.exe /install /quiet
To deploy Reflection and a transform
At a command prompt, enter:
path_to_administrative_installation_point\setup.exe /install TRANSFORMS= myCustomInstall.mst
Note: You can also set up the Attachmate Setup Program to deploy a transform automatically. See Add (Chain) Installations and Run Programs (page 66).

Deploy Reflection
73
To remove Reflection with the Attachmate Installation Program
CAUTION: If you use the following instructions to find the product code in the registry, make sure you do not change any registry values. Changing these values can damage an installation. If you prefer not to use the registry, you can get the product code by contacting Attachmate Technical Support.
1 Open the registry editor (regedit.exe) and find this key:
32-bit platforms
HKEY_LOCAL_MACHINE\SOFTWARE\Microsoft\Windows\CurrentVersion\Uninstall
64-bit platforms
HKEY_LOCAL_MACHINE\SOFTWARE\Wow6432Node\Microsoft\Windows\CurrentVersion\Uninstall
2 Each key under the Uninstall key is the product code or Globally Unique Identifier (GUID) for a product installed on the computer.
3 In the Uninstall key, search for Attachmate Reflection to find the Attachmate Reflection product code.
4 Verify that the DisplayName includes “Attachmate Reflection … 2014”
5 At a command prompt, change to the directory in which the setup.exe file resides and enter:
setup.exe /uninstall ProductCode
Deploy with MSI
Use these procedures to install Reflection from a command line with MSI.
To customize your installation, specify Windows Installer properties on the command line or pass them in a transform file. For a list of public properties that are standard to the Microsoft Windows Installer, see the Modify Setup Properties (page 64) pane in the Attachmate Customization Tool, or refer to the Microsoft Windows Installer Guide (http://msdn.microsoft.com/en-us/library/windows/desktop/aa372845(v=vs.85).aspx).
If you want to create a custom (non-default) user data location that will be used by all installed Reflection products, specify the product-specific property WRQ_USERDIR. This property affects only those applications whose default user data directory is %personalfolder%\Attachmate\Reflection. Reflection applications that use this default data location include: Reflection Workspace, Reflection FTP Client, Reflection Kerberos Manager, Reflection Key Agent, Reflection IBM Printer, and Reflection X (legacy). Reflection X Advantage does not use this user data location.
To deploy Reflection “out-of-the-box” directly with MSI
At a command prompt on a test workstation, change to the directory in which the .msi file resides and enter:
msiexec /i path_to_administrative_installation_point\yourVersion.msi
where yourVersion.msi is the specific version of the reflection MSI that you downloaded (for example, SE11R1c.msi).

Installation and Deployment Guide
74
To deploy Reflection and a transform directly with MSI
At a command prompt, enter:
msiexec /i path_to_administrative_installation_point\yourVersion.msi TRANSFORMS= yourCustomInstall.mst
where yourVersion.msi is the specific version of the Reflection MSI that you downloaded (for example, SE11R1c.msi).
Deploy an MSI File Independently
You can deploy configuration files that are “packaged” in a companion installer package separately from Reflection. This allows you to deploy and maintain these files between Reflection software updates without removing Reflection.
If you use Reflection Security Gateway, you can upload MSI files to the Package Manager and silently deploy them to users' workstations. See Deploy MSI Packages from Reflection Security Gateway (page 86).
To deploy a companion installer package directly with MSI
At a command prompt, enter:
msiexec /i path_to_administrative_installation_point\ your_companion_file.msi
To remove a companion installer package directly with MSI
At a command prompt, change to the directory in which the companion installer package file resides and enter:
msiexec /x your_companion_file.msi
Publish with Active Directory
To assign and publish your product installation using Microsoft Active Directory, you must meet the following requirements:
Windows Administrative Tools are installed on your workstation.
You are a member of Domain Admins and Group Policy Creators and Owners. (This is required to publish software.)
For more information, see "Active Directory groups" in the Microsoft Management Console help.

Deploy Reflection
75
To install with Active Directory
1 From the Active Directory User and Computers Console, advertise your product installation to members of any organizational units in your Active Directory using appropriate transform modifications.
2 If multiple transforms are specified, make sure that the listed order of the transforms is correct, and click OK. (If you need to change the order for any reason after you click OK, you will have to start over again.)
Note: For more information about assigning and publishing, see "assigning applications" and "publishing applications" in the Microsoft Management Console help.
Deploy with System Center Configuration Manager
You can deploy Reflection with Microsoft Systems Center Configuration Manager (or Microsoft Systems Management Server).
To deploy with System Center Configuration Manager
1 Create an administrative install image on your site server.
This serves as the administrative installation point for deployment.
2 Use the product Package Definition File (.sms) to create the product installation package.
Note: The Package Definition File (.sms) is created during the administrative installation and can be found at the root of the administrative installation point. Alternatively, you can reference the .msi file directly — consult the Microsoft SMS documentation for more information.
3 Advertise the installation packages to your users.

77
Deploy with Reflection Security Gateway
This section provides instructions on deploying Reflection sessions using Attachmate Reflection Security Gateway. Reflection Security Gateway provides increased security to legacy host applications by leveraging the current enterprise authentication infrastructure.
Requirements
Reflection Security Gateway, the components of which can be installed on one or more servers available over the network
On the Administrator's workstation, installation of Attachmate Reflection 2014 and a browser (with Java enabled)
On the user’s workstation, installation of Attachmate Reflection 2014 and a browser (with Java enabled)
C H A P T E R 6

Installation and Deployment Guide
78
Connect to Hosts using the Reflection Security Proxy
You can centrally control access to your sessions and reduce host visibility by connecting emulation sessions through the Reflection Security Gateway.
Note: If you plan to customize Reflection, create a companion installer package in the Attachmate Customization Tool or another MSI tool and deploy it to users or groups from the Package Manager. See Deploy MSI Packages from Reflection Security Gateway (page 86).
The Reflection Security Gateway offers several configuration options:
Client Authorization
When using the default configuration for the Security Proxy, users are authorized using security tokens. Transmitted data between the client and the Security Proxy is encrypted; transmitted data between the Security Proxy and the host is not. The Security Proxy server should be installed behind a corporate firewall when used in this mode. See Connect using Client Authorization.
Pass Through When configured as a Pass Through Proxy, the Security Proxy passes
data to the destination host without regard to content (that is, it ignores any SSL handshaking data). You can secure data traffic using SSL between the client and the destination host by enabling SSL user authentication on the destination host. When using a Pass Through proxy, client authorization is not an option. See Connect using Pass Through Mode.
End-to-End Security
This option, available for 3270 sessions only, combines user authorization with SSL security for the entire connection. Single sign-on capability using the IBM Express Logon is also supported, provided the host supports SSL. See Connect using End-to-End Security and Express Logon in 3270 Sessions.

Deploy with Reflection Security Gateway
79
Connect using Client Authorization Use this procedure to create an Reflection emulation session that connects to the Reflection Security Proxy and requires a user token for client authorization. Client authorization is a configurable option in Reflection Security Proxy that is enabled by default.
To configure a session
1 In a web browser, start Reflection Security Gateway by setting the URL to:
http://server:port/rweb/AdminStart.html where server and port are replaced with the Reflection Management server address.
2 Click Administrative WebStation and log on as administrator.

Installation and Deployment Guide
80
3 From the left pane, click Session Manager.
4 Click Add to open the Add New Session page.
5 Under Windows-Based, select Reflection Workspace, and click Continue.
6 Specify a trusted location on the user's workstation where settings files will be stored, and then click Launch.

Deploy with Reflection Security Gateway
81
Reflection opens the new session document on your workstation in Administrative WebStation mode.
7 Configure the new session document as follows:
a) In the Create New Document dialog box, choose the type of session and then click Create.
b) Enter the IP Address or Host name, configure other settings as required, and then select Configure additional settings.
c) In the Settings dialog box, under Host Connection, click Set Up Connection Security.
d) In the Configure Advanced Connection Settings dialog box, click Security Settings.
e) In the Security Properties dialog box, select Use SSL/TLS security and then select Use Reflection security proxy.
8 If you are prompted for a certificate, accept it, wait until the session connects, and then close the session.
9 When prompted, confirm that you want to send the settings to the Administrative WebStation.
In the WebStation Session Manager page, a message indicates that the session is saved.
10 Click Map session access and use Access Mapper to configure which users have access to the session document.
11 Point users to the Reflection URL (for example http://myserver/rweb) to access Reflection sessions.
Connect using Pass Through Mode Use this procedure to create Reflection emulation sessions that connect to a Reflection Security Proxy that is configured as a Pass Through proxy.
In Pass Through mode, the Security Proxy doesn't perform any SSL handshake, client/server authentication or encryption. If SSL is used in this mode, the SSL session is created between the client and destination host and encrypted data simply passes through the Security Proxy.
For instructions on configuring the Reflection Security Proxy, see the documentation included with Reflection Security Gateway.
To configure a session
1 In a web browser, start Reflection Security Gateway by setting the URL to:
http://server:port/rweb/AdminStart.html where server and port are replaced with the Reflection Management server address.
2 Click Administrative WebStation and log on as administrator.
3 From the left pane, click Session Manager.
4 Click Add to open the Add New Session page.

Installation and Deployment Guide
82
5 Under Windows-Based, select Reflection Workspace, and click Continue.
6 Specify a trusted location on the user's workstation where settings files will be stored, and then click Launch.
Reflection opens the new session document on your workstation in Administrative WebStation mode.
7 Configure the session document as follows:
a) In the Create New Terminal Document dialog box, enter the IP Address or Host name and port, select the check box Configure additional settings, and click OK.
b) In the Settings dialog box, under Host Connection, click Set Up Connection Security.
c) In the Configure Advanced Connection Settings dialog box, click Security Settings....
d) In the Security Properties dialog box, on the SSL/TLS tab, select Use SSL/TLS security, select the check box Use Reflection security proxy and enter the proxy name and port.
8 After the session successfully connects, save the session.
The session file is then saved to the Reflection Management Server.
9 Next, you make the session available to specific users (page 84).
Note: If you want to establish an SSL-secured connection between Reflection and the destination host using the Security Proxy in Pass Through mode, you may need to deselect Host name must match certificate or, preferably, add the Security Proxy as the Subject Alternate name in the host server certificate.
Connect using End-to-End Encryption in 3270 Sessions Use this procedure to configure end-to-end encryption in sessions that connect to hosts via the Reflection Security Gateway. Without end-to-end encryption, only data between the client and proxy server is encrypted.
End-to-end encryption tunnels a direct SSL/TLS connection to the host, while still connecting through the Reflection Security Proxy Server. These connections require two certificates and SSL/TLS handshakes — one for the client/proxy server connection and another for the client/host connection.
Requirements
SSL is enabled on the host. See the documentation included with the host for instructions.
An installation of Reflection Security Gateway. The Security Proxy must be configured to require Client authorization. (It can optionally be configured to require Client authentication. For client authentication, you can use a single certificate or two separate client certificates on each server (Security Proxy and destination host).
Digital certificates. To successfully establish the SSL/TLS sessions between the client and the Security Proxy, and the client and the destination host, you may need multiple digital certificates. See Setting Up Certificates.

Deploy with Reflection Security Gateway
83
About Certificates
Server Certificates Destination SSL hosts and Security Proxy servers typically have server certificates already installed. Each of these server certificates must be trusted by the client. The client will trust a server certificate if:
It is signed by the certificate authority that is trusted by the client, or
It is self-signed and imported them into the trusted root certificate store where Reflection can find it.
To use a single server certificate for both the destination host and the Security Proxy, do one of the following:
In the Reflection session, de-select the Verify Server Identity check box on the Connection Editor dialog box.
(Recommended) Create a certificate that uses the destination host address for the Subject Common Name and the Security Proxy address for the Subject Alternative Name.
Client certificates Certificates used for client authentication must be signed by a certificate authority that is trusted by both the Security Proxy and the destination host’s SSL server.
Express Logon also requires that the client certificate used to authenticate on the TN3270 server be registered with RACF. (For details, see the documentation that came with the 3270 server.)
For more details on configuring SSL and creating certificates on the host, see Technical Notes 1759 http://support.attachmate.com/techdocs/1759.htm and 1760.
To configure a session with end-to-end encryption
1 In a web browser, start Reflection Security Gateway by setting the URL to:
http://server:port/rweb/AdminStart.html where server and port are replaced with the Reflection Management server address.
2 Click Administrative WebStation and log on as administrator.
3 From the left pane, click Session Manager.
4 Click Add to open the Add New Session page.
Under Windows-Based, select Reflection Workspace, and click Continue.
5 Specify a trusted location on the user's workstation where settings files will be stored, and then click Launch.
Reflection opens the new session document on your workstation in Administrative WebStation mode.

Installation and Deployment Guide
84
6 Enter the host name and port, select the check box Configure additional settings, and click OK.
7 In the Reflection Settings dialog box, under Host Connection, click Set Up Connection Security.
a) Click Security Settings, and in the Security Properties dialog box, make the following required selections:
b) Select Use SSL/TLS security.
c) Select Use Reflection security proxy.
d) From Security proxy settings, choose your Security proxy and Proxy port from the drop-down menus.
e) In the Destination host box, type the host name.
f) Select the End-to-End encryption check box.
Note: You can modify the level of security by adjusting the SSL protocol version and encryption key-strength setting. Click PKI Manager to add the Certificate Revocation List (CRL) and Online Certificate Status protocols (OCSP) to certificate validation.
8 Click OK to close the Security Settings dialog box, and then make any other modifications to the session before clicking OK to save it.
The session opens and attempts to connect to the host. The session file is saved to the Reflection Management server.
9 In the Administrative WebStation, click Access Mapper and specify which users have access to the file. The users you specify can access the file from the Links List.
Make Sessions Available to Users from Administrative WebStation
Use this procedure to give users and groups access to Reflection sessions you create in the Administrative WebStation.
To make the session available to users
Use Access Mapper in the Administrative WebStation to provide access to specific users or groups.
If the Reflection Management Server has been configured to integrate with your enterprise directory using LDAP, the Access Mapper operates in different mode. For more information, refer to the documentation included with Reflection Security Gateway.
The user accesses the session by clicking a link on their Links List. For more information, see How Users Start Sessions from the Reflection Management Server (page 85).

Deploy with Reflection Security Gateway
85
How Users Start Sessions from the Reflection Management Server
This procedure explains how end users start Reflection emulation sessions created in Administrative WebStation.
To start a session
1 Click the URL provided by your Administrator, which uses the format http://servername:port/rweb.
2 Provide any necessary information to authenticate to the Reflection Management Server.
3 From the Links List, select the session you want to open. If the session is configured to use tokens for user authorization, you must connect before the specified expiration period. Within that expiration period, the session can disconnect and reconnect using the same token. After the token expires, you must restart Reflection by clicking the session in the Links List to retrieve a new, valid token.
The session profile and associated files are downloaded to your computer the first time the session is accessed. An updated session profile is downloaded to the client only if the previous file was deleted or if the option Overwrite end user files was selected in the Session Manager.
After the session opens in Reflection and makes the connection, the status icon shows a connection to the Reflection Security Proxy Server instead of the host.
Note: Saving a local copy of a session created in Administration WebStation is generally not recommended. If the session is modified from the Reflection Management Server, the local copy will not include the modifications.
Modify a Session Created in Administrative WebStation
Use the following procedure to modify Reflection sessions created in the Administrative WebStation. If you modify these sessions outside of Administrative WebStation, many of the Reflection security settings will be unavailable.
To modify the session's settings
1 In a web browser, start Reflection Security Gateway by setting the URL to:
2 http://server:port/rweb/AdminStart.html where server and port are replaced with the Reflection Management server address.
3 Click Administrative WebStation and log on as administrator.
4 From the left pane, click Session Manager.
5 Select the session you want to modify.
6 Click Launch.

Installation and Deployment Guide
86
7 After you make changes, save the file as prompted.
Your modified session file replaces the existing session file of the same name on the Reflection Management Server.
Deploy MSI Packages from Reflection Security Gateway
Use the Package Manager to upload companion install packages (.msi) to the Reflection Management Server for deployment to specified users. Companion install packages can be created in the Attachmate Customization Tool (ACT) or other MSI creation tools, and may include toolbars, macros, keyboard maps, and settings files.
These packages are automatically deployed to a user's desktop when the user logs on to the Reflection Management Server or opens a session from the Links List.
To upload a package
1 In a web browser, start Reflection Security Gateway by setting the URL to:
http://server:port/rweb/AdminStart.html where server and port are replaced with the Reflection Management server address.
2 Click Administrative WebStation and log on as administrator.
3 Click Package Manager on the left.
4 Click Add and then Browse to locate the .msi file you want to add or update. You can optionally add a description about the package.
5 Click Save to upload the package to the Reflection Management Server.
To deploy a package to users
Use the Access Mapper to specify users to which the package will be deployed.
Use Access Mapper in the Administrative WebStation to provide access to specific users or groups. If the Reflection Management Server has been configured to integrate with your enterprise directory using LDAP, the Access Mapper operates in a different mode. For more information, refer to the documentation included with Reflection Security Gateway.
After you make the package available to a user, the next time that user accesses the Links List, the package contents are copied to the user's computer to the locations specified in the MSI package. Files on the user's computer may be overwritten, depending on the options chosen when the MSI package was created.
To update or replace a package
To update an MSI package on the Reflection Management Server, you essentially replace it with an updated file of the same name.
1 Make your changes to the MSI package and save it using the same name.
2 From Package Manager, click the MSI file that you want to replace.
3 Click Browse, select the modified package, and then click Open.
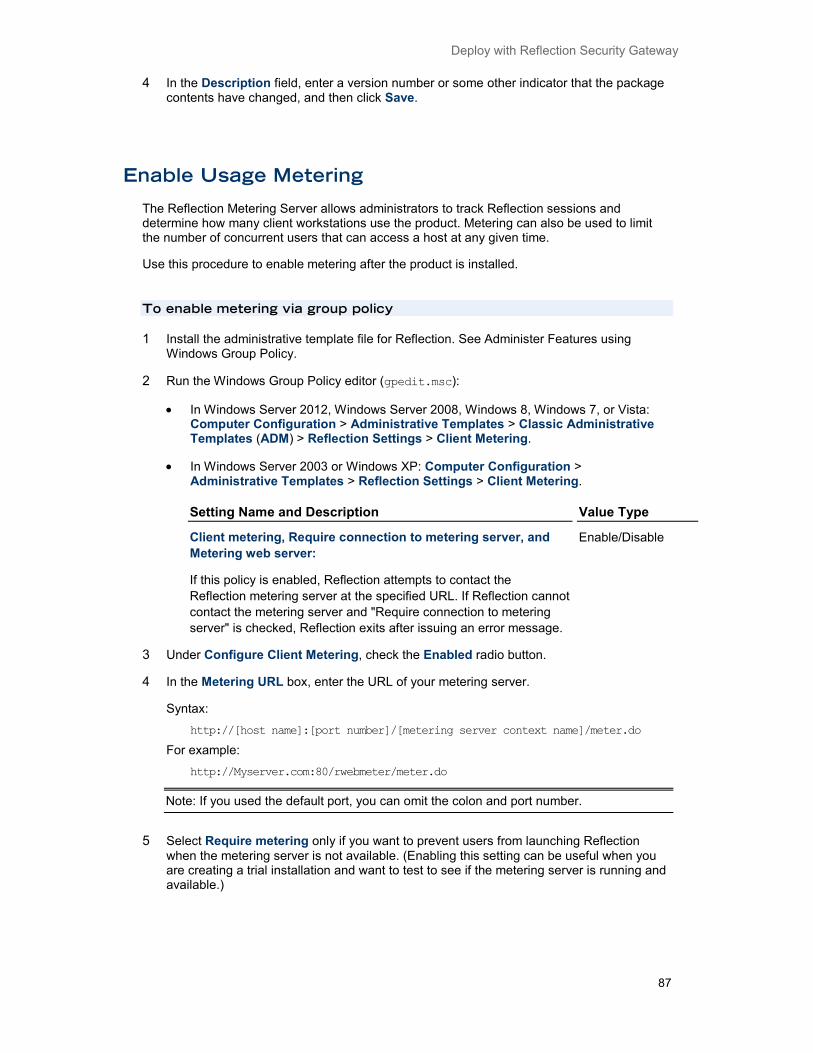
Deploy with Reflection Security Gateway
87
4 In the Description field, enter a version number or some other indicator that the package contents have changed, and then click Save.
Enable Usage Metering
The Reflection Metering Server allows administrators to track Reflection sessions and determine how many client workstations use the product. Metering can also be used to limit the number of concurrent users that can access a host at any given time.
Use this procedure to enable metering after the product is installed.
To enable metering via group policy
1 Install the administrative template file for Reflection. See Administer Features using Windows Group Policy.
2 Run the Windows Group Policy editor (gpedit.msc):
• In Windows Server 2012, Windows Server 2008, Windows 8, Windows 7, or Vista: Computer Configuration > Administrative Templates > Classic Administrative Templates (ADM) > Reflection Settings > Client Metering.
• In Windows Server 2003 or Windows XP: Computer Configuration > Administrative Templates > Reflection Settings > Client Metering.
Setting Name and Description Value Type
Client metering, Require connection to metering server, and Metering web server:
If this policy is enabled, Reflection attempts to contact the Reflection metering server at the specified URL. If Reflection cannot contact the metering server and "Require connection to metering server" is checked, Reflection exits after issuing an error message.
Enable/Disable
3 Under Configure Client Metering, check the Enabled radio button.
4 In the Metering URL box, enter the URL of your metering server.
Syntax: http://[host name]:[port number]/[metering server context name]/meter.do
For example: http://Myserver.com:80/rwebmeter/meter.do
Note: If you used the default port, you can omit the colon and port number.
5 Select Require metering only if you want to prevent users from launching Reflection when the metering server is not available. (Enabling this setting can be useful when you are creating a trial installation and want to test to see if the metering server is running and available.)


89
Maintain Reflection
This section discusses how to distribute software updates in a standard Microsoft .msp file format, and how to remove or repair an installation.
What do you want to do?
Distribute Software Updates 89
Remove an Installation 90
Repair an Installation 91
Distribute Software Updates
Software updates are distributed as Microsoft .msp files. You can deploy these updates with the Attachmate Patch utility included with your distribution. Patch log files are saved in the user's Windows temporary folder(%tmp%) with a generated name, using the form atmpatchxxxxxx.log.
To distribute updates with the Attachmate Patch utility
1 From the distribution image, double-click the self-extracting executable update file.
The Attachmate Patch utility opens.
2 Follow the instructions provided by the utility.
For detailed instructions on upgrading your Attachmate products, refer to the Attachmate Patch Utility Help.
To distribute updates from the command line
To Install to a (clean) workstation and apply a patch:
msiexec /i <path_to_original.msi> PATCH=<path_to_patch.msp> /qb
To apply a patch to an administrative installation:
msiexec /p <path_to_patch.msp> /a <path_to_admin.msi> /qb
To reinstall to workstation (for example, after applying patch to admin):
msiexec /i <path_to_admin.msi> REINSTALLMODE=vomus REINSTALL=ALL /qb
C H A P T E R 7
Installation and Deployment Guide
90
Remove an Installation
To remove Reflection, you can use the Windows Control Panel, the Attachmate Setup program user interface, or a command line. To remove a companion installation, you can use the Windows Control Panel or a command line.
Note: You must log on with administrator privileges to remove Reflection.
To remove an installation using the Windows control panel
1 To open the Programs and Features control panel go to Start > Control Panel > Programs and Features. (On older Windows systems, this Control Panel is called Add or Remove Programs.)
2 Select the name of the installation that you want to remove.
3 Click Uninstall (or Remove).
To remove an installation with the Attachmate Setup program user interface
1 From an administrative installation image, click the setup.exe file.
2 From the tab, select Remove, and then click Continue.
To remove an installation from the ACT (setup.exe) command line
CAUTION: If you use the following instructions to find the product code in the registry, make sure you do not change any registry values. Changing these values can damage an installation. If you prefer not to use the registry, you can get the product code by contacting Attachmate Technical Support.
1 Open the registry editor (regedit.exe) and find this key: HKEY_LOCAL_MACHINE\SOFTWARE\Microsoft\Windows\CurrentVersion\Uninstall
Each key under the Uninstall key is the product code or Globally Unique Identifier (GUID) for a product installed on the computer.
2 In the Uninstall key, search for DisplayName to locate the GUID associated with the product you want to uninstall.
3 At the command prompt or the Start menu Run command, change to the directory in which the setup.exe file resides and enter:
setup.exe /uninstall ProductCode
where ProductCode is the Globally Unique Identifier (GUID) that is the principal identifier for the product.
To remove a companion installer package with MSI directly
At a command prompt, change to the directory in which the companion installer package file resides and enter:

Maintain Reflection
91
msiexec /x your_companion_file.msi
Repair an Installation
If you are experiencing problems with your installation, you can use the Repair option, which automatically searches for and replaces missing or corrupted files.
To repair an installation with the Attachmate Setup program user interface
1 From an administrative installation image, click the setup.exe file.
2 Click Repair, and then follow the installer instructions.
To repair an installation using Windows Add/Remove
1 From the Windows Programs and Features (or the Add or Remove Programs) control panel, select the name of the installation that you want to repair, and then click Change.
2 From the Attachmate Setup program, select Repair, and then click Continue.