CONTENTS READING STRATEGIES Getting Ready to Read · these identified words. Purpose • To...
48
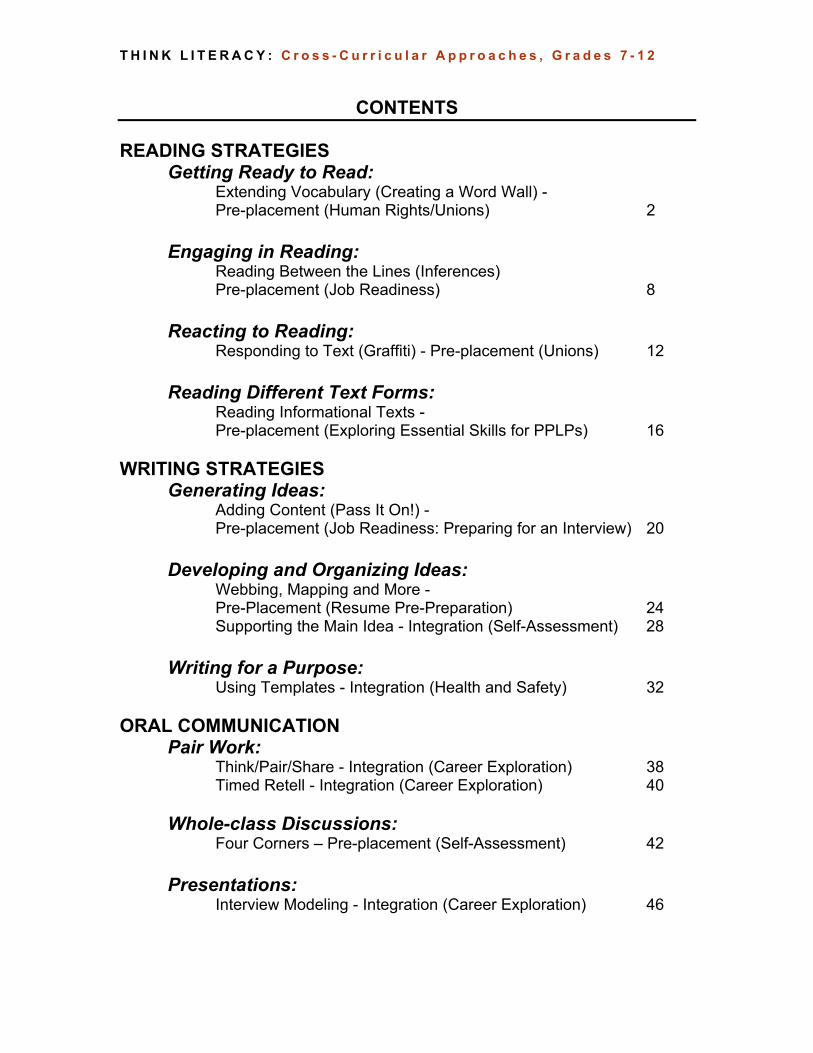
THINK LITERACY: Cross-Curricular Approaches, Grades 7-12 CONTENTS READING STRATEGIES Getting Ready to Read: Extending Vocabulary (Creating a Word Wall) - Pre-placement (Human Rights/Unions) 2 Engaging in Reading: Reading Between the Lines (Inferences) Pre-placement (Job Readiness) 8 Reacting to Reading: Responding to Text (Graffiti) - Pre-placement (Unions) 12 Reading Different Text Forms: Reading Informational Texts - Pre-placement (Exploring Essential Skills for PPLPs) 16 WRITING STRATEGIES Generating Ideas: Adding Content (Pass It On!) - Pre-placement (Job Readiness: Preparing for an Interview) 20 Developing and Organizing Ideas: Webbing, Mapping and More - Pre-Placement (Resume Pre-Preparation) 24 Supporting the Main Idea - Integration (Self-Assessment) 28 Writing for a Purpose: Using Templates - Integration (Health and Safety) 32 ORAL COMMUNICATION Pair Work: Think/Pair/Share - Integration (Career Exploration) 38 Timed Retell - Integration (Career Exploration) 40 Whole-class Discussions: Four Corners – Pre-placement (Self-Assessment) 42 Presentations: Interview Modeling - Integration (Career Exploration) 46
Transcript of CONTENTS READING STRATEGIES Getting Ready to Read · these identified words. Purpose • To...
T H I N K L I T E R A C Y : C r o s s - C u r r i c u l a r A p p r o a c h e s , G r a d e s 7 - 1 2
CONTENTS READING STRATEGIES Getting Ready to Read: Extending Vocabulary (Creating a Word Wall) - Pre-placement (Human Rights/Unions) 2
Engaging in Reading: Reading Between the Lines (Inferences)
Pre-placement (Job Readiness) 8 Reacting to Reading:
Responding to Text (Graffiti) - Pre-placement (Unions) 12
Reading Different Text Forms: Reading Informational Texts - Pre-placement (Exploring Essential Skills for PPLPs) 16
WRITING STRATEGIES
Generating Ideas: Adding Content (Pass It On!) -
Pre-placement (Job Readiness: Preparing for an Interview) 20 Developing and Organizing Ideas:
Webbing, Mapping and More - Pre-Placement (Resume Pre-Preparation) 24 Supporting the Main Idea - Integration (Self-Assessment) 28
Writing for a Purpose:
Using Templates - Integration (Health and Safety) 32 ORAL COMMUNICATION Pair Work:
Think/Pair/Share - Integration (Career Exploration) 38 Timed Retell - Integration (Career Exploration) 40
Whole-class Discussions: Four Corners – Pre-placement (Self-Assessment) 42
Presentations:
Interview Modeling - Integration (Career Exploration) 46
2
T H I N K L I T E R A C Y : C r o s s - C u r r i c u l a r A p p r o a c h e s , G r a d e s 7 - 1 2
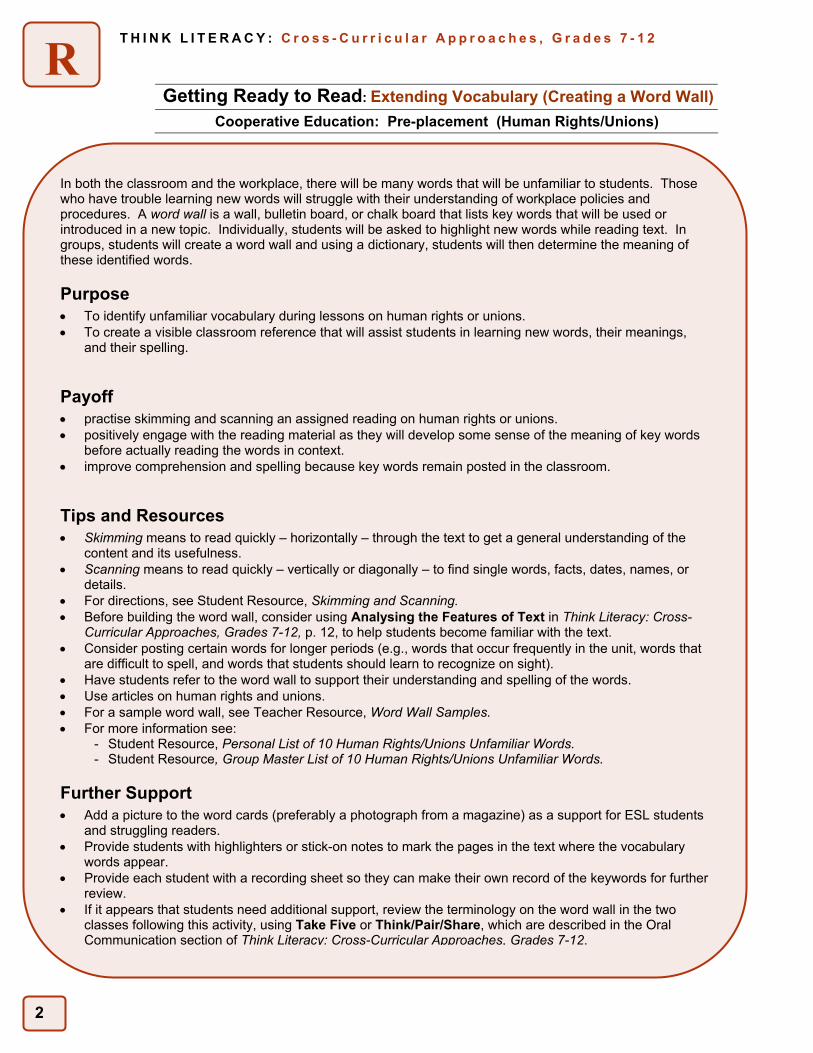
R Getting Ready to Read: Extending Vocabulary (Creating a Word Wall)
Cooperative Education: Pre-placement (Human Rights/Unions)
In both the classroom and the workplace, there will be many words that will be unfamiliar to students. Those who have trouble learning new words will struggle with their understanding of workplace policies and procedures. A word wall is a wall, bulletin board, or chalk board that lists key words that will be used or introduced in a new topic. Individually, students will be asked to highlight new words while reading text. In groups, students will create a word wall and using a dictionary, students will then determine the meaning of these identified words.
Purpose •• To identify unfamiliar vocabulary during lessons on human rights or unions. •• To create a visible classroom reference that will assist students in learning new words, their meanings,
and their spelling.
Payoff •• practise skimming and scanning an assigned reading on human rights or unions. •• positively engage with the reading material as they will develop some sense of the meaning of key words
before actually reading the words in context. •• improve comprehension and spelling because key words remain posted in the classroom.
Tips and Resources • Skimming means to read quickly – horizontally – through the text to get a general understanding of the
content and its usefulness. • Scanning means to read quickly – vertically or diagonally – to find single words, facts, dates, names, or
details. • For directions, see Student Resource, Skimming and Scanning. • Before building the word wall, consider using Analysing the Features of Text in Think Literacy: Cross-
Curricular Approaches, Grades 7-12, p. 12, to help students become familiar with the text. • Consider posting certain words for longer periods (e.g., words that occur frequently in the unit, words that
are difficult to spell, and words that students should learn to recognize on sight). • Have students refer to the word wall to support their understanding and spelling of the words. • Use articles on human rights and unions. • For a sample word wall, see Teacher Resource, Word Wall Samples. • For more information see:
- Student Resource, Personal List of 10 Human Rights/Unions Unfamiliar Words. - Student Resource, Group Master List of 10 Human Rights/Unions Unfamiliar Words.
Further Support • Add a picture to the word cards (preferably a photograph from a magazine) as a support for ESL students
and struggling readers. • Provide students with highlighters or stick-on notes to mark the pages in the text where the vocabulary
words appear. • Provide each student with a recording sheet so they can make their own record of the keywords for further
review. • If it appears that students need additional support, review the terminology on the word wall in the two
classes following this activity, using Take Five or Think/Pair/Share, which are described in the Oral Communication section of Think Literacy: Cross-Curricular Approaches, Grades 7-12.
3
T H I N K L I T E R A C Y : C r o s s - C u r r i c u l a r A p p r o a c h e s , G r a d e s 7 - 1 2
R
Getting Ready to Read: Extending Vocabulary (Creating a Word Wall)
Cooperative Education: Pre-placement (Human Rights/Unions)
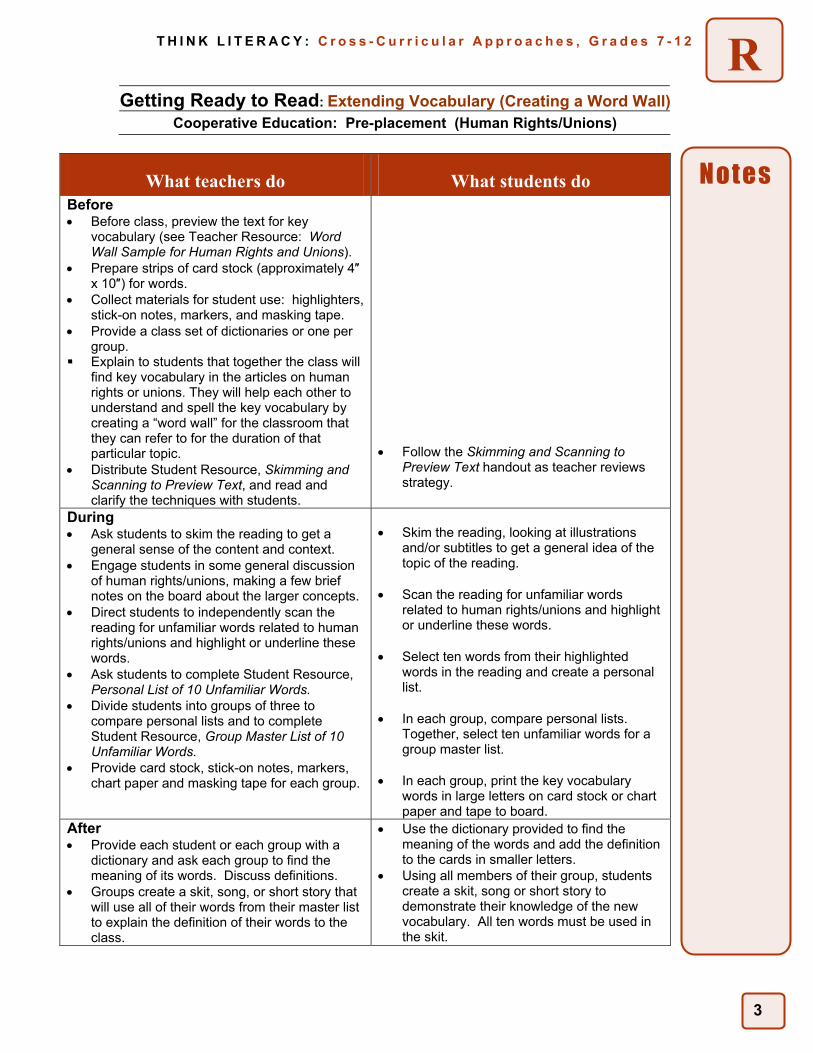
What teachers do What students do Before • Before class, preview the text for key
vocabulary (see Teacher Resource: Word Wall Sample for Human Rights and Unions).
• Prepare strips of card stock (approximately 4″ x 10″) for words.
• Collect materials for student use: highlighters, stick-on notes, markers, and masking tape.
• Provide a class set of dictionaries or one per group.
Explain to students that together the class will find key vocabulary in the articles on human rights or unions. They will help each other to understand and spell the key vocabulary by creating a “word wall” for the classroom that they can refer to for the duration of that particular topic.
• Distribute Student Resource, Skimming and Scanning to Preview Text, and read and clarify the techniques with students.
• Follow the Skimming and Scanning to
Preview Text handout as teacher reviews strategy.
During • Ask students to skim the reading to get a
general sense of the content and context. • Engage students in some general discussion
of human rights/unions, making a few brief notes on the board about the larger concepts.
• Direct students to independently scan the reading for unfamiliar words related to human rights/unions and highlight or underline these words.
• Ask students to complete Student Resource, Personal List of 10 Unfamiliar Words.
• Divide students into groups of three to compare personal lists and to complete Student Resource, Group Master List of 10 Unfamiliar Words.
• Provide card stock, stick-on notes, markers, chart paper and masking tape for each group.
• Skim the reading, looking at illustrations
and/or subtitles to get a general idea of the topic of the reading.
• Scan the reading for unfamiliar words
related to human rights/unions and highlight or underline these words.
• Select ten words from their highlighted
words in the reading and create a personal list.
• In each group, compare personal lists.
Together, select ten unfamiliar words for a group master list.
• In each group, print the key vocabulary
words in large letters on card stock or chart paper and tape to board.
After • Provide each student or each group with a
dictionary and ask each group to find the meaning of its words. Discuss definitions.
• Groups create a skit, song, or short story that will use all of their words from their master list to explain the definition of their words to the class.
• Use the dictionary provided to find the meaning of the words and add the definition to the cards in smaller letters.
• Using all members of their group, students create a skit, song or short story to demonstrate their knowledge of the new vocabulary. All ten words must be used in the skit.
Notes
4
T H I N K L I T E R A C Y : C r o s s - C u r r i c u l a r A p p r o a c h e s , G r a d e s 7 - 1 2
R
Getting Ready to Read: Extending Vocabulary (Creating a Word Wall)
Cooperative Education: Pre-placement (Human Rights/Unions)
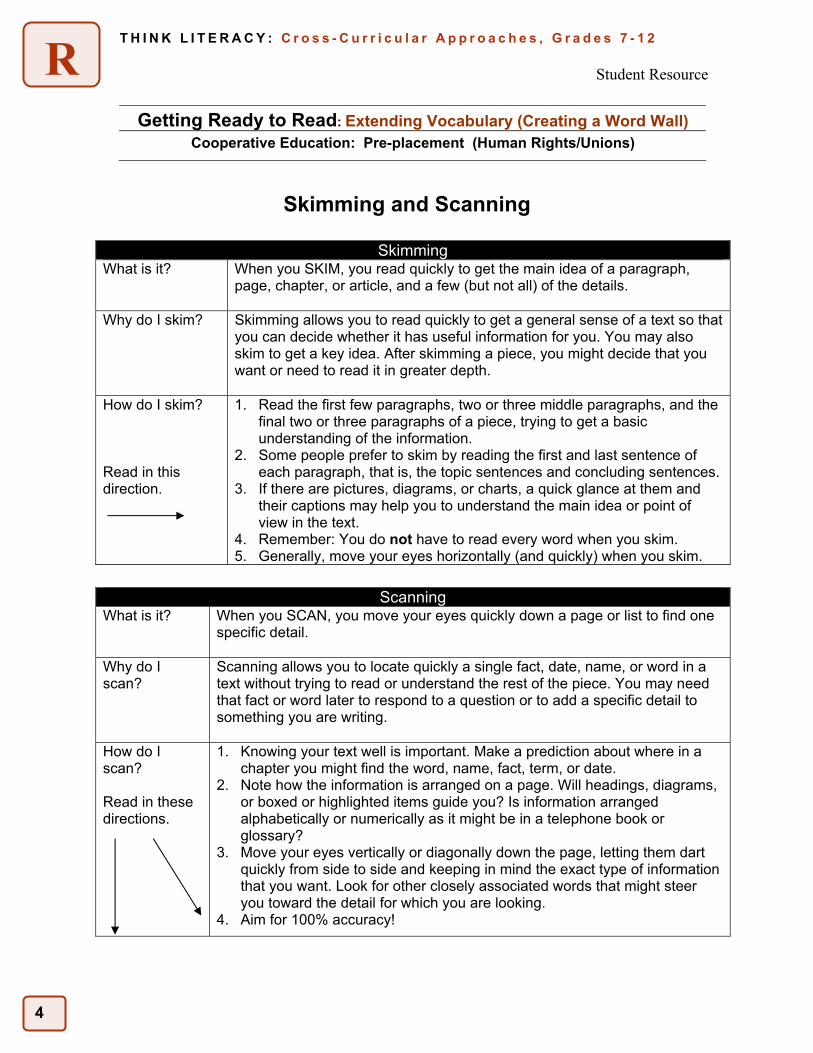
Skimming and Scanning
Skimming What is it? When you SKIM, you read quickly to get the main idea of a paragraph,
page, chapter, or article, and a few (but not all) of the details.
Why do I skim? Skimming allows you to read quickly to get a general sense of a text so that you can decide whether it has useful information for you. You may also skim to get a key idea. After skimming a piece, you might decide that you want or need to read it in greater depth.
How do I skim? Read in this direction.
1. Read the first few paragraphs, two or three middle paragraphs, and the final two or three paragraphs of a piece, trying to get a basic understanding of the information.
2. Some people prefer to skim by reading the first and last sentence of each paragraph, that is, the topic sentences and concluding sentences.
3. If there are pictures, diagrams, or charts, a quick glance at them and their captions may help you to understand the main idea or point of view in the text.
4. Remember: You do not have to read every word when you skim. 5. Generally, move your eyes horizontally (and quickly) when you skim.
Scanning
What is it? When you SCAN, you move your eyes quickly down a page or list to find one specific detail.
Why do I scan?
Scanning allows you to locate quickly a single fact, date, name, or word in a text without trying to read or understand the rest of the piece. You may need that fact or word later to respond to a question or to add a specific detail to something you are writing.
How do I scan? Read in these directions.
1. Knowing your text well is important. Make a prediction about where in a chapter you might find the word, name, fact, term, or date.
2. Note how the information is arranged on a page. Will headings, diagrams, or boxed or highlighted items guide you? Is information arranged alphabetically or numerically as it might be in a telephone book or glossary?
3. Move your eyes vertically or diagonally down the page, letting them dart quickly from side to side and keeping in mind the exact type of information that you want. Look for other closely associated words that might steer you toward the detail for which you are looking.
4. Aim for 100% accuracy!
Student Resource
5
T H I N K L I T E R A C Y : C r o s s - C u r r i c u l a r A p p r o a c h e s , G r a d e s 7 - 1 2
R
Getting Ready to Read: Extending Vocabulary (Creating a Word Wall)
Cooperative Education: Pre-placement (Human Rights/Unions)
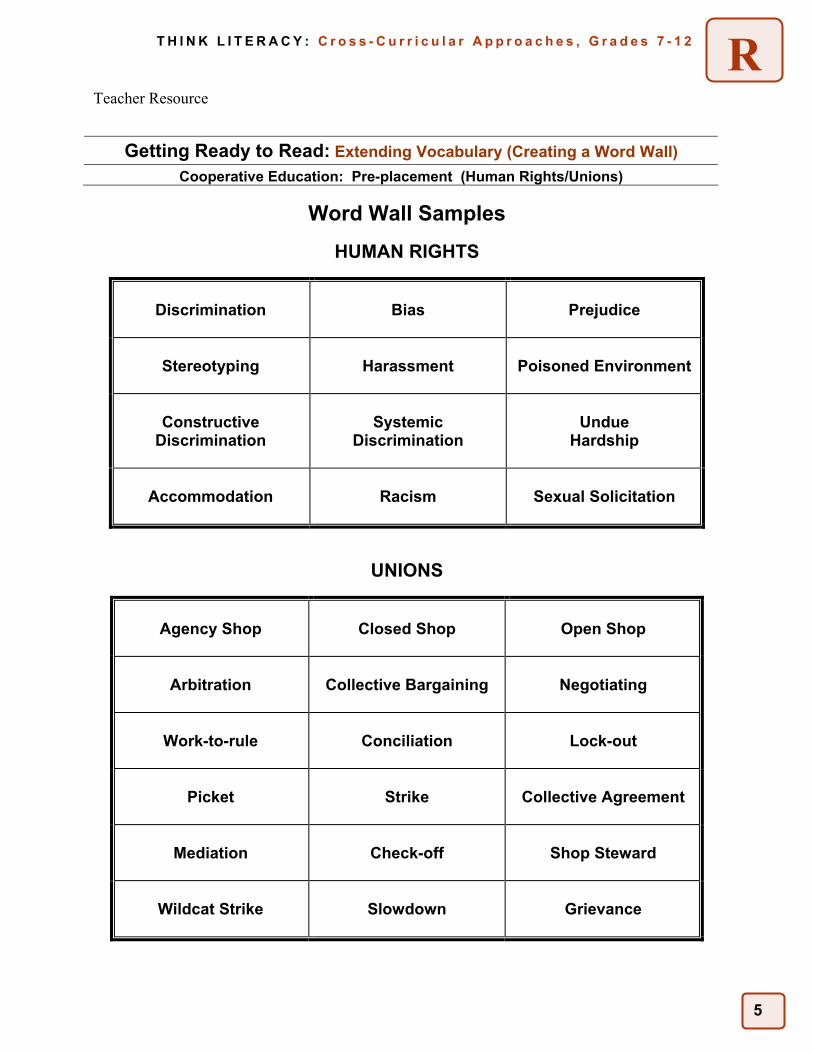
Word Wall Samples
HUMAN RIGHTS
Discrimination
Bias
Prejudice
Stereotyping
Harassment
Poisoned Environment
Constructive
Discrimination
Systemic
Discrimination
Undue
Hardship
Accommodation
Racism
Sexual Solicitation
UNIONS
Agency Shop
Closed Shop
Open Shop
Arbitration
Collective Bargaining
Negotiating
Work-to-rule
Conciliation
Lock-out
Picket
Strike
Collective Agreement
Mediation
Check-off
Shop Steward
Wildcat Strike
Slowdown
Grievance
Teacher Resource
6
T H I N K L I T E R A C Y : C r o s s - C u r r i c u l a r A p p r o a c h e s , G r a d e s 7 - 1 2
R
Getting Ready to Read: Extending Vocabulary (Creating a Word Wall)
Cooperative Education: Pre-placement (Human Rights/Unions)
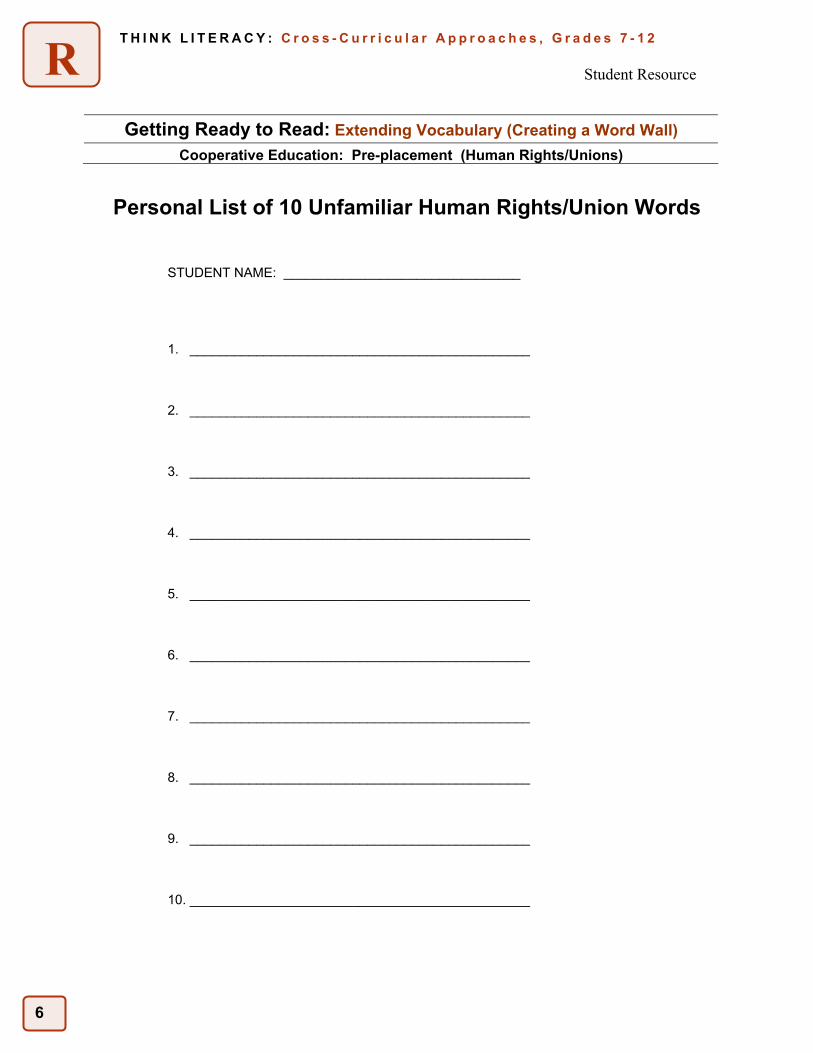
Personal List of 10 Unfamiliar Human Rights/Union Words
STUDENT NAME: ________________________________
1. ______________________________________________
2. ______________________________________________
3. ______________________________________________
4. ______________________________________________
5. ______________________________________________
6. ______________________________________________
7. ______________________________________________
8. ______________________________________________
9. ______________________________________________
10. ______________________________________________
Student Resource
7
T H I N K L I T E R A C Y : C r o s s - C u r r i c u l a r A p p r o a c h e s , G r a d e s 7 - 1 2
R
Getting Ready to Read: Extending Vocabulary (Creating a Word Wall)
Cooperative Education: Pre-placement (Human Rights/Unions)
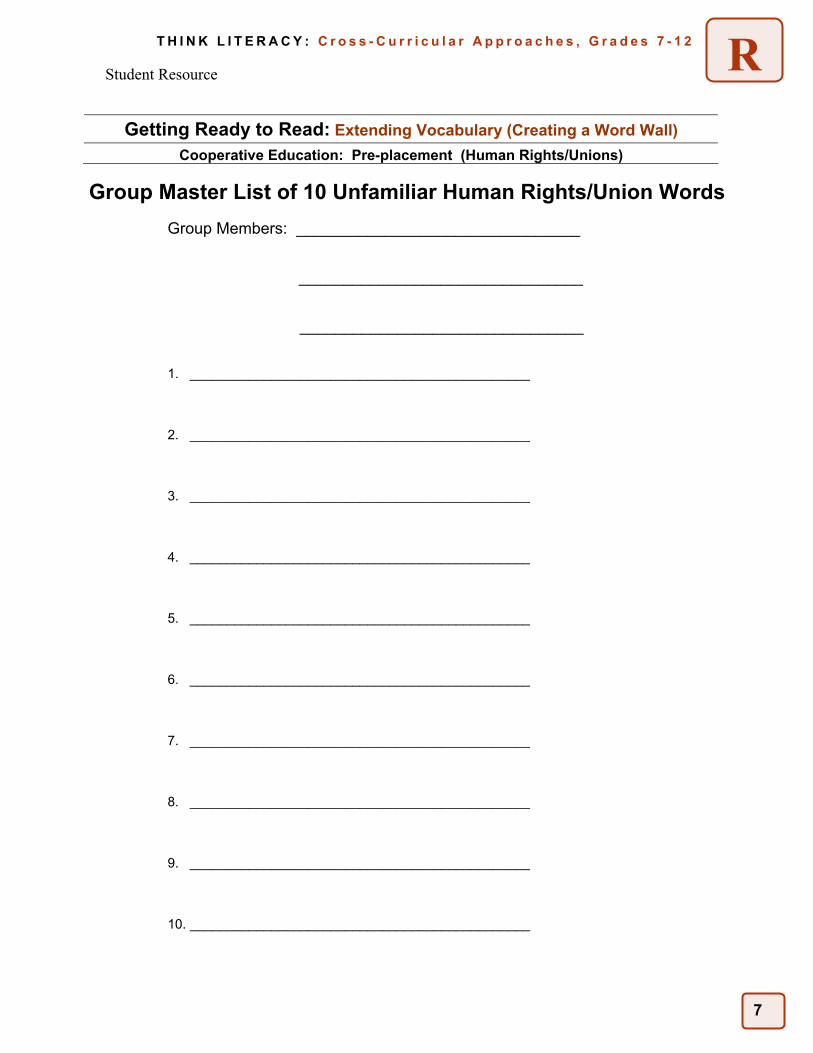
Group Master List of 10 Unfamiliar Human Rights/Union Words
Group Members: ________________________________
________________________________
________________________________
1. ______________________________________________
2. ______________________________________________
3. ______________________________________________
4. ______________________________________________
5. ______________________________________________
6. ______________________________________________
7. ______________________________________________
8. ______________________________________________
9. ______________________________________________
10. ______________________________________________
Student Resource
8
T H I N K L I T E R A C Y : C r o s s - C u r r i c u l a r A p p r o a c h e s , G r a d e s 7 - 1 2
R
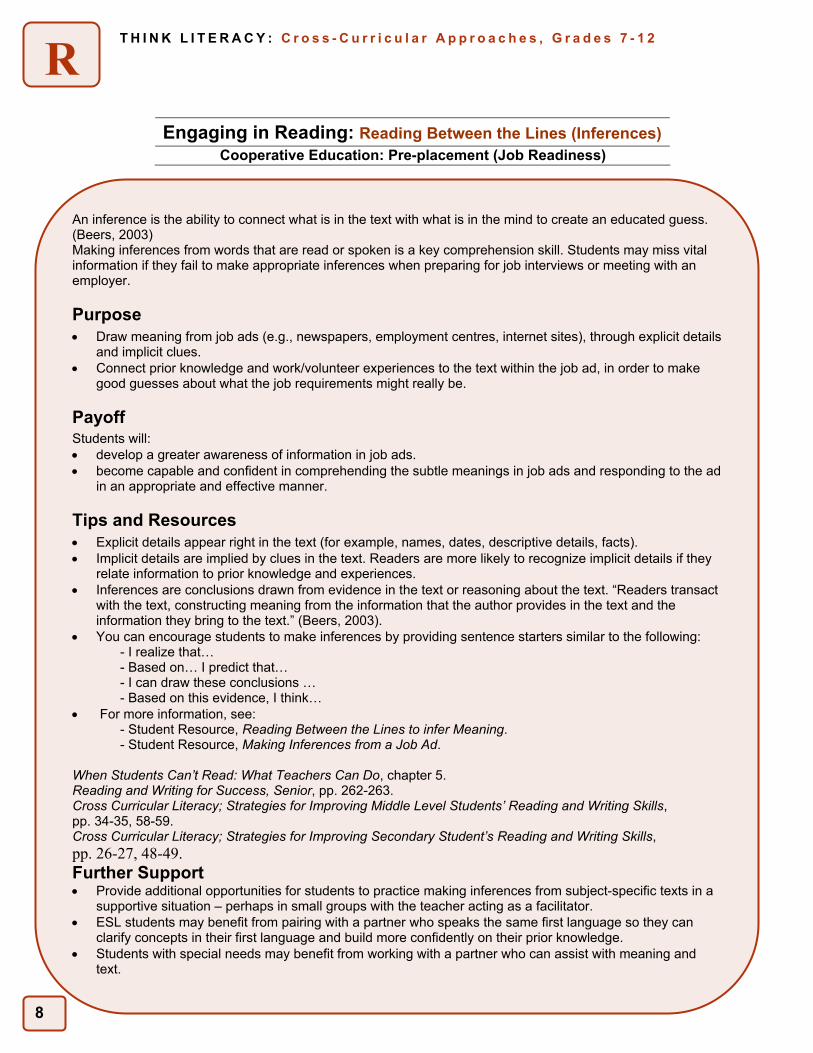
Engaging in Reading: Reading Between the Lines (Inferences)
Cooperative Education: Pre-placement (Job Readiness)
An inference is the ability to connect what is in the text with what is in the mind to create an educated guess. (Beers, 2003) Making inferences from words that are read or spoken is a key comprehension skill. Students may miss vital information if they fail to make appropriate inferences when preparing for job interviews or meeting with an employer.
Purpose • Draw meaning from job ads (e.g., newspapers, employment centres, internet sites), through explicit details
and implicit clues. • Connect prior knowledge and work/volunteer experiences to the text within the job ad, in order to make
good guesses about what the job requirements might really be.
Payoff Students will: • develop a greater awareness of information in job ads. • become capable and confident in comprehending the subtle meanings in job ads and responding to the ad
in an appropriate and effective manner.
Tips and Resources • Explicit details appear right in the text (for example, names, dates, descriptive details, facts). • Implicit details are implied by clues in the text. Readers are more likely to recognize implicit details if they
relate information to prior knowledge and experiences. • Inferences are conclusions drawn from evidence in the text or reasoning about the text. “Readers transact
with the text, constructing meaning from the information that the author provides in the text and the information they bring to the text.” (Beers, 2003).
• You can encourage students to make inferences by providing sentence starters similar to the following: - I realize that… - Based on… I predict that… - I can draw these conclusions … - Based on this evidence, I think…
• For more information, see: - Student Resource, Reading Between the Lines to infer Meaning. - Student Resource, Making Inferences from a Job Ad.
When Students Can’t Read: What Teachers Can Do, chapter 5. Reading and Writing for Success, Senior, pp. 262-263. Cross Curricular Literacy; Strategies for Improving Middle Level Students’ Reading and Writing Skills, pp. 34-35, 58-59. Cross Curricular Literacy; Strategies for Improving Secondary Student’s Reading and Writing Skills, pp. 26-27, 48-49. Further Support • Provide additional opportunities for students to practice making inferences from subject-specific texts in a
supportive situation – perhaps in small groups with the teacher acting as a facilitator. • ESL students may benefit from pairing with a partner who speaks the same first language so they can
clarify concepts in their first language and build more confidently on their prior knowledge. • Students with special needs may benefit from working with a partner who can assist with meaning and
text.
9
T H I N K L I T E R A C Y : C r o s s - C u r r i c u l a r A p p r o a c h e s , G r a d e s 7 - 1 2
R
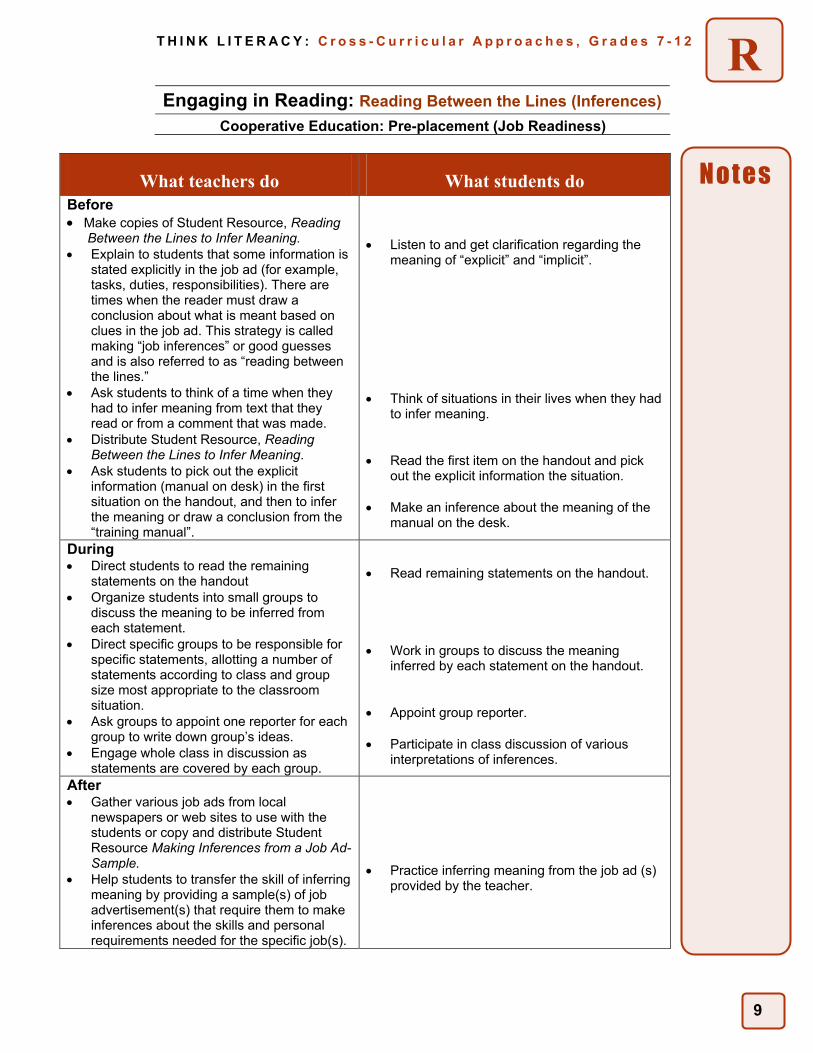
Engaging in Reading: Reading Between the Lines (Inferences)
Cooperative Education: Pre-placement (Job Readiness)
What teachers do What students do Before • Make copies of Student Resource, Reading
Between the Lines to Infer Meaning. • Explain to students that some information is
stated explicitly in the job ad (for example, tasks, duties, responsibilities). There are times when the reader must draw a conclusion about what is meant based on clues in the job ad. This strategy is called making “job inferences” or good guesses and is also referred to as “reading between the lines.”
• Ask students to think of a time when they had to infer meaning from text that they read or from a comment that was made.
• Distribute Student Resource, Reading Between the Lines to Infer Meaning.
• Ask students to pick out the explicit information (manual on desk) in the first situation on the handout, and then to infer the meaning or draw a conclusion from the “training manual”.
• Listen to and get clarification regarding the
meaning of “explicit” and “implicit”. • Think of situations in their lives when they had
to infer meaning. • Read the first item on the handout and pick
out the explicit information the situation. • Make an inference about the meaning of the
manual on the desk.
During • Direct students to read the remaining
statements on the handout • Organize students into small groups to
discuss the meaning to be inferred from each statement.
• Direct specific groups to be responsible for specific statements, allotting a number of statements according to class and group size most appropriate to the classroom situation.
• Ask groups to appoint one reporter for each group to write down group’s ideas.
• Engage whole class in discussion as statements are covered by each group.
• Read remaining statements on the handout. • Work in groups to discuss the meaning
inferred by each statement on the handout. • Appoint group reporter. • Participate in class discussion of various
interpretations of inferences.
After • Gather various job ads from local
newspapers or web sites to use with the students or copy and distribute Student Resource Making Inferences from a Job Ad- Sample.
• Help students to transfer the skill of inferring meaning by providing a sample(s) of job advertisement(s) that require them to make inferences about the skills and personal requirements needed for the specific job(s).
• Practice inferring meaning from the job ad (s)
provided by the teacher.
Notes
10
T H I N K L I T E R A C Y : C r o s s - C u r r i c u l a r A p p r o a c h e s , G r a d e s 7 - 1 2
R
Engaging in Reading: Reading Between the Lines (Inferences)
Cooperative Education: Pre-placement (Job Readiness)
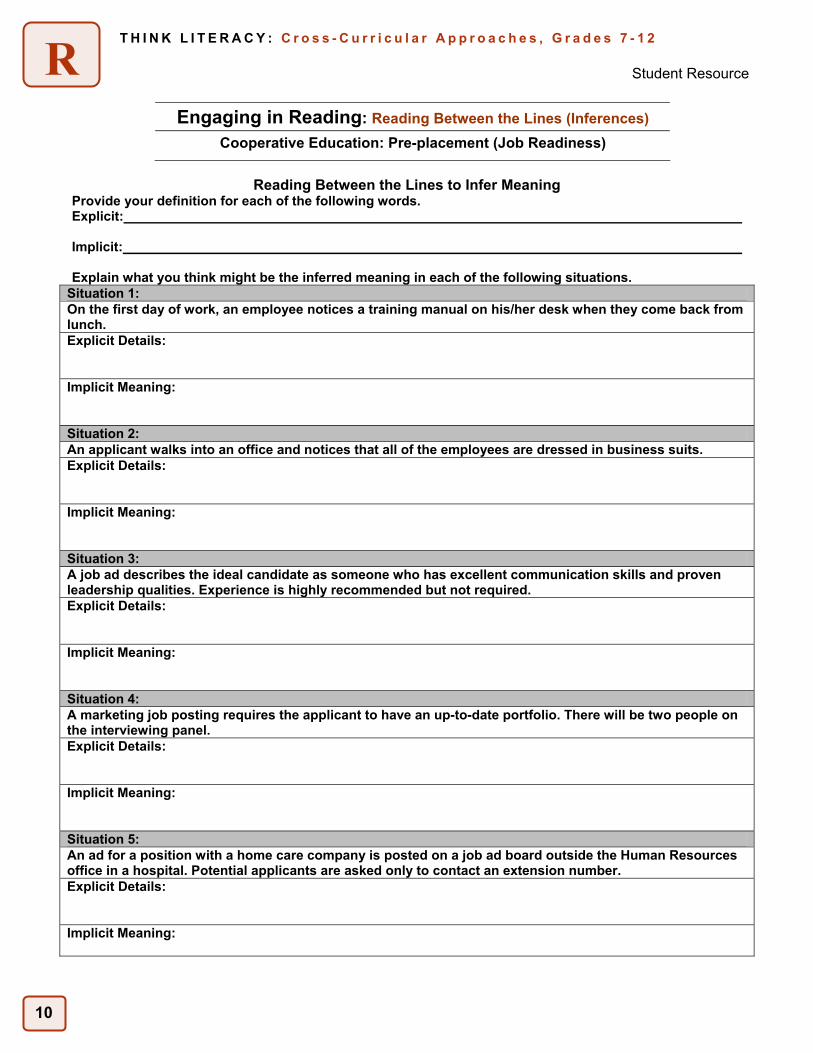
Reading Between the Lines to Infer Meaning
Provide your definition for each of the following words. Explicit:
Implicit:
Explain what you think might be the inferred meaning in each of the following situations.
Situation 1: On the first day of work, an employee notices a training manual on his/her desk when they come back from lunch. Explicit Details: Implicit Meaning: Situation 2: An applicant walks into an office and notices that all of the employees are dressed in business suits. Explicit Details: Implicit Meaning: Situation 3: A job ad describes the ideal candidate as someone who has excellent communication skills and proven leadership qualities. Experience is highly recommended but not required. Explicit Details: Implicit Meaning: Situation 4: A marketing job posting requires the applicant to have an up-to-date portfolio. There will be two people on the interviewing panel. Explicit Details: Implicit Meaning: Situation 5: An ad for a position with a home care company is posted on a job ad board outside the Human Resources office in a hospital. Potential applicants are asked only to contact an extension number. Explicit Details: Implicit Meaning:
Student Resource
11
T H I N K L I T E R A C Y : C r o s s - C u r r i c u l a r A p p r o a c h e s , G r a d e s 7 - 1 2
R
Engaging in Reading: Reading Between the Lines (Inferences)
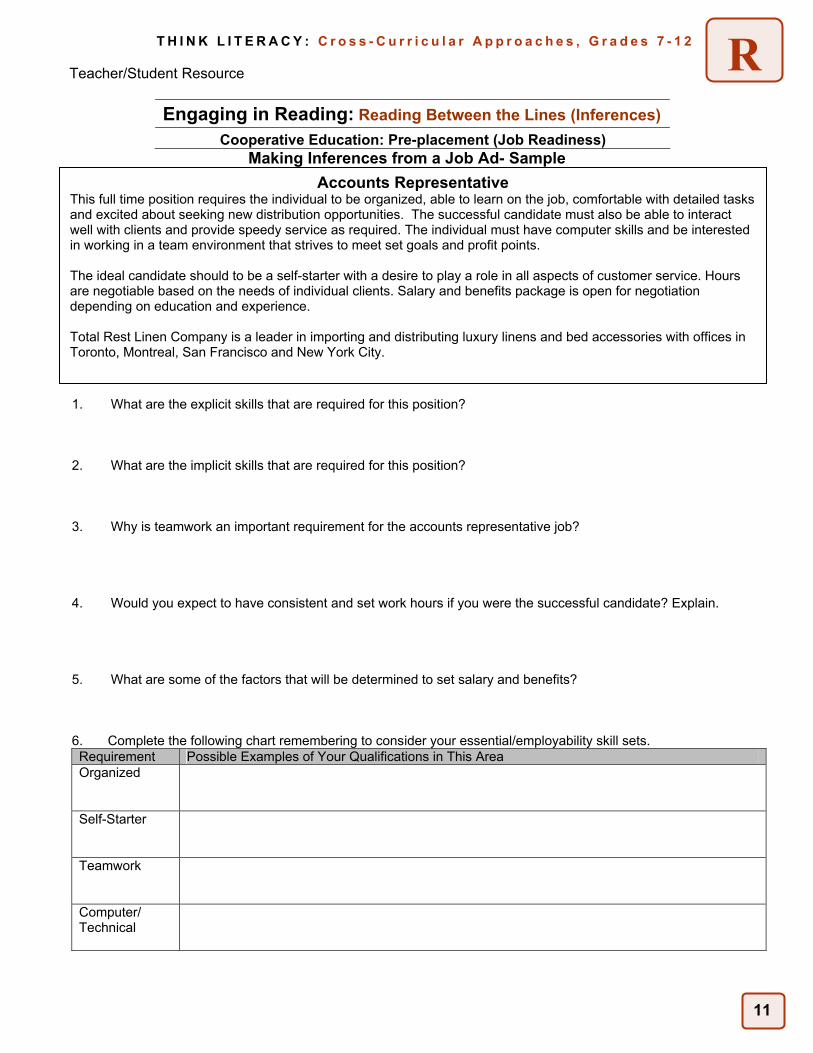
Cooperative Education: Pre-placement (Job Readiness) Making Inferences from a Job Ad- Sample
1. What are the explicit skills that are required for this position?
2. What are the implicit skills that are required for this position?
3. Why is teamwork an important requirement for the accounts representative job?
4. Would you expect to have consistent and set work hours if you were the successful candidate? Explain.
5. What are some of the factors that will be determined to set salary and benefits?
6. Complete the following chart remembering to consider your essential/employability skill sets. Requirement Possible Examples of Your Qualifications in This Area Organized
Self-Starter
Teamwork
Computer/ Technical
Teacher/Student Resource
Accounts Representative This full time position requires the individual to be organized, able to learn on the job, comfortable with detailed tasks and excited about seeking new distribution opportunities. The successful candidate must also be able to interact well with clients and provide speedy service as required. The individual must have computer skills and be interested in working in a team environment that strives to meet set goals and profit points. The ideal candidate should to be a self-starter with a desire to play a role in all aspects of customer service. Hours are negotiable based on the needs of individual clients. Salary and benefits package is open for negotiation depending on education and experience. Total Rest Linen Company is a leader in importing and distributing luxury linens and bed accessories with offices in Toronto, Montreal, San Francisco and New York City.
12
T H I N K L I T E R A C Y : C r o s s - C u r r i c u l a r A p p r o a c h e s , G r a d e s 7 - 1 2
R
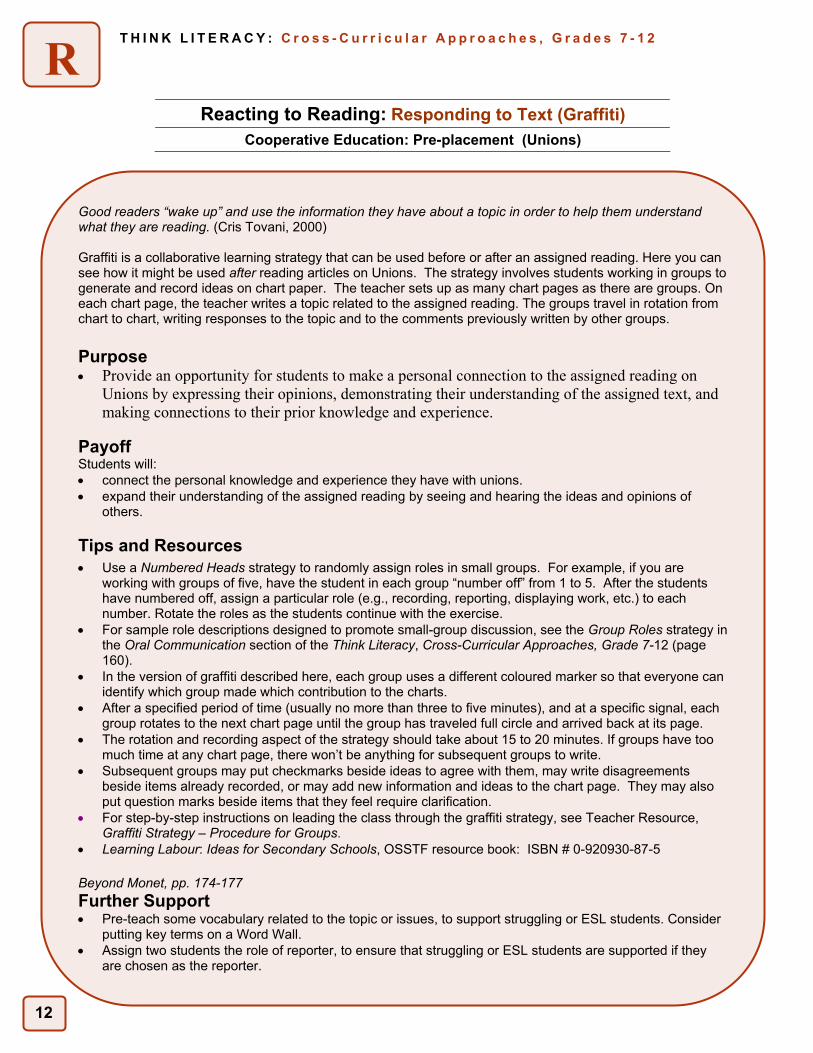
Reacting to Reading: Responding to Text (Graffiti)
Cooperative Education: Pre-placement (Unions)
Good readers “wake up” and use the information they have about a topic in order to help them understand what they are reading. (Cris Tovani, 2000) Graffiti is a collaborative learning strategy that can be used before or after an assigned reading. Here you can see how it might be used after reading articles on Unions. The strategy involves students working in groups to generate and record ideas on chart paper. The teacher sets up as many chart pages as there are groups. On each chart page, the teacher writes a topic related to the assigned reading. The groups travel in rotation from chart to chart, writing responses to the topic and to the comments previously written by other groups. Purpose • Provide an opportunity for students to make a personal connection to the assigned reading on
Unions by expressing their opinions, demonstrating their understanding of the assigned text, and making connections to their prior knowledge and experience.
Payoff Students will: • connect the personal knowledge and experience they have with unions. • expand their understanding of the assigned reading by seeing and hearing the ideas and opinions of
others.
Tips and Resources • Use a Numbered Heads strategy to randomly assign roles in small groups. For example, if you are
working with groups of five, have the student in each group “number off” from 1 to 5. After the students have numbered off, assign a particular role (e.g., recording, reporting, displaying work, etc.) to each number. Rotate the roles as the students continue with the exercise.
• For sample role descriptions designed to promote small-group discussion, see the Group Roles strategy in the Oral Communication section of the Think Literacy, Cross-Curricular Approaches, Grade 7-12 (page 160).
• In the version of graffiti described here, each group uses a different coloured marker so that everyone can identify which group made which contribution to the charts.
• After a specified period of time (usually no more than three to five minutes), and at a specific signal, each group rotates to the next chart page until the group has traveled full circle and arrived back at its page.
• The rotation and recording aspect of the strategy should take about 15 to 20 minutes. If groups have too much time at any chart page, there won’t be anything for subsequent groups to write.
• Subsequent groups may put checkmarks beside ideas to agree with them, may write disagreements beside items already recorded, or may add new information and ideas to the chart page. They may also put question marks beside items that they feel require clarification.
• For step-by-step instructions on leading the class through the graffiti strategy, see Teacher Resource, Graffiti Strategy – Procedure for Groups.
• Learning Labour: Ideas for Secondary Schools, OSSTF resource book: ISBN # 0-920930-87-5 Beyond Monet, pp. 174-177 Further Support • Pre-teach some vocabulary related to the topic or issues, to support struggling or ESL students. Consider
putting key terms on a Word Wall. • Assign two students the role of reporter, to ensure that struggling or ESL students are supported if they
are chosen as the reporter.

13
T H I N K L I T E R A C Y : C r o s s - C u r r i c u l a r A p p r o a c h e s , G r a d e s 7 - 1 2
R
Reacting to Reading: Responding to Text (Graffiti)
Cooperative Education: Pre-placement (Unions)
What teachers do What students do Before • Assign a reading on Unions. • Determine how many groups of five you
will have in the class, and set up that many “stations”. At each station, put a chart page and a different-colour marker. On each page, write one issue or topic related to the assigned reading
• Define graffiti for the class or ask students for definitions.
• Explain the graffiti process to students; groups of five students will begin at a chart page, choosing one student to record their information and ideas with the coloured marker.
• Ask students to number off from 1 to 5 to create groups.
• Indicate that #1 will be the recorder for the first chart page. Recorders for later chart pages will follow sequentially, and other students will be designated at the end of the rotation to display and report on the original chart page.
• Read assigned text. • Contribute to the discussion about graffiti. • Listen carefully to instructions about the
process. Clarify if needed.
During • After a specified length of time, ask
groups to rotate to the next chart page, taking the same coloured marker with them. At the next chart page, a new recorder will be chosen to write down ideas and information, and so on.
• Monitor activity and remind students of the task and process.
• Rotate as a group to each chart page, keeping the same coloured marker.
• Respond to the next topic or question. • Have a different recorder for each chart page. • Take turns contributing ideas and information
to the graffiti page and ensure everyone has an opportunity to contribute.
• Conclude at the original chart page.
After • Designate #s to be reporters and
displayers for the chart page (e.g. #3 students will be displayers and #5s will be reporters). This keeps all students accountable.
• As each group reports, ask other students to record in their notes the top three items that interest or concern them, leaving space between each item.
• Invite students to reread the assigned reading.
• Review the original chart page together to ensure they can read and understand each item.
• Display and report the information on their chart page, as requested by the teacher.
• As other groups report, individually record the
top three items of interest or concern in one’s own notes.
• Reread the text and add page numbers to the
three items listed from each of the other groups’ reports, to prepare for making more complete notes.
Notes
14
T H I N K L I T E R A C Y : C r o s s - C u r r i c u l a r A p p r o a c h e s , G r a d e s 7 - 1 2
R
Reacting to Reading: Responding to Text (Graffiti)
Cooperative Education: Pre-placement (Unions)
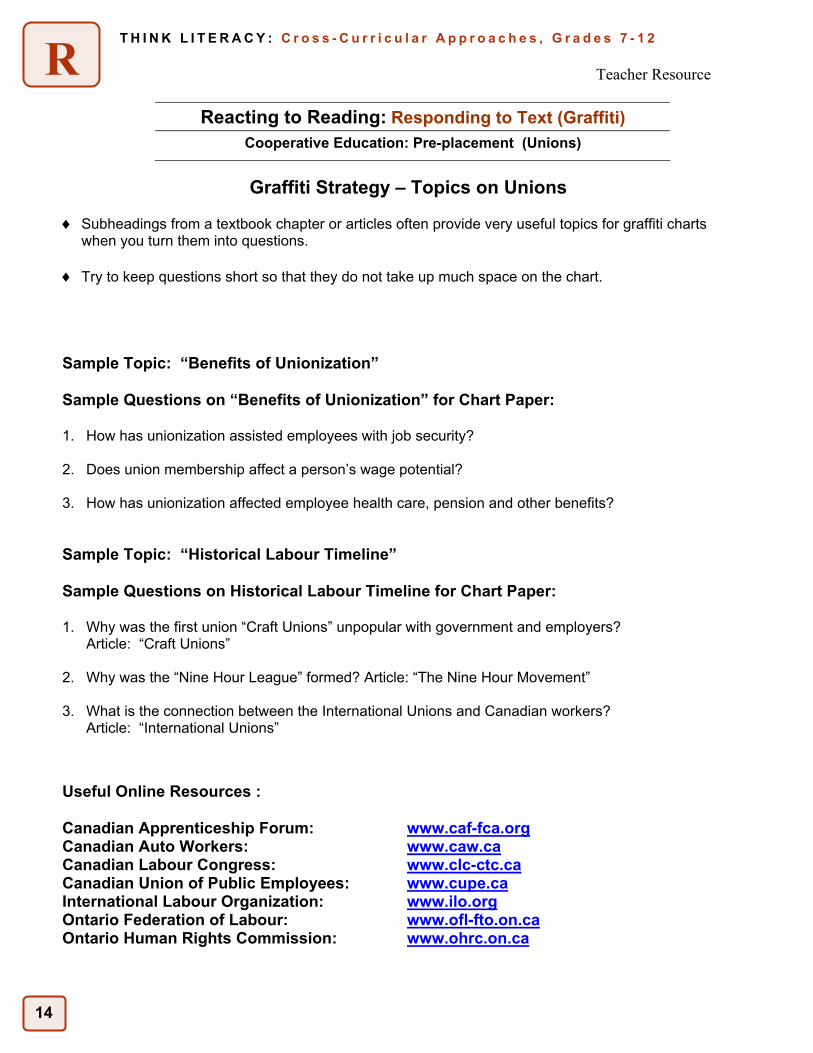
Graffiti Strategy – Topics on Unions
♦ Subheadings from a textbook chapter or articles often provide very useful topics for graffiti charts
when you turn them into questions.
♦ Try to keep questions short so that they do not take up much space on the chart.
Sample Topic: “Benefits of Unionization”
Sample Questions on “Benefits of Unionization” for Chart Paper:
1. How has unionization assisted employees with job security?
2. Does union membership affect a person’s wage potential?
3. How has unionization affected employee health care, pension and other benefits?
Sample Topic: “Historical Labour Timeline”
Sample Questions on Historical Labour Timeline for Chart Paper:
1. Why was the first union “Craft Unions” unpopular with government and employers? Article: “Craft Unions”
2. Why was the “Nine Hour League” formed? Article: “The Nine Hour Movement”
3. What is the connection between the International Unions and Canadian workers?
Article: “International Unions”
Useful Online Resources :
Canadian Apprenticeship Forum: www.caf-fca.org Canadian Auto Workers: www.caw.ca Canadian Labour Congress: www.clc-ctc.ca Canadian Union of Public Employees: www.cupe.ca International Labour Organization: www.ilo.org Ontario Federation of Labour: www.ofl-fto.on.ca Ontario Human Rights Commission: www.ohrc.on.ca
Teacher Resource
15
T H I N K L I T E R A C Y : C r o s s - C u r r i c u l a r A p p r o a c h e s , G r a d e s 7 - 1 2
R
Reacting to Reading: Responding to Text (Graffiti)
Cooperative Education: Pre-placement (Unions)
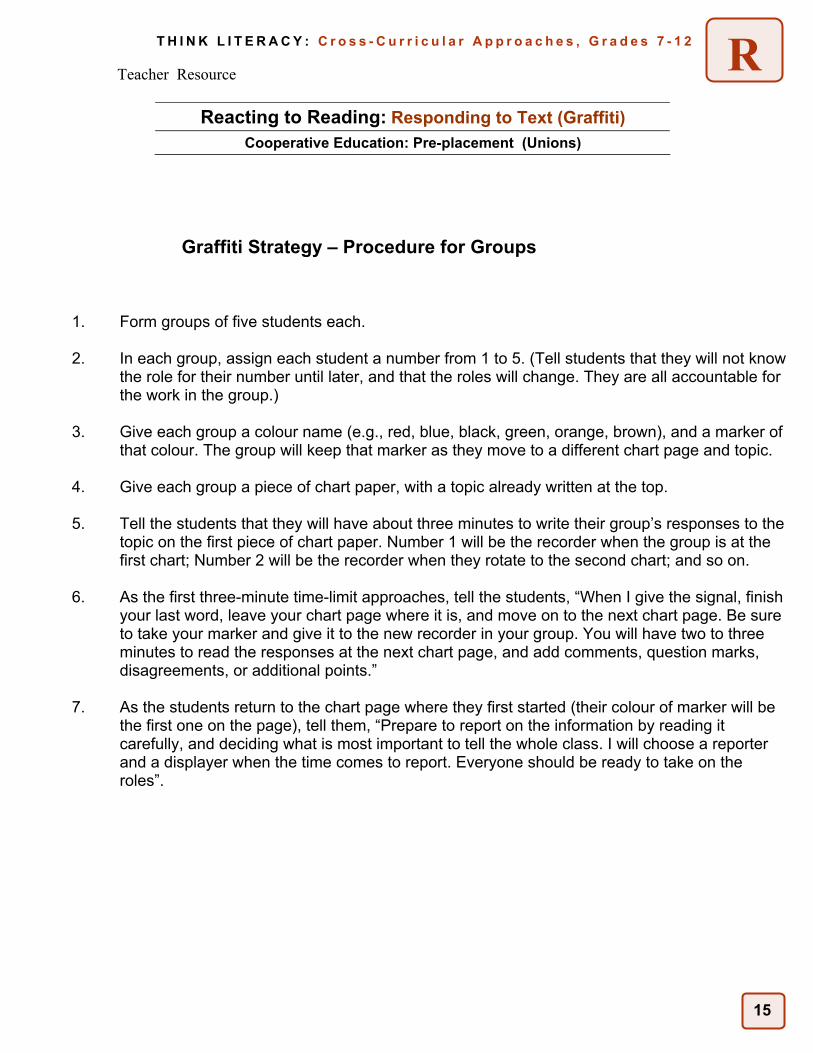
Graffiti Strategy – Procedure for Groups
1. Form groups of five students each.
2. In each group, assign each student a number from 1 to 5. (Tell students that they will not know the role for their number until later, and that the roles will change. They are all accountable for the work in the group.)
3. Give each group a colour name (e.g., red, blue, black, green, orange, brown), and a marker of
that colour. The group will keep that marker as they move to a different chart page and topic.
4. Give each group a piece of chart paper, with a topic already written at the top.
5. Tell the students that they will have about three minutes to write their group’s responses to the topic on the first piece of chart paper. Number 1 will be the recorder when the group is at the first chart; Number 2 will be the recorder when they rotate to the second chart; and so on.
6. As the first three-minute time-limit approaches, tell the students, “When I give the signal, finish
your last word, leave your chart page where it is, and move on to the next chart page. Be sure to take your marker and give it to the new recorder in your group. You will have two to three minutes to read the responses at the next chart page, and add comments, question marks, disagreements, or additional points.”
7. As the students return to the chart page where they first started (their colour of marker will be
the first one on the page), tell them, “Prepare to report on the information by reading it carefully, and deciding what is most important to tell the whole class. I will choose a reporter and a displayer when the time comes to report. Everyone should be ready to take on the roles”.
Teacher Resource
16
T H I N K L I T E R A C Y : C r o s s - C u r r i c u l a r A p p r o a c h e s , G r a d e s 7 - 1 2
R
Reading Different Text Forms: Reading Informational Texts
Cooperative Education: Pre-placement (Exploring Essential Skills for PPLPs)
Occupational Profiles (OPs), a type of informational text, provide students with specific information about the nine Essential Skills, as developed by Human Resources & Skills Development Canada (HRSDC), in specific occupations. This type of informational text uses vocabulary, special design elements, and organizational patterns to clearly present text material. Providing students with an approach to reading Occupational Profiles (OPs) helps them to become effective readers and begin the process of developing their Personalized Placement Learning Plans (PPLPs).
Purpose • Understand what the nine Essential Skills are. • Understand how the Essential Skills will be applied in the placement-specific occupations. • Connect students’ present personal skill sets to the required skill sets of the chosen placement position. • Use acquired knowledge about skills to assist in the development of the PPLP.
Payoff Students will: • expand their vocabulary that may be used for future job interviews, assignments, development of their
Personalized Placement Learning Plan. • gain a realistic understanding of what their placement might entail and how they can contribute at their
placement.. • organize information about their skill set in a practical manner that can be used for future purposes.
Tips and Resources • Review the format of the Occupational Profiles. Some of the features of informational texts are headings,
subheadings, questions, introductions, summaries, overviews and illustrations. These features work together to draw readers into the text at different levels. In the Occupational Profiles, information is presented using summaries, point-form detail under appropriate headings and sub-headings, classifications, and descriptions.
• Various elements such as typeface, size of type, and margin notes help to emphasize important words and concepts.
• See Student Resource, Tips for Reading Informational Texts, from Think Literacy: Cross-Curricular Approaches, Grade 7-12. Focus on one or two tips at a time to help the students before, during and after the assigned reading. Add tips as needed to guide the students in their reading.
• Download Occupational Profiles from Essential Skills Website: http://www15.hrdc-drhc.gc.ca • See: http://skills.edu.gov.on.ca (Ontario Skills Passport, login: osp, password: passport) for student-
focused versions of the Occupational Profiles and a graphic organizer that allows students to keep track of their skill development at the placement.
• See: http://www.skillplan.ca for further information on Essential Skills. Further Support • Provide students with an advance organizer to guide them as they read a particular text. This might be a
series of prompts related to the Occupational Profiles.
17
T H I N K L I T E R A C Y : C r o s s - C u r r i c u l a r A p p r o a c h e s , G r a d e s 7 - 1 2
R
Reading Different Text Forms: Reading Informational Texts
Cooperative Education: Pre-placement (Exploring Essential Skills for PPLPs)
What teachers do What students do Before • Make copies of the Student Resource
Essential Skills Graphic Organizer and the Occupational Profiles (see Tips and Resources) students will need.
• Brainstorm what skills are needed to be successful in any type of work or life situation.
• Introduce the nine HRSDC Essential Skills. • Identify and pre-teach unfamiliar vocabulary
and concepts that students will need to be familiar with.
• Provide each student with the Occupational Profile that is most closely related to their Cooperative Education placement.
• Discuss the various components of the profiles and the organizational tools that are used to present the information in a clear and effective manner.
• Brainstorm the skills that they think are
essential for success in work, school and life. • Become familiar with and make brief notes on:
the nine HRSDC Essential Skills, National Occupational Classification, occupational profiles and other vocabulary introduced by the teacher.
• Contribute responses to the class discussion
on format of profiles.
During • As students read the OPs, help them to
understand the universal nature of the Essential Skills and make the connection to the list of skills generated during the brainstorming activity.
• Have students use the graphic organizer to select the tasks that relate to each essential skill and that they predict they are likely to observe or participate in at their placement.(Column 2)
• Have students activate prior knowledge of their skills (self assessment that has already been completed) and relate these skills to the tasks and essential skills that are found in their occupational profiles. (Column 3)
• Complete Column 2 of the Essential Skills
graphic organizer. • Relate their personal skills to the skills that
are required in the occupation that relates to their Cooperative Education placement.
• Complete Column 3 of the graphic organizer.
After After the reading of the profile, have students consolidate and extend their understanding of the content. • Asking students to identify tasks and skills
from Column 2 and 3 that they think should be in their PPLP.
• Place the identified tasks and skills in Column 4 of the graphic organizer.
• (Optional Reflection) Summarize their understanding of Essential Skills and discuss the skills in the context of their own lives and co-op placement.
• Identify tasks and skills from Column 2 and 3
to include in their PPLP. • Identify and place relevant skills and tasks in
Column 4 of the graphic organizer (to be used for developing the PPLP).
• Complete a reflective journal related to essential skills, their personal skill sets and how the placement will allow them to develop further skills.
Notes
18
T H I N K L I T E R A C Y : C r o s s - C u r r i c u l a r A p p r o a c h e s , G r a d e s 7 - 1 2
R
Reading Different Text Forms: Reading Informational Texts
Cooperative Education: Pre-placement (Exploring Essential Skills for PPLPs)
Tips for Reading Informational Texts
Before Reading • Set a purpose for reading. Ask yourself why you are reading this particular text. • Look over the text to see which elements appear (such as headings, subheadings, illustrations
and captions, etc.). • Examine the titles, headings, and subheadings, and scan for words that stand out.
• Look for words and phrases that might give you clues about how the information is organized.
• Read any overviews, summaries or questions. In a shorter piece, read the opening and concluding sentences or paragraphs.
• Examine each illustration and read the titles or captions.
• Recall what you already know about the topic.
• Record some questions you might have about the topic.
During Reading
• Divide the reading task into smaller chunks (chunking the text into paragraphs, chunking sections by sub-headings, etc.). Read a chunk, pause and think about what you read, and write a brief one sentence summary or brief point-form notes to help you remember important and interesting information.
• Read quickly, then slowly. Skim the sections you think will support your purpose for reading.
When you find specific information you want, slow down and read it word by word. You may need to reread the passage several times.
• Read the selection and jot down thoughts, responses to your questions and new questions that
occur to you. After Reading
• Read the selection again to confirm the main idea and supporting details.
• Make connections to what you already know about the topic. How does the information you have read add to or alter what you knew about the topic?
• Record your thinking about and responses to the text. For example, write a summary, complete a graphic organizer, create a sketch, or orally retell to yourself or a friend.
Student Resource
19
T H I N K L I T E R A C Y : C r o s s - C u r r i c u l a r A p p r o a c h e s , G r a d e s 7 - 1 2
R
Reading Different Text Forms: Reading Informational Texts
Cooperative Education: Pre-placement (Exploring Essential Skills for PPLPs)
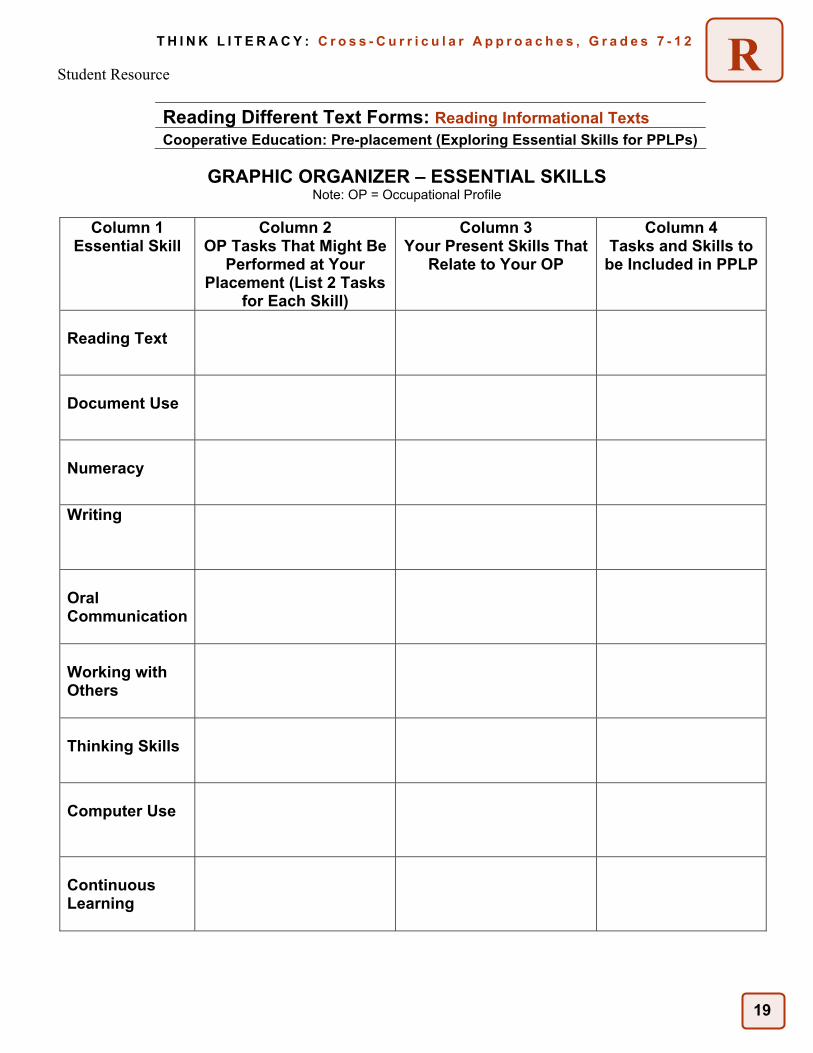
GRAPHIC ORGANIZER – ESSENTIAL SKILLS
Note: OP = Occupational Profile
Column 1 Essential Skill
Column 2 OP Tasks That Might Be
Performed at Your Placement (List 2 Tasks
for Each Skill)
Column 3 Your Present Skills That
Relate to Your OP
Column 4 Tasks and Skills to
be Included in PPLP
Reading Text
Document Use
Numeracy
Writing
Oral Communication
Working with Others
Thinking Skills
Computer Use
Continuous Learning
Student Resource
20
T H I N K L I T E R A C Y : C r o s s - C u r r i c u l a r A p p r o a c h e s , G r a d e s 7 - 1 2
W
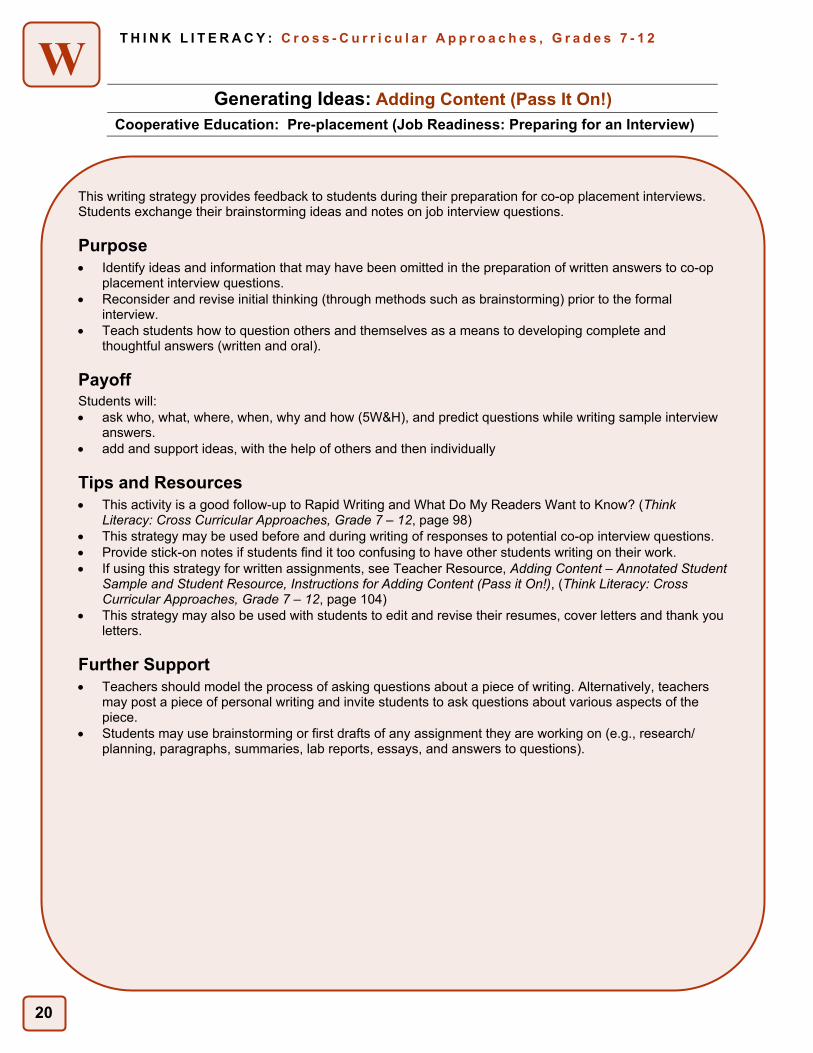
Generating Ideas: Adding Content (Pass It On!)
Cooperative Education: Pre-placement (Job Readiness: Preparing for an Interview)
This writing strategy provides feedback to students during their preparation for co-op placement interviews. Students exchange their brainstorming ideas and notes on job interview questions.
Purpose • Identify ideas and information that may have been omitted in the preparation of written answers to co-op
placement interview questions. • Reconsider and revise initial thinking (through methods such as brainstorming) prior to the formal
interview. • Teach students how to question others and themselves as a means to developing complete and
thoughtful answers (written and oral).
Payoff Students will: • ask who, what, where, when, why and how (5W&H), and predict questions while writing sample interview
answers. • add and support ideas, with the help of others and then individually
Tips and Resources • This activity is a good follow-up to Rapid Writing and What Do My Readers Want to Know? (Think
Literacy: Cross Curricular Approaches, Grade 7 – 12, page 98) • This strategy may be used before and during writing of responses to potential co-op interview questions. • Provide stick-on notes if students find it too confusing to have other students writing on their work. • If using this strategy for written assignments, see Teacher Resource, Adding Content – Annotated Student
Sample and Student Resource, Instructions for Adding Content (Pass it On!), (Think Literacy: Cross Curricular Approaches, Grade 7 – 12, page 104)
• This strategy may also be used with students to edit and revise their resumes, cover letters and thank you letters.
Further Support • Teachers should model the process of asking questions about a piece of writing. Alternatively, teachers
may post a piece of personal writing and invite students to ask questions about various aspects of the piece.
• Students may use brainstorming or first drafts of any assignment they are working on (e.g., research/ planning, paragraphs, summaries, lab reports, essays, and answers to questions).

21
T H I N K L I T E R A C Y : C r o s s - C u r r i c u l a r A p p r o a c h e s , G r a d e s 7 - 1 2
W
Generating Ideas: Adding Content (Pass It On!)
Cooperative Education: Pre-placement (Job Readiness: Preparing for an Interview)
What teachers do What students do Before • Students should have completed the
student resource; Potential Co-op Interview Questions prior to class.
• Distribute Student Resource; Instructions for Adding Content (Pass It On!).
• Using this handout, review: who, what, where, when, why and how (5W & H) questions. Also, discuss the appropriate length of interview answers, and the importance of avoiding yes or no answers.
• Remind students about the purpose of this activity – to ask questions to clarify the writer’s responses or to gather more information from the writer.
• Create groups of 3 students.
• Brainstorm answers and make notes on the
potential co-op interview questions. • Read the instructions on the handout with the
teacher.
During • Have students pass their work (Co-op
Interview Questions and Answers) to the person to their left. The second student will add questions to the work that is handed to them in order to clarify the writer’s responses.
• In 3 to 5 minutes, depending on length of the work, call “time” and have the students pass their work to the left again and repeat the process.
• Have students continue this process until the work has been returned to the original author.
• Within their group, students pass their work to the left and quickly skim the work handed to them.
• As they read, ask questions based on the 5Ws and How.
• Use stick-on notes and write comments and/or questions in margins to clarify the writer’s responses or to gather more information.
After • Students use the edited work and the
answers to the questions as the basis for their preparation for their co-op placement interviews.
• Review the questions raised by their group members and clarify their personal written responses.
• Use the questions and answers as the basis for preparation for their co-op placement interviews.
Notes
22
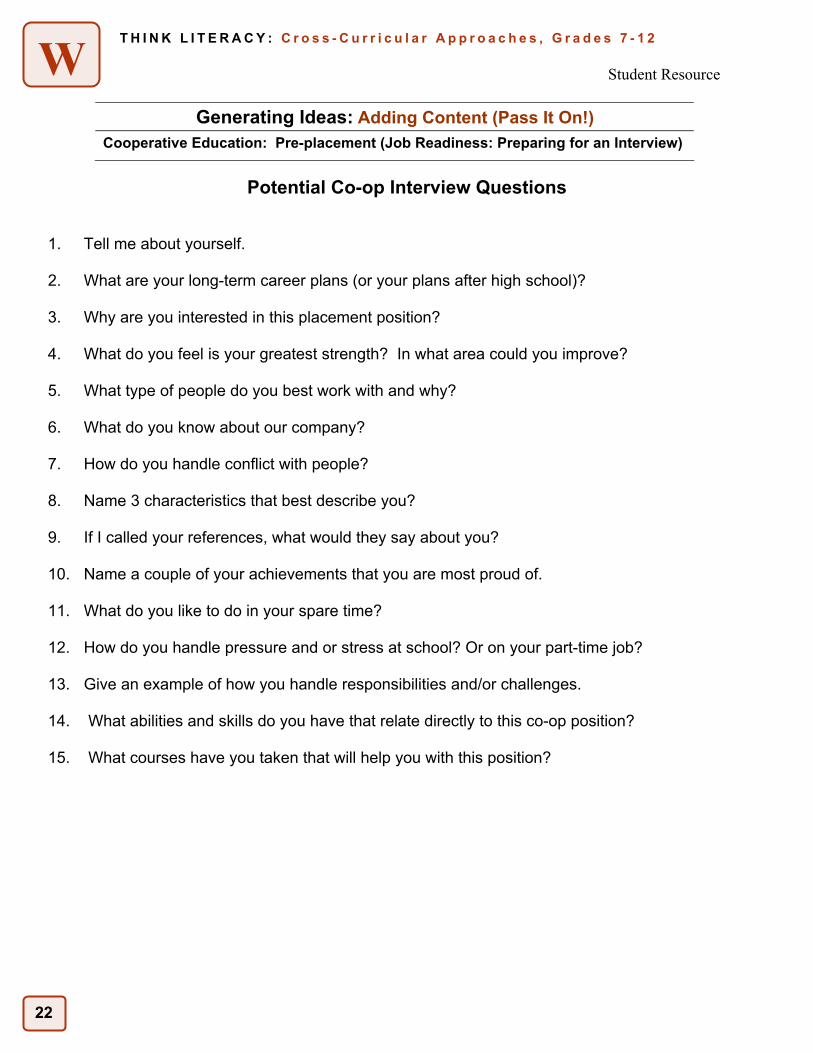
T H I N K L I T E R A C Y : C r o s s - C u r r i c u l a r A p p r o a c h e s , G r a d e s 7 - 1 2
W
Generating Ideas: Adding Content (Pass It On!)
Cooperative Education: Pre-placement (Job Readiness: Preparing for an Interview)
Potential Co-op Interview Questions
1. Tell me about yourself.
2. What are your long-term career plans (or your plans after high school)?
3. Why are you interested in this placement position?
4. What do you feel is your greatest strength? In what area could you improve?
5. What type of people do you best work with and why?
6. What do you know about our company?
7. How do you handle conflict with people?
8. Name 3 characteristics that best describe you?
9. If I called your references, what would they say about you?
10. Name a couple of your achievements that you are most proud of.
11. What do you like to do in your spare time?
12. How do you handle pressure and or stress at school? Or on your part-time job?
13. Give an example of how you handle responsibilities and/or challenges.
14. What abilities and skills do you have that relate directly to this co-op position?
15. What courses have you taken that will help you with this position?
Student Resource
23
T H I N K L I T E R A C Y : C r o s s - C u r r i c u l a r A p p r o a c h e s , G r a d e s 7 - 1 2
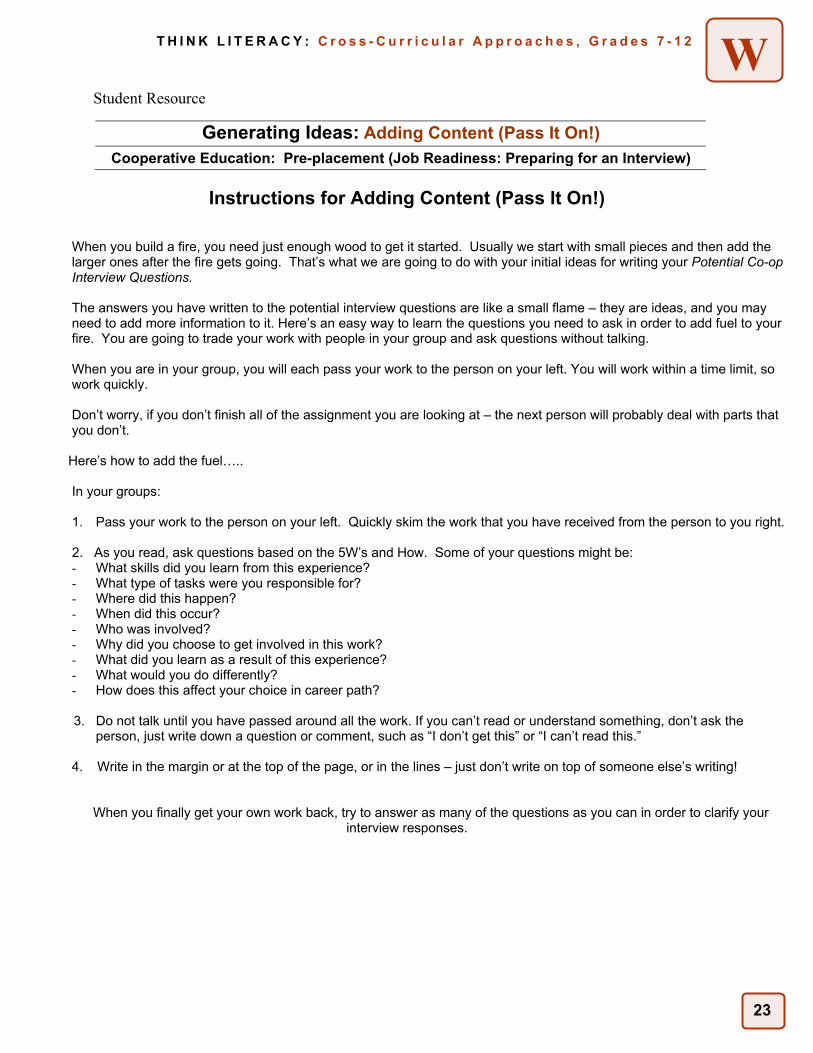
W
Generating Ideas: Adding Content (Pass It On!)
Cooperative Education: Pre-placement (Job Readiness: Preparing for an Interview)
Instructions for Adding Content (Pass It On!)
When you build a fire, you need just enough wood to get it started. Usually we start with small pieces and then add the larger ones after the fire gets going. That’s what we are going to do with your initial ideas for writing your Potential Co-op Interview Questions.
The answers you have written to the potential interview questions are like a small flame – they are ideas, and you may need to add more information to it. Here’s an easy way to learn the questions you need to ask in order to add fuel to your fire. You are going to trade your work with people in your group and ask questions without talking.
When you are in your group, you will each pass your work to the person on your left. You will work within a time limit, so work quickly.
Don’t worry, if you don’t finish all of the assignment you are looking at – the next person will probably deal with parts that you don’t.
Here’s how to add the fuel….. In your groups:
1. Pass your work to the person on your left. Quickly skim the work that you have received from the person to you right. 2. As you read, ask questions based on the 5W’s and How. Some of your questions might be:
- What skills did you learn from this experience? - What type of tasks were you responsible for? - Where did this happen? - When did this occur? - Who was involved? - Why did you choose to get involved in this work? - What did you learn as a result of this experience? - What would you do differently? - How does this affect your choice in career path?
3. Do not talk until you have passed around all the work. If you can’t read or understand something, don’t ask the
person, just write down a question or comment, such as “I don’t get this” or “I can’t read this.”
4. Write in the margin or at the top of the page, or in the lines – just don’t write on top of someone else’s writing!
When you finally get your own work back, try to answer as many of the questions as you can in order to clarify your interview responses.
Student Resource

24
T H I N K L I T E R A C Y : C r o s s - C u r r i c u l a r A p p r o a c h e s , G r a d e s 7 - 1 2
W
Developing and Organizing Ideas: Webbing, Mapping and More
Cooperative Education: Pre-Placement (Resume Pre-Preparation)
Effective writers use different strategies to sort the ideas and information they have gathered in order to make connections, identify relationships, and determine possible directions and forms for their writing. This strategy gives students the opportunity to reorganize, regroup, sort, categorize, classify and cluster their notes and prior learning in order to develop an effective resume.
Purpose • Identify relationships to make connections between self-assessment information (already gathered) and
the development of a resume. • Gather and select information for possible topics and subtopics found in a resume including: personal
information, objective, qualifications, skills, education, work experience, volunteer experience, and relevant accomplishments.
Payoff Students will: • model critical and creative thinking strategies. • learn a variety of strategies that can be used throughout the writing process. • reread notes, gathered information and writing, that are related to creating a resume. • organize ideas and information to focus the content of the resume.
Tips and Resources • Strategies for webbing and mapping include:
Clustering – looking for similarities among ideas, information or things, and grouping them according to characteristics.
Comparing – identifying similarities among ideas, information, or things. Contrasting – identifying differences among ideas, information, or things. Generalizing – describing the overall picture based on the ideas and information presented. Outlining – organizing main ideas, information, and supporting details based on their
relationship to each other. Relating – showing how events, situations, ideas, and information are connected. Sorting – arranging or separating into types, kinds, sizes, etc. Trend-spotting – identifying things that generally look or behave the same.
• See Student/Teacher Resource, Webbing Ideas and Information: Organizing Information for the Resume. • See Student Resource, Webbing Ideas and Information: Organizing Information for the Resume. Info Tasks for Successful Learning, pp.23-32, 87, 90. 98. Further Support • Provide students with sample graphic organizers that guide them in sorting and organizing their
information and notes (e.g., cluster (webs), sequence (flow charts), compare (Venn diagram)). • Have students create a variety of graphic organizers that they have successfully used for different writing
tasks. Create a class collection for students to refer to and use. • Provide students with access to markers, highlighters, scissors, and glue for marking and manipulating
their gathered ideas and information. • Select a familiar topic (the information they have already gathered for their self-assessment). Have
students form discussion groups. Ask students to recall what they already know about resumes (personal experience, lessons teacher has taught), and questions that they still have about the resumes. Ask students to group type of information from their self-assessments into various components of the resume.
25
T H I N K L I T E R A C Y : C r o s s - C u r r i c u l a r A p p r o a c h e s , G r a d e s 7 - 1 2
W
Developing and Organizing Ideas: Webbing, Mapping and More
Cooperative Education: Pre-Placement (Resume Pre-Preparation)
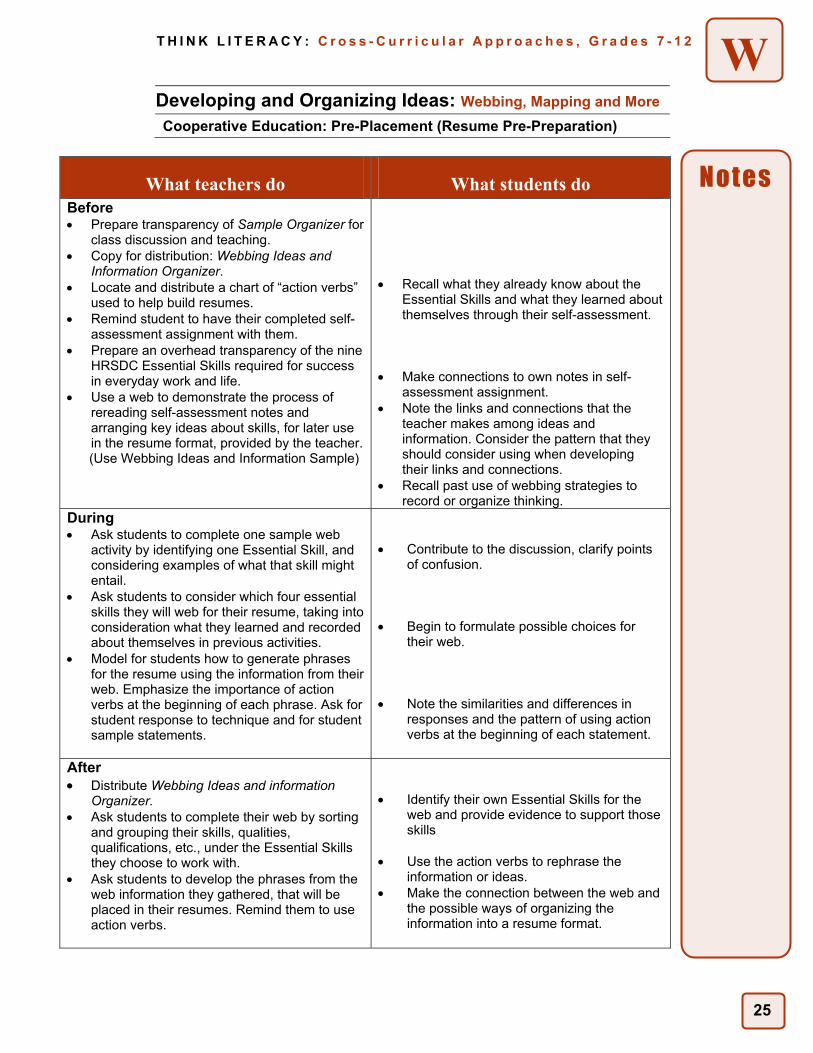
What teachers do What students do Before • Prepare transparency of Sample Organizer for
class discussion and teaching. • Copy for distribution: Webbing Ideas and
Information Organizer. • Locate and distribute a chart of “action verbs”
used to help build resumes. • Remind student to have their completed self-
assessment assignment with them. • Prepare an overhead transparency of the nine
HRSDC Essential Skills required for success in everyday work and life.
• Use a web to demonstrate the process of rereading self-assessment notes and arranging key ideas about skills, for later use in the resume format, provided by the teacher.
(Use Webbing Ideas and Information Sample)
• Recall what they already know about the
Essential Skills and what they learned about themselves through their self-assessment.
• Make connections to own notes in self-
assessment assignment. • Note the links and connections that the
teacher makes among ideas and information. Consider the pattern that they should consider using when developing their links and connections.
• Recall past use of webbing strategies to record or organize thinking.
During • Ask students to complete one sample web
activity by identifying one Essential Skill, and considering examples of what that skill might entail.
• Ask students to consider which four essential skills they will web for their resume, taking into consideration what they learned and recorded about themselves in previous activities.
• Model for students how to generate phrases for the resume using the information from their web. Emphasize the importance of action verbs at the beginning of each phrase. Ask for student response to technique and for student sample statements.
• Contribute to the discussion, clarify points
of confusion.
• Begin to formulate possible choices for their web.
• Note the similarities and differences in
responses and the pattern of using action verbs at the beginning of each statement.
After • Distribute Webbing Ideas and information
Organizer. • Ask students to complete their web by sorting
and grouping their skills, qualities, qualifications, etc., under the Essential Skills they choose to work with.
• Ask students to develop the phrases from the web information they gathered, that will be placed in their resumes. Remind them to use action verbs.
• Identify their own Essential Skills for the
web and provide evidence to support those skills
• Use the action verbs to rephrase the
information or ideas. • Make the connection between the web and
the possible ways of organizing the information into a resume format.
Notes
26
T H I N K L I T E R A C Y : C r o s s - C u r r i c u l a r A p p r o a c h e s , G r a d e s 7 - 1 2
W
Developing and Organizing Ideas: Webbing, Mapping and More
Cooperative Education: Pre-Placement (Resume Pre-Preparation)
Sample
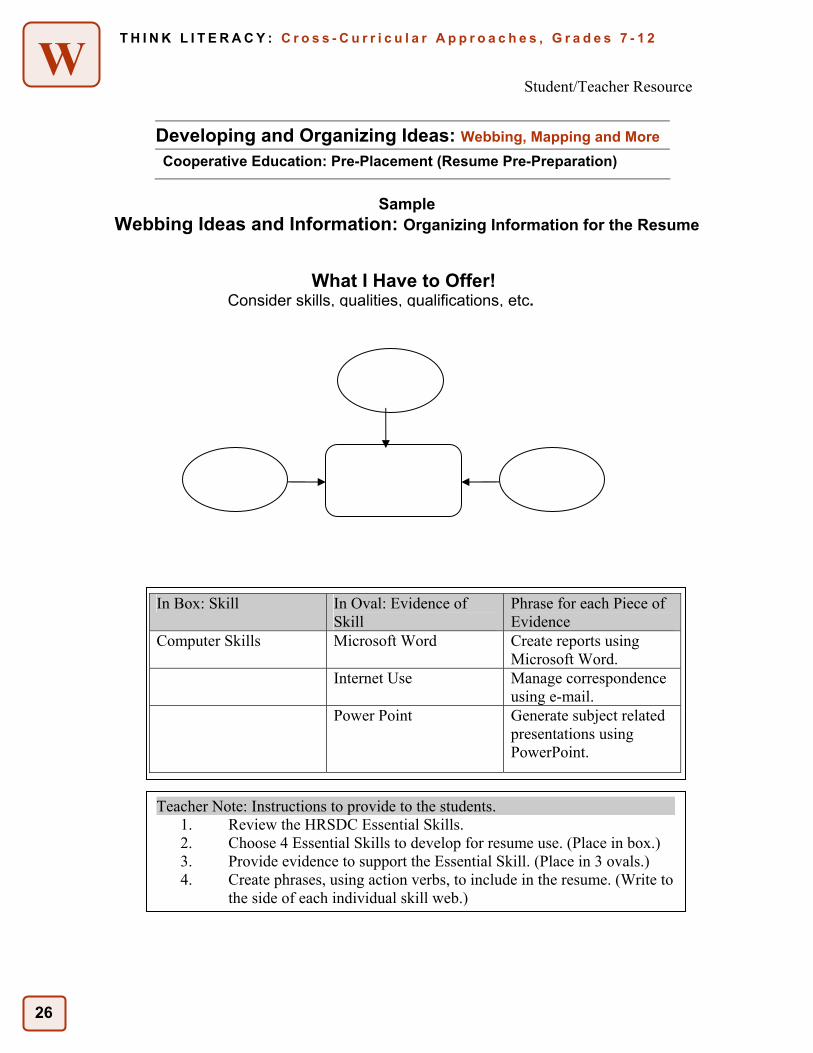
Webbing Ideas and Information: Organizing Information for the Resume
What I Have to Offer! Consider skills, qualities, qualifications, etc.
Teacher Note: Instructions to provide to the students. 1. Review the HRSDC Essential Skills. 2. Choose 4 Essential Skills to develop for resume use. (Place in box.) 3. Provide evidence to support the Essential Skill. (Place in 3 ovals.) 4. Create phrases, using action verbs, to include in the resume. (Write to
the side of each individual skill web.)
In Box: Skill In Oval: Evidence of Skill
Phrase for each Piece of Evidence
Computer Skills Microsoft Word Create reports using Microsoft Word.
Internet Use Manage correspondence using e-mail.
Power Point Generate subject related presentations using PowerPoint.
Student/Teacher Resource
27
T H I N K L I T E R A C Y : C r o s s - C u r r i c u l a r A p p r o a c h e s , G r a d e s 7 - 1 2
W
Developing and Organizing Ideas: Webbing, Mapping and More
Cooperative Education: Pre-Placement (Resume Pre- Preparation)
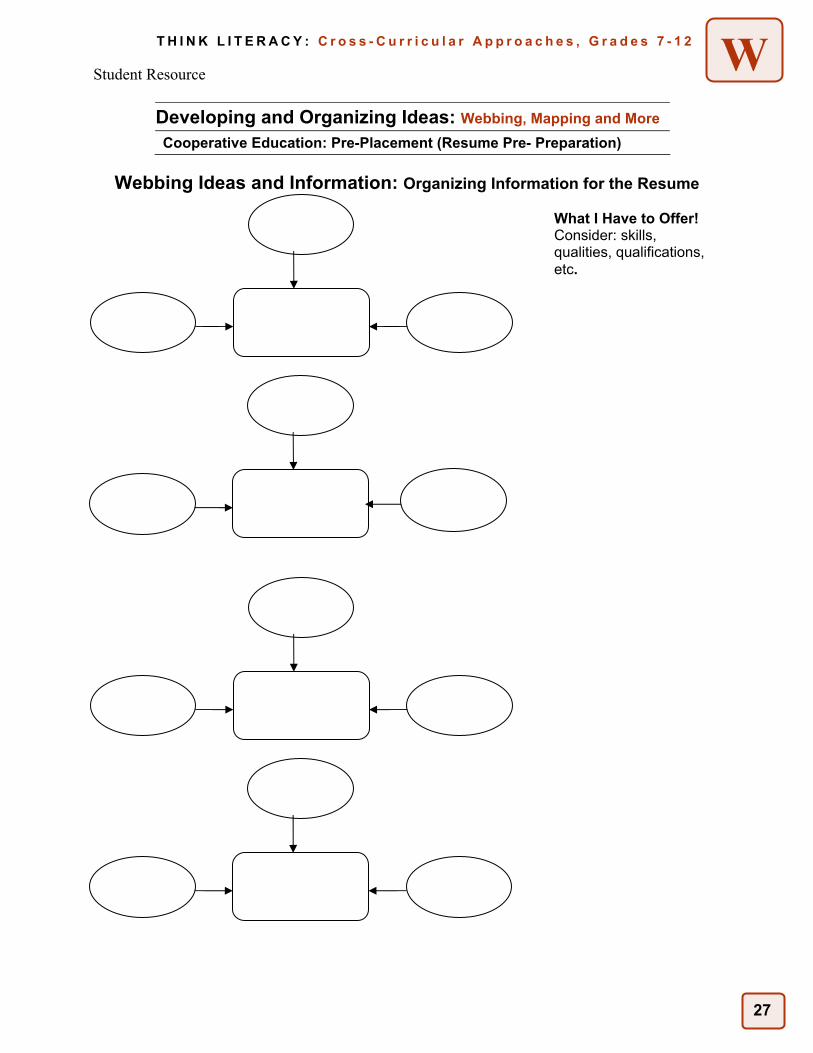
Webbing Ideas and Information: Organizing Information for the Resume
What I Have to Offer! Consider: skills, qualities, qualifications, etc.
Student Resource

28
T H I N K L I T E R A C Y : C r o s s - C u r r i c u l a r A p p r o a c h e s , G r a d e s 7 - 1 2
W
Developing and Organizing Ideas: Supporting the Main Idea
Cooperative Education: Integration (Self-Assessment)
In this writing strategy, students learn how to select the best idea to use as a topic sentence in a paragraph. Through the arrangement of sentences into a logical sequence, students create structured paragraphs to develop their reflective journals.
Purpose •• To assist students with developing main ideas and supporting details for their journals. •• To demonstrate the paragraph structure of a reflective journal.
Payoff Students will: • write well-organized paragraphs for their journals, with supporting details. • comprehend the need for purpose and clarity in their journal writing. • understand the necessary components of reflective journal writing for a cooperative education class.
Tips and Resources • “Main Idea”: a broad statement that includes a topic that can be expanded. It usually begins a paragraph
(e.g., Business activities have resulted in changes in local communities. Businesses can generate wealth and influence standards of living.).
• When constructing a paragraph, begin with writing the most general sentence as the topic sentence and write the remaining sentences in order of importance (most to least or least to most).
• This strategy can help students to understand how to do the task on information paragraphs in the Ontario Secondary School Literacy Test.
• For more information, see Think Literacy: Cross-Curricular Approaches, Grades 7-12, pp. 114 – 116. • Please refer to Student Resource, The 3 R’s of Reflective Journal Writing, for an example of how students
may structure their reflective writing.
Further Support • Alternative methods:
- Complete the activity on paper. - Work either individually or in pairs. - Read groups of sentences. - Look for the best-supported general statement.
• If students are having difficulty determining the topic sentence, provide the topic sentence first; demonstrate how to generate ideas to support the topic sentence.
• As a basic introduction, student can first complete the Sample Exercise in Think Literacy: Cross-Curricular Approaches, Grades 7-12, p. 115.
29
T H I N K L I T E R A C Y : C r o s s - C u r r i c u l a r A p p r o a c h e s , G r a d e s 7 - 1 2
W
Developing and Organizing Ideas: Supporting the Main Idea
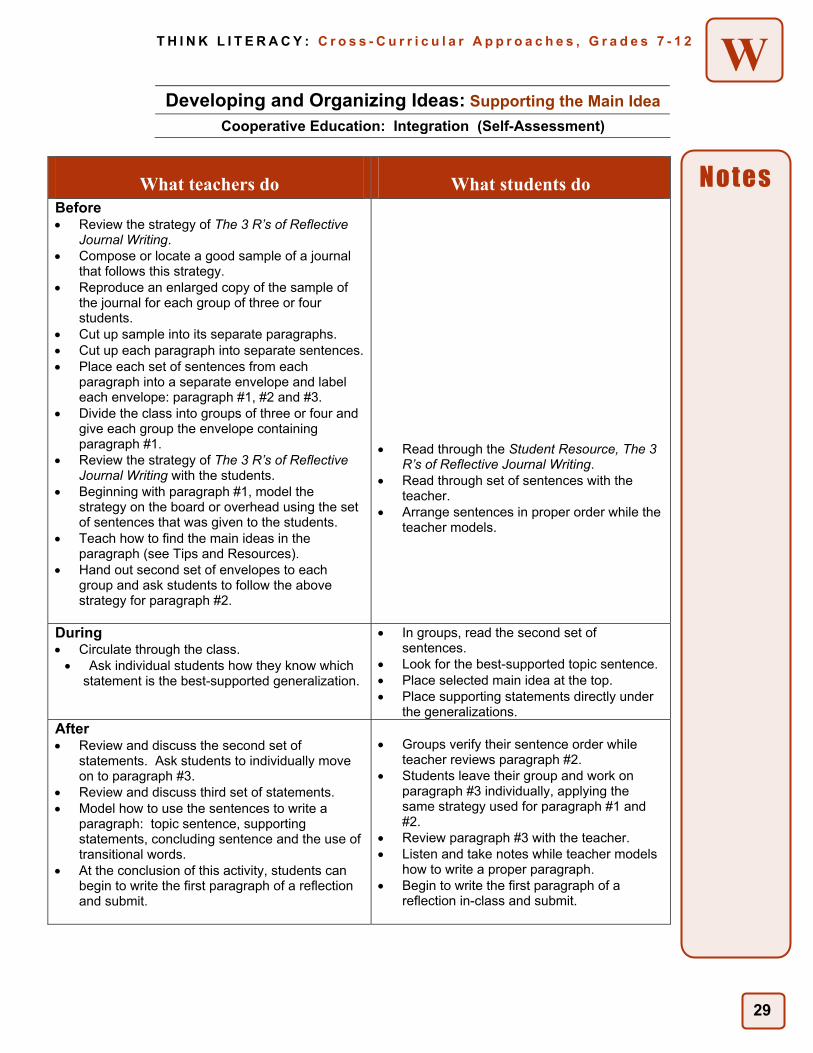
Cooperative Education: Integration (Self-Assessment)
What teachers do What students do Before • Review the strategy of The 3 R’s of Reflective
Journal Writing. • Compose or locate a good sample of a journal
that follows this strategy. • Reproduce an enlarged copy of the sample of
the journal for each group of three or four students.
• Cut up sample into its separate paragraphs. • Cut up each paragraph into separate sentences.• Place each set of sentences from each
paragraph into a separate envelope and label each envelope: paragraph #1, #2 and #3.
• Divide the class into groups of three or four and give each group the envelope containing paragraph #1.
• Review the strategy of The 3 R’s of Reflective Journal Writing with the students.
• Beginning with paragraph #1, model the strategy on the board or overhead using the set of sentences that was given to the students.
• Teach how to find the main ideas in the paragraph (see Tips and Resources).
• Hand out second set of envelopes to each group and ask students to follow the above strategy for paragraph #2.
• Read through the Student Resource, The 3
R’s of Reflective Journal Writing. • Read through set of sentences with the
teacher. • Arrange sentences in proper order while the
teacher models.
During • Circulate through the class. • Ask individual students how they know which
statement is the best-supported generalization.
• In groups, read the second set of sentences.
• Look for the best-supported topic sentence. • Place selected main idea at the top. • Place supporting statements directly under
the generalizations. After • Review and discuss the second set of
statements. Ask students to individually move on to paragraph #3.
• Review and discuss third set of statements. • Model how to use the sentences to write a
paragraph: topic sentence, supporting statements, concluding sentence and the use of transitional words.
• At the conclusion of this activity, students can begin to write the first paragraph of a reflection and submit.
• Groups verify their sentence order while teacher reviews paragraph #2.
• Students leave their group and work on paragraph #3 individually, applying the same strategy used for paragraph #1 and #2.
• Review paragraph #3 with the teacher. • Listen and take notes while teacher models
how to write a proper paragraph. • Begin to write the first paragraph of a
reflection in-class and submit.
Notes
30
T H I N K L I T E R A C Y : C r o s s - C u r r i c u l a r A p p r o a c h e s , G r a d e s 7 - 1 2
W
Developing and Organizing Ideas: Supporting the Main Idea
Cooperative Education: Integration (Self-Assessment)
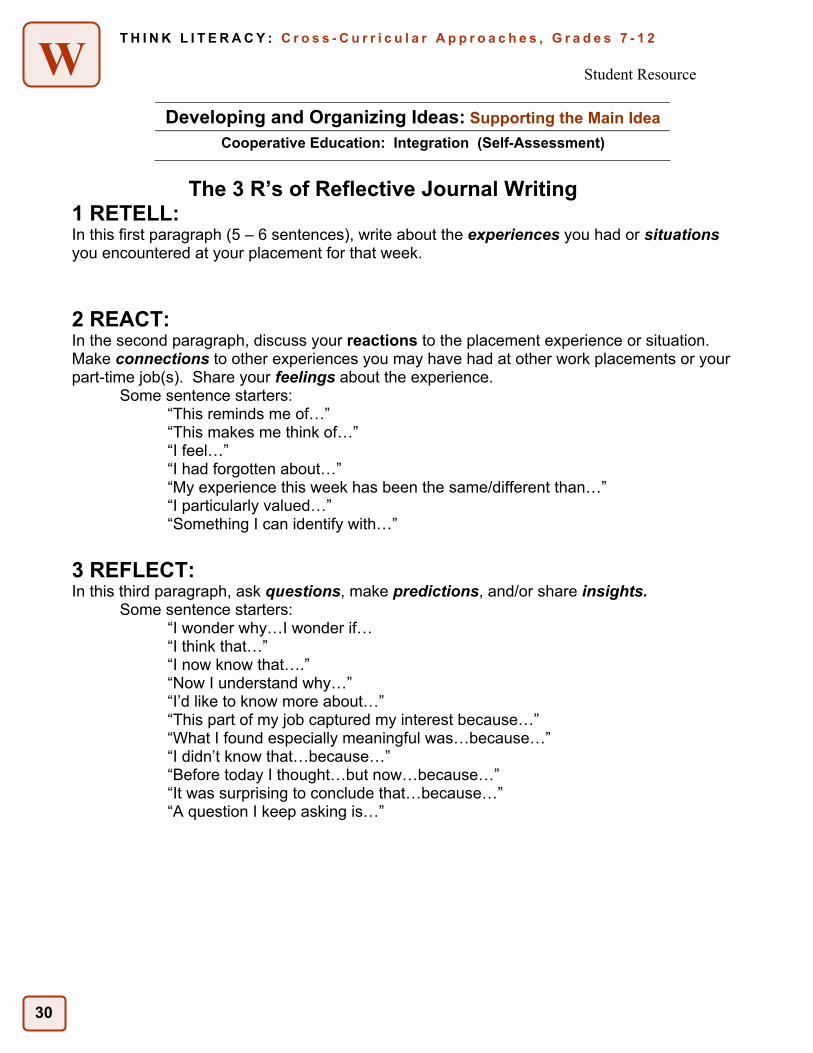
The 3 R’s of Reflective Journal Writing 1 RETELL: In this first paragraph (5 – 6 sentences), write about the experiences you had or situations you encountered at your placement for that week.
2 REACT: In the second paragraph, discuss your reactions to the placement experience or situation. Make connections to other experiences you may have had at other work placements or your part-time job(s). Share your feelings about the experience.
Some sentence starters: “This reminds me of…”
“This makes me think of…” “I feel…” “I had forgotten about…” “My experience this week has been the same/different than…” “I particularly valued…” “Something I can identify with…”
3 REFLECT: In this third paragraph, ask questions, make predictions, and/or share insights.
Some sentence starters: “I wonder why…I wonder if… “I think that…” “I now know that….” “Now I understand why…” “I’d like to know more about…” “This part of my job captured my interest because…” “What I found especially meaningful was…because…” “I didn’t know that…because…” “Before today I thought…but now…because…” “It was surprising to conclude that…because…” “A question I keep asking is…”
Student Resource

31
T H I N K L I T E R A C Y : C r o s s - C u r r i c u l a r A p p r o a c h e s , G r a d e s 7 - 1 2
W
32
T H I N K L I T E R A C Y : C r o s s - C u r r i c u l a r A p p r o a c h e s , G r a d e s 7 - 1 2
W
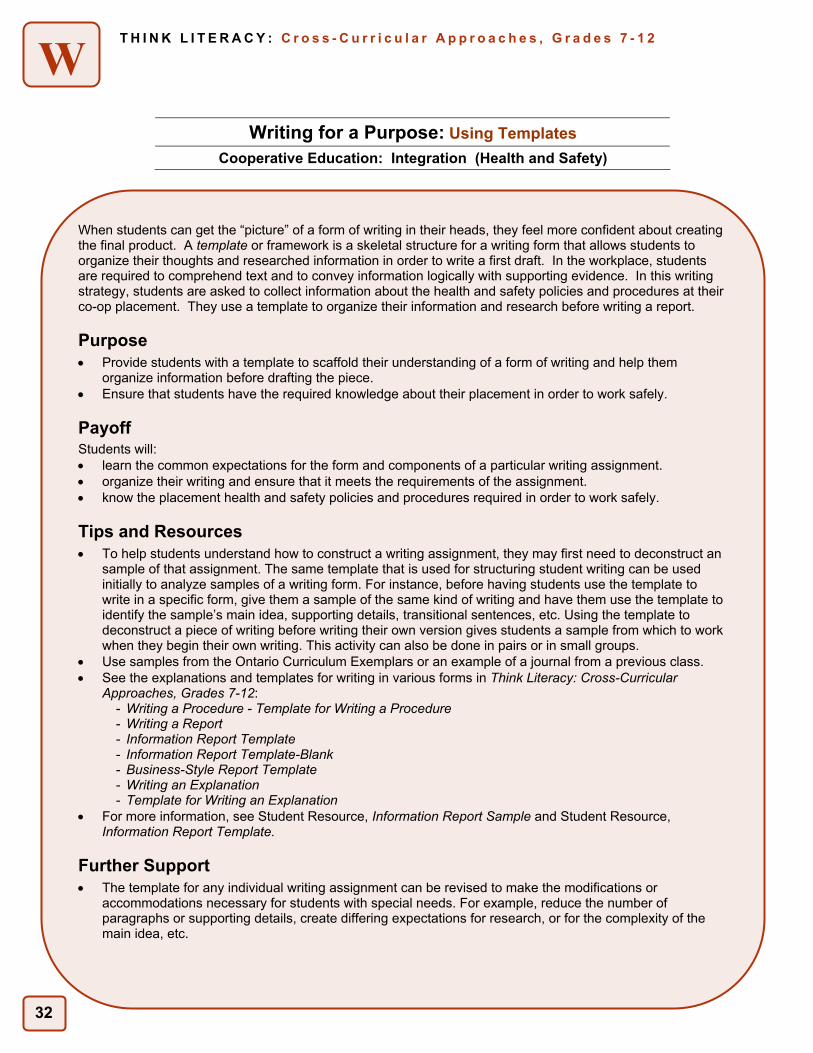
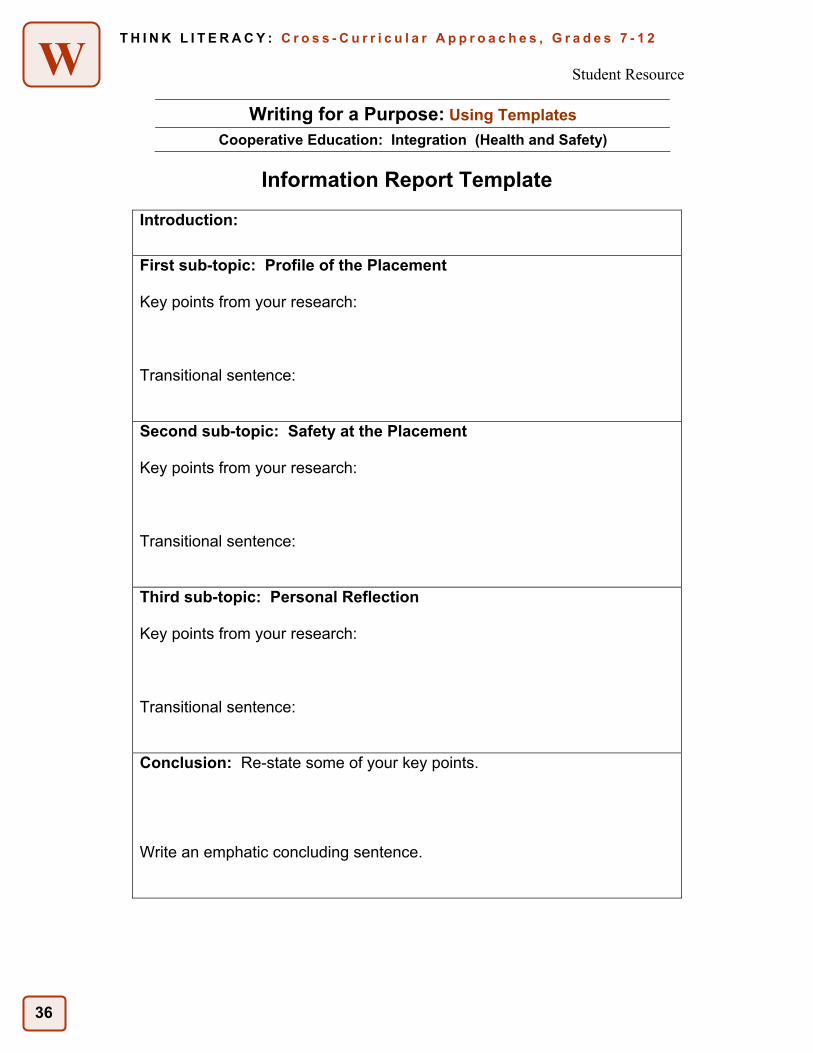
Writing for a Purpose: Using Templates
Cooperative Education: Integration (Health and Safety)
When students can get the “picture” of a form of writing in their heads, they feel more confident about creating the final product. A template or framework is a skeletal structure for a writing form that allows students to organize their thoughts and researched information in order to write a first draft. In the workplace, students are required to comprehend text and to convey information logically with supporting evidence. In this writing strategy, students are asked to collect information about the health and safety policies and procedures at their co-op placement. They use a template to organize their information and research before writing a report.
Purpose •• Provide students with a template to scaffold their understanding of a form of writing and help them
organize information before drafting the piece. •• Ensure that students have the required knowledge about their placement in order to work safely.
Payoff Students will: • learn the common expectations for the form and components of a particular writing assignment. • organize their writing and ensure that it meets the requirements of the assignment. • know the placement health and safety policies and procedures required in order to work safely.
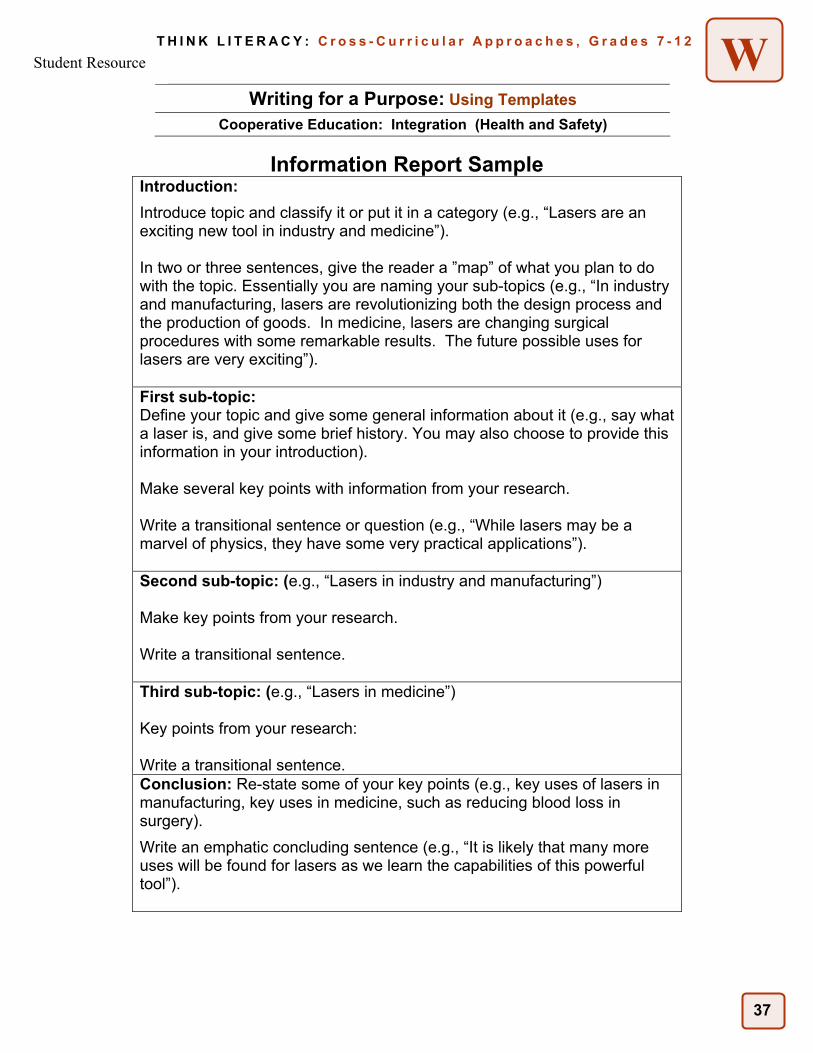
Tips and Resources • To help students understand how to construct a writing assignment, they may first need to deconstruct an
sample of that assignment. The same template that is used for structuring student writing can be used initially to analyze samples of a writing form. For instance, before having students use the template to write in a specific form, give them a sample of the same kind of writing and have them use the template to identify the sample’s main idea, supporting details, transitional sentences, etc. Using the template to deconstruct a piece of writing before writing their own version gives students a sample from which to work when they begin their own writing. This activity can also be done in pairs or in small groups.
• Use samples from the Ontario Curriculum Exemplars or an example of a journal from a previous class. • See the explanations and templates for writing in various forms in Think Literacy: Cross-Curricular
Approaches, Grades 7-12: - Writing a Procedure - Template for Writing a Procedure - Writing a Report - Information Report Template - Information Report Template-Blank - Business-Style Report Template - Writing an Explanation - Template for Writing an Explanation
• For more information, see Student Resource, Information Report Sample and Student Resource, Information Report Template.
Further Support • The template for any individual writing assignment can be revised to make the modifications or
accommodations necessary for students with special needs. For example, reduce the number of paragraphs or supporting details, create differing expectations for research, or for the complexity of the main idea, etc.
33
T H I N K L I T E R A C Y : C r o s s - C u r r i c u l a r A p p r o a c h e s , G r a d e s 7 - 1 2
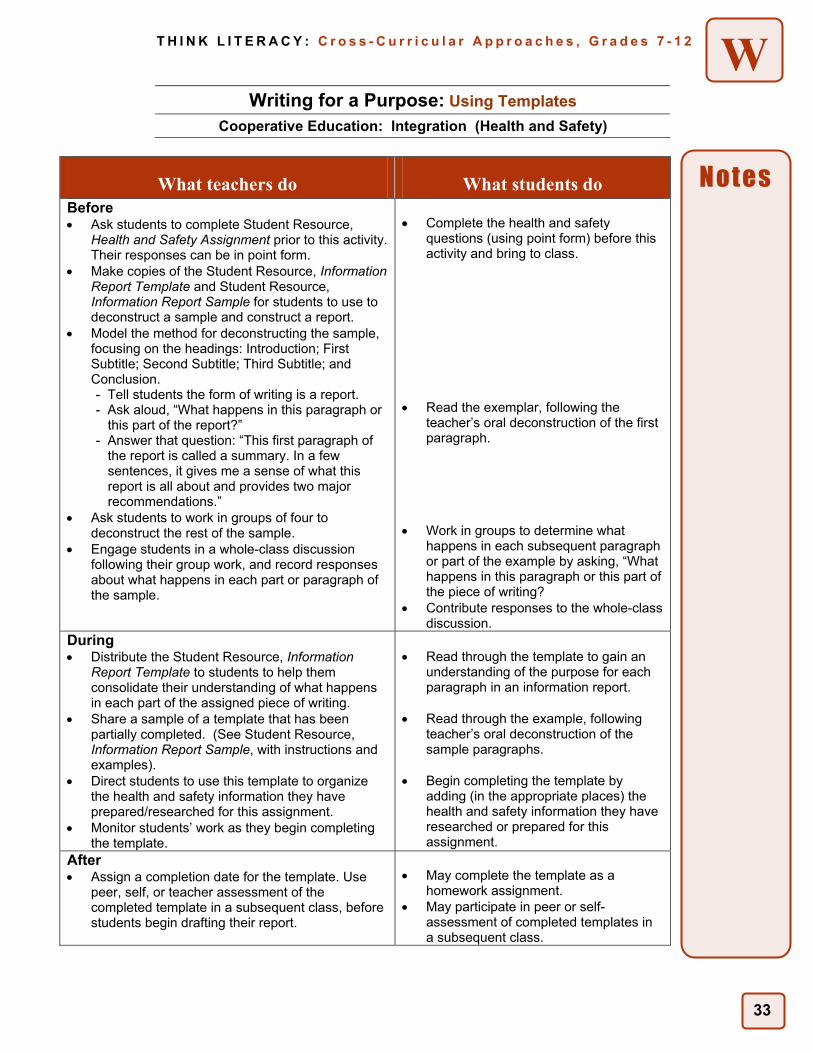
W
Writing for a Purpose: Using Templates
Cooperative Education: Integration (Health and Safety)
What teachers do What students do Before • Ask students to complete Student Resource,
Health and Safety Assignment prior to this activity. Their responses can be in point form.
• Make copies of the Student Resource, Information Report Template and Student Resource, Information Report Sample for students to use to deconstruct a sample and construct a report.
• Model the method for deconstructing the sample, focusing on the headings: Introduction; First Subtitle; Second Subtitle; Third Subtitle; and Conclusion. - Tell students the form of writing is a report. - Ask aloud, “What happens in this paragraph or
this part of the report?” - Answer that question: “This first paragraph of
the report is called a summary. In a few sentences, it gives me a sense of what this report is all about and provides two major recommendations.”
• Ask students to work in groups of four to deconstruct the rest of the sample.
• Engage students in a whole-class discussion following their group work, and record responses about what happens in each part or paragraph of the sample.
•• Complete the health and safety
questions (using point form) before this activity and bring to class.
• Read the exemplar, following the
teacher’s oral deconstruction of the first paragraph.
• Work in groups to determine what
happens in each subsequent paragraph or part of the example by asking, “What happens in this paragraph or this part of the piece of writing?
• Contribute responses to the whole-class discussion.
During • Distribute the Student Resource, Information
Report Template to students to help them consolidate their understanding of what happens in each part of the assigned piece of writing.
• Share a sample of a template that has been partially completed. (See Student Resource, Information Report Sample, with instructions and examples).
• Direct students to use this template to organize the health and safety information they have prepared/researched for this assignment.
• Monitor students’ work as they begin completing the template.
• Read through the template to gain an
understanding of the purpose for each paragraph in an information report.
• Read through the example, following
teacher’s oral deconstruction of the sample paragraphs.
• Begin completing the template by
adding (in the appropriate places) the health and safety information they have researched or prepared for this assignment.
After • Assign a completion date for the template. Use
peer, self, or teacher assessment of the completed template in a subsequent class, before students begin drafting their report.
• May complete the template as a
homework assignment. • May participate in peer or self-
assessment of completed templates in a subsequent class.
Notes
34
T H I N K L I T E R A C Y : C r o s s - C u r r i c u l a r A p p r o a c h e s , G r a d e s 7 - 1 2
W
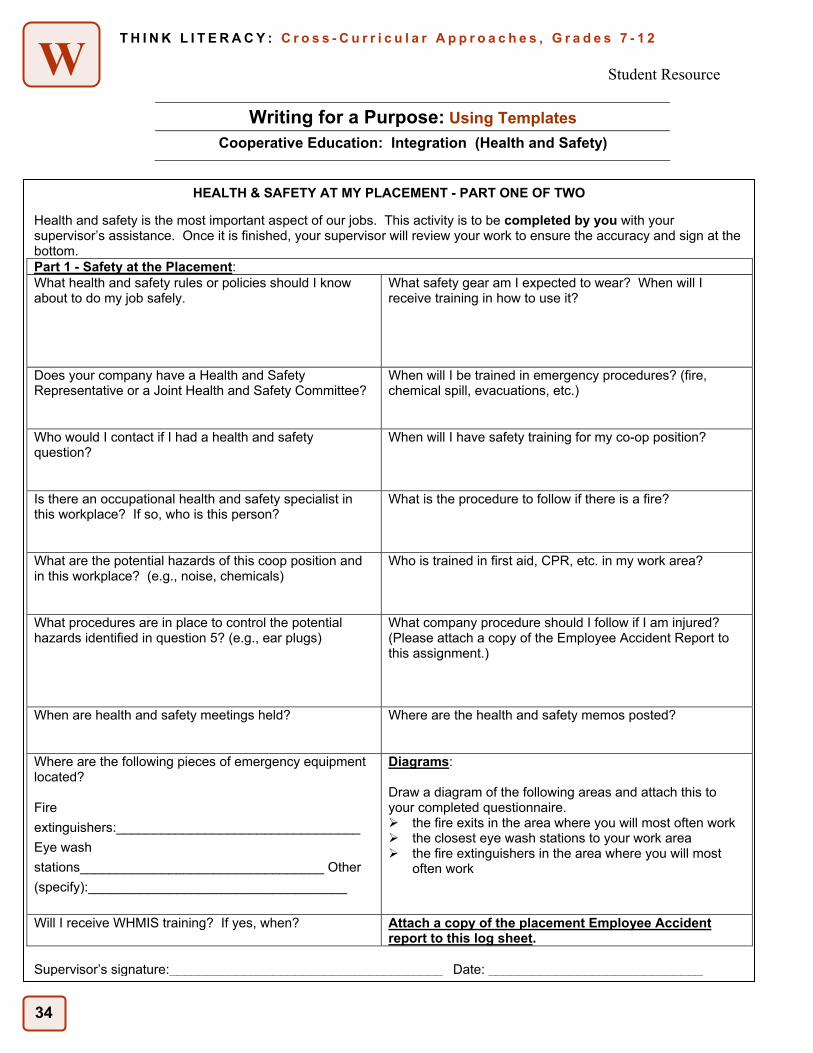
Writing for a Purpose: Using Templates
Cooperative Education: Integration (Health and Safety)
Student Resource
HEALTH & SAFETY AT MY PLACEMENT - PART ONE OF TWO
Health and safety is the most important aspect of our jobs. This activity is to be completed by you with your supervisor’s assistance. Once it is finished, your supervisor will review your work to ensure the accuracy and sign at the bottom. Part 1 - Safety at the Placement: What health and safety rules or policies should I know about to do my job safely.
What safety gear am I expected to wear? When will I receive training in how to use it?
Does your company have a Health and Safety Representative or a Joint Health and Safety Committee?
When will I be trained in emergency procedures? (fire, chemical spill, evacuations, etc.)
Who would I contact if I had a health and safety question?
When will I have safety training for my co-op position?
Is there an occupational health and safety specialist in this workplace? If so, who is this person?
What is the procedure to follow if there is a fire?
What are the potential hazards of this coop position and in this workplace? (e.g., noise, chemicals)
Who is trained in first aid, CPR, etc. in my work area?
What procedures are in place to control the potential hazards identified in question 5? (e.g., ear plugs)
What company procedure should I follow if I am injured? (Please attach a copy of the Employee Accident Report to this assignment.)
When are health and safety meetings held?
Where are the health and safety memos posted?
Where are the following pieces of emergency equipment located? Fire extinguishers:_________________________________ Eye wash stations_________________________________ Other (specify):___________________________________
Diagrams: Draw a diagram of the following areas and attach this to your completed questionnaire.
the fire exits in the area where you will most often work the closest eye wash stations to your work area the fire extinguishers in the area where you will most
often work
Will I receive WHMIS training? If yes, when? Attach a copy of the placement Employee Accident report to this log sheet.
Supervisor’s signature:_____________________________________ Date: _____________________________
35
T H I N K L I T E R A C Y : C r o s s - C u r r i c u l a r A p p r o a c h e s , G r a d e s 7 - 1 2
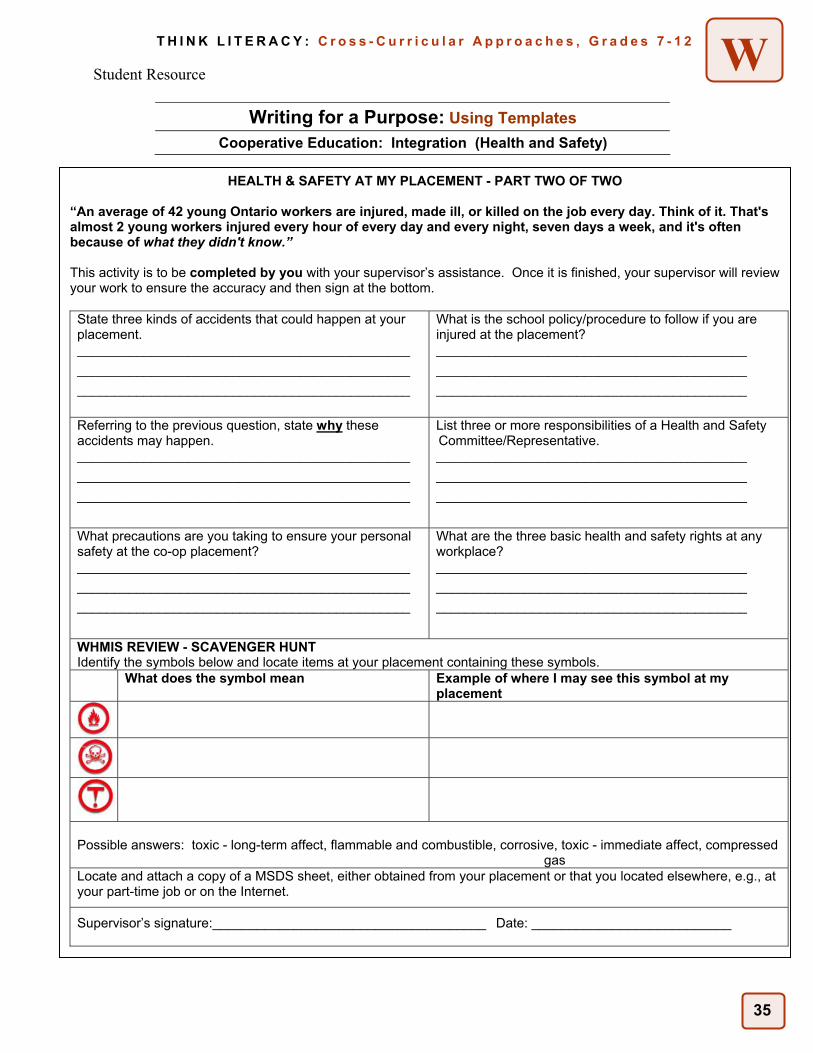
W
Writing for a Purpose: Using Templates
Cooperative Education: Integration (Health and Safety)
Student Resource
HEALTH & SAFETY AT MY PLACEMENT - PART TWO OF TWO
“An average of 42 young Ontario workers are injured, made ill, or killed on the job every day. Think of it. That's almost 2 young workers injured every hour of every day and every night, seven days a week, and it's often because of what they didn't know.” This activity is to be completed by you with your supervisor’s assistance. Once it is finished, your supervisor will review your work to ensure the accuracy and then sign at the bottom. State three kinds of accidents that could happen at your placement. _____________________________________________ _____________________________________________ _____________________________________________
What is the school policy/procedure to follow if you are injured at the placement? __________________________________________ __________________________________________ __________________________________________
Referring to the previous question, state why these accidents may happen. _____________________________________________ _____________________________________________ _____________________________________________
List three or more responsibilities of a Health and Safety Committee/Representative. __________________________________________ __________________________________________ __________________________________________
What precautions are you taking to ensure your personal safety at the co-op placement? _____________________________________________ _____________________________________________ _____________________________________________
What are the three basic health and safety rights at any workplace? __________________________________________ __________________________________________ __________________________________________
WHMIS REVIEW - SCAVENGER HUNT Identify the symbols below and locate items at your placement containing these symbols. What does the symbol mean Example of where I may see this symbol at my
placement
Possible answers: toxic - long-term affect, flammable and combustible, corrosive, toxic - immediate affect, compressed
gas Locate and attach a copy of a MSDS sheet, either obtained from your placement or that you located elsewhere, e.g., at your part-time job or on the Internet.
Supervisor’s signature:_____________________________________ Date: ___________________________
36
T H I N K L I T E R A C Y : C r o s s - C u r r i c u l a r A p p r o a c h e s , G r a d e s 7 - 1 2
W
Writing for a Purpose: Using Templates
Cooperative Education: Integration (Health and Safety)
Information Report Template
Introduction: First sub-topic: Profile of the Placement Key points from your research: Transitional sentence: Second sub-topic: Safety at the Placement Key points from your research: Transitional sentence: Third sub-topic: Personal Reflection Key points from your research: Transitional sentence: Conclusion: Re-state some of your key points. Write an emphatic concluding sentence.
Student Resource
37
T H I N K L I T E R A C Y : C r o s s - C u r r i c u l a r A p p r o a c h e s , G r a d e s 7 - 1 2
W
Writing for a Purpose: Using Templates
Cooperative Education: Integration (Health and Safety)
Information Report Sample Introduction: Introduce topic and classify it or put it in a category (e.g., “Lasers are an exciting new tool in industry and medicine”). In two or three sentences, give the reader a ”map” of what you plan to do with the topic. Essentially you are naming your sub-topics (e.g., “In industry and manufacturing, lasers are revolutionizing both the design process and the production of goods. In medicine, lasers are changing surgical procedures with some remarkable results. The future possible uses for lasers are very exciting”). First sub-topic: Define your topic and give some general information about it (e.g., say what a laser is, and give some brief history. You may also choose to provide this information in your introduction). Make several key points with information from your research. Write a transitional sentence or question (e.g., “While lasers may be a marvel of physics, they have some very practical applications”). Second sub-topic: (e.g., “Lasers in industry and manufacturing”) Make key points from your research. Write a transitional sentence. Third sub-topic: (e.g., “Lasers in medicine”) Key points from your research: Write a transitional sentence. Conclusion: Re-state some of your key points (e.g., key uses of lasers in manufacturing, key uses in medicine, such as reducing blood loss in surgery). Write an emphatic concluding sentence (e.g., “It is likely that many more uses will be found for lasers as we learn the capabilities of this powerful tool”).
Student Resource
38
T H I N K L I T E R A C Y : C r o s s - C u r r i c u l a r A p p r o a c h e s , G r a d e s 7 - 1 2
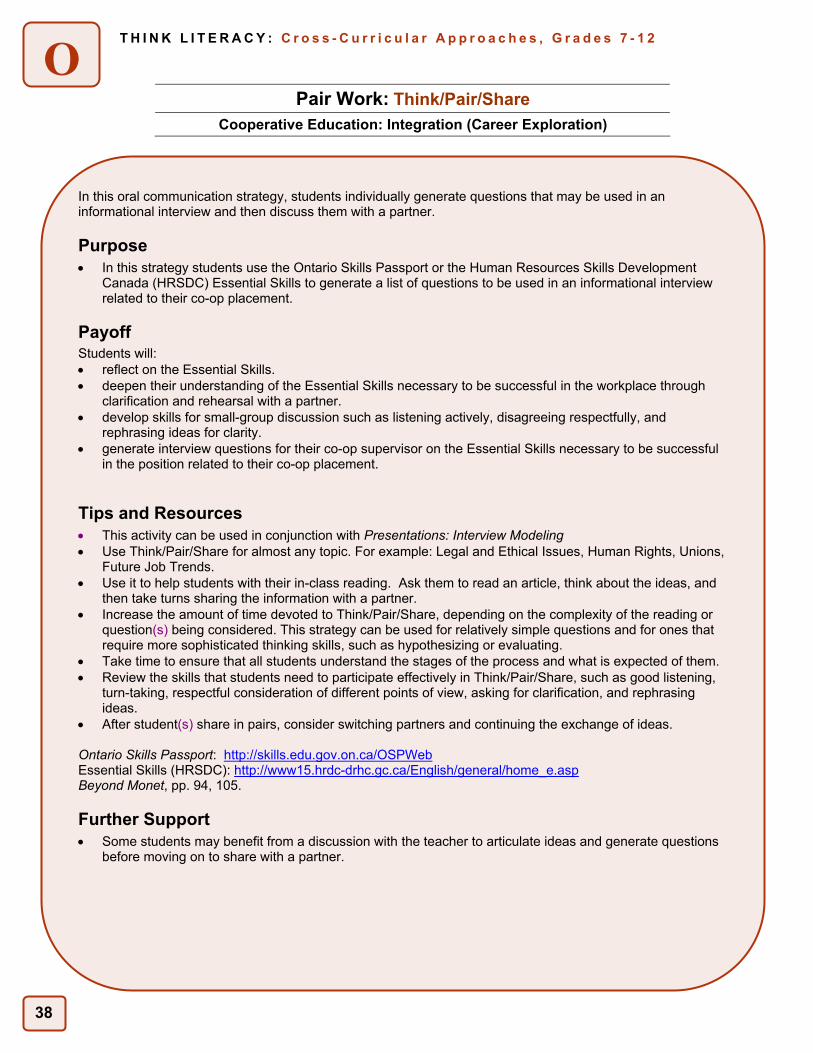
O
Pair Work: Think/Pair/Share
Cooperative Education: Integration (Career Exploration)
In this oral communication strategy, students individually generate questions that may be used in an informational interview and then discuss them with a partner.
Purpose • In this strategy students use the Ontario Skills Passport or the Human Resources Skills Development
Canada (HRSDC) Essential Skills to generate a list of questions to be used in an informational interview related to their co-op placement.
Payoff Students will: • reflect on the Essential Skills. • deepen their understanding of the Essential Skills necessary to be successful in the workplace through
clarification and rehearsal with a partner. • develop skills for small-group discussion such as listening actively, disagreeing respectfully, and
rephrasing ideas for clarity. • generate interview questions for their co-op supervisor on the Essential Skills necessary to be successful
in the position related to their co-op placement.
Tips and Resources • This activity can be used in conjunction with Presentations: Interview Modeling • Use Think/Pair/Share for almost any topic. For example: Legal and Ethical Issues, Human Rights, Unions,
Future Job Trends. • Use it to help students with their in-class reading. Ask them to read an article, think about the ideas, and
then take turns sharing the information with a partner. • Increase the amount of time devoted to Think/Pair/Share, depending on the complexity of the reading or
question(s) being considered. This strategy can be used for relatively simple questions and for ones that require more sophisticated thinking skills, such as hypothesizing or evaluating.
• Take time to ensure that all students understand the stages of the process and what is expected of them. • Review the skills that students need to participate effectively in Think/Pair/Share, such as good listening,
turn-taking, respectful consideration of different points of view, asking for clarification, and rephrasing ideas.
• After student(s) share in pairs, consider switching partners and continuing the exchange of ideas. Ontario Skills Passport: http://skills.edu.gov.on.ca/OSPWeb Essential Skills (HRSDC): http://www15.hrdc-drhc.gc.ca/English/general/home_e.asp Beyond Monet, pp. 94, 105.
Further Support • Some students may benefit from a discussion with the teacher to articulate ideas and generate questions
before moving on to share with a partner.
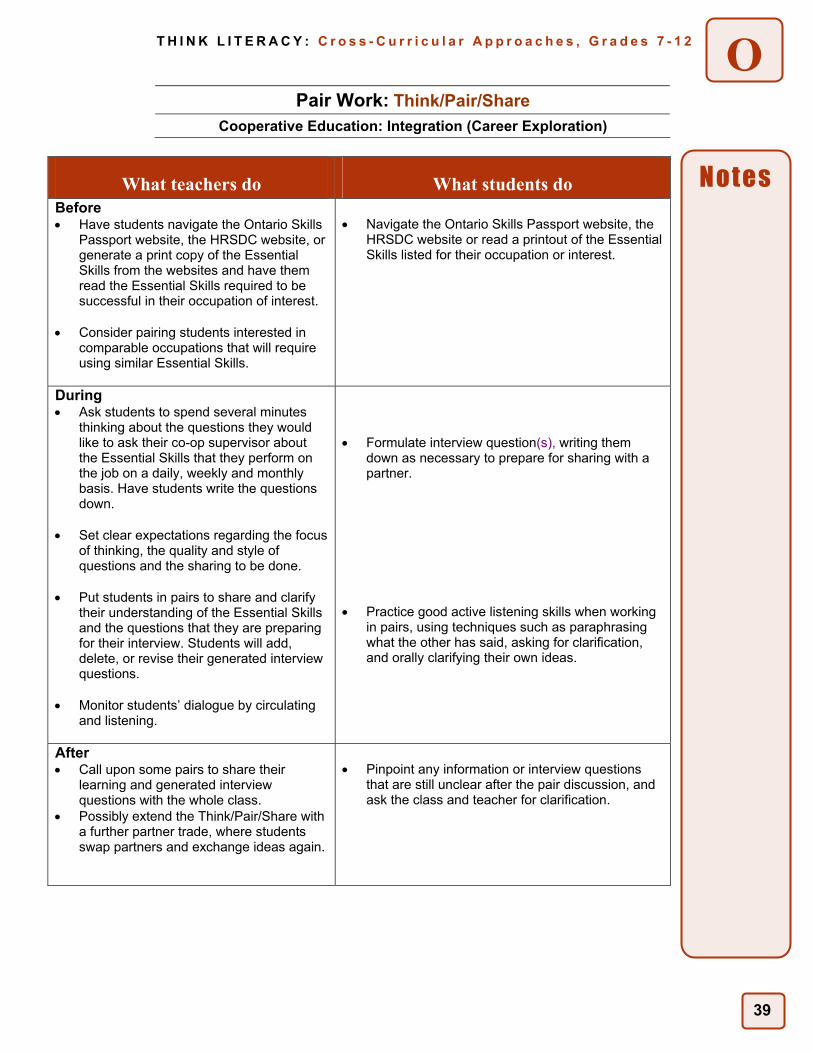
39
T H I N K L I T E R A C Y : C r o s s - C u r r i c u l a r A p p r o a c h e s , G r a d e s 7 - 1 2
O
Pair Work: Think/Pair/Share
Cooperative Education: Integration (Career Exploration)
What teachers do What students do Before • Have students navigate the Ontario Skills
Passport website, the HRSDC website, or generate a print copy of the Essential Skills from the websites and have them read the Essential Skills required to be successful in their occupation of interest.
• Consider pairing students interested in
comparable occupations that will require using similar Essential Skills.
• Navigate the Ontario Skills Passport website, the HRSDC website or read a printout of the Essential Skills listed for their occupation or interest.
During • Ask students to spend several minutes
thinking about the questions they would like to ask their co-op supervisor about the Essential Skills that they perform on the job on a daily, weekly and monthly basis. Have students write the questions down.
• Set clear expectations regarding the focus
of thinking, the quality and style of questions and the sharing to be done.
• Put students in pairs to share and clarify
their understanding of the Essential Skills and the questions that they are preparing for their interview. Students will add, delete, or revise their generated interview questions.
• Monitor students’ dialogue by circulating
and listening.
• Formulate interview question(s), writing them down as necessary to prepare for sharing with a partner.
• Practice good active listening skills when working
in pairs, using techniques such as paraphrasing what the other has said, asking for clarification, and orally clarifying their own ideas.
After • Call upon some pairs to share their
learning and generated interview questions with the whole class.
• Possibly extend the Think/Pair/Share with a further partner trade, where students swap partners and exchange ideas again.
• Pinpoint any information or interview questions that are still unclear after the pair discussion, and ask the class and teacher for clarification.
Notes
40
T H I N K L I T E R A C Y : C r o s s - C u r r i c u l a r A p p r o a c h e s , G r a d e s 7 - 1 2
O
Pair Work: Timed Retell
Cooperative Education: Integration (Career Exploration)
In this oral communication strategy, students practice their listening and speaking skills. Students divide into pairs and take turns speaking, listening, and retelling information on the Human Resources Skills Development Canada (HRSDC) Essential Skills in timed steps. As an extension, pairs of students join with a second or third pair to continue the timed retell.
Purpose • Develop a common language and a general understanding of the Essential Skills. • Develop an understanding of the Essential Skills that are required to be successful in the workplace. • Share information or create an argument and be concise in its delivery. • Develop attentive listening skills while sharing information or viewpoints on an issue. • Make connections between written and oral skills.
Payoff Students will: • use a common language related to the workplace. • share ideas and develop listening skills. • apply communication skills in different ways – in pairs, small groups, and with the whole class.
Tips and Resources • Timed retell can be informal or more formal, as described here. In the more formal approach, students
require more confidence. • Students may make notes during the brief presentations given by their partners. • It is possible to use this activity with more extensive subject matter. In that case students will need time to
properly research the topic and devise their arguments. Ontario Skills Passport: http://skills.edu.gov.on.ca/OSPWeb (login: osp, password: passport) Essential Skills (HRSDC): http://www15.hrdc-drhc.gc.ca/English/general/home_e.asp
Further Support • The struggling student may feel uncomfortable speaking in front of the whole class. Students should be
given other opportunities to share and practice speaking skills before this assignment. • As always, consider pairs carefully.
41
T H I N K L I T E R A C Y : C r o s s - C u r r i c u l a r A p p r o a c h e s , G r a d e s 7 - 1 2
O
Pair Work: Timed Retell
Cooperative Education: Integration (Career Exploration)
What teachers do What students do • Students will need to gather information on
the Essential Skills by navigating the Ontario Skills Passport website or the HRSDC website. The teacher may distribute a print copy of the Essential Skills.
• Students will need to have the appropriate
background knowledge on the Essential Skills to perform this activity.
• Choose relevant questions or issue(s) that
might invite a discussion or debate on the Essential Skills in the Canadian workplace.
• Navigate the Ontario Skills Passport website, the HRSDC website or read a printout of the Essential Skills.
During • Place students in pairs, facing each other. • Direct all partner A students to begin by
speaking about/supporting one side of the question or issue for one minute, while partner B listens.
• Ask partner B to retell partner A’s viewpoint for one minute.
• At the end of one minute, ask partner B to
present their side of the question or issue. • Direct partner A to then retell partner B’s
information
• Decide who will be partner A and who will be partner B.
• Partner A speaks for one minute, while partner B listens.
• Partner B listens carefully and retells partner
A’s information. • Partner B wraps up the retell and then
provides an opposing viewpoint. • Partner A listens carefully and retells partner
B’s viewpoint.
After • Invite students to write each other’s side of
the issue into a paragraph. • Ask students to read their paragraphs to the
other members of their group. • Optional suggestion: organize the class in a
circle to discuss the group findings.
• Write a carefully constructed paragraph of the
Essential Skills and issues discussed. • Read the paragraph to ensure that no
important details have been omitted. • Peer-edit paragraphs for sentence structure,
grammar and mechanical errors. • Read their paragraph to the other member(s)
of the group. • Members point out common viewpoints
mentioned. • List the common viewpoints. • Present the list of common viewpoints to the
class, ensuring that all group members have a chance to speak.
Notes
42
T H I N K L I T E R A C Y : C r o s s - C u r r i c u l a r A p p r o a c h e s , G r a d e s 7 - 1 2
O
Whole-class Discussions: Four Corners
Cooperative Education: Pre-placement (Self-Assessment)
In Cooperative Education, many students begin the program with a variety of goals and different ideas about their future. In this oral communication strategy, students are given symbols about their possible futures. They are then asked to move to one of the four corners of the room that most closely represents their concept of their future and discuss this with others in that corner.
Purpose • To have students recognize the link between their idea of their future and of the role that Cooperative
Education plays in helping to determine their future. • To allow students to reflect on their concept of the future and exchange ideas with others with similar
thoughts and feelings. • To facilitate whole-class discussions of these ideas. • To demonstrate how students can positively influence their future.
Payoff Students will: • have a personal understanding of their goals for the Cooperative Education program. • think creatively and critically. • have a sense of belonging in the classroom. • speak freely with others in a relaxed environment.
Tips and Resources • This activity can be used at the beginning of pre-placement as an introductory lesson to the world of
Cooperative Education. • This strategy is very effective in allowing students to introduce themselves to their peers in a new class
and for teachers to begin to understand the needs of their students. • To make connections from the outcomes of this activity to the goals of the Cooperative Education
program, students should be aware of the following: - they have already taken steps towards exploring their future goals by participating in the Co-op
program. - through their involvement in the program, they will refine their possible career paths. - they have the greatest control over their own future and they should take full advantage of their Cooperative Education experience.
• See Teacher Resource, Symbols of the Future, for examples of possible interpretations of the four symbols used in this activity. This is meant as a guideline only as students will develop their own individual interpretations.
• For variations on this Four Corners strategy, see Whole-class Discussions: Four Corners in Think Literacy: Cross-Curricular Approaches, Grades 7-12, p. 182.
Further Support • Consider asking students to reflect on options first before moving to a corner. Focus their thinking with the
following questions: Why have you selected __________ as the best representation of your future? Do you think you can control your future? Why or why not?
• The teacher may need to encourage some students to think independently and to promote equal responses in groups.
43
T H I N K L I T E R A C Y : C r o s s - C u r r i c u l a r A p p r o a c h e s , G r a d e s 7 - 1 2
O
Whole-class Discussions: Four Corners
Cooperative Education: Pre-placement (Self-Assessment)
What teachers do What students do Before • Organize the room into four areas
(corners) and label with: Giant Card Game, Great Big Sea, Powerful Stream, Rocket Ship.
• Pose the question to the whole class: Which one of these four symbols best represents your view of your future?
• Give students an opportunity to think about the question and take a stance. Students need to be encouraged to make their own choices through individual interpretations of the symbols.
• After a quiet minute or two, ask the students to move to the corner that best symbolizes their view of their future.
• Fully understand the question posed. • Without speaking to anyone, carefully consider
the question and make a personal decision as to the corner they will move to.
• Move to the corner when directed.
During • At each corner, direct students into sub-
groups of three (if possible) to discuss the reasons for their choices. If the group is not large enough, students may engage in whole-group discussion. In cases where only one student is in a corner, the teacher can act as the other member of the group.
• Engage in an exchange of ideas as to the reason why this symbol was selected.
• Ensure that everyone is heard and that everyone in the group shares equally.
• Prepare to speak to the class about the group’s discussions, noting common reasons and differing opinions.
After • Call upon various groups to share
information gathered in small-group discussions with the whole class.
• If group presentations require elaboration, the teacher can read the Teacher Resource, Symbols of the Future.
• Ask students if they wish to move to another corner now that they have a better understanding of the meaning of the symbols.
• Question individual students as to why they have moved to a different corner.
• Ask students how they believe the Co-op program will assist with determining their future (see Tips and Resources).
• Students can be asked to develop their own personal symbol of the future and/or write a reflection on what they discovered through this activity (optional).
• Highlight their group’s main points with the class, pointing out commonalities and discrepancies.
• Carefully listen to the explanation of the various
symbols. • Move to a different corner if their viewpoint has
changed. • Individual students respond to question. • Reflect and orally respond to question. • Develop their own symbol and/or write a reflection
on their choices of symbols.
Notes

44
T H I N K L I T E R A C Y : C r o s s - C u r r i c u l a r A p p r o a c h e s , G r a d e s 7 - 1 2
O
Whole-class Discussions: Four Corners
Cooperative Education: Pre-placement (Self-Assessment)
Symbols of the Future
1. Rocket Ship We are in the dark, and we can only see what is ahead when we arrive there. Occasionally, we can see an object in the distance but we are hurtling towards the unknown and our mission from ground control is already determined for us. We are trapped in this rocket ship and we cannot alter what is ahead.
2. Strong River The current in this river carries us along and the direction of the river cannot be changed. We can, however adjust to our surroundings and make our way through the rocks, torrents, and the undertow in order to successfully reach our destination.
3. Great Big Sea In the sea, there are many different routes to many different places. These routes however, contain obstacles along the way. It will help if we can plan our journey in advance, know where the rocks are, and avoid the shoals to arrive at our destination.
4. Giant Card Game The future is a game of chance mixed with a player’s skill. We have to know when to hold the cards and know when to fold them but our destiny is ultimately in the hands of the dealer. Against all of the odds, we keeping hoping that we will win the jackpot and we take pleasure in the living for the moment.
Teacher Resource

45
T H I N K L I T E R A C Y : C r o s s - C u r r i c u l a r A p p r o a c h e s , G r a d e s 7 - 1 2
O
46
T H I N K L I T E R A C Y : C r o s s - C u r r i c u l a r A p p r o a c h e s , G r a d e s 7 - 1 2
O
Presentations: Interview Modeling
Cooperative Education: Integration (Career Exploration)
Many students are hesitant to conduct an interview with their co-op placement supervisor or community partner. They are uncomfortable or nervous and do not clearly understand what an effective interview looks like. By demonstrating an ineffective interview, modeling an effective interview, and facilitating student collaboration, teachers will ease student stress and clearly define an effective interview.
Purpose • To clearly define exemplary presentation and/or interview skills. • To create a comfortable, safe environment in which students may be successful in presentations. • To prepare students to conduct informational interviews with their co-op supervisor.
Payoff Students will: • collaborate with each other and the teacher to improve the teacher’s demonstration of an ineffective
presentation and interview. • experience, first-hand, examples of ineffective and effective presentations and/or interviews. • using the feedback from fellow students and the teacher, conduct effective interviews and/or
presentations.
Tips and Resources • Teachers may consider modeling only the interview. Teachers need to be cautious when demonstrating
the ineffective interview – a sense of humour goes a long way to help your students feel comfortable. • It may be helpful to videotape both the teacher’s first interview and the improved interview so that students
may re-examine the changes. • This strategy can be applied in pre-placement when preparing students for their co-op placement
interview. For the purpose of this activity students will be conducting an information interview with their co-op supervisor on Career Exploration.
• For further extensions of this activity, examine the following strategies: Pair Work: Think/Pair/Share and Pair Work: Timed Retell in (Think Literacy: Cross Curricular Approaches, Cooperative Education, Grades 11-12, page 40, 42.
• This strategy may also be used for Presentation Modeling, see (Think Literacy: Cross Curricular Approaches, Grade 7 – 12, page 194)
Further Support • Give careful consideration when determining pairs of students who will present together.
47
T H I N K L I T E R A C Y : C r o s s - C u r r i c u l a r A p p r o a c h e s , G r a d e s 7 - 1 2
O
Presentations: Interview Modeling
Cooperative Education: Integration (Career Exploration)
What teachers do What students do Before • Prepare a brief interview for the class that
demonstrates ineffective interview skills.
• Observe teacher’s first interview and prepare to comment on areas in need of improvement
During • Lead students in a discussion of the purpose of
interviews and the various purposes and forms of interviews that can be conducted (e.g., job interviews, informational interviews, phone interviews, etc.).
• Ask students to list all of the aspects of verbal
and non-verbal communication that need improvement in the mock interview.
• Divide class into small groups to discuss the list
that they compiled. • Facilitate whole-class discussion about the
aspects needing improvement. • Discuss how these improvements might take
place. • Prepare a new presentation or interview for the
class, using improvements suggested.
• Participate in brainstorming the purpose of
interviews. • Write down all verbal and non-verbal
communication areas needing improvement.
• Discuss ideas with small group, compiling
one list to be presented to the class. • Present ideas for improvement to the class. • Observe improved presentation or
interview. • Write down further suggestions. Discuss
with the class how these suggestions may improve their own presentations or interviews.
After • Distribute to students, Effective Interview Skills. • Facilitate class discussion – is anything missing
that needs to be added? • Have students prepare a mock information
interview with their prospective co-op supervisor.
• See Pair Work: Think/Pair/Share for student
activity on how to generate information interview questions.
• Divide the class into pairs – these pairs will give
each other constructive criticism as they prepare and conduct their mock interviews. (May need to define or remind students of constructive criticism)
• Add any new ideas to their handouts. • Prepare mock informational interviews. • Practice mock informational interviews. • Work in pairs throughout practice sessions
to give each other constructive criticism and helpful hints.
• Before presenting or interviewing someone, use the handout Effective Skills for Conducting an Interview as a checklist to ensure presentations or interviews are effective.
• Present to the class or interview a community member on a particular topic or issue.
Notes
48
T H I N K L I T E R A C Y : C r o s s - C u r r i c u l a r A p p r o a c h e s , G r a d e s 7 - 1 2
O
Presentations: Interview Modeling
Cooperative Education: Integration (Career Exploration)
Effective Skills for Conducting an Interview
Prior to the Interview
Did the interviewer have the proper tools needed to conduct the interview?(e.g., clipboard, lined paper, pen, tape recorder, camera or video camera, etc.).
Did the interviewer have prepared questions to lead the interview?
Did the interviewer set up an appointment and location to meet with the interviewee? The Interview
Did the interviewer properly greet the interviewee?
Did the interviewer make the interviewee feel comfortable and welcomed?
Were the questions asked in a clear and loud voice?
Were the questions asked in a logical order?
Did the interviewer make appropriate eye contact with the interviewee and demonstrate effective listening skills?
Did the interviewer take notes of what the speaker was saying at appropriate times, or ask the interviewee to be tape recorded or video taped?
Did the interviewer use an appropriate tone and language for an interview?
Did the interviewer ask for clarification or provide clarification when necessary?
Did the interviewer avoid leading the interviewee towards an answer?
Did the interviewer provide an appropriate amount of time for the interviewee to speak? Did the interviewer let the speaker finish their answer before asking another question or adding their own thoughts?
Did the interviewer avoid unnecessary movements such as shuffling, toe tapping and shaking?
After the Interview
Did the interviewer properly thank the interviewee for their time?
Student/Teacher Resource