Connecting a Laptop to this AV system · Web viewAutomatically detect devices / If not Aux Video....
8
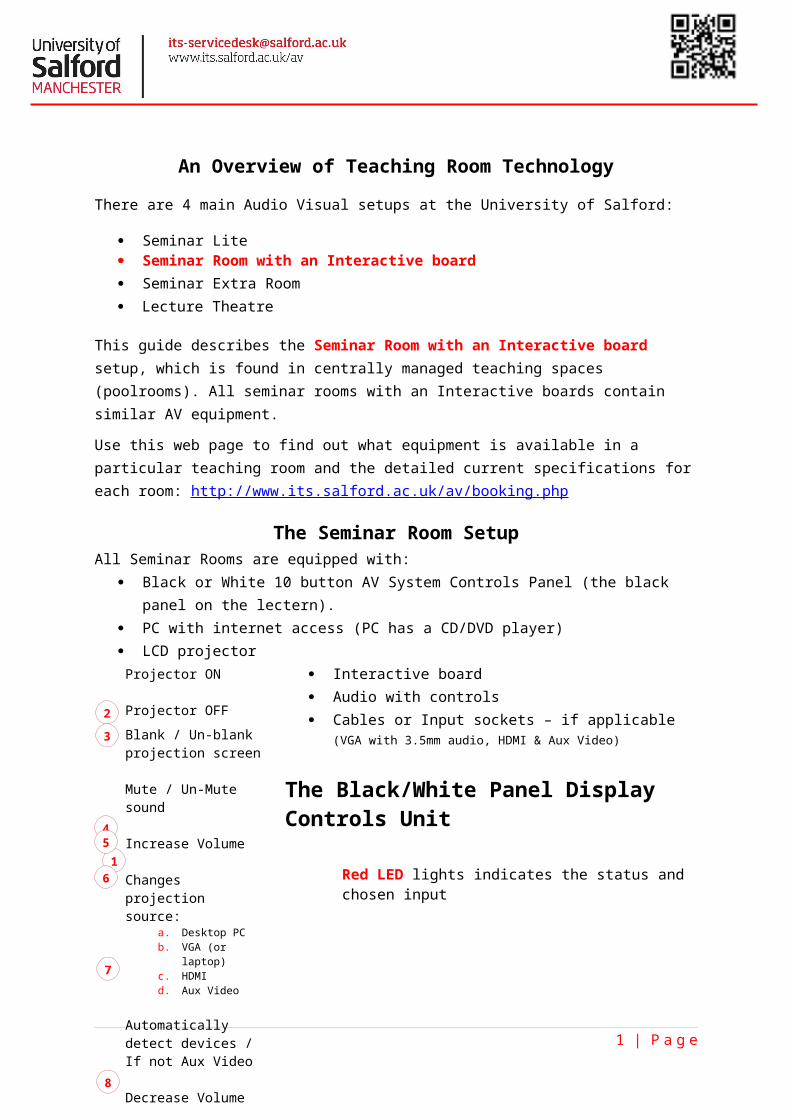
An Overview of Teaching Room Technology There are 4 main Audio Visual setups at the University of Salford: Seminar Lite Seminar Room with an Interactive board Seminar Extra Room Lecture Theatre This guide describes the Seminar Room with an Interactive board setup, which is found in centrally managed teaching spaces (poolrooms). All seminar rooms with an Interactive boards contain similar AV equipment. Use this web page to find out what equipment is available in a particular teaching room and the detailed current specifications for each room: http://www.its.salford.ac.uk/av/booking.php The Seminar Room Setup All Seminar Rooms are equipped with: Black or White 10 button AV System Controls Panel (the black panel on the lectern). PC with internet access (PC has a CD/DVD player) LCD projector Interactive board Audio with controls Cables or Input sockets – if applicable (VGA with 3.5mm audio, HDMI & Aux Video) The Black/White Panel Display Controls Unit 1 | P a g e Red LED lights indicates the status and chosen input Buttons may vary 1 Projector ON Projector OFF Blank / Un-blank projection screen Mute / Un-Mute sound Increase Volume Changes projection source: a. Desktop PC b. VGA (or laptop) c. HDMI d. Aux Video Automatically detect devices / If not Aux Video Decrease Volume 2 3 4 6 5 7 8
Transcript of Connecting a Laptop to this AV system · Web viewAutomatically detect devices / If not Aux Video....
An Overview of Teaching Room Technology
There are 4 main Audio Visual setups at the University of Salford:
Seminar Lite Seminar Room with an Interactive board Seminar Extra Room Lecture Theatre
This guide describes the Seminar Room with an Interactive board setup, which is found in centrally managed teaching spaces (poolrooms). All seminar rooms with an Interactive boards contain similar AV equipment.
Use this web page to find out what equipment is available in a particular teaching room and the detailed current specifications for each room: http://www.its.salford.ac.uk/av/booking.php
The Seminar Room SetupAll Seminar Rooms are equipped with:
Black or White 10 button AV System Controls Panel (the black panel on the lectern). PC with internet access (PC has a CD/DVD player) LCD projector Interactive board Audio with controls Cables or Input sockets – if applicable (VGA with 3.5mm audio, HDMI & Aux Video)
The Black/White Panel Display Controls Unit
1 | P a g e
1
Red LED lights indicates the status and chosen inputButtons may vary
1
2 3 4 5
87
a. b. c. d.
6
Projector ON
Projector OFF
Blank / Un-blank projection screen
Mute / Un-Mute sound
Increase Volume
Changes projectionsource:
a. Desktop PCb. VGA (or laptop)c. HDMI d. Aux Video
Automatically detect devices / If not Aux Video
Decrease Volume
2
3
4
5
6
7
8

Turning the projector on1. Switch on the PC and logon.
2. Press the ON button on the black panel display controls unit until the green LED light is displayed.The projector will switch on automatically and after a few seconds the desktop PC will be displayed.
If the PC screen is not displayed, press the PC button on the black panel. This should display the desktop PC on the projector screen (if not, please check the trouble shooter sheet available in the room).
To blank the projector screenPress the Blank button on the black panel. Press the Blank button again to bring the display back. Blanking the screen gives you a chance to address students with no image.
Changing volume and muting sound: Up Down MutePress volume up or down buttons to get to the desired level. Press Mute to silence the sound and press mute again to restore sound.
Switching the system off Once you have finished press the OFF button on the black panel. This will switch off the projector automatically. You cannot turn the projector back on until it has gone through its cool down cycle the light will flash until its ready. Remember to turn off the PC and shut down the computer as well.
Connecting a device
In new rooms our standard come with input cables, in older rooms input panels. You may need to supply a cable. These are clearly detailed for each room on http://www.its.salford.ac.uk/av/booking.php so you will know what to expect
Rooms with input Cables Rooms with input Panels (Panels may vary in appearance)
b. VGA or Laptop c. HDMI d. Aux Video e. USB (if not use PC)
2 | P a g e
a
3
4 8 4
2
b.
c.
d.
e.
c.
b.
d.

Connecting a Laptop or Tablet
1. Plug the VGA with 3.5mm or HDMI cable into the ‘external monitor’ port on your laptop or device, rooms without supplied cables will need one supplying by the user (Consult the room directory link on page 1).
2. If your device requires a dongle you will need to supply this.
3. You can also access the wireless network (UoS-WiFi or eduroam) in most rooms on campus. Please consult the wireless policy for login information.
4. Switch the projector on.
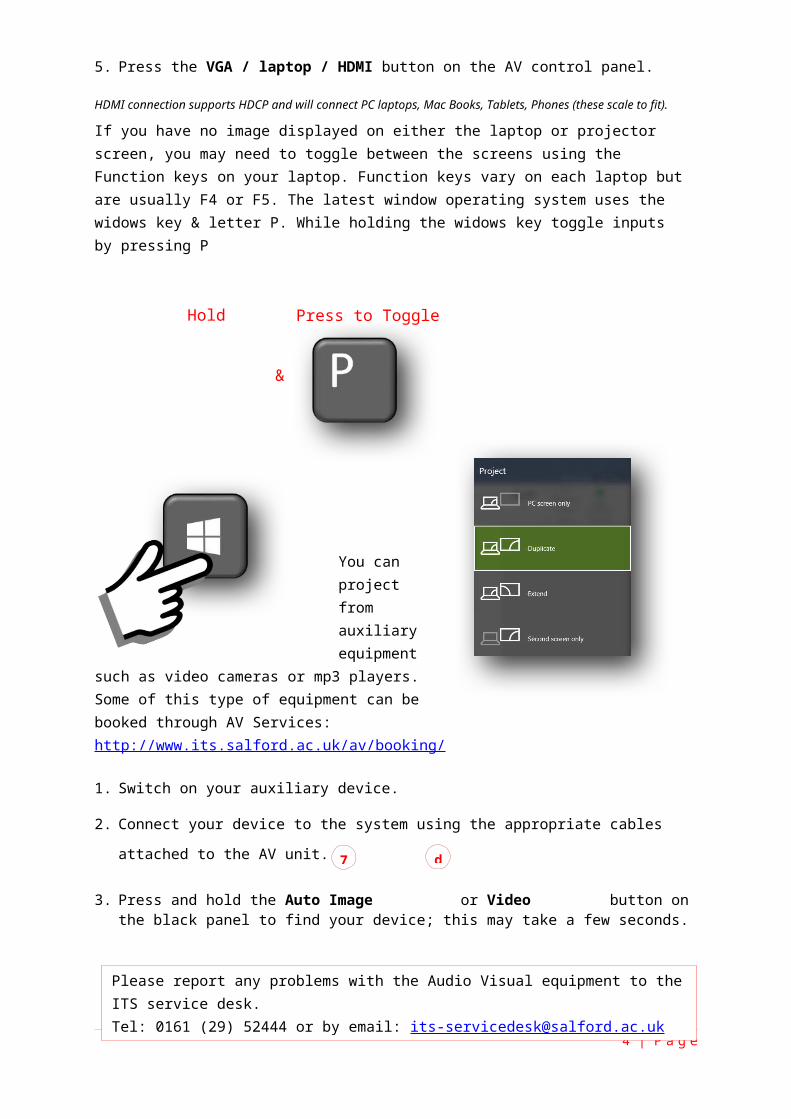
5. Press the VGA / laptop / HDMI button on the AV control panel.
HDMI connection supports HDCP and will connect PC laptops, Mac Books, Tablets, Phones (these scale to fit).
If you have no image displayed on either the laptop or projector screen, you may need to toggle between the screens using the Function keys on your laptop. Function keys vary on each laptop but are usually F4 or F5. The latest window operating system uses the widows key & letter P. While holding the widows key toggle inputs by pressing P
You can project from auxiliary equipment such as video cameras or mp3 players. Some of this type of equipment can be booked through AV Services: http://www.its.salford.ac.uk/av/booking/
1. Switch on your auxiliary device.
2. Connect your device to the system using the appropriate cables attached to the AV unit.
3. Press and hold the Auto Image or Video button on the black panel to find your device; this may take a few seconds.
3 | P a g e
1
6
7 d
Please report any problems with the Audio Visual equipment to the ITS service desk.Tel: 0161 (29) 52444 or by email: [email protected]
Hold Press to Toggle
&
Audio Visual EquipmentPC Boot Options for Pool Rooms
When you boot up a PC in the teaching rooms you will now be prompted to choose between the Full Image and Quick Boot. Audio Visual Quick Boot has been installed on all audio visual enabled teaching room PC’s within the University. Quick Boot provides access to software normally available on the full image, as well as portable data devices, in a much shorter time scale. The consequence of selecting Quick Boot is that you will not have immediate access to your shared V: drive or any external internet access.
Selecting the boot image
When you switch on the PC, instead of loading straight into Windows and being asked to enter your login details, you will first be prompted to choose an image in the Windows Boot Manager screen:
Windows 10 - Full Image Windows 10 - Quick Boot
Use the arrow keys to select the image you wish to use, then press the enter key to select the highlighted option. The default selection is the Full Image. If you do not make a selection your PC will boot into the option that is currently highlighted. The default time setting for this is 30 seconds. This time is displayed onscreen in a countdown format.
What are the differences between the Full Image and Quick Boot?The Full Image is the default boot option for all PCs. You will be required to login using your University credentials (eg abc123).With Quick Boot you will not be prompted for your login details, the PC will boot straight to the Desktop where you will be able to retrieve files saved to a portable data device (eg USB stick).Although Quick Boot will not give you access to your Outlook email, F: drive or V: Drive, you will still be able to access these through the UoS Portal on the staff homepage (http://staff.salford.ac.uk).
4 | P a g e
Boot options
Timer until highlighted choice is selected

Differences between the Full Image and Quick Boot
AV Quick Boot Full ImageF:Drive (with login) V:Drive
Blackboard & Internal Websites External Websites
Microsoft Office (Word, Excel, Access PowerPoint etc.)
Microsoft Outlook UoS Portal (WebMail & F:/V: Drive)
Blackboard Collaborate (Live Sessions)
Blackboard Collaborate (Recordings) Internet Explorer
Mozilla Firefox Google Chrome
Adobe Reader Media Players
Note: if you want to change which boot option you selected, you will have to restart the PC.
Accessing F:Drive in Quick Boot
To log into your F:Drive in quick book click on the F:Drive Icon in quick boot and enter your details.
5 | P a g e
Please report any problems with the Audio Visual equipment to the ITS service desk. Tel: 0161 (29) 52444 or by email: [email protected]