confocal manual 021317 - Boyce Thompson Institute
16
PCIC SP5 confocal microscope user manual, Hélène Javot updated by Mamta Srivastava 2/11/2017, page 1/16 PCIC Plant Cell Imaging Center (BTI, room 104B) CONFOCAL LEICA SP5 user manual Startup procedure: -Remove the dust cover from the microscope -Turn on the mercury lamp if you need to see the fluorescence through the eye pieces. Check that its shutter is on the “open” position, and that the intensity is not adjusted beyond the second setting. -On the main switch board, switch on PC/microscope (button Nº1). Wait for 15 seconds. (The computer will turn on automatically). -Switch on the Scanner power button (Nº2, on the main switch board). Wait for 15 seconds. Check that the fan is working properly. -Switch on the Laser power button (Nº3, on the main switch board). It may be already on, in which case leave it that way. -Turn the laser key (Nº4, on the main switch board) from OFF to ON. -Fill out the log book. -On PC: login as “your first name” and password is PCICuser! STARTING THE LAS AF SOFTWARE: -After login, wait for about 45 seconds (important). -After 30 seconds, right click on the LAS AF icon on the desktop and press “open” -On the starting screen, check that the configuration is OK: “MACHINE” should be picked (If you need the resonant scanner, mark the box “Activate the resonant scanner”). Then click OK. -When the window “Microscope stand” pops up, say NO unless you are doing advanced techniques (such as Multiple Field, mosaic, etc.).
Transcript of confocal manual 021317 - Boyce Thompson Institute

PCIC SP5 confocal microscope user manual, Hélène Javot updated by Mamta Srivastava 2/11/2017, page 1/16
PCIC Plant Cell Imaging Center (BTI, room 104B)
CONFOCAL LEICA SP5 user manual
Startup procedure: -Remove the dust cover from the microscope
-Turn on the mercury lamp if you need to see the fluorescence through the eye pieces. Check that its shutter is on the “open” position, and that the intensity is not adjusted beyond the second setting.
-On the main switch board, switch on PC/microscope (button Nº1). Wait for 15 seconds. (The computer will turn on automatically). -Switch on the Scanner power button (Nº2, on the main switch board). Wait for 15 seconds. Check that the fan is working properly. -Switch on the Laser power button (Nº3, on the main switch board). It may be already on, in which case leave it that way. -Turn the laser key (Nº4, on the main switch board) from OFF to ON. -Fill out the log book. -On PC: login as “your first name” and password is PCICuser! STARTING THE LAS AF SOFTWARE: -After login, wait for about 45 seconds (important). -After 30 seconds, right click on the LAS AF icon on the desktop and press “open” -On the starting screen, check that the configuration is OK: “MACHINE” should be picked (If you need the resonant scanner, mark the box “Activate the resonant scanner”). Then click OK. -When the window “Microscope stand” pops up, say NO unless you are doing advanced techniques (such as Multiple Field, mosaic, etc.).
PCIC SP5 confocal microscope user manual, Hélène Javot updated by Mamta Srivastava 2/11/2017, page 2/16
In the configuration tab (1), select the laser window (2). Turn on the laser(s) you need (3). By
checking the box next to laser means starting up the laser. Adjust the Argon laser to approximately 30 % (4) if you use it (You can increase the power if you are doing bleaching, or if your signal is really too weak for example).
!!! If lasers were turned off by the previous user recently, make sure the Argon laser was left off for at least 2 hours before you turn it back on. HeNeLasers have to rest at least one hour before being back on. The 405 nm laser needs to rest only about 15 minutes. The DPSS 561nm can be turned back on immediately. SLIDE OBSERVATION THROUGH THE EYEPIECES:
First select the 10 X objective to identify your sample, and check if you are in focus when the stage moves to its preset Z=0 position (more details on next page).
Although it is possible to change the objectives manually, our SP5 is equipped with an automated objective turret. To use this function, go back in the “Acquire” tab and select the appropriate objective (see the supplementary information for details on available objectives, and correct ring settings).
Avoid switching manually the objectives, as you may inadvertently rotate the objective ring, or even worse, the objective itself.
Be careful not to put oil on water objectives! If this happens, contact Mamta.
Use ONLY Leica OIL 11-513-859 for oil immersion.

PCIC SP5 confocal microscope user manual, Hélène Javot updated by Mamta Srivastava 2/11/2017, page 3/16
Lower the stage by pressing the “Down” Z axis button of the stage knob (D). Place your sample under the microscope. Be very gentle when you place your slide on the stage: it is very delicate. Press the “Up” button of the stage knob until it stops automatically.
Look down the eyepiece and turn the X/Y or Z axis wheels of the stage knob to identify your sample (you can adjust the speed of movement (X/Y and Z) on the right).
Fine focus along the Z axis by turning the knob on the side of the microscope stand. Check the Z position on the XYZ Screen (see below).
If you are too far from the preset Z=0, you must reset this parameter so that you can safely switch to higher magnification objective. The left 4th xyz icon is used to do the stage limit settings. To move the stage up, press and hold the top arrow icon until it reaches the previously set zero position. To go down, press and hold the lower down arrow icon.
To reset the top position, when you are at 10X (never set with higher mag objective), press set with the top arrow (left side) of set/clear limits. For lower stage settings use the right side of the set/clear limits.

PCIC SP5 confocal microscope user manual, Hélène Javot updated by Mamta Srivastava 2/11/2017, page 4/16
Left side 2nd icon: To see if you are in TL or IL mode and which filter set you are using
You can change filter cubes and also switch different modes of TL from #2 icon. Third icon (objective): to check where you are and to switch objective if you turned off the software or when you need to move to 10X after closing software by mistake before switching to 10X. Always switch objective through LASAF software (recommended).
PCIC SP5 confocal microscope user manual, Hélène Javot updated by Mamta Srivastava 2/11/2017, page 5/16
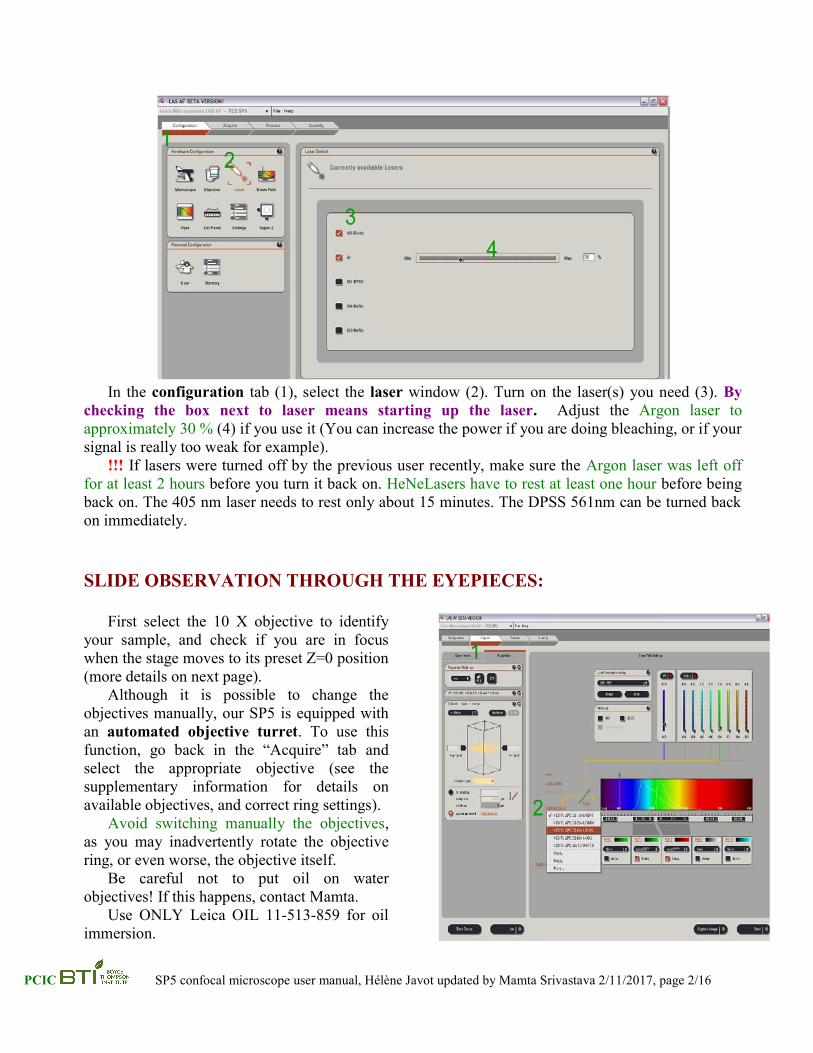
TRANSMITTED LIGHT: To use transmitted light (TL),
check that the transmitted light lever (behind the microscope stand) is directed towards the eyepieces. Note: Adjusting the microscope for an optimal brightfield image (Köhler illumination) is more complicated than for fluorescence. Although we regularly check that the settings are optimal, you may need further readjustment. Please ask for help the first few times.
By pressing the buttons on the left side of the microscope stand, you can switch to TL. You can also pick between various TL modes: brightfield, polarized and DIC. The last button allows you to visualize fluorescence and DIC together (not available).
If the objective (eg. 10X) is not equipped for a specific illumination mode (e.g. DIC), an exclamation mark will appear on the touch pad. The resolution in X and Y is determined by the distance from the center of the Airy disk to the first dark ring. This is referred to as Airy 1. This distance depends on the wavelength of light (λ) and the Numerical Aperture of the lens (NA). For a confocal system, the pinhole radius is set somewhat smaller than Airy 1 and thus the X Y resolution equation is: Rxy = 0.8 λ / 2 NA

PCIC SP5 confocal microscope user manual, Hélène Javot updated by Mamta Srivastava 2/11/2017, page 6/16
On the left side of the stand, underneath the stage, push the TL/IL button until “TL” appears on the touch pad. Look through the eyepieces and adjust the brightness with the INT buttons. You can adjust the shape and size of the illuminated area with the “FD” button.
Fine adjustment of the rotation of the Wollaston prism for DIC imaging is performed by rotating the thumbscrew located right above the objectives.
FLUORESCENCE:
By pressing the buttons on the right side of the microscope stand, you can switch to fluorescence mode. You can choose the appropriate filter cube with the “cube” button. Its name will appear on the touch pad. Filter cubes available: “A” = UV
“I3” = Green LP “GFP” = Green BP “N21”= Red “N3” = Red BP See supplementary information for more details. The last button is the fluorescence shutter.
On the left side of the stand, underneath the stage, push the TL/IL button until “fluo” appears on the touch pad. Look through the eyepieces and adjust the brightness with the INT buttons. You can adjust the shape and size of the illuminated area with the “FD” button.

PCIC SP5 confocal microscope user manual, Hélène Javot updated by Mamta Srivastava 2/11/2017, page 7/16
CONFOCAL ACQUISITION ADJUSTING THE PARAMETERS FOR PMT1, PMT3 and PMT5
Go to the Acquire Tab of the LAS AF software. You can expand any menu on the left part of the settings screen by clicking on the black arrows.
In the first panel, pick the desired acquisition mode (1). Standard mode is XYZ.
If you want to use preset adjustments or have already saved yours, load them from the scrolling list (2).
Otherwise activate the UV or Visible icons, and adjust the
required laser lines (3). For PMT, use between 5 and 50 % depending on the line and your sample. For HyD, do not use more than 20% of laser. Then activate and adjust the required PMT’s/HyD’s by checking the “Active” box (4). Use first the PMTs located just under the spectral band you want to detect.
You can download the emission spectra of numerous dyes to help you adjust your settings (5). This has no impact on your image collection, and the display of any spectra from the list will not affect the data collection. Make sure the detection wavelengths don’t cover any laser line! (and is set atleast 10 nm higher than the laser line) Move the cursor slowly to prevent damage to the mechanical part.
If you want to use transmitted light, reposition the transmitted light lever (see page 3) towards
the confocal position. Click on “Additional channels” in the acquisition tab, then select SCAN-BF or SCAN-DIC (1). Then activate the transmitted light PMT by checking the “Active” box.
When you switch from using the software to viewing through the eye pieces, always make sure that the transmitted light PMT is inactivated, and click on the TL/IL button on the microscope stand before using any other buttons.

PCIC SP5 confocal microscope user manual, Hélène Javot updated by Mamta Srivastava 2/11/2017, page 8/16
Start preview scanning by clicking on LIVE (bottom of the left screen).
In the image window (right screen), activate the multi-panel view (1). Click on the “Quick-LUT” icon to obtain a false color optimization screen (2). Click on the panel of the first fluorophore. Gain adjustment:
Increase “Smart gain” until just a few single blue dots appear (saturated pixels=value 255). Offset adjustment: Reduce the “Smart offset” level until very few green dots appear (Green pixels= no signal=0). Sets automatically in HyD detectors.
Repeat with the other channels. Check the settings by moving along the Z axis (you can use the button bar). Save the settings. NOTE: In case of PMTs, for proper gain adjustment, you may want to increase your smart gain value up to 900-1000V. A smart gain value lower than 400V means that you can lower the laser line intensity, and readjust your smart gain. A smart gain between 1100-1250 would suggest increasing the laser line intensity. REMEMBER: Enhancing the laser line intensity will bleach your fluorophore faster, but increasing the gain does not affect your sample. Therefore, in order to protect your sample, it is better to keep the laser line intensity as low as possible, and increase the gain instead. For HyDs, offset is set automatically, but gain can be adjusted between 10 and 500 based on LUT.
To adjust the TL channel: exit the Q-LUT mode and adjust gain and offset in the standard mode. In the XY panel (left screen), set the image format, scan speed and zoom factor (3). Faster scans require zooming. You can use the arrows to move the imaged area. You can also zoom specifically on an area by activating the “zoom” box (3), then drawing a rectangle around your region of interest (the rectangle drawing tool will appear on the right screen once you select the “zoom” option). Adjust the averaging to improve the image definition (4): - For live imaging: use line averaging (8 or 16) - For fixed samples: line or frame averaging - For weak samples, you can also use the accumulating function for PMT or use HyD) NOTE: if you change the scan speed or the zoom factor, or if you switch objectives, you may need to readjust gain and offset.
PCIC SP5 confocal microscope user manual, Hélène Javot updated by Mamta Srivastava 2/11/2017, page 9/16
ADJUSTING THE PARAMETERS FOR Hybrid Detectors HyD (old PMT2 and PMT4): If weakly fluorescent samples, you may want to use HyD detector to collect your signal. Do not use high laser with HyD detector: use as low laser as possible (1%-max 20%) Old PMT2 and PMT4 are now HYD detector which provides:
x Large Dynamic range x Improved cell viability x High speed Imaging x Single photon counting x Low dark noise x Exquisite contrast
Gain adjustment: can go from 0-500 Increase “Smart gain” until just a few single blue dots appear (saturated pixels=value 255). Offset adjustment: Sets automatically in HyD
Leica HyD has 3 modes of collection: 1) Standard mode (most commonly used) 2) BrightR (rarely used, non-linear gain applied to structure) 3) Photon Counting Mode (good for quantitative imaging; works best with dim sample)
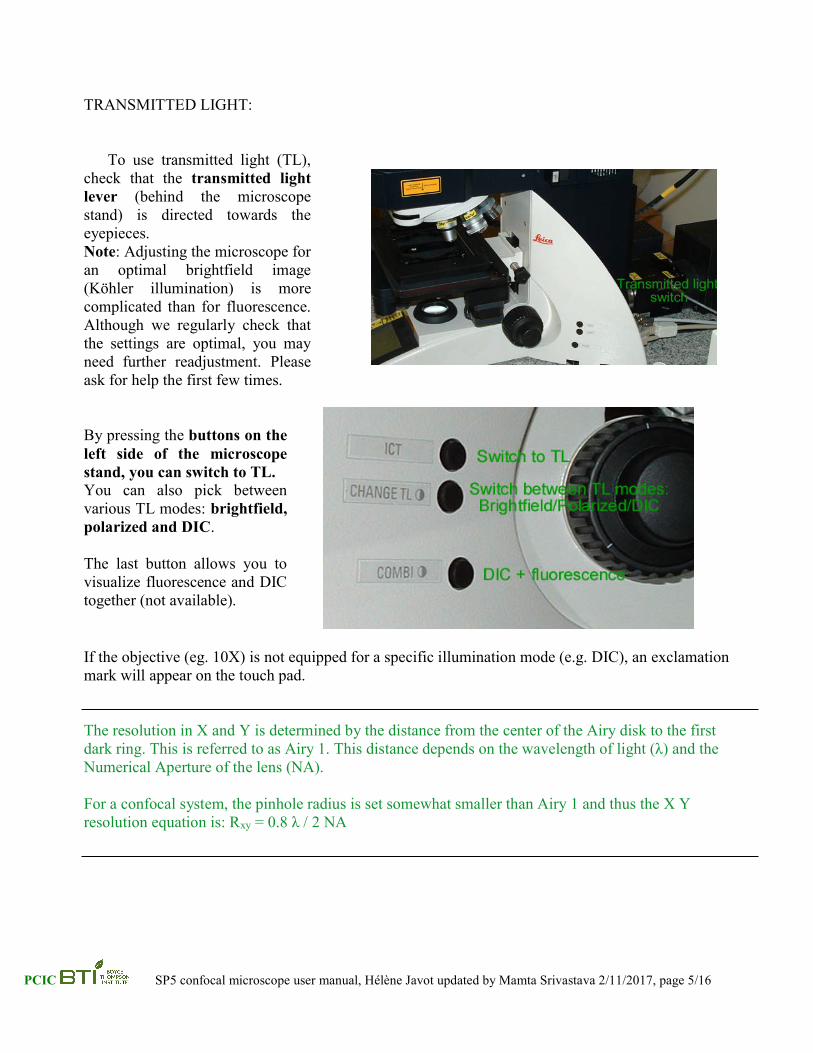
Z stack
Expand the Z-stack panel and activate the “live” viewing mode.
Move along the Z axis with the appropriate wheel of the button bar.
Click the red arrow next to the “Begin” field to mark the start position.
Then define the end position by rotating the wheel and clicking the “end” arrow.
Define the number of slices by either entering the number of steps, or by choosing a defined z-step size.
PCIC SP5 confocal microscope user manual, Hélène Javot updated by Mamta Srivastava 2/11/2017, page 10/16
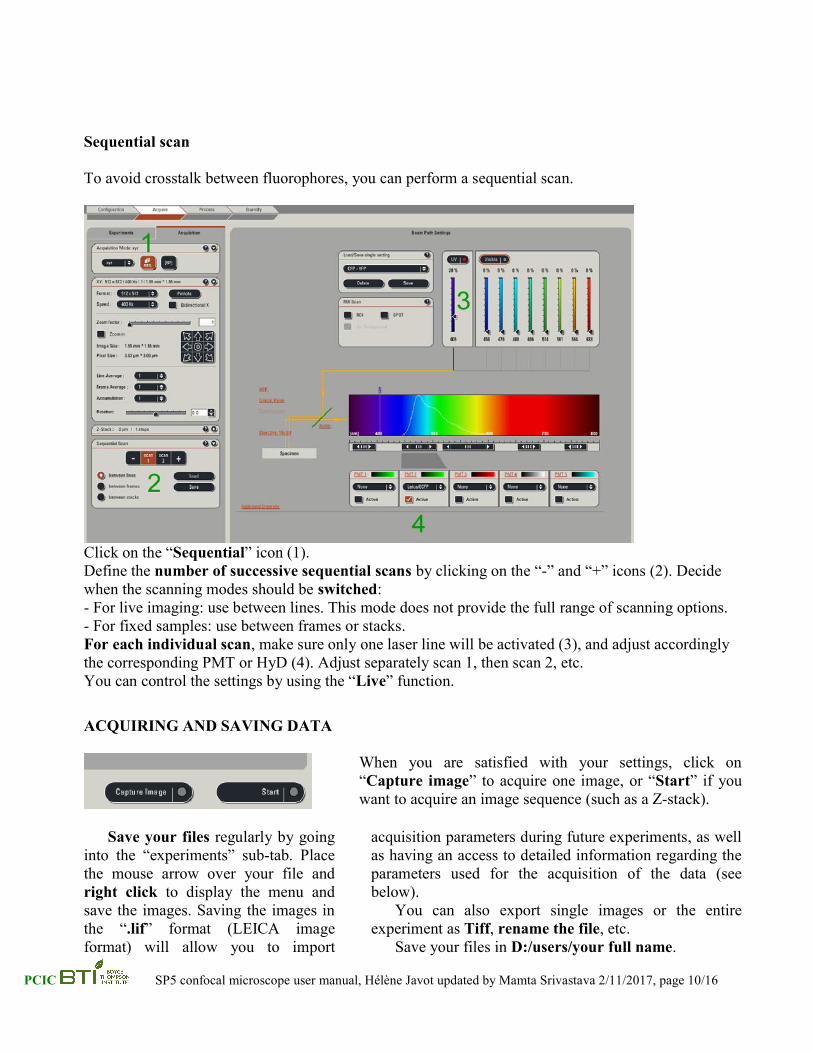
Sequential scan To avoid crosstalk between fluorophores, you can perform a sequential scan.
Click on the “Sequential” icon (1). Define the number of successive sequential scans by clicking on the “-” and “+” icons (2). Decide when the scanning modes should be switched: - For live imaging: use between lines. This mode does not provide the full range of scanning options. - For fixed samples: use between frames or stacks. For each individual scan, make sure only one laser line will be activated (3), and adjust accordingly the corresponding PMT or HyD (4). Adjust separately scan 1, then scan 2, etc. You can control the settings by using the “Live” function. ACQUIRING AND SAVING DATA
When you are satisfied with your settings, click on “Capture image” to acquire one image, or “Start” if you want to acquire an image sequence (such as a Z-stack).
Save your files regularly by going
into the “experiments” sub-tab. Place the mouse arrow over your file and right click to display the menu and save the images. Saving the images in the “.lif” format (LEICA image format) will allow you to import
acquisition parameters during future experiments, as well as having an access to detailed information regarding the parameters used for the acquisition of the data (see below).
You can also export single images or the entire experiment as Tiff, rename the file, etc.
Save your files in D:/users/your full name.

PCIC SP5 confocal microscope user manual, Hélène Javot updated by Mamta Srivastava 2/11/2017, page 11/16
Your old files (from 2008) are all saved under d:\images\your lab folder\your folder
NOTE: do not go beyond 2 Giga for a single experiment. TO REAPPLY SETTINGS FROM PREVIOUS EXPERIMENTS
Open an experiment.
Right-click on the image name in the file list or the image window itself. Open Properties and click on “Apply settings” at the bottom of the window.
PCIC SP5 confocal microscope user manual, Hélène Javot updated by Mamta Srivastava 2/11/2017, page 12/16
TRANSFER YOUR DATA TO THE SERVER For this you have to map a network drive: MAP A NETWORK DRIVE (do it after you login as you on confocal PC) Double Click on MY COMPUTER Top Menu Bar –TOOLS – MAP A NETWORK DRIVE Z \\132.236.156.5\PCIC\ Check Reconnect at Logon Click Connect Using a Different User Name User Name: PCIC_user Password: enter password (contact PCIC if you forgot the password.) OK Finish New window showing the Users Data folder on the Workstation will appear CREATE A SHORTUCT ON YOUR DESKTOP: My Computer Scroll to bottom on screen You will see your mapped network drive Right Click on it (rename it if you want for eg. “Data transfer to Server”) Create Shortcut On Desktop (it creates an icon “shortcut to users data” or an icon “Data transfer to Server”) When you need to transfer your data to the Workstation – use the shortcut on your desktop (which is as before “shortcut to users”) Please note it may take a few minutes before the two computers are able to communicate. Copy (or drag) your files from the D: drive to this folder. TO RETRIEVE YOUR DATA FROM THE SERVER VIA YOUR COMPUTER On a PC: Go to “My Computer” and right click. Choose "map network drive"
In the window that comes up type the following: Drive: Z Folder: \\132.236.156.5\PCIC\
Check Reconnect at Logon Click Connect Using a Different User Name User Name: PCIC_user Password: enter password (contact PCIC if you forgot the password.) OK Finish New window showing the Users Data folder on the Workstation will appear We will regularly erase files from the server and the confocal computer, so don't wait to transfer your files to your own computer...

PCIC SP5 confocal microscope user manual, Hélène Javot updated by Mamta Srivastava 2/11/2017, page 13/16
On a Mac: From the Finder select "Connect to server" from the GO menu (or press command K) Type smb: \\132.236.156.5\PCIC\ In the address box / Connect In the dialog box that appears, leave confocal in the workgroup or domain box. Enter user name and password (contact PCIC if you forgot it). You can then download an entire folder.
You should be able to connect. If it still doesn't -- Apple Menu System Preferences Sharing Services tab -- make sure personal file sharing is checked Firewall tab -- make sure personal file sharing is checked then try again If it still doesn't work, contact Elaine ([email protected]).
TO PROCESS YOUR FILES The workstation 1 hosts an offline version of the LAS AF software, as well as Image J and Image-Pro Plus version 6.3. Image-Pro Plus is a powerful and customizable image processing and analysis software. The workstation 2 has Photoshop and two free softwares (LAS AF Lite and Image J) allowing limited manipulations of your Leica files. !!! It is extremely important that you keep an intact copy of all your original files:
- Some journals request the access to the unmodified, original data before publication - If you open and save a .lif file in LAS AF Lite or the offline full version of LAS AF, you may
not be able to open this file and reapply its settings on the confocal machine (depends on the confocal version and the offline and the Lite versions).
On your own computer: To install LAS AF Lite or Image J on your computer, follow the instructions on the PCIC website (look under software).
PCIC SP5 confocal microscope user manual, Hélène Javot updated by Mamta Srivastava 2/11/2017, page 14/16
TROUBLESHOOT: . -I am not sure if the fluorescence comes from my fluorophore More info on how to perform a lambda scan can be provided upon request. Contact PCIC. -I turned on everything according to the manual, but nothing is working!!! Check that the microscope control box is on (E, page 1) -The fluorescence is too dim, although I adjusted gain and contrast 3 factors can affect the brightness: the laser line power (see supplementary information for details), the laser intensity (change the % in the laser configuration tab, but keep it as low as possible) and the pinhole size (should be set to 1 Airy). If you increase the pinhole size, you will have a brighter image, but it will affect the definition of your image). Also, more info on how to use the Enhanced Data Transfer Mode or frame accumulation for dim samples can be provided upon request. Contact PCIC. -The fluorescence of my sample is bleaching You can reduce the number of frame/line averaging, or increase the scan speed (it will decrease the definition of your image). Also, more info on how to use the Enhanced Data Transfer Mode for dim samples can be provided upon request. Contact PCIC. -I am using live samples and some components are moving too rapidly More info on how to use the bidirectional scan or the resonant scanner for high-speed imaging can be provided upon request. Contact PCIC. Need some help? Imaging help can be provided by Mamta Srivastava from 9 am to 1 pm. For questions call 254-4436 or come between 9 am and 1 pm at the PCIC, or send an E-mail to [email protected]

PCIC SP5 confocal microscope user manual, Hélène Javot updated by Mamta Srivastava 2/11/2017, page 15/16
SUPPLEMENTARY INFORMATION:
Filter cubes:
Configuration of the lasers:
Relative Argon laser power: Source: http://facs.scripps.edu/Lasers.html
Laser Line (nm) 458 476 488 496 514 % of the strongest 15 30 80 30 100
Objectives: Type Magnif.
(N.A.) Type
(Ref #) Cover Glass
Free working distance
DIC
Resol. max (nm) in xy/ in z
(488nm laser)
Immersion ring setting
10X Dry
10X (0.40)
HC PL APO CS (11506285)
0.17 2.2 mm No 488 / 2630.4 DRY only
20X Water
20X (0.70)
HC PL APO CS (11506178)
Correction with /
without
0.26 with water and
0.17
Yes 278.9 / 1284 OIL=oil GLYC= glycerol 0.17= with cover glass, water immersion
W= no cover glass, salted buffer (ca. 3% NaCl) 0= no cover glass, with water immersion
40X Dry
40X (0.85)
HCX PL APO CS (11506295)
0.11-0.23 0.21 Yes 229.6/464.1 DRY only
40X Oil
40X (1.25-0.75)
HCX PL APO CS (11506251)
0.17 0.1 Yes 156.2 / 334.4 Oil only
63X Oil
63X (1.40-0.60)
HCX PL APO CS (11506188)
0.17 0.1 Yes 139.4 / 235.8 Oil only
63X Water
63X (1.20)
HCX PL APO (11506213)
0.14-0.18 0.22 Yes 162.7 / 290.3 Water only, correction for coverglass thickness
100 X Oil
100X (1.44)
HCX PL APO (11506325)
0.14-0.17 0.22 Yes 135.6/ 172.8 Oil only
Max speed of the regular scanner: about 5 frames / second (512/512 pixels) Max speed of the bi-directional resonant scanner: about 25 frames / second (512/512 pixels)
Filter cube
Excitation filter Dichroic mirror Emission filter
A BP 340-380 400 LP 425 I3 BP 450-490 510 LP 515 GFP BP 470/40 500 BP 500-550 N2,1 BP 515-560 580 LP 590 N3 BP 546/12 565 BP 580-620
Laser Wavelength Suitable for Near UV Diode 405 nm CFP Argon 458 nm
476 nm 488 nm 496 nm 514 nm
GFP YFP
DPSS (Diode-Pumped Solid State) 561 nm HeNe Orange (Helium-Neon) 594 nm HeNe red (Helium-Neon) 633 nm

PCIC SP5 confocal microscope user manual, Hélène Javot updated by Mamta Srivastava 2/11/2017, page 16/16
SHUTDOWN PROCEDURE: First, check the Microsoft Outlook calendar on the PCIC workstation No. 1. If someone booked within one hour after you (DO NOT UNCHECK THE BOX NEXT TO LASER) -Save your images and leave the objective at 10X (do not rotate the objective manually). -Exit the program. -Transfer your data to the server (see above) -Log off and fill out the logbook -Lower the stage and clean objectives with fresh lens cleaning tissue (NO Kimwipes!) -clear up the desk and the working area If the next booking is later today (>1h but <3h later) -Save your images and leave the objective at 10X (do not rotate the objective manually). -In the laser configuration tab (see page 2), uncheck all lasers except the Argon. Slide down the argon power to 0%. -Exit the program. -Transfer your data to the server (see above) -Log off and fill out the logbook -Turn off the mercury lamp (see page 1, A) - Lower the stage and clean objectives with fresh lens cleaning tissue (NO Kimwipes!) -Put the dust cover on the microscope -clear up the desk and the working area If no one booked after you (last user of the day or >3h later) -Save your images and leave the objective at 10X (do not rotate the objective manually). -Lower the stage -In the laser configuration tab (see page 2), uncheck all lasers. -Exit the program. -Transfer your data to the server (see above) -Turn off the computer via the “Start” menu of Windows -Turn off the mercury lamp (A) -Turn the laser key (Nº4, on the main switch board) from ON to OFF -Keep the Laser power button (Nº3, on the main switch board) ON for at least 15 minutes -Switch off the Scanner power button (Nº2, on the main switch board). -Switch off the PC/microscope button (Nº1). -Log off and Fill out the logbook -Clean objectives with fresh lens cleaning tissue (NO Kimwipes!) -Clear up the desk and the working area -Put the dust cover on the microscope -15 minutes after shut down, turn off the laser power button (Nº3). Important: after hours, make sure the next person is coming (contact by e-mail or phone). If nobody comes, perform a total shutdown.