COMPUWARE TEST DRIVE TOPAZ WORKBENCH ... Drive/File_and...Topaz displays all of the relationships...
35
COMPUWARE TEST DRIVE TOPAZ WORKBENCH WORKSHOP File and Data Management (6/25/19)
Transcript of COMPUWARE TEST DRIVE TOPAZ WORKBENCH ... Drive/File_and...Topaz displays all of the relationships...

COMPUWARE TEST DRIVE TOPAZ WORKBENCH WORKSHOP
File and Data Management (6/25/19)
2
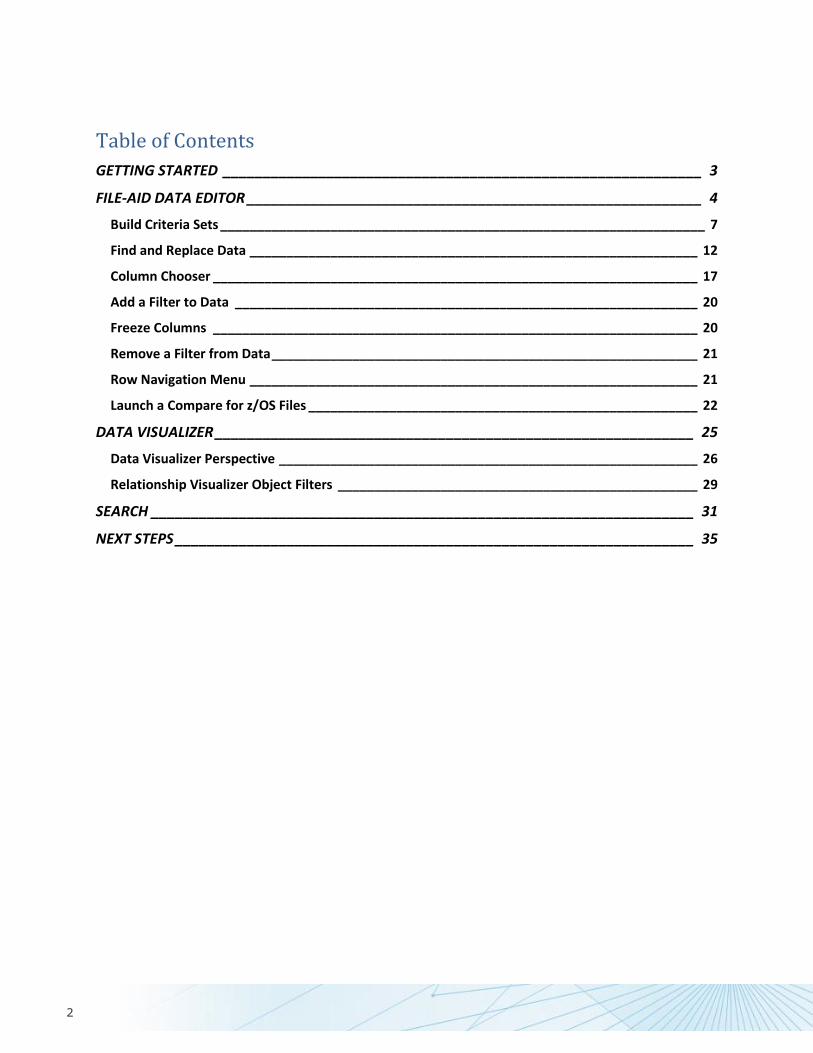
Table of Contents
GETTING STARTED ____________________________________________________________ 3
FILE-AID DATA EDITOR _________________________________________________________ 4
Build Criteria Sets __________________________________________________________________ 7
Find and Replace Data _____________________________________________________________ 12
Column Chooser __________________________________________________________________ 17
Add a Filter to Data _______________________________________________________________ 20
Freeze Columns __________________________________________________________________ 20
Remove a Filter from Data __________________________________________________________ 21
Row Navigation Menu _____________________________________________________________ 21
Launch a Compare for z/OS Files _____________________________________________________ 22
DATA VISUALIZER ____________________________________________________________ 25
Data Visualizer Perspective _________________________________________________________ 26
Relationship Visualizer Object Filters _________________________________________________ 29
SEARCH ____________________________________________________________________ 31
NEXT STEPS _________________________________________________________________ 35

3
GETTING STARTED
This tutorial will introduce you to the File-AID Data Editor and Topaz for Enterprise Data that enable you to manage various file types and
understand data relationships. Instructions:
• This guide contains many screenshots to provide a visual reference
• Every action you must take is in BOLD
• Please note each place that you must enter your own specific ID or number
• You must complete each step before proceeding to the next to successfully
follow the test drive script.
The Compuware Test Drive Experience requires that the user must have completed the Building Your Environment
http://resources.compuware.com/hubfs/Test%20Drive/Building_Environment_with_Host_and_JES_Explorers_TW_Test_Drive.pdf exercise before starting any tutorial script. If, at any point during your experience, your host connection times out, you may need to
log back in to the TestDrive host connection.
4
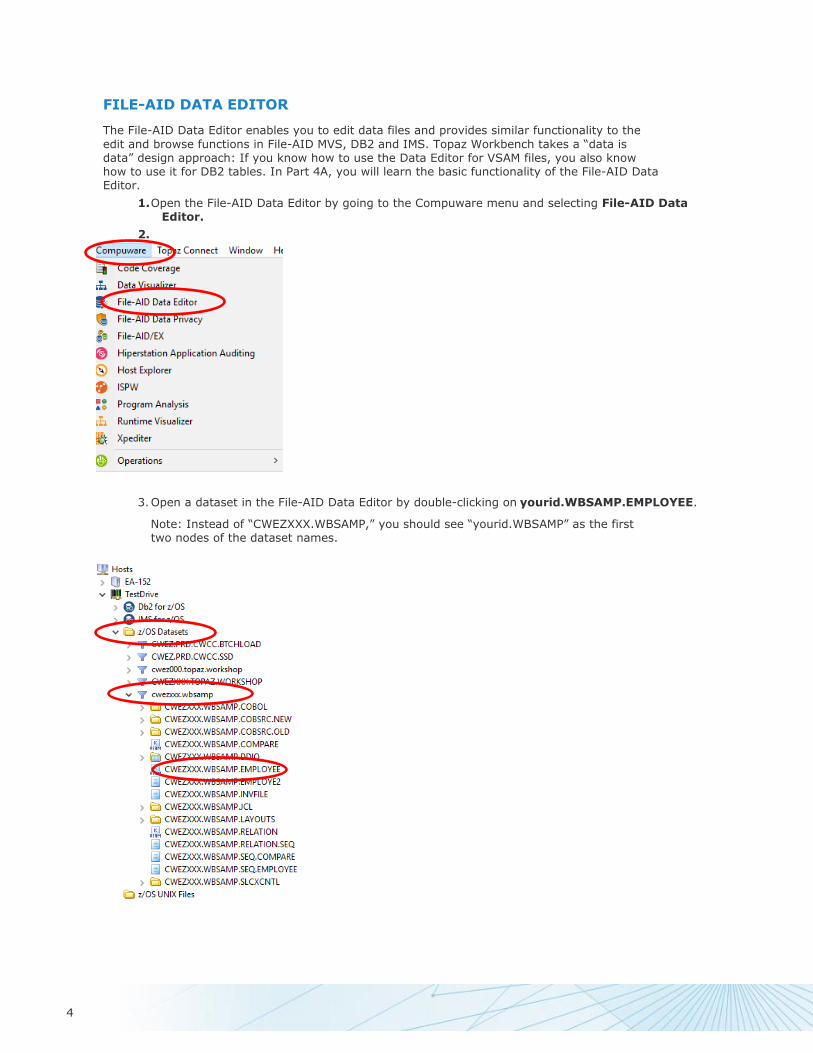
FILE-AID DATA EDITOR
The File-AID Data Editor enables you to edit data files and provides similar functionality to the
edit and browse functions in File-AID MVS, DB2 and IMS. Topaz Workbench takes a “data is data” design approach: If you know how to use the Data Editor for VSAM files, you also know how to use it for DB2 tables. In Part 4A, you will learn the basic functionality of the File-AID Data Editor.
1. Open the File-AID Data Editor by going to the Compuware menu and selecting File-AID Data Editor.
2.
3. Open a dataset in the File-AID Data Editor by double-clicking on yourid.WBSAMP.EMPLOYEE.
Note: Instead of “CWEZXXX.WBSAMP,” you should see “yourid.WBSAMP” as the first two nodes of the dataset names.
5
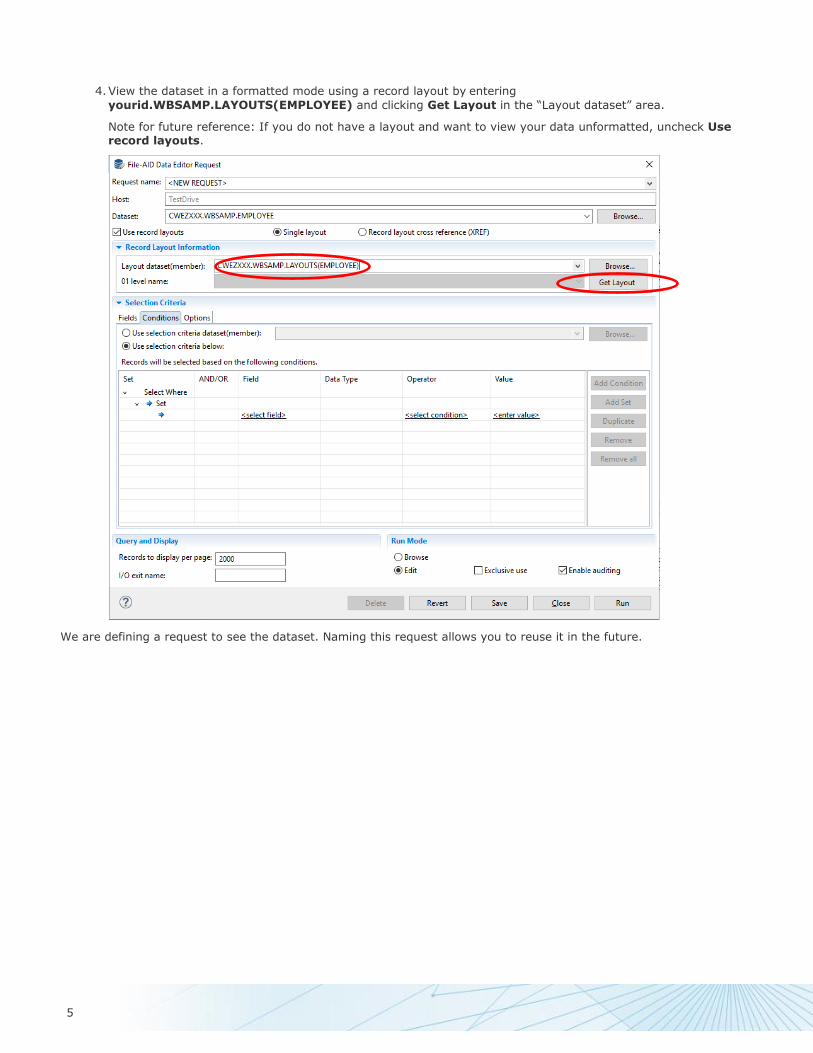
4. View the dataset in a formatted mode using a record layout by entering
yourid.WBSAMP.LAYOUTS(EMPLOYEE) and clicking Get Layout in the “Layout dataset” area.
Note for future reference: If you do not have a layout and want to view your data unformatted, uncheck Use record layouts.
We are defining a request to see the dataset. Naming this request allows you to reuse it in the future.

6
5. Add “Employee” to the “Request name field” then click Run.
File-AID opens the file for display:

7
6. Click Return to request to modify the request with some selection criteria.
Build Criteria Sets
1. Select the Conditions tab.
2. Click <select field> to view the column list.
We are using a record layout, so we will build formatted conditions.

8
3. Select the Formatted radio button, and click OK.
4. Click on EMP-NUMBER and then OK.
5. Under the Operator column, select the dropdown menu, and choose the is greater than option.

9

10
6. In the Value column, type “0”
7. Run the request by clicking Save and then Run.
Tip: At this point, do not click Add Condition. This would start another set of conditions.

11
The File-AID Data Editor within Topaz Workbench displays the data in Table Mode by default. You can also view data in Row Mode at the same time.
8. Click Show/Hide the Row Editor to toggle Row Mode on and off.
The table and row stay in sync when different fields are collected. Click around to see how it works.

12
9. Select Display Mode to toggle between Normal and Hex mode.
Hex mode displays the data with up-down hex.
Find and Replace Data
1. Open the Find/Replace dialog by clicking the Binoculars toolbar icon or pressing Ctrl+F on your keyboard.
2. Open the Numeric tab.

13
3. Type a value in the “Find” field, and click Find All.
Note: The number of occurrences is displayed at the top of the Find/Replace dialog box above the tabs.
14
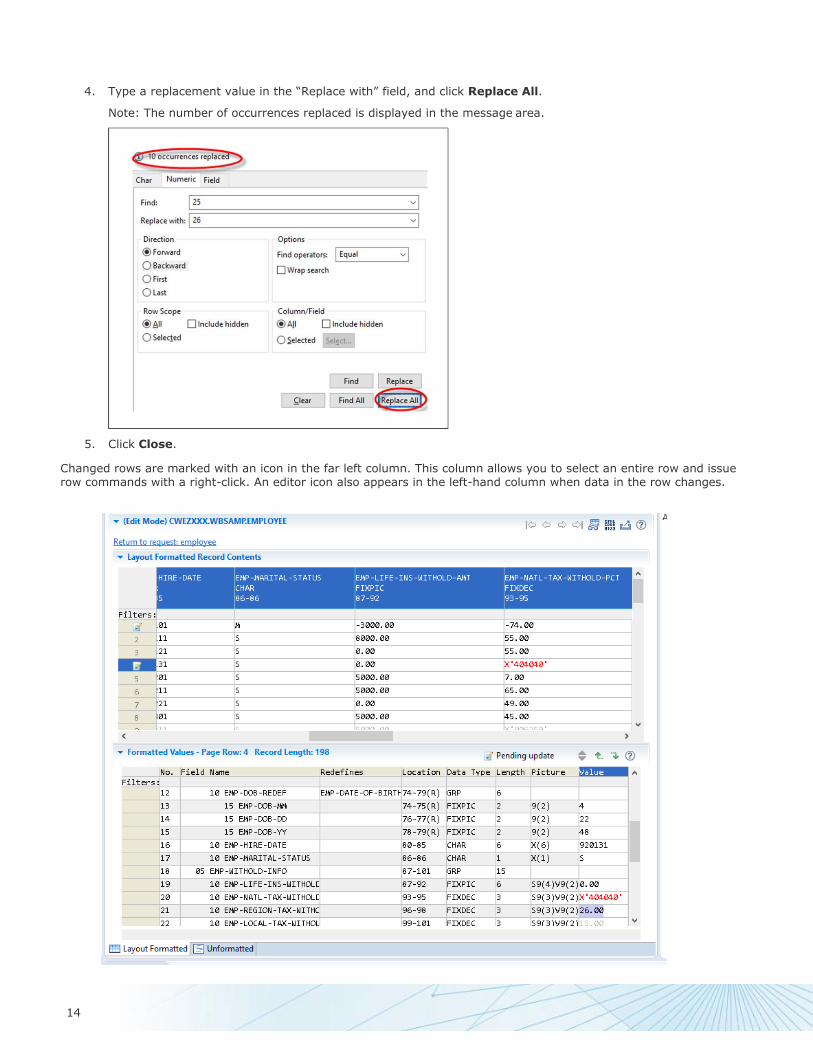
4. Type a replacement value in the “Replace with” field, and click Replace All.
Note: The number of occurrences replaced is displayed in the message area.
5. Click Close.
Changed rows are marked with an icon in the far left column. This column allows you to select an entire row and issue row commands with a right-click. An editor icon also appears in the left-hand column when data in the row changes.

15
6. Click on the fourth row then right-click on the left-hand column.
For a changed row, the Undo command will be available.
You can undo changes in any order, even out of sequence of how the changes were made.
7. Simultaneously, press the F and Ctrl keys on your keyboard.
8. Open the Numeric tab.
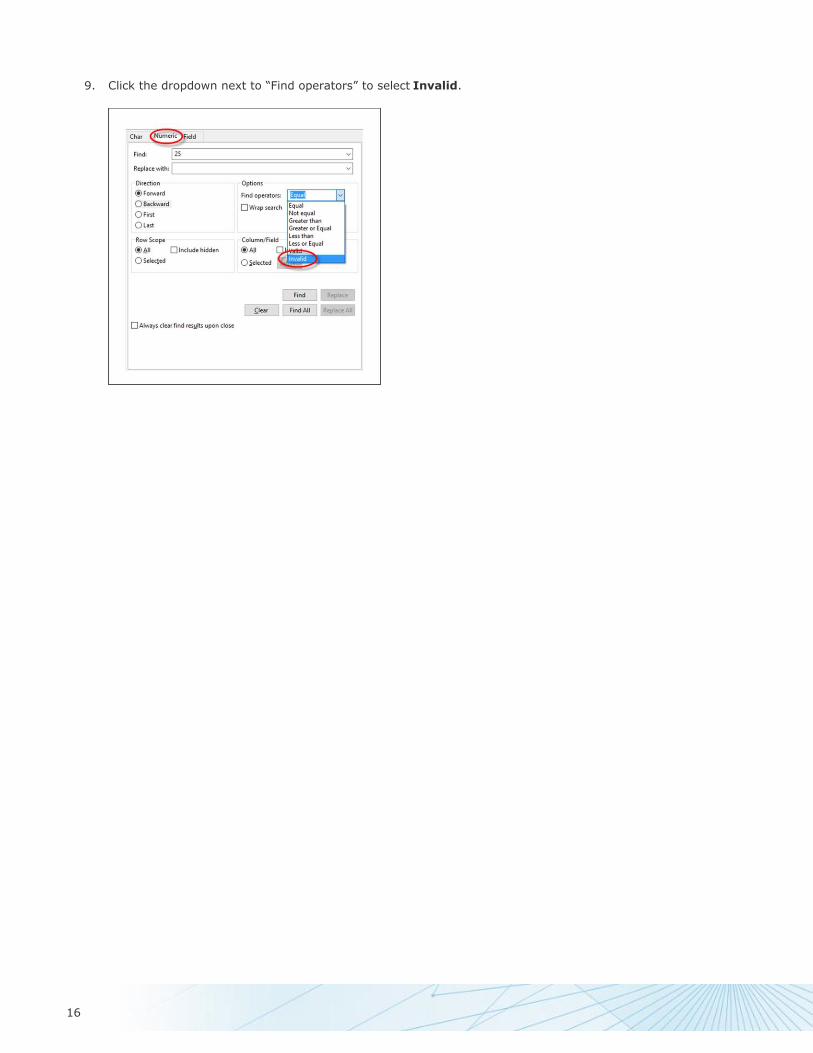
16
9. Click the dropdown next to “Find operators” to select Invalid.

17
10. Type “0” in the “Replace with” field, and click Replace All.
Observe that the value field next to Find is disabled.
11. Notice the message: “3 occurrences replaced” and click Close.
Column Chooser
This section investigates the Column Chooser function, which allows you to eliminate and reorder columns in the display.
1. Right-click on the column header to display the column commands.
2. Select Choose Columns.

18
3. Click on one of the column names and simultaneously hold down the Ctrl and A keys on your keyboard.
4. Click the left arrow to move your selections into the Available Columns area.
5. Select the columns shown in the screenshot below, holding down the Ctrl key while clicking the column names.

19
6. Click the right arrow, and press Done.
Now the File-AID Data Editor shows just the columns chosen.
7. Reset the display to show all columns by right-clicking on the column header and selecting Show All Columns.

20
Add a Filter to Data
The filter row is located between the headers and the data. Within the filter row, type a name under EMP-
LAST-NAME and hit enter.
The display filters all but that row.
Freeze Columns
1. Right-click on the header row, and select Freeze Columns.
2. Using the yellow arrows, select and move the two fields shown below to the Frozen Columns area.

21
3. Click OK to return to the file display.
4. Scroll left and right to see the effect.
Remove a Filter from Data
Click the Clear Filter icon next to the text in the filter row to display all of the data.
Row Navigation Menu
1. Select a row and then click the Navigation (Paging) menu in the toolbar or right click for the command menu and select Navigation.
2. Select Go To Specific Row.
3. Type a row number and select OK.
4. Close the file by clicking the x on the tab with the file name.
5. Click Yes to save your changes.

22
Launch a Compare for z/OS Files
You can run previous requests, organize favorites and manage requests using the File-AID toolbar icon, denoted with the blue File-AID icon.
Notice that you can also launch the Compare functionality from this dropdown menu.
Another way to launch the Compare functionality:
1. Select yourid.WBSAMP.COMPARE and yourid.WBSAMP.EMPLOYEE by holding down the Ctrl key while clicking the names.
2. Right-click on one of the files, select Compare With and then Each Other Using File-AID.
3. Format the compare by selecting Browse, which is next to the Layout (optional) field.

23
4. Type yourid.WBSAMP.LAYOUTS and click List.
5. Click the Employee member and then OK.
6. Choose Run.
The Comparison Summary will open.

24
7. Maximize the view by clicking the square in the top right corner of the window or by double clicking the tab.
8. Click on the Differences bar within the Comparison Summary chart to display Comparison Details.

25
9. Explore and play with the filter controls for File Differences and Record Differences.
10. Select a Changed Record in the top section to see differences highlighted below. Change vertical to horizontal view with buttons on right of that section. To finish close the window by clicking the X in the tab.
This completes the File-AID Data Editor section.
DATA VISUALIZER
The Topaz Workbench Data Visualizer allows you to see relationships that you have defined between DB2 tables and VSAM files. This is equivalent to the File-AID for DB2 and File-AID/RDX functionality, where you can display relationships between files in the ISPF interface.
In this section, you will bring up a relationship file visualization containing sample tables.

26
Data Visualizer Perspective
1. Open the Data Visualizer Perspective by opening the Compuware menu and selecting Data Visualizer.
2. On the Import tab, click Relationship file.
3. Select the Import button.
Choose the Visualizer Data Source
1. Click Browse to view the file list mechanism.

27
2. In the Name field, type yourid.WBSAMP.RELATION.
3. Click List and then OK.
4. In the DB2 Location dropdown menu, select DB01CW01.
Note: DB01 is a subsystem on the LPAR CW01 where this relation file was created. The relationship information itself is self-contained and independent of the fact that you are currently connected to a different LPAR.

28
5. Click Finish.
Topaz displays all of the relationships defined in this file.
Note: you may wish to change the way the visualization is laid out, either for readability or to ensure everything is on the screen. On the graph, you can
right-click and select a different layout to see alternative ways to lay out the information.
29
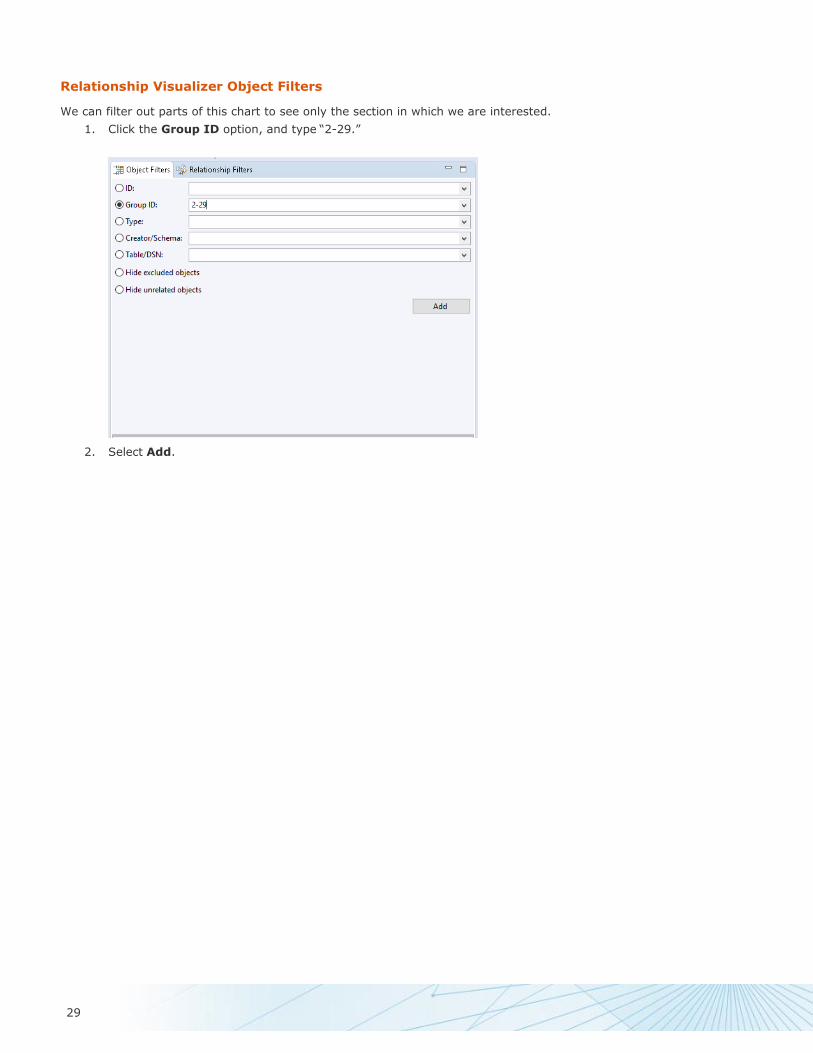
Relationship Visualizer Object Filters
We can filter out parts of this chart to see only the section in which we are interested.
1. Click the Group ID option, and type “2-29.”
2. Select Add.

30
3. Maximize the visualizer by clicking the square icon in the top right corner.
The Relationship Visualizer shows:
• Application relationships (dashed lines)
• Referential integrity (solid lines)
This completes the Data Visualizer section.

31
SEARCH
Search within Topaz Workbench allows you to locate the contents of multiple datasets simultaneously. This is similar
functionality to File-AID/MVS option 3.6 or ISPF option 3.14 (SEARCH) or 3.15 (SEARCHE).
1. Open the Host Explorer perspective by opening the Compuware menu and selecting Host Explorer or by selecting the Host Explorer perspective switcher.
2. Reset the Host Explorer Perspective by right-clicking the perspective name, selecting Reset and confirming.
1. Select both WBSAMP.COBOL and WBSAMP.JCL. Right-click WBSAMP.JCL, and select Search.
Tip: Hold the Ctrl key on your keyboard while selecting your items.

32
At the top of the Search window, the first two tabs are for the File-AID and Host Explorer dataset searches.
File-AID Search Host Explorer Search
• Search
• Option
sequential, PDS and
to process as JCL
VSAM Files • Search sequential or PDS files only
• Does not provide the JCL processing capability
We will use the File-AID search.
2. Type “Salary” in the Search for text field, and click Search.
3. Maximize the search view by double clicking the search tab.

33
4. Click Expand All.
The upper portion of the search results shows the COBOL source code where salary is a part of a data name or is a constant. The lower portion shows where salary is part of a comment in the JCL.
5. Double-click on Employee Salary Data.

34
The member opens with the cursor position at the search result.
6. Click on the X on the toolbar in the search tab window to remove the highlighted line from the search results.
Tip: You can use search results like a checklist, removing results as tasks are completed.

35
7. Close the JCL member.
You may choose to reset the Host Explorer perspective at this point.
This completes the Search section.
NEXT STEPS
Click on the link below to return to the Compuware Test Drive main page and choose your next
road trip! COMPUWARE TEST DRIVE