cms 2 PR Forms ™ Price : Call $$$ ( generous discounts on multiple purchase)
Upload
demetrius-gloverCategory
view
38download
0description

Slide#: 1 © GPS Financial Services 2010-2011Revised 05/27/2011
cms2SY Setup-Windows7 on WS ™
(generous discounts on multiple purchase)
cms2SY Setup-Windows7 on WS ™
(generous discounts on multiple purchase)
Cougar Mountain Software
Professional Version

Slide#: 2 © GPS Financial Services 2010-2011Revised 05/27/2011
cms2SY Setup-Windows7 on WS™ by CMS to the MAX
cms2SY Setup-Windows7 on WS™ by CMS to the MAX
Procedure to setup Windows 7 to run Cougar Mtn Professional 2010/11. Log-in with administrator rights (required to run client.exe)
2. Map the Cougar directory on the server (the M: drive is most often used for CMS)
3. Editing the config.nt (per the description below)
4. Rename and existing cmswin\Backup directories <optional> then run the Client.exe in the \cmswin or \cmsfund directory(if this is an single user install, install the software normally)
5. In the folder that the program makes, change the icon that runs Cougar to run in a separate memory space (its under the advanced tab)
6. If you wish to auto launch your company code, add dc MAX to the command linee.g. M:\cmswin\cmsmain.exe dc MAX where MAX is your primary company code(dc is in lower case and MAX is in upper case with you company code)
7. Turn off the UAC in the Control Panel under Users
8. Change the date settings in Regional Settings
9. Edit the _default.pif in the C:\Windows directory
10. Set the screen resolution as low as possible (800x600 is best for CMS)
11. Shorten any long printer names
12. Reboot your PC for the changes to take effect

Slide#: 3 © GPS Financial Services 2010-2011Revised 05/27/2011
cms2SY Setup-Windows7 on WS™ 2. Mapping the Cougar Directory
cms2SY Setup-Windows7 on WS™ 2. Mapping the Cougar Directory
Mapping the Cougar directory on the server in Windows 7
From the desktop or Start Menu, right-click on the My Computer icon and select Map Network Drive from the menu.
Select M under the Drive: drop down menu. Choose browse, select your network folder.

Slide#: 4 © GPS Financial Services 2010-2011Revised 05/27/2011
cms2SY Setup-Windows7 on WS™ 2. Mapping the Cougar Directory
cms2SY Setup-Windows7 on WS™ 2. Mapping the Cougar Directory
Right click Computer, select map network drive…
Slide#: 5 © GPS Financial Services 2010-2011Revised 05/27/2011
cms2SY Setup-Windows7 on WS™ 2. Mapping the Cougar Directory
cms2SY Setup-Windows7 on WS™ 2. Mapping the Cougar Directory
Select Drive as M, under Folder select your server. Click ok, Reconnect at
Login & then finish.

Slide#: 6 © GPS Financial Services 2010-2011Revised 05/27/2011
cms2SY Setup-Windows7 on WS™ 3. Editing config.nt
cms2SY Setup-Windows7 on WS™ 3. Editing config.nt
Procedure to edit config.nt in Windows 7 Click on Start
Type in NOTEPAD on the run line
Right click on notepad & run as administrator
Click Yes on the screen to allow modification to your system
Click on File, Open and enter c:\windows\system32\config.nt
Go to the bottom of the file
Change Files=40 to Files=250
Click on File, Save, Exit
This won’t take effect until you reboot your PC but you can wait until the other steps have been completed

Slide#: 7 © GPS Financial Services 2010-2011Revised 05/27/2011
cms2SY Setup-Windows7 on WS™ 3. Editing config.nt
cms2SY Setup-Windows7 on WS™ 3. Editing config.nt
Enter in below NOTEPAD

Slide#: 8 © GPS Financial Services 2010-2011Revised 05/27/2011
cms2SY Setup-Windows7 on WS™ 3. Editing config.nt
cms2SY Setup-Windows7 on WS™ 3. Editing config.nt
Right Click and then Run as administrator

Slide#: 9 © GPS Financial Services 2010-2011Revised 05/27/2011
cms2SY Setup-Windows7 on WS™ 3. Editing config.nt
cms2SY Setup-Windows7 on WS™ 3. Editing config.nt
Click on Yes

Slide#: 10 © GPS Financial Services 2010-2011Revised 05/27/2011
cms2SY Setup-Windows7 on WS™ 3. Editing config.nt
cms2SY Setup-Windows7 on WS™ 3. Editing config.nt
Browse/search or enter the File name, open & enter
c:\windows\system32\config.nt

Slide#: 11 © GPS Financial Services 2010-2011Revised 05/27/2011
cms2SY Setup-Windows7 on WS™ 3. Editing config.nt
cms2SY Setup-Windows7 on WS™ 3. Editing config.nt
Scroll to the end of the file

Slide#: 12 © GPS Financial Services 2010-2011Revised 05/27/2011
cms2SY Setup-Windows7 on WS™ 3. Editing config.nt
cms2SY Setup-Windows7 on WS™ 3. Editing config.nt
Change to files=250No spaces, then Save and Exit

Slide#: 13 © GPS Financial Services 2010-2011Revised 05/27/2011
cms2SY Setup-Windows7 on WS™ 4. Run Client.exe
cms2SY Setup-Windows7 on WS™ 4. Run Client.exe
4. Procedure to run Client.exe Select Browse and navigate to the M network drive or the drive to which you
mapped on the server, you can also use the search function from inside the Cougar program directory.
Open the CMSWIN (CMSFUND for FUND) folder and double-click the CLIENT.EXE file.
The Cougar Mountain Installation window will appear and should reflect the installation directory as C:\CMSWIN. Follow the on-screen instructions.

Slide#: 14 © GPS Financial Services 2010-2011Revised 05/27/2011
cms2SY Setup-Windows7 on WS™ 4. Run Client.exe
cms2SY Setup-Windows7 on WS™ 4. Run Client.exe
Launch the Client.exe and follow the on screen prompts
Slide#: 15 © GPS Financial Services 2010-2011Revised 05/27/2011
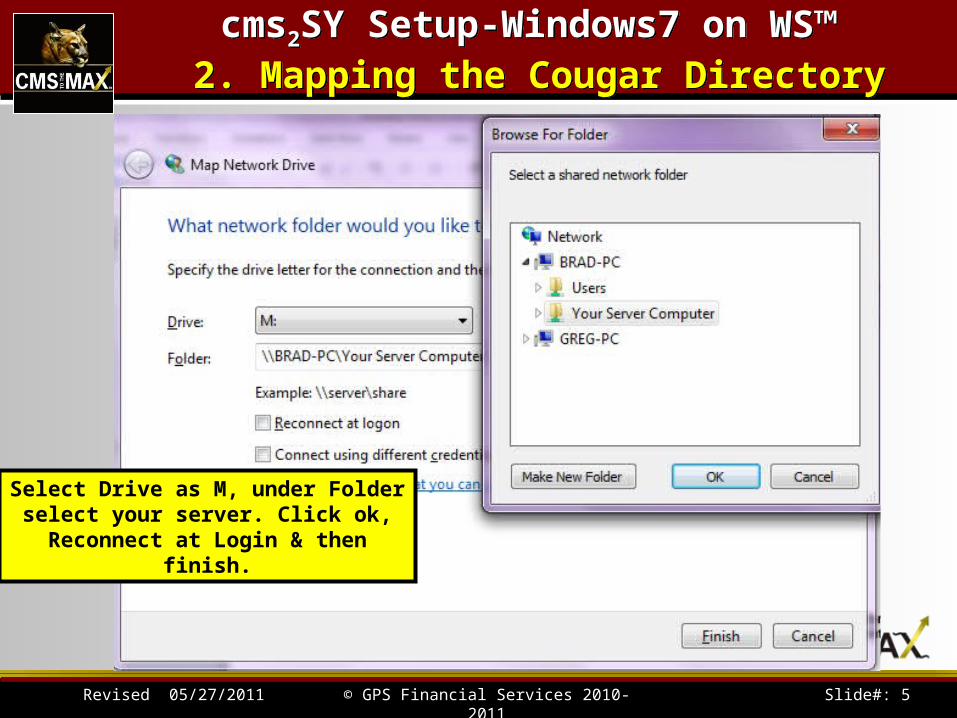
cms2SY Setup-Windows7 on WS™ 4. Run Client.exe
cms2SY Setup-Windows7 on WS™ 4. Run Client.exe
Click Run
Slide#: 16 © GPS Financial Services 2010-2011Revised 05/27/2011
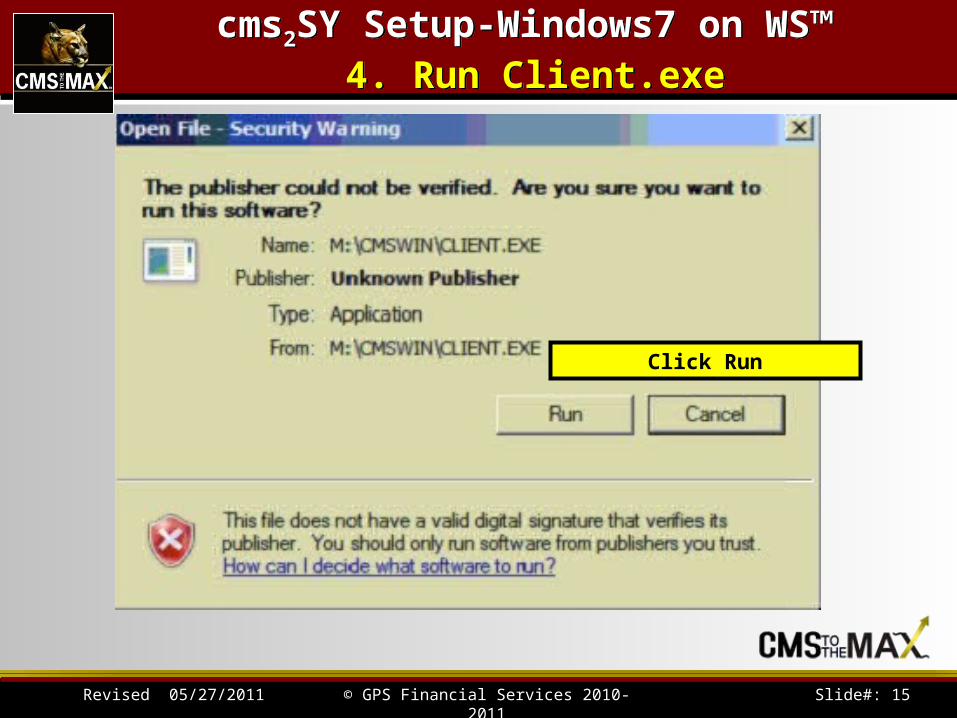
cms2SY Setup-Windows7 on WS™ 4. Run Client.exe
cms2SY Setup-Windows7 on WS™ 4. Run Client.exe
Click on Next

Slide#: 17 © GPS Financial Services 2010-2011Revised 05/27/2011
cms2SY Setup-Windows7 on WS™ 4. Run Client.exe
cms2SY Setup-Windows7 on WS™ 4. Run Client.exe
Normally, use the default directory C:\CMSWIN, then click next, sometimes you can
use c:\CMSWINws to differentiate from the “real” program directory name, then click on
Next

Slide#: 18 © GPS Financial Services 2010-2011Revised 05/27/2011
cms2SY Setup-Windows7 on WS™ 4. Run Client.exe
cms2SY Setup-Windows7 on WS™ 4. Run Client.exe
Normally, the default setting is Yes. This will copy all
replaced files into the directory shown. It’s an advanced procedure to rename the existing directory before proceeding, than Install

Slide#: 19 © GPS Financial Services 2010-2011Revised 05/27/2011
cms2SY Setup-Windows7 on WS™ 4. Run Client.exe
cms2SY Setup-Windows7 on WS™ 4. Run Client.exe
Wait for this to finish

Slide#: 20 © GPS Financial Services 2010-2011Revised 05/27/2011
cms2SY Setup-Windows7 on WS™ 4. Run Client.exe
cms2SY Setup-Windows7 on WS™ 4. Run Client.exe
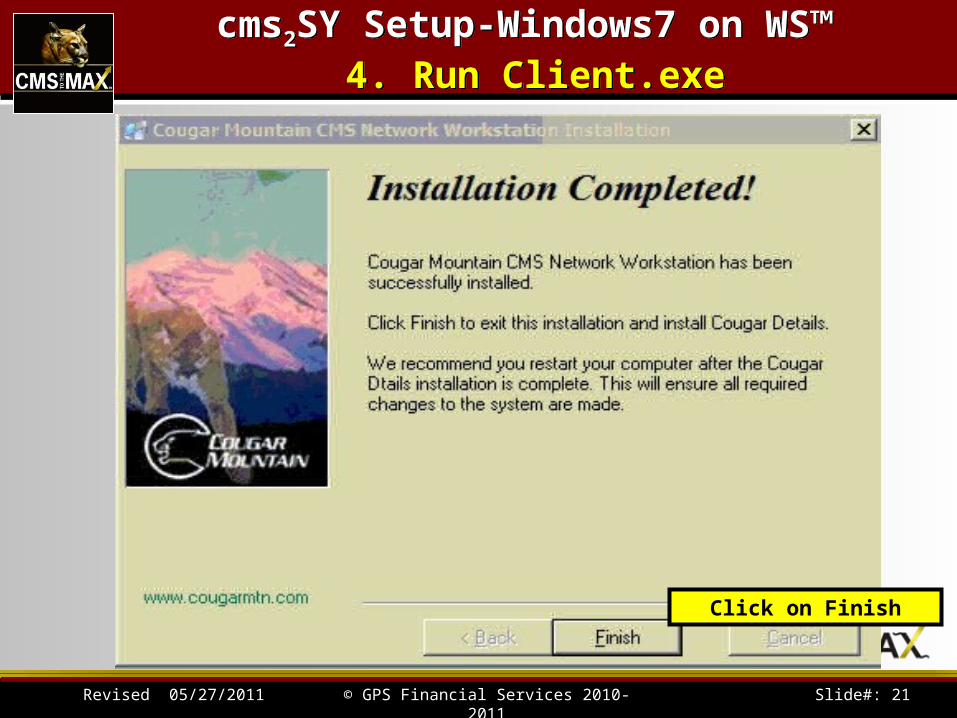
Click on Run
Slide#: 21 © GPS Financial Services 2010-2011Revised 05/27/2011
cms2SY Setup-Windows7 on WS™ 4. Run Client.exe
cms2SY Setup-Windows7 on WS™ 4. Run Client.exe
Click on Finish

Slide#: 22 © GPS Financial Services 2010-2011Revised 05/27/2011
cms2SY Setup-Windows7 on WS™ 5. Run Icon in a Separate Memory Space
cms2SY Setup-Windows7 on WS™ 5. Run Icon in a Separate Memory Space
5. Run Icon in a Separate Memory Space Right-click on the Cougar Mountain software icon on your desktop and
select Properties. Or, select Start, point to All Programs, point to Cougar Mountain Software, and right-click on the program icon to select Properties.
On the Shortcut tab, select the Advanced button.
In the Advanced Properties window, check the Run in separate memory space check box.
Select OK to save the settings and close the window. You have completed this task.
.

Slide#: 23 © GPS Financial Services 2010-2011Revised 05/27/2011
cms2SY Setup-Windows7 on WS™ 5. Run Icon in a Separate Memory Space
cms2SY Setup-Windows7 on WS™ 5. Run Icon in a Separate Memory Space
Right click Cougar Mountain icon, select properties

Slide#: 24 © GPS Financial Services 2010-2011Revised 05/27/2011
cms2SY Setup-Windows7 on WS™ 5. Run Icon in a Separate Memory Space
cms2SY Setup-Windows7 on WS™ 5. Run Icon in a Separate Memory Space
Select Advanced from the Shortcut tab

Slide#: 25 © GPS Financial Services 2010-2011Revised 05/27/2011
cms2SY Setup-Windows7 on WS™ 5. Run Icon in a Separate Memory Space
cms2SY Setup-Windows7 on WS™ 5. Run Icon in a Separate Memory Space
Check Run in separate memory space, then click
OK

Slide#: 26 © GPS Financial Services 2010-2011Revised 05/27/2011
cms2SY Setup-Windows7 on WS™ 6. Auto-Launch a company code
cms2SY Setup-Windows7 on WS™ 6. Auto-Launch a company code
6. Auto-Launching a company code Right-click on the Cougar Mountain software icon on your desktop and
select Properties. Or, select Start, point to All Programs, point to Cougar Mountain Software, and right-click on the program icon to select Properties.
In the shortcut tab, find the “target” box.
At the end add dc MAX (MAX is your company code that you want auto-launched).
Click OK and you are finished..

Slide#: 27 © GPS Financial Services 2010-2011Revised 05/27/2011
cms2SY Setup-Windows7 on WS™ 6. Auto-Launch a company code
cms2SY Setup-Windows7 on WS™ 6. Auto-Launch a company code
Right click Cougar Mountain icon, select properties

Slide#: 28 © GPS Financial Services 2010-2011Revised 05/27/2011
cms2SY Setup-Windows7 on WS™ 6. Auto-Launch a company code
cms2SY Setup-Windows7 on WS™ 6. Auto-Launch a company code
Under “target” add dc MAX (where MAX is the desired company code to be auto launched).
Remember to make dc lowercase and the MAX uppercase. Click OK.

Slide#: 29 © GPS Financial Services 2010-2011Revised 05/27/2011
cms2SY Setup-Windows7 on WS™ 6. Auto-Launch a company code
cms2SY Setup-Windows7 on WS™ 6. Auto-Launch a company code
Right click Cougar Mountain icon, select Send> Pin to Start Menu and or Send to Desktop

Slide#: 30 © GPS Financial Services 2010-2011Revised 05/27/2011
cms2SY Setup-Windows7 on WS™ 7. Turning UAC Off
cms2SY Setup-Windows7 on WS™ 7. Turning UAC Off
Procedure to turn off UAC in Windows 7 Select the Start Menu
Go to Control Panel
Select User Accounts and Family Safety
Select User Accounts
Select Change User Account Control Setting
Bring the slide bar all the way down to “Never Notify Me”

Slide#: 31 © GPS Financial Services 2010-2011Revised 05/27/2011
cms2SY Setup-Windows7 on WS™ 7. Turning UAC Off
cms2SY Setup-Windows7 on WS™ 7. Turning UAC Off
Select Control Panel

Slide#: 32 © GPS Financial Services 2010-2011Revised 05/27/2011
cms2SY Setup-Windows7 on WS™ 7. Turning UAC Off
cms2SY Setup-Windows7 on WS™ 7. Turning UAC Off
Select User Accounts and Family Safety

Slide#: 33 © GPS Financial Services 2010-2011Revised 05/27/2011
cms2SY Setup-Windows7 on WS™ 7. Turning UAC Off
cms2SY Setup-Windows7 on WS™ 7. Turning UAC Off
Select User Accounts

Slide#: 34 © GPS Financial Services 2010-2011Revised 05/27/2011
cms2SY Setup-Windows7 on WS™ 7. Turning UAC Off
cms2SY Setup-Windows7 on WS™ 7. Turning UAC Off
Select Change User Account Control Settings

Slide#: 35 © GPS Financial Services 2010-2011Revised 05/27/2011
cms2SY Setup-Windows7 on WS™ 7. Turning UAC Off
cms2SY Setup-Windows7 on WS™ 7. Turning UAC Off
Click Ok
Slide bar all the way down
Slide#: 36 © GPS Financial Services 2010-2011Revised 05/27/2011
cms2SY Setup-Windows7 on WS™ 8. Changing the Date Settings
cms2SY Setup-Windows7 on WS™ 8. Changing the Date Settings
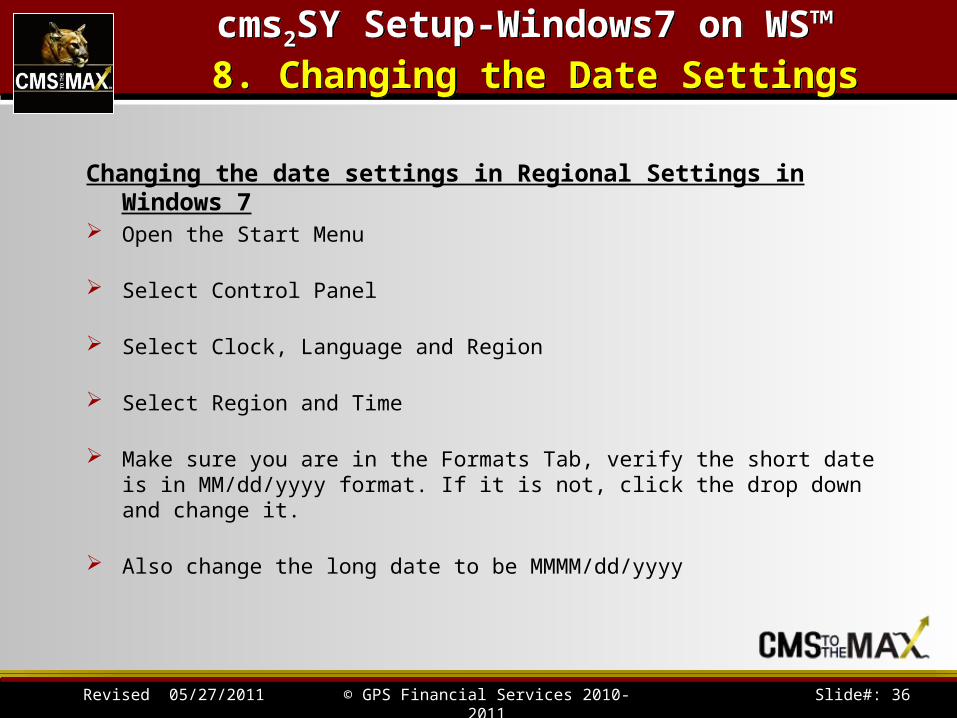
Changing the date settings in Regional Settings in Windows 7 Open the Start Menu
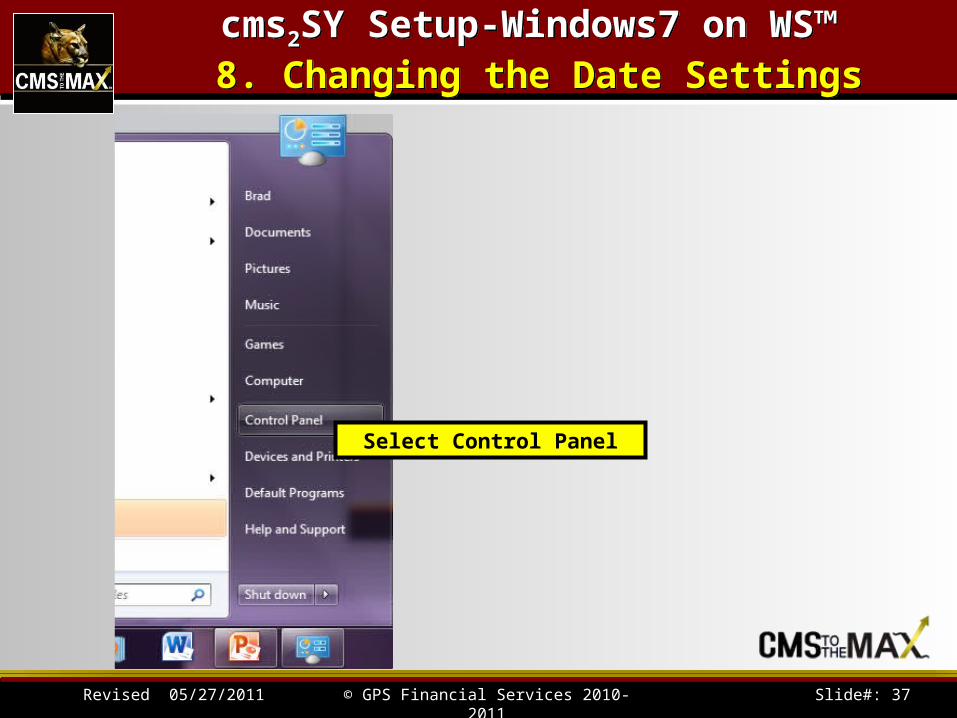
Select Control Panel
Select Clock, Language and Region
Select Region and Time
Make sure you are in the Formats Tab, verify the short date is in MM/dd/yyyy format. If it is not, click the drop down and change it.
Also change the long date to be MMMM/dd/yyyy
Slide#: 37 © GPS Financial Services 2010-2011Revised 05/27/2011
cms2SY Setup-Windows7 on WS™ 8. Changing the Date Settings
cms2SY Setup-Windows7 on WS™ 8. Changing the Date Settings
Select Control Panel

Slide#: 38 © GPS Financial Services 2010-2011Revised 05/27/2011
cms2SY Setup-Windows7 on WS™ 8. Changing the Date Settings
cms2SY Setup-Windows7 on WS™ 8. Changing the Date Settings
Select Clock, Language and Region

Slide#: 39 © GPS Financial Services 2010-2011Revised 05/27/2011
cms2SY Setup-Windows7 on WS™ 8. Changing the Date Settings
cms2SY Setup-Windows7 on WS™ 8. Changing the Date Settings
Select Region and Language

Slide#: 40 © GPS Financial Services 2010-2011Revised 05/27/2011
cms2SY Setup-Windows7 on WS™ 8. Changing the Date Settings
cms2SY Setup-Windows7 on WS™ 8. Changing the Date Settings
Make sure Short date is set to MM/dd/yyyy
Make sure Long date is set to MMMM/dd/yyyy

Slide#: 41 © GPS Financial Services 2010-2011Revised 05/27/2011
cms2SY Setup-Windows7 on WS™ 9. Editing _Default.PIF
cms2SY Setup-Windows7 on WS™ 9. Editing _Default.PIF
First Activating Administrator Account using an Elevated Command Prompt (there are other techniques, this is just the easiest one) NOTE: This option can be used in all editions of Windows7,
1. Open a elevated command prompt by clicking on Run entering CMD and the hold the shift and control key down while hitting <Enter>
2. To Enable the Hidden Built-in Administrator AccountA) In the elevated command prompt, copy and paste the command below and press <Enter>.
net user administrator /active:yes
3. Close the elevated command prompt by typing exit & <Enter>
4. Log off, and you will now see the built-in Administrator account log on icon added (enabled) NOTE: It is very advisable to put a password on the Administrator active

Slide#: 42 © GPS Financial Services 2010-2011Revised 05/27/2011
cms2SY Setup-Windows7 on WS™ 9. Editing _Default.PIF
cms2SY Setup-Windows7 on WS™ 9. Editing _Default.PIF
To Prepare to modify the _Default.pif
Before you can follow the “normal” procedure used under Windows NT, 2000, or XP, you must give yourself permission to modify the _default.pif file. To do this, make sure that you are logged into Windows 7 with an administrative account.
In the search field in the Start Menu, type CMD, but instead of pressing Enter, press Ctrl-Shift-Enter to open a command prompt in administrative mode. When the command window opens, enter the following commands:
cd /D %systemroot%takeown /A /F %systemroot%\_default.pificacls %systemroot%\_default.pif /grant Users:F

Slide#: 43 © GPS Financial Services 2010-2011Revised 05/27/2011
cms2SY Setup-Windows7 on WS™ 9. Editing _Default.PIF
cms2SY Setup-Windows7 on WS™ 9. Editing _Default.PIF
Procedure to edit _Default.PIF in Windows 7 Click on Start
Go to my computer
In the C:\Windows find the file _Default.PIF . (In some systems, the file extension might not be visible.)
Right-click on the file or file icon and select Properties from the menu.
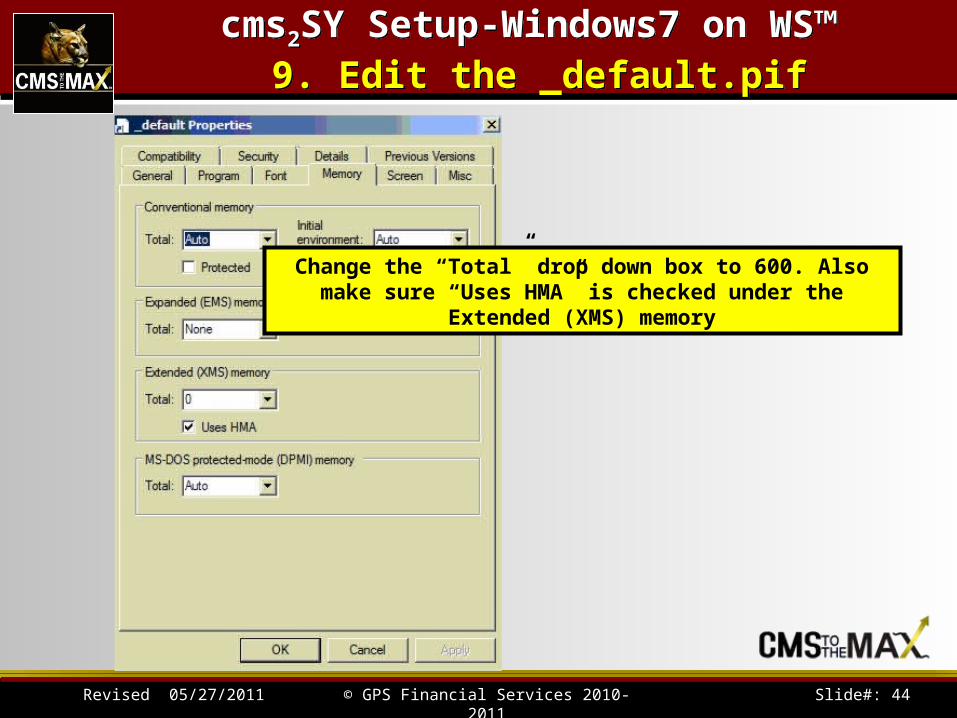
Select the Memory tab.
In the Conventional memory section Total drop-down list box, select 600. 7. Check that all the other drop-down list boxes have the highest available value selected. 8. Check the Uses HMA check box in the Extended (XMS) memory section. 9. Click OK to save your settings and close the window.
Slide#: 44 © GPS Financial Services 2010-2011Revised 05/27/2011
cms2SY Setup-Windows7 on WS™ 9. Edit the _default.pif
cms2SY Setup-Windows7 on WS™ 9. Edit the _default.pif
Change the “Total” drop down box to 600. Also make sure “Uses HMA” is checked under the Extended (XMS) memory

Slide#: 45 © GPS Financial Services 2010-2011Revised 05/27/2011
cms2SY Setup-Windows7 on WS™ 10. Reboot your PC
cms2SY Setup-Windows7 on WS™ 10. Reboot your PC
Reboot your PC, so that all the
changes can take effect.

Slide#: 46 © GPS Financial Services 2010-2011Revised 05/27/2011
How Can I Get the CMStotheMax tm & Cougar-Magic tm Products?
GPS Financial Services (aka CMStotheMAX.com and CougarMtnSupport.com)
13337 South Street #352
Cerritos, CA 90703
714 228-5444 Phone
800 531-2944 Fax
email us at: [email protected]

Slide#: 47 © GPS Financial Services 2010-2011Revised 05/27/2011
Cougar-Magic.com Products

Slide#: 48 © GPS Financial Services 2010-2011Revised 05/27/2011
cms2SY Setup-Windows7 on WS™ by CMS to the MAX
cms2SY Setup-Windows7 on WS™ by CMS to the MAX

Slide#: 49 © GPS Financial Services 2010-2011Revised 05/27/2011
cms2SY Setup-Windows7 on WS™ Troubleshooting
cms2SY Setup-Windows7 on WS™ Troubleshooting
Troubleshooting Problems editing Config.nt (not using Notepad in administrator
mode)
Client.exe not loading completely (not logged in with administrative privileges)
Auto launch isn’t working properly (capitalization is key, dc is lowercase and your company code is in upper case)
Computer running slow (UAC not set properly)
Printing problems (check for too long of printer names)
Screen too small (change screen settings in Control Panel> Display