KALPOUZOS GIANNHS-_-SAOS PANTOMIMA FANTASMATWN-_-greekleech.pdf
Ciena 8700 Packetwave Platform with SAOS 8.5
Supplemental Administrative Guidance Version 1.0
May 2, 2017
Ciena Corporation
7035 Ridge Road
Hanover, MD 21076
Prepared By:
Cyber Assurance Testing Laboratory
304 Sentinel Drive, Suite 100
Annapolis Junction, MD 20701
1 | P a g e
Contents
1 Introduction ........................................................................................................................................... 3
2 Intended Audience ................................................................................................................................ 3
3 Terminology .......................................................................................................................................... 3
4 References ............................................................................................................................................. 4
5 Evaluated Configuration of the TOE .................................................................................................... 4
5.1 TOE Components .......................................................................................................................... 4
5.2 Supporting Environmental Components ....................................................................................... 4
5.3 Assumptions .................................................................................................................................. 5
6 Secure Acceptance, Installation, and Configuration ............................................................................. 6
6.1 Enable Logging ............................................................................................................................. 7
6.2 Set up the SSH Server ................................................................................................................... 8
6.3 Set up the SFTP Client .................................................................................................................. 9
6.4 Set up Syslog ............................................................................................................................... 10
6.5 Enable FIPS Mode ...................................................................................................................... 11
6.6 Configuring SSH Algorithms...................................................................................................... 11
6.7 Configuring TLS ......................................................................................................................... 15
6.8 Configuring OCSP ...................................................................................................................... 16
6.9 Set up the RADIUS Server over TLS (Optional)........................................................................ 16
6.10 In-Band Management Configuration (Optional) ......................................................................... 18
7 Secure Management of the TOE ......................................................................................................... 18
7.1 Authenticating to the TOE .......................................................................................................... 18
7.2 User Lockout ............................................................................................................................... 19
7.3 Managing Users .......................................................................................................................... 19
7.4 Password Management ............................................................................................................... 20
7.5 Login Banner .............................................................................................................................. 20
7.6 Session Termination .................................................................................................................... 20
7.6.1 Admin Logout ..................................................................................................................... 20
7.6.2 Termination from Inactivity ................................................................................................ 20
7.7 System Time Configuration ........................................................................................................ 20
7.8 Secure Updates ............................................................................................................................ 21

2 | P a g e
8 Auditing .............................................................................................................................................. 21
8.1 Audit Storage .............................................................................................................................. 27
9 Operational Modes .............................................................................................................................. 27
10 Additional Support .......................................................................................................................... 28
Table of Tables
Table 8-1: Ciena 8700 Auditable Events .................................................................................................... 27

3 | P a g e
1 Introduction
The Ciena 8700 Packetwave Platform (Ciena 8700) is a hardware appliance whose primary functionality
is related to the handling of network traffic. The NDcPP defines a network device as “a device composed
of hardware and software that is connected to the network and has an infrastructure role in the overall
enterprise.” Additionally, the NDcPP says that example devices that fit this definition include routers,
firewalls, intrusion detection systems, audit servers, and switches that have Layer 2 functionality. The
TOE is a packet networking switch that performs second tier aggregation of network traffic that interfaces
with an IP/MPLS domain.
As a Common Criteria evaluated product, this guidance serves to define the ‘evaluated configuration’ in
which the evaluation was performed and to summarize how to perform the security functions that were
tested as part of the evaluation.
2 Intended Audience
This document is intended for administrators responsible for installing, configuring, and/or operating the
Ciena 8700. Guidance provided in this document allows the reader to deploy the product in an
environment that is consistent with the configuration that was evaluated as part of the product’s Common
Criteria (CC) testing process. It also provides the reader with instructions on how to exercise the security
functions that were claimed as part of the CC evaluation. The reader is also expected to be familiarity
with the general operation of the Ciena 8700 product. This supplemental guidance includes references to
Ciena’s standard documentation set for the product and does not explicitly reproduce materials located
there.
The reader is also expected to be familiar with the Security Target for the Ciena 8700 Packetwave
Platform and the general CC terminology that is referenced in it. This document references the Security
Functional Requirements (SFRs) that are defined in the Security Target document and provides
instructions for how to perform the security functions that are defined by these SFRs. The Ciena 8700
product as a whole provides a great deal of security functionality but only those functions that were in the
scope of the claimed PP are discussed here. Any functionality that is not described here or in the Ciena
8700 Packetwave Platform with SAOS 8.5 Security Target was not evaluated and should be exercised at
the user’s risk.
3 Terminology
In reviewing this document, the reader should be aware of the terms listed below. These terms are also
described in the Ciena 8700 Packetwave Platform with SAOS 8.5 Security Target.
CC: stands for Common Criteria. Common Criteria provides assurance that the process of specification,
implementation and evaluation of a computer security product has been conducted in a rigorous and
standard and repeatable manner at a level that is commensurate with the target environment for use.
SFR: stands for Security Functional Requirement. An SFR is a security capability that was tested as part
of the CC process.

4 | P a g e
TOE: stands for Target of Evaluation. This refers to the aspects of the 8700 product that contain the
security functions that were tested as part of the CC evaluation process.
4 References
The following security-relevant documents are included with the TOE. This is part of the standard
documentation set that is provided with the product. Documentation that is not related to the functionality
tested as part of the CC evaluation is not listed here.
[1] 8700 SAOS 8.5 Product Fundamentals – 380-1875-010
[2] 8700 SAOS 8.5 Administration and Security – 380-1875-301
[3] 8700 SAOS 8.5 Base Configuration – 380-1875-310
[4] 8700 SAOS 8.5 Command Reference – 380-1875-810
[5] 8700 4-slot Installation and Startup – 380-1875-201; 8700 10-slot Installation and Startup –
380-1875-202 (each document contains identical information from a security perspective)
[6] 8700 SAOS 8.5 System Event Reference – 380-1875-840
[7] 8700 SAOS Fault and Performance Management – 380-1875-500
[8] 8700 SAOS 8.5 Software Management and Licensing – 380-1875-221
[9] 8700 SAOS 8.5 Planning, Engineering, and Ordering Guide – 380-1875-101
The following document was created in support of the Ciena 8700 Packetwave Platform CC evaluation:
[10] Ciena 8700 Packetwave Platform with SAOS 8.5 Common Criteria Security Target
5 Evaluated Configuration of the TOE
This section lists the components that have been included in the TOE’s evaluated configuration, whether
they are part of the TOE itself, environmental components that support the security behavior of the TOE,
or non-interfering environmental components that were present during testing but are not associated with
any security claims:
5.1 TOE Components
The TOE is a network appliance that comes in two models: 4-slot and 10-slot. Each model of the TOE
can run independently and both models have the same SAOS 8.5 software, processor family, and security-
relevant external interfaces. Information about the physical characteristics of each model is provided in
detail in the “8700 Packetwave Platform hardware” section in [4].
5.2 Supporting Environmental Components Component Definition
Management
Workstation
Any general-purpose computer that is used by an administrator to manage the TOE.
The TOE can be managed remotely, in which case the management workstation
requires an SSH client, or locally, in which case the management workstation must be
physically connected to the TOE using the serial port and must use a terminal
emulator that is compatible with serial communications.
OCSP Server The OCSP server is used by the TOE to validate certificate revocation status.

5 | P a g e
SFTP Server The SFTP server is used for storage of TOE software/firmware updates that can be
retrieved remotely by the TSF. The Administrator can also transfer the security,
event, and command logs to another or the same SFTP server over this interface.
Communications over this interface are secured using SFTP via SSH where the TOE
is acting as an SSH client.
Syslog Server A remote server that is used to store syslog audit records that the TOE transmits to it.
The TOE communicates with the syslog server using TLS.
RADIUS Server The RADIUS server enables user authentication and is secured using TLS. Note that
while RADIUS authentication is supported by the TOE, the use of it is not
mandatory.
Table 5-1: Supporting Environmental Components
Note that switched traffic is not addressed by the security requirements of the claimed Protection Profile
so the only use of data plane interfaces was to perform in-band management of the TOE.
5.3 Assumptions
In order to ensure the product is capable of meeting its security requirements when deployed in its
evaluated configuration, the following conditions must be satisfied by the organization, as defined in the
claimed Protection Profile:
No general purpose computing capabilities: The 8700 product must only be used for its
intended purpose. General purpose computing applications, especially those with network-visible
interfaces, may compromise the security of the product if introduced.
Physical security: The Ciena 8700 product does not claim any sort of physical tamper-evident or
tamper-resistant security mechanisms. Therefore, it is necessary to deploy the product in a locked
or otherwise physically secured environment so that it is not subject to untrusted physical
modification.
Trusted administration: The Ciena 8700 product does not provide a mechanism to protect
against the threat of a rogue or otherwise malicious administrator. Therefore, it is the
responsibility of the organization to perform appropriate vetting and training for security
administrators prior to granting them the ability to manage the product. Additionally, it is
assumed that any administrative credentials maintained by an environmental RADIUS server are
secured in order to mitigate the risk of impersonation
No through traffic protection: The security boundary of the Common Criteria evaluation is
limited to traffic flowing to or from the TOE. Through traffic is tested only tested to the extent
that the data plane interface was fuzzed to ensure that malformed traffic would not adversely
affect the security boundary. The Ciena 8700 is expected to be deployed in an environment where
appropriate network architecture and boundary protection is employed to mitigate the threat of
malicious traffic being transmitted through the device via the data plane.
Regular updates: Ciena provides regular product updates for the 8700 product that include bug
fixes as well as functionality and security enhancements. It is expected that administrators are
reasonably diligent in ensuring that software patches are applied regularly as they are made
available.

6 | P a g e
6 Secure Acceptance, Installation, and Configuration
Documentation for how to order and acquire the TOE is described in the Ordering section of [9]. This
section also lists the physical part numbers that are associated with each model. When receiving delivery
of a TOE model, this documentation should be checked as part of the acceptance procedures so that the
correctness of the hardware can be verified. Additionally, [9] can be referenced for physical requirements
such as power and environmental operating conditions in order to minimize the risk of compromise of
TOE functionality due to an improper physical environment.
Physical installation and first-time setup of the TOE can be accomplished by following the steps outlined
in [5], depending on the model. Regardless of the specific device being installed, the SAOS software is
functionally identical so secure management for each device is described in the remainder of this
document. Note that these steps can be performed using the initial default user account.
Note: in order to support the Common Criteria evaluated functionality, it is necessary to acquire an
Advanced Security license. Information about this license can be found in [8].
Once the TOE is physically installed, it is recommended that an administrator acquire a software image
from Ciena and perform a software upgrade to the known version. Depending on when the device was
manufactured, it may have a different software version initially installed on it. To install the new software
image, perform the following steps:
1. Place the software image on an SFTP server in the environment that can be reached by the 8700
device.
2. Connect to the serial port (CONSOLE) on ctx1 and open a connection to the device over Telnet.
3. Authenticate to the device as the default account su//wwp.
4. Enter “configuration reset-to-factory-defaults” to perform a factory reset.
5. Wait approximately 5-10 minutes.
6. After this has occurred, log back in using the same default account as step 2.
7. Follow Procedure 13-7 in [5] to set the IP address for the remote interface using the following
command (substituting IP address and prefix as needed):
interface set interface active ip 10.41.71.101/24
8. Apply the Advanced Security license using the following command, substituting <license> with
your 14-character license:
software license install license-key <license>
9. Perform the following steps to enable outbound SFTP client communications.
system xftp set sftp-server <ip address> login-id <username> echoless-password <password>
Note that if the SFTP server is configured to use public key authentication the command “ssh
server key install user <user> sftp-server <ip address> login-id <user> echoless-password
<password>” will be entered before this.
10. Install the package using the following command:
software install package-path <path> default-sftp-server start now

7 | P a g e
11. Enter the software show command to view the installed package. It will be identified as ‘good’ in
the status column.
12. Enter the following command to apply the update:
software forced-upgrade package <package name from step 11> start now
Upon the startup of the TOE, multiple Power-On Self Tests (POSTs) are run. The POSTs provide
environmental monitoring of the TOE’s components, in which early warnings can prevent whole
component failure. The following self-tests are performed:
Software integrity: hashed and validated against a known SHA-256 value which in storage that
can only be modified when a software update is performed.
Cryptographic module integrity: the cryptographic algorithm implementation is run through
known answer tests to ensure they are operating properly.
Hardware integrity: the field-programmable gate arrays (FPGAs) and data plane hardware are
tested for correct operation.
In the event that a self-test fails, the TOE will automatically reboot. If the TSF has been corrupted or the
hardware has failed such that rebooting will not resolve the issue, an administrator (Admin or Super) will
need to factory reset the TOE and/or replace the failed hardware component.
Once the TOE has fully booted, follow the steps in section 7.3 of this guide to change the password of the
default user account. Now verify the version of software operating on the TOE by issuing a “system
show” command and compare the displayed version to the expected version. If the version is not what is
expected then follow the instructions in section 7.8 of this guide to obtain and install the correct software
image from Ciena.
Note that the syntax ‘config save’ and ‘configuration save’ are used interchangeably in the reference
documentation. These are parsed by the TOE as identical and equivalent commands.
6.1 Enable Logging
In the evaluated configuration, all auditable events are logged by entering the following commands:
1. command-log enable
2. logging add filter default severity all
3. logging enable destination flash
4. system security log enable event-id 0x1B000A
The security, event, and command logs are all stored locally on the device. Each log holds a maximum
number of log entries and rolls over to a new file when that number is exceeded. Each log has a certain
number of files in its rotation, after which point the original file is overwritten because the audit storage is
exhausted. The maximum quantity and size for each log file is as follows:
Security Log: up to 4 historical files with up to 5,000 entries per file
Event Log: up to 4 historical files with up to 10,000 entries per file
Command Log: up to 5 historical files with up to 2,500 entries per file

8 | P a g e
This is not configurable. By default, only an administrator with the Super role can manually delete audit
logs. This is done by navigating to the ‘log’ directory and using the rm command on the desired log
file(s).
6.2 Set up the SSH Server
To enable the SSH server for secure remote administration, enter the following commands:
1. ssh server key generate
2. ssh server enable
3. ssh server show
4. configuration save
If support for X.509 host key authentication is desired:
Create a config file on an external SFTP server with the subject name for the device. For example:
[ req ]
distinguished_name = req_distinguished_name
prompt = no
[ req_distinguished_name ]
C = US
ST = Maryland
L = Hanover
O = YourCompany
OU = YourDepartment
CN = 8700SSHServer
Download the certificate configuration file from the SFTP server and generate a certificate signing
request (CSR). The CSR is uploaded to the FTP server as < config file >.csr.
8700*> ssh server certificate csr generate sftp-server <ip address> filename <config file> login-id <sftp user> echoless-password
Sign and install the certificate. Signing is done outside the 8700 by a Certificate Authority. Place the
signed certificate in PEM format on the external SFTP sever, then install it as the 8700 SFTP server host
certificate.
ssh server certificate install sftp-server <ip address> filename <host-
certificate> login-id <sftp user> echoless-password
To restrict the SSH server to ONLY offer the X.509 certificate based host key.
ssh server set x509-host-key only
If support for user public key authentication is desired, generate a public key file in the environment, save
it as <user>.pub, and place in the root directory of an SFTP server that can be reached by the 8700. Then,
execute the following command and then enter the SFTP password when prompted:
9 | P a g e
ssh server key install user <user> sftp-server <ip address> login-id <sftp
user> echoless-password
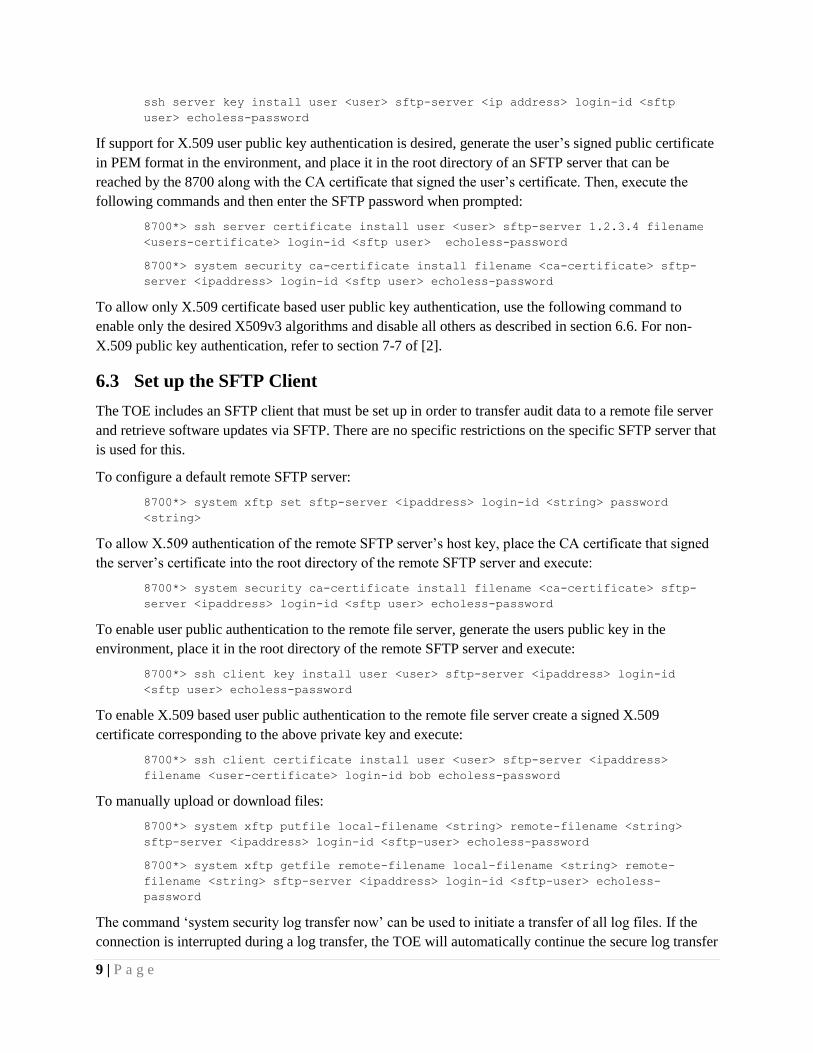
If support for X.509 user public key authentication is desired, generate the user’s signed public certificate
in PEM format in the environment, and place it in the root directory of an SFTP server that can be
reached by the 8700 along with the CA certificate that signed the user’s certificate. Then, execute the
following commands and then enter the SFTP password when prompted:
8700*> ssh server certificate install user <user> sftp-server 1.2.3.4 filename
<users-certificate> login-id <sftp user> echoless-password
8700*> system security ca-certificate install filename <ca-certificate> sftp-
server <ipaddress> login-id <sftp user> echoless-password
To allow only X.509 certificate based user public key authentication, use the following command to
enable only the desired X509v3 algorithms and disable all others as described in section 6.6. For non-
X.509 public key authentication, refer to section 7-7 of [2].
6.3 Set up the SFTP Client
The TOE includes an SFTP client that must be set up in order to transfer audit data to a remote file server
and retrieve software updates via SFTP. There are no specific restrictions on the specific SFTP server that
is used for this.
To configure a default remote SFTP server:
8700*> system xftp set sftp-server <ipaddress> login-id <string> password
<string>
To allow X.509 authentication of the remote SFTP server’s host key, place the CA certificate that signed
the server’s certificate into the root directory of the remote SFTP server and execute:
8700*> system security ca-certificate install filename <ca-certificate> sftp-
server <ipaddress> login-id <sftp user> echoless-password
To enable user public authentication to the remote file server, generate the users public key in the
environment, place it in the root directory of the remote SFTP server and execute:
8700*> ssh client key install user <user> sftp-server <ipaddress> login-id
<sftp user> echoless-password
To enable X.509 based user public authentication to the remote file server create a signed X.509
certificate corresponding to the above private key and execute:
8700*> ssh client certificate install user <user> sftp-server <ipaddress>
filename <user-certificate> login-id bob echoless-password
To manually upload or download files:
8700*> system xftp putfile local-filename <string> remote-filename <string>
sftp-server <ipaddress> login-id <sftp-user> echoless-password
8700*> system xftp getfile remote-filename local-filename <string> remote-
filename <string> sftp-server <ipaddress> login-id <sftp-user> echoless-
password
The command ‘system security log transfer now’ can be used to initiate a transfer of all log files. If the
connection is interrupted during a log transfer, the TOE will automatically continue the secure log transfer

10 | P a g e
over SSH once the connection is re-established. Alternatively, an automatic transfer can be set up via the
following commands:
For the security log:
1. system security log transfer enable
2. system security log transfer set sftp-server <IP address> login-id <username> echoless-password
3. system security log transfer set interval <time> (e.g. 1h, 5m)
For the event log:
1. logging transfer enable
2. logging transfer set sftp-server <IP address> login-id <username> echoless-password
3. logging transfer set interval <time>
For the command log:
1. command-log transfer enable
2. command-log transfer set sftp-server <IP address> login-id <username> echoless-password
3. command-log transfer set interval <time>
Note that this requires that the other end of the connection be a network-accessible SFTP server running
on port 22 and that it is configured to support the SSH configuration. In all cases, the data that is
transmitted is a duplicate of what is retained internally. Therefore, any communications outage with the
SFTP server is not likely to result in the loss of audit data because the entire locally-stored audit trail will
be transmitted each time. No special action needs to be performed during a communications outage;
unencrypted information will not be transmitted while the SFTP server is unavailable and transmissions
will resume during the next scheduled period.
6.4 Set up Syslog In addition to the SFTP auditing functionality, the TOE provides a syslog interface for remote
transmission of audit log data. In the evaluated configuration, this interface is secured using TLS. Note
that since syslog functions in a streaming fashion, a sustained communications outage will result in audit
data being lost. The TOE provides a small buffer for syslog data but this only ensures availability of audit
data for any delays in establishing or maintaining TLS. No special action needs to be taken in the event of
a communications outage; no data will be transmitted without encryption and transmissions will
automatically resume once communications have been re-established.
The following steps must be performed in order to enable secure syslog:
1. syslog tls enable
2. syslog tls enable collector <ip address of syslog server>
To use syslog TLS, a private key must be created and an X.509 certificate must be signed and installed.
Create a config file on an external SFTP server with the subject name for the device certificate for
example:
[ req ]
distinguished_name = req_distinguished_name
prompt = no

11 | P a g e
[ req_distinguished_name ]
C = US
ST = Maryland
L = Hanover
O = YourCompany
OU = YourDepartment
CN = SyslogTlsClient
emailAddress = [email protected]
To create a private key and generate a certificate signing request:
8700*> syslog tls certificate csr generate sftp-server <ipAddress> filename
<file> login-id <sftp-user> echoless-password
This creates a private key, downloads the certificate configuration file from the sftp server and generates a
certificate signing request (CSR). The CSR is then uploaded to the ftp server as <file>.csr.
Sign the certificate in the environment and put the certificate file on the SFTP server as well as a copy of
the CA certificate that signed the remote syslog TLS server’s certificate.
Install the certificates with:
8700*> syslog tls certificate install ftp-server <ipAddress> filename
<syslogTls-certificate> certificate-only login-id <sftp-user> echoless-password
8700*> system security ca-certificate install filename <ca-certificate> sftp-
server <ipaddress> login-id <sftp user> echoless-password
6.5 Enable FIPS Mode
Enabling FIPS mode allows the TOE to use only approved cipher suites for SSH communications and to
perform cryptographic self-tests on system startup. Note that when this mode is enabled, if any self-test
fails during system startup, the system will not become operational. If this happens, the system is
unusable and will have to be recovered and reloaded.
FIPS mode is enabled using the following commands:
1. system security set encryption-mode fips-140-2
2. configuration save
3. chassis restart
Note: The TOE must be run in the FIPS mode of operation. The use of the cryptographic engine in any
other mode was not evaluated nor tested during the CC evaluation of the TOE.
6.6 Configuring SSH Algorithms
The specific algorithms allowed by SSH in the evaluated configuration need to be enabled and the others
disabled, otherwise users can log in with the wrong algorithms. The following SSH algorithms are
supported in the evaluated configuration:

12 | P a g e
Key Exchange: ecdh-sha2-nistp256, ecdh-sha2-nistp384 (server only), ecdh-sha2-nistp521
(server only)
Encryption: aes128-cbc, aes256-cbc
MAC: hmac-sha1, hmac-sha2-256, hmac-sha2-512
Public Key Authentication: ssh-rsa, ecdsa-sha2-nistp256, ecdsa-sha2-nistp384, x509v3-ecdsa-
sha2-nistp256, x509v3-ecdsa-sha2-nistp384
While the 8700 product supports several other cryptographic algorithms in support of SSH
communications, these were not within the scope of the Security Target so they were not evaluated or
tested during the CC testing for the product.
Disabling Algorithms for SSH:
The following show command provides information on the various SSH algorithms supports for SSH.
They include key-exchange, encryption, mac and public key authentication algorithms.
8700*> ssh server algorithm show
+------------------- SSH SERVER KEX ALGORITHM CONFIGURATION -------------------+
| Algorithm Name | Priority | Admin State | Oper State |
+----------------------------------------+----------+-------------+------------+
| [email protected] | 1 | Disabled | Disabled |
| ecdh-sha2-nistp256 | 2 | Enabled | Enabled |
| ecdh-sha2-nistp384 | 3 | Enabled | Enabled |
| ecdh-sha2-nistp521 | 4 | Enabled | Enabled |
| diffie-hellman-group-exchange-sha256 | 5 | Disabled | Disabled |
| diffie-hellman-group-exchange-sha1 | 6 | Disabled | Disabled |
| diffie-hellman-group14-sha1 | 7 | Enabled | Enabled |
| diffie-hellman-group1-sha1 | 8 | Disabled | Disabled |
+----------------------------------------+----------+-------------+------------+
--------------- SSH SERVER ENCRYPTION ALGORITHM CONFIGURATION ----------------+
| Algorithm Name | Priority | Admin State | Oper State |
+----------------------------------------+----------+-------------+------------+
| aes128-ctr | 1 | Disabled | Disabled |
| aes192-ctr | 2 | Disabled | Disabled |
| aes256-ctr | 3 | Disabled | Disabled |
| arcfour256 | 4 | Disabled | Disabled |
| arcfour128 | 5 | Disabled | Disabled |
| [email protected] | 6 | Disabled | Disabled |
| [email protected] | 7 | Disabled | Disabled |
| [email protected] | 8 | Disabled | Disabled |
| aes128-cbc | 9 | Enabled | Enabled |
| 3des-cbc | 10 | Disabled | Disabled |
| blowfish-cbc | 11 | Disabled | Disabled |
| cast128-cbc | 12 | Disabled | Disabled |
| aes192-cbc | 13 | Disabled | Disabled |
| aes256-cbc | 14 | Enabled | Enabled |
| arcfour | 15 | Disabled | Disabled |
| [email protected] | 16 | Disabled | Disabled |
+----------------------------------------+----------+-------------+------------+
+------------------- SSH SERVER MAC ALGORITHM CONFIGURATION -------------------+
| Algorithm Name | Priority | Admin State | Oper State |
+----------------------------------------+----------+-------------+------------+
| [email protected] | 1 | Disabled | Disabled |
| [email protected] | 2 | Disabled | Disabled |
| [email protected] | 3 | Disabled | Disabled |

13 | P a g e
| [email protected] | 4 | Disabled | Disabled |
| [email protected] | 5 | Disabled | Disabled |
| [email protected] | 6 | Disabled | Disabled |
| [email protected] | 7 | Disabled | Disabled |
| [email protected] | 8 | Disabled | Disabled |
| [email protected] | 9 | Disabled | Disabled |
| hmac-md5 | 10 | Disabled | Disabled |
| hmac-sha1 | 11 | Enabled | Enabled |
| [email protected] | 12 | Disabled | Disabled |
| [email protected] | 13 | Disabled | Disabled |
| hmac-sha2-256 | 14 | Enabled | Enabled |
| hmac-sha2-512 | 15 | Disabled | Disabled |
| hmac-ripemd160 | 16 | Disabled | Disabled |
| [email protected] | 17 | Disabled | Disabled |
| hmac-sha1-96 | 18 | Disabled | Disabled |
| hmac-md5-96 | 19 | Disabled | Disabled |
+----------------------------------------+----------+-------------+------------+
+-------- SSH SERVER PUBLIC-KEY-AUTHENTICATION ALGORITHM CONFIGURATION --------+
| Algorithm Name | Admin State | Oper State |
+---------------------------------------------------+-------------+------------+
| ssh-dss | Disabled | Disabled |
| ssh-rsa | Enabled | Enabled |
| ssh-ed25519 | Disabled | Disabled |
| ecdsa-sha2-nistp256 | Disabled | Disabled |
| ecdsa-sha2-nistp384 | Enabled | Enabled |
| ecdsa-sha2-nistp521 | Enabled | Enabled |
| x509v3-sign-rsa | Disabled | Disabled |
| x509v3-sign-dss | Disabled | Disabled |
| x509v3-ecdsa-sha2-nistp256 | Disabled | Disabled |
| x509v3-ecdsa-sha2-nistp384 | Enabled | Enabled |
| x509v3-ecdsa-sha2-nistp521 | Enabled | Enabled |
+---------------------------------------------------+-------------+------------+
When FIPS mode is enabled, some of these are automatically disabled. Others need to be enabled or
disabled manually in order to conform to the evaluated configuration defined in [10].
To enable/disable selected algorithms for the SSH server, the commands below can be used.
Configuration of the SSH client uses the same syntax except that ‘client’ is used instead of ‘server’ in all
cases.
Note that these commands represent sample syntax used to enable/disable arbitrarily chosen ciphers;
consult [10] and any site-specific security policies you may have to use these commands to configure the
product in a manner that is appropriate for your environment.
Enable/Disable Key Exchange Algorithms
Disabling Key-Exchange Algorithms
8700*> ssh server algorithm kex disable algorithm <TAB>
diffie-hellman-group-exchange-sha1
diffie-hellman-group-exchange-sha256
diffie-hellman-group1-sha1
diffie-hellman-group14-sha1
ecdh-sha2-nistp256
ecdh-sha2-nistp384
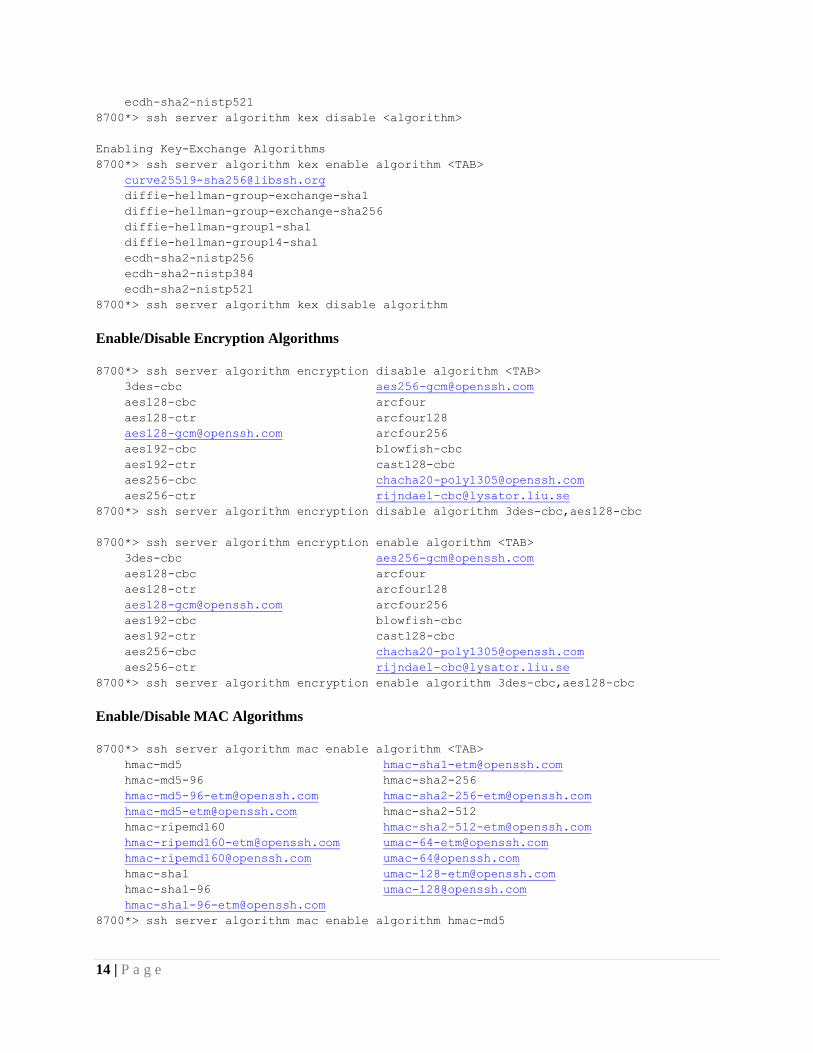
14 | P a g e
ecdh-sha2-nistp521
8700*> ssh server algorithm kex disable <algorithm>
Enabling Key-Exchange Algorithms
8700*> ssh server algorithm kex enable algorithm <TAB>
diffie-hellman-group-exchange-sha1
diffie-hellman-group-exchange-sha256
diffie-hellman-group1-sha1
diffie-hellman-group14-sha1
ecdh-sha2-nistp256
ecdh-sha2-nistp384
ecdh-sha2-nistp521
8700*> ssh server algorithm kex disable algorithm
Enable/Disable Encryption Algorithms
8700*> ssh server algorithm encryption disable algorithm <TAB>
3des-cbc [email protected]
aes128-cbc arcfour
aes128-ctr arcfour128
[email protected] arcfour256
aes192-cbc blowfish-cbc
aes192-ctr cast128-cbc
aes256-cbc [email protected]
aes256-ctr [email protected]
8700*> ssh server algorithm encryption disable algorithm 3des-cbc,aes128-cbc
8700*> ssh server algorithm encryption enable algorithm <TAB>
3des-cbc [email protected]
aes128-cbc arcfour
aes128-ctr arcfour128
[email protected] arcfour256
aes192-cbc blowfish-cbc
aes192-ctr cast128-cbc
aes256-cbc [email protected]
aes256-ctr [email protected]
8700*> ssh server algorithm encryption enable algorithm 3des-cbc,aes128-cbc
Enable/Disable MAC Algorithms
8700*> ssh server algorithm mac enable algorithm <TAB>
hmac-md5 [email protected]
hmac-md5-96 hmac-sha2-256
[email protected] [email protected]
[email protected] hmac-sha2-512
hmac-ripemd160 [email protected]
[email protected] [email protected]
[email protected] [email protected]
hmac-sha1 [email protected]
hmac-sha1-96 [email protected]
8700*> ssh server algorithm mac enable algorithm hmac-md5
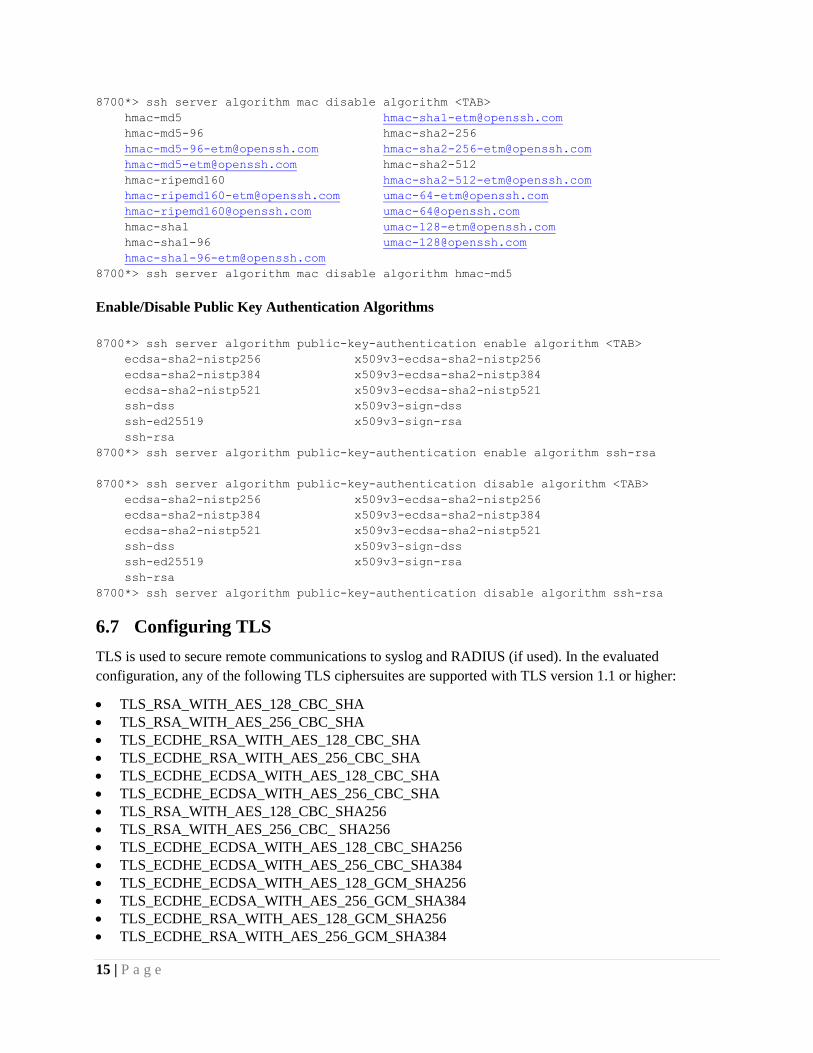
15 | P a g e
8700*> ssh server algorithm mac disable algorithm <TAB>
hmac-md5 [email protected]
hmac-md5-96 hmac-sha2-256
[email protected] [email protected]
[email protected] hmac-sha2-512
hmac-ripemd160 [email protected]
[email protected] [email protected]
[email protected] [email protected]
hmac-sha1 [email protected]
hmac-sha1-96 [email protected]
8700*> ssh server algorithm mac disable algorithm hmac-md5
Enable/Disable Public Key Authentication Algorithms
8700*> ssh server algorithm public-key-authentication enable algorithm <TAB>
ecdsa-sha2-nistp256 x509v3-ecdsa-sha2-nistp256
ecdsa-sha2-nistp384 x509v3-ecdsa-sha2-nistp384
ecdsa-sha2-nistp521 x509v3-ecdsa-sha2-nistp521
ssh-dss x509v3-sign-dss
ssh-ed25519 x509v3-sign-rsa
ssh-rsa
8700*> ssh server algorithm public-key-authentication enable algorithm ssh-rsa
8700*> ssh server algorithm public-key-authentication disable algorithm <TAB>
ecdsa-sha2-nistp256 x509v3-ecdsa-sha2-nistp256
ecdsa-sha2-nistp384 x509v3-ecdsa-sha2-nistp384
ecdsa-sha2-nistp521 x509v3-ecdsa-sha2-nistp521
ssh-dss x509v3-sign-dss
ssh-ed25519 x509v3-sign-rsa
ssh-rsa
8700*> ssh server algorithm public-key-authentication disable algorithm ssh-rsa
6.7 Configuring TLS
TLS is used to secure remote communications to syslog and RADIUS (if used). In the evaluated
configuration, any of the following TLS ciphersuites are supported with TLS version 1.1 or higher:
TLS_RSA_WITH_AES_128_CBC_SHA
TLS_RSA_WITH_AES_256_CBC_SHA
TLS_ECDHE_RSA_WITH_AES_128_CBC_SHA
TLS_ECDHE_RSA_WITH_AES_256_CBC_SHA
TLS_ECDHE_ECDSA_WITH_AES_128_CBC_SHA
TLS_ECDHE_ECDSA_WITH_AES_256_CBC_SHA
TLS_RSA_WITH_AES_128_CBC_SHA256
TLS_RSA_WITH_AES_256_CBC_ SHA256
TLS_ECDHE_ECDSA_WITH_AES_128_CBC_SHA256
TLS_ECDHE_ECDSA_WITH_AES_256_CBC_SHA384
TLS_ECDHE_ECDSA_WITH_AES_128_GCM_SHA256
TLS_ECDHE_ECDSA_WITH_AES_256_GCM_SHA384
TLS_ECDHE_RSA_WITH_AES_128_GCM_SHA256
TLS_ECDHE_RSA_WITH_AES_256_GCM_SHA384
16 | P a g e
In addition to this, the only elliptic curves that may be used in the evaluated configuration are secp256k1,
secp384r1, and secp512r1.
TLS ciphersuites and elliptic curves can be enabled, disabled, and prioritized with the following
commands:
For RADIUS:
1. radsec set minimum tls-version TLSv1.1
2. radsec algorithm cipher-suite [enable | disable] cipher-suite <ciphersuite>
3. radsec algorithm cipher-suite set cipher-suite <ciphersuite> priority <n>
4. radsec algorithm [enable | disable] elliptic-curve <curve>
For syslog:
1. syslog tls set minimum tls-version TLSv1.1
2. syslog tls algorithm cipher-suite [enable | disable] cipher-suite <ciphersuite>
3. syslog tls algorithm cipher-suite set cipher-suite <ciphersuite> priority <n>
4. syslog tls algorithm [enable | disable] elliptic-curve <curve>
Reference identifiers for server certificates can be set to Common Name or Subject Alternative Name.
Instructions and examples for this are shown throughout section 7 of [2].
6.8 Configuring OCSP
In the evaluated configuration, the TOE is expected to use an OCSP responder to check certificate
revocation status. The commands to enable and configure OCSP are the same for each logical interface
that uses it. Listed below are sample commands to set up OCSP for the security-relevant interfaces for the
TOE:
8700*> radsec ocsp enable
8700*> radsec ocsp set default-responder <http-url>
8700*> ssh client ocsp enable
8700*> ssh client ocsp set default-responder <http-url>
8700*> ssh server ocsp enable
8700*> ssh server ocsp set default-responder <http-url>
8700*> syslog tls ocsp enable
8700*> syslog tls ocsp set default-responder <http-url>
6.9 Set up the RADIUS Server over TLS (Optional)
In the evaluated configuration, a RADIUS server may be used as a method for administrator
authentication instead of locally-defined usernames and passwords. If a RADIUS server is used, the

17 | P a g e
communications must be secured using TLS as described in the previous section. The following steps
must be performed in order to enable this interface:
1. radsec enable
2. radsec set secret <string>
3. radsec add server <ip address>
4. radsec show
5. configuration save
To use RadSec, a private key must be created and an X.509 certificate must be signed and installed.
Create a config file on an external sftp server with the subject name for the device certificate, for
example:
[ req ]
distinguished_name = req_distinguished_name
prompt = no
[ req_distinguished_name ]
C = US
ST = Maryland
L = Hanover
O = YourCompany
OU = YourDepartment
CN = RadSecClient
emailAddress = [email protected]
To create a private key and generate a certificate signing request:
8700*> radsec certificate csr generate sftp-server <ipAddress> filename <file>
login-id <sftp-user> echoless-password
This creates a private key, downloads the certificate configuration file from the sftp server and generates a
certificate signing request (CSR). The CSR is then uploaded to the ftp server as <file>.csr.
Sign the certificate in the environment and put the certificate file on the SFTP server as well as a copy of
the CA certificate that signed the remote RADIUS TLS server’s certificate.
Install the certificates with:
8700*> radsec certificate install ftp-server <ipAddress> filename <radius-
certificate> certificate-only login-id <sftp-user> echoless-password
8700*> system security ca-certificate install filename <ca-certificate> sftp-
server <ipaddress> login-id <sftp user> echoless-password
If the RADIUS server cannot be reached, it cannot be used to perform authentication. To ensure
availability, the ‘user auth set’ command should be used to specify local authentication as a fallback
mechanism. This behavior is described in section 7 of [2].

18 | P a g e
6.10 In-Band Management Configuration (Optional)
If desired for network architecture purposes, it is possible to configure one or more data plane interfaces
to direct traffic to the management plane of the TOE for remote administration. This is known as in-band
management. This section describes the steps that are necessary to perform in order to enable remote
administration on these systems using a representative example that makes the following assumptions:
DHCP is not used to obtain an IP address for the remote interface.
By default there is no remote interface. It must be created, associated with a virtual-switch and
given an IP address.
Ensure DHCP is disabled. 8700*> dhcp client disable
Create/configure the remote management interface. Note that this does not include an optional vlan tag. 8700*> virtual-switch create vs mgmtVs
8700*> interface create ip-interface mngtIf3_3 ip <IP> vs mgmtVs
8700*> cpu-interface sub-interface create cpu-subinterface mgmtCpu
8700*> sub-port create sub-port spMgmt3_3 parent-port <port> classifier-
precedence 2
8700*> sub-port add sub-port spMgmt3_3 class-element 1 vlan-untagged-data
8700*> virtual-switch interface attach sub-port spMgmt3_3 vs mgmtVs
8700*> virtual-switch interface attach cpu-subinterface mgmtCpu vs mgmtVs
Note that you can change the IPv4 gateway in the same command line as the IP address to avoid loss of
connectivity due to mismatch between IP and gateway. If you specified a gateway IP address in the
previous command, skip to the last step.
Configure a default gateway. 8700*> interface set gateway <IpAddress>
Validate that your changes were made. 8700*> interface show ip-interface mngtIf3_3
8700*> cpu-interface sub-interface show cpu-subinterface mgmtCpu
Save and complete the process. 8700*> configuration save
7 Secure Management of the TOE
The following sections provide information on managing TOE functionality that is relevant to the claimed
Protection Profile. Note that this information is largely derived from [3] and [4] but summarized here to
discuss only actions that are required as part of the ‘evaluated configuration’. The administrator is
encouraged to reference these documents in full in order to have in-depth awareness of the security
functionality of the 8700 product, including functions that may be beyond the scope of this evaluation.
7.1 Authenticating to the TOE
Users must authenticate to the TOE in order to perform any management functions.
19 | P a g e
Local users log in to the command line interface (CLI) using username and password, while remote users
can log in via the CLI using username and either password or SSH public key. This username and
password data may be defined either on the Ciena 8700 device itself or on an environmental RADIUS
server. User authentication information that is sent remotely via the CLI is protected using SSHv2.
Section 6-1 of [2] provides instructions for connecting to the TOE using Telnet. In the evaluated
configuration, telnet for remote access must be disabled in favor of SSH. To connect to the TOE over
SSH, the administrator must make sure the SSH server is configured as per section 6.2 of this document.
The administrator can connect using a valid username/password or can connect using public key-based
authentication by performing the steps outlined in that section.
Note that the TOE has user-based authentication but administrative privileges are derived from assigned
roles. Only a user with Super level privileges can manage other users. The following are the three roles
supported by the TOE:
Super: Accounts in this group are for use in managing secure access to the switch through
creation, deletion, and modification of user accounts. Although users in this group can also make
significant system state changes, modify the configuration, and perform execute commands, the
primary purpose of this group is user account maintenance.
Admin: Accounts in this group are for use in making significant system state changes, modifying
the system configuration, and performing execute commands.
Limited: Accounts in this group are used primarily in system monitoring and in the gathering of
information about the configuration and performance of the system. A restricted command set
protects user accounts in this group from changing the state of the system in a significant way or
changing the system configuration.
7.2 User Lockout
By default, the TOE does not lock out a user for an idle interactive session unless configured to do so. In
the evaluated configuration, this is enabled and set to the desired length of time by using the following
commands (Admin or Super level privileges required):
system shell set global-inactivity-timer on
system shell set global-inactivity-timeout <number of minutes>
7.3 Managing Users
Users can be created with the following command:
user create user <username> access-level <limited|admin|super> echoless-password
The CLI will collect the password in an interactive prompt after this command is entered. This prevents
password data from being displayed in the command log.
A user can be edited using the ‘user set’ command, which uses the same syntax as the ‘user create’
command described above. A user can be displayed or deleted using the commands ‘user show user
<username>’ and ‘user delete user <username>’, respectively.

20 | P a g e
Note that manipulation of user data requires the Super level privilege, but any user with Limited, Admin,
or Super privilege can view the attributes of another user (minus password-related data).
7.4 Password Management
Passwords can be composed using any combination of upper case and lower case letters, numbers and
special characters. The special characters that are supported include the following: “!”, “@”, “#”, “$”,
“%”, “^”, “&”, “*”, “(“, and “)”.
The password policy includes a configurable minimum length, which can be configured by an
administrator with Super level privileges to any value between 15 and 128 and in the evaluated
configuration. The minimum password length can be set using the command ‘user password-policy set
min-length <value>’. 128 characters is the maximum length for any password. In order to minimize the
risk of account compromise, it is recommended to use a password that includes a mixture of uppercase,
lowercase, numeric, and special characters and is not a common word or phrase, but is not so complex
that it must be written down in order to be remembered.
7.5 Login Banner
The login banner is created by using the banner command:
system shell banner create banner login line <banner text>
The banner text can be deleted or edited using the same command as above with ‘delete banner’ and ‘edit
banner’, respectively, substituted for ‘create banner’. Note that if the ‘edit banner’ command is used, the
banner will only be edited for the specific interface from which the command was initiated. This can be
used if, for example, it is desired to use separate banners for local versus remote access. If synchronized
changes are desired, it is recommended to delete and then re-create the banner. Super level privileges are
required to perform these operations.
7.6 Session Termination
7.6.1 Admin Logout
An administrator can manually log out at any time by entering the ‘exit’ command. Note that if the
administrator is currently navigating a sub-menu, the ‘quit’ command will bring them up one level to the
previous menu. It may therefore be necessary to issue the ‘quit’ command multiple times before issuing
the ‘exit’ command to close the session.
7.6.2 Termination from Inactivity
Refer to section 7.2 above.
7.7 System Time Configuration
In the evaluated configuration of the TOE, the system time is expected to be manually. Admin or Super
level privileges are required to perform these operations. To set the time manually, the following
command is used:

21 | P a g e
system set [date <yyyy-mm-dd>|<yy-mm-dd>|<mm-dd>] [time <hh:mm:ss>|<hh:mm>] [time-offset
<SECONDS: -43200..50400>] [timestamp <local|UTC>]
This allows the date and time to be set as well as the UTC offset (in seconds) and whether or not the
offset should be applied in audit log timestamps.
7.8 Secure Updates
To maintain security throughout the lifecycle of the 8700 product, the TOE provides a mechanism to
apply software upgrades. The current version of the software can be displayed at any time using the
‘software show’ command. To upgrade the software, the new software image must be acquired from
Ciena and placed on an SFTP server in the environment. An administrator with Admin or Super level
privileges can then use the ‘software upgrade’ command to retrieve the software image from the server.
Configuration of the SFTP client is described in section 6.8 of this document and the process for
upgrading the TOE software is described in Procedure 3-4 of [8]. The TOE ensures the integrity of Ciena
updates through the use of a 2048-bit RSA signature. An update will not be applied until the TOE checks
the validity of the update’s digital signature. If this validation fails, the update is aborted and the software
update is discarded automatically. Once the update is installed, the TOE must be rebooted in order for the
new software version to become active. The previously-installed version will continue as the running
version until this reboot occurs.
Note that to enable validity checking of the software update, the following command must be entered:
system security set software-signing mode on
8 Auditing
In order to be compliant with Common Criteria, the TOE must audit the events in the table below. The
audit records that the TOE creates include the date and time, outcome of the event, event type, subject
identity and the source of the event. The TOE maintains several different log files and audit interfaces:
syslog, security log, event log, and command log. The command log is simply a sequential record of all
commands entered into the TOE. More specific information about the event associated with each
command is included in the syslog, security log, and event log auditing. The entire list of individual
system events that are audited by the TOE can be found in [6]. Sample records of each security-relevant
auditable event are included below.
Auditable Event Location Sample Data
Failure to establish an SSH
session
Security Log 799: Wed Mar 29 17:07:45.497 2017 [local] P Sev:8 chassis(1):
:sshd[8787]: fatal: Unable to negotiate with 10.41.71.103: no
matching cipher found. Their offer: 3des-cbc [preauth]
858: Wed Mar 29 18:36:03.400 2017 [local] P Sev:8 chassis(1):
:sshd[5734]: fatal: Unable to negotiate with 10.41.71.103: no
matching host key type found. Their offer: ssh-dss [preauth]
1383: Thu Mar 30 15:16:48.349 2017 [local] P Sev:8 chassis(1):
:sshd[2506]: fatal: Unable to negotiate with 10.41.71.103: no
matching MAC found. Their offer: [preauth]
1167: Wed Mar 29 20:50:16.922 2017 [local] P Sev:8
chassis(1): :sshd[5764]: fatal: Unable to negotiate with

22 | P a g e
10.41.71.103: no matching key exchange method found. Their
offer: diffie-hellman-group1-sha1,ext-info-c [preauth]
Syslog Apr 11 13:48:05 ip6-localhost [Local] 10.41.71.101
2c:39:c1:b9:c8:00 8700 SSH-6-SSHD_LOG: chassis(1):
:sshd[5253]: fatal: Unable to negotiate with 10.41.71.103: no
matching cipher found. Their offer: 3des-cbc [preauth]
Apr 11 13:53:56 ip6-localhost [Local] 10.41.71.101
2c:39:c1:b9:c8:00 8700 SSH-6-SSHD_LOG: chassis(1):
:sshd[6935]: fatal: Unable to negotiate with 10.41.71.103: no
matching MAC found. Their offer: [preauth]
Apr 11 13:51:03 ip6-localhost [Local] 10.41.71.101
2c:39:c1:b9:c8:00 8700 SSH-6-SSHD_LOG: chassis(1):
:sshd[6083]: fatal: Unable to negotiate with 10.41.71.103: no
matching host key type found. Their offer: ssh-dss [preauth]
Apr 11 13:45:44 ip6-localhost [Local] 10.41.71.101
2c:39:c1:b9:c8:00 8700 SSH-6-SSHD_LOG: chassis(1):
:sshd[4584]: fatal: Unable to negotiate with 10.41.71.103: no
matching key exchange method found. Their offer: diffie-
hellman-group1-sha1,ext-info-c [preauth]
Failure to establish a TLS
session
Security Log
18580: Mon Apr 17 14:55:02.386 2017 [local] P Sev:8 radsec:
RadSec Error: Error during TLS connect : Connection refused.
Server: 10.41.71.110:2083
Syslog Apr 17 14:55:02 localhost [Local] 10.41.71.101
2c:39:c1:b9:c8:00 8700 RADSEC-6-T_L_S_ERROR: radsec:
RadSec Error: Error during TLS connect : Connection refused.
Server: 10.41.71.110:2083
285: Wed Apr 5 14:10:59.512 2017 [local] P Sev:8 chassis(1):
:SyslogTLS Error: Error during TLS connect : Connection
refused Dest: 10.41.71.100:6514
All uses of the
authentication mechanism
Security Log 118: Tue Dec 22 20:21:06.798 2015 [local] P Sev:8 chassis(1):
:sshd[3085]: Incoming connection from 10.41.71.103 port
64898 on 10.41.71.101 port 22
119: Tue Dec 22 20:21:11.116 2015 [local] P Sev:8 chassis(1):
:User successfully logged in from IP 10.41.71.103 user name
'su'
126: Tue Dec 22 20:24:08.260 2015 [local] P Sev:8 chassis(1):
:sshd[3946]: Incoming connection from 10.41.71.103 port
64933 on 10.41.71.101 port 22
127: Tue Dec 22 20:24:08.582 2015 [local] P Sev:6 chassis(1):
:User authentication failed from IP shell user name 'su'
128: Tue Dec 22 20:24:11.516 2015 [local] P Sev:8 chassis(1):
:sshd[3947]: Failed user authentication method, partial=0 next
methods="publickey,password,keyboard-interactive"
Syslog Apr 11 14:17:11 ip6-localhost [Local] 10.41.71.101
2c:39:c1:b9:c8:00 8700 SEC-6-LOGIN_ACCEPTED:
chassis(1): :User successfully logged in from IP 10.41.71.103
user name 'su'
Apr 11 14:23:05 ip6-localhost [Local] 10.41.71.101
2c:39:c1:b9:c8:00 8700 SEC-4-INTRUSION_DETECTION:
23 | P a g e
chassis(1): :User authentication failed from IP shell user name
'su'
Apr 11 14:25:43 ip6-localhost [Local] 10.41.71.101
2c:39:c1:b9:c8:00 8700 SEC-6-LOGIN_ACCEPTED:
chassis(1): :User successfully logged in from IP Console user
name 'su'
Apr 11 14:26:35 ip6-localhost [Local] 10.41.71.101
2c:39:c1:b9:c8:00 8700 SEC-4-INTRUSION_DETECTION:
chassis(1): :User authentication failed from IP ttyS0 user name
'su'
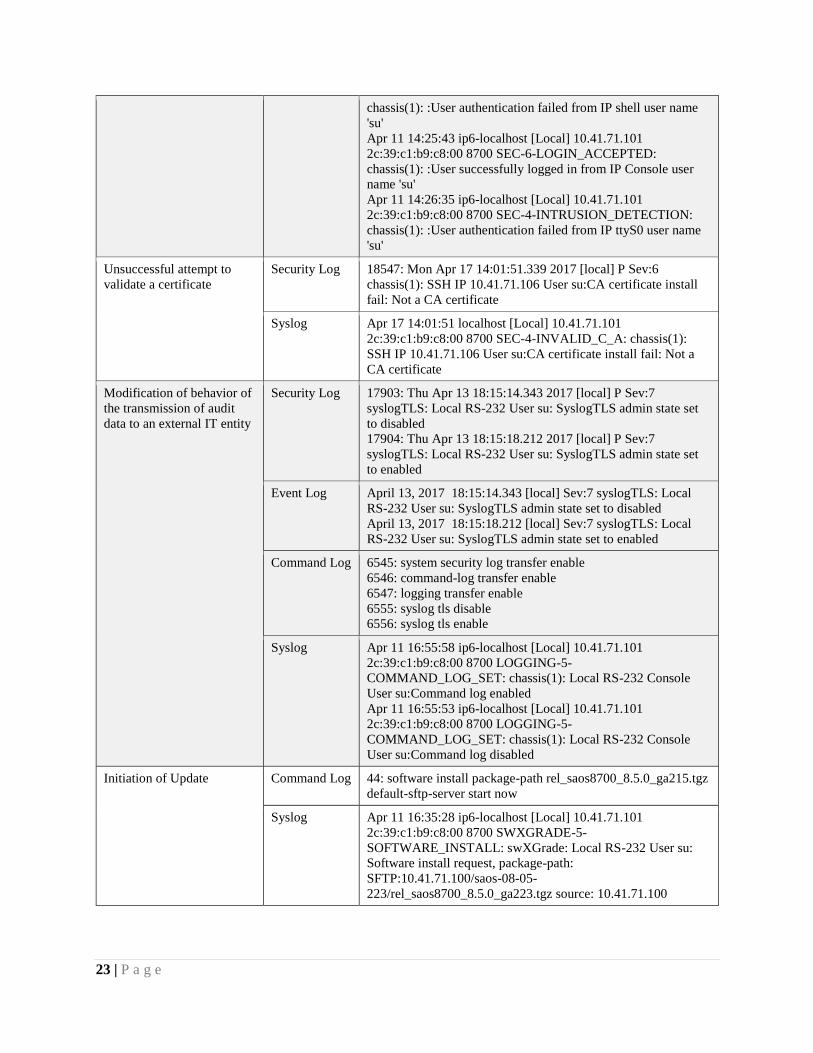
Unsuccessful attempt to
validate a certificate
Security Log 18547: Mon Apr 17 14:01:51.339 2017 [local] P Sev:6
chassis(1): SSH IP 10.41.71.106 User su:CA certificate install
fail: Not a CA certificate
Syslog Apr 17 14:01:51 localhost [Local] 10.41.71.101
2c:39:c1:b9:c8:00 8700 SEC-4-INVALID_C_A: chassis(1):
SSH IP 10.41.71.106 User su:CA certificate install fail: Not a
CA certificate
Modification of behavior of
the transmission of audit
data to an external IT entity
Security Log 17903: Thu Apr 13 18:15:14.343 2017 [local] P Sev:7
syslogTLS: Local RS-232 User su: SyslogTLS admin state set
to disabled
17904: Thu Apr 13 18:15:18.212 2017 [local] P Sev:7
syslogTLS: Local RS-232 User su: SyslogTLS admin state set
to enabled
Event Log April 13, 2017 18:15:14.343 [local] Sev:7 syslogTLS: Local
RS-232 User su: SyslogTLS admin state set to disabled
April 13, 2017 18:15:18.212 [local] Sev:7 syslogTLS: Local
RS-232 User su: SyslogTLS admin state set to enabled
Command Log 6545: system security log transfer enable
6546: command-log transfer enable
6547: logging transfer enable
6555: syslog tls disable
6556: syslog tls enable
Syslog Apr 11 16:55:58 ip6-localhost [Local] 10.41.71.101
2c:39:c1:b9:c8:00 8700 LOGGING-5-
COMMAND_LOG_SET: chassis(1): Local RS-232 Console
User su:Command log enabled
Apr 11 16:55:53 ip6-localhost [Local] 10.41.71.101
2c:39:c1:b9:c8:00 8700 LOGGING-5-
COMMAND_LOG_SET: chassis(1): Local RS-232 Console
User su:Command log disabled
Initiation of Update Command Log 44: software install package-path rel_saos8700_8.5.0_ga215.tgz
default-sftp-server start now
Syslog Apr 11 16:35:28 ip6-localhost [Local] 10.41.71.101
2c:39:c1:b9:c8:00 8700 SWXGRADE-5-
SOFTWARE_INSTALL: swXGrade: Local RS-232 User su:
Software install request, package-path:
SFTP:10.41.71.100/saos-08-05-
223/rel_saos8700_8.5.0_ga223.tgz source: 10.41.71.100
24 | P a g e
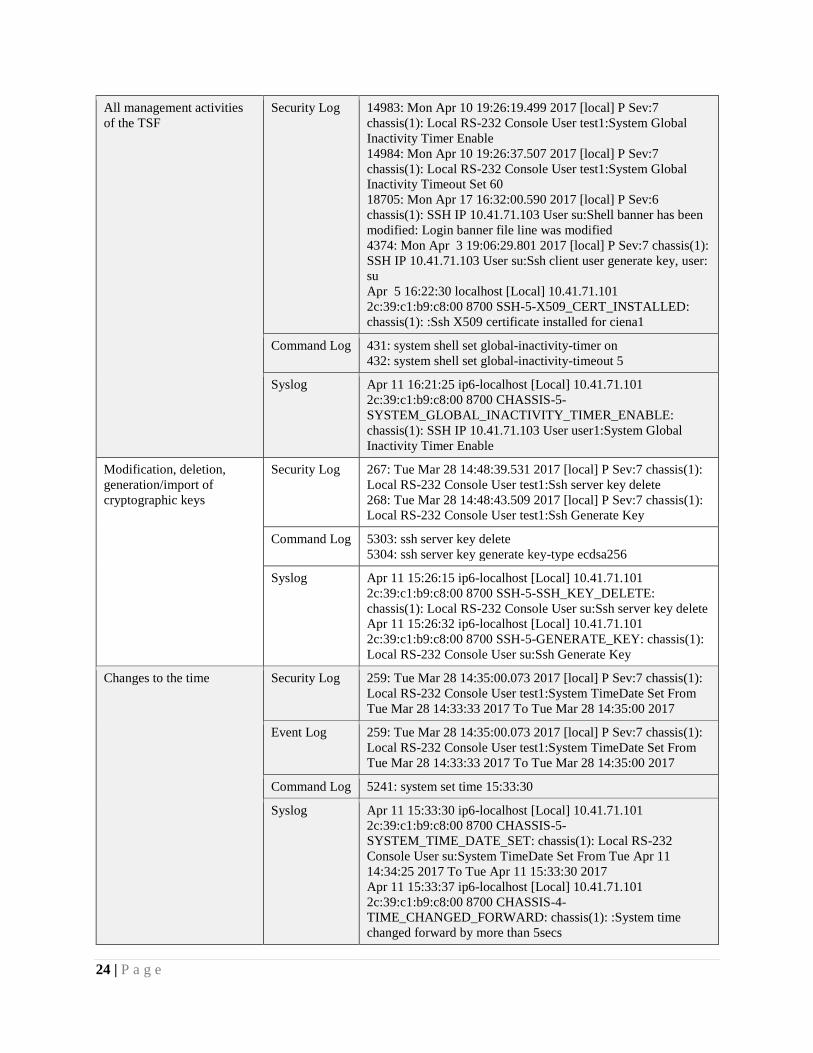
All management activities
of the TSF
Security Log 14983: Mon Apr 10 19:26:19.499 2017 [local] P Sev:7
chassis(1): Local RS-232 Console User test1:System Global
Inactivity Timer Enable
14984: Mon Apr 10 19:26:37.507 2017 [local] P Sev:7
chassis(1): Local RS-232 Console User test1:System Global
Inactivity Timeout Set 60
18705: Mon Apr 17 16:32:00.590 2017 [local] P Sev:6
chassis(1): SSH IP 10.41.71.103 User su:Shell banner has been
modified: Login banner file line was modified
4374: Mon Apr 3 19:06:29.801 2017 [local] P Sev:7 chassis(1):
SSH IP 10.41.71.103 User su:Ssh client user generate key, user:
su
Apr 5 16:22:30 localhost [Local] 10.41.71.101
2c:39:c1:b9:c8:00 8700 SSH-5-X509_CERT_INSTALLED:
chassis(1): :Ssh X509 certificate installed for ciena1
Command Log 431: system shell set global-inactivity-timer on
432: system shell set global-inactivity-timeout 5
Syslog Apr 11 16:21:25 ip6-localhost [Local] 10.41.71.101
2c:39:c1:b9:c8:00 8700 CHASSIS-5-
SYSTEM_GLOBAL_INACTIVITY_TIMER_ENABLE:
chassis(1): SSH IP 10.41.71.103 User user1:System Global
Inactivity Timer Enable
Modification, deletion,
generation/import of
cryptographic keys
Security Log
267: Tue Mar 28 14:48:39.531 2017 [local] P Sev:7 chassis(1):
Local RS-232 Console User test1:Ssh server key delete
268: Tue Mar 28 14:48:43.509 2017 [local] P Sev:7 chassis(1):
Local RS-232 Console User test1:Ssh Generate Key
Command Log 5303: ssh server key delete
5304: ssh server key generate key-type ecdsa256
Syslog Apr 11 15:26:15 ip6-localhost [Local] 10.41.71.101
2c:39:c1:b9:c8:00 8700 SSH-5-SSH_KEY_DELETE:
chassis(1): Local RS-232 Console User su:Ssh server key delete
Apr 11 15:26:32 ip6-localhost [Local] 10.41.71.101
2c:39:c1:b9:c8:00 8700 SSH-5-GENERATE_KEY: chassis(1):
Local RS-232 Console User su:Ssh Generate Key
Changes to the time
Security Log 259: Tue Mar 28 14:35:00.073 2017 [local] P Sev:7 chassis(1):
Local RS-232 Console User test1:System TimeDate Set From
Tue Mar 28 14:33:33 2017 To Tue Mar 28 14:35:00 2017
Event Log 259: Tue Mar 28 14:35:00.073 2017 [local] P Sev:7 chassis(1):
Local RS-232 Console User test1:System TimeDate Set From
Tue Mar 28 14:33:33 2017 To Tue Mar 28 14:35:00 2017
Command Log 5241: system set time 15:33:30
Syslog Apr 11 15:33:30 ip6-localhost [Local] 10.41.71.101
2c:39:c1:b9:c8:00 8700 CHASSIS-5-
SYSTEM_TIME_DATE_SET: chassis(1): Local RS-232
Console User su:System TimeDate Set From Tue Apr 11
14:34:25 2017 To Tue Apr 11 15:33:30 2017
Apr 11 15:33:37 ip6-localhost [Local] 10.41.71.101
2c:39:c1:b9:c8:00 8700 CHASSIS-4-
TIME_CHANGED_FORWARD: chassis(1): :System time
changed forward by more than 5secs
25 | P a g e
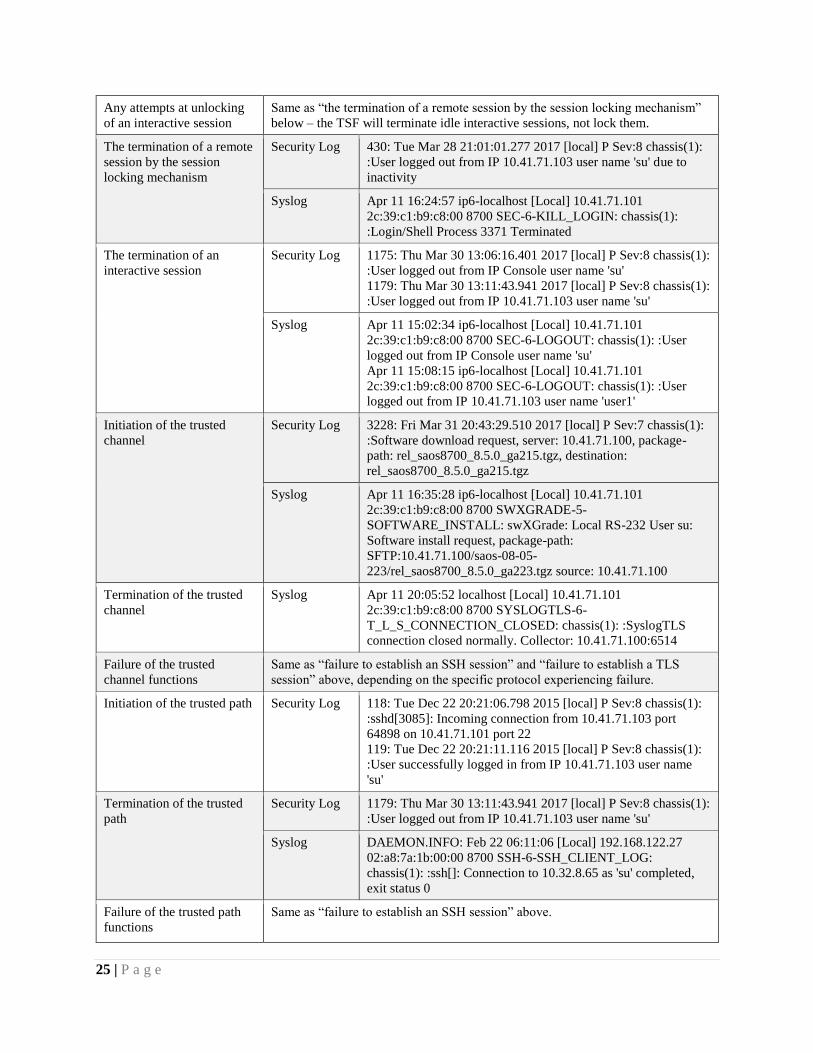
Any attempts at unlocking
of an interactive session
Same as “the termination of a remote session by the session locking mechanism”
below – the TSF will terminate idle interactive sessions, not lock them.
The termination of a remote
session by the session
locking mechanism
Security Log 430: Tue Mar 28 21:01:01.277 2017 [local] P Sev:8 chassis(1):
:User logged out from IP 10.41.71.103 user name 'su' due to
inactivity
Syslog Apr 11 16:24:57 ip6-localhost [Local] 10.41.71.101
2c:39:c1:b9:c8:00 8700 SEC-6-KILL_LOGIN: chassis(1):
:Login/Shell Process 3371 Terminated
The termination of an
interactive session
Security Log 1175: Thu Mar 30 13:06:16.401 2017 [local] P Sev:8 chassis(1):
:User logged out from IP Console user name 'su'
1179: Thu Mar 30 13:11:43.941 2017 [local] P Sev:8 chassis(1):
:User logged out from IP 10.41.71.103 user name 'su'
Syslog
Apr 11 15:02:34 ip6-localhost [Local] 10.41.71.101
2c:39:c1:b9:c8:00 8700 SEC-6-LOGOUT: chassis(1): :User
logged out from IP Console user name 'su'
Apr 11 15:08:15 ip6-localhost [Local] 10.41.71.101
2c:39:c1:b9:c8:00 8700 SEC-6-LOGOUT: chassis(1): :User
logged out from IP 10.41.71.103 user name 'user1'
Initiation of the trusted
channel
Security Log 3228: Fri Mar 31 20:43:29.510 2017 [local] P Sev:7 chassis(1):
:Software download request, server: 10.41.71.100, package-
path: rel_saos8700_8.5.0_ga215.tgz, destination:
rel_saos8700_8.5.0_ga215.tgz
Syslog Apr 11 16:35:28 ip6-localhost [Local] 10.41.71.101
2c:39:c1:b9:c8:00 8700 SWXGRADE-5-
SOFTWARE_INSTALL: swXGrade: Local RS-232 User su:
Software install request, package-path:
SFTP:10.41.71.100/saos-08-05-
223/rel_saos8700_8.5.0_ga223.tgz source: 10.41.71.100
Termination of the trusted
channel
Syslog Apr 11 20:05:52 localhost [Local] 10.41.71.101
2c:39:c1:b9:c8:00 8700 SYSLOGTLS-6-
T_L_S_CONNECTION_CLOSED: chassis(1): :SyslogTLS
connection closed normally. Collector: 10.41.71.100:6514
Failure of the trusted
channel functions
Same as “failure to establish an SSH session” and “failure to establish a TLS
session” above, depending on the specific protocol experiencing failure.
Initiation of the trusted path Security Log 118: Tue Dec 22 20:21:06.798 2015 [local] P Sev:8 chassis(1):
:sshd[3085]: Incoming connection from 10.41.71.103 port
64898 on 10.41.71.101 port 22
119: Tue Dec 22 20:21:11.116 2015 [local] P Sev:8 chassis(1):
:User successfully logged in from IP 10.41.71.103 user name
'su'
Termination of the trusted
path
Security Log 1179: Thu Mar 30 13:11:43.941 2017 [local] P Sev:8 chassis(1):
:User logged out from IP 10.41.71.103 user name 'su'
Syslog
DAEMON.INFO: Feb 22 06:11:06 [Local] 192.168.122.27
02:a8:7a:1b:00:00 8700 SSH-6-SSH_CLIENT_LOG:
chassis(1): :ssh[]: Connection to 10.32.8.65 as 'su' completed,
exit status 0
Failure of the trusted path
functions
Same as “failure to establish an SSH session” above.

26 | P a g e
Modification of the
behavior of the TSF
Same as “all management activities of the TSF” above.
Resetting passwords Security Log 4416: Mon Apr 3 19:55:32.882 2017 [local] P Sev:7 chassis(1):
SSH IP 10.41.71.103 User su:User Password Set test10
Command Log 5254: user set user test1 echoless-password
Syslog Apr 11 14:53:16 ip6-localhost [Local] 10.41.71.101
2c:39:c1:b9:c8:00 8700 SEC-5-USER_PASSWORD_SET:
chassis(1): Local RS-232 Console User su:User Password Set
test1
Start-up and shutdown of
the audit functions
Security Log 15742: Tue Apr 11 17:00:23.083 2017 [local] P Sev:7 logging:
Local RS-232 User su: Security Log event number 0x1B000A
disabled
15743: Tue Apr 11 17:00:32.439 2017 [local] P Sev:7 logging:
Local RS-232 User su: Security Log event number 0x1B000A
enabled
Command Log 5347: logging disable destination flash
5348: logging enable destination flash
5351: command-log disable
5352: command-log enable
1398: syslog tls disable collector cc-server-2.ciena.com
1400: syslog tls enable collector cc-server-2.ciena.com
5359: system security log disable event-id 0x1B000A
5360: system security log enable event-id 0x1B000A
Syslog Apr 11 16:52:04 ip6-localhost [Local] 10.41.71.101
2c:39:c1:b9:c8:00 8700 LOGGING-5-
LOG_DESTINATION_ADMIN_STATE_SET: chassis(1):
Local RS-232 Console User su:Log Destination Admin State
Set destination flash admin state disabled
Apr 11 16:52:13 ip6-localhost [Local] 10.41.71.101
2c:39:c1:b9:c8:00 8700 LOGGING-5-
LOG_DESTINATION_ADMIN_STATE_SET: chassis(1):
Local RS-232 Console User su:Log Destination Admin State
Set destination flash admin state enabled
Apr 11 16:55:53 ip6-localhost [Local] 10.41.71.101
2c:39:c1:b9:c8:00 8700 LOGGING-5-
COMMAND_LOG_SET: chassis(1): Local RS-232 Console
User su:Command log disabled
Apr 11 16:55:58 ip6-localhost [Local] 10.41.71.101
2c:39:c1:b9:c8:00 8700 LOGGING-5-
COMMAND_LOG_SET: chassis(1): Local RS-232 Console
User su:Command log enabled
Apr 11 16:57:55 ip6-localhost [Local] 10.41.71.101
2c:39:c1:b9:c8:00 8700 SYSLOG-5-
GLOBAL_ADMIN_STATE_SET: chassis(1): Local RS-232
Console User su:Syslog global admin state set disabled
Apr 11 16:57:58 ip6-localhost [Local] 10.41.71.101
2c:39:c1:b9:c8:00 8700 SYSLOG-5-
GLOBAL_ADMIN_STATE_SET: chassis(1): Local RS-232
Console User su:Syslog global admin state set enabled
Apr 11 17:00:23 ip6-localhost [Local] 10.41.71.101
2c:39:c1:b9:c8:00 8700 LOGGING-5-

27 | P a g e
SEC_LOG_EVENT_STATE: logging: Local RS-232 User su:
Security Log event number 0x1B000A disabled
Apr 11 17:00:32 ip6-localhost [Local] 10.41.71.101
2c:39:c1:b9:c8:00 8700 LOGGING-5-
SEC_LOG_EVENT_STATE: logging: Local RS-232 User su:
Security Log event number 0x1B000A enabled
Administrative login and
logout
Same as “all use of the authentication mechanism” and “termination of an
interactive session” above.
Security related
configuration
Same as “all management activities of the TSF” above.
Table 8-1: Ciena 8700 Auditable Events
The following is an example of an audit record that the Ciena 8700 produces.
Apr 11 15:26:32 ip6-localhost [Local] 10.41.71.101 2c:39:c1:b9:c8:00 8700 SSH-5-GENERATE_KEY:
chassis(1): Local RS-232 Console User su:Ssh Generate Key
It can be seen from the example record that this includes a timestamp value (Apr 11 15:26:32), what is
causing the log to be generated (localhost), the IP address of the event (10.41.71.101, which in this case is
the TOE’s own IP address), the user causing the event to occur (su), and the action (SSH generate key).
The success of the event is implicit in the fact that the event was generated; if a key could not be
generated, the key generation event would not be recorded.
8.1 Audit Storage
Once enabled (see section 6.1), log records are stored locally by default. Section 6.3 provides instructions
on how to set up and verify an SFTP client connection to a remote file server that can be used to transfer
audit data. An administrator with Super level privilege can transfer audit data using the ‘system security
log transfer now’ command. Administrators are encouraged to back up audit data regularly so that there is
organizational visibility into the behavior of the CES device.
9 Operational Modes
When the TOE is first installed, it is considered to be in its normal operational mode. In order for the TOE
to be placed into its evaluated configuration, it is necessary to obtain an Advanced Security license.
Information about this license can be found in [8]. This license will enable security features necessary to
meet the Common Criteria requirements for the TOE. It is also necessary to ensure that FIPS 140-2
encryption mode is set, which is performed using the following command:
system security set encryption-mode fips-140-2
There is no separate error mode or other degraded mode of operation in the event that a cryptographic
self-test, integrity test, or hardware test fails; instead, the device will reboot and attempt to automatically
repair the error state. If this fails to correct the error state, it may be necessary to perform a factory reset
on the device or to load a new software image. Upon factory reset, the Advanced Security license must be
re-applied and FIPS 140-2 encryption mode must be re-enabled.

28 | P a g e
10 Additional Support
Ciena provides technical support for its products if needed. Customers can register for a support account
at www.ciena.com/support. Additionally, direct support can be reached toll-free in North America at 1-
800-243-6224.