Child restraint technician’s manual - NZ Transport Agency · Child restraint technician’s...
40
Child restraint technician’s manual
Transcript of Child restraint technician’s manual - NZ Transport Agency · Child restraint technician’s...

Child restraint technician’s manual

OUR PURPOSE
CREATING TRANSPORT SOLUTIONS FOR A THRIVING NEW ZEALAND
NZ Transport Agency Published April 2016
ISBN 978-0-478-44588-6 (print) ISBN 978-0-478-44587-9 (online) Copyright: April 2016
The information contained in this manual reflects best practice but should be used in conjunction with the manufacturer’s instructions for the child restraint being installed.
If you have further queries, call our contact centre on 0800 699 000 or write to us:
NZ Transport Agency Private Bag 6995 Wellington 6141.
This publication is also available on NZ Transport Agency’s website at www.nzta.govt.nz
COPYRIGHT INFORMATIONThis publication is copyright © NZ Transport Agency. Material in it may be reproduced for personal or inhouse use without formal permission or charge, provided suitable acknowledgement is made to this publication and the NZ Transport Agency as the source. Requests and enquiries about the reproduction of material in this publication for any other purpose should be made to:
Manager, Information NZ Transport Agency Private Bag 6995 Wellington 6141
The permission to reproduce material in this publication does not extend to any material for which the copyright is identified as being held by a third party. Authorisation to reproduce material belonging to a third party must be obtained from the copyright holder(s) concerned.
DISCLAIMER The NZ Transport Agency has endeavoured to ensure material in this document is technically accurate and reflects legal requirements. However, the document does not override governing legislation. The NZ Transport Agency does not accept liability for any consequences arising from the use of this document. If the user of this document is unsure whether the material is correct, they should refer directly to the relevant legislation and contact the NZ Transport Agency.

NZ Transport Agency | 1 Child restraint technician’s manual Version 3 April 2016
2Introduction
6Legislation and standards
8Standards markings
9Buying a vehicle
10Crash dynamics
14Vehicle/restraint compatibility
20Selecting child restraints
22Installing child restraints into vehicles and fitting children into child restraints
35Common problems when installing child restraints
33The five-step test
33Child safety harness
CONTENTS
37Appendix

Introduction
2 | NZ Transport Agency Child restraint technician’s manual Version 3 April 2016
Road crashes are a leading cause of unintentional death for children in New Zealand. Road crashes can happen to anyone at any time. Child restraint use is a proven strategy for reducing death and injury in road crashes. An appropriate child restraint that is correctly fitted needs to be used every time a child travels in a vehicle.
Child restraints can be difficult to install. This can result in people either not using a restraint correctly or not using a child restraint at all. Therefore it is important that there are suitably qualified people – child restraint technicians (CRTs) – who can assist parents and caregivers to select, install and use child restraints safely. If you are working in the area of child restraints, you may have many roles: » selling/hiring child restraints in a retail store » selling/hiring and installing child restraints through a rental scheme » participating in child restraint checking clinics » providing advice to parents and caregivers » installing child restraints in rental vehicles » moving child restraints between vehicles to transport children in childcare settings.
Whatever role you are playing in the area of child restraints, if you intend to provide advice and assist others, it is important that you are suitably qualified. This manual covers the legal requirements (see page 6) surrounding child restraints within New Zealand and provides best practice recommendations for the safe travel of children in vehicles.

NZ Transport Agency | 3 Child restraint technician’s manual Version 3 April 2016

ASSESSMENT PROCESS FOR CRTS Before you can practise as a registered CRT, you are required to obtain two competencies. This ensures that all CRTs have the skills and knowledge required to carry out this role competently.The two competencies are: » Demonstrate knowledge of child restraints to provide advice for
installation, rental or sale (knowledge competency). » Select approved child restraints for installation, rental or sale,
and install them (practical competency). If you only need to know how to select and use child restraints as part of your job, rather than install them, you will only need to obtain one competency (knowledge-based).There is a process that you will have to go through to obtain the relevant competencies. If you are new to the sector, you will undergo training and then be assessed in either just the knowledge-based competency, if you just require this for your job role, or both competencies if you wish to become a registered CRT. The assessment for the knowledge competency is carried out by a theory test where you can use your reference manual for assistance. Once you are deemed competent you do not have to repeat it unless major changes are made to the competency due to (for example) significant legislative changes. If this happens, reassessment would need to take place. People holding only this competency are not deemed to be CRTs. The assessment to become a CRT is in two parts: » The first assessment is the knowledge-based competency
carried out by a theory test where you can use your reference manual for assistance.
» The second assessment can only be undertaken once you are deemed competent in the theory assessment. This assessment is a practical assessment where you are observed installing a range of child restraints. In order for you to maintain your currency, you will need to be reassessed against the practical competency every two years.
People holding both of the competencies will be recognised as a CRT. While the competencies will provide you with the knowledge and skills required to select and install child restraints, other considerations (outlined on the right) need to be taken into account when working in this area.
COMMUNICATION A CRT may be required to work with a variety of different cultural groups. Therefore, CRTs need to be aware of possible cultural differences: » Language difficulties for people who
have English as a second language. See our non-English language child restraint brochures.
» Religious differences where some cultures will not allow dealings with a female if a male is present.
» Attitudes to authority where some cultures are uncomfortable around authority figures in uniform.
» Cultural differences where some cultures will not ask questions of someone in authority.
These factors may affect the questions a person asks and their attitude to the assistance you are offering. However they respond, it is important to do your best to make them confident about their new information and skills. What you can offer is best practice. Best practice is the gold standard of protection. It is the most acceptable way to transport a child safely on the basis of the child’s age, weight, height and body development. Sometimes parents and caregivers do not choose the best practice because they do not understand the reason for it. As a CRT, it is your job to understand the reason and explain it in simple, clear terms to the parent or caregiver. Sometimes, issues may arise that may not have a clear answer regarding the safest way to transport a child. You will then need to outline to the parent or caregiver the legal requirements and the best options in the circumstances for transporting their child. It is then up to the parent or caregiver to make the best choice about how to restrain their own child/children.
4 | NZ Transport Agency Child restraint technician’s manual Version 3 April 2016

NZ Transport Agency | 5 Child restraint technician’s manual Version 3 April 2016

6 | NZ Transport Agency Child restraint technician’s manual Version 3 April 2016
Legislation and standardsNew Zealand legislation – the Transport Act 1998 and the Land Transport (Road User) Rule 2004 – governs how children are transported in vehicles. The Land Transport (Road User) Rule 2004 (amended in 2013) includes details about the use of child restraints in part 7: Driver responsibility and occupant protection. The important clauses are 7.6, 7.7, 7.8 and 7.9.
7.6 Driver must ensure passengers under 7 years use child restraintA driver must ensure that, while the vehicle is in motion on a road, every passenger under the age of 7 years is properly restrained by an approved child restraint appropriate for that passenger.
7.7 Driver must ensure passengers aged 7 use child restraint or seat beltA driver must ensure that, while the motor vehicle is in motion on a road, every passenger aged 7—(a) is properly restrained by an approved child restraint appropriate for that passenger, if such a restraint is available in the vehicle; or(b) if such a restraint is not available in the vehicle, is restrained as securely as practicable in the circumstances using any child restraint or seat belt that is available (whether or not that child restraint or seat belt is approved).
7.8 Driver must ensure passengers of 8 to 14 years wear seat belts(1) Subclause (2) applies when a person—(a) is a passenger in a motor vehicle; and(b) occupies a seat fitted with a seat belt, whether or not the seat belt is an approved seat belt; and(c) is aged from 8 to 14 years.(2) The driver of the vehicle must ensure that, while the vehicle is in motion on the road, the person—(a) wears the seat belt correctly so that he or she is properly restrained; and(b) keeps the seat belt securely fastened.
7.9 Driver must not permit passengers under 15 years to sit in front seat without child restraint or seat beltA driver must not, while the motor vehicle is in motion on a road, permit a passenger under the age of 15 years who is not properly restrained by an approved child restraint or seat belt appropriate for that passenger to be alongside the driver unless—(a) the vehicle is not provided with sitting positions behind the driver’s seat; or(b) all the sitting positions behind the driver’s seat are occupied by passengers under the age of 15 years.

NZ Transport Agency | 7 Child restraint technician’s manual Version 3 April 2016
EXCEPTIONS TO THE LAW7.11 Exceptions to application of requirements relating to use of child restraints and seat belts
1) The requirements of clauses 7.6 to 7.9 do not apply to a driver (whether imposed in respect of himself or herself or any child) or to a passenger in any motor vehicle, if the driver or passenger produces to an enforcement officer, whenever required to do so by that officer, a certificate from a registered medical practitioner certifying that the restraining of the person who would otherwise be required by those provisions to be restrained by a child restraint or seat belt is impracticable or undesirable for medical reasons.
2) A driver or passenger who is required to produce a certificate to an enforcement officer under sub-clause (1) has 7 days, after the day on which a requirement is imposed, to do so.
2A) If the certificate produced to the enforcement officer was issued on or after 1 October 2011: » The certificate must specify the date on which it was issued and its expiry date, and » The expiry date must be on or after the day on which the certificate was required to be
produced. (3) The requirements of clause 7.6 do not apply to a driver (whether imposed in respect of himself or herself or any child), or to a passenger in any vehicle, if the driver: » is driving a passenger service vehicle in which no appropriate child restraints are
available, or » is driving a motor vehicle first registered before 1 January 1955 in which no seat belts are
available, or » is driving a motorcycle, or » is driving a motor vehicle that is being used by an enforcement officer in the execution of
the officer’s duty. For most of these exemptions a child restraint will not be required.
CONSUMER PROTECTIONThe Consumer Guarantees Act 1993 is administered by the Ministry of Business, Innovation and Employment (www.mbie.govt.nz) and requires businesses and individuals who are selling child restraints in New Zealand to ensure the products they sell meet certain quality guarantees.For example, the Consumer Guarantees Act provides some protection if a person buys a new child restraint and finds that it is faulty, not fit for purpose, or does not fit safely and securely into their car.For more information about consumer protection check the Consumer Affairs website.To report unsafe products contact Consumer Affairs 0508 627 774 or go to:www.consumeraffairs.govt.nz/for-consumers/goods/product-safety/report-a-product-safety-incident.
8 | NZ Transport Agency Child restraint technician’s manual Version 3 April 2016
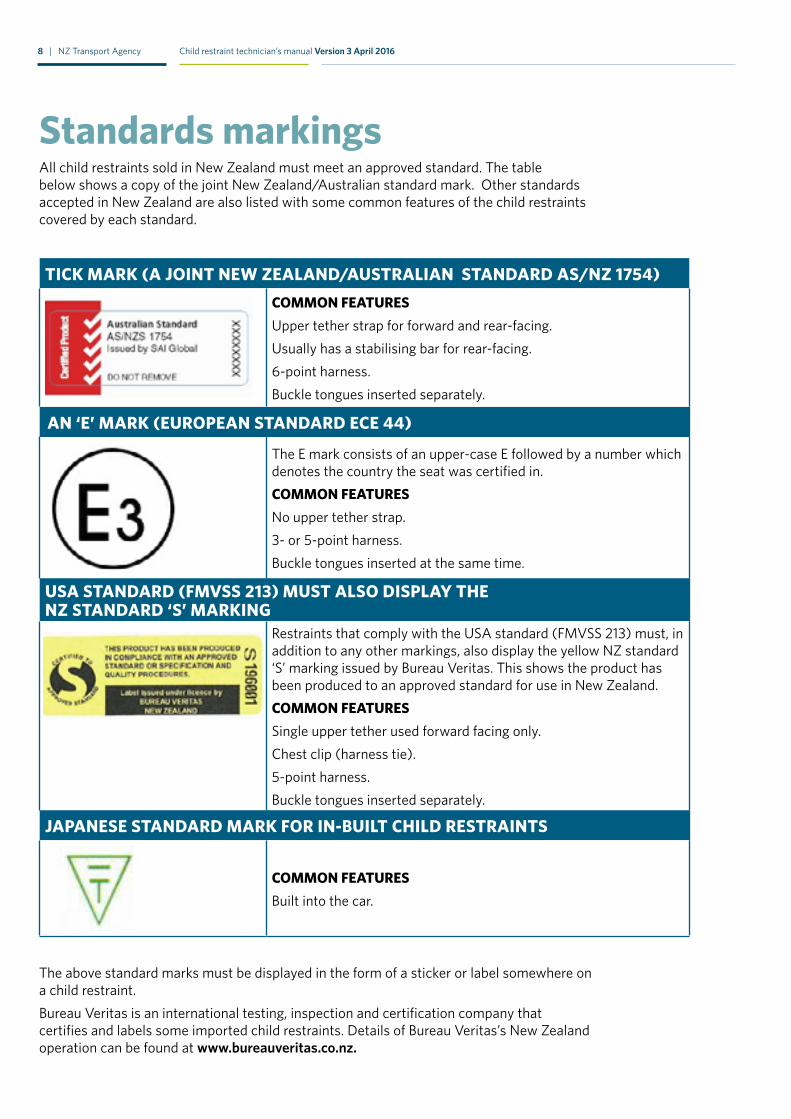
Standards markings All child restraints sold in New Zealand must meet an approved standard. The table below shows a copy of the joint New Zealand/Australian standard mark. Other standards accepted in New Zealand are also listed with some common features of the child restraints covered by each standard.
TICK MARK (A JOINT NEW ZEALAND/AUSTRALIAN STANDARD AS/NZ 1754) COMMON FEATURESUpper tether strap for forward and rear-facing. Usually has a stabilising bar for rear-facing. 6-point harness. Buckle tongues inserted separately.
AN ‘E’ MARK (EUROPEAN STANDARD ECE 44)
The E mark consists of an upper-case E followed by a number which denotes the country the seat was certified in.COMMON FEATURESNo upper tether strap. 3- or 5-point harness. Buckle tongues inserted at the same time.
USA STANDARD (FMVSS 213) MUST ALSO DISPLAY THE NZ STANDARD ‘S’ MARKING
Restraints that comply with the USA standard (FMVSS 213) must, in addition to any other markings, also display the yellow NZ standard ‘S’ marking issued by Bureau Veritas. This shows the product has been produced to an approved standard for use in New Zealand. COMMON FEATURES Single upper tether used forward facing only. Chest clip (harness tie). 5-point harness. Buckle tongues inserted separately.
JAPANESE STANDARD MARK FOR IN-BUILT CHILD RESTRAINTS
COMMON FEATURES Built into the car.
The above standard marks must be displayed in the form of a sticker or label somewhere on a child restraint.Bureau Veritas is an international testing, inspection and certification company that certifies and labels some imported child restraints. Details of Bureau Veritas’s New Zealand operation can be found at www.bureauveritas.co.nz.

NZ Transport Agency | 9 Child restraint technician’s manual Version 3 April 2016
Buying a vehicle Vehicles must have enough seats and safety belts/approved child restraints for the entire family.Consideration should be given to the type of child restraints required for the children who will be transported and the requirement for items such as tether anchor points and lap/diagonal safety belts.Refer to page 6 for the law as it relates to child restraint use. It is strongly recommended that to provide the best protection for a child when travelling in a vehicle they remain in a booster seat until they can safely fit the dimensions of a vehicle seat and safety belt. Research shows that this is when the child is around 148cm tall.

10 | NZ Transport Agency Child restraint technician’s manual Version 3 April 2016
Crash dynamics INJURY PREVENTION Injuries occur when too much energy or force is applied to a human body. An injury can cause death or affect someone for life. ‘Injury prevention’ is the use of a scientific approach for preventing injuries or death due to a trauma from adverse forces. Many factors in a crash determine the outcome, such as vehicle size, speed and point of impact and complexity of the impact. Drivers who buckle up are more likely to have child passengers who buckle up. Setting a good example is an essential part of the learning process and ensuring everyone travels safely.
WHY DO WE USE CHILD RESTRAINTS? » Child restraints protect children in the same way that safety belts
protect adults. » Adult safety belts are made to restrain adults in a vehicle. » Child restraints are designed to keep children safe in a vehicle.
CHALLENGES FOR INJURY PREVENTION Unintentional injury is a leading cause of death of New Zealand children aged one to 14 years, with transport related crashes contributing a major portion of these. Injuries that occur while children are passengers (vehicle occupants) are the second most frequent causes of unintentional injury deaths for New Zealand children aged one to 14 years.Over two-thirds (71%) of child deaths in motor vehicle crashes occur when children are vehicle occupants, followed by pedestrians (20%).Deaths from motor vehicle crashes affect all ages equally, but older children (aged 10-14) are more likely to sustain nonfatal injuries. Māori children were also disproportionately likely to be injured in motor vehicle crashes, especially as vehicle occupants (Safekids Aotearoa 20151).
1. Safekids Aotearoa. (2015). Child unintentional deaths and injuries in New Zealand, and prevention strategies. Auckland, NZ: SafekidsAotearoa.
FIVE WAYS THAT RESTRAINTS PREVENT INJURYKeeps the child in the vehicle.
Contacts the strongest part of the body.
Spreads the crash forces over a wide area of the body.
Helps the body to slow down safely.
Protects the head, neck and spinal cord by preventing the head striking the interior of the car.
KEY MESSAGES FOR PARENTS AND CAREGIVERSChildren may not hear what you say, but they will do what you do.
Caregivers must buckle up.
Children must be restrained at all times when travelling in a vehicle even when travelling a short distance.

NZ Transport Agency | 11 Child restraint technician’s manual Version 3 April 2016
Vehicle occupant related child injury and deathNew Zealand data:
» Deaths of children under 15 Each year an average of 12.6 children younger than 15 years of age die while they are travelling as an occupant in a motor vehicle. (This is an average based on the years from 2008 to 2012 inclusive.) Data from Otago University Injury Prevention Research Unit – IPRU. https://blogs.otago.ac.nz/ipru/statistics.
» Deaths of children under 5 Each year an average of 4.8 children younger than five years of age die while they are travelling as an occupant of a motor vehicle. (This is an average based on the years from 2010 to 2014 inclusive.) Data from Otago University Injury Prevention Research Unit – IPRU. https://blogs.otago.ac.nz/ipru/statistics.
» Hospitalisations of children under 15 Each year an average of 121 children aged younger than 15 are hospitalised after receiving injuries while they are travelling as an occupant in a motor vehicle. (This is an average based on the years from 2010 to 2014 inclusive.) Data from Otago University Injury Prevention Research Unit – IPRU. https://blogs.otago.ac.nz/ipru/statistics.
» Hospitalisations of children under 15 Ministry of Transport crash data from 2014 showed that during that year 203 children aged 0 to 14 were hospitalised after being injured while travelling as a vehicle occupant. (Ministry of Transport Motor vehicle crash statistics in New Zealand 2014.) www.transport.govt.nz/research/roadcrashstatistics/motorvehiclecrashesinnewzealand.
This means that in New Zealand each week between two to four children are injured seriously enough to be admitted to hospital, or die, while they are travelling as vehicle passengers.
The NZ Transport Agency Crash Analysis System (CAS) data from 2010–14 provides a profile for circumstances in which people are injured while travelling in motor vehicles. Of the reported crashes:
» weekends accounted for 37% of all fatal and serious injury crashes » the number of injury crashes peak between 3pm and 6pm (24% of injuries) » 46% of injury crashes were recorded as happening on the open road where the
speed limit was 100km/h, while 42% were recorded as happening on urban roads where the speed limit was 50km/h.
More information on crash statistics can be found on the following websites:
» Ministry of Transport: www.transport.govt.nz. » NZ Transport Agency: www.nzta.govt.nz. » University of Otago Injury Prevention Research Unit:
https://blogs.otago.ac.nz/ipru/statistics. » New Zealand Child and Youth Epidemiology Service:
http://dnmeds.otago.ac.nz/departments/womens/paediatrics/research/nzcyes/nz_reports.html.

12 | NZ Transport Agency Child restraint technician’s manual Version 3 April 2016
NEWTON’S LAW OF MOTION Laws of gravity and motion state that ‘an object in motion continues to remain in motion at the original speed until acted on by an outside force’. In other words, an object keeps moving in the direction it was headed until it is stopped by something. For a vehicle, that object may be the brakes, another vehicle or a solid object. For the occupants in that vehicle, it could be the windshield, a safety belt or the child restraint. In a vehicle crash, occupants will hit something.
THREE COLLISIONS IN A CRASH There are three collisions in a crash: » vehicle collision » human collision » internal collision.
First is the vehicle collision. The vehicle begins stopping as it collides with another object. The time from crash to full stop in a 50km/h crash is 1/10th of a second. In a front-on collision, as the vehicle slows, the front of the vehicle crushes, which takes some of the energy of the crash. Second is the human collision. In the human collision, the occupant continues to move toward the point of impact at the same speed, even though the vehicle will have already stopped once impact occurred. The occupant will begin to stop once he or she connects with an outside force. An unrestrained occupant will hit the inside of the vehicle, such as a window or other object in the path of motion. As that individual collides with the vehicle interior, he or she slows down from 50km/h to a stop in a few hundredths of a second, with only the body to absorb the energy of the crash. For a restrained occupant, however, the outside force will be met by a safety belt, child restraint or airbag.Third is the internal collision. In the internal collision, the occupant’s internal organs move toward the point of impact and hit other organs, bones and the skull. Even though the body may appear uninjured, the liver, spleen, heart or other organs may be torn, bruised and/or caused to bleed. Impacts to the head may cause ‘closed head injuries’, resulting in the soft tissue of the brain hitting the skull or being torn as the skull fractures. These injuries may be hard to see, yet can be deadly.
Watch the Transport Agency ad showing what can happen inside a vehicle as it crashes. https://youtu.be/uV5o_-UADiY
NZ Transport Agency | 13 Child restraint technician’s manual Version 3 April 2016
EXPLAINING CRASH FORCES Weight + speed = restraining force » Impact force is about how rapidly the car stops. » Injury-causing forces are how quickly the body stops against a part of the car.
The forces involved in a crash can kill or seriously injury a child. Parents and caregivers must understand that it is extremely dangerous to attempt to hold a child in their lap or leave them unrestrained. A child weighing 10kg in a moving vehicle that stops suddenly due to a crash will exert a force 20 times this weight, ie 200kg. Even the strongest adult cannot hold a child with this level of crash forces.
TYPES OF CRASHES Different types of collisions pose different risks to vehicle occupants.
Frontal impacts Frontal collisions are the most frequent types of crashes. The vehicle is moving forward and is stopped suddenly by an object. Frontal impact can be offset where the collision is on one side of the front of the car. Common injuries – skull fractures, spinal fractures, broken ribs, cuts and bruises to head and face, larynx injuries, liver and spleen injuries.
Side impacts (lateral)This is when a vehicle is impacted on one side. Side impacts are the most dangerous for occupants sitting on the same side as the impact. There is not a lot of space between the striking vehicle and the occupant. Common injuries – similar injuries can occur as for frontal impacts.
Rear impacts Many rear impacts occur when both vehicles are moving forward or when the front vehicle is stopped. After impact, the vehicle moves forward, pushing the occupant’s body out from under the head. The head rotates back (unless held in place by a properly positioned head restraint) and then is thrown forward. The occupant’s head moves towards the point of impact. Common injuries – neck fractures and stretching/tearing of anterior ligaments and tendons.
Rollovers Rollover crashes occur when the vehicle rolls over onto its side or top one or more times. Rollovers are often responsible for occupants being thrown from vehicles if they are not restrained.
Non-collisions These include spins, skids, swerves and emergency braking. Common causes of occupant injuries – occur as a result of being thrown out of windows or doors (if not restrained), collision with other occupants, or striking the vehicle interior.

14 | NZ Transport Agency Child restraint technician’s manual Version 3 April 2016
Vehicle/restraint compatibility Modern vehicles have a number of built-in safety features that must interact correctly with any installed child restraint. This especially applies to safety belts and airbags.
SAFETY BELTS What is needed to successfully secure a restraint to a vehicle safety belt?Safety belt systems in vehicles: » enable the webbing of the safety belt to fit
securely to the person wearing it » come in different types - as a CRT, it’s
important you can identify the different types and understand how they work and how they affect child restraint installation
» are called ‘locking’ or ‘retractor’ systems.Safety belts must be: » correctly anchored to the vehicle » free of any unintentional twists in the webbing » correctly buckled up.
Safety belts should never be replaced with second-hand parts, as you don’t know what forces they’ve been subjected to in the past.
Types of retractors » ALR (automatic locking retractor). This type of safety belt:
› can be ‘pulled’ to lock and hold a child restraint firmly under normal travel › ‘clicks’ when it is fully pulled out and then let back in. The click is the sound of it locking › no locking clip is required because the ALR mechanism locks the belt, except when using a
capsule with a base.
» ELR (emergency locking retractor). This type of safety belt: › locks only during a sudden stop or crash › does not click on the way in (this safety belt will only lock when pulled out fast, ie when the
vehicle is involved in a crash) › needs a locking clip to hold a child restraint firmly under normal travel.
Static safety belt Static safety belts are found in older cars. They don’t have a retractor, either automatic or emergency locking. They tend to be lap-diagonal or lap-belt types. A static safety belt must always be manually adjusted to the child restraint that has been fitted into the vehicle.
Lap belts Lap belts work well to secure a capsule or convertible or front-facing child restraint, as the centre rear is the safest position in the vehicle, subject to child seat compatability.Never use a booster with a lap belt only. Occasionally, retractable lap belts are found in vehicles. These are not suitable for child restraints as they cannot be fixed. Lap belts provide more protection in crashes than being unrestrained, but it’s worth noting that
Webbing: fabric part of vehicle safety belt
Latch plate: metal tongue attached to one side of webbing
Buckle: what tongue/latch inserts into

NZ Transport Agency | 15 Child restraint technician’s manual Version 3 April 2016
lap belts are not recommended for adults as they can be very dangerous in a crash.
LOCKING CLIPS A locking clip is a piece of metal or plastic that is used to stop the lap portion of a lap–sash belt from lengthening during normal travel. A locking clip holds the lap part of the belt firmly to stop the restraint moving. It does this by clamping the webbing of the safety belt together next to the latch plate of the safety belt. The latch plate is the metal portion of the safety belt that clicks into the buckle.A locking clip should be used if the latch plate slides freely along the safety belt webbing. The locking clip is placed on the safety belt webbing within 2cm of the latch plate. The locking clip never goes on the opposite side of the safety belt, unless it is being used to make a lap–sash belt into a lap belt for use with a child harness. Not all restraints require or come with locking clips. You don’t need a locking clip if: » the vehicle has automatic retractor safety belts. These are
designed to hold child restraints securely. Locking clips are not required on these types of safety belts. However, it is recommended that a locking clip is used when installing a capsule base
» the child restraint itself has a built-in locking device » there is a static lap-only safety belt where the restraint is to be
installed in the vehicle » the sash part of the safety belt goes around the head end of the
child restraint » there is no room within 2cm of the latch to install the locking clip.
If so, then place it further along the safety belt but not on the opposite side.
Always follow the child restraint manufacturer’s requirements/instructions.
TETHER STRAPS Tether straps limit and control the movement of a child restraint during a crash, reducing the possibility of serious neck and head injuries. When used on a forward-facing restraint, it also helps prevent the child’s head from hitting the front seat. Tether straps must always be used according to the manufacturer’s instructions and must not be over tightened.
Locking clip in use

16 | NZ Transport Agency Child restraint technician’s manual Version 3 April 2016
ANCHOR POINTSRefer to your vehicle manual for the location of the anchor points. The child restraint fitting instructions in the restraint’s manual may also have details about where holes for anchor points should be drilled in relation to where the restraint goes, and correct installation of the anchorage fittings.For those vehicles without factory-installed mounting points, it is preferable to have anchor points installed by a professional. To be effective, anchor bolts should be immediately behind the restraint. Anchor bolts that are at an angle to the restraint of more than 20 degrees may not be effective in a crash. Pre-drilled holes for anchor points may be found under a plastic or rubber bung. If you use anchor points located in the back of the vehicle seat, make sure the rear seat is in the locked position to prevent it folding forward in a crash. Do not use a luggage clip or cargo net holder as an anchor bolt unless specified that you can do so in the vehicle manual. If the original tether strap isn’t long enough, extension straps are widely available. There are two lengths – 300mm and 600mm. These may be joined together for extra length. They can be purchased from retailers who stock restraints.
Tether strap extensions

NZ Transport Agency | 17 Child restraint technician’s manual Version 3 April 2016
LATCH AND ISOFIX SYSTEMS The USA’s LATCH system and Europe’s ISOFIX system are seen in some vehicles and restraints. These systems offer an alternative method of installing child restraints. The LATCH and ISOFIX systems consist of lower anchors in the vehicle and lower attachments on child restraints. This method of installation allows a child restraint to be snapped into place instead of being held by the safety belt. Lower anchor bars or brackets are found between the seat cushion and the seat back. Some vehicles have a symbol on the seat showing where they are. Child restraints fitted with connectors (lower attachments) at the bottom of the child restraint, one on each side, that fasten into lower anchors are found in some vehicles, along with an anchor point for an upper tether strap. The size of the bottom of the restraint may sometimes make the LATCH or ISOFIX system difficult to attach. All restraints can be installed in the conventional way with the vehicle safety belt if LATCH or ISOFIX is difficult to use or the safety belt installation method is preferred.
1 2LATCH is a method of installation of child restraints using rigid bars installed in the vehicle seat bight and flexible (1) or rigid (2) lower attachments on the restraint that connect into the rigid bars. Never use both safety belt and ISOFIX together. This system is intended as either/or but never both. Check both the vehicle and child restraint manuals for information about the maximum weights recommended when using LATCH or ISOFIX. Some vehicle manufacturers have lower maximum weight ratings for LATCH or ISOFIX anchors than those recommended by child restraint manufacturers. Install the child restraint with the vehicle safety belt once the maximum LATCH or ISOFIX usage weight is reached.
Rigid ISOFIX connector Flexible latch connector

18 | NZ Transport Agency Child restraint technician’s manual Version 3 April 2016
AIRBAGS » Airbags are inflated by a small explosive device. » They inflate with a speed between 160 and 320km/h.
They will fully inflate and deflate in less than 3/10ths of a second.
Location of airbags in a vehicle » CRTs often need to inform people about the airbags
within their vehicles. » Airbags can be located in many places in a vehicle. » Vehicles are often marked with ‘SRS’, which means
‘supplementary restraint system’. Some modern cars have the word ‘airbag’. Many people are unfamiliar with what the term SRS means and may not know their vehicle is fitted with airbags.
» Look for the appropriate markings on the dashboard or glove box area. You will need to encourage a parent or caregiver to check the vehicle manual to see if they are fitted.
» Airbags may be able to be switched on and off, although switches can be difficult to locate. You may need to refer to the vehicle manual.
Safety features of airbags » By protecting occupants from a car’s hard surfaces, airbags can prevent, or lessen the
severity of, injuries in moderate to high speed frontal or side impacts. » Protection is limited to the head and part of the torso. Airbags are not usually designed to
take the full impact of a body in a crash. The safety belt needs to take this weight. » Airbags are designed to deploy only when the impact is of a degree that an airbag is
needed to improve the safety of the occupants. » Airbags are not soft pillows. They deploy very fast and can potentially cause injuries.
These injuries, however, are minor in comparison to those prevented by airbags. » It’s important not to place any object, no matter how small, on top of an airbag cover – it
will become dangerous if the bag deploys, eg a ballpoint pen on the airbag would be thrust off in a crash, just like a speeding bullet.
Airbags and child restraints » Remember that the centre rear seat position is the safest for babies and children when
they are seated in a correctly fitted child restraint. » If circumstances require a child to travel in the front seat, then only use a forward-facing
restraint. A child restraint in the front must be positioned as far as possible from the airbag. To do this, move the vehicle seat as far back as it will go.
» Keep loose objects away from the restraint and airbag. » It is recommended that a child should not be able to rest their head against the window.
This may occur where a side airbag is fitted and a child restraint that has minimal side wings to support a sleeping child or a booster cushion is used.

NZ Transport Agency | 19 Child restraint technician’s manual Version 3 April 2016
When should an airbag be switched off? » Forward-facing child restraints can be used in seats with front airbags, if there is no other
seating option. However the airbag should be temporarily disabled if this is the case, and the seat moved as far back from the dashboard as possible.
» If you have to place a rear-facing child restraint in the front seat of a vehicle the airbag must be temporarily disabled, as listed in the manufacturer’s instructions.
» Airbag switches can be difficult to locate. You will need to look in the vehicle manual or contact the vehicle dealer or manufacturer.
» Airbag disabling switches can be installed in vehicles, but the installation needs to be certified by a low volume vehicle certifier. You will need to contact a vehicle testing station for the contact details of local certifiers.
When should a child be allowed to sit in the front seat with an active airbag? » Never, if in a rear-facing restraint. » If they are in a forward-facing restraint and there is no available position for the restraint
in the rear seat.

20 | NZ Transport Agency Child restraint technician’s manual Version 3 April 2016
BEFORE YOU SELECT A CHILD RESTRAINT, TAKE INTO ACCOUNT:• the child’s weight, height and age
• any physical, developmental and behavioural considerations
• the type of child restraint
• the type of vehicle.
WHAT IS THE BEST CHILD RESTRAINTOne that fits the child.
One that fits the vehicle.
One that is used correctly every time.
Selecting child restraintsWhen you are selecting child restraints, take into account the following factors: » Selection – make sure that the right child restraint fits the child, fits the vehicle, is used
on every trip and is within its recommended life span. » Direction – make sure that the child restraint faces the correct direction (rear or forward
facing) for the type of restraint and the child’s age, weight and height. » Location – the rear seat is the safest position for all children under 15 years of age or until
they can sit safely and correctly in an adult seat. » Installation – make sure the child restraint you are using has been installed correctly.
If you are unsure how to install your child restraint, contact a registered child restraint technician.
NZ Transport Agency | 21 Child restraint technician’s manual Version 3 April 2016
SECOND-HAND CHILD RESTRAINTS When advising people about the purchase of second-hand restraints, the following key factors should be taken into account: » Check the child restraint for a date of manufacture or a ‘do not use after’ date. Don’t use
a child restraint that has reached its ‘do not use after’ date or, if this isn’t known, is more than 10 years old. Always refer to the manufacturer’s instructions for the expiry date of the seat. After the expiry date the seat may not protect your child in a crash.
» Inspect the seat to ensure there is no obvious damage or deterioration. This includes cracks and discolouration in the restraint’s shell, fraying of the harness or rust on the buckle. Do not buy a restraint that is worn or damaged. Check for any evidence of mould on the harness straps as it is not wise to have live mould spores near children.
» Look for a ‘Standards’ mark that indicates the restraint is approved for use in New Zealand. Check the table on page 8 or www.standards.co.nz.
» Make sure the restraint comes with a user manual in English. The manual or user’s instructions may be available on-line or on the manufacturer’s website.
» Ask the seller if the seat has been in a crash. Do not buy a child restraint that has been in a crash as it may not be safe.
» Make sure that the child restraint has all the necessary parts and that all parts are in good working order and that it has not been modified.
» Some child restraint manufacturers now state that the restraint ‘life’ commences from the time of purchase. Check the manufacturer’s website for information about this.
CHILD RESTRAINT PROBLEMS Child restraint manufacturers have warranties and service and repair options for child restraints that are not functioning correctly. Seek advice from the manufacturer, retailer or importer if there is an issue. Always check to ensure that the child restraint is in good condition and all parts are attached and working correctly. Check that: » the buckle is engaging and disengaging correctly – contamination inside the buckle may
prevent the correct operation » the adjuster which loosens and tightens the tension in the harness must be working
correctly » all plastic parts are in good condition and not broken or cracked » webbing is not cut, frayed or stretched » the plastic is not discoloured, which may indicate it has come in contact with polishes,
oils, bleaches or other chemicals that can reduce the strength of many plastics.Remember: Child restraints sold in New Zealand must be fit for purpose and meet quality standards. Check www.consumeraffairs.govt.nz.
AFTER A CRASH If the car has been involved in a crash, do not continue to use the restraint. This applies even if no child was in the restraint. The first step is to check the manufacturer’s requirements. Even if there is no visible damage the restraint may no longer be safe. Dispose of the child restraint so that it can’t be used, by removing or cutting the harness. The insurance may cover a child restraint that has been in a crash and may replace the child restraint.

22 | NZ Transport Agency Child restraint technician’s manual Version 3 April 2016
Installing child restraints into vehicles and fitting children into child restraints A child’s weight, height and physical development influences the type of child restraint in which they are safest travelling.
PLACEMENT OF CHILD RESTRAINTS IN VEHICLES » Research shows that positioning a child restraint in the centre rear seat of the vehicle is the
safest position in a crash, because it’s furthest away from any impact. » Ideally, always put a restraint in the centre rear (obviously, this will depend on the number
of children travelling in the vehicle, the length of the restraint, the contours of the seat and whether there is a centre arm rest and whether the restraint fits well in the centre rear compared with other positions).
» If the restraint can’t go in the centre rear, consider putting it behind the passenger seat. This allows easy access to take a child in and out of the car on the pavement side.
» ‘Best fit’ = ‘minimum movement of restraint once fitted’. » Back seat is always best. » Never place a rear-facing child restraint on the front seat if there’s a passenger front seat
airbag. » A forward-facing child restraint could be placed on the front seat only as a last resort,
moving the vehicle seat as far back as possible, and switching the airbag off. » Do not use child restraints on vehicle seats that face sideways or rearwards. The
performance is unknown.
MODIFYING RESTRAINTS Never adapt or modify a child restraint to make it fit. Minor modifications can change the way a child restraint performs in a crash. Even minor changes can alter performance in a crash.
Advice for parents of children who need specialised child restraints When a child needs a specialised child restraint it’s often a case of trial and error when searching for the best restraint. Several restraints that assist children who need extra support with their stability when travelling are available.Manufacturers and importers can be contacted for advice and assistance to get the safest fit for the child. It can be difficult to find a restraint that accommodates the splayed legs of an infant in a hip plaster, for example. Hospitals and medical providers may be able to supply inserts or amendments to child restraints to assist with some of these issues. Refer to AS/NZS 4370, Restraint of children with disabilities or medical conditions in motor vehicles, which can provide guidance on selecting restraints for children who need specialised child restraints, available on www.standards.co.nz.

NZ Transport Agency | 23 Child restraint technician’s manual Version 3 April 2016
REAR-FACING RESTRAINTS Rear-facing restraints may be child restraints that only face the rear or convertible restraints that can be used rear-facing and then forward-facing. They are fitted with an in-built harness system. When a child is secured in a rear-facing restraint, during a crash: » the forces acting on the restraint and child will push the
child back into the restraint shell so that their head and back press on to the restraint seat back
» the child’s head and neck will be cradled by the restraint shell
» the head and body will move in the same direction » it’s less likely the child will suffer spinal damage.
Weight and/or height recommendations for child restraints vary according to make and model. Always check the manufacturer’s fitting instructions.
Convertible restraints (rearward facing)These convert from a rear-facing to a forward-facing position. The weight and/or height recommendations for the convertible restraint may allow for children who have outgrown their restraints to continue to face rearward longer – past their second birthday. Convertible restraints may also be used from birth. Weight and/or height recommendations for convertible restraints vary according to the make and model. Always check the manufacturer’s fitting instructions. The safety belt path on convertible child restraints that are being installed rear-facing may differ from the safety belt path forward-facing. A stabilising bar and tether strap may need to be used in rear-facing mode on some makes and models.

24 | NZ Transport Agency Child restraint technician’s manual Version 3 April 2016
INSTALLING A REAR-FACING RESTRAINT When installing a rear-facing restraint: » always follow the manufacturer’s instructions » child restraints can only go on a vehicle seat
that faces forward » a rear-facing restraint must not be placed on
the front seat of a vehicle equipped with an active passenger airbag
» the centre of the rear seat is best if the restraint fits well there. Try another position if you can’t get a firm fit.
There are different ways of installing a rear-facing child restraint, depending on the make and model:
Restraints with a detachable base » Some restraints have a detachable base that
is installed in the vehicle. The restraint simply clips into the base. Some people find the base enables them to get the restraint in and out of the vehicle quickly and easily. Always check the manufacturer’s instructions.
» Always check that the restraint is correctly attached to the base as it could be ejected from the base in a crash if it is incorrectly attached.
» Some makes and models of restraint with a base also allow the restraint to be installed without the base, using the vehicle safety belt to secure the restraint.
Restraints without a separate base » Some restraints do not have a separate base. A restraint without a base is secured using the
vehicle safety belt threaded across and at times around the restraint. How the safety belt is threaded through and around the restraint will vary depending on the make and model so always check the fitting instructions. Length of the vehicle safety belt may sometimes be a problem.
Restraint angle » A rear-facing restraint should be installed at around a 45-degree angle to the vertical. Less
upright and the child may be pushed upward and into the shoulder straps in a crash, and more upright may put a newborn baby at risk of its head falling forward and obstructing the airway.
» If 45 degrees is too upright for the child’s comfort, it is acceptable to have it slightly laid back.
» As the child grows, the restraint can be made more upright to offer better protection. » Some restraints have a visual level indicator which gives an indication of the correct angle for
the restraint. » The vehicle must be on a flat surface to get an accurate restraint angle. Few vehicles have
flat rear seats and vehicles have different shapes and angles so make sure that the restraint is at the right angle for the child.
» To achieve the right angle, you may need to place a rolled up small towel or blanket beneath the restraint.

NZ Transport Agency | 25 Child restraint technician’s manual Version 3 April 2016
Movement The restraint shouldn’t move more than 2.5cm (1 inch) in any direction once installed. This includes American or European restraints. Try another position or another restraint if the restraint moves around too much.
Locking clips For further information – see page 15.
Tether straps For further information – see page 15.
Latch and Isofix systemsFor further information – see page 17.
Stabilising bar Some rear-facing restraints will have a stabilising bar at the foot end. This is often mistaken for a foot rest! The stabilising bar rests against the back of the vehicle seat and stops excess movement in crashes, along with the tether strap. The stabilising bar may be hidden and needs to be extended out and locked into position.
Foot propsFoot props work in the same way as a stabilising bar by stabilising the restraint and stopping excessive movement.
Carry handles The position of the carry handles on restraints, when installed in a vehicle, do vary and needs to be checked with the manufacturer’s instructions.
Fold-down armrest If there is a fold-down armrest in the centre of the rear seat, check the vehicle and child restraint manual to see if the rear-facing restraint can be placed in this position. Generally, this position should be avoided because the armrest can swing down and hit the child as the restraint rebounds.
After-market products (accessories)There are some additional items made by non-child restraint manufacturers that are available and advertised as suitable for use with child restraints. These items are called ‘after-market products’ and may include head surrounds, inserts, harness strap covers and seat protectors. It is important that only products recommended by the manufacturer of the child restraint be used with that restraint.AS/NZS 8005, Accessories for child restraints for use in motor vehicles, available at www.standards.co.nz, outlines the minimum requirements for the design, construction, performance and informative labelling for products sold separately as accessories for child restraints. One of the general principles of this standard is that accessories do not compromise the compliance of any child restraint on which they are used or increase the risk of injury for the child.

26 | NZ Transport Agency Child restraint technician’s manual Version 3 April 2016
SECURING A CHILD IN A REAR-FACING RESTRAINT » The child should be placed with their bottom
well back in the restraint. Positioning the child snugly helps the harness fit correctly and holds the child securely in the restraint.
» The shoulder strap slot in the seat back should be in line with or slightly above the child’s shoulders for rear-facing seats complying with AS/NZS 1754, available at www.standards.co.nz. For other standards, the shoulder strap slot in the seat back should be in line with or slightly below the child’s shoulders as long as the shoulder harness goes over the child’s shoulders. The harness keeps the child low and contained within the restraint. The crash forces are spread across the child’s back.
» The harness must be firm against the child’s chest and over the shoulder, with no more than a finger’s width of slack between the child and the harness. Always give the harness a tug to make sure that the harness adjuster is holding fast. Do not over-tighten.
» For a baby with poor head support, use rolled small towels or a head snuggler around the head to stop the head moving sideways and to align it with the rest of the body. If using a head snuggler or small rolled-up towels, ensure they are around the baby’s head, not under the baby’s head, as this could cause the baby’s head to drop forward and potentially obstruct the baby’s airway.
» If there is a gap between the baby’s crotch and the crotch strap, a rolled small towel or blanket can be placed in the gap. In some restraints the position of the crotch strap can be altered as the baby grows.
» Blankets or wraps are always put over the baby after the harness is in place. A blanket or thick padding should not be used under the baby unless the product is designed and tested for this purpose.
» American restraints have a chest tie (also known as a harness retainer clip). The chest tie is placed across the chest at the level of the child’s armpits – not up towards the neck. It holds the shoulder harness in the correct position.
Outgrowing the rear-facing restraint » A child has outgrown their restraint when their head is within 2–3cm of the top of the
restraint or when they are over the maximum recommended weight. For AS/NZS 1754 restraints (www.standards.co.nz), the child can use the restraint until their shoulders reach the top rear-facing shoulder markers.
» Feet hanging over the end of the restraint do not affect the performance of the restraint or harm the child.
» If the child is under 12 months old, move them to a rear-facing restraint with a higher maximum weight/length limit. Always check the manufacturer’s instructions. It is recommended by paediatricians that a child should remain rear-facing until around 2 years of age. Many restraints allow for this.
Advice for parents of small or premature babies » Seek medical advice on the best way to transport small or premature babies. Current
information suggests that babies born at less than 37 weeks should be observed in a restraint (positioned as it would be in a vehicle) before being discharged from hospital.

NZ Transport Agency | 27 Child restraint technician’s manual Version 3 April 2016
This is to monitor for any periods of not breathing, the heart rate slowing or decreased oxygen levels.
» Ensure that you are using a child restraint where the harness can be adjusted so that the harness fits their body.
» Limit travel as much as possible. When travelling, take care that the baby’s head doesn’t fall forward and obstruct the airway. Placing the baby correctly in the restraint will help the baby maintain the best position. Families should minimise travel for babies with respiratory difficulties as the position of the restraint could compromise breathing for some babies.
» Have an adult sit beside them in the rear seat of the vehicle. A very small or premature baby may need to travel lying flat. A conventional child restraint that allows for proper positioning should be chosen if the baby can maintain a semi-upright position safely.
Placing the premature baby in a restraint » If the restraint offers two crotch strap positions, use the strap closest to the back of the
restraint to help prevent the baby from slumping forward. » If the restraint has low harness slots, use these to help prevent the harness from coming
up over the baby’s ears. » The baby’s back and bottom should be against the restraint. » Rolled blankets placed either side of the body will provide side support for the head and
neck. » If the restraint does not have an adjustable crotch strap, position a small rolled blanket or
towel between the crotch strap and the baby to reduce slouching. The legs should still be in each side of the crotch strap.
» Recline the restraint halfway back on the vehicle seat at about a 45-degree angle. You may need to use a firm rolled small towel under the foot end of the restraint to achieve this. All babies are best travelling rear-facing at an angle of approximately 45 degrees.
FITTING CHECKLIST: REAR-FACINGVEHICLE CHECK YES NOAlways rear-facing Never in front seat of vehicle with airbag On forward-facing vehicle seat Base and restraint locked togetherRestraint angle around 45 degrees Safety belt routed correctly Stabilising bar/foot prop used (if present)Locking clip correctly positioned (if required) Restraint handle correctly positionedTether strap fitted and used correctlyNo excessive sideways movement (2.5 cm or 1 inch)
FITTING CHECKLIST: REAR-FACINGCHILD CHECK YES NOCrotch strap used in the correct slots and adjusted correctly if adjustable Harness firm against child Harness positioned correctlyChest clip at armpit level if fitted Child’s head below top of restraint

28 | NZ Transport Agency Child restraint technician’s manual Version 3 April 2016
FORWARD-FACING RESTRAINTS AND CONVERTIBLE RESTRAINTS Forward-facing restraints may be forward-facing only, may be convertible restraints that are used both rearward and forward facing or combination booster seats with an in-built harness. CRTs have a key role to play educating parents why it’s safest to stay in a rear-facing restraint for as long as possible. A forward-facing restraint only protects the child when: » it is fitted correctly into the vehicle » the harness straps are placed correctly » the child is positioned correctly, with its bottom at the back of the restraint » the child is the right weight and height for the restraint being used.
Convertible restraints These convert from a rear-facing to a forward-facing position. The weight and/or height recommendations for the convertible restraint may allow for children who have outgrown their restraint to continue to face rearward longer. Convertible restraints may also be used from birth. Weight and/or height recommendations for convertible restraints vary according to the make and model. Always check the manufacturer’s instructions. Convertible child restraints that are being installed rear facing may differ from the forward-facing safety belt path and may require the use of a tether strap and stabilising bar. (See page 25.)
INSTALLING A FORWARD-FACING RESTRAINT When installing a forward-facing restraint, always: » follow the manufacturer’s instructions » place it on a vehicle seat that faces forward » place it in the centre of the rear seat if the restraint fits well there (try another position if
you can’t get a firm fit) » put the restraint in the rear seat if there is an airbag in the front » stow the stabilising bar (if present on the convertible restraint) as per the manufacturer’s
instructions (See vehicle/restraint compatibility section on page 14) » check the way the safety belt is threaded though the restraint (it may be different from
the rear-facing position) » use the tether strap if the restraint has one – secure the tether, then remove the slack
once the safety belt has been threaded through the restraint and tightened, but don’t over-tighten the tether (the purpose of the tether strap is to stabilise the top part of the child restraint) (See vehicle/restraint compatibility section on page 14)
» apply your weight to the restraint as you secure the vehicle safety belt through the correct safety belt path (this allows you to get a more secure fit, which is essential if there is no tether strap, as the performance of the child restraint depends on the firmness of the safety belt)
» ensure that the restraint does not move more than 2.5 cm or 1 inch in any direction (try another position in the vehicle, or another restraint, if you can’t achieve this)
» make sure the restraint seat back fits flat against the vehicle seat back, if necessary remove the vehicle head rest to do this and stow the head rest safely.

NZ Transport Agency | 29 Child restraint technician’s manual Version 3 April 2016

30 | NZ Transport Agency Child restraint technician’s manual Version 3 April 2016
SECURING A CHILD IN A FORWARD-FACING RESTRAINT » Follow the manufacturer’s instructions. » The child should be placed with their bottom well back in the restraint. Positioning the
child snugly helps the harness fit correctly and holds the child securely in the restraint. » The harness must come out of the restraint level with or above the child’s shoulders. » Always check the fitting instructions for the correct shoulder strap position. When some
convertible restraints are used in the forward-facing position, the top slots must be used. This is because only the top slots are reinforced enough to take the extra load of a heavier child in a crash.
» The harness should be firm against the child, with no more than a finger’s width of slack between the child and the harness. Always give the harness a tug to make sure that the harness adjuster is holding fast.
» American restraints have a chest tie (also known as a harness retainer clip). The chest tie is placed across the chest at the level of the child’s armpits – not up towards the neck. It holds the shoulder harness in the correct position.
» A child should not be moved to a booster seat until they have outgrown the forward-facing child restraint. This is when the child’s eye level is at or above the top of the restraint or they have reached the maximum weight limit of the seat and/or the harness or the restraint shoulder height markers.
FITTING CHECKLIST: FORWARD-FACINGVEHICLE CHECK YES NOAlways forward-facing On forward-facing vehicle seat Safety belt routed correctly Locking clip correctly positioned (if required) No excessive sideways movement (2.5 cm or 1 inch)Tether strap, if fitted, is used correctly
FITTING CHECKLIST: FORWARD-FACINGCHILD CHECK YES NOCrotch strap used in the correct slots and adjusted correctly if adjustable Shoulders not more than 25mm above the top shoulder height markers Harness firm against the child Harness at/just above shoulders Chest clip at armpit level if fitted Eye level below top of restraint

NZ Transport Agency | 31 Child restraint technician’s manual Version 3 April 2016
BOOSTER SEATS » Legally, an approved child restraint must be
used until a child is 7 years old. However, to reduce the risk of injury it is strongly recommended that they remain in a booster seat until they can safely fit the dimensions of a vehicle seat and safety belt. Best practice is to keep a child in a booster seat until they are 148cm tall.
» It is recommended that children remain in a child restraint with an in-built harness until they have outgrown it. Graduating to a booster seat before a child is the right weight and height can lead to injuries, as even when seated on booster seats smaller children do not always wear the lap–sash safety belt correctly.
Remember these points when placing a child in a booster seat: » When fitting a child into a booster (with
a built-in harness), always refer to the manufacturer’s instructions. Remember to remove the harness once the child has reached the weight limit for the harness.
» Place the booster seat on the rear seat, as it is safer.
» A booster seat raises the child up so that the vehicle lap–sash safety belt will fit across the shoulder and not the neck and the lap belt sits low on the hips and thighs.
» Sash guides are usually provided to direct the sash over the shoulder and position the safety belt away from the neck.
» A booster seat can be used for an older child. Use your child restraint for as long as your child fits it, as it offers more protection in a crash.
» A booster seat will improve the fit of the vehicle safety belt.
» Make sure the diagonal safety belt goes through the guide and over the shoulder, not across the child’s neck.
» For a booster seat to offer maximum safety, it must be used with the lap belt always over the child’s hips and thighs. The lap belt must never be on the child’s abdomen. Do not allow the child to slump. The sash belt must be diagonally across the chest, passing over the child’s shoulder near the neck. Slight contact with the child’s neck is not dangerous. The sash belt behind the back or under the child’s arm is dangerous.
» A booster seat with a lap belt positioning device prevents children slumping and keeps the lap belt on the child’s thighs.
» Never use a booster seat with a lap belt only unless used with a child harness. » A booster with a back will better protect the head and neck than a half booster. » The lap portion of the safety belt needs to be threaded under the arm rests of the child
restraint.

32 | NZ Transport Agency Child restraint technician’s manual Version 3 April 2016
FITTING CHECKLIST: BOOSTER SEATVEHICLE CHECK YES NOOn forward-facing vehicle seat Tether strap is connected (if fitted) Anti-submarine device is used correctly (if fitted) Lap-only safety belt is used only with child safety harness Locking clip is used with lap–sash safety belt (if indicated in the instructions) Seat needs to be flush against the back of the vehicle seat. This may require the removal of the vehicle headrest.
FITTING CHECKLIST: BOOSTER SEATCHILD CHECK YES NOSafety belt across child’s shoulders Safety belt low on child’s thighs and hips Shoulder guide is used (if fitted) Head rest is correctly adjusted Safety belt is not over armrest

NZ Transport Agency | 33 Child restraint technician’s manual Version 3 April 2016
The five-step testThis test is useful for parents to determine whether their child will be safe on a vehicle seat.
Child safety harness » A child safety harness is an approved child restraint that may be used with a vehicle
lap or lap-sash safety belt. It may also be used with a booster seat if the booster seat instructions and the child safety harness instructions both allow for this.
» A child safety harness should be used with caution. Research has shown that too often when the harness is in use the lap safety belt sits too high on the abdomen, placing the child at risk of serious injuries in a crash.
» Always follow the manufacturer instructions.

34 | NZ Transport Agency Child restraint technician’s manual Version 3 April 2016

NZ Transport Agency | 35 Child restraint technician’s manual Version 3 April 2016
Common problems when installing child restraintsA number of problems can arise when installing child restraints. These include:
»buckle crunching »short safety belts »excessive restraint movement and seat contours »size of the restraint »angle of restraint.
BUCKLE CRUNCHINGIn some positions, the safety belt buckle catches against the frame of the restraint and tries to bend and thread through the back of the restraint frame. This places undue tension on the buckle and it may come undone in a crash. It can also be difficult to get a proper fit if the safety belt buckle comes through the base of the vehicle’s rear seat forward of the seat bight. The seat bight is where the back and base of the vehicle seat meet. In this situation, try another restraint. Check your vehicle and restraint manual to see if buckle twisting is allowed.
SHORT SAFETY BELTS Some safety belts will be too short to go around the top of a child restraint. Not all safety belts are long enough for this. If a restraint that needs the belt threaded this way won’t fit on the rear seat, try the front seat if there’s no airbag. Moving the front seat back as far as possible will give you the longest length of safety belt. There may be an alternative route for the safety belt – check the restraint manual. For booster seats and child harnesses, ensure that the locking clip is under the armrest to get maximum safety belt length. If it’s still difficult to fit the child restraint securely, try another type of restraint or a different seating position.
EXCESSIVE RESTRAINT MOVEMENT AND SEAT CONTOURS The shape of the vehicle seat and the size and shape of the restraint affects how the restraint fits. A high centre portion of a vehicle seat will make it difficult to fit a restraint securely. Most rear-facing seats will have some side-to-side movement. Apply pressure while attaching the safety belt so you can pull the safety belt tight. If needed, use a locking clip to hold the safety belt firmly. This should help keep the restraint tightly secured. If not, try another position in the vehicle or another type of restraint.

36 | NZ Transport Agency Child restraint technician’s manual Version 3 April 2016
SIZE OF THE RESTRAINT Before you purchase a child restraint try it in the car both rear-facing and forward-facing if it is a convertible restraint. Sometimes, a convertible rear-facing restraint may be too large for a small car. If you have to move the car’s front seat forward a long way to fit the rear-facing convertible restraint in the rear, there may not be room for a front seat passenger. Placing the restraint in the centre position can gain distance by the restraint fitting partially between the two front seats. If you put the convertible restraint in the front seat (if there’s no airbag) you may have no room for a rear-seat passenger. Try another position in the car or find another type of restraint.
ANGLE OF RESTRAINT If a rear-facing restraint is too big for the space available, then this will result in the angle of the child restraint being too steep, which may compromise the child’s ability to maintain an open airway.
INSTALLATION AFTER VEHICLE SERVICING When you have had your car serviced and/or warranted check that the child restraint has been correctly reinstalled, and if not reinstall the seat in accordance with the manufacturer’s specifications.

NZ Transport Agency | 37 Child restraint technician’s manual Version 3 April 2016
AppendixWEBSITES The following websites provide extra reference materials : • www.nzta.govt.nz/childrestraints • www.acc.co.nz • www.transport.govt.nz • www.plunket.org.nz • www.safekids.org.nz
CONVERSIONS
IMPERIAL METRIC1’ 2.5cm
29’ 73.7cm 30’ 76.2cm 57’ 142.2cm 4’8’ 148.0cm 4lb 1.8kg 5lb 2.3kg
20lb 9.0kg 22lb 10.0kg 30lb 13.6kg 35lb 15.9kg 40lb 18.2kg 50lb 22.7kg 65lb 29.5kg 80lb 36.3kg 100lb 45.4kg
NZ Transport Agency Private Bag 6995 Wellington 6141 Telephone: 0800 699 000 [email protected]
OUR CONTACT DETAILS
April 2016 15-283
This publication is also available on NZ Transport Agency’s website at www.nzta.govt.nz
If you have further queries, call our contact centre on 0800 699 000 or write to us:
NZ Transport Agency Private Bag 6995 Wellington 6141.