Chapter 9 Bid Opening, Bid Processing & Awarddot.alaska.gov/aashtoware/docs/guides/Ch9-Bid...Chapter...
59
Chapter 9 - Page 1 of 59 Alaska DOT&PF AWP Precon User Guide revised 2/20 Chapter 9 – Bid Opening, Bid Processing & Award Contents 9.1 Bid Opening Prep .......................................................................................................................... 2 9.2 Managing Proposal Workflow ....................................................................................................... 3 9.3 Opening Bids in Bid Express .......................................................................................................... 4 9.4 Publishing Bid Results ................................................................................................................. 10 9.5 Entering Manual Bids via AWP Bids Entry .................................................................................... 13 9.6 Importing Bids to AWP ................................................................................................................ 18 9.7 Entering Manual Bids into AWP ................................................................................................... 20 9.8 Managing Bids in AWP ................................................................................................................ 23 9.9 Applying Bidder Preference Amounts ......................................................................................... 28 9.10 Additive Alternate / NTP Analysis .............................................................................................. 35 9.11 Proposal Processing ................................................................................................................... 39 9.12 Awarding a Proposal in AWP ..................................................................................................... 45 9.13 Electronic Bid Bonds .................................................................................................................. 47 9.14 Rejecting Bids ............................................................................................................................ 54 9.15 Re-Letting a Proposal ................................................................................................................ 57
Transcript of Chapter 9 Bid Opening, Bid Processing & Awarddot.alaska.gov/aashtoware/docs/guides/Ch9-Bid...Chapter...

Chapter 9 - Page 1 of 59 Alaska DOT&PF AWP Precon User Guide revised 2/20
Chapter 9 – Bid Opening, Bid Processing & Award
Contents
9.1 Bid Opening Prep .......................................................................................................................... 2
9.2 Managing Proposal Workflow ....................................................................................................... 3
9.3 Opening Bids in Bid Express .......................................................................................................... 4
9.4 Publishing Bid Results ................................................................................................................. 10
9.5 Entering Manual Bids via AWP Bids Entry .................................................................................... 13
9.6 Importing Bids to AWP ................................................................................................................ 18
9.7 Entering Manual Bids into AWP ................................................................................................... 20
9.8 Managing Bids in AWP ................................................................................................................ 23
9.9 Applying Bidder Preference Amounts ......................................................................................... 28
9.10 Additive Alternate / NTP Analysis .............................................................................................. 35
9.11 Proposal Processing ................................................................................................................... 39
9.12 Awarding a Proposal in AWP ..................................................................................................... 45
9.13 Electronic Bid Bonds .................................................................................................................. 47
9.14 Rejecting Bids ............................................................................................................................ 54
9.15 Re-Letting a Proposal ................................................................................................................ 57
Chapter 9 - Page 2 of 59 Alaska DOT&PF AWP Precon User Guide revised 2/20
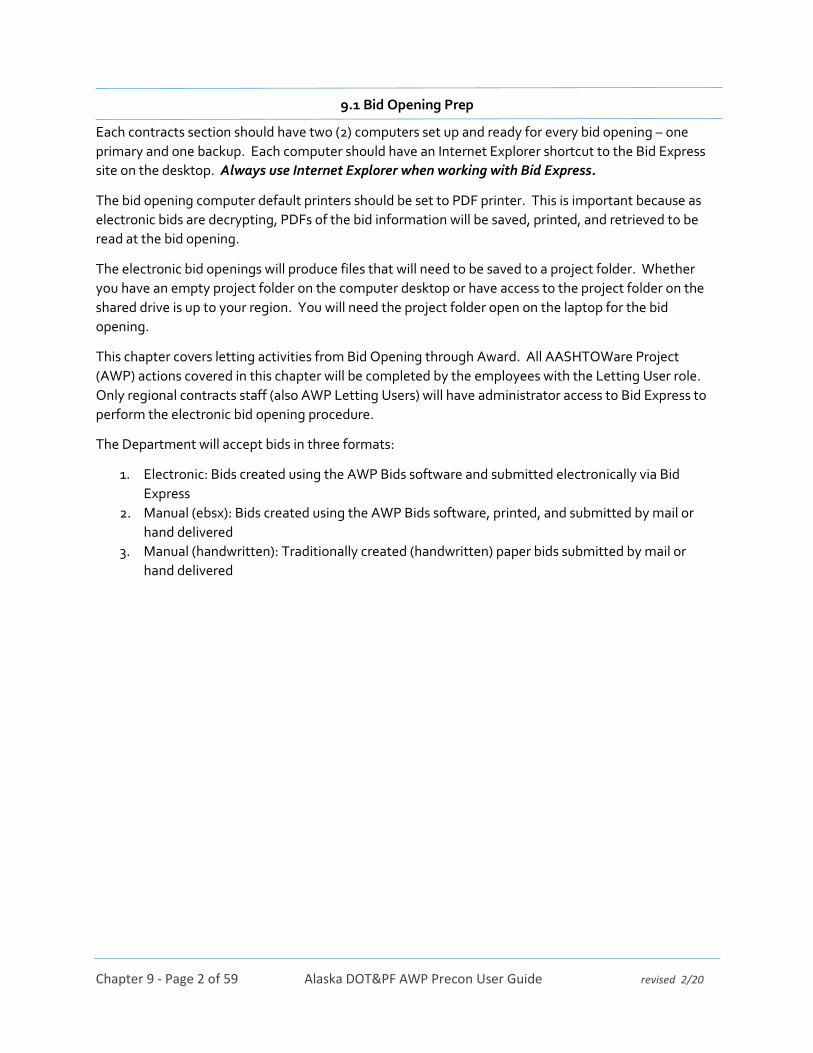
9.1 Bid Opening Prep
Each contracts section should have two (2) computers set up and ready for every bid opening – one
primary and one backup. Each computer should have an Internet Explorer shortcut to the Bid Express
site on the desktop. Always use Internet Explorer when working with Bid Express.
The bid opening computer default printers should be set to PDF printer. This is important because as
electronic bids are decrypting, PDFs of the bid information will be saved, printed, and retrieved to be
read at the bid opening.
The electronic bid openings will produce files that will need to be saved to a project folder. Whether
you have an empty project folder on the computer desktop or have access to the project folder on the
shared drive is up to your region. You will need the project folder open on the laptop for the bid
opening.
This chapter covers letting activities from Bid Opening through Award. All AASHTOWare Project
(AWP) actions covered in this chapter will be completed by the employees with the Letting User role.
Only regional contracts staff (also AWP Letting Users) will have administrator access to Bid Express to
perform the electronic bid opening procedure.
The Department will accept bids in three formats:
1. Electronic: Bids created using the AWP Bids software and submitted electronically via Bid
Express
2. Manual (ebsx): Bids created using the AWP Bids software, printed, and submitted by mail or
hand delivered
3. Manual (handwritten): Traditionally created (handwritten) paper bids submitted by mail or
hand delivered

Chapter 9 - Page 3 of 59 Alaska DOT&PF AWP Precon User Guide revised 2/20
9.2 Managing Proposal Workflow
Just before the bid opening, you must change the proposal workflow phase in AWP. Depending on
your region’s preference, this may be done before heading to the public bid opening room/location or
just before starting the actual bid opening.
1. Log into AWP (see chapter 1).
2. Make sure you are in the Letting User role.
3. Navigate to Proposal Overview on the dashboard (Figure 9.1).
4. (A) Search for and (B) select your proposal.
Your proposal should still be in the workflow phase Advertising, so the blue addenda banner will be at
the top of the Proposal Summary component (Figure 9.2).
5. (C) Click on the Workflow tab.
6. (D) From the Workflow Phase dropdown select Award Processing.
7. (E) Click <Save>.
B
A
Figure 9.1
Figure 9.2
E
D
C

Chapter 9 - Page 4 of 59 Alaska DOT&PF AWP Precon User Guide revised 2/20
9.3 Opening Bids in Bid Express
*Always use Internet Explorer with Bid Express.*
Log onto Bid Express:
1. (A) Go to www.bidx.com (Figure 9.3).
2. (B) Type in your email address.
3. (C) Enter your password.
4. (D) Click the <Log In> button.
NOTE: You do not have to select Alaska DOT&PF from the Select a U.S. Agency dropdown.
The system knows from your email address.
5. From the home page, click the <Admin> button on the top right of the screen (Figure 9.4).
This brings you to the Manage Agency page. Notice that there is an “Admin” watermark across your
screen indicating that you are in administrator mode.
6. (Figure 9.5) In the Letting and Vendor
Data section, select Manage Lettings,
Proposals, and Bids.
D C B
A
Figure 9.3
Figure 9.4
Figure 9.5
Chapter 9 - Page 5 of 59 Alaska DOT&PF AWP Precon User Guide revised 2/20
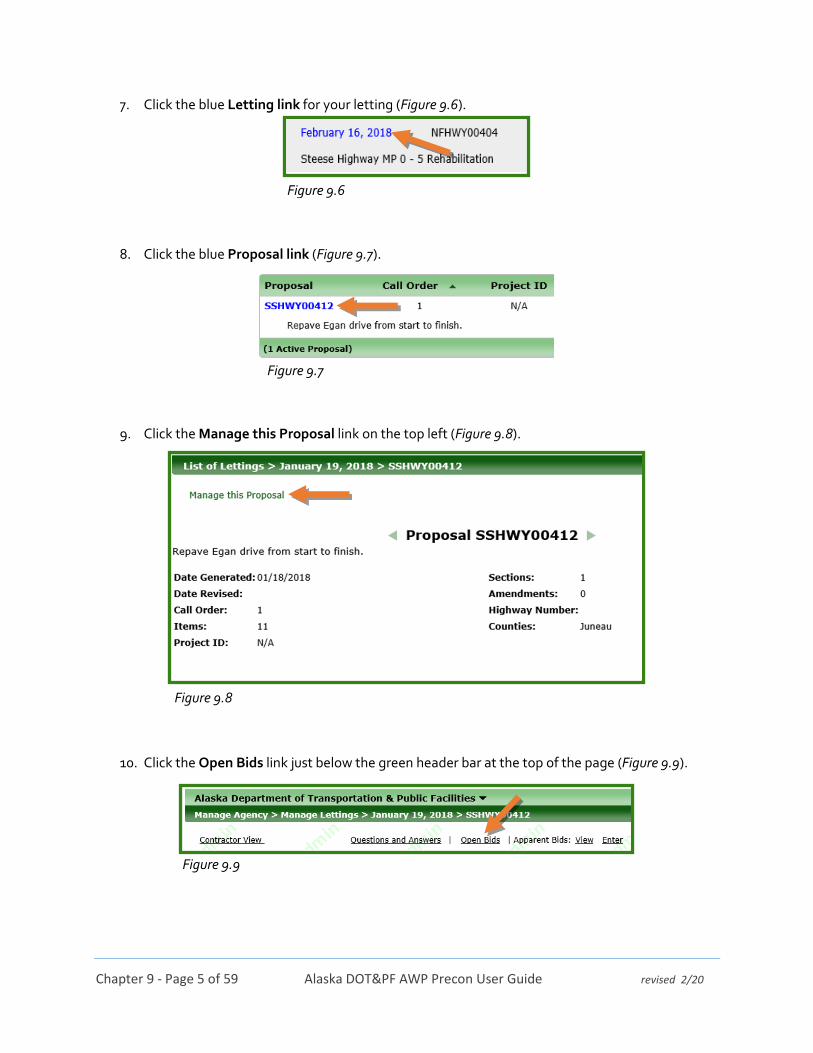
7. Click the blue Letting link for your letting (Figure 9.6).
8. Click the blue Proposal link (Figure 9.7).
9. Click the Manage this Proposal link on the top left (Figure 9.8).
10. Click the Open Bids link just below the green header bar at the top of the page (Figure 9.9).
Figure 9.6
Figure 9.7
Figure 9.8
Figure 9.9

Chapter 9 - Page 6 of 59 Alaska DOT&PF AWP Precon User Guide revised 2/20
11. Click the <Launch Open Bids> button (Figure 9.10).
The Bid Express Bid Opener window will pop up (Figure 9.11).
12. On the Bid Express Bid Opener window, (A) click Tools and (B) select Options (Figure 9.11)
(Figure 9.12) 13. (C) Check the Automatically print all EBSX files after bid opening box. 14. (D) Click the <Change Folder> button.
15. Navigate to the project folder for the proposal you are opening bids for and click <Okay>.
16. (E) Click <Save>.
As each bid is opening (decrypting), a PDF of each AWP Bids file will appear on your screen to save.
Figure 9.10
A B
Figure 9.11
D
C
E
Figure 9.12

Chapter 9 - Page 7 of 59 Alaska DOT&PF AWP Precon User Guide revised 2/20
(Figure 9.13)
17. (F) Enter the agency password in the Password field. (It is the same password for all three
regions. However, because each region has its own “Agency Key”, each region will only be able
to open bids on its own proposals.)
18. (G) Click the <Open Bids> button.
NOTE: If you click Open Bids and get the message that there were no bids submitted for this proposal,
see the information at the end of this section.
Figure 9.13
G F

Chapter 9 - Page 8 of 59 Alaska DOT&PF AWP Precon User Guide revised 2/20
Once bids have finished decrypting, there will be a link at the bottom of the Status Log window (Figure
9.14).
19. Click the link.
Figure 9.14
Chapter 9 - Page 9 of 59 Alaska DOT&PF AWP Precon User Guide revised 2/20
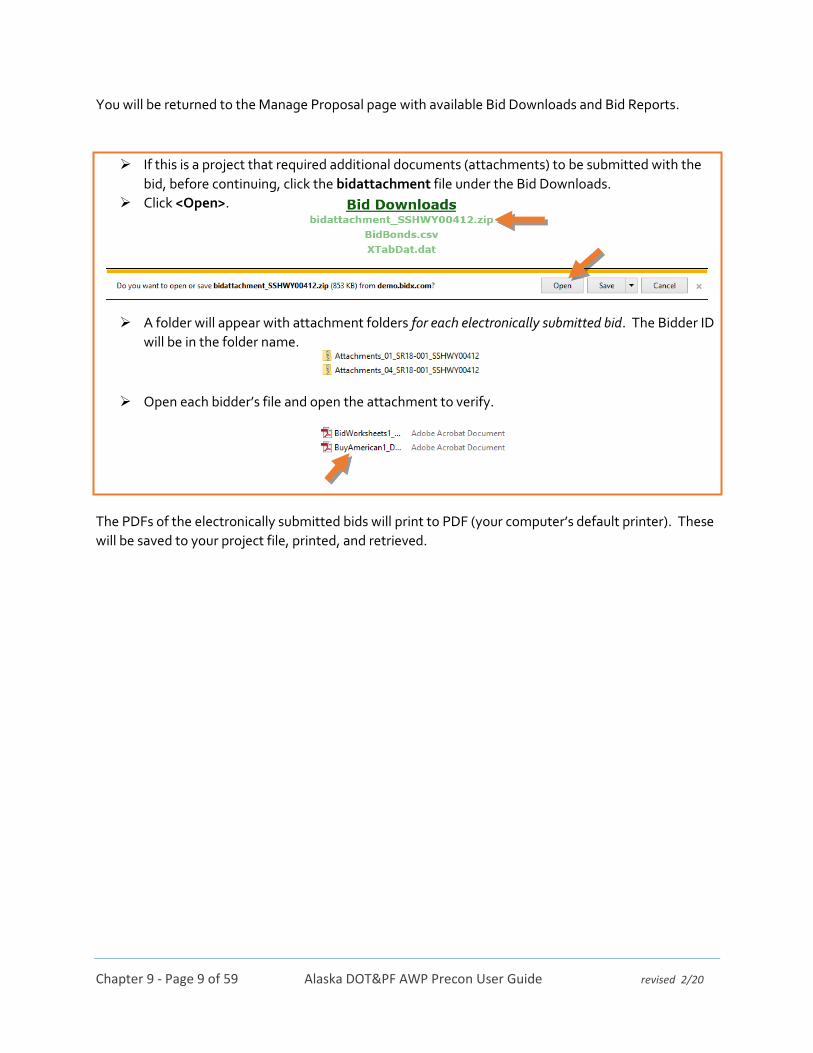
You will be returned to the Manage Proposal page with available Bid Downloads and Bid Reports.
If this is a project that required additional documents (attachments) to be submitted with the
bid, before continuing, click the bidattachment file under the Bid Downloads.
Click <Open>.
A folder will appear with attachment folders for each electronically submitted bid. The Bidder ID
will be in the folder name.
Open each bidder’s file and open the attachment to verify.
The PDFs of the electronically submitted bids will print to PDF (your computer’s default printer). These
will be saved to your project file, printed, and retrieved.

Chapter 9 - Page 10 of 59 Alaska DOT&PF AWP Precon User Guide revised 2/20
9.4 Publishing Bid Results
1. Using the “breadcrumbs” on the header, navigate back to the proposal (Figure 9.15)
2. Click the Enter link just below the green header bar at the top of the page (Figure 9.16).
The Apparent Bid Entry window will appear (Figure 9.17). The electronically submitted bids already
appear.
*NOTE: If your proposal contains multiple sections (additive alternates or multiple NTPs), you will not
publish results using the Bid Express Apparent Bids section. Skip these steps, go to Publishing Bid
Results for Proposals with Multiple Sections below.
3. For manual bid submitters, (A) enter the Bidder ID and (B) the Bid total (from the Bids file
paper printout mailed in and read out).
4. (C) Enter EE in the Bidder ID field for the Engineer’s Estimate.
5. (D) Enter the Engineer’s Estimate amount in the Bid field and type Engineer’s Estimate in the
Unknown Bidder Name field.
6. If a state-funded proposal, enter adjusted bid amounts for all bids in the Adjusted Bid Amount
column.
7. (E) Under the Public column, click All or individually select the bids you want to make public.
8. (F) Click the <Publish> button.
9. You will be asked to confirm that you want to publish bids. Click <Ok>.
Figure 9.15
Figure 9.16
Figure 9.17
A
D
F
B
C
E
Electronic Bids

Chapter 9 - Page 11 of 59 Alaska DOT&PF AWP Precon User Guide revised 2/20
If you want to verify that the apparent bids are published or want to see them from the contractor’s
perspective, click the Contractor View link on the top left of the page.
If, after publishing bid results, you find made an error when entering a ‘paper’ bid amount, click the
Manage Apparent Bids for this Proposal link on the top left. Correct the error and click the <Publish>
button.
Publishing Bid Results for Proposals with Multiple Sections (additive alternates or multiple NTPs):
1. Create a PDF document of the bid results (from excel or word).
2. Click the attachments link just below the green header bar at the top of the page (Figure 9.18).
(Figure 9.19) 3. (A) Click the <Browse> button. 4. Navigate to the bid results PDF you want to upload, click <Open>. 5. (B) Select the Unchecked Bid Results attachment type:
6. (C) Click the <Upload> button.
Before logging off and closing Bid Express, download the three (3) files under Bid Downloads and save
them to your proposal file (Figure 9.20).
C
B A
Figure 9.18
Figure 9.19
Figure 9.20

Chapter 9 - Page 12 of 59 Alaska DOT&PF AWP Precon User Guide revised 2/20
If no electronic bids were submitted:
If you did not receive any electronic bids, you will get a red message when you click the Launch Open
Bids button (Figure 9.21).
If this occurs, using the “breadcrumbs” on the header, navigate back to the proposal (Figure 9.22).
Then, complete the Publishing Bid Results steps detailed in this section.
NOTE: Since there were no electronic bids, you will not need to download any files produced by Bid
Express (bid attachments, bidbonds.csv, or XTabDat.dat) (see Figure 9.20).
Figure 9.21
Figure 9.22
Chapter 9 - Page 13 of 59 Alaska DOT&PF AWP Precon User Guide revised 2/20
9.5 Entering Manual Bids via AWP Bids Entry
Electronically submitted bids create an XTabDat.dat file that is imported directly into AWP. If contracts
sections wish to enter manual bids by using the AWP Bids Entry software, these bids will automatically
add to the XTabDat.dat file that was created from the electronic bids and all bids can be imported into
AWP together.
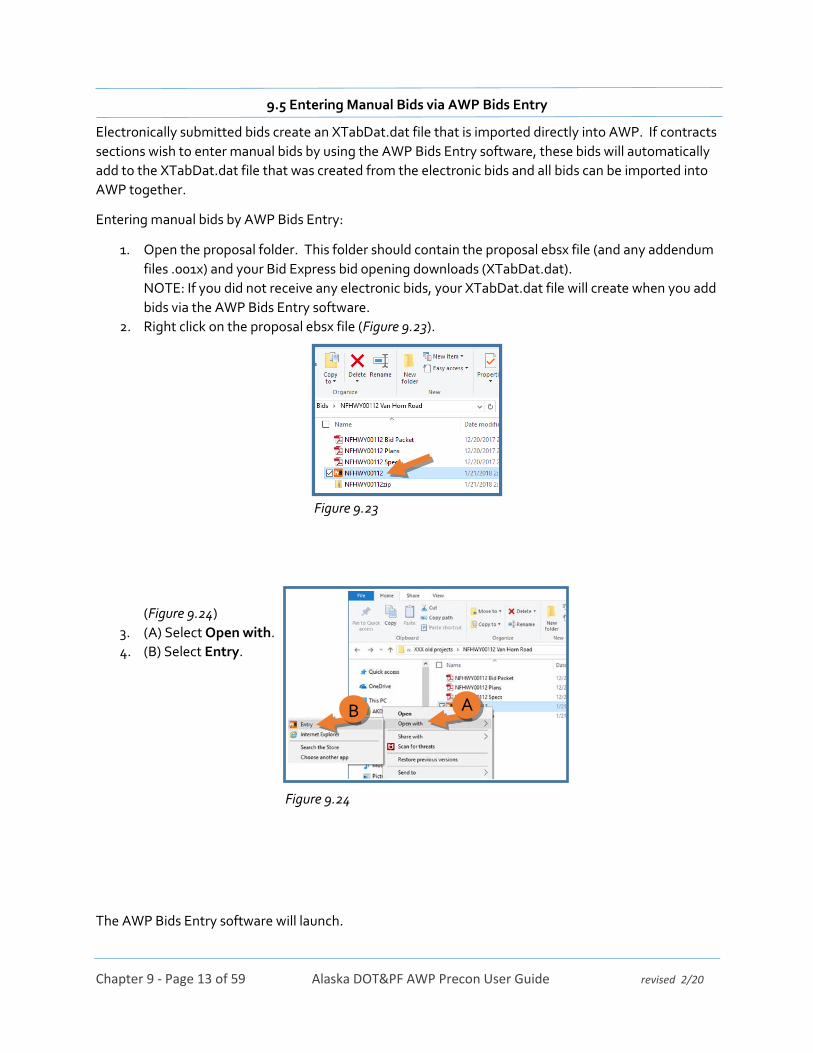
Entering manual bids by AWP Bids Entry:
1. Open the proposal folder. This folder should contain the proposal ebsx file (and any addendum
files .001x) and your Bid Express bid opening downloads (XTabDat.dat).
NOTE: If you did not receive any electronic bids, your XTabDat.dat file will create when you add
bids via the AWP Bids Entry software.
2. Right click on the proposal ebsx file (Figure 9.23).
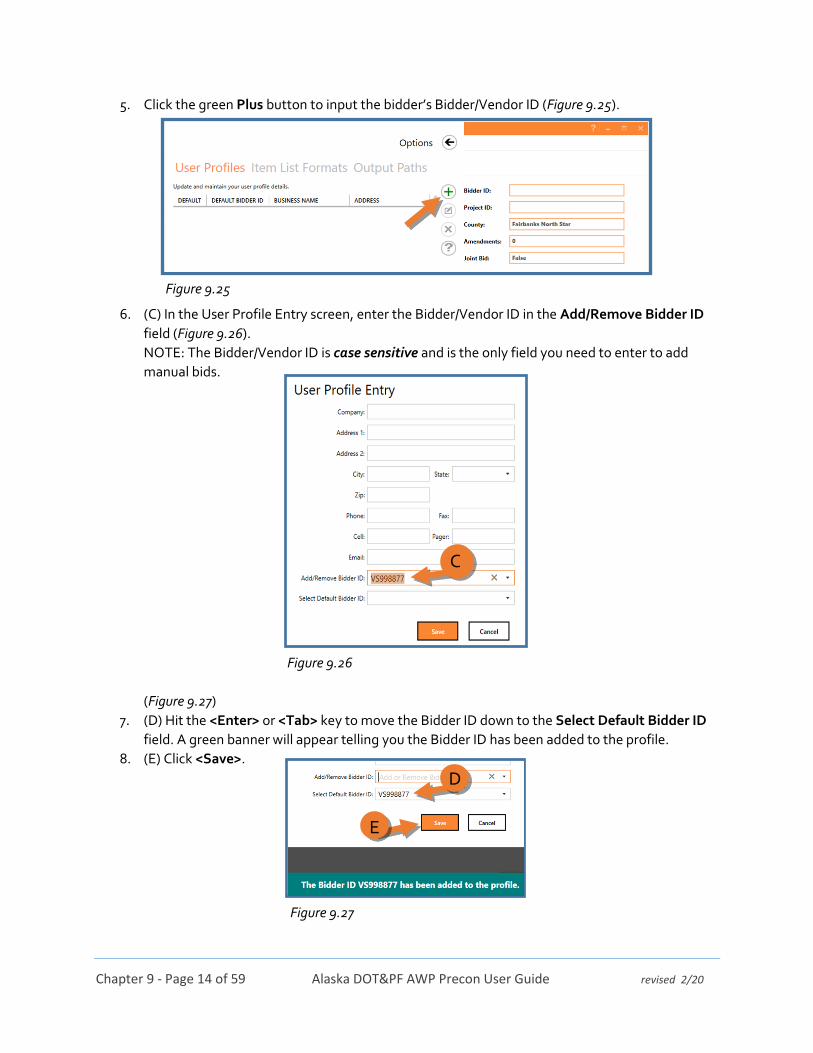
(Figure 9.24)
3. (A) Select Open with.
4. (B) Select Entry.
The AWP Bids Entry software will launch.
Figure 9.23
B A
Figure 9.24
Chapter 9 - Page 14 of 59 Alaska DOT&PF AWP Precon User Guide revised 2/20
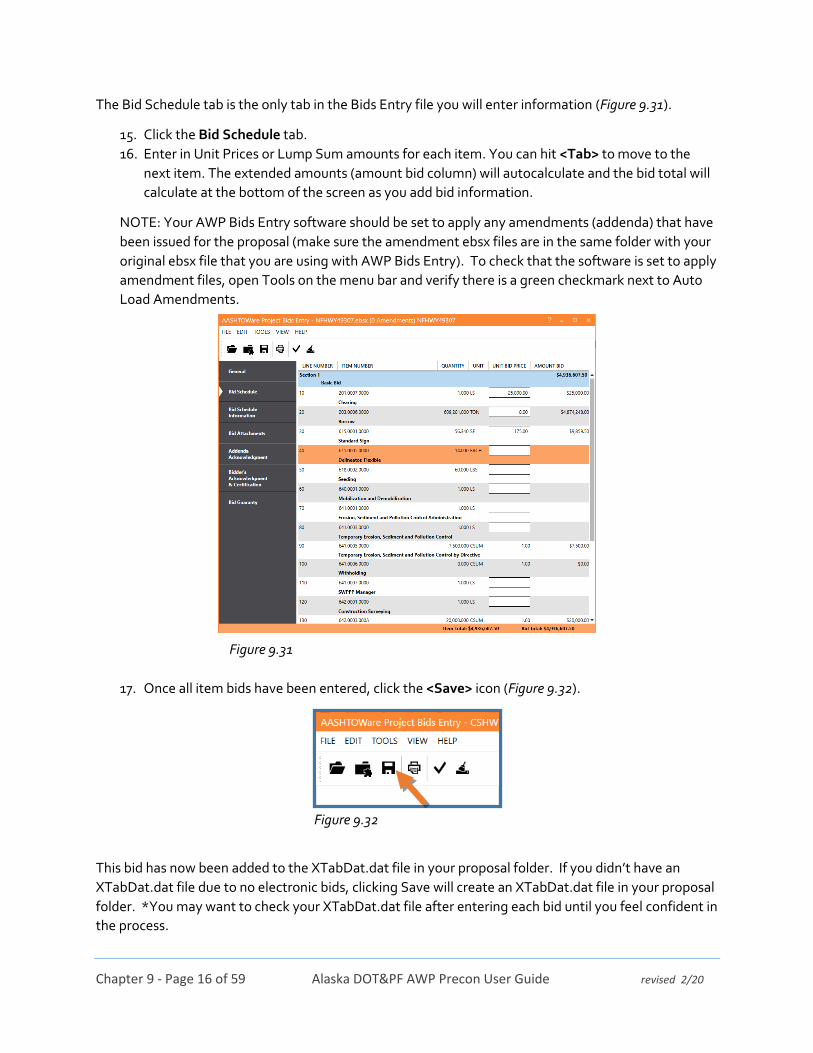
5. Click the green Plus button to input the bidder’s Bidder/Vendor ID (Figure 9.25).
6. (C) In the User Profile Entry screen, enter the Bidder/Vendor ID in the Add/Remove Bidder ID
field (Figure 9.26).
NOTE: The Bidder/Vendor ID is case sensitive and is the only field you need to enter to add
manual bids.
(Figure 9.27)
7. (D) Hit the <Enter> or <Tab> key to move the Bidder ID down to the Select Default Bidder ID
field. A green banner will appear telling you the Bidder ID has been added to the profile.
8. (E) Click <Save>.
Figure 9.25
C
D
E
Figure 9.26
Figure 9.27

Chapter 9 - Page 15 of 59 Alaska DOT&PF AWP Precon User Guide revised 2/20
You will be returned to the Options window (Figure 9.28). Notice the Bidder ID now appears and is
marked as default. You must tell the AWP Bids Entry software where you want the bids you enter to be
saved.
9. Click Output Paths.
(Figure 9.29 and Figure 9.30)
10. Check the Current Output Path. If it is not set to your proposal folder, (F) click <Browse>.
11. (G) Navigate to and select your proposal folder.
12. (H) Click <OK>. Check the Current Output Path to make sure it is correct.
13. (I) Click the <Save> icon.
14. (J) Close the Options window by clicking the <Close Arrow>.
NOTE: Once you have set your output path for this proposal, you will not have to reset it before
entering in each bid.
Figure 9.28
I
F
J
H
G
Figure 9.29
Figure 9.30
Chapter 9 - Page 16 of 59 Alaska DOT&PF AWP Precon User Guide revised 2/20
The Bid Schedule tab is the only tab in the Bids Entry file you will enter information (Figure 9.31).
15. Click the Bid Schedule tab.
16. Enter in Unit Prices or Lump Sum amounts for each item. You can hit <Tab> to move to the
next item. The extended amounts (amount bid column) will autocalculate and the bid total will
calculate at the bottom of the screen as you add bid information.
NOTE: Your AWP Bids Entry software should be set to apply any amendments (addenda) that have
been issued for the proposal (make sure the amendment ebsx files are in the same folder with your
original ebsx file that you are using with AWP Bids Entry). To check that the software is set to apply
amendment files, open Tools on the menu bar and verify there is a green checkmark next to Auto
Load Amendments.
17. Once all item bids have been entered, click the <Save> icon (Figure 9.32).
This bid has now been added to the XTabDat.dat file in your proposal folder. If you didn’t have an
XTabDat.dat file due to no electronic bids, clicking Save will create an XTabDat.dat file in your proposal
folder. *You may want to check your XTabDat.dat file after entering each bid until you feel confident in
the process.
Figure 9.31
Figure 9.32

Chapter 9 - Page 17 of 59 Alaska DOT&PF AWP Precon User Guide revised 2/20
18. Before entering in your next bid, click the <Sweep> icon to clear out the existing bid
information (Figure 9.33).
This will clear out the last bid and you will be returned to the Options window. If you are not taken to
the User Profile window, click User Profiles and repeat steps 5 – 18 for all manual bids to be entered
(Figure 9.34).
Now your XTabDat.dat file contains all your bids (electronic and manual) and is ready to be imported to
AWP.
Figure 9.33
Figure 9.34

Chapter 9 - Page 18 of 59 Alaska DOT&PF AWP Precon User Guide revised 2/20
9.6 Importing Bids to AWP
1. Log into AWP (see chapter 1).
2. Make sure you are in the Letting User role.
3. (A) Expand the Global Action menu (Figure 9.35).
4. (B) Select Import File.
(Figure 9.36)
5. (C) Click the <Select File> button.
6. (D) Navigate to and select the XTabDat file for your proposal.
7. (E) Click <Open>.
8. (F) Click the <Import> button.
You will see a green message bar confirming the successful submission of the XTabDat file (Figure 9.37).
A
B
Figure 9.35
Figure 9.36
Figure 9.37
C
E
D
F

Chapter 9 - Page 19 of 59 Alaska DOT&PF AWP Precon User Guide revised 2/20
9. (G) Expand the Global Action menu (Figure 9.38).
10. (H) Select Open Process History.
There should be two (2) output files (Figure 9.39):
EXPEDITE_IMPORT.LOG
Error.log
11. Open the EXPEDITE_IMPORT.LOG.
The log should indicate a Successful Import (Figure 9.40).
If there are error messages in the EXPEDITE_IMPORT.LOG, it is usually “Vendor ID not found in
system”. This may be from an error when DOT staff entered the Bidder ID when creating a Bids file for
a manual bidder.
If you get an error message, contact a Module Administrator for assistance.
G
H
Figure 9.38
Figure 9.39
Figure 9.40
Chapter 9 - Page 20 of 59 Alaska DOT&PF AWP Precon User Guide revised 2/20
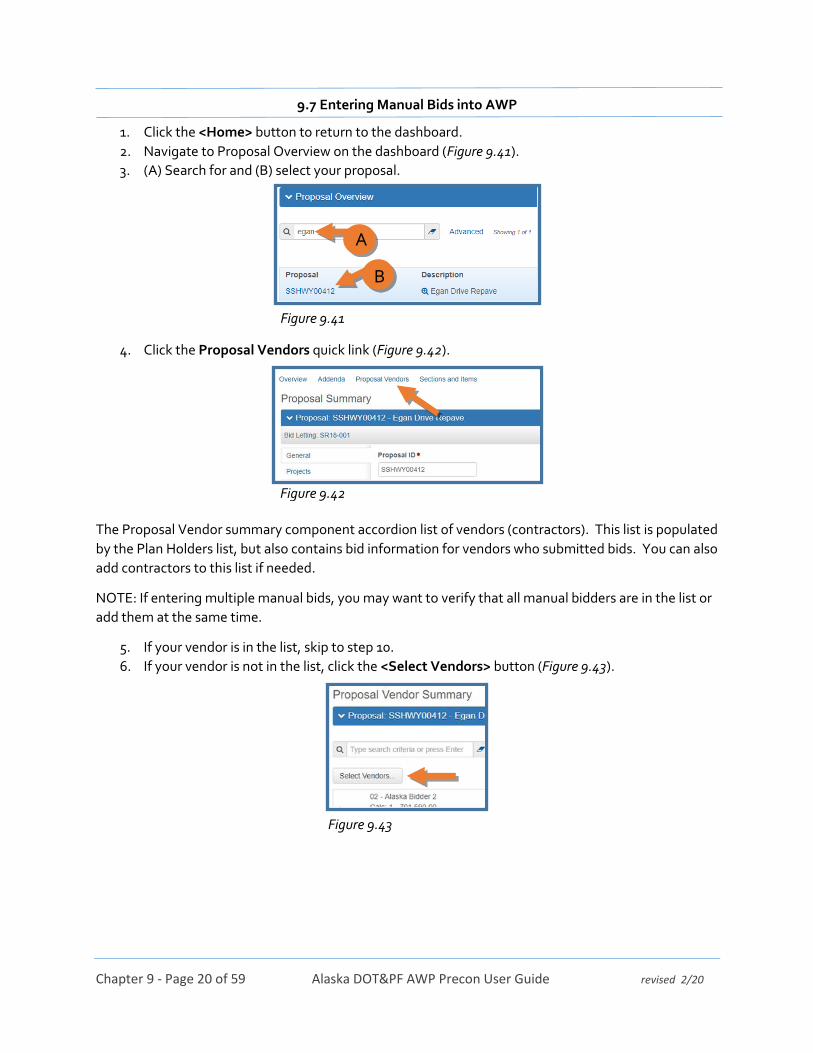
9.7 Entering Manual Bids into AWP
1. Click the <Home> button to return to the dashboard.
2. Navigate to Proposal Overview on the dashboard (Figure 9.41).
3. (A) Search for and (B) select your proposal.
4. Click the Proposal Vendors quick link (Figure 9.42).
The Proposal Vendor summary component accordion list of vendors (contractors). This list is populated
by the Plan Holders list, but also contains bid information for vendors who submitted bids. You can also
add contractors to this list if needed.
NOTE: If entering multiple manual bids, you may want to verify that all manual bidders are in the list or
add them at the same time.
5. If your vendor is in the list, skip to step 10.
6. If your vendor is not in the list, click the <Select Vendors> button (Figure 9.43).
B
A
Figure 9.41
Figure 9.42
Figure 9.43
Chapter 9 - Page 21 of 59 Alaska DOT&PF AWP Precon User Guide revised 2/20
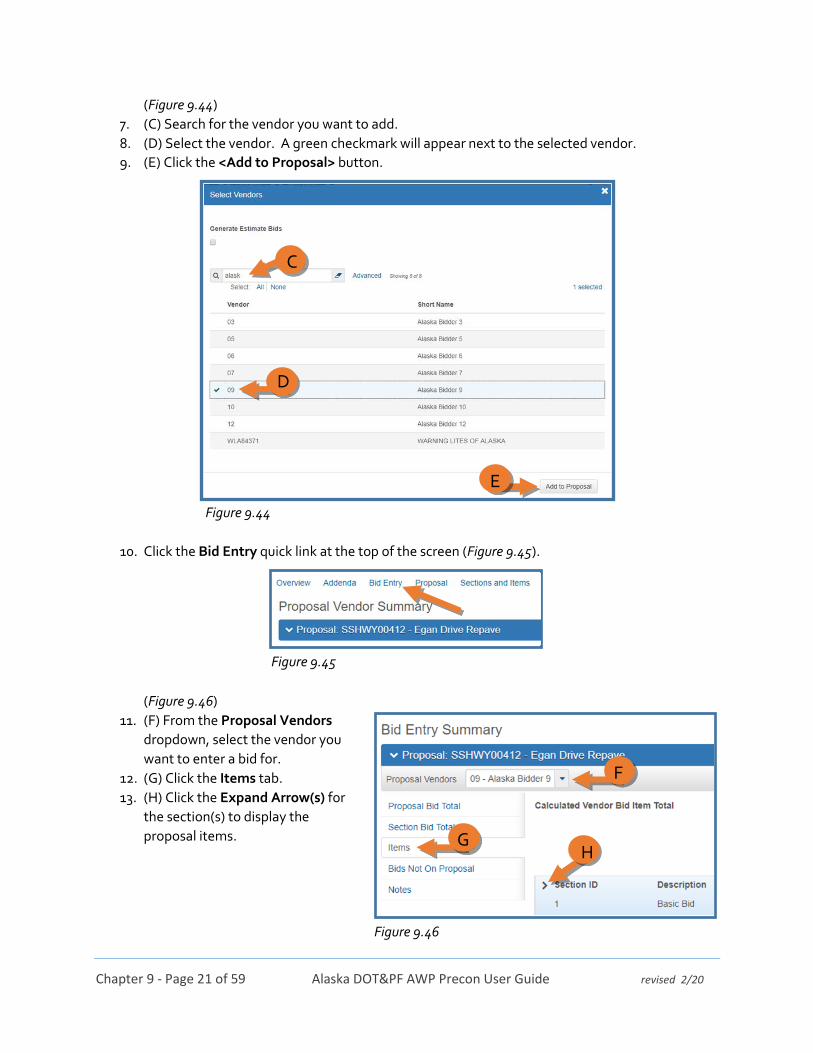
(Figure 9.44)
7. (C) Search for the vendor you want to add.
8. (D) Select the vendor. A green checkmark will appear next to the selected vendor.
9. (E) Click the <Add to Proposal> button.
10. Click the Bid Entry quick link at the top of the screen (Figure 9.45).
(Figure 9.46)
11. (F) From the Proposal Vendors
dropdown, select the vendor you
want to enter a bid for.
12. (G) Click the Items tab.
13. (H) Click the Expand Arrow(s) for
the section(s) to display the
proposal items.
E
D
C
Figure 9.44
Figure 9.45
H G
F
Figure 9.46
Chapter 9 - Page 22 of 59 Alaska DOT&PF AWP Precon User Guide revised 2/20
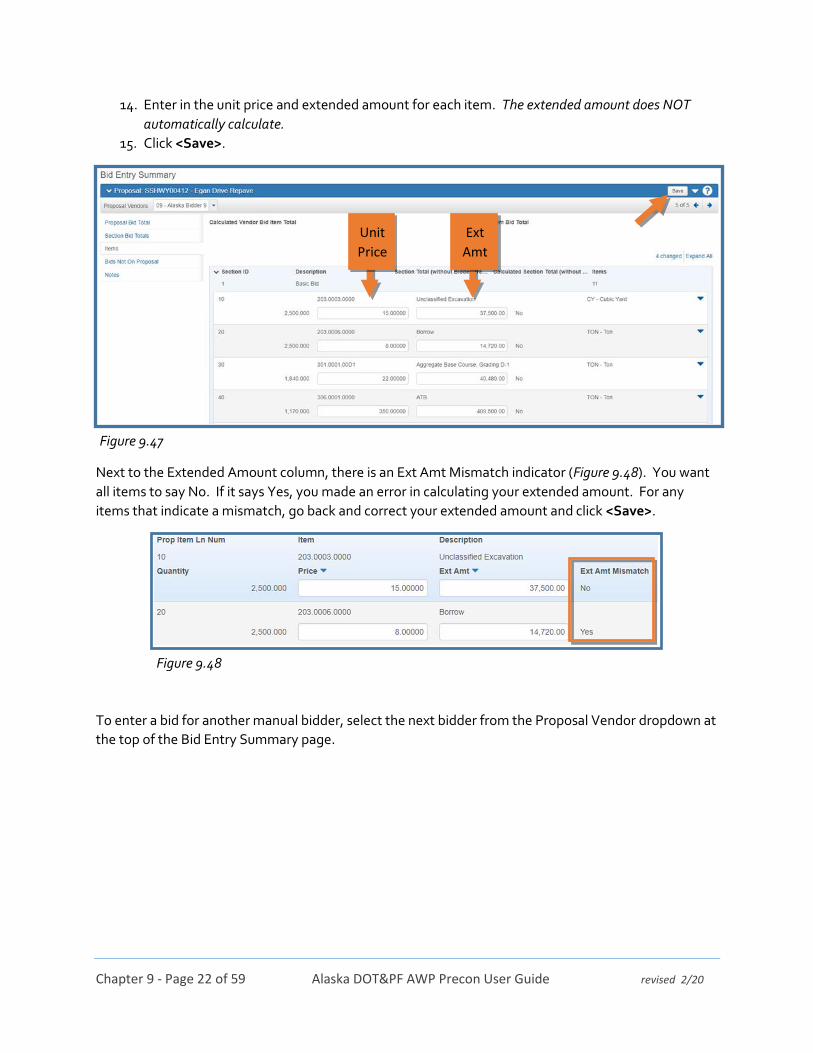
14. Enter in the unit price and extended amount for each item. The extended amount does NOT
automatically calculate.
15. Click <Save>.
Next to the Extended Amount column, there is an Ext Amt Mismatch indicator (Figure 9.48). You want
all items to say No. If it says Yes, you made an error in calculating your extended amount. For any
items that indicate a mismatch, go back and correct your extended amount and click <Save>.
To enter a bid for another manual bidder, select the next bidder from the Proposal Vendor dropdown at
the top of the Bid Entry Summary page.
Unit
Price
Ext
Amt
Figure 9.47
Figure 9.48
Chapter 9 - Page 23 of 59 Alaska DOT&PF AWP Precon User Guide revised 2/20
9.8 Managing Bids in AWP
Now that bids have been imported (or entered) into AWP:
Add dates to the Letting Summary component or the Proposal Summary component as they
are determined.
Bid Analysis can be performed.
Bidder Preference amounts can be added if necessary
Additive Alternate analysis can be performed if necessary.
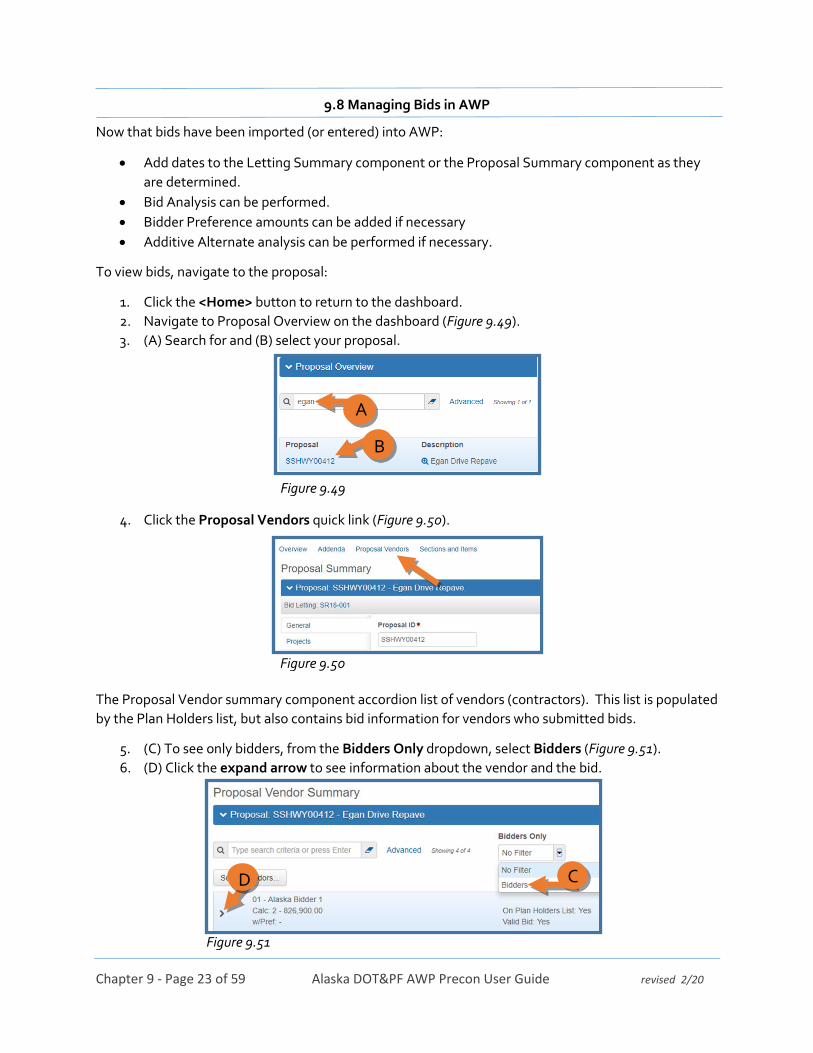
To view bids, navigate to the proposal:
1. Click the <Home> button to return to the dashboard.
2. Navigate to Proposal Overview on the dashboard (Figure 9.49).
3. (A) Search for and (B) select your proposal.
4. Click the Proposal Vendors quick link (Figure 9.50).
The Proposal Vendor summary component accordion list of vendors (contractors). This list is populated
by the Plan Holders list, but also contains bid information for vendors who submitted bids.
5. (C) To see only bidders, from the Bidders Only dropdown, select Bidders (Figure 9.51).
6. (D) Click the expand arrow to see information about the vendor and the bid.
D C
Figure 9.51
B
A
Figure 9.49
Figure 9.50

Chapter 9 - Page 24 of 59 Alaska DOT&PF AWP Precon User Guide revised 2/20
(Figure 9.52)
7. (E) In the Bid Type dropdown, select the type of bid submission.
8. (F) If the low bidder, once the bid is analyzed, from the Bid Status dropdown, select the
appropriate status.
NOTE: If a status of Non-Responsive, Withdrawn, or Non-Responsible is selected, the bid
becomes invalid according to AWP and the Valid Bid status at the top of the right column will
change to No.
9. Click <Save>.
10. Repeat step 7 for all bidders (enter Bid Type for Statewide tracking).
11. Repeat step 8 if bidders found non-responsive, non-responsible, or the bid is withdrawn after
opening.
To view bid information for each bidder:
1. Click the Bid Entry quick link at the top of the screen (Figure 9.53).
Figure 9.52
Figure 9.53
E
F
Chapter 9 - Page 25 of 59 Alaska DOT&PF AWP Precon User Guide revised 2/20
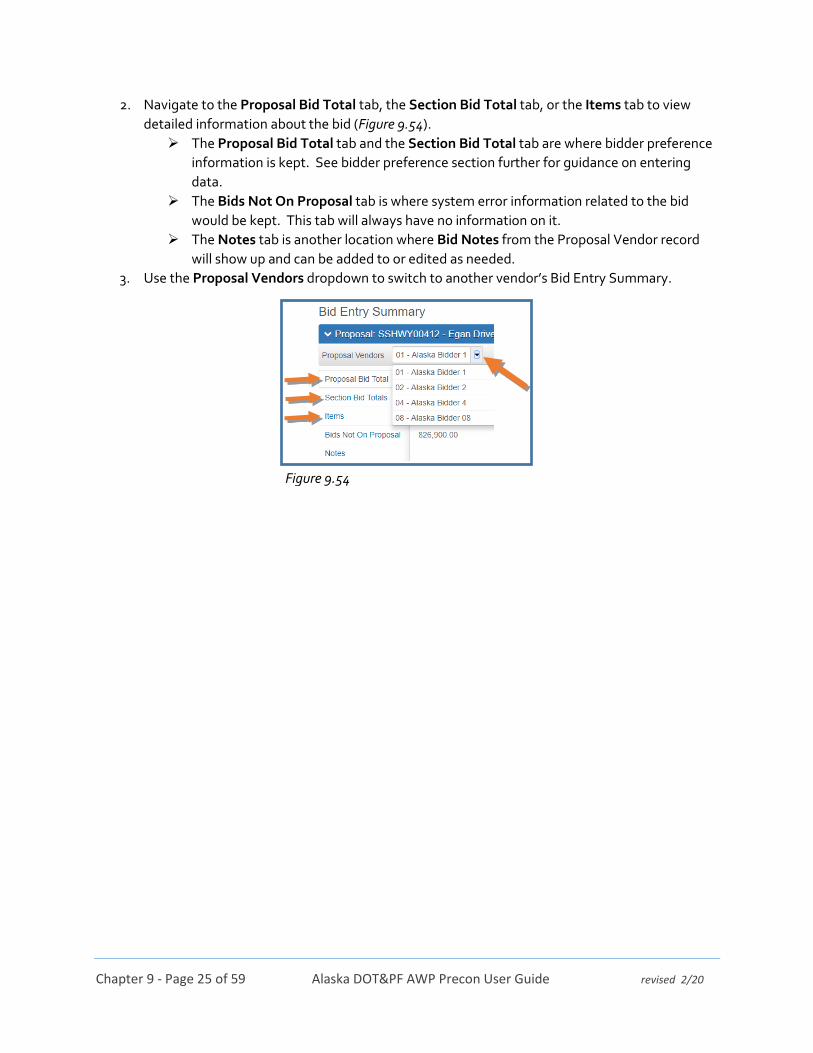
2. Navigate to the Proposal Bid Total tab, the Section Bid Total tab, or the Items tab to view
detailed information about the bid (Figure 9.54).
The Proposal Bid Total tab and the Section Bid Total tab are where bidder preference
information is kept. See bidder preference section further for guidance on entering
data.
The Bids Not On Proposal tab is where system error information related to the bid
would be kept. This tab will always have no information on it.
The Notes tab is another location where Bid Notes from the Proposal Vendor record
will show up and can be added to or edited as needed.
3. Use the Proposal Vendors dropdown to switch to another vendor’s Bid Entry Summary.
Figure 9.54
Chapter 9 - Page 26 of 59 Alaska DOT&PF AWP Precon User Guide revised 2/20
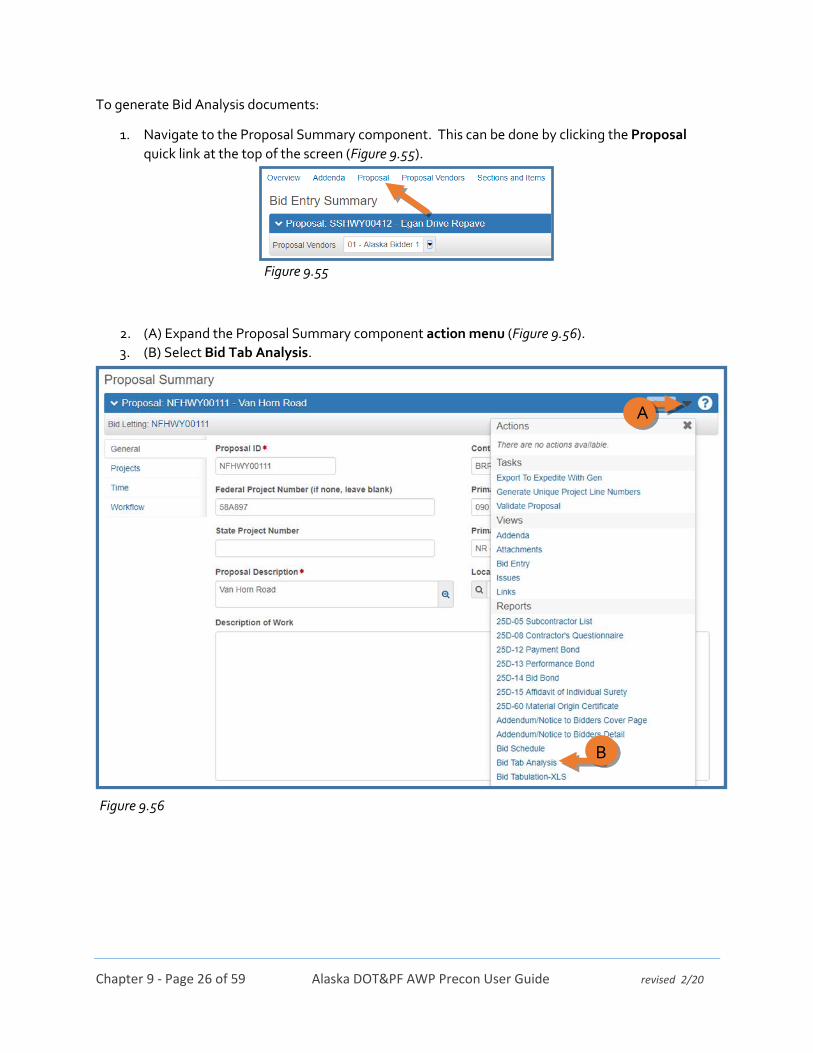
To generate Bid Analysis documents:
1. Navigate to the Proposal Summary component. This can be done by clicking the Proposal
quick link at the top of the screen (Figure 9.55).
2. (A) Expand the Proposal Summary component action menu (Figure 9.56).
3. (B) Select Bid Tab Analysis.
Figure 9.55
Figure 9.56
A
B

Chapter 9 - Page 27 of 59 Alaska DOT&PF AWP Precon User Guide revised 2/20
By default, all the reports included in the Bid Tab Analysis package are selected (Figure 9.57).
4. (C) Deselect any reports you don’t want to run.
5. (D) Click <Execute>.
To generate the Bid Tabulation Excel version, expand the Proposal Summary component action menu
and select Bid Tabulation-XLS (see Figure 9.56). When the Generate Report window appears, click
<Execute>.
C D
Figure 9.57

Chapter 9 - Page 28 of 59 Alaska DOT&PF AWP Precon User Guide revised 2/20
9.9 Applying Bidder Preference Amounts
To add Bidder Preference information for state-funded proposals:
1. Gather the Preference worksheets and certifications (downloaded in Bid Attachments from the
electronic bid submissions or from the envelope of manual submissions).
2. If any bidders claim Alaska Products Preference, check their worksheet and calculations to
verify the correct amount to be applied.
3. Navigate to the Proposal Vendor Summary component (Figure 9.58).
4. (A) Check any of the boxes for which bidder preference certifications were submitted.
5. (B) Click <Save>.
NOTE: You may want to do this step for all bidders submitting bidder preference certifications before
moving to the next step.
6. Click the Bid Entry quick link at the top of the screen (Figure 9.59).
Figure 9.58
Figure 9.59
B
A
Chapter 9 - Page 29 of 59 Alaska DOT&PF AWP Precon User Guide revised 2/20
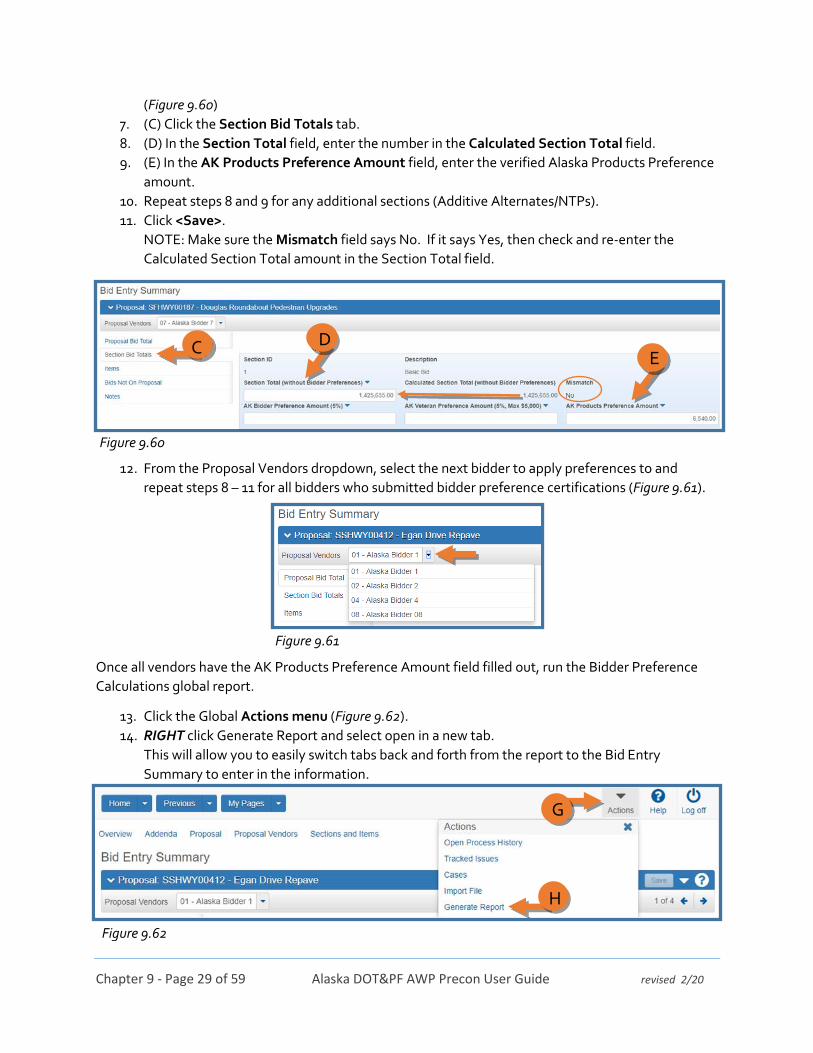
(Figure 9.60)
7. (C) Click the Section Bid Totals tab.
8. (D) In the Section Total field, enter the number in the Calculated Section Total field.
9. (E) In the AK Products Preference Amount field, enter the verified Alaska Products Preference
amount.
10. Repeat steps 8 and 9 for any additional sections (Additive Alternates/NTPs).
11. Click <Save>.
NOTE: Make sure the Mismatch field says No. If it says Yes, then check and re-enter the
Calculated Section Total amount in the Section Total field.
12. From the Proposal Vendors dropdown, select the next bidder to apply preferences to and
repeat steps 8 – 11 for all bidders who submitted bidder preference certifications (Figure 9.61).
Once all vendors have the AK Products Preference Amount field filled out, run the Bidder Preference
Calculations global report.
13. Click the Global Actions menu (Figure 9.62).
14. RIGHT click Generate Report and select open in a new tab.
This will allow you to easily switch tabs back and forth from the report to the Bid Entry
Summary to enter in the information.
Figure 9.60
Figure 9.61
Figure 9.62
H
G
E D C

Chapter 9 - Page 30 of 59 Alaska DOT&PF AWP Precon User Guide revised 2/20
15. (I) Search for and (J) select the Bidder Preferences Calculation report (Figure 9.63).
(Figure 9.64)
16. (K) Search for your proposal ID
17. (L) Select all vendors on the proposal. Selected vendors will have a green checkmark.
18. (M) Click <Execute>.
This will run the Bidder Preference Calculation report for every bidder selected on that proposal (Figure
9.65). The report will generate in a new tab.
J
I
L
K
M
Figure 9.63
Figure 9.64
Chapter 9 - Page 31 of 59 Alaska DOT&PF AWP Precon User Guide revised 2/20
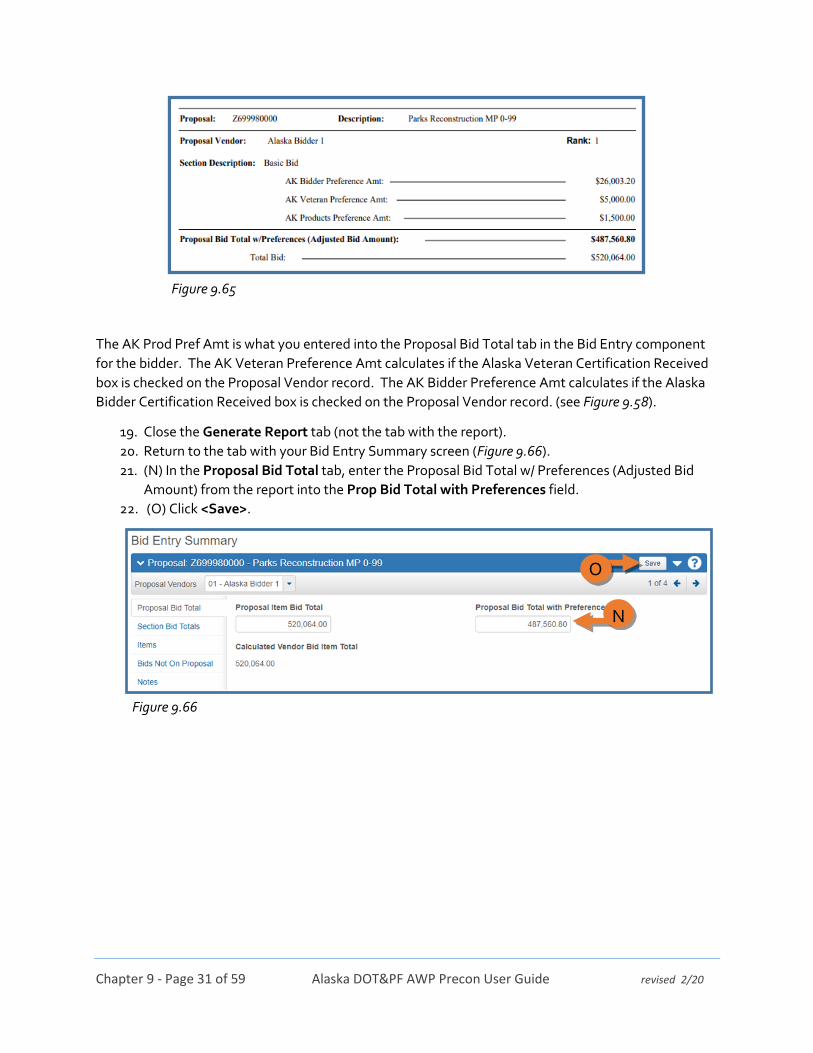
The AK Prod Pref Amt is what you entered into the Proposal Bid Total tab in the Bid Entry component
for the bidder. The AK Veteran Preference Amt calculates if the Alaska Veteran Certification Received
box is checked on the Proposal Vendor record. The AK Bidder Preference Amt calculates if the Alaska
Bidder Certification Received box is checked on the Proposal Vendor record. (see Figure 9.58).
19. Close the Generate Report tab (not the tab with the report).
20. Return to the tab with your Bid Entry Summary screen (Figure 9.66).
21. (N) In the Proposal Bid Total tab, enter the Proposal Bid Total w/ Preferences (Adjusted Bid
Amount) from the report into the Prop Bid Total with Preferences field.
22. (O) Click <Save>.
Figure 9.65
Figure 9.66
O
N

Chapter 9 - Page 32 of 59 Alaska DOT&PF AWP Precon User Guide revised 2/20
(Figure 9.67)
23. (P) Click the Section Bid Totals tab.
24. (Q) Enter the AK Bidder Preference Amt for this bidder from the report into the AK Bidder
Preference Amount field.
25. (R) Enter the AK Veteran Preference Amt for this bidder from the report into the AK Veteran
Preference Amount field.
26. Click <Save>.
27. If there are additional sections on the proposal, repeat steps 24 – 26 to apply bidder
preferences.
NOTE: For proposals with multiple sections: If bidder preferences were entered in the Bid Entry
area and the Additive Alternate or NTP was not awarded, the following message will appear on the
Bidder Preferences Calculation report and all values for the preferences in that section will be
zeroed out and will not be included in the adjusted bid amount calculations (Figure 9.68).
28. Switch to the next bidder in the Proposal Vendors dropdown (Figure 9.69) and repeat steps 21
through 26.
Figure 9.67
Figure 9.69
Q P
R
Figure 9.68

Chapter 9 - Page 33 of 59 Alaska DOT&PF AWP Precon User Guide revised 2/20
Once bidder preference amounts for all bidders have been entered, enter the bidder ranking with
preferences applied.
29. Click the Proposal quick link at the top of the Bid Entry Summary page (Figure 9.70).
30. Click the Bid Letting hypertext link (Figure 9.71).
31. (S) Click the Proposals tab (Figure 9.72).
32. (T) Click the Expand arrow.
Figure 9.70
Figure 9.71
T
S
Figure 9.72

Chapter 9 - Page 34 of 59 Alaska DOT&PF AWP Precon User Guide revised 2/20
(Figure 9.73)
33. (U) In the Rank w/ Pref fields, enter in the custom rankings based on the amounts in the Prop
Bid Total w/ Pref column. NOTE: Bids will re-sort in order of adjusted amt (Prop Bid Total w/
Pref).
34. (V) Click <Save>.
V
U
Figure 9.73
Chapter 9 - Page 35 of 59 Alaska DOT&PF AWP Precon User Guide revised 2/20
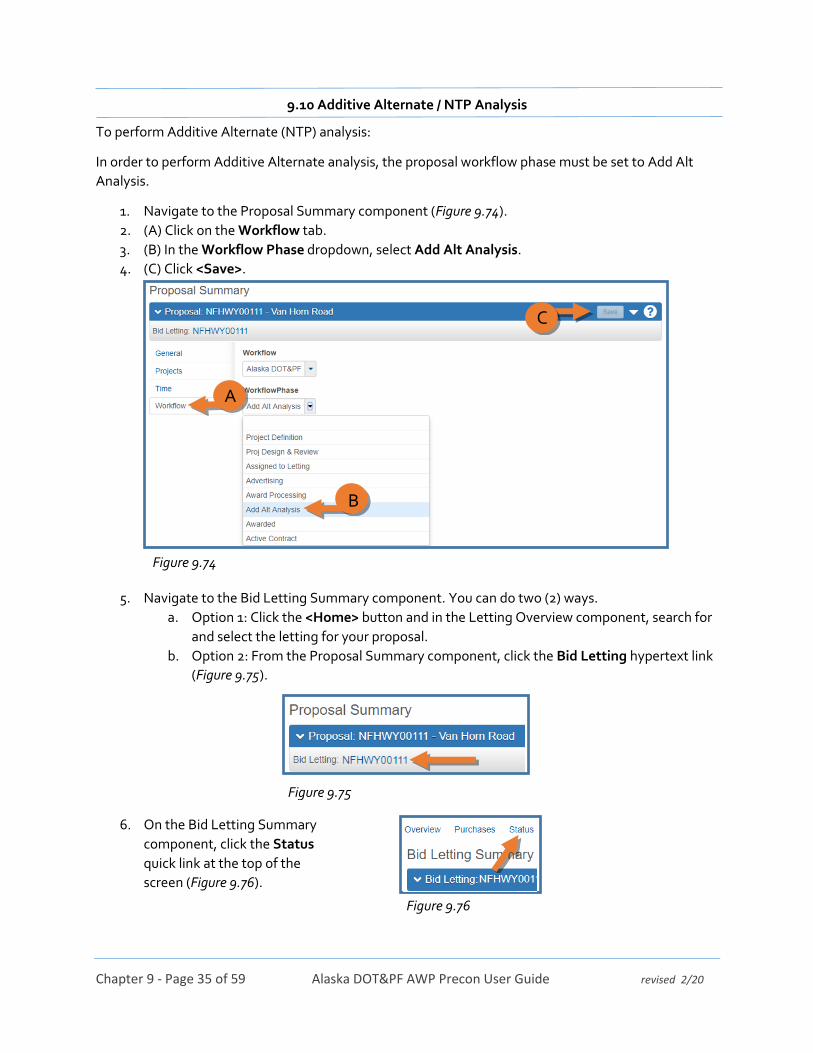
9.10 Additive Alternate / NTP Analysis
To perform Additive Alternate (NTP) analysis:
In order to perform Additive Alternate analysis, the proposal workflow phase must be set to Add Alt
Analysis.
1. Navigate to the Proposal Summary component (Figure 9.74).
2. (A) Click on the Workflow tab.
3. (B) In the Workflow Phase dropdown, select Add Alt Analysis.
4. (C) Click <Save>.
5. Navigate to the Bid Letting Summary component. You can do two (2) ways.
a. Option 1: Click the <Home> button and in the Letting Overview component, search for
and select the letting for your proposal.
b. Option 2: From the Proposal Summary component, click the Bid Letting hypertext link
(Figure 9.75).
6. On the Bid Letting Summary
component, click the Status
quick link at the top of the
screen (Figure 9.76).
Figure 9.74
Figure 9.75
Figure 9.76
A
B
C
Chapter 9 - Page 36 of 59 Alaska DOT&PF AWP Precon User Guide revised 2/20
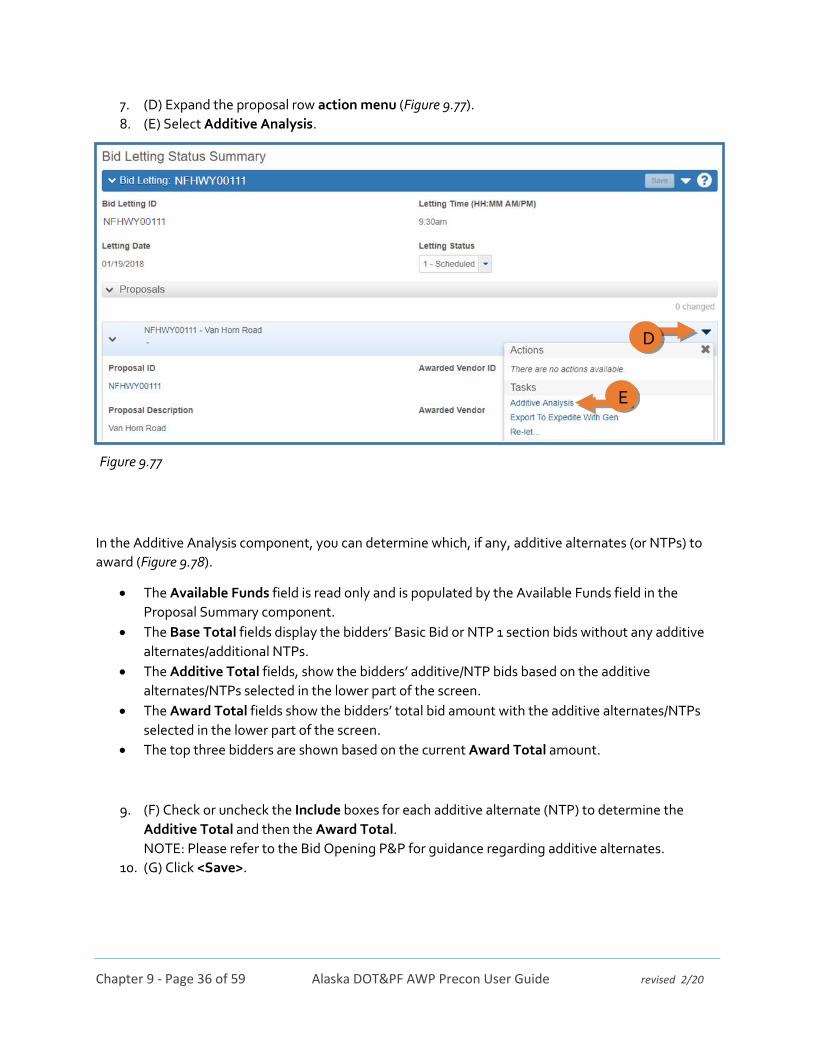
7. (D) Expand the proposal row action menu (Figure 9.77).
8. (E) Select Additive Analysis.
In the Additive Analysis component, you can determine which, if any, additive alternates (or NTPs) to
award (Figure 9.78).
The Available Funds field is read only and is populated by the Available Funds field in the
Proposal Summary component.
The Base Total fields display the bidders’ Basic Bid or NTP 1 section bids without any additive
alternates/additional NTPs.
The Additive Total fields, show the bidders’ additive/NTP bids based on the additive
alternates/NTPs selected in the lower part of the screen.
The Award Total fields show the bidders’ total bid amount with the additive alternates/NTPs
selected in the lower part of the screen.
The top three bidders are shown based on the current Award Total amount.
9. (F) Check or uncheck the Include boxes for each additive alternate (NTP) to determine the
Additive Total and then the Award Total.
NOTE: Please refer to the Bid Opening P&P for guidance regarding additive alternates.
10. (G) Click <Save>.
Figure 9.77
E
D

Chapter 9 - Page 37 of 59 Alaska DOT&PF AWP Precon User Guide revised 2/20
NOTE: For state-funded projects where bidder preferences were entered on additive alternates (NTPs)
that are not to be awarded:
1. Go back and run the Bidder Preferences Calculation report and in the Bid Entry Summary
component:
(Figure 9.79)
2. (A) Change the Proposal Bid Total with Preferences field to match the new Proposal Bid Total
w/Preferences (Adjusted Bid Amount) from the new report.
3. (B) Click <Save>.
4. (C) Select the next bidder from the Proposal Vendors dropdown and repeat.
Include
G
F
Figure 9.78
B
A
C
Figure 9.79
Chapter 9 - Page 38 of 59 Alaska DOT&PF AWP Precon User Guide revised 2/20
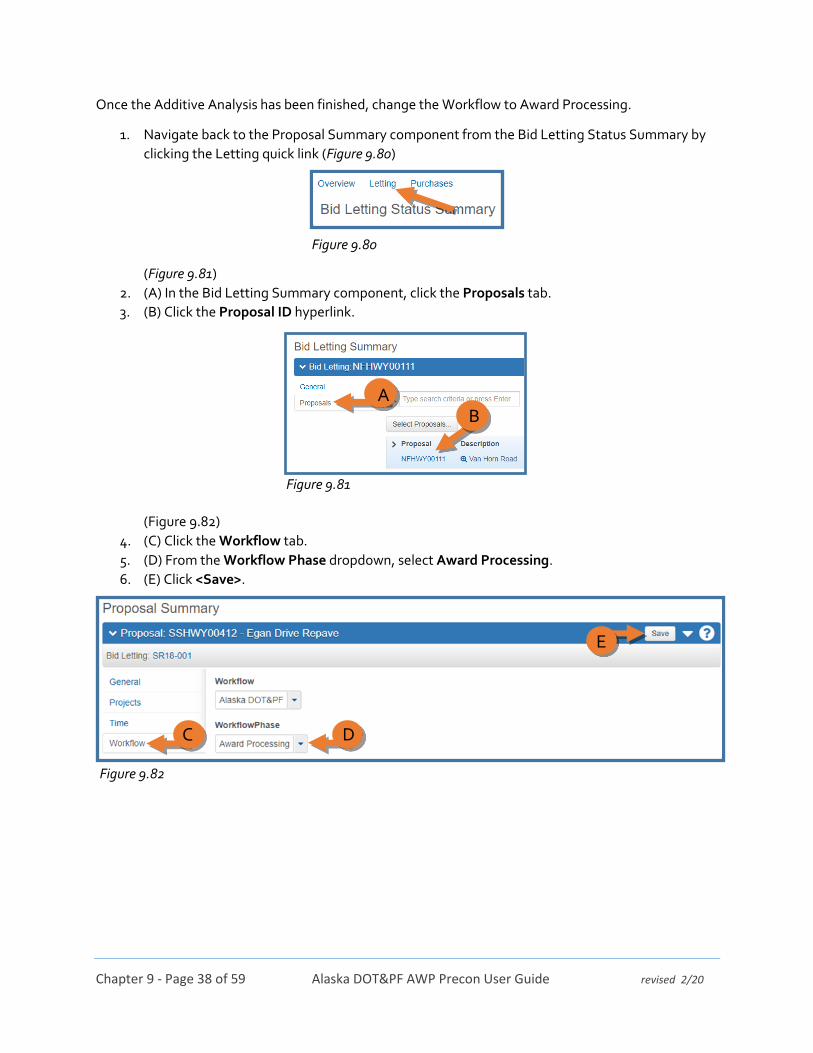
Once the Additive Analysis has been finished, change the Workflow to Award Processing.
1. Navigate back to the Proposal Summary component from the Bid Letting Status Summary by
clicking the Letting quick link (Figure 9.80)
(Figure 9.81)
2. (A) In the Bid Letting Summary component, click the Proposals tab.
3. (B) Click the Proposal ID hyperlink.
(Figure 9.82)
4. (C) Click the Workflow tab.
5. (D) From the Workflow Phase dropdown, select Award Processing.
6. (E) Click <Save>.
Figure 9.80
B A
Figure 9.81
E
D C
Figure 9.82

Chapter 9 - Page 39 of 59 Alaska DOT&PF AWP Precon User Guide revised 2/20
9.11 Proposal Processing
The Letting Summary component consists of containers of dates. Dates and fields will be filled out as
the proposal processes to award.
Evaluation (Figure 9.83)
Apparent Low Bidder:
1. When the apparent low bidder is determined, click the Apparent Low Bidder Notification
Date calendar icon and select the correct date.
2. Click <Save>.
Figure 9.83

Chapter 9 - Page 40 of 59 Alaska DOT&PF AWP Precon User Guide revised 2/20
Certified Bid Tab:
1. When the Bid Tab is certified, click the Certified Bid Tabulation Date calendar icon and select
the appropriate date.
2. From the Certified By dropdown, select the appropriate regional contracts officer or designee.
3. Run the Certified Bid Tab report by (A) expanding the proposal component action menu and
(B) selecting Bid Tab Analysis (Figure 9.84).
Figure 9.84
A
B
Chapter 9 - Page 41 of 59 Alaska DOT&PF AWP Precon User Guide revised 2/20
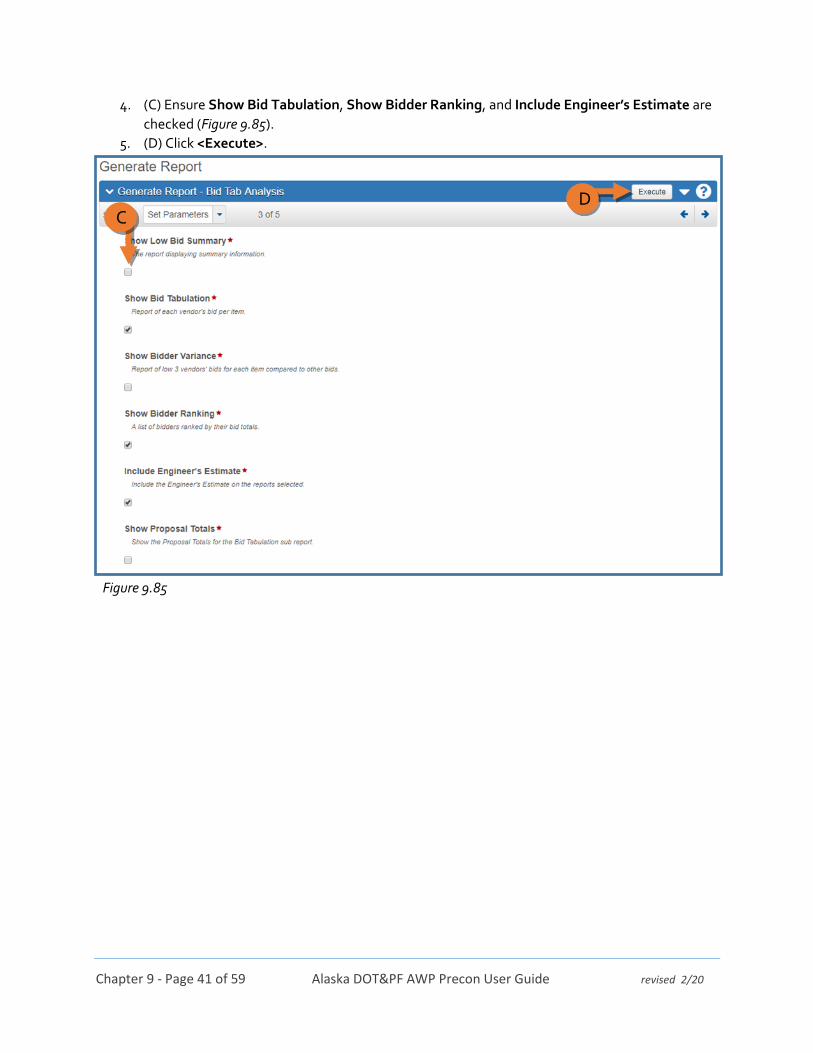
4. (C) Ensure Show Bid Tabulation, Show Bidder Ranking, and Include Engineer’s Estimate are
checked (Figure 9.85).
5. (D) Click <Execute>.
Figure 9.85
D C
Chapter 9 - Page 42 of 59 Alaska DOT&PF AWP Precon User Guide revised 2/20
Sub List / DBE Documents:
1. When the apparent low bidder notification date is known, click the Sub List Due and DBE
Documents Due calendar icons and select the date that information is due from the
contractor.
2. Click <Save>.
3. When the Sub List and DBE Documents have been received from the contractor, enter the
dates in the Sub List Received and DBE Documents Received fields by clicking calendar icon
and selecting the date that information was received from the contractor.
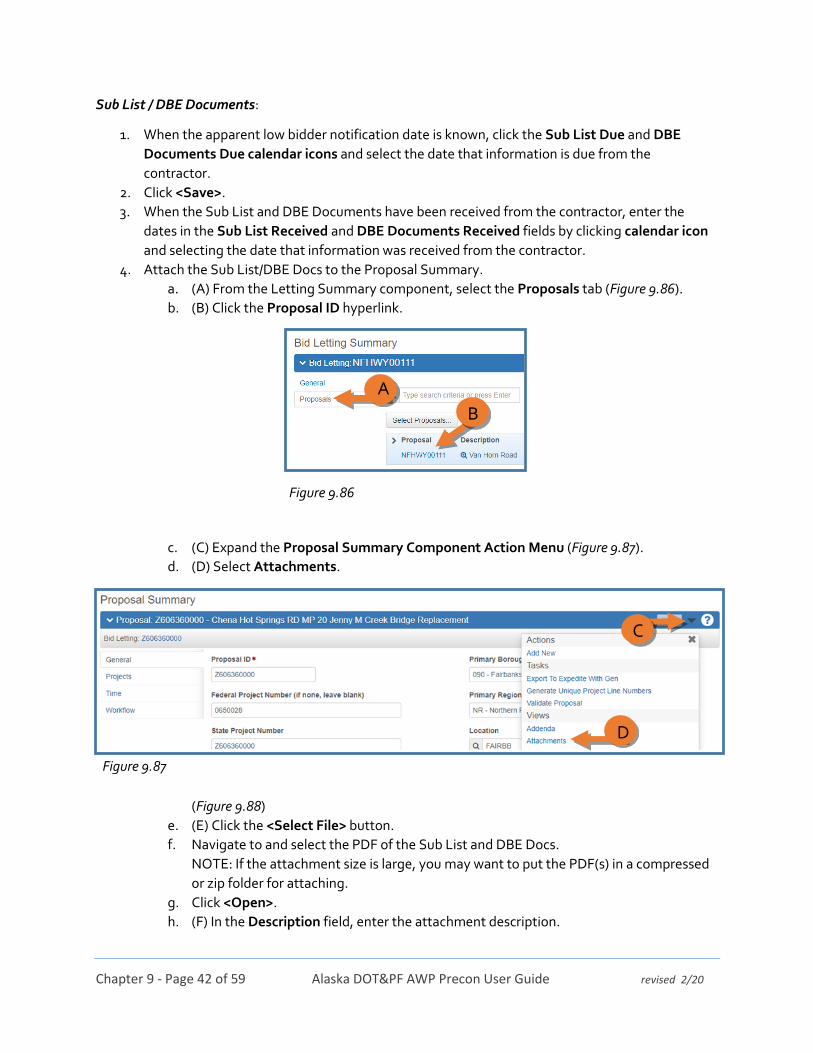
4. Attach the Sub List/DBE Docs to the Proposal Summary.
a. (A) From the Letting Summary component, select the Proposals tab (Figure 9.86).
b. (B) Click the Proposal ID hyperlink.
c. (C) Expand the Proposal Summary Component Action Menu (Figure 9.87).
d. (D) Select Attachments.
(Figure 9.88)
e. (E) Click the <Select File> button.
f. Navigate to and select the PDF of the Sub List and DBE Docs.
NOTE: If the attachment size is large, you may want to put the PDF(s) in a compressed
or zip folder for attaching.
g. Click <Open>.
h. (F) In the Description field, enter the attachment description.
B
A
Figure 9.86
Figure 9.87
D
C

Chapter 9 - Page 43 of 59 Alaska DOT&PF AWP Precon User Guide revised 2/20
i. (G) Click <Save>.
5. Email the Civil Rights Office that the Sublist/DBE Docs are ready to reviewed.
Award (Figure 9.89)
Award Recommendation Date:
1. When the recommendation to award is made, click the Award Recommendation Date
calendar icon and select the correct date.
2. Click <Save>.
Notice of Intent to Award Date:
1. When the notice of intent to award date is determined, click the Notice of Intent to Award
Date calendar icon and select the correct date.
2. Click <Save>.
Protest Period End Date:
1. When the protest period is determined, click the Protest Period End Date calendar icon and
select the date the protest period ends.
2. Click <Save>.
G
F
E
Figure 9.88
Figure 9.89
Chapter 9 - Page 44 of 59 Alaska DOT&PF AWP Precon User Guide revised 2/20
Letter of Award Date:
1. When the award date is determined, click the Letter of Award Date calendar icon and select
the correct date.
2. Click <Save>.
*Awarding the contract in AWP is in the next section.
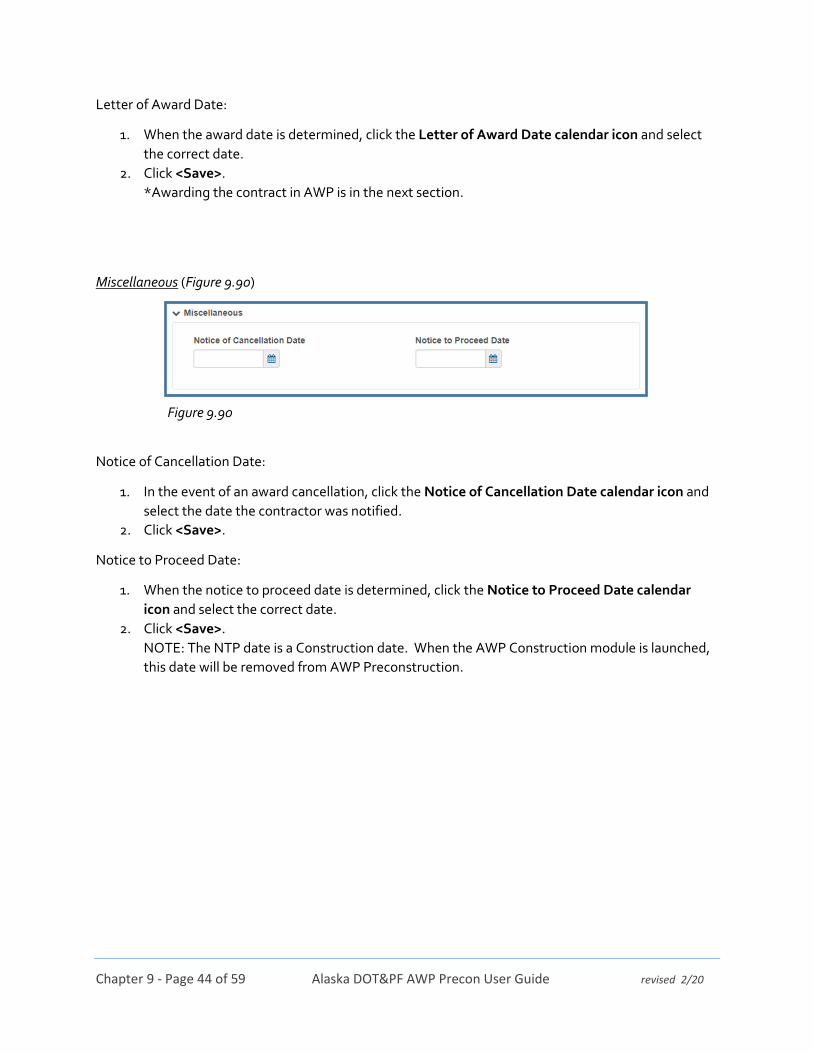
Miscellaneous (Figure 9.90)
Notice of Cancellation Date:
1. In the event of an award cancellation, click the Notice of Cancellation Date calendar icon and
select the date the contractor was notified.
2. Click <Save>.
Notice to Proceed Date:
1. When the notice to proceed date is determined, click the Notice to Proceed Date calendar
icon and select the correct date.
2. Click <Save>.
NOTE: The NTP date is a Construction date. When the AWP Construction module is launched,
this date will be removed from AWP Preconstruction.
Figure 9.90
Chapter 9 - Page 45 of 59 Alaska DOT&PF AWP Precon User Guide revised 2/20
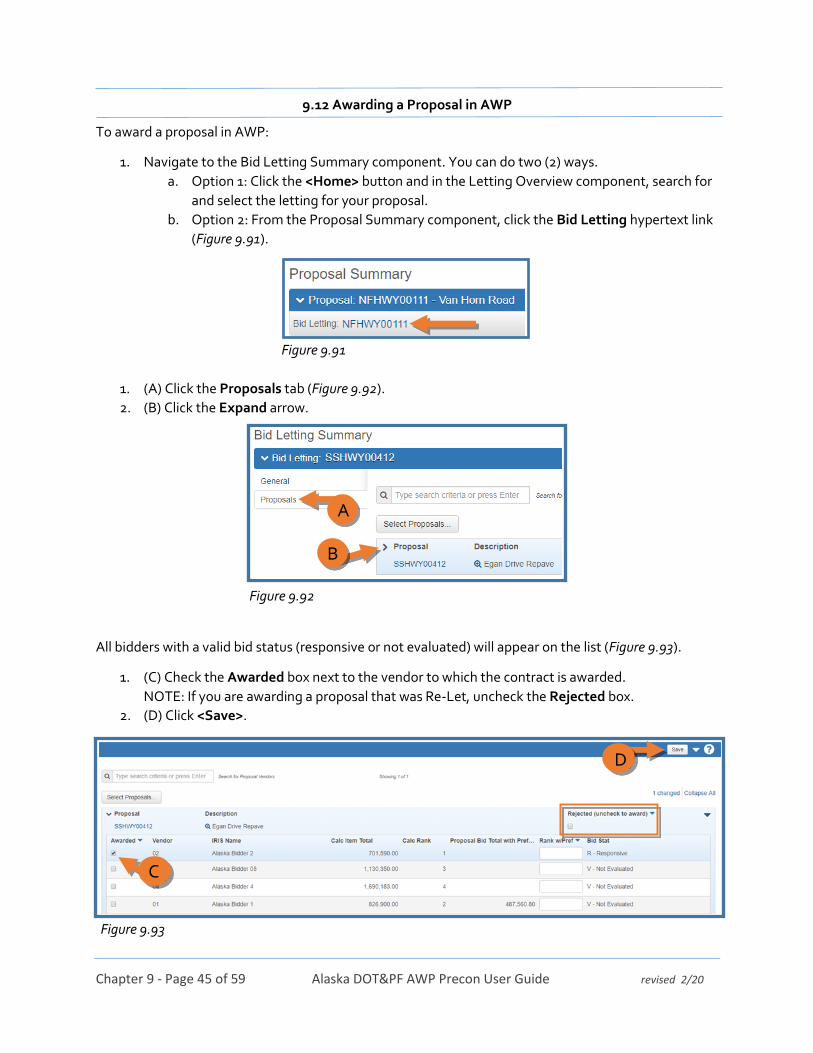
9.12 Awarding a Proposal in AWP
To award a proposal in AWP:
1. Navigate to the Bid Letting Summary component. You can do two (2) ways.
a. Option 1: Click the <Home> button and in the Letting Overview component, search for
and select the letting for your proposal.
b. Option 2: From the Proposal Summary component, click the Bid Letting hypertext link
(Figure 9.91).
1. (A) Click the Proposals tab (Figure 9.92).
2. (B) Click the Expand arrow.
All bidders with a valid bid status (responsive or not evaluated) will appear on the list (Figure 9.93).
1. (C) Check the Awarded box next to the vendor to which the contract is awarded.
NOTE: If you are awarding a proposal that was Re-Let, uncheck the Rejected box.
2. (D) Click <Save>.
Figure 9.91
B
A
Figure 9.92
Figure 9.93
D
C
Chapter 9 - Page 46 of 59 Alaska DOT&PF AWP Precon User Guide revised 2/20
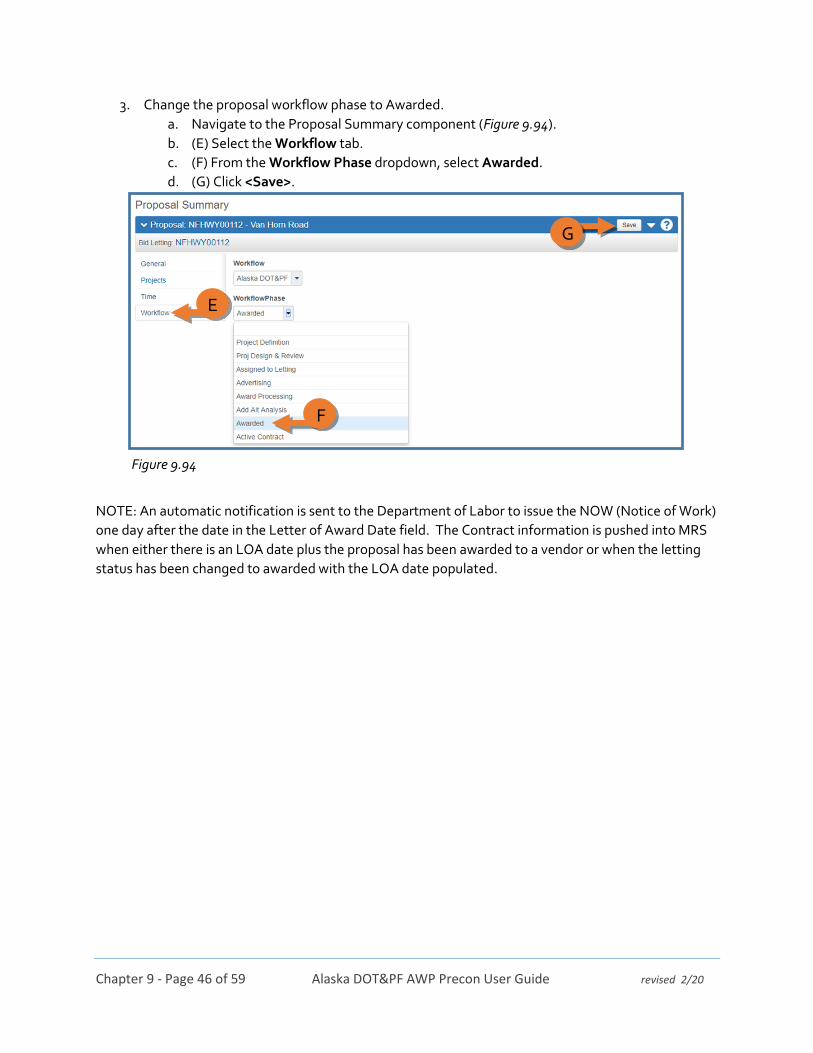
3. Change the proposal workflow phase to Awarded.
a. Navigate to the Proposal Summary component (Figure 9.94).
b. (E) Select the Workflow tab.
c. (F) From the Workflow Phase dropdown, select Awarded.
d. (G) Click <Save>.
NOTE: An automatic notification is sent to the Department of Labor to issue the NOW (Notice of Work)
one day after the date in the Letter of Award Date field. The Contract information is pushed into MRS
when either there is an LOA date plus the proposal has been awarded to a vendor or when the letting
status has been changed to awarded with the LOA date populated.
Figure 9.94
E
F
G

Chapter 9 - Page 47 of 59 Alaska DOT&PF AWP Precon User Guide revised 2/20
9.13 Electronic Bid Bonds
This section details how to log into the two electronic bid bond clearinghouses and access bid bond
information.
When electronic bidders chose to submit an electronic bid bond, they will enter their bid bond ID into
the AWP Bids file and click <Verify>. The image below appears to let them know the electronic bond
has been verified (Figure 9.95).
To access the bid bonds on the clearinghouse websites, you must have the Bid Bond IDs and the Bond
Company information. This can be found in the BidBonds excel file that was produced by Bid Express
when electronic bids were decrypted (Figure 9.96).
Open the BidBonds excel file. All electronically submitted bids will appear with the type of Bid
Guaranty selected in the Bids file. The verified electronic bid bonds submitted will include a Bond
Company and Bond ID (Figure 9.97).
Figure 9.95
Figure 9.96
Figure 9.97
Chapter 9 - Page 48 of 59 Alaska DOT&PF AWP Precon User Guide revised 2/20
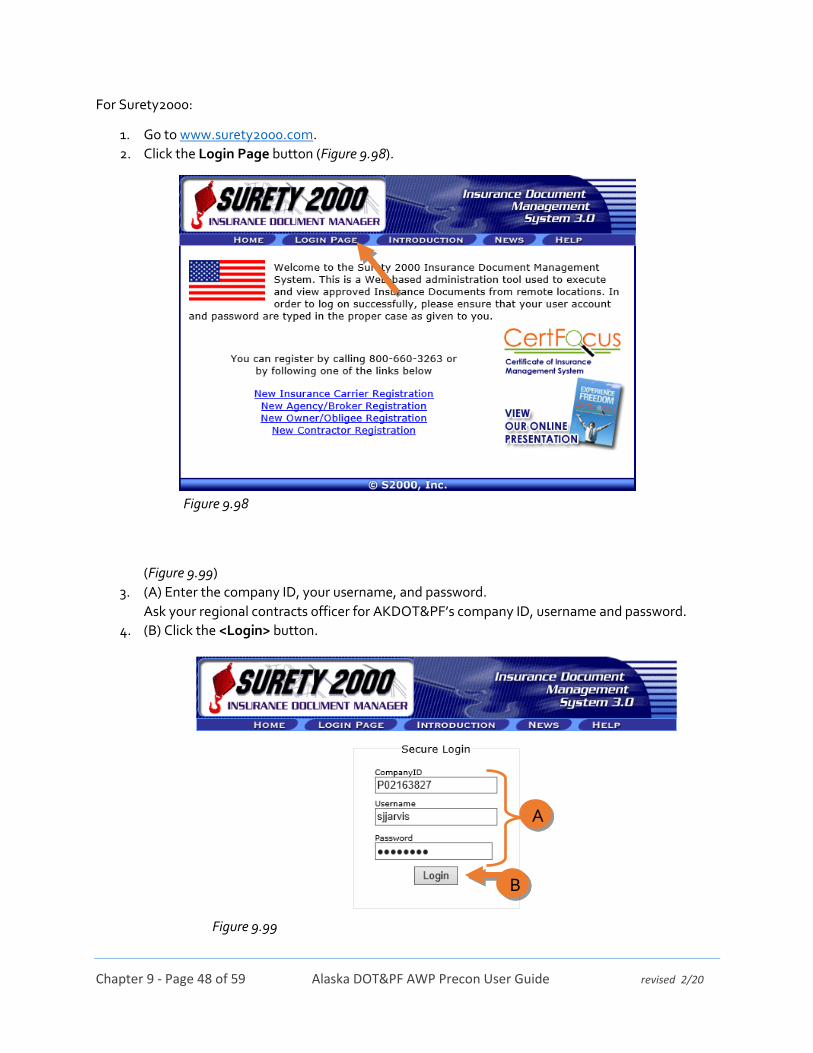
For Surety2000:
1. Go to www.surety2000.com.
2. Click the Login Page button (Figure 9.98).
(Figure 9.99)
3. (A) Enter the company ID, your username, and password.
Ask your regional contracts officer for AKDOT&PF’s company ID, username and password.
4. (B) Click the <Login> button.
Figure 9.98
A
B
Figure 9.99
Chapter 9 - Page 49 of 59 Alaska DOT&PF AWP Precon User Guide revised 2/20
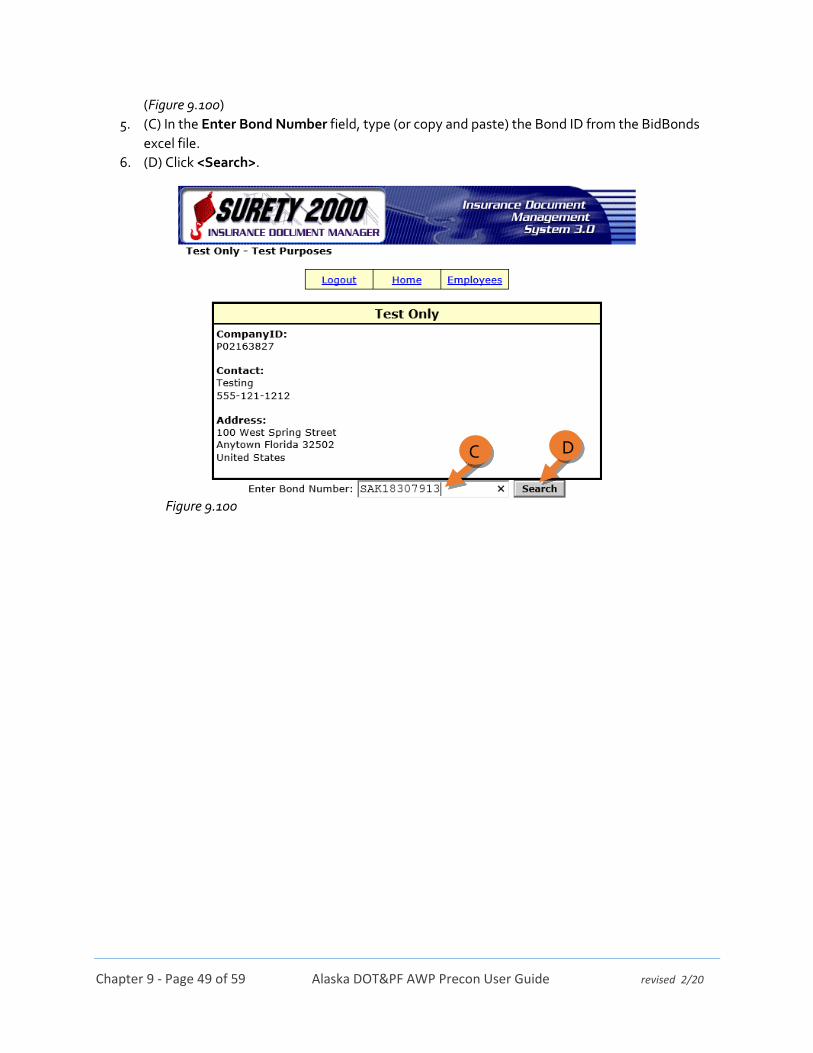
(Figure 9.100)
5. (C) In the Enter Bond Number field, type (or copy and paste) the Bond ID from the BidBonds
excel file.
6. (D) Click <Search>.
D C
Figure 9.100

Chapter 9 - Page 50 of 59 Alaska DOT&PF AWP Precon User Guide revised 2/20
The electronic bond information will appear (Figure 9.101).
7. Click the red Lock icon.
Figure 9.101

Chapter 9 - Page 51 of 59 Alaska DOT&PF AWP Precon User Guide revised 2/20
A new window will appear with the Bid Bond showing the electronic signature at the bottom (Figure
9.102).
8. Right click on the image.
9. Select Print, and print to PDF.
10. Save the Bid Bond to the project folder or wherever your regional process directs.
Figure 9.102
Chapter 9 - Page 52 of 59 Alaska DOT&PF AWP Precon User Guide revised 2/20
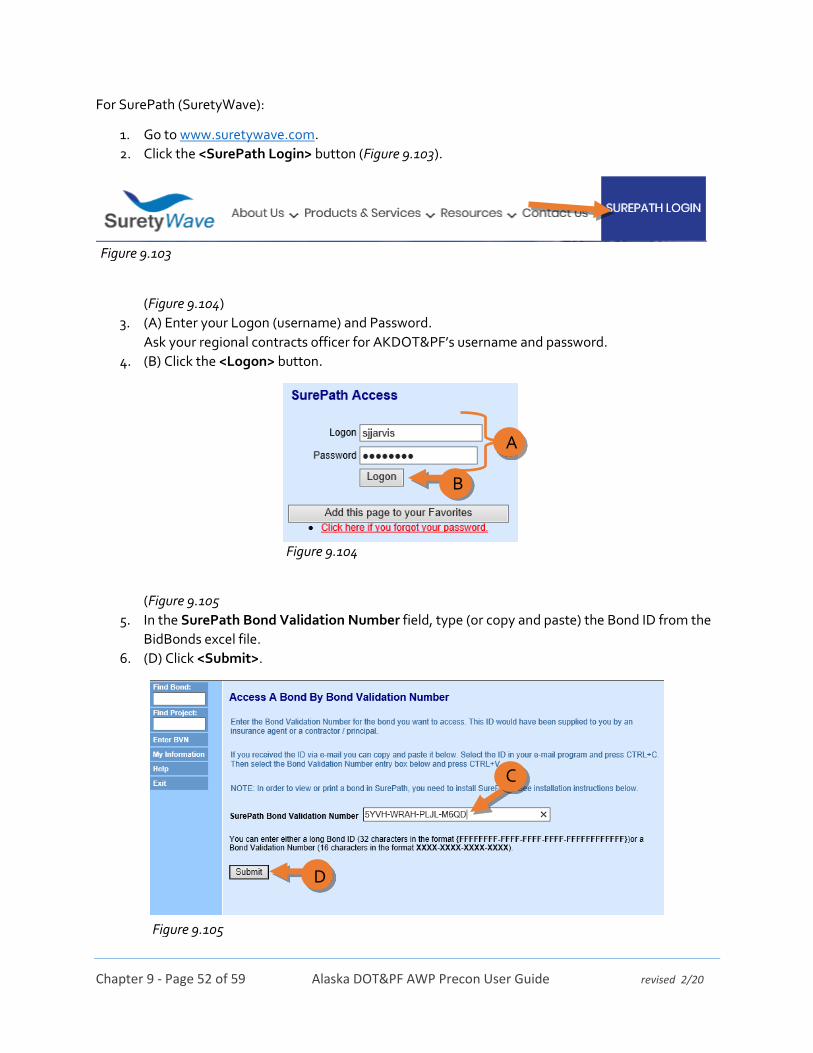
For SurePath (SuretyWave):
1. Go to www.suretywave.com.
2. Click the <SurePath Login> button (Figure 9.103).
(Figure 9.104)
3. (A) Enter your Logon (username) and Password.
Ask your regional contracts officer for AKDOT&PF’s username and password.
4. (B) Click the <Logon> button.
(Figure 9.105
5. In the SurePath Bond Validation Number field, type (or copy and paste) the Bond ID from the
BidBonds excel file.
6. (D) Click <Submit>.
Figure 9.103
B
A
Figure 9.104
D
C
Figure 9.105

Chapter 9 - Page 53 of 59 Alaska DOT&PF AWP Precon User Guide revised 2/20
7. When the new page opens, scroll to the Transaction History section at the bottom of the page
(Figure 9.106).
8. Click the PDF link for the Signing Document.
9. Click <Save As> (Figure 9.107).
10. Save the Bid Bond to the project folder or wherever your regional process directs.
11. Exit SurePath/SuretyWave by clicking Exit on the upper left of the screen (Figure 9.108 or just
close the browser window.
Figure 9.106
Figure 9.107
Figure 9.108
Chapter 9 - Page 54 of 59 Alaska DOT&PF AWP Precon User Guide revised 2/20
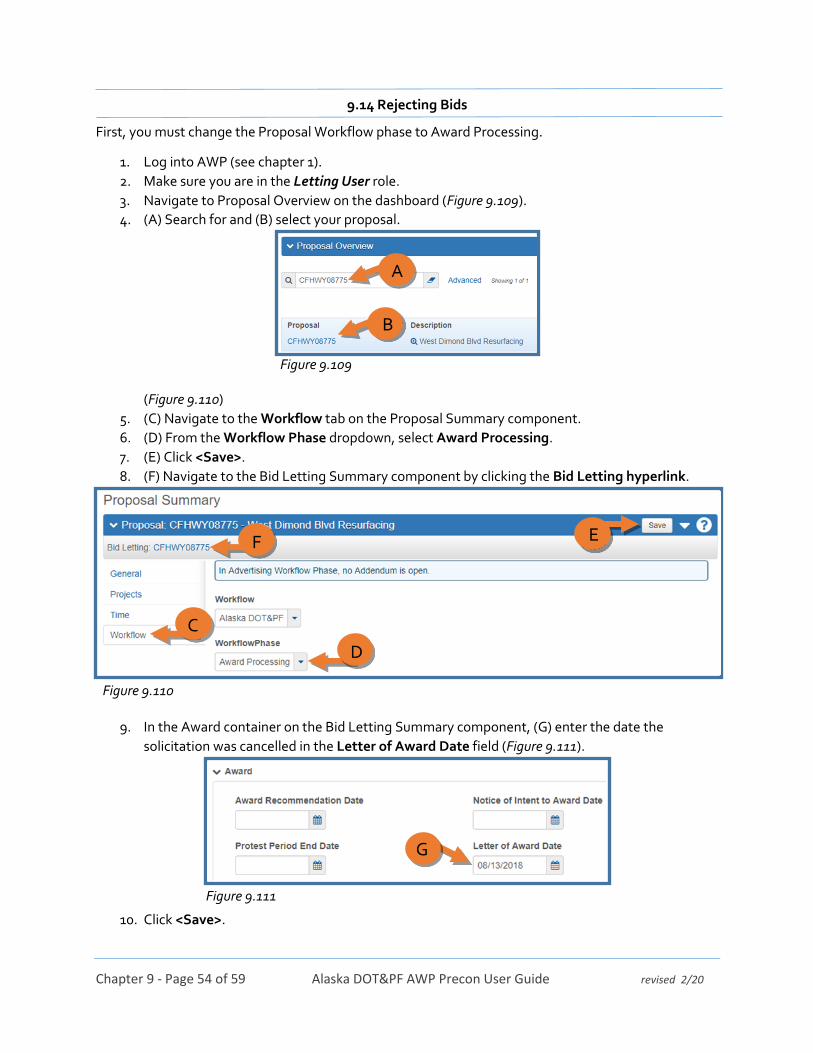
9.14 Rejecting Bids
First, you must change the Proposal Workflow phase to Award Processing.
1. Log into AWP (see chapter 1).
2. Make sure you are in the Letting User role.
3. Navigate to Proposal Overview on the dashboard (Figure 9.109).
4. (A) Search for and (B) select your proposal.
(Figure 9.110)
5. (C) Navigate to the Workflow tab on the Proposal Summary component.
6. (D) From the Workflow Phase dropdown, select Award Processing.
7. (E) Click <Save>.
8. (F) Navigate to the Bid Letting Summary component by clicking the Bid Letting hyperlink.
9. In the Award container on the Bid Letting Summary component, (G) enter the date the
solicitation was cancelled in the Letter of Award Date field (Figure 9.111).
10. Click <Save>.
Figure 9.109
B
A
Figure 9.110
E
D
C
F
G
Figure 9.111

Chapter 9 - Page 55 of 59 Alaska DOT&PF AWP Precon User Guide revised 2/20
11. On the top of the Bid Letting Summary component page, click the Status quicklink (Figure
9.112).
(Figure 9.113)
12. On the Bid Letting Status component, (H) change the Letting Status field to Bids Rejected.
13. (I) Click <Save>.
14. (J) Expand the Proposal row action menu.
15. (K) Click Reject.
Figure 9.112
Figure 9.113
K
J
I
H

Chapter 9 - Page 56 of 59 Alaska DOT&PF AWP Precon User Guide revised 2/20
A Reject Bids popup window will appear (Figure 9.114).
16. (L) Click the Rejected checkbox.
17. (M) Click the <Reject Bids> button in the lower right of the popup.
Create Alerts on both the Letting and Proposal page announcing the rejection of bids.
For proposals with bids rejected, reports will show “Bids Rejected” in place of the vendor and no value
will appear for the awarded amount.
Figure 9.114
M
L

Chapter 9 - Page 57 of 59 Alaska DOT&PF AWP Precon User Guide revised 2/20
9.15 Re-Letting a Proposal
Before you can re-let your proposal, you must follow the Rejecting Bids process outlined in the previous
section.
Once the bids have been rejected, you must copy your original Proposal (which includes any projects
associated with the Proposal):
1. Log into AWP (see chapter 1).
2. Make sure you are in the Letting User role.
(Figure 9.115)
3. Navigate to Proposal Overview on the dashboard.
4. (A) Search for your Proposal.
5. (B) Expand the Proposal row action menu.
6. (C) Click Copy Proposal and Project.
A Copy Proposal window will appear (Figure 9.116).
7. (D) In the New Proposal ID field, enter the previous Proposal ID with A, B, C after it (as applies).
8. (E) Click the blue Advance Arrow.
C
B
A
Figure 9.115
E D
Figure 9.116

Chapter 9 - Page 58 of 59 Alaska DOT&PF AWP Precon User Guide revised 2/20
(Figure 9.117)
9. (F) Select the Project(s) from the original Proposal to be included in the new Proposal.
10. (G) Click the blue Advance Arrow.
(Figure 9.118)
11. (H) In the New Project ID field, enter the previous Project ID with A, B, C after it (as applies).
12. (I) Click the green <Copy Proposal> button.
F
G
Figure 9.117
I
H
Figure 9.118
Chapter 9 - Page 59 of 59 Alaska DOT&PF AWP Precon User Guide revised 2/20
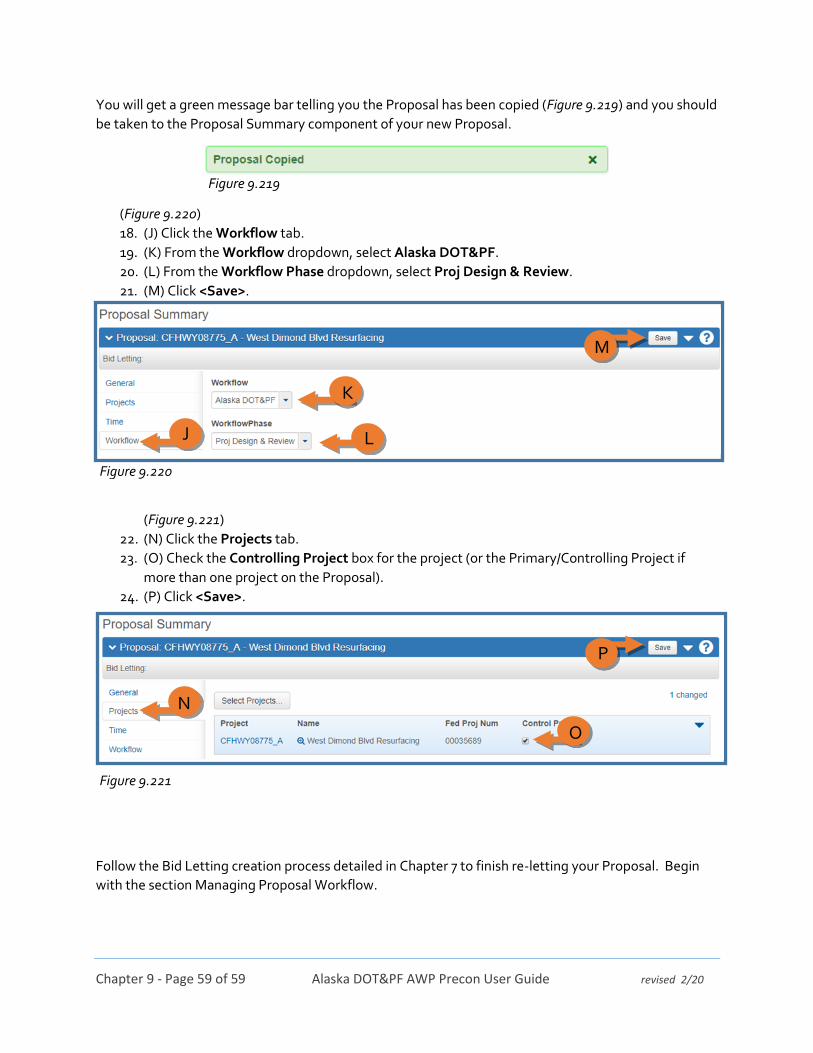
You will get a green message bar telling you the Proposal has been copied (Figure 9.219) and you should
be taken to the Proposal Summary component of your new Proposal.
(Figure 9.220)
18. (J) Click the Workflow tab.
19. (K) From the Workflow dropdown, select Alaska DOT&PF.
20. (L) From the Workflow Phase dropdown, select Proj Design & Review.
21. (M) Click <Save>.
(Figure 9.221)
22. (N) Click the Projects tab.
23. (O) Check the Controlling Project box for the project (or the Primary/Controlling Project if
more than one project on the Proposal).
24. (P) Click <Save>.
Follow the Bid Letting creation process detailed in Chapter 7 to finish re-letting your Proposal. Begin
with the section Managing Proposal Workflow.
Figure 9.219
Figure 9.220
Figure 9.221
M
L
K
J
P
O
N