Chapter 6 – Process Control 1. Process Workflow...
9
Page 1 of 9 Chapter 6 – Process Control 1. Process Workflow 1 Load and add data Calculate data Adjust data Translate & Consolidate Approve data Lock data Run and publish financial reports Hyperion Financial Management Overview Now we analyze in detail the concept of Process Control. The process managed by the HFM system can be divided in the following flows: - Data Loading; - Processing of the data through the launch of calculations; - Adjustment; - Conversion and Data Consolidation; - Approval of Data; - Lock of the data. From the Process Control the Base user can launch calculations and check the approval status of the Entity (Company and DOS / Store) under his competence.
Transcript of Chapter 6 – Process Control 1. Process Workflow...

Page 1 of 9
Chapter 6 – Process Control
1. Process Workflow
1
Load and
add data
Calculate data Adjust data
Translate
& Consolidate
Approve dataLock dataRun and publish
financial reports
Hyperion Financial Management Overview
Now we analyze in detail the concept of Process Control. The process managed by the HFM system can be divided in the following flows: - Data Loading; - Processing of the data through the launch of calculations; - Adjustment; - Conversion and Data Consolidation; - Approval of Data; - Lock of the data. From the Process Control the Base user can launch calculations and check the approval status of the Entity (Company and DOS / Store) under his competence.

Page 2 of 9
2
A “Process Unit” or “Data Unit” is the combination of data for a specific Scenario, Year,Period, Entity and Value (POV dimensions). Every Data Unit can take one of the followingsubsequent states:
Data Units and Process Levels
The HFM system is based on the two following concepts:
• The “Process Unit” or “Data Unit” that is the combination of Scenario, Year, Period, Entity
and Value “Point of View” (POV) dimensions. For example Scenario: Actual, Year: 2011,
Period: September, Entity: 001 - Poltrona Frau and Value: Entity Currency;
• The “Process Level” that describes the “Review Cycle” that is the progress of the promotion
process of the “Data Unit” that opens with its starting until its lock.
3
Data Units and Process Levels
ADMINISTRATORBASE
USERADMINISTRATOR
Not Started First Pass RL 1 RL 2 RL 3 Submitted Approved Published Locked
GROUP GROUPBASE
ENTITYBASE
ENTITY
BASEENTITY
GROUP GROUP GROUP GROUP
Start Promote Promote Promote Submit Publish Lock
Reject Reject Reject Reject Unlock
VALIDATORCONSOLIDATOR
Approve
Reject
Page 3 of 9
PAY ATTENTION, PLEASE: The promotion of the Entity / Data Unit must be necessarily made before the fixed deadline for the data collection defined by the Group Management Control Department. Now we describe the different “Process Levels” and responsible Actors for each steps of the Reporting application. During the “Not Started” phase the Process or Data Unit has not been started yet and it is not possible to load data on the database. The Process Administrator has the task to start all Data Units by promoting them from “Not Started” to “First Pass” and then to “Review Level 1”. With this Review Level the Base user can make the data entry and continue to make changes to his own Data Unit until its promotion to “Review Level 2” (this task is in charge of Base user). Following the promotion to “Review Level 2”, the Base user can no longer make changes to the loaded data. The Validator / Consolidator checks the processed data: if it is correct / square, he promotes the Data Unit to “Review Level 3”; otherwise he can request changes or additions to the Base user after rejecting / moving the Data Unit to the “Review Level 1”. Starting from “Review Level 3” the Process Administrator can provide approval of the Data Unit and of its definitive validation by promoting it to the subsequent “Submitted”, “Approved“, “Published” and “Locked” phases.
Page 4 of 9
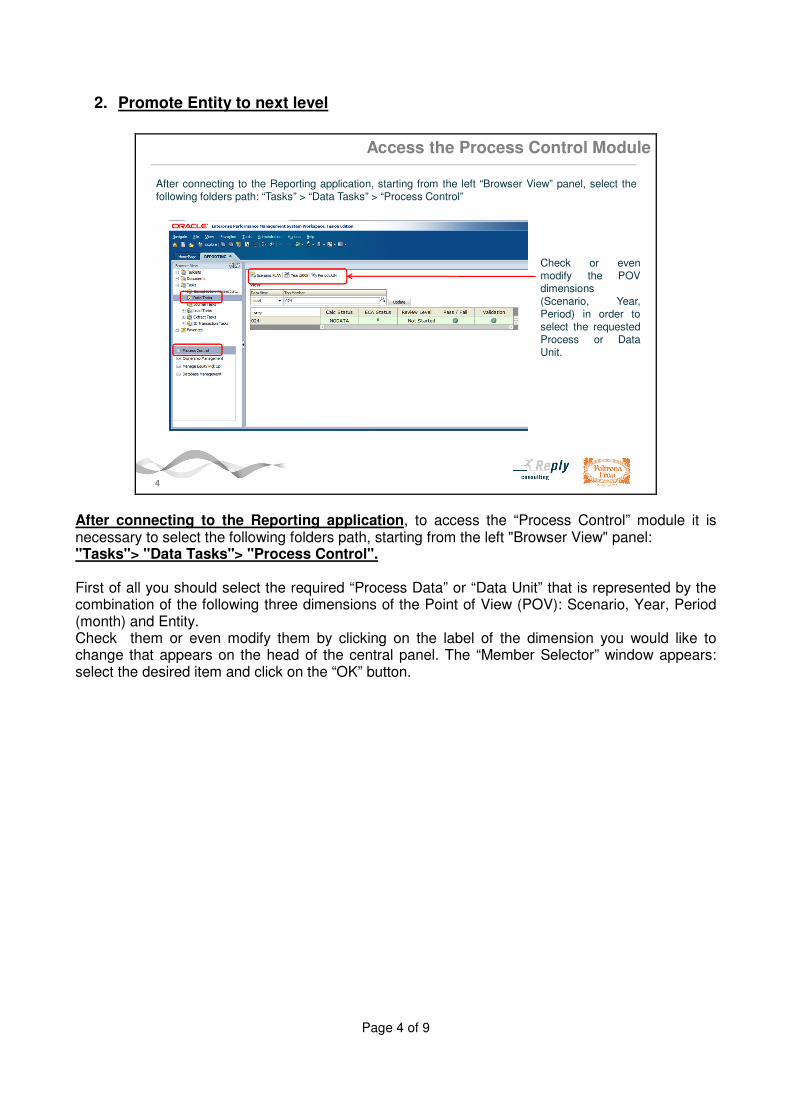
2. Promote Entity to next level
4
Access the Process Control Module
After connecting to the Reporting application, starting from the left “Browser View” panel, select thefollowing folders path: “Tasks” > “Data Tasks” > “Process Control”
Check or evenmodify the POVdimensions(Scenario, Year,Period) in order toselect the requestedProcess or DataUnit.
After connecting to the Reporting application, to access the “Process Control” module it is necessary to select the following folders path, starting from the left "Browser View" panel: "Tasks"> "Data Tasks"> "Process Control". First of all you should select the required “Process Data” or “Data Unit” that is represented by the combination of the following three dimensions of the Point of View (POV): Scenario, Year, Period (month) and Entity. Check them or even modify them by clicking on the label of the dimension you would like to change that appears on the head of the central panel. The “Member Selector” window appears: select the desired item and click on the “OK” button.
Page 5 of 9
5
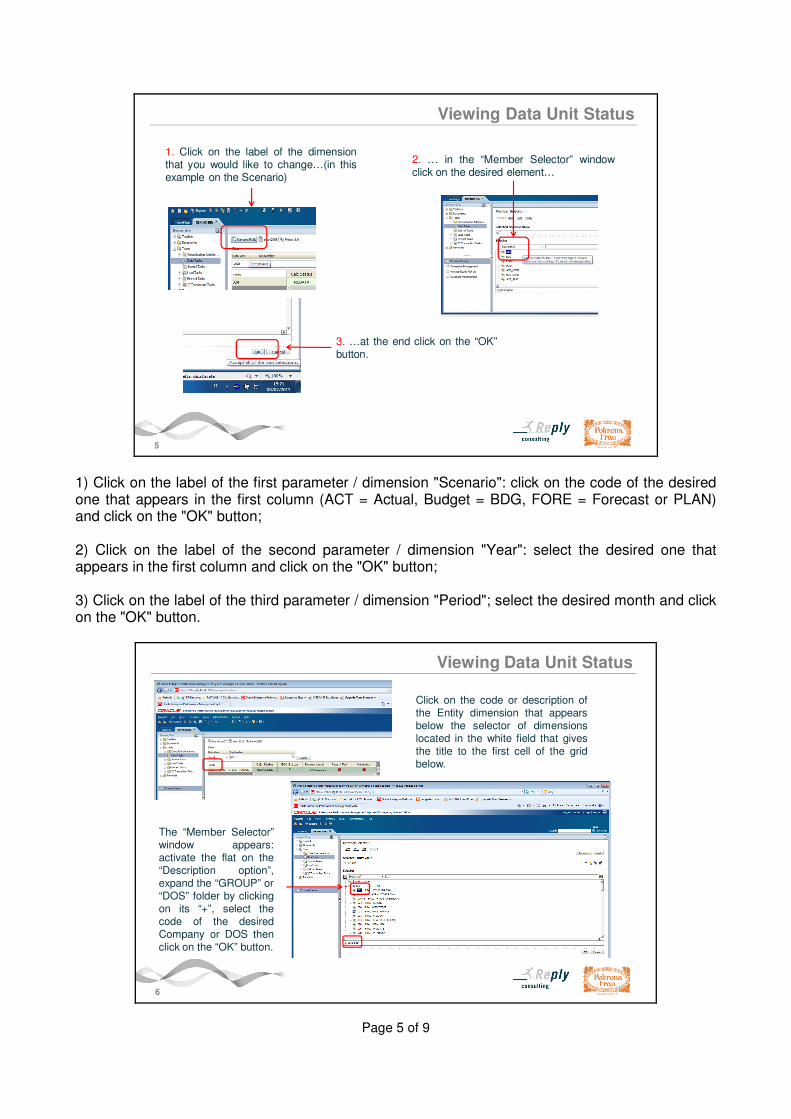
1. Click on the label of the dimensionthat you would like to change…(in thisexample on the Scenario)
2. … in the “Member Selector” windowclick on the desired element…
3. …at the end click on the “OK”button.
Viewing Data Unit Status
1) Click on the label of the first parameter / dimension "Scenario": click on the code of the desired one that appears in the first column (ACT = Actual, Budget = BDG, FORE = Forecast or PLAN) and click on the "OK" button; 2) Click on the label of the second parameter / dimension "Year": select the desired one that appears in the first column and click on the "OK" button; 3) Click on the label of the third parameter / dimension "Period"; select the desired month and click on the "OK" button.
6
Viewing Data Unit Status
Click on the code or description ofthe Entity dimension that appearsbelow the selector of dimensionslocated in the white field that givesthe title to the first cell of the gridbelow.
The “Member Selector”window appears:activate the flat on the“Description option”,expand the “GROUP” or“DOS” folder by clickingon its “+”, select thecode of the desiredCompany or DOS thenclick on the “OK” button.

Page 6 of 9
Then you have to select the Entity of your competence (Company or DOS). Click on the label of the “Entity” dimension that appears below the selector of dimensions located in the white field that gives title to the first cell of the grid below. The “Member Selector" window appears: activate the flag on the "Description" option below, expand the “GROUP” or “DOS” folder by clicking on its “+”, select the code of the desired Company or DOS then click on the “OK” button. Remember that the Companies are contained in the “GROUP” folder; the DOS / Stores are contained in the “DOS” folder.
7
The “Review Level” fielddisplays the level of thepromotion of Data Unit.
The “Pass / Fail” ReviewOption field displayswhether the Data Unit isready for promotion to thenext level.
The “Validation (account amount)”Review Option displays thevalidation state of the Data Unit thatdepends on the amount of possiblechecking accounts.
The “Calc Status” (Calculation Status)yellow field containing the “CH”indication means that the Data Unitneeds to run a calculation;
The “ECA Status” or “Journal Status”field can display a red or green flagsrelated to the state of the Journals(Company Adjustments) created forthe selected Entity.
Viewing Data Unit Status
For each selected Entity (ordered by line / row) appears the following fields: The "Calc Status” (Calculation Status) indicates the calculation state of the Data Unit selected. This field can take the following signallings: - “CH” indicates that the Data Unit needs to run a calculation (starting from the “Force Calculate” command that appears in the controls bar of Hyperion); in this case the cell will be yellow; - “OK” indicates that the calculation process was already successfully launched; in this case the cell is green. The “ECA Status” or “Journal Status” can display a green or red flag: the green one indicates that the Journals (Company Adjustments) created are all Posted; otherwise, if some Journals have not been posted yet, the flag appears in red colour. (Concerning the Journals you can refer to Chapter 5). The “Review Level” field displays the level of the promotion of the Data Unit. The "Pass / Fail" Review Option shows if the Data Units is ready for the promotion to the next level and checks the amount of the validation account. The "Validation (account amount)" Review Option displays the validation state of the Data Unit that
Page 7 of 9
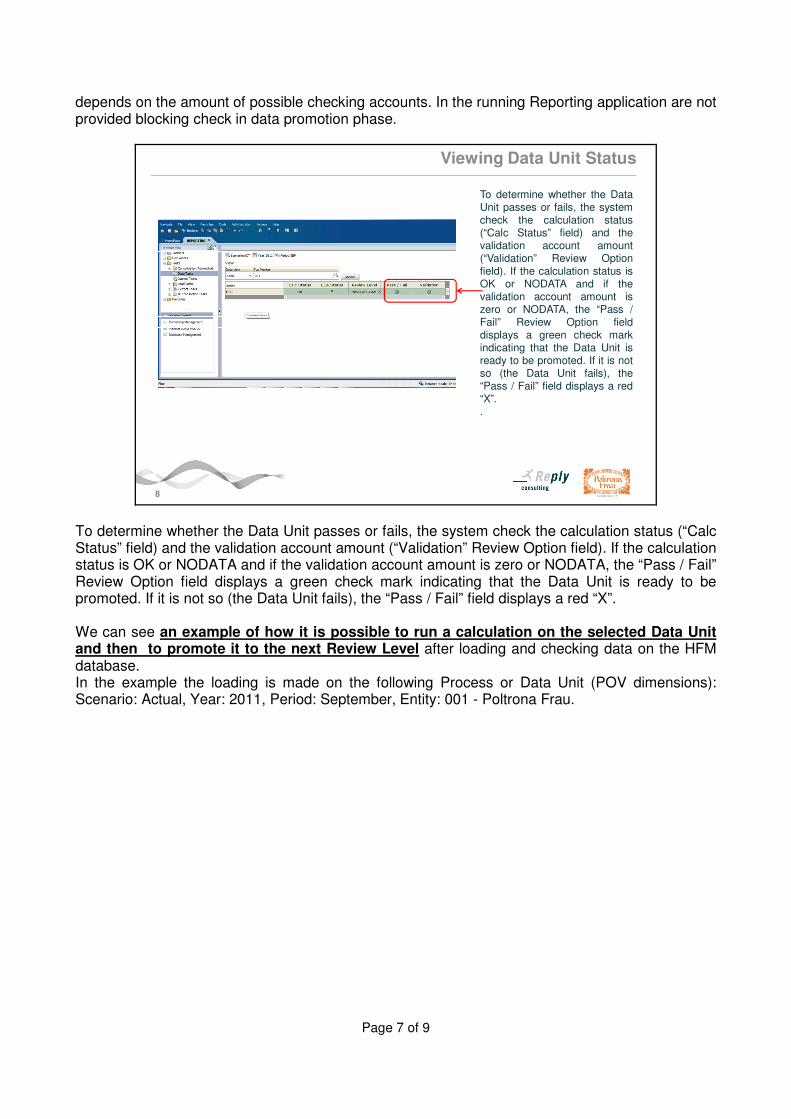
depends on the amount of possible checking accounts. In the running Reporting application are not provided blocking check in data promotion phase.
8
To determine whether the DataUnit passes or fails, the systemcheck the calculation status(“Calc Status” field) and thevalidation account amount(“Validation” Review Optionfield). If the calculation status isOK or NODATA and if thevalidation account amount iszero or NODATA, the “Pass /Fail” Review Option fielddisplays a green check markindicating that the Data Unit isready to be promoted. If it is notso (the Data Unit fails), the“Pass / Fail” field displays a red“X”..
Viewing Data Unit Status
To determine whether the Data Unit passes or fails, the system check the calculation status (“Calc Status” field) and the validation account amount (“Validation” Review Option field). If the calculation status is OK or NODATA and if the validation account amount is zero or NODATA, the “Pass / Fail” Review Option field displays a green check mark indicating that the Data Unit is ready to be promoted. If it is not so (the Data Unit fails), the “Pass / Fail” field displays a red “X”. We can see an example of how it is possible to run a calculation on the selected Data Unit and then to promote it to the next Review Level after loading and checking data on the HFM database. In the example the loading is made on the following Process or Data Unit (POV dimensions): Scenario: Actual, Year: 2011, Period: September, Entity: 001 - Poltrona Frau.

Page 8 of 9
9
If the line / row that contains the code or description of theselected Entity dimension appears yellow with the “CH”signaling in the “Calc Status” field, it means that it isnecessary to launch the “Force Calculate” command on theData Unit in order to promote it to a next Review Level
Click on the “Calculate”command button that appearsabove in the controls bar ofHyperion and then, startingfrom its menu, click on the“Force Calculate” command
1. Select the entire line /row by clicking on thedescription of the Entity(Company or DOS)selected before;
Launching Calculation using the Process Control module
First of all you have to check the calculation state of your Data Unit. If the entire line / row that contains the encode or description of your selected Entity (Company or DOS) appears yellow with the “CH” signalling in the “Calc Status” field, you have to run a calculation on the Data Unit. Select the entire line / row by clicking on the encode or description of the Entity. Click on the “Calculate” command button that appears above in the controls bar of Hyperion and then, starting from its menu, click on the “Force Calculate” command.
10
The line / row of the Entity become green with the “OK” signaling in the “Calc Status” field. Also the“Validation (account)” and the “Pass / Fail” Review Options get a green symbol.The calculation process has been successfully completed
Promote Data Unit / Entity to next level
The line / row of the Entity become green with the “OK” signalling in the “Calc Status” field. Also the “Validation (account)” and the “Pass / Fail” Review Options fields get a green symbol. The calculation process has been successfully completed.

Page 9 of 9
At this point you can proceed to the movement of the selected Data Unit through the Review Cycle by promoting it to the next Review Level. By keeping the previous selection of the entire line / row with the selected Entity, click on the "Manage Process” command button that appears in the controls bar of Hyperion and then, starting from its menu, click on the “Promote” command. The “Process Management” window appears: click on the first “Promote to” field and select the desired level of promotion starting from its drop-down list. Then click on the “Promote” button below. Please, remember: The promotion of the Entity / Data Unit must be necessarily made before the fixed deadline for the data collection defined by the Group Management Control Department. Base user should pass his Data Unit from “Review Level 1” to “Review Level 2”. If the data he entered is correct / square, the Validator / Consolidator should promote the Data Unit to “Review Level 3”; otherwise he should reject it by clicking on the “Manage Process” command button described above, selecting the “Reject” option contained in its menu and then click on the “Reject” button to confirm it. So the Data Unit comes back to “Review Level 1”; the Base user has to make changes or additions to his data and after he has finished, he has to promote again his Data Unit to the “Review Level 2”. When all the Data Units are brought to “Review Level 3”, the Process Administrator can proceed to consolidate, approve, publish and lock them.