Canon Mp620 Getting Started guide
73
Make sure to read this manual before using the machine. Please keep it in hand for future reference. MP620 Getting Started =Read Me First= series Photo All-In-One
-
Upload
cottchen6605 -
Category
Documents
-
view
225 -
download
0
Transcript of Canon Mp620 Getting Started guide

8/11/2019 Canon Mp620 Getting Started guide
http://slidepdf.com/reader/full/canon-mp620-getting-started-guide 1/73
Make sure to read this manual before using the machine. Please keep it in hand for future reference.
MP620
Getting Started=Read Me First=
series
Photo All-In-One

8/11/2019 Canon Mp620 Getting Started guide
http://slidepdf.com/reader/full/canon-mp620-getting-started-guide 2/73
Symbols■The following symbols are used to mark important instructions. Observe these instructions.
Instructions that, if ignored, could result in personal injury or material damage.
Instructions that must be observed for safe operation.
Additional explanations.
Descriptions for operations that take some time to complete.
Model Number: K10325(MP620)
Microsoft is a registered trademark of Microsoft Corporation.
Windows is a trademark or registered trademark of Microsoft Corporation in the U.S. and/or other countries.
Windows Vista is a trademark or registered trademark of Microsoft Corporation in the U.S. and/or other countries.
Macintosh, Mac, and AirPort are trademarks of Apple Inc., registered in the U.S. and other countries.
Wi-Fi is a registered trademark of the Wi-Fi Alliance.The Wi-Fi CERTIFIED logo is a certication mark of the Wi-Fi Alliance.
•
•
•
•
•

8/11/2019 Canon Mp620 Getting Started guide
http://slidepdf.com/reader/full/canon-mp620-getting-started-guide 3/73
1
Contents
Check the Included Items
Turn the Power On
Install the Print Head
Install the Ink Tanks
Setup the Machine and the Computer
Loading Paper
Conrming the Setup Flow
After Installing the Machine

8/11/2019 Canon Mp620 Getting Started guide
http://slidepdf.com/reader/full/canon-mp620-getting-started-guide 4/73
2
(A)
1
Manuals
Setup CD-ROM (containing the drivers, applications and on-screen manuals)
Warranty
•
•
•
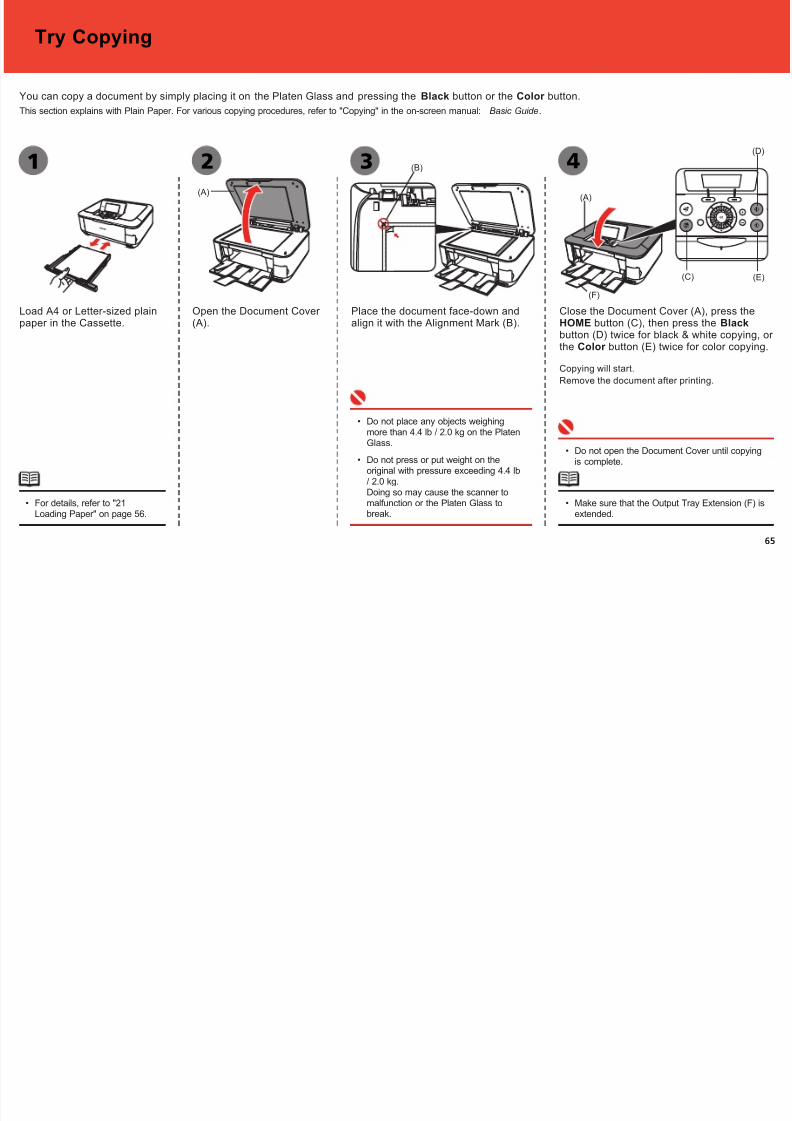
Check the Included Items
Before turning on the machine, remove all the orange tapes and the protective sheets.•
Open the Paper Output Tray with your hands, and take out the Print Head.
The Print Head is placed inside of the Paper Output Tray (A).
ink tank
Print Head
power cord USB cable
The USB cable is used during the
network setup procedure.

8/11/2019 Canon Mp620 Getting Started guide
http://slidepdf.com/reader/full/canon-mp620-getting-started-guide 5/73
3
(A)
(B)
(C)
(D)
(1)
(2)
2 2 31
Turn the Power On
Do NOT connect the USB cable at thisstage.
•
Plug in the power cord on the leftside at the back of the machine andconnect the other end to the walloutlet.
Open the Operation Panel (A), then press the ON button (B)to turn on the machine.
Make sure that the Document Cover (C) is closed.
If an unintended language is displayed on the LCD, press the Back button on the Operation Panel to return to theLanguage selection screen.
•
•
Use the { or } button (D) on theOperation Panel to select the languagefor the LCD, then press the OK button.The standby screen is displayed.
The machine may make some operating noises. This is normal operation.•
3

8/11/2019 Canon Mp620 Getting Started guide
http://slidepdf.com/reader/full/canon-mp620-getting-started-guide 6/73
4
(E)
(A)
(B)
(C)
(D)
3 1 2
Install the Print Head
Close the Document Cover (D) and lift it with the
Scanning Unit (Cover).
• Firmly raise the Print Head Lock Lever until it stops. (The
Print Head Lock Lever may feel heavy.)
•
If the Print Head Holder does not move, make sure that themachine is turned on.
•
Open the Paper Output Tray (A), then lift theScanning Unit (Cover) (B) until it locks into place.
Raise the Print Head Lock Lever (E).
Do not handle the Print Headroughly such as applying themexcessive pressure or droppingthem.
•
The Print Head Holder makes a noise as it moves.This is normal operation.
•
The Scanning Unit (Cover) (B) is fixed automatically.
The Print Head Holder (C) comes out. (This is where
you install the Print Head.)

8/11/2019 Canon Mp620 Getting Started guide
http://slidepdf.com/reader/full/canon-mp620-getting-started-guide 7/73
5
(E)543
Remove the Print Head from thesilver package.
Remove and discard the orangeprotective cap.
Tilt the Print Head and set it in place. Lower the Print Head Lock Lever(E) completely.
There may be some transparent or light blue ink on the inside of the bag the PrintHead comes in, or the inside of the protective cap - this has no effect on printquality. Be careful not to get ink on yourself when handling these items. Be carefulnot to stain your hands.
•
Do not knock the Print Head against the sides of the Holder.
Be sure to install it in a well-lit environment.
Pinch the Print Head Lock Lever rmly and lower it gently.
Once you have installed the Print Head, do not remove it unnecessarily.
•
•
•
•
4
8/11/2019 Canon Mp620 Getting Started guide
http://slidepdf.com/reader/full/canon-mp620-getting-started-guide 8/73
6
(A)
(1)
(2)
4 1 2
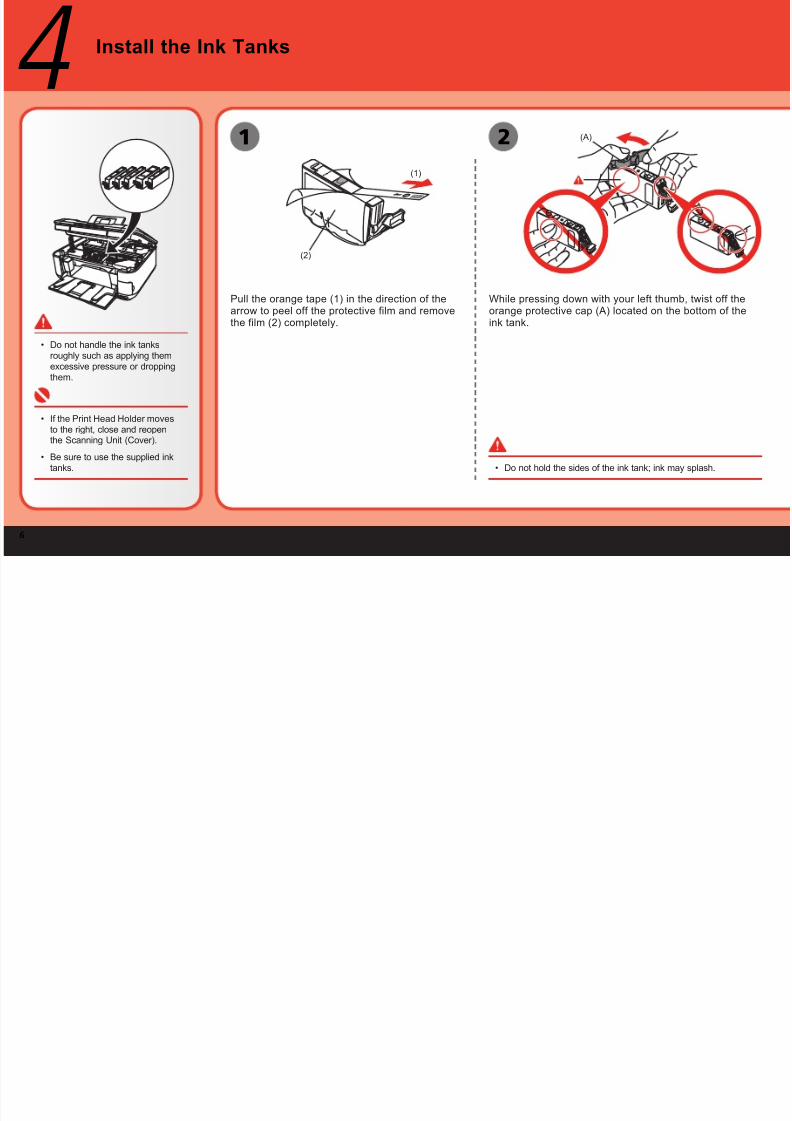
Install the Ink Tanks
Do not hold the sides of the ink tank; ink may splash.•
Pull the orange tape (1) in the direction of thearrow to peel off the protective film and removethe film (2) completely.
If the Print Head Holder movesto the right, close and reopenthe Scanning Unit (Cover).
Be sure to use the supplied inktanks.
•
•
Do not handle the ink tanksroughly such as applying themexcessive pressure or droppingthem.
•
While pressing down with your left thumb, twist off theorange protective cap (A) located on the bottom of theink tank.

8/11/2019 Canon Mp620 Getting Started guide
http://slidepdf.com/reader/full/canon-mp620-getting-started-guide 9/73
7
(B)
4 53
Wait until the screen above appears (about 4
minutes) and go to the next step.
The machine may make some operating noises
when preparing to print. This is normal operation.
•
•
If an error message is displayed on the LCD, makesure that the Print Head and the ink tanks are correctlyinstalled.
•
Install all the other ink tanks in thesame way.
Install all the ink tanks.
Make sure all the Ink lamp lights red.•
Once you have installed the ink tanks,do not remove them unnecessarily.
•
Close the Scanning Unit (Cover) (B).Press the PUSH mark on the inktank until it clicks into place.
Make sure the Ink lamp lights red.
Instal l the Ink Tank
Be sure to install it in a well-litenvironment.•
Match the labels when installing.•
4

8/11/2019 Canon Mp620 Getting Started guide
http://slidepdf.com/reader/full/canon-mp620-getting-started-guide 10/73
8
(C)
4 76
Press the OK button.
For details, refer to "21 Loading Paper" on page 56.
Close the Paper Output Tray to make it easier to pull out theCassette.
•
•
For better print results, it is recommended that you align the Print Head before printing photos. Toalign the Print Head, use the { or } button to select Perform head alignment, then press the OK button. Follow the steps in "Align the Print Head" on page 67 for alignment.
You can perform Print Head Alignment at any time. For details, refer to the on-screen manual: BasicGuide.
•
•
Load three or more sheets of A4 or Letter-sized plainpaper into the Cassette (C), then press the OK button.
Confirm that the above screen appears.
5

8/11/2019 Canon Mp620 Getting Started guide
http://slidepdf.com/reader/full/canon-mp620-getting-started-guide 11/73
9
5 Confirming the Setup Flow
Confirming Your Connection Type■
Before starting setup, decide on the most suitable connection method for the machine.
This machine can be used over a wireless or wired LAN, as well as via USB connection.
Wireless LANUSB Wired LAN
Before connecting the machine to the network, conrm that conguration of the computer and network devices (router,access point, etc.) is complete, and that the computer can connect to the network. For the procedures to connect anetwork device to the computer and set them up, refer to the manual of your network device or contact its manufacturer.
The machine cannot be used over a wired and wireless LAN at the same time.
•
•
Router Access point
LAN cableUSB cable
5

8/11/2019 Canon Mp620 Getting Started guide
http://slidepdf.com/reader/full/canon-mp620-getting-started-guide 12/73
10
5
Quit all running applications before installation.
Log into a user account with the administrator privilege.
Do not switch user accounts during installation.
It may be necessary to restart your computer during the installation process.
Follow the on-screen instructions and click OK, and do not remove the Setup CD-ROM during restarting. The installation resumes from where it left off when yourcomputer has been restarted.
Since Mac OS 9, Mac OS X Classic environments, Mac OS X v.10.3.8 or earlierare not supported.
•
•
•
•
•
Preparation for Setup■
Ad-hoc mode is not supported.
If you connect to a network that is not protected with security measures, there isa risk of disclosing data such as your personal information to a third party.
The machine may communicate with other access points used in the vicinity.
The machine supports WPS (Wi-Fi Protected Setup) and WCN (WindowsConnect Now) in addition to the conventional wireless LAN settings. As for WCN,"WCN-UFD" that requires a USB ash drive is supported.
•
•
•
•
Notes on Wireless LAN Connection□
A router and LAN cable are required to connect the machine to a wired LAN.These must be purchased separately.
•
Note on Wired LAN Connection□
To use the machine by connecting it to a computer, software including the drivers needs to be copied (installed) to the computer's hard disk, and setting configured
according to the connection method. In addition, configure the machine's LAN settings to connect to the network. Read the following carefully before starting setup.
The screens below are based on Windows Vista operating system Ultimate Edition (hereafter referred to as "Windows Vista") and Mac OS X v.10.5.x.
Notes on Setup□
Before connecting the machine to the network, conrm that conguration of thecomputer and network devices (router, access point, etc.) complete, and that thecomputer can connect to the network.
For information on how to conrm the settings of the access point, refer to your
access point's instruction manual or contact its manufacturer. For example,
Disable Stealth (closed network) functionConfirm MAC addressDisable the access point's IP address
•
•
– – –
Notes on Network Connection□
The conguration, router functions, setup procedures and security functions ofthe network device vary depending on your environment. For details, refer to yourdevice’s instruction manual or contact its manufacturer.
If the rewall function of your security software is turned on the warning messagemay appear that Canon software is attempting to access the network.If the warning message appears, set the security software to always allow access.
In an ofce setup, consult your network administrator.
If a screen not specied in the procedure or an error message appears duringsetup, refer to “5 The following screen is displayed during setup” in the printedmanual: Network Setup Troubleshooting .
•
•
•
•

8/11/2019 Canon Mp620 Getting Started guide
http://slidepdf.com/reader/full/canon-mp620-getting-started-guide 13/73
11
A
B
C
G
H
I
J
K
D
E
F
Which connection methoddo you intend to use?
USB
Setup Flow■
P.13 P.16 P.29
P.32 P.37
P.12 P.13 P.17 P.29
P.12 P.32 P.38 P.45
P.12 P.13 P.29P.21
P.12 P.32 P.45P.40
P.51 P.13 P.29
P.48 P.13 P.26 P.29
P.48 P.32 P.44 P.45
P.13 P.26 P.29
P.32 P.44 P.45
Is this your rst timeconnecting the machineto the network?
Network
Yes
No
Wired LAN
Wireless LAN
P.26
To use the machine on other computers
USB
WPS
WCN
6

8/11/2019 Canon Mp620 Getting Started guide
http://slidepdf.com/reader/full/canon-mp620-getting-started-guide 14/73
12
6 1 3 4 52
D
F
C
E
(A)
Use the Easy-Scroll Wheel (A) or the[ or ] button to select Settings, thenpress the OK button.
Select Devicesettings, then pressthe OK button.
Select LAN settings,then press the OK button.
Select Changewireless/wired, thenpress the OK button.
Select either to theconnection method,then press the OK button.
Setup the Machine and the Computer
Machine's LAN Setting
Next, read "Install the Software" !Windows
Macintosh
P.13
P.32

8/11/2019 Canon Mp620 Getting Started guide
http://slidepdf.com/reader/full/canon-mp620-getting-started-guide 15/73
7

8/11/2019 Canon Mp620 Getting Started guide
http://slidepdf.com/reader/full/canon-mp620-getting-started-guide 16/73
14
3 4 5
C
A
E
G
I
J
7 Windows Vista Windows Vista
AutoPlay screen appears, clickRun Msetup4.exe.
User Account Control screenappears, click Continue.
If the same screen reappears in
subsequent steps, click Continue.
Click Easy Install.
The drivers, application software, and on-screen manuals are installed
automatically.
If you want to select particular items to install, click Custom Install and followthe on-screen instructions to proceed with the installation.
•

8/11/2019 Canon Mp620 Getting Started guide
http://slidepdf.com/reader/full/canon-mp620-getting-started-guide 17/73
15
7A
C
G
I
J
E
6
Windows
Read the License Agreement screencarefully and click Yes.
Installation starts.
Follow any on-screen instructions to installthe software.
•
Click Install.
Move the cursor over items to display
explanations.
USB
Wired LAN
P.26
Wireless LAN
Additional
Computer
P.16
P.17
P.21
P.26
P.26
Go to either of the following proceduresaccording to your connection method!
J
E
C
A
WPS
WCNI
G
8S t th M hi d th C t

8/11/2019 Canon Mp620 Getting Started guide
http://slidepdf.com/reader/full/canon-mp620-getting-started-guide 18/73
16
USB
1 2A
8 Windows
When the Printer Connection screen appears, connect the machine to the computer with aUSB cable, then turn on the machine.
USB Connection
Setup the Machine and the Computer
Next, read "12 Information" on page 29!
When the machine is recognized by the computer, a message appears on the screen.
If you cannot go to the next procedure after 10 minutes, click Help and conrm the message.
•
•
The USB port is located on the right side at the back of the machine.•
On the Setup Method screen, select Use theprinter via USB, then click Next.
9Setup the Machine and the Computer

8/11/2019 Canon Mp620 Getting Started guide
http://slidepdf.com/reader/full/canon-mp620-getting-started-guide 19/73
17
1 2
C
9 First-time Setup for Use over Wired LAN
Setup the Machine and the Computer
Set the machine's LAN setting to Wired LAN active beforehand. Fordetails, refer to “6 Machine's LAN Setting” on page 12.
•
When a confirmation screen for the machine's LAN setting appears, click
OK.
Windows
Confirm that USB Cable and LAN Cable are Ready.
Prepare Cables
On the Setup Method screen, select Connect printer to thenetwork for the first time, then click Next.
USB Cable LAN Cable
9
8/11/2019 Canon Mp620 Getting Started guide
http://slidepdf.com/reader/full/canon-mp620-getting-started-guide 20/73
18
USB
3
C
4
9
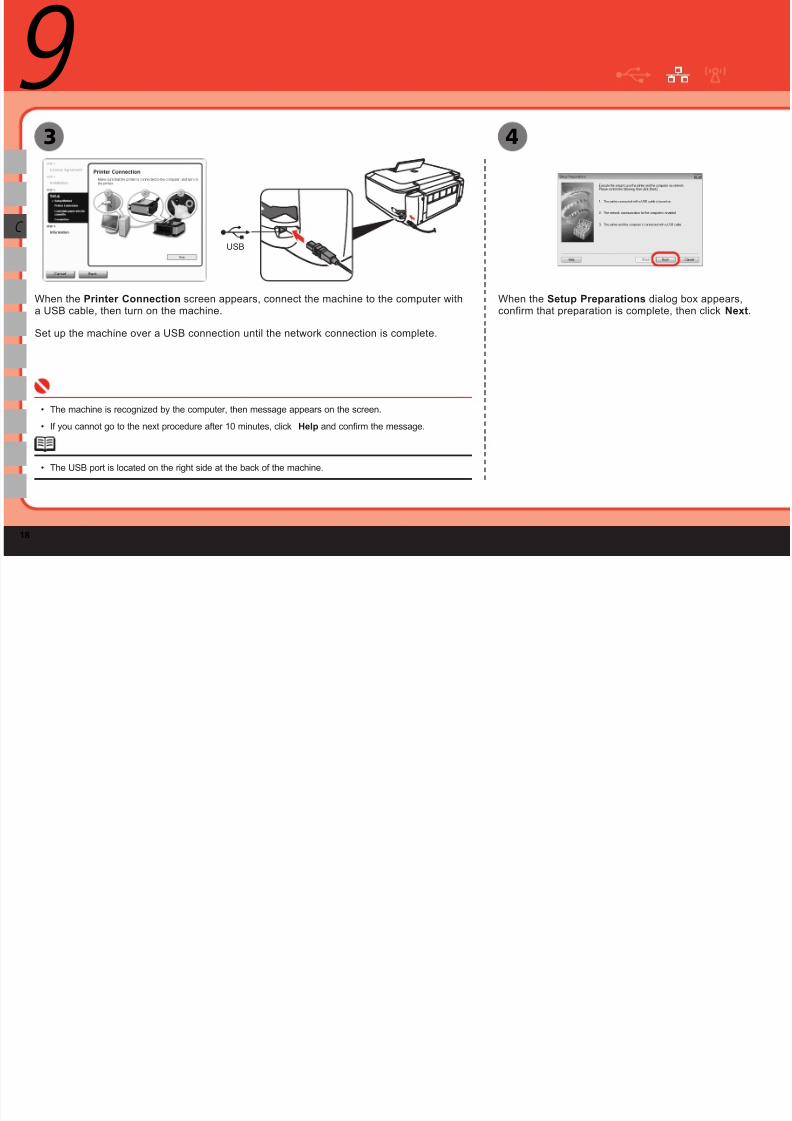
When the Printer Connection screen appears, connect the machine to the computer witha USB cable, then turn on the machine.
Set up the machine over a USB connection until the network connection is complete.
When the Setup Preparations dialog box appears,confirm that preparation is complete, then click Next.
The machine is recognized by the computer, then message appears on the screen.
If you cannot go to the next procedure after 10 minutes, click Help and conrm the message.
•
•
The USB port is located on the right side at the back of the machine.•

8/11/2019 Canon Mp620 Getting Started guide
http://slidepdf.com/reader/full/canon-mp620-getting-started-guide 21/73
19
(A)
USB
5
C
6
Connect the machine to thenetwork device with a LAN cable(A), then click Yes.
Windows
Windows Vista
Windows XP/2000
Detect the Machine
If no connection is established even afterConnect is clicked, refer to "5.6 The Set PrinterIP Address dialog box is displayed duringsetup" in the printed manual: Network SetupTroubleshooting .
•
When the Set Printer IP Address screenappears, click Connect.
If the machine is detected automatically, the Set
Printer IP Address screen does not appear. Go
to the following procedure.
Go to Step .
Go to Step .
9

8/11/2019 Canon Mp620 Getting Started guide
http://slidepdf.com/reader/full/canon-mp620-getting-started-guide 22/73
20
USB
7
C
9 8
Windows
Windows XP/2000
When the Network Setup of the Card Slot dialog box appears, specifythe drive letter, then click Next.
If the error message appears, refer to "5 The following screen is displayedduring setup" in the printed manual: Network Setup Troubleshooting .
•
When the Setup Completion dialog box appears, remove the USBcable, then click Finish.
Next, read "12 Information" on page 29!
To change the port name, click View Setup Results, then click Set PortName. For details, refer to "8 Changing the port name" in the printedmanual: Network Setup Troubleshooting .
If Unsafe Removal of Device is displayed, click OK.
•
•
10Setup the Machine and the Computer

8/11/2019 Canon Mp620 Getting Started guide
http://slidepdf.com/reader/full/canon-mp620-getting-started-guide 23/73
21
USB
21
E
10
On the Setup Method screen, selectConnect printer to the network for thefirst time, then click Next.
Set the machine's LAN setting to WirelessLAN active beforehand. For details, refer to“6 Machine's LAN Setting” on page 12.
•
When a confirmation screen for the machine's
LAN setting appears, click OK.
First-time Setup for Use over Wireless LAN
p p
Windows
Set up the machine over a USB connection until the network connection is complete.
When the machine is recognized by the computer, a message appears on the screen.
If you cannot go to the next procedure after 10 minutes, click Help and conrm the message.
•
•
The USB port is located on the right side at the back of the machine.•
When the Printer Connection screen appears, connect the machine to the computerwith a USB cable, then turn on the machine.

8/11/2019 Canon Mp620 Getting Started guide
http://slidepdf.com/reader/full/canon-mp620-getting-started-guide 24/73

8/11/2019 Canon Mp620 Getting Started guide
http://slidepdf.com/reader/full/canon-mp620-getting-started-guide 25/73
23
5 6
E
Windows
If no connection is established even after Connect isclicked, refer to "5.6 The Set Printer IP Address dialog box isdisplayed during setup" in the printed manual: Network SetupTroubleshooting .
•
When the Set Printer IP Address screen appears, clickConnect.
If the machine is detected automatically, the Set Printer
IP Address screen does not appear. Go to the following
procedure.
Detect the Machine Windows XP/2000
When the Network Setup of the Card Slot dialog box appears, specifythe drive letter, then click Next.
If the error message appears, refer to "5 The following screen is displayedduring setup" in the printed manual: Network Setup Troubleshooting .
•
Windows Vista
Windows XP/2000
Go to Step .
Go to Step .
10

8/11/2019 Canon Mp620 Getting Started guide
http://slidepdf.com/reader/full/canon-mp620-getting-started-guide 26/73
24
USB
7 8
E
10
When the Setup Completion dialog box appears, remove the USB cable,then click Next.
To change the port name, click View Setup Results, then click Set Port Name.For details, refer to "8 Changing the port name" in the printed manual:Network Setup Troubleshooting .
If Unsafe Removal of Device is displayed, click OK.
•
•
Turn off the machine, then place the machine in the location where youwill use it, and turn on it.

8/11/2019 Canon Mp620 Getting Started guide
http://slidepdf.com/reader/full/canon-mp620-getting-started-guide 27/73
25
9 10
E
Measuring takes a few minutes. You can cancel measuring by clicking Cancel.You also examine the detailed status of the communication link after setup byusing the Canon IJ Network Tool. For details, refer to the on-screen manual:
Advanced Guide.
•
On the Connection Performance Measurement screen, click Next.
Measuring of the communication status starts, and the results are displayed.
If any symbol other than is displayed, refer to displayed comments and Helpfor improving the status of communication link.
To check whether the new location is better, click Remesurement. Measurementof the communication status is performed again.
When any message on Overall network performance appears in themeasurement results, rearrange the printer and other network devices followingthe instructions on the screen.
•
•
•
Confirm the measurement results, then click Finish.
Ensure that is displayed in Connection performance between the printer and
the access point.
Next, read "12 Information" on page 29!
Windows
11Setup the Machine and the Computer

8/11/2019 Canon Mp620 Getting Started guide
http://slidepdf.com/reader/full/canon-mp620-getting-started-guide 28/73
26
(A)
21
G
I
J
11 Connect the Wired LAN / Wireless LAN
Press the ON button (A) to TURN ON THE MACHINE.
Make sure that the computer you are setting up is not connected to the machine with aUSB cable.
For wired LAN connections, conrm that the machine is connected to the network with aLAN cable.
•
•
On the Setup Method screen, select Printer is already connectedto the network, then click Next.
Wi d

8/11/2019 Canon Mp620 Getting Started guide
http://slidepdf.com/reader/full/canon-mp620-getting-started-guide 29/73
27
3
G
I
J
Windows
Some programs that switch the network environment depending on your environment will enable a rewall by default. Check the settings of any such software.•
When the Printers screen appears, make sure that the machine is selected and click Next.
When the machine is not detected, make sure of the following, click Update.•
The machine is turned on.When using wireless LAN : The computer is connected to the access point.When using wired LAN : The machine is connected to the network device with the LAN cable.
– – –
Windows Vista
Windows XP/2000
Go to Step .
Go to Step .
11Windo s

8/11/2019 Canon Mp620 Getting Started guide
http://slidepdf.com/reader/full/canon-mp620-getting-started-guide 30/73
28
5
G
I
J
114
Windows
Windows XP/2000
When the Network Setup of the Card Slot dialog box appears, specify the driveletter, then click Next.
If the error message appears, refer to "5 The following screen is displayed during setup"in the printed manual: Network Setup Troubleshooting .
•To change the port name, click View Setup Results, then click SetPort Name. For details, refer to "8 Changing the port name" in theprinted manual: Network Setup Troubleshooting .
•
When the Setup Completion screen appears, click Finish.
Next, read "12 Information" on page 29!

8/11/2019 Canon Mp620 Getting Started guide
http://slidepdf.com/reader/full/canon-mp620-getting-started-guide 31/73
12

8/11/2019 Canon Mp620 Getting Started guide
http://slidepdf.com/reader/full/canon-mp620-getting-started-guide 32/73
30
Serial Number * * * * * * *
3 4
C
A
E
G
I
J
12
Click Next.
If connected to the Internet, the user registration page appears. Follow the on-screen instructions to
register your product. You will need your product serial number, which is located on the inside of the
machine.
To register later, click Cancel. User Registration can be started from the Solution Menu icon. Fordetails, refer to "Solution Menu" on page 60.
•
Internet connection is required. (Connection fees apply.)•
When the Extended Survey Program screen appears,confirm the message. If you can agree,click Agree.
If you click Do not agree, the Extended Survey Program
will not be installed. (This has no effect on the machine's
functionality.)
Windows

8/11/2019 Canon Mp620 Getting Started guide
http://slidepdf.com/reader/full/canon-mp620-getting-started-guide 33/73
31
5
A
C
G
E
I
J
Windows
Click Exit.
If Restart is displayed, make sure that the Restart the system now (recommended) check box is selected, then
click Restart.
After restarting the computer, remove the Setup CD-ROM and keep it in a safe place.
Next, read "21 Loading Paper"on page 56!

8/11/2019 Canon Mp620 Getting Started guide
http://slidepdf.com/reader/full/canon-mp620-getting-started-guide 34/73
Macintosh
8/11/2019 Canon Mp620 Getting Started guide
http://slidepdf.com/reader/full/canon-mp620-getting-started-guide 35/73
33
54
B
H
K
D
F
Macintosh
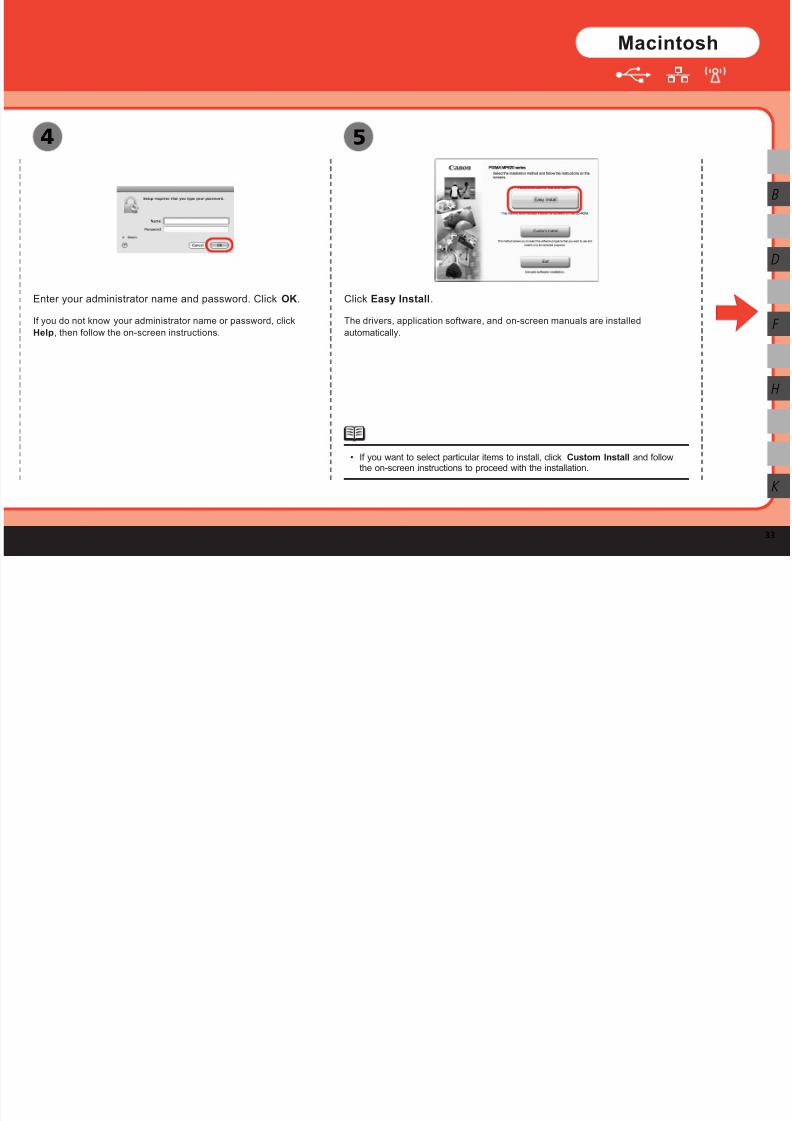
Enter your administrator name and password. Click OK.
If you do not know your administrator name or password, click
Help, then follow the on-screen instructions.
Click Easy Install.
The drivers, application software, and on-screen manuals are installed
automatically.
If you want to select particular items to install, click Custom Install and followthe on-screen instructions to proceed with the installation.
•
13

8/11/2019 Canon Mp620 Getting Started guide
http://slidepdf.com/reader/full/canon-mp620-getting-started-guide 36/73
34
(A)
8
K
H
F
D
B
13 76
Read the License Agreement screen carefully and click Yes.
Installation starts.
Follow any on-screen instructions toinstall the software.
•
When the Load plain paper into the cassette screen appears,load plain paper in the Cassette (A) and click Next.
For details, refer to "21 Loading Paper" on page 56.•
Move the cursor over items to display
explanations.
Click Install.
Macintosh

8/11/2019 Canon Mp620 Getting Started guide
http://slidepdf.com/reader/full/canon-mp620-getting-started-guide 37/73
35
Serial Number * * * * * * *
10
B
H
K
D
F
9
Macintosh
Click Next. Click Next.
If connected to the Internet, the user registration page appears.
Follow the on-screen instructions to register your product.
You will need your product serial number, which is located on the inside of the machine.
Internet connection is required. (Connection fees apply.)•
To register later, click Cancel. User Registration can be started from the Solution Menu icon. For details,refer to "Solution Menu" on page 60.
•

8/11/2019 Canon Mp620 Getting Started guide
http://slidepdf.com/reader/full/canon-mp620-getting-started-guide 38/73
14Setup the Machine and the Computer
USB Connection Macintosh

8/11/2019 Canon Mp620 Getting Started guide
http://slidepdf.com/reader/full/canon-mp620-getting-started-guide 39/73
37
1
B
14 USB Connection
On the Canon IJ Network Tool screen, select USB connection, then clickOK.
Next, read "21 Loading Paper" on page 56!

8/11/2019 Canon Mp620 Getting Started guide
http://slidepdf.com/reader/full/canon-mp620-getting-started-guide 40/73
Macintosh

8/11/2019 Canon Mp620 Getting Started guide
http://slidepdf.com/reader/full/canon-mp620-getting-started-guide 41/73
39
USB
USB
(A)4
D
5
Connect the machine to the network device with a LAN cable (A), then click Yes. When the Setup Completion dialog box appears, removethe USB cable, then click OK.
The Printer Setup Utility and Canon IJ Network Scanner Selector
will start up.
Next, read "18 Add the Machine" on page 45!If the Set Printer IP Address dialog box appear, refer to "5.6 The Set Printer IP Address dialogbox is displayed during setup" in the printed manual: Network Setup Troubleshooting .
•
Mac OS X v.10.5.x
Mac OS X v.10.4.x/v.10.3.9
Go to Step .
Go to Step .
16First-time Setup for Use over Wireless LAN
Setup the Machine and the Computer

8/11/2019 Canon Mp620 Getting Started guide
http://slidepdf.com/reader/full/canon-mp620-getting-started-guide 42/73
40
2 31
F
16 p
Set the machine's LAN setting toWireless LAN active beforehand.For details, refer to “6 Machine's LANSetting” on page 12.
•If no machine is detected, refer to "4.1 The machine is not detected" in theprinted manual: Network Setup Troubleshooting . Make sure there is no problem,then click Update.
•
If the Setup Preparations dialog box appears, confirm thatpreparation is complete, thenclick OK.
On the Canon IJ Network Tool screen, select LAN connection, thenclick OK.
Select Setup in the pop-up menu, select MP620 series in Printers, thenclick OK.
Macintosh

8/11/2019 Canon Mp620 Getting Started guide
http://slidepdf.com/reader/full/canon-mp620-getting-started-guide 43/73
41
You can retrieve your network key by using the Canon PIXMAWireless Setup Assistant or the instructions which can bedownloaded from the Canon support webpage (www.usa.canon.com/downloadlibrary).
If you are unable to retrieve the network key or other settingsrefer to the manual of your access point or router, or contact itsmanufacturer.
4
F
Detect Access Point
To connect to the access point with WEP or WPA displayed in the Encryption column, enter the network key (WEP key or WPA key) in Network Password,then click Connect. For details on network keys, refer to "3.1 About Network Key (Windows)/Network Password (Macintosh)" in the printed manual: NetworkSetup Troubleshooting .
•
If you want to select an access point manually, or if the target access point is not displayed in the list, or if an error message appears, refer to “5 Thefollowing screen is displayed during setup” in the printed manual: Network Setup Troubleshooting .
•
When the Access Points screen appears, select an access point to use, then click Connect.
When an access point is detected automatically, the Access Points screen does not appear. Go to step .
16

8/11/2019 Canon Mp620 Getting Started guide
http://slidepdf.com/reader/full/canon-mp620-getting-started-guide 44/73
42
USB
(A)
6 7
F
16 5
Press the ON button (A) TO TURN OFFTHE MACHINE, then place the machinein the location where you will use it, andturn on it.
Detect the Machine
If no connection is established even
after Connect is clicked, refer to "5.6The Set Printer IP Address dialogbox is displayed during setup" inthe printed manual: Network SetupTroubleshooting .
•
If the machine is detected automatically,
the Set Printer IP Address screen does
not appear. Go to step .
When the Set Printer IP Address screen appears, confirm the contents,then click Connect.
When the Setup Completion dialog box appears, removethe USB cable, then click Next.
Macintosh

8/11/2019 Canon Mp620 Getting Started guide
http://slidepdf.com/reader/full/canon-mp620-getting-started-guide 45/73
43
9
F
8
If any symbol other than is displayed, refer to displayed commentsand Help for improving the status of communication link.
To check whether the new location is better, click Remeasurement .Measurement of the communication status is performed again.
When any message on Overall network performance appears in themeasurement results, rearrange the printer and other network devices
following the instructions on the screen.
•
•
•
Confirm the measurement results, then clickFinish.
Ensure that is displayed in Connection
performance between the printer and the access
point.
The Printer Setup Utility and Canon IJ Network
Scanner Selector will start up.
Measuring takes a few minutes.
Measuring can be cancelledby clicking Cancel. You alsoexamine the detailed status of thecommunication link after setup byusing the Canon IJ Network Tool.
•
On the Connection PerformanceMeasurement dialog box, clickNext.
Measuring of the communication status
starts, and the results are displayed.
Next, read "18 Add the Machine" on page 45!
Mac OS X v.10.5.x
Mac OS X v.10.4.x/v.10.3.9
Go to Step .
Go to Step .

8/11/2019 Canon Mp620 Getting Started guide
http://slidepdf.com/reader/full/canon-mp620-getting-started-guide 46/73
18Add the Machine
Setup the Machine and the Computer
Macintosh

8/11/2019 Canon Mp620 Getting Started guide
http://slidepdf.com/reader/full/canon-mp620-getting-started-guide 47/73
45
1 2
H
K
D
F
18 Mac OS X v.10.5.x/v.10.4.x
Wait for a while, then select Canon MP620series and click Add.
In Mac OS X v.10.4.x, click More Printers in the
Printer Browser screen.
The alphanumeric string after Canon MP620series is the machine's MAC address.
If the machine has not been detected, makesure of the following.
•
•
When the Printer List screen appears,click Add.
Mac OS X v.10.4.x/v.10.3.9
Mac OS X v.10.4.x
Mac OS X v.10.3.9
Go to Step .
Go to Step .Mac OS X v.10.5.x
Mac OS X v.10.4.x
Go to Step .
Go to Step .
The machine is turned on.The firewall function of any security soft-ware is turned off.Wired LAN Connection: The machine isconnected to the network device with the
LAN cable.Wireless LAN Connection: The computeris connected to the access point.The machine is not set to use accesscontrol (MAC address filtering).
– –
–
–
–
18

8/11/2019 Canon Mp620 Getting Started guide
http://slidepdf.com/reader/full/canon-mp620-getting-started-guide 48/73
46
3 4
K
H
F
D
18
Select Canon IJ Network in the pop-up menu, select your machine’s name in the listof printers, then click Add.
The alphanumeric string after Canon MP620 series is the machine's MAC address.
If the machine has not been detected, make sure of the following.
•
•
Confirm that your MP620 series is added to the list ofprinters.
Mac OS X v.10.4.x/v.10.3.9 Mac OS X v.10.4.x/v.10.3.9
The machine is turned on.The firewall function of any security software is turned off.Wired LAN Connection: The machine is connected to the network device w ith the LANcable.Wireless LAN Connection: The computer is connected to the access point.The machine is not set to use access control (MAC address filtering).
– – –
– –
Macintosh

8/11/2019 Canon Mp620 Getting Started guide
http://slidepdf.com/reader/full/canon-mp620-getting-started-guide 49/73
47
5
H
K
D
F
6
On the Canon IJ Network Scanner Selector screen, select Canon MP620 series Network inTWAIN Data Source Name and the MAC addressof the machine in Network Device List, then clickApply to use the machine as a scanner.
To conrm the machine's MAC address, refer to "Troubleshooting" in the on-screen manual: Advanced Guide available via Solution Menu.
With Mac OS X v.10.5.x, the Card Slot is not available when using the machine over a network.
•
•
Confirm that a check mark is displayed, thenclick Exit to close the dialog box. Next, read "21 Loading
Paper" on page 56!
19WPS Connection
Setup the Machine and the Computer

8/11/2019 Canon Mp620 Getting Started guide
http://slidepdf.com/reader/full/canon-mp620-getting-started-guide 50/73
48
(A)
21
G
H
3
19 If your access point supports WPS
(Wi-Fi Protected Setup), you can set
the wireless LAN security easily.
Use the Easy-Scroll Wheel (A) or the [ or] button to select Settings, then press theOK button.
Select Device settings,then press the OK button.
Select LAN settings, thenpress the OK button.
Windows/ Macintosh

8/11/2019 Canon Mp620 Getting Started guide
http://slidepdf.com/reader/full/canon-mp620-getting-started-guide 51/73
49
5 64 7
G
H
Select Wireless LAN active,then press the OK button.
Select Change wireless/wired, then press the OK button.
Select Wireless LANsettings, then press the OK button.
Select WPS settings, thenpress the OK button.
19Windows/ Macintosh

8/11/2019 Canon Mp620 Getting Started guide
http://slidepdf.com/reader/full/canon-mp620-getting-started-guide 52/73
50
1098
G
H
19
To use the PIN code method for setup, select PIN method on step , then press the OK button. Follow the on-screen isinstructions to operate the machine and access point. Whenthe setup is complete, the completion screen appears thenthe LAN settings screen returns. A timeout error occurs ifsetup is not completed within 10 minutes. If the timeout errorscreen appears, refer to "5.12 The Timeout error screen isdisplayed during WPS setup" in the printed manual: NetworkSetup Troubleshooting .
•
Select Push buttonmethod, then press theOK button.
Press the OK button. When the access po int is ready, press the OK button on the machine, then press theWPS button on the access point within two minutes.
The completion screen appears on the LCD of the machine, then the LAN settings screen returns.
A timeout error occurs if setup is not completed within two minutes. When the timeout error screenappears, refer to "5.12 The Timeout error screen is displayed during WPS setup" in the printedmanual: Network Setup Troubleshooting .
•
The WPS button may be named differently depending on your access point. For details, refer to themanual of your access point.
•
Next, read "Install the Software" !Windows
Macintosh
P.13
StepP.32
20WCN Connection
Setup the Machine and the Computer
Windows

8/11/2019 Canon Mp620 Getting Started guide
http://slidepdf.com/reader/full/canon-mp620-getting-started-guide 53/73
51
1 2
I
20
The machine supports "WCN-UFD".•
You can set the wireless LAN
security on the machine easily by
using the WCN (Windows ConnectNow) function of Windows Vista
together with a USB ash drive.
Canon assumes no responsibility
for any damage or loss of storeddata regardless of the cause.
If your USB ash drive cannot beattached to the direct print port ofthe machine, an extension cord forUSB ash drives may be required.Purchase one at an electronicsshop.
Operation may not be guaranteeddepending on your USB ash drive.
USB ash drives with securityenabled may not be used.
•
•
•
•
From the Start menu of the Windows side,click Network.
Click Add a wireless device on the menu.
The Network folder opens.
The Add a wireless device to the Network
screen will be displayed.
20

8/11/2019 Canon Mp620 Getting Started guide
http://slidepdf.com/reader/full/canon-mp620-getting-started-guide 54/73
52
54
I
3
20
Click Add the device or computer using aUSB flash drive.
From the list, select the network name (SSID),then click Next.
Click I want to add a wireless device orcomputer that is not on the list, using a USBflash drive.
If the User Account Control screen appears,click Continue. If the same screen reappears insubsequent steps, click Continue.
•
Windows

8/11/2019 Canon Mp620 Getting Started guide
http://slidepdf.com/reader/full/canon-mp620-getting-started-guide 55/73
53
I
6 7
Connect the USB flash drive to the computer, confirm that thedrive name is displayed, then click Next.
When the above screen appears, remove the USB flash drivefrom the computer, then click Close.
20

8/11/2019 Canon Mp620 Getting Started guide
http://slidepdf.com/reader/full/canon-mp620-getting-started-guide 56/73
54
(A)
10 11
I
9
20 8
Use the Easy-Scroll Wheel (A) or the [ or ] button to select Settings, then press the OK button.
Select Device settings, thenpress the OK button.
Select LAN settings, then pressthe OK button.
Select Change wireless/wired, then press the OK button.

8/11/2019 Canon Mp620 Getting Started guide
http://slidepdf.com/reader/full/canon-mp620-getting-started-guide 57/73
21Loading Paper

8/11/2019 Canon Mp620 Getting Started guide
http://slidepdf.com/reader/full/canon-mp620-getting-started-guide 58/73
56
(A)
(A)
(B)
(C)
(D)
(F)
(E)
1 2 3
21This section explains how to
load paper in the Cassette (A)
and the Rear Tray (B).
The Cassette (A) supports plain
paper (C) only. To print Photo
Paper / Hagaki (D), be sure to
load it in the Rear Tray (B).
Load in the Cassette
Move the Paper Guides (E) and (F)to both edges.
Pull out the Cassette (A). Load paper.
Load paper with the printing sidefacing down.
•

8/11/2019 Canon Mp620 Getting Started guide
http://slidepdf.com/reader/full/canon-mp620-getting-started-guide 59/73
57
(F)
(G)
A 4
(E)
(A)
654
Insert the Cassette (A) into the machineuntil it clicks into place.
Slide the Paper Guide (F) against left edge ofthe paper.
Do not exceed the Load Limit Mark (G).
Slide the Paper Guide (E) to alignwith the mark of paper size.
The Paper Guide (E) will stop when it
aligns with the corresponding mark of
paper size.
There may be a little space betweenthe Paper Guide (E) and the paperstack.
•To print on speciality paper, be sure to load it inthe Rear Tray.
•
21
8/11/2019 Canon Mp620 Getting Started guide
http://slidepdf.com/reader/full/canon-mp620-getting-started-guide 60/73
58
(I) (I)
(H)
(I)
(J)
(I)
7 1098
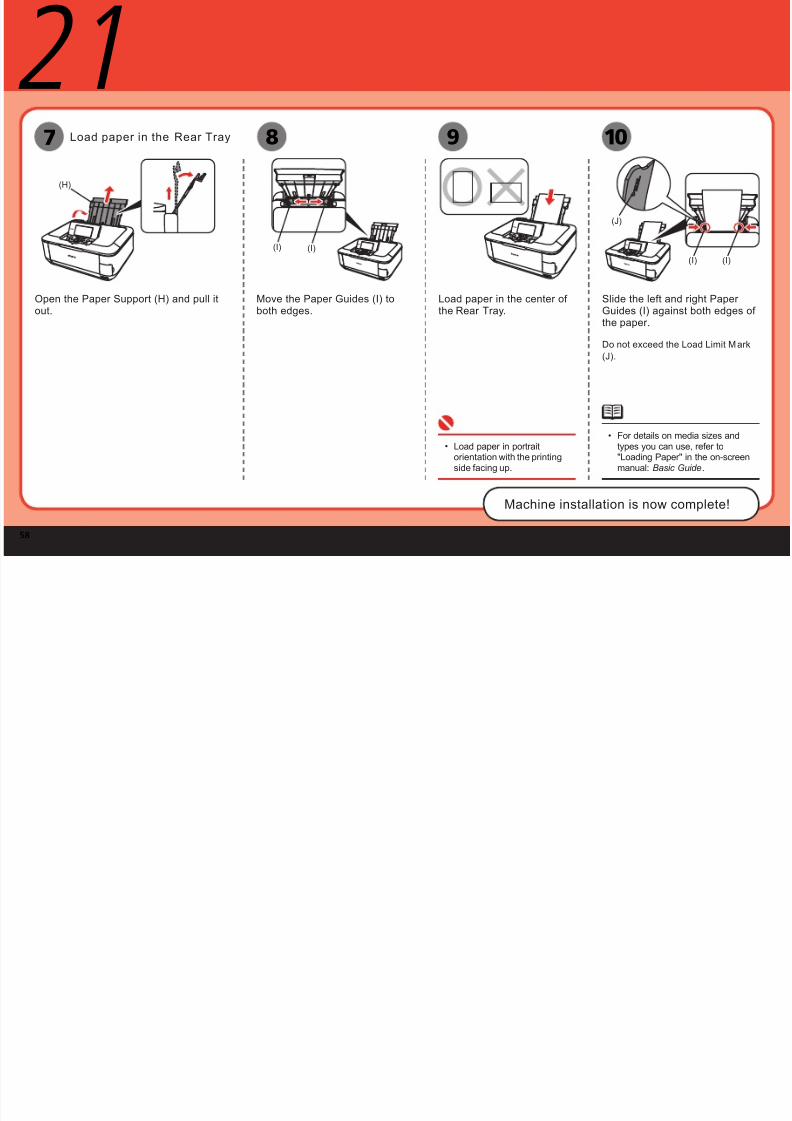
21Load paper in the Rear Tray
For details on media sizes andtypes you can use, refer to"Loading Paper" in the on-screenmanual: Basic Guide.
•Load paper in portraitorientation with the printingside facing up.
•
Machine installation is now complete!
Open the Paper Support (H) and pull itout.
Move the Paper Guides (I) toboth edges.
Load paper in the center ofthe Rear Tray.
Slide the left and right PaperGuides (I) against both edges ofthe paper.
Do not exceed the Load Limit Mark
(J).
After Installing the Machine

8/11/2019 Canon Mp620 Getting Started guide
http://slidepdf.com/reader/full/canon-mp620-getting-started-guide 61/73
59
Safety Precautions
For proper use, read safety
precautions before using the
product.
Safety and Environment
Informat ion
Manuals■
Gett ing Started(this manual)
Describes how to set up and use
your machine. Introduces the
machine and its functions, theincluded manuals and application
software.
Basic Guide(on-screen manual )
Describes the basic operations
and gives an introduction to other
functions available.
Advanced Guide(on-screen manual )
Describes various operating
procedures to make full use
of the machine. Also includes"Troubleshooting" information for
your machine.
Network Setup
Troubleshoot ing

8/11/2019 Canon Mp620 Getting Started guide
http://slidepdf.com/reader/full/canon-mp620-getting-started-guide 62/73
60
Solution Menu■
Solution Menu is a gateway to functions and information that allow you to make full use of the machine!
Open various applications and on-screen manuals with a single click.
You can start Solution Menu from the Solution Menu icon on the desktop (Windows) or onthe Dock (Macintosh).
If you have a problem with machine settings, click the Change settings or find solutions toproblems icon in Solution Menu to open My Printer (Windows only).
*The buttons displayed vary depending on the country or region of purchase.
Example: Windows Vista

8/11/2019 Canon Mp620 Getting Started guide
http://slidepdf.com/reader/full/canon-mp620-getting-started-guide 63/73
Print Photos from a Memory Card

8/11/2019 Canon Mp620 Getting Started guide
http://slidepdf.com/reader/full/canon-mp620-getting-started-guide 64/73
62
(A)
(B)(C)
CF
SDMS
MSDuo
CF
SDMS
MSDuo
CF
SDMS
MSDuo
1
Print images saved on a memory card used with digital cameras, etc.
*Supported Memory Cards (Adapter required for .)
For more information on printing from a memory card, refer to "Printing from a Memory Card" in the on-screen manual: Basic Guide.
SD CardSDHC Card
MultiMediaCard (Ver.4.1)MultiMediaCard Plus (Ver.4.1)
miniSD CardminiSDHC Card
microSD CardmicroSDHC Card
Memory Stick DuoMemory Stick PRO Duo
RS-MMC (Ver.4.1)
Compact Flash Card*Microdrive
xD-Picture CardxD-Picture Card Type MxD-Picture Card Type H
Memory StickMemory Stick PRO
Memory Stick Micro
*TYPE I / TYPE II (3.3V)
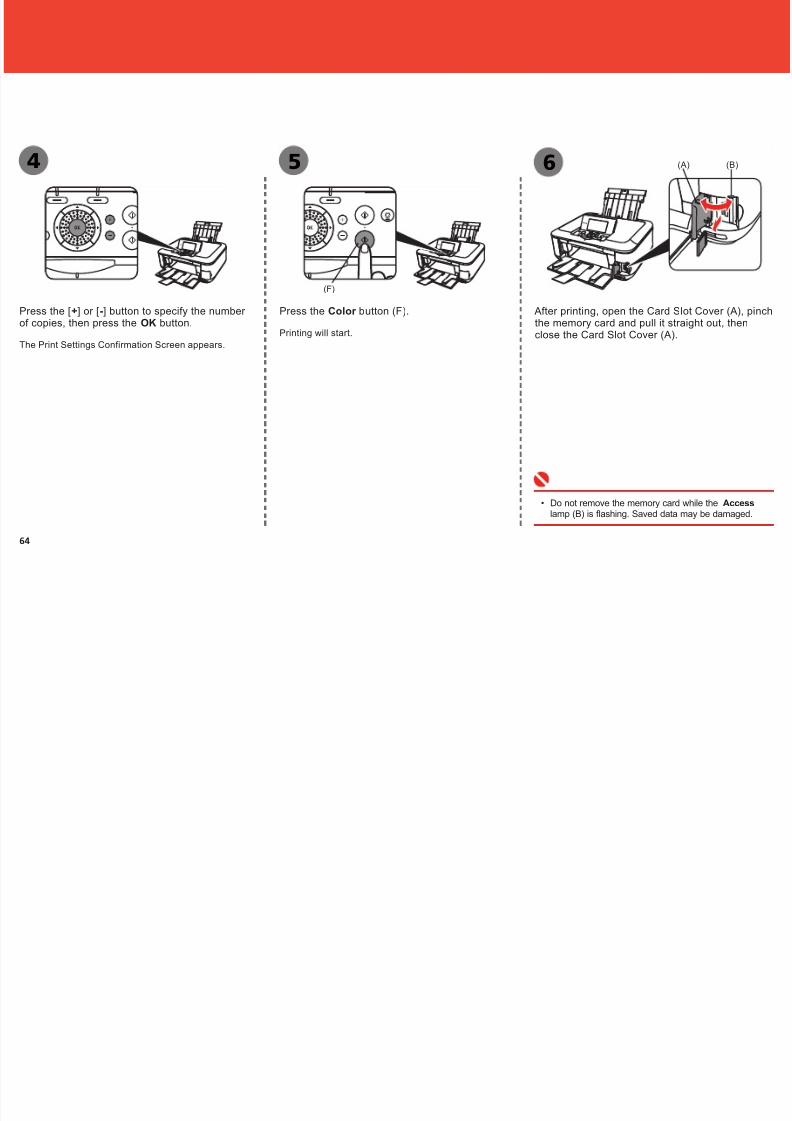
Confirm that the Access lamp (B) has lit up. After the photos on the memory card are
read, the screen to specify photos and the number of copies to print appears.
Insert a memory card into the Card Slot in the direction of the arrow on the label, with thelabeled side facing left.
Insert only one memory card.
•
•
Press the HOME button (C) to return to the standby screen.•
While the standby screen appears, open the Card Slot Cover (A), insert amemory card into the Card Slot, then close the Card Slot Cover (A).

8/11/2019 Canon Mp620 Getting Started guide
http://slidepdf.com/reader/full/canon-mp620-getting-started-guide 65/73
63
(E)
(D)2 3
Rotate the Easy-Scroll Wheel (E) to display a phototo print.
Alterna tively, use the [ or ] button to select a photo.
For details, refer to "21 Loading Paper" on page 56.•
Load a sheet of 4" x 6" size photo paper in the Rear Tray (D) in portraitorientation.
8/11/2019 Canon Mp620 Getting Started guide
http://slidepdf.com/reader/full/canon-mp620-getting-started-guide 66/73
8/11/2019 Canon Mp620 Getting Started guide
http://slidepdf.com/reader/full/canon-mp620-getting-started-guide 67/73
Print Photos from a Computer

8/11/2019 Canon Mp620 Getting Started guide
http://slidepdf.com/reader/full/canon-mp620-getting-started-guide 68/73
66
(A)
21 3 4
For opening Solution Menu, refer to "Solution Menu" on page 60.
For more information refer to the on-screen manual: Advanced Guide.
•
•
Load a sheet of photo paper in the Rear Tray (A)in portrait orientation.
For details, refer to "21 Loading Paper" on page56.
•
Click Print.
Printing will start.
Load paper with the printing side facing up.
Select the image you wantto print in a folder, then clickLayout/Print.
When a photo is selected, the
number of copies is set to "1."
In Solution Menu, click One-Click to Photo Print.
Easy-PhotoPrint EX starts.
On Macintosh, if the Print screenis displayed, click Print to startprinting.
•
This section explains how to print borderless photos using 4" x 6" size Photo Paper Plus Glossy II. The screens are based on Windows Vista.
Easy-PhotoPrint EX allows you to print photos easily.
Align the Print Head
Align the Pr int Head for better print res lts

8/11/2019 Canon Mp620 Getting Started guide
http://slidepdf.com/reader/full/canon-mp620-getting-started-guide 69/73
67
(C)
(A)
(B)
21
Select Yes, then press OK button.
For details, refer to "21 LoadingPaper" on page 56.
•
Use three sheets of A4 or Letter-sized plain
paper for alignment.
Confirm that three or moresheets of A4 or Letter-sizedplain paper are loaded into theCassette (B).
Printing of the first pattern starts.
Make sure that the Output Tray Extension (C) is extended.•
To cancel Print Head Alignment, press HOME button (A).
Align the Pr int Head for better print results.
8/11/2019 Canon Mp620 Getting Started guide
http://slidepdf.com/reader/full/canon-mp620-getting-started-guide 70/73
68
43
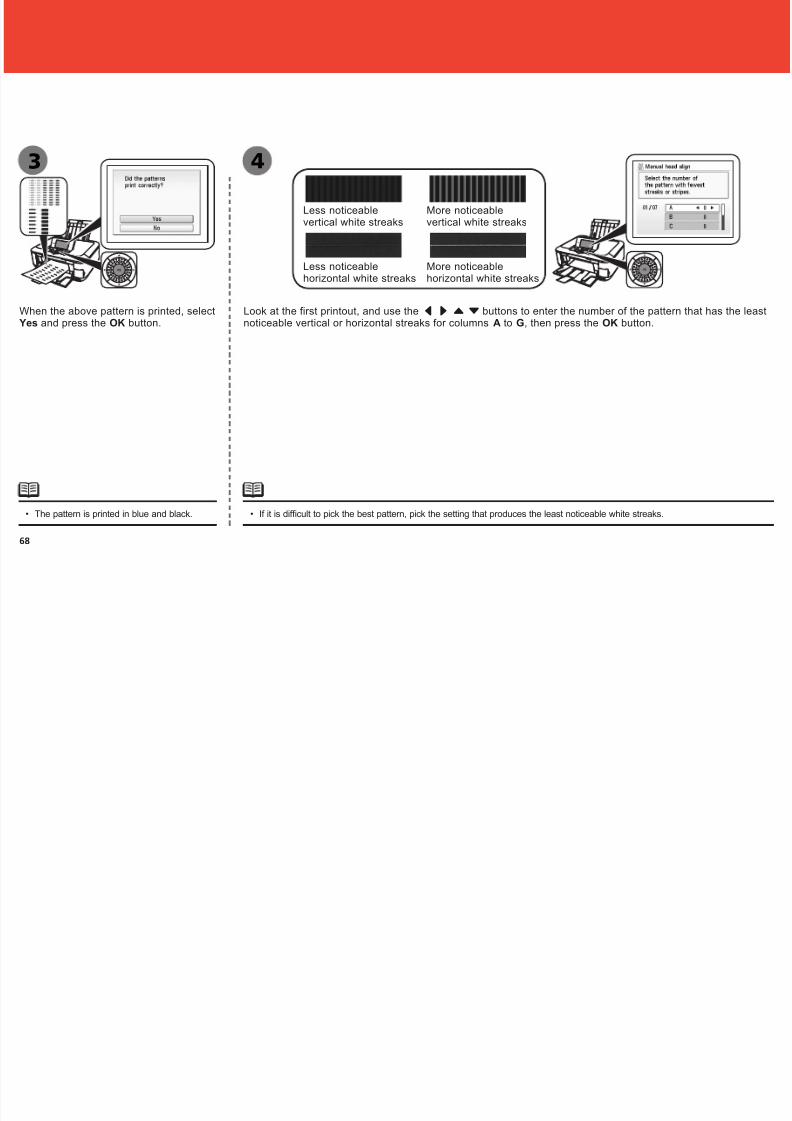
When the above pattern is printed, select Yes and press the OK button.
Look at the first printout, and use the [ ] { } buttons to enter the number of the pattern that has the leastnoticeable vertical or horizontal streaks for columns A to G, then press the OK button.
If it is difcult to pick the best pattern, pick the setting that produces the least noticeable white streaks.•
Less noticeablevertical white streaks
More noticeablevertical white streaks
The pattern is printed in blue and black.•
Less noticeablehorizontal white streaks
More noticeablehorizontal white streaks

8/11/2019 Canon Mp620 Getting Started guide
http://slidepdf.com/reader/full/canon-mp620-getting-started-guide 71/73
69
65
Follow the same procedure as to enter the number of the pattern that has the leastnoticeable vertical streaks for columns H to Q, then press the OK button.
Less noticeablevertical white streaks
More noticeablevertical white streaks
Confirm the above message, thenpress the OK button.
Printing of the second pattern starts.

8/11/2019 Canon Mp620 Getting Started guide
http://slidepdf.com/reader/full/canon-mp620-getting-started-guide 72/73
70
8 97
Confirm that the above screen appears.
Print Head Alignment is now complete.
Enter the number of the pattern that has the least noticeablehorizontal stripes for columns a to j, then press OK button.
If it is difcult to pick the best pattern, pick the setting that producesthe least noticeable white stripes.
•
Less noticeablehorizontal whitestripes
More noticeablehorizontal whitestripes
Print Head Alignment is nowcomplete.
Next, read "5 Confirming theSetup Flow" on page 9!
Confirm the above message, thenpress the OK button.
Printing of the third pattern starts.
8/11/2019 Canon Mp620 Getting Started guide
http://slidepdf.com/reader/full/canon-mp620-getting-started-guide 73/73