CADET - Hire - United States Coast Guard Auxiliary - Hire The following procedure is for the HIRE...
27
CADET - Hire The following procedure is for the HIRE process of Cadets. The HIRE process is for new members who have NOT previously been issued an Employee ID (Emplid) number. If the member has an Emplid, please navigate to the Rehire Guide. Step Action 1 From the Portal Page, select Add a Person from the Accessions pagelet. 2 Click the Add Person button. 22 August 2017
Transcript of CADET - Hire - United States Coast Guard Auxiliary - Hire The following procedure is for the HIRE...

CADET - Hire
The following procedure is for the HIRE process of Cadets.
The HIRE process is for new members who have NOT previously
been issued an Employee ID (Emplid) number. If the member has
an Emplid, please navigate to the Rehire Guide.
Step Action
1
From the Portal Page, select Add a Person from the Accessions pagelet.
2
Click the Add Person button.
22 August 2017

3
The Effective Date will default to the current date. You may edit to a previous
date, but cannot future date.
Click on the Add Name button.
4
Enter member’s complete (spell out) name including middle name; when
completed click the OK button.
Note: With respect to the middle name, do not use the traditional NMN for
those members with no middle name: this will cause the issuance of a
government travel card with a middle initial of “N” and cause a subsequent
denial of its use for a member so identified. Leave blank as above.
You will be returned to the Biographical Details Tab.
22 August 2017

5
The Effective Date defaults to the current date. It may be edited to a previous actual
hire date. It cannot currently be future dated.
Date of Birth: Enter the member’s date of birth.
Birth Country: Defaults to USA, if incorrect, select the lookup and select the
correct Birth Country. If selecting other than USA, other fields may be displayed.
Birth Location: City/Town of birth.
Gender: Click the dropdown and select appropriate gender.
Highest Education Level: Click the dropdown and select education level.
Marital Status: Click the dropdown and select applicable status.
Language Code: Click the dropdown and select English.
National ID: Enter the member’s Social Security Number (no spaces).
When completed, select the Contact Information Tab.
6
The system defaults the first address as Home and the As Of Date is the date of
hire.
Select the Add Address Detail link.
22 August 2017

7
The effective date defaults to the current date and may be edited to reflect the
correct date of hire. This date currently cannot be future dated.
Select the Add Address link.
8
Address 1: Number/street name
Address 2: Not used
Address 3: Not used
City: Enter address city
State: Enter Address state
Postal: Enter Postal Zip code
County: Enter county (if known)
Click the OK button.
22 August 2017

9
The address will display as entered.
Select the OK button.
10
The Home address has been recorded. Click the “+” to add a Mailing Address.
11
Click the Address Type drop down and select Mailing. Then click the
Add Address Detail link.
12
Click the Add Address link.
13
Enter Mailing Address. Address line 2 and 3 are not used. When completed,
click the OK button.
22 August 2017

14
The Mailing address will be listed as entered. Click the OK button.
15
Click the “+” and repeat steps 10, 11 and 12 to enter a Home of Record as
identified on the DD4.
16
The Phone Information, Email Address and Instant Message IDs are left blank.
Select the Regional Tab.
17
Click Ethnic Group lookup and select appropriate category. If member claims
other than one ethnic group, click the “+” button and add Hispanic or Non-
Hispanic or for additional group designation. All other data fields are left
blank.
Select the Organizational Relationship Tab.
Ensure
Reg
Region
is USA
22 August 2017

18
Check the Employee box, then click the Add Relationship button.
The Employee ID number will be generated and you will automatically navigate to
Job Data.
19
You should record the Employee ID number for future reference. If for any reason
you do not complete this accession during this session, you use the Add Employment
Instance link in the HR Data Shortcuts pagelet. Enter the Employee ID number, click
on Add Relationship and you will be returned to member’s Job Data. All previous Job
Data entries will have been deleted and will need to be reentered.
Do not use the Add Employment Instance if you had previously entered and saved
Job Data. Any edits after initial save should be made using Personal Information
or Job Data links.
Effective Date: Defaults to the current date. This date may be future dated to reflect
actual hire date.
Reason: Click the drop down and select New Position.
Enter the appropriate Position Number. Currently, for a CADET enter 00060344.
Position Entry Date: Date of Hire.
Click the Override Position Data button.
22 August 2017

19
cont.
The Regulatory Region, Company, Business Unit, Department, Department
Entry Date and Location should default as shown. If they do not, click the
lookup button and set them to:
Regulatory Region: AD
Company: ACG
Business Unit: CADCG
Department: 004311
Department Entry Date: Date of Hire
Location: Default with data matching Department entered.
Click on the Job Information Tab.
22 August 2017

20
Job Code: Enter 209898 (if not defaulted) and Tab.
Supervisor ID: Enter the Employee ID for the CGHRSUP that will be
approving the accession.
Employee Class: Click on the drop-down and select AD.
Click on the Job Labor Tab.
21
Labor Agreement: Click on the lookup icon and select ENL.
The Labor Agreement Entry Dt will default to date of hire.
Click on the Job Labor Tab.
22 August 2017

22
Scroll down the page to Assigned Seniority Dates and select View All.
22 August 2017

23
Only enter dates as indicated. All other fields are blank.
Active duty Base Date: Leave blank (See note 1 below)
AD Pay Scale Date: Date of Oath of Office
CMA Date (see Chapter 3 of PAYMAN for correct date per situation)
Current Active Duty Date: Date of Oath of Office
DIEMS Date: Date Initial Entry Military Service (any component)
Expected AD Term Date: 6 years from Oath of Office date (remember to minus
1 day)
Expected Loss Date: 8 years from DIEMS (minus 1 day)
Job Family Entry Date: Date of Oath of Office
Mil Obligation Completion date: 8 years from original DIEMS date (minus 1
day) unless prior discharge authorized under an approved program (i.e.
VOLSEP)
Pay Allowance Date: Date of Oath of Office
Pay Base Date: Leave blank (See note 1 below)
Date of Rank: Date of Oath of Office
Note 1: Upon graduation from the Academy and appointment as a
commissioned officer, the service dates are defaulted to the commissioning
date in Seniority Dates. A Statement of Creditable Services (SOCS) request
must be sent to PPC Customer Care for those members that attended the
Scholar Program (served on active duty or reserve).
Click on the Payroll Tab.
22 August 2017

24
Pay Group: Should default to USCG STG.
Click on the Salary Plan Tab.
25
Salary Admin Plan: Should default to CDT. If not, click on the lookup icon
and select CDT.
Grade: Click the lookup icon and select CDT.
Grade Entry Date: Should default to date of Hire.
Step: Enter 1 and tab
Step Entry Date: Will default to date of Hire.
Click on the Compensation Tab.
22 August 2017

26
Click on the Default Pay Components button. This will update the
Compensation Rate data.
Click the Benefits Program Participation link.
27
Ensure Benefits System reads Base Benefits
Effective Date: If you are completing the Job Data AFTER the effective date of
hire, you need to change the date to the date of hire.
Benefit Program: Click the lookup icon and select ACG.
Click the Job Data link.
22 August 2017

28
Click the OK button.
29 You will receive several “Warning” messages
Head Count – Click the OK button
22 August 2017

29
Cont’d
Hourly Rate – Click the OK button
Establishment ID – Click the OK button
30
After a successful Save you will be returned to the Organizational Relationships
Tab.
22 August 2017
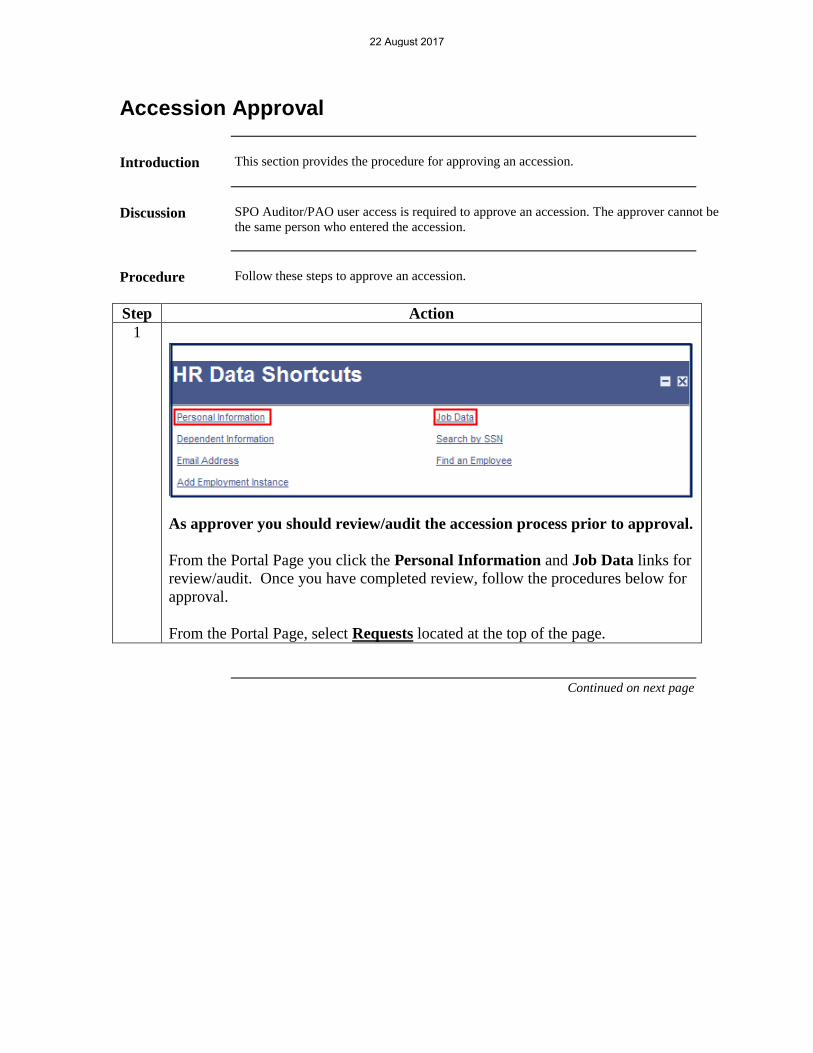
Accession Approval
Introduction This section provides the procedure for approving an accession.
Discussion SPO Auditor/PAO user access is required to approve an accession. The approver cannot be
the same person who entered the accession.
Procedure Follow these steps to approve an accession.
Step Action
1
As approver you should review/audit the accession process prior to approval.
From the Portal Page you click the Personal Information and Job Data links for
review/audit. Once you have completed review, follow the procedures below for
approval.
From the Portal Page, select Requests located at the top of the page.
Continued on next page
22 August 2017

Accession Approval, Continued
Procedure (continued)
Step Action
2
Click the View My Requests (all types) link.
3
Select the Requests I am Approval For radio button.
The Transaction Name and Transaction Status defaults for all pending
transactions. You may click the drop down to narrow your search parameters.
Click the Populate Grid button.
Continued on next page
22 August 2017

Accession Approval, Continued
Procedure (continued)
Step Action
4
A listing of all accessions you have been identified for approval will be displayed.
Select Approve/Deny for the member you are approving.
Continued on next page
22 August 2017

Accession Approval, Continued
Procedure (continued)
Step Action
5
You can now either Approve or Deny the accession. You may enter any comments for the
review by the person who submitted the accession for approval.
Select either Approve or Deny.
Continued on next page
22 August 2017

Accession Approval, Continued
Procedure (continued)
Step Action
6
If Approved, the Approve/Deny buttons will gray out after system saves the approval.
You can now click on the “X” at the top of the document to close this page and repeat
the process for the next accession.
22 August 2017

Accessions – Contract Data
Introduction This section provides the procedure for completing the contract of a Cadet with no
prior service
_____________________________________________________________________
Procedure Follow these steps to complete the contract of a Cadet Step Action
1
From the portal Page, navigate to Contract Data found on the Career Management
pagelet 2
Click on Add a New Value
Continued on next page
22 August 2017

Accessions – Contract Data, Continued
Step Action 3
Enter EMPLID and Contract Number (First contract = 0001)
Click Add
You will be navigated to Contract Status/Content
4
Contract Status/Content page will appear with Contract Number (in this case 001)
Ensure Contract Begin Date is appropriate date
Alter Regulatory Region to appropriate region (in this case AD)
A Contract Content statement is required
Navigate to Contract Type/Clauses
Continued on next page
22 August 2017

Accessions – Contract Data, Continued
Step Action
5
Enter appropriate Contact Type from the drop-down
Effective date should default correctly
Under Contract Clauses you may select Clause status (optional/required) and
enter any contractual specific comments
Navigate to Reason/Oath Info
6
Enter Contract Term Years/Months/Days (in this case 6 years)
Select a Reason from the drop-down and Select Member Signature Date (date
contract signed) Add Name of Oath Administrator and applicable Military
Grade and City/State where contract was administered.
Navigate to Contract Leave tab
Continued on next page
22 August 2017

Accessions – Contract Data, Continued
Step Action
7
Enter any leave to be sold
Navigate to Mbr Service Dates
8
Click View All on Assigned Seniority Dates
Note: these dates should concur with dates set during the ACCESSION process; if
not, return to Job Data and verify the dates entered during the ACCESSION
process are entered correctly.
Navigate to Contract Approval
Continued on next page
22 August 2017

Accessions – Contract Data, Continued
9
Click on Submit for Approval and approval will be routed to Approving SPO
22 August 2017

Contract Approval
Introduction This section provides the procedure for approving a contract.
Discussion SPO Auditor/PAO user access is required to approve a contract. The approver cannot be the
same person who entered the accession.
Procedure Follow these steps to approve a contract
Step Action
1
Approver should select Requests
2
Select View My Requests (all types)
3
Select Requests I am Approver For and Populate Grid
4
Click on Approve/Deny
Continued on next page
22 August 2017

Contract Approval, Continued
Step Action
5
Enter comments and click Approve or Deny
Note: selecting Deny returns contract to HRS user
6
Contract is approved. Member is fully Accessed into USCG
22 August 2017


![Group[in] group hire process](https://static.fdocuments.in/doc/165x107/5443665eb1af9f310a8b49b8/groupin-group-hire-process.jpg)