CA Service Desk Manager (SDM) r12 - Welcome to UI ... · PDF fileCA Service Desk Manager (SDM)...
26
CA Service Desk Manager (SDM) r12.1 SDM Advanced Functionality and Reporting Analyst Training Last Updated: June 22, 2010 Created by: Administrative Information Technology Services (AITS) University of Illinois E-mail: [email protected]
Transcript of CA Service Desk Manager (SDM) r12 - Welcome to UI ... · PDF fileCA Service Desk Manager (SDM)...
CA Service Desk Manager (SDM) r12.1 SDM Advanced Functionality and Reporting
Analyst Training Last Updated:
June 22, 2010
Created by: Administrative Information Technology Services (AITS)
University of Illinois E-mail: [email protected]

SDM Advanced Functionality and Reporting
Table of Contents About this Course .................................................................................................................................... 1
Course Details .............................................................................................................................. 1
Instructor Led Course .................................................................................................................. 1
How To’s and Tips ........................................................................................................................ 1
Chapter 1: Service Desk Interface .................................................................................................... 2
Accessing Service Desk Training Environment ............................................................................ 2
Welcome Banner ......................................................................................................................... 2
Main Toolbar ............................................................................................................................... 2
Scoreboard .................................................................................................................................. 3
Ticket Detail ................................................................................................................................. 4
Chapter 2: Altering Tickets ................................................................................................................. 5
Creating an Incident from a Request........................................................................................... 5
Changing the Status of Multiple Tickets ...................................................................................... 5
Exercise 1: Altering Tickets ................................................................................................................ 6
Chapter 3: Parent / Child Ticket Relationships ........................................................................... 8
Adding a Parent Ticket ................................................................................................................ 8
Adding a Child Ticket ................................................................................................................... 9
Chapter 4: Understanding and Creating Ticket Templates .................................................. 11
Creating Templates ................................................................................................................... 11
Using Templates to Create Tickets ............................................................................................ 12
Exercise 2: Creating a Ticket Template ....................................................................................... 13
Chapter 5: Reporting in the Service Desk Application ........................................................... 14
Getting Data from the Application ............................................................................................ 14
Exercise 3: Reporting in the Application .................................................................................... 15

SDM Advanced Functionality and Reporting
Chapter 6: Reporting Options – Service Desk Universe ......................................................... 16
Creating Your Own Reports ....................................................................................................... 16
Chapter 7: Reporting Options – AITS Developed Report....................................................... 19
Appendix A: Requesting Access to Service Desk ...................................................................... 21
Appendix B: Accessing Service Desk............................................................................................. 21
Appendix C: On-Line Help ................................................................................................................. 21
Appendix D: Service Desk Enhancements .................................................................................. 22
Appendix E: Setting Your Preferences ......................................................................................... 22
Appendix F: AITS Service Desk ....................................................................................................... 23

SDM Advanced Functionality and Reporting
1
About this Course Welcome to the CA Service Desk Manager (SDM) Analyst training. This course was designed for customer
service analysts and will describe the advanced functions required to perform the role of an analyst working
with the Service Desk product.
Course Details
This course has no prerequisites and will cover the following subject areas:
Creating an Incident from a Request
Changing the Status of Multiple Tickets
Adding a Parent Ticket
Adding a Child Ticket
Creating Ticket Templates
Using Templates to Create Tickets
Reporting in the Service Desk Application
Instructor Led Course
This course is presented in a computer lab with an instructor. The instructor presents the information by
completing the examples in each chapter on the screen. The students in the class follow by doing the same
steps as the instructor. At the end of specific chapters, the students will complete an exercise.
How To’s and Tips
Demonstrations and documents explaining various Service Desk features can be found at:
https://apps.uillinois.edu/ServiceDesk.

SDM Advanced Functionality and Reporting
2
Chapter 1: Service Desk Interface
Accessing Service Desk Training Environment
To access the Service Desk Training Environment for this course:
1. Open an Internet Explorer browser window.
2. Navigate to http://urbhdptest2.ui.uillinois.edu/CAisd/pdmweb.exe.
3. Type in the username and password located for you at your station.
The Service Desk training interface will open. If you are inactive in the system for 60 minutes, you will
be logged off the system and will need to login again.
Tip: The Service Desk system is fully compatible with Internet Explorer and Mozilla Firefox.
Welcome Banner
This banner appears above the menus in the main window and provides login and system information, as well
as the Log Out button that you may click to log you out of Service Desk.
Main Toolbar
The toolbar will be examined in more detail throughout the course in various chapters. It is also detailed in the
handout provided to you in this training.

SDM Advanced Functionality and Reporting
3
Scoreboard
The left pane of the Service Desk tab displays the Scoreboard, a tree-like structure that shows the requests,
change orders, issues, call backs, and tasks assigned to you or your group (depending on how your department
has configured your system). You can view your assigned and unassigned records by priority.
You can expand the list of records displayed in the Scoreboard by selecting the node for those records, clicking
the expansion button, or hovering over the node to reveal and select the Open button. You can collapse the
list of records displayed in the Scoreboard by selecting the node for those records, clicking the collapse button,
or hovering over the node to reveal and select the Close button.
Keyboard shortcut: When the focus is on the Scoreboard, you can use the up and down arrow keys to
navigate through the nodes. You can expand and collapse the list of records displayed in the Scoreboard by
pressing Enter on your keyboard.
Tip: To refresh the counts that are currently displayed in the Scoreboard, click the Update Counts button.
To view the tickets in your Group or those assigned to you:
1. Click the Update Counts button to ensure you have the most up to date ticket counts.
2. Expand the lists in the Scoreboard by selecting the node for those records, clicking the expansion
button, or hovering over the node to reveal and select the Open button.
3. Select the list you would like to view, for instance, My Requests.
This will now display all requests assigned to you.

SDM Advanced Functionality and Reporting
4
4. Select the ticket you would like to view in the Request List Window.
A Ticket Detail Window will open in a new window.
Ticket Detail
Tickets will be examined in more detail throughout the course in various chapters. Details of a ticket include:
Affected End User NetID Email Request Area Status
Group Assignee Created By Reported By Summary
Call Back Date/Time Description Activities

SDM Advanced Functionality and Reporting
5
Chapter 2: Altering Tickets
Creating an Incident from a Request
Tickets can be changed from a request to an incident if an analyst sees the need or if mistakenly chose the
wrong ticket type. To change a Request to an Incident:
1. View the Request.
2. Click the Create Incident button.
An Incident window will open.
3. Click the Save button.
IMPORTANT: The original Request will still be active and the Incident will refer to the Request in the first line
of the Description field. The original Request is still active and when it has been changed to a status of Closed,
it will also change the status of the Incident created to Closed.
Note: Utilizing Incidents is a department-by-department decision. Your department may only utilize Requests
and therefore you will not see the Create Incident button in production when logged in under your account.
Changing the Status of Multiple Tickets
The status of multiple tickets in a queue can be changed at the same time. To do this:
1. View one of the Scoreboard queues by selecting the node for those records and/or search for the
tickets you want to update by utilizing the Search Filter.

SDM Advanced Functionality and Reporting
6
2. Click the Edit in List button.
3. Use the dropdown under Status to choose from the list of provided statuses.
4. Click the Change All button.
All the statuses on the list will be changed.
5. Click Save.
The activity is added to the Activities Tabs of all tickets.
Exercise 1: Altering Tickets Perform the following activities in the ticket you have opened from your queue:
1. View a ticket assigned to you under My Requests.
2. Change the Request into an Incident and save.

SDM Advanced Functionality and Reporting
7
3. Select the My Incidents queue to view the new Incident.
4. Change the status of all the tickets in the My Incidents queue to Close at the same time.

SDM Advanced Functionality and Reporting
8
Chapter 3: Parent / Child Ticket Relationships If an analyst has multiple tickets coming regarding the same issue during the same period of time, it is an
efficient use of time for the analyst to create a Parent/Child relationship between the tickets. Creating this
relationship between the tickets will assist an analyst in keeping track of all the tickets that are in regards to
one particular issue and allow them to close all tickets at once by updating the Parent ticket. The Parent ticket
is usually the first ticket to come in regarding the issue and the Child ticket is the following issue(s) received.
Adding a Parent Ticket
Parent tickets do not have to be established prior to adding children tickets. To specify a parent ticket while
viewing a subsequent child ticket:
1. View the ticket that is intended to be a child ticket.
2. Click the Edit button.
3. Click the Parent / Child tab.
4. Type the ticket number of the parent ticket into the Parent field.
5. Click Save.
Tip: If you do not know the ticket number of the parent ticket, you can also use the search feature by
selecting the Parent hyperlink in the Parent/Child tab to locate the parent ticket.

SDM Advanced Functionality and Reporting
9
Adding a Child Ticket
Children tickets can be added to the parent ticket. To add a child ticket on a parent ticket:
1. View the parent ticket.
2. Click the Parent / Child tab.
3. Click the Update Children button.
A Request Children Search window will open.
4. Type in the search requirements into the fields offered.
5. Click the Search button.

SDM Advanced Functionality and Reporting
10
A listing of all requests matching the search criteria will appear
6. Click the >> button to move the tickets to the right hand window to add children tickets.
7. Click the OK button.
The activity is added to the Parent / Child Tab.
IMPORTANT: Child tickets are updated to a Closed status when the Parent ticket is updated to a Closed
status.
SDM Advanced Functionality and Reporting
11
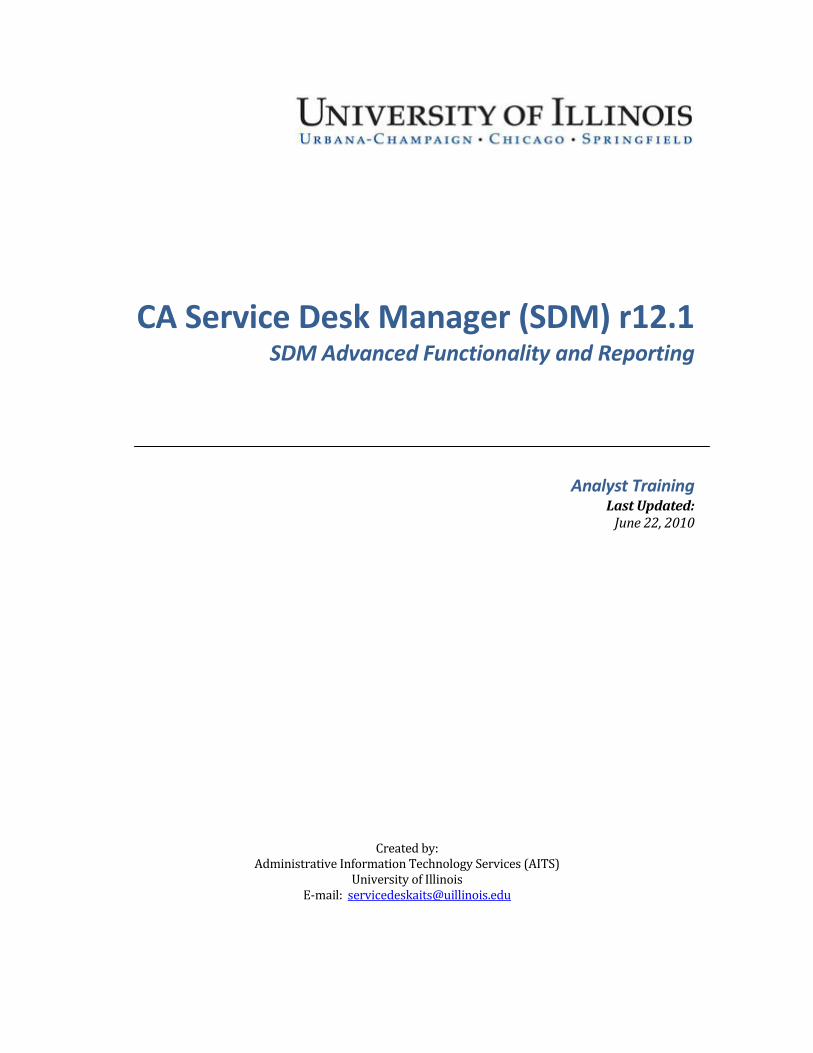
Chapter 4: Understanding and Creating Ticket Templates Analysts can create and use ticket templates to have a standardized form for creating tickets for frequent
issues. Creating tickets from templates also significantly decreases the amount of time it takes to create tickets
therefore increasing the efficiency of an analyst’s time.
Creating Templates
Creating templates will assist analysts with creating tickets on frequent issues. To create a template:
1. View an existing ticket that is consistent with the issue to be addressed in the template.
2. From the Ticket Detail window, click the Edit button.
An Edit window will open.
3. Click on the Template tab at the bottom of the window.
4. Type a name for the template in the Template Name field.
Tip: Try to make Template names short enough to remember yet descriptive enough to determine use.
5. Type a description for the template in the Description field.

SDM Advanced Functionality and Reporting
12
6. Click the Save button to save your template.
Tip: Templates will populate all fields as set by the template with the exception of Affected End User. The
template will also not carry through any Attachments or Knowledge Tool documents.
Using Templates to Create Tickets
Creating tickets from templates significantly decreases the amount of time it takes to create tickets and will
eliminate the need for analysts to enter redundant information. To create a ticket from a template:
1. In the Service Desk tab, from the Main Menu, select View, then Profile Browser.
2. Type in the Profile Browser Contact Search parameters and find your Affected End User.
3. Determine and select the Type of ticket from the dropdown.
4. Click on the Template link.
Tip: If you know the name of the template, you can also type the name of the template into the
Template field.
A Request or Incident Template Search window will open.
5. Click on the Template name hyperlink of the template you would like to use for the issue
This will return you to the Contact Search window and will populate the Template field with the template
you selected.
6. Click the New button.
A new ticket will open in a separate window.

SDM Advanced Functionality and Reporting
13
Exercise 2: Creating a Ticket Template Perform the following activities in the ticket you have opened from your queue:
1. View one of the tickets in the Scoreboard under My Requests.
2. Create a Template from this Request.

SDM Advanced Functionality and Reporting
14
Chapter 5: Reporting in the Service Desk Application
Getting Data from the Application
The Search feature provides a way to get simple reports from the application. To get a simple report:
1. In the Service Desk tab, from the Main Menu, select Search, then Requests.
2. Use the search fields to type in and select search criteria.
3. Click the More filter for additional fields.
Additional search fields will appear.
4. Click the Search button.
Tip: If you need to search for both open and closed tickets, make sure the Active drop-down is set to
<empty>.
Tip: If your search comes up with more than 25 results, you can choose the List All link to have all results
appear in the window.

SDM Advanced Functionality and Reporting
15
Exercise 3: Reporting in the Application Perform the following activity using the Search menu to display how many tickets were opened in the month
of February 2010 for the request area SDM Training:
1. Open the Request Search window.
2. In the request area field, type in SDM Training.
3. In the Active drop-down box, choose <empty>.
4. Use the More filter and use the Earliest Open Date and Latest Open Date to enter the dates
06/01/2010 12:00 am and 06/28/2010 11:59 pm.
5. Click the Search button.
SDM Advanced Functionality and Reporting
16
Chapter 6: Reporting Options – Service Desk Universe
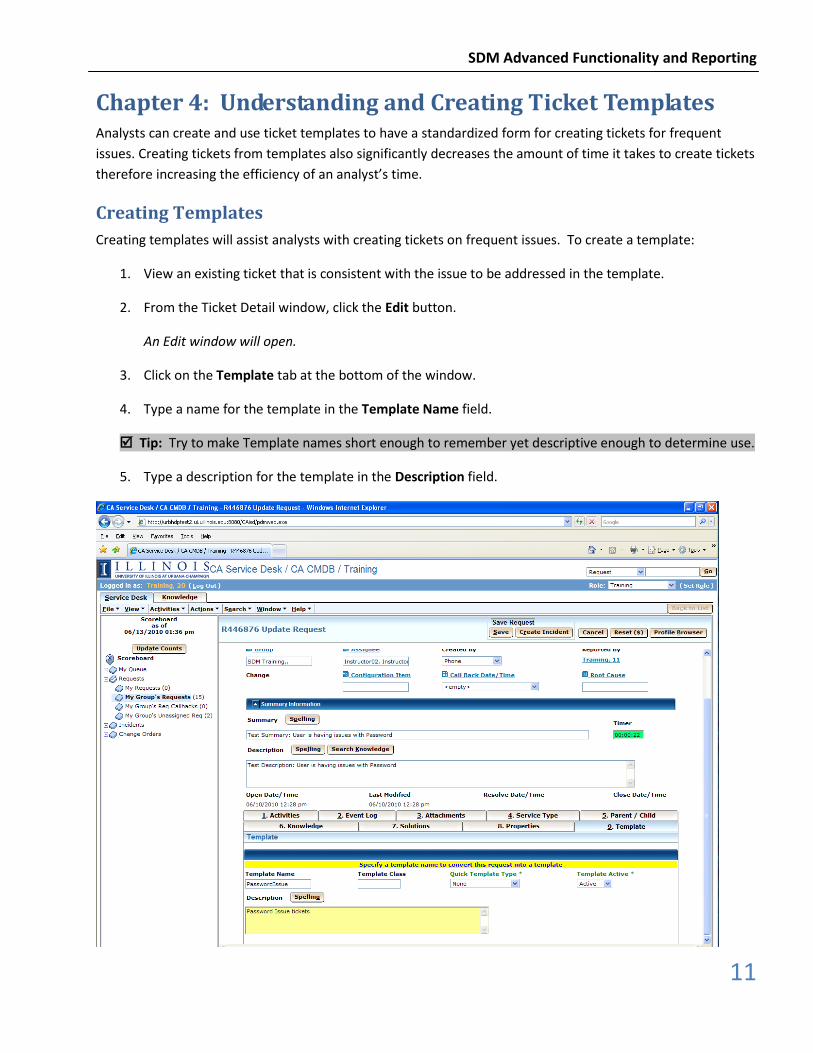
Creating Your Own Reports
Users can learn to create their own reports based on the data entered in the Service Desk Manager. By
utilizing the reporting software BusinessObjects, users can customize reports. To learn more about getting
access and training opportunities, please visit: www.ds.uillinois.edu
1. Once you have requested and been granted access to the system, you can install and run the reporting
tool – Desktop Intelligence – from your computer. You will need to log in to the system before you can
begin.
2. Next, you can select the dataset on which to base your report.

SDM Advanced Functionality and Reporting
17
3. A listing of available fields for reporting is shown.
4. Select the data you want to include for your report.

SDM Advanced Functionality and Reporting
18
5. After running your query against the dataset, a report is produced. This report can be formatted many
ways to display the data in a table, crosstab table or a chart.

SDM Advanced Functionality and Reporting
19
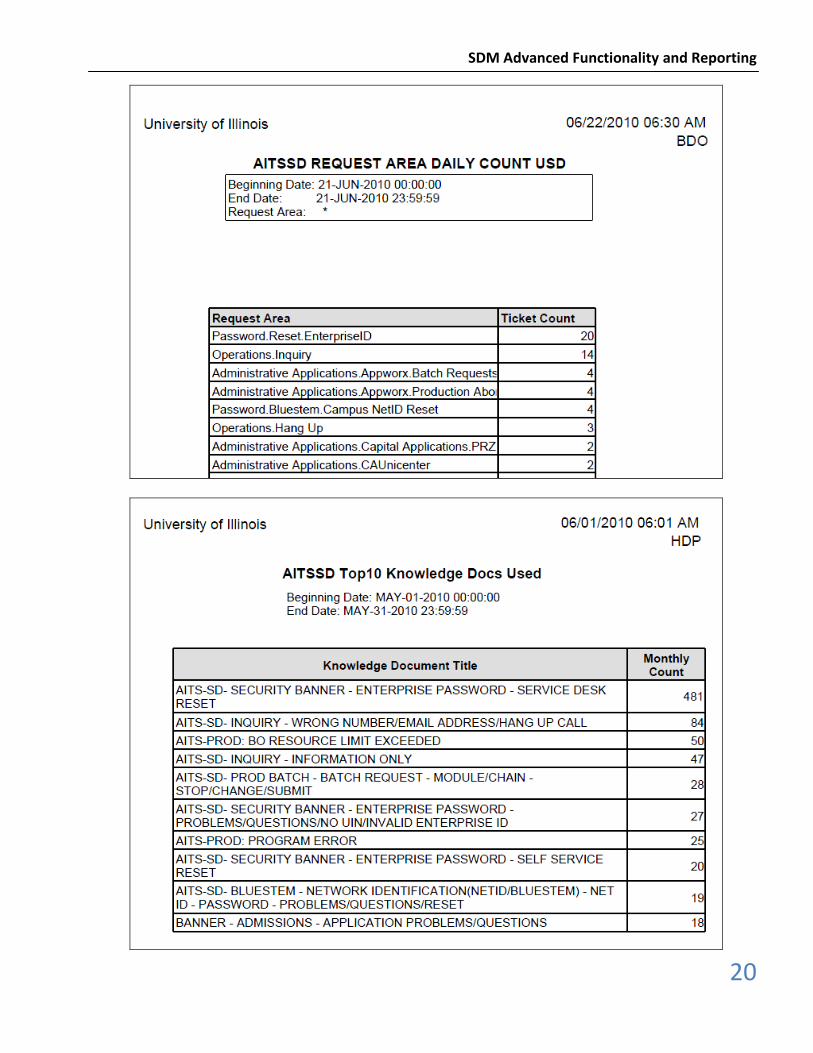
Chapter 7: Reporting Options – AITS Developed Report The AITS Reporting Team develops, modifies, and maintains customer requested custom reports. If you have a
reporting request, please submit your request to the AITS Service Desk including a 1-2 paragraph description of
the requested work and it will be assigned to the appropriate technical area to be assessed. Some sample
reports are shown below.
SDM Advanced Functionality and Reporting
20

SDM Advanced Functionality and Reporting
21
Appendix A: Requesting Access to Service Desk To gain access to Service Desk as an analyst, contact the AITS Service Desk:
You can call the AITS Service Desk at:
217-333-3102 (from Urbana-Champaign or Springfield) or 312-996-4806 (from Chicago)
You can also email the AITS Service Desk at: [email protected]
Appendix B: Accessing Service Desk To access Service Desk:
1. Open a browser window.
2. Navigate to http://support.uillinois.edu.
3. Type in your EnterpriseID and EnterpriseID Password.
The Service Desk interface will open. If you are inactive in the system for 60 minutes, you will be logged
off the system and will need to login again.
Tip: The Service Desk system is fully compatible with Internet Explorer and Mozilla Firefox.
Tip: If you know your NetID and NetID password, you may set up your EnterpriseID and EnterpriseID
password here. You will be prompted to enter your NetID and NetID password, and then you will be presented
a form that displays your EnterpriseID and asks you to set up your EnterpriseID password.
Appendix C: On-Line Help Full training documentation including the most updated training manuals, tutorials, and detailed information
on additional trainings can be found on the Service Desk Manager (SDM) website at
https://apps.uillinois.edu/ServiceDesk.html.

SDM Advanced Functionality and Reporting
22
Appendix D: Service Desk Enhancements In January of 2010, a survey was distributed to analysts to gather additional input about the way the Service
Desk tool is currently used and how it could be further enhanced to meet client's needs. This following
specifically describes the four enhancements that will be live with the Service Desk Manager (SDM) upgrade.
These have also been included in this training document.
Net ID Search
The Service Desk tool now has the ability to search by Net ID. This field is now located next to the Enterprise ID
field.
Avenue of Ticket
The Service Desk tool now has an additional field, the Created By field, to record the avenue the issue was
reported. Options include walk-in, phone, fax, chat, and email.
Signature Addition
The Service Desk tool now has the ability to add signatures to Manual Notifications. Instructions for this new
feature are located in Chapter 7.
Status Field Drop-Down
The Service Desk Status field is now a drop-down field.
Client Response Email Notification
The Service Desk tool now provides an email notification to an Analyst when a ticket has been updated by the
affected end user. This feature was added prior to the upgrade due to priority set by the Help Desk Steering
Team (HDST).
Appendix E: Setting Your Preferences To adjust your preferences for the Service Desk tab:
1. In the Service Desk tab, select View, then Preferences from the main menu.
2. Adjust your preferences as necessary and then click the Save button.
To adjust your preferences for the Knowledge tab:
1. In the Knowledge tab, select View, then Preferences from the main menu.
2. Adjust your preferences as necessary and then click the Save button.

SDM Advanced Functionality and Reporting
23
Appendix F: AITS Service Desk For further assistance, or to report problems, please contact the AITS Service Desk.
You can call the AITS Service Desk at:
217-333-3102 (from Urbana-Champaign or Springfield) or 312-996-4806 (from Chicago)
You can also report issues via email to the AITS Service Desk at: [email protected]