BurnInTest in a production line environment
25
PassMark ™ Software BurnInTest in a production line environment Page 1 Copyright © 2006 White paper Using BurnInTest in a production line environment by PassMark ™ Software Document Edition: 4.0 Date: 7/February/2006 BurnInTest Version: 5.0 BurnInTest is a trademark of PassMark software
Transcript of BurnInTest in a production line environment
PassMark™ S o f t w a r e
BurnInTest in a production line environment Page 1 Copyright © 2006
White paper
Using BurnInTest in a production line environment
by
PassMark™ Software
Document Edition: 4.0 Date: 7/February/2006 BurnInTest Version: 5.0 BurnInTest is a trademark of PassMark software
PassMark™ S o f t w a r e
BurnInTest in a production line environment Page 2 Copyright © 2006
Overview
This white paper describes how BurnInTest can be used in a production line environment. The main aim in this environment is to devise a system to increase the level of automation and maintain adequate records of the testing carried out. This paper is applicable to both the Standard and Professional Windows editions of BurnInTest. More testing will be possible with the Professional edition however. This document does not cover the Linux version of BurnInTest.
Audience
This paper is targeted at companies that manufacture, integrate or repair a large number of PC’s on a daily basis. Companies or individuals that run smaller operations may also benefit from some of the information in this document however.
PassMark™ S o f t w a r e
BurnInTest in a production line environment Page 3 Copyright © 2006
Configuration files
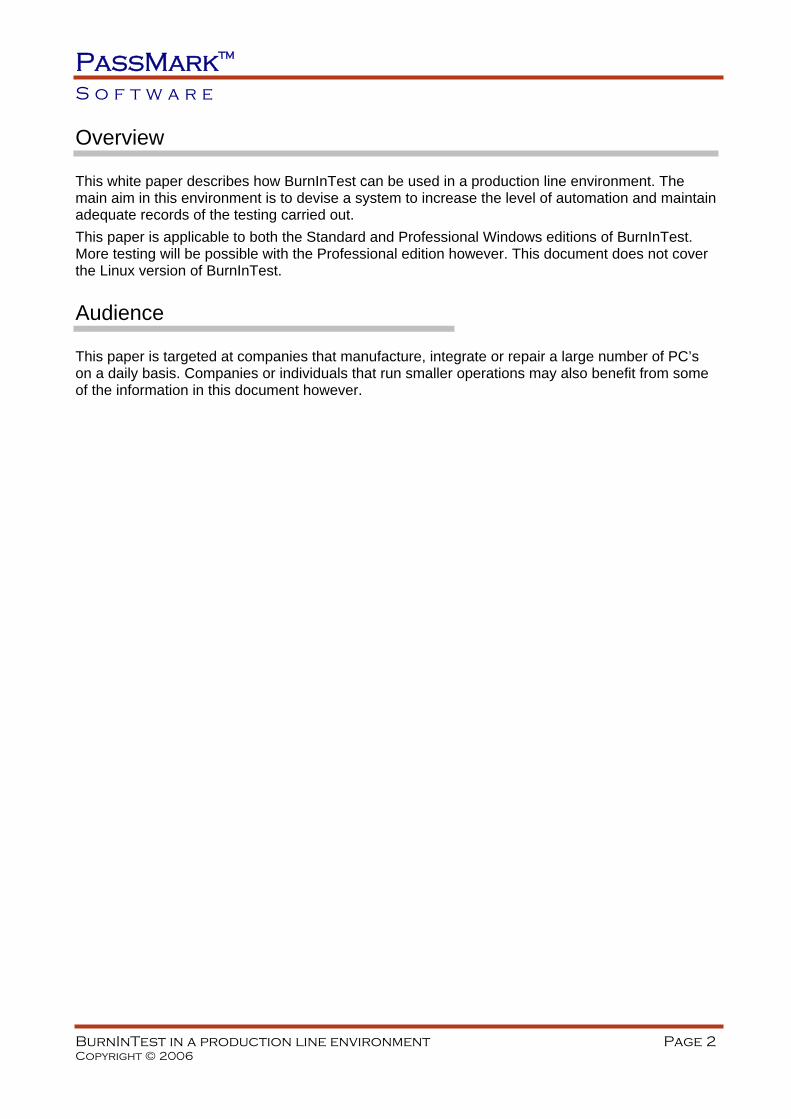
What are configuration files A configuration file contains all the parameters available in the test duty cycles and test preferences windows. That is to say it contains information about which tests to perform, the duty cycle setting for each test and other preferences, such as drive letters and device names.
Configuration files end in the extension ‘bitcfg. For example the current configuration is stored automatically in the file ‘LastUsed.bitcfg’, which is located in the BurnInTest installation directory. Configuration files aid with the automation of the testing process and also allow the maintenance of several different test configurations. For example a configuration file could be created for each different model of computer to be tested. By saving a particular configuration to a file, you can avoid resetting all the parameters each time BurnInTest is used.
How are configuration files created A configuration file can be created by first selecting all the required settings in the test duty cycles and test preferences windows, then use the menu option, ‘Save Config As’. This will create a new configuration file in the location selected by the user. After the configuration files have been created they can be transferred between computers where BurnInTest is installed.
How are configuration files used Files can be used in three ways
1. They can be loaded from the command line.
Figure 1 – Duty cycle window. These settings along with other preferences are saved in configuration files
PassMark™ S o f t w a r e
BurnInTest in a production line environment Page 4 Copyright © 2006
2. They can be loaded by using the menu option, ‘Load Config’. 3. They can be loaded by a BurnInTest script file.
For the purpose of test automation options 2 and 3 are of most interest. (see ‘Command line arguments’ and ‘Scripting’ sections below)
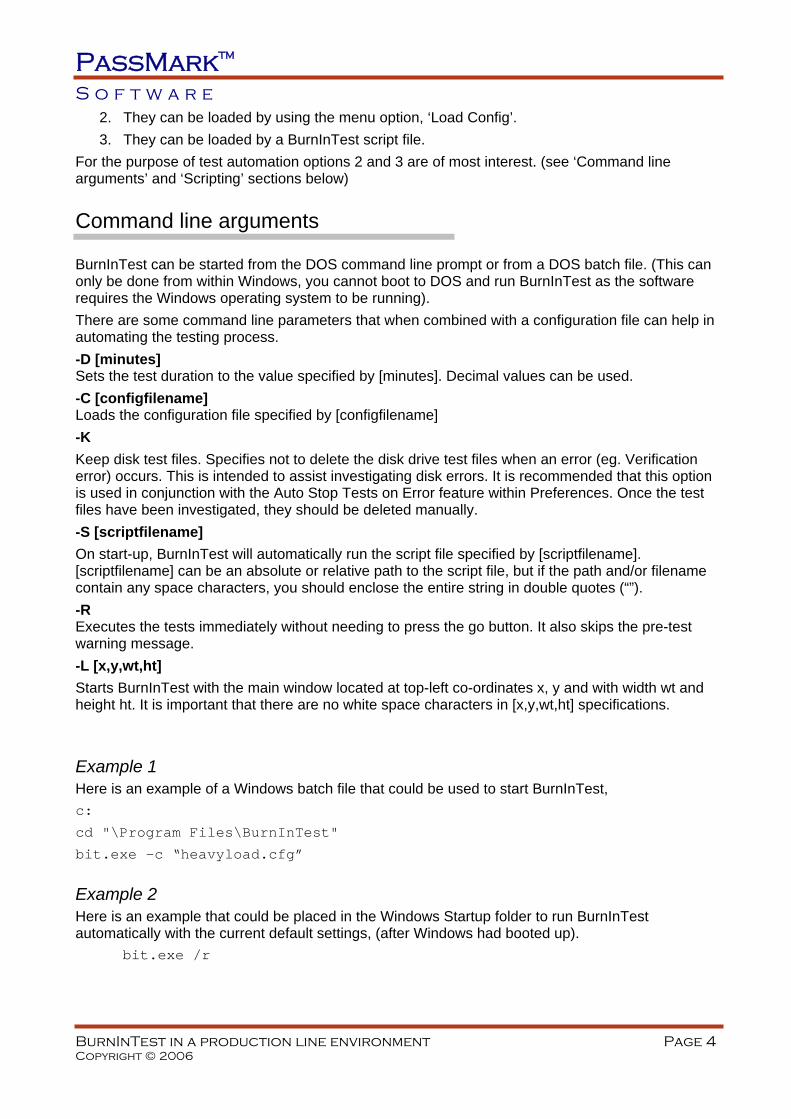
Command line arguments
BurnInTest can be started from the DOS command line prompt or from a DOS batch file. (This can only be done from within Windows, you cannot boot to DOS and run BurnInTest as the software requires the Windows operating system to be running). There are some command line parameters that when combined with a configuration file can help in automating the testing process. -D [minutes] Sets the test duration to the value specified by [minutes]. Decimal values can be used. -C [configfilename] Loads the configuration file specified by [configfilename] -K Keep disk test files. Specifies not to delete the disk drive test files when an error (eg. Verification error) occurs. This is intended to assist investigating disk errors. It is recommended that this option is used in conjunction with the Auto Stop Tests on Error feature within Preferences. Once the test files have been investigated, they should be deleted manually. -S [scriptfilename] On start-up, BurnInTest will automatically run the script file specified by [scriptfilename]. [scriptfilename] can be an absolute or relative path to the script file, but if the path and/or filename contain any space characters, you should enclose the entire string in double quotes (“”). -R Executes the tests immediately without needing to press the go button. It also skips the pre-test warning message. -L [x,y,wt,ht] Starts BurnInTest with the main window located at top-left co-ordinates x, y and with width wt and height ht. It is important that there are no white space characters in [x,y,wt,ht] specifications.
Example 1 Here is an example of a Windows batch file that could be used to start BurnInTest, c:
cd "\Program Files\BurnInTest"
bit.exe –c “heavyload.cfg”
Example 2 Here is an example that could be placed in the Windows Startup folder to run BurnInTest automatically with the current default settings, (after Windows had booted up).
bit.exe /r
PassMark™ S o f t w a r e
BurnInTest in a production line environment Page 5 Copyright © 2006
Un-installer command line arguments
The BurnInTest uninstaller executable can be found in the BurnInTest installation directory. It is called, “unins000.exe”. Running this file will uninstall BurnInTest. There is also a command line option for the uninstaller. /silent When specified, the uninstaller will not ask the user any questions or display a message stating that uninstall is complete. Shared files that are no longer in use are deleted automatically without prompting. Any critical error messages will still be shown on the screen.
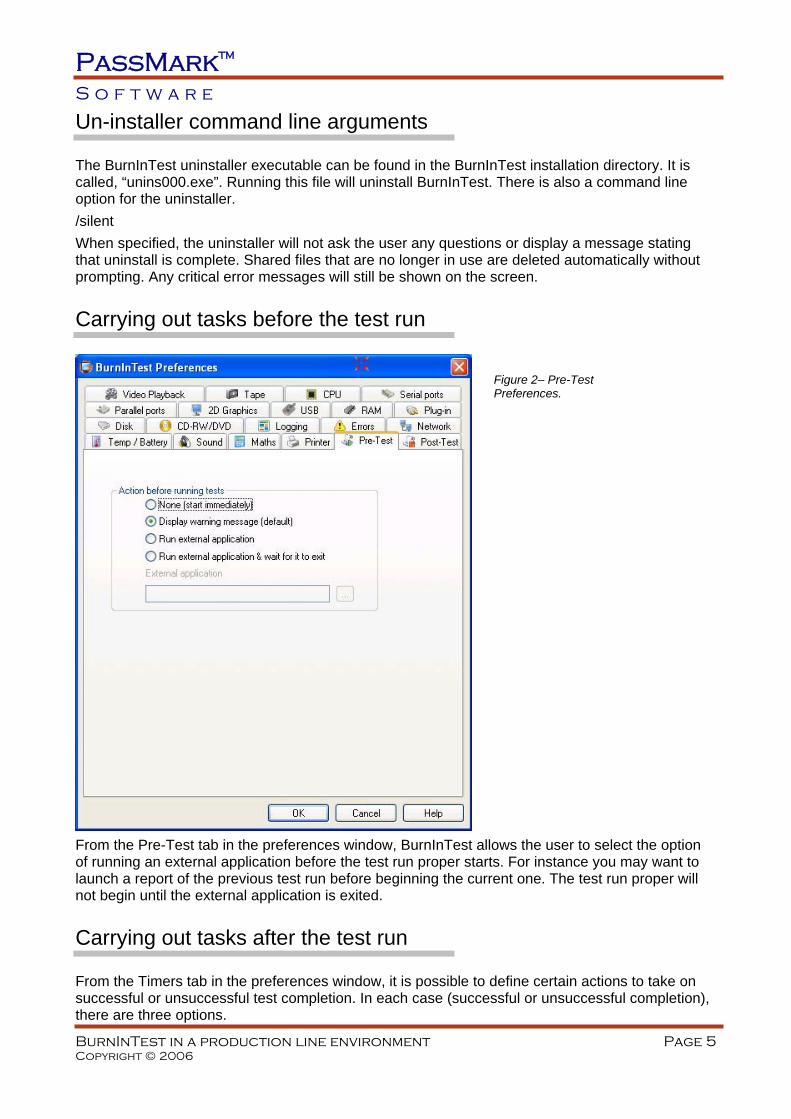
Carrying out tasks before the test run
From the Pre-Test tab in the preferences window, BurnInTest allows the user to select the option of running an external application before the test run proper starts. For instance you may want to launch a report of the previous test run before beginning the current one. The test run proper will not begin until the external application is exited.
Carrying out tasks after the test run
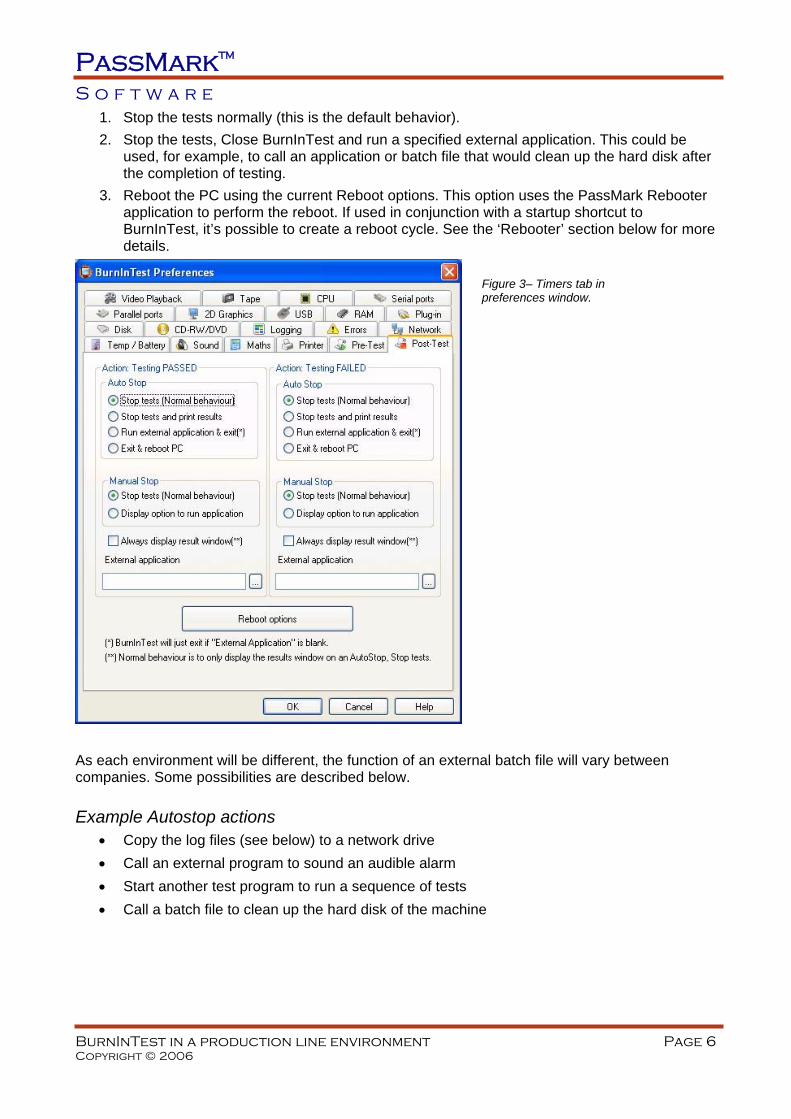
From the Timers tab in the preferences window, it is possible to define certain actions to take on successful or unsuccessful test completion. In each case (successful or unsuccessful completion), there are three options.
Figure 2– Pre-Test Preferences.
PassMark™ S o f t w a r e
BurnInTest in a production line environment Page 6 Copyright © 2006
1. Stop the tests normally (this is the default behavior). 2. Stop the tests, Close BurnInTest and run a specified external application. This could be
used, for example, to call an application or batch file that would clean up the hard disk after the completion of testing.
3. Reboot the PC using the current Reboot options. This option uses the PassMark Rebooter application to perform the reboot. If used in conjunction with a startup shortcut to BurnInTest, it’s possible to create a reboot cycle. See the ‘Rebooter’ section below for more details.
As each environment will be different, the function of an external batch file will vary between companies. Some possibilities are described below.
Example Autostop actions • Copy the log files (see below) to a network drive • Call an external program to sound an audible alarm • Start another test program to run a sequence of tests • Call a batch file to clean up the hard disk of the machine
Figure 3– Timers tab in preferences window.

PassMark™ S o f t w a r e
BurnInTest in a production line environment Page 7 Copyright © 2006
Report information - (Machine identification)
General report information The identity of the machine can be entered in to the ‘Machine Identity’ window, (accessible from the Edit menu in BurnInTest).
Certificate report information The fields in this section allow the entry of customer specific information for the system under test. This information is used in the Customer Test Certificate report.
This information can be saved to a file using the ‘Save as Defaults’ button. The name of the file is always ‘machineid.dat’. This file will be saved in the BurnInTest installation directory. Each time BurnInTest starts it checks to see if this file exists on the disk and loads the contents of the file.
Selecting a test configuration
It is possible to adjust a wide range of values from the ‘test duty cycles’ and ‘test preferences’ windows. The following general tips can be used to help select the right combination of tests to perform and their intensity level.
• Only turn on tests for which there is some corresponding hardware. For example, there is obviously no point in turning on the tape drive test if there is no tape drive installed.
• If the disk drive has a fairly large capacity, you will probably need to set the duty cycle for the disk test to 100% in order to make sure the maximum amount of disk surface is tested over several cycles.
• Monitor the CPU utilization during the 1st couple of test runs. If the CPU is not running at 100% all the time, raise the duty cycle of one or more tests. Conversely, if the CPU consistently runs at 100%, lower the duty cycle of one or more tests.
• If the machine has booted to Windows there is a reasonable chance that the CPU is working reasonably reliably. Give preference to the RAM test over the CPU test when setting the duty cycle. RAM tends to fail more often than a CPU.
Figure 3 – Machine identity window.
PassMark™ S o f t w a r e
BurnInTest in a production line environment Page 8 Copyright © 2006
• Don’t be scared of pushing the machine too hard. It’s better that it fails on the production line than after you have shipped it to your customer.
• You should test for at least a few hours. An absolute minimum is one complete cycle of the disk test. Leaving BurnInTest to run on the PC overnight should give the machine a good work out.
Logging to disk
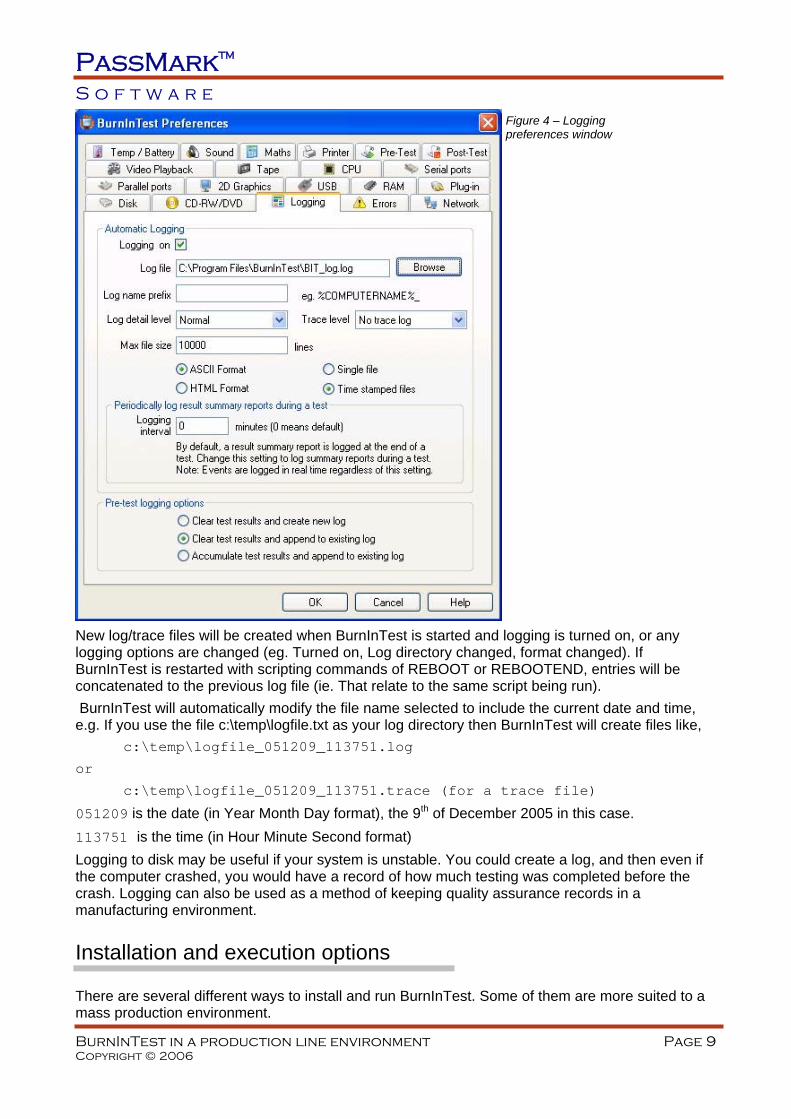
BurnInTest can create log files automatically. Using the setting in the preferences dialog the user can select • If logging to disk is on or off. • The log file directory and base file name. Note: Log files are prefixed as described below and
suffixed with the created date and time. • The required detail level of the log file. Either a Results Summary or Normal (recommended). • Whether a very detailed activity trace log is produced and the level. It is recommended that No
trace log be specified under normal circumstances. • The approximate size of the log (and trace) files. • The format of the log file. Plain ASCII text or HTML web page. • A prefix to the log file name, including a number of system Environment variables. • Whether to clear all log files at the start of each test run, or to accumulate the log files over test
runs. Note: Log entries are written to disk in real time (unlike versions prior to V4.0 where they are written out at periodic intervals eg. Every 10 minutes). In Version 5.0 of BurnInTest, you can also log periodic interim result reports. The log file format can be ASCII (plain text), BIT (BurnInTest Binary) or HTML (for the web). Log files can be opened in a text editor or a word processor application. See the example ASCII log file in Appendix 1. HTML files can be opened in a browser and posted on the web. Both formats can be attached to E-Mail messages.
PassMark™ S o f t w a r e
BurnInTest in a production line environment Page 9 Copyright © 2006
New log/trace files will be created when BurnInTest is started and logging is turned on, or any logging options are changed (eg. Turned on, Log directory changed, format changed). If BurnInTest is restarted with scripting commands of REBOOT or REBOOTEND, entries will be concatenated to the previous log file (ie. That relate to the same script being run). BurnInTest will automatically modify the file name selected to include the current date and time, e.g. If you use the file c:\temp\logfile.txt as your log directory then BurnInTest will create files like,
c:\temp\logfile_051209_113751.log
or
c:\temp\logfile_051209_113751.trace (for a trace file)
051209 is the date (in Year Month Day format), the 9th of December 2005 in this case. 113751 is the time (in Hour Minute Second format) Logging to disk may be useful if your system is unstable. You could create a log, and then even if the computer crashed, you would have a record of how much testing was completed before the crash. Logging can also be used as a method of keeping quality assurance records in a manufacturing environment.
Installation and execution options
There are several different ways to install and run BurnInTest. Some of them are more suited to a mass production environment.
Figure 4 – Logging preferences window
PassMark™ S o f t w a r e
BurnInTest in a production line environment Page 10 Copyright © 2006
Standard Install This is what happens when the standard package is installed. The files are expanded from the compressed archive and the install program is run to prompt the user for various information, like the installation directory. Files are then copied from the archive to the installation directory and some information is written to the registry to support the security software used to protect BurnInTest and the uninstallation of the package. After a standard install, uninstallation should be done from the Add / Remove programs icon in the Windows control panel. In a mass production environment this option can be time consuming.
Run from a removable drive or network drive The installation step can be avoided entirely by running BurnInTest directly from a CD, USB drive or Network drive. There are some issues with each method that bear consideration.
Running from a CD Normally BurnInTest uses the BurnInTest installation directory to store log files and configuration settings. Running BurnInTest from a read only CD will mean that it will not be possible to create / update these files. To run BurnInTest from a CD when no Operating System is installed, please see the section on “Running BurnInTest from a bootable CD”
Running from a USB Key drive This method is recommended over running BurnInTest from CD as configuration and log files can be saved.
Running from a Network drive This can be a viable option but if multiple instances of BurnInTest are started from the same network directory at the same time, there is a risk that configuration and log files will be overwritten by the various different instances. BurnInTest also uses a custom driver for certain purposes, such as accessing COM ports. BurnInTest will not have sufficient privileges to install the driver from a network.
Running from a Floppy disk From V5.0, BurnInTest is too large to run be from a floppy.
Use the following process to run BurnInTest from a CD or USB key drive.
1. Download the current version of BurnInTest without the installer and uninstaller. http://www.passmark.com/ftp/bitpro.zip
2. Copy all the files from the zip file to a USB key drive, (or burn to a CD).
3. Make a 'key.dat' file (see below) and include it on the floppy disk in the same directory as the BurnInTest executable file (bit.exe).
4. That's it - you're finished. BurnInTest should now run from your CD or USB drive and pick up the license information automatically. Using the Windows Start / Run menu option you can for example enter the following 'g:\bit.exe' to start BurnInTest from a USB key drive.
Making a key.dat file (applicable to version 3.1 and above only)
1. Create an ASCII text file.
2. The first line must contain the username.
3. The second line must contain the licence key
PassMark™ S o f t w a r e
BurnInTest in a production line environment Page 11 Copyright © 2006
4. Save the file in the same directory as bit.exe with a file name of key.dat
When running BurnInTest this way, there will be no files left on the PC after BurnInTest has finished. The floppy disk should be left writeable however, for log files. The procedure is the same for burning a CD. You can also get more sophisticated by having multiple test configurations, there is some information about this in the online help file. NOTE: If you are using the unlicensed evaluation version you need to be careful that the date and time is set correctly on all the PCs.
Running BurnInTest from a bootable CD
Many BurnInTest users can benefit from testing PC hardware when there is no Operating System installed, or the Operating System is inoperable. This can be useful for testing PC hardware:
1. In a production line environment, 2. That is to be shipped with Linux, 3. In a known virus free environment and 4. To try to determine the cause of corruption of an Operating System.
To run BurnInTest on a system without an operating system you need to set up a “Pre-install Environment” that allows Microsoft Windows to be booted from a CD. PassMark has produced another document describing how to set up a Bart Pre-install environment (BartPE) that includes both Windows XP SP2 and BurnInTest V5.0 (32-bit Professional Edition) on a bootable CD. Please refer to the Passmark website for this document (http://www.passmark.com/download/bit_download.htm).
Putting it all together
There are many possible ways that BurnInTest could be used. Example 1: Running BurnInTest from a CD This example assumes the following.
• That log files need to be kept • That each PC to be tested has a CD drive (Drive F), a USB key drive (Drive G) and no
network connection. • That the machine needs to be left in a clean state.
1. Create the required configuration files From within BurnInTest, select the settings that suit your specific test requirements from the test duty cycle window and the test preferences window. Save this configuration, using the ‘Save Config As’ menu option. This can be repeated several times if several test configurations are required. For this example we assume the following…
• The default ‘Stop Tests’ on testing Passed and ‘Stop Tests’ on testing Failed options are selected from the Post-test tab of the preferences window.

PassMark™ S o f t w a r e
BurnInTest in a production line environment Page 12 Copyright © 2006
• Automatic logging is turned ON from the Logging tab of the preferences window. The log file directory is, c:\burnintest The name of the log file is, ‘bitlogfile.txt’
• The name of the saved configuration file is, ‘heavyload.bitcfg’
2. Create the required batch file Using Notepad or another text editor, create an installation batch file (‘startburn.bat’), eg.
mkdir c:\burnintest
copy f:\*.* c:\burnintest
c:\burnintest\bit.exe /r heavyload.bitcfg
copy c:\burnintest\bitlogfile*.* g:\
copy c:\burnintest\error*.* g:\
del c:\burnintest\*.*
rmdir c:\burnintest
This batch file installs BurnInTest then runs the software with the configuration file that was prepared in advance. It then saves the log files to a USB Key drive and cleans up.
3. Create a fast install CD Follow the steps given above to create a CD (in section ‘Installation and execution options’), but when burning the CD include the configuration files and batch file created above. Optionally a machine identification file, ‘machineid.dat’, (see above), could also be included on the CD.
4. Run the tests To run the tests insert the CD in a machine to be tested and run the batch file.
5. Collect the results If the test is completed without error there will be a number of log files on the USB Key drive. These can then be transferred to a central data store (along with the serial number of the machine). If the test is completed with at least one error you will see something that looks like the following.
Figure 5 – Flashing Test failure window

PassMark™ S o f t w a r e
BurnInTest in a production line environment Page 13 Copyright © 2006
Example 2: Running BurnInTest from a USB Key drive This example assumes the following.
• That log files need to be kept • That each PC to be tested has a USB key drive (Drive G) that will by mapped to the same
drive letter • That the machine needs to be left in a clean state.
1. Install BurnInTest on the USB key drive Follow the steps given above to install BurnInTest on a USB Key drive (in section ‘Installation and execution options’), but include the configuration files created in the next step. Optionally a machine identification file, ‘machineid.dat’, (see above), could also be included on the USB key drive.
2. Create the required configuration files As per Example 1.
3. Run the tests Run BurnInTest from the USB key drive:
g:\burnintest\bit.exe /r heavyload.bitcfg
4. Collect the results If the test is completed there will be a number of log files on the USB Key drive.
PassMark™ S o f t w a r e
BurnInTest in a production line environment Page 14 Copyright © 2006
Rebooter
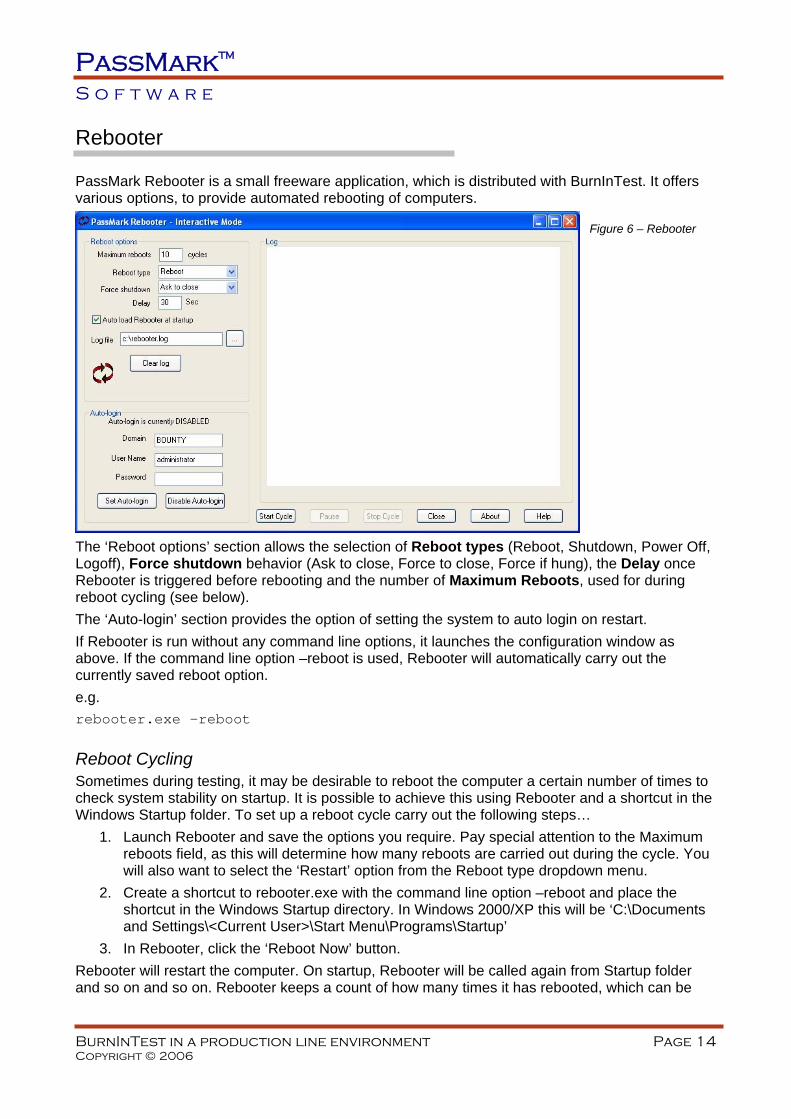
PassMark Rebooter is a small freeware application, which is distributed with BurnInTest. It offers various options, to provide automated rebooting of computers.
The ‘Reboot options’ section allows the selection of Reboot types (Reboot, Shutdown, Power Off, Logoff), Force shutdown behavior (Ask to close, Force to close, Force if hung), the Delay once Rebooter is triggered before rebooting and the number of Maximum Reboots, used for during reboot cycling (see below). The ‘Auto-login’ section provides the option of setting the system to auto login on restart. If Rebooter is run without any command line options, it launches the configuration window as above. If the command line option –reboot is used, Rebooter will automatically carry out the currently saved reboot option. e.g. rebooter.exe -reboot
Reboot Cycling Sometimes during testing, it may be desirable to reboot the computer a certain number of times to check system stability on startup. It is possible to achieve this using Rebooter and a shortcut in the Windows Startup folder. To set up a reboot cycle carry out the following steps…
1. Launch Rebooter and save the options you require. Pay special attention to the Maximum reboots field, as this will determine how many reboots are carried out during the cycle. You will also want to select the ‘Restart’ option from the Reboot type dropdown menu.
2. Create a shortcut to rebooter.exe with the command line option –reboot and place the shortcut in the Windows Startup directory. In Windows 2000/XP this will be ‘C:\Documents and Settings\<Current User>\Start Menu\Programs\Startup’
3. In Rebooter, click the ‘Reboot Now’ button. Rebooter will restart the computer. On startup, Rebooter will be called again from Startup folder and so on and so on. Rebooter keeps a count of how many times it has rebooted, which can be
Figure 6 – Rebooter

PassMark™ S o f t w a r e
BurnInTest in a production line environment Page 15 Copyright © 2006
seen in the ‘Reboot counter’ field. Once this value gets to the ‘Maximum reboots’ value, Rebooter will stop carrying out reboot actions. Note that this process will also work if BurnInTest is called from the Windows Startup menu and subsequently launches Rebooter on test run completion. Also of note are the REBOOT and REBOOTEND script commands. See ‘Scripting’ below for more.
Sleeper
PassMark Sleeper is a small freeware application, which allows the user to put their system into various states of sleep and hibernation. Sleeper can be called from BurnInTest using the ‘Close BurnInTest and run external file’ option from the Post test tab of the BurnInTest preferences window.
If Sleeper is called without any command line, the configuration screen above is displayed allowing the user to select options such as the Sleep state to enter, the duration of the sleep or hibernation etc. It is then possible to begin the sleep by clicking the Sleep Now button. All settings can also be specified from the command line. See the Sleeper online help for more details on command line options. Like Rebooter, Sleeper can be called from within BurnInTest by specifying the required command line from within the Pre-Test and/or Timers tabs on the preferences window. Sleeper is available from http://www.passmark.com/ftp/sleeper.zip
Figure 7 – Sleeper
PassMark™ S o f t w a r e
BurnInTest in a production line environment Page 16 Copyright © 2006
Scripting
BurnInTest includes a simple scripting language that allows tests to be executed in a sequence. Script files are ASCII text files that you can create with a text editor (e.g. notepad). The file name must end with the extension ‘.bits’. Scripts can be called from within BurnInTest using the ‘Test / Execute script’ menu item. Each script command must appear on its own line in the text file and the entire command must appear on a single line (i.e. a single command can not be split across multiple lines). The command and its parameters must be separated by one or more spaces. Comments can be included by starting the line with the ‘#’ character. The following commands are available in the current version of the software.
RUN COMMAND Syntax:
RUN <Test Name> Parameters:
<Test Name> See below for a list of all test names. Examples:
#Run the CD test with the current settings RUN CD #Run all the tests in the current configuration simultaneously RUN CONFIG
LOAD COMMAND Syntax:
LOAD <File name> Parameters:
<File name> The full path name to a configuration file. This configuration file must have been previously created from within BurnInTest. A partial path name can be used to load a configuration file from the current directory. A loaded configuration file will over write all preferences currently selected.
Examples: #Load the low load configuration file that we created earlier LOAD “C:\ConfigurationFiles\LowLoad.bitcfg”
MESSAGE COMMAND Syntax:
MESSAGE <Message Text> Parameters:
< Message Text > A single line of text that will be displayed in a window with an OK button. The user must click on the OK button to continue with the script.
Examples: MESSAGE “Insert the test disc into the DVD drive then click on OK to proceed with the test”
PassMark™ S o f t w a r e
BurnInTest in a production line environment Page 17 Copyright © 2006
SLEEP COMMAND Syntax:
SLEEP <Delay period> Parameters:
< Delay period > An integer that represents the number of milliseconds to pause before continuing with the next command in the script..
Examples: #Pause 2 seconds SLEEP 2000
SETDURATION COMMAND Syntax:
SETDURATION <Duration> Parameters:
<Duration> Sets the test duration in minutes. Using this command is the same as changing the auto-stop period from the preferences window.
Examples: #Set the test duration to 90 seconds SETDURATION 1.5
SETCYCLES COMMAND Syntax:
SETCYCLES <Number of test cycles> Parameters:
< Number of test cycles > Sets the number of test cycles that will lead to an automatic stopping of the test runs after all selected tests have reached or exceeded this number of test cycles. Using this command is the same as changing the auto-stop number of cycles from the preferences window.
Example 1: #Set the number of test cycles to 1 SETCYCLES 1
Example : Run each test one cycle in series.
SETCYCLES 1 SETDURATION 0 LOG "Run Maths Test” RUN MATHS LOG "Run MMX Test” RUN MMX Etc…
NOTE: Automatic stopping after a set number of test cycles is only supported in the licensed version of BurnInTest.
PassMark™ S o f t w a r e
BurnInTest in a production line environment Page 18 Copyright © 2006
SETDUTYCYCLE COMMAND Syntax:
SETDUTYCYCLE <Test Name> <Duty setting> Parameters:
<Test Name> See below for a list of all test names. <Duty setting> Sets the duty cycle for the specified test to the value specified. Values must
be between 1 and 100. Using this command is the same as changing the duty cycle value from the Test duty cycle window.
Examples: #Set the disk test to maximum load SETDUTYCYCLE DISK 100 #Set the CPU test to medium load SETDUTYCYCLE DISK 65
SETSERIAL COMMAND Syntax:
SETSERIAL < Serial Number > Parameters:
<Serial Number> The serial number string. Must be enclosed in double quotes (“”). Examples:
#Set the serial number SETSERIAL "1234-shdfgdhs-GHGHG"
SETMACHINETYPE COMMAND Syntax:
SETMACHINETYPE < Machine Name> Parameters:
< Machine Name > The Machine Name. Must be enclosed in double quotes (“”). Examples:
#Set Machine type SETMACHINETYPE "Dell XPS800"
SETNOTES COMMAND Syntax:
SETNOTES <Notes > Parameters:
< Notes > The Notes. Must be enclosed in double quotes (“”). Examples:
PassMark™ S o f t w a r e
BurnInTest in a production line environment Page 19 Copyright © 2006
#Set Notes SETNOTES "Test notes defined by the external application."
SETLOG COMMAND Syntax:
SETLOG <Filename> Parameters:
<Filename> The name of the log file. The file name must be enclosed in double quotes (“”). The file must be an executable.
Examples: #Set log file with full path SETLOG "C:\Program Files\Plugin\plugin_log" #Set log file with path relative to BurnInTest drive SETLOG "\Program Files\Plugin\plugin_log" #Set log file with path relative to BurnInTest application path SETLOG "plugin_log"
SETPLUGIN COMMAND Sets up the first external test plug-in application executable file name. Syntax:
SETPLUGIN <Filename> Parameters:
<Filename> The name of the plugin file. The file name must be enclosed in double quotes (“”). The file must be an executable, and the “.exe” must be included.
Examples: #Set plug-in test application file with full path SETPLUGIN "C:\Program Files\Plugin\plugin.exe” #Set plug-in test application file with path relative to BurnInTest drive SETPLUGIN "\Program Files\Plugin\plugin.exe” #Set plug-in test application file with path relative to BurnInTest application path SETPLUGIN "plugin.exe”
<Test Name> Parameter The test name parameter can takes the following values. The first value “CONFIG” is special because it does not refer to the name of an individual test. When used with the RUN command it causes all tests in the current configuration file to be started simultaneously.
CONFIG MATHS MMX

PassMark™ S o f t w a r e
BurnInTest in a production line environment Page 20 Copyright © 2006
BurnInTest 64bit version specific:
MMX and 3Dnow! have been superseded and are not supported in BurnInTest. The MMX and 3Dnow! Tests have been removed from the 64bit version of BurnInTest.
CD DISK MEMORY NETWORK PARALLEL PRINTER SERIAL SOUND TAPE USB 2D 3D VIDEO PLUGIN
Example #Load my preferred test configuration LOAD "MyConfiguration1.bitcfg" #Override the test duration for all tests SETDURATION 60 MESSAGE "Click on OK to start test run" RUN MATHS MESSAGE "Insert test discs into both the CD and DVD drive" RUN CD #Load my preferred test configuration for disk testing LOAD "MyDiskConfig.bitcfg" RUN CONFIG
EXECUTE COMMAND Overview:
Executes an external file and continues processing the script. Syntax:
EXECUTE <Filename> <Parameters> Parameters:
Filename The name of the file to execute. The file name must be enclosed in double quotes (“”). The file must be an executable.
PassMark™ S o f t w a r e
BurnInTest in a production line environment Page 21 Copyright © 2006
Parameters Any command line parameters which you wish to pass to your executable. If any of these parameters are filenames, you should enclose them in double quotes (“”)
Examples: #Start up Notepad with some results before starting tests. EXECUTE "c:\winnt\system32\notepad.exe" "c:\MyResults\Results.txt" RUN CONFIG
EXECUTEWAIT COMMAND Overview:
Runs an executable file and waits for that process to finish before continuing to process the script. Passing configuration information from an external program to BurnInTest. The executable file may produce a file of scripting commands that are to be run by BurnInTest once the executable file has closed. As an example, this may be used to set the Machine type, serial number, test notes etc at the start of a script file.. The only script commands that will be processed by BurnInTest are the SET… commands. All other commands will be ignored. If this file, called a Sub-Script file, is created is must: - be placed in the same directory as the EXECUTEWAIT executable file;
- must be called “bit-script-input.txt”; and
- must conform to the scripting file format.
After processing the script commands in this file, BurnInTest will delete the file.
Syntax: EXECUTE <Filename> <Parameters>
Parameters: Filename The name of the file to execute. The file name must be enclosed in double
quotes (“”). The file must be an executable. Parameters Any command line parameters which you wish to pass to your executable.
If any of these parameters are filenames, you should enclose them in double quotes (“”)
Examples: #Start PassMark’s Sleeper application with user defined parameters. EXECUTEWAIT "sleeper.exe" -S1000 -R 30 -N 1 –E #Start up Notepad with some results before starting tests. EXECUTEWAIT "c:\winnt\system32\notepad.exe" "c:\MyResults\Results.txt" RUN CONFIG
LOG COMMAND Overview:
PassMark™ S o f t w a r e
BurnInTest in a production line environment Page 22 Copyright © 2006
Writes text to the detailed error and status log history. Syntax:
LOG <Text> Parameters:
Text The text to be added to the detailed error and status log history. Examples:
#Start an S1 sleep and log the start and stop times LOG "Sleep S1 Duration 60 seconds starting" EXECUTEWAIT SLEEPER -S1 -D 60 LOG "Sleep S1 Duration 60seconds complete"
REBOOT and REBOOTEND COMMAND Note: These commands should only be used where multiple reboots within one script are required. The commands are designed in such a way that they ONLY make sense in the following context… BurnInTest must be launched automatically at start up using a shortcut to bit.exe in the Start-Up directory. The shortcut must use the /s command line parameter to automatically run the script, which contains the REBOOT command. So if, for example the script file containing the REBOOT command was called ‘Reboot.bits’, then the command line ‘Target’ of the shortcut would look something like “C:\Program Files\BurnInTest\bit.exe” /s Reboot.bits These commands require that the Rebooter application is present in the BurnInTest application directory. Any reboots occurring as a result of these commands will use the current Rebooter settings.
Overview: REBOOT reboots the computer. After the computer boots up, and BurnInTest restarts, the script will continue to execute at the line following the REBOOT command. REBOOTEND reboots the computer. After the computer boots up, BurnInTest will restart, but the script will no longer continue to execute.
Example: MESSAGE “Run some 3D tests” RUN 3D MESSAGE “Reboot for the first time” REBOOT MESSAGE “Run some 2D tests” RUN 2D MESSAGE “Reboot for the second time” REBOOT MESSAGE “And now one final reboot” REBOOTEND MESSAGE “This message will never be displayed” Note: It is recommended to use “Accumulate logs” when using REBOOT and REBOOTEND.
PassMark™ S o f t w a r e
BurnInTest in a production line environment Page 23 Copyright © 2006
Loopback plugs
The following BurnInTest tests use loopback plugs or cables. o Serial Port test o Parallel Port test o Audio test o USB test. Two loopback plugs are available at the time of writing:
o PassMark USB 2.0 Loopback plug: Used to test USB 1.x and 2.0 ports. Supports testing of FullSpeed (12Mb/s) and HighSpeed (480Mb/s). USB 2.0 ports will be tested at the faster HighSpeed.
o PassMark USB Loopback plug: Used to test USB 1.x and 2.0 ports. Supports testing of FullSpeed (12Mb/s) only. USB 2.0 ports will be tested at the slower USB 1.x speed.
It is recommended that you have at least one plug per port on the machine under test. For example, if the computer being tested has two COM ports, then having two serial loopback plugs will halve the amount of time you must spend testing.
PassMark™ S o f t w a r e
BurnInTest in a production line environment Page 24 Copyright © 2006
Feedback
We appreciate your feedback on this document, so if you find any mistakes or oversights please let us know.
Contacting PassMark Software
PassMark Software Pty Ltd Suite 10, Level 1 38 Waterloo St. Surry Hills, 2010 Sydney, Australia Ph: +612 9690 0444 Fax: +612 9690 0445 http://www.passmark.com Email Sales: [email protected] Email Support: [email protected] (send comments about this document to this address)

PassMark™ S o f t w a r e
BurnInTest in a production line environment Page 25 Copyright © 2006
Appendix 1 – Example text log file
PassMark BurnInTest Log file - http://www.passmark.com ======================================================== BurnInTest V5.0 Pro 1000 Logging detail level: Normal ****************** SYSTEM INFORMATION ****************** Network Name: PASSMARKXPP12 Date: 12/21/05 14:02:35 Operating system: Windows XP Service Pack 2 build 2600 (32-bit) Number of CPUs: 1 CPU manufacturer: GenuineIntel CPU type: Genuine Intel(R) CPU 3.00GHz CPU features: MMX SSE SSE2 SSE3 DEP PAE CPU1 speed: 2999.6 MHz CPU L2 Cache: 2 MB (L3 Cache: 0 KB) RAM: 510 MB Video card: ASUS Extreme AX300 (Resolution: 1920x1200x32) Disk drive: Model ST3160827AS (Size: 149.0GB) Disk drive: Model ST380013AS (Size: 74.5GB) Optical drive: TSSTcorp DVD-ROM TS-H352A Optical drive: PIODATA DVD-RW DVR-108DX ****************** DETAILED EVENT LOG ****************** LOG NOTE: 2005-12-21 14:03:28, Status, Main Tests started CRITICAL : 2005-12-21 14:03:29, USB, Could not detect USB loopback plug INFORMATION: 2005-12-21 14:03:31, Disk, A: Not enough free disk space CRITICAL : 2005-12-21 14:03:35, Serial, Error while receiving from the COM port LOG NOTE: 2005-12-21 14:03:35, Serial, \\.\COM1 Speed: 9600baud BlockSize: 100 BlockNum: 0 Transfered: 0 Handle:0000030C Total: 0, ErrorCode: 0 CRITICAL : 2005-12-21 14:03:36, USB, Could not detect USB loopback plug CRITICAL : 2005-12-21 14:03:41, Serial, Error while receiving from the COM port LOG NOTE: 2005-12-21 14:03:41, Serial, \\.\COM1 Speed: 9600baud BlockSize: 100 BlockNum: 0 Transfered: 0 Handle:0000030C Total: 0, ErrorCode: 0 CRITICAL : 2005-12-21 14:03:42, USB, Could not detect USB loopback plug LOG NOTE: 2005-12-21 14:03:44, Status, Test run stopped WARNING : 2005-12-21 14:03:44, Parallel, Warning: Could not lock parallel port ************** RESULT SUMMARY ************** Test Start time: Wed Dec 21 14:03:27 2005 Test Stop time: Wed Dec 21 14:03:44 2005 Test Duration: 000h 00m 17s Test Name Cycles Operations Result Errors Last Error CPU - Maths 3 419 Million PASS 0 No errors CPU - MMX / SSE 2 534 Million PASS 0 No errors Memory (RAM) 0 72.321 Million PASS 0 No errors 2D Graphics 0 90 PASS 0 No errors Disk (A: ) 0 0 FAIL 1 Not enough free disk space Disk (C: ) 0 8.962 Million PASS 0 No errors Network 1 0 1840 PASS 0 No errors Sound 0 286650 PASS 0 No errors Parallel Port 0 0 FAIL 1 Warning: Could not lock parallel port USB Plug 1 0 0 FAIL 3 Could not detect USB loopback plug Serial Port 1 2 900 FAIL 2 Error while receiving from the COM port Advanced Net 0 0 PASS 0 No errors TEST RUN FAILED ********************* SERIOUS ERROR SUMMARY ********************* CRITICAL : 2005-12-21 14:03:35, Serial, CRITICAL: Error while receiving from the COM port (x 2) CRITICAL : 2005-12-21 14:03:29, USB, CRITICAL: Could not detect USB loopback plug (x 3) -----------------------------------------------------------------------------------------------------