An Embeddable Dashboard for Widget-Based Visual Analytics on Scientific Communities

Building XML Editing Applications with XonomyMichal Boleslav Měchura
This document was last updated 3 April 2018.It applies to Xonomy version 3.5.0.
0.Introducing Xonomy......................................................................................................................................... 21.Quick-start guide............................................................................................................................................... 42.Controlling the structure of documents.......................................................................................................... 63.Editing attribute values................................................................................................................................... 114.Controlling the contents of menus................................................................................................................. 155.Controlling the order of elements and attributes......................................................................................... 226.Dragging and dropping................................................................................................................................... 237.Controlling the display of elements and their children...............................................................................248.Working with mixed content.......................................................................................................................... 269.Validating the document................................................................................................................................ 3010.Working with surrogate objects................................................................................................................... 3311.Working with namespaces............................................................................................................................ 3712.Serving users multilingually......................................................................................................................... 3813.Using server-side data................................................................................................................................... 4114.Document specification reference................................................................................................................ 4515.Minor and experimental features................................................................................................................ 54
1/55

0. Introducing XonomyXonomy is a web-based, schema-driven XML editor, written entirely in JavaScript and embeddable in any web page. Xonomy emulates the look and feel of a text editor with syntax highlighting, code foldingand autocompletion. It is, however, not a text editor: you edit your XML documents by clicking on nodes, selecting options from context menus, selecting attribute values from picklists, dragging and dropping elements around, and so on.
You can customize Xonomy by giving it a document specification. A document specification is similar to a schema: it determines what actions the user can perform on each element, which attributes or childelements the user can create, where attribute values come from, and so on. This gives you a mechanism for constraining the structure of your XML documents which is roughly equivalent to a Document Type Definition (DTD). You can constrain your document further by attaching your own validation functionsin JavaScript.
Xonomy can handle both data-centric XML, which it displays in a tree structure, and document-centric XML, which is displayed as running text with inline XML markup. Xonomy is able to handle mixed content (elements which contain a mixture of text and elements) and has features for annotating text with inline XML. Xonomy can work with documents that use namespaces.
0.1. Who Xonomy is forXonomy isn’t a shrink-wrapped product for end-users. It is a UI component which software developers can use as a building block in their own applications. If you are building a web-based application where your users will need to edit XML documents (or any structured data that can be rendered as XML), then Xonomy will make your job a lot easier. You will no longer need to painstakingly handcraft a user interface for each document type. Instead, you can simply embed Xonomy in your HTML pages and write a few lines of JavaScript to provide a document specification. Xonomy will take care of all the remaining on-screen magic.
2/55

0.2. Xonomy’s vital statistics
Compatibility
Xonomy should work on all reasonably recent versions of all reasonably modern browsers. It is positively known to work on (= has been tested on) Mozilla Firefox version 30 and Microsoft Internet Explorer version 11, both on Windows 7.
Dependencies
Xonomy uses the jQuery library, which it expects to find in the $ variable. If you don’t know what jQuery is, find out here: http://jquery.com/
Known limitations
Xonomy can only handle one XML editor and one XML document per page.
Licence
Xonomy is available to you under the MIT Licence: https://opensource.org/licenses/MIT
The MIT Licence applies to the Xonomy software but not this document, which is copyrighted by the author.
Contacting the author
You can e-mail me at [email protected]. Bug reports and feature requests are welcome. Also, I’d really love hear how people are using Xonomy: send me URLs and screenshots!
Acknowledgments
Xonomy uses icons from http://famfamfam.com.
0.3. How this document is structuredChapters 1 and 2 together form the minimum you need to know in order to start using Xonomy in your applications – so these are the chapters you should absolutely not skip.
Chapters 3 through to 11 deal with specialized topics and you can dip into them as and when you need. Although, if you have the time and headspace available, it’s probably a good idea to read them all in sequence because they will expose you to Xonomy’s design principles: you will re-emerge at the end of chapter 13 with a good understanding of how Xonomy ‘ticks’.
Finally, chapter 14 is a reference to the properties of a document specification, so you can find them all in one place instead of having to fumble for them in the other chapters.
The last chapter is Chapter 15 which is a bit of catch-all basket for any remaining things that don’t fit neatly into any other chapter.
3/55
1. Quick-start guide
1.1. InstallingTo start using Xonomy on your website, download Xonomy from http://lexiconista.com/xonomy/, uncompress it into a folder somewhere on your website, and include the files xonomy.js and xonomy.css in your HTML page. You must also include jQuery.
1.2. RenderingTo open an XML document, you must tell Xonomy to render it into a div (or some other HTML element). You do this by calling the function Xonomy.render. Once you’ve done all this, your user can start interacting with it.
The function Xonomy.render takes three arguments:
• the XML document, which can be XML-as-string or an actual XMLDocument object,
• a reference to the div where you want to render it,
• and a document specification. A document specification is a JavaScript object which tells Xonomy everything it needs to know about the structure of the document and the actions the user is allowed to perform on it. It can be null, in which case your user will be able to look at the document but wil not be able to do anything to it. More about document specifications in chapter 2.
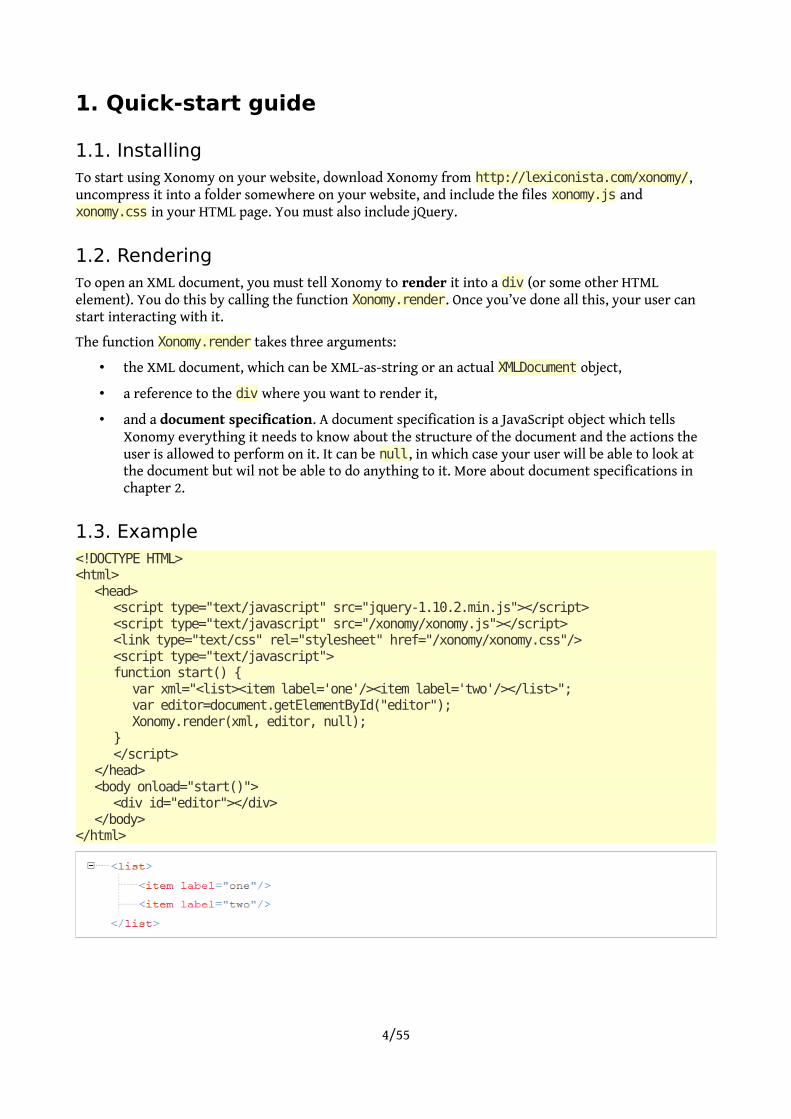
1.3. Example<!DOCTYPE HTML><html>
<head><script type="text/javascript" src="jquery-1.10.2.min.js"></script><script type="text/javascript" src="/xonomy/xonomy.js"></script><link type="text/css" rel="stylesheet" href="/xonomy/xonomy.css"/><script type="text/javascript">function start() {
var xml="<list><item label='one'/><item label='two'/></list>";var editor=document.getElementById("editor");Xonomy.render(xml, editor, null);
}</script>
</head><body onload="start()">
<div id="editor"></div></body>
</html>
4/55

1.4. HarvestingOnce your user has finished interacting with the document, you need to harvest it by calling the function Xonomy.harvest. This function takes no arguments and returns XML-as-string.
function submit() {var xml=Xonomy.harvest(); //"<list><item label='one'/><item label='two'/></list>"
}
“How come Xonomy.harvest takes no arguments? How does it know where to find the editor?”
The reason why no argument is necessary is that Xonomy can only handle one editor per page.So, Xonomy.harvest simply grabs the first editor it can find, believing it to be the only one. On that topic, don’t ever try to include more than one Xonomy editor in a single HTML page: unexpected mayhem would ensue!
1.5. ‘Nerd’ mode and ‘laic’ modeBy default, Xonomy emulates the look and feel of XML source code, angle brackets and all. This is called ‘nerd’ mode. If you prefer (or rather, if your users prefer) you can switch Xonomy into something called ‘laic’ mode which hides the XML code away and presents the document in a kind of structured tree-view. This mode is intended for users who are not familiar with XML notation and do not find it helpful.
You can switch between modes by calling Xonomy.setMode("nerd") or Xonomy.setMode("laic"), beforerendering a document or anytime after. The two modes differ only in appearance: all functionality and all features are equally available in both. All remaining screenshots in this document will be in ‘nerd’ mode.
5/55
2. Controlling the structure of documents
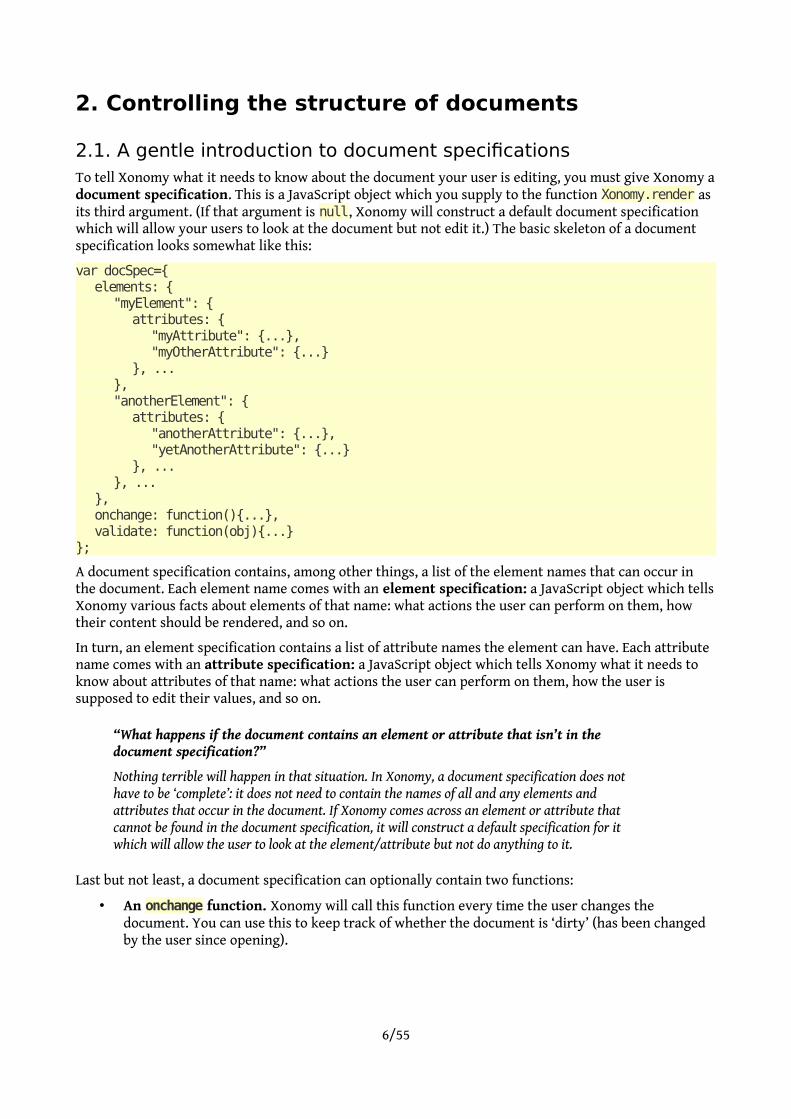
2.1. A gentle introduction to document specificationsTo tell Xonomy what it needs to know about the document your user is editing, you must give Xonomy adocument specification. This is a JavaScript object which you supply to the function Xonomy.render as its third argument. (If that argument is null, Xonomy will construct a default document specification which will allow your users to look at the document but not edit it.) The basic skeleton of a document specification looks somewhat like this:
var docSpec={elements: {
"myElement": {attributes: {
"myAttribute": {...},"myOtherAttribute": {...}
}, ...},"anotherElement": {
attributes: {"anotherAttribute": {...},"yetAnotherAttribute": {...}
}, ...}, ...
},onchange: function(){...},validate: function(obj){...}
};
A document specification contains, among other things, a list of the element names that can occur in the document. Each element name comes with an element specification: a JavaScript object which tellsXonomy various facts about elements of that name: what actions the user can perform on them, how their content should be rendered, and so on.
In turn, an element specification contains a list of attribute names the element can have. Each attribute name comes with an attribute specification: a JavaScript object which tells Xonomy what it needs to know about attributes of that name: what actions the user can perform on them, how the user is supposed to edit their values, and so on.
“What happens if the document contains an element or attribute that isn’t in the document specification?”
Nothing terrible will happen in that situation. In Xonomy, a document specification does not have to be ‘complete’: it does not need to contain the names of all and any elements and attributes that occur in the document. If Xonomy comes across an element or attribute that cannot be found in the document specification, it will construct a default specification for it which will allow the user to look at the element/attribute but not do anything to it.
Last but not least, a document specification can optionally contain two functions:
• An onchange function. Xonomy will call this function every time the user changes the document. You can use this to keep track of whether the document is ‘dirty’ (has been changed by the user since opening).
6/55

• A validate function. Xonomy will call this funtion every time the user has changed the document. You can use this to validate the document and to give feedback to your user in the form of warning messages. More about validation in chapter 9.
A complete reference to all the properties of a document specification can be found in chapter 14. Also, the other chapters in this document take a detailed look at how particular topics are handled in document specifications.
2.2. ExampleLet’s now have a look at a working example that makes use of a document specification. We will use Xonomy to let our users edit a simple XML document. The document starts with the <list> root element, which may contain one or more <item> child elements, which may optionally have a label attribute whose value is an arbitrary string of text. The document specification looks like this:
var docSpec={onchange: function(){
console.log("I been changed now!")},validate: function(obj){
console.log("I be validatin' now!")},elements: {
"list": {menu: [{
caption: "Append an <item>",action: Xonomy.newElementChild,actionParameter: "<item/>"
}]},"item": {
menu: [{caption: "Add @label=\"something\"",action: Xonomy.newAttribute,actionParameter: {name: "label", value: "something"},hideIf: function(jsElement){
return jsElement.hasAttribute("label");}
}, {caption: "Delete this <item>",action: Xonomy.deleteElement
}, {caption: "New <item> before this",action: Xonomy.newElementBefore,actionParameter: "<item/>"
}, {caption: "New <item> after this",action: Xonomy.newElementAfter,actionParameter: "<item/>"
}],canDropTo: ["list"],attributes: {
"label": {asker: Xonomy.askString,menu: [{
caption: "Delete this @label",action: Xonomy.deleteAttribute
7/55

}]}
}}
}};
And the HTML page can look like this:
<!DOCTYPE HTML><html>
<head><script type="text/javascript" src="jquery-1.10.2.min.js"></script><script type="text/javascript" src="/xonomy/xonomy.js"></script><link type="text/css" rel="stylesheet" href="/xonomy/xonomy.css"/><script type="text/javascript">function start() {
var docSpec={...}; //insert docSpec herevar xml="<list><item label='one'/><item label='two'/></list>";var editor=document.getElementById("editor");Xonomy.render(xml, editor, docSpec);
}function submit() {
var xml=Xonomy.harvest();//do something with xml...
}</script>
</head><body onload="start()">
<div id="editor"></div><button onclick="submit()">Submit!</button>
</body></html>
Now, let’s read the document specification from top to bottom.
You see that the document specification is a hash table with three key: onchange, validate and elements. You already know what the first two do. The most interesting is the third one, elements. It too is a hash table where the keys are element names and the values are element specifications. You see that the document has two kinds of elements: <list> and <item>.
The <list> element specification is, again, a hash table. This one contains only one key, menu, which specifies the menu that appears when the user clicks on the element. The value is an array of menu item specifications. A menu item specification is again a hash table (this is getting boring!) with properties that specify what the menu item does and what its caption is. You will learn more about menus and menu item specifications in chapter 4. The menu item in this example appends a new <item>child element to the <list> element when the user clicks it. The function Xonomy.newElementChild
8/55

takes care of that, which is one of Xonomy’s predefined menu action functions. Menu action functionsare explained in chapter 4, and you can also write your own.
The <item> element specification is a little richer. Its menu has four items: one to add the label attribute (along with an initial value), two to add sibling <item> elements before and after, and one to delete the element. Notice that the first menu item – the one that inserts the attribute – has a property called hideIf. This is a function which causes the menu item to be hidden if it returns true. Here, it causes the the menu item to be hidden if the element already has an attribute called label. The object passed to the function is an element surrogate object, a JavaScript object which encapsulates the current state of the element when the user clicked on it. Understanding surrogate objects is important if you want to write moderately complex document specifications, and they are explained in chapter 10.You will also see surrogate objects mentioned quite a lot before we even get to chapter 10.
The <item> element specification also has a canDropTo property. This tells Xonomy that elements of this name can be dragged-and-dropped around. Its value is an array of element names that can accept this element as a child. In this case the specification says that the <item> element can be dropped insidethe <list> element. Try adding a few <item> elements to your document and then use the drag handle to drag them around. You will see that, while dragging, Xonomy shows you ‘drop anchors’ everywhere the element can be dropped.
Finally, the <item> element specification has an attributes property. This is a hash table of the names of attributes the element can have. Here it says that the element can have one attribute called label. The value is an attribute specification. The attribute specification says that the attribute has a menu with one item that allows the user to delete the attribute. Also, the attribute specification specifies how the user is expected to edit the attribute’s value. The asker property takes care of that. It refers to a funcion which ‘asks’ the user for a value. Here it refers to Xonomy.askString, a predefined asker function in Xonomy which affords editing the value as a short one-line string. Xonomy comes with several predefined asker functions. More details about asker functions, including instructions for writing your own, are explained in chapter 3.
Well, congratulations, we’ve gotten to the end of this example! You now have a good idea of how Xonomy works. The rest of this document will delve deeper into some of the topics we touched above.
“This document specification looks nothing like a DTD or an XML Schema! It doesn’t even say what the root element is or what children it can have! What’s going on?”
Xonomy’s document specification isn’t meant to be a schema against which you could validatea document. Instead, it is intended as a specification of the actions and operations the user is allowed to perform on each element and attribute. In other words, a document specification in Xonomy is less abstract and more down-to-earth than a schema. It is not a schema, but a schema is implicit in it.
Take for example the question ‘how does Xonomy know that the root element is <list>’. This isn’t stated explicitly anywhere in the document specification, but it is implied by the fact thatthe initial XML document you are passing to Xonomy.render has <list> as root element andthat the document specification doesn’t allow the user to change or rename it.
Similarly, take the question ‘how does Xonomy know what children <list> can have’. Although the document specification doesn’t say anywhere that a <list> can have zero or more <item> elements as its children, this is implicit in the fact that the document specification allows the user to add and delete <item> elements to/from the <list> element.
So it turns out that a Xonomy document specification allows you to do pretty much everythinga DTD or an XML Schema does, only in a more verbose and less abstract way. The verbosity is compensated by extra flexibility: you have direct control over the menus that appear when theuser clicks on something, you have direct control over how the user is allowed to edit values, and so on.
9/55

Note
In theory, it is possible to write a script that generates a Xonomy document specification from a DTD or from an XML Schema, but that would be a separate project.
10/55

3. Editing attribute valuesWhen a user clicks an attribute value, a pop-up box appears for the user to edit the value in. You have control over the contents of that box. Each attribute specification has a property called asker; this refers to a function which ‘asks’ the user for a value. An asker function returns HTML-as-string which Xonomy inserts into the pop-up box. Some asker functions take an additional argument, which you can assign to the attribute specification’s askerParameter property.
If you fail to assign anything to the asker property, Xonomy will treat the attribute value as read-only, preventing the user from editing it.
Xonomy comes with three predefined asker functions. We will have a look at them in the next three subchapters. and then we’ll explain how you can write your own asker functions.
3.1. Xonomy.askStringattributes: {
"label": {asker: Xonomy.askString
}}
This function allows the user to edit the value as a single-line string.
3.2. Xonomy.askLongStringattributes: {
"label": {asker: Xonomy.askLongString
}}
This function allows the user to edit the value as a multi-line string which may contain line breaks.
Note
This function is also used by Xonomy for editing text nodes.
11/55

3.3. Xonomy.askPicklistattributes: {
"label": {asker: Xonomy.askPicklist,askerParameter: [
{value: "m", caption: "male"},{value: "f", caption: "female"}
]}
}
This function allows the user to pick the value from a list. You must assign the list to the attribute specification’s askerParameter property. The list can be:
• an array of strings,["m", "f"]
• or an array of objects where each has a value and an explanatory caption,[{value: "m", caption: "male"}, {value: "f", caption: "female"}]
• or a combination of both.[{value: "m", caption: "male"}, "f"]
Objects inside the array can have a value, a caption, and optionally a displayValue: a string which is displayed on the list instead of the actual value. You can use this to – for example – translate the values into another language for the user (while the real values stay hidden from the user’s view). The string can be a multilingual string (see Chapter 12).
3.4. Xonomy.askOpenPicklistThis function is a combination of askString and askPicklist: it encourages the user to pick a value from a list, but also allows him or her to type their own value in a textbox. The askerParameter property is the same as that of askPicklist.
3.5. Xonomy.askRemoteThis asker works like askPicklist except that the data comes from an external source which Xonomy talks to via Ajax and JSON. More abou this in Chapter 13 where we talk about building applications which consume external metadata.
3.6. Writing your own asker functionsIf the three predefined asker functions are not enougb for you, you can create your own function and assign it to the asker property of an attribute specification. The function must take at least one and at most three arguments:
12/55

1. As a first argument, Xonomy passes the current value of the attribute to your function. This is a string.
2. Whatever you assign to the attribute specification’s askerParameter property will be passed to the asker function as a second argument. You have seen that the Xonomy.askPicklist function uses this argument to know the contents of the picklist.
3. The third argument is a surrogate object representing the attribute the asker function is being invoked on. For surrogate objects see Chapter 10. From this you can traverse the entire XML document. You can use this to customize the contents of the asker depending on the value of some other attribute, say, or indeed on anything else in the XML document.
The function must return HTML-as-string, which Xonomy will insert into the pop-up box. The HTML may contain an element with the class name focusme; Xonomy will automatically move input focus to the first such element it finds in the pop-up box.
Your user will intract with the contents of the pop-up box and, at some stage, he or she will presumably click on something or press a key to indicate that he or she wishes to set the attribute’s value. At that stage, your HTML must call the function Xonomy.answer whose one and only argument is the new value. This must again be a string.
A good way to understand how an asker function is supposed to work is to look at the source code of one of Xonomy’s predefined asker functions – such as Xonomy.askString, which is reproduced for you here.
Xonomy.askString=function(defaultString) {var html="";html+="<form onsubmit='Xonomy.answer(this.val.value); return false'>";html+="<input name='val' class='textbox
focusme'value='"+Xonomy.xmlEscape(defaultString)+"'/>";html+=" <input type='submit' value='OK'>";html+="</form>";return html;
};
3.7. Treating element content like an attributeOften in XML, the text nodes inside elements are free text which the user is supposed to type in. But sometimes you may want to constrain the contents of elements in the same way as you would constrain the contents of attributes. To this end, Xonomy allows you to assign askers to elements as well.
var docSpec={elements: {
"title": {...asker: Xonomy.askPicklist,askerParameter: ["Introduction", "History", "Current Status", "Conclusion"],
}}
}
13/55

14/55
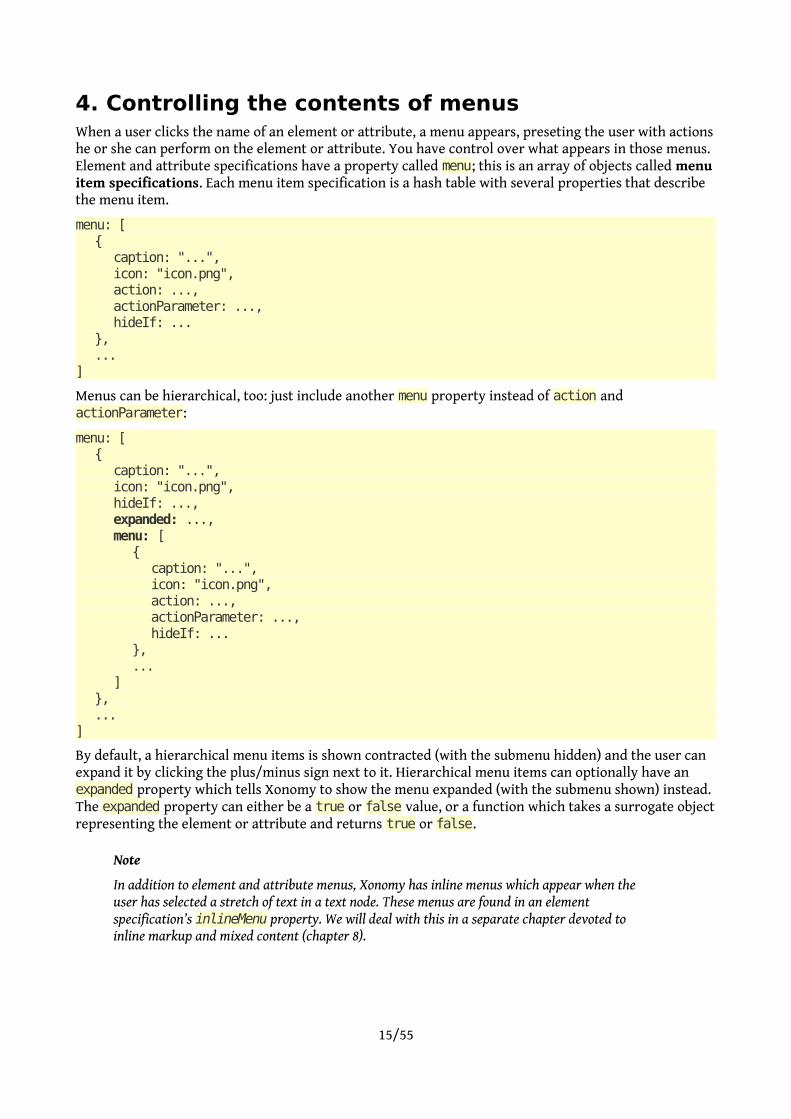
4. Controlling the contents of menusWhen a user clicks the name of an element or attribute, a menu appears, preseting the user with actionshe or she can perform on the element or attribute. You have control over what appears in those menus. Element and attribute specifications have a property called menu; this is an array of objects called menu item specifications. Each menu item specification is a hash table with several properties that describe the menu item.
menu: [{
caption: "...",icon: "icon.png",action: ...,actionParameter: ...,hideIf: ...
},...
]
Menus can be hierarchical, too: just include another menu property instead of action and actionParameter:
menu: [{
caption: "...",icon: "icon.png",hideIf: ...,expanded: ...,menu: [
{caption: "...",icon: "icon.png",action: ...,actionParameter: ...,hideIf: ...
},...
]},...
]
By default, a hierarchical menu items is shown contracted (with the submenu hidden) and the user can expand it by clicking the plus/minus sign next to it. Hierarchical menu items can optionally have an expanded property which tells Xonomy to show the menu expanded (with the submenu shown) instead. The expanded property can either be a true or false value, or a function which takes a surrogate objectrepresenting the element or attribute and returns true or false.
Note
In addition to element and attribute menus, Xonomy has inline menus which appear when the user has selected a stretch of text in a text node. These menus are found in an element specification’s inlineMenu property. We will deal with this in a separate chapter devoted to inline markup and mixed content (chapter 8).
15/55
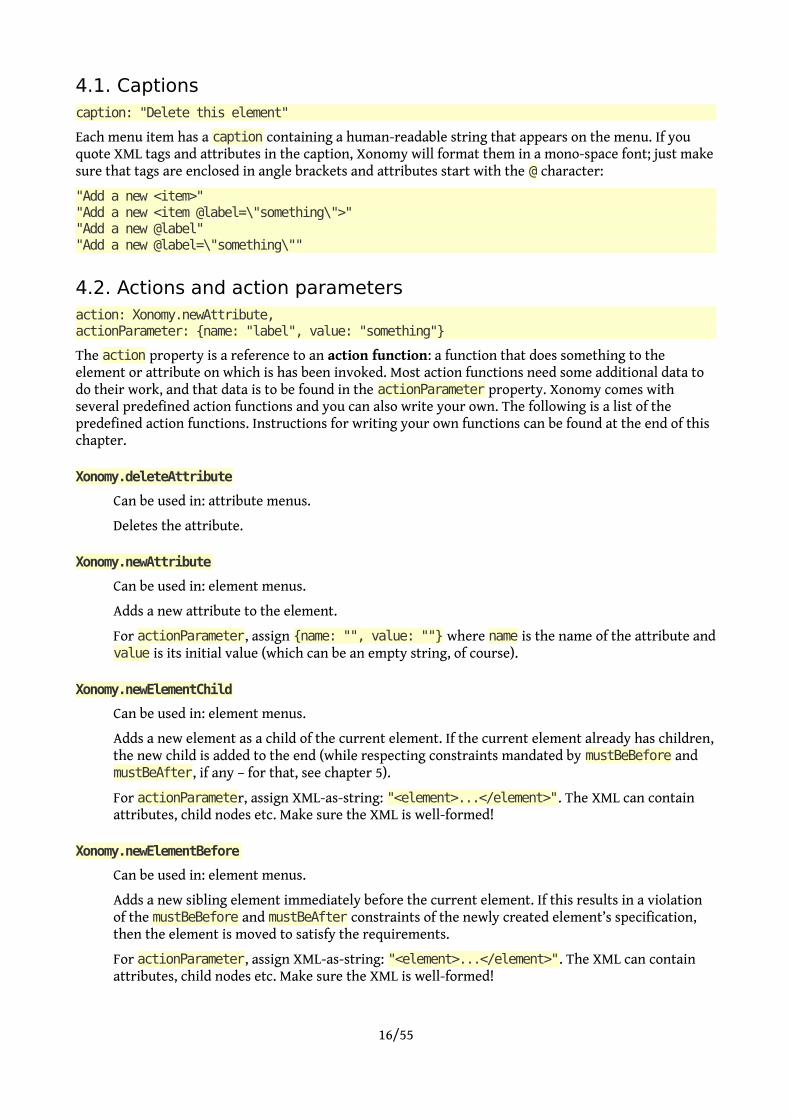
4.1. Captionscaption: "Delete this element"
Each menu item has a caption containing a human-readable string that appears on the menu. If you quote XML tags and attributes in the caption, Xonomy will format them in a mono-space font; just makesure that tags are enclosed in angle brackets and attributes start with the @ character:
"Add a new <item>""Add a new <item @label=\"something\">""Add a new @label""Add a new @label=\"something\""
4.2. Actions and action parametersaction: Xonomy.newAttribute,actionParameter: {name: "label", value: "something"}
The action property is a reference to an action function: a function that does something to the element or attribute on which is has been invoked. Most action functions need some additional data to do their work, and that data is to be found in the actionParameter property. Xonomy comes with several predefined action functions and you can also write your own. The following is a list of the predefined action functions. Instructions for writing your own functions can be found at the end of this chapter.
Xonomy.deleteAttribute
Can be used in: attribute menus.
Deletes the attribute.
Xonomy.newAttribute
Can be used in: element menus.
Adds a new attribute to the element.
For actionParameter, assign {name: "", value: ""} where name is the name of the attribute andvalue is its initial value (which can be an empty string, of course).
Xonomy.newElementChild
Can be used in: element menus.
Adds a new element as a child of the current element. If the current element already has children,the new child is added to the end (while respecting constraints mandated by mustBeBefore and mustBeAfter, if any – for that, see chapter 5).
For actionParameter, assign XML-as-string: "<element>...</element>". The XML can contain attributes, child nodes etc. Make sure the XML is well-formed!
Xonomy.newElementBefore
Can be used in: element menus.
Adds a new sibling element immediately before the current element. If this results in a violation of the mustBeBefore and mustBeAfter constraints of the newly created element’s specification, then the element is moved to satisfy the requirements.
For actionParameter, assign XML-as-string: "<element>...</element>". The XML can contain attributes, child nodes etc. Make sure the XML is well-formed!
16/55

Xonomy.newElementAfter
Can be used in: element menus.
Adds a new sibling element immediately after the current element. If this results in a violation of the mustBeBefore and mustBeAfter constraints of the newly created element’s specification, thenthe element is moved to satisfy the requirements.
For actionParameter, assign XML-as-string: "<element>...</element>". The XML can contain attributes, child nodes etc. Make sure the XML is well-formed!
Xonomy.deleteElement
Can be used in: element menus.
Deletes the element.
Xonomy.editRaw
Can be used in: element menus.
Opens a window in which the user can edit the element (its name, its attributes and all its descendant text nodes and elements) as plain text in raw XML or in an arbitrary markdown notation which you specify in the actionParameter.
For actionParameter, assign a JavaScript object which has at least one of these two methods which Xonomy will call immediately before editing starts:
• fromJs: function(jsElement){ ... }
A function which takes the element (passed as a surrogate object) and returns a markdown representation of it (as a string).
• fromXml: function(xml){ ... }
A function which takes the element (passed as XML-as-string) and returns a markdown representation of it. If you want the user to be able to edit the raw XML, just return xml unchanged.
and at least of these two methods which will be called immediately after editing ends (after the user clicks the OK button):
• toJs: function(txt, origElement){ ... }
A function which takes a plain-text representation of the element (in raw XML or in your own markdown notation) and returns a surrogate object representing the element which will replace the original element in the XML document. The original element, as it was before editing started, is passed to this function (as a surrogate object) in case the function is needed.
• toXml: function(txt, origElement){ ... }
A function which takes a plain-text representation of the element (in raw XML or in your own markdown notation) and returns XML-as-string representing the element which will replace the original element in the XML document. The original element, as it was before editing started, is passed to this function (as a surrogate object) in case the function is needed. If you have allowed the user to edit the raw XML, just return txt unchanged.
Xonomy.duplicateElement
Can be used in: element menus.
Creates a copy of the current element, inserts the copy into the document as a following sibling ofthe current element, and makes the copy the current element.
17/55

No actionParameter needed.
Xonomy.moveElementUpXonomy.moveElementDown
Can be used in: element menus.
Moves the element up (= towards the beginning of the XML document) or down (= towards the end of the XML document) to the nearest place where it can be dragged and dropped. This is the same as actually grabbing the element with the mouse and then dragging and dropping it onto the nearest drop target before it or after it. If there are no potential drop targets then nothing will happen.
No actionParameter needed.
Additionally, Xonomy provides handy helper functions canMoveElementUp and canMoveElementDown which you can use to automatically hide the menu item when there is no potential drop target (see also chapter 4.3 below):
hideIf: function(jsMe){ return !Xonomy.canMoveElementUp(jsMe.htmlID) }hideIf: function(jsMe){ return !Xonomy.canMoveElementDown(jsMe.htmlID) }
Xonomy.mergeWithPreviousXonomy.mergeWithNext
Can be used in: element menus.
Moves all attributes, child elements and text nodes from the current element (the “source parent”) to its preceding or following sibling (the “target parent”) and deletes the source parent.
No actionParameter needed.
When moving attributes, the following rules are observed. If the target parent does not have an attribute of that name, then the attribute is moved to the target parent. If the target parent has an attribute of that name but its value is an empty string, then the target parent’s attribute is replaced with the source parent’s attribute. If the target parent has a non-empty attribute of that name, then nothing happens.
When moving child elements and text nodes, the following rules are observed. (1) If either the target parent or the source parent or both are supposed to have text (= their element specifications have hasText set to true) then the contents of the source element is appended to the contents of the target element, with a space in between if the target parent’s content is non-emty. (2) If neither of the two parents is supposed to have text, then each of the source parent’s children is moved into the target parent if and only if the target parent does not already have a child whose XML serialization is exactly equal.
Eventually, the target element’s children are re-ordered to satisfy their element specifications’ mustBeBefore and mustBeAfter constraints.
Note
Additionally, Xonomy has two predefined action functions for working with inline markup: Xonomy.wrap and Xonomy.unwrap. These are explained in the chapter that deals with inline markup, which is chapter 8.
4.3. Hiding menu itemsThe hideIf property is a function which causes the menu item to be hidden if it returns true. A typical use for this is to hide an attribute-insertion menu item if the element already has such an attribute:
18/55

{caption: "Add a @label",action: Xonomy.newAttribute,actionParameter: {name: "label", value: ""},hideIf: function(jsElement){
return jsElement.hasAttribute("label");}
}
Another popular option is to hide a child-insertion menu item if the parent already has such a child (this is how you can make sure, for example, that a <list> always only has up to one <item>, if that is what your schema dictates):
{caption: "Add an <item>",action: Xonomy.newElementChild,actionParameter: "<item/>",hideIf: function(jsElement) {
return jsElement.hasChildElement("item");}
}
The argument that Xonomy passes to the hideIf function (called jsElement in the examples above) is an element surrogate object (if we are in an element menu) or an attribute surrogate object (if we are in an attribute menu). Surrogate objects are objects which encapsulate the state of the element or attribute at the time the user has clicked the menu item. They have various properties which you can test against. More about surrogate objects in chapter 10.
4.4. Writing your own action functionsIf Xonomy’s predefined action functions are not enough for you, you can write your own. An action function is a function that takes two arguments and returns nothing.
• The first argument is a unique ID of the element or attribute in which the action is being invoked. Xonomy assigns a unique ID (usually called htmlID in Xonomy’s source code; it is a string like "xonomy1", "xonomy2" etc.) to every element, attribute and text node in your XML document. This is how your action function knows which object the action is being applied to.
• The second argument is whatever you have assigned to the actionParameter property – which can be nothing, of course.
If your action function changes the XML document, then you must include a call to Xonomy.changed() in the function to make sure Xonomy hears of the change, performs validation and notifies the host application.
Example 1The easiest way to write your own action functions is to reuse Xonomy’s predefined action functions. Let’s demonstrate that on an example. Let’s say you want to have a menu item on one of your elements that inserts two attributes at once. You can write an action function that simply calls Xonomy.newAttribute twice. This is what the menu item would like:
19/55
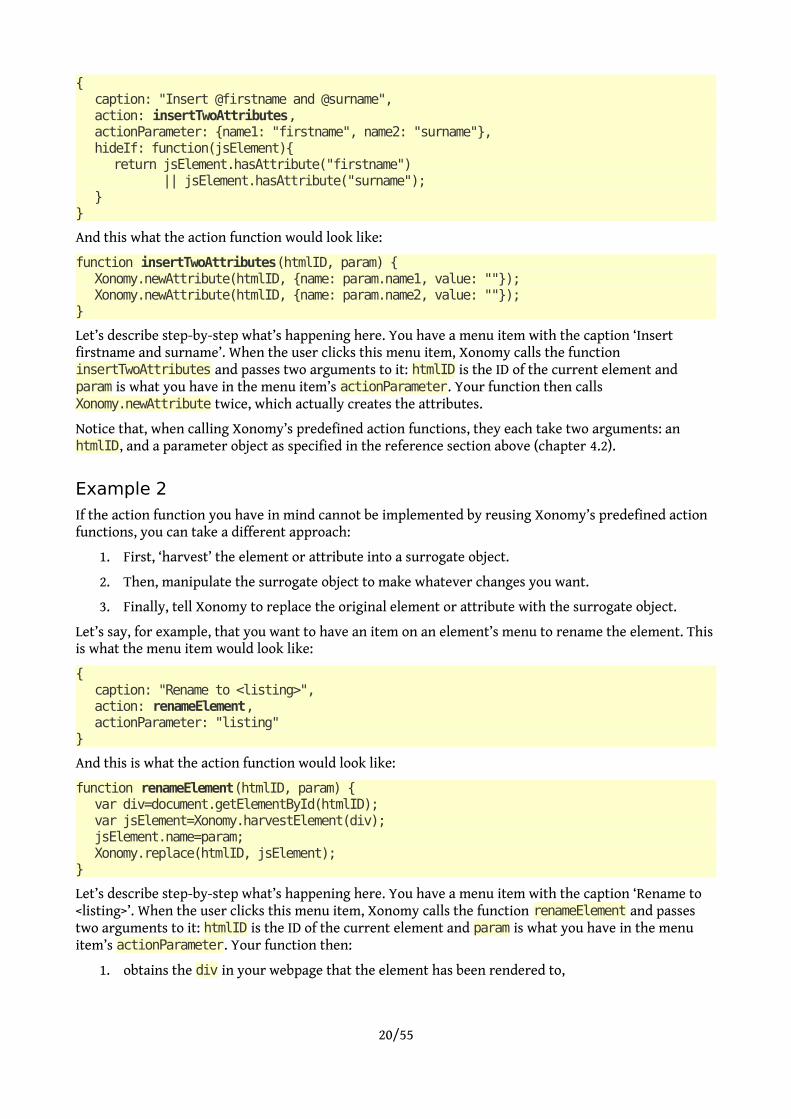
{caption: "Insert @firstname and @surname",action: insertTwoAttributes,actionParameter: {name1: "firstname", name2: "surname"},hideIf: function(jsElement){
return jsElement.hasAttribute("firstname") || jsElement.hasAttribute("surname");
}}
And this what the action function would look like:
function insertTwoAttributes(htmlID, param) {Xonomy.newAttribute(htmlID, {name: param.name1, value: ""});Xonomy.newAttribute(htmlID, {name: param.name2, value: ""});
}
Let’s describe step-by-step what’s happening here. You have a menu item with the caption ‘Insert firstname and surname’. When the user clicks this menu item, Xonomy calls the function insertTwoAttributes and passes two arguments to it: htmlID is the ID of the current element and param is what you have in the menu item’s actionParameter. Your function then calls Xonomy.newAttribute twice, which actually creates the attributes.
Notice that, when calling Xonomy’s predefined action functions, they each take two arguments: an htmlID, and a parameter object as specified in the reference section above (chapter 4.2).
Example 2If the action function you have in mind cannot be implemented by reusing Xonomy’s predefined action functions, you can take a different approach:
1. First, ‘harvest’ the element or attribute into a surrogate object.
2. Then, manipulate the surrogate object to make whatever changes you want.
3. Finally, tell Xonomy to replace the original element or attribute with the surrogate object.
Let’s say, for example, that you want to have an item on an element’s menu to rename the element. Thisis what the menu item would look like:
{caption: "Rename to <listing>",action: renameElement,actionParameter: "listing"
}
And this is what the action function would look like:
function renameElement(htmlID, param) {var div=document.getElementById(htmlID);var jsElement=Xonomy.harvestElement(div);jsElement.name=param;Xonomy.replace(htmlID, jsElement);
}
Let’s describe step-by-step what’s happening here. You have a menu item with the caption ‘Rename to <listing>’. When the user clicks this menu item, Xonomy calls the function renameElement and passes two arguments to it: htmlID is the ID of the current element and param is what you have in the menu item’s actionParameter. Your function then:
1. obtains the div in your webpage that the element has been rendered to,
20/55

2. asks Xonomy to harvest this div into a surrogate element object (you must use Xonomy.harvestElement, Xonomy.harvestAttribute or Xonomy.harvestText depending on whether the node you want to harvest is an element, an attribute or a text node),
3. changes the surrogate object’s name property, effectively renaming the surrogate element object
4. and, finally, asks Xonomy to replace the existing element with the surrogate object.
The function Xonomy.replace is a function you can call from anywhere to replace an existing object in your XML document (element, attribute or text node) with another one. It takes the htmlID of the existing object and a surrogate object representing the new one.
As usual, this action function makes use of surrogate objects. We have not looked at surrogate objects inany systematic way yet in this document, but we will get to them in chapter 10.
4.5. Keyboard shortcutsIt is possible to assign keyboard shortcuts to menu items. Users can use these shortcuts instead of having to open the menu and clicking the menu item.
menu: [{caption: "Add @id",action: Xonomy.newAttribute,actionParameter: {name: "id", value: ""},hideIf: function(jsElement){return jsElement.hasAttribute("id")},keyTrigger: function(event){
return (event.ctrlKey||event.metaKey) && event.shiftKey && event.which==68},keyCaption: "Ctrl + Shift + D",
}]
The keyTrigger property is a function which takes a jQuery event object and retuns true if the event should trigger the menu item. (Note that the menu item will only be triggered if it isn’t hidden as per the hideIf property.)
The keyCaption property is simply a user-friendly string which Xoonmy shows beside the menu item, as a guide to the user.
21/55

5. Controlling the order of elements and attributes
5.1. Attribute orderXonomy automatically makes sure the attributes of an element are listed in the order in which they are given in the element specification. If they are not, Xonomy reorders them. This happens everytime the element is rendered (including when you initially render the document by calling Xonomy.render) and everytime an attribute is added.
5.2. Child element orderUnlike attributes, elements are not required by Xonomy to appear in any particular order by default. However, you can specify in a element’s specification that the element must always appear before or after another element. You do this by setting the element specification’s mustBeBefore and mustBeAfter properties. Both are arrays of element names. Example:
var docSpec={elements: {
"introduction": {mustBeBefore: ["exposition", "conclusion"],...
},"exposition": {
...},"conclusion": {
mustBeAfter: ["introduction", "exposition"],...
},...
}}
A mustBeBefore array means that, if the current element has a sibling whose name is listed in mustBeBefore, then the current element must be its preceding sibling. Conversely, a mustBeAfter array means that, if the current element has a sibling whose name is listed in mustBeAfter, then the current element must be its following sibling. Note that the terms ‘preceding’ and ‘following’ do not necessarily mean ‘immediately preceding’ and ‘immediately following’; there may be intervening elements.
The mustBeBefore and mustBeAfter constraints are imposed:
• When a new child element is added to a parent element by the menu action function Xonomy.newElementChild. The new child is appended to the end of the parent’s children and then moved up or down to satisfy the mustBeBefore and mustBeAfter constraints of its specification. (If the constraints are mutually incosistent, nothing terrible will happen: Xonomy will first move the element to satisfy its mustBeBefore constraint, then move it again to satisfy its mustBeAfter constraint, and then finish.)
• When dragging and dropping: Xonomy displays drop anchors in places where the dragged element can be dropped, as per the element’s own mustBeBefore and mustBeAfter constraints. See chapter 6 for more about dragging and dropping.
If the mustBeBefore and mustBeAfter formalism is not flexible enough to impose ordering restrictions in your application, you can always write your own validation functions and notify the user when he or she has violated a constraint. More about validation functions in chapter 9.
22/55
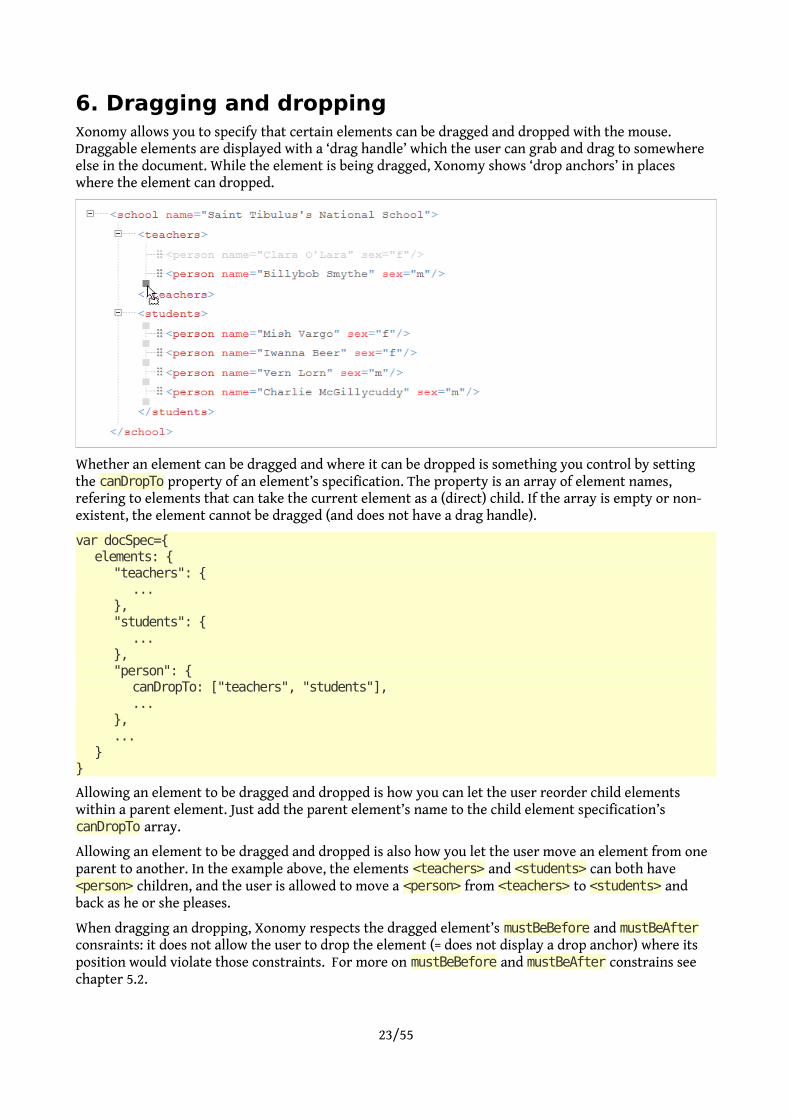
6. Dragging and droppingXonomy allows you to specify that certain elements can be dragged and dropped with the mouse. Draggable elements are displayed with a ‘drag handle’ which the user can grab and drag to somewhere else in the document. While the element is being dragged, Xonomy shows ‘drop anchors’ in places where the element can dropped.
Whether an element can be dragged and where it can be dropped is something you control by setting the canDropTo property of an element’s specification. The property is an array of element names, refering to elements that can take the current element as a (direct) child. If the array is empty or non-existent, the element cannot be dragged (and does not have a drag handle).
var docSpec={elements: {
"teachers": {...
},"students": {
...},"person": {
canDropTo: ["teachers", "students"],...
},...
}}
Allowing an element to be dragged and dropped is how you can let the user reorder child elements within a parent element. Just add the parent element’s name to the child element specification’s canDropTo array.
Allowing an element to be dragged and dropped is also how you let the user move an element from one parent to another. In the example above, the elements <teachers> and <students> can both have <person> children, and the user is allowed to move a <person> from <teachers> to <students> and back as he or she pleases.
When dragging an dropping, Xonomy respects the dragged element’s mustBeBefore and mustBeAfter consraints: it does not allow the user to drop the element (= does not display a drop anchor) where its position would violate those constraints. For more on mustBeBefore and mustBeAfter constrains see chapter 5.2.
23/55

7. Controlling the display of elements and their children
7.1. Collapsing elementsYou will no doubt have noticed that elements that have children come with little plus/minus symbols which you can click to collapse and expand the element’s content. You can control whether an element will be collapsed by default when it is first rendered. You do this by setting the collapsed property in the element’s specification. It is a function which returns either true (= the element should be collapsedintially) or false. The default value for this property is a function that returns false.
var docSpec={elements: {
"item": {collapsed: function(jsElement){return true;}
},...
}}
The reason why the collapsed property is a function rather than a straight true/false value is that you may want to decide its value dynamically. For example, if your XML document contains sections in different languages, you may want all English sections to be expanded by default and the others collapsed for an English-speaking user, and so on. To achieve this, make sure the collapsed function of the <section> element’s specification returns false if the element has lang="en" and true in all other cases.
<section lang="en">...
</section><section lang="de">
...</section><section lang="fr">
...</section>
The collapsed function takes an argument which is a surrogate element object (see chapter 10).
7.2. Oneliner displayBy default, if an element has children (child elements or text nodes or both), Xonomy displays the children as a block-level list of items between the opening and closing tag. If you prefer, you can tell Xonomy to display the element in a more compact layout in which the entire element (the opening tag, the children and the closing tag) are displayed as a single line of items. You do this by setting the oneliner property of the element’s specification.
var docSpec={elements: {
"title": {oneliner: true
},...
}}
24/55

Notice that the oneliner property is inherited by child elements. If, in the example above, the <title> element had any child elements, the child elements would also be treated as if they had oneliner set to true, regarless of what their element specifications said.
25/55

8. Working with mixed contentThe term ‘mixed content’ refers to a situation when a parent element contains a mixture of child elements and text nodes. When a situation like that occurs, by default Xonomy displays each text node and each child element as a separate (block-level) item. This probably isn’t very convenient for editing. Luckily, you can override this behaviour by setting a few properties in the parent element’s specification to make editing mixed content more user-friendly. The rest of this chapter explains how.
8.1. Allowing mixed contentTo tell Xonomy that the contents of a particular element is meant to be not a list of block-level elementsbut text (potentially decorated with inline markup), set the element specification’s hasText property totrue. This changes a few things about how Xonomy treats the children of that element. One important change is that it displays the children not as a block-level list but as a single inline sequence.
var docSpec={elements: {
"sentence": {hasText: true
},"place": {
hasText: true}
}};
Notice that you need to set hasText to true for all inline markup elements as well. If you have a <sentence> element which can contain a mixture of text nodes and <place> elements, and if <place> elements can also contain text, then you need to set hasText to true in the element specifications of both <sentence> and <place>. If you only set it to true on <sentence> but not on <place>, then the contents of <sentence> will be displayed inline but the contents of <place> will still be a block-level list. This is not a bug: it may actually be desired behaviour if the <place> element contains complex markup which you don’t want to display inline.
var docSpec={elements: {
"sentence": {hasText: true
},"place": {
hasText: false},"name": {
oneliner: true}
}};
26/55

“What is the difference betwen hasText and oneliner?”
We met the oneliner property when we were looking at controlling the display of elements inthe previous chapter. The difference is as follows:
• The oneliner property affects the entire element. When it is true for en element, the entire element is displayed as an inline stretch of text, including its opening tag, its children collection, and its closing tag.
• The hasText property affects only the children of the element. When it is true for an element, only its children collection is displayed as an inline stretch of text, not its opening tag or closing tag.
Moreover, oneliner is inherited by child elements while hasText isn’t.
You can of course combine the two (set both oneliner and hasText to true), which will result in the most compact (= least space-consuming) display for your mixed-content elements.
8.2. Entering text at tag boundariesAnother thing that changes when you set an element specification’s hasText property to true is that Xonomy will now allow your user to create new text nodes at tag boundaries. Here is what it means in practice:
• If the first child is an element (as opposed to a text node), Xonomy will allow your user to createa text node before it by hovering the mouse there and clicking.
• If the last child is an element (as opposed to a text node), Xonomy will allow your user to create a text node after it by hovering the mouse there and clicking.
• If two child elements meet without an intervening text node, Xonomy will allow your user to create a text node between them by hovering the mouse there and clicking.
• If the element has no content at all (no text node and no child elements), Xonomy will allow your user to create a text node inside it by hovering the mouse between the opening and closingtag and clicking.
27/55

8.3. Inserting inline markupXonomy makes it possible for your users to select a stretch of text inside a text node and surround it with XML markup. Let’s first have a look how it works from a user’s point of view. Then we’ll explain how to make this feature available through a document specification.
When a text node can be annotated with inline markup, you will notice a thin grey line underlining the text. To select a stretch of text, click on this line underneath the first character and then again underneath the last character. (If you want to select just one character, click on the same character twice.) You will see that the stretch has been highlighted and a menu has appeared. You can now select something from the menu and Xonomy will surround the selected text with XML markup.
Note
Instead of clicking the thin grey underneath the character (which can be tricky) your users can also click the entire character while holding down the Ctrl key (or the Meta key if on a Mac).
The menu that appears beside a selected stretch of text comes from the inlineMenu property of the element’s specification. Like all other menu properties, it is an array of menu specifications (see chapter4).
var docSpec={elements: {
"sentence": {hasText: true,inlineMenu: [{
caption: "Wrap with <place>",action: Xonomy.wrap,actionParameter: {template: "<place>$</place>", placeholder: "$"}
}, {caption: "Wrap with <person>",action: Xonomy.wrap,actionParameter: {template: "<person>$</person>", placeholder: "$"}
}]},...
}}
Xonomy provides a prefabricated menu action function which you will probably be using very often in inline menus: Xonomy.wrap. This functin works by splitting the text node in three and replacing the middle one with the XML markup specified in the menu item’s actionParameter. Notice that the XML markup contains a placeholder: the contents of the middle text node will be inserted in its place.
8.4. Removing inline markupTo make it possible for your users to remove an element from around a stretch of content without also deleting the content, add an item to the element’s menu and use the function Xonomy.unwrap. Unlike Xonomy.deleteElement, this function doesn’t delete the whole element but replaces it with its content.
28/55

var docSpec={elements: {
...,"place": {
hasText: true,menu: [{
caption: "Unwrap <place>",action: Xonomy.unwrap
}]},...
}}
8.5. hasText and oneliner as functionsIn all previous examples the hasText and oneliner fields were explicit true/false values. But they can also be functions which return true or false of you prefer, like this:
var docSpec={elements: {
"sentence": {hasText: function(jsElement) {...; return true;}
},"place": {
hasText: function(jsElement) {...; return true;}},"name": {
oneliner: function(jsElement) {...; return true;}}
}};
The functions take a surrogate object which represents the element whose appearance we are deciding. This way, you can decide on the element’s appearance dynamically based on its content and other properties. This decision-making takes place while the document is being rendered. For more about surrogate objects see chapter 10.
29/55

9. Validating the documentFor the (hopefully rare) ocassions when Xonomy’s document specification is not expressive enough to impose structure on the document your user is editing, Xonomy lets you write your own validation functions in JavaScript. A Xonomy validation function is a funtion that checks the document and issues human-readable warning messages to the user.
You must assign your validation function to the document specification’s validate property. The function is called by Xonomy every time the document changes, and also immediately after the document has been rendered (after you have called Xonomy.render).
var docSpec={validate: function(jsElement){
console.log("Let's validate this document!");},...
}
The validation function takes a single argument, a surrogate element object representing the document’s top element. From there you can access all other elements, attributes and text nodes present in the document, test them in any way you want, and issue warning messages.
To issue a warning message, push an object to the array Xonomy.warnings. The object you push there must have two properties, htmlID and text. The htmlID property is the ID of the element or attribute towhich the warning messages is to be attached; you can get this ID from the surrogate object. The text property is a human-readable warning message (any element or attribute name mentioned in the message will be pretty-formatted as explained in chapter 4.1)
var docSpec={validate: function(jsElement){
if(...) { //if something is trueXonomy.warnings.push({
htmlID: jsElement.htmlID,text: "This element is missing an @id attribute."
});};
},...
}
When a warning message is pushed to the Xonomy.warnings array, Xonomy displays an exclamation mark icon in the element or attribute and, upon clicking on it, shows the warning message in a pop-up box. The user is now expected to correct the error. As soon as he or she has made a change to the document, the validate function is called again and the error message will either disappear or appear again, depending on whether the error has been corrected or not. (The Xonomy.warnings array is emptied automatically before each validate call.)
“I’m confused. The validate function doesn’t seem to return any value. So how does it tell me whether the document is valid or not?”
It doesn’t tell you that. The purpose of the validate function is to issue human-readable warnings to the user, and that is all. Its purpose is not to produce a single true/false
30/55

judgment. Neither is its purpose to stop the user from saving or submitting the document if it is invalid.
If you require this kind of functionality, you should implement it externally from Xonomy, such as by doing server-side validation.
Performing validation requires good knowledge of surrogate objects, which you can learn more about inthe next chapter (10).
9.1. Validating with recursionWhen designing a validate funtion, a popular choice is to cycle through the document recursively, performing checks on each element individually.
var docSpec={validate: function(jsElement){
//Cycle through the element's attributes:for(var i=0; i<jsElement.attributes.length; i++) {
var jsAttribute=jsElement.attributes[i];//Make sure item/@label is not an empty string:if(jsElement.name=="item" && jsAttribute.name=="label") {
if(jsAttribute.value=="") {Xonomy.warnings.push({
htmlID: jsAttribute.htmlID,text: "This attribute must not be empty."}
);}
}};//Cycle through the element's children:for(var i=0; i<jsElement.children.length; i++) {
var jsChild=jsElement.children[i];if(jsChild.type=="element") { //if element
docSpec.validate(jsChild); //recursion}
}},...
}
9.2. Validating with delegationAnother approach to validation is to give each element and attribute specification its own validation function, and to call these functions from the document specification’s validate function. In other words, instead of doing all validation in a single function, you ‘delegate’ the validation of each element and attribute to its specification.
31/55
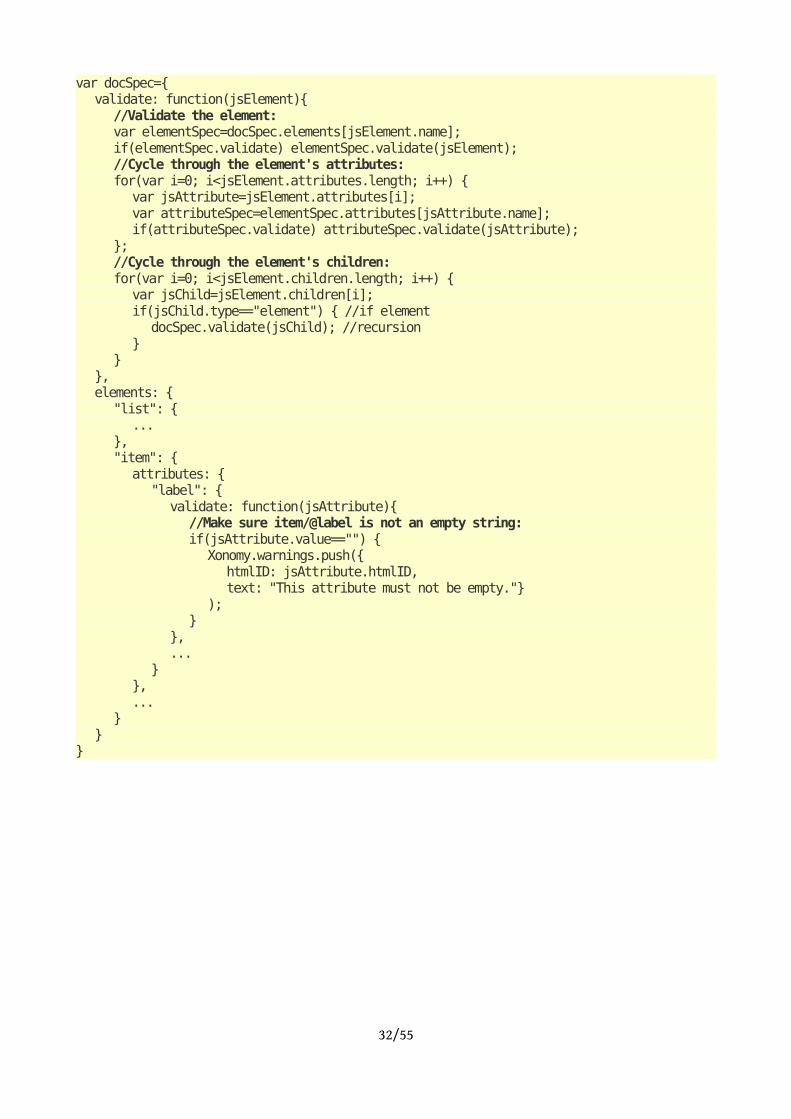
var docSpec={validate: function(jsElement){
//Validate the element:var elementSpec=docSpec.elements[jsElement.name];if(elementSpec.validate) elementSpec.validate(jsElement);//Cycle through the element's attributes:for(var i=0; i<jsElement.attributes.length; i++) {
var jsAttribute=jsElement.attributes[i];var attributeSpec=elementSpec.attributes[jsAttribute.name];if(attributeSpec.validate) attributeSpec.validate(jsAttribute);
};//Cycle through the element's children:for(var i=0; i<jsElement.children.length; i++) {
var jsChild=jsElement.children[i];if(jsChild.type=="element") { //if element
docSpec.validate(jsChild); //recursion}
}},elements: {
"list": {...
},"item": {
attributes: {"label": {
validate: function(jsAttribute){//Make sure item/@label is not an empty string:if(jsAttribute.value=="") {
Xonomy.warnings.push({htmlID: jsAttribute.htmlID,text: "This attribute must not be empty."}
);}
},...
}},...
}}
}
32/55

10. Working with surrogate objectsSurrogate objects are JavaScript objects that Xonomy passes as arguments to certain functions. You have seen them mentioned several times in this document, last but not least in the chapter on validation (chapter 9). A surrogate object encapsulates the state of an element, attribute or text node at a moment in the lifetime of a document being edited in Xonomy. Surrogate objects are like objects in the XML document object model (DOM) but simpler and more geared towards the requirements of Xonomy. For example, the element <item label='one'/> will be represented by a surrogate object that looks like this:
{type: "element",name: "item",htmlID: "xonomy2",parent: function() {...},attributes: [{
type: "attribute",name: "label",value: "one",htmlID: "xonomy3",parent: function() {...}
}],children: []
}
10.1. The properties of a surrogate object
type
Who has it: elements, attributes, text nodes.
The string "element", "attribute" or "text" to tell you whether the surrrogate object represents an element, an attribute or a text node.
name
Who has it: elements, attributes.
The name of the element or attribute (a string).
value
Who has it: attributes, text nodes.
The value of the attribute, or the text of the text node (a string).
htmlID
Who has it: elements, attributes, text nodes.
The unique ID of the node (a string).
parent()
Who has it: elements, attributes, text nodes.
A function which returns a reference to the surrogate object that represents the current object’s parent. For elements and text nodes, this is the parent element. For attributes, this is the element that contains the attribute. For the document’s top-level element, this is null.
33/55

attributes
Who has it: elements.
An array of surrogate objects representing the attributes the element has. Can be an empty array.
children
Who has it: elements.
An array of surrogate objects representing the children the element has. A child is either an element or a text node. Can be an empty array.
hasAttribute(name)
Who has it: elements.
A function that returns true if the element has an attribute of that name.
getAttribute(name)
Who has it: elements.
A function that returns a surrogate object representing the attribute of that name, or null if there is no such attribute.
getAttributeValue(name, ifNull)
Who has it: elements.
A function that returns the value of the element’s attribute (as a string) . If no such attribute exists in the element, returns whatever ifNull is.
hasElements()
Who has it: elements.
A function that returns true if the element has at least one child element.
hasChildElement(name)
Who has it: elements.
A function that returns true if the element has at least one child element of that name.
getText()
Who has it: elements
A function that returns a concatenation of all descendant text nodes. Retuens an empty string if the element has no descendant text nodes.
getChildElements(name)
Who has it: elements.
A function that returns an array of element surrogate objects representing child elements of that name. The array is empty is the element has no children of that name.
getDescendantElements(name)
Who has it: elements.
A function that returns an array of element surrogate objects representing descendant elements
34/55

of that name. The array is empty is the element has no descendants of that name.
getPrecedingSibling()
Who has it: elements.
Returns a surrogate object representing the element’s preceding sibling (which is either an element or a text node) or null.
getFollowingSibling()
Who has it: elements.
Returns a surrogate object representing the element’s following sibling (which is either an element or a text node) or null.
setAttribute(name, value)
Who has it: elements.
Adds an attribute called name to the surrrogate object (it it doesn’t exist already) and sets its valueto value. Note that this affects only the surrogate object, not the XML document currently rendered in Xonomy.
jsElement.addText(txt)
Who has it: elements.
Appends a text node, with value txt, to the element’s children. Note that this affects only the surrogate object, not the XML document currently rendered in Xonomy.
10.2. Quick reference to surrogate objects
Element{
type: "element",name: "",htmlID: "",attributes: [{...}, {...}, ...],children: [{...}, {...}, ...],parent: function() {...},hasAttribute(name),
getAttribute(name),getAttributeValue(name, ifNull),getText(),hasElements(),hasChildElement(name),hasDescendantdElements(name),getPrecedingSibling(),getFollowingSibling(),setAttribute(name, value),addText(txt)
}
35/55
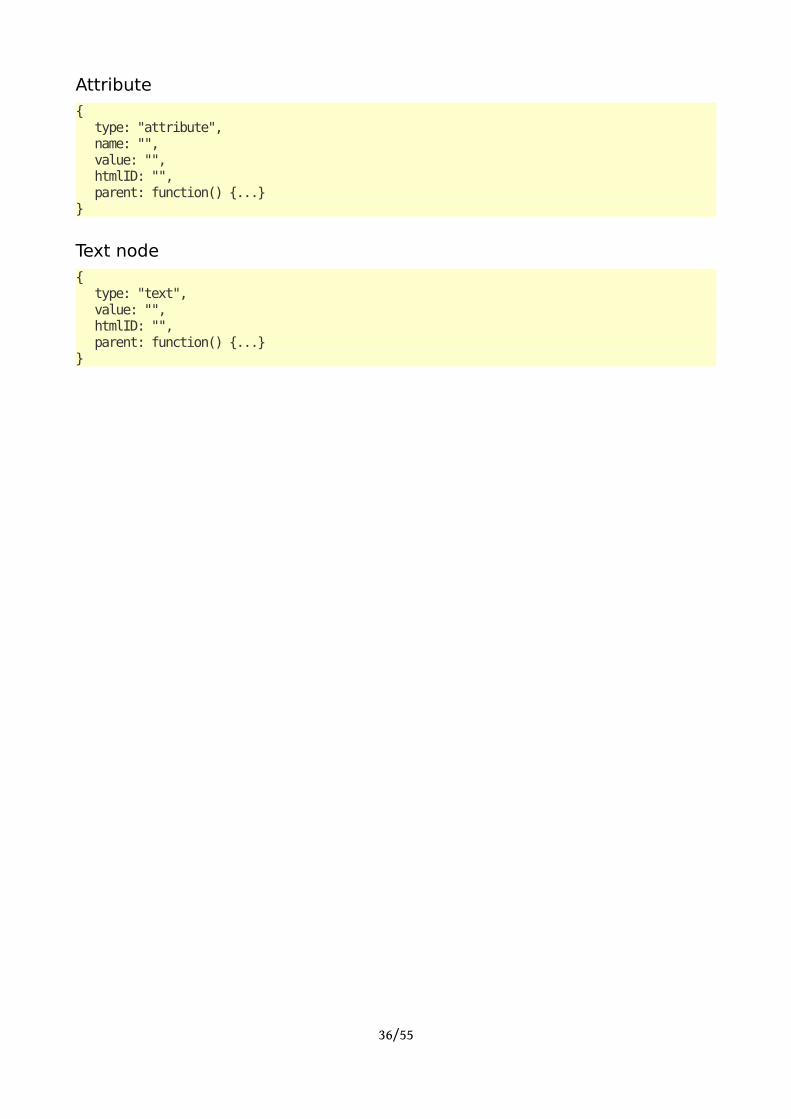
Attribute{
type: "attribute",name: "",value: "",htmlID: "",parent: function() {...}
}
Text node
{type: "text",value: "",htmlID: "",parent: function() {...}
}
36/55

11. Working with namespacesXonomy is able to work with XML documents that refer to namespaces. If an element or attribute name contains a namespace prefix, such as <mbm:list> the whole ‘local’ name is treated as an element name. In this example, the name of the element is "mbm:list" as far as Xonomy is concerned. Xonomy makes no effort to understand or analyze what the prefix "mbm:" means.
11.1. Namespaces in document specificationsThis means that you must use the whole ‘local’ name in your document specification.
var docSpec={elements: {
"mbm:list": {//...
}}
}
11.2. Rendering with namespacesEven though Xonomy pays no attention to what namespace prefixes mean, the XML parser that Xonomyuses internally does, and so you still need to declare namespaces properly in the XML-as-string you passto the Xonomy.render function. If you fail to declare what a namespace prefix means, the XML will fail to parse:
var xml="<mbm:list xmlns:mbm='http://lexiconista.com'><mbm:item label='one'/></mbm:list>";var editor=document.getElementById("editor");Xonomy.render(xml, editor, docSpec);
The same holds for the XML-as-string you pass to menu action functions such as Xonomy.newElementChild. Xonomy uses an XML parser internally to parse the XML as if it were a brand new document. Therefore, you need to declare all namespaces, even if they have been declared in your document before. This is what your menu items should look like:
{caption: "New <mbm:item>",action: Xonomy.newElementChild,actionParameter: "<mbm:item xmlns:mbm='http://lexiconista.com'/>"
}
Xonomy doesn’t show namespace declarations in the rendered document. The only reason you need to include them in your XML-as-string is to make sure the internal parser doesn’t fail.
11.3. Harvesting with namespacesXonomy remembers all the namespace declarations you’ve used in your XML-as-strings throughout the lifetime of the document, and adds them back to the document’s top-level element when you call Xonomy.harvest.
var xml=Xonomy.harvest();//xml=="<mbm:list xmlns:mbm='http://lexiconista.com'><mbm:item label='one'/></mbm:list>";
37/55

12. Serving users multilinguallyA Xonomy document specification typically contains some text in English or another human language which is displayed to the user at run time: menu captions, validation warnings and so on. But what should you do if you are building an application for several users, each of whom speaks a different language? No, you do not have to write a separate document specification for each language. Xonomy has a feature which allows you to write user-facing strings multilingually, and then decide at run time which language to display.
12.1. Multilingual stringsEverywhere in a document specification where you have a user-facing string of text, such as "Delete this attribute", you can replace it with a multilingual string which looks like this:
"en: Delete this attribute | de: Dieses Attribut entfernen"
Notice that the string consists of a series of pipe-separated sections, each of which begins with a language code, followed by a colon, followed by a string in that language. Any whitespace around the pipes and following the colons is optional. You can include arbitrarily many languages and you can use any language codes you want, including ones you’ve made up yourself:
"en: Delete this attribute | de: Dieses Attribut entfernen | ga: Scrios an aitreabúid seo | cs: Smazat tento atribut | pirate: Yarr, delete this scurvy dog!"
12.2. Where can I use multilingual strings?Multilingual strings can be used instead of ordinary strings everywhere in a Xonomy document specification where you have a user-facing string in a human language. There are four such places:
Menu item captionsThis includes captions for items in element menus, attribute menus and inline menus. Example:
var docSpec={elements: {
"p": {menu: [
{caption: "en: Add @id | ga: Cuir @id leis", action: Xonomy.newAttribute, actionParameter: {name: "id", value: ""}},{caption: "en: New <p> before this | ga: <p> nua roimhe seo", action: Xonomy.newElementBefore, actionParameter: "<p/>"},{caption: "en: New <p> after this | ga: <p> nua ina dhiaidh seo", action: Xonomy.newElementAfter, actionParameter: "<p/>"},{caption: "en: Delete | ga: Scrios", action: Xonomy.deleteElement}
],},
},};
Picklist item captions
As you know by now, the asker function Xonomy.askPicklist takes a parameter which contains an array of values and, optionally, user-friendly captions for those values. The captions can be multilingualstrings. Example:
38/55

var docSpec={elements: {
"article": {attributes: [
"language": {asker: Xonomy.askPicklist,askerParameter: [
{value: "en", caption: "en: English | de: Englisch | ga: Béarla"},{value: "ga", caption: "en: Irish | de: Irisch | ga: Gaeilge"},{value: "de", caption: "en: German | de: Deutsch | ga: Gearmáinis"},{value: "cs", caption: "en: Czech | de: Tschechisch | ga: Seicis"},
],},
],},
},};
Validation warningsAs you know by now, validation functions can attach a validation warning to a given element or attribute. The warning text can be a multilingual string. Example:
var docSpec={elements: {
"article": {attributes: [
"id": {validate: function(jsAttribute) {
if($.trim(jsAttribute.value)=="") {Xonomy.warnings.push({
htmlID: jsAttribute.htmlID,text: "en: The @id attribute must not be empty.
| de: Das Attribut @id darf nicht leer sein.",});return false;
}return true;
},},
],},
},};
Display names of elements and attributesIn element and attribte specifications, you can assign display names to elements and attributes, which are then dispayed by Xonomy instead of the element’s or attribute’s real name. These can be multilingual strings:
elements: {"customer": {
displayName: "en: customer | de: Kunde"}
}
39/55

12.3. Telling Xonomy which language to useAt run time, you can tell Xonomy which language to show to the user by setting the lang property of the Xonomy object:
Xonomy.lang="en";
This can be done before or after the initial rendering of the document, can be changed at any time and will affect the language of strings shown to the user from that point onwards.
If the required language is not available, Xonomy will show the entire multilingual string, pipes and all. For example, if you have the multilingual string "en: Delete | de: Entfernen" and Xonomy.lang is setto "fr", the entire string "en: Delete | de: Entfernen" will be shown. The default settings for Xonomy.lang is an empty string, meaning again that the entire multilingual string will be shown.
12.4. Using multilingual strings in your own applicationsIf you want to process Xonomy’s multilingual strings in your own applications, for example in your own asker functions, you can use the function Xonomy.textByLang(). This takes a multilingual string as argument and returns a string in the current language (as per Xonomy.lang). If the current language is not available in the multilingual string, then the function returns the whole multilingual string unchanged.
40/55

13. Using server-side dataThis chapter will explain what you need to know if you want to build an XML editing application where the values of attributes and elements refer to server-side data. You already know how to make it possible for your users to select attribute and element values from lists: you use asker functions such as Xonomy.askPicklist or Xonomy.askOpenPicklist for that (which are explained in Chapter 3) and the lists from which the user selects are hard-coded into the document specification. But let’s say you do not want to hard-code lists of metadata into the document specification, either because they would be too long, or because you would rather have a single copy of the list in some central location on your webserver instead of having to copy and paste it into every single document specification you write.
Luckily, Xonomy has features that support that scenario. There is an asker function called Xonomy.askRemote which, while looking more or less exactly like Xonomy.askPicklist to the user, loads the list of options from a URL. In addition, Xonomy also has a feature which lets you load captions,display names and things like that from the server. We will explain all that in this chapter.
13.1. Xonomy.askRemoteWhen using the Xonomy.askRemote asker function in the specification of an element or attribute, you need to give it a parameter which tells it which URL to go to to obtain the list:
asker: Xonomy.askRemote,askerParameter: {
url: "/cities.json",}
When the user clicks the value of an element or attribute to edit it, Xonomy will hit that URL (with a POST request) and it will expect to be sent back a JavaScript array of objects, the same kind of array thatXonomy.askPicklist takes. The array can be:
• an array of strings,["123", "456"]
• or an array of objects where each has a value and an explanatory caption,[{value: "123", caption: "Barcelona"}, {value: "456", caption: "Brno"}]
• or a combination of both.[{value: "123", caption: "Barcelona"}, "456"]
Objects inside the array can have a value, a caption, and optionally a displayValue. Once Xonomy has received this response from the external data source, it displays it in the asker pop-up box, just like Xonomy.askPicklist would. This may happen almost instantaneously or there may be a delay,
41/55

depending on how quickly your server is responding. While Xonomy is waiting for a response a spinningloader icon is displayed in the pop-up box.
Note that that URL you are hitting must be in the same domain as the rest of your application, in order to meet the same-origin requirement.
13.2. Searching server-side dataThe Xonomy.askRemote asker function can do more than just load a JavaScript array from a URL and display it. Some metadata lists can be so long that it isn’t practical to display them in their entirety. What you need in that situation is to be able to search or filter the list. To help you with that scenario, Xonomy.askRemote can optionally have a search box at the top of the menu. The user can type a piece of text into the box, Xonomy will send it back to the server as a search request, and receive a (hopefully shorter) list of items back. All you need to do is provide the server-side hookup to do the search. In the specification of your element or attribute you need to tell Xonomy which URL it should hit:
asker: Xonomy.askRemote,askerParameter: {
url: "/cities.json",searchUrl: "/cities.json?search=$",urlPlaceholder: "$",
}
When the user has typed something into the search box and clicked the search button (or pressed Enter in the search box), Xonomy will send a POST request to searchURL, replacing urlPlaceholder with the text the user has typed. It will expect to receive a response of the exact same type as before, an array of strings or objects with value and caption properties.
13.3. Creating new server-side dataAnother thing Xonomy.askRemote can do is let the user quickly create a item on the server. This will come in handy if the server-side list does not contain what the user wants. For example, let’s say you are using Xonomy.askRemote to let enter references to cities, and you have a list of cities in a database on your server, with unique IDs and names. Now a user wants to enter a reference to a city that doesn’t exist in your database yet. If you want, you can allow your users to create a new city there and then, justby clicking a button in the asker. All you need to do is provide a server-side hookup that does the actual database footwork. Then, in the specification of your element or attribute, you tell Xonomy where to find that hookup.
asker: Xonomy.askRemote,askerParameter: {
url: "/cities.json",searchUrl: "/cities.json?search=$",createUrl: "/newcity?name=$",urlPlaceholder: "$",
}
42/55
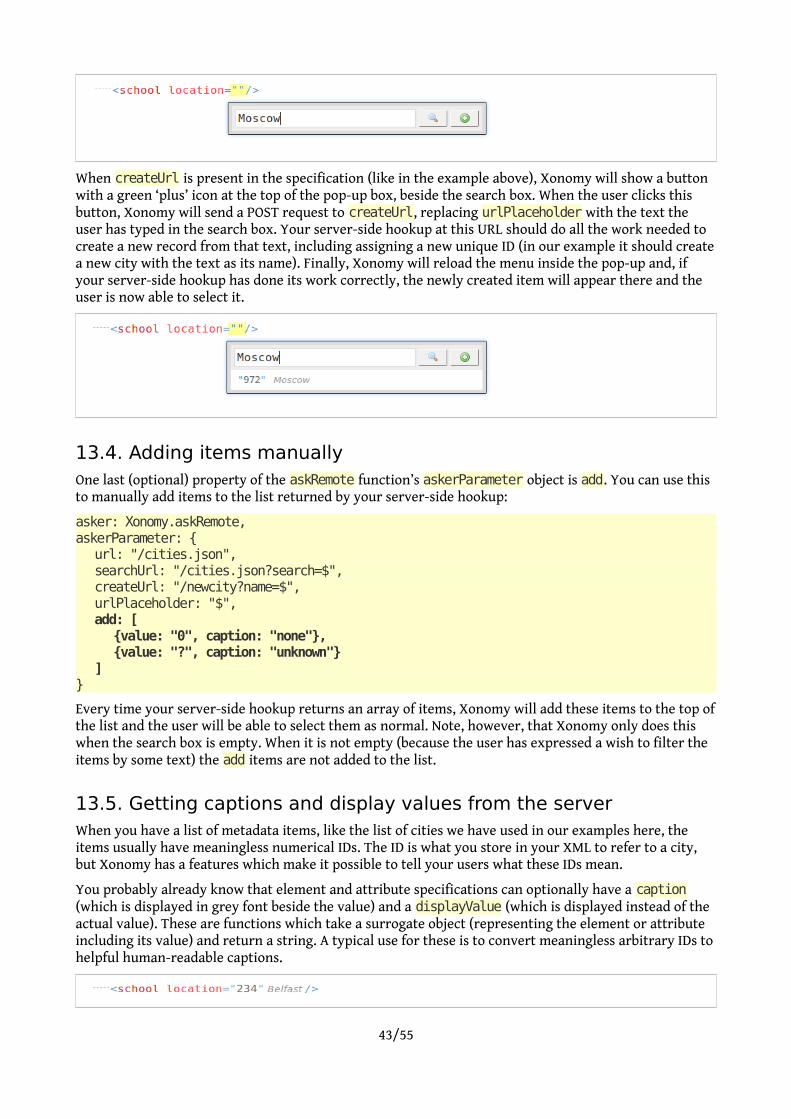
When createUrl is present in the specification (like in the example above), Xonomy will show a button with a green ‘plus’ icon at the top of the pop-up box, beside the search box. When the user clicks this button, Xonomy will send a POST request to createUrl, replacing urlPlaceholder with the text the user has typed in the search box. Your server-side hookup at this URL should do all the work needed to create a new record from that text, including assigning a new unique ID (in our example it should createa new city with the text as its name). Finally, Xonomy will reload the menu inside the pop-up and, if your server-side hookup has done its work correctly, the newly created item will appear there and the user is now able to select it.
13.4. Adding items manuallyOne last (optional) property of the askRemote function’s askerParameter object is add. You can use this to manually add items to the list returned by your server-side hookup:
asker: Xonomy.askRemote,askerParameter: {
url: "/cities.json",searchUrl: "/cities.json?search=$",createUrl: "/newcity?name=$",urlPlaceholder: "$",add: [
{value: "0", caption: "none"},{value: "?", caption: "unknown"}
]}
Every time your server-side hookup returns an array of items, Xonomy will add these items to the top ofthe list and the user will be able to select them as normal. Note, however, that Xonomy only does this when the search box is empty. When it is not empty (because the user has expressed a wish to filter the items by some text) the add items are not added to the list.
13.5. Getting captions and display values from the serverWhen you have a list of metadata items, like the list of cities we have used in our examples here, the items usually have meaningless numerical IDs. The ID is what you store in your XML to refer to a city, but Xonomy has a features which make it possible to tell your users what these IDs mean.
You probably already know that element and attribute specifications can optionally have a caption (which is displayed in grey font beside the value) and a displayValue (which is displayed instead of the actual value). These are functions which take a surrogate object (representing the element or attribute including its value) and return a string. A typical use for these is to convert meaningless arbitrary IDs tohelpful human-readable captions.
43/55
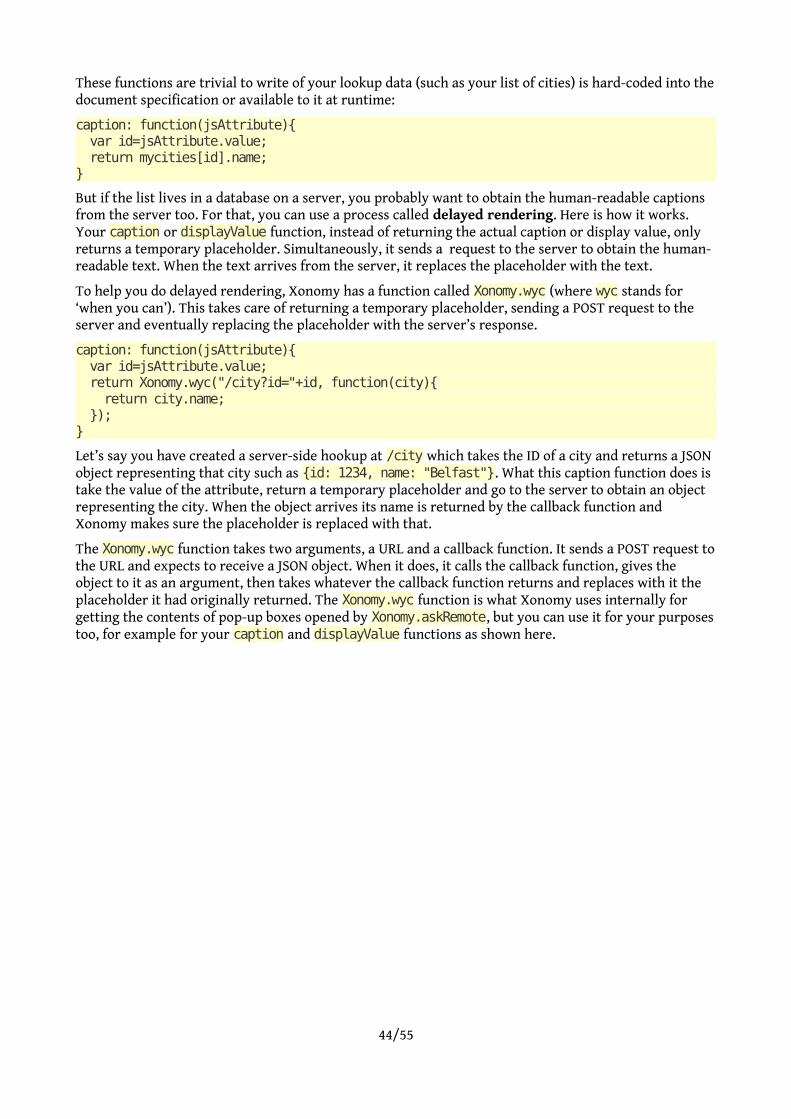
These functions are trivial to write of your lookup data (such as your list of cities) is hard-coded into thedocument specification or available to it at runtime:
caption: function(jsAttribute){ var id=jsAttribute.value; return mycities[id].name;}
But if the list lives in a database on a server, you probably want to obtain the human-readable captions from the server too. For that, you can use a process called delayed rendering. Here is how it works. Your caption or displayValue function, instead of returning the actual caption or display value, only returns a temporary placeholder. Simultaneously, it sends a request to the server to obtain the human-readable text. When the text arrives from the server, it replaces the placeholder with the text.
To help you do delayed rendering, Xonomy has a function called Xonomy.wyc (where wyc stands for ‘when you can’). This takes care of returning a temporary placeholder, sending a POST request to the server and eventually replacing the placeholder with the server’s response.
caption: function(jsAttribute){ var id=jsAttribute.value; return Xonomy.wyc("/city?id="+id, function(city){ return city.name; });}
Let’s say you have created a server-side hookup at /city which takes the ID of a city and returns a JSON object representing that city such as {id: 1234, name: "Belfast"}. What this caption function does is take the value of the attribute, return a temporary placeholder and go to the server to obtain an object representing the city. When the object arrives its name is returned by the callback function and Xonomy makes sure the placeholder is replaced with that.
The Xonomy.wyc function takes two arguments, a URL and a callback function. It sends a POST request tothe URL and expects to receive a JSON object. When it does, it calls the callback function, gives the object to it as an argument, then takes whatever the callback function returns and replaces with it the placeholder it had originally returned. The Xonomy.wyc function is what Xonomy uses internally for getting the contents of pop-up boxes opened by Xonomy.askRemote, but you can use it for your purposestoo, for example for your caption and displayValue functions as shown here.
44/55

14. Document specification reference
14.1. Document specificationvar docSpec={
elements: {"myElement": {...},"anotherElement": {...}
},unknownElement: {...},unknownAttribute: {...},onchange: function(){...},validate: function(jsTopElement){...},allowModeSwitching: true|false,onModeSwitch: function(mode){...},allowLayby: true|false,laybyMessage: "..."
}
elements: {...}
An associative array where the keys are the names of elements the document can contain and each value is an element specification. For details of what goes in an element specification see chapter 14.2.
Default: an empty object.
unknownElement: {...}unknownElement: function(elName) {return {...}}
Optional. A default element specification which Xonomy will use if the XML document contains anelement for which there is no specification in elements.
The value of this property can be an element specification, or a function which takes the element’s name and returns an element specification.
unknownAttribute: {...}unknownAttribute: function(elName, attrName) {return {...}}
Optional. A default attribute specification which Xonomy will use if an element in the XML document contains an attribute for which there is no specification in the element specification’s attributes property.
The value of this property can be an attribute specification, or a function which takes the element’s and attributes’s names and returns an attribute specification.
onchange: function() {...}
Xonomy calls this function each time the user has done something to the document, telling you that the document is now ‘dirty’.
If the node that has been changed is a text node, Xonomy passes an argument to the function. Theargument is a surrogate object that represent the text node that has been changed. You cna use this to quickly validate or clean up the text the user has entered without having to validate the entire document. If the node that has been changed is something other than a text node, no such argument is passed.
Default: a function that does nothing.
45/55
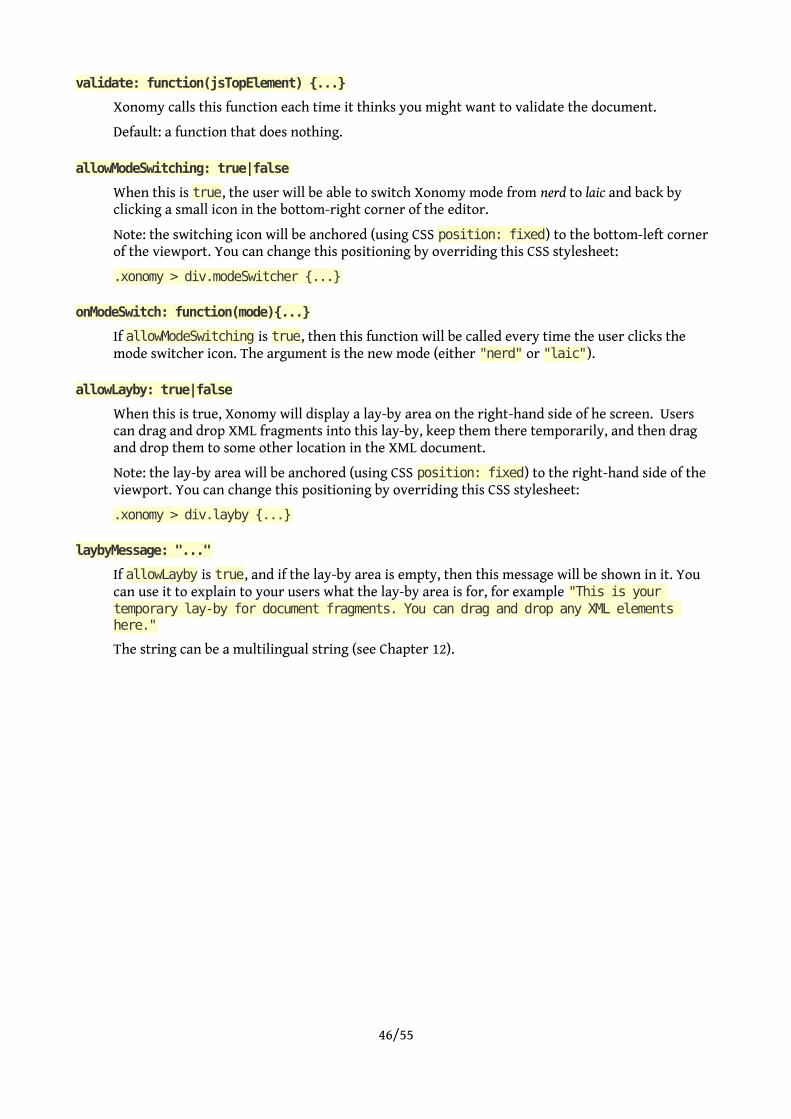
validate: function(jsTopElement) {...}
Xonomy calls this function each time it thinks you might want to validate the document.
Default: a function that does nothing.
allowModeSwitching: true|false
When this is true, the user will be able to switch Xonomy mode from nerd to laic and back by clicking a small icon in the bottom-right corner of the editor.
Note: the switching icon will be anchored (using CSS position: fixed) to the bottom-left corner of the viewport. You can change this positioning by overriding this CSS stylesheet:
.xonomy > div.modeSwitcher {...}
onModeSwitch: function(mode){...}
If allowModeSwitching is true, then this function will be called every time the user clicks the mode switcher icon. The argument is the new mode (either "nerd" or "laic").
allowLayby: true|false
When this is true, Xonomy will display a lay-by area on the right-hand side of he screen. Users can drag and drop XML fragments into this lay-by, keep them there temporarily, and then drag and drop them to some other location in the XML document.
Note: the lay-by area will be anchored (using CSS position: fixed) to the right-hand side of the viewport. You can change this positioning by overriding this CSS stylesheet:
.xonomy > div.layby {...}
laybyMessage: "..."
If allowLayby is true, and if the lay-by area is empty, then this message will be shown in it. You can use it to explain to your users what the lay-by area is for, for example "This is your temporary lay-by for document fragments. You can drag and drop any XML elements here."
The string can be a multilingual string (see Chapter 12).
46/55
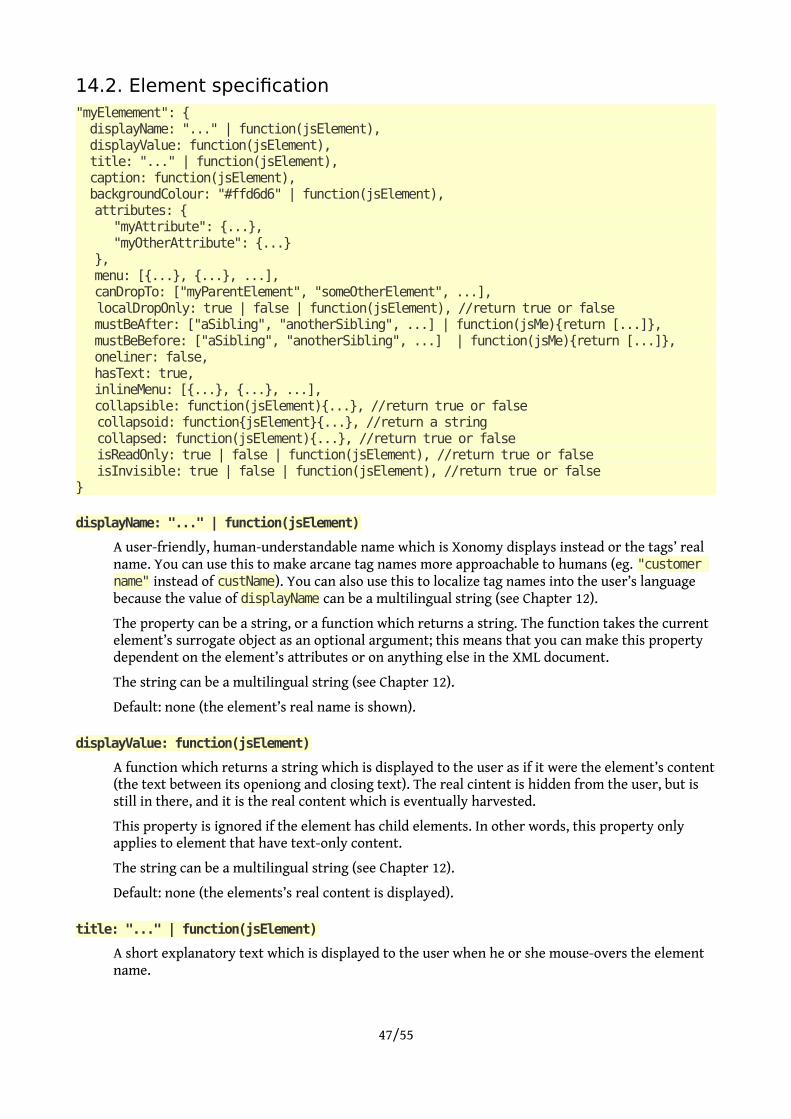
14.2. Element specification"myElemement": { displayName: "..." | function(jsElement), displayValue: function(jsElement), title: "..." | function(jsElement), caption: function(jsElement), backgroundColour: "#ffd6d6" | function(jsElement),
attributes: {"myAttribute": {...},"myOtherAttribute": {...}
}, menu: [{...}, {...}, ...],canDropTo: ["myParentElement", "someOtherElement", ...],
localDropOnly: true | false | function(jsElement), //return true or falsemustBeAfter: ["aSibling", "anotherSibling", ...] | function(jsMe){return [...]},mustBeBefore: ["aSibling", "anotherSibling", ...] | function(jsMe){return [...]},oneliner: false,hasText: true,inlineMenu: [{...}, {...}, ...],collapsible: function(jsElement){...}, //return true or false
collapsoid: function{jsElement}{...}, //return a string collapsed: function(jsElement){...}, //return true or false isReadOnly: true | false | function(jsElement), //return true or false isInvisible: true | false | function(jsElement), //return true or false}
displayName: "..." | function(jsElement)
A user-friendly, human-understandable name which is Xonomy displays instead or the tags’ real name. You can use this to make arcane tag names more approachable to humans (eg. "customer name" instead of custName). You can also use this to localize tag names into the user’s language because the value of displayName can be a multilingual string (see Chapter 12).
The property can be a string, or a function which returns a string. The function takes the current element’s surrogate object as an optional argument; this means that you can make this property dependent on the element’s attributes or on anything else in the XML document.
The string can be a multilingual string (see Chapter 12).
Default: none (the element’s real name is shown).
displayValue: function(jsElement)
A function which returns a string which is displayed to the user as if it were the element’s content(the text between its openiong and closing text). The real cintent is hidden from the user, but is still in there, and it is the real content which is eventually harvested.
This property is ignored if the element has child elements. In other words, this property only applies to element that have text-only content.
The string can be a multilingual string (see Chapter 12).
Default: none (the elements’s real content is displayed).
title: "..." | function(jsElement)
A short explanatory text which is displayed to the user when he or she mouse-overs the element name.
47/55

caption: function(jsElement)
A function which returns a string which is displayed to the user beside the element’s content, as an optional hint to explain the meaning of the content.
For oneliner elements (= elements whose element specification has the oneliner property set to true), the caption is displayed after the closing tag. For other elements the caption is displayed after the opening element.
The string can be a multilingual string (see Chapter 12).
Default: none (no hint is displayed).
backgroundColour: "#d6d6ff"backgroundColour: function(jsElement){return "#d6d6ff";}
A background colour which will be used to highlight the element. Specify the colour like you would in a CSS style. Only use light colours rather than dark ones to make sure you don’t disturb the visibility and legibility of element and attribute names overlaid on it. Also, remember that lessis more; when everything is highlighted nothing is highlighted!
The property can be a string, or a function which returns a string. The function takes the current element’s surrogate object as an optional argument; this means that you can make this property dependent on the element’s attributes or on anything else in the XML document.
Default: transparent background in ‘nerd’ mode, a light grey-ish tint in ‘laic’ mode.
Note
The property name is spelled the European way: ‘colour’ not ‘color’.
attributes: {...}
An associative array where the keys are the names of attributes the element can contain and each value is an attribute specification. For details of what goes in an attribute specification see chapter 14.3.
Default: an emty object.
menu: [{...}, {...}, ...]
An array of menu items for the menu that appears when the user clicks this element. For details of what goes in a menu item see chapter 14.4.
Default: an empty array.
canDropTo: ["myParentElement", "someOtherElement", ...]
An array of the names of elements that this element can be dragged-and-dropped to as (direct) child.
Default: an empty array.
localDropOnly: true | false | function(jsElement)
If the element is draggable (its specification’s canDropTo property is non-empty), and if localDropOnly is true, then the element can only be dragged and dropped inside its current parent; in other words, it cannot be moved out of its current parent.
Default: false.
The property can be a function which returns true or false. The function takes the current
48/55

element’s surrogate object as an optional argument; this means that you can make this property dependent on the element’s attributes or on anything else in the XML document.
mustBeAfter: ["aSibling", "anotherSibling", ...]mustBeAfter: function(jsMe){return ["aSibling", "anotherSibling", ...];}
An array of the names of elements who can never be following siblings of this element. This can be either a literal array, or a function which takes the element’s surrogate object and returns an array.
Default: an empty array.
mustBeBefore: ["aSibling", "anotherSibling", ...]mustBeBefore: function(jsMe){return ["aSibling", "anotherSibling", ...];}
An array of the names of elements who can never be preceding siblings of this element. This can be either a literal array, or a function which takes the element’s surrogate object and returns an array.
Default: an empty array.
oneliner: true|falseoneliner: function(jsElement){...}
Should this element be displayed inline, with the opening tag, the children and the closing tag in a single (possibly wrapped) line of text?
This can be either a true/false value, or a function that that returns such a value. If a function, then the function takes as its single argument a surrogate object representing the element.
Default: false.
hasText: true|falsehasText: function(jsElement){...}
Is this element allowed to have text nodes?
This can be either a true/false value, or a function that that returns such a value. If a function, then the function takes as its single argument a surrogate object representing the element.
Default: false.
inlineMenu: [{...}, {...}, ...]
An array of menu items for the menu when the user selects a stretch of text in a text node which is a direct child of this element. For details of what goes in a menu item see chapter 14.4.
Default: an empty array.
collapsible: true|falsecollapsible: function(jsElement){...}
Should it be possible to collapse this element? If true Xonomy displayes a plus/minus sign next toit, if false then not.
collapsed: true|falsecollapsed: function(jsElement){...}
If collapsible is true, should this element be collapsed when the document is first rendered? If collapsible is false then collapsed is ignored.
This can be either a true/false value, or a function that that returns such a value. If a function,
49/55
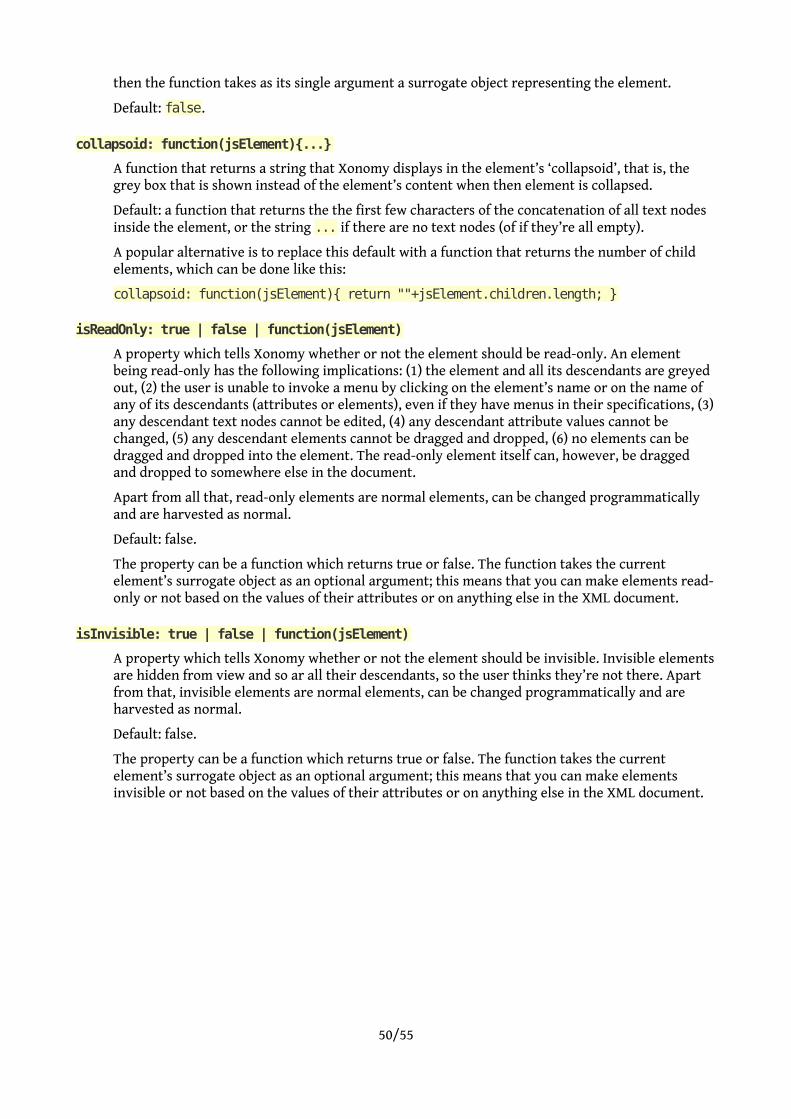
then the function takes as its single argument a surrogate object representing the element.
Default: false.
collapsoid: function(jsElement){...}
A function that returns a string that Xonomy displays in the element’s ‘collapsoid’, that is, the grey box that is shown instead of the element’s content when then element is collapsed.
Default: a function that returns the the first few characters of the concatenation of all text nodes inside the element, or the string ... if there are no text nodes (of if they’re all empty).
A popular alternative is to replace this default with a function that returns the number of child elements, which can be done like this:
collapsoid: function(jsElement){ return ""+jsElement.children.length; }
isReadOnly: true | false | function(jsElement)
A property which tells Xonomy whether or not the element should be read-only. An element being read-only has the following implications: (1) the element and all its descendants are greyed out, (2) the user is unable to invoke a menu by clicking on the element’s name or on the name of any of its descendants (attributes or elements), even if they have menus in their specifications, (3)any descendant text nodes cannot be edited, (4) any descendant attribute values cannot be changed, (5) any descendant elements cannot be dragged and dropped, (6) no elements can be dragged and dropped into the element. The read-only element itself can, however, be dragged and dropped to somewhere else in the document.
Apart from all that, read-only elements are normal elements, can be changed programmatically and are harvested as normal.
Default: false.
The property can be a function which returns true or false. The function takes the current element’s surrogate object as an optional argument; this means that you can make elements read-only or not based on the values of their attributes or on anything else in the XML document.
isInvisible: true | false | function(jsElement)
A property which tells Xonomy whether or not the element should be invisible. Invisible elementsare hidden from view and so ar all their descendants, so the user thinks they’re not there. Apart from that, invisible elements are normal elements, can be changed programmatically and are harvested as normal.
Default: false.
The property can be a function which returns true or false. The function takes the current element’s surrogate object as an optional argument; this means that you can make elements invisible or not based on the values of their attributes or on anything else in the XML document.
50/55

14.3. Attribute specification"myAttribute": { displayName: "..." | function(jsAttribute), displayValue: function(jsAttribute), title: "..." | function(jsAttribute), caption: function(jsAttribute),
asker: function(currentValue, askerParameter),askerParameter: {...},menu: [{...}, {...}, ...],
isReadOnly: true | false | function(jsAttribute), //return true or false isInvisible: true | false | function(jsAttribute), //return true or false shy: true | false | function(jsAttribute), //return true or false}
displayName: "..." | function(jsAttribute)
A user-friendly, human-understandable name which is Xonomy displays instead or the attribute’sreal name. You can use this to make arcane attribute names more approachable to humans (eg. "customer name" instead of custName). You can also use this to localize attribute names into the user’s language because the value of displayName can be a multilingual string (see Chapter 12).
The property can be a string, or a function which returns a string. The function takes the current attribute’s surrogate object as an optional argument; this means that you can make this property dependent on anything in the XML document.
The string can be a multilingual string (see Chapter 12).
Default: none (the attribute’s real name is shown).
title: "..." | function(jsAttribute)
A short explanatory text which is displayed to the user when he or she mouse-overs the attribute name.
displayValue: function(jsAttribute)
A function which returns a string which is displayed to the user as if it were the attribute’s value. The real value is hidden from the user, but is still in there, and it is the real value which is eventually harvested.
The string can be a multilingual string (see Chapter 12).
Default: none (the attribute’s real value is displayed).
caption: function(jsAttribute)
A function which returns a string which is displayed to the user beside the attribute’s value, as an optional hint to explain the meaning of the value.
The string can be a multilingual string (see Chapter 12).
Default: none (no hint is displayed).
asker: function(currentValue, askerParameter)
An asker function which renders the contents of the pop-up box where the user edits the value. You can use one of Xonomy’s prefabricated asker functions (see chapter 3 for a list of what’s available). A popular choice is Xonomy.askString which permits editing the value in a simple one-line textbox.
Default: a function that returns nothing, meaning the attribute cannot be edited (is read-only).
51/55

You can also assign your own asker function to this. If you are writing your own function, design it in such a way that it returns HTML-as-string and accepts two arguments: currentValue is the current value of the attribute (which must be a string and can be empty) and askerParameter is an optional arbitrary object which you can specify in the next property described below. For moredetails on editing attribute values, see chapter 3.
askerParameter: {...}
An arbitrary object to be passed to the attribute’s asker function.
Default: an empty object.
menu: [{...}, {...}, ...]
An array of menu items for the menu that appears when the user clicks this element. For details of what goes in a menu item see chapter 14.4.
Default: an empty array.
isReadOnly: true | false | function(jsAttribute)
A property which tells Xonomy whether or not the attribute should be read-only. Read-only attributes are greyed out, the user is unable to edit their values by clicking on them, and the user is unable to invoke a menu by clicking on the attribute’s name, even if the attribute has a menu inits specification. Apart from that, read-only attributes are normal attributes, can be changed programmatically and are harvested as normal.
Default: false.
The property can be a function which returns true or false. The function takes the current attribute’s surrogate object as an optional argument; this means that you can make attributes read-only or not based on their values or on anything else in the XML document.
isInvisible: true | false | function(jsAttribute)
A property which tells Xonomy whether or not the attribute should be invisible. Invisible attributes are hidden from view, so the user thinks they’re not there. Apart from that, invisible attributes are normal attributes, can be changed programmatically and are harvested as normal.
Default: false.
The property can be a function which returns true or false. The function takes the current attribute’s surrogate object as an optional argument; this means that you can make attributes invisible or not based on their values or on anything else in the XML document.
shy: true | false | function(jsAttribute)
A property which tells Xonomy whether or not the attribute is ‘shy’. A shy attribute is invisible, but its owner element is shown with an arrow which the user can click to display all shy elements.This is useful for dealing with elements that have lots of attributes.
Default: false.
The property can be a function which returns true or false. The function takes the current attribute’s surrogate object as an optional argument; this means that you can make the property dependent on the attribute’s value or on anything else in the XML document.
52/55

14.4. Menu item specification{
caption: "" | function(jsMe),icon: "image.png",action: function(htmlID, actionParameter),actionParameter: {...},hideIf: function(jsElement|jsAttribute)
}
caption: "" | function(jsMe)
A human-readable caption to appear on the menu, for example "Delete this attribute".
This property can be a string, or a function which takes a surrogate object representing the XML node the menu has been invoked on, and returns a string.
The string can be a multilingual string.
Default: the string "?".
icon: "image.png"
The icon property in a menu iem is optional and, when present, should contain a path to an icon which will be shown next to the caption. The path should be relative to the HTML page in which Xonomy is embedded.
The image can be any size but Xonomy will automatically resize icons to a maximum width of 20 pixels and a maximum height of 15 pixels.
action: function(htmlID, actionParameter)
A function representing the action that’s supposed to happen when the user clicks this menu item. It can be one of Xonomy’s prefabricated menu action functions (see chaper 4.2 for a list of what’s available) or you can write your own.
Default: a function that does nothing.
If you are writing your own, design the function in such a way that it takes two arguments: htmlID is the ID of the element or attribute the action is being applied to, and actionParameter isan optional arbitrary object which you can specify in the next property described below.
actionParameter: {...}
An arbitrary object to be passed to the menu action function.
Default: an empty object.
hideIf: function(jsElement|jsAttribute)
A function that returns true if the menu item is to be hidden, false if not. The argument passed to the function is either a surrogate element object or a surrogate attribute object, depending on what is being edited.
Default: a function that returns false.
53/55

15. Minor and experimental features
15.1. EventsWhen the user clicks the name of an element or an attribute, Xonomy emits the following events:
• xonomy-click-element
• xonomy-click-attribute
An application can listen for these events and handle them. In each case, a surrogate object corresponding to the element or attribute that has been clicked is passed on to the event handler as an argument.
Sample code:
$(document).on("xonomy-click-element", function(event, jsMe){ console.log(jsMe); });$(document).on("xonomy-click-attribute", function(event, jsMe){ console.log(jsMe); });
15.2. Keyboard navigationTo enable keyboard navigation in the XML document (and to save your users from carpal tunnel syndrome) call the function Xonomy.startKeyNav(). Yor users can then use the following keys to navigate around the XML document:
• The cursor keys (up, down, left, right) to move up and down, left and right between element names, attribute names, attribute values and text nodes.
• The Ctrl+left, Ctrl+right combinations to expand and contract elements that have a plus/minus next to them.
• The Ctrl+up, Ctrl+down combinations to scroll the XML document up and down if it is too long to fit in its vertical space and has a scrollbar.
• The Enter key to bring up a pop-up bubble containing a menu or the output of an asker function: same as a mouse click.
• The up and down keys to navigate pop-up menus.
• The Esc key to close a pop-up bubble.
• For text nodes that allow inline markup, the cursor keys can be used to navigate between the individual characters. When the text node is current, press the right key to go to the first character. Then you are inside the text node andyou can use the right and left keys to to move from character to character. Pressing the Enter key will have the same effect as clicking: the first Enter starts a selection, the second finishes it and opens an inline menu. To leave the text node, either go to the first/last character and press the right/left key again, or press the up or down key.
The Xonomy.startKeyNav() function takes two optional arguments:
• The first argument is a reference to the keyboard event catcher: a HTML element to which Xonomy should attach the keyboard event handler. If you leave this undefined, the default is thesame element as the editor you had passed to Xonomy.render(). If the XML editor is pretty much only thing on your HTML page then it’s a probably a good idea to simply pass the entire document here. If the keyboard event catcher is anything other than document, then keyboard navigation only works when the keyboard event catcher is focused.
54/55

• The second argument is a reference to the scrollable container: a HTML element which Xonomy should scroll up and down in response to the Ctrl+up, Ctrl+down keys. Again, the default is the editor itself.
The defaults only work if the XML document has been rendered already, so it is best you call Xonomy.startKeyNav() after Xonomy.render():
var editor=document.getElementById("editor");var container=document.getElementById("container");Xonomy.render(xml, editor, docSpec);Xonomy.startKeyNav(document, container);......<div id="container" style="height: 500px; overflow-x: scroll">
<div id="editor"></div></div>
Once keyboard navigation has been enabled it cannot be disabled (other than by reloading the page).
55/55