ASX: AZS 28 August 2013 PORPHYRY COPPER POTENTIAL IDENTIFIED

Building the AZS Day TankInsulation Comparison
Diagram “A” above demonstrates optimum insulation for an AZS furnace. Diagram “B” demonstrates adequate insulation but will have a cold face temperature of 367° F (a difference of almost 100° F). Over the long haul, this difference can significantly add to your fuel bill. Insulation is your friend.
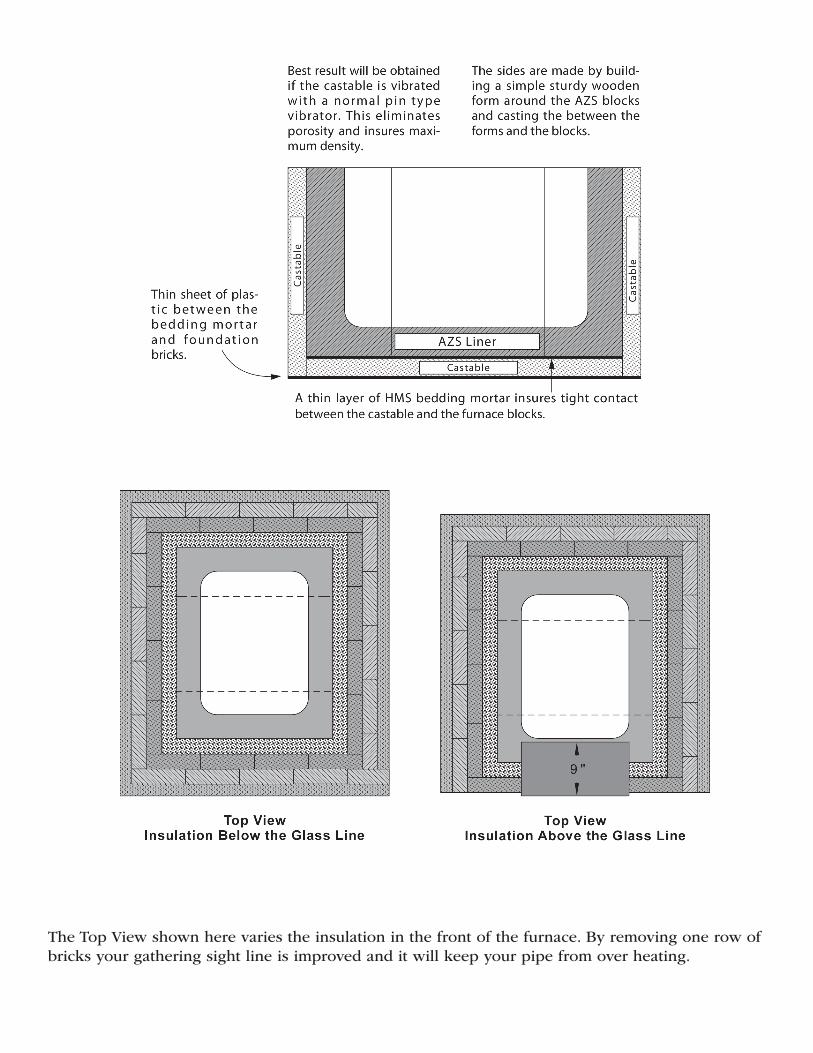
The Top View shown here varies the insulation in the front of the furnace. By removing one row of bricks your gathering sight line is improved and it will keep your pipe from over heating.
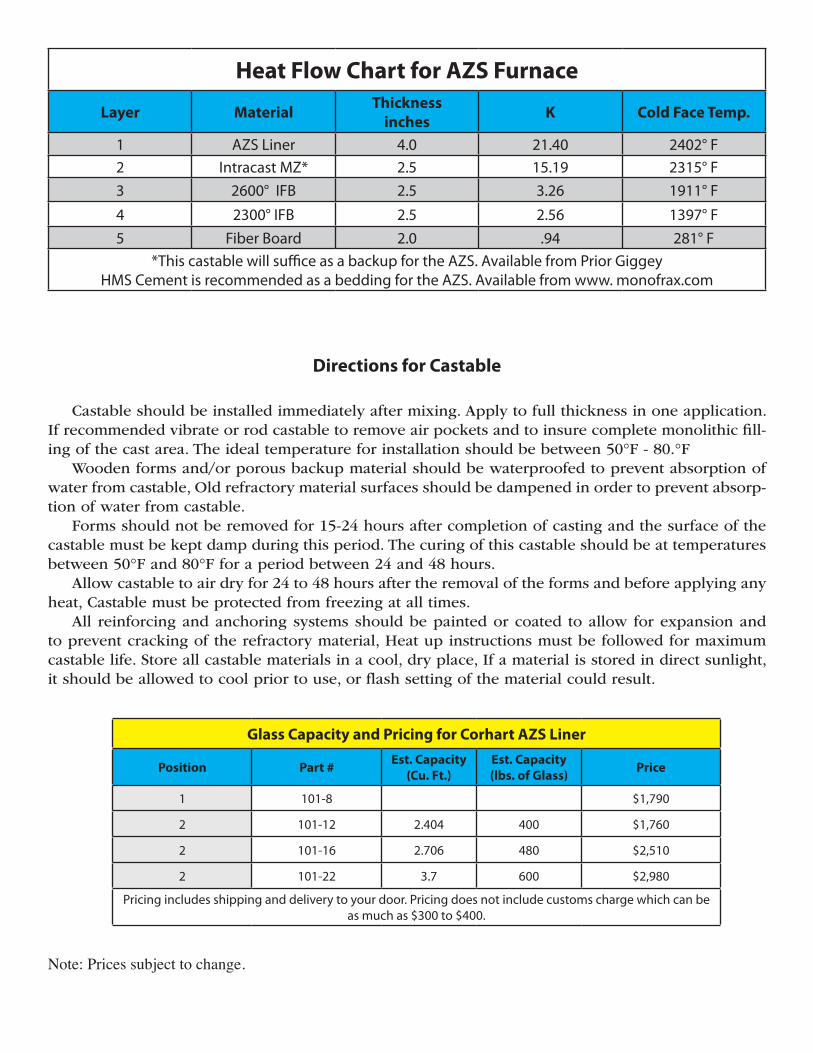
Heat Flow Chart for AZS Furnace
Layer Material Thicknessinches K Cold Face Temp.
1 AZS Liner 4.0 21.40 2402° F2 Intracast MZ* 2.5 15.19 2315° F3 2600° IFB 2.5 3.26 1911° F
4 2300° IFB 2.5 2.56 1397° F5 Fiber Board 2.0 .94 281° F
*This castable will suffice as a backup for the AZS. Available from Prior GiggeyHMS Cement is recommended as a bedding for the AZS. Available from www. monofrax.com
Castable should be installed immediately after mixing. Apply to full thickness in one application. If recommended vibrate or rod castable to remove air pockets and to insure complete monolithic fill-ing of the cast area. The ideal temperature for installation should be between 50°F - 80.°F
Wooden forms and/or porous backup material should be waterproofed to prevent absorption of water from castable, Old refractory material surfaces should be dampened in order to prevent absorp-tion of water from castable.
Forms should not be removed for 15-24 hours after completion of casting and the surface of the castable must be kept damp during this period. The curing of this castable should be at temperatures between 50°F and 80°F for a period between 24 and 48 hours.
Allow castable to air dry for 24 to 48 hours after the removal of the forms and before applying any heat, Castable must be protected from freezing at all times.
All reinforcing and anchoring systems should be painted or coated to allow for expansion and to prevent cracking of the refractory material, Heat up instructions must be followed for maximum castable life. Store all castable materials in a cool, dry place, If a material is stored in direct sunlight, it should be allowed to cool prior to use, or flash setting of the material could result.
Directions for Castable
Glass Capacity and Pricing for Corhart AZS Liner
Position Part # Est. Capacity(Cu. Ft.)
Est. Capacity(lbs. of Glass) Price
1 101-8 $1,790
2 101-12 2.404 400 $1,760
2 101-16 2.706 480 $2,510
2 101-22 3.7 600 $2,980
Pricing includes shipping and delivery to your door. Pricing does not include customs charge which can be as much as $300 to $400.
Note: Prices subject to change.

These photos might help in your understanding
how the AZS furnace gets put together.
This is the base brick configura-tion
This shows the plastic sheeting and form in place for the cast-able. I recommend securing the form better than what is shown. You do not want the form to shift. It is very important that it is square to the brick bed.
Here is what it looks like after being cast.
After the casting has set and the wooden mold is still in place spread the HMS cement in place and carefully place your blocks. Be very careful not to get any cement between the blocks. It takes some doing to get your blocks set correctly.