Building a Strong Vision for 1 to 1 Learning Program/2015 iPad... · ITUNES ... Building a Strong...
19
iPad User Information 2015 Building a Strong Vision for 1 to 1 Learning We value1 to 1 Learning as a vehicle to support teaching and enhance learning by a new generation of learners that requires connectedness, flexibility and portability.
-
Upload
truongkiet -
Category
Documents
-
view
214 -
download
2
Transcript of Building a Strong Vision for 1 to 1 Learning Program/2015 iPad... · ITUNES ... Building a Strong...
iPad User Information
2015
Building a Strong Vision for
1 to 1 Learning
We value1 to 1 Learning as
a vehicle to support
teaching and enhance
learning by a new
generation of learners that
requires connectedness,
flexibility and portability.

1 | P a g e
Table of Contents
RATIONALE ...................................................................................................................................... 2
GOALS.............................................................................................................................................. 2
OUTCOMES ..................................................................................................................................... 3
PROGRAM INFORMATION ............................................................................................................. 4
DEPLOYMENT ................................................................................................................................. 5
2015 ESSENTIAL APPS .................................................................................................................... 6
ITUNES ............................................................................................................................................ 7 Installing iTunes on Mac or PC .................................................................................................................................. 7
ITUNES STORE ................................................................................................................................. 8
Creating an account on iPad ..................................................................................................................................... 8
Creating an account on a computer ......................................................................................................................... 9
PURCHASING AND SEARCHING FOR APPS ..................................................................................... 9
Purchasing Apps using iPad ...................................................................................................................................... 9
Purchasing Apps using iTunes on PC or MAC ........................................................................................................... 9
IPAD BACKUP ................................................................................................................................ 10
Full iPad Backup ..................................................................................................................................................... 10
Sync your iPad with iTunes on your Wi-Fi enabled computer over Wi-Fi ………………………………………………………. . ..10
Sync your iPad with iTunes on your computer via cable connection……………………… ..………………………………..……..10
iCloud Backup ……………………………………………………………………………………………………………… .. ……………………………..…11
iCloud Backup for iWorks ....................................................................................................................................... 12
UPDATING ITUNES, IPAD & APPS .................................................................................................. 13
Update iPad software on iPad …………………………………………………………………………………… .. …………………………………..13
RESTORING IPAD VIA ITUNES … ................................................................................................ ….13
IPAD RESTRICTION SETTINGS …………………………………………………………………………………… ... …………14
PROCEDURES – CONFIGURING ACCOUNTS .………………………………………… ………………………………….15
Configure School Gmail Account ……………………………………………………………………………… ..………………..……….…………15
PROCEDURE – PRINTING
Printing a document at home ………………………………………………..………………………………… .……………………….…………….18

2 | P a g e
Rationale
Building a Strong Vision for 1 to 1 Learning
1 to 1 Learning is simply a process layered within our School’s Mission, Curriculum and
Technology visions. It is through a 1 to 1 program, that we will enact our Technology Vision
which is listed below and further expanded upon within our Technology Master Plan.
Technology Vision
The St Francis Xavier Catholic School community will be technologically literate, lifelong-
learners. The community will be empowered with knowledge, skills, processes and attitudes to
positively interact in an information and technology rich environment to achieve their goals.
They will be discerning users of technology and information resources, guided by the values of
Catholic Education.
Our purpose for supplying students in Year 6 with their own iPad is to provide additional ways
to support them in their life-long learning journey.
Goals
The integration of ICT into the curriculum at St Francis Xavier Catholic Primary School is valued
as a vehicle to support teaching and enhance learning for a new generation of learners that
requires connectedness, flexibility and portability. It requires adaptation of the traditional
pedagogies to meet their dynamic needs.
As a broad guide, we have the following goals for the iPad programme in 2012-15.
1. iPads will be used to facilitate learning by allowing students to:
access, use, create and publish digital and online information
develop knowledge, understanding and skills through creativity, critical thinking and problem-solving
collaborate with others
communicate, in a variety of ways, their knowledge and learning experiences.
2. Students will use the iPad as a tool to manage their work and learning.
3. Students will develop age-appropriate ICT skills and understandings, including the
responsibilities of online citizenship.
4. Students will accept responsibility for:
their personal actions when using ICT
the care and functionality of their iPad.

3 | P a g e
Outcomes
The iPad programme will provide a range of opportunities that both support and enhance
teaching and learning at our school.
Substitution
The iPad will allow practices or processes that substitute for other non-digital mechanisms,
including:
textbooks and class handouts available on iPad
note-taking and data collection
completion and submission of workbooks in PDF format
feedback on drafts emailed between teachers and students
Augmentation
The iPad will allow for augmented teaching and learning through:
internet research and communication
videos / animations that complement teaching
study / note-taking templates
persistent, instantaneous feedback on drafts /notes
extension / consolidation of maths concepts
Modification
The iPad will allow significant modification of teaching, learning and assessment via:
podcasting
collaborative, online brainstorming
multimodal assessment tasks.
Redefinition
The iPad will allow for the creation of new learning and presentation functions, breaking away
from traditional methods.
4 | P a g e
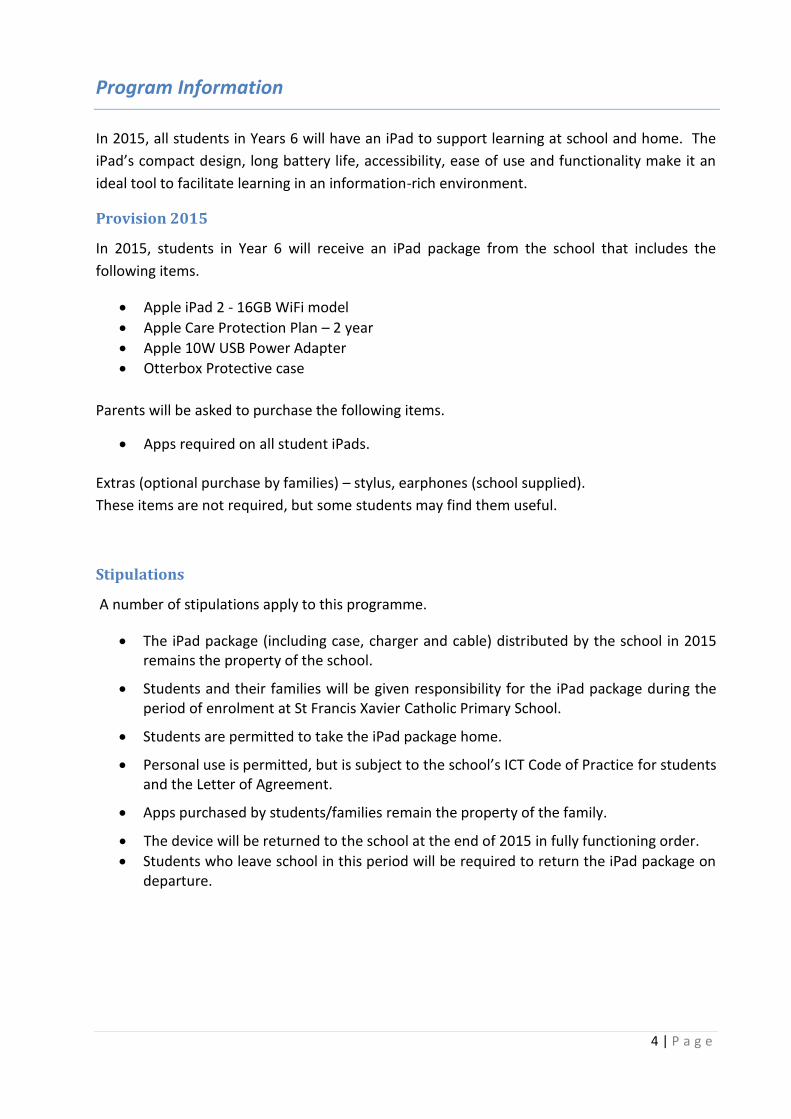
Program Information
In 2015, all students in Years 6 will have an iPad to support learning at school and home. The
iPad’s compact design, long battery life, accessibility, ease of use and functionality make it an
ideal tool to facilitate learning in an information-rich environment.
Provision 2015
In 2015, students in Year 6 will receive an iPad package from the school that includes the
following items.
Apple iPad 2 - 16GB WiFi model
Apple Care Protection Plan – 2 year
Apple 10W USB Power Adapter
Otterbox Protective case
Parents will be asked to purchase the following items.
Apps required on all student iPads.
Extras (optional purchase by families) – stylus, earphones (school supplied).
These items are not required, but some students may find them useful.
Stipulations
A number of stipulations apply to this programme.
The iPad package (including case, charger and cable) distributed by the school in 2015 remains the property of the school.
Students and their families will be given responsibility for the iPad package during the period of enrolment at St Francis Xavier Catholic Primary School.
Students are permitted to take the iPad package home.
Personal use is permitted, but is subject to the school’s ICT Code of Practice for students and the Letter of Agreement.
Apps purchased by students/families remain the property of the family.
The device will be returned to the school at the end of 2015 in fully functioning order.
Students who leave school in this period will be required to return the iPad package on departure.

5 | P a g e
Deployment
Students in Year 6, 2015 will receive their iPad packages during an ‘out-of-the-box’ evening. One
parent/carer will be asked to be present. During the session, parents and students will be provided with
modelling and steps of setting up the iPad at home. This information will be available in the
Parent/Student iPad Guidelines document.
During the ‘out-of the-box’ session, the Parent/Student iPad Agreement will be explained and the
signed agreement will need to be returned to the school by Friday 20thFebruary as well as the ICT Code
of Practice Letter of Agreement.
6 | P a g e
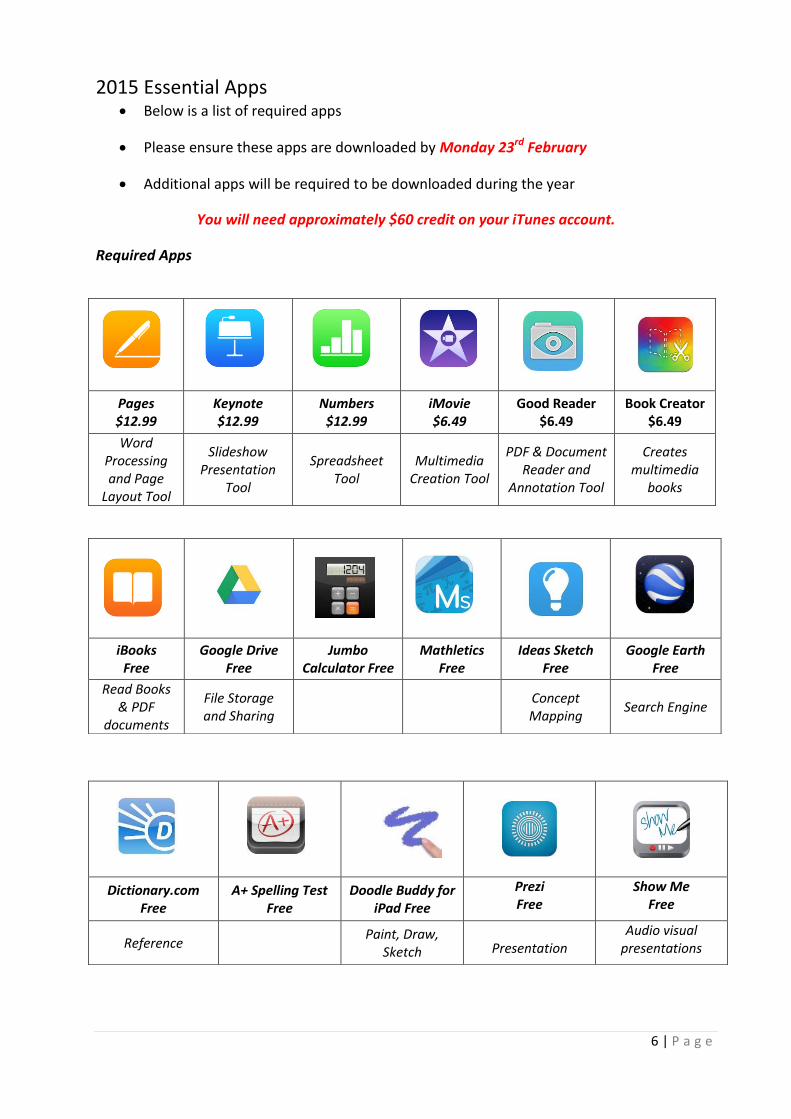
2015 Essential Apps Below is a list of required apps
Please ensure these apps are downloaded by Monday 23rd February
Additional apps will be required to be downloaded during the year
You will need approximately $60 credit on your iTunes account.
Required Apps
Pages $12.99
Keynote $12.99
Numbers $12.99
iMovie $6.49
Good Reader $6.49
Book Creator $6.49
Word Processing and Page
Layout Tool
Slideshow Presentation
Tool
Spreadsheet Tool
Multimedia Creation Tool
PDF & Document Reader and
Annotation Tool
Creates multimedia
books
iBooks Free
Google Drive Free
Jumbo Calculator Free
Mathletics Free
Ideas Sketch Free
Google Earth Free
Read Books & PDF
documents
File Storage and Sharing
Concept Mapping
Search Engine
Dictionary.com Free
A+ Spelling Test Free
Doodle Buddy for iPad Free
Prezi Free
Show Me Free
Reference Paint, Draw,
Sketch
Presentation
Audio visual presentations

7 | P a g e
Configuring iPad
Set up an iPad
To set up an iPad, turn it on and follow the Setup Assistant. The onscreen directions in Setup Assistant step you through the setup process, including:
• Connecting to a Wi-Fi network • Signing in with or creating a free Apple ID • Setting up iCloud • Turning on recommended features, such as Location Services and Find My iPad.
Presently iOS 8 is the most recent Apple operating system for the iPad. This guide is designed to assist in setting up your iPad and creating an iTunes Store Account (Apple ID).
iTunes
iTunes is a powerful application that is used to back-up, sync and transfer files from your computer to your iPad. It is also a storage area for all your content, giving you an easy and intuitive way to browse, search, and organise your audio and video content. It includes the iTunes Store, which is a place to find educational content that can be downloaded to a computer or the iPad. iTunes, is free for both Mac and PC. What can I do with iTunes?
With iTunes you can back up, sync, transfer files to your portable device as well as import, buy, organise, play, watch, and burn all your different media files.
Installing iTunes on Mac or Windows computer
1. Install iTunes (latest version is necessary) on Mac or Windows computer by visiting
http://www.apple.com/au/itunes/download/
2. Follow iTunes installation instructions as prompted during the installation process.
NB: PC User Advice
It is advised that you create a separate PC user account where you can download iTunes and
create a student-based iTunes account.

8 | P a g e
iTunes Store Account (Apple ID)
What is an Apple ID?
An Apple ID is the user name for a free account that lets you access Apple services, such as the iTunes Store, the App Store, and iCloud. You need only one Apple ID for everything you do with Apple. There may be charges for services and products that you use, purchase, or rent. If you have an Apple ID, use it when you first set up the iPad, and whenever you need to sign in to an Apple service. If you don’t already have an Apple ID, you can create one.
NOTE: As you must be at least 13 years old to create an Apple ID, do not enter the student’s date of birth.
Creating an Apple ID on an iPad (without adding credit card details)
1. Open the App Store on your device.
2. Find a free application on the App Store.
3. Important: Before proceeding to the next step, you must download and install the free
application by tapping Free followed by tapping Install.
4. Choose Create New Apple ID.
5. Choose the appropriate store by tapping on Store, and select Australia. Choose Next to
proceed.
6. The next screen will display the iTunes Store Terms and Conditions. After you've read through the Terms and Conditions tap Agree, located in the bottom right of the page. Then again when the confirmation appears.
7. Once you've agreed to the terms and conditions, you'll need to input a. Your preferred email address and password - the email address you provide
will be your new Apple ID. b. Answers to three security questions. NB: Make a note of these questions
and answers and keep in a safe place. c. Optional - Rescue email address. NB: It is recommended that you enter
another email address. If you forget your security question answers, Apple can use this optional email address to send you instructions on resetting your information.
d. An Apple user should be over 13 years of age. NB: Do not enter the student’s date of birth.
8. Tap Next.
9. Next, you'll be required to enter your billing information. Under Payment details enter either
a. None – if you do not have an iTunes Gift Card or b. Enter iTunes Gift Card redemption code
10. Once you've filled out all the fields for your billing information, tap Next.
11. A verification email will be sent to your email address. Follow the link in the verification
email to finish creating your Apple ID.
12. Tap Done to go to the App Store or iTunes Store to begin browsing the store.
9 | P a g e
Creating an Apple ID using iTunes on a computer
1. Open iTunes.
2. Choose iTunes Store from the menu bar.
3. Choose Account from the right hand menu
4. Choose Create ID and follow the on-screen instructions to set up your account.
Purchasing and Searching for Apps
Purchasing Apps using iPad
1. Choose the App Store app.
2. In Search Store Box (with magnifying symbol) type in App name, press Enter
3. Click on App required and choose Free or Buy App (under app icon)and Install
4. App will install on iPad.
5. Ensure you sync the iPad to iTunes at home to backup the app.
Purchasing Apps using iTunes on PC or Mac
1. Open iTunes
2. Go to iTunes Store on top menu bar
3. In Search Store Box (with magnifying symbol) type in App name, press Enter
4. Click on App required and choose Free or Buy App (under app icon)and Install
5. The App will download to the Library under the Apps heading (see left hand panel)
6. Sync iPad with iTunes –by connecting the iPad to the computer.
7. In Devices, choose your iPad and click Sync.
10 | P a g e
iPad Backup
iCloud automatically backs-ups your iPad across all your iOS (iPad/iPhone etc.) devices with the same Apple ID. Cloud automatically backs up the most important data on your device using iOS 5 or later.
Once you have enabled Backup on your iPad, in Settings > iCloud > Backup & Storage, it will run on a daily basis as long as your device:
is connected to Internet over Wi-Fi is connected to a power source has the screen locked
You can also back up manually whenever your device is connected to Internet over Wi-Fi by
choosing Back Up Now from Settings > iCloud > Storage & Backup.
Due to the bandwidth restrictions imposed at the school, students should NOT enable iCloud Backup.
ICloud Backup should be enabled for Pages, Keynote, Numbers and Photo Stream (see below
for detailed instructions)
IPAD BACKUP PROCEDURE
Students are required to perform a full backup of their iPad at home each week. There are
three options to achieve a full iPad backup:
1. Sync your iPad with iTunes on your computer via cable connection 2. Sync your iPad with iTunes on your Wi-Fi enabled computer over Wi-Fi 3. Backup using iCloud.
We recommend you use options 1 or 2 to perform a full backup of your iPad.
Option 1
Sync your iPad with iTunes on your computer via cable connection
4. Open iTunes on your computer 5. Plug cable into your iPad and computer 6. Sync process will begin

11 | P a g e
Option2
Sync your iPad with iTunes on your Wi-Fi enabled computer over Wi-Fi
With iOS 7 or later it is possible to synchronise your iPad over Wi-Fi, meaning that you
are no longer required to plug your iPad into your computer to make it back up. It is
highly recommended that this is set up on your iPad so it backs itself up on a weekly
basis.
Set up
Note: In order for this to work, you need to be aware that the computer needs to be switched on and connected to your WiFi network, logged in and iTunes must be running.
1. With your iPad plugged into your computer, select your iPad and on the Summary
tab, then select “Back-up to this Computer” followed by ‘Sync with this iPad over
Wi-Fi’
2. Check to ensure that you are not preventing your iPad from syncing from iTunes.
This can be found under Edit -> Preferences -> Devices -> Prevent iPods, iPhones and
iPads from syncing automatically. There should be no tick in this box.
3. Sync (bottom right) your iPad then disconnect from the computer.
4. Shut down iTunes.
5. Open iTunes again and wait a few minutes, do not reconnect your iPad.
6. You should see your iPad appear under Devices (left side), if so your iPad is
connected to iTunes over WiFi.
7. In iTunes right click on your iPad, which will bring up the below sub menu.
8. Select from one of the options:
a. Sync- transfers changed content on the iPad into your iTunes library.
b. Transfer Purchases - moves purchased apps, songs, videos etc. from your
iPad to a folder on your computer.
c. Back Up- creates a copy of everything on your device and stores it in a folder
on your computer.
An alternate method (Which does require your device to be plugged into power) is to
select on the iPad - Settings -> General -> iTunes Wi-Fi Sync -> Sync Now. (Only active
when plugged into power and iTunes is running or the above steps have been
performed)
Option 3
iCloud Backup
Due to the bandwidth restrictions imposed at the school, students must NOT turn on iCloud Backup.
As iOS 7 and later integrates with iCloud, the iPad can be fully backed up to iCloud.

12 | P a g e
Turn off iCloud Backup
On iPad, choose Settings
In the left hand menu choose iCloud
Choose Storage & Backup
iCloud Backup – OFF
iCLOUD BACKUP FOR iWORKS SUITE – Pages / Keynote / Numbers
iCloud automatically stores your iWork for iOS documents and keeps them up to date across all your iOS devices and your computer by using www.icloud.com/iwork .
iCloud can be used at the school and home to automatically back up your Pages, Numbers and Keynote presentations (this is different to performing a full backup to iCloud).
1. On iPad, tap Settings, then iCloud
2. Enter iCloud account details. If you have not set-up iCloud, enter your Apple
ID and password and follow the prompts on the screen.
3. Turn Documents & Data – ON.
4. Turn Photos – ON
5. Documents and data from Keynote, Pages and numbers will sync to
www.icloud.com/iwork.
ACCESSING iCLOUD DOCUMENTS on my iPad or my computer
1. Go to www.icloud.com/iwork, login with your Apple iTunes Username and password and select iWorks.
2. On a Mac or PC, you can download your Pages, Numbers or Keynote documents in iWork ’09, Microsoft Office, or PDF format.
3. You can also upload your iWork ’09 or Microsoft Office documents from your Mac or PC by dragging and dropping them to icloud.com/iwork; the documents will automatically appear on your iPad.
Note: You cannot download a document from icloud.com to your Mac or Windows computer until the document has been previously opened on the iPad.
Note: For changes made to iWork documents on your computer to appear on your iPad device, you must upload the updated document(s) to icloud.com/iwork using your computer’s web browser.

13 | P a g e
Updating iTunes, iPad Software and Apps
Students must ensure the iPad software and Apps are kept up to date via the App Store on their iPad or
through iTunes.
** It is important that you have backed up your iPad BEFORE you upgrade. If you have any issues with
the upgrade process, the backup will allow you to restore your settings without issue.
Update iPad Software using your iPad
To upgrade using this method, select General -> Software update ->iOS 8 - Download and Install
iOS 8 will then download and update your iPad automatically. This will take a while to complete. Your
iPad will restart and require you to continue the update process.
Any iOS software or app updates MUST to downloaded at home and not school due to our
bandwidth restrictions.
Restoring iPad via iTunes
1. Plug iPad into the computer you used to back up the iPad.
2. From within iTunes, right click the iPad and select 'Restore from Backup'.
3. Select the backup by the iPad name and then ensure you are restoring from the latest
backup.
4. Leave the iPad plugged in and let the process complete. This can take a while and your
iPad may restart more than once.
5. After this has completed, you will need to add the apps back to your iPad. Select them
to reinstall. (If you haven't got the apps on your computer, you are able to log into the
iTunes store using the original account name you previously noted. You are then able to
re-download the Apps. Don't worry if it looks like you need to pay for them again. The
Account has a record of the apps you have purchased and it will not charge you to
download them again.)
6. Everything should be restored the way you had it before, with the exception of some
iBooks. You may need to send these to your device again.

14 | P a g e
iPad Restriction Settings
School iPad Restrictions
For the safe use and suitability for students, the iPad has the following content restrictions
enabled which have been passcoded to prevent removal.
Allowed Content –
Ratings for Australia
Music, Podcasts & iTunes U – Clean
Movies – PG
TV Shows – PG
Books - Restricted
Apps – 9+
Twitter, Facebook & Advertising – prevents other apps from using accounts
Multiplayer Games - OFF
Adding Friends – OFF
If the iPad has been restored, it must be brought to the IT Department for reinstatement of the
restricted content.

15 | P a g e
Procedure
Configure School GMail Account
1. Tap SETTINGS
2. Choose ADD ACCOUNT
3. Choose MICROSOFT EXCHANGE
4. SCHOOL GMAIL DETAILS
a. Enter your school email address eg.
b. Enter your email password.
c. Ensure you have entered all details
correctly.
d. Enter Description: School Gmail
e. Select “Next”.
16 | P a g e
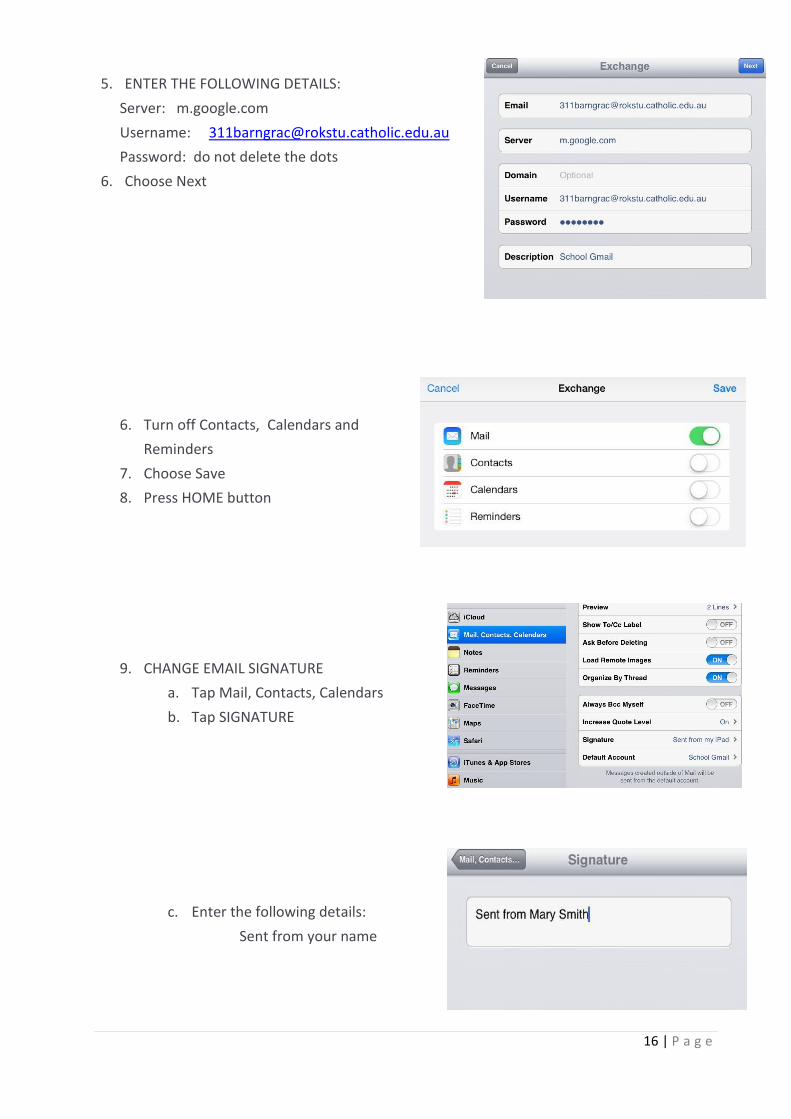
5. ENTER THE FOLLOWING DETAILS:
Server: m.google.com
Username: [email protected]
Password: do not delete the dots
6. Choose Next
6. Turn off Contacts, Calendars and
Reminders
7. Choose Save
8. Press HOME button
9. CHANGE EMAIL SIGNATURE
a. Tap Mail, Contacts, Calendars
b. Tap SIGNATURE
c. Enter the following details:
Sent from your name

17 | P a g e
10. CHANGE MAIL DAYS TO SYNC
a. In Mail, Contacts, Calendars - Accounts
Choose School Gmail
b. Change the “Mail Days to Sync” to 1 month
11. Press HOME button.
12. Select the Mail App on iPad and check to see if the Inbox appears.
18 | P a g e
Procedure
Printing a document at home
There are three methods of printing a document at home outlined below.
1. Email the document to your school email account
2. Access the document via Google Drive
3. For iOS suite documents (Pages, Keynote & Numbers) – access the document via iCloud.
Email Document
1. On your iPad, email the document you want to print to your school email account. Choose the
document format which is compatible with software on the computer you will use to access the
document.
Eg. Email document in WORD format if computer has MS Office installed on PC or
MSOffice for MAC (Macintosh). Email document in PAGES format for Macintosh
computer.
2. Log in to your school Gmail account –
a. Go to www.google.com – Choose Sign In and enter your school Gmail account details.
3. Download the document, edit if necessary and print.
Print via Google Drive
1. On your iPad, upload the document you want to print to your Google Drive. Choose the
document format which is compatible with software on the computer you will use to access the
document.
Eg. The document should be in WORD format if the computer has MS Office installed
on PC or MSOffice for MAC (Macintosh). Use PAGES format for Macintosh computer.
2. Log in to your Google Drive account on any computer connected to a printer using the following
URL.
URL: www.google.com
Eg.Login details
Username: school email address
Password: school email password
3. Download the document, edit if necessary and print.
Print via iCloud –
This option works only if the iWorks suite of apps (Pages, Keynote & Numbers) is turned on in
iCloud.
1. Sign in to your iCloud account on any computer connected to a printer using the following URL.
URL: icloud.com/iWorks
Eg. Login details
Username: your Apple ID
Password: ………..
2. Download the document, edit if necessary and print.