Build a better betty - FineScale Modeler/media/import/files/pdf/c/6/c/tamiya_japanese... · Build a...
5
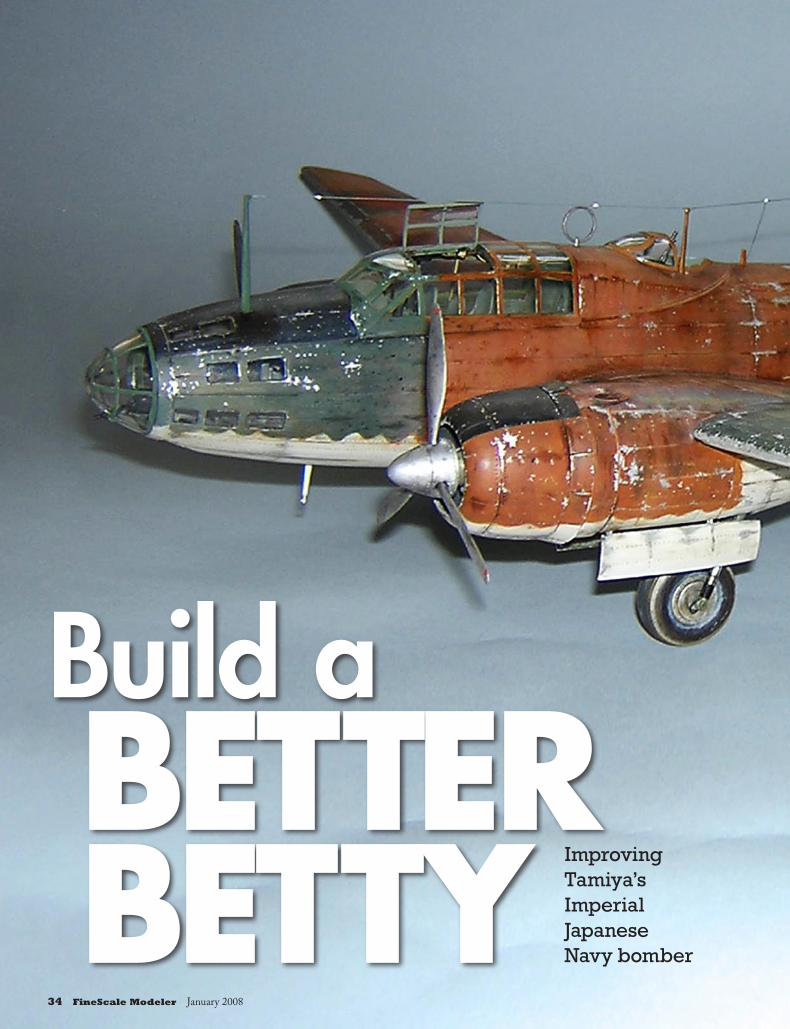
34 FineScale Modeler January 2008 Build a BETTER BETTY Improving Tamiya’s Imperial Japanese Navy bomber
Transcript of Build a better betty - FineScale Modeler/media/import/files/pdf/c/6/c/tamiya_japanese... · Build a...
34 FineScale Modeler January 2008 January 2008 www.FineScale.com 3534 FineScale Modeler January 2008 January 2008 www.FineScale.com 35
Build a better betty
Improving Tamiya’s Imperial Japanese Navy bomber

34 FineScale Modeler January 2008 January 2008 www.FineScale.com 3534 FineScale Modeler January 2008 January 2008 www.FineScale.com 35
1/ 48 Scale | Aircraft | How-to
As the tide of war changed, Japan’s aircraft received little cosmetic work, and their finishes weathered rapidly and dramatically.
better betty
To World War II’s Allies, the Mitsubishi G4M had an offi-cial and decidedly nonthreat-ening code name: “Betty.” But as the war wore on, the prewar
bomber’s design flaws earned it a much more chilling nickname, “the flying lighter.” The bomber was critically lacking in two areas: It had little defensive armament and almost no armor around its fuel tanks. A well-armed Allied fighter could turn the aircraft into a fireball with little effort. Although it first
flew in late 1939, the Betty remained in ser-vice throughout the war. Japan’s Naval Commander in Chief Admiral Isoruku Yamamoto was killed while aboard a Betty in April, 1943, and many Bettys were lost during the Battle of the Phillipine Sea in mid-1944, in the “Marianas Turkey Shoot.” The U.S. Navy’s newer fighters, better-trained pilots, and radar-coordinated patrols easily bested the inexperienced Japanese crews who were saddled with obsolete air-craft like the Betty.
By Carmine Mari

36 FineScale Modeler January 2008 January 2008 www.FineScale.com 3736 FineScale Modeler January 2008 January 2008 www.FineScale.com 37
Simple tools are all you need to produce a real-istically uneven stressed-metal finish on an air-craft model.
Carmine worked slowly and checked his prog-ress regularly as he worked.
Oxygen bottles, sheet-styrene junction boxes, and fine metal wire add life to the forward fuselage.
Carmine went the extra mile and wired all the gauges on the prominent instrument panel.
Plenty of workbench light makes It easier to gauge the effect you’re producing. Keep photo references handy, too.
Carmine improved the bombadier’s station with a new-and-improved seat and table.
The Betty has lots of cockpit glass, so added detail won’t go unnoticed. Carmine added wir-ing to the inside of the fuselage, along the framing.
After a little weathering and detail painting, the cockpit was complete and the fuselage was ready to close.
Why stop now? Carmine used his references to add detail to the landing-gear bays.
Giving the model’s engines and propellers a realistic bare-metal finish would be critical to the success of the completed model.
1 2 3
4 5 6
7 8 9
10Winsor & Newton oil paints helped add a little wear and tear.
Carmine applies the oil paint straight from the tube, using a fine-point brush.
1211

36 FineScale Modeler January 2008 January 2008 www.FineScale.com 3736 FineScale Modeler January 2008 January 2008 www.FineScale.com 37
External works Next to the Zero, the Betty is one of the most recognizable Japanese aircraft of WWII, and I’ve long wanted to add one to my collection. Tamiya’s 1/48 scale kit (No. 610490) is fantastically detailed, but I knew I could not only add a little detail, I could also use the Betty’s massive fuselage to as a canvas to simulate the subtle rip-ples and surface variations that are visible on a full-size aircraft’s aluminum skin.
Armed with a scalpel, 1, sandpaper, reference photos, and patience, I started digging, using the recessed panel lines as boundaries. Working slowly and checking my work often, the effect I was looking for slowly started to appear, 2.
Aside from patience and a few simple tools, make sure you have good photo-graphic references and at least one strong light source at your workbench, 3.
Interior detailsThe Tamiya kit is nicely detailed, but
with the Betty’s large canopy and many windows, I decided to add a few details here and there. First, I improved the bom-bardier’s station with a new seat and map table I made from sheet styrene, 4. A few scratchbuilt oxygen bottles and electrical junction boxes added detail, too, 5. Moving aft, I used copper wire to detail the instrument panel’s connections, 6. While I had the wire out, I added some to
the inside of the canopy, along the inside surface of the framing, 7.
When I was satisfied with the level of detail, I painted the interior, did a little detail painting, then closed the fuselage halves, 8.
Other details There’s plenty of detail opportunity out-side the aircraft, too. The landing gear bays are large, and it’s easy to add electri-cal wiring, hydraulic lines, and junction boxes here and there, 9.
The kit has two nicely represented Mitsubishi Kansei radial engines. After painting them with Humbrol metallic paint, all they needed was a dark wash, 10. I used a slightly different technique on the propellers, spinners, and the tor-pedo, however. After applying the part’s metallic finish and allowing it to cure for a few days, I weathered the parts with Winsor & Newton artist’s oil paint, 11.
The technique isn’t as difficult as it sounds. Using the tip of a fine-point brush, 12, I apply small amounts of oil paint (straight from the tube) to the parts. After it’s cured for a while, I used a larger, softer brush to remove and streak the oil paint across the surface, 13. With a little practice, the effect can produce subtle results on what would normally be a large, monochromatic objects, like the torpedo, 14. Artist’s oils have a nice long working
time, too, so there’s no need to rush.
The paintingI realize I’m in the modeling minority in that I normally brush-paint my models rather than airbrushing them. Not only do I simply enjoy working with paint and brush, I also enjoy preparing all the little jars of the different shades I’ll need, as well as the process of picking out the dif-ferent brushes I’ll need. Having used this method for years, I’m always pleased to see how my technique has evolved and improved from model to model. Of course, there are some practical reasons, too. A paint brush doesn’t fill the house with fumes like an airbrush would, which undoubtedly helps preserve my marital status!
To paint large surfaces (such as the fuselage or wings) with a brush, I prefer to use enamels instead of acrylics. The main reason is that enamels dry much more slowly than acrylics. This might initially seem like a drawback, but it’s actually a considerable advantage in that you can cover a large area in one sitting and the paint will remain workable. Enamels have a much larger “open time” before they start to dry.
For large areas, I use a flat brush with soft bristles. Thinning the paint properly is critical, too, and this is where my time practicing and experimenting pays off; I’ve
13Believe it or not, Carmine hand-painted the model’s fantastically weathered camouflage finish.
The identification bands on the tail and rear fuselage are hand-painted too, but Carmine masked them first.
The spinners are a good example of Carmine’s finely tuned weathering technique.
Even though it’s tucked up in the bomb bay, Carmine still detailed the Betty’s torpedo.
Using in-flight photos of operational Bettys, Carmine carefully varied the model’s camou-flage finish.
A round of silver paint helped represent areas where the camouflage had chipped away, revealing the aluminum skin underneath.
14
18
15
1716

developed a good feel for mixing the proper paint/thinner ratio for the effects and finishes I want to produce. (See, some parts of my method are just like airbrush-ing!)
Surface preparation is important, too. Just before I paint, I soak a cotton ball in alcohol and wipe down the model. This removes any stray dust or oils from my fingers.
A few simple rules make brush-paint-ing easier. One of the most important (especially with multicolor camouflage schemes) is planning the application sequence: Work your way through the scheme apply the lightest colors first and the darkest colors last.
When I paint, I gently support the brush and apply the paint slowly and evenly. It’s much better to apply multiple thin coats that to try and cover everything
with one thick pass. This is where patience plays a critical role. The first thin coat may not look very impressive, but as the color-builds up and the coats level out, you’ll be impressed with the changes. Normally light colors require more coats to cover properly; darker colors usually don’t require as many. It’s still best to apply multiple, thin layers, though, regardless of the paint’s color. Applying multiple coats makes it possible to vary the finish, too, to simulate wear and tear, 15.
My Betty doesn’t have many markings. I masked and painted the identification bands, 16, but the squadron codes are decals.
Finish After apply the decals and installing the last of the detail parts, I gave the model one last pass with highly thinned dillu-
tions of the camouflage colors. This helped fade the colors realistically and (seemingly) randomly. This is where it really pays to have reference photos handy, 17.Next, I used silver paint to simulate chipped paint. Toward the end of the war, aircraft like the Betty received little cos-metic work, and weathered rapidly in tropical climates. As such, I used quite a bit more silver paint than I usually do!The last step was to add some tiny stains, where fuel, oil, or hydraulic fluid might leak out.
In retrospect, I feel my Betty is an accurate representation of how an aircraft might have appeared in the brutal theater of the Pacific, as the tide of the second world war shifted toward its long-due final act. FSM
While Tamiya’s 1/48 scale kit is great straight from the box, Carmine found a few ways to make it even better.
19
38 FineScale Modeler January 2008