BRAIDING_Easy Styles for Everyone
175
-
Upload
marianthi00 -
Category
Documents
-
view
55 -
download
0
description
2001
Transcript of BRAIDING_Easy Styles for Everyone


BRAIDING

iiiAustralia Canada Mexico Singapore Spain United Kingdom United States

NOTICE TO THE READER
Publisher does not warrant or guarantee any of the products described herein or perform any independent analysis in connec-tion with any of the product information contained herein. Publisher does not assume, and expressly disclaims, any obligationto obtain and include information other than that provided to it by the manufacturer.The reader is expressly warned to consider and adopt all safety precautions that might be indicated by the activities herein andto avoid all potential hazards. By following the instructions contained herein, the reader willingly assumes all risks in connec-tion with such instructions.The Publisher makes no representation or warranties of any kind, including but not limited to, the warranties of fitness for par-ticular purpose or merchantability, nor are any such representations implied with respect to the material set forth herein, andthe publisher takes no responsibility with respect to such material. The publisher shall not be liable for any special, consequen-tial, or exemplary damages resulting, in whole or part, from the readers’ use of, or reliance upon, this material.
Delmar Staff:Business Unit Director: Susan L. SimpfenderferExecutive Editor: Marlene McHugh PrattAcquisitions Editor: Paul DrougasDevelopmental Editor: Patricia A. GillivanEditorial Assistant: Rebecca McCarthyExecutive Marketing Manager: Donna J. LewisChannel Manager: Wendy E. MapstoneExecutive Production Manager: Wendy A. Troeger
COPYRIGHT © 2002 Delmar, a division of Thomson Learning, Inc. Thomson Learning™ is a trademark used herein underlicense.
Printed in the United States of America1 2 3 4 5 6 7 8 9 10 XXX 06 05 04 03 02 01For more information, contact Delmar, 3 Columbia Circle, PO Box 15015, Albany, NY 12212-0515; or find us on the WorldWide Web at http://www.delmar.comInternational Division List
Asia:Thomson Learning60 Albert Street, #15-01Albert ComplexSingapore 189969Tel: 65 336 6411Fax: 65 336 7411Japan:Thomson LearningPalaceside Building 5F1-1-1 Hitotsubashi, Chiyoda-kuTokyo 100 0003 JapanTel: 813 5218 6544Fax: 813 5218 6551Australia/New Zealand:Nelson/Thomson Learning102 Dodds StreetSouth Melbourne, Victoria 3205AustraliaTel: 61 39 685 4111Fax: 61 39 685 4199UK/Europe/Middle East:Thomson LearningBerkshire House168-173 High Holborn
LondonWC1V 7AA United KingdomTel: 44 171 497 1422Fax: 44 171 497 1426Thomas Nelson & Sons LTDNelson HouseMayfield RoadWalton-on-ThamesKT 12 5PL United KingdomTel: 44 1932 2522111Fax: 44 1932 246574Latin America:Thomson LearningSeneca, 53Colonia Polanco11560 Mexico D.F. MexicoTel: 525-281-2906Fax: 525-281-2656South Africa:Thomson LearningZonnebloem BuildingConstantia Square526 Sixteenth RoadP.O. Box 2459Halfway House, 1685
South AfricaTel: 27 11 805 4819Fax: 27 11 805 3648Canada:Nelson/Thomson Learning1120 Birchmount RoadScarborough, OntarioCanada M1K 5G4Tel: 416-752-9100Fax: 416-752-8102Spain:Thomson LearningCalle Magallanes, 2528015-MADRIDESPANATel: 34 91 446 33 50Fax: 34 91 445 62 18International Headquarters:Thomson LearningInternational Division290 Harbor Drive, 2nd FloorStamford, CT 06902-7477Tel: 203-969-8700Fax: 203-969-8751
ALL RIGHTS RESERVED. No part of this work covered by the copyright hereon may be reproduced or used in any form orby any means—graphic, electronic, or mechanical, including photocopying, recording, taping, Web distribution or informa-tion storage and retrieval systems—without the written permission of the publisher.For permission to use material from this text or product contact us byTel (800) 730-2214Fax (800) 730-2215www.thomsonrights.comLibrary of Congress Cataloging-in-Publication DataBailey, Diane Carol.
Braiding : easy styles for everyone / Diane Carol Bailey, Jamie Rines Jones.p. cm. — (Personal care collection)
ISBN 0-7668-3764-51. Braids (Hairdressing) I. Jones, Jamie Rines. II. Title. III. Series.
TT975 .B35 2001646.7'24—dc21 2001037237

v
CHAPTER 1 Working with Long Hair ■ 1Shampooing and Brushing / 1Wet or Dry? / 1Tools of the Trade / 2Back-combing / 2Bobby Pins vs Hairpins / 3The Perfect Ponytail / 4Ponytail #1 / 4Ponytail #2 / 6Accessories / 8
CHAPTER 2 Long Hair Design ■ 11Introduction / 11Rope Ponytail and Chignon / 12Rope Braid / 17Two-Strand Twist / 26Two-Strand Twist with Ribbon / 38Two-Strand Ribbon Braid / 51Fishtail Ponytail / 60Fishtail/ 64French Braid / 71Dutch Braid / 80Twisting / 89Knotting / 96The Bow / 103The Bowtie / 109French Twist / 116
CHAPTER 3 Curls, Kinks, and Coils: Working with Texture ■ 123Introduction / 123Cornrows / 123Three-Strand Cornrow / 124Cornrows with Extension / 126
Contents

vi CONTENTS
Cornrow with Extension (Feed-in Method) / 127The Feed-in Method / 128Over-directing Braid Extension / 130Senegalese Twists / 131Diamond Casama Braids / 134Braid Tapering / 137Cornrows and Senegalese Twist (Combo) / 138Individual Braids / 143Individual Braid / 145Diva Crimps / 147Pixie Braids / 148Flat Twists / 151“Lin Twist”—Flat Twist with Lin / 152The African Kurl—Twist Out / 154African Kurl and Flat Twist “Sunburst” / 155Locks / 157Nubian Coils / 157Nubian Coils—Pre-locking Phase / 159African Locks / 160The Developmental Stages of Hair Locking / 161How to Cultivate and Groom Locks / 162Styling and Texturizing Locks / 162Materials for Extensions / 164
Index ■ 167

Working with Long Hair
SHAMPOOING AND BRUSHINGShampooing and brushing long hair requires special techniques that not only make it easierfor you but also cause less damage to long hair.
If you require a shampoo, use a gentle, all hair-type shampoo. With damaged or chemi-cally treated hair, a moisturizing shampoo should be used, followed by a weekly, deep pene-trating conditioner. There are several products available from professional haircare companies,and the choice is a matter of personal preference.
When shampooing your hair, apply shampoo to the scalp only, and then massage theentire scalp area using small circular motions. Now, rinse the hair while working the shampoothrough to the ends. This is usually all that’s required to cleanse the ends, since the primarygoal is to clean the scalp without tangling the ends of the hair. Following this shampooingtechnique will cut down on the time needed for detangling and combing the hair.
Towel blot the hair by placing the towel over sections of the hair. Start at the top andsqueeze as you work your way down. Do not rub. Rubbing will not remove excess water, butwill instead create matting of the ends.
Change the towel whenever it gets too wet. Expect to use several towels.At this point, a leave-in conditioner is strongly recommended. Use of this product will
make combing the hair much easier. It also helps hold moisture in the hair when the hair isexposed to the heat of the sun, or the cold, drying weather of winter.
To comb long hair, start at the ends and gently work out the tangles while moving up oneinch at a time. A large toothed, bone comb is effective in detangling the hair when it is wet. Ifthe hair is clean and dry, a large paddle brush works well. Use the same technique of starting atthe bottom and working up in 1" increments.
Now it’s time to dry the hair. If you use a blowdryer, run your fingers through the hairfrom the scalp to the ends while you dry. Always go in the direction of the cuticle layer, notagainst it. If you need to save some time, sit under a hairdryer for about 5 minutes to removeexcess water.
WET OR DRY?If possible, it is best to work with dry hair. The only exception would be if you wanted a stylethat wasn’t the best for your hair type. In this case, the hair requires dampening with waterfrom a spray bottle, and the addition of gel or mousse, to hold the hair in place.
Working with dry hair means you don’t have to walk around with wet hair. Also, as hairdries, it shrinks. If a braid is comfortable while the hair is wet, it will get tighter and uncom-fortable as the hair dries. This could cause a headache.
1
2 CHAPTER 1
Some people like to work with wet, gelled hair because it is easier to make it neat. This istrue only if you have not perfected a hand position that stops the hair from sliding as you workwith it. This hand technique will be discussed further in the book, and you will find that wethair is no longer required to achieve neatness.
TOOLS OF THE TRADEThere are only 2 tools needed to work with long hair. They are:
1. A large 11" tail comb.
2. A square paddle brush.
The large tail comb in 11" long and is made of bone with 1/4" of space between the teeth.It is used for detangling wet hair and for back-combing dry hair. The tail portion of this combis 6" long, which is required for making entire head sections. It is also long enough to hold allthe hair at one time.
The square, anti-static, paddle brush is perfect for long hair for 3 reasons: First, thesebrushes usually have flexible rubber bristles. If you are brushing the hair and come to a knot,the tips of the bristles will bend and release the hair rather than ripping through the knot,which causes breakage. Second, the rubber bristles are seated in a padded base, which giveswhen pressure is applied. This adds to the assurance that the hair is not damaged or broken.And finally, removing hair from the brush is easier than with other brushes.
These are the only tools necessary when creating the long hair designs you’ll find in thisbook. If you find other tools that work better for you, feel free to use them.
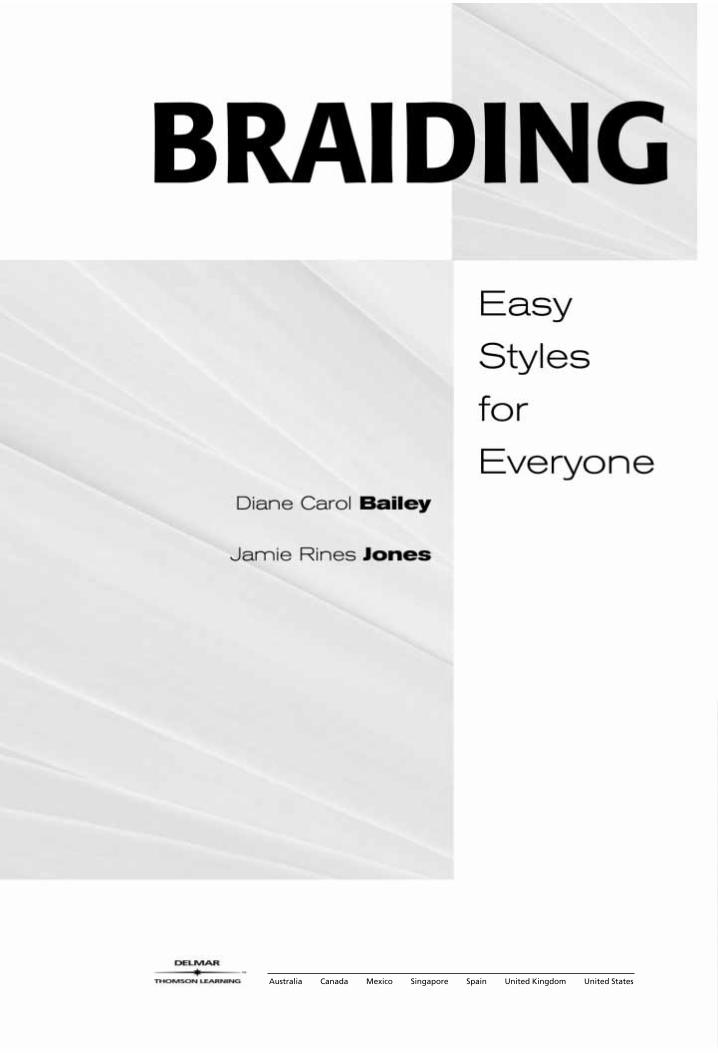
BACK-COMBINGTeasing with great vigor was the style at one time. It was achieved by using a teasing brushand brushing hard against the cuticle layer from the scalp to the ends. It resulted in very mat-ted, tangled hair. This is not necessary with the styles you will be doing in this book. Thesestyles use no teasing, but a few will require small amounts of back-combing.
Back-combing is done by placing a comb underneath a strand of hair. Starting very closeto the base, roll the comb and apply medium pressure going against the cuticle layer. Usually,back-combing a strand once or twice is all that is needed to create the fullness required forthese styles. Your goal is to make the strand you are back-combing fuller, and to prevent itfrom splitting or opening when you work with that strand.

WORKING WITH LONG HAIR 3
Remember, back-combing should always be done with the hair combed in the direction inwhich you want the hair to go when finished. Here is a common mistake seen in back-combing:Say the hair is in a ponytail at the crown, and you want to place a curl behind the left ear. Peo-ple very often will back-comb the hair straight up, then try to force it behind the left ear. Theresult is usually buckling, or unevenness of that hair strand.
Now, take this same example with proper back-combing: Section out the hair you wantplaced behind the left ear, and then comb it in the direction in which you want the hair to lie.Next, back-comb this stand while keeping it in this position. Place your comb underneathand, starting very close to the base, back-comb the strand by rolling the comb while applyingmedium pressure. Smooth out the top if necessary, and then place the strand where you wantit. If you are making a curl, there is no need to back-comb the ends, since they will be tuckedunder.
BOBBY PINS VS HAIRPINSBobby pins and hairpins look similar yet have a completely different purpose.
Bobby pins touch in the middle and are designed to hold weight. They are best suitedwhen you need to anchor a weighted curl, or when you change the direction of the hair, suchas in the bowtie (page 109) or the French twist with back-combing. For direction changes,make sure the tips cross each other. This gives them added strength in holding the hair whereyou want it.
Hairpins are used to help place hair that has already been secured with a bobby pin. Forexample, once a curl has been placed and secured where you want it, you might decide tospread the curl to make it wider. Spread the hair with your fingers, and then secure it with ahairpin to hold the strands in the new position.

4 CHAPTER 1
A common question concerns the placement of pins in the hair. A basic rule is to pinexactly where your fingers are holding the hair. Very often, bobby pins are being inserted nextto the fingers holding the hair. When you let go, the hair moves to the new pinned position. Ittakes a little practice, but it’s worth it for perfect style placement every time.
The styles that follow in this book will offer examples for the use of bobby pins and hair-pins. Suggestions will be made for the best pin to use.
THE PERFECT PONYTAILOne of the most common problems people run into is getting the ponytail exactly wherethey want it while keeping the hair smooth. The main reason the hair doesn’t stay smooth isbecause people try to tighten it after rubberband placement. Following are 2 different waysto make a ponytail without ever tightening it. Try both, and then decide which works bestfor you.
Ponytail #1You will need 2 bobby pins and an elastic band (preferably fabric covered).
1. Attach 2 bobby pins to rubberband as shown.
2. Put left hand where you want ponytail to be placed and brush hair into it. Holdinghair securely, twist ponytail 1/4 turn clockwise.

WORKING WITH LONG HAIR 5
3. Insert one bobby pin into the top of the ponytail next to scalp. Hold securely withindex finger. Allow other bobby pin to hang freely on the right side of ponytail.
4. With right arm, reach over top of ponytail. With right hand, reach under ponytail tograb free-hanging bobby pin. Pull rubberband at least 1 1/2 times around ponytail.

6 CHAPTER 1
5. Insert free bobby pin into ponytail under the rubberband along the scalp.
Ponytail #2You will need 1 bobby pin and 1 rubberband (preferably fabric covered).
1. Attach bobby pin to rubberband as shown.
2. Put your left hand where you want the ponytail to be placed and brush hair into it.Hook the rubberband over your left thumb and allow the bobby pin to hang free.

WORKING WITH LONG HAIR 7
3. With your right hand, grab the free-hanging bobby pin and pull it underneath theponytail, and then pull bobby pin through the rubberband.
4. Pull the bobby pin back underneath the ponytail, and go back around the ponytailat least 1 time.

8 CHAPTER 1
5. Insert free bobby pin into ponytail between the rubberband and scalp.
ACCESSORIESSome of the following styles use ribbon to create the finished look. Here are some questionscommonly asked about purchasing ribbon.
How wide should the ribbon be? The styles in this book use a ribbon no wider than 1/2".A personal favorite is 1/4" wide. It is easier to work with and it doesn’t make the style quite asstiff.
What kind of ribbon is best? The ribbon should be as slick as possible. Metallic ribbonsare fun, but they rarely have a smooth finish. When the ribbon is not smooth, it can pull onthe hair and make the style look messy. The perfect test for ribbon is to run it over a silky fab-ric or panty hose and see if it catches. Once you have perfected using ribbons, you can success-fully use ribbons that are not as slick, and still keep the style clean.
How long should the ribbon be? It is best to start with ribbon at least twice the length ofthe hair you are working on. Many of the styles don’t require quite that much, but nothingcould be worse than getting to the end of a style and finding out you need just a couple ofinches more. Better safe than sorry, so cut the ribbon to twice the hair length to be sure.
Is there anything else besides ribbon that can be used? Yes, strings of pearls and stringsof sequins can be used successfully. You can purchase these at most fabric or craft stores. Theycome on spools of 5 yards or more and can be cut to any length. But, again, you will not wantto work with these 2 accessories until you have mastered using smooth ribbon. You will have amuch better chance of a successful design.
While you are at the fabric or craft center, take time to look around. There are alwaystreasures to be found and used in your hair designs. Some highly recommended items includethe following.

WORKING WITH LONG HAIR 9
Individual beads and pearls These are easily put onto a hairpin and placed in the finisheddesign to dress it up. Colors recommended are gold, black, silver, and opaque white. Sizes rec-ommended are from 2 to 4 mm. Following are directions for putting beads on hairpins andusing them in your long hair designs.
1. Straighten a hairpin and slide bead onto it.
2. Bend the hairpin down firmly on either side of bead.
3. Bend one leg of the hairpin halfway up, as shown. This prevents the hairpin fromslipping out when worn. Slide this accessorized pin into any hairstyle that needs tobe dressed up for a special occasion.
4. You can also tie bows or ribbons on the hairpin for a different look.

10 CHAPTER 1
Easier still is to buy them already tied and just slip them onto a pin.Silk flowers You can purchase tiny flowers wrapped in a small bundle. These are great to
have on hand. Just cut them out of the bundle and insert them into the final design. If you usehairspray after you insert the flowers, it will help hold them in place. Real flowers, like baby’sbreath, are wonderful, too, but these are difficult to have on hand all the time.
Buttons Some of the buttons available today are tiny works of art. You can always hot glueor sew these onto a fabric-covered rubberband for a dressy or more fun look. Small rhinestonebuttons can be added to a hairpin (follow directions for individual beads and pearls) for astunning finish to an evening design.
Once you start looking around, you will become creative and come up with your ownideas. Belt buckles, tee-shirt clasps, and even gold charms have been used before, so don’t belimited by the few things mentioned here.

Long Hair Design
INTRODUCTIONThis chapter takes you through a series of styles. It is designed so that you master one stylebefore you proceed to the next. Each additional step is based on some technique learned inthe style before it. Illustrations appear at every step to help you master the hand positions andtechnique of every style. Don’t give up if it gets confusing. Start at step 1 again, and make yourhands match the illustrations exactly. Keep practicing until the hand positions become com-fortable before you move to the next style.
The following exciting styles are included in this chapter:
■ Rope ponytail and chignon
■ Rope braid
■ Two-strand twist
■ Two-strand twist with ribbon
■ Two-strand ribbon braid
■ Fishtail ponytail
■ Fishtail
■ French braid
■ Dutch braid
■ Twisting
■ Knotting
■ The bow
■ The bowtie
■ French twist
11

12 CHAPTER 2
Rope Ponytail and Chignon
The rope ponytail is a true show stopper. The concept is simple, yet figuring out how to stop2 twisted strands from coming unwound can be difficult. In order for 2 strands to stay twisted,they must go in opposing directions. Notice that the left-hand side is twisted to the right, yetthe entire ponytail is twisted to the left.
This braid is best done on all one-length hair.
The most common mistake made with this technique is twisting theleft-hand side of the ponytail counterclockwise (or to the left). Thiswill result in the twist’s unwinding. If this happens, start over andmake sure you twist the left-hand side of the ponytail clockwise (orto the right).

LONG HAIR DESIGN 13
1. Begin with hair in ponytail.Divide ponytail into 2 sections.
2. Twist left strand clockwise (tothe right) 2 or 3 times.
14 CHAPTER 2
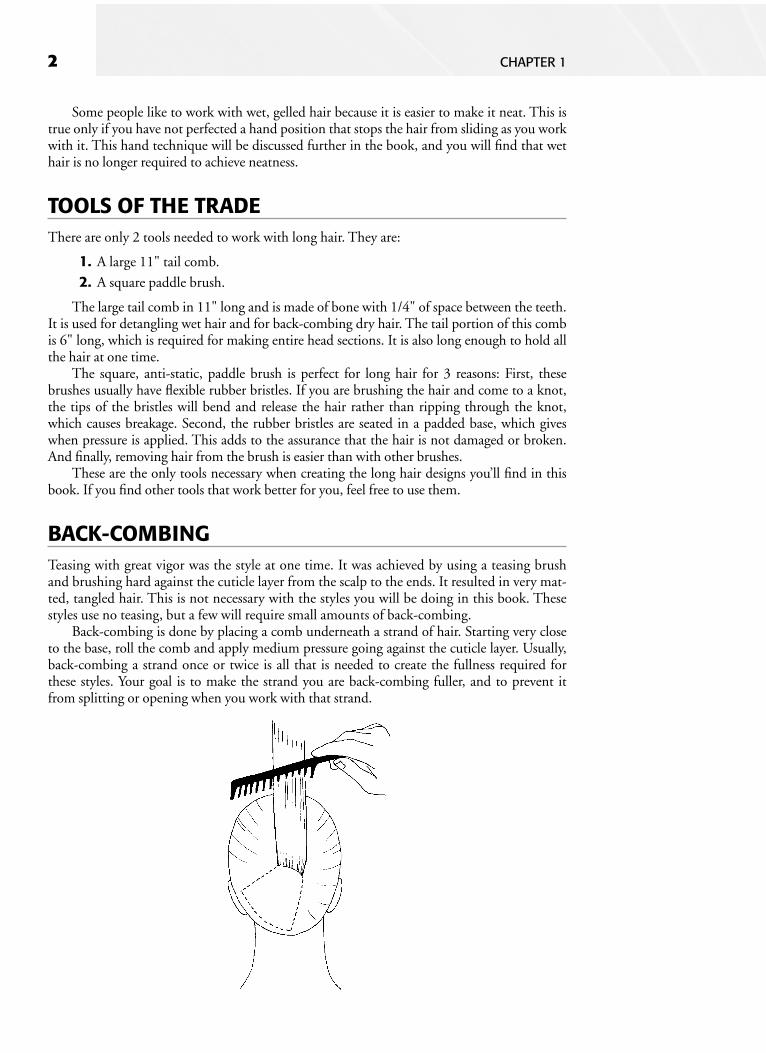
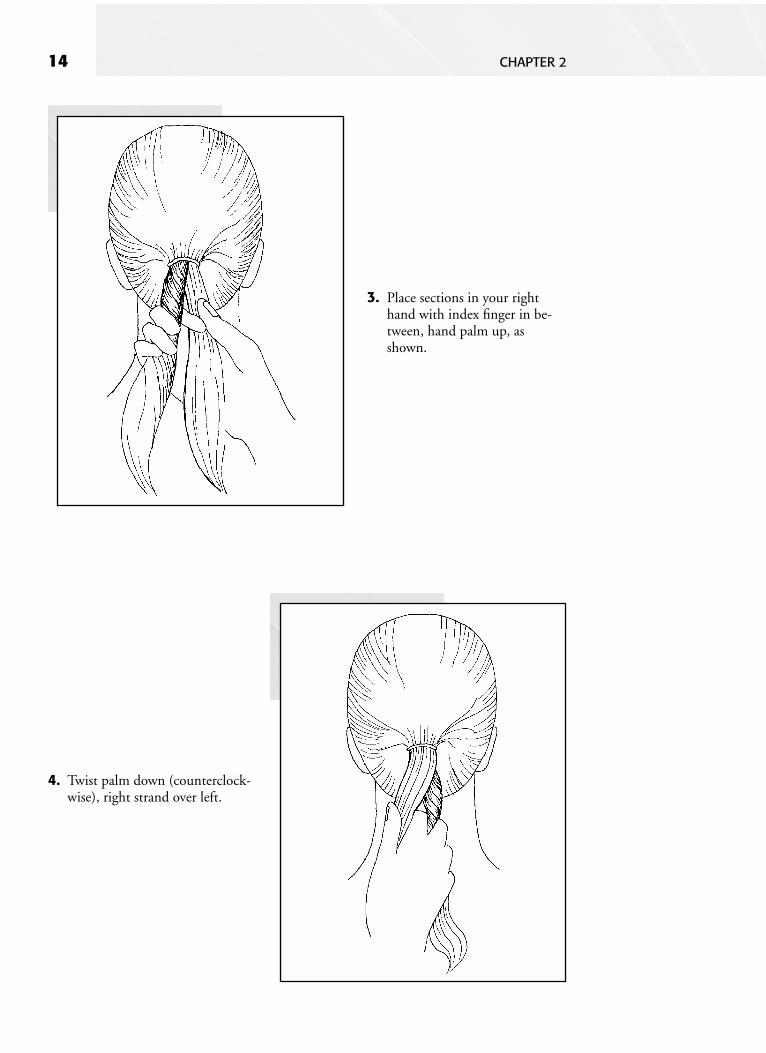
3. Place sections in your righthand with index finger in be-tween, hand palm up, asshown.
4. Twist palm down (counterclock-wise), right strand over left.

LONG HAIR DESIGN 15
5. Repeat steps 2 through 4 untilthe ponytail is completelytwisted. When this technique isdone correctly, you can put arubberband around the end ofthe ponytail and the ponytailwill not come unwound.
6. Another option is to make achignon from this rope. Begintwisting the rope ponytail coun-terclockwise around the rubber-band.
16 CHAPTER 2
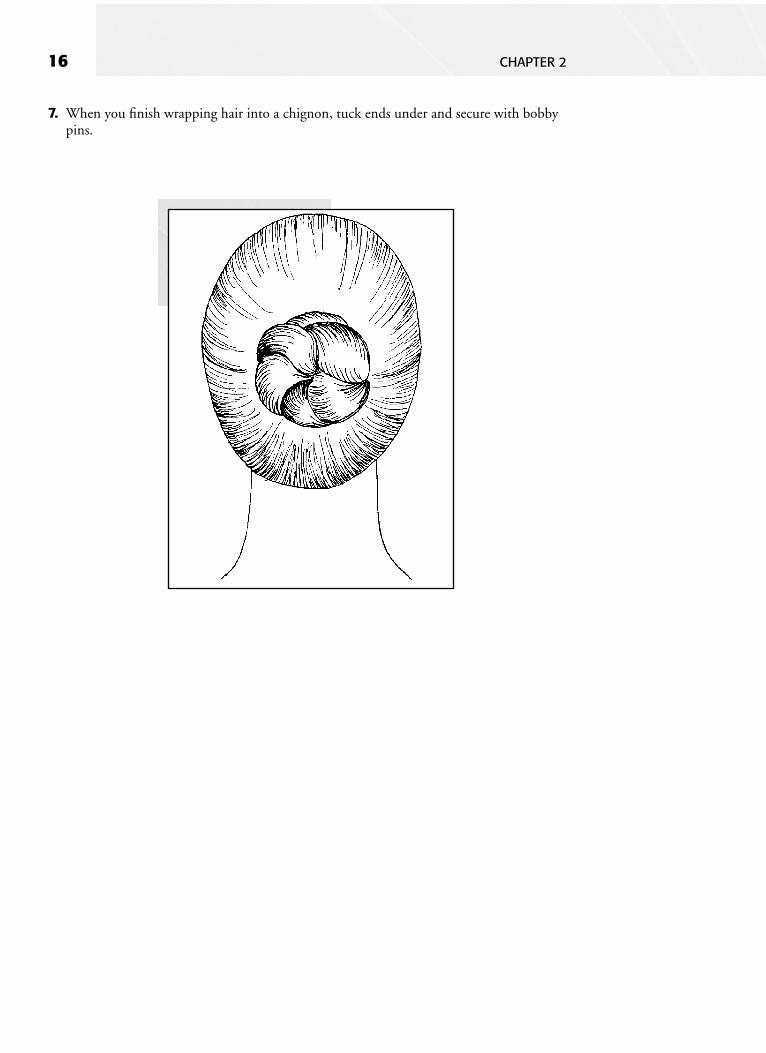
7. When you finish wrapping hair into a chignon, tuck ends under and secure with bobbypins.

LONG HAIR DESIGN 17
Rope Braid
The rope braid is one of the most popular braids. It can be done on all one-length hair as wellas long, layered hair.
You must add to both sides before you twist the right side over theleft.

18 CHAPTER 2
1. Take a triangle section of hairfrom the front. If there arebangs, begin behind them.
2. Divide the section into 2 strands.

LONG HAIR DESIGN 19
3. Cross theright strandover the leftstrand.
4. Place both strands in the righthand with the index finger inbetween, hand palm up, asshown.

20 CHAPTER 2
5. Twist the left strand2 times clockwise, ortoward the center.
6. Pick up a 1" section fromthe left side.

LONG HAIR DESIGN 21
7. Add this section to the leftstrand.
8. Put both strands in the lefthand with the index finger inbetween, hand palm up, asshown.

22 CHAPTER 2
9. Pick up a 1" sectionfrom the right side.
10. Add this section to the rightside.

LONG HAIR DESIGN 23
11. Put both strands in the righthand with the index fingerin between, hand palm up,as shown.
12. With your hand in this posi-tion, twist toward the left(counterclockwise) until yourpalm is facing down.

24 CHAPTER 2
13. Repeat steps 4 through 11,working toward the nape, un-til style is done. Use a rubber-band to secure.
14. When you run out of sectionsto pick up, you can repeat steps2 through 4 of the rope pony-tail. This will lock the braidfrom coming unwound. Place arubberband around the endsand let the ponytail hang free.

LONG HAIR DESIGN 25
15. Another option would be to bobby pin the ends under in the nape area.

26 CHAPTER 2
Two-Strand Twist
The 2-strand twist is another one of the most popular braids. It allows fullness on the sidesand behind the ear and is perfect for the non-oval face. This style is done best on all one-lengthhair or hair that is shoulder length or longer.
You must twist up toward the part. On the right side of the head,the right hand does the twisting toward the part, and, on the leftside, the left hand does the work.

LONG HAIR DESIGN 27
1. Divide hair into2 sections.
2. Starting on theright side, pickup a triangle sec-tion from thefront.

28 CHAPTER 2
3. Divide this sec-tion into 2strands.
4. Cross theright strandover the left.
LONG HAIR DESIGN 29
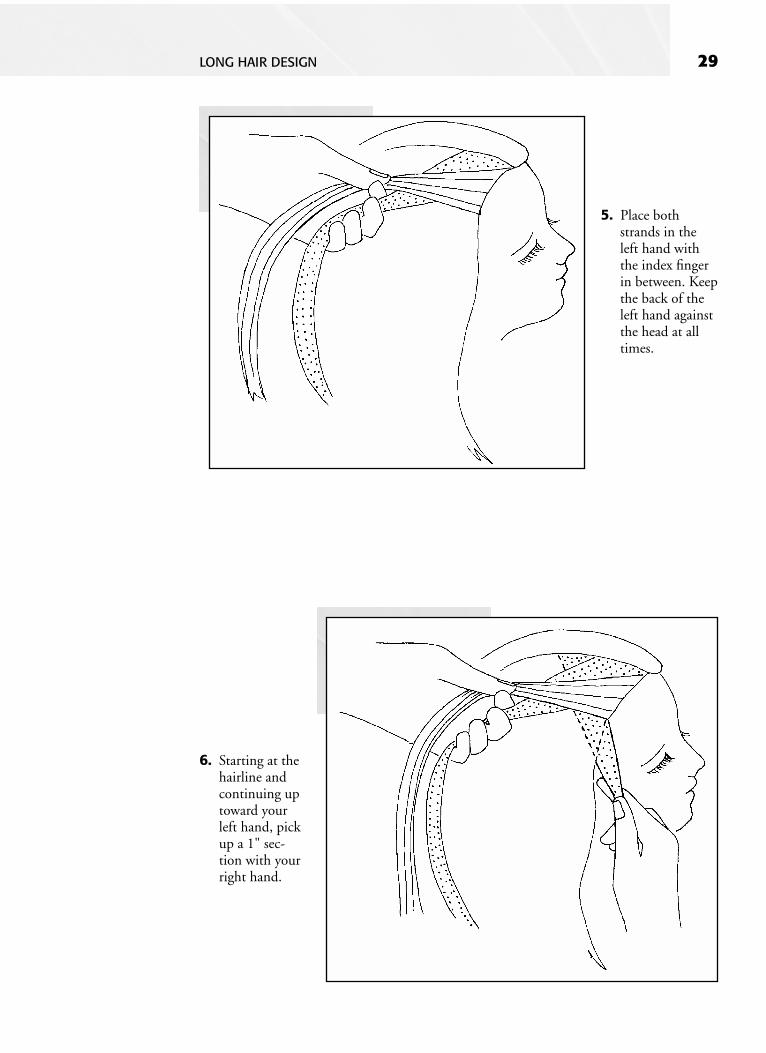
5. Place bothstrands in theleft hand withthe index fingerin between. Keepthe back of theleft hand againstthe head at alltimes.
6. Starting at thehairline andcontinuing uptoward yourleft hand, pickup a 1" sec-tion with yourright hand.

30 CHAPTER 2
7. Add this sec-tion to theright (or bot-tom) strand.
8. Place thesesections inyour righthand, with theindex finger inbetween.
LONG HAIR DESIGN 31
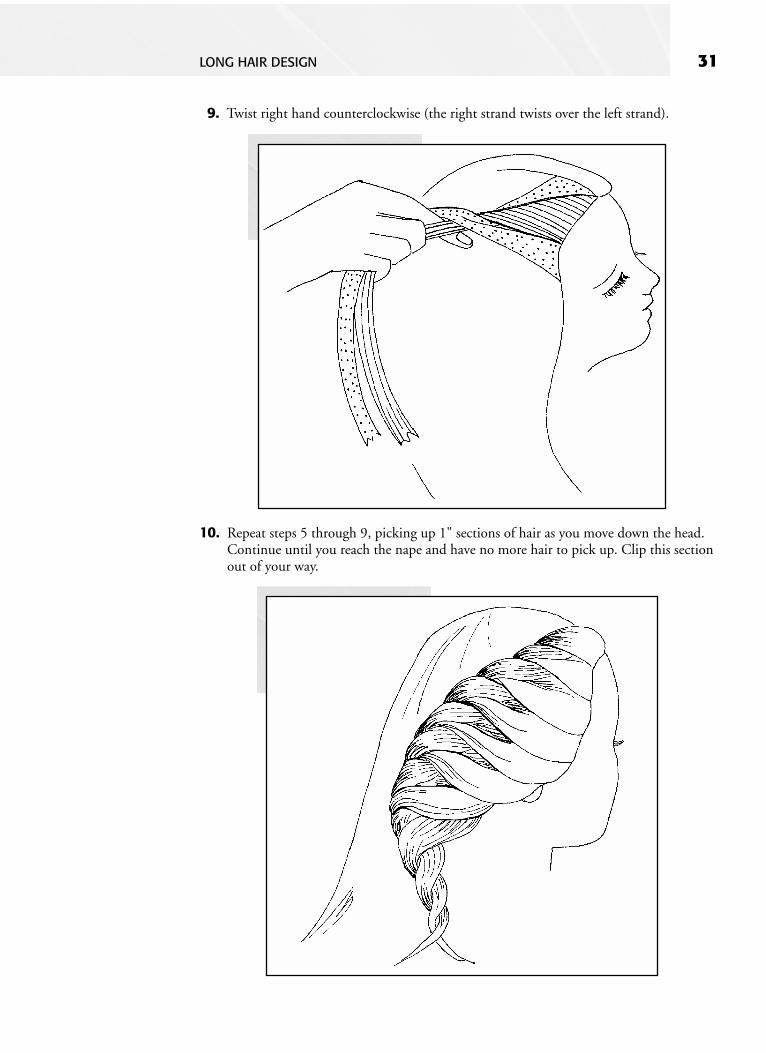
9. Twist right hand counterclockwise (the right strand twists over the left strand).
10. Repeat steps 5 through 9, picking up 1" sections of hair as you move down the head.Continue until you reach the nape and have no more hair to pick up. Clip this sectionout of your way.

32 CHAPTER 2
11. Starting on theleft side, pickup a triangularsection fromthe front.
12. Divide this sec-tion into 2strands.

LONG HAIR DESIGN 33
13. Cross theleft strandover theright.
14. Place bothstrands in theright handwith the in-dex finger inbetween.Keep theback of theright handagainst thehead at alltimes.

34 CHAPTER 2
15. Starting at thehairline andcontinuing uptoward yourright hand, pickup a 1" sectionwith your lefthand.
16. Add this sectionto the left (or bot-tom) strand.

LONG HAIR DESIGN 35
17. Place these sections in your left hand, index finger in between.
18. Twist left hand clockwise (the left strand twists over the right strand).

36 CHAPTER 2
19. Repeat steps 14 through 18, picking up1" sections of hair as you move down thehead. Continue until you reach the napeand run out of hair. Bring both finishedsides together to form a ponytail. Securewith a rubberband.
20. Another option would be to do the fishtailponytail. Cover the rubberband with hair,make the ponytail, and then pin ends un-derneath. See the section on the fishtailponytail for more information.

LONG HAIR DESIGN 37
21. You could also leave the back down and do the 2-strand twist on the top portion of thehead. This is a great option for all one-length, bob-line haircuts.

38 CHAPTER 2
Two-Strand Twist with Ribbon
This is another beautiful way to dress up the 2-strand twist. Make sure you have perfected the2-strand twist without ribbon before you attempt this version. It makes this style so much eas-ier to master.
The ribbon never gets added to the hair strands. It is always passedafter you twist the 2 hair strands over each other and before youpick up your next section.

LONG HAIR DESIGN 39
1. Divide hair into2 sections asshown.
2. Starting onthe rightside, pickup a trian-gle sectionfrom thefront.

40 CHAPTER 2
3. Tie a ribbon to the inside of the triangle section. Push the ribbon toward the face andout of the way of the hair sections.
4. Divide the hair section into 2 strands.
LONG HAIR DESIGN 41
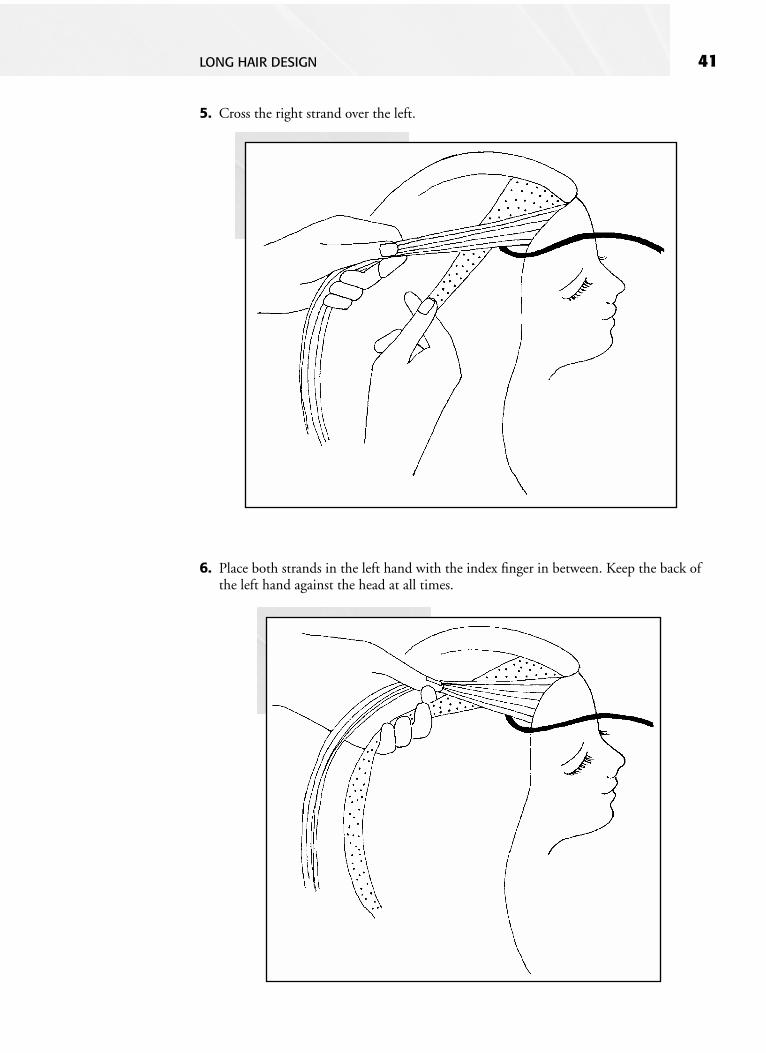
5. Cross the right strand over the left.
6. Place both strands in the left hand with the index finger in between. Keep the back ofthe left hand against the head at all times.

42 CHAPTER 2
7. Now wrapribbon coun-terclockwisecompletelyaround bothsections.Push ribbontoward theface and outof the way ofthe hair sec-tion.
8. Starting at thehairline andcontinuing uptoward your lefthand, pick up a1" section withyour right hand.

LONG HAIR DESIGN 43
9. Add this section to the right (or bottom) strand.
10. Place these sections in your right hand, with the index finger in between.

44 CHAPTER 2
11. Twist right hand counterclockwise (the right strand twists over the left strand).
12. Repeat steps 6 through 11, picking up 1" sections of hair as you move down the head.Continue until you reach the nape and have no more hair to pick up.

LONG HAIR DESIGN 45
13. Starting on the left side, pick up a triangular section from the front.
14. Tie a ribbon to the inside of the triangle section. Push ribbon toward the face and outof the way of the hair sections.

46 CHAPTER 2
15. Divide the triangle section into 2 strands.
16. Cross the left strand over the right.

LONG HAIR DESIGN 47
17. Place both strands in the right hand with the index finger in between. Keep the back ofthe right hand against the head at all times.
18. Wrap ribbon clockwise completely around both sections. Push ribbon forward and outof the way of the hair strands.

48 CHAPTER 2
19. Starting at the hairline and continuing up toward your right hand, pick up a 1" sectionwith your left hand.
20. Add this section to the left (or bottom) strand.

LONG HAIR DESIGN 49
21. Place these sections in your left hand, index finger in between.
22. Twist left hand clockwise; left strand twists over the right strand.

50 CHAPTER 2
23. Repeat steps 17 through 22, picking up1" sections of hair as you move downthe head. Continue until you reach thenape and run out of hair. Bring the 2finished sides together to form a pony-tail.
24. Another option would be to wrapboth ponytail sections with remain-ing ribbon, then wrap into achignon.

LONG HAIR DESIGN 51
Two-Strand Ribbon Braid
This is a perfect style for all one-length hair. It is popular for proms and weddings becauseribbon that matches the dress can be braided into the hair. This style is also very easy to do.
The hair strands never twist or cross each other. The ribbon does allthe work by making a figure 8 around the 2 strands.

52 CHAPTER 2
1. Take a triangle section ofhair from the front. Ifthere are bangs, beginbehind them.
2. Divide the section into2 strands. Tie a ribbononto the left-sidestrand.

LONG HAIR DESIGN 53
3. While holding theleft-hand strand,drop the ribbondown to hang freely.
4. Pick up the rightstrand and placeit in between theindex and thirdfingers, handpalm up, asshown. Pick upthe ribbon withyour right handand bring it un-der the rightstrand.

54 CHAPTER 2
5. Then bring ribbon upand over the rightstrand. Drop the rib-bon to let it hangfreely between the 2strands.
6. Place both strands in yourright hand, index finger in between, hand palm up, asshown. Allow ribbon to hangfreely.

LONG HAIR DESIGN 55
7. Pick up a 1" sectionon the left side.
8. Add this section to the leftstrand you already have inyour hand.

56 CHAPTER 2
9. Pick up the ribbonwith your lefthand and bring itunder the leftstrand.
10. Then bring ribbon upand over the leftstrand. Drop the rib-bon to let it hangfreely between the 2strands.

LONG HAIR DESIGN 57
11. Place both strands inyour left hand, indexfinger in between,hand palm up, asshown. Allow ribbonto hang free.
12. Pick up a 1" section onthe right side.

58 CHAPTER 2
13. Add the section tothe right-side strandalready in yourhand.
14. Pick up the ribbon with yourright hand and bring it un-der, then up and over, theright strand. Allow ribbon tohang freely between the 2strands.

LONG HAIR DESIGN 59
15. Repeat steps 6 through 14, moving down towardthe nape with each 1" section picked up. Whenyou run out of sections, secure braid with rubber-band. Remainder of hair forms a ponytail.
16. Another option is to finish the ponytail by con-tinuing to make a figure 8 with the ribbon tothe ends of the hair.

60 CHAPTER 2
Fishtail Ponytail
The fishtail is a very complicated-looking braid yet is actually one of the easiest braids to do.It is best done on dry, all one-length hair. It makes a very attractive ponytail by itself. It couldalso be a perfect way to finish off a ponytail combined with another type of braid such as the2-strand twist.
When doing steps 2 and 4, make sure you reach behind the free-hanging section. If you take the sections from the top, they will notwrap around the sides and the finished look will be affected.

LONG HAIR DESIGN 61
1. Divide ponytail into 2 sections.
2. Take a small section frombehind the left-side section.
62 CHAPTER 2
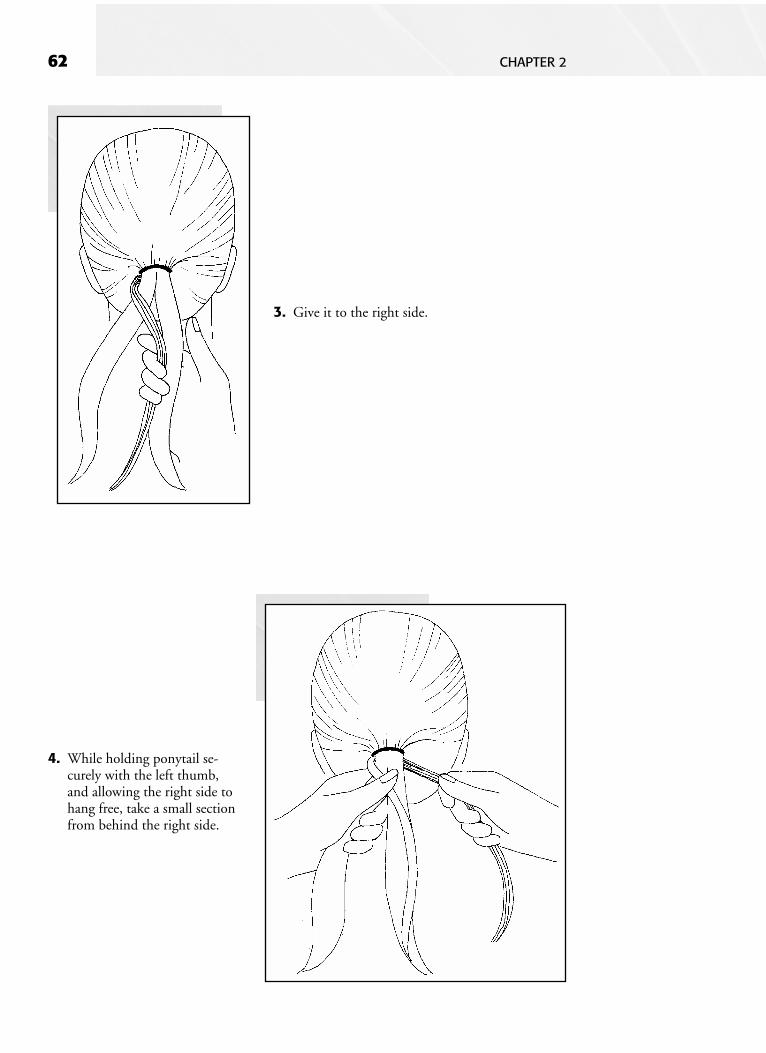
3. Give it to the right side.
4. While holding ponytail se-curely with the left thumb,and allowing the right side tohang free, take a small sectionfrom behind the right side.

LONG HAIR DESIGN 63
5. Give it to the left side.
6. While holding the right side securely with your rightthumb, continue steps 2 through 6 until you reachthe end of the ponytail. Secure with a rubberband.

64 CHAPTER 2
Fishtail
We are going to take the technique you learned in the fishtail ponytail and add to it to createthe fishtail braid, which starts in the bang area. If you have perfected the ponytail technique,you will be doing this braid in no time at all. The fishtail is best done on dry, non-layered hair,shoulder length or longer. It is guaranteed to be one of your favorites.
Make an X . When you pick up one side, make sure you give it tothe opposite side.

LONG HAIR DESIGN 65
1. Take a triangle section ofhair from the front. If thereare bangs, begin behindthem.
2. Divide this section into 2 strands.

66 CHAPTER 2
3. Cross theright strandover the leftstrand.
4. Place both strands in the righthand with the index finger inbetween, hand palm up, asshown.

LONG HAIR DESIGN 67
5. Pick up a 1" sec-tion on the leftside. Starting atthe hairline, con-tinue across thehead and end inthe middle byyour right hand.
6. Cross this section over the leftstrand and add to the rightstrand. (This makes one sideof an X.)

68 CHAPTER 2
7. Put both strands in the left handwith the index finger in be-tween, hand palm up, as shown.
8. Pick up a 1" section onthe right side. Startingat the hairline, con-tinue across the headand end in the middleby your left hand.

LONG HAIR DESIGN 69
9. Cross the section over theright strand and add it to theleft strand. (This makes theother side of the X.)
10. Put both strands in the righthand with index finger in be-tween, hand palm up, asshown.

70 CHAPTER 2
11. Repeat steps 5 through 10, al-lowing your hand to movedown to the nape with each 1"section picked up. When yourun out of sections, secure braidwith a rubberband.
12. Another option is to keep your hands elevated,at crown level, while you are doing this braid.Once you are finished, but before you put therubberband in the hair, let your hands relax tothe nape area and allow the braid to slidedown. This technique creates fullness behindthe ears. Finish off the ponytail with the fish-tail ponytail technique, and then tuck underand secure with bobby pins. The finished stylewill look like this.

LONG HAIR DESIGN 71
French Braid
We are now beginning the 3-strand braids. To make them easier to learn, pay special atten-tion to the hand positions, and copy them exactly. This will take the confusion out of work-ing with 3 strands of hair at one time.
Once you have perfected the 3-strand techniques, you are unlimited in the number of dif-ferent styles you can create. By varying the direction or the number of braids, you can createcompletely different looks. For example, put a French braid on the left side and then one onthe right side. Rubberband them together with a ponytail hanging in the back. Or try doing aDutch braid, but start it in the nape area instead of the bang area.
The French braid is the braid most requested in salons and is always in style. It can be doneon layered or all one-length hair. If it is done on layered hair, it is best to dampen and gel thehair before braiding it. If the style is done on all one-length hair, it is best done with the hairdry.
The French braid is done by passing the outside strands over thecenter strands.

72 CHAPTER 2
1. Take a triangle section ofhair from the front. Ifthere are bangs, begin be-hind them.
2. Divide this section into 3 strands.

LONG HAIR DESIGN 73
3. Cross the right strandover the center strand.
4. Cross the left strand overthe center strand.
74 CHAPTER 2
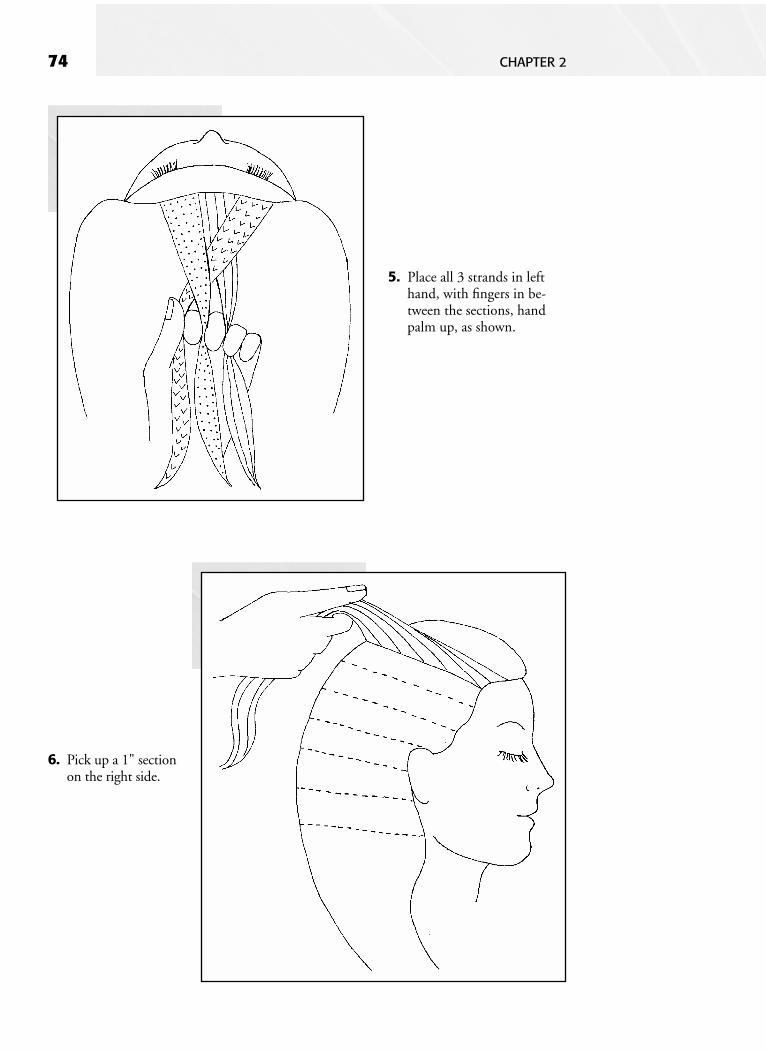
5. Place all 3 strands in lefthand, with fingers in be-tween the sections, handpalm up, as shown.
6. Pick up a 1" sectionon the right side.

LONG HAIR DESIGN 75
7. Add this section to theright strand already in yourhand.
8. Cross right strand overcenter.

76 CHAPTER 2
9. Place strands in righthand, fingers in between,hand palm up, as shown.
10. Pick up a 1" sectionon the left side.

LONG HAIR DESIGN 77
11. Add this section to theleft strand already inyour hand.
12. Cross the left strandover center strand.

78 CHAPTER 2
13. Place strands in left hand, fin-gers in between, hand palm up,as shown.
14. Repeat steps 6 through 13,moving down the nape witheach 1" section picked up.When you run out of sections,secure braid with rubberband.Remainder of the hair formsponytail.

LONG HAIR DESIGN 79
15. Another option is to finish the ponytail by braiding to the ends, as shown.

80 CHAPTER 2
Dutch Braid
The Dutch braid is very similar to the French braid. The technique is similar, too. It differsonly in that, for the Dutch braid, you pass the strands under the center sections instead ofover. The Dutch braid can be done on layered or all one-length hair. If it is done on layeredhair, it is best to dampen and gel the hair before braiding it. If the style is done on all one-length hair, it is best done with the hair dry.
The Dutch braid is done by crossing the outside strands under thecenter strands.

LONG HAIR DESIGN 81
1. Take a triangle sectionof hair from the front.If there are bangs, be-gin behind them.
2. Divide this section into 3 strands.

82 CHAPTER 2
3. Cross the right strand un-der the center strand.
4. Cross the left strand un-der the center strand.

LONG HAIR DESIGN 83
5. Place all 3 strands in left hand, with fingers between the sections, hand palm up, asshown.
6. Pick up a 1" section on the right side.
84 CHAPTER 2
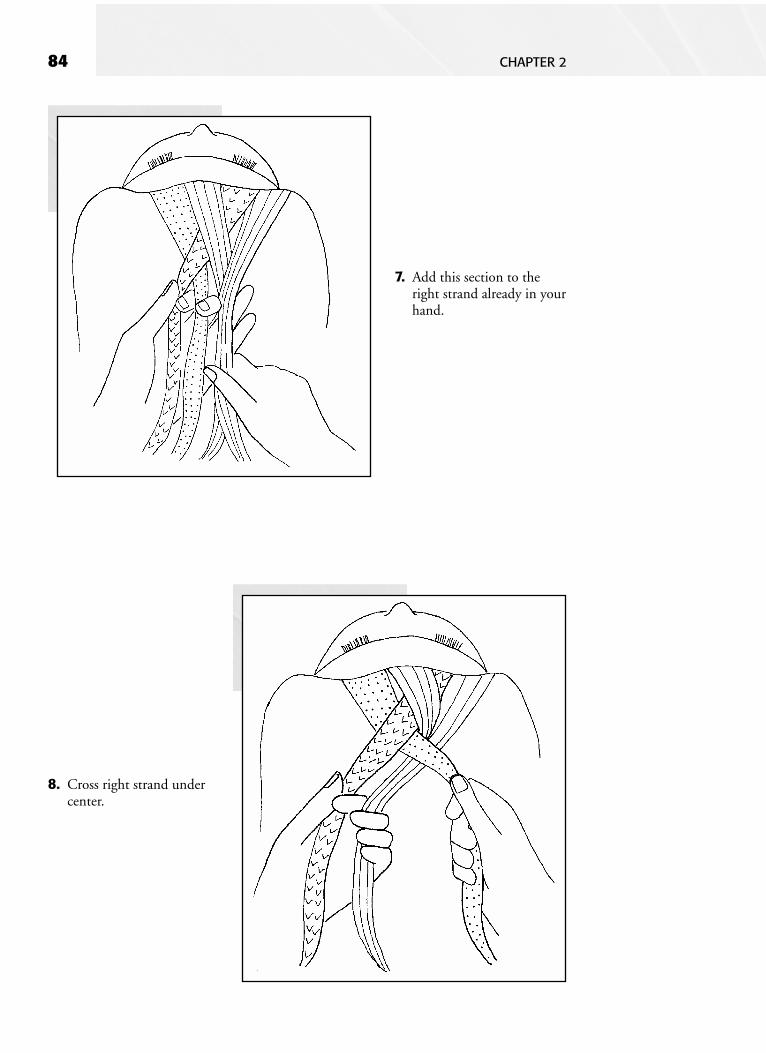
7. Add this section to theright strand already in yourhand.
8. Cross right strand undercenter.

LONG HAIR DESIGN 85
9. Place strands in righthand, fingers in between,hand palm up, as shown.
10. Pick up a 1" sectionon the left side.

86 CHAPTER 2
11. Add this section tothe left strand al-ready in your hand.
12. Cross the left strand un-der the center strand.

LONG HAIR DESIGN 87
13. Place strands in left hand,fingers in between, handpalm up, as shown.
14. Repeat steps 6 through 13, mov-ing down the nape with each 1"section picked up. When yourun out of sections, secure braidwith rubberband. Remainder ofhair forms ponytail.

88 CHAPTER 2
15. Another option is to finish the ponytail by braiding to the ends, as shown.

LONG HAIR DESIGN 89
Twisting
The twisting techniques shown here can be used in varied ways. Following are instructionsfor forming the twisted design into many figure 8s. But don’t think this is the only way to dotwisting. It is also very beautiful to allow the twist to be free form and lie where it may.
Be certain the 1" section you are picking up passes over the exist-ing strand, not under it.

90 CHAPTER 2
1. Take a triangle sectionjust to the left side ofcenter. If there are bangs,begin behind them.
2. Begin twisting this section ofhair toward the right andmove your body over by theperson’s right shoulder.

LONG HAIR DESIGN 91
3. Pick up a 1" section on theright side.
4. Take this new strandand pass it over thetop of the twistedstrand.

92 CHAPTER 2
5. Continue wrapping this new strand in a counterclockwise direction around the twistedstrand until they become one strand.
6. As you walk to the left shoulder, force the twisted strand up to form the top part of an 8.

LONG HAIR DESIGN 93
7. Pick up a 1" sec-tion on the leftside.
8. Take thisnew strandand pass itover the topof the twistedstrand.

94 CHAPTER 2
9. Continue wrapping this new strand in a clockwise direction around the twisted stranduntil they make one strand.
10. As you walk to the right shoulder, force the twisted strand up to form the bottom partof an 8.

LONG HAIR DESIGN 95
11. Repeat steps 3 through 10, moving down toward the nape with each 1" section pickedup. When you run out of sections, secure the twist with bobby pins. You might wantto softly curl the piece of remaining hair and place it over the person’s shoulder.

96 CHAPTER 2
Knotting
This style is easy and fun to do. People always ask how it’s done because it looks so compli-cated. But as you have already learned, just because you can’t figure out how it’s done by look-ing at it doesn’t mean it is difficult to do. The key to knotting is that it’s best done on dry, allone-length hair.
You must tie the knots exactly the same each time. If you tie rightover left, as we have done here, you must follow through and tie itthat way each time.

LONG HAIR DESIGN 97
1. Make a triangle section atthe top. If there arebangs, begin behindthem.
2. Divide this section into 2strands.

98 CHAPTER 2
3. Place both sections in yourleft hand, matching thehand positions shown.Then, place the rightstrand over the left strand.
4. Using your rightthumb and indexfinger, reach be-tween the strandsand pull the rightstrand through the2 strands.

LONG HAIR DESIGN 99
5. Make sure the strandyou pulled between the2 strands is kept to theleft side.
6. Pull both strands so the hair tiesnext to the scalp. You have justtied the first part of a knot.

100 CHAPTER 2
7. Place both strands inthe left hand, fingersin between. Pick up a1" section on theright side of the head.
8. Add this section to the right-side section already in yourhand.

LONG HAIR DESIGN 101
9. Place both sections in yourright hand, finger in betweenas shown. (You have justchanged hands.)
10. Pick up a 1" sectionon the left side of thehead.

102 CHAPTER 2
11. Add it to the left-side sectionalready in your hand.
12. Repeat steps 3 through 11, picking up 1"sections as you move down the head.Continue until you reach the nape andrun out of sections to pick up. Tie the 2strands together a few more times, andthen roll under and pin. Curl remainingtendrils with a curling iron and rest overshoulder.

LONG HAIR DESIGN 103
The Bow
Everyone should know how to make a bow. It is such an elegant evening look. Following areinstructions for making a bow very easily. See if you don’t agree.
Be sure to cover the rubberband with hair or a hair accessory be-fore you make the bow. It is too difficult to cover later.

104 CHAPTER 2
1. Make a ponytailwhere you want thecenter of the bow tobe positioned. Take asmall section fromunderneath the pony-tail and back-comb.
2. Wrap this back-combed section around rub-berband and secure with hairpins.

LONG HAIR DESIGN 105
3. Remove a small section from thetop of ponytail and clip up out ofyour way.
4. Divide remaining ponytailinto 2 sections.

106 CHAPTER 2
5. Clip left side outof your way. Back-comb the rightside, making sureto hold hairstraight out to theside as shown.
6. Roll back-combedsection into a bar-rel curl, placing itbehind the rightear. Secure withbobby pins. Useyour fingers to fanout barrel curl tomake it as wide aspossible withoutsplitting. Use hair-pins to tack inplace. This is thefinished right sideof your bow.

LONG HAIR DESIGN 107
7. Next, back-combleft side and rollinto a barrel curl,placing it behindthe left ear. Securewith bobby pinsand fan out thebarrel curl withyour fingers, mak-ing it as wide aspossible.
8. Take the small section youclipped out of your way in step 3and gently back-comb. Roll thissection into a pin curl. Lay thissection over the split in theponytail and bobby pin the curlunderneath.

108 CHAPTER 2
9. The finished bow will look like this. Make sure to use a finishing spray to keep smoothand fixed in place.

LONG HAIR DESIGN 109
The Bowtie
The bowtie is a beautiful finished style as well as a perfect base for many different long hairdesigns. It is recommended that you become comfortable tying this style, and then experi-ment with the ponytail pieces to create a completely different style. Have fun with the differ-ent options this style gives you.
The bowtie is best done on dry, all one-length hair. When first learning how to tie thisstyle, you may find it easier to make it neat if you dampen and gel the hair first. This stops thestrands from wrinkling when tied. If you are working with dampened hair, back-combing isnot recommended.
The right-hand side must tie over, then under, the left side and endup at the crown.

110 CHAPTER 2
1. Comb the hair back into aponytail and hold it with yourleft hand. Using a tail comb,make a diagonal section alongthe scalp, starting at the top ofthe right ear and ending be-hind the bottom of the left ear.
2. Put your comb down and placethe right section in your righthand and the left section in yourleft hand.
Hint: Try to copy the hand posi-tions exactly on steps 3 and 4.This will take the confusion outof trying to manipulate these sec-tions without the hair’s gettingmessy.

LONG HAIR DESIGN 111
3. Using your thumb, index fin-ger, and third finger to keepthese sections separated, placethe right section over the leftsection.
4. Reach through the strand separa-tion and grab the strand on top.Pull it through and toward thecrown.

112 CHAPTER 2
5. You have just tiedthe hair.
6. Using bobby pins, make sureyou securely fasten the tiedsection of the hair. This isvery important. If it is notsecurely pinned, the entirestyle can slide out.

LONG HAIR DESIGN 113
7. Taking the section onthe left, lightly back-comb it while directingthe section to behindthe left ear.
8. Roll this sectionunder into abarrel curl andbobby pin intoplace. After pin-ning it, spreadthis curl out aswide as you feelis necessary.
114 CHAPTER 2
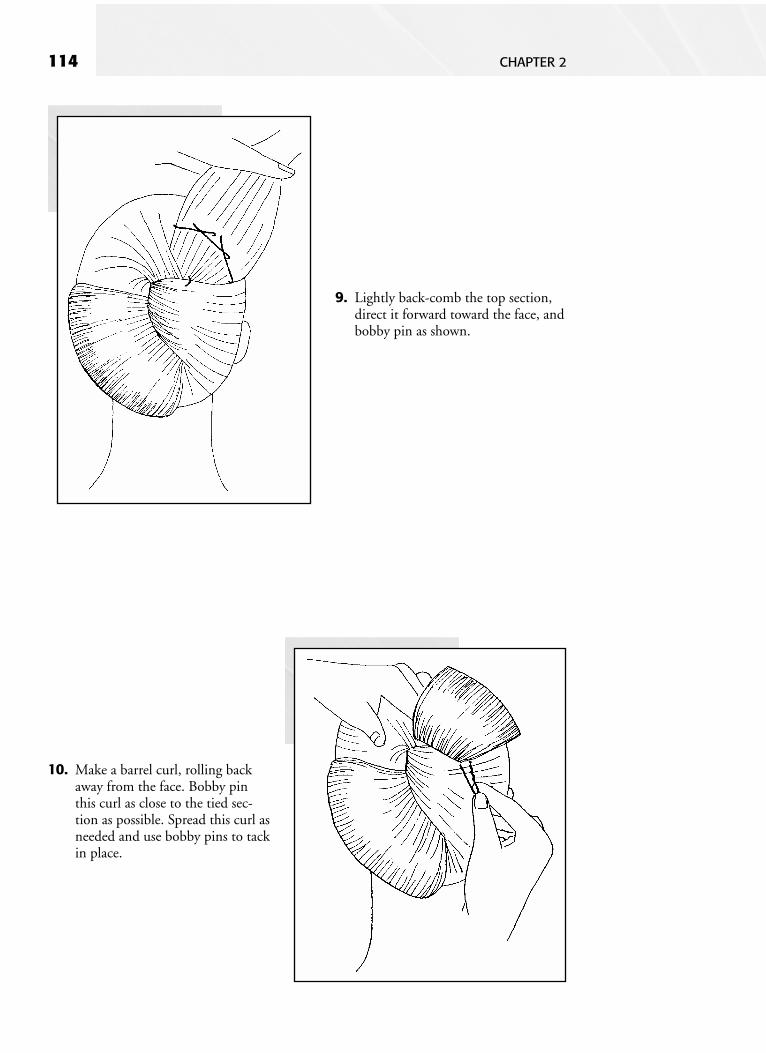
9. Lightly back-comb the top section,direct it forward toward the face, andbobby pin as shown.
10. Make a barrel curl, rolling backaway from the face. Bobby pinthis curl as close to the tied sec-tion as possible. Spread this curl asneeded and use bobby pins to tackin place.

LONG HAIR DESIGN 115
11. This is the finished style.

116 CHAPTER 2
French Twist
Following are instructions for the easiest way found to do the French twist. There is no back-combing and no setting. The French twist is a simple, smooth look with no fullness aroundthe face. The technique will require practice, but once you have perfected it, you will use itoften.
The hand positions are easily copied when you stand in front of theperson’s right shoulder.

LONG HAIR DESIGN 117
1. Comb the hair back into a ponytail and hold itwith your left hand, palm facing toward napewith hand in a V position as shown.
2. Close fingers together, making sure to keephand in the closed V position. Do not closehand into a circle as with a ponytail.

118 CHAPTER 2
3. Reaching over the person’s head with your right arm, grab the hair strand and begin wisting the entire strand to your right.
4. Continue loosely twisting the strand until you havereached the ends of the hair.

LONG HAIR DESIGN 119
5. Place your left thumb againstthe head in the crown area.
6. Bring the twisted strand downtoward the nape, and back upagain if necessary, so all the hairis folded together.

120 CHAPTER 2
7. Take this folded hair and tuckit under the beginning twist.
8. Secure along twist with bobbypins and hairpins.

LONG HAIR DESIGN 121
9. This is the finished style.


Curls, Kinks, and Coils:Working with Texture
INTRODUCTIONThere is no such thing as “good” hair or “bad” hair. This chapter focuses on traditional braid-ing, locking, and twisting hairstyles that create an aesthetic look for all hair textures. Many ofthese styles are cultural in origin, as they are derived from traditional African braiding designsthat date back to ancient dynasties. The following descriptions will provide you with thebasic knowledge of the popular natural braid styles and techniques. The creative art form isunlimited, and the techniques offered here are fundamental and can be improvised to allowself-expression.
CORNROWSThere are many techniques for starting the traditional on-the-base braid known as the corn-row. The cornrow is created with a 3-strand, on-the-scalp braid, which uses an underhand“pick-up” technique. The fundamentals of braiding start with the basic cornrow. Accordingto master braid designer Annu Prestonia, co-owner of Khamit Kinks in New York and Geor-gia and celebrity braid designer (among her clients are such notables as Stevie Wonder andAngela Basset), cornrows are the foundation of all braid styles. “If you excel at the art of corn-rowing, all other braiding techniques are at your disposal,” says Prestonia.
To cornrow like a professional you must be patient and practice. A skilled braider musttake the time daily to practice cornrowing. Cornrowing is the repetition of the entire wovenpatterns; the sequence of weave patterns may vary and will determine the style. However, theseries of revolutions is a simple repetition of a secure pick-up motion. Practicing will help youto develop speed, accuracy, and finger/wrist dexterity. The time required for braiding can varyfrom 2 hours for a large braid to 2 days for a micro braid. Mastering the basic cornrow tech-nique will enable you to approach other braid styles with confidence.
Skillful cornrowing is designed through the process of sculpting the parted sections.Sculpting is more than just vertical or horizontal partings. When sculpting the braid, youmust first visualize the finished look. This will allow you to create smooth and consistentcurved partings that contour with the head. The curved partings are a part of the design, sothey must be neat and even. The more creative you are in designing the parts, the more beauti-ful the finished sculpted look will be. This contouring, or sculpting, is especially beautiful onsmall to medium sized cornrows.
123

124 CHAPTER 3
Three-Strand Cornrow
Practice the following technique for cornrowing. It uses 3 strands with an underhand weav-ing motion, in which the strands on the sides are always passed under the center strand, alter-nating between the right side and the left. Tulani Kinard, master braider and owner ofTulani’s Regal Movement in New York, gives the following technique:
Finished style
CURLS, KINKS, AND COILS: WORKING WITH TEXTURE 125
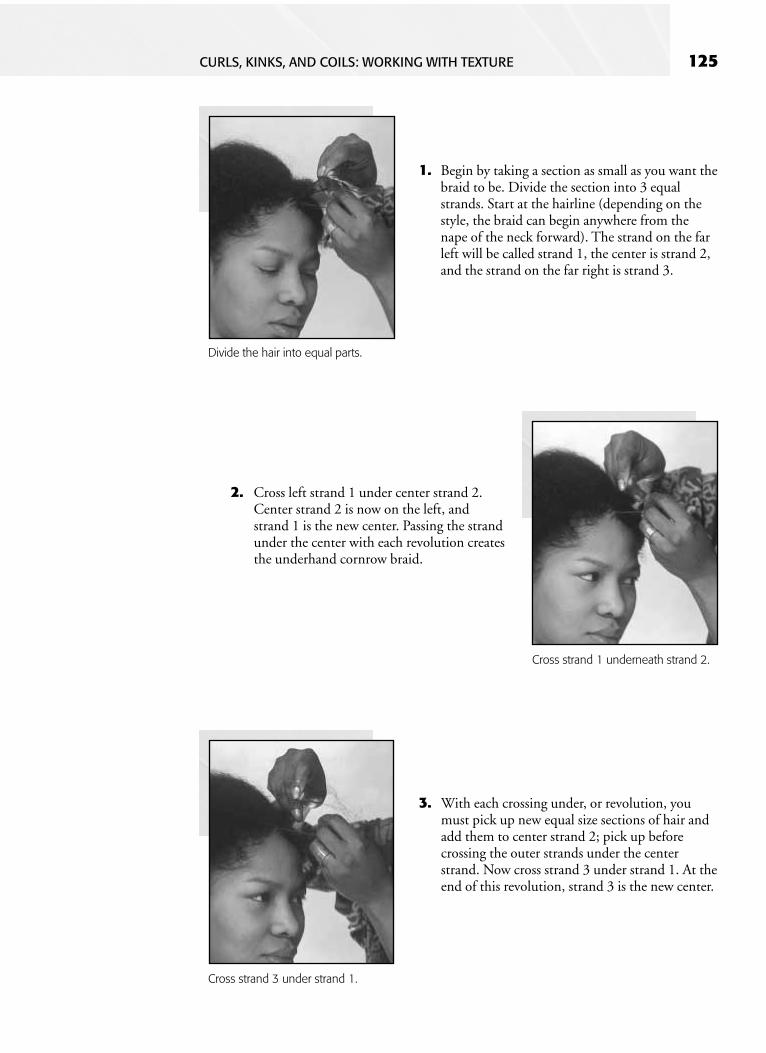
1. Begin by taking a section as small as you want thebraid to be. Divide the section into 3 equalstrands. Start at the hairline (depending on thestyle, the braid can begin anywhere from thenape of the neck forward). The strand on the farleft will be called strand 1, the center is strand 2,and the strand on the far right is strand 3.
Divide the hair into equal parts.
Cross strand 1 underneath strand 2.
2. Cross left strand 1 under center strand 2.Center strand 2 is now on the left, andstrand 1 is the new center. Passing the strandunder the center with each revolution createsthe underhand cornrow braid.
Cross strand 3 under strand 1.
3. With each crossing under, or revolution, youmust pick up new equal size sections of hair andadd them to center strand 2; pick up beforecrossing the outer strands under the centerstrand. Now cross strand 3 under strand 1. At theend of this revolution, strand 3 is the new center.

126 CHAPTER 3
4. Each time you make a revolution (crossing underthe center strand), you must pick up the hairfrom the scalp and add it to the new center. Witheach revolution, alternate the side of the braid onwhich you pick up hair.
Pass strand 2 under strand 3. Workfrom side to side.
Finished style: Sculpting—thethree-strand cornrow.
5. As you move along the section, cornrowingand picking up more hair, you add fullness tothe braid. Contoured parting should be cleanand neat.
Cornrows with ExtensionHair additions, or extensions, are used for the following reasons:
■ To lengthen short hair.
■ To add volume to thin hair.
■ To protect damaged hair.
■ To add dimension to the height of the natural hair.
■ To allow the braid style to last longer.
■ To make a creative and cultural statement.

CURLS, KINKS, AND COILS: WORKING WITH TEXTURE 127
Cornrow with Extension (Feed-in Method)The feed-in method can be applied to cornrows or individual braids. There are several differ-ent methods for integrating extension hair into the hairline. Some methods just introducelarge amounts of extension material into the fragile hairline, leaving the front of the braidbulky and knotted. In some cases, this bulky, bumpy look has become very popular. Theseare fast and effective methods for adding extensions if you don’t mind the braids looking likea helmet!
But many braid professionals contend that the braid extension should be concealed andthe knot or lump eliminated because it is damaging to the hair. “When hair is braided usingthe knot or lump at the beginning of the braid, it is a tell-tale sign that you are wearing anextension,” notes Taliah Waajid, author of Hairitage Masterpieces. She uses the feed-in methodto gradually add hair throughout the braid. Literally, strand by strand the braid must be builtup. Too large amounts of extension material place excessive weight on the fragile areas of thehairline. They also tighten and pull the hair and create an unrealistic finished look. By prop-erly applying the correct amount of tension with the feed-in method, you can eliminate theartificial look.
The traditional cornrow does not look like a hat of braids. It is flat, natural, and con-toured to the scalp. The parting is definitely important because it defines the finished style.The feed-in method creates a tapered, or narrow, base at the hairline. As small pieces, or strips,of extension hair are added, the base fills in, which brings the adjoining braids closer together.
This technique takes longer to perform. However, the cornrow lasts longer, looks morenatural, and does not put excessive tension on the hairline. Practice this method for a flat con-tour, natural cornrow style.

128 CHAPTER 3
The Feed-in Method
1. Start at the hairline by parting off a cornrowbase in the desired style.
2. At the starting point, no extension is usuallyadded. If the hair extension is required becauseof the thinning hairline, minute amounts can beapplied to 5 to 10 strands. This is all relative tothe size of the cornrow.
3. Divide the natural hair into 3 equal portions.
4. With the first revolution, left strand 1 crossesunder strand 2.
12 3
Three-strand extension
12
3
First revolution
5. On the second revolution, right strand 3 crossesunder strand 1. A small portion of natural hair ispicked up and added to the outside portion duringthe revolution.
CURLS, KINKS, AND COILS: WORKING WITH TEXTURE 129
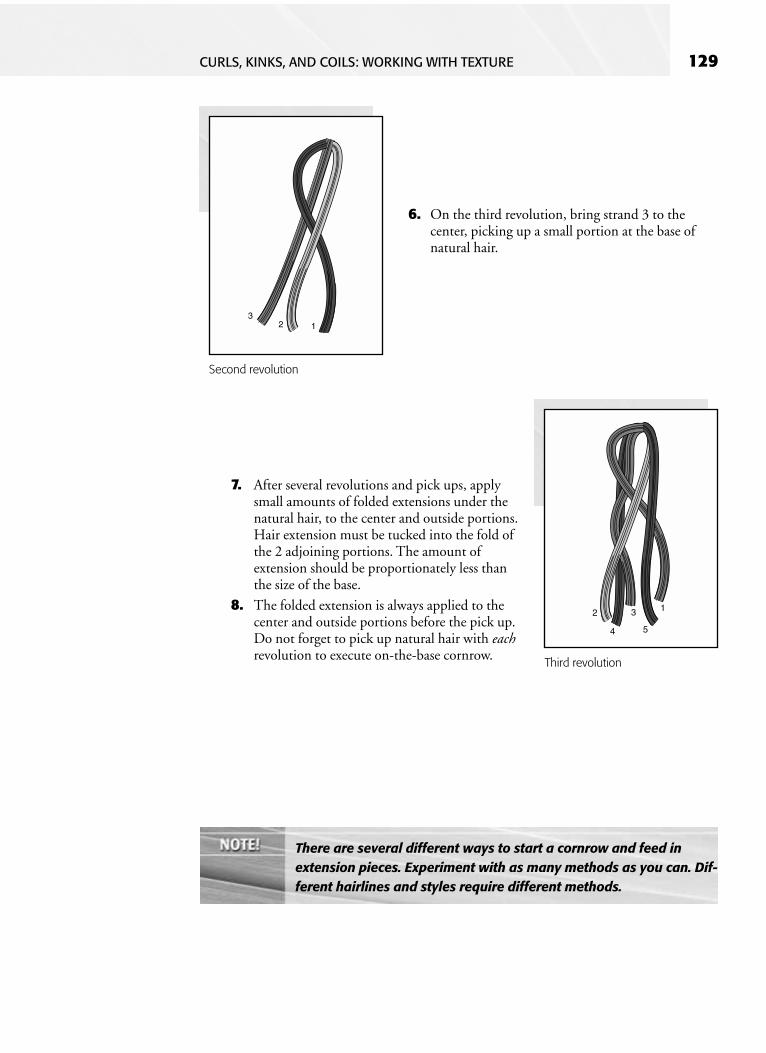
6. On the third revolution, bring strand 3 to thecenter, picking up a small portion at the base ofnatural hair.
123
Second revolution
12 3
4 5
Third revolution
7. After several revolutions and pick ups, applysmall amounts of folded extensions under thenatural hair, to the center and outside portions.Hair extension must be tucked into the fold ofthe 2 adjoining portions. The amount ofextension should be proportionately less thanthe size of the base.
8. The folded extension is always applied to thecenter and outside portions before the pick up.Do not forget to pick up natural hair with eachrevolution to execute on-the-base cornrow.
There are several different ways to start a cornrow and feed inextension pieces. Experiment with as many methods as you can. Dif-ferent hairlines and styles require different methods.

130 CHAPTER 3
Over-directing Braid ExtensionPrecision parting and sectioning is vital to all braiding techniques. Parting will determine thedirection of the braid. Clean and precise partings are required to create a strong braid base.Hair strands must never be over-directed or misplaced within an adjacent braid. If singlestrands are incorporated into another section outside of their own section, the hair will even-tually break. Over-extending the hair adds tension to the unsupported strand.
During the cornrow process, when you are picking up hair at the base, the hair directlyunderneath the previous revolution must be incorporated into the braid. The hair picked upmust never come from another subsection or be extended up into the braid from a lower partof the braid.
The same is true when applying any braid technique. When creating an individual braidwith extensions, start in the center of the subsection. Over-extending or misplacing the begin-ning of the extension leaves the hair exposed and unsupported, which can lead to breakageand traction alopecia. This is particularly true when adding extensions to the hairline. If theextension is not secure (2 or 3 revolutions before picking up), the extension will move awayfrom the point of entry. This pulled base around the hairline will definitely create breakageand eventually alopecia.
For professional finishing, always trim split ends that may popthrough the braid shaft. Hold scissors flat, moving up the braidshaft. Avoid cutting into the braid.
CURLS, KINKS, AND COILS: WORKING WITH TEXTURE 131
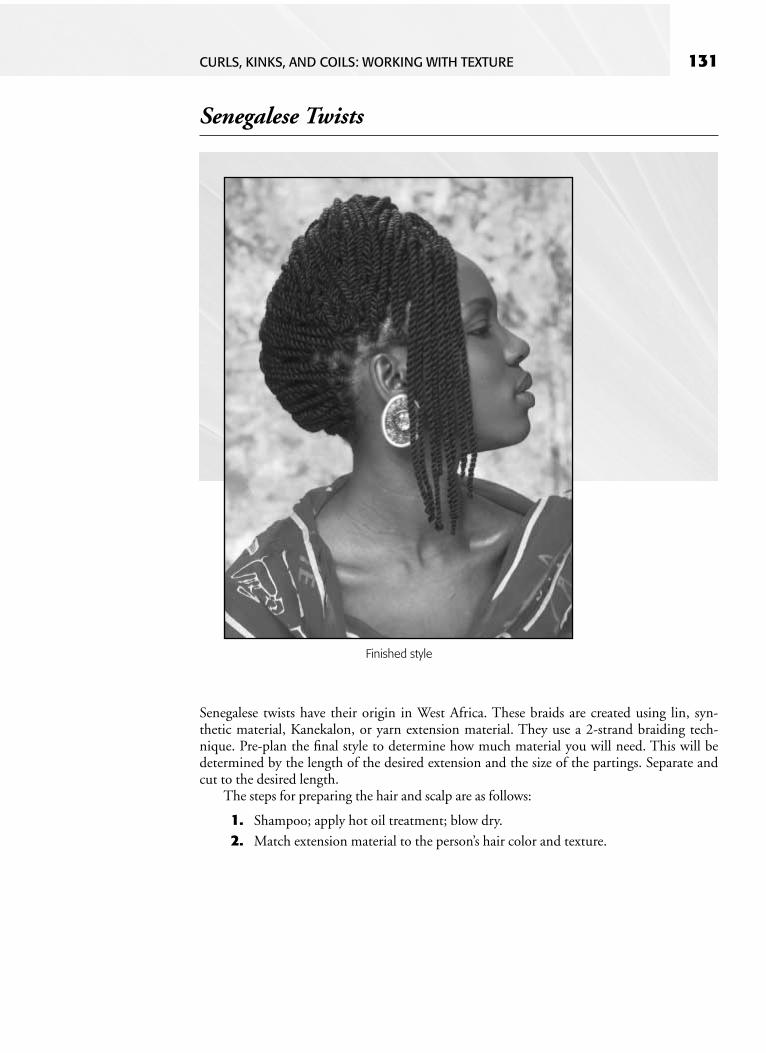
Senegalese Twists
Senegalese twists have their origin in West Africa. These braids are created using lin, syn-thetic material, Kanekalon, or yarn extension material. They use a 2-strand braiding tech-nique. Pre-plan the final style to determine how much material you will need. This will bedetermined by the length of the desired extension and the size of the partings. Separate andcut to the desired length.
The steps for preparing the hair and scalp are as follows:
1. Shampoo; apply hot oil treatment; blow dry.
2. Match extension material to the person’s hair color and texture.
Finished style

132 CHAPTER 3
1. Start by dividing the entire head of hair in halffrom ear to ear.
2. Slightly above the ear with tail of comb, make a45-degree part down toward the neck. The partcan be as large or small as required for the size ofthe twist you are trying to create.
Part hair at 45-degree angle.
Roll fiber 3 or 4 times.
3. Make a subsection above the ear. Separatethe subsection into 2 equal parts. Section offa required amount of extension material.Place the extension strip between the 2 equalparts.
4. Simultaneously, you must perform 2twisting motions. The first twisting is to rollthe fiber between both of your fingers, whichsecures the natural hair into the fiber. Thesecond twisting motion takes the “rolled”fiber and hair and twists, or overlaps, onestrand over the other. This rolling motion isdone with the fingertip and the roll shouldbe very tight.

CURLS, KINKS, AND COILS: WORKING WITH TEXTURE 133
5. Continue the double twist motion for the entirelength of the strand. Roll and cross strands untilyou reach the ends. Loop and knot the twists toclose. Trim excess fiber.
Twist one strand over the other tocreate a tight twist.
Seal the ends in the pre-determined fashion.
Finished sealed ends Finished style
6. Seal ends with singeing method or knot andcut close.
134 CHAPTER 3
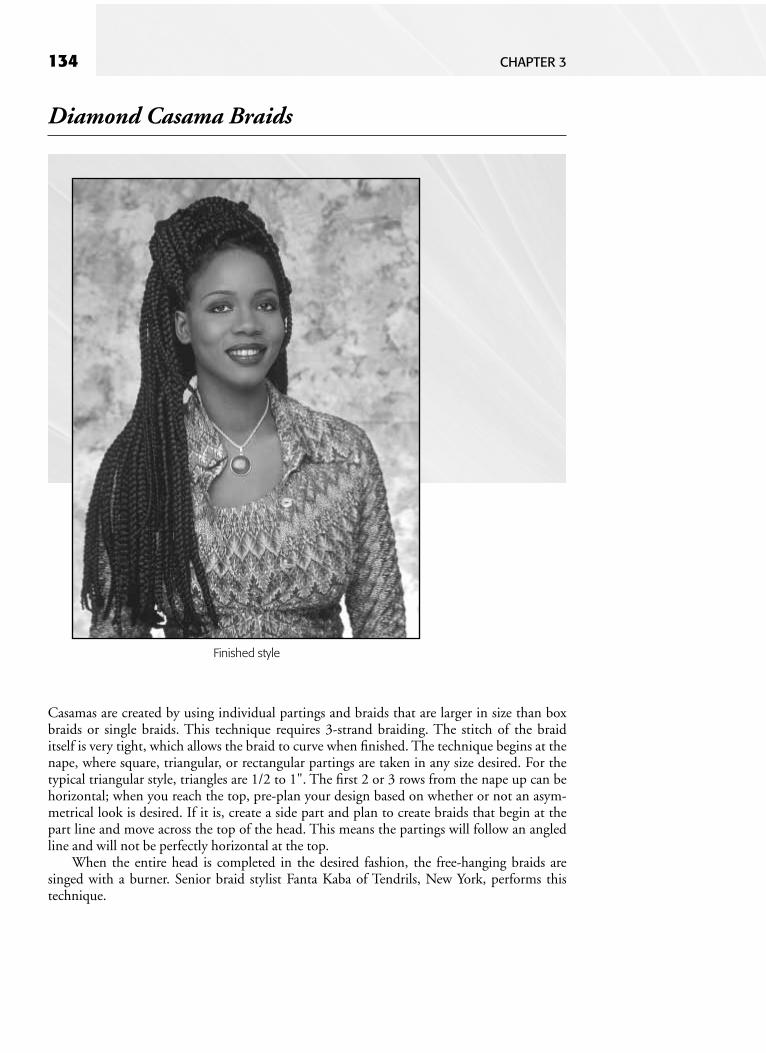
Diamond Casama Braids
Casamas are created by using individual partings and braids that are larger in size than boxbraids or single braids. This technique requires 3-strand braiding. The stitch of the braiditself is very tight, which allows the braid to curve when finished. The technique begins at thenape, where square, triangular, or rectangular partings are taken in any size desired. For thetypical triangular style, triangles are 1/2 to 1". The first 2 or 3 rows from the nape up can behorizontal; when you reach the top, pre-plan your design based on whether or not an asym-metrical look is desired. If it is, create a side part and plan to create braids that begin at thepart line and move across the top of the head. This means the partings will follow an angledline and will not be perfectly horizontal at the top.
When the entire head is completed in the desired fashion, the free-hanging braids aresinged with a burner. Senior braid stylist Fanta Kaba of Tendrils, New York, performs thistechnique.
Finished style

CURLS, KINKS, AND COILS: WORKING WITH TEXTURE 135
1. Start in the back of the head by parting adiagonal section at about a 45-degree angle,toward the front hairline, just past the ear. Thissection can be from 1 to 2" wide.
Parting hair at 45-degree angle
Diagonal sub-partings
Three-strand braiding
2. Part the base into subsections with verticalparts to create the diamond sections. Aftersubsection size has been determined, selectthe appropriate amount of Kanekalon. Fortapered ends, the extension material is gentlypulled at both sides so that the ends have a“shredded” uneven effect.
3. Take a strand of synthetic hair of a pre-determined length and fold it in half. Positionthe center of the strand at the base of the partingand wrap half of the strand 2 or 3 revolutionsaround the base of the parted natural hair (basewrap is optional).

136 CHAPTER 3
4. Immediately divide the hair into 3 sections, withthe natural hair encompassed in the centersection. Make certain that the natural hair isconcealed under the section before you begin 3-strand braiding.
5. Alternate diagonal partings so that a V shapeconfiguration is created in the back.
V shape partings
Front to back partings
Finished style
6. Partings should appear from front to back.Partings in front are curved and continue thediamond shape.
7. Braid the hair from scalp to ends, using anunderhand, or inverted, technique. Each time youpass a side strand under the center strand, bringthe center strand over tightly, so that the sidestrand becomes the new center strand. Then passthe alternate-side strand under this one.
8. When you reach the ends, pull out a long, smallsection of hair, wrap it around the braid, knot it,and repeat wrapping and knotting. This holds thetight braid in place and allows it to curve. Thencontinue to the next parting and repeat the entireprocedure. Move up on the head, taking partingsaccording to the pre-planned design.
9. When the entire head is completed, you can heat-seal the ends.

CURLS, KINKS, AND COILS: WORKING WITH TEXTURE 137
Braid TaperingThe beauty of the casama braid is that the braid is full and wide at the base and tapered off atthe ends. The tapered ends usually have a slight curve. To create this effect, the extensionmaterial must be shed before it is applied to the head.
1. Hold the required amount of extension material with both hands, about 6 to 10"apart.
2. Slowly pull the hair extension until it becomes uneven at the ends. By beingstaggered at the ends, the extension material loses its blunt edges.
3. When staggering extension material, or redistributing it in an uneven manner, beaware of the length and size of the braid.

138 CHAPTER 3
Cornrows and Senegalese Twist (Combo)
This classic combination of micro cornrows and small Senegalese twists was sculpted byAvion Julien of Tulani’s Regal Movement of New York.
Finished style

CURLS, KINKS, AND COILS: WORKING WITH TEXTURE 139
PART 1
1. Start in the back by making a diagonal 45-degreeangle section to just above the ear. Part off asubsection by making a smaller vertical part tothe bottom of the neck.
Senegalese twist back—45-degreeangle
Diagonal parting
Two equal partings
2. Divide the subsection into 2 equal parts.

140 CHAPTER 3
4. Once the extension is twisted close to thescalp, cross over the 2 twisted strands. Therole-overlap-roll sequence must be repeatedfor the entire twist. Tension must beconsistent so that the twist remains straight.
Hold and twist.
Create a tight braid.
Loop to close.
3. Make a double twist motion—roll hair strandscounterclockwise.
5. To close, loop ends by separating small numbersof strands and wrapping them around the braid.Singe ends to secure and seal at the desiredlength.

CURLS, KINKS, AND COILS: WORKING WITH TEXTURE 141
6. Trim frizzies, or split ends, from the twist to complete finished style.
PART 2
1. Start at the hairline by parting off the base in the desired size. Vertical parts shouldbe about 1/4" wide.
2. Divide the base into 3 equal portions. Take a pre-measured strip of extensionproportionately less than the size of the base. Using the feed-in method, apply smallunits of extension (10 to 20 hairs) to the hairline.
Complete loop. Trim.
Pick up hair from the base and addto strand.
3. Begin the cornrow method. Each time you crossa strand from the outside to the inside centerstrand, pick up natural hair from the base andadd it to the new center strand.

142 CHAPTER 3
4. With your middle finger, hold the revolution inplace. A second strip of extension can be addedto the left outside strand.
Hold the revolution in place.
Create 2 equal portions.
5. After the cornrow base is completed, startthe Senegalese twist motion by separatingthe center strand and adding it to theoutside pieces, creating 2 equal portions.
Roll and twist. Finished style
6. Continue by startingthe double twistmotion in order tocreate the Senegalesetwist.
7. Continue until you reachthe end. Loop to close;trim and singe ends.

CURLS, KINKS, AND COILS: WORKING WITH TEXTURE 143
INDIVIDUAL BRAIDSIndividual braids may also be known as single or box braids. These are the most versatile towear, and they are directional—able to move or be swept into updos.
Twist or single braids placement Twist or single braids placement—parting,sectioning, units
Cornrow—sectioning, parting Cornrow placement—parting, sectioning

144 CHAPTER 3
Whether you use human or synthetic extension or yarn, the variations of the braid areunlimited. Individual braids are traditional and classic. They are as fundamental as cornrows.Skill and practice are necessary in order to master this technique. The individual braid is a 3-strand braid that, if done improperly, can create excessive tension and lead to breakage.
The secrets to an excellent single braid are the following:
1. The 3 portions are equal in size (uniform).2. The braid is consistent and taut.3. The braid is straight.4. The base of the braid does not have a large loop or knot putting
excessive tension on the natural hair.5. The braid must be tightly woven but done without causing pain.6. Parts should be consistent. As you get to the hairline, braids
should be parted to camouflage any thin areas. This can bedone using angled or brick layered parts.

CURLS, KINKS, AND COILS: WORKING WITH TEXTURE 145
Individual Braid
Braid stylist Susan Bishop of Jaha Studio in Silver Springs, Maryland, uses this technique forthe individual braid style.
Finished style (shown with Diva Crimp enhancement)

146 CHAPTER 3
1. Part the hair in half from ear to ear.
2. With diagonal partings from behind the ear tothe nape of the neck, create a subsection with avertical part for the base size of the braid. Take apre-determined amount of human hair to beginthe braid.
3. Within that subsection, separate the hair into 3equal parts.
Three equal portions
Secure, rotate, overlap, secure.
4. The braid revolution must include theperson’s natural hair. Each braid is createdwith the 3-strand braid technique in whichthe strand on the side is always passed underthe center strand.
Braid the extension to 2" past theperson’s natural length for fullness.
5. Continue the braiding sequence with the outerstrand crossing under to become the new centerstrand. Braid the human hair extension to about2" past the person’s natural length. This helps tocreate fullness.
6. Trim the braid shaft for a finished look.

CURLS, KINKS, AND COILS: WORKING WITH TEXTURE 147
Diva Crimps
The addition of the crimped texture to braids is an enhancement that has become very popu-lar. It creates dimension and fullness without bulk. It helps to soften the braided style. Manypeople prefer this look because it gives the braids a loose, directional hair effect.
1. After the human hair extension is braided andthe entire head is complete with braids, lightlyspray mist along the whole length of the braidwith a diluted setting mixture.
2. Saturate the braid so that its entire depth iscovered. It should not be dripping wet,however, because that will increase the dryingtime.
3. Rebraid the braids. Take about 6 braids,divide them into 3 sets (about 2 braids persection), and braid from the base to the veryend. Roll this rebraided hair onto a roller,using a pink or blue (small) perm rod.
4. Allow to dry thoroughly (about 1 hour under a hair dryer).
5. Unbraid the braided strands. Be careful not to disturb the braided extension.
6. Use fingers to take out the double braid. (Flip rebraided hair on the underside andproceed to unravel the braids with an underhand braiding motion.)
7. Trim and shape any uneven ends. The single braids should appear curly andtexturized.
Finished style

148 CHAPTER 3
Pixie Braids
The pixie braid style offers a youthful, short braid look. The individual braids are usuallysmall to medium in size. The braids are layered to various lengths, usually framing the face. Itis best to use a Kanekalon synthetic hair because this fiber singes better when you are mold-ing the tips. The ends are cut and singed closed for the desired length.
The pixie braid must be tight. This will create a curved braid. There should be a light, airyfeel to the braids. The layers create the feathered look when you singe the tips wherever neces-sary to complete the style. Always be aware of the natural hair length so that you do not burnthe hair. The hair must be short for this technique, and the finished braid can be slightlylonger than the natural length. Singe the braid to be 1 to 2" longer than the natural hair.
Finished style

CURLS, KINKS, AND COILS: WORKING WITH TEXTURE 149
1. Follow steps of individual braid instruction tostart pixie braids.
2. Maintain the 3-strand, outside-to-inside strandunderhand braiding technique. Keep the braidstitch close.
Three-strand braid sequence
First loop
Second loop
3. To hold the tight stitch taut, double loop theends. Bring together the 3 strands; hold inone hand. With the other hand, separateseveral strands out from the braid, loop overand around, and pull through the loop.Repeat.

150 CHAPTER 3
4. Trim directly under the knot. Singe the knot toclose. The singed ends will be warm and softenough for you to mold by rolling the meltedsynthetic fiber between thumb and pointerfinger. This will give the ends a sharp, pointed,neat finish.
Trim.
Finished style

CURLS, KINKS, AND COILS: WORKING WITH TEXTURE 151
Flat Twists
Flat twists are a great alternative for people with medium- to shoulder-length hair. Thesetwists are regal, soft, and easily sculpted into a day or evening look. Flat twists are a wonder-ful option for women who are interested in wearing their hair natural, but who do not wantextensions or a woven braided look. Whether the hair is relaxed or chemical-free, thissculpted style offers an elegant and sophisticated crown of glory.
The flat twist is a 2-strand, flat-on-the-scalp braid. The pattern resembles the flat spiral ona candy cane. Master braider Cecelia Hinds of Uzuri Braids in Washington, D.C., uses thistechnique. You twist 2 strands of equal proportions onto the scalp, picking up natural hairwith every revolution. Most flat twist styles can last for 2 to 3 weeks.
To maintain this style, no shampooing is required. Cover the hair nightly with a satinscarf. Oil the scalp as needed.
Finished style

152 CHAPTER 3
“Lin Twist”—Flat Twist with Lin
Lin twists are the new classic of updo braiding styles. They give medium- to shoulder-lengthhair dimension and diversity. The style can last 3 to 4 weeks. It can be done in 2 hours and isa quick alternative for people who want extensions incorporated into their braid style. Thistechnique also has been mastered by Cecelia Hinds of Uzuri Braids.
Finished style

CURLS, KINKS, AND COILS: WORKING WITH TEXTURE 153
1. The 2-strand twist can be performed using theroll-and-twist method at the hairline. Place thelin flat on top of the 2 equal portions. Secure thelin to each base with the double twist sequence,picking up natural hair with each revolution.
2. Pre-plan the style so that it fits the contour of thehead along the sides and back.
Lin twist—side
Lin twist—back
3. Gather the extended ends into a French roll orinverted cornrow; pin and tuck.
154 CHAPTER 3
The African Kurl—Twist Out
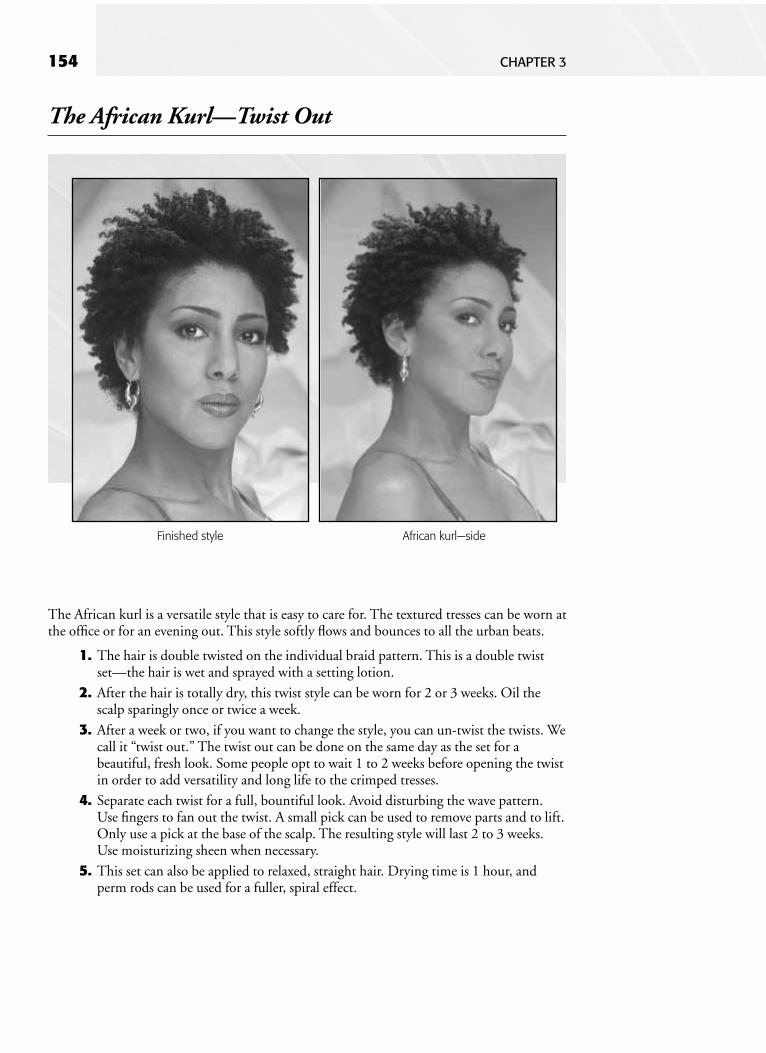
The African kurl is a versatile style that is easy to care for. The textured tresses can be worn atthe office or for an evening out. This style softly flows and bounces to all the urban beats.
1. The hair is double twisted on the individual braid pattern. This is a double twistset—the hair is wet and sprayed with a setting lotion.
2. After the hair is totally dry, this twist style can be worn for 2 or 3 weeks. Oil thescalp sparingly once or twice a week.
3. After a week or two, if you want to change the style, you can un-twist the twists. Wecall it “twist out.” The twist out can be done on the same day as the set for abeautiful, fresh look. Some people opt to wait 1 to 2 weeks before opening the twistin order to add versatility and long life to the crimped tresses.
4. Separate each twist for a full, bountiful look. Avoid disturbing the wave pattern.Use fingers to fan out the twist. A small pick can be used to remove parts and to lift.Only use a pick at the base of the scalp. The resulting style will last 2 to 3 weeks.Use moisturizing sheen when necessary.
5. This set can also be applied to relaxed, straight hair. Drying time is 1 hour, andperm rods can be used for a fuller, spiral effect.
Finished style African kurl—side

CURLS, KINKS, AND COILS: WORKING WITH TEXTURE 155
African Kurl and Flat Twist “Sunburst”
This combination of natural twists is fresh and youthful. The styles mix a curly look with thesculpted flat twist, which spreads sunshine to every face. The tighter the coil pattern, themore texture the curls will have. These curls are versatile and can last for up to 6 weeks.
For more fullness you can do a twist out. You can un-twist both the curls and the flat twistfor styling options.
Finished style

156 CHAPTER 3
1. Shampoo and deep condition the hair. Toweldry, squeezing out excess moisture. Hair shouldbe damp but not dripping wet.
2. With tail comb, divide the hair in half from earto ear. Then divide the back portion of the hairinto 4 sections.
Four sections
Close together to form curl
Lower side, 2 strands
3. Beginning at the nape, lightly apply a pinchof water-soluble gel to each subsection. Witha horizontal parting, sub-divide verticallyinto 1/4" partings. Overlap equal portionswhile moving counterclockwise and do a 2-strand twist to the ends of the strand. Thetwist must be tight, so revolutions should beclose together to form the curl pattern.
4. When the back is completed, move to the sideand repeat the twist movement.
5. Dampen hair in front with a spray bottle ofwater and oil to keep moist. Flat twist damp hairinto a small, sculpted pattern. Place personunder dryer until hair is completely dry.

CURLS, KINKS, AND COILS: WORKING WITH TEXTURE 157
6. Lightly oil scalp and finish with moisturizingspray sheen.
Finished style
LOCKS
Nubian CoilsStyling the hair in Nubian coils is the first step toward locking hair. Nubian coils are smallspiral curls, usually short to medium in length. The texture of the hair determines the forma-tion, or coil pattern. Some coil patterns are tighter, or closer together, than others. If the coilpattern is smaller, then the coil will be tight. The reverse also holds true: the larger the waveor curl formation, the larger in size the actual coil will be. By examining the coil pattern ofseveral strands of hair over the entire head, you will be able to determine the size and charac-teristics of the coil formation.
Examine the hair to determine the coil pattern. Check 3 different areas of the head:
1. The nape (the “kitchen”) is usually tight; very coily or curly; and dense.
2. The side hairline is usually slightly less coily or curly and may be thinner. Look fordamage or alopecia.
3. The crown may have the least curl or wave pattern. For some menopausal women,this area may thin or bald. However, this area is usually rich with a dense concentra-tion of hair.
The average person has several textures of hair, from grey wiry to fine coily. What thismeans is that you must be aware of the differences and apply the necessary techniques basedon the hair texture to get the best results before locking.
Nubian coils are the “pre-lock phase” before African locks, or dread locks, as they are oftencalled. This pre-locked phase is a beautiful style in itself and can be worn to work or for play. Itis neat yet at the same time loose in structure. When done initially, Nubian coils are flat andcontoured to the head. When you use different styling gels, a shiny/glossy glow gives the coilstheir finished look. However, after about 48 hours, the coil “puffs” open slightly—just enoughto expand the spiral and soften the curl. The coil formation is still in place and can last for upto 6 weeks. The life of this coiled style depends on the size of the coil. Smaller coils last longer,and the tighter the coil or curl pattern, the longer the style will last, since this style is thepreparatory style for African locks.

158 CHAPTER 3
It is necessary to know whether the person intends to lock or just wants to wear his or herhair in a natural coiled style. The person who is interested in locking is at a higher commit-ment level, physically, emotionally, and spiritually willing to invest the time—which is usually6 months to a year—for the locks to solidify and mature.
Hair locking is a natural coiling process of textured curly hair that happens without theuse of combs or chemicals. The hair meshes and spirals within itself, interlocking and adher-ing until the joined strands become a tight, dense unit, or lock. The hair locks in slow develop-mental stages, which can take anywhere from 6 months to a year depending on the length,density, and coil pattern. Cultivating locks is a process, a journey into self-discovery andacceptance of genetic and cultural inheritance.
There are several ways to cultivate locks, such asdouble twisting, wrapping with cord or wire, braidingwith or without extension, or simply not disturbingthe hair by not combing or brushing the lock (as theRastafarians of Jamaica do); if the hair is just left to itsown natural course, it will lock. However, it will nothave a groomed, manicured look. I refer to this typeof locks as “organic” locks. Cultivated African lockshave symmetry. The goal to grooming locks is to cre-ate uniform tresses that will turn heads when the per-son is well groomed. Symmetry is not easy to achievewith textured hair. Although the hair is programmedgenetically to coil, no two coils are exactly alike. It isyour responsibility to develop a system that promotessymmetry in the textured hair. Three basic methodsof locking are (1) comb, (2) palm roll, and (3) braidor extension.
The most effective techniques that use the natu-ral coil pattern are the comb technique and the palmroll method. The comb technique can be most effec-tive during the early stages of locking, while the coil isstill open. This method of coiling entails placing thecomb at the base of the coil and, in a rotating motion,spiraling the hair into a curl. With each revolution the comb moves down until it reaches theend of the hair shaft. This method offers a great tight coil and is excellent on short (1 to 3")hair.
The second method of grooming and starting locks is the palm roll method. This methodis the gentlest on the hair and guides it through all the natural stages of locking. Palm rollingtakes advantage of the hair’s natural ability to coil. The following description shows how to usethe palm roll method to create a coiled style.
Mature locks

CURLS, KINKS, AND COILS: WORKING WITH TEXTURE 159
Nubian Coils—Pre-locking Phase
1. To begin, shampoo and condition the hair. Then towel blot the hair, squeezing outexcess moisture so that the hair is damp but not wet.
. 2. Next, part the hair in horizontal rows from the nape all the way to the fronthairline. Then divide the first horizontal row at the nape into equal size subsections.The subsections can be square, circular, triangular, or rectangular; the size of theindividual sections and their shape depend on the desired finished look. Beforepalm rolling, use hair clips to hold the hair around the subsection out of the way.
3. Beginning at the nape on the far side, take the hair within the first subsection andlightly apply a pinch of gel, using your right forefinger and thumb. Then pinch thehair near the scalp and twist it 1 full counterclockwise revolution. (If you are left-handed, use your left hand to pinch the hair, but always turn it counterclockwise.)
4. With one smooth motion, pass the hair from your right hand to your left hand,tuck the hair into the recession near the thumb, and fold your thumb down to holdthe hair in place. Position your left hand behind your right hand so that the leftfingertips are at the right wrist. Slide your right hand back while sliding the lefthand forward.
5. When the hair is between your palms, pull out your thumb so that the hair is rolledbetween your palms. When the fingertips of your right hand are near the left-handwrist, fold your thumb back down to recapture the hair.
Palm rolling

160 CHAPTER 3
6. So that the hair is always rolled in acounterclockwise direction, reposition the lefthand behind the right hand and repeat the palmrolling technique. Each time you roll the hair,move progressively down the hair shaft. Whenyou reach the ends, place the lock down neatlyand begin again with the adjacent subsection.
7. When each subsection in the first horizontal rowhas been completed, move up to the nexthorizontal row and sub-divide it as before. If yourolled the previous subsections from right to left,this time work from left to right. Continue thispattern all the way to the crown. As you work upthe head, include the side sections. Alwaysmaintain a degree of moisture by using the spraybottle as needed. Also, apply the same amount ofgel to each subsection.
8. When you reach the crown, continue palmrolling subsections, directing them to move toward the back. When you reach thetop of the head, move around the person to accommodate the desired finished style.If the person wants the front individualized, for instance, if a few sections are tomove onto the forehead, reposition yourself in front of the person to palm roll thesesubsections.
9. When all the hair has been palm rolled, place the person under a hood dryer set onlow heat. Dry the hair completely, but no more than necessary.
10. When the hair is completely dry, finish the style by applying a light oil to add sheen.
11. Single braids with yarn are a lock alternative which is added to the front to framethe face. The ends are looped and singed to the desired length.
African LocksThe ultimate in natural hair care is the textured richness of hair locking. Throughout thecontinent of Africa, various tribes have practiced this art form and cultural expression ofbeauty enhancement. The people of the Pokot, Massai, Mau Mau, Kau, Ashanti, and Fulanitribes, as well as many others, practice some form of locking. Some tribes use mud or a redclay with straw or hay to perform the grooming technique.
Locks are what the Afro was in the 1960s: a symbol of freedom, cultural empowerment,and identity, as well as a seed to self-acceptance. Ona Osirio-Maat, a locktician for 11 years, isthe creator of the LockSmyth method, a lock technique that incorporates a special, rhythmicalpalm rolling technique. Osirio-Maat stated during a phone interview with the author,“Locked hair is the ultimate natural hair statement. It says you have come home . . . finally.The self-love and appreciation that has been gained from ‘growing’ through the process canhave tremendous transformative power surrounding the ‘locker’ life. People usually undergosome deeper level of self-evaluation as they return for professional cultivation of their locks,and the stories center around their hair getting longer and stronger. Also, there are storiesabout the strength their locks silently display. As a locktician, I witness the internal growth ofmy clients as well as the inches of hair flowing down their backs. Their pride is tempered bythe humility of the process. Instead of running fast, hard, and long distances from the kink,they changed their perspective and began to embrace the coil.”
Nubian coils with yarn extension

CURLS, KINKS, AND COILS: WORKING WITH TEXTURE 161
The Developmental Stages of Hair LockingDepending on the coil pattern, density, and length of hair, the locking process may vary from6 to 12 months to lock the entire head.
Phase 1 Pre-lock Stage—Hair is soft and is coiled into spiral configurations. The coil issmooth and the end is open. The coil has a shiny, or a glossy, texture.
Phase II Sprouting Stage—Hair begins to interlace and mesh. The separate units begin to“puff up” and expand. The units are no longer glossy, thin, and smooth. Little bulbs, or knots,form at the middle or ends of the coiled unit, indicating that the coil is starting to close. This“plumping” of the lock may give the head an unkempt look. Avoid over-grooming or excessivetwisting at this phase. The length starts to shrink because the coil is solidifying. This “frizzy”look is part of the process. Here is where patience and desire are virtues—and the person’s levelof commitment is tested. This is also the stage in which some sections of the head will betotally locked, while other portions of the head will still have soft and open coils. Be aware ofthe different coil patterns and the density of the hair in each area.
Phase III Growing Stage—The hair strands adhere to one another, creating a network oftresses within each coiled unit. You can feel interlacing and meshing by squeezing the lock.You can feel a bulb at the end of each lock. The locking process starts at the middle or ends ofthe unit, not at the scalp. Hair begins to regain length. The lock still may be frizzy, yet solid insome areas. Locks are closed at the ends, dense, and dull, not reflecting light to get any sheen.
Textured curly, coily hair does not reflect light the way straight hairdoes. The person may complain about the dullness, or the lack ofluster. Again, this is part of the process. Reassure the person thatthis perceived dullness is what creates the lock. One can add oils,which allow the light to reflect off the oils and give the hair a gloss.
Phase IV Maturation Stage—The lock is now totally closed at the end. The unit is inter-laced and meshed, giving the hair a tighter, rope-like look, except where there is new growth atthe base. The network of intertwined strands is tight and hard to the touch. The hair grows ata rapid rate. Whether the strands are in the anagen cycle or telogen cycle of growth, all the hair isfused together; because the hair is not combed or brushed, there is little shedding. The hairstays within the locked unit. New sprouts spring up between mature locks. In some cases, thehair forms whole new locks.
Some textures will not close at the end. A single curl or wave mayexist at the end of the lock, giving the lock the appearance of beingopen. The maturation stage will still continue.
Phase V Atrophy Stage—After several years of maturation (the usual time varies between 7and 10 years), the lock may start to weaken, or atrophy, at the ends. The smaller the lock, themore fragile it is, and the more likely it is that the atrophy will occur. The larger the lock, themore durable it is, and the degeneration may never occur. This atrophy stage usually occurs atthe nape of the neck and around the frontal and peripheral hairlines. When the person’s hairstarts to weaken, consult with him or her and make sure it is part of a natural locking processand not due to physical or emotional stress. Here is how to tell the difference:
1. Thinning and breakage at the ends are signs of a degenerative process and part ofthe locks’ life cycle; excessive dryness can accelerate this process.

162 CHAPTER 3
2. Thinning and breakage at the base, or scalp, are the body’s warning signals thatsomething is internally or externally imbalanced.
How to Cultivate and Groom LocksThere is an effective 7-step procedure for grooming and cultivating locks:
1. To start locks, use the palm roll technique described earlier in the chapter.
2. Avoid over-twisting. With each revolution, move down the shaft to avoid over-spiraling the hair.
3. During the first 3 months, the person should have the locks groomed every 3 or 4 weeks.
4. Grooming may entail the following:
■ Herbal shampoo.
■ Hot oil treatment.
■ Herbal rinse or acid rinse.
■ Re-rolling, cultivating, or manicuring.
■ Trim (optional).
■ Styling (texturizing, to include crimping, curling, braiding, and so on).
■ Watering: Spritzing with water helps keep locks or natural curls clean. Theweight of water helps the lock drop down in length and brings lint to the sur-face. Keeping the hair wet is one of the keys to lock growth and promotes thenatural curling of hair.
5. Always remove lock debris, lint, and excess oils embedded in locks.
6. Avoid using heavy petroleum or waxy oils. Use diluted moisturizing and water-soluble gels when rolling the hair.
7. Once the locks are fully matured, the hair can be shampooed more often.
Be careful not to dry out the hair. Use lemon rinses and acid rinsesto loosen the lock debris after each shampoo for deep cleansing.Follow with light hot oil treatments to the scalp.
Locked hair may appear dull when not properly cared for. Locks do, however, have abeautiful sheen when healthy and clean. The sheen is subtly understated and soft because, likemost natural fibers, locks have a matte finish; this finish is a part of their natural beauty anduniqueness. Avoid applying large amounts of braid oil or moisturizing sheen to create moreshine; this contributes to lock sediment build-up. Once or twice a week, small amounts of nat-ural oil (dime size) can be applied to the scalp and massaged through the hair to create luster.With locks, “less is more.”
Styling and Texturizing LocksAt the salon Tendrils in Brooklyn, New York, texture is used to enhance the natural tress. Thefiner the lock, the more versatility the stylist will have to create new looks. To eliminatebreakage, avoid putting too much stress on the hair. Remember: Thin locks are fragile.
■ Texturizing—On damp locks, lightly spray a setting lotion. Braid or twist the entirelength. Add a perm rod or clip to hold the end. The hair must be completely drybefore unbraiding or twisting out in order to get style.

CURLS, KINKS, AND COILS: WORKING WITH TEXTURE 163
■ Tendrils/Spirals—On damp locks, lightly spray a setting lotion to cover the entirelock surface. Take a perm rod (pink, purple, or white) and vertically wind the lockaround the rod, starting at the end of the hair and moving up toward the scalp.
Finished style

164 CHAPTER 3
■ Updo Sweeps—Roll, twist, braid, pin, and tuck. Create chignons, buns, French rolls,and inverted braids—be as creative as your hair will let you. There are no limits!
MATERIALS FOR EXTENSIONSThere are a variety of materials that are available for the purpose of extending textured hair.The life of the style, however, will always be determined by the materials used. As braidextensions become more popular, more varieties of quality and price will be available.Though it may save money to buy the least expensive product, beware that you may not getthe desired results. In other words, the extension material is critical to the final outcome ofyour hair design.
When buying a new product, buy in small quantities and test the fiber on a small sectionof hair before using it on the whole head.
Upswept locks—spiral curl Upswept locks—side
Lin
Human hairweft
Human hairloose
Nylon/rayonsynthetic
Kanekalon
Yarn Nylon/rayonsynthetic
Extension materials
CURLS, KINKS, AND COILS: WORKING WITH TEXTURE 165
The following list may help you to decide what extensionmaterial to use:
1. Kanekalon—It is a synthetic fiber of excellent quality. It is designed to have atexture similar to that of African hair types. It does not reflect light, which means ithas less shine. It is durable and holds up to shampooing and styling. When beingused in braiding the hair, it is smooth to the scalp and fingers, which is veryimportant because it means it does not cut or damage natural hair as other, lessexpensive products do. It generally has a softer feel and tangles less than othersynthetics. It comes in a variety of colors. It is versatile and easy to match withnatural hair colors. Kanekalon costs more than most synthetics but is of a betterquality—not only according to manufacturers, but also according to many braidstylists. This extension material finishes well when you are using the singeingmethod; it burns safely and seals quickly.
2. Nylon/Rayon Synthetic—This product is less expensive and readily available. Thequality can vary depending on the brand name. You must be familiar with thebrands in order to get a decent quality. In general, the less expensive synthetic hairtangles more and can damage natural hair. Nylon and rayon have been known tocut or break the hair. They are often less durable after repeated shampooing. Theyalso reflect light and leave hair very shiny. Stylists must be cautious when choosingthe quality of the extension material. Nylon and rayon synthetics, however, come inmore varieties of color than Kanekalon. However, these materials do not burn wellwhen you are using the singe method to close synthetic extensions. The warmplastic melts too quickly, holds heat, and can burn and blister the skin.
It has been my experience that when the hair is shampooedregularly, the natural hair begins to expand—but the Kanekalon orother synthetic hair does not. As the natural hair expands, thetension at the base of the braid with the extension increases.
Warning: This extension material finishes poorly when you areusing the singeing method; melted fibers can stick to the skin andburn. Avoid this material when singeing.
3. Human Hair—This material is the most confusing of the fibers and is somewhatmysterious. Most of the product is imported from Asia. It is a closed market, andvery little is known about how the supposed human hair is produced or processed.Some of it is imported from Europe, and small amounts are from Africa. Althoughthe label may say “human hair,” buyer beware—all that glitters is not gold. Thebuyer must select hair from a reputable dealer or wholesaler of this product to beassured of its quality. Pre-packaged human hair is generally less expensive than thatwhich is customized by a wholesaler. If a wholesaler is not available in your area,consider mail order.
This material (supposedly) is derived from human hair and is processed intohundreds of colors and textures. It is versatile, soft, and tangle-free. Although thematerial is extremely expensive, sometimes overpriced, it moves and feels like

166 CHAPTER 3
natural hair. It expands along with human hair when it is washed, which may alsochange the desired results and the life of a particular hairstyle. It can easily slip fromthe base of the braid. But unlike Kanekalon, it can be reused, if properly cleanedand combed. This product is ideal for those who are allergic to the syntheticproducts. To finish braid styles with human hair you can use thermal curling toolsand set the hair for crimps.
4. Human Hair Weft—Wefted human hair has all the advantages of loose human hair,except that when it is shampooed it does not expand to the point that it can slipfrom the base. The material is sewn together on a woven strip that interlaces withthe individual human hair strands. Wefted human hair is a great alternative to adddimension, length, and color to a person’s natural hair. Wefted hair is sewn with aneedle and thread into a braided cornrow track and netting.
5. Yarn—Traditional yarn material is used to make fabric for sweaters, hats, and so on.But now it is being used to adorn textured African hair. When braided or wrapped,it is light and soft and detangles easily. Yarn comes in many colors. The mostcommonly used is black or brown for a more natural look. Yarn is different thansynthetic fibers because it does not reflect any light. It is not glossy. It gives the braidstyle a matte finish and can give braids a “locked” look. But be careful whenchoosing yarns. Some black yarns have a blue or green tint. A yarn may appear jetblack in the store but, in the light, reflect green. Always hold yarn to the light beforepurchasing. Yarn is very inexpensive and easy to find. Also, the yarn can be cottonor a nylon blend, and though it may expand when shampooed, it does not slip fromthe base. So, braid styles that use yarns are durable. Do not burn yarns if they are100% cotton. Finish braids with a neat knot.
6. Lin—This is a beautiful wool fiber made in France and imported from Africa. Likeyarn, it has a matte finish and gives off little shine. It only comes in black andbrown. Lin can be purchased in packages of 25 m or 24 yds. It comes on a roll andis used in any length and size. Often used for Senegalese twists and “corkscrew”styles, this fiber cannot be singed. It is cottony and very flammable. Braid stylesusing lin are generally not shampooed often.
7. Yak—This strong textured fiber comes from the domestic ox, usually found in themountains of Tibet and central Asia. The hairs on the ox are long on the sides andthe back. These hairs are shaven and processed to be used alone or blended withhuman hair. The variety of blends usually creates a more African texture when yak isused in wigs. Small mixtures of yak with human hair help to remove themanufactured shine.

167
Index
Accessories to ponytails, 8-10African braiding, 123African kurl and flat twist “sunburst,” 155-157African kurl-twist out, 154African locks, 160
see also LocksAshanti tribe, 160
Back-combing, 2-3Basset, Angela, 123Beads, 9Bishop, Susan, 145Bobby pins, 304Bow, 103-108Bowtie, 3, 109-115Box braids, 143Braid tapering, 137Braids and wet hair, 1Brushes, 2Buttons, 10
Chemically treated hair, 1Chignons, 50Comb technique for locks, 158Combing hair, 1Combs for detangling hair, 1, 2Conditioners, 1Contouring, 123Cornrows, 123-130Cornrows and Senegalese twist (combo), 138-142Cultivating and grooming locks, 162Cultural hair styles, 123, 158
Damaged hair, 1Detangling hair, 1Developmental stages of locks, 161-162Diamond casama braids, 134-137Diva crimps, 147Dread locks. See LocksDry versus wet hair, 1-2Drying hair, 1Dutch braid, 80-88
Extension materials, 164-166Extensions for cornrows, 126-130
Feed-in method for cornrows, 127-130Fishtail, 64-70Fishtail ponytail, 36, 60-63Flat twists, 151-153French braid, 71-79French twist, 3, 116-121Fulani tribe, 160
Gelled hair, 2
Hair pins, 3-4Hairitage Masterpieces (Waajid), 127Hand technique, 2, 11Hinds, Cecelia, 151, 152Human hair extensions, 144, 165-166Human hair weft extensions, 166
Individual braids, 143-147
Jaha Studio, 145Julien, Avion, 138
Kaba, Fanta, 134Kanekalon extension material, 131, 148, 165Kau tribe, 160Khamit Kinks, 123Kinard, Tulani, 124Knotting, 96-102
Lin extensions, 166Lin twist (flat twist with lin), 152-153Locks, 157-164
cultivating and grooming, 162developmental stages of, 161-162styling and texturizing, 162-164
LockSmyth method, 160Long hair, 1-4
Massai tribe, 160Materials for extensions, 164-166Mau Mau tribe, 160
Nubian coils, 157-160Nubian coils—pre-locking phase, 159-160Nylon/rayon synthetic extensions, 165

168 INDEX
Organic locks, 158Osirio-Maat, Ona, 160Over-directing braid extension, 130
Palm roll method for locks, 158Pearl strings, 8Pearls, 9Pixie braids, 148-150Pokot tribe, 160Ponytails, 4-8, 50
accessories to, 8-10fishtail, 36, 60-63
Pre-lock phase of locks, 157Prestonia, Annu, 123
Rastafarians of Jamaica, 158Ribbons, 8Rope braid, 17-25Rope ponytail and chignon, 12-16
Sculpting, 123Senegalese twists, 131-133Sequin strings, 8Shampooing, 1
Silk flowers, 10Single braids, 143Styling and texturizing locks, 162-164Synthetic extensions, 144
Teasing hair, 2Tendrils, 134, 162Three-strand cornrow, 124Tools of the trade, 2Tulani’s Regal Movement, 124, 138Twisting, 89-95Two-strand ribbon braid, 51-59Two-strand twist, 26-37Two-strand twist with ribbon, 38-50
Uzsuri braids, 151, 152
Waajid, Taliah, Hairitage Masterpieces, 127Wet versus dry hair, 1-2Wonder, Stevie, 123
Yak extensions, 166Yarn extension material, 131, 144, 160, 166