BMFB 4283 NDT & FAILURE ANALYSIS Lectures for Week 3 Prof. Qumrul Ahsan, PhD Department of...
86
BMFB 4283 NDT & FAILURE ANALYSIS Lectures for Week 3 Prof. Qumrul Ahsan, PhD Department of Engineering Materials Faculty of Manufacturing Engineering
-
Upload
hector-ferguson -
Category
Documents
-
view
238 -
download
3
Transcript of BMFB 4283 NDT & FAILURE ANALYSIS Lectures for Week 3 Prof. Qumrul Ahsan, PhD Department of...

BMFB 4283NDT & FAILURE ANALYSIS
Lectures for Week 3
Prof. Qumrul Ahsan, PhD Department of Engineering MaterialsFaculty of Manufacturing Engineering

3.0 Magnetic Particle Testing
3.1 Introduction3.2 Theory3.3 Techniques and Equipment3.4 Inspection and Application
Issues to address

MAGNETIC PARTICLE TESTING - Outline• Magnetism and Ferromagnetic
Materials• Introduction of Magnetic Particle
Inspection• Basic Procedure and Important
Considerations• Magnetizing methods and apparatus• The detecting medium
• Examples of MPI Indications• Reporting Indications

Introduction• This module is intended to present information
on the widely used method of magnetic particle inspection.
• Magnetic particle inspection can detect both production discontinuities (seams, laps, grinding cracks and quenching cracks) and in-service damage (fatigue and overload cracks).

Ferromagnetic Material
Surface DefectSubsurface
Internal
MT MT
CANNOT BE DETECTED BY Magnetic Particle Testing
Magnetic Particle Testing• Test method for the detection of surface and
slightly sub-surface indications in ferromagnetic materials

Magnetic lines of force around a bar magnet
Opposite poles attracting Similar poles repelling
Introduction to Magnetism
Magnetism is the ability of matter to attract other matter to itself. Objects that possess the property of magnetism are said to be magnetic or magnetized and magnetic lines of force can be found in and around the objects. A magnetic pole is a point where the a magnetic line of force exits or enters a material.
Magnetic field lines:• Form complete loops.• Do not cross.• Follow the path of least
resistance.• All have the same
strength.• Have a direction such
that they cause poles to attract or repel.

UNMAGNETISED STATE
DOMAINS RANDOMLY ORIENTATED
MAGNETIZED STATE.
DOMAINS ORIENTATED IN EXTERNAL
MAGNETIC FIELD
FIELD
SATURATED STATE
DOMAINS ORIENTATED IN STRONG
EXTERNAL FIELD
FIELD
Domain Theory

RESIDUAL STATE. DOMAIN REMAINING
ORIENTATED
FIELD
DEMAGNETISED STATE.
DOMAINS RANDOMLY ORIENTATED IN
OPPOSING CURVE
Domain Theory

How Does Magnetic Particle Inspection Work?
A ferromagnetic test specimen is magnetized with a strong magnetic field created by a magnet or special equipment. If the specimen has a discontinuity, the discontinuity will interrupt the magnetic field flowing through the specimen and a leakage field will occur.

How Does Magnetic Particle Inspection Work? (Cont.)
Finely milled iron particles coated with a dye pigment are applied to the test specimen. These particles are attracted to leakage fields and will cluster to form an indication directly over the discontinuity. This indication can be visually detected under proper lighting conditions.

Principle of MT : Flux Leakage
Ring Magnet Ring Magnet
Magnetic field is Fully contained: No Poles
Flux Leakage occurs: Poles created
Flux LeakageN
S
Ferromagnetic Particles
Attracted at poles

Principle of MPI : Flux Leakage
N S
No Defect Defect
The change in permeability causes flux leakage
N SFlux Leakage

Principle of MPI : Flux Leakage
N S
No Flux Leakage because No change in permeability
STEEL µ= 1000

Principle of MPI : Flux Leakage
The change in permeability causes flux leakage
Flux LeakageN S
STEEL µ= 1000
AIR µ= 1

Factors Affecting Flux Leakage
• Depth of defect• Orientation of defect shape of defect • Size of defect• Permeability of material• Amount of flux available

SN SN
• Depth of defect• Orientation of defect shape of defect • Size of defect• Permeability of material• Amount of flux available
Factors Affecting Flux Leakage
Depth below surface

Basic Procedure
Basic steps involved:
1. Component pre-cleaning
2. Introduction of magnetic field
3. Application of magnetic media
4. Interpretation of magnetic particle indications

Pre-cleaning
When inspecting a test part with the magnetic particle method it is essential for the particles to have an unimpeded path for migration to both strong and weak leakage fields alike. The part’s surface should be clean and dry before inspection.Contaminants such as oil, grease, or scale may not only prevent particles from being attracted to leakage fields, they may also interfere with interpretation of indications.

Introduction of the Magnetic Field The required magnetic field can be introduced into a component in a
number of different ways.
1. Using a permanent magnet or an electromagnet that contacts the test piece
2. Flowing an electrical current through the specimen
3. Flowing an electrical current through a coil of wire around the part or through a central conductor running near the part.

Direction of the Magnetic FieldTwo general types of magnetic fields (longitudinal and circular) may be established within the specimen. The type of magnetic field established is determined by the method used to magnetize the specimen.
• A longitudinal magnetic field has magnetic lines of force that run parallel to the long axis of the part. • External solenoidal coil• With yoke
• A circular magnetic field has magnetic lines of force that run circumferentially around the perimeter of a part.• Head Shot• Central conductor• Prod

Importance of Magnetic Field Direction
Being able to magnetize the part in two directions is important because the best detection of defects occurs when the lines of magnetic force are established at right angles to the longest dimension of the defect.
This orientation creates the largest disruption of the magnetic field within the part and the greatest flux leakage at the surface of the part.
An orientation of 45 to 90 degrees between the magnetic field and the defect is necessary to form an indication.
Since defects may occur in various and unknown directions, each part is normally magnetized in two directions at right angles to each other.
Flux Leakage
No Flux Leakage

Defect Orientation
Defect at 90 degrees to flux : maximum indication

Defect Orientation
>60 Degrees to Flux: Acceptable indication

Defect Orientation
<60 Degrees to Flux : Weak indication

Question
? From the previous slide regarding the optimum test sensitivity, which kinds of defect are easily found in the images below?
Longitudinal (along the axis) Transverse (perpendicular the axis)

Induction methods– Threaded bar
• Hollow object must have access both ends• Conductor carrying current is threaded through
bore passed current through it.• Produced circular field
– Flexible cables• Used for a variety component shape• Place flexible cable on or around specimen• Current passed through coil induce magnetic field

Producing a Longitudinal Magnetic Field Using a Coil
A longitudinal magnetic field is usually established by placing the part near the inside or a coil’s annulus. This produces magnetic lines of force that are parallel to the long axis of the test part.
Coil on Wet Horizontal Inspection Unit
Portable Coil

Magnetizing methods – Induction methods• Methods:
– Encircling coils• Placing specimen inside coils• Low voltage, high amperage current is
passed• Creates longitudinal magnetic field• Current values:
–NI = K/[L/D]– N = number of turns in the coils– I = current in amperes– L = the component length– D = the component diameter– L/D = ratio of geometrical
information of component– K = source constant ( K= 32 for DC,
22 for AC, 11 for mean value)

Flexible cable technique• Advantages:
– AC or DC field– Large areas can be inspected– No poles to attract magnetic particles– Filed strength can be altered– Predictable field strength
• Disadvantages:– Cumbersome long heavy cable required– Longer setting time– Heavy transformer required for large amperage

Producing a Longitudinal Field Using Permanent or Electromagnetic Magnets
Permanent magnets and electro-magnetic yokes are also often used to produce a longitudinal magnetic field. The magnetic lines of force run from one pole to the other, and the poles are positioned such that any flaws present run normal to these lines of force.
Yokes:• Highly permeable, low
retentive steel• Laminated to reduce
induction and prevent the yoke from permanently magnetized

Electromagnetic yokes• Magnetism:
– Encircling yoke with coil through which current is passed
– Strength of field is varied by:• Adjusting the current (amperage) flowing
through the yoke• Varying the distance between the pole pieces
– The field produced is longitudinal• Depth of field depends on type of current
• Require source of electrical energy (AC or DC)
• Surface discontinuities using AC• Sub-surface defect using DC

Electromagnetic yokes• Advantages:
– AC or rectified DC operation– Controllable field strength– Can be switched on/off as required– No damage done to test piece– Relatively lightweight
• Disadvantages:
– Requires power supply– Only small area can be examined– Leaves only one hand free

Magnetizing methods - Permanent magnet• Permanent magnet:
– able to maintain a magnetic field in surrounding space– Field strength can vary considerably, depends on flux
density in magnet and shape
• Magnetic bar:– A piece of ferromagnetic material with a magnetic pole at
each end– Placed into a closed loop:
• create magnetic field within closed circuit and no external field would exist
• If defect present in the loop, flux leakage occur• Provide magnetic flow in the specimen and produce
longitudinal magnetic field between poles

Permanent magnets
• Advantages:– No power supply required– Inexpensive– No damage to the test piece from arcing– Relatively lightweight (portable)
• Disadvantages:– Deterioration with wear– Have to be pulled from the test surface– Magnetic particles attracted to poles– Limited application on awkward shapes
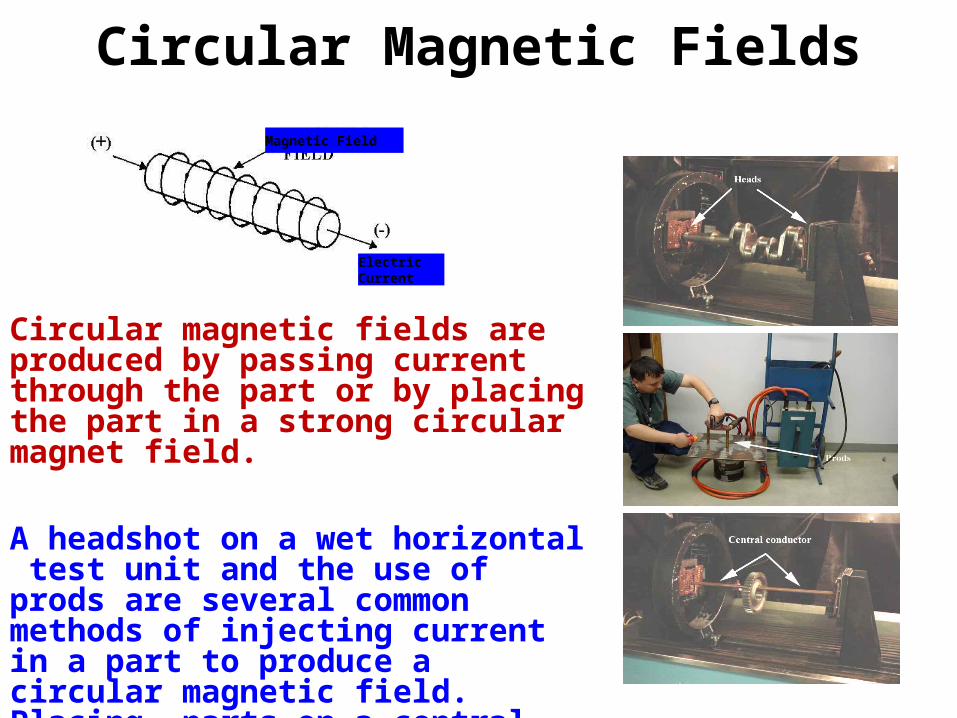
Circular Magnetic Fields
Circular magnetic fields are produced by passing current through the part or by placing the part in a strong circular magnet field.
A headshot on a wet horizontal test unit and the use of prods are several common methods of injecting current in a part to produce a circular magnetic field. Placing parts on a central conductors carrying high current is another way to produce the field.
Magnetic Field
ElectricCurrent

Magnetizing methods – Current flow• Produce circular magnetic field by
passing current through test piece– Prod technique
• Current is introduced using electrical contacts (prod)
• Prod induce circular magnetic field within specimen using current values
• Correct positioning is essential to ensure all possible defects are detected
• Ideally the prods should be in line parallel to or on the same axis as the defect

Current flow - Prods• Advantages:
– AC or DC fields– Low voltage output– No poles to attract magnetic particles– Variable field strength– Can be used in confined spaces
• Disadvantages:– Risk of creating arc strikes– Heavy transformer required– Contacts and small test items can be overheated– Careful positioning and spacing of prods are
required

Longitudinal vs. Circular Magnetic FieldLongitudinal Magnetic Field Circular Magnetic Field
Advantages
Easy to generate Higher field strength
No electrical contacts Wholly contained within the part
Rapid processing of small and long part
Penetrating power is more
Easy to demagnetize part
Disadvantages
Lower field strength than circular Difficult to remove circular DC fields
Generates nonrelevant poles at the part ends
Electric contact and associated with arcs
Very little subsurface sensitivity

Types of Magnetization Current • DC, AC, HWDC, 1FWDC, 3FWDC• Type of current used depends primarily on the depth of the
defect from the surface, not the crack size
• AC provides a highly concentrating field at the parts surface ( detecting surface and very near surface defects)– Alternating magnetic field increases particle mobility and particles
attract to leakage field(dry powder with HWDC) – A time varying magnetic field induces eddy current within the
material. Eddy currents cause the magnetic field to decay exponentially .
– The depth is the skin depth, where the magnetic field is 37% of its maximum value. = 1/πµf
• DC penetrates deeper, provides both moderate surfaces and subsurface sensitivity.

Magnetic Particles• Fine magnetic particles that create an indication at
a leakage field caused by a flaw in the magnetized sample
• Depending on its characteristics and application – Type of particle (dry or wet)– Viewing method (color contrast or fluorescent)– Method of application (continuous or residual)

Requirement of magnetic particles• Fine grains to reduce the gravitational effect. The
maximum size (BS 4069): 200m for powder and 100 m for inks
• Particles are chemically treated iron oxide particles, small in size and varying in shape (spherical to irregular sensitive to flaw)– Elongated shape for easier polarization. Spherical particles
are also needed to ensure dispersal over the surface• High magnetic permeability and low retentivity (avoid
to become permanent magnet)– High permeability for magnetization in weak flux leakage
fields– Low retentivity if particles are to be removed after the test
• High contrast against the background of the test surface

Dry Magnetic Particles • Magnetic particles come in a variety of colors. A color that
produces a high level of contrast against the background should be used.
• May be black, grey, red, orange, fluorescent
• Usually applied to a surface by means of puffer device:
They should be floated, not blasted on to the area under test
the particles are lightly dusted on to the surface
• Should be ideally be used with ac or dc current Because of extra mobility of the current
impart onto powder• Must be used when MPI is being carried out on hot and rough surfacesInks are not suitable
The dry method is more portable

Wet Magnetic Particles
Wet particles are typically supplied as visible or fluorescent. Visible particles are viewed under normal white light and fluorescent particles are viewed under black light.

Wet Magnetic Particles• According to BS 4069, the composition of
inks shall be:– Ferromagnetic particles in non-fluorescent
inks should not be less than 1.25% and not more than 3.5% by volume
– Ferromagnetic particles in fluorescent inks should not be less than 0.1% and not more than 0.3% by volume
• Carrier fluid may be oil based: paraffin or water to make up volume by 100%– If water is used, additives shall be added to
prevent corrosion on the surface or the particles and improve the wetting action
With the wet method, the part is flooded with a solution carrying the particles. The wet method is generally more sensitive since the liquid carrier gives the magnetic particles additional mobility.

Viewing conditions• Non-fluorescent inks and powders:
– Area under inspection must be evenly illuminated– Min illumination level of 500 lux (daylight/artificial light)
• Fluorescent inks and powders:
– Min UV-A irradiance level: 800 W/cm2, min background intensity 10 lux
– Degrade with exposure to ordinary light over a period of time and high temperature
– UV intensity increases, the amount of fluorescent increases too

UV-A light• Generated by mercury vapor lamps• Mercury is vaporized inside a quartz capsule by small
low current arc from auxiliary electrode • After 5 minutes, there is sufficient mercury vapor in
the capsule to initiate between main electrode• The lamp should be used after 15 minutes to allow
sufficient time to attain full working intensity

Safety • UV light operate with wavelengths between 320 – 400 nm• Shorter wavelength cause injury to the eyes• Filter must be used which cut wavelength under 320 nm to
prevent injury• Looking into UV-A cause temporary clouding vision
– fluid in the eyeball fluorescing– will normalize with no permanent effects after few seconds– Prolonged exposure may cause cataract

Health
• Flammability:– Read container labels for flash points. Materials cannot be
used under flash points
• Asthmatic:– Do not use in confined space without masks or adequate
ventilation
• Skin hazard:– Use protective clothing

Methods of Application• Continuous method : apply particles to all surfaces of
the part while the part is being magnetized– Rather easy for dry powder– For wet powder parts are magnetised several time
with short duration (0.5 sec)
• Residual Method: apply the particle after magnetizing has been removed– Residual force must be large– Suitable for wet part and defects under plating or
coating– less sensitive

Relative Penetration Sensitivity• Current Type vs. Wet or Dry Method
AC HW DC (1FWDC & 3FDC)
Penetration Poor Excellent Good
Wet Method
Surface and near surface to 0.25 mm
Surface and near surface to 0.65 mm
Surface and subsurface to 1.3 mm
Dry Method Surface and near surface to 0.25mm
Surface and subsurface to 6.35 mm
Surface and subsurface to 1.3 mm

Inspection Aids• Controlling particle suspension
– Changes in particle concentrationThe acceptable operating range for
fluorescent particles is 0.15-0.25 ml in 100 ml of liquid
Below 0.1 ml – too low to detect small defects
Above 0.4 ml –background fluorescrnce may mask small defects
– Loss of fluorescence– Contaminations
Water in oil bath or vice versaExcessive wetting agentAgglomeration reduces mobility
Centrifuge tube

Inspection Aids• Controlling magnetization and
system performance– Hall Effect Meter: measures the
amplitude of either an AC or a DC magnetic field
– Pie Gauge : made by brazing together six pie-shaped pieces of high permeability, low retentivity material
– Ketos Test Ring : A centered hole circular disk with several small drilled holes at varying depth to check leakage flux of circular field.
• Avoiding non relevant indication

Indications
Relevant Indications - Indications due to discontinuities or flaws
Non-Relevant Indications - Indications due to flux leakage from design features
Spurious Indications - Indications due incorrect inspection procedures

All surface defects form indications But not all indications are caused by defects
Non-relevant indications
Due to flux leakage but arising from design features or geometry
Changes in section Changes in permeability Furring
Splines
Keyway
Rivet
Toe of welds
Rough SurfaceFurring

FurringCaused by:
Sharp change of contour
FurringFurring

FurringCaused by:
Excessive flux on the surface or ends of component
Furring

Magnetic WritingCaused by:
Localised polarization when magnetised object induced the magnetic field into another object

Spurious / False IndicationsIndications caused by operator errorsNot due to flux leakage
Lint Dirt Hairs

Relevant IndicationsIndications caused by defects

Magnetic Particle TestingCracks indications by Fluorescent Ink

Crane Hook with Service Induced Crack
Fluorescent, Wet Particle Method

Gear with Service Induced Crack
Fluorescent, Wet Particle Method

Drive Shaft with Heat Treatment Induced Cracks
Fluorescent, Wet Particle Method

Splined Shaft with Service Induced Cracks
Fluorescent, Wet Particle Method

Threaded Shaft withService Induced Crack
Fluorescent, Wet Particle Method

Large Bolt with Service Induced Crack
Fluorescent, Wet Particle Method

Crank Shaft with Service Induced Crack Near Lube
Hole
Fluorescent, Wet Particle Method

Lack of Fusion in SMAW Weld
Visible, Dry Powder Method
Indication

Toe Crack in SMAW Weld
Visible, Dry Powder Method

Throat and Toe Cracks in Partially Ground Weld
Visible, Dry Powder Method

Reporting • Adequate reporting is essential for transmission of relevant
and correct information after the test• Minimum requirement:
– Work location– Description and identity of the component tested– Date of test– Stage of test– Reference to the written test procedure and the technique sheets
used– Name of the company– Name and signature of the person performing the test– The test results

Reporting• If written procedure is absent: these information must be
supplied:– Description of equipment used– Technique of flux generation– Indicated current values and waveform for each technique used– Distance between contact areas of dimensional details of the coils– Detection medium used and background– Surface preparation– Viewing condition– Method of recoding or marking indications

Method of recording indications
• Common method:– Reproduce indications on a scaled diagram.– Indications drawn with references to a datum on
test piece– The diagrams should not be overloaded with too
much information– Separate diagram show the magnetization
techniques

Method of recording indications
• Other methods:– Photographs– Clear sticky tape to peel the dried magnetic particles
indication from the test piece– Propriety lacquers sprayed on wet; when dry the resultant
film is then peeled away with the indication– Magneto-graph– Magnetic sachets with light sensitive paper backings

Preservation of indications• To maintain permanent record, one of these
methods can be used:• Cover the indications with a transparent adhesive film. Carefully
peel off the film and the adhering indications and reapply to either paper or card of contrasting color.
• Degrease the test surface, cover with a white matt adhesive film and retest. After drying, if necessary, cover the indications with a clear film as in method describe above.
• Spray the tested area with a quick-drying, strippable coating. Strip off this coating and view the face previously in contact with the workplace to which the indications will be transferred.

Preservation of indications
• Heat the work place to an approved temperature and, without delay, slowly immerse in a powdered plastic material and slowly withdraw. Allow it to drain and cure it in accordance with the manufacturers instructions. Strip off the coating complete with the indications from the work piece and view the face previously in contact with it
• Degrease the test surface and coat with a proprietary, strippable, magnetic-oxide paint. Magnetize the part to saturation and peel off the coating. If it is dipped in agitated magnetic ink, it will reveal the flaw indications on the oxide film.
• Degrease the test area and coat the test area with a proprietary, self curing magnetic silicone-rubber compound. Magnetize to saturation and allow the compound to cure. The oxide in the compound will migrate to the position of nay flaw and when removed from the work piece, the rubber previously in contact with the surface will show the flaw

Photographic records
• When photographic record is made, the resulting photograph of tested surface should be, if possible, the actual size
• If the surface is highly polished, care should be taken to avoid highlights
• The use of matt contrast medium applied prior to testing may be desirable

Surface preparation
• Dry powder:– No preparation is necessary
• Wet powder:– Drained surface or adequately dried– Retest work piece with magnetic ink made with
volatile carrier fluid

Demagnetization• Parts inspected by the
magnetic particle method may sometimes have an objectionable residual magnetic field that may interfere with subsequent manufacturing operations or service of the component.
• Demagnetization requires that the residual magnetic field is reversed and reduced by the inspector.
• This process will scramble the magnetic domains and reduce the strength of the residual field to an acceptable level.
Magnetized
Demagnetized

Demagnetization (Cont.)
• Using a solenoid is the simplest way to demagnetize a part90% of all parts magnetized in MPI are demagnetised using a
simple AC coil
• Possible reasons for demagnetization include:– May interfere with welding and/or machining
operations– Can effect gauges that are sensitive to magnetic fields
if placed in close proximity.– Abrasive particles may adhere to components surface
and cause and increase in wear to engines components, gears, bearings etc.

Advantages of Magnetic Particle Inspection
• Can detect both surface and near sub-surface defects.• Can inspect parts with irregular shapes easily.• Precleaning of components is not as critical as it is for
some other inspection methods. Most contaminants within a flaw will not hinder flaw detectability.
• Fast method of inspection and indications are visible directly on the specimen surface.
• Considered low cost compared to many other NDT methods.
• Is a very portable inspection method especially when used with battery powered equipment.

Limitations ofMagnetic Particle Inspection
• Cannot inspect non-ferrous materials such as aluminum, magnesium or most stainless steels.
• Inspection of large parts may require use of equipment with special power requirements.
• Some parts may require removal of coating or plating to achieve desired inspection sensitivity.
• Limited subsurface discontinuity detection capabilities. Maximum depth sensitivity is approximately 0.6” (under ideal conditions).
• Post cleaning, and post demagnetization is often necessary.
• Alignment between magnetic flux and defect is important

Glossary of Terms
• Black Light: ultraviolet light which is filtered to produce a wavelength of approximately 365 nanometers. Black light will cause certain materials to fluoresce.
• Central conductor: an electrically conductive bar usually made of copper used to introduce a circular magnetic field in to a test specimen.
• Coil: an electrical conductor such a copper wire or cable that is wrapped in several or many loops that are brought close to one another to form a strong longitudinal magnetic field.

Glossary of Terms
• Discontinuity: an interruption in the structure of the material such as a crack.
• Ferromagnetic: a material such as iron, nickel and cobalt or one of it’s alloys that is strongly attracted to a magnetic field.
• Heads: electrical contact pads on a wet horizontal magnetic particle inspection machine. The part to be inspected is clamped and held in place between the heads and shot of current is sent through the part from the heads to create a circular magnetic field in the part.
• Leakage field: a disruption in the magnetic field. This disruption must extend to the surface of the part for particles to be attracted.

Glossary of Terms• Non-relevant indications: indications produced due to
some intended design feature of a specimen such a keyways, splines or press fits.
• Prods: two electrodes usually made of copper or aluminum that are used to introduce current in to a test part. This current in turn creates a circular magnetic field where each prod touches the part. (Similar in principal to a welding electrode and ground clamp).
• Relevant indications: indications produced from something other than a design feature of a test specimen. Cracks, stringers, or laps are examples of relevant indications.

Glossary of Terms• Suspension: a bath created by mixing particles with
either oil or water.• Yoke: a horseshoe magnet used to create a longitudinal
magnetic field. Yokes may be made from permanent magnets or electromagnets.
![[4283]-101 - Savitribai Phule Pune University · [4283]-101 B. Sc. (Hospitality Studies) ... Explain different types of Room Rates offered by Hotel. ... Explain these barriers using](https://static.fdocuments.in/doc/165x107/5afd18217f8b9a68498c6866/4283-101-savitribai-phule-pune-4283-101-b-sc-hospitality-studies-explain.jpg)


![1-800-543-GATE (4283) • DUAL Gate …please call GTO at (800) 543-GATE [4283] or (850) 575-0176 for information about our GTO/PRO professional line of gate openers and accessories.](https://static.fdocuments.in/doc/165x107/5ed4ddedd593760db56156a0/1-800-543-gate-4283-a-dual-gate-please-call-gto-at-800-543-gate-4283-or.jpg)